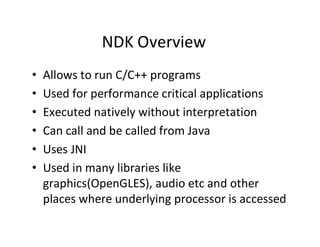
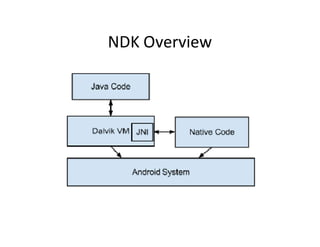
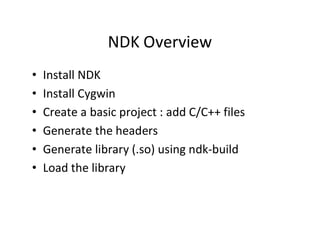
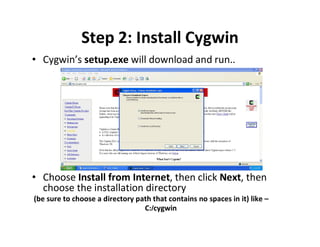
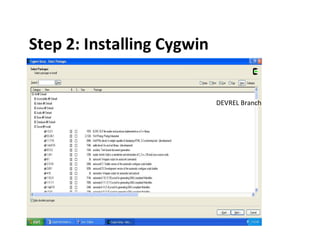
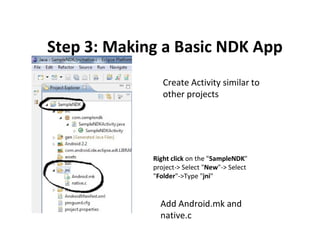
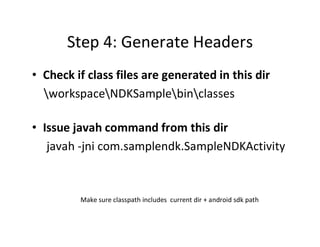
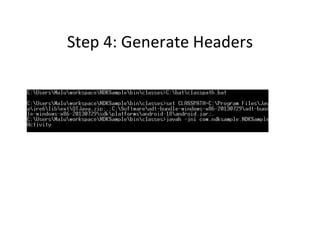
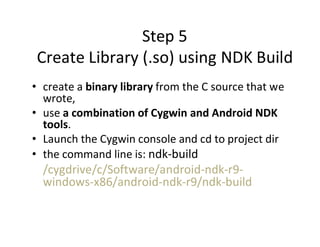
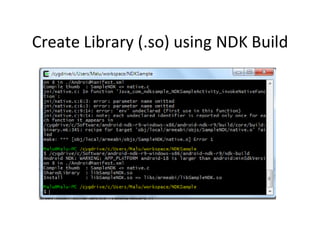
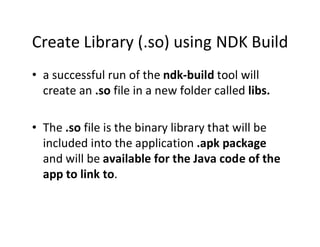
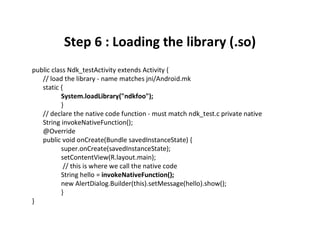
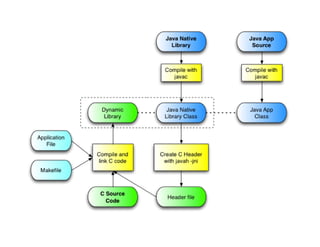
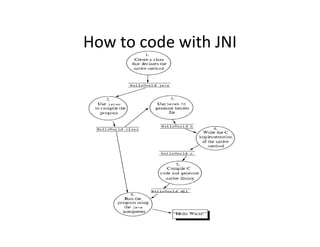
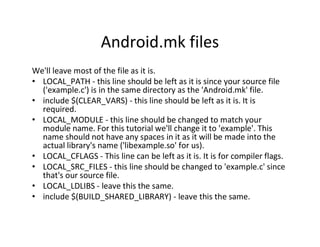
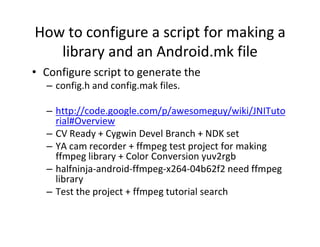
Android NDK
NDK Overview
•
•
•
•
•
•

Allows to run C/C++ programs
Used for performance critical applications
Executed natively without interpretation
Can call and be called from Java
Uses JNI
Used in many libraries like
graphics(OpenGLES), audio etc and other
places where underlying processor is accessed
NDK Overview
NDK Overview
•
•
•
•
•
•

Install NDK
Install Cygwin
Create a basic project : add C/C++ files
Generate the headers
Generate library (.so) using ndk­build
Load the library
Step 1: Installing the Android NDK
• Android NDK itself and place it on our
filesystem.
• Can get NDK from the official Android site
• Be sure that there are no spaces in the path.
• Extract it to C:,
• so the path is C:android­ndk­r6.
Step 1: Installing the Android NDK
http://developer.android.com/tools/sdk/ndk/index.html

NDK is download to local dir C:Softwareandroid­ndk­r9­windows­x86android­ndk­r9
Step 2: Installing Cygwin
• Android is Linux based, and thus it is no
surprise that when build native code for it,
need some Linux tools.
• On Windows, NDK supports Cygwin 1.7.x and
above.
• It’s just a set of software that emulates Unix
environment on Windows
• get Cygwin, go to cygwin.com
Step 2: Install Cygwin
• Cygwin’s setup.exe will download and run..

• Choose Install from Internet, then click Next, then
choose the installation directory
(be sure to choose a directory path that contains no spaces in it) like –
C:/cygwin
Step 2: Installing Cygwin

DEVREL Branch
Step 3: Making a Basic NDK App
• The general idea of using NDK in apps is to
put your native pieces of code into libraries
that you can then consume from the Java
code.
Step 3: Making a Basic NDK App
Create Activity similar to
other projects

Right click on the "SampleNDK"
project­> Select "New"­> Select
"Folder"­>Type "jni"

Add Android.mk and
native.c
Step 4: Generate Headers
• Check if class files are generated in this dir
workspaceNDKSamplebinclasses
• Issue javah command from this dir
javah ­jni com.samplendk.SampleNDKActivity

Make sure classpath includes current dir + android sdk path
Step 4: Generate Headers
Step 5
Create Library (.so) using NDK Build
• create a binary library from the C source that we
wrote,
• use a combination of Cygwin and Android NDK
tools.
• Launch the Cygwin console and cd to project dir
• the command line is: ndk­build

/cygdrive/c/Software/android­ndk­r9­
windows­x86/android­ndk­r9/ndk­build
Create Library (.so) using NDK Build
• a successful run of the ndk­build tool will
create an .so file in a new folder called libs.
• The .so file is the binary library that will be
included into the application .apk package
and will be available for the Java code of the
app to link to.
Step 6 : Loading the library (.so)
public class Ndk_testActivity extends Activity {
// load the library ­ name matches jni/Android.mk
static {
System.loadLibrary("ndkfoo");
}
// declare the native code function ­ must match ndk_test.c private native
String invokeNativeFunction();
@Override
public void onCreate(Bundle savedInstanceState) {
super.onCreate(savedInstanceState);
setContentView(R.layout.main);
// this is where we call the native code
String hello = invokeNativeFunction();
new AlertDialog.Builder(this).setMessage(hello).show();
}
}
Backup slides
All about JNI
• Java Native Interface (JNI)
• The JNI is a part of the Java platform,
programmers can address interoperability
issues once, and expect their solution to work
with all implementations of the Java platform.
“Applications written in the Java programming
language as well as in native (C, C++, etc.)
programming languages.”
Java Platform do
• Java platforms are commonly deployed on top of
a host environment.
For example, the Java Runtime Environment (JRE) is
a Sun product that supports the Java platform on
existing operating systems such as Solaris and
Windows.
• The Java platform offers a set of features that
applications can rely on independent of the
underlying host environment.
Role of the JNI
•

The JNI is a powerful feature that allows you to take advantage of the Java
platform, but still utilize code written in other languages. As a part of the Java
virtual machine implementation, the JNI is a two­way interface that allows Java
applications to invoke native code and vice versa. Figure ­
JNI ­ Two­way interface
• As a two­way interface, the JNI can support two types of native
code:
­ Native libraries and
­ Native applications.
­ Applications call native methods in the same way that they call
methods implemented in the Java programming language.
­ An invocation interface :
Native applications can link with a native library that implements
the Java virtual machine, and then ..
Use the invocation interface to execute software components
written in the Java programming language.
For example, a web browser written in C can execute downloaded
applets in an embedded Java virtual machine implemention.
When the JNI becomes useful ?
The following scenarios:
• Targeted Java API might not support certain host­dependent
features needed by an application.
• May want to access an existing native library and are not willing to
pay for the overhead of copying and transmitting data across
different processes.
• Loading a native library into the existing process hosting the
application requires less system resources than starting a new
process and loading the library into that process.
• If a 3D­intensive application spends most of its time in graphics
rendering, you may find it necessary to write the core portion of a
graphics library in assembly code to achieve maximum
performance. Like, Games, Ex­H/W ….
• Have role on the JDK
­ The JNI was first supported in JDK release 1.1. Internally.
­ Java 'jdk' is the 'Java Development Kit' and it allows you to
compile Java programs.
How to code with JNI
Android.mk files
We'll leave most of the file as it is.
• LOCAL_PATH ­ this line should be left as it is since your source file
('example.c') is in the same directory as the 'Android.mk' file.
• include $(CLEAR_VARS) ­ this line should be left as it is. It is
required.
• LOCAL_MODULE ­ this line should be changed to match your
module name. For this tutorial we'll change it to 'example'. This
name should not have any spaces in it as it will be made into the
actual library's name ('libexample.so' for us).
• LOCAL_CFLAGS ­ This line can be left as it is. It is for compiler flags.
• LOCAL_SRC_FILES ­ this line should be changed to 'example.c' since
that's our source file.
• LOCAL_LDLIBS ­ leave this the same.
• include $(BUILD_SHARED_LIBRARY) ­ leave this the same.
How to configure a script for making a
library and an Android.mk file
• Configure script to generate the
– config.h and config.mak files.
– http://code.google.com/p/awesomeguy/wiki/JNITuto
rial#Overview
– CV Ready + Cygwin Devel Branch + NDK set
– YA cam recorder + ffmpeg test project for making
ffmpeg library + Color Conversion yuv2rgb
– halfninja­android­ffmpeg­x264­04b62f2 need ffmpeg
library
– Test the project + ffmpeg tutorial search
���������������������������������������������������������������������������
���������������������������������������������������������������������������������
�����������������������������������������������������

NDK Programming in Android

  • 1.
  • 2.
    NDK Overview • • • • • • Allows torun C/C++ programs Used for performance critical applications Executed natively without interpretation Can call and be called from Java Uses JNI Used in many libraries like graphics(OpenGLES), audio etc and other places where underlying processor is accessed
  • 3.
  • 4.
    NDK Overview • • • • • • Install NDK InstallCygwin Create a basic project : add C/C++ files Generate the headers Generate library (.so) using ndk­build Load the library
  • 5.
    Step 1: Installingthe Android NDK • Android NDK itself and place it on our filesystem. • Can get NDK from the official Android site • Be sure that there are no spaces in the path. • Extract it to C:, • so the path is C:android­ndk­r6.
  • 6.
    Step 1: Installingthe Android NDK http://developer.android.com/tools/sdk/ndk/index.html NDK is download to local dir C:Softwareandroid­ndk­r9­windows­x86android­ndk­r9
  • 7.
    Step 2: InstallingCygwin • Android is Linux based, and thus it is no surprise that when build native code for it, need some Linux tools. • On Windows, NDK supports Cygwin 1.7.x and above. • It’s just a set of software that emulates Unix environment on Windows • get Cygwin, go to cygwin.com
  • 8.
    Step 2: InstallCygwin • Cygwin’s setup.exe will download and run.. • Choose Install from Internet, then click Next, then choose the installation directory (be sure to choose a directory path that contains no spaces in it) like – C:/cygwin
  • 9.
    Step 2: InstallingCygwin DEVREL Branch
  • 10.
    Step 3: Makinga Basic NDK App • The general idea of using NDK in apps is to put your native pieces of code into libraries that you can then consume from the Java code.
  • 11.
    Step 3: Makinga Basic NDK App Create Activity similar to other projects Right click on the "SampleNDK" project­> Select "New"­> Select "Folder"­>Type "jni" Add Android.mk and native.c
  • 12.
    Step 4: GenerateHeaders • Check if class files are generated in this dir workspaceNDKSamplebinclasses • Issue javah command from this dir javah ­jni com.samplendk.SampleNDKActivity Make sure classpath includes current dir + android sdk path
  • 13.
  • 14.
    Step 5 Create Library(.so) using NDK Build • create a binary library from the C source that we wrote, • use a combination of Cygwin and Android NDK tools. • Launch the Cygwin console and cd to project dir • the command line is: ndk­build /cygdrive/c/Software/android­ndk­r9­ windows­x86/android­ndk­r9/ndk­build
  • 15.
    Create Library (.so)using NDK Build
  • 16.
    Create Library (.so)using NDK Build • a successful run of the ndk­build tool will create an .so file in a new folder called libs. • The .so file is the binary library that will be included into the application .apk package and will be available for the Java code of the app to link to.
  • 17.
    Step 6 :Loading the library (.so) public class Ndk_testActivity extends Activity { // load the library ­ name matches jni/Android.mk static { System.loadLibrary("ndkfoo"); } // declare the native code function ­ must match ndk_test.c private native String invokeNativeFunction(); @Override public void onCreate(Bundle savedInstanceState) { super.onCreate(savedInstanceState); setContentView(R.layout.main); // this is where we call the native code String hello = invokeNativeFunction(); new AlertDialog.Builder(this).setMessage(hello).show(); } }
  • 19.
  • 20.
    All about JNI •Java Native Interface (JNI) • The JNI is a part of the Java platform, programmers can address interoperability issues once, and expect their solution to work with all implementations of the Java platform. “Applications written in the Java programming language as well as in native (C, C++, etc.) programming languages.”
  • 21.
    Java Platform do •Java platforms are commonly deployed on top of a host environment. For example, the Java Runtime Environment (JRE) is a Sun product that supports the Java platform on existing operating systems such as Solaris and Windows. • The Java platform offers a set of features that applications can rely on independent of the underlying host environment.
  • 22.
    Role of theJNI • The JNI is a powerful feature that allows you to take advantage of the Java platform, but still utilize code written in other languages. As a part of the Java virtual machine implementation, the JNI is a two­way interface that allows Java applications to invoke native code and vice versa. Figure ­
  • 23.
    JNI ­ Two­wayinterface • As a two­way interface, the JNI can support two types of native code: ­ Native libraries and ­ Native applications. ­ Applications call native methods in the same way that they call methods implemented in the Java programming language. ­ An invocation interface : Native applications can link with a native library that implements the Java virtual machine, and then .. Use the invocation interface to execute software components written in the Java programming language. For example, a web browser written in C can execute downloaded applets in an embedded Java virtual machine implemention.
  • 24.
    When the JNIbecomes useful ? The following scenarios: • Targeted Java API might not support certain host­dependent features needed by an application. • May want to access an existing native library and are not willing to pay for the overhead of copying and transmitting data across different processes. • Loading a native library into the existing process hosting the application requires less system resources than starting a new process and loading the library into that process. • If a 3D­intensive application spends most of its time in graphics rendering, you may find it necessary to write the core portion of a graphics library in assembly code to achieve maximum performance. Like, Games, Ex­H/W …. • Have role on the JDK ­ The JNI was first supported in JDK release 1.1. Internally. ­ Java 'jdk' is the 'Java Development Kit' and it allows you to compile Java programs.
  • 25.
    How to codewith JNI
  • 26.
    Android.mk files We'll leavemost of the file as it is. • LOCAL_PATH ­ this line should be left as it is since your source file ('example.c') is in the same directory as the 'Android.mk' file. • include $(CLEAR_VARS) ­ this line should be left as it is. It is required. • LOCAL_MODULE ­ this line should be changed to match your module name. For this tutorial we'll change it to 'example'. This name should not have any spaces in it as it will be made into the actual library's name ('libexample.so' for us). • LOCAL_CFLAGS ­ This line can be left as it is. It is for compiler flags. • LOCAL_SRC_FILES ­ this line should be changed to 'example.c' since that's our source file. • LOCAL_LDLIBS ­ leave this the same. • include $(BUILD_SHARED_LIBRARY) ­ leave this the same.
  • 27.
    How to configurea script for making a library and an Android.mk file • Configure script to generate the – config.h and config.mak files. – http://code.google.com/p/awesomeguy/wiki/JNITuto rial#Overview – CV Ready + Cygwin Devel Branch + NDK set – YA cam recorder + ffmpeg test project for making ffmpeg library + Color Conversion yuv2rgb – halfninja­android­ffmpeg­x264­04b62f2 need ffmpeg library – Test the project + ffmpeg tutorial search
  • 28.