Download to read offline


![developerWorks® ibm.com/developerWorks/
4. Write the C/C++ code. This step consists of implementing the function in a C
or C++ source code file. The C/C++ source file must include the header file we
created in Step 3.
5. Create the shared library file. We'll create a shared library file from the C
source code file we created in Step 4.
6. Run the Java program. We'll run the code and see if it works. We'll also go
over some tips for dealing with the more commonly occurring errors.
Step 1: Write the Java code
We'll start by writing the Java source code file, which will declare the native method
(or methods), load the shared library containing the native code, and actually call the
native method.
Here's our example Java source code file, called Sample1.java:
1. public class Sample1
2. {
3. public native int intMethod(int n);
4. public native boolean booleanMethod(boolean bool);
5. public native String stringMethod(String text);
6. public native int intArrayMethod(int[] intArray);
7.
8. public static void main(String[] args)
9. {
10. System.loadLibrary("Sample1");
11. Sample1 sample = new Sample1();
12. int square = sample.intMethod(5);
13. boolean bool = sample.booleanMethod(true);
14. String text = sample.stringMethod("JAVA");
15. int sum = sample.intArrayMethod(
16. new int[]{1,1,2,3,5,8,13} );
17.
18. System.out.println("intMethod: " + square);
19. System.out.println("booleanMethod: " + bool);
20. System.out.println("stringMethod: " + text);
21. System.out.println("intArrayMethod: " + sum);
22. }
23. }
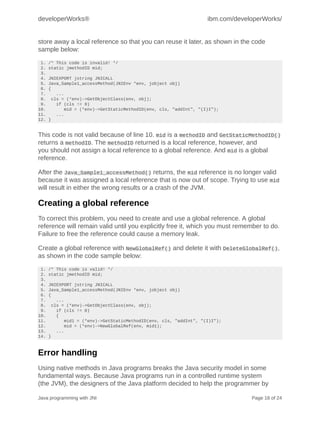
What's happening in this code?
First of all, note the use of the native keyword, which can be used only with
methods. The native keyword tells the Java compiler that a method is implemented
in native code outside of the Java class in which it is being declared. Native methods
can only be declared in Java classes, not implemented, so a native method cannot
have a body.
Now, let's look at the code line by line:
• In lines 3 through 6 we declare four native methods.
• On line 10 we load the shared library file containing the implementation for
these native methods. (We'll create the shared library file when we come to
Step 5.)
Java programming with JNI Page 4 of 24](https://image.slidesharecdn.com/109842496-jni-130314230915-phpapp02/85/109842496-jni-4-320.jpg)

![developerWorks® ibm.com/developerWorks/
25. #endif
26. #endif
About the C/C++ header file
As you've probably noticed, the C/C++ function signatures in Sample1.h are quite
different from the Java native method declarations in Sample1.java. JNIEXPORT and
JNICALL are compiler-dependent specifiers for export functions. The return types are
C/C++ types that map to Java types. These types are fully explained in Appendix A:
JNI types
The parameter lists of all these functions have a pointer to a JNIEnv and a jobject,
in addition to normal parameters in the Java declaration. The pointer to JNIEnv is in
fact a pointer to a table of function pointers. As we'll see in Step 4, these functions
provide the various faculties to manipulate Java data in C and C++.
The jobject parameter refers to the current object. Thus, if the C or C++ code needs
to refer back to the Java side, this jobject acts as a reference, or pointer, back to the
calling Java object. The function name itself is made by the "Java_" prefix, followed
by the fully qualified class name, followed by an underscore and the method name.
Step 4: Write the C/C++ code
When it comes to writing the C/C++ function implementation, the important thing to
keep in mind is that our signatures must be exactly like the function declarations from
Sample1.h. We'll look at the complete code for both a C implementation and a C++
implementation, then discuss the differences between the two.
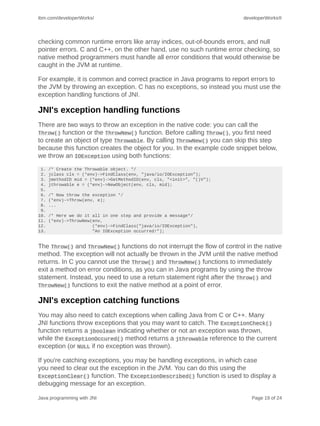
The C function implementation
Here is Sample1.c, an implementation written in C:
1. #include "Sample1.h"
2. #include <string.h>
3.
4. JNIEXPORT jint JNICALL Java_Sample1_intMethod
5. (JNIEnv *env, jobject obj, jint num) {
6. return num * num;
7. }
8.
9. JNIEXPORT jboolean JNICALL Java_Sample1_booleanMethod
10. (JNIEnv *env, jobject obj, jboolean boolean) {
11. return !boolean;
12. }
13.
14. JNIEXPORT jstring JNICALL Java_Sample1_stringMethod
15. (JNIEnv *env, jobject obj, jstring string) {
16. const char *str = (*env)->GetStringUTFChars(env, string, 0);
17. char cap[128];
18. strcpy(cap, str);
19. (*env)->ReleaseStringUTFChars(env, string, str);
20. return (*env)->NewStringUTF(env, strupr(cap));
21. }
22.
23. JNIEXPORT jint JNICALL Java_Sample1_intArrayMethod
Java programming with JNI Page 6 of 24](https://image.slidesharecdn.com/109842496-jni-130314230915-phpapp02/85/109842496-jni-6-320.jpg)
![ibm.com/developerWorks/ developerWorks®
24. (JNIEnv *env, jobject obj, jintArray array) {
25. int i, sum = 0;
26. jsize len = (*env)->GetArrayLength(env, array);
27. jint *body = (*env)->GetIntArrayElements(env, array, 0);
28. for (i=0; i<len; i++)
29. { sum += body[i];
30. }
31. (*env)->ReleaseIntArrayElements(env, array, body, 0);
32. return sum;
33. }
34.
35. void main(){}
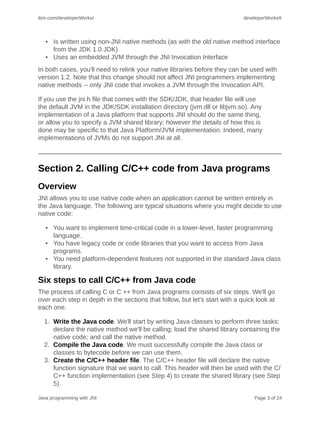
The C++ function implementation
And here's Sample1.cpp, the C++ implementation:
1. #include "Sample1.h"
2. #include <string.h>
3.
4.JNIEXPORT jint JNICALL Java_Sample1_intMethod
5. (JNIEnv *env, jobject obj, jint num) {
6. return num * num;
7. }
8.
9. JNIEXPORT jboolean JNICALL Java_Sample1_booleanMethod
10. (JNIEnv *env, jobject obj, jboolean boolean) {
11. return !boolean;
12. }
13.
14. JNIEXPORT jstring JNICALL Java_Sample1_stringMethod
15. (JNIEnv *env, jobject obj, jstring string) {
16. const char *str = env->GetStringUTFChars(string, 0);
17. char cap[128];
18. strcpy(cap, str);
19. env->ReleaseStringUTFChars(string, str);
20. return env->NewStringUTF(strupr(cap));
21. }
22.
23. JNIEXPORT jint JNICALL Java_Sample1_intArrayMethod
24. (JNIEnv *env, jobject obj, jintArray array) {
25. int i, sum = 0;
26. jsize len = env->GetArrayLength(array);
27. jint *body = env->GetIntArrayElements(array, 0);
28. for (i=0; i<len; i++)
29. { sum += body[i];
30. }
31. env->ReleaseIntArrayElements(array, body, 0);
32. return sum;
33. }
34.
35. void main(){}
C and C++ function implementations compared
The C and C++ code is nearly identical; the only difference is the method used to
access JNI functions. In C, JNI function calls are prefixed with "(*env)->" in order
to de-reference the function pointer. In C++, the JNIEnv class has inline member
functions that handle the function pointer lookup. This slight difference is illustrated
below, where the two lines of code access the same function but the syntax is
specialized for each language.
Java programming with JNI Page 7 of 24](https://image.slidesharecdn.com/109842496-jni-130314230915-phpapp02/85/109842496-jni-7-320.jpg)


![ibm.com/developerWorks/ developerWorks®
10. {
11. JavaVMOption options[1];
12. JNIEnv *env;
13. JavaVM *jvm;
14. JavaVMInitArgs vm_args;
15. long status;
16. jclass cls;
17. jmethodID mid;
18. jint square;
19. jboolean not;
20.
21. options[0].optionString = "-Djava.class.path=.";
22. memset(&vm_args, 0, sizeof(vm_args));
23. vm_args.version = JNI_VERSION_1_2;
24. vm_args.nOptions = 1;
25. vm_args.options = options;
26. status = JNI_CreateJavaVM(&jvm, (void**)&env, &vm_args);
27.
28. if (status != JNI_ERR)
29. {
30. cls = (*env)->FindClass(env, "Sample2");
31. if(cls !=0)
32. { mid = (*env)->GetStaticMethodID(env, cls, "intMethod", "(I)I");
33. if(mid !=0)
34. { square = (*env)->CallStaticIntMethod(env, cls, mid, 5);
35. printf("Result of intMethod: %dn", square);
36. }
37.
38. mid = (*env)->GetStaticMethodID(env, cls, "booleanMethod", "(Z)Z");
39. if(mid !=0)
40. { not = (*env)->CallStaticBooleanMethod(env, cls, mid, 1);
41. printf("Result of booleanMethod: %dn", not);
42. }
43. }
44.
45. (*jvm)->DestroyJavaVM(jvm);
46. return 0;
47/ }
48. else
49. return -1;
50. }
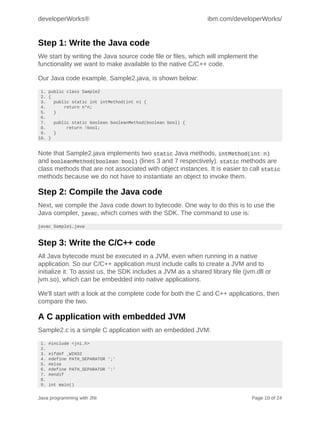
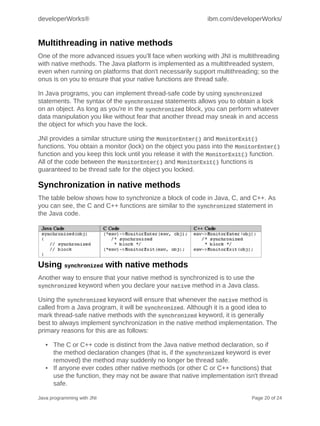
A C++ application with embedded JVM
Sample2.cpp is a C++ application with an embedded JVM:
1. #include <jni.h>
2.
3. #ifdef _WIN32
4. #define PATH_SEPARATOR ';'
5. #else
6. #define PATH_SEPARATOR ':'
7. #endif
8.
9. int main()
10. {
11. JavaVMOption options[1];
12. JNIEnv *env;
13. JavaVM *jvm;
14. JavaVMInitArgs vm_args;
15. long status;
16. jclass cls;
17. jmethodID mid;
18. jint square;
19. jboolean not;
Java programming with JNI Page 11 of 24](https://image.slidesharecdn.com/109842496-jni-130314230915-phpapp02/85/109842496-jni-11-320.jpg)
![developerWorks® ibm.com/developerWorks/
20.
21. options[0].optionString = "-Djava.class.path=.";
22. memset(&vm_args, 0, sizeof(vm_args));
23. vm_args.version = JNI_VERSION_1_2;
24. vm_args.nOptions = 1;
25. vm_args.options = options;
26. status = JNI_CreateJavaVM(&jvm, (void**)&env, &vm_args);
27.
28. if (status != JNI_ERR)
29. {
30. cls = (*env)->FindClass(env, "Sample2");
31. if(cls !=0)
32. { mid = (*env)->GetStaticMethodID(env, cls, "intMethod", "(I)I");
33. if(mid !=0)
34. { square = (*env)->CallStaticIntMethod(env, cls, mid, 5);
35. printf("Result of intMethod: %dn", square);
36. }
37.
38. mid = (*env)->GetStaticMethodID(env, cls, "booleanMethod", "(Z)Z");
39. if(mid !=0)
40. { not = (*env)->CallStaticBooleanMethod(env, cls, mid, 1);
41. printf("Result of booleanMethod: %dn", not);
42. }
43. }
44.
45. (*jvm)->DestroyJavaVM(jvm);
46. return 0;
47. }
48. else
49. return -1;
50. }
C and C++ implementations compared
The C and C++ code are nearly identical; the only difference is the method used
to access JNI functions. In C, JNI function calls are prefixed with (*env)-> in order
to de-reference the function pointer. In C++, the JNIEnv class has inline member
functions that handle the function pointer lookup. Thus, these two lines of code
access the same function, but the syntax is specialized for each language, as shown
below.
C syntax: cls = (*env)->FindClass(env, "Sample2");
C++ syntax: cls = env->FindClass("Sample2");
A closer look at the C application
We've just produced a lot of code, but what does it all do? Before we move on
to Step 4, let's take a closer look at the code for our C application. We'll walk
through the essential steps of preparing a native application to process Java code,
embedding a JVM in a native application, then finding and calling a Java method
from within that application.
Include the jni.h file
We start by including the jni.h C header file in the C application, as shown in the code
sample below.
Java programming with JNI Page 12 of 24](https://image.slidesharecdn.com/109842496-jni-130314230915-phpapp02/85/109842496-jni-12-320.jpg)
![ibm.com/developerWorks/ developerWorks®
#include <jni.h>
The jni.h file contains all the type and function definitions we need for JNI on the C
side.
Declare the variables
Next, we declare all the variables we want to use in the program. The JavaVMOption
options[] holds various optional settings for the JVM. When declaring variables, be
sure that you declare the JavaVMOption options[] array large enough to hold all the
options you want to use. In this case, the only option we're using is the classpath
option. We set the classpath to the current directory because in this example all of
our files are in the same directory. You can set the classpath to point to any directory
structure you would like to use.
Here's the code to declare the variables for Sample2.c:
JavaVMOption options[1];
JNIEnv *env;
JavaVM *jvm;
JavaVMInitArgs vm_args;
Notes:
• JNIEnv *env represents JNI execution environment.
• JavaVM jvm is a pointer to the JVM. We use this primarily to create, initialize,
and destroy the JVM.
• JavaVMInitArgs vm_args represents various JVM arguments that we can use to
initialize our JVM.
Set the initialization arguments
The JavaVMInitArgs structure represents initialization arguments for the JVM. You
can use these arguments to customize the runtime environment before you execute
your Java code. As you can see, the options are one argument and the Java version
is another. We set these arguments as follows:
vm_args.version = JNI_VERSION_1_2;
vm_args.nOptions = 1;
vm_args.options = options;
Set the classpath
Next, we set the classpath for the JVM, to enable it to find the required Java classes.
In this particular case, we set the classpath to the current directory, because the
Sample2.class and Sample2.exe are located in the same directory. The code we use
to set the classpath for Sample2.c is shown below:
options[0].optionString = "-Djava.class.path=.";
// same text as command-line options for the java.exe JVM
Java programming with JNI Page 13 of 24](https://image.slidesharecdn.com/109842496-jni-130314230915-phpapp02/85/109842496-jni-13-320.jpg)
![developerWorks® ibm.com/developerWorks/
Set aside memory for vm_args
Before we can use vm_args we need to set aside some memory for it. Once we've set
the memory, we can set the version and option arguments, as shown below:
memset(&vm_args, 0, sizeof(vm_args)); // set aside enough memory for vm_args
vm_args.version = JNI_VERSION_1_2; // version of Java platform
vm_args.nOptions = 1; // same as size of options[1]
vm_args.options = options;
Create the JVM
With all the setup taken care of, we're ready to create a JVM. We start with a call to
the method:
JNI_CreateJavaVM(JavaVM **jvm, void** env, JavaVMInitArgs **vm_args)
This method returns zero if successful or JNI_ERR if the JVM could not be created.
Find and load the Java classes
Once we've created our JVM, we're ready to begin running Java code in the native
application. First, we need to find and load our Java class, using the FindClass()
function, shown here:
cls = (*env)->FindClass(env, "Sample2");
The cls variable stores the result of the FindClass() function. If the class is found,
the cls variable represents a handle to the Java class. If the class cannot be found,
cls will be zero.
Find a Java method
Next, we want to find a method inside of the class using the GetStaticMethodID()
function. We want to find the method intMethod, which takes an int parameter and
returns an int. Here's the code to find intMethod:
mid = (*env)->GetStaticMethodID(env, cls, "intMethod", "(I)I");
The mid variable stores the result of the GetStaticMethodID() function. If the method
is found, the mid variable represents a handle to the method. If the method cannot be
found, mid will be zero.
Remember that in this example, we are calling static Java methods. That is why
we're using the GetStaticMethodID() function. The GetMethodID() function does the
same thing, but it is used to find instance methods.
If we were calling a constructor, the name of the method would have been "<init>".
To learn more about calling a constructor, see Error handling. To learn more about
Java programming with JNI Page 14 of 24](https://image.slidesharecdn.com/109842496-jni-130314230915-phpapp02/85/109842496-jni-14-320.jpg)

![developerWorks® ibm.com/developerWorks/
Conclusion
Calling Java methods from C is relatively straightforward for experienced C
programmers, although it does require fairly advanced quasi-object-oriented
programming techniques. Although JNI supports both C and C++, the C++ interface
is slightly cleaner and is generally preferred over the C interface.
One important point to remember is that a single JVM can be used to load and
execute multiple classes and methods. Creating and destroying a JVM every
time you interact with Java from native code can waste resources and decrease
performance.
Section 4. Advanced topics
Overview
Calling native code from within a Java program compromises the Java program's
portability and security. Although the compiled Java bytecode remains highly
portable, the native code must be recompiled for each platform on which you intend
to run the application. The native code also executes outside of the JVM, so it is not
necessarily constrained by the same security protocols as Java code.
Calling Java code from within a native program is also complicated. Because the
Java language is object-oriented, calling Java code from a native application typically
involves object-oriented techniques. In native languages that have no support or
limited support for object-oriented programming, such as C, calling Java methods can
be problematic. In this section, we'll explore some of the complexities that arise when
working with JNI, and look at ways to work around them.
Java strings versus C strings
Java strings are stored as sequences of 16-bit Unicode characters, while C strings
are stored as sequences of 8-bit null-terminated characters. JNI provides several
useful functions for converting between and manipulating Java strings and C strings.
The code snippet below demonstrates how to convert C strings to Java strings:
1. /* Convert a C string to a Java String. */
2. char[] str = "To be or not to be.n";
3. jstring jstr = (*env)->NewStringUTF(env, str);
Next, we'll look at the code to convert Java strings to C strings. Note the call to the
ReleaseStringUTFChars() function on line 5. You should use this function to release
Java strings when you're no longer using them. Be sure you always release your
Java programming with JNI Page 16 of 24](https://image.slidesharecdn.com/109842496-jni-130314230915-phpapp02/85/109842496-jni-16-320.jpg)
![ibm.com/developerWorks/ developerWorks®
strings when the native code no longer needs to reference them. Failure to do so
could cause a memory leak.
1. /* Convert a Java String into a C string. */
2. char buf[128;
3. const char *newString = (*env)->GetStringUTFChars(env, jstr, 0);
4. ...
5. (*env)->ReleaseStringUTFChars(env, jstr, newString);
Java arrays versus C arrays
Like strings, Java arrays and C arrays are represented differently in memory.
Fortunately, a set of JNI functions provides you with pointers to the elements in
arrays. The image below shows how Java arrays are mapped to the JNI C types.
The C type jarray represents a generic array. In C, all of the array types are really
just type synonyms of jobject. In C++, however, all of the array types inherit from
jarray, which in turn inherits from jobject . See Appendix A: JNI types for an
inheritance diagram of all the C type objects.
s
Working with arrays
Generally, the first thing you want to do when dealing with an array is to determine its
size. For this, you should use the GetArrayLength() function, which returns a jsize
representing the array's size.
Next, you'll want to obtain a pointer to the array's elements. You can access elements
in an array using the GetXXXArrayElement() and SetXXXArrayElement() functions
(replace the XXX in the method name according to the type of the array: Object,
Boolean, Byte, Char, Int, Long, and so on).
When the native code is finished using a Java array, it must release it with a call to
the function ReleaseXXXArrayElements(). Otherwise, a memory leak may result. The
code snippet below shows how to loop through an array of integers and up all the
elements:
1. /* Looping through the elements in an array. */
2. int* elem = (*env)->GetIntArrayElements(env, intArray, 0);
3. for (i=0; I < (*env)->GetIntArrayLength(env, intArray); i++)
4. sum += elem[i]
5. (*env)->ReleaseIntArrayElements(env, intArray, elem, 0);
Local versus global references
When programming with JNI you will be required to use references to Java objects.
By default, JNI creates local references to ensure that they are liable for garbage
collection. Because of this, you may unintentionally write illegal code by trying to
Java programming with JNI Page 17 of 24](https://image.slidesharecdn.com/109842496-jni-130314230915-phpapp02/85/109842496-jni-17-320.jpg)

![developerWorks® ibm.com/developerWorks/
Here is an object tree that shows how the JNI pseudo-classes are related.
Appendix B: JNI method signature encoding
Native Java method parameter types are rendered, or mangled, into native code
using the encoding specified in the table below.
Notes:
• The semicolon at the end of the class type L expression is the terminator of the
type expression, not a separator between expressions.
• You must use a forward slash (/) instead of a dot (.) to separate the package
and class name. To specify an array type use an open bracket ([). For example,
the Java method:
boolean print(String[] parms, int n)
has the following mangled signature:
([Ljava/lang/Sting;I)Z
Java programming with JNI Page 22 of 24](https://image.slidesharecdn.com/109842496-jni-130314230915-phpapp02/85/109842496-jni-22-320.jpg)


The document provides a tutorial on using the Java Native Interface (JNI) to call C/C++ code from Java programs and call Java code from C/C++ programs. It outlines the six main steps to call C/C++ code from Java: 1) write the Java code, 2) compile the Java code, 3) create a C/C++ header file, 4) write the C/C++ code, 5) create a shared library file, and 6) run the Java program. The document also discusses tools needed, advanced JNI topics, and considerations for different Java versions.