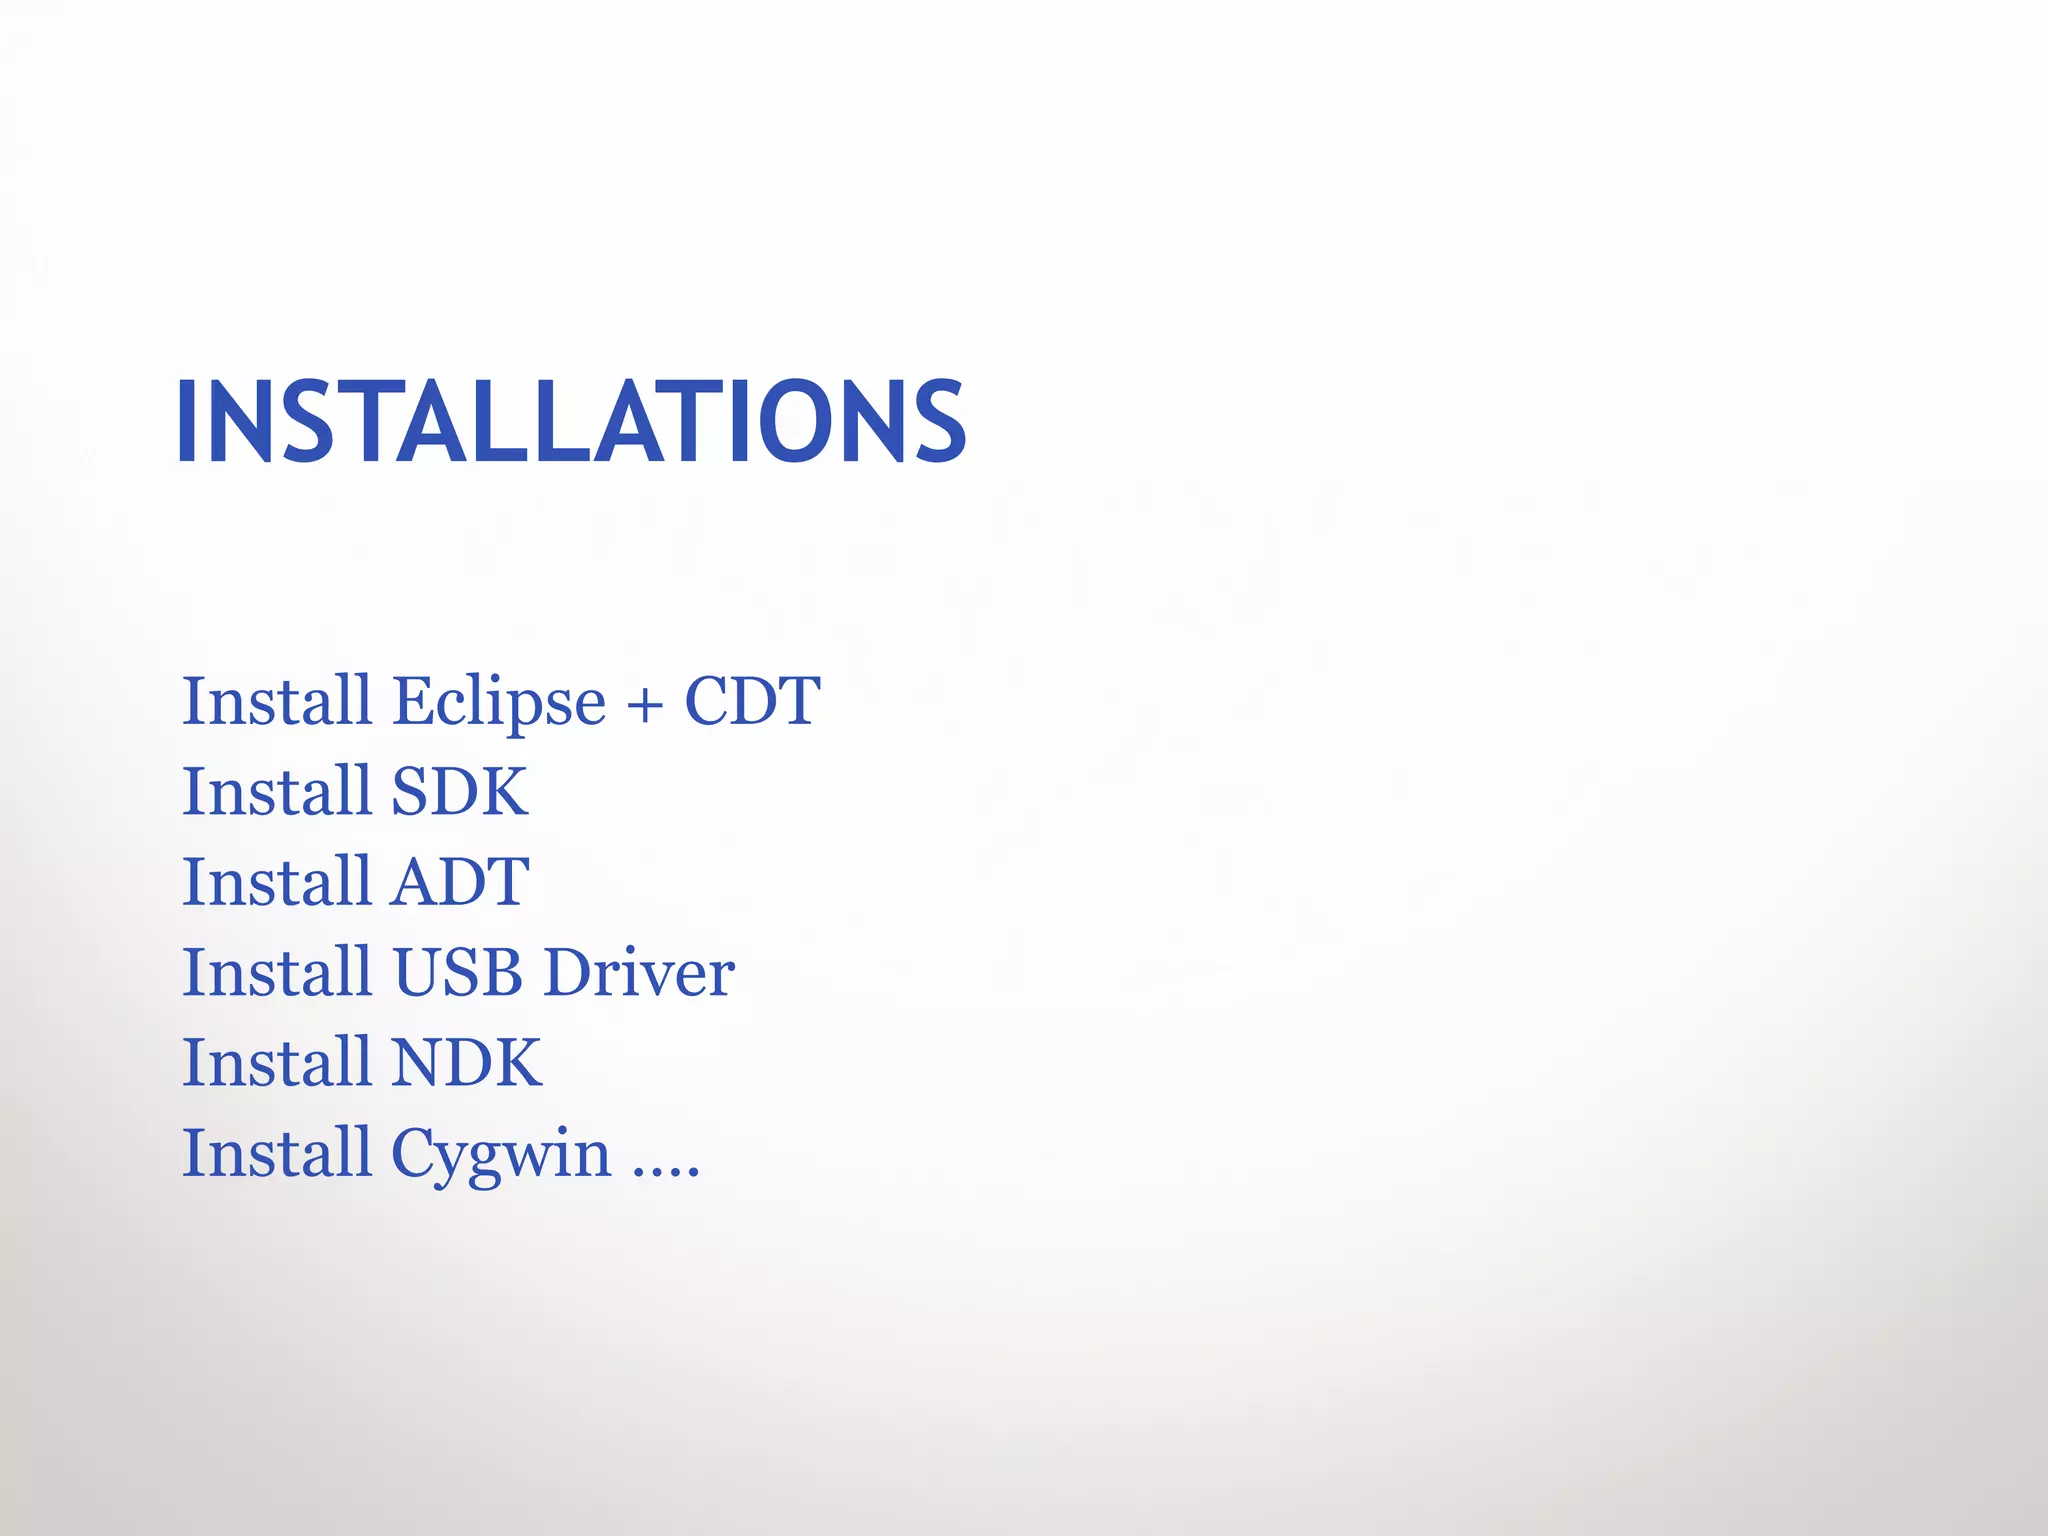
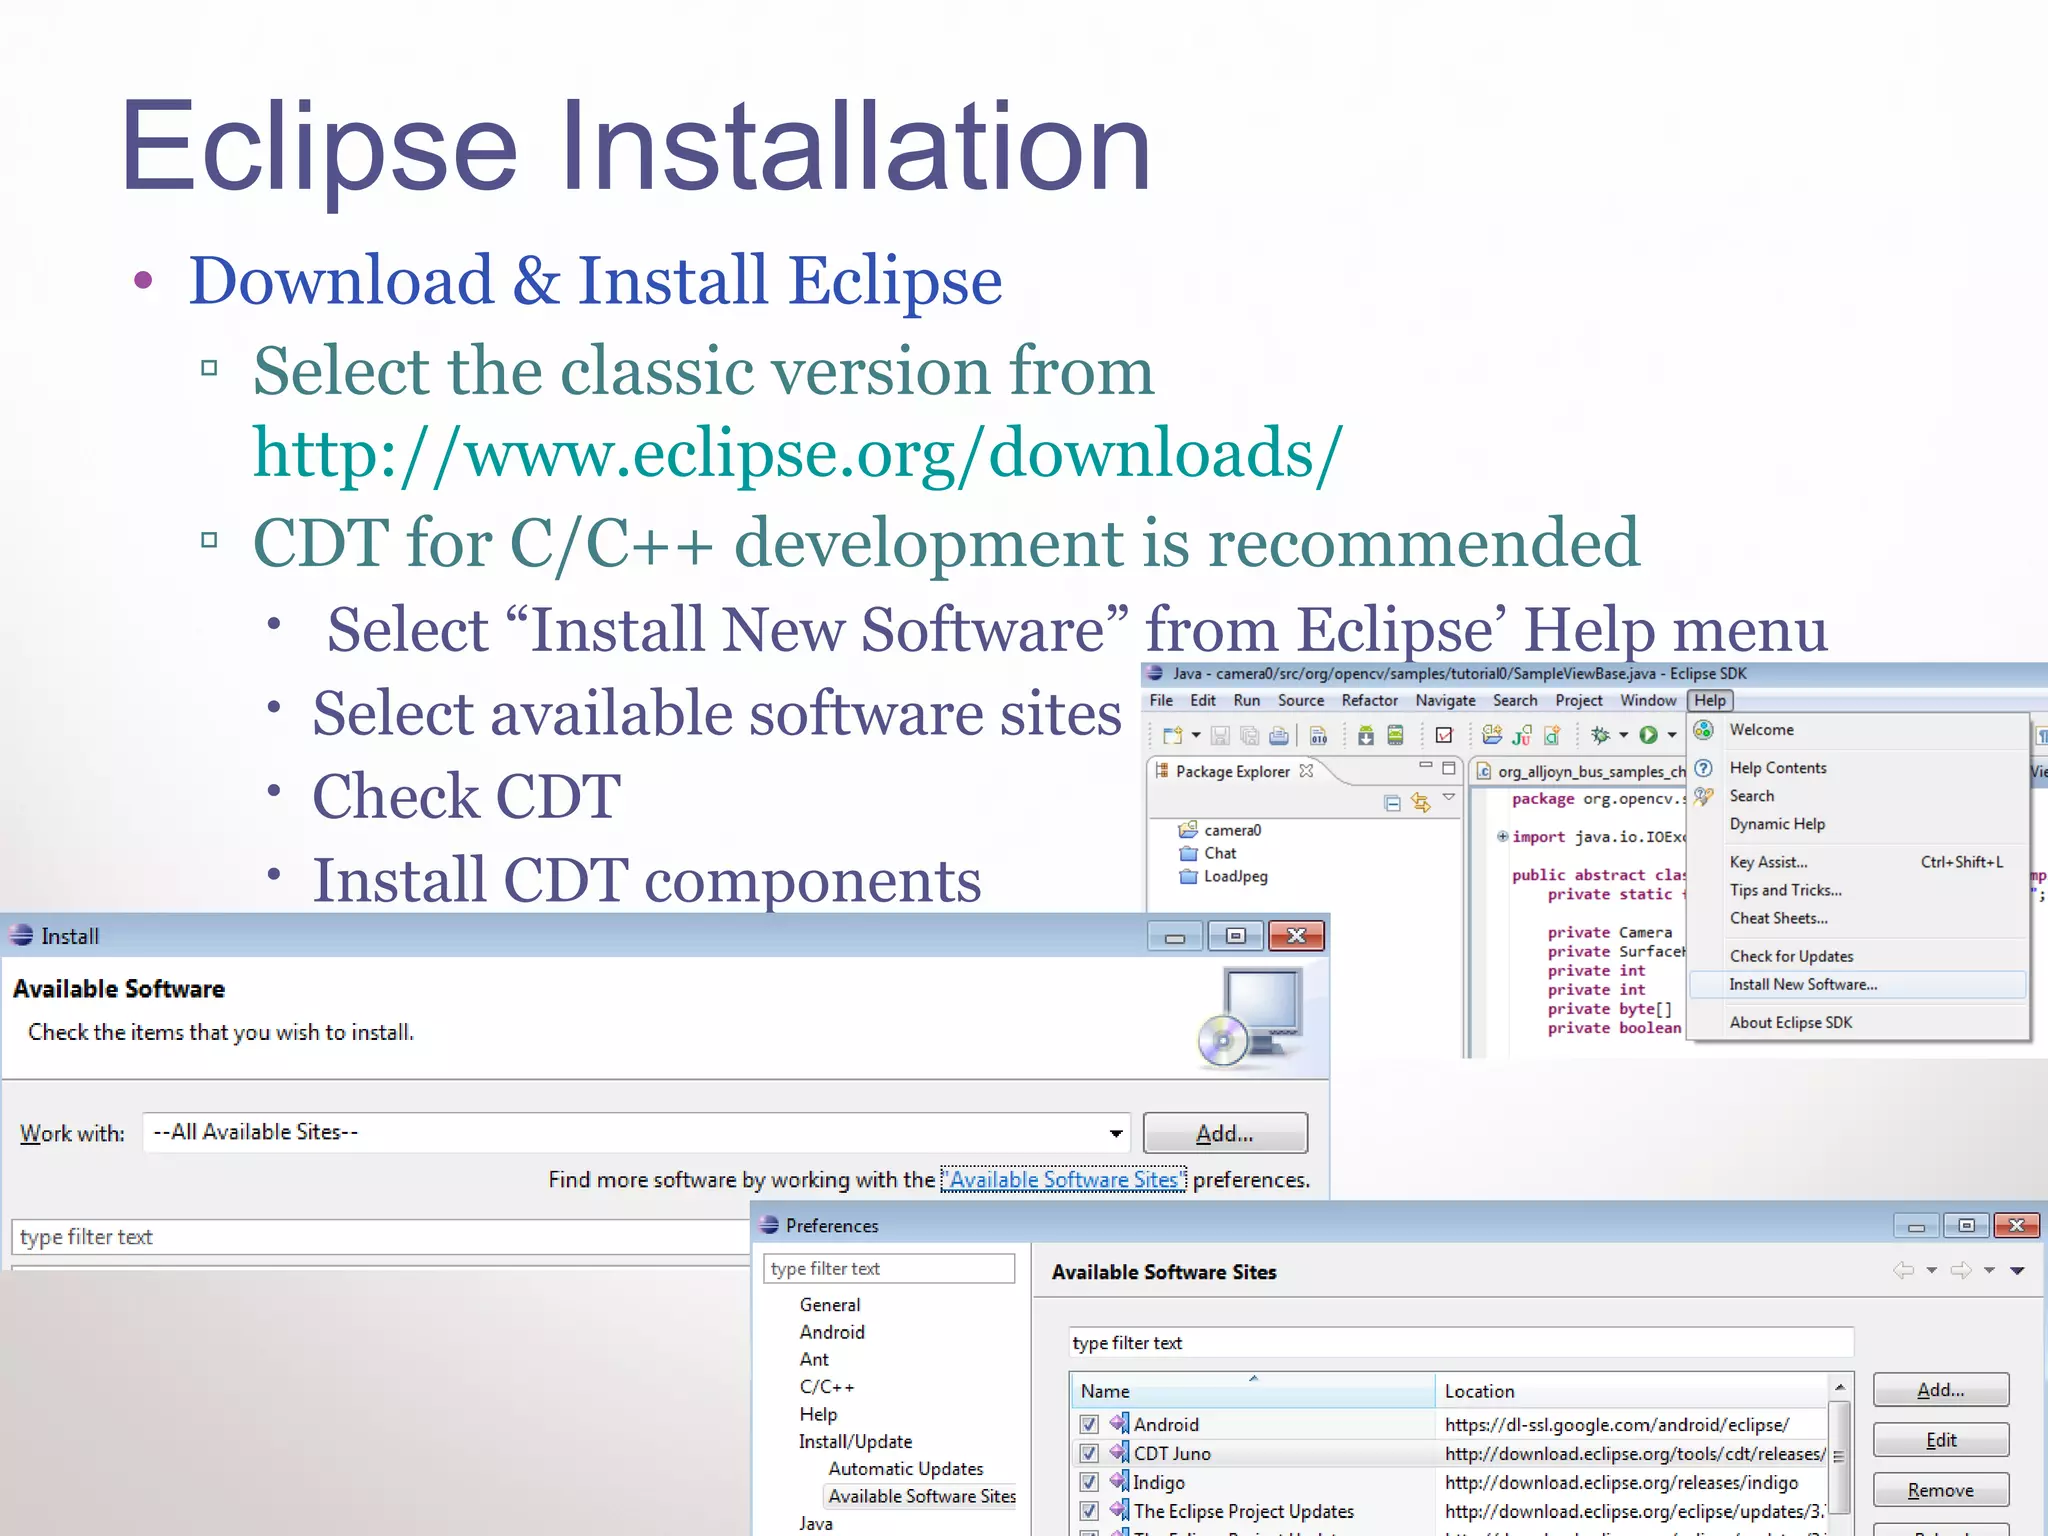
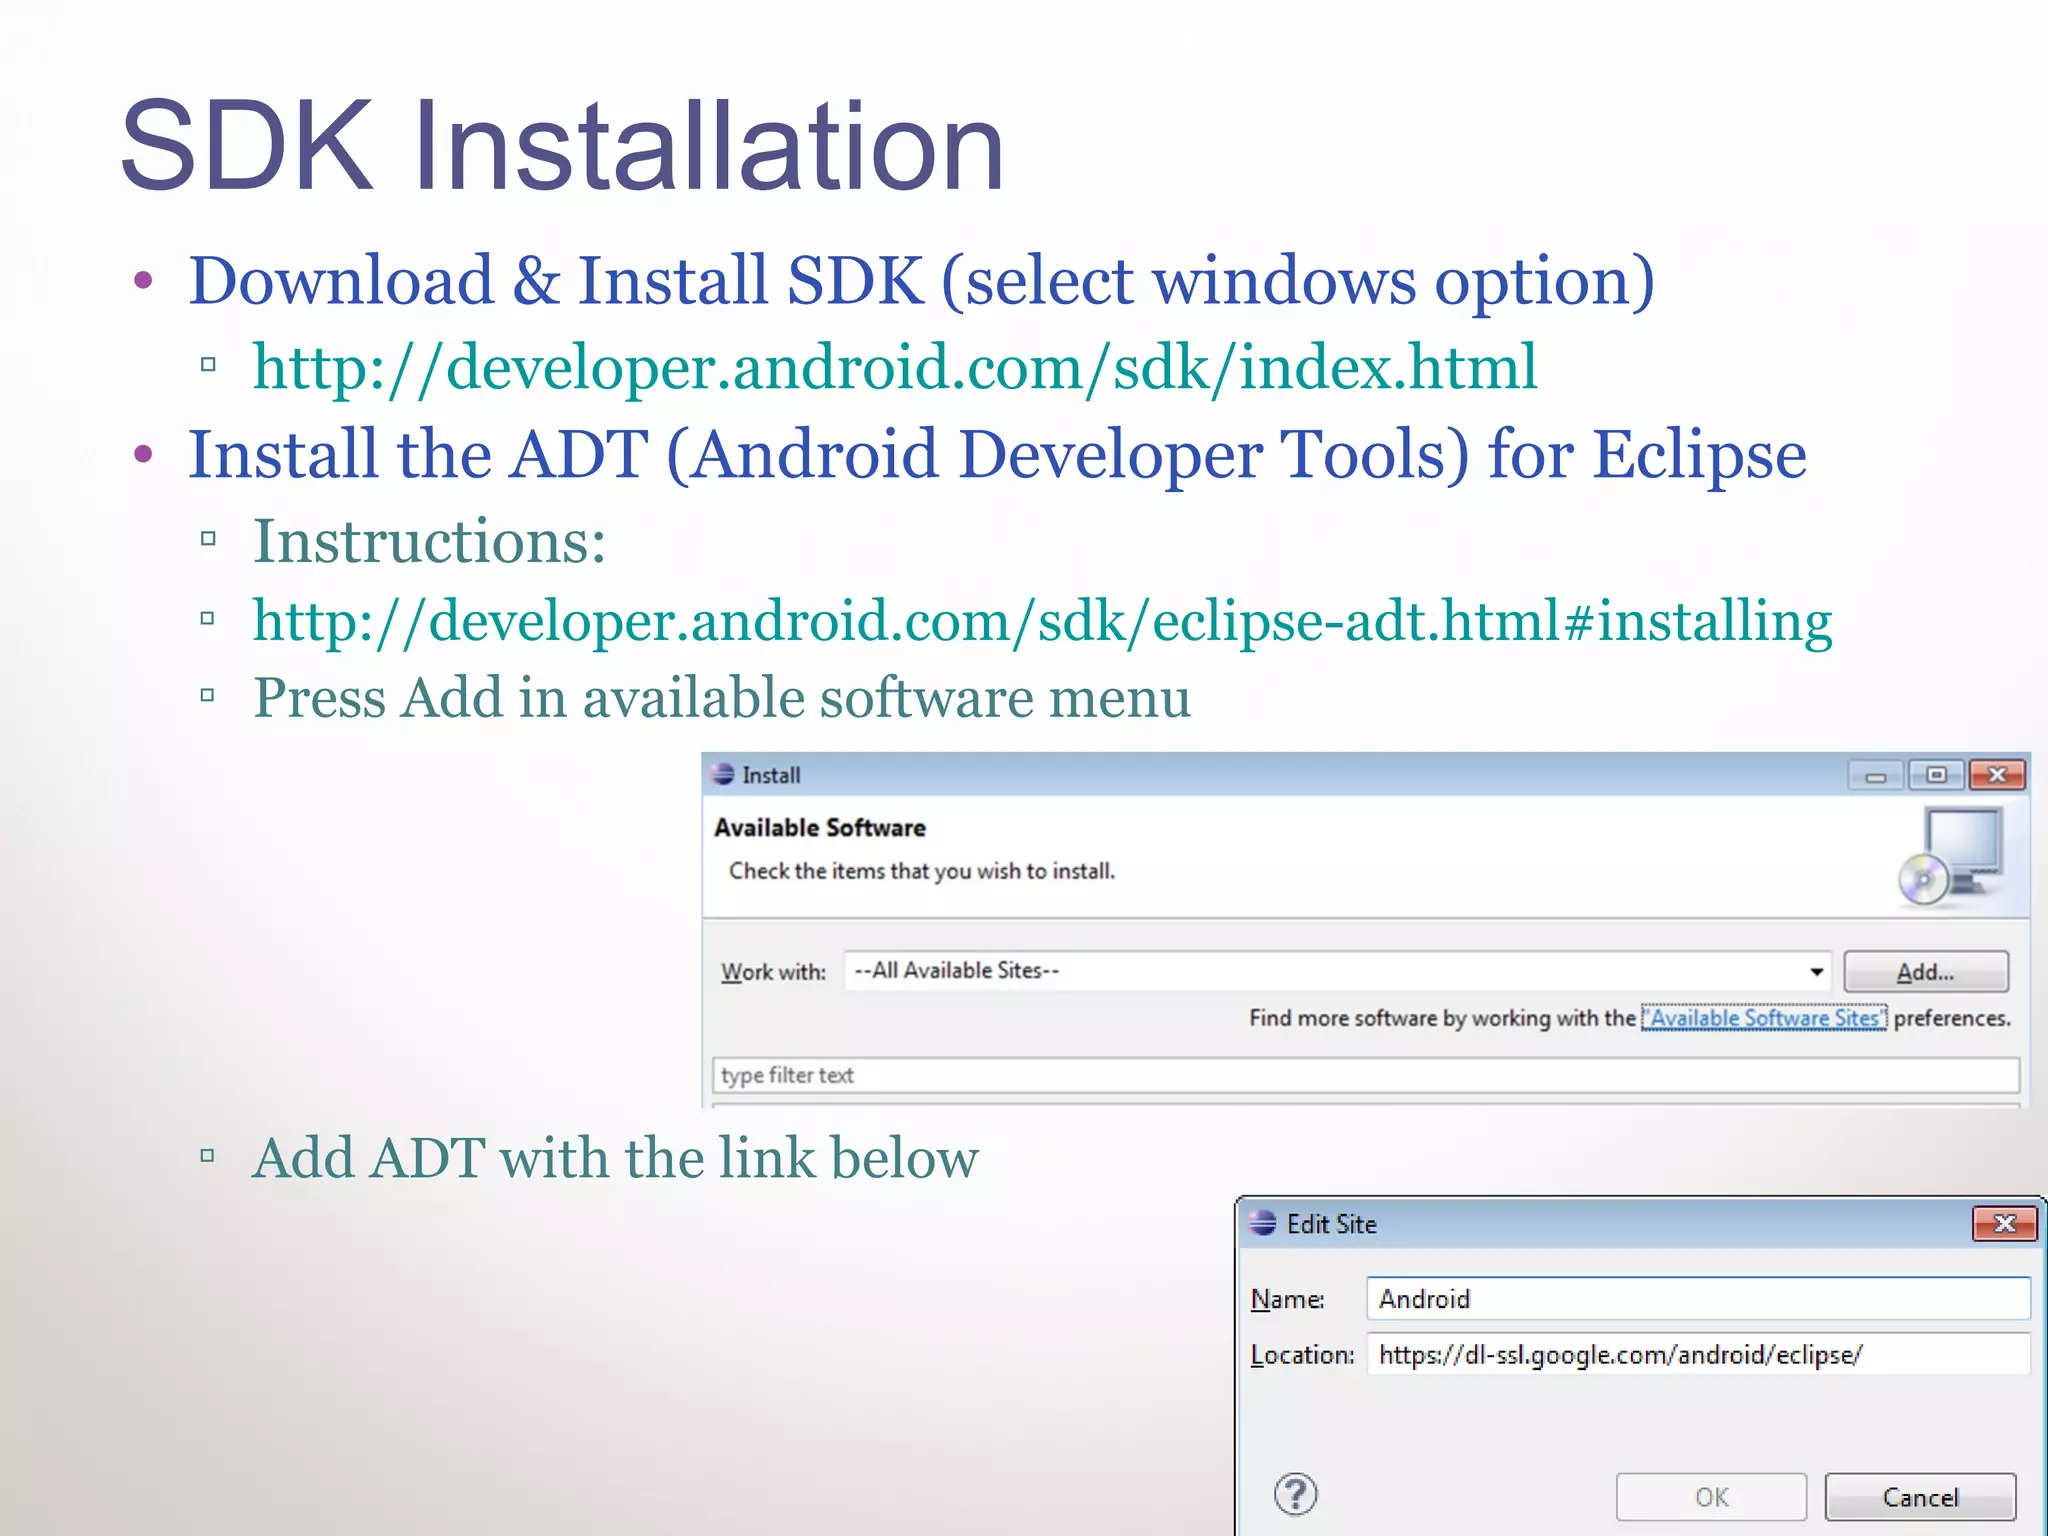
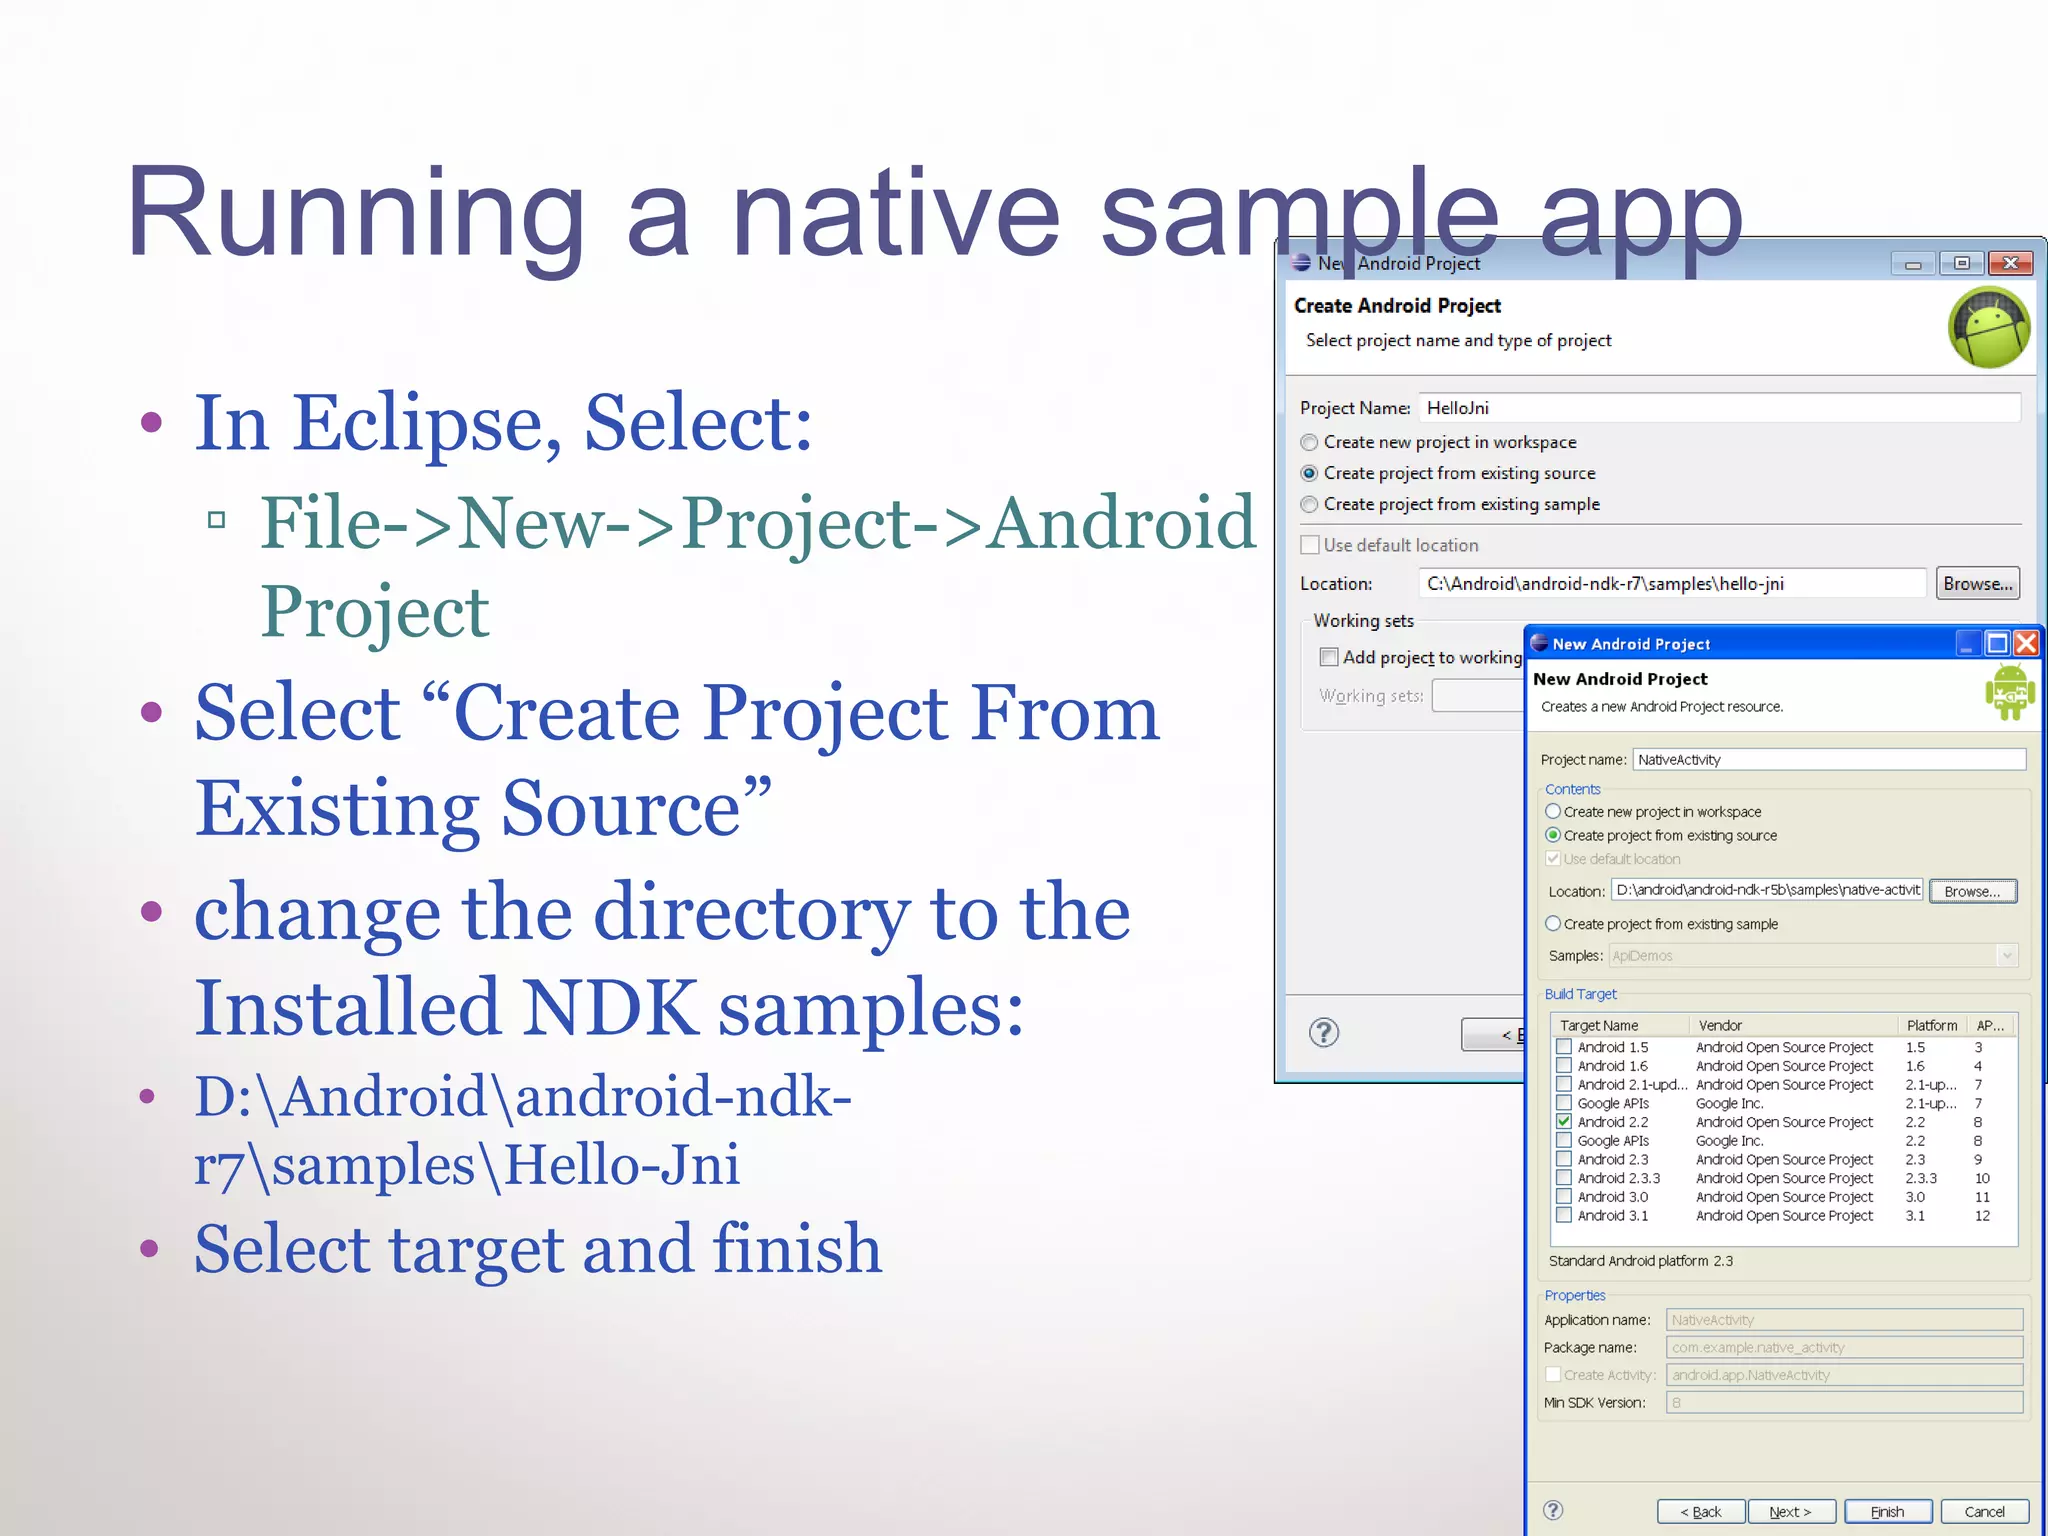
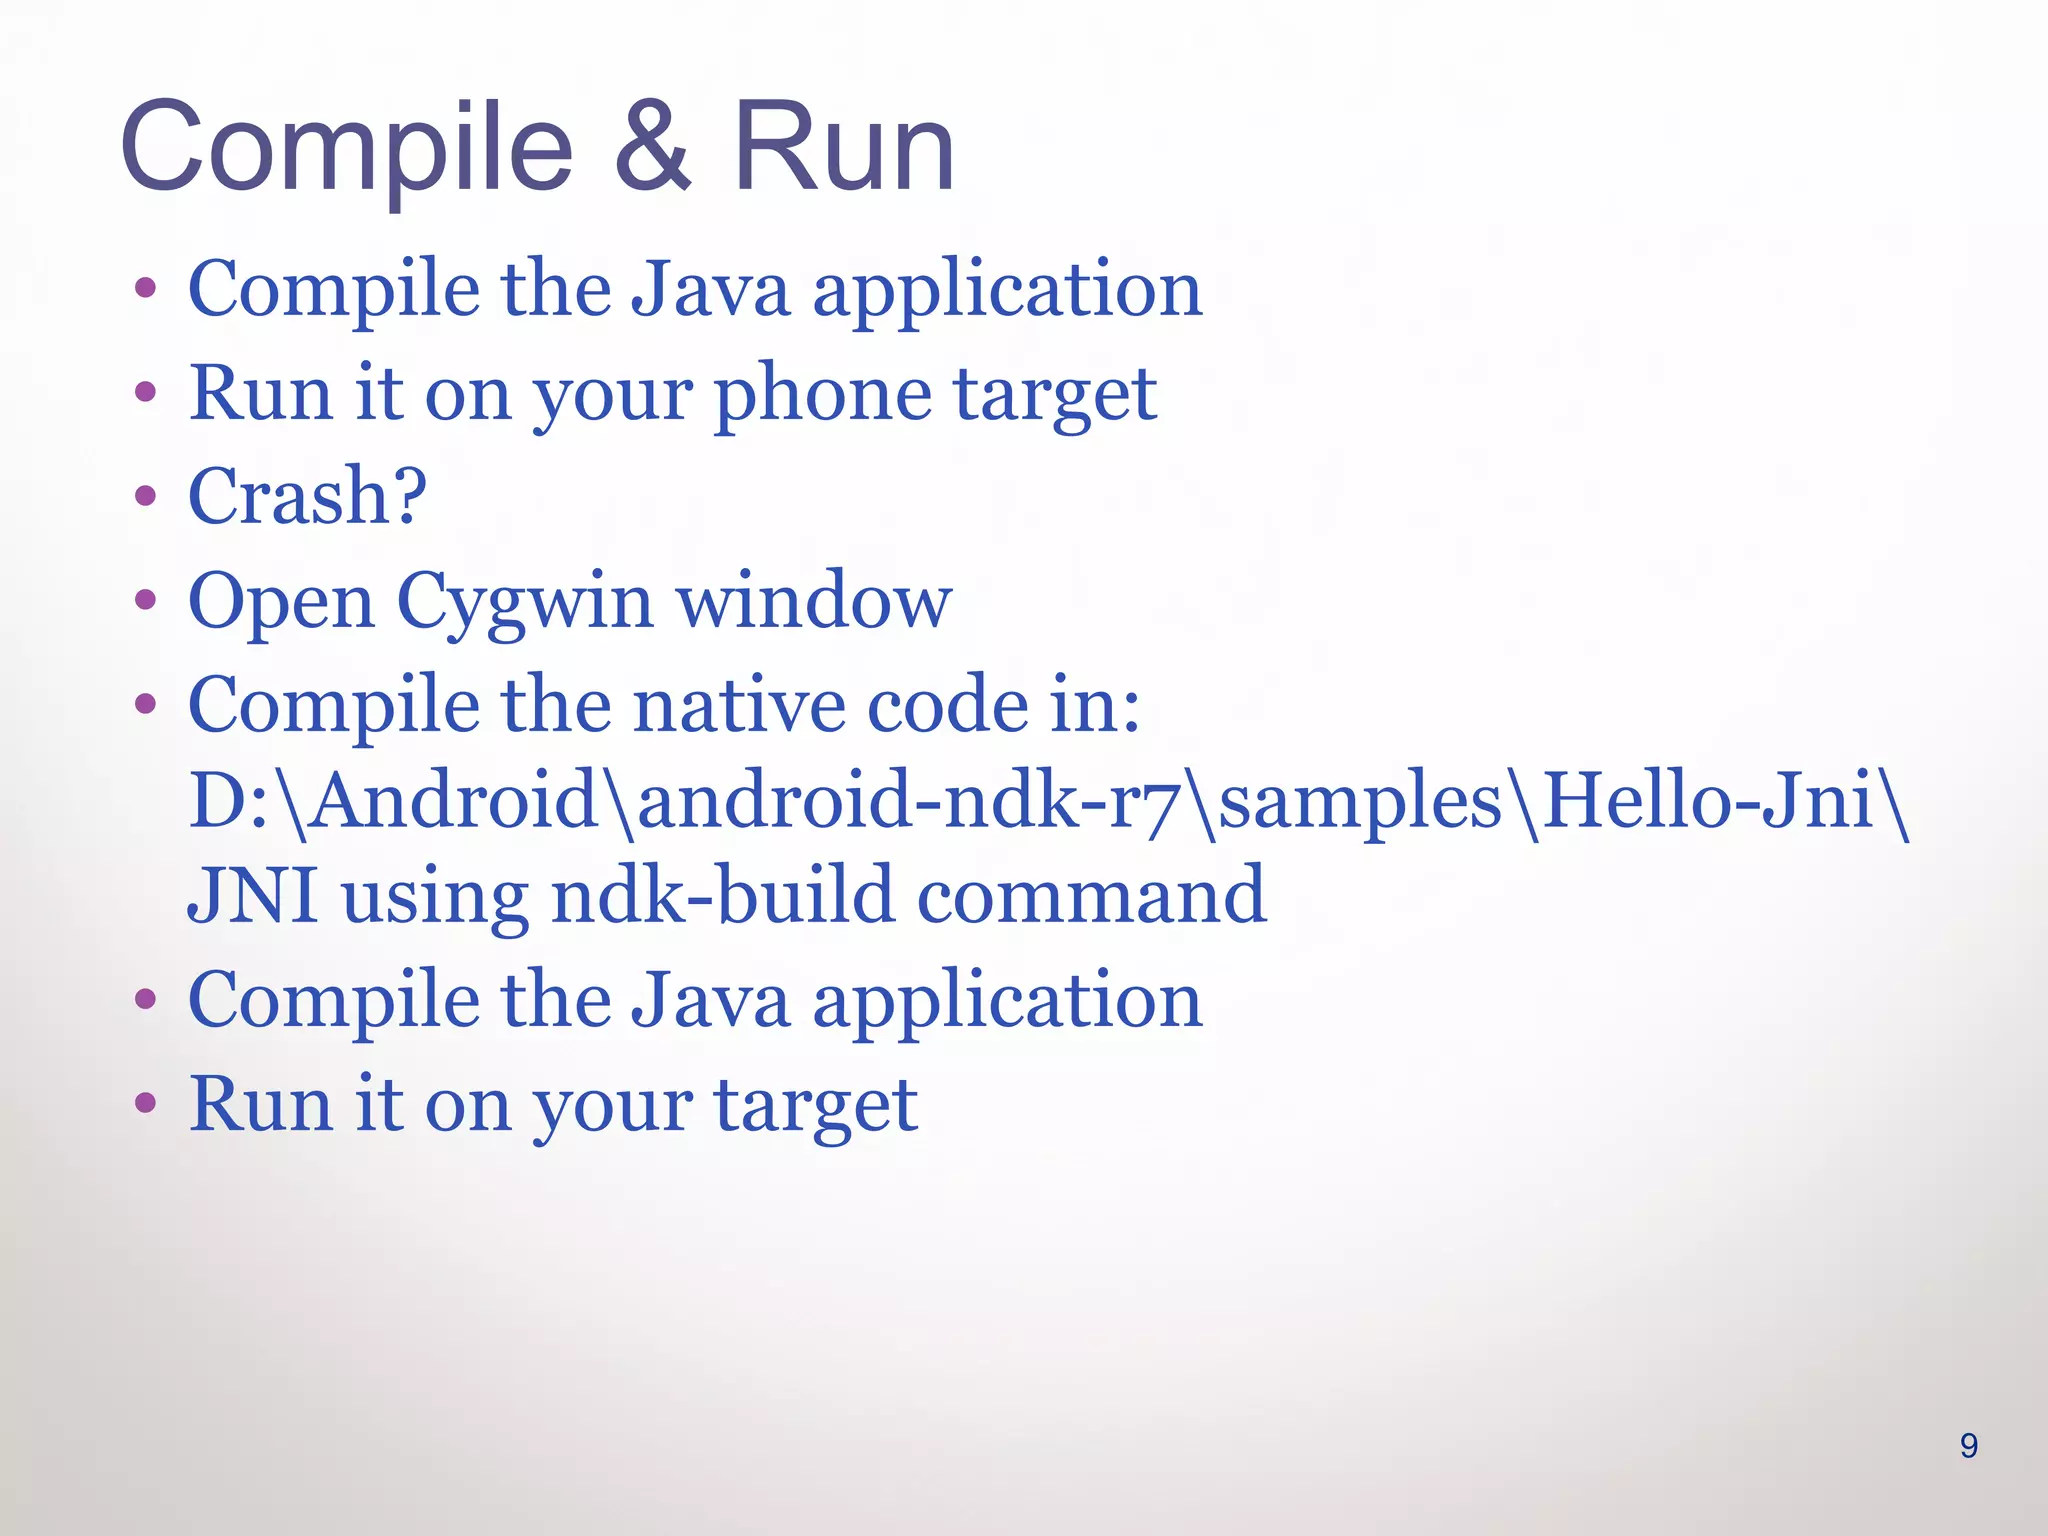
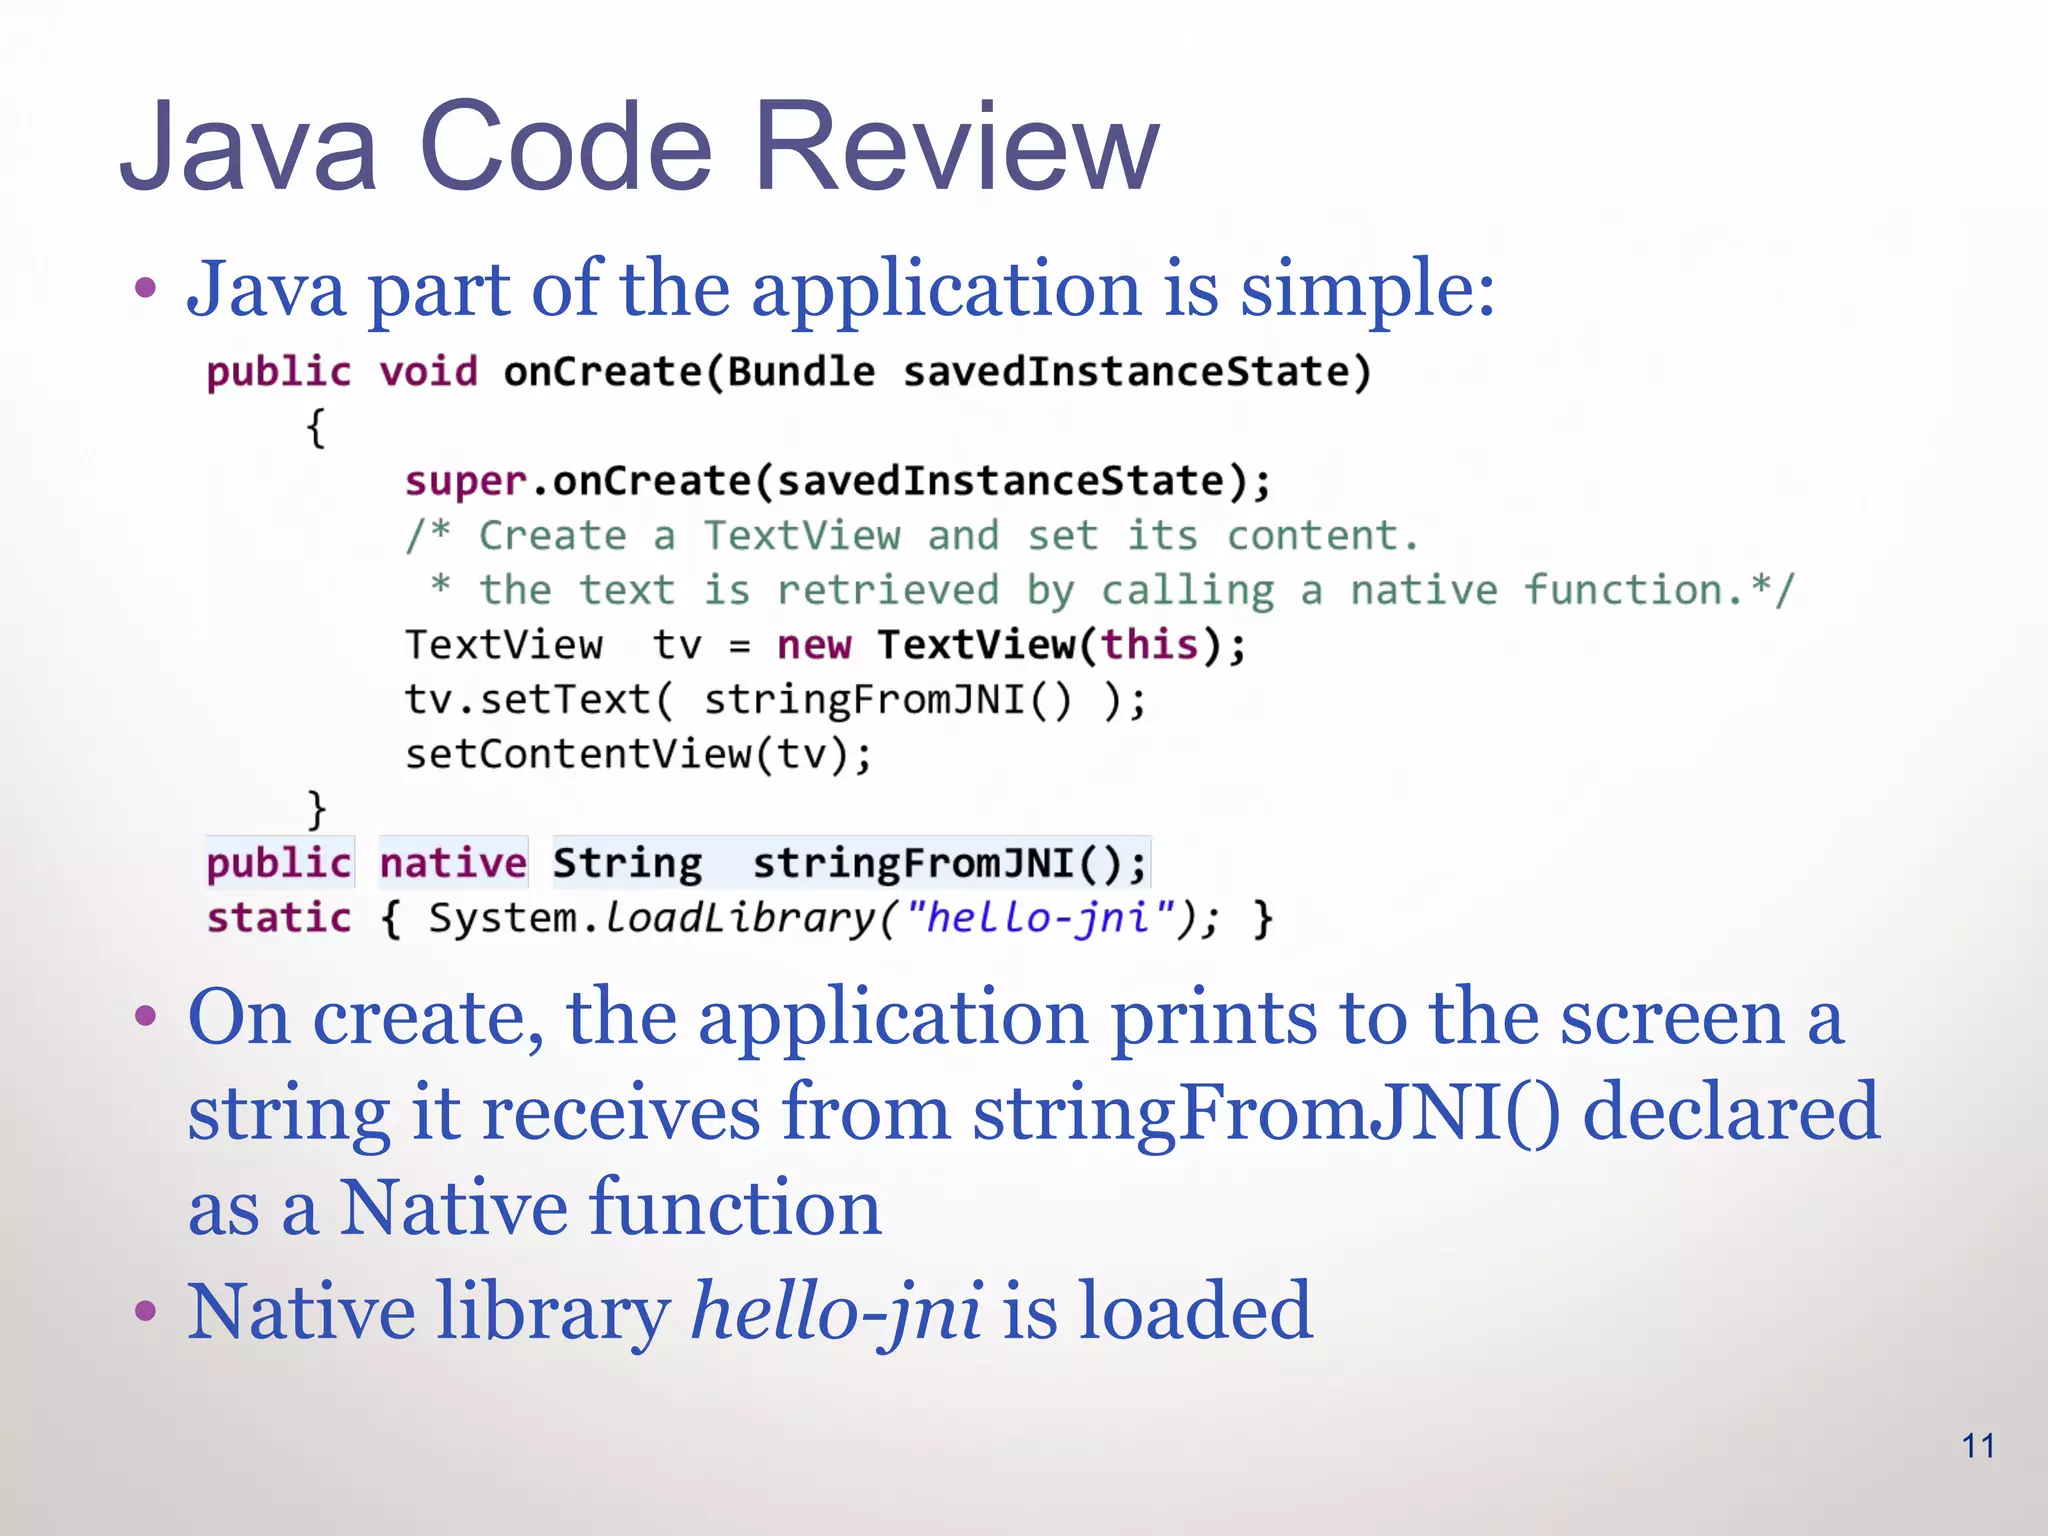
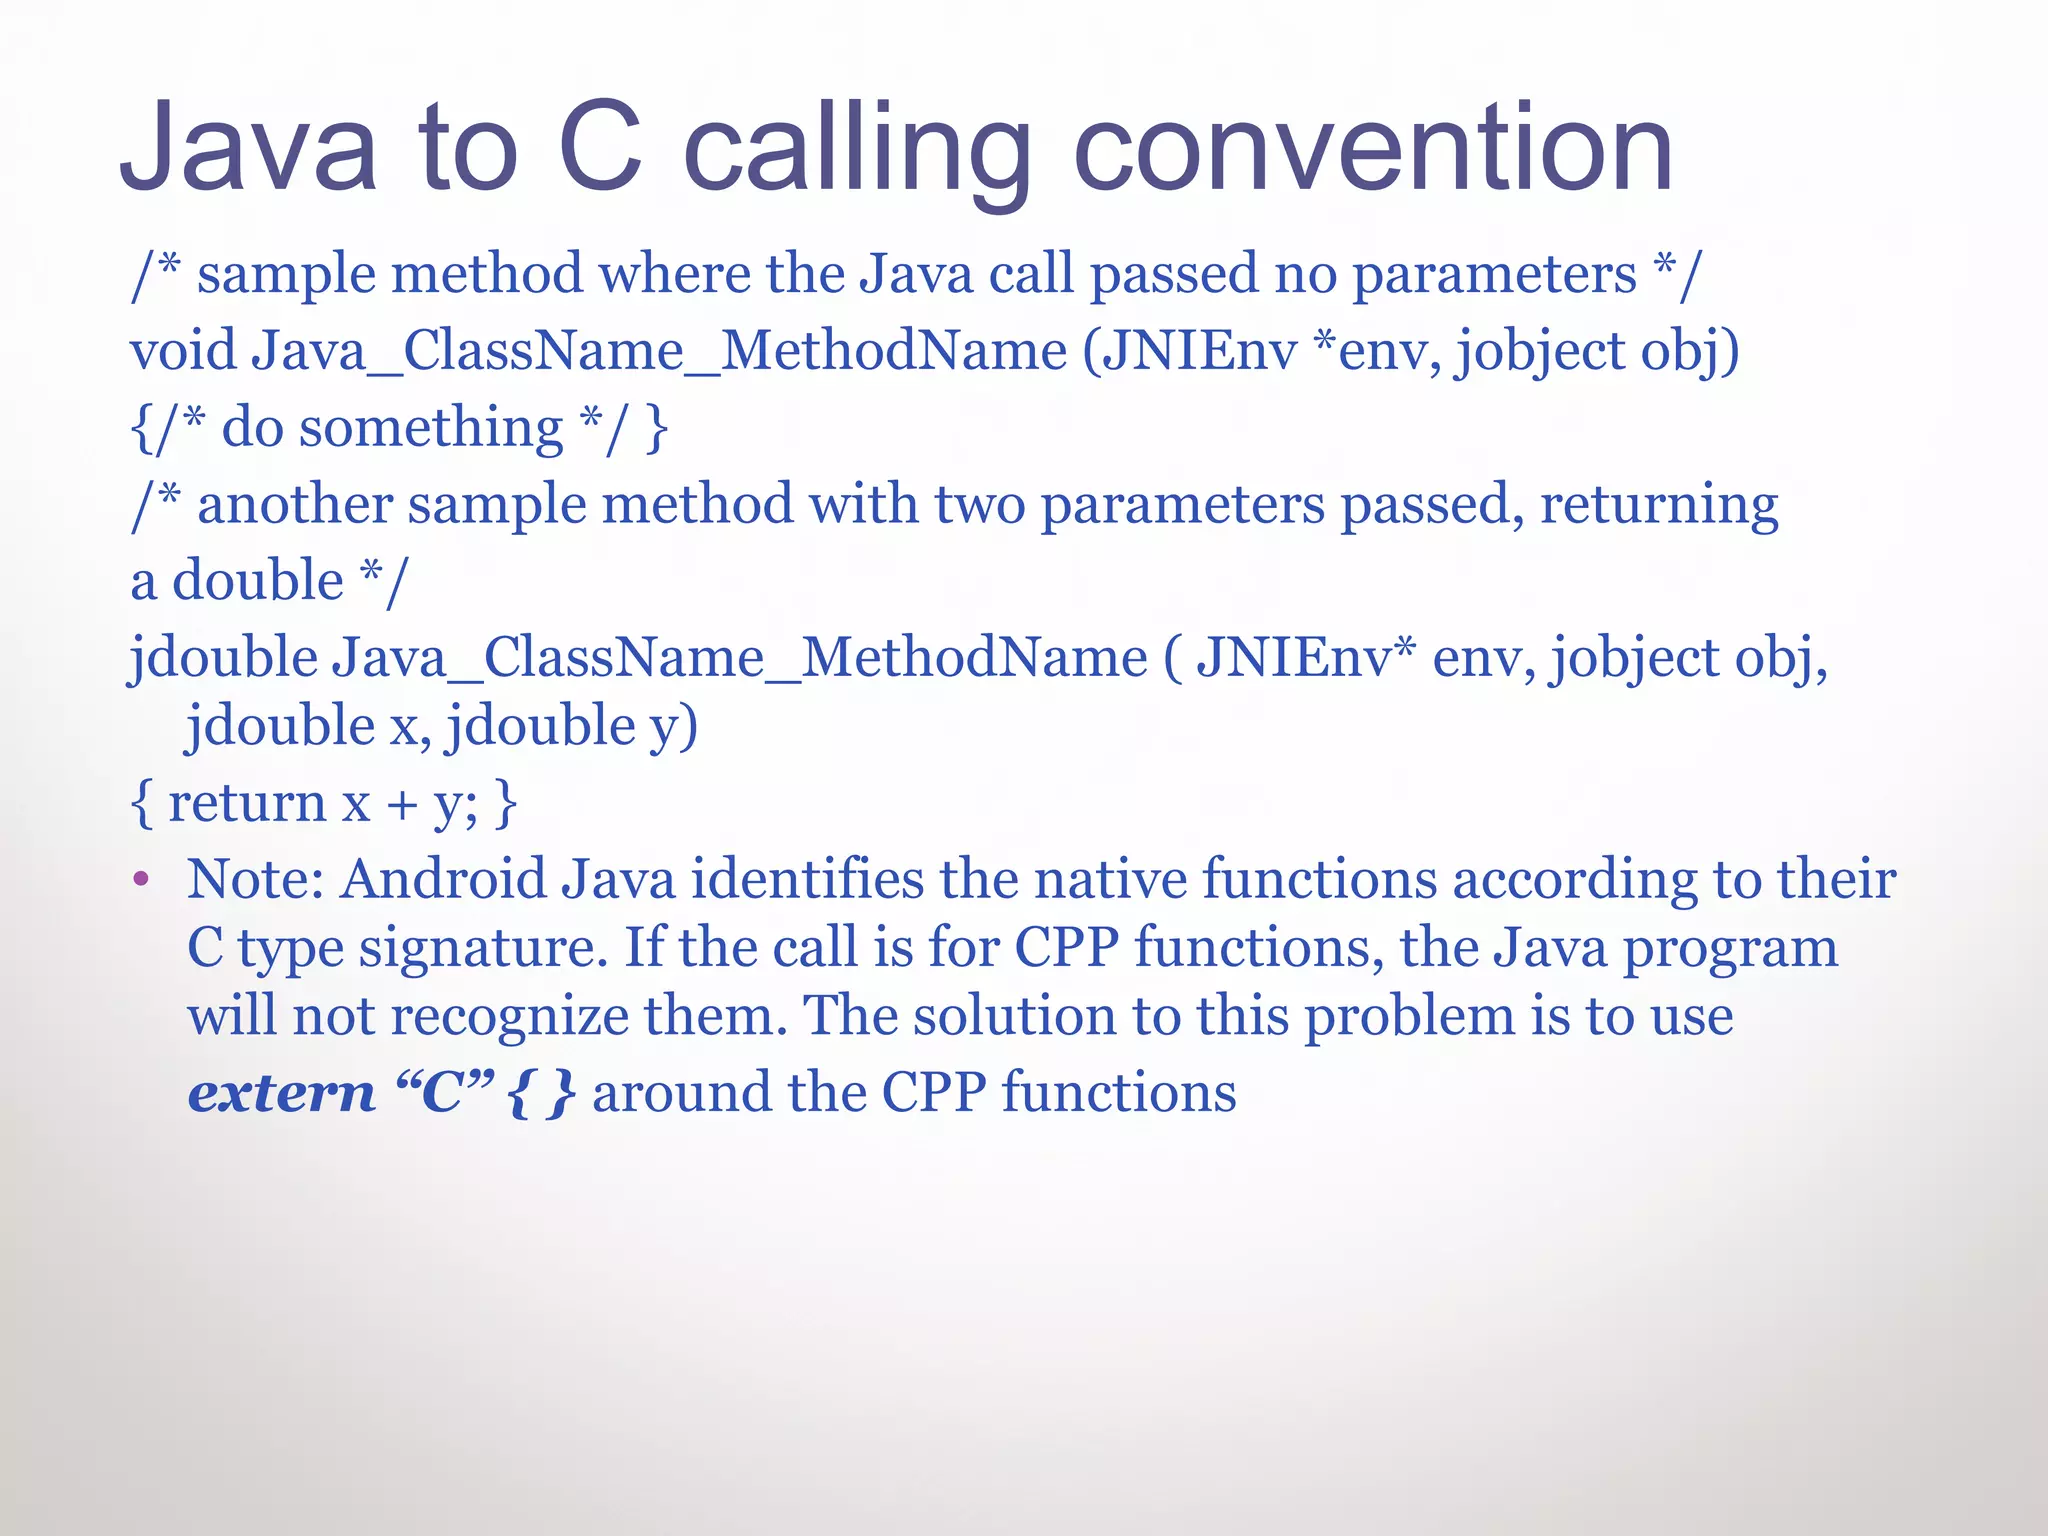
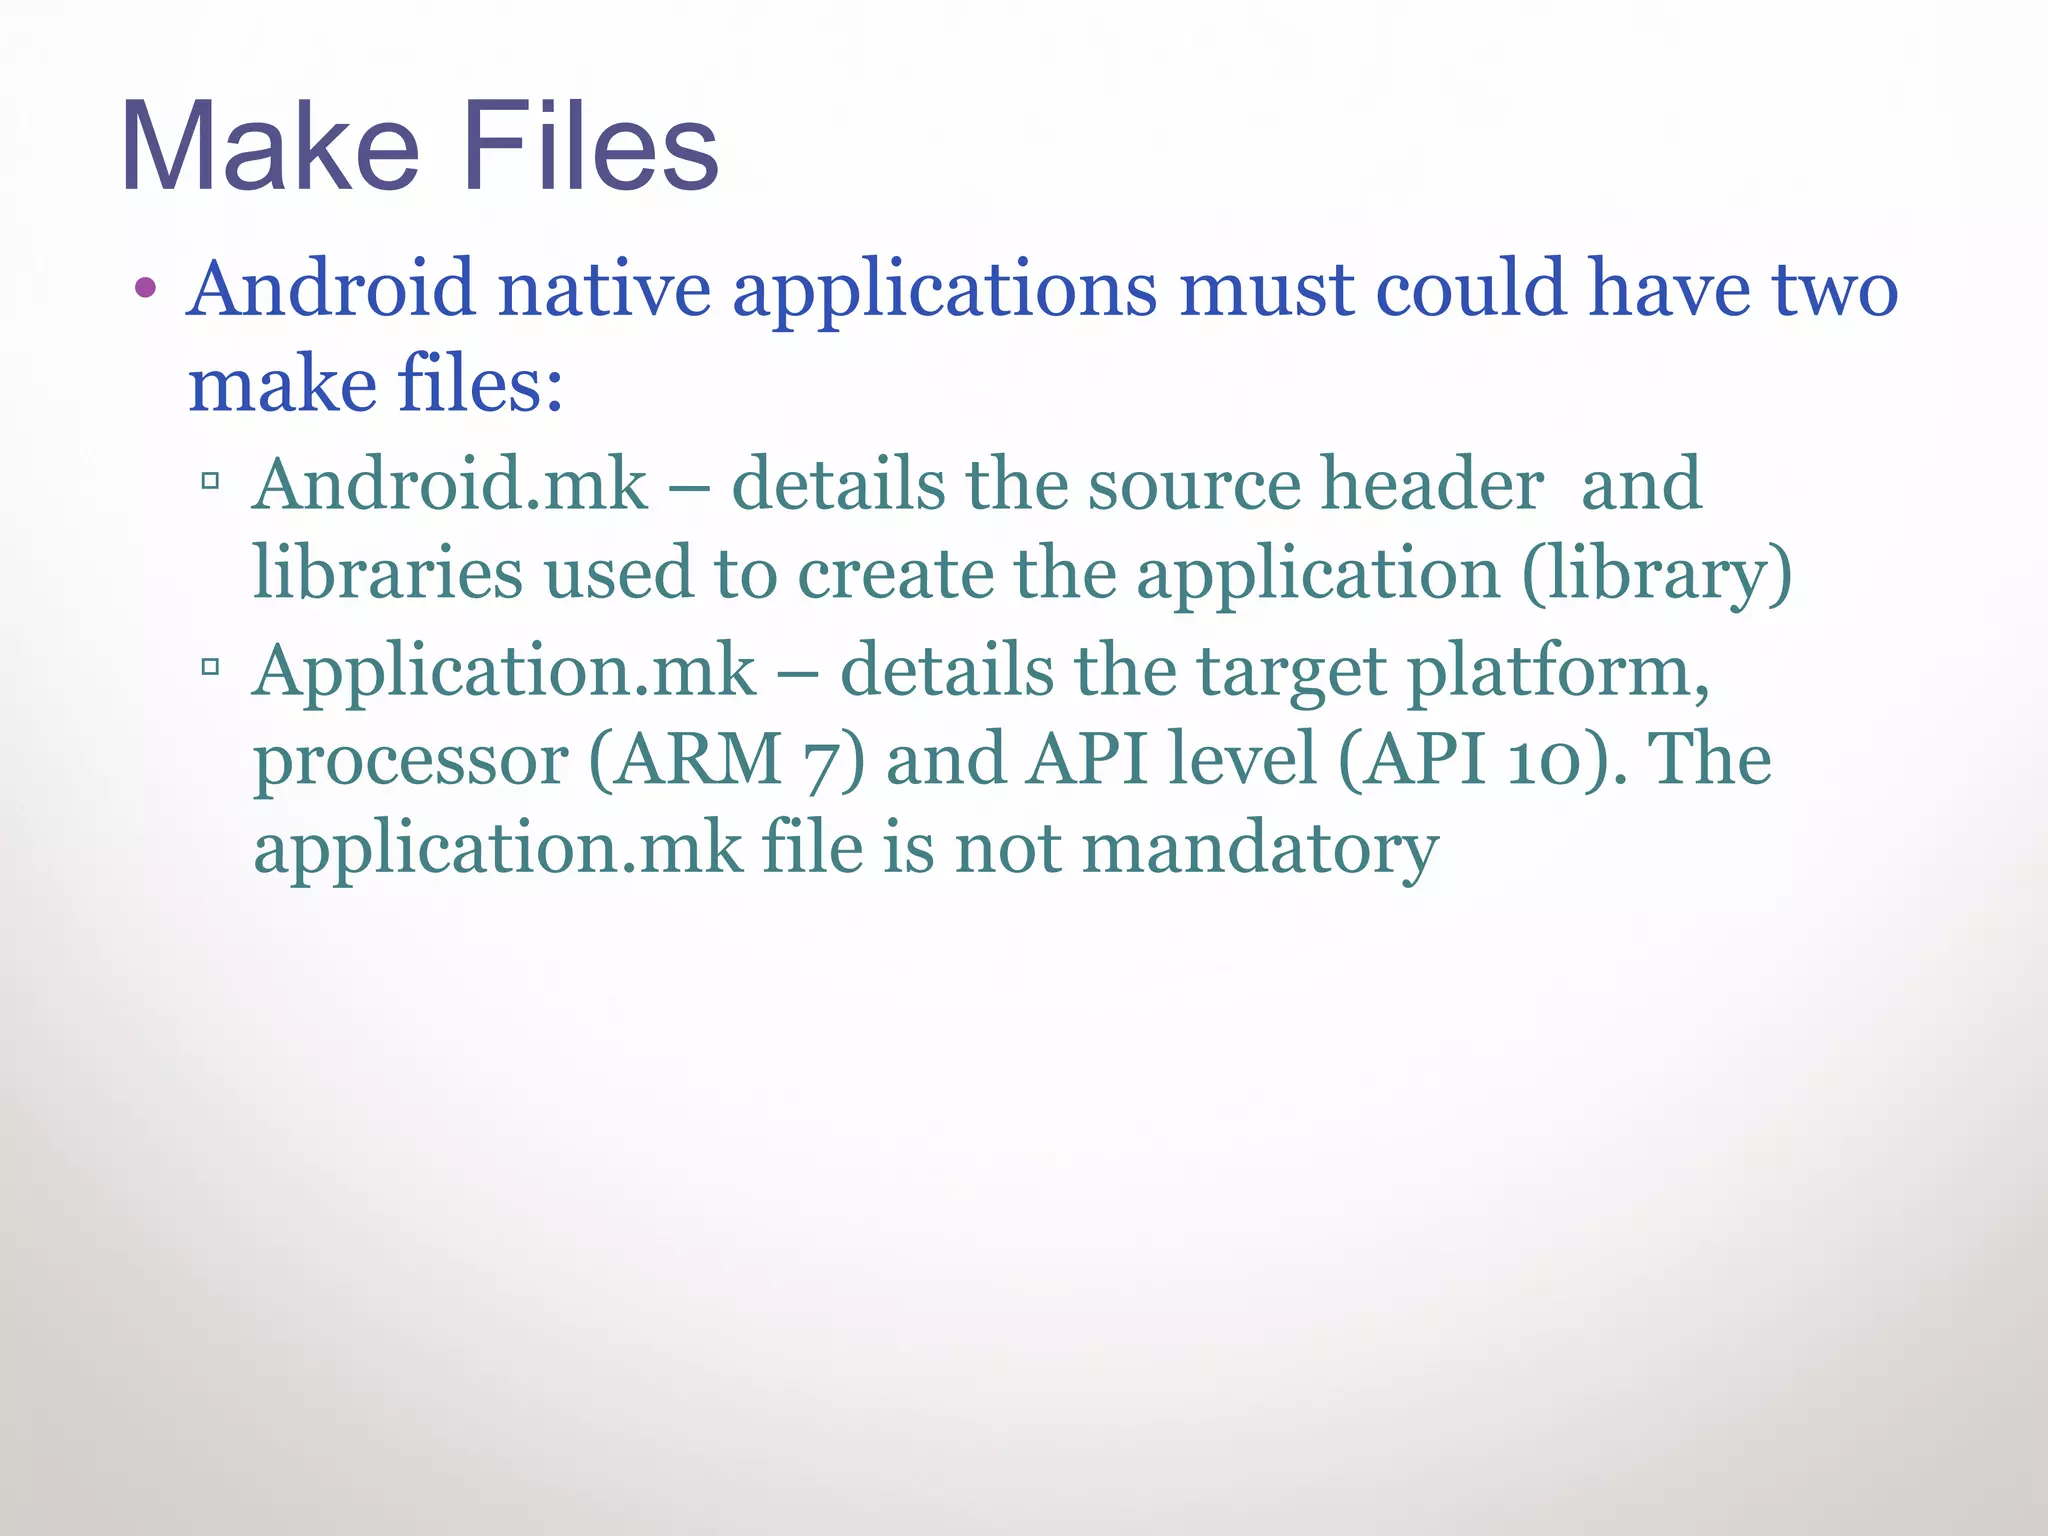
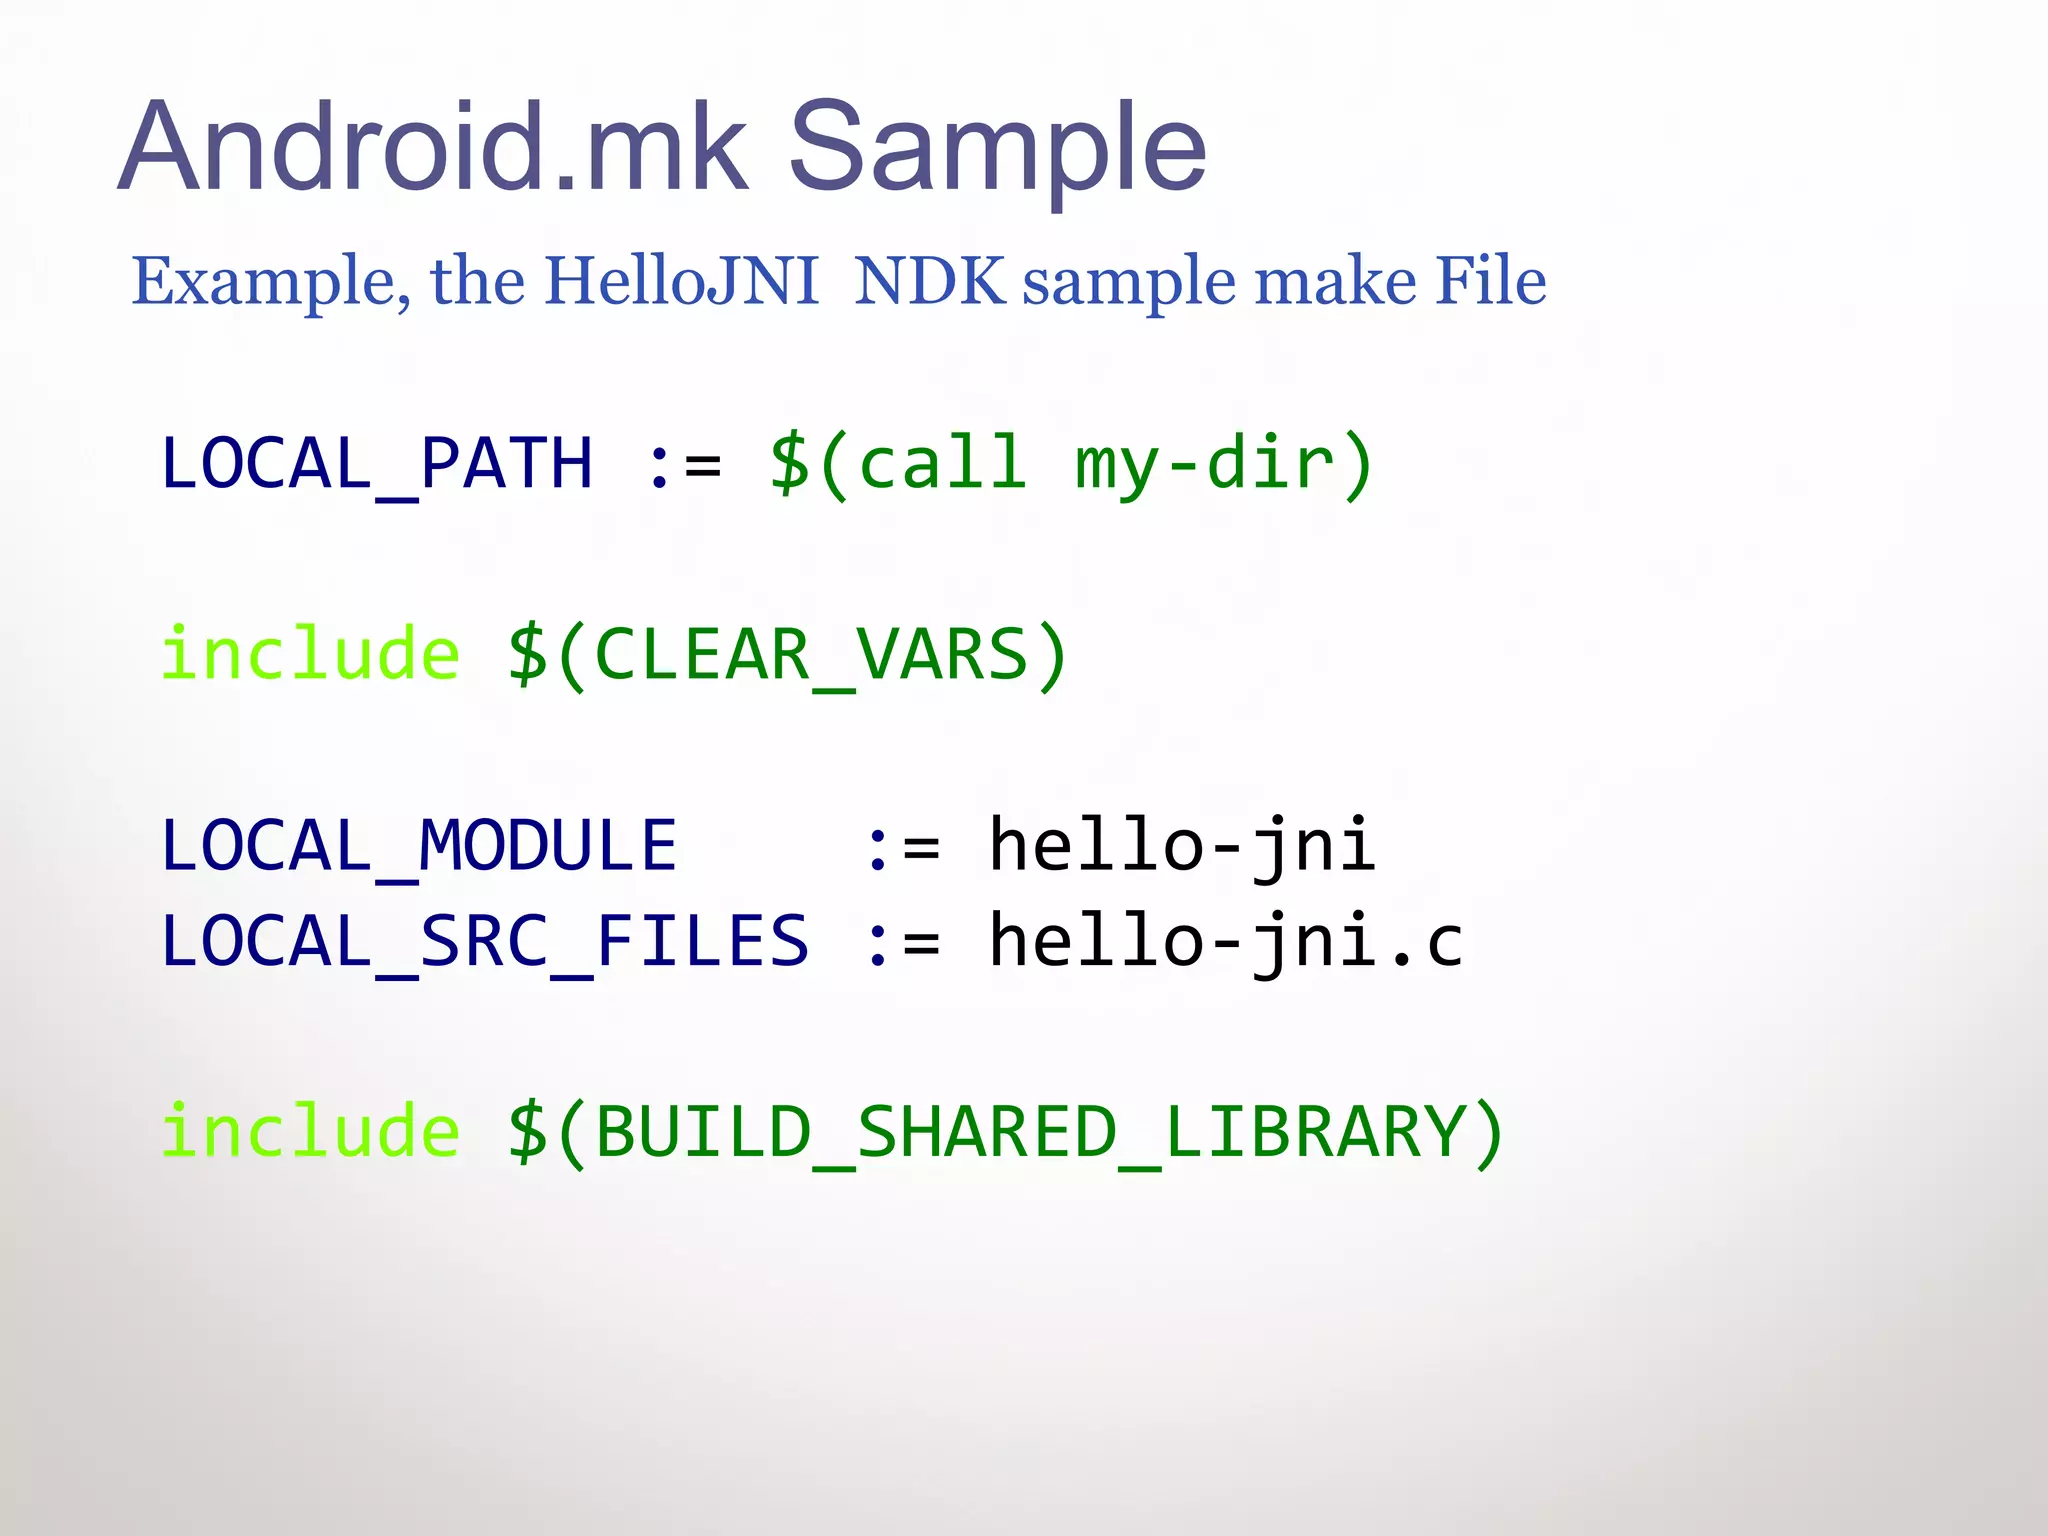
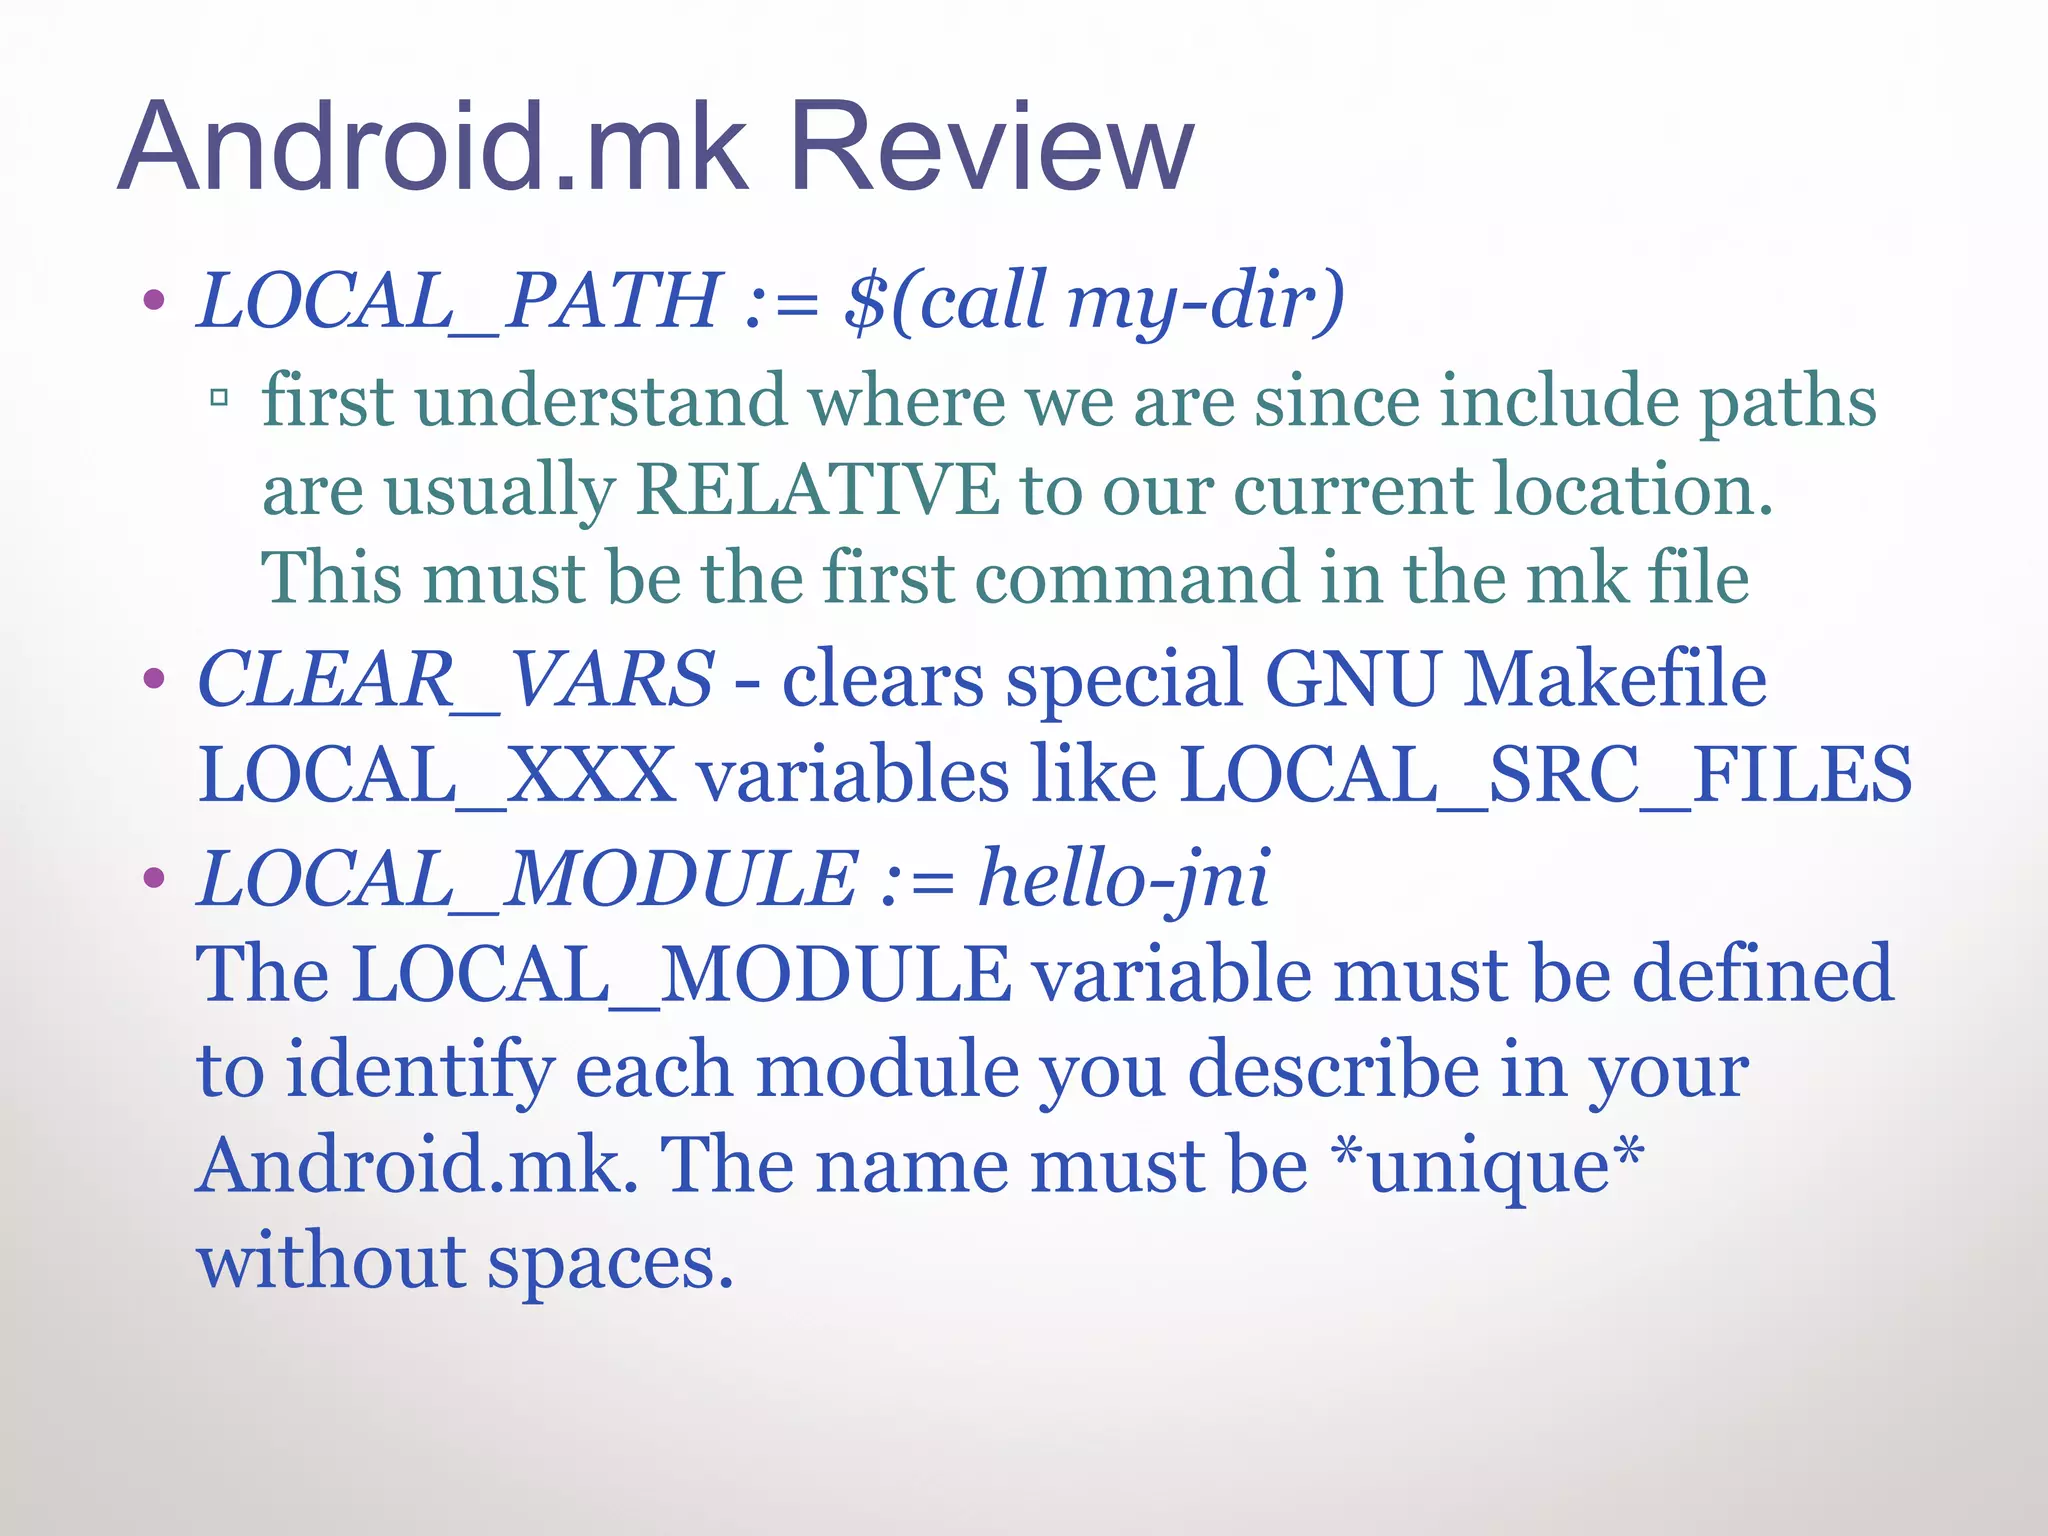
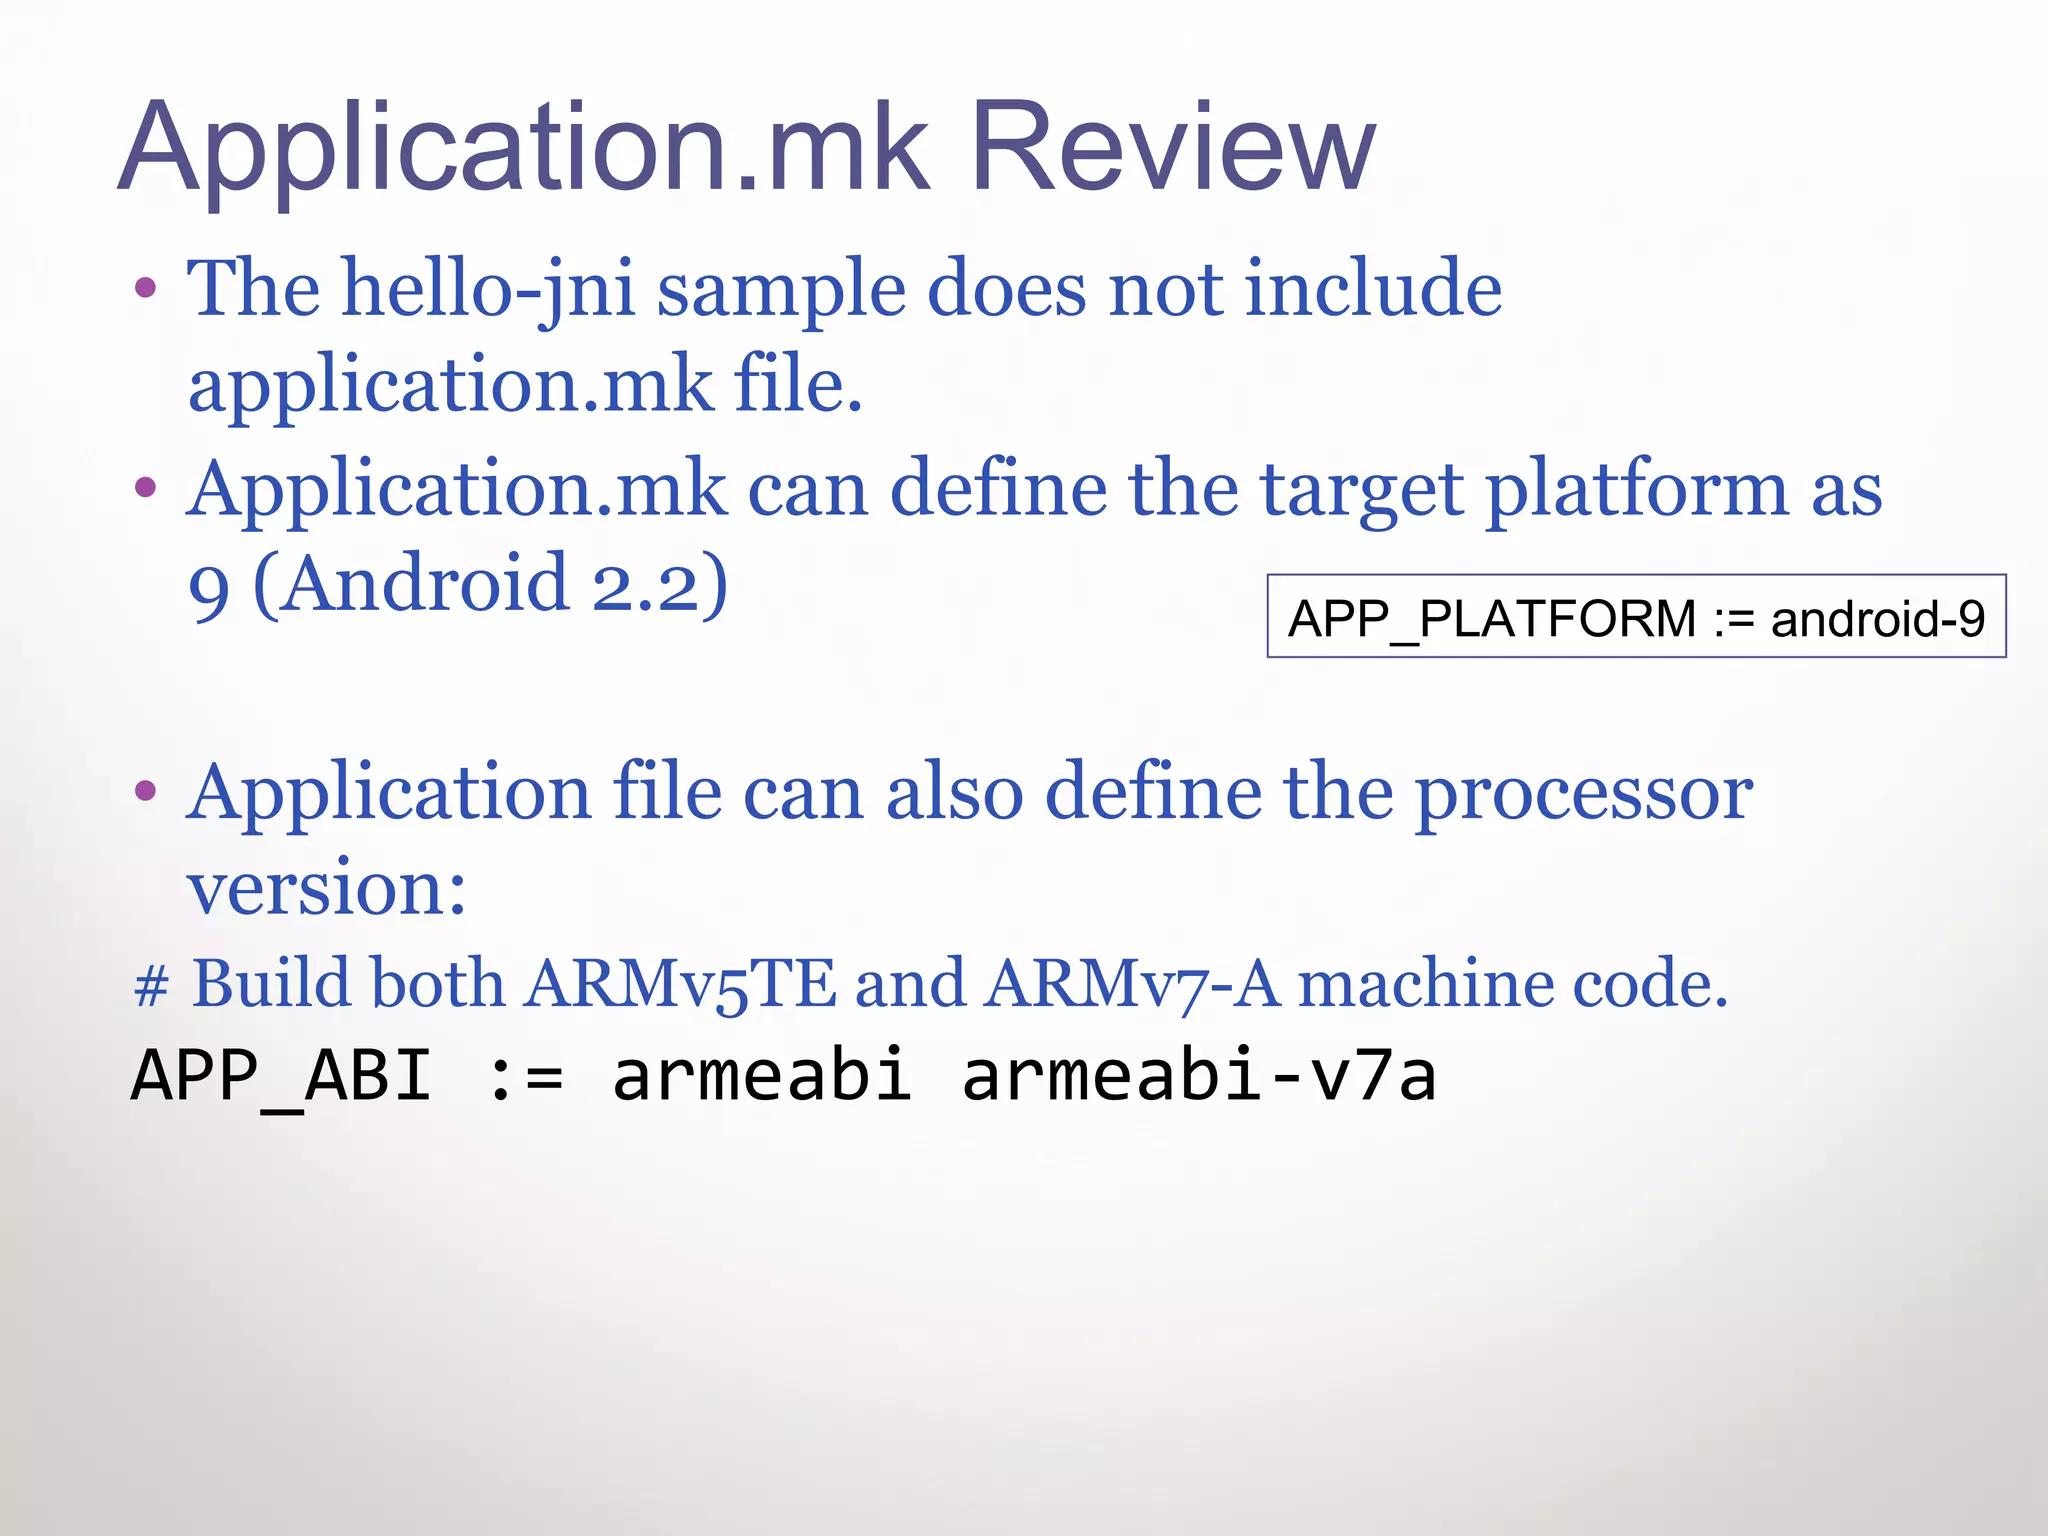
Native Android
for
Windows Developers

Yossi Cohen
INSTALLATIONS

Install Eclipse + CDT
Install SDK
Install ADT
Install USB Driver
Install NDK
Install Cygwin ….
Eclipse Installation
• Download & Install Eclipse
  ▫ Select the classic version from
    http://www.eclipse.org/downloads/
  ▫ CDT for C/C++ development is recommended
       Select “Install New Software” from Eclipse’ Help menu
      Select available software sites
      Check CDT
      Install CDT components
SDK Installation
• Download & Install SDK (select windows option)
  ▫ http://developer.android.com/sdk/index.html
• Install the ADT (Android Developer Tools) for Eclipse
  ▫ Instructions:
  ▫ http://developer.android.com/sdk/eclipse-adt.html#installing
  ▫ Press Add in available software menu


  ▫ Add ADT with the link below


                                                                   4
USB Driver / NDK Installations
• Install USB Driver
 ▫ If you don’t have a nexus phone download driver
   from vendor. Instructions:
   http://developer.android.com/sdk/oem-usb.html#InstallingDriver
• Install NDK
 ▫ http://developer.android.com/sdk/ndk/index.html

• Preferably do all Installations in D:Android


                                                                    5
Cygwin Installation
•   Goo to http://cygwin.com/ and download setup
•   Install Cygwin.
•   Select default install options
•   After installation, add the following Dirs to
    Cygwin Path:
    ▫ C:Androidandroid-sdktools
    ▫ C:Androidandroid-ndk-r7buildtools


                                                    6
THE FIRST NDK SAMPLE
Running a native sample app
• In Eclipse, Select:
  ▫ File->New->Project->Android
    Project
• Select “Create Project From
  Existing Source”
• change the directory to the
  Installed NDK samples:
• D:Androidandroid-ndk-
  r7samplesHello-Jni
• Select target and finish
Compile & Run
• Compile the Java application
• Run it on your phone target
• Crash?
• Open Cygwin window
• Compile the native code in:
  D:Androidandroid-ndk-r7samplesHello-Jni
  JNI using ndk-build command
• Compile the Java application
• Run it on your target


                                                 9
CODE REVIEW


              10
Java Code Review
• Java part of the application is simple:


• On create, the application prints to the screen a
  string it receives from stringFromJNI() declared
  as a Native function
• Native library hello-jni is loaded
                                                      11
Java to C calling convention
/* sample method where the Java call passed no parameters */
void Java_ClassName_MethodName (JNIEnv *env, jobject obj)
{/* do something */ }
/* another sample method with two parameters passed, returning
a double */
jdouble Java_ClassName_MethodName ( JNIEnv* env, jobject obj,
   jdouble x, jdouble y)
{ return x + y; }
• Note: Android Java identifies the native functions according to their
   C type signature. If the call is for CPP functions, the Java program
   will not recognize them. The solution to this problem is to use
   extern “C” { } around the CPP functions
Make Files
• Android native applications must could have two
  make files:
 ▫ Android.mk – details the source header and
   libraries used to create the application (library)
 ▫ Application.mk – details the target platform,
   processor (ARM 7) and API level (API 10). The
   application.mk file is not mandatory
Android.mk Sample
Example, the HelloJNI NDK sample make File

LOCAL_PATH := $(call my-dir)

include $(CLEAR_VARS)

LOCAL_MODULE    := hello-jni
LOCAL_SRC_FILES := hello-jni.c

include $(BUILD_SHARED_LIBRARY)
Android.mk Review
• LOCAL_PATH := $(call my-dir)
 ▫ first understand where we are since include paths
   are usually RELATIVE to our current location.
   This must be the first command in the mk file
• CLEAR_VARS - clears special GNU Makefile
  LOCAL_XXX variables like LOCAL_SRC_FILES
• LOCAL_MODULE := hello-jni
  The LOCAL_MODULE variable must be defined
  to identify each module you describe in your
  Android.mk. The name must be *unique*
  without spaces.
Application.mk Review
• The hello-jni sample does not include
  application.mk file.
• Application.mk can define the target platform as
  9 (Android 2.2)                APP_PLATFORM := android-9


• Application file can also define the processor
  version:
# Build both ARMv5TE and ARMv7-A machine code.
APP_ABI := armeabi armeabi-v7a
Refrences
• Review of Android Make file
• Native android development
• Cygwin Install for Android
DSP-IP Contact information
For courses & programming services contact

Yossi Cohen
yossi@dsp-ip.com
+972-545-313092

Native Android for Windows Developers

  • 1.
  • 2.
    INSTALLATIONS Install Eclipse +CDT Install SDK Install ADT Install USB Driver Install NDK Install Cygwin ….
  • 3.
    Eclipse Installation • Download& Install Eclipse ▫ Select the classic version from http://www.eclipse.org/downloads/ ▫ CDT for C/C++ development is recommended  Select “Install New Software” from Eclipse’ Help menu  Select available software sites  Check CDT  Install CDT components
  • 4.
    SDK Installation • Download& Install SDK (select windows option) ▫ http://developer.android.com/sdk/index.html • Install the ADT (Android Developer Tools) for Eclipse ▫ Instructions: ▫ http://developer.android.com/sdk/eclipse-adt.html#installing ▫ Press Add in available software menu ▫ Add ADT with the link below 4
  • 5.
    USB Driver /NDK Installations • Install USB Driver ▫ If you don’t have a nexus phone download driver from vendor. Instructions: http://developer.android.com/sdk/oem-usb.html#InstallingDriver • Install NDK ▫ http://developer.android.com/sdk/ndk/index.html • Preferably do all Installations in D:Android 5
  • 6.
    Cygwin Installation • Goo to http://cygwin.com/ and download setup • Install Cygwin. • Select default install options • After installation, add the following Dirs to Cygwin Path: ▫ C:Androidandroid-sdktools ▫ C:Androidandroid-ndk-r7buildtools 6
  • 7.
  • 8.
    Running a nativesample app • In Eclipse, Select: ▫ File->New->Project->Android Project • Select “Create Project From Existing Source” • change the directory to the Installed NDK samples: • D:Androidandroid-ndk- r7samplesHello-Jni • Select target and finish
  • 9.
    Compile & Run •Compile the Java application • Run it on your phone target • Crash? • Open Cygwin window • Compile the native code in: D:Androidandroid-ndk-r7samplesHello-Jni JNI using ndk-build command • Compile the Java application • Run it on your target 9
  • 10.
  • 11.
    Java Code Review •Java part of the application is simple: • On create, the application prints to the screen a string it receives from stringFromJNI() declared as a Native function • Native library hello-jni is loaded 11
  • 12.
    Java to Ccalling convention /* sample method where the Java call passed no parameters */ void Java_ClassName_MethodName (JNIEnv *env, jobject obj) {/* do something */ } /* another sample method with two parameters passed, returning a double */ jdouble Java_ClassName_MethodName ( JNIEnv* env, jobject obj, jdouble x, jdouble y) { return x + y; } • Note: Android Java identifies the native functions according to their C type signature. If the call is for CPP functions, the Java program will not recognize them. The solution to this problem is to use extern “C” { } around the CPP functions
  • 13.
    Make Files • Androidnative applications must could have two make files: ▫ Android.mk – details the source header and libraries used to create the application (library) ▫ Application.mk – details the target platform, processor (ARM 7) and API level (API 10). The application.mk file is not mandatory
  • 14.
    Android.mk Sample Example, theHelloJNI NDK sample make File LOCAL_PATH := $(call my-dir) include $(CLEAR_VARS) LOCAL_MODULE := hello-jni LOCAL_SRC_FILES := hello-jni.c include $(BUILD_SHARED_LIBRARY)
  • 15.
    Android.mk Review • LOCAL_PATH:= $(call my-dir) ▫ first understand where we are since include paths are usually RELATIVE to our current location. This must be the first command in the mk file • CLEAR_VARS - clears special GNU Makefile LOCAL_XXX variables like LOCAL_SRC_FILES • LOCAL_MODULE := hello-jni The LOCAL_MODULE variable must be defined to identify each module you describe in your Android.mk. The name must be *unique* without spaces.
  • 16.
    Application.mk Review • Thehello-jni sample does not include application.mk file. • Application.mk can define the target platform as 9 (Android 2.2) APP_PLATFORM := android-9 • Application file can also define the processor version: # Build both ARMv5TE and ARMv7-A machine code. APP_ABI := armeabi armeabi-v7a
  • 17.
    Refrences • Review ofAndroid Make file • Native android development • Cygwin Install for Android
  • 18.
    DSP-IP Contact information Forcourses & programming services contact Yossi Cohen yossi@dsp-ip.com +972-545-313092