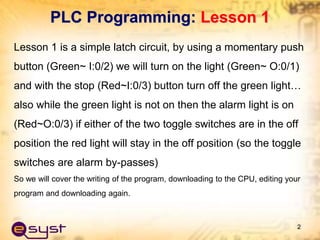
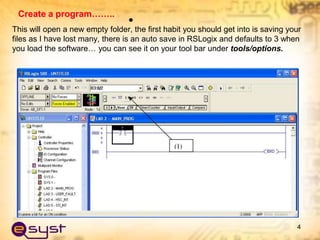
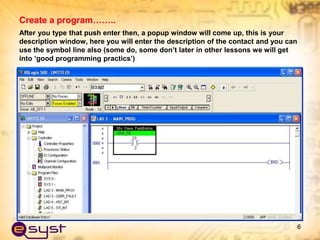
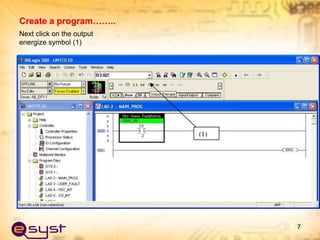
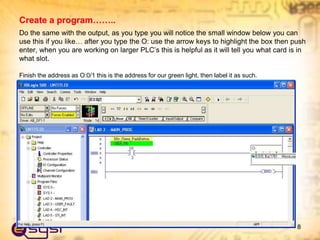
PLC
Programming
by SLC150
MEB 3219
Industrial Automation
PLC Programming: Lesson 1
Lesson 1 is a simple latch circuit, by using a momentary push
button (Green~ I:0/2) we will turn on the light (Green~ O:0/1)
and with the stop (Red~I:0/3) button turn off the green light…
also while the green light is not on then the alarm light is on
(Red~O:0/3) if either of the two toggle switches are in the off
position the red light will stay in the off position (so the toggle
switches are alarm by-passes)
So we will cover the writing of the program, downloading to the CPU, editing your
program and downloading again.
2
Create a program……..
First start by opening RSLogix 500 and creating a new project
• Click on the open new
• Then this will open a pop up window choose 1761 MicroLogix 1000
3
Create a program……..
•
This will open a new empty folder, the first habit you should get into is saving your
files as I have lost many, there is an auto save in RSLogix and defaults to 3 when
you load the software… you can see it on your tool bar under tools/options.
4
5
Now you can just start typing the address of the first contact.
The first contact will be I:0/0 (Note the address is 0 not O)
Create a program……..
After you type that push enter then, a popup window will come up, this is your
description window, here you will enter the description of the contact and you can
use the symbol line also (some do, some don’t later in other lessons we will get
into ‘good programming practics’)
6
Create a program……..
Next click on the output
energize symbol (1)
7
Create a program……..
Do the same with the output, as you type you will notice the small window below you can
use this if you like… after you type the O: use the arrow keys to highlight the box then push
enter, when you are working on larger PLC’s this is helpful as it will tell you what card is in
what slot.
Finish the address as O:0/1 this is the address for our green light, then label it as such.
8
Create a program……..
Next click on the 0000 again, this will turn it red then click on the branch symbol
(1), If you place the mouse over the symbols a popup box with the description will
show
9
Create a program……..
Now left click on the right side of the branch and hold/drag your mouse to
the right side of the contact I:0/2 (see next picture)
10
Create a program……..
After the small box is highlighted in green, let go and it will wrap the
branch around the contact
11
Create a program……..
Now not shown in the picture below, click on the left lower corner of the
branch (1) this will turn the corner red, click on the N/O (normally open) (2)
contact again, after you type in the address of your output O:0/1 then click
enter.
12
Create a program……..
Now click on the right top side of the branch, this will also turn red (1) ,
then click on the N/C symbol (2) and address it as I:0/3 this address is
your input for your Red push button.
13
Create a program……..
After you enter the address and inserting the description we will verify
what we have done, by clicking on the verify project symbol (1), if you
have any errors another box will show up on the screen and tell you where
you made the mistake, if you have any now is the time that you must go
back and fix your mistake.
14
If everything
has cleared
(your eeeee’s
on the left of
your new
rung) then
now its time to
download and
save you
program
again.
Create a program……..
If you did not change any of your setting (like I always do) then RSLinx should be
running and you can click on the tool bar (Comms) then click, or go to our website
and on the links/programming help page and the top link is for setting up DF1.
15
Create a program……..
• Next a popup window comes up for revision notes, if you are not the only one
programming this is a good place for them, then others can see the changes
you are
making/made and why you made them.
• Another popup with a clarification asking if you want to proceed, say yes….
If you CPU has ever been programmed before it will most likely be in the run
mode so
you will need to place it in the stop mode, when you do this it will start to
download the
program.
• Then you will be prompted to place it in the RUN mode, click YES and go
online also…
Now lets test your program, push the Green Push Button, this should turn on
the Green light and it should stay on, the reason is stays on is the electrical
path that we made with the latch, the push button input shuts off but the logic
that you wrote keeps the lamp on and seals (latches) the circuit.
16
Create a program……..
EDITING……..
• Now lets go off line from the CPU so we can edit the program.
To edit you must be off line on a MicroLogix some other PLCs you can
do online editing.
Click on the down arrow next to the REMOTE RUN and click Go Offline,
notice that there are other short cuts on this dropdown menu that you
may also use.
17
Next we want to
insert a new rung
click on the new
rung icon (1-
above pic)
• Now insert the logic, you must use NC (normally closed) contacts for
the logic to work the way it is described.
18
EDITING……..

plc slc 500.pptx

  • 1.
  • 2.
    PLC Programming: Lesson1 Lesson 1 is a simple latch circuit, by using a momentary push button (Green~ I:0/2) we will turn on the light (Green~ O:0/1) and with the stop (Red~I:0/3) button turn off the green light… also while the green light is not on then the alarm light is on (Red~O:0/3) if either of the two toggle switches are in the off position the red light will stay in the off position (so the toggle switches are alarm by-passes) So we will cover the writing of the program, downloading to the CPU, editing your program and downloading again. 2
  • 3.
    Create a program…….. Firststart by opening RSLogix 500 and creating a new project • Click on the open new • Then this will open a pop up window choose 1761 MicroLogix 1000 3
  • 4.
    Create a program…….. • Thiswill open a new empty folder, the first habit you should get into is saving your files as I have lost many, there is an auto save in RSLogix and defaults to 3 when you load the software… you can see it on your tool bar under tools/options. 4
  • 5.
    5 Now you canjust start typing the address of the first contact. The first contact will be I:0/0 (Note the address is 0 not O) Create a program……..
  • 6.
    After you typethat push enter then, a popup window will come up, this is your description window, here you will enter the description of the contact and you can use the symbol line also (some do, some don’t later in other lessons we will get into ‘good programming practics’) 6 Create a program……..
  • 7.
    Next click onthe output energize symbol (1) 7 Create a program……..
  • 8.
    Do the samewith the output, as you type you will notice the small window below you can use this if you like… after you type the O: use the arrow keys to highlight the box then push enter, when you are working on larger PLC’s this is helpful as it will tell you what card is in what slot. Finish the address as O:0/1 this is the address for our green light, then label it as such. 8 Create a program……..
  • 9.
    Next click onthe 0000 again, this will turn it red then click on the branch symbol (1), If you place the mouse over the symbols a popup box with the description will show 9 Create a program……..
  • 10.
    Now left clickon the right side of the branch and hold/drag your mouse to the right side of the contact I:0/2 (see next picture) 10 Create a program……..
  • 11.
    After the smallbox is highlighted in green, let go and it will wrap the branch around the contact 11 Create a program……..
  • 12.
    Now not shownin the picture below, click on the left lower corner of the branch (1) this will turn the corner red, click on the N/O (normally open) (2) contact again, after you type in the address of your output O:0/1 then click enter. 12 Create a program……..
  • 13.
    Now click onthe right top side of the branch, this will also turn red (1) , then click on the N/C symbol (2) and address it as I:0/3 this address is your input for your Red push button. 13 Create a program……..
  • 14.
    After you enterthe address and inserting the description we will verify what we have done, by clicking on the verify project symbol (1), if you have any errors another box will show up on the screen and tell you where you made the mistake, if you have any now is the time that you must go back and fix your mistake. 14 If everything has cleared (your eeeee’s on the left of your new rung) then now its time to download and save you program again. Create a program……..
  • 15.
    If you didnot change any of your setting (like I always do) then RSLinx should be running and you can click on the tool bar (Comms) then click, or go to our website and on the links/programming help page and the top link is for setting up DF1. 15 Create a program……..
  • 16.
    • Next apopup window comes up for revision notes, if you are not the only one programming this is a good place for them, then others can see the changes you are making/made and why you made them. • Another popup with a clarification asking if you want to proceed, say yes…. If you CPU has ever been programmed before it will most likely be in the run mode so you will need to place it in the stop mode, when you do this it will start to download the program. • Then you will be prompted to place it in the RUN mode, click YES and go online also… Now lets test your program, push the Green Push Button, this should turn on the Green light and it should stay on, the reason is stays on is the electrical path that we made with the latch, the push button input shuts off but the logic that you wrote keeps the lamp on and seals (latches) the circuit. 16 Create a program……..
  • 17.
    EDITING…….. • Now letsgo off line from the CPU so we can edit the program. To edit you must be off line on a MicroLogix some other PLCs you can do online editing. Click on the down arrow next to the REMOTE RUN and click Go Offline, notice that there are other short cuts on this dropdown menu that you may also use. 17 Next we want to insert a new rung click on the new rung icon (1- above pic)
  • 18.
    • Now insertthe logic, you must use NC (normally closed) contacts for the logic to work the way it is described. 18 EDITING……..