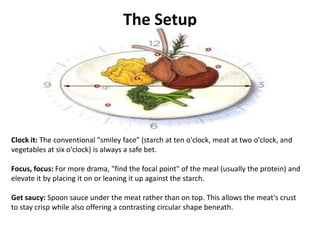
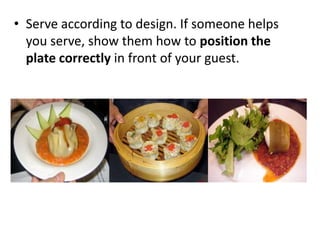
Plating Food
How to Plate Like a Pro
• "Plating food" refers to placing food on a plate in as
  appealing a manner as possible. Many cooks give short
  shrift to this concept, but let me assure
  you, presentation is a very important part of the dining
  experience because we eat with our eyes first.
• One of the things we all most enjoy about dining at an
  expensive restaurant is that moment when our entree
  arrives, decked out in all its glory. We marvel at what the
  chef has wrought, and can't wait to dig in.
• Honestly, if the presentation is excellent, the food need
  not be. Plating food properly is that important . . . or
  nearly so.
• Remember "BUFF" when plating: Balance, Unity, Focus
  and Flow
The Plate

• Bigger is better: Crowding food is a no-no.
  Large plates allow for separation between
  items, which lets the inherent beauty of each
  one shine.
• Color me neutral: When plating food, use
  classic white or earth tones; these will
  complement any color of food.
The Food

• What grows together goes together: Preparing
  fresh ingredients that are in season doesn't
  just taste better, it looks better. Seasonal
  produce tends to fall into both culinary and
  visual harmony.
The Setup


Clock it: The conventional "smiley face" (starch at ten o'clock, meat at two o'clock, and
vegetables at six o'clock) is always a safe bet.

Focus, focus: For more drama, "find the focal point" of the meal (usually the protein) and
elevate it by placing it on or leaning it up against the starch.

Get saucy: Spoon sauce under the meat rather than on top. This allows the meat's crust
to stay crisp while also offering a contrasting circular shape beneath.
Tips For Plating
• Plan it. Sketch the presentation to help you
  visualize the plate. Assemble a "practice" plate
  to help decide the final presentation.
• Keep it simple and quick. You want the food to
  look attractive, but not overwhelming or silly.
  Don't try to build towers or other elaborate
  structures when plating food. And remember:
  Unless you have a dozen cooks at your disposal,
  you will need to arrange the food on the plate
  quickly in order to serve it warm.
• Everything should be edible. Don't garnish with
  large sprigs or spears of rosemary or other
  herbs. garnishing tips
• Start arranging food in the center of the
  plate and build outward. This improves
  appearance, and also helps prevent the server
  from sticking his or her thumb in the food.
• Reserve the front of the plate for the most
  attractive and appetizing food.
• Add height to the plate. Do this simply by mounding
  potatoes, rice or other starch (make a mound, not a
  mountain) at the back of the plate and leaning other
  vegetables or meat against it. Generally, the
  presentation should begin low at the front of the
  plate and grow taller at the rear.
• Think color. If your food is basically brown or
  white, brighten the plate with colorful garnishes and
  vegetables. A sprig of fresh cilantro or flat leaf
  parsley, a few rings of sliced green onion, a wedge of
  fruit, a sprinkling of toasted sesame seeds, or a small
  chili pepper are just a few garnishes that add color.
  Make sure your garnish suits the recipe.
• Serve according to design. If someone helps
  you serve, show them how to position the
  plate correctly in front of your guest.
Tips For Trays
• When making up a tray, be sure to separate the
  colors. Try not to put different foods of the same
  color next to each other.
• Trays also look best when arranged
  symmetrically. Strong lines add eye appeal. It
  adds energy and movement. Keep in mind
  that balance is important, particularly when
  making a round tray. food presentation tips
• A centerpiece is also important. Hollowed-
  out foods can make wonderful bowls for your
  dips. Try hollowing out peppers, tomatoes,
  round bread loaves, cabbage, or eggplant. Serve
  fruit salad in a pineapple, cantalope, or
  watermelon.
• Or, for winter, try serving soup in a pumpkin, or
  rice or stuffing in a baked squash half. Edible
  bowls are both beautiful and functional; they
  create interest and reduce waste
Garnishing
• Is an art that can easily be acquired by
  following these few simple rules. It can be
  done with little or no additional time, effort,
  or money expenditure on the part of the
  culinary artist, and the results are far-
  reaching. Not only will the homemaker derive
  joy from the art, but the members of her
  family will sense the love and the
  thoughtfulness which prompted those extra
  little touches.
1. Generally speaking, garnishes should be
   edible. However, there are a few exceptions,
   as will be seen in the following chapters.

2. Beauty is obtained through simplicity.
   Garnishes should appear natural, fresh, and
   dainty-never overworked or overdone.
• 3. All garnishes should be suitable in character
  and size to the food adorned. For example, a
  pickle fan would be out of place if served next
  to a piece of cake, just as a large calla lily
  arrangement would be out of proportion on a
  small platter.
• 4. The flavor of edible garnishes should be in
  keeping with the food. Bland foods require
  more highly seasoned garnishes.
• 5. A few small groups of garnish are often more
  attractive than a continuous decorative scheme.
  For example, to carry out a Christmas theme
  around a salad mold, green-tinted mayonnaise
  may be fashioned into the shape of leaves with
  specks of candied cherry to simulate holly
  arranged at intervals instead of forming a
  continuous border. Elaborate wheels, flowers,
  chains, diamonds, or circles are lovely if carefully
  done. Use either whole or clean-cut pieces of
  fruit or vegetables and arrange in an orderly
  design around ring or loaf molds.
6. A garnish must be neatly arranged in a fashion that will
   enhance the food with which it is to be used. A flat-
   spreading garnish will make a mold appear smaller
   whereas perky lettuce will give it height.

7. Colors should harmonize-never clash. Small quantities
   of the more vivid natural colors may be used to accent
   a food. In using artificial coloring, great care must be
   exercised in producing tints that will be in keeping with
   the occasion and at the same time produce a pleasing
   effect rather than one which is repellent. Contrasting
   colors usually produce an artistic picture. So much of
   our food is neutral that a wide range of color treatment
   is permitted.
8. Garnishes which are too highly seasoned are
  not in good taste.
9. The serving dish as well as the garnish used
  must be considered. A beautiful dish serves as
  an accessory to the food. Do not hide it.
10. Temperature is a factor that will make or mar
  a garnish. To serve cold sliced frankfurters on
  a hot soup as a garnish would be most
  unsatisfactory. Any frozen food that is used as
  a garnish should be sufficiently cold to hold its
  shape.
• 11. The consistencies of garnish and food can be
  contrasted with excellent results, such as sauce over
  molded food.
• 12. Garnishes need not be expensive. Properly used,
  almost any leftover material can do wonders to
  make a drab or uninteresting dish take on a regal
  aspect.
• 13. Garnishes should not be used to disguise
  deficiencies or food of poor quality. 14. The setting
  must be viewed as a whole. Harmonious plate or
  platter arrangements can be ruined if they clash
  with the table color scheme or the lighting of the
  room
HELPFUL HINTS, AND TIME SAVING
             TIPS
How to Use a Cardboard Stencil:

Cut a piece of medium stiff cardboard in the shape but
slightly larger than the food to be decorated. Trace a design
or the outline of some specific object on the cardboard and
cut out the design with scissors or a razor blade in a safety
holder. The design should be clean-cut, with no ragged
edges.

If the food to be decorated is dry or firm, the cardboard
stencil can rest on the surface; if it is soft and moist, hold
the stencil a fraction of an inch above the surface. Sprinkle
the garnish over the design, making sure that all parts of
the design are completely filled in. Remove the stencil
carefully without disturbing the design.
How to Frost a Glass:

To frost glass stemware, brush the rim of each
glass with lemon juice or slightly beaten egg
white. Dip the rim in powdered sugar and let
dry. If necessary, dip a second or third time.
How to Unmold Gelatin:

Dip the mold in warm water long enough for
the gelatin to loosen. If necessary, loosen the
edges with a thin knife. Place the serving plate
over the mold and invert. If the gelatin does
not come out immediately, wrap a hot towel
around the form and after a few seconds give
the mold a hard shake.
How to Use Fruit or Vegetable Coloring:

Pure fruit or vegetable coloring can be purchased
in liquid or powdered form. The coloring should
be added a little at a time, mixing thoroughly
after each addition, until the desired shade is
obtained. Add coloring to the ingredients in the
liquid state (that is, before whipping or freezing).
To tint solid foods (such as pears or hard-cooked
eggs), add the coloring to water or syrup and
then place the food in the colored solution until it
becomes the right shade. Solid foods can also be
painted by using the pure fruit or vegetable dyes.
A paintbrush should be kept especially for use in
the kitchen.
How to Make a Paper Pastry Tube:

 Use a stiff sheet of paper (8"X 11") and roll
into a funnel. To prevent the funnel from
unrolling, fasten with gummed tape. Cut off as
much of the tip as is necessary for the size of
opening desired. Fill the funnel about two-
thirds full and force through the tip by
squeezing the large end of the funnel.

Plating food

  • 1.
    Plating Food How toPlate Like a Pro
  • 2.
    • "Plating food"refers to placing food on a plate in as appealing a manner as possible. Many cooks give short shrift to this concept, but let me assure you, presentation is a very important part of the dining experience because we eat with our eyes first. • One of the things we all most enjoy about dining at an expensive restaurant is that moment when our entree arrives, decked out in all its glory. We marvel at what the chef has wrought, and can't wait to dig in. • Honestly, if the presentation is excellent, the food need not be. Plating food properly is that important . . . or nearly so. • Remember "BUFF" when plating: Balance, Unity, Focus and Flow
  • 3.
    The Plate • Biggeris better: Crowding food is a no-no. Large plates allow for separation between items, which lets the inherent beauty of each one shine. • Color me neutral: When plating food, use classic white or earth tones; these will complement any color of food.
  • 4.
    The Food • Whatgrows together goes together: Preparing fresh ingredients that are in season doesn't just taste better, it looks better. Seasonal produce tends to fall into both culinary and visual harmony.
  • 5.
    The Setup Clock it:The conventional "smiley face" (starch at ten o'clock, meat at two o'clock, and vegetables at six o'clock) is always a safe bet. Focus, focus: For more drama, "find the focal point" of the meal (usually the protein) and elevate it by placing it on or leaning it up against the starch. Get saucy: Spoon sauce under the meat rather than on top. This allows the meat's crust to stay crisp while also offering a contrasting circular shape beneath.
  • 6.
    Tips For Plating •Plan it. Sketch the presentation to help you visualize the plate. Assemble a "practice" plate to help decide the final presentation. • Keep it simple and quick. You want the food to look attractive, but not overwhelming or silly. Don't try to build towers or other elaborate structures when plating food. And remember: Unless you have a dozen cooks at your disposal, you will need to arrange the food on the plate quickly in order to serve it warm.
  • 7.
    • Everything shouldbe edible. Don't garnish with large sprigs or spears of rosemary or other herbs. garnishing tips • Start arranging food in the center of the plate and build outward. This improves appearance, and also helps prevent the server from sticking his or her thumb in the food. • Reserve the front of the plate for the most attractive and appetizing food.
  • 8.
    • Add heightto the plate. Do this simply by mounding potatoes, rice or other starch (make a mound, not a mountain) at the back of the plate and leaning other vegetables or meat against it. Generally, the presentation should begin low at the front of the plate and grow taller at the rear. • Think color. If your food is basically brown or white, brighten the plate with colorful garnishes and vegetables. A sprig of fresh cilantro or flat leaf parsley, a few rings of sliced green onion, a wedge of fruit, a sprinkling of toasted sesame seeds, or a small chili pepper are just a few garnishes that add color. Make sure your garnish suits the recipe.
  • 9.
    • Serve accordingto design. If someone helps you serve, show them how to position the plate correctly in front of your guest.
  • 10.
    Tips For Trays •When making up a tray, be sure to separate the colors. Try not to put different foods of the same color next to each other. • Trays also look best when arranged symmetrically. Strong lines add eye appeal. It adds energy and movement. Keep in mind that balance is important, particularly when making a round tray. food presentation tips
  • 11.
    • A centerpieceis also important. Hollowed- out foods can make wonderful bowls for your dips. Try hollowing out peppers, tomatoes, round bread loaves, cabbage, or eggplant. Serve fruit salad in a pineapple, cantalope, or watermelon. • Or, for winter, try serving soup in a pumpkin, or rice or stuffing in a baked squash half. Edible bowls are both beautiful and functional; they create interest and reduce waste
  • 12.
    Garnishing • Is anart that can easily be acquired by following these few simple rules. It can be done with little or no additional time, effort, or money expenditure on the part of the culinary artist, and the results are far- reaching. Not only will the homemaker derive joy from the art, but the members of her family will sense the love and the thoughtfulness which prompted those extra little touches.
  • 13.
    1. Generally speaking,garnishes should be edible. However, there are a few exceptions, as will be seen in the following chapters. 2. Beauty is obtained through simplicity. Garnishes should appear natural, fresh, and dainty-never overworked or overdone.
  • 14.
    • 3. Allgarnishes should be suitable in character and size to the food adorned. For example, a pickle fan would be out of place if served next to a piece of cake, just as a large calla lily arrangement would be out of proportion on a small platter. • 4. The flavor of edible garnishes should be in keeping with the food. Bland foods require more highly seasoned garnishes.
  • 15.
    • 5. Afew small groups of garnish are often more attractive than a continuous decorative scheme. For example, to carry out a Christmas theme around a salad mold, green-tinted mayonnaise may be fashioned into the shape of leaves with specks of candied cherry to simulate holly arranged at intervals instead of forming a continuous border. Elaborate wheels, flowers, chains, diamonds, or circles are lovely if carefully done. Use either whole or clean-cut pieces of fruit or vegetables and arrange in an orderly design around ring or loaf molds.
  • 16.
    6. A garnishmust be neatly arranged in a fashion that will enhance the food with which it is to be used. A flat- spreading garnish will make a mold appear smaller whereas perky lettuce will give it height. 7. Colors should harmonize-never clash. Small quantities of the more vivid natural colors may be used to accent a food. In using artificial coloring, great care must be exercised in producing tints that will be in keeping with the occasion and at the same time produce a pleasing effect rather than one which is repellent. Contrasting colors usually produce an artistic picture. So much of our food is neutral that a wide range of color treatment is permitted.
  • 17.
    8. Garnishes whichare too highly seasoned are not in good taste. 9. The serving dish as well as the garnish used must be considered. A beautiful dish serves as an accessory to the food. Do not hide it. 10. Temperature is a factor that will make or mar a garnish. To serve cold sliced frankfurters on a hot soup as a garnish would be most unsatisfactory. Any frozen food that is used as a garnish should be sufficiently cold to hold its shape.
  • 18.
    • 11. Theconsistencies of garnish and food can be contrasted with excellent results, such as sauce over molded food. • 12. Garnishes need not be expensive. Properly used, almost any leftover material can do wonders to make a drab or uninteresting dish take on a regal aspect. • 13. Garnishes should not be used to disguise deficiencies or food of poor quality. 14. The setting must be viewed as a whole. Harmonious plate or platter arrangements can be ruined if they clash with the table color scheme or the lighting of the room
  • 19.
    HELPFUL HINTS, ANDTIME SAVING TIPS
  • 20.
    How to Usea Cardboard Stencil: Cut a piece of medium stiff cardboard in the shape but slightly larger than the food to be decorated. Trace a design or the outline of some specific object on the cardboard and cut out the design with scissors or a razor blade in a safety holder. The design should be clean-cut, with no ragged edges. If the food to be decorated is dry or firm, the cardboard stencil can rest on the surface; if it is soft and moist, hold the stencil a fraction of an inch above the surface. Sprinkle the garnish over the design, making sure that all parts of the design are completely filled in. Remove the stencil carefully without disturbing the design.
  • 21.
    How to Frosta Glass: To frost glass stemware, brush the rim of each glass with lemon juice or slightly beaten egg white. Dip the rim in powdered sugar and let dry. If necessary, dip a second or third time.
  • 22.
    How to UnmoldGelatin: Dip the mold in warm water long enough for the gelatin to loosen. If necessary, loosen the edges with a thin knife. Place the serving plate over the mold and invert. If the gelatin does not come out immediately, wrap a hot towel around the form and after a few seconds give the mold a hard shake.
  • 23.
    How to UseFruit or Vegetable Coloring: Pure fruit or vegetable coloring can be purchased in liquid or powdered form. The coloring should be added a little at a time, mixing thoroughly after each addition, until the desired shade is obtained. Add coloring to the ingredients in the liquid state (that is, before whipping or freezing). To tint solid foods (such as pears or hard-cooked eggs), add the coloring to water or syrup and then place the food in the colored solution until it becomes the right shade. Solid foods can also be painted by using the pure fruit or vegetable dyes. A paintbrush should be kept especially for use in the kitchen.
  • 24.
    How to Makea Paper Pastry Tube: Use a stiff sheet of paper (8"X 11") and roll into a funnel. To prevent the funnel from unrolling, fasten with gummed tape. Cut off as much of the tip as is necessary for the size of opening desired. Fill the funnel about two- thirds full and force through the tip by squeezing the large end of the funnel.