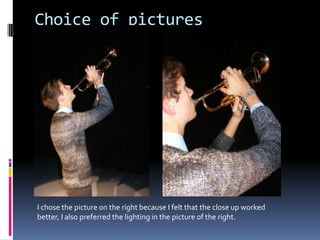
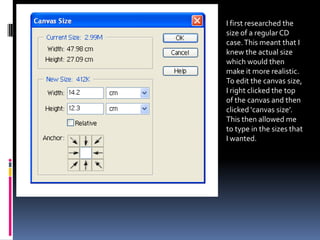
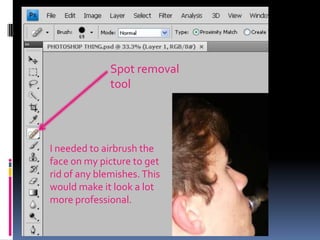
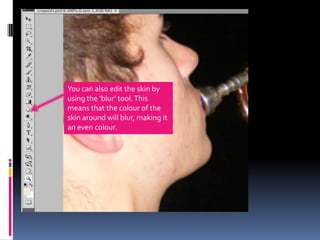
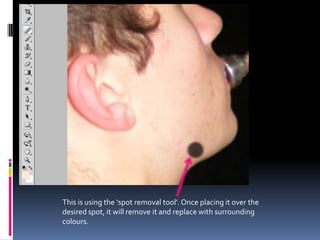
Photoshop

PANEL 4
Choice of pictures


I chose the picture on the right because I felt that the close up worked
better, I also preferred the lighting in the picture of the right.
I first researched the
size of a regular CD
case. This meant that I
knew the actual size
which would then
make it more realistic.
To edit the canvas size,
I right clicked the top
of the canvas and then
clicked ‘canvas size’.
This then allowed me
to type in the sizes that
I wanted.
I then cropped my picture that I took, which meant it fitted the size of the CD
case. I struggled with this because I wanted to get more of his shoulder in the
picture, yet I wanted the trumpet in the picture too.
Spot removal
              tool


I needed to airbrush the
face on my picture to get
rid of any blemishes. This
would make it look a lot
more professional.
You can also edit the skin by
using the ‘blur’ tool. This
means that the colour of the
skin around will blur, making it
an even colour.
This is using the ‘spot removal tool’. Once placing it over the
desired spot, it will remove it and replace with surrounding
colours.
Final picture


This is the final edited photo which I will now add the
writing on.

Panel 4

  • 1.
  • 2.
    Choice of pictures Ichose the picture on the right because I felt that the close up worked better, I also preferred the lighting in the picture of the right.
  • 3.
    I first researchedthe size of a regular CD case. This meant that I knew the actual size which would then make it more realistic. To edit the canvas size, I right clicked the top of the canvas and then clicked ‘canvas size’. This then allowed me to type in the sizes that I wanted.
  • 4.
    I then croppedmy picture that I took, which meant it fitted the size of the CD case. I struggled with this because I wanted to get more of his shoulder in the picture, yet I wanted the trumpet in the picture too.
  • 5.
    Spot removal tool I needed to airbrush the face on my picture to get rid of any blemishes. This would make it look a lot more professional.
  • 6.
    You can alsoedit the skin by using the ‘blur’ tool. This means that the colour of the skin around will blur, making it an even colour.
  • 7.
    This is usingthe ‘spot removal tool’. Once placing it over the desired spot, it will remove it and replace with surrounding colours.
  • 8.
    Final picture This isthe final edited photo which I will now add the writing on.