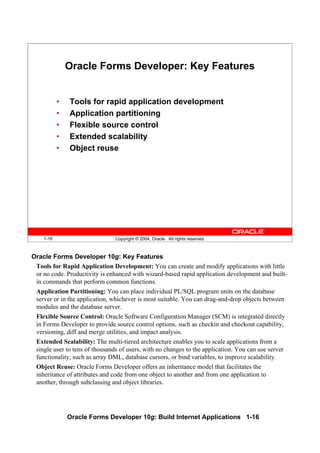
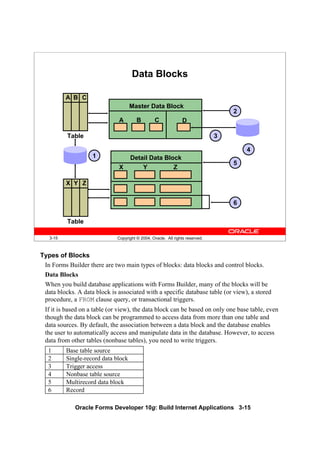
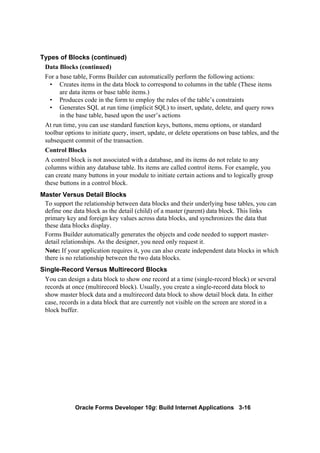
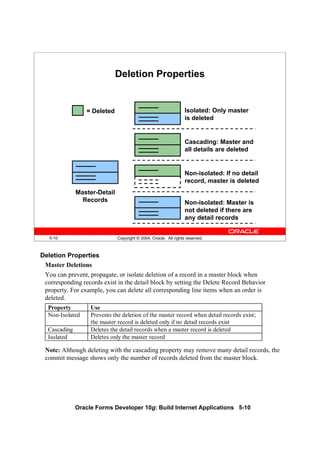
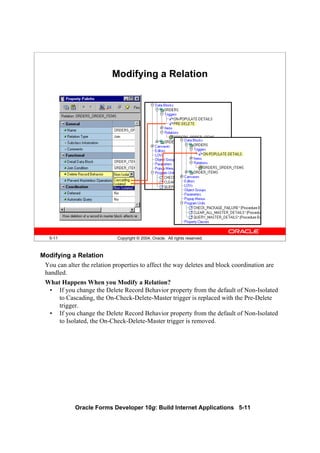
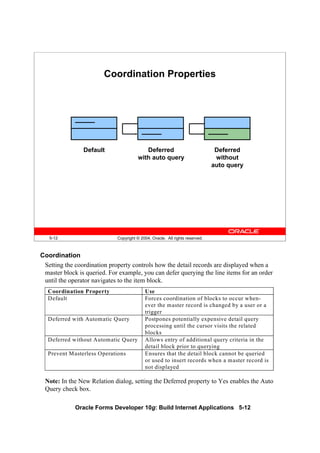
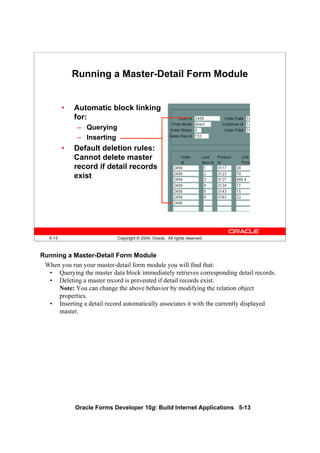
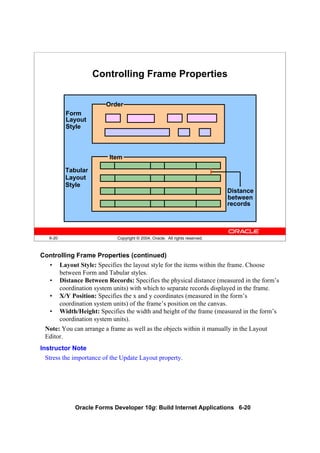
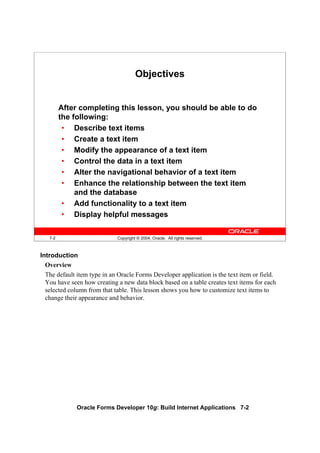
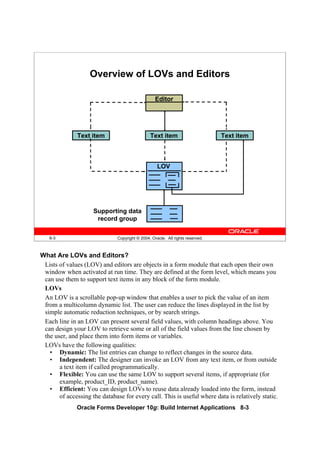
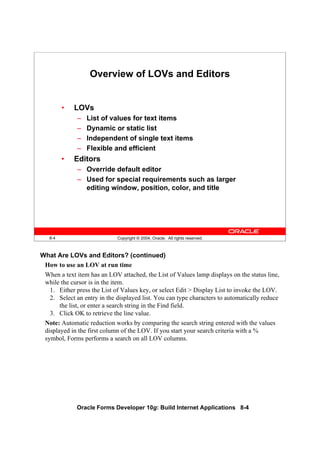
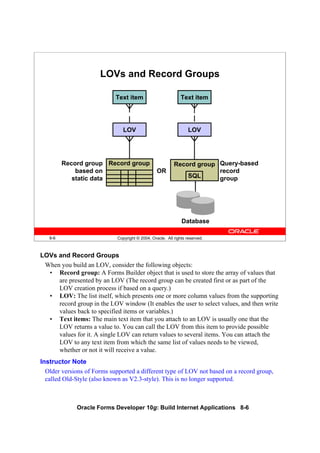
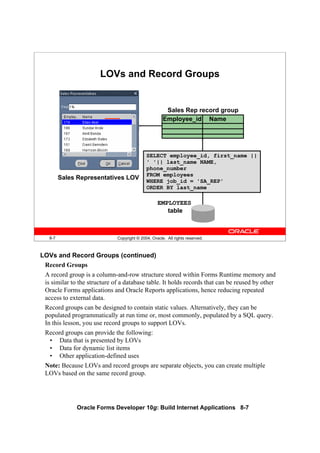
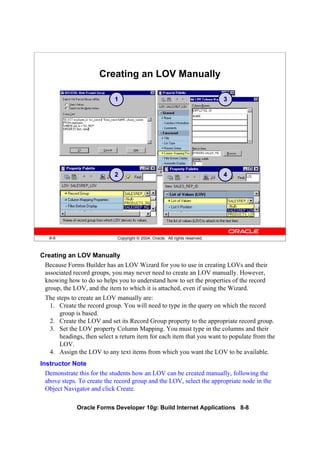
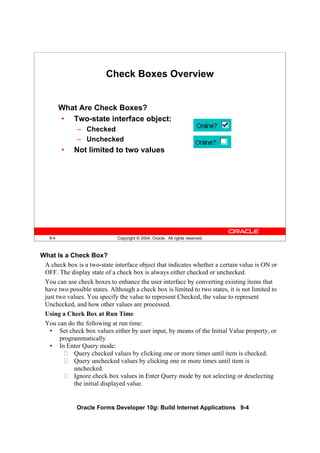
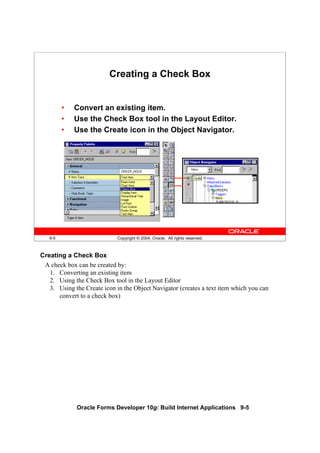
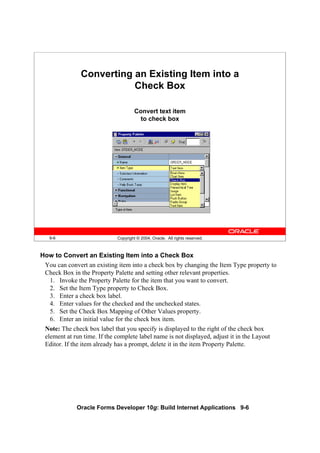
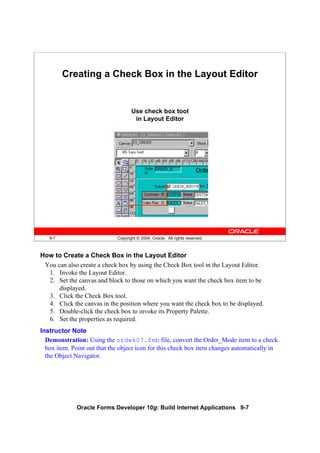
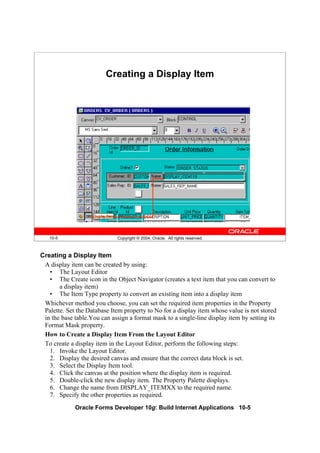
The document provides instructions for using Oracle Forms Developer 10g to build internet applications, including an instructor guide with objectives, course content, and chapters on creating forms, working in the Forms Builder environment, creating data blocks and items, and more. It contains proprietary information from Oracle Corporation and is protected by copyright law.


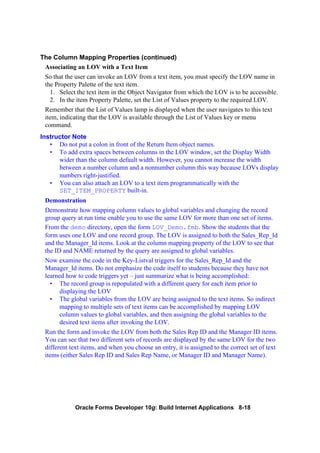
![Oracle Forms Developer 10g: Build Internet Applications Preface - 6
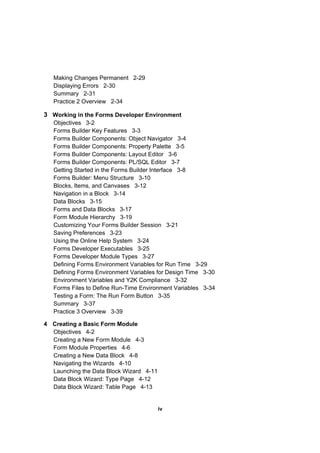
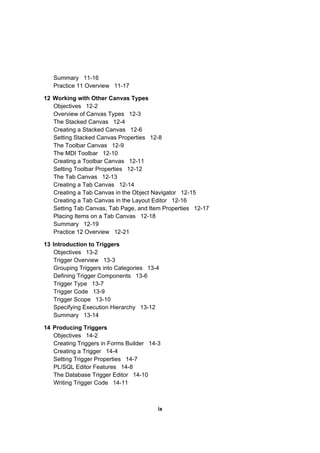
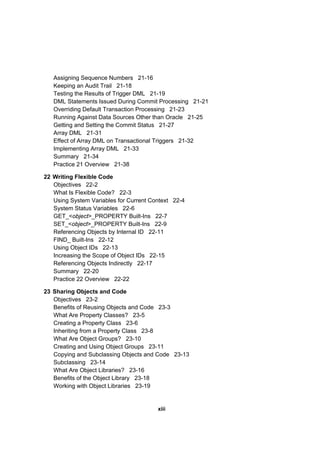
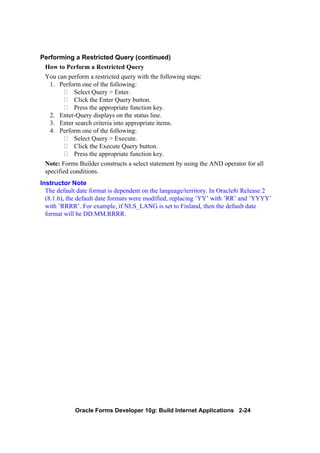
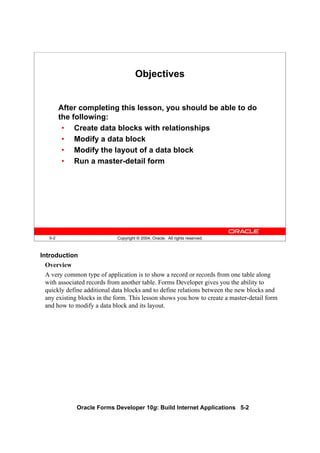
Typographic Conventions (continued)
Typographic conventions in text (continued)
Typographic conventions in code
Convention Element Example
Right arrow Menu paths Select File > Save.
Brackets Key names Press [Enter].
Commas Key sequences Press and release keys one at a time:
[Alternate], [F], [D]
Plus signs Key combinations Press and hold these keys simultaneously:
[Ctrl]+[Alt]+[Del]
Convention Element Example
Caps and
lowercase
Oracle Forms
triggers
When-Validate-Item
Lowercase Column names,
table names
SELECT last_name
FROM s_emp;
Passwords DROP USER scott
IDENTIFIED BY tiger;
PL/SQL objects OG_ACTIVATE_LAYER
(OG_GET_LAYER (‘prod_pie_layer’))
Lowercase italic Syntax variables CREATE ROLE role
Uppercase SQL commands
and functions
SELECT userid
FROM emp;](https://image.slidesharecdn.com/oracleformsdeveloper10gvol1-130429005213-phpapp02/85/Oracle-forms-developer-10g-vol1-22-320.jpg)


![Oracle Forms Developer 10g: Build Internet Applications 2-4
2-4 Copyright © 2004, Oracle. All rights reserved.
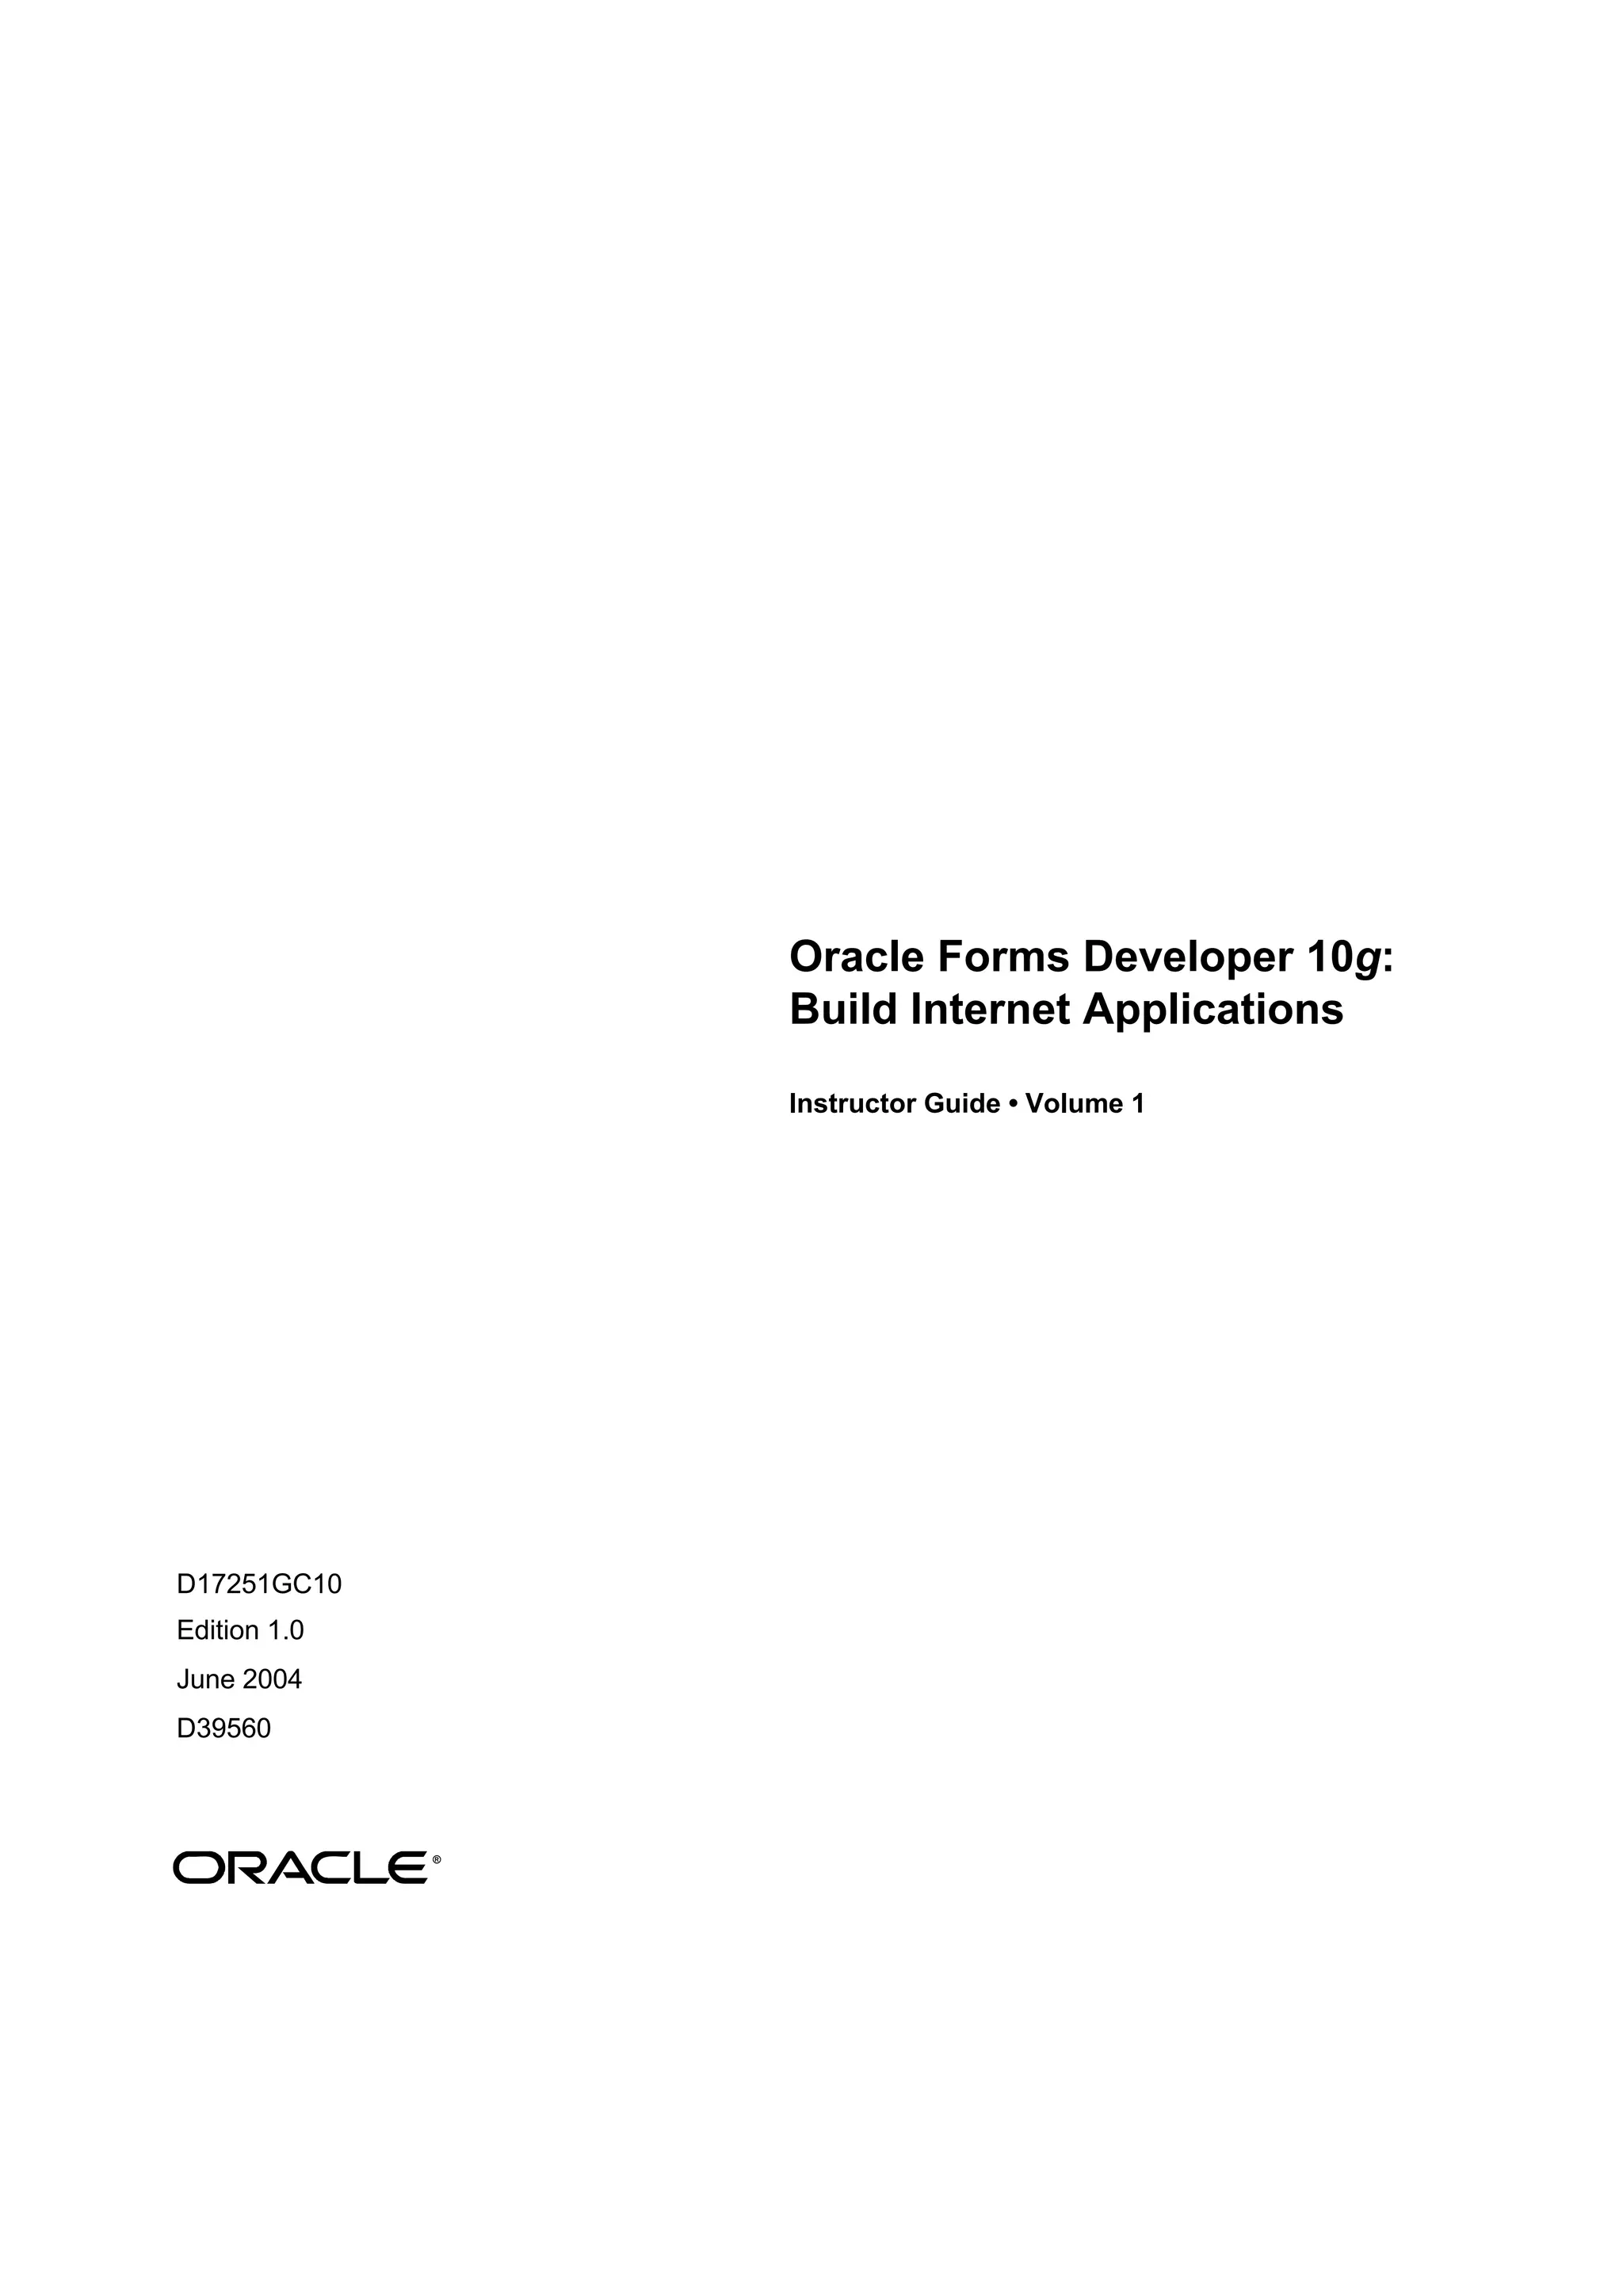
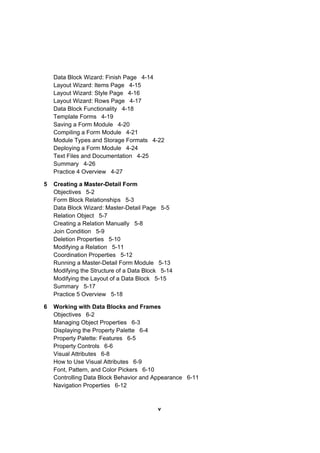
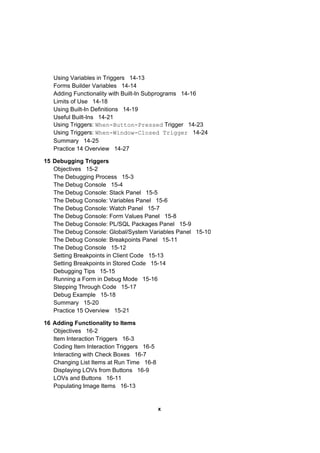
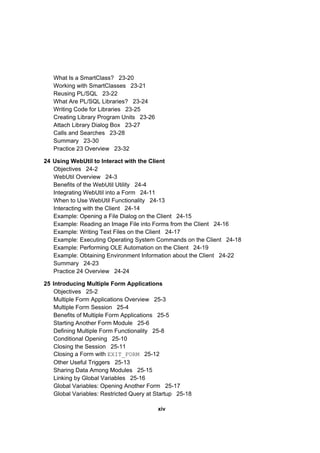
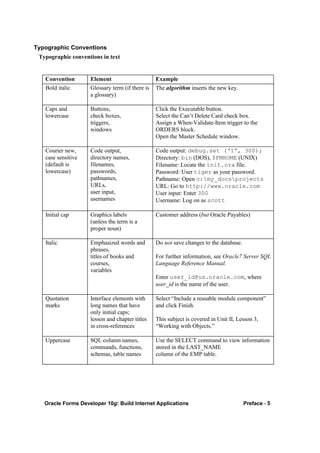
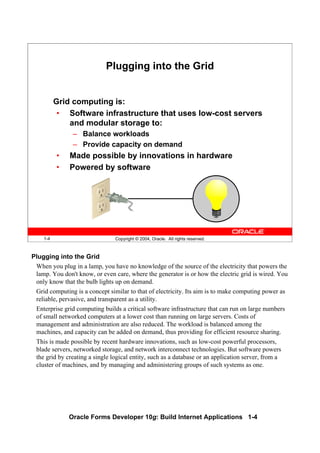
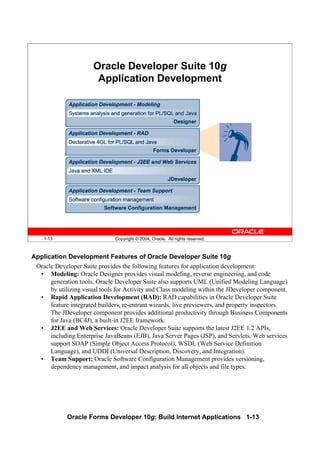
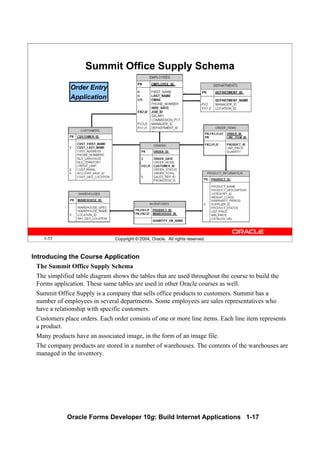
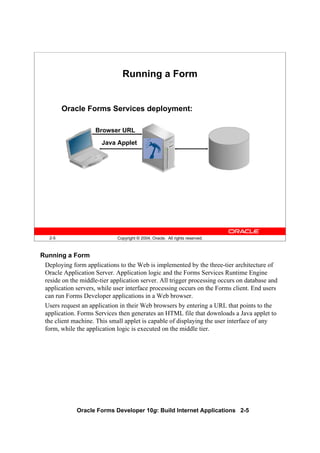
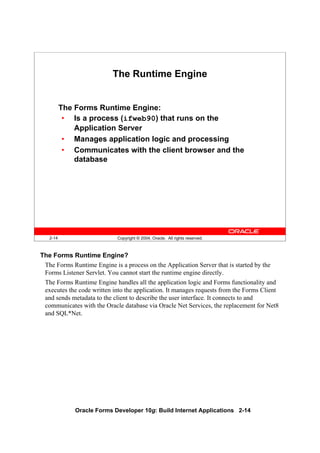
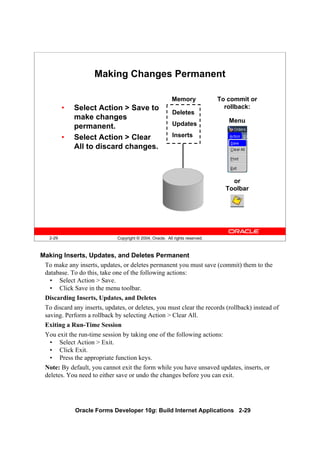
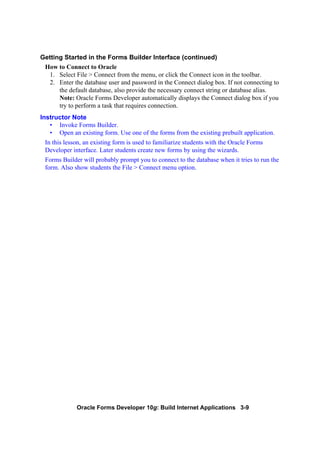
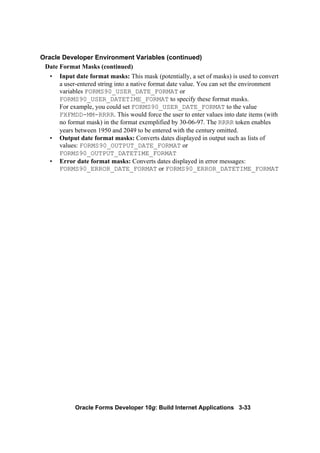
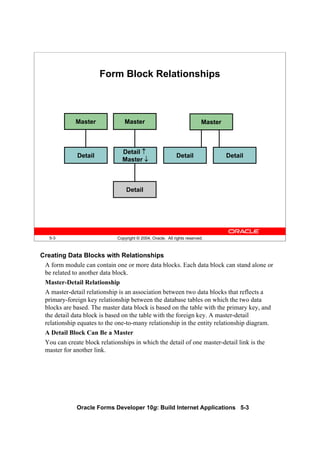
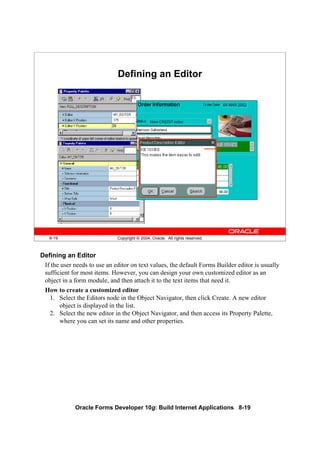
Testing a Form: Starting OC4J
• On NT, run batch file to start
OC4J: startinst.bat.
• OC4J starts in DOS window:
– Minimize window
– Closing window aborts OC4J
• Run batch file to stop OC4J: stopinst.bat.
Testing a Form: Starting OC4J
To use OC4J on Windows, start it by executing the batch file provided, called
startinst.bat. This file is located in the j2eeDevSuite subdirectory of the
Developer Suite home directory. If you will be testing your applications on your client
machine, it is a good idea to set up a shortcut to this batch file, and also to the batch file
called stopinst.bat, which stops the OC4J instance. Alternatively, you can call these
batch files from the Windows Start menu: Programs > Oracle Developer Suite – iDS10g >
Forms Developer > Start [Shutdown] OC4J Instance.
The batch file executes in a separate window; you can minimize this window if desired.
Do not close this window, or you will abort the OC4J instance.
When you no longer need to run OC4J you can execute the batch file called
stopinst.bat to stop the OC4J instance.](https://image.slidesharecdn.com/oracleformsdeveloper10gvol1-130429005213-phpapp02/85/Oracle-forms-developer-10g-vol1-58-320.jpg)
![Oracle Forms Developer 10g: Build Internet Applications 2-6
2-6 Copyright © 2004, Oracle. All rights reserved.
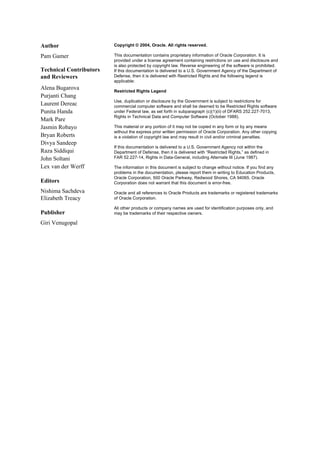
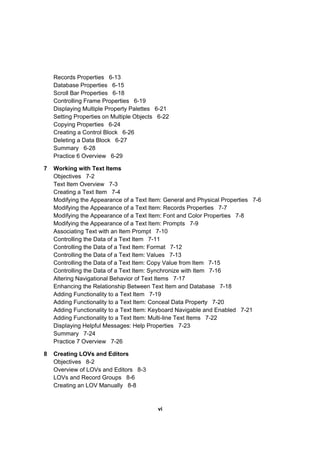
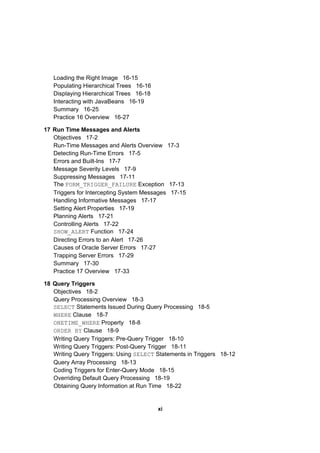
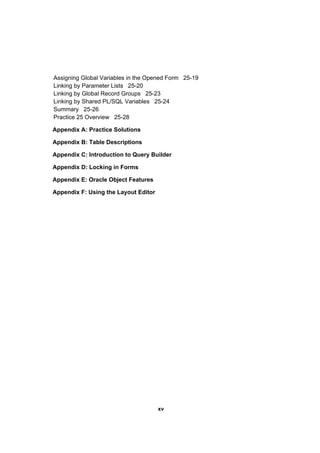
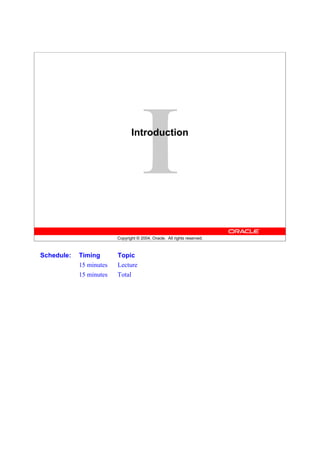
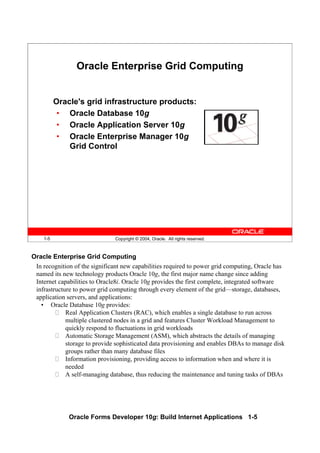
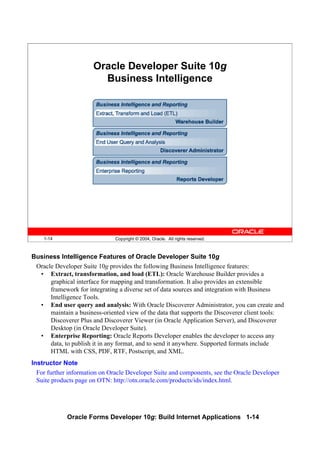
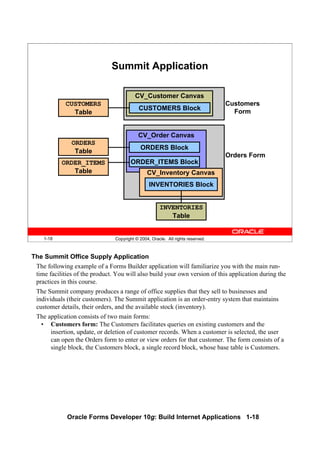
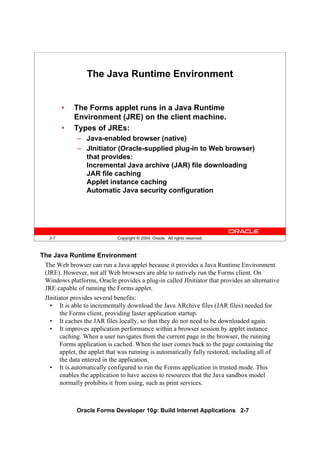
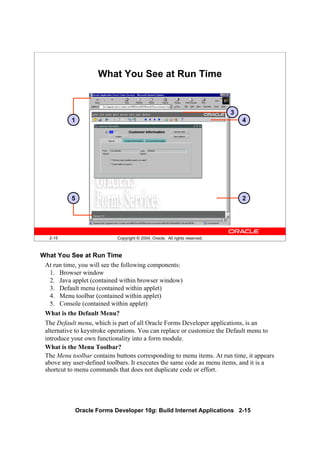
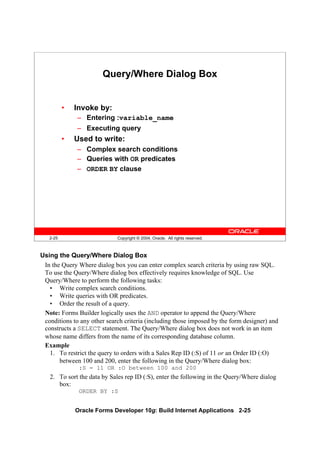
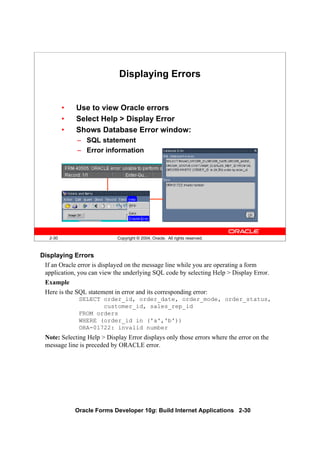
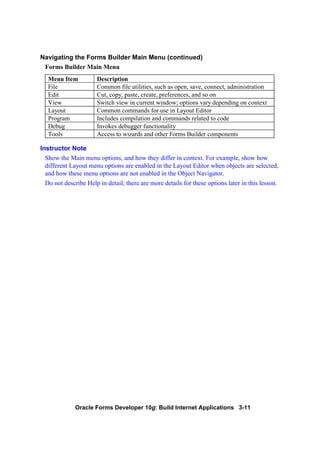
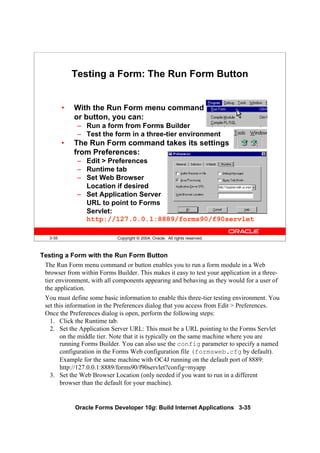
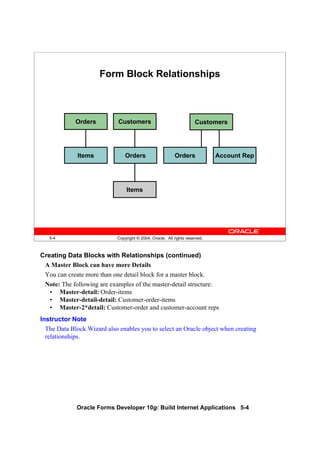
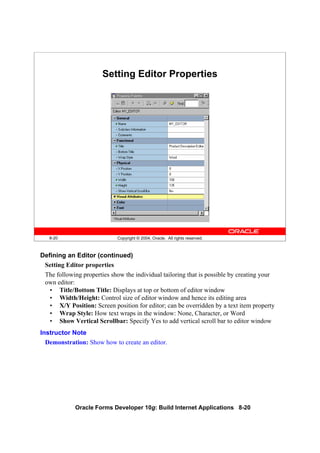
Running a Form: Browser
http://summit.com:8889/forms90/f90servlet
?form=customers.fmx&userid=username/password@database
&buffer_records=NO&debug_messages=NO&array=YES
&query_only=NO
http://summit.com:8889/forms90/f90servlet?form=customers.fmx&userid=
How do I
access this
application?
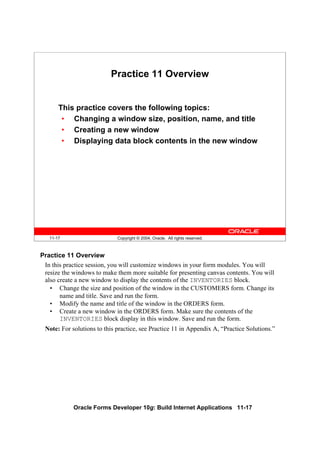
Running a Form: Browser
The URL to invoke an application must have the following format:
http://host[:port]/forms servlet or html file[parameters] (optional portions of URL
enclosed in brackets)
Summit’s URL consists of the following components:
Instructor Note
Mention to students that it is common to provide an HTML front end to allow the user to
choose the application to start, then construct the URL based on the user’s choice.
Protocol http
Domain summit.com
Port for HTTP Server
or OC4J
xxxx default for HTTP Server
8889 default for OC4J
Forms Servlet Alias
or static html file
/forms90/f90servlet
Parameters: this section begins with
“?”; parameters separated by “&”
(can be specified in the URL or
taken from configuration file)
form=customers.fmx
userid=username/password@database
buffer_records=NO
debug_messages=NO
....](https://image.slidesharecdn.com/oracleformsdeveloper10gvol1-130429005213-phpapp02/85/Oracle-forms-developer-10g-vol1-60-320.jpg)

![Oracle Forms Developer 10g: Build Internet Applications 2-19
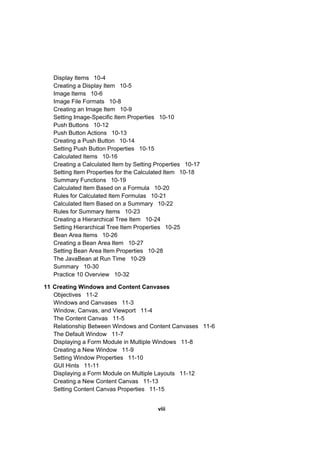
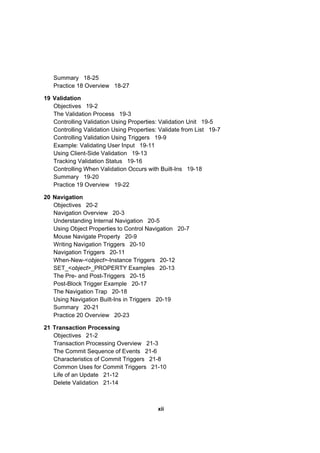
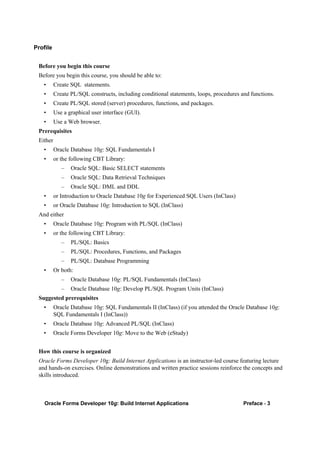
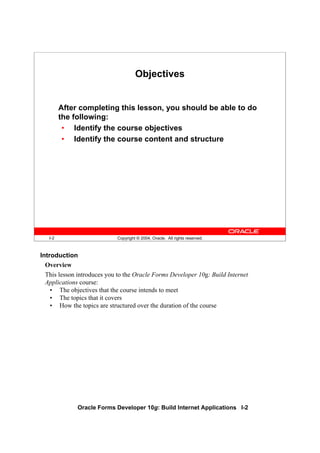
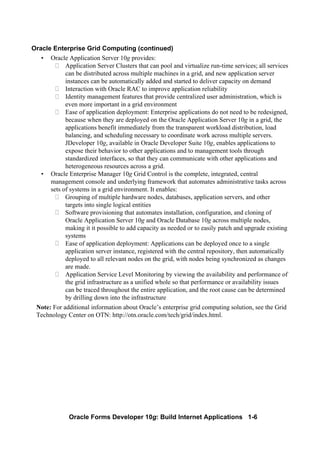
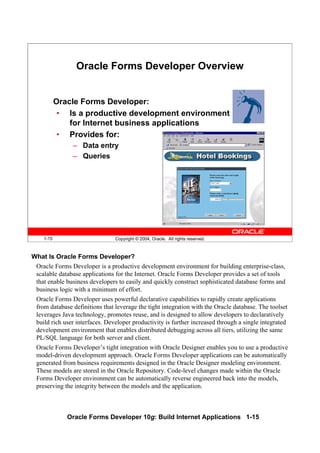
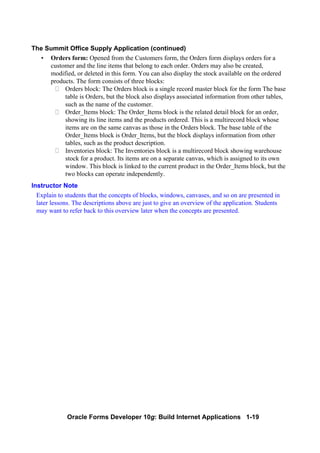
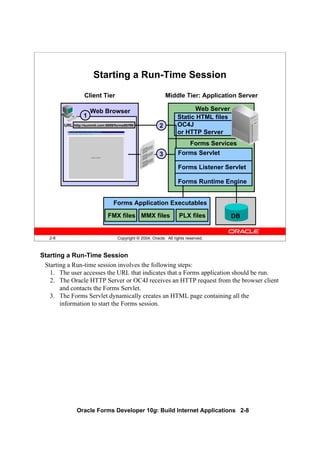
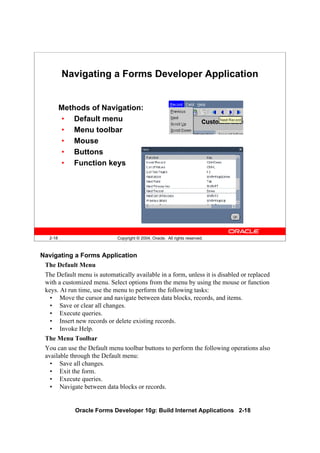
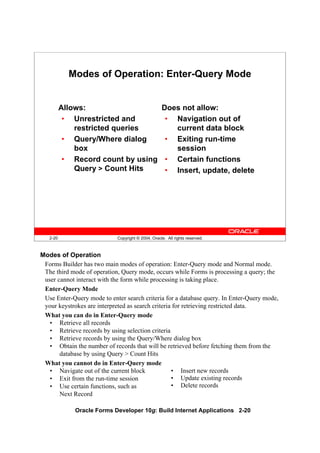
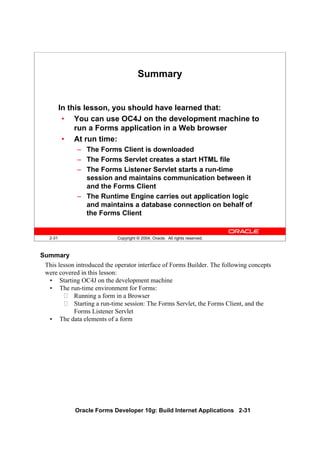
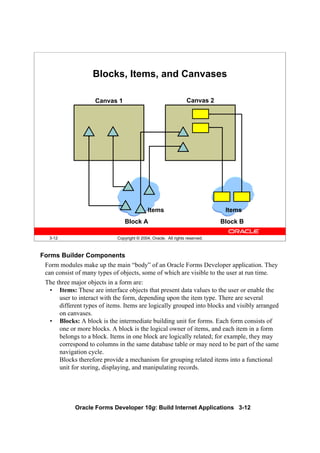
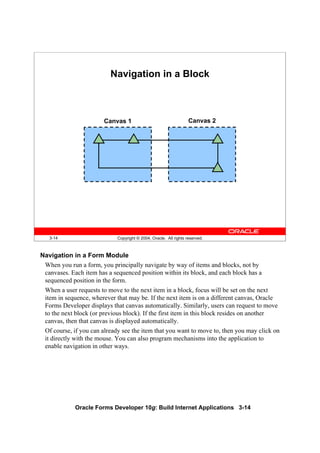
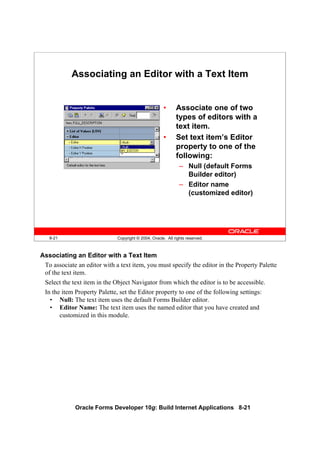
Navigating a Forms Application (continued)
The Menu Toolbar (continued)
• Insert new records or delete existing records.
• Invoke Help to see properties of an item.
The Mouse
You can use the mouse to navigate and to perform many user operations in a bitmapped
environment without needing to learn the function keys. Use the mouse to perform the
following actions:
• Move the cursor.
• Select from a menu.
• Select from an LOV.
• Select or clear a check box.
• Select a button, including a radio button.
• Switch to an open window.
• Respond to an alert.
• Scroll records or lines by using a data block or item scroll bar.
• Manipulate a custom item.
Buttons
Web applications often use buttons as a means of navigation. You can click buttons with
the mouse. Use buttons to perform the following tasks:
• Move input focus.
• Display a list of values.
• Invoke an editor.
• Invoke another window.
• Commit data.
• Issue a query.
• Perform calculations.
• Exit the form.
Function Keys
In addition to navigating with the mouse, you can move from item to item in sequence
with function keys. Use function keys to perform the following tasks:
• Navigate between data blocks, records, and items.
• Execute queries.
• Insert new records or delete existing ones.
• Invoke Help.
To view a list of keys and the functions they perform, select Help > Keys, or press
[Ctrl]+K.
Instructor Note
Demonstration: From Forms Builder, run the ORDERS form. Point out the main data
elements. Show the different means of navigation.](https://image.slidesharecdn.com/oracleformsdeveloper10gvol1-130429005213-phpapp02/85/Oracle-forms-developer-10g-vol1-73-320.jpg)

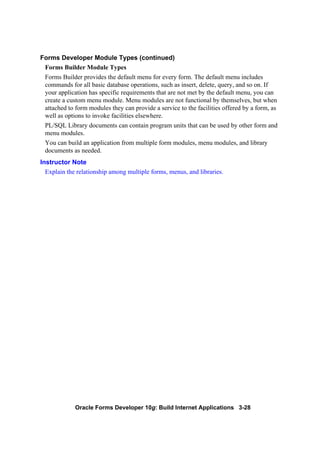
![Oracle Forms Developer 10g: Build Internet Applications 3-6
3-6 Copyright © 2004, Oracle. All rights reserved.
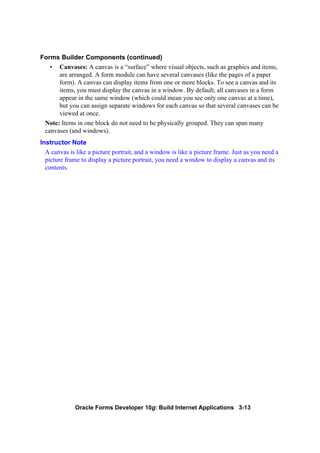
Toolbar
Tool
palette
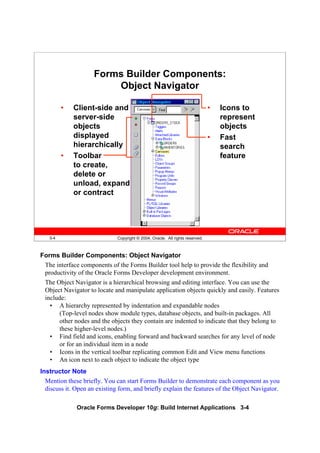
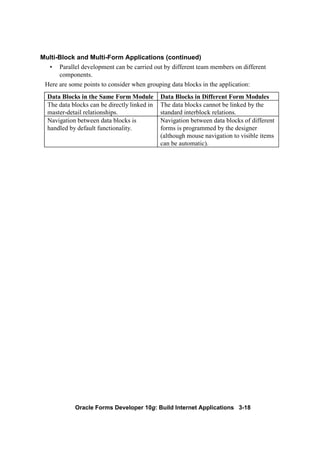
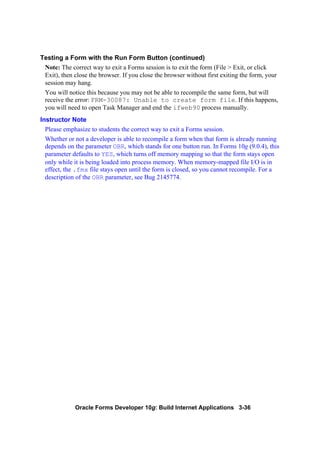
Forms Builder Components:
Layout Editor
Forms Builder Components: Layout Editor
The Layout Editor (or Layout Model) is a graphical design facility for creating and
arranging interface items and graphical objects in your application. You can use the Tool
palette and the toolbar available in the Layout Editor to design the style, color, size, and
arrangement of visual objects in the application. The layout can include graphical objects
and images.
Instructor Note
Demonstration
• Go to the Layout Editor. Point out the major tools in the toolbar. Demonstrate some
of the major tools in the Tool palette.
• Draw a rectangle and an ellipse, and also show how to draw a square and a circle by
holding down the [Shift] key when using the rectangle and ellipse tools.
• Demonstrate selecting multiple objects and show how to group various objects.
• Demonstrate resizing, moving, aligning, coloring, and deleting objects.
• Demonstrate using the Text tool and changing the font style and size.
• Demonstrate how to pin a tool by double-clicking a tool.](https://image.slidesharecdn.com/oracleformsdeveloper10gvol1-130429005213-phpapp02/85/Oracle-forms-developer-10g-vol1-96-320.jpg)
![Oracle Forms Developer 10g: Build Internet Applications 3-10
3-10 Copyright © 2004, Oracle. All rights reserved.
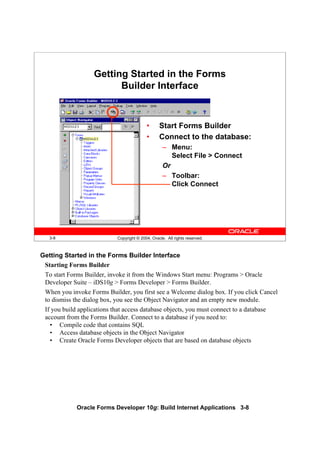
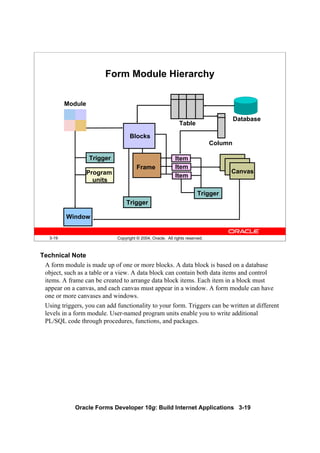
Forms Builder: Menu Structure
Navigating the Forms Builder Main Menu
The Forms Builder main menu contains options to enable you to create, modify, and
manage your form modules.
Common Menu Features
The following table describes some common features in GUI menus:
Native GUI Interface
The menu shown in the slide depicts the Windows NT environment. However, menus
appear with the same look and feel of your native GUI interface.
For example, in Motif, the Windows Print Dialog options appear as submenus of the Font
menu.
Feature Description
Underline Shortcut key: [Alt] + letter
Ellipsis (… ) Additional input, usually by using a dialog box
Menu option has a submenu
Windows menu List of open windows; select any window to make it active
Help List of help facilities: Online Help, Forms on OTN, About box](https://image.slidesharecdn.com/oracleformsdeveloper10gvol1-130429005213-phpapp02/85/Oracle-forms-developer-10g-vol1-100-320.jpg)
![Oracle Forms Developer 10g: Build Internet Applications 3-21
3-21 Copyright © 2004, Oracle. All rights reserved.
Customizing Your Forms Builder Session
Customizing Your Forms Builder Session
What Are Oracle Forms Developer Preferences?
You can use preferences to customize some aspects of your Forms Builder session.
Forms Builder Preferences
There are four tabs in the Preferences dialog box.
To see a description of each preference, click Help in the Preferences dialog or press the
Help key ([F1] for Windows NT/95).
In addition to session preferences, you can also set run-time settings that apply to running
your form from within the builder.
To modify preferences, perform the following steps:
1. Select Edit > Preferences.
2. Specify any options that you require.
3. Click OK to save changes, or Cancel to cancel changes.](https://image.slidesharecdn.com/oracleformsdeveloper10gvol1-130429005213-phpapp02/85/Oracle-forms-developer-10g-vol1-111-320.jpg)
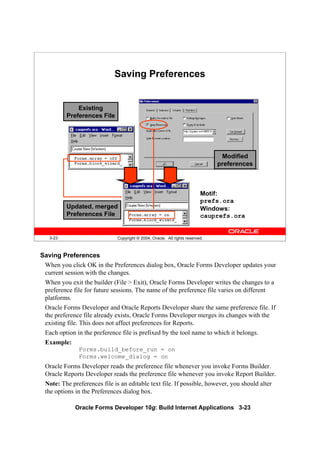
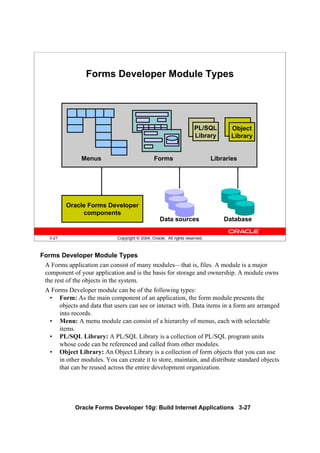
![Oracle Forms Developer 10g: Build Internet Applications 3-24
3-24 Copyright © 2004, Oracle. All rights reserved.
Using the Online Help System
Invoking Online Help Facilities
Oracle Forms Developer Help Options
The table below describes the Help menu options in Forms Builder:
You can also invoke context-sensitive online help from Forms Builder by pressing
[Help] ([F1] on Windows).
Help Menu Option Description
Online Help Comprehensive online help window with 3 tabs. The
Contents tab provides access to a variety of manuals and
references. There are also Index and Search tabs.
The Help key ([F1] for Windows NT/95) displays context-
sensitive online help at any place in the Builder.
Forms on OTN The latest product information on the Oracle Technology
Network
About Form Builder This is a separate window that shows product components
and their version numbers. When you are connected to a
database server, it also displays similar information for
server-side product components.](https://image.slidesharecdn.com/oracleformsdeveloper10gvol1-130429005213-phpapp02/85/Oracle-forms-developer-10g-vol1-114-320.jpg)
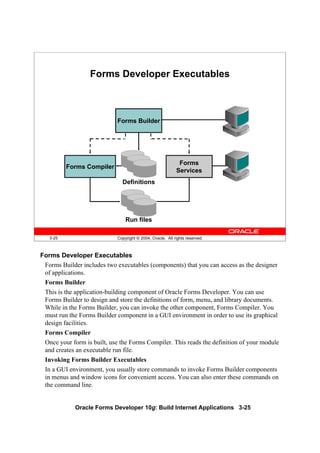
![Oracle Forms Developer 10g: Build Internet Applications 3-26
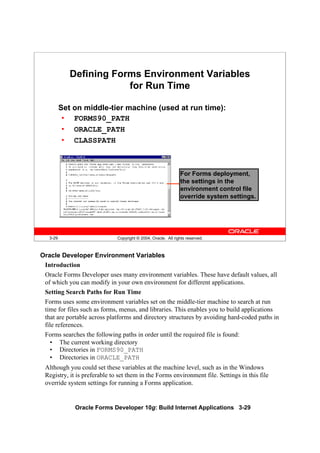
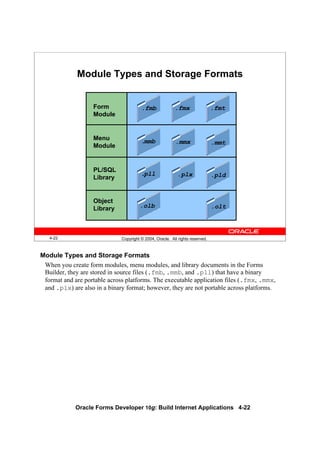
Forms Developer Executables (continued)
For example:
IFBLD90 [my_form] [scott/tiger@my_database]
Note: Commands for invoking the product components vary according to platform.
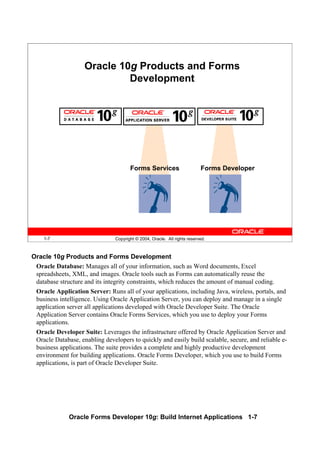
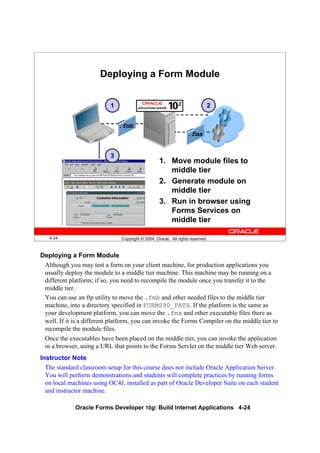
Forms Services
Because Forms applications are Web based, it is not possible to run them directly from the
command line. Instead, they are invoked by typing a URL into a browser or applet viewer
command, directed to Forms Services.
The files used at run time must already have been compiled by the Forms Compiler
component. These files must reside on the middle tier machine in a directory accessible to
the Forms Runtime Engine (in FORMS90_PATH).
To test your applications, you also can access Forms Services directly from Forms Builder
by setting certain preferences, as described later in this lesson.
Instructor Note
Explain the components of the product and their relationships.](https://image.slidesharecdn.com/oracleformsdeveloper10gvol1-130429005213-phpapp02/85/Oracle-forms-developer-10g-vol1-116-320.jpg)


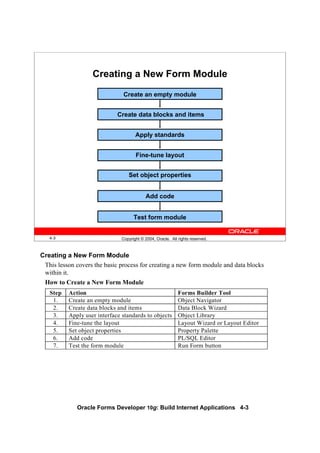
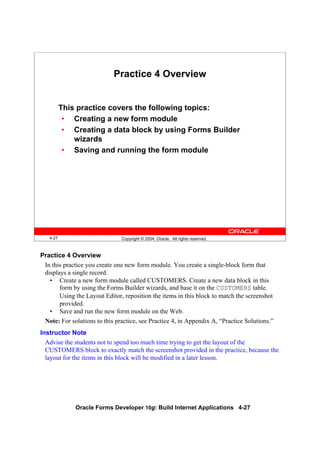
![Oracle Forms Developer 10g: Build Internet Applications 4-5
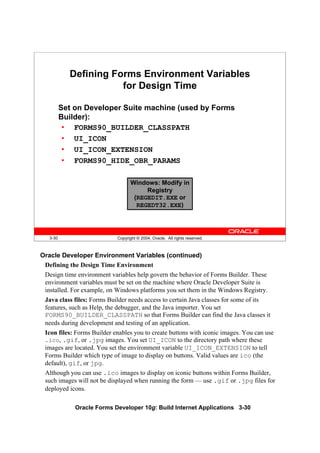
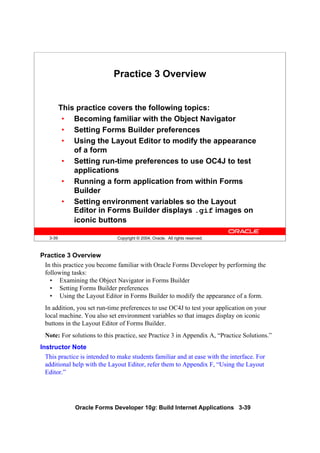
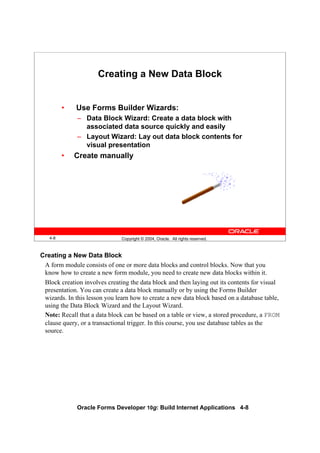
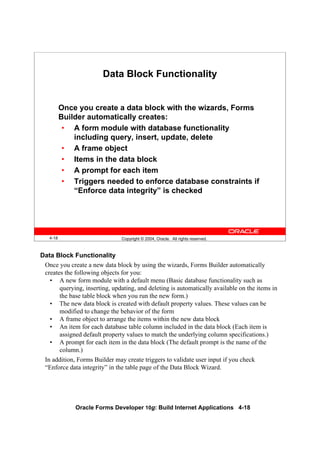
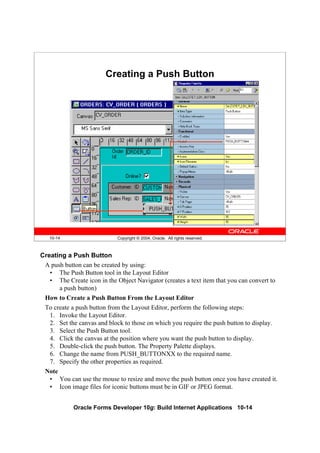
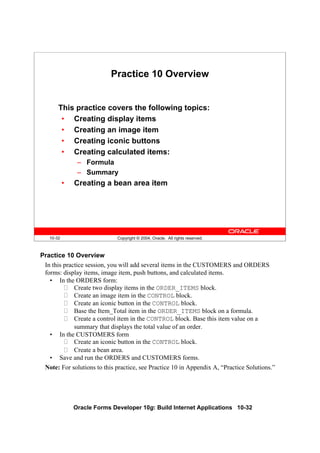
Creating a New Form Module (continued)
Changing the Form Module Name
• When you first build a form module, Forms Builder assigns the name MODULEXX
to the new form module, where XX is the next number available for module names.
This name is displayed in the Object Navigator and in the Property Palette. You
should change the default name to a meaningful name in either of the following
places:
• In the Object Navigator:
Click the form module name.
Change the default name as desired and press [Enter].
• In the Property Palette (shown on the next page)
Note: Follow Oracle naming rules. Do not give two objects of the same type the same
name. The name cannot include Oracle or Forms Builder reserved words.
Instructor Note
Demonstration: Create a new, empty form module and change its name to DEPT_EMP.](https://image.slidesharecdn.com/oracleformsdeveloper10gvol1-130429005213-phpapp02/85/Oracle-forms-developer-10g-vol1-137-320.jpg)
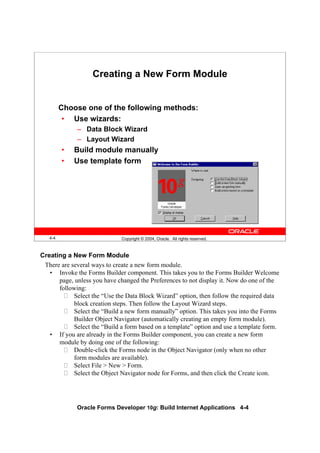
![Oracle Forms Developer 10g: Build Internet Applications 4-6
4-6 Copyright © 2004, Oracle. All rights reserved.
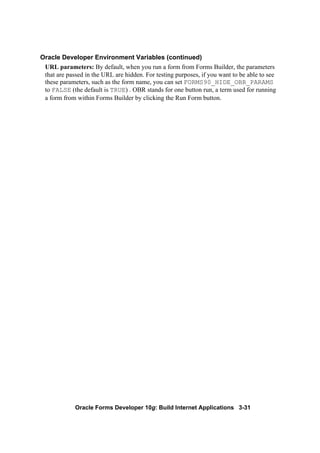
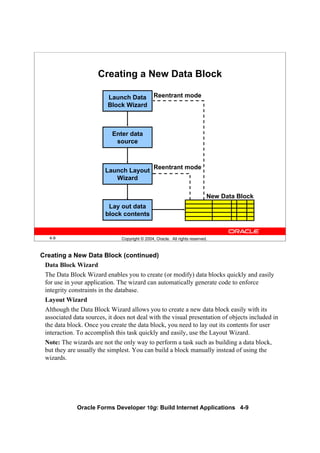
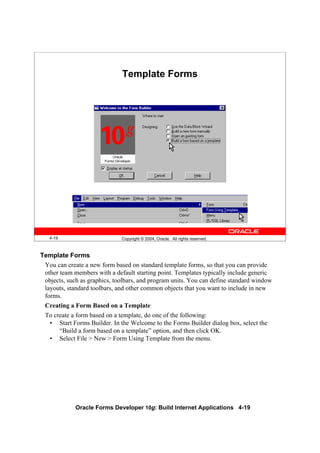
Form Module Properties
Name
property
Coordinate
System property
Setting Form Module Properties
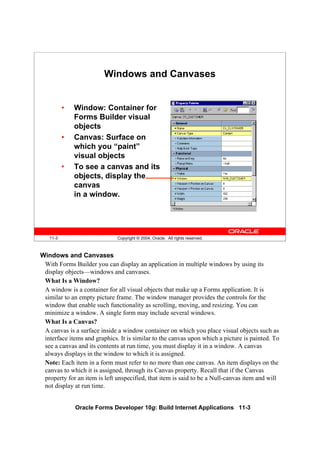
Each form module consists of several objects. Objects within a form, and the form module
itself, have properties that define their behavior. You can see the properties of an object
and their values in its Property Palette.
To open the Property Palette of an object, do one of the following:
• Double-click the object’s icon in the Object Navigator.
• Select the object in the Object Navigator and select Tools > Property Palette.
To obtain online help for any of the properties, click the property and use the Help key,
[F1], to bring up a description of that property.
Define the properties of the form module when you first create it. The properties affect the
general behavior of the form and the objects within it. Properties for a form module
include the following:
Property Description
Name Specifies the internal name of the form module, as it appears
in the Object Navigator
Coordinate
System
Defines the units used to measure objects in the form and their
positions (see next section)](https://image.slidesharecdn.com/oracleformsdeveloper10gvol1-130429005213-phpapp02/85/Oracle-forms-developer-10g-vol1-138-320.jpg)

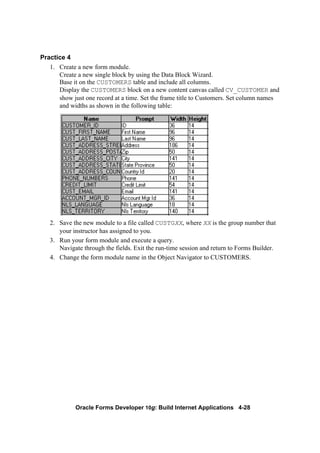
![Oracle Forms Developer 10g: Build Internet Applications 4-13
4-13 Copyright © 2004, Oracle. All rights reserved.
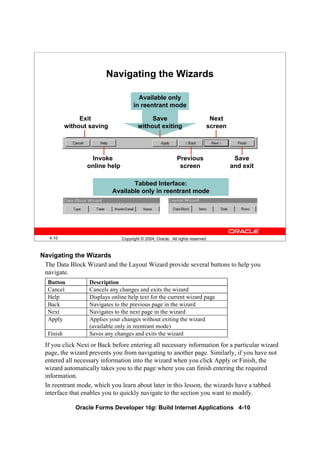
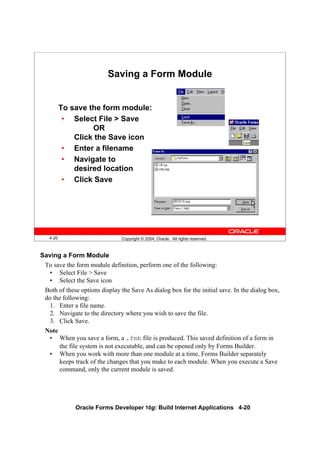
Data Block Wizard: Table Page
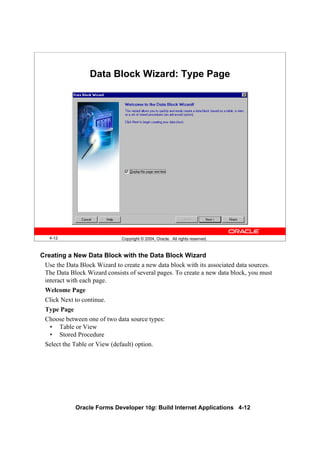
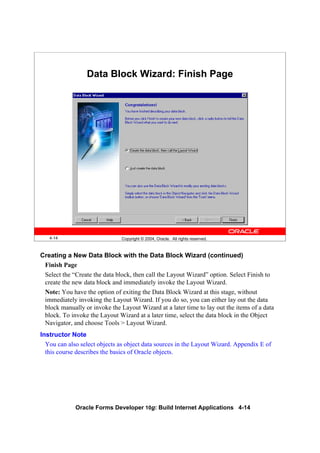
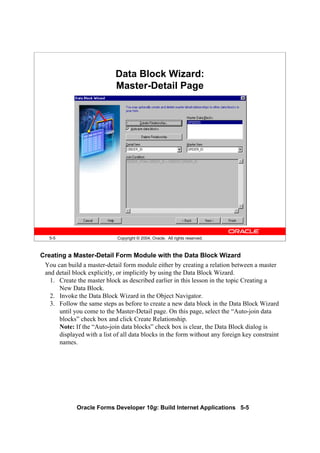
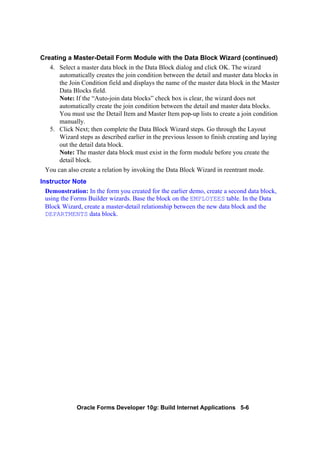
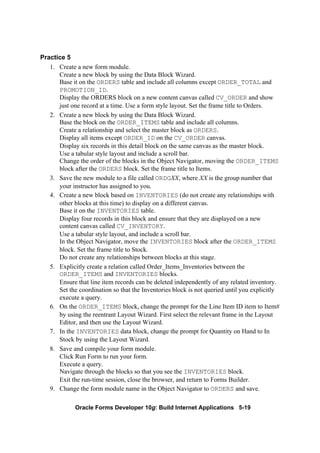
Creating a New Data Block with the Data Block Wizard (continued)
Table Page
1. Enter the table or view name for the data source name, or click Browse and select a
name from a dialog box.
2. Click Refresh to display a list of columns in the selected table or view. If you are not
connected to the database, the Connect box is displayed.
3. Select the columns you want to include in the data block. (Use [Control]- click
to select more than one column.)
4. Click the double right arrow or the double left arrow to include or exclude all
columns, or click the right arrow or the left arrow to include or exclude selected
columns only. You can also drag selected columns from one list to another.
5. Select the "Enforce data integrity" check box if you want the wizard to enforce the
database integrity constraints.
Note: If there is at least one other existing block in the current module, the next page that
displays is the Master-Detail page, where you can associate the new data block with other
master data blocks. This page is discussed later in the lesson.](https://image.slidesharecdn.com/oracleformsdeveloper10gvol1-130429005213-phpapp02/85/Oracle-forms-developer-10g-vol1-145-320.jpg)
![Oracle Forms Developer 10g: Build Internet Applications 4-15
4-15 Copyright © 2004, Oracle. All rights reserved.
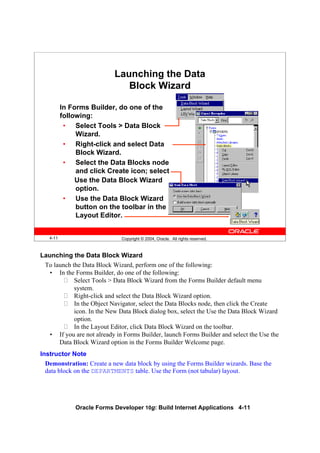
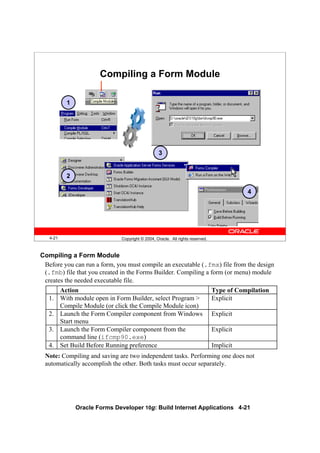
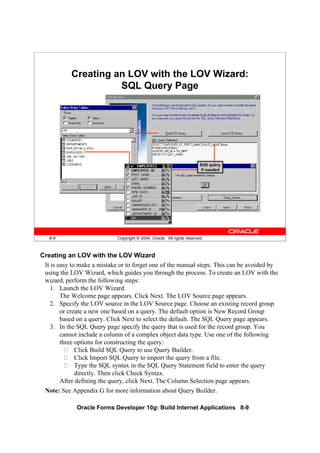
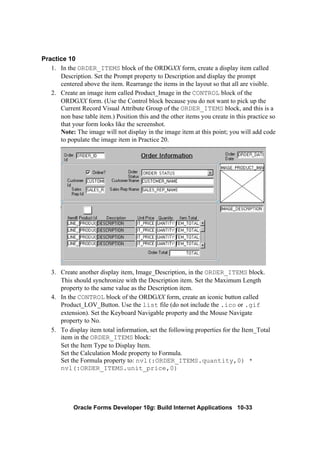
Layout Wizard: Items Page
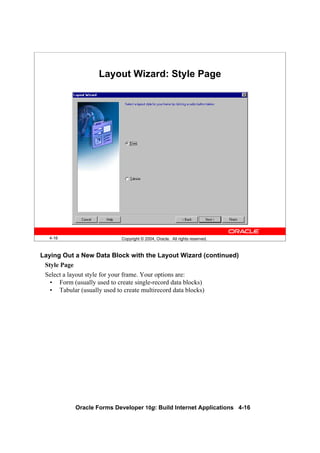
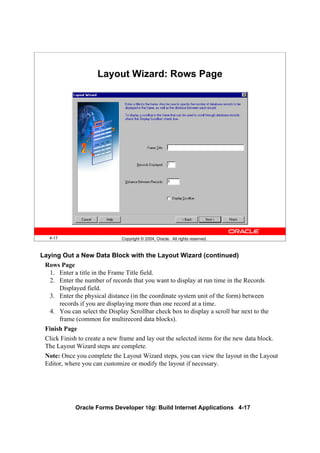
Laying Out a New Data Block with the Layout Wizard
Use the Layout Wizard to lay out the data block items for visual presentation quickly and
easily. The Layout Wizard consists of several pages. You must interact with each
page.
Canvas Page
1. Select New Canvas from the Canvas pop-up list to get a new canvas on which to
display the data block items.
2. Select Content as the canvas type in the Type pop-up list.
Data Block Page
1. Select the items that you want to display in the data block frame. (Use
[Ctrl]-click to select more than one column.)
2. Click the double right arrow or double left-arrow to include or exclude all items, or
click the right-arrow or the left-arrow to include or exclude selected items only. You
can also drag selected items from one list to another.
Note: To lay out the items in a particular sequence, drag items into that sequence.
3. You can use the Item Type pop-up list to select a type for each item. The default
type is Text for each item.
Note: An item type can also be changed later to something else, such as pop-up list
or radio group.
Items Page
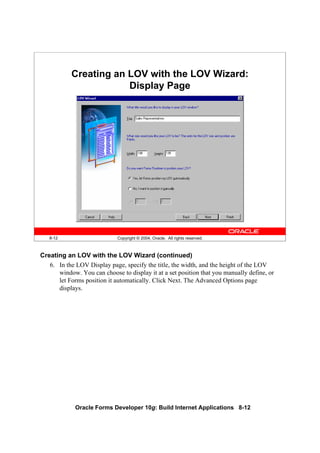
Specify prompt text and display width and height for each display item.](https://image.slidesharecdn.com/oracleformsdeveloper10gvol1-130429005213-phpapp02/85/Oracle-forms-developer-10g-vol1-147-320.jpg)


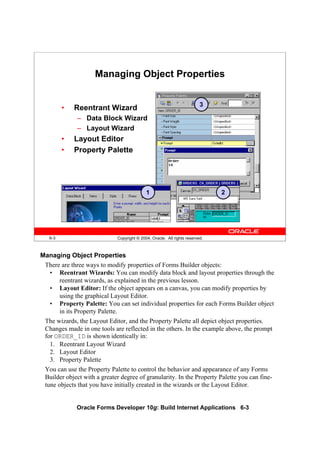
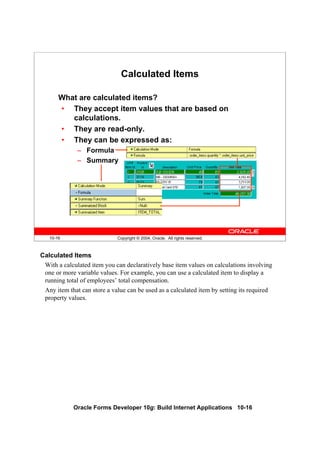
![Oracle Forms Developer 10g: Build Internet Applications 6-5
6-5 Copyright © 2004, Oracle. All rights reserved.
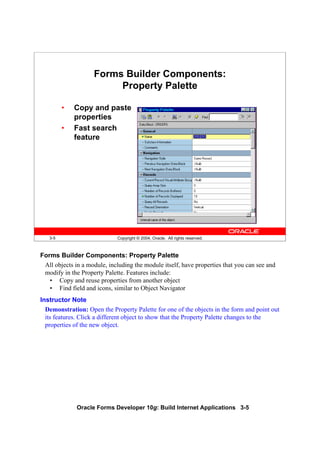
Property Palette: Features
Property
name
Property
value
Toolbar
Expand/
collapse
Find field
Search
backward
Search
forward
Help:
Press [F1]
Property Palette: Features
Features of the Property Palette include the following:
Feature Description
Property list Displays a two-column list of names and values of
properties that are valid for a particular object. Properties
are grouped under functional headings or nodes. You can
expand or collapse a node by using the plus and minus
icons beside the node name.
Find field Enables you to quickly locate a particular property. The
Search Forward and Search Backward buttons enhance
your search.
Toolbar Consists of a series of buttons that provide quick access to
commands.
Help Obtain description, usage, and other information about
any property by pressing [F1] with the property selected.](https://image.slidesharecdn.com/oracleformsdeveloper10gvol1-130429005213-phpapp02/85/Oracle-forms-developer-10g-vol1-187-320.jpg)


![Oracle Forms Developer 10g: Build Internet Applications 6-15
6-15 Copyright © 2004, Oracle. All rights reserved.
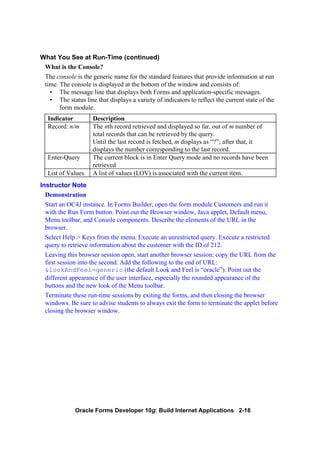
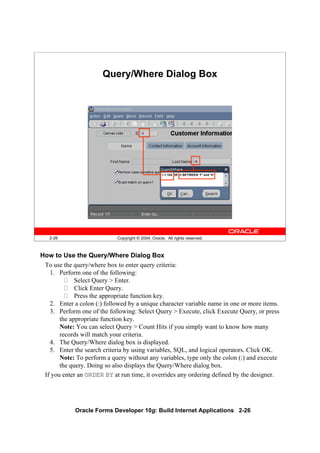
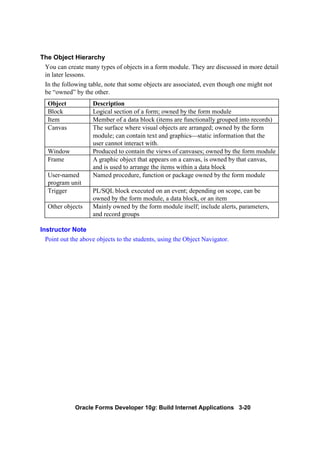
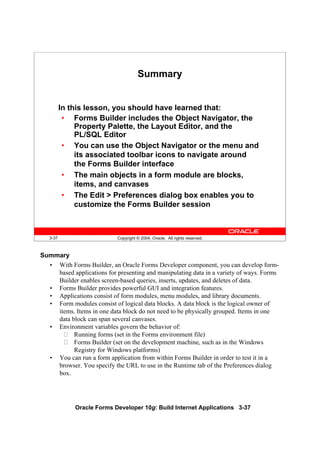
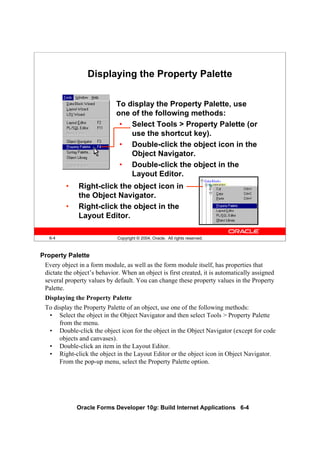
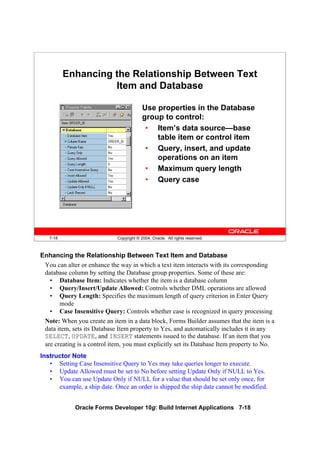
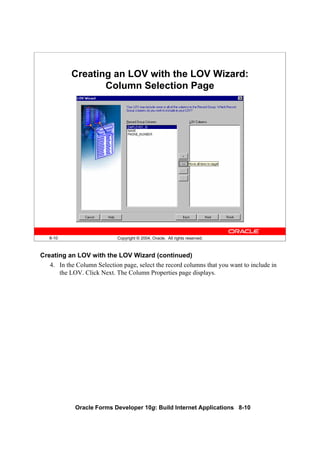
Database Properties
Use properties in the Database
group to control:
• Type of block—data or
control block
• Query, insert, update, and
delete operations on the
data block
• Data block’s data source
• Query search criteria and
default sort order
• Maximum query time
• Maximum number of
records fetched
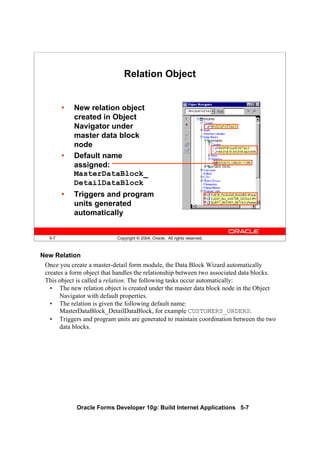
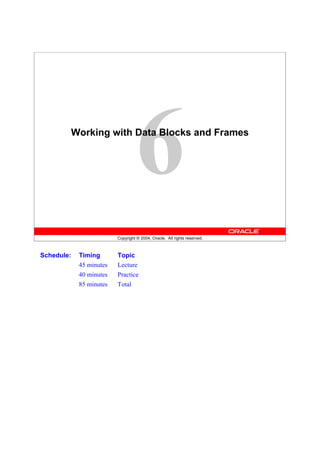
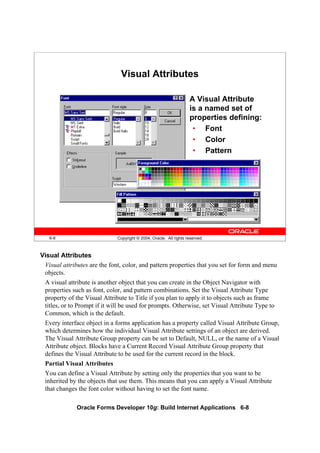
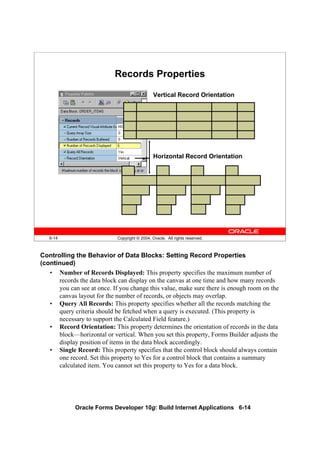
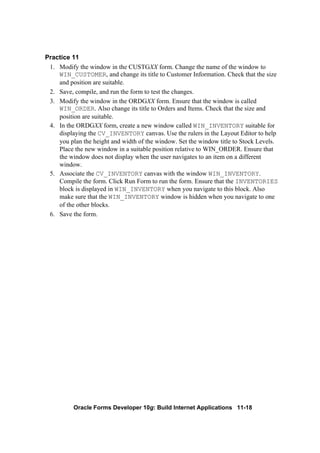
Controlling the Behavior of Data Blocks: Setting Database Properties
In the Database group of the Property Palette, you can set numerous properties to control
interaction with the database server. Some of these properties are:
• Database Data Block: Set to Yes if the data block is based on a database object and
No if it is a control block.
• Enforce Primary Key: Controls whether Forms checks for uniqueness before
inserting or updating records in the base table, in order to avoid committing
duplicate rows in the database. A value of Yes means that the form checks that
inserted or updated records are unique before an attempt is made to commit possible
duplicate rows.
• Query/Insert/Update/Delete Allowed: Control whether the associated operations
can be performed on the data block records.
Instructor Note
Due to time constraints, discuss only the properties depicted on the slides. Remind
students that they can select any property and press [F1] to get context-sensitive help
about it.](https://image.slidesharecdn.com/oracleformsdeveloper10gvol1-130429005213-phpapp02/85/Oracle-forms-developer-10g-vol1-197-320.jpg)
![Oracle Forms Developer 10g: Build Internet Applications 6-17
6-17 Copyright © 2004, Oracle. All rights reserved.
SELECT ....
WHERE Clause
[ORDER BY Clause]
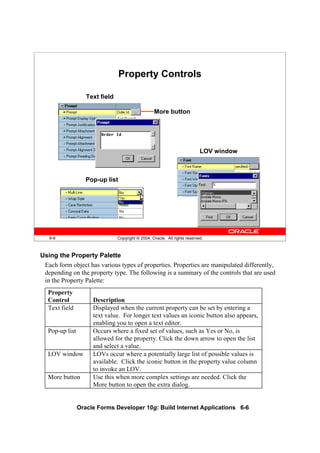
Database Properties
Work file
Block display
Records
fetched
Records buffered
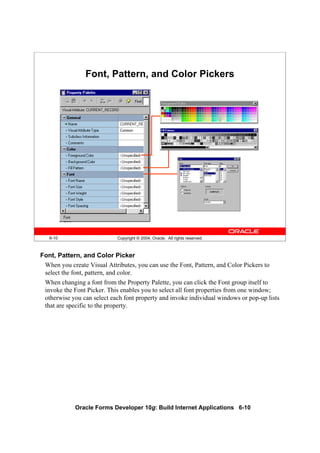
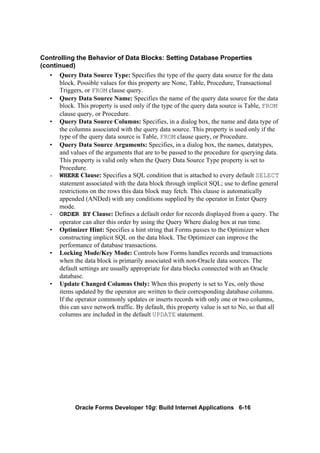
Controlling the Behavior of Data Blocks: Setting Database Properties
(continued)
• Enforce Column Security: When this property is set to Yes, items in the data block
can be updated only if the current user has privileges to update the corresponding
database columns.
• Maximum Query Time: Provides the option to abort a query when the elapsed time
of the query exceeds the value of this property; useful when the Query All Records
property is set to Yes.
• Maximum Records Fetched: Provides the option to abort a query when the number
of records fetched exceeds the value of this property; useful when the Query All
Records property is set to Yes.
Instructor Note
When Update Changed Columns Only is set to No, Forms Builder can reuse the same
SQL statement for multiple updates without the database having to reparse each time in its
system global area (SGA). Changing this property value to Yes can degrade performance
because the database must reparse the UPDATE statement each time.](https://image.slidesharecdn.com/oracleformsdeveloper10gvol1-130429005213-phpapp02/85/Oracle-forms-developer-10g-vol1-199-320.jpg)
![Oracle Forms Developer 10g: Build Internet Applications 6-21
6-21 Copyright © 2004, Oracle. All rights reserved.
Displaying Multiple Property Palettes
Two Palettes for Two Items: Two Palettes for One Item:
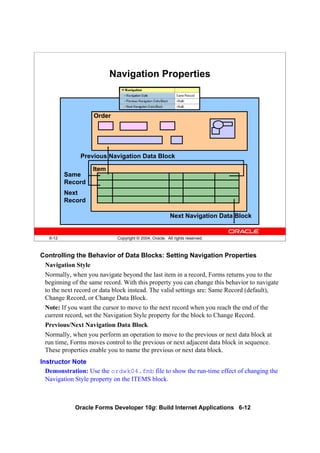
Displaying Multiple Property Palettes
More Than One Property Palette for One Object
You may want to see more properties for an object than there is room for in a single
Property Palette. To display the properties of an object in multiple Property Palettes,
perform the following steps:
1. Open a Property Palette for the object.
2. Hold down the [Shift] key and double-click the object icon for the object in the
Object Navigator.
More Than One Property Palette for Multiple Objects
You may want to display properties for multiple objects simultaneously. To display the
Property Palettes for multiple objects at the same time, perform the following steps:
1. Open the Property Palette of the first object.
2. Click Pin/Unpin on the toolbar to “freeze” this palette.
3. Invoke the Property Palette for another object. This Property Palette appears in a
separate window.
If the second window is on top of the first one, drag it so that both windows are visible.](https://image.slidesharecdn.com/oracleformsdeveloper10gvol1-130429005213-phpapp02/85/Oracle-forms-developer-10g-vol1-203-320.jpg)
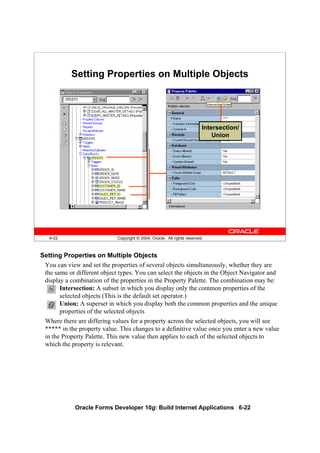
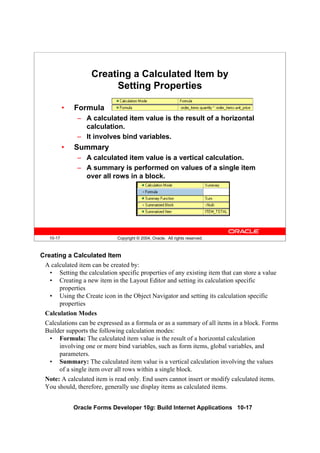
![Oracle Forms Developer 10g: Build Internet Applications 6-23
Setting Properties on Multiple Objects (continued)
How to Set Properties on Multiple Objects
To set properties on multiple objects at one time, perform the following steps:
1. Open the Property Palette for one of the objects.
2. Hold down the [Ctrl] key and click each object in the Object Navigator or the editors
whose properties are to be viewed or changed in combination. The selected objects
are highlighted.
3. Set the Intersection/Union button from the toolbar in the Property Palette to the
desired operation. This button toggles between the two options.
4. Change the displayed properties, as required. Your changes are applied to all
selected objects with these properties.
Note: With a union, you may see some properties that are not relevant to all of the
selected objects. Changes to a property are applied only to objects that have the property.
Instructor Note
Show how to select multiple objects in the Object Navigator, and how their combined
properties can be represented in the Property Palette. Switch between Intersection and
Union, pointing out the difference between the properties.](https://image.slidesharecdn.com/oracleformsdeveloper10gvol1-130429005213-phpapp02/85/Oracle-forms-developer-10g-vol1-205-320.jpg)
![Oracle Forms Developer 10g: Build Internet Applications 6-24
6-24 Copyright © 2004, Oracle. All rights reserved.
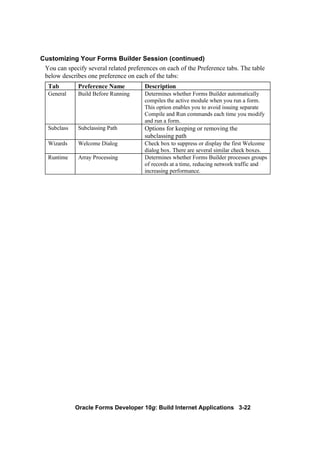
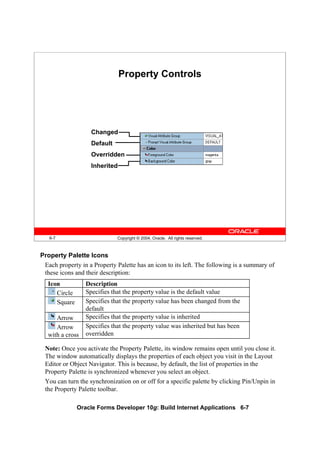
Copying Properties
Copy Paste
Source objects Destination objects
Properties
Name ITEMS
Query All Records Yes
Query Allowed Yes
Insert Allowed Yes
Update Allowed No
Delete Allowed Yes
Query All Records No
Query Allowed Yes
Insert Allowed Yes
Update Allowed Yes
Delete Allowed Yes
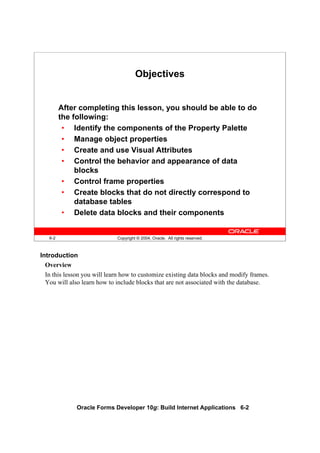
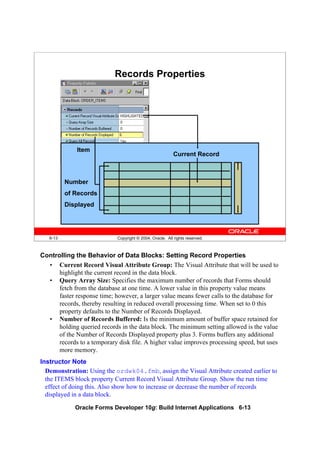
Copying Properties
You can copy the properties and values from the Property Palette to a buffer, so that they
can be applied (pasted) to other objects in your design session. To copy properties,
perform the following steps:
1. In the Property Palette, display and set the properties that are to be copied. This may
be from one object or a combination of objects.
To copy all property settings from the Property Palette, select Edit > Select
All.
To copy the selected property settings only, press and hold [Ctrl] while you
click each property individually.
2. Click Copy Properties on the toolbar of the Property Palette.
3. From the Object Navigator select the object into which the properties are to be
copied.
4. In the Property Palette, click Paste Properties. The selected object receives values
from all copied properties that are relevant to their object types.
Note: It is possible to copy the property settings of an object to objects of different types.
In this case, properties that do not apply to the target object are ignored.](https://image.slidesharecdn.com/oracleformsdeveloper10gvol1-130429005213-phpapp02/85/Oracle-forms-developer-10g-vol1-206-320.jpg)
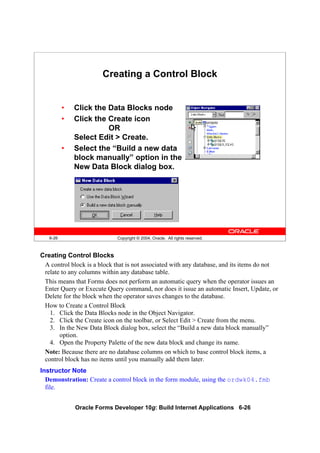
![Oracle Forms Developer 10g: Build Internet Applications 6-27
6-27 Copyright © 2004, Oracle. All rights reserved.
Deleting a Data Block
• Select a data block for deletion
• Click the Delete icon
OR
Press [Delete]
• Click Yes in the alert box.
Deleting Data Blocks
To delete a data block:
1. Select the data block to be deleted in the Object Navigator.
2. Click the Delete icon on the toolbar.
or
Press [Delete].
3. An alert is displayed for delete confirmation. Click Yes to delete the data block.
Note: Deleting a data block also deletes its subordinate objects (items and triggers). If the
data block was a master or detail block in a relation, the relation is also deleted. However,
the frame border and its title will remain. Delete the frame manually in the Layout Editor.
Instructor Note
Demonstration: Delete the ITEMS data block in the ordwk04.fmb file. Show the
effect of doing this in the Layout Editor. Do not save the effects of this demonstration.](https://image.slidesharecdn.com/oracleformsdeveloper10gvol1-130429005213-phpapp02/85/Oracle-forms-developer-10g-vol1-209-320.jpg)
![Oracle Forms Developer 10g: Build Internet Applications 6-31
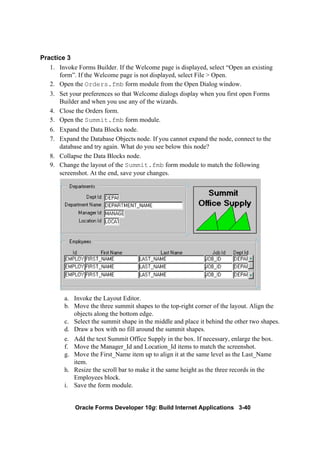
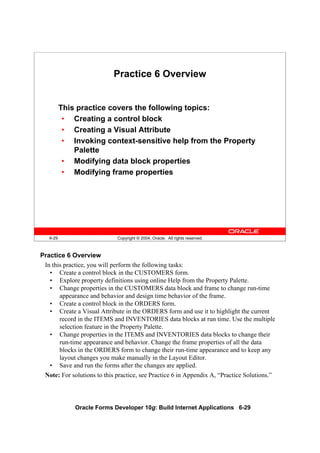
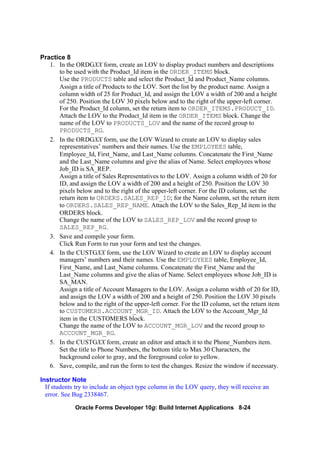
Practice 6 (continued)
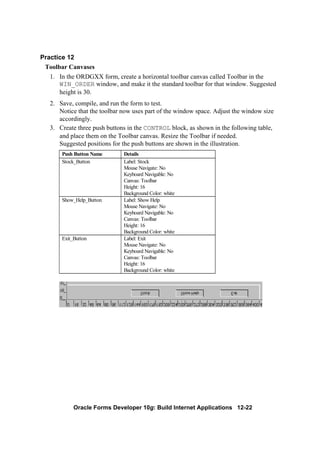
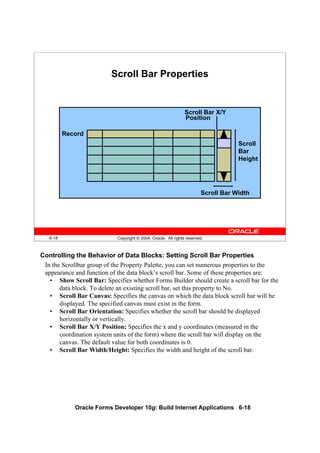
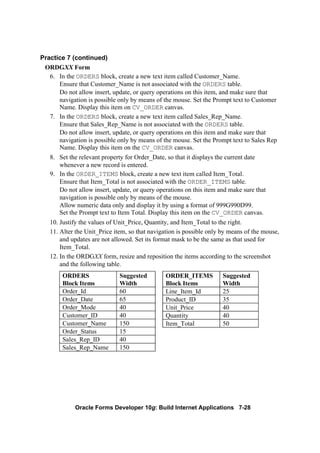
8. For the ORDER_ITEMS block, change the number of records displayed to 4 and
resize the scroll bar accordingly.
9. Ensure that the records retrieved in the ORDER_ITEMS block are sorted by the
LINE_ITEM_ID.
10. Set the ORDER_ITEMS block to automatically navigate to the next record when the
user presses [Next Item] while the cursor is in the last item of a record.
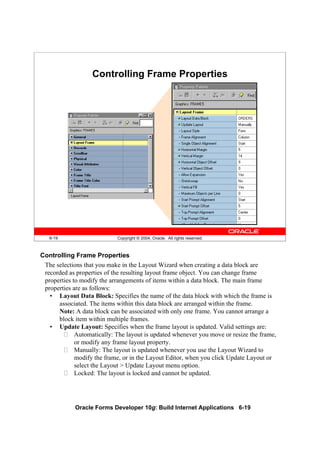
11. Set the frame properties for all blocks as follows:
Remove the frame title and set the Update Layout property to Manually.
12. Save and compile the ORDGXX form.
Click Run Form to run your form.
Test the effects of the properties that you have set.
Note: The Compilation Errors window displays a warning that advises you that the
CONTROL block has no items. This is expected (until you add some items to the
CONTROL block in a later lesson).](https://image.slidesharecdn.com/oracleformsdeveloper10gvol1-130429005213-phpapp02/85/Oracle-forms-developer-10g-vol1-213-320.jpg)


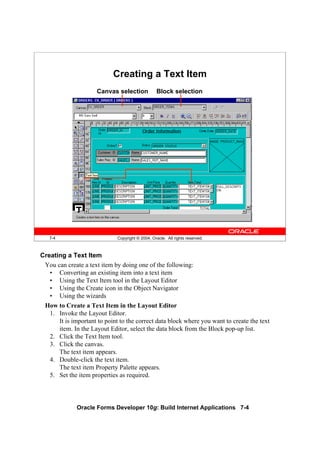
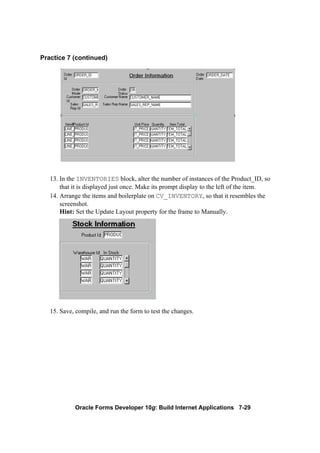
![Oracle Forms Developer 10g: Build Internet Applications 7-6
7-6 Copyright © 2004, Oracle. All rights reserved.
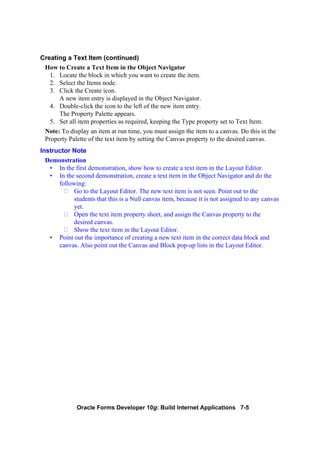
Modifying the Appearance of a Text Item:
General and Physical Properties
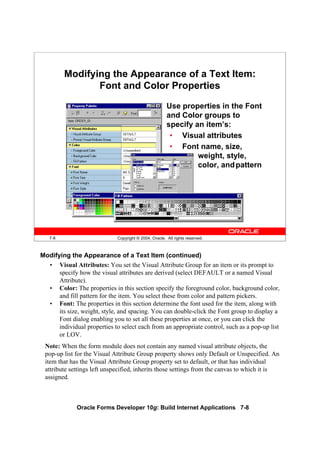
Modifying the Appearance of a Text Item
The properties of an item are divided into several groups.
You can affect the way the text item is displayed by altering its General, Physical,
Records, Font, and Color group properties. To view descriptions of any of these
properties, click the property in the Property Palette and press [F1]. Some of these
properties are:
• General:
Item type: Selects the type of item you want to create (pop-up list)
• Physical:
Visible: Determines whether the item is displayed
Canvas: Determines the canvas on which the item is displayed. If left
unspecified, the item is said to be a Null canvas item, and will not display at
run time or in the Layout Editor.
X and Y Position: Sets the X and Y coordinates of the item relative to the
canvas
Width and Height: Sets the width and height of the item in the current form
coordinate units
Bevel: Controls appearance of bevel around the item; can also be set to Plain
(flat) or None](https://image.slidesharecdn.com/oracleformsdeveloper10gvol1-130429005213-phpapp02/85/Oracle-forms-developer-10g-vol1-220-320.jpg)
![Oracle Forms Developer 10g: Build Internet Applications 7-11
7-11 Copyright © 2004, Oracle. All rights reserved.
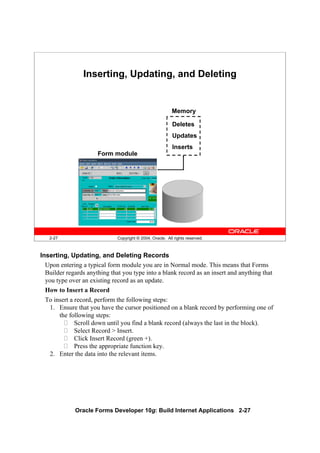
Controlling the Data of a Text Item
Use properties in Data group
to control the data:
• Type
• Length
• Format
• Value
1 2 3 4 5US7ASCII
VARCHAR2(5 CHAR)
1 2 3 4 5JA16SJIS
VARCHAR2(5 CHAR)
1 2 3UTF8
VARCHAR2(5 CHAR)
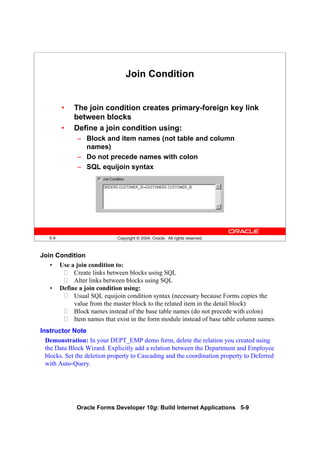
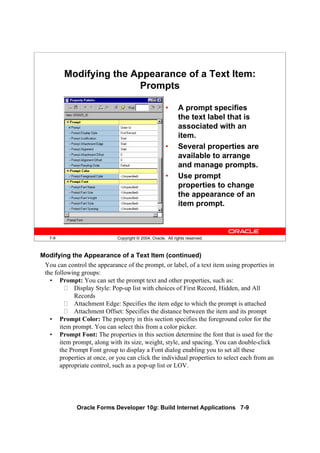
Controlling the Data of a Text Item
The properties in the Data group of the text item are used to control the way data is
displayed and entered. You can see descriptions of any of these properties by clicking the
property in the Property Palette, then pressing [F1]. Some of these properties are:
• Data Type: Enables you to choose CHAR, DATE, DATETIME, and NUMBER; the
others listed are for backward compatibility.
• Data Length Semantics: You can set to Null, BYTE, or CHAR to be compatible
with multiple character sets. If Data Length Semantics is CHAR, the correct amount
of storage will be automatically allocated as required for the Maximum Length with
either a single-byte or multi-byte character set.
• Maximum Length: Specifies the maximum length of the data value that can be
stored in an item. If the Maximum Length exceeds the display width of the item,
Forms automatically enables the end user to scroll horizontally.
Note: In the example on the slide, whether the form operator is using a single-,
double-, or variable-byte character set, the right amount of storage is allocated. To
hold the same value if the Data Length Semantics had been set to BYTE, the
Maximum Length would have needed to be 5 for single-byte, 10 for double-byte,
and an unknown value for a variable-byte character set.](https://image.slidesharecdn.com/oracleformsdeveloper10gvol1-130429005213-phpapp02/85/Oracle-forms-developer-10g-vol1-225-320.jpg)
![Oracle Forms Developer 10g: Build Internet Applications 7-14
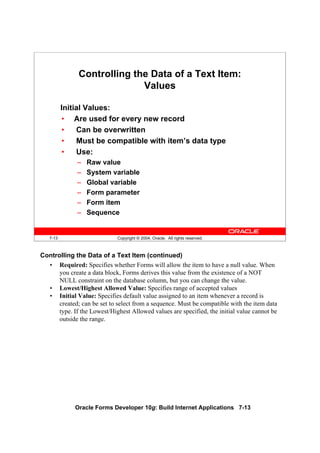
Controlling the Data of a Text Item (continued)
Creating an Initial Value
You can use any one of the following values to issue an initial item value whenever a new
record is created:
• Raw value
Example: 340, RICHMOND
• System variable
Variables giving current application server operating system date/time:
Variables giving current database date/time:
• Global variable
Example: :GLOBAL.CUSTOMER_ID
• Form parameter
Example: :PARAMETER.SALES_REP_ID
• Form item
Example: :ORDERS.ORDER_ID
• Sequence
The initial value can reference a sequence in the database. Forms automatically
writes generated sequence numbers into the text item. To use a sequence, enter:
:sequence.<sequence name>.nextval.
Example: :SEQUENCE.ORDERS_SEQ.NEXTVAL
Variable Format
$$DATE$$ DD-MON-YY
$$DATETIME$$ DD-MON-YYYY hh:mi[:ss]
$$TIME$$ hh:mi[:ss]
Variable Format
$$DBDATE$$ DD-MON-YY
$$DBDATETIME$$ DD-MON-YYYY hh:mi[:ss]
$$DBTIME$$ hh:mi[:ss]](https://image.slidesharecdn.com/oracleformsdeveloper10gvol1-130429005213-phpapp02/85/Oracle-forms-developer-10g-vol1-228-320.jpg)
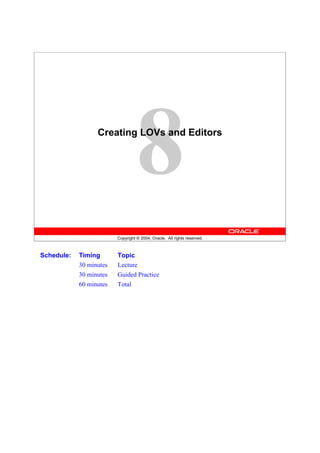
![Oracle Forms Developer 10g: Build Internet Applications 7-19
7-19 Copyright © 2004, Oracle. All rights reserved.
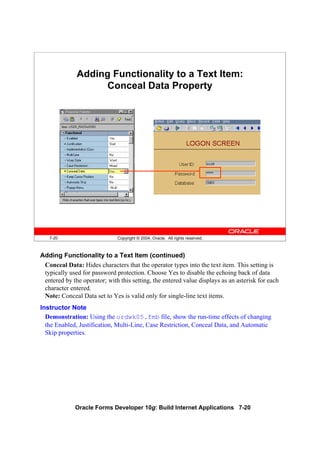
Adding Functionality to a Text Item
Item
Id Product Id Price Quantity Item Total
10011 135 500 67,500.00
10013 380 400 152,000.00
1
2
Order
CREDITOrder Id 100
Enabled=No
Case
Restriction=
Upper
Justification = Start
Justification = Right
Payment
Type
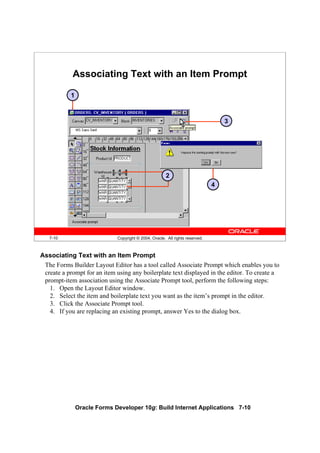
Adding Functionality to a Text Item
Augment the default functionality of a text item by introducing some of the additional
features you can set in the Functional group of the Property Palette. Some of these are
depicted above or will be discussed in the next few pages. For descriptions of other
properties in the Functional group, select the property in the Property Palette and press
[F1].
Note
• The Enabled property set to No grays out the item. If you want the item to appear
normally but do not want the users to change it, do the following:
Set Insert Allowed to No.
Set Update Allowed to No.
Set Enabled to Yes.
• A pop-up menu is a context-sensitive menu that enables users to access common
functions and commands quickly. It is a top-level object in the Object Navigator and
belongs to a form module (as opposed to a form menu, which belongs to a separate
menu module).](https://image.slidesharecdn.com/oracleformsdeveloper10gvol1-130429005213-phpapp02/85/Oracle-forms-developer-10g-vol1-233-320.jpg)
![Oracle Forms Developer 10g: Build Internet Applications 7-23
7-23 Copyright © 2004, Oracle. All rights reserved.
Displaying Helpful Messages:
Help Properties
Hint
Tooltip
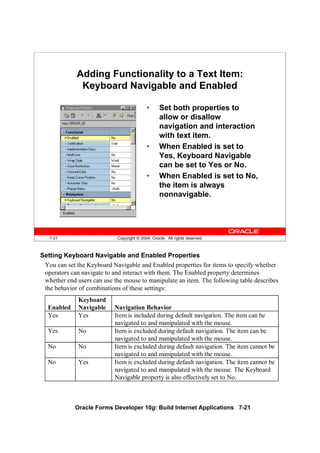
Displaying Helpful Messages
You can use the Help group properties to provide context-sensitive help to users:
Instructor Note
Tool tips are used most often for push buttons, which are discussed in Lesson 9.
Help Property Function
Hint Writes item-specific Help text that is displayed on the
message line at run time. The Help text is available
when input focus is on the item.
Display Hint Automatically Determines whether the hint for the item is displayed
automatically. If set to No, the hint displays only when
the operator presses [Help] or selects the Help
command on the default menu.
Tooltip Help text that should appear in a small box beneath the
item when the mouse enters the item. The item does not
need to have input focus for the tooltip to appear.
Tooltip Visual Attribute
Group
Specifies Visual Attribute to use for the tooltip](https://image.slidesharecdn.com/oracleformsdeveloper10gvol1-130429005213-phpapp02/85/Oracle-forms-developer-10g-vol1-237-320.jpg)


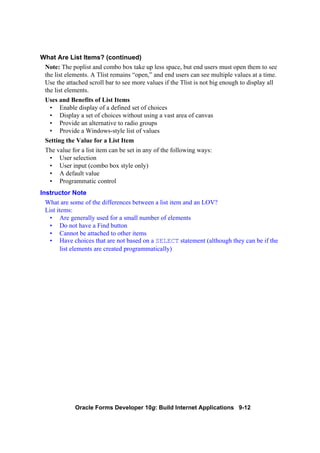
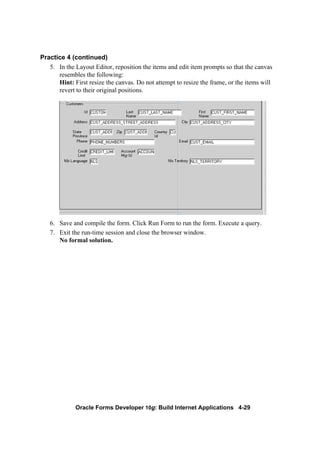
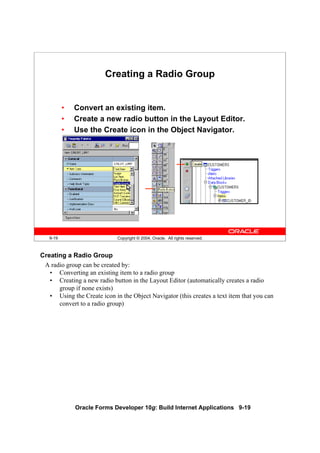
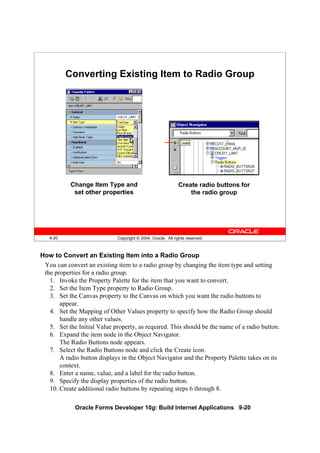
![Oracle Forms Developer 10g: Build Internet Applications 9-15
9-15 Copyright © 2004, Oracle. All rights reserved.
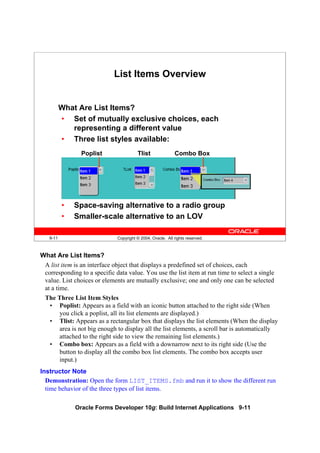
Creating a List Item in the Layout Editor
Use list item tool
in Layout Editor
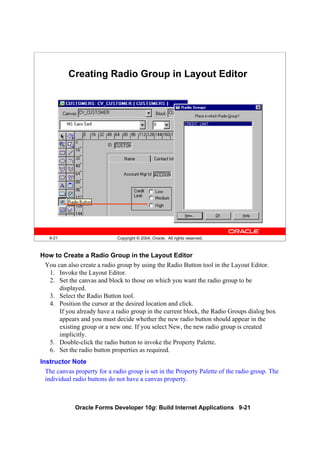
How to Create a List Item in the Layout Editor
You can also create a list item by using the List Item tool in the Layout Editor.
1. Invoke the Layout Editor.
2. Set the canvas and block to those on which you want the list item to be displayed.
3. Select the List Item tool.
4. Click the canvas in the position where you want the list item to be displayed.
5. Double-click the list item to invoke its Property Palette.
6. Set the properties as required.
Technical Note
To obtain a list of available functions when defining list elements, select [Ctrl] + k
while the input focus is in the List Elements window. The Keys window may pop up
behind the List Elements window; if so, just move the List Elements window so that you
can see the Keys window.](https://image.slidesharecdn.com/oracleformsdeveloper10gvol1-130429005213-phpapp02/85/Oracle-forms-developer-10g-vol1-283-320.jpg)
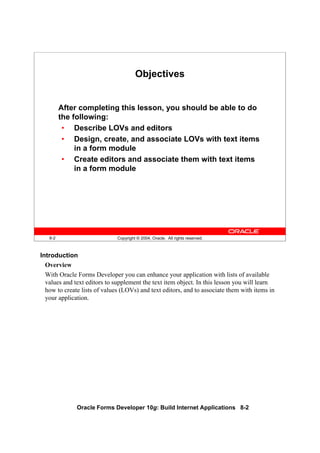
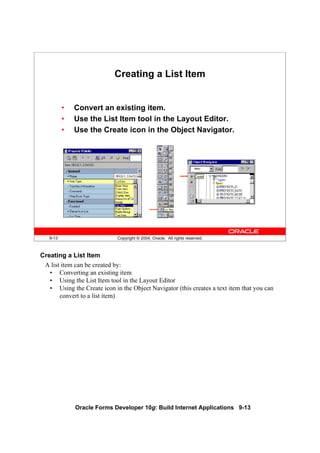
![Oracle Forms Developer 10g: Build Internet Applications 9-17
9-17 Copyright © 2004, Oracle. All rights reserved.
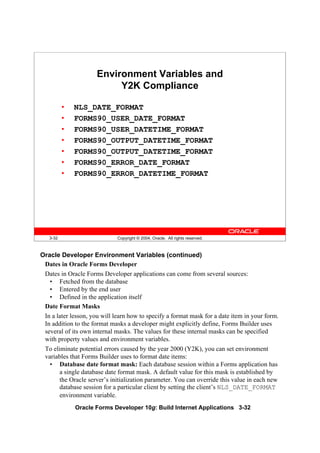
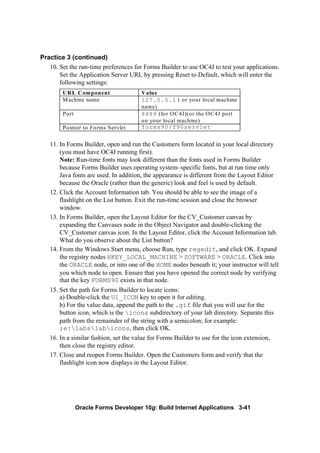
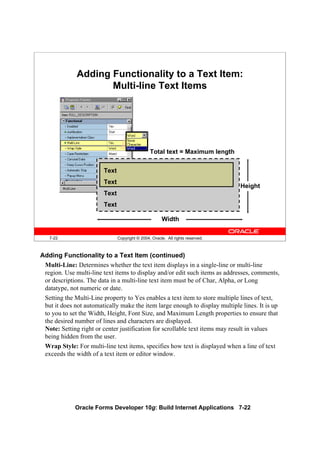
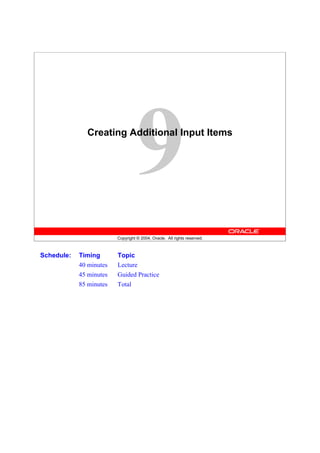
List Item Mapping of Other Values
Order_Status
10
4
2
0
12
CREDIT order paid
New CASH order
List Elements
Mapping of Other
Values = 11 (Unknown)
Unknown
CASH backorder
New CREDIT order
Values for Forms Items Displayed Values
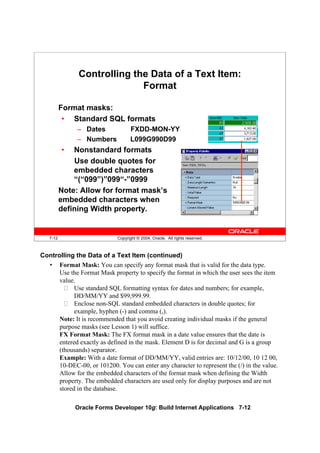
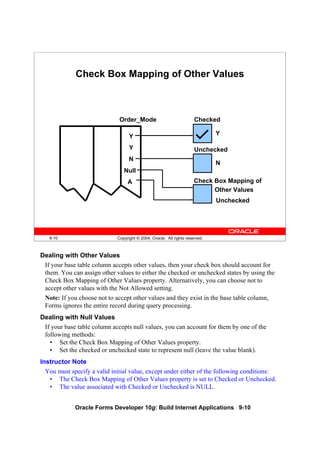
NULL Values in a List Item
If the base table column for a list item accepts NULL values, Forms Builder creates a
pseudochoice in the list to represent the null.
All three list styles display a blank field if a query returns a NULL value. If the Data
Required property is set to No:
• A poplist displays a blank element for a NULL value.
• The user can omit a selection for a TList or can press [Clear Field] to deselect all list
elements. This sets the list item to NULL.
• A combo box does not display a blank element. The end user must delete the default
value if the default value is not NULL.
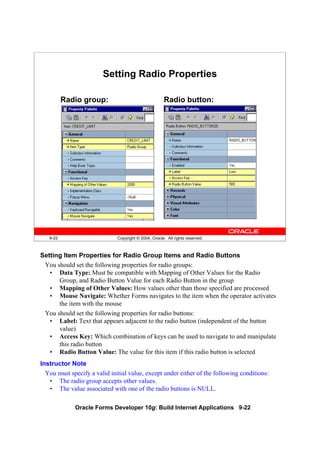
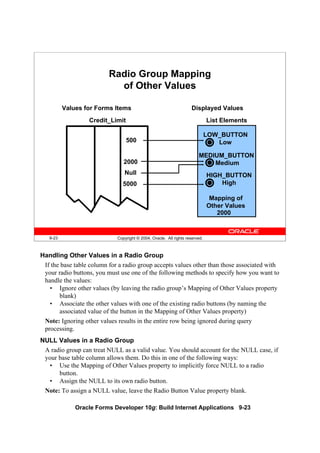
Handling Other Values in a List Item
If the base table column for a list item accepts values other than those associated with
your list elements, you must specify how you want to handle the values. Do this in one of
the following ways:
• Ignore other values by leaving the Mapping of Other Values property blank.
• Associate the other values with one of the existing list elements (by naming either
the list element or its associated value) in the Mapping of Other Values property.](https://image.slidesharecdn.com/oracleformsdeveloper10gvol1-130429005213-phpapp02/85/Oracle-forms-developer-10g-vol1-285-320.jpg)

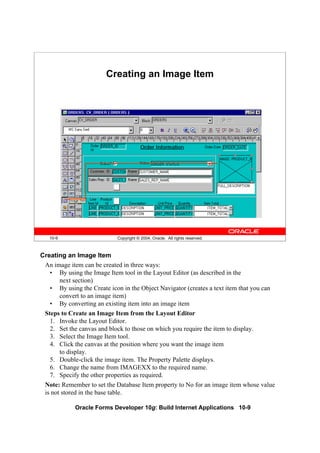
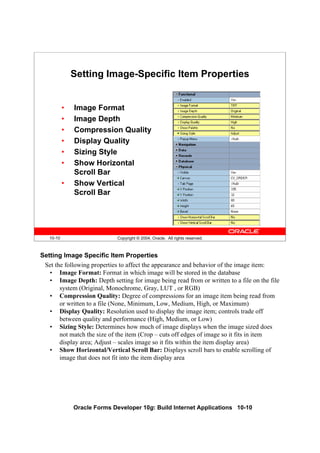
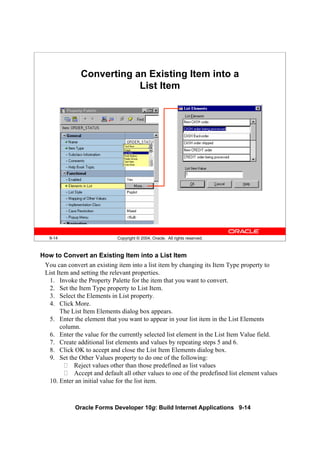
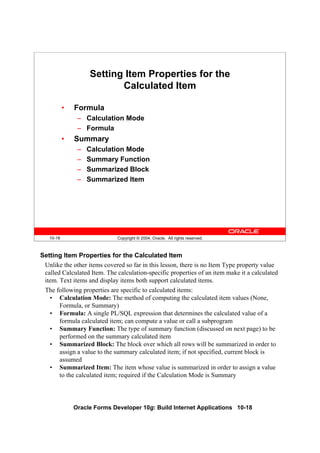
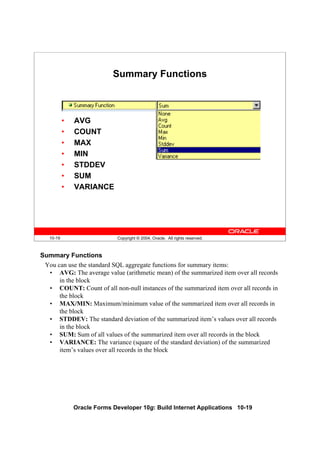
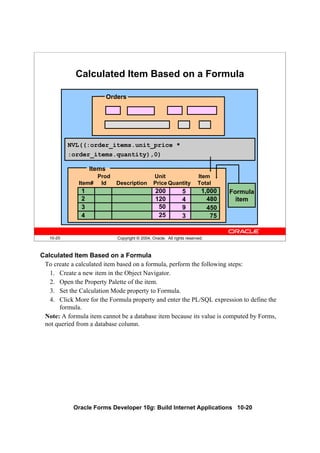
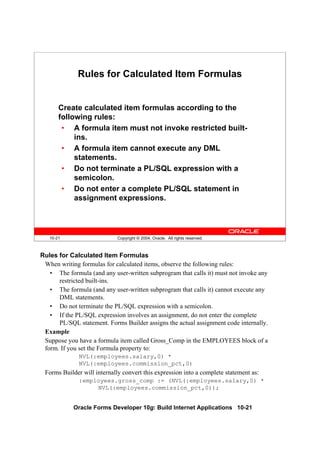
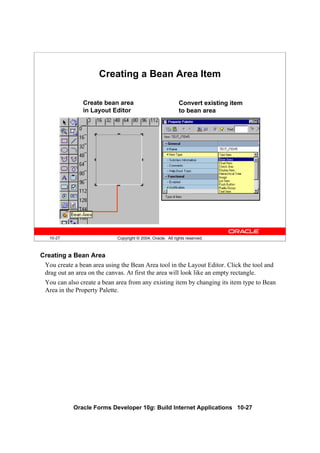
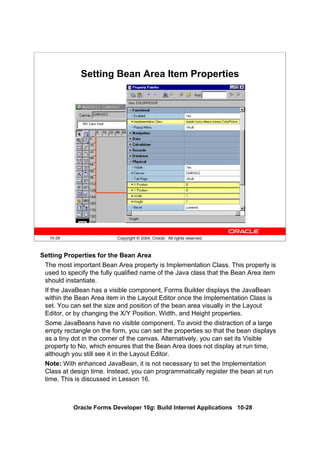
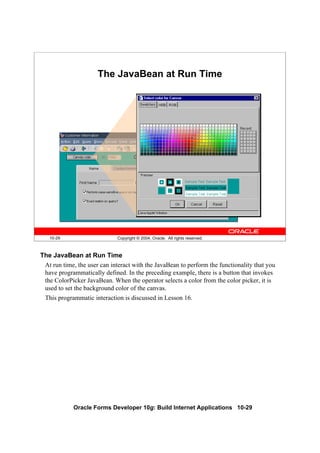
![Oracle Forms Developer 10g: Build Internet Applications 10-15
10-15 Copyright © 2004, Oracle. All rights reserved.
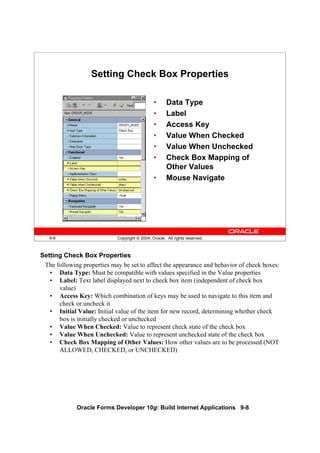
Setting Push Button Properties
• Label
• Iconic
• Icon Filename
• Default Button
• Mouse Navigate
• Tooltip
• Tooltip Visual
Attribute Group
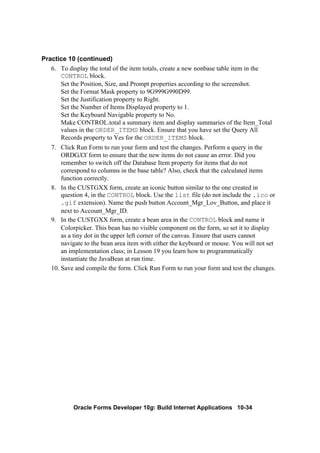
Setting Properties for the Push Button
• Label: Text label that appears on the button at run time
• Iconic: Whether the button displays as an icon instead of as a label
• Icon Filename: Name of the file that contains the icon resource (filename only
without the extension, such as “list”, not “list.gif”)
• Default Button: Whether this is the default push button for the block, which can be
selected implicitly by pressing [Select] without the need to navigate or use the
mouse
• Mouse Navigate: Whether Forms navigates to the item when you click on it with
the mouse
• Tooltip: Help text that should appear in a tool tip beneath the button when the
mouse moves over it
• Tooltip Visual Attribute Group: Named visual attribute to apply to the tool tip at
run time
Note: The default push button may be bordered or highlighted in a unique fashion to
distinguish it from other push buttons.](https://image.slidesharecdn.com/oracleformsdeveloper10gvol1-130429005213-phpapp02/85/Oracle-forms-developer-10g-vol1-309-320.jpg)


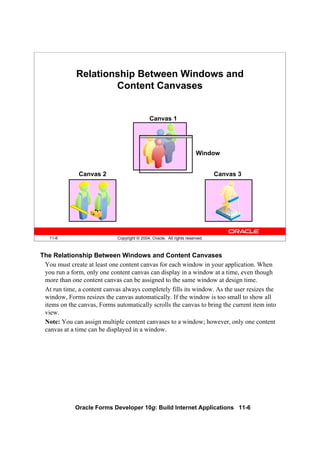
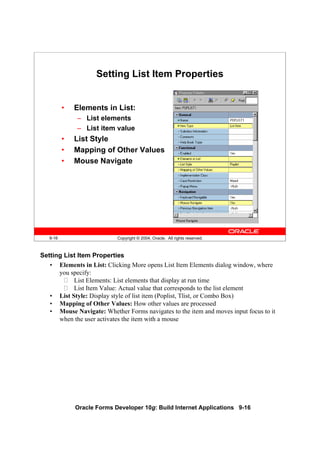
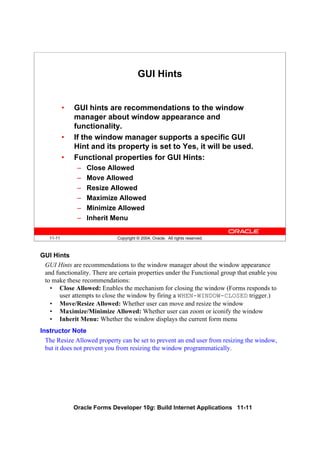
![Oracle Forms Developer 10g: Build Internet Applications 11-10
11-10 Copyright © 2004, Oracle. All rights reserved.
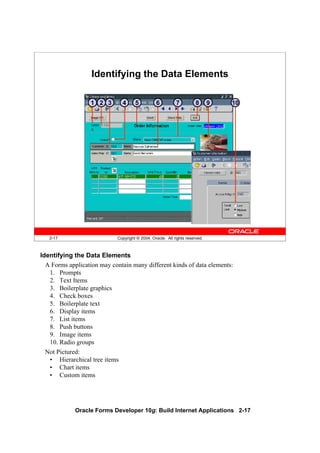
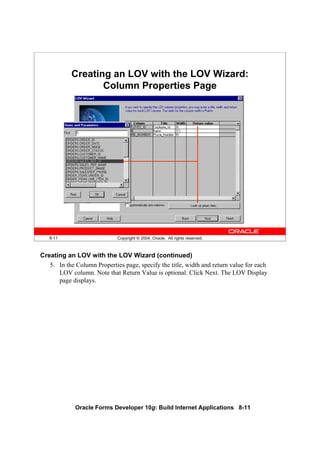
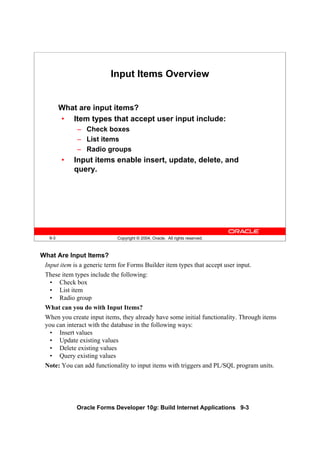
Setting Window Properties
3
5
4
1 2
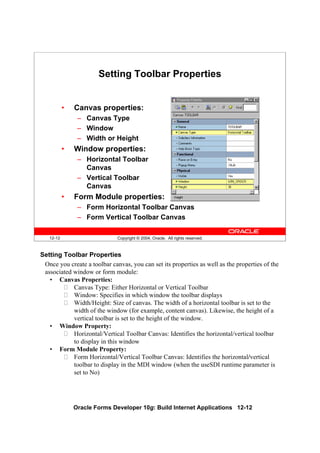
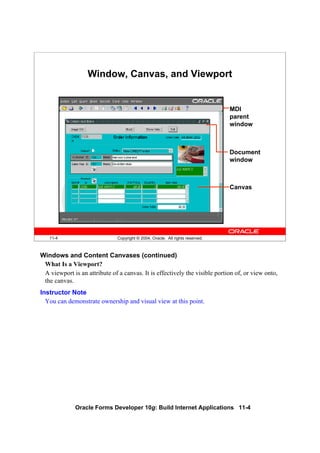
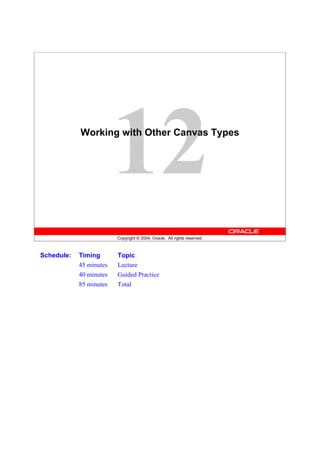
Setting Window Properties
You set properties for windows to determine their behavior and appearance. Some of
these properties are:
1. X/Y Position: Specifies the location of the window within the containing window.
2. Title: The title to be displayed; if not specified, uses the name indicated by the
window Name property
3. Horizontal/Vertical Toolbar Canvas: Specifies the toolbar canvas to be displayed
horizontally across the top or vertically to the left of the window; selected from all
horizontal/vertical toolbar canvases assigned to this window
4. Modal: Specifies if window is modal, requiring the user to dismiss the window
before any other user interaction can continue, like Question window above
5. Show Horizontal/Vertical Scroll Bar: Whether a horizontal or vertical scroll bar
should display on the window
6. Hide on Exit: Whether Forms hides the window automatically when the end user
navigates to an item in another window (not shown on slide)
For a description of other properties that affect the behavior of windows, click the
property in the Property Palette and press [F1].](https://image.slidesharecdn.com/oracleformsdeveloper10gvol1-130429005213-phpapp02/85/Oracle-forms-developer-10g-vol1-338-320.jpg)

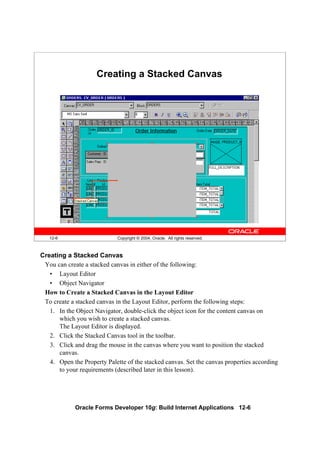
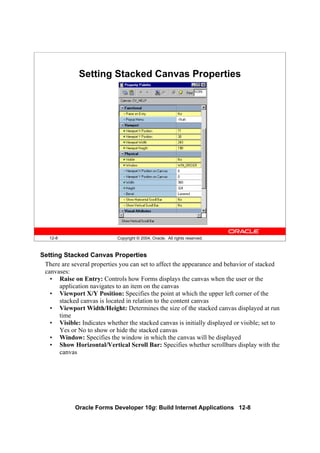
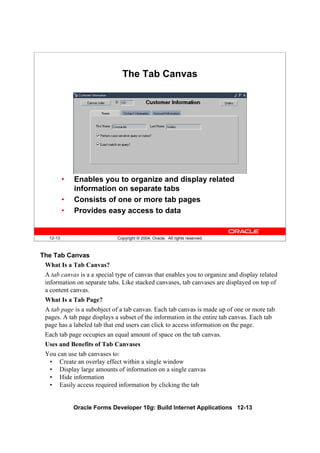
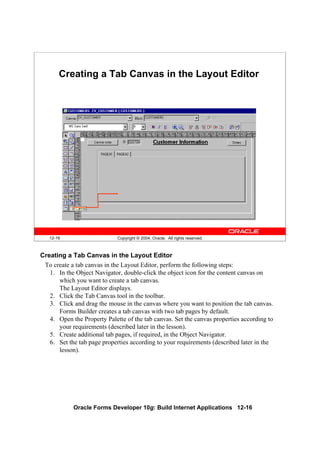
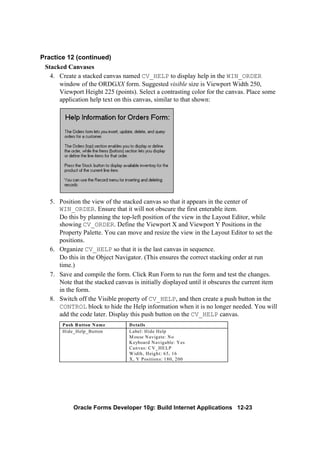
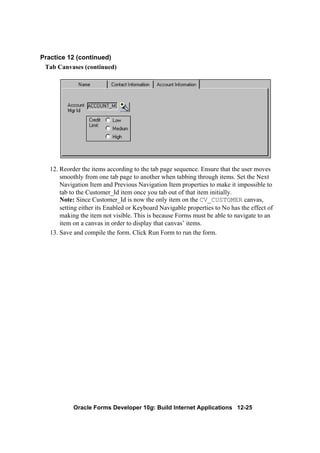
![Oracle Forms Developer 10g: Build Internet Applications 12-7
Creating a Stacked Canvas (continued)
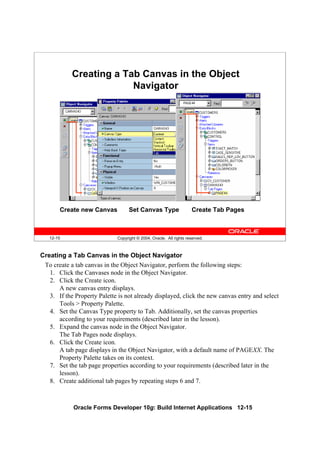
How to Create a Stacked Canvas in the Object Navigator
To create a stacked canvas in the Object Navigator, perform the following steps:
1. Click the Canvases node in the Object Navigator.
2. Click the Create icon.
A new canvas entry displays with a default name of CANVASXX.
3. If the Property Palette is not already displayed, click the new canvas entry and select
Tools > Property Palette.
4. Set the Canvas Type property to Stacked. Additionally, set the properties that are
described later in this lesson according to your requirements.
5. Ensure that the stacked canvas is below the content canvas in the Object Navigator.
Note: To convert an existing content canvas to a stacked canvas, change its Canvas Type
property value from Content to Stacked.
In order for the stacked canvas to display properly at run time, make sure that its position
in the stacking order places it in front of the content canvas assigned to the same window.
The stacking order of canvases is defined by the sequence in which they appear in the
Object Navigator.
Displaying Stacked Canvases in the Layout Editor
You can display a stacked canvas as it sits over the content canvas in the Layout Editor.
Check the display position of stacked canvases by doing the following:
• Select View > Stacked Views in the Layout Editor. The Stacked/Tab Canvases
dialog box is displayed, with a list of all the stacked canvases assigned to the same
window as the current content canvas.
• Select the stacked canvases you want to display in the Layout Editor.
Note: [Ctrl] + click to clear a stacked canvas that was previously selected.
Instructor Note
Demonstration: Create a stacked canvas. Show the stacked canvas in the Layout Editor.
Show the stacked canvas at run time.](https://image.slidesharecdn.com/oracleformsdeveloper10gvol1-130429005213-phpapp02/85/Oracle-forms-developer-10g-vol1-353-320.jpg)