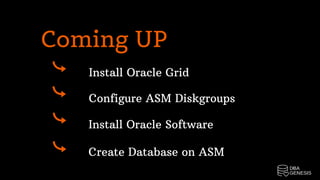
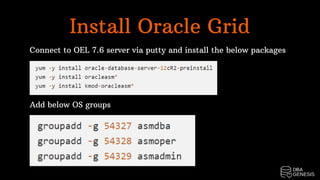
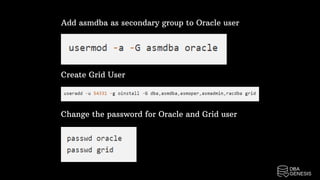
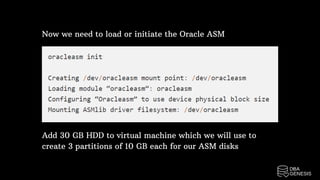
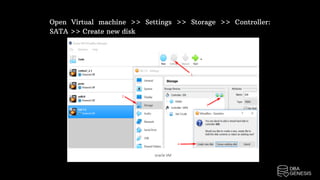
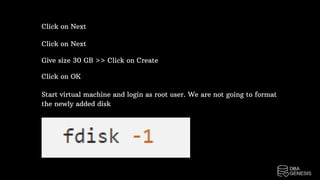
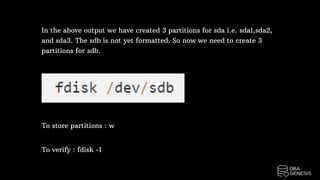
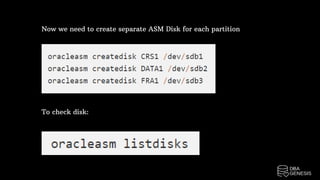
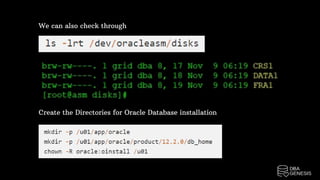
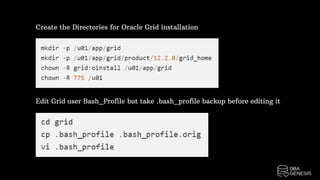
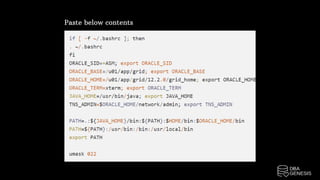
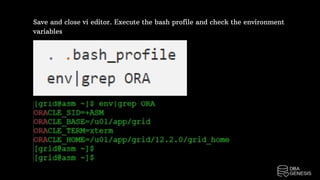
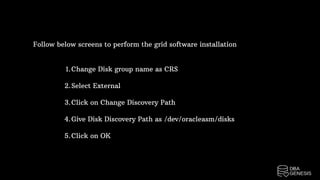
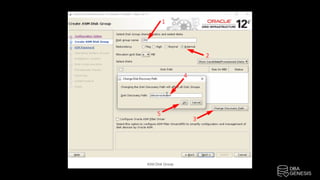
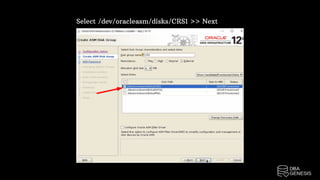
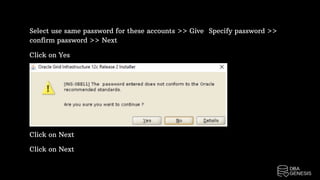
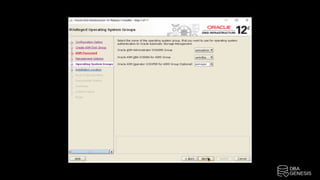
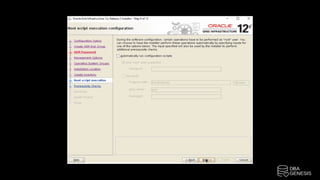
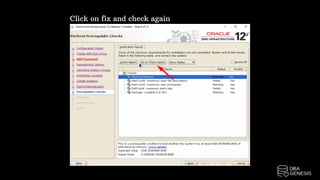
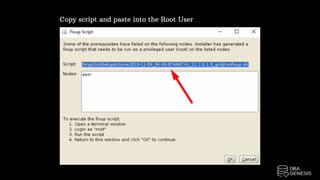
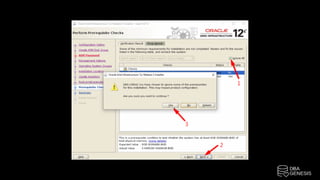
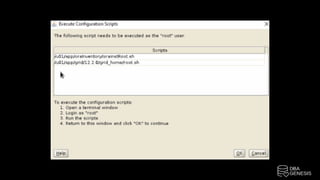
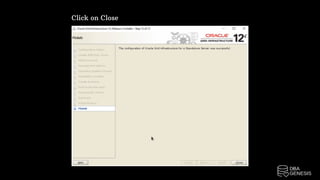
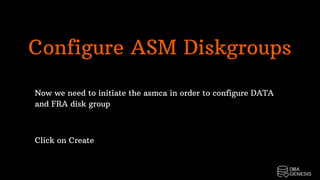
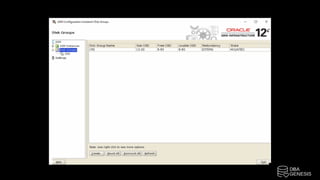
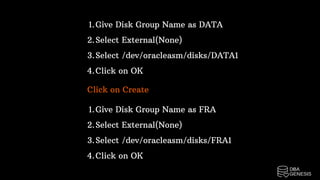
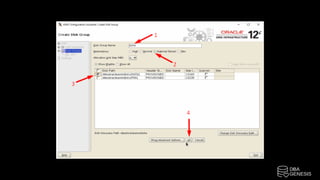
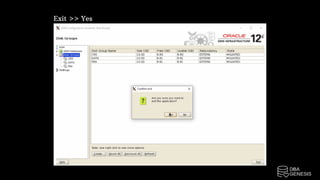
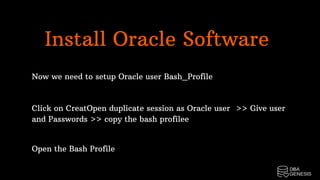
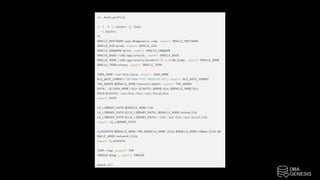
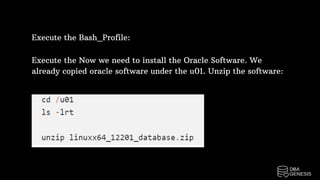
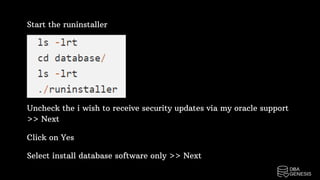
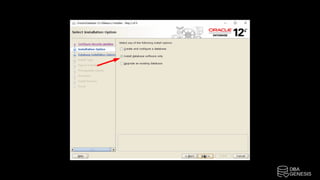
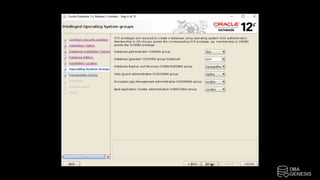
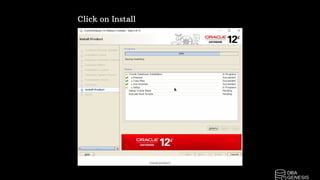
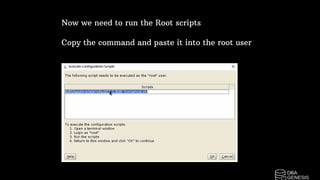
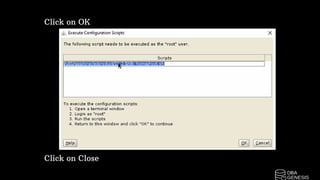
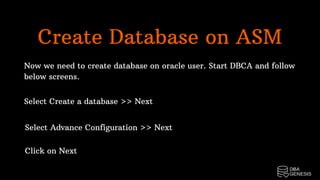
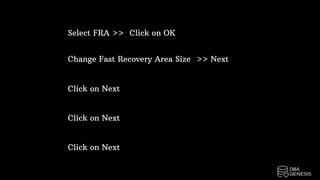
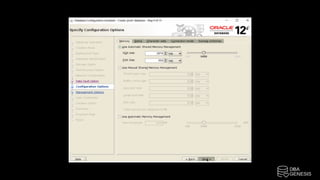
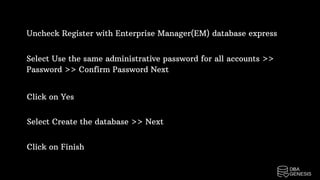
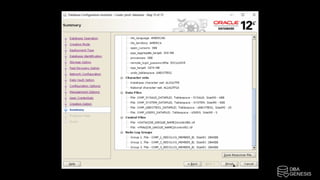
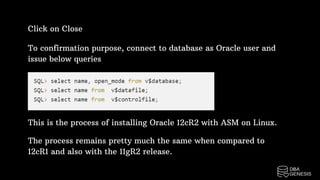
ORACLE 12CR2
INSTALLATION ON
LINUX WITH ASM
Install Oracle Grid
Configure ASM Diskgroups
Install Oracle Software
Create Database on ASM
Coming UP
Install Oracle Grid
Connect to OEL 7.6 server via putty and install the below packages
Add below OS groups
Add asmdba as secondary group to Oracle user
Create Grid User
Change the password for Oracle and Grid user
Let us configure the Oracle ASM
Now we need to load or initiate the Oracle ASM
Add 30 GB HDD to virtual machine which we will use to
create 3 partitions of 10 GB each for our ASM disks
Open Virtual machine >> Settings >> Storage >> Controller:
SATA >> Create new disk
Click on Next
Click on Next
Give size 30 GB >> Click on Create
Click on OK
Start virtual machine and login as root user. We are not going to format
the newly added disk
In the above output we have created 3 partitions for sda i.e. sda1,sda2,
and sda3. The sdb is not yet formatted. So now we need to create 3
partitions for sdb.
To store partitions : w
To verify : fdisk -1
Now we need to create separate ASM Disk for each partition
To check disk:
We can also check through
Create the Directories for Oracle Database installation
Create the Directories for Oracle Grid installation
Edit Grid user Bash_Profile but take .bash_profile backup before editing it
Paste below contents
Save and close vi editor. Execute the bash profile and check the environment
variables
Let’s proceed with Grid Installation
Copy the grid 12cR2 under grid home and unzip the software
Start the gridSetup.sh which will install grid software. Make sure xming is
up and running on your windows machine
Follow below screens to perform the grid software installation
Change Disk group name as CRS
Select External
Click on Change Discovery Path
Give Disk Discovery Path as /dev/oracleasm/disks
Click on OK
1.
2.
3.
4.
5.
Select /dev/oracleasm/disks/CRS1 >> Next
Select use same password for these accounts >> Give  Specify password >>
confirm password >> Next
Click on Yes
Click on Next
Click on Next
Click on Next
Click on Next
Click on Next
Click on fix and check again
Copy script and paste into the Root User
Click on OK
Ignore All
Next
Yes
1.
2.
3.
Click on Install
Wait till the installation is completed
Copy first command and run on the root user
Copy second command and run on the root user
Click on OK
Click on Close
Configure ASM Diskgroups
Now we need to initiate the asmca in order to configure DATA
and FRA disk group
Click on Create
Give Disk Group Name as DATA
Select External(None)
Select /dev/oracleasm/disks/DATA1
Click on OK
1.
2.
3.
4.
Click on Create
Give Disk Group Name as FRA
Select External(None)
Select /dev/oracleasm/disks/FRA1
Click on OK
1.
2.
3.
4.
Exit >> Yes
Install Oracle Software
Now we need to setup Oracle user Bash_Profile
Click on CreatOpen duplicate session as Oracle user  >> Give user
and Passwords >> copy the bash profilee
Open the Bash Profile
Execute the Bash_Profile:
Execute the Now we need to install the Oracle Software. We
already copied oracle software under the u01. Unzip the software:
Start the runinstaller
Uncheck the i wish to receive security updates via my oracle support
>> Next
Click on Yes
Select install database software only >> Next
Click On Next
Click On Next
Click On Next
Click On Next
Click on Install
Now we need to run the Root scripts
Copy the command and paste it into the root user
Click on OK
Click on Close
Create Database on ASM
Now we need to create database on oracle user. Start DBCA and follow
below screens.
Select Create a database >> Next
Select Advance Configuration >> Next
Click on Next
Give Global Database name as prod
Unable Create as container database
Click on Next
1.
2.
3.
Select Use following for the database storage attributes >> Browse
Select DATA >> Click on OK
Click on Next
Select specific fast recovery area >> Browse
Select FRA >>  Click on OK
Click on Next
Change Fast Recovery Area Size  >> Next
Click on Next
Click on Next
Uncheck Register with Enterprise Manager(EM) database express
Select Use the same administrative password for all accounts >>
Password >> Confirm Password Next
Click on Yes
Select Create the database >> Next
Click on Finish
To confirmation purpose, connect to database as Oracle user and
issue below queries
Click on Close
This is the process of installing Oracle 12cR2 with ASM on Linux.
The process remains pretty much the same when compared to
12cR1 and also with the 11gR2 release.
Oracle 12cR2 Installation On Linux With ASM

Oracle 12cR2 Installation On Linux With ASM

  • 1.
  • 2.
    Install Oracle Grid ConfigureASM Diskgroups Install Oracle Software Create Database on ASM Coming UP
  • 3.
    Install Oracle Grid Connectto OEL 7.6 server via putty and install the below packages Add below OS groups
  • 4.
    Add asmdba assecondary group to Oracle user Create Grid User Change the password for Oracle and Grid user
  • 5.
    Let us configurethe Oracle ASM
  • 6.
    Now we needto load or initiate the Oracle ASM Add 30 GB HDD to virtual machine which we will use to create 3 partitions of 10 GB each for our ASM disks
  • 7.
    Open Virtual machine>> Settings >> Storage >> Controller: SATA >> Create new disk
  • 8.
    Click on Next Clickon Next Give size 30 GB >> Click on Create Click on OK Start virtual machine and login as root user. We are not going to format the newly added disk
  • 9.
    In the aboveoutput we have created 3 partitions for sda i.e. sda1,sda2, and sda3. The sdb is not yet formatted. So now we need to create 3 partitions for sdb. To store partitions : w To verify : fdisk -1
  • 10.
    Now we needto create separate ASM Disk for each partition To check disk:
  • 11.
    We can alsocheck through Create the Directories for Oracle Database installation
  • 12.
    Create the Directoriesfor Oracle Grid installation Edit Grid user Bash_Profile but take .bash_profile backup before editing it
  • 13.
  • 14.
    Save and closevi editor. Execute the bash profile and check the environment variables
  • 15.
    Let’s proceed withGrid Installation Copy the grid 12cR2 under grid home and unzip the software Start the gridSetup.sh which will install grid software. Make sure xming is up and running on your windows machine
  • 16.
    Follow below screensto perform the grid software installation Change Disk group name as CRS Select External Click on Change Discovery Path Give Disk Discovery Path as /dev/oracleasm/disks Click on OK 1. 2. 3. 4. 5.
  • 18.
  • 19.
    Select use samepassword for these accounts >> Give  Specify password >> confirm password >> Next Click on Yes Click on Next Click on Next
  • 21.
    Click on Next Clickon Next Click on Next
  • 23.
    Click on fixand check again
  • 24.
    Copy script andpaste into the Root User
  • 25.
    Click on OK IgnoreAll Next Yes 1. 2. 3.
  • 27.
    Click on Install Waittill the installation is completed Copy first command and run on the root user Copy second command and run on the root user Click on OK
  • 29.
  • 30.
    Configure ASM Diskgroups Nowwe need to initiate the asmca in order to configure DATA and FRA disk group Click on Create
  • 32.
    Give Disk GroupName as DATA Select External(None) Select /dev/oracleasm/disks/DATA1 Click on OK 1. 2. 3. 4. Click on Create Give Disk Group Name as FRA Select External(None) Select /dev/oracleasm/disks/FRA1 Click on OK 1. 2. 3. 4.
  • 34.
  • 35.
    Install Oracle Software Nowwe need to setup Oracle user Bash_Profile Click on CreatOpen duplicate session as Oracle user  >> Give user and Passwords >> copy the bash profilee Open the Bash Profile
  • 37.
    Execute the Bash_Profile: Executethe Now we need to install the Oracle Software. We already copied oracle software under the u01. Unzip the software:
  • 38.
    Start the runinstaller Uncheckthe i wish to receive security updates via my oracle support >> Next Click on Yes Select install database software only >> Next
  • 40.
    Click On Next ClickOn Next Click On Next Click On Next
  • 42.
  • 43.
    Now we needto run the Root scripts Copy the command and paste it into the root user
  • 44.
  • 45.
    Create Database onASM Now we need to create database on oracle user. Start DBCA and follow below screens. Select Create a database >> Next Select Advance Configuration >> Next Click on Next
  • 47.
    Give Global Databasename as prod Unable Create as container database Click on Next 1. 2. 3. Select Use following for the database storage attributes >> Browse Select DATA >> Click on OK Click on Next Select specific fast recovery area >> Browse
  • 48.
    Select FRA >> Click on OK Click on Next Change Fast Recovery Area Size  >> Next Click on Next Click on Next
  • 50.
    Uncheck Register withEnterprise Manager(EM) database express Select Use the same administrative password for all accounts >> Password >> Confirm Password Next Click on Yes Select Create the database >> Next Click on Finish
  • 52.
    To confirmation purpose,connect to database as Oracle user and issue below queries Click on Close This is the process of installing Oracle 12cR2 with ASM on Linux. The process remains pretty much the same when compared to 12cR1 and also with the 11gR2 release.