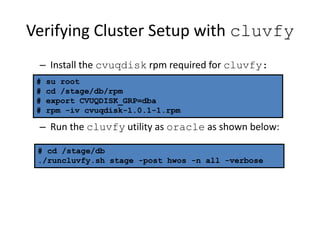
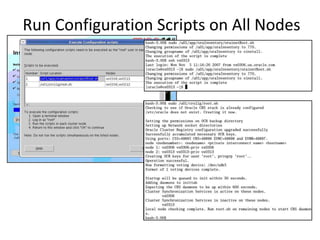
Oracle Clusterware
Installation and Configuration
Objectives
• After completing this lesson, you should be able to:
– Describe the installation of Oracle RAC
– Perform RAC preinstallation tasks
– Perform cluster setup tasks
– Install Oracle Clusterware
Oracle RAC Installation
• Oracle RAC incorporates a two-phase installation
process:
– Phase one installs Oracle Clusterware.
– Phase two installs the Oracle Database software with
RAC.
Oracle RAC Installation: Outline
1. Complete preinstallation tasks:
• Hardware requirements
• Software requirements
• Environment configuration, kernel
parameters, and so on
2. Perform Oracle Clusterware installation.
3. Perform ASM installation.
4. Perform Oracle Database software
installation.
5. Install EM agent on cluster nodes if using Grid Control.
6. Perform cluster database creation.
7. Complete postinstallation tasks.
Preinstallation Tasks
Check system requirements.
Check software requirements.
Check kernel parameters.
Create groups and users.
Perform cluster setup.
Hardware Requirements
– At least 1 GB of physical memory is needed.
– A minimum of 1 GB of swap space is required.
– The /tmp directory should be at least 400 MB.
– The Oracle Database software requires up to 4 GB
of disk space.
# grep MemTotal /proc/meminfo
MemTotal: 1126400 kB
# grep SwapTotal /proc/meminfo
SwapTotal: 1566328 kB
# df -k /tmp
Filesystem 1K-blocks Used Available Use%
/dev/sda6 6198556 3137920 2745756 54%
Network Requirements
– Each node must have at least two network adapters.
– Each public network adapter must support TCP/IP.
– The interconnect adapter must support User Datagram
Protocol (UDP).
– The host name and IP address associated with the public
interface must be registered in the domain name service
(DNS) or the /etc/hosts file.
Virtual IP Addresses and RAC
ERP=(DESCRIPTION=
((HOST=clusnode-1vip))
((HOST=clusnode-2vip))
(SERVICE_NAME=ERP))
clnode-1
ERP=(DESCRIPTION=
((HOST=clusnode-1))
((HOST=clusnode-2))
(SERVICE_NAME=ERP))
Timeout
wait
clnode-2
clnode-1 clnode-2
2
5
3
7
clnode-1vip
clnode-2vip
2
clnode-1vip
clnode-2vip
3
4
7
Clients
1
4
6
1
5
6
RAC Network Software Requirements
– Supported interconnect software protocols are
required:
• TCP/IP
• UDP
– Token Ring is not supported on AIX platforms.
Package Requirements
– Package versions are checked by the cluvfy utility.
– For example, required packages and versions for Red
Hat 4.0 and Oracle Enterprise Linux 4 include:
• glibc-2.3.4-2.25
• glibc-common-2.3.4.2-25
• glibc-devel-2.3.4.2-25
• gcc-3.4.6-3
• gcc-c++-3.4.6-3
• libaio-0.3.105-2
• libaio-devel-0.3.105-2
• libstdc++-3.4.6-3.1
• make-3.80-6
• sysstat-5.0.5-11
Required UNIX Groups and Users
– Create an oracle user, a dba, and an oinstall
group on each node:
– Verify the existence of the nobody nonprivileged user:
# groupadd -g 500 oinstall
# groupadd -g 501 dba
# useradd -u 500 -d /home/oracle -g "oinstall" 
–G "dba" -m -s /bin/bash oracle
# grep nobody /etc/passwd
Nobody:x:99:99:Nobody:/:/sbin/nobody
oracle User Environment
– Set umask to 022 (New file permission)
– Set the DISPLAY environment variable.
– Set the ORACLE_BASE environment variable.
– Set the TMP and TMPDIR variables, if needed.
$ cd
$ vi .bash_profile
umask 022
ORACLE_BASE=/u01/app/oracle; export ORACLE_BASE
TMP=/u01/mytmp; export TMP
TMPDIR=$TMP; export TMPDIR
User Shell Limits
– Add the following lines to the
/etc/security/limits.conf file:
nproc – threads
nofile – description
– Add the following line to the /etc/pam.d/login file:
login - rules for local (console login)
* soft nproc 2047
* hard nproc 16384
* soft nofile 1024
* hard nofile 65536
session required
/lib/security/pam_limits.so
Configuring for Remote Installation
• To configure Secure Shell:
1. Create the public and private keys on all nodes:
2. Concatenate id_dsa.pub from all nodes into the
authorized_keys file on the first node:
3. Copy the authorized_keys file to the other nodes:
[vx0044]$ /usr/bin/ssh-keygen -t dsa
[vx0045]$ /usr/bin/ssh-keygen -t dsa
[vx0044]$ ssh vx0044 "cat ~/.ssh/id_dsa.pub" >> 
~/.ssh/authorized_keys
[vx0044]$ ssh vx0045 "cat ~/.ssh/id_dsa.pub" >> 
~/.ssh/authorized_keys
[vx0044]$ scp ~/.ssh/authorized_keys vx0045:/home/oracle/.ssh/
Required Directories for the
Oracle Database Software
• You must identify five directories for the Oracle
database software:
– Oracle base directory
– Oracle inventory directory
– Oracle Clusterware home directory
– Oracle home directory for the database
– Oracle home directory for ASM
Cluster Setup Tasks
1. View the Certifications by Product section at
http://metalink.oracle.com/.
2. Verify your high-speed interconnects.
3. Determine the shared storage (disk) option for your
system:
• OCFS or other shared file system solution
• Raw devices
• ASM
ASM cannot be used for the OCR and Voting Disk files!
4. Install the necessary operating system patches.
Verifying Cluster Setup with cluvfy
– Install the cvuqdisk rpm required for cluvfy:
– Run the cluvfy utility as oracle as shown below:
# su root
# cd /stage/db/rpm
# export CVUQDISK_GRP=dba
# rpm -iv cvuqdisk-1.0.1-1.rpm
# cd /stage/db
./runcluvfy.sh stage -post hwos -n all -verbose
Installing Oracle Clusterware
$ export ORACLE_BASE=/u01/app/oracle
$ /stage/db/runInstaller
Specifying the Inventory Directory
Specify Home Details
Product-Specific Prerequisite Checks
Cluster Configuration
Private Interconnect Enforcement
Oracle Cluster Registry File
Voting Disk File
Summary and Install
Run Configuration Scripts on All Nodes
End of Installation
Verifying the Oracle Clusterware
Installation
– Check for Oracle Clusterware processes with the ps
command.
– Check the Oracle Clusterware startup entries in the
/etc/inittab file.
# cat /etc/inittab
# Run xdm in runlevel 5
x:5:respawn:/etc/X11/prefdm -nodaemon
h1:35:respawn:/etc/init.d/init.evmd run >/dev/null
2>&1 </dev/null
h2:35:respawn:/etc/init.d/init.cssd fatal >/dev/null
2>&1 </dev/null
h3:35:respawn:/etc/init.d/init.crsd run >/dev/null
2>&1 </dev/null
Summary
• In this lesson, you should have learned how to:
– Describe the installation of Oracle RAC 11g
– Perform RAC preinstallation tasks
– Perform cluster setup tasks
– Install Oracle Clusterware
Practice 1: Overview
• This practice covers the following topics:
– Performing initial cluster configuration
– Installing Oracle Clusterware

les01.pdf

  • 1.
  • 2.
    Objectives • After completingthis lesson, you should be able to: – Describe the installation of Oracle RAC – Perform RAC preinstallation tasks – Perform cluster setup tasks – Install Oracle Clusterware
  • 3.
    Oracle RAC Installation •Oracle RAC incorporates a two-phase installation process: – Phase one installs Oracle Clusterware. – Phase two installs the Oracle Database software with RAC.
  • 4.
    Oracle RAC Installation:Outline 1. Complete preinstallation tasks: • Hardware requirements • Software requirements • Environment configuration, kernel parameters, and so on 2. Perform Oracle Clusterware installation. 3. Perform ASM installation. 4. Perform Oracle Database software installation. 5. Install EM agent on cluster nodes if using Grid Control. 6. Perform cluster database creation. 7. Complete postinstallation tasks.
  • 5.
    Preinstallation Tasks Check systemrequirements. Check software requirements. Check kernel parameters. Create groups and users. Perform cluster setup.
  • 6.
    Hardware Requirements – Atleast 1 GB of physical memory is needed. – A minimum of 1 GB of swap space is required. – The /tmp directory should be at least 400 MB. – The Oracle Database software requires up to 4 GB of disk space. # grep MemTotal /proc/meminfo MemTotal: 1126400 kB # grep SwapTotal /proc/meminfo SwapTotal: 1566328 kB # df -k /tmp Filesystem 1K-blocks Used Available Use% /dev/sda6 6198556 3137920 2745756 54%
  • 7.
    Network Requirements – Eachnode must have at least two network adapters. – Each public network adapter must support TCP/IP. – The interconnect adapter must support User Datagram Protocol (UDP). – The host name and IP address associated with the public interface must be registered in the domain name service (DNS) or the /etc/hosts file.
  • 8.
    Virtual IP Addressesand RAC ERP=(DESCRIPTION= ((HOST=clusnode-1vip)) ((HOST=clusnode-2vip)) (SERVICE_NAME=ERP)) clnode-1 ERP=(DESCRIPTION= ((HOST=clusnode-1)) ((HOST=clusnode-2)) (SERVICE_NAME=ERP)) Timeout wait clnode-2 clnode-1 clnode-2 2 5 3 7 clnode-1vip clnode-2vip 2 clnode-1vip clnode-2vip 3 4 7 Clients 1 4 6 1 5 6
  • 9.
    RAC Network SoftwareRequirements – Supported interconnect software protocols are required: • TCP/IP • UDP – Token Ring is not supported on AIX platforms.
  • 10.
    Package Requirements – Packageversions are checked by the cluvfy utility. – For example, required packages and versions for Red Hat 4.0 and Oracle Enterprise Linux 4 include: • glibc-2.3.4-2.25 • glibc-common-2.3.4.2-25 • glibc-devel-2.3.4.2-25 • gcc-3.4.6-3 • gcc-c++-3.4.6-3 • libaio-0.3.105-2 • libaio-devel-0.3.105-2 • libstdc++-3.4.6-3.1 • make-3.80-6 • sysstat-5.0.5-11
  • 11.
    Required UNIX Groupsand Users – Create an oracle user, a dba, and an oinstall group on each node: – Verify the existence of the nobody nonprivileged user: # groupadd -g 500 oinstall # groupadd -g 501 dba # useradd -u 500 -d /home/oracle -g "oinstall" –G "dba" -m -s /bin/bash oracle # grep nobody /etc/passwd Nobody:x:99:99:Nobody:/:/sbin/nobody
  • 12.
    oracle User Environment –Set umask to 022 (New file permission) – Set the DISPLAY environment variable. – Set the ORACLE_BASE environment variable. – Set the TMP and TMPDIR variables, if needed. $ cd $ vi .bash_profile umask 022 ORACLE_BASE=/u01/app/oracle; export ORACLE_BASE TMP=/u01/mytmp; export TMP TMPDIR=$TMP; export TMPDIR
  • 13.
    User Shell Limits –Add the following lines to the /etc/security/limits.conf file: nproc – threads nofile – description – Add the following line to the /etc/pam.d/login file: login - rules for local (console login) * soft nproc 2047 * hard nproc 16384 * soft nofile 1024 * hard nofile 65536 session required /lib/security/pam_limits.so
  • 14.
    Configuring for RemoteInstallation • To configure Secure Shell: 1. Create the public and private keys on all nodes: 2. Concatenate id_dsa.pub from all nodes into the authorized_keys file on the first node: 3. Copy the authorized_keys file to the other nodes: [vx0044]$ /usr/bin/ssh-keygen -t dsa [vx0045]$ /usr/bin/ssh-keygen -t dsa [vx0044]$ ssh vx0044 "cat ~/.ssh/id_dsa.pub" >> ~/.ssh/authorized_keys [vx0044]$ ssh vx0045 "cat ~/.ssh/id_dsa.pub" >> ~/.ssh/authorized_keys [vx0044]$ scp ~/.ssh/authorized_keys vx0045:/home/oracle/.ssh/
  • 15.
    Required Directories forthe Oracle Database Software • You must identify five directories for the Oracle database software: – Oracle base directory – Oracle inventory directory – Oracle Clusterware home directory – Oracle home directory for the database – Oracle home directory for ASM
  • 16.
    Cluster Setup Tasks 1.View the Certifications by Product section at http://metalink.oracle.com/. 2. Verify your high-speed interconnects. 3. Determine the shared storage (disk) option for your system: • OCFS or other shared file system solution • Raw devices • ASM ASM cannot be used for the OCR and Voting Disk files! 4. Install the necessary operating system patches.
  • 17.
    Verifying Cluster Setupwith cluvfy – Install the cvuqdisk rpm required for cluvfy: – Run the cluvfy utility as oracle as shown below: # su root # cd /stage/db/rpm # export CVUQDISK_GRP=dba # rpm -iv cvuqdisk-1.0.1-1.rpm # cd /stage/db ./runcluvfy.sh stage -post hwos -n all -verbose
  • 18.
    Installing Oracle Clusterware $export ORACLE_BASE=/u01/app/oracle $ /stage/db/runInstaller
  • 19.
  • 20.
  • 21.
  • 22.
  • 23.
  • 24.
  • 25.
  • 26.
  • 27.
  • 28.
  • 29.
    Verifying the OracleClusterware Installation – Check for Oracle Clusterware processes with the ps command. – Check the Oracle Clusterware startup entries in the /etc/inittab file. # cat /etc/inittab # Run xdm in runlevel 5 x:5:respawn:/etc/X11/prefdm -nodaemon h1:35:respawn:/etc/init.d/init.evmd run >/dev/null 2>&1 </dev/null h2:35:respawn:/etc/init.d/init.cssd fatal >/dev/null 2>&1 </dev/null h3:35:respawn:/etc/init.d/init.crsd run >/dev/null 2>&1 </dev/null
  • 30.
    Summary • In thislesson, you should have learned how to: – Describe the installation of Oracle RAC 11g – Perform RAC preinstallation tasks – Perform cluster setup tasks – Install Oracle Clusterware
  • 31.
    Practice 1: Overview •This practice covers the following topics: – Performing initial cluster configuration – Installing Oracle Clusterware