Downloaded 225 times

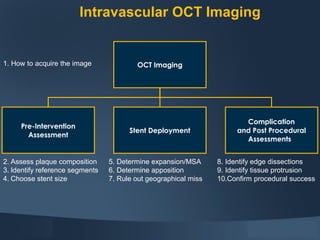


1. OCT imaging provides high-resolution cross-sectional images of coronary arteries and stents to assess plaque, guide stent sizing and placement, and confirm procedural success. 2. The OCT catheter is advanced to the region of interest and an automated pullback acquires images as flush media clears blood from the field of view. Images can be used to characterize plaque, measure vessel and stent dimensions, check apposition and expansion, and detect complications. 3. OCT has advantages over IVUS like superior resolution and ability to identify details like thin-cap fibroatheroma, but it also has limitations such as limited tissue penetration and the need for flush media that adds contrast load.


