
More Related Content
What's hot
Similar to My evaluation
Similar to My evaluation (20)
More from taylerday
My evaluation
- 1. AS Media Preliminary Task Create a Front Cover and Contents page for a College magazine. Evaluation
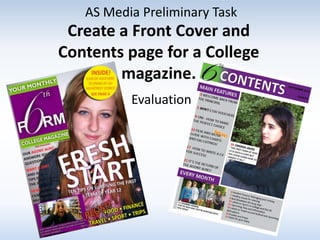
- 2. In what ways does your media product use, develop or challenge forms and conventions of real media products? Flash Masthead Date Line Cover Lines Main Image, following rule of thirds Main Cover Line Footer Insert
- 3. How is your media product different to real media products? On my magazine cover, I used drop shadow on all the text to make it stand out from the main image. This is an effect that is not seen on real magazines. I have also used a broader colour scheme and than what is normally used on real covers. The use of orange and yellow is for enticing the audience to look at these features on the cover. However the white, purple and green are the initial colour scheme.
- 4. In what ways does your media product use, develop or challenge forms and conventions of real media products? Title, matching the masthead on the cover. Date/Issue Main Image Description for Main Image Sub-headings for contents Contents list Features in this Features magazine are indicated by a heart.
- 5. How is your media product different to real media products? My contents page has two images on it as I added an insert to emphasise the ‘Student Council’ page. My contents are also separated into 2 categories: ‘Main Features’ and ‘Every Month’. This is not a very popular layout amongst real magazines but I used it because it makes the main stories/features look more important and worth reading.
- 6. What have you learnt about the technologies from the process of constructing this product? I used a digital camera to take my photos for my magazine. When using the camera, I experimented with angles and backgrounds to produce an interesting set of photos. I kept in mind the rule of thirds to make my photos look professional. To manipulate images and create my magazine cover, I used Adobe Photoshop. I learnt how to use the different tools to make the images look professional, neat and appealing to the audience. I then used the text tool, auto shapes and blending options to create the features on the cover. Then, to create my contents page, I used the desktop publishing programme, Adobe InDesign. I placed my cover onto one page and completed my contents on the other by placing in my manipulated images and using the tools available on the programme. Finally I uploaded my work onto this blog. I learnt how to create posts on an account on blogger.com and I created an account on slideshare.net to upload my PowerPoints. To upload my drafts completed on Word, I converted the documents into PDFs and then into JPEGs. I used a scanner to upload my hand-drawn draft of my magazine cover. This was then manipulated to make the pencil lines more clear. I did this by uploading the scan of my draft onto Photoshop and altering brightness and contrast. It was then uploaded to the blog.
- 7. How I used Adobe Photoshop to create my magazine cover Firstly I manipulated my original image using tools such as brightness and contrast, spot healing tool, burn and dodge tool and blur tool. I then created the masthead using auto shapes and the text tool. To make the text in the masthead more eye- catching, I added a drop shadow to make it stand out against the purple and green and to make it look less flat. I also added drop shadow to the rest of the text on the cover except for the flash to make it clear to read against the main image. The insert was also manipulated in Photoshop and is used to emphasise the article on University.
- 8. How I used Adobe InDesign to create my contents page. Before using InDesign, I manipulated the photos on Photoshop so that they looked bright and professional. Then, I placed my completed front cover onto page 1 and started creating my contents on page 2. I used the shape tools to add the banner for the title and for the boxes behind the contents. I used drop shadow effect on the word ‘Contents’ to make it bolder and less flat. I cropped and resized the images to make them fit so that all the boxes and images were in line with equal spaces.