The document provides instructions for projecting media from different sources using a projector and switch box. To project from a computer, turn on the projector, wait for it to warm up, set the switch box to input A, and turn on the computer. To project from a VCR, follow similar warm up steps, turn on the VCR, and press the video button. To project from a laptop, connect it to the VGA cable after warming up the projector, set the switch box to input B, and turn on the laptop. Contact the AV manager if issues arise.
This instruction manual provides directions for safely operating three Digital Movie Camera models: VPC-HD1010EX, VPC-HD1010, and VPC-HD1010GX. It reviews important safety information and contains guides for setup, basic shooting and playback, and using the cameras advanced features through the Simple and Normal modes. Accessories like the docking station and remote control are also explained. The manual aims to help users fully utilize and enjoy their camera's digital video recording capabilities.
This document provides instructions for using the basic functions of a Dell Media Center computer, including playing DVDs, viewing digital photos, watching and recording TV (if the computer has a TV tuner), and listening to music. It describes the buttons on the included remote control and how to navigate the Media Center interface using either the remote or mouse/keyboard. Notes are provided about input options and playback features for different media types.
This document provides the user manual for the ICAM FHD 18 Full High Definition Video Camera. It describes the key features of the camera including its 5 megapixel sensor for HD video recording, 3" LCD touchscreen, and HDMI port for viewing videos on an HDTV. The manual guides the user through set up, operation and customization of the camera, covering topics such as inserting batteries and memory cards, navigating the menu system, taking photos and videos, and transferring media to other devices. Functions like zoom, lighting effects, and resolution settings are also explained.
Sz804 720 p&1200p_pen mini dv user manual_20110622george david
The document provides instructions for operating an HD DV camera, including how to power it on/off, switch modes, take photos and videos, use motion detection, access the removable disk, charge the battery, and set the date/time using the included PC tools software.
This document provides an overview and instructions for using Windows Movie Maker 2 (MM2) for basic digital video editing. It explains the MM2 interface and components, how to set up a project by selecting options and saving it, how to import video clips, photos, audio and music files, and how to capture new video from a connected device. The goal is to guide students and others through the basic movie making process in MM2 from start to finish.
This document provides an overview of the operation flow for a Sony digital HD video camera. It begins with checking supplied items, charging the battery pack, setting the date and time, and making setting adjustments. It then covers selecting the recording media, basic recording and playback functions, saving, editing, and dubbing images. Additional sections provide details on customizing settings, troubleshooting, and specifications. The document is an owner's manual that teaches users how to utilize the full capabilities of the camera.
This document provides an overview and operating guide for the Sony NEX-FS100E/FS100P/FS100EK/FS100PK interchangeable lens digital HD video camera recorder. It includes notes on proper use, handling, recording, playback, and troubleshooting. Safety tips are provided such as not holding the camera by certain parts, not recording the sun directly, and allowing the camera to cool if a temperature warning appears. Formatting recording media is recommended if images are not recording or playing back properly.
This document provides instructions for using a 720P HD camcorder. It has functions for video recording, photography, audio recording, and use as a PC camera or removable disk. The camcorder starts in video mode and can switch between modes. It uses buttons to control functions like starting/stopping recording, taking photos, and switching modes. Files are saved automatically. It requires charging via USB and has indicators to show charging status.
Smart Home, What They Want from Smart Home – Survey ReportJAKPATAPP
A survey of 1,003 respondents in Indonesia found the following:
- Over 60% were familiar with the term "smart home" and understood its definition.
- Security and convenience were seen as the top benefits of a smart home, selected by over half of respondents.
- Most respondents felt security was more important than ease of use when considering a smart home.
- Professional monitoring and alerts about intruders or leaks were the most desired smart home services.
The document provides instructions for connecting a computer to either a projector or television to give presentations. It discusses the differences between projectors and televisions, and then provides step-by-step setup guides for connecting various types of computers (laptops and desktops) to projection or TV displays using connectors like HDMI, S-Video, or requiring a scan converter. Setup instructions are given for 5 different scenarios depending on the user's available equipment and ports.
Usability Testing on Mobile Devices - No More Excuses!UXPA Boston
This document describes two setup options for conducting usability testing on mobile devices remotely. Setup 1 involves using two laptops, one to capture and share the screen of the mobile device being tested and the other to record the session. This allows observers to view both the screen and participant's face. Setup 2 only requires one device but is limited to iPhones. The document provides details on equipment, software, and steps needed for Setup 1 to help overcome barriers to remote mobile testing.
This user manual provides instructions for setting up and using a community computer called K-Yan. K-Yan is an all-in-one device that includes a projector, computer, and speakers. It can be used to project presentations, videos, and access the internet for community members. The manual covers unpacking K-Yan, setting up the projection area, starting up and shutting down the computer and projector, and basic projector controls. Contact information is also provided for technical support.
The document provides instructions for using audiovisual equipment to conduct distance learning sessions between two classrooms. Key points:
1. The system can operate in Stand Alone mode for local presentations or VTC (Video Teleconference) mode to conduct distance learning.
2. In VTC Teach mode, the teacher's laptop display is shown on Projector 1 while the remote classroom is seen on Projector 2.
3. In VTC Learn mode, the remote classroom is seen on both projectors while allowing interaction between classrooms.
4. Buttons on the Front Row panel control the projectors and switching between modes, while the Touch Pad is used to manage camera views and place calls.
1. The document provides instructions for using a DVR watch, including charging, recording videos, transferring files to a computer, and setting the system time.
2. It details the watch's functions such as video recording, photo taking, memory capacity, battery life, and USB connectivity.
3. The instructions explain how to power on the watch, start recording, save videos, and transfer files by connecting the watch to a computer via USB. Settings like the system time can be adjusted by connecting the watch to a computer and running a configuration file.
Marywood University has approximately 70 technology-equipped classrooms across campus. These classrooms contain equipment like projectors, computers, DVD/VCR players, and some have cameras or portable units. The document provides instructions on how to operate this equipment, including turning on the projector and amplifier, using the computers and DVD/VCR players, connecting a laptop to project, and using the sympodium or whiteboard functions. Users are reminded to turn off all equipment when finished.
1. The document discusses various types of audio-visual equipment used for educational purposes, including projectors, screens, and audio equipment.
2. It describes different types of projectors like slide projectors, transparency projectors, and digital projectors. It also covers screens and components of projector systems.
3. The document also outlines different types of audio equipment such as CD players, turntables, and speakers. It discusses technologies used in broadcasting like television and components of a TV system.
The document provides instructions for using a Polycom video conferencing system, including its main components and how to operate the ViewStation, monitors, microphones, remote control, and other devices. It describes how to turn on the equipment, adjust cameras and volume, select sources, connect directly to other locations manually or via an address book, and contact technical support.
This document describes how to build an internet-enabled push button that triggers an email notification. The project uses a Particle Photon microcontroller, push button, resistor, and jumper cables wired together. It also requires a Pushingbox account to set up the email notification "scenario". The steps include creating a scenario in Pushingbox, setting up the Particle Photon, wiring the circuit, writing code to flash to the Photon, and testing the button by receiving a test email. Pushing the button should then trigger an email through the Pushingbox notification system.
This document provides instructions for an introductory lesson on the micro:pi. Learners will connect remotely to the micro:pi using RDP and run Python programs using Mu to familiarize themselves with its components like the buzzer, LEDs, buttons, and OLED display. The document explains how to set up a WiFi hotspot, power up the micro:pi, connect remotely, and run example programs to test the components.
This document provides instructions for an introductory lesson on the micro:pi. Learners will explore components of the micro:pi to develop an awareness of its capabilities. They will connect to the micro:pi remotely using RDP and run Python programs from the Mu integrated development environment. By checking that the buzzer, LEDs, buttons and OLED display are working when running sample programs, learners will gain an understanding of how the programs function. The document includes steps to set up a mobile hotspot and remote desktop connection to load and run example Python programs using the micro:pi's components.
Making apps for the Apple TV:
-What is the Apple TV?
-AirPlay
-Adding AirPlay support to iOS apps
-Testing AirPlay in the iOS simulator
-Design considerations
Video from NSScotland 2014 at: https://vimeo.com/album/3132071/video/111942376
Presented at NSScotland 2014 and LiDG November 2014
This document provides instructions for using various equipment in a televideo conference room, including:
1. The remote control for dialing numbers, adjusting volume, controlling cameras, and zooming.
2. Speakers and microphones for audio, making sure to control volume with the remote, not the TV. Microphones can be muted.
3. A Polycom telephone for point-to-point or multi-point audio calls by dialing numbers provided and adjusting volume.
4. Projecting a laptop by connecting with a VGA cable and video sharing software, then clicking share to project the screen.
5. Peripherals like a document camera, digital stethoscope, and
User Manual for Qditor V3, an all-in-one video editor which can help you easily make cool videos with the most powerful editing functions and hundreds of built-in effects.
Set up Google Assistant
20
VIII. Battery
The battery is not removable. Please fully charge the battery before first
use. When the battery is low, please recharge in time.
IX .Firmware Upgrading Procedures
1. Download the latest firmware package from the manufacturer's
website. Make sure the firmware is compatible with your tablet model.
2. Copy the firmware package to the root directory of the tablet's
internal storage or external SD card.
3. Power off the tablet and then power it on while pressing and holding
the "Reset" button located at the bottom of the tablet.
4. When the upgrade mode menu appears, use the volume buttons
KALYAN CHART SATTA MATKA DPBOSS KALYAN MATKA RESULTS KALYAN MATKA MATKA RESULT KALYAN MATKA TIPS SATTA MATKA MATKA COM MATKA PANA JODI TODAY BATTA SATKA MATKA PATTI JODI NUMBER MATKA RESULTS MATKA CHART MATKA JODI SATTA COM INDIA SATTA MATKA MATKA TIPS MATKA WAPKA ALL MATKA RESULT LIVE ONLINE MATKA RESULT KALYAN MATKA RESULT DPBOSS MATKA 143 MAIN MATKA KALYAN MATKA RESULTS KALYAN CHART
➒➌➎➏➑➐➋➑➐➐ Satta Matka Dpboss Matka Guessing Indian Matka Satta Matta Matka KALYAN MATKA | MATKA RESULT | KALYAN MATKA TIPS | SATTA MATKA | MATKA.COM | MATKA PANA JODI TODAY | BATTA SATKA | MATKA PATTI JODI NUMBER | MATKA RESULTS | MATKA CHART | MATKA JODI | SATTA COM | FULL RATE GAME | MATKA GAME | MATKA WAPKA | ALL MATKA RESULT LIVE ONLINE | MATKA RESULT | KALYAN MATKA RESULT | DPBOSS MATKA 143 | MAIN MATKA
Unlocking WhatsApp Marketing with HubSpot: Integrating Messaging into Your Ma...Niswey
50 million companies worldwide leverage WhatsApp as a key marketing channel. You may have considered adding it to your marketing mix, or probably already driving impressive conversions with WhatsApp.
But wait. What happens when you fully integrate your WhatsApp campaigns with HubSpot?
That's exactly what we explored in this session.
We take a look at everything that you need to know in order to deploy effective WhatsApp marketing strategies, and integrate it with your buyer journey in HubSpot. From technical requirements to innovative campaign strategies, to advanced campaign reporting - we discuss all that and more, to leverage WhatsApp for maximum impact. Check out more details about the event here https://events.hubspot.com/events/details/hubspot-new-delhi-presents-unlocking-whatsapp-marketing-with-hubspot-integrating-messaging-into-your-marketing-strategy/
Enhancing Adoption of AI in Agri-food: IntroductionCor Verdouw
Introduction to the Panel on: Pathways and Challenges: AI-Driven Technology in Agri-Food, AI4Food, University of Guelph
“Enhancing Adoption of AI in Agri-food: a Path Forward”, 18 June 2024
AI Transformation Playbook: Thinking AI-First for Your BusinessArijit Dutta
I dive into how businesses can stay competitive by integrating AI into their core processes. From identifying the right approach to building collaborative teams and recognizing common pitfalls, this guide has got you covered. AI transformation is a journey, and this playbook is here to help you navigate it successfully.
SATTA MATKA DPBOSS KALYAN MATKA RESULTS KALYAN CHART KALYAN MATKA MATKA RESULT KALYAN MATKA TIPS SATTA MATKA MATKA COM MATKA PANA JODI TODAY BATTA SATKA MATKA PATTI JODI NUMBER MATKA RESULTS MATKA CHART MATKA JODI SATTA COM INDIA SATTA MATKA MATKA TIPS MATKA WAPKA ALL MATKA RESULT LIVE ONLINE MATKA RESULT KALYAN MATKA RESULT DPBOSS MATKA 143 MAIN MATKA KALYAN MATKA RESULTS KALYAN CHART
63662490260Kalyan chart, satta matta matka 143, satta matka jodi fix , matka boss OTC 420, Indian Satta, India matka, matka ank, spbossmatka, online satta matka game play, live satta matka results, fix fix fix satta namber, free satta matka games, Kalyan matka jodi chart, Kalyan weekly final anl matka 420
Tired of chasing down expiring contracts and drowning in paperwork? Mastering contract management can significantly enhance your business efficiency and productivity. This guide unveils expert secrets to streamline your contract management process. Learn how to save time, minimize risk, and achieve effortless contract management.
➒➌➎➏➑➐➋➑➐➐ Satta Matka Dpboss Matka Guessing Indian Matka KALYAN MATKA | MATKA RESULT | KALYAN MATKA TIPS | SATTA MATKA | MATKA.COM | MATKA PANA JODI TODAY | BATTA SATKA | MATKA PATTI JODI NUMBER | MATKA RESULTS | MATKA CHART | MATKA JODI | SATTA COM | FULL RATE GAME | MATKA GAME | MATKA WAPKA | ALL MATKA RESULT LIVE ONLINE | MATKA RESULT | KALYAN MATKA RESULT | DPBOSS MATKA 143 | MAIN MATKA
Discover the Beauty and Functionality of The Expert Remodeling Serviceobriengroupinc04
Unlock your kitchen's true potential with expert remodeling services from O'Brien Group Inc. Transform your space into a functional, modern, and luxurious haven with their experienced professionals. From layout reconfiguration to high-end upgrades, they deliver stunning results tailored to your style and needs. Visit obriengroupinc.com to elevate your kitchen's beauty and functionality today.
High-Quality IPTV Monthly Subscription for $15advik4387
Experience high-quality entertainment with our IPTV monthly subscription for just $15. Access a vast array of live TV channels, movies, and on-demand shows with crystal-clear streaming. Our reliable service ensures smooth, uninterrupted viewing at an unbeatable price. Perfect for those seeking premium content without breaking the bank. Start streaming today!
https://rb.gy/f409dk
➒➌➎➏➑➐➋➑➐➐ Satta Matka Dpboss Matka Guessing Indian Matka KALYAN MATKA | MATKA RESULT | KALYAN MATKA TIPS | SATTA MATKA | MATKA.COM | MATKA PANA JODI TODAY | BATTA SATKA | MATKA PATTI JODI NUMBER | MATKA RESULTS | MATKA CHART | MATKA JODI | SATTA COM | FULL RATE GAME | MATKA GAME | MATKA WAPKA | ALL MATKA RESULT LIVE ONLINE | MATKA RESULT | KALYAN MATKA RESULT | DPBOSS MATKA 143 | MAIN MATKA
SATTA MATKA SATTA FAST RESULT KALYAN TOP MATKA RESULT KALYAN SATTA MATKA FAST RESULT MILAN RATAN RAJDHANI MAIN BAZAR MATKA FAST TIPS RESULT MATKA CHART JODI CHART PANEL CHART FREE FIX GAME SATTAMATKA ! MATKA MOBI SATTA 143 spboss.in TOP NO1 RESULT FULL RATE MATKA ONLINE GAME PLAY BY APP SPBOSS
➒➌➎➏➑➐➋➑➐➐ Satta Matka Dpboss Matka Guessing Indian Matka
KALYAN MATKA | MATKA RESULT | KALYAN MATKA TIPS | SATTA MATKA | MATKA.COM | MATKA PANA JODI TODAY | BATTA SATKA | MATKA PATTI JODI NUMBER | MATKA RESULTS | MATKA CHART | MATKA JODI | SATTA COM | FULL RATE GAME | MATKA GAME | MATKA WAPKA | ALL MATKA RESULT LIVE ONLINE | MATKA RESULT | KALYAN MATKA RESULT | DPBOSS MATKA 143 | MAIN MATKA
➒➌➎➏➑➐➋➑➐➐ Satta Matka Dpboss Matka Guessing Indian Matka
Projector Signs
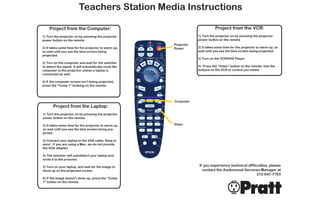
1. Teachers Station Media Instructions
Project from the Computer: Project from the VCR:
1) Turn the projector on by pressing the projector 1) Turn the projector on by pressing the projector
power button on the remote power button on the remote
Projector
2) It takes some time for the projector to warm up, Power 2) It takes some time for the projector to warm up, so
so wait until you see the blue screen being wait until you see the blue screen being projected.
projected.
3) Turn on the VCR/DVD Player.
3) Turn on the computer and wait for the switcher
to detect the signal. It will automatically route the 3) Press the “Video” button on the remote. Use the
computer to the projector unless a laptop is buttons on the VCR to control you media.
connected as well.
4) If the computer screen isn’t being projected,
press the “Comp 1” buttong on the remote.
Computer
Project from the Laptop:
1) Turn the projector on by pressing the projector
power button on the remote.
2) It takes some time for the projector to warm up, Video
so wait until you see the blue screen being pro-
jected.
3) Connect your laptop to the VGA cable. Keep in
mind : if you are using a Mac, we do not provide
the VGA adapter.
4) The switcher will autodetect your laptop and
route it to the proector.
5) Turn on your laptop, and wait for the image to If you experience technical difficulties, please
show up on the projected screen. contact the Audiovisual Services Manager at
212-647-7793
6) If the image doesn’t show up, press the “Comp
1” button on the remote. w14
labs
2. Teachers Station Media Instructions
Project from the Computer: Project from the VCR:
1) Turn the projector on by pressing the projector 1) Turn the projector on by pressing the projector
power button on the remote. power button on the remote
Projector
2) It takes some time for the projector to warm up, Power 2) It takes some time for the projector to warm up, so
so wait until you see the blue screen being wait until you see the blue screen being projected.
projected.
3) Turn on the VCR/DVD Player.
3) Set the switch box dial to “A.”
3) Press the “Video” button on the remote. Use the
4) Turn on the computer. buttons on the VCR to control you media.
5) If the computer screen is not being projected,
press the “Comp 1” button on the remote.
Computer
Project from the Laptop:
1) Turn the projector on by pressing the projec-
tor power button on the remote.
Video
2) It takes some time for the projector to warm
up, so wait until you see the blue screen being
projected.
3) Connect your laptop to the VGA cable. Keep in
mind : if you are using a Mac, we do not provide
the VGA adapter.
4) Set the switch box dial to “B”.
5) Turn on your laptop, and wait for the image to
If you experience technical difficulties, please
show up on the projected screen.
contact the Audiovisual Services Manager at
6) If the image doesn’t show up, press the 212-647-7793
“Comp 1” button on the remote.
w14
labs
3. Teachers Station Media Instructions
Project from the Computer: Project from the VCR:
1) Turn the projector on by pressing the projec- 1) Turn the projector on by pressing the projector
tor power button on the remote. power button on the remote.
Projector
2) It takes some time for the projector to warm Power 2) It takes some time for the projector to warm up, so
up, so wait until you see the blue screen being wait until you see the blue screen being projected.
projected.
3) Once the projector has warmed up, turn on the
3) Set the switch box dial to “A.” VCR/DVD Player.
4) Turn on the computer. 3) Press the “Video” button on the remote. Use the
buttons on the VCR to control your media.
5) If the computer screen is not being projected,
press the “Comp 1” button on the remote.
Project from the Laptop: Computer
1) Turn the projector on by pressing the projec-
tor power button on the remote.
2) It takes some time for the projector to warm
up, so wait until you see the blue screen being
projected.
3) Connect your laptop to the VGA cable. Keep in
mind : if you are using a Mac, we do not provide Video
the VGA adapter.
4) Set the switch box dial to “B”.
If you experience technical difficulties, please
5) Turn on your laptop, and wait for the image to
show up on the projected screen. contact the Audiovisual Services Manager at
212-647-7793.
6) If the image doesn’t show up, press the
w14
“Comp 1” button on the remote.
labs
4. Teachers Station Media Instructions
Project from the Computer: Project from the VCR:
1) Turn the projector on by pressing the projector 1) Turn the projector on by pressing the projector
power button on the remote power button on the remote
Projector
2) It takes some time for the projector to warm up, Power 2) It takes some time for the projector to warm up, so
so wait until you see the blue screen being wait until you see the blue screen being projected.
projected.
3) Turn on the VCR/DVD Player.
3) Turn on the computer and wait for the switcher
to detect the signal. It will automatically route the 3) Press the “Video” button on the remote. Use the
computer to the projector unless a laptop is buttons on the VCR to control you media.
connected as well.
4) If the computer screen isn’t being projected,
press the “Comp 1” buttong on the remote. Computer
Project from the Laptop:
Video
1) Turn the projector on by pressing the projector
power button on the remote.
2) It takes some time for the projector to warm up,
so wait until you see the blue screen being pro-
jected.
3) Connect your laptop to the VGA cable. Keep in
mind : if you are using a Mac, we do not provide
the VGA adapter.
4) The switcher will autodetect your laptop and
route it to the proector. If you experience technical difficulties, please
contact the Audiovisual Services Manager at
5) Turn on your laptop, and wait for the image to
show up on the projected screen. 212-647-7793.
6) If the image doesn’t show up, press the “Comp
1” button on the remote. w14
labs
5. Teachers Station Media Instructions
Project from the Computer: Projector Project from the VCR:
Power
1) Turn the projector on by pressing the projector 1) Turn the projector on by pressing the projector
power button on the remote. power button on the remote.
2) It takes some time for the projector to warm up, so 2) It takes some time for the projector to warm up, so
wait until you see the blue screen being projected. wait until you see the blue screen being projected.
3) Set the switch box dial to “A.” 3) Once the projector has warmed up, turn on the
VCR/DVD Player.
4) Turn on the computer.
3) Press the “Video” button on the remote. Use the
5) If the computer screen is not being projected, buttons on the VCR to control your media.
press the “Comp 1” button on the remote.
Project from the Laptop:
Computer
1) Turn the projector on by pressing the projector
power button on the remote.
2) It takes some time for the projector to warm up, so
wait until you see the blue screen being projected.
3) Connect your laptop to the VGA cable. Keep in
Video
mind : if you are using a Mac, we do not provide the
VGA adapter.
4) Set the switch box dial to “B”.
If you experience technical difficulties, please
5) Turn on your laptop, and wait for the image to contact the Audiovisual Services Manager at
show up on the projected screen. 212-647-7793.
6) If the image doesn’t show up, press the “Comp 1” w14
button on the remote.
labs
6. Teachers Station Media Instructions
Project from the Computer: Project from the VCR:
1) Turn the projector on by pressing the pro- 1) Turn the projector on by pressing the projec-
jector power button on the remote. Projector tor power button on the remote.
Power
2) It takes some time for the projector to 2) It takes some time for the projector to warm
warm up, so wait until you see the blue up, so wait until you see the blue screen being
screen being projected. projected.
3) Set the switch box dial to “A”. 3) Once the projector has warmed up, turn on
the VCR/DVD Player.
4) Turn on the computer.
Video 3) Press the “Video” button on the remote. Use
5) If the computer screen isn’t being pro- the buttons on the VCR to control your media.
jected, press the “Comp 1” button on the
remote.
Computer
Project from the Laptop:
1) Turn the projector on by pressing the
projector power button on the remote
If you experience technical difficulties, please
2) It takes some time for the projector to contact the Audiovisual Services Manager at
warm up, so wait until you see the blue 212-647-7793.
screen being projected.
3) Connect your laptop to the VGA cable.
Keep in mind : if you are using a Mac, we do
not provide the VGA adapter.
4) Set the switch box dial to “B”
5) Turn on your laptop, and wait for the image
to show up on the projected screen.
6) If the image doesn’t show up, press the w14
“Comp 1” button on the remote.
labs