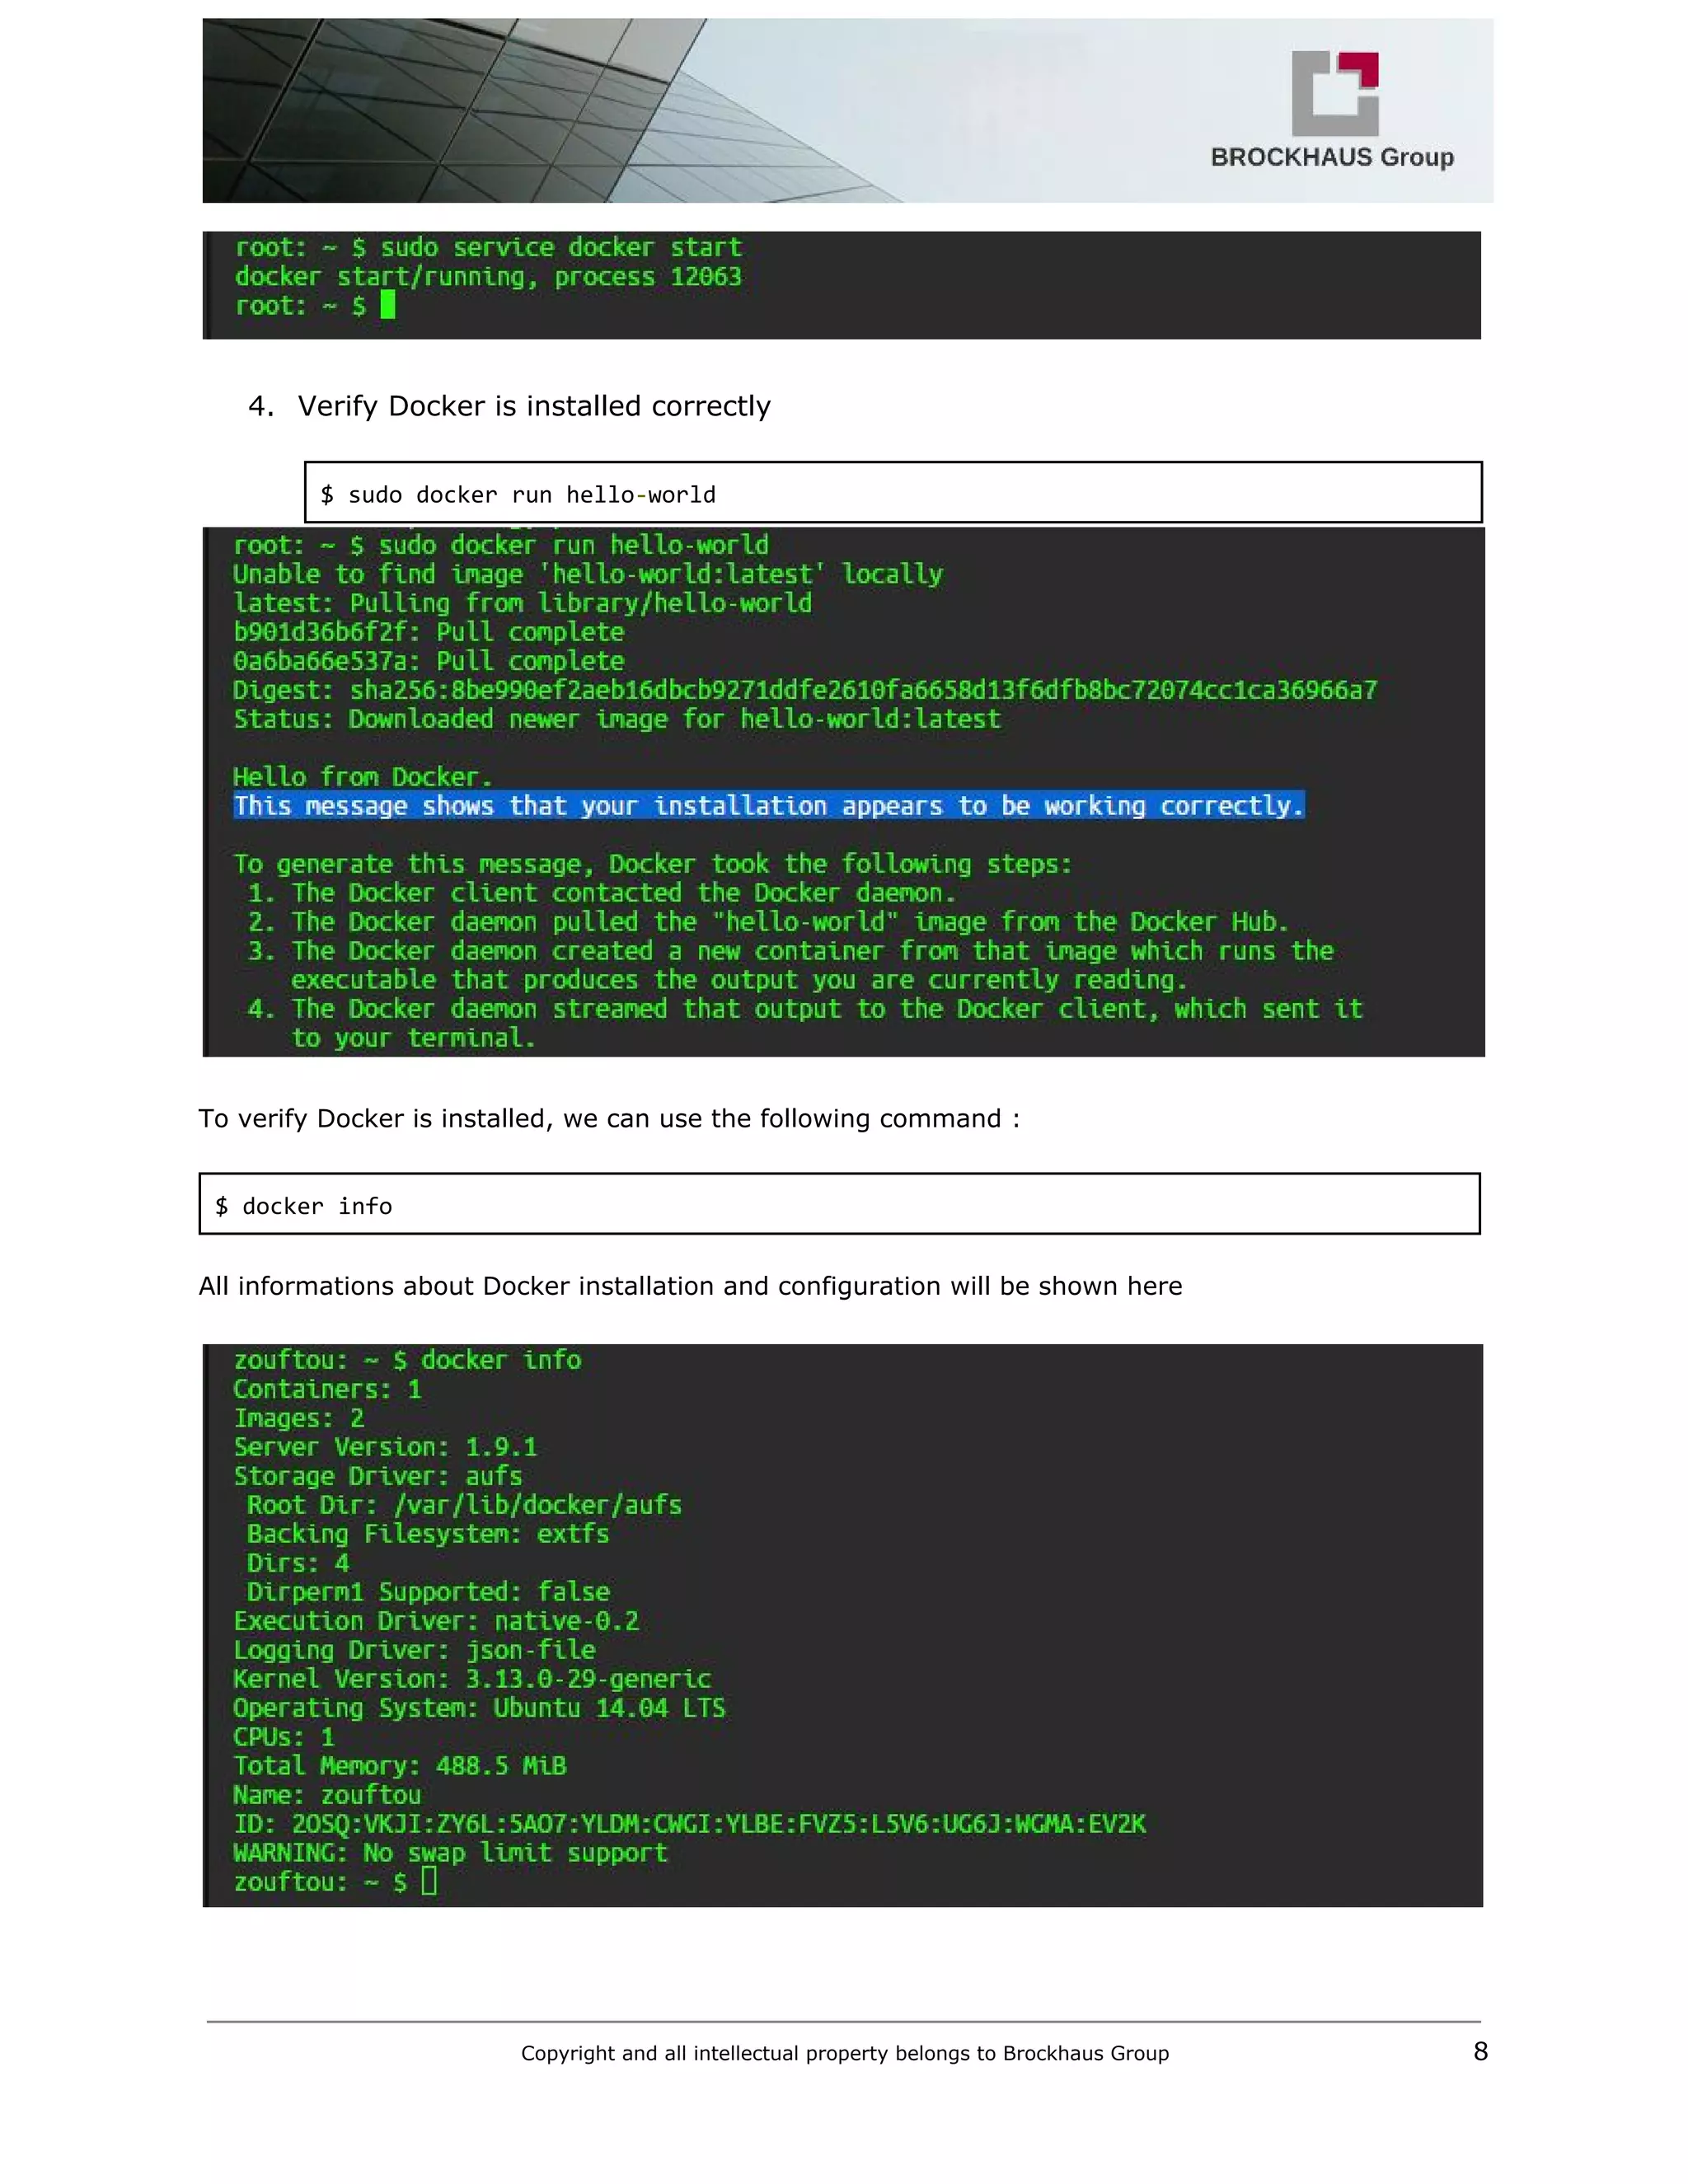
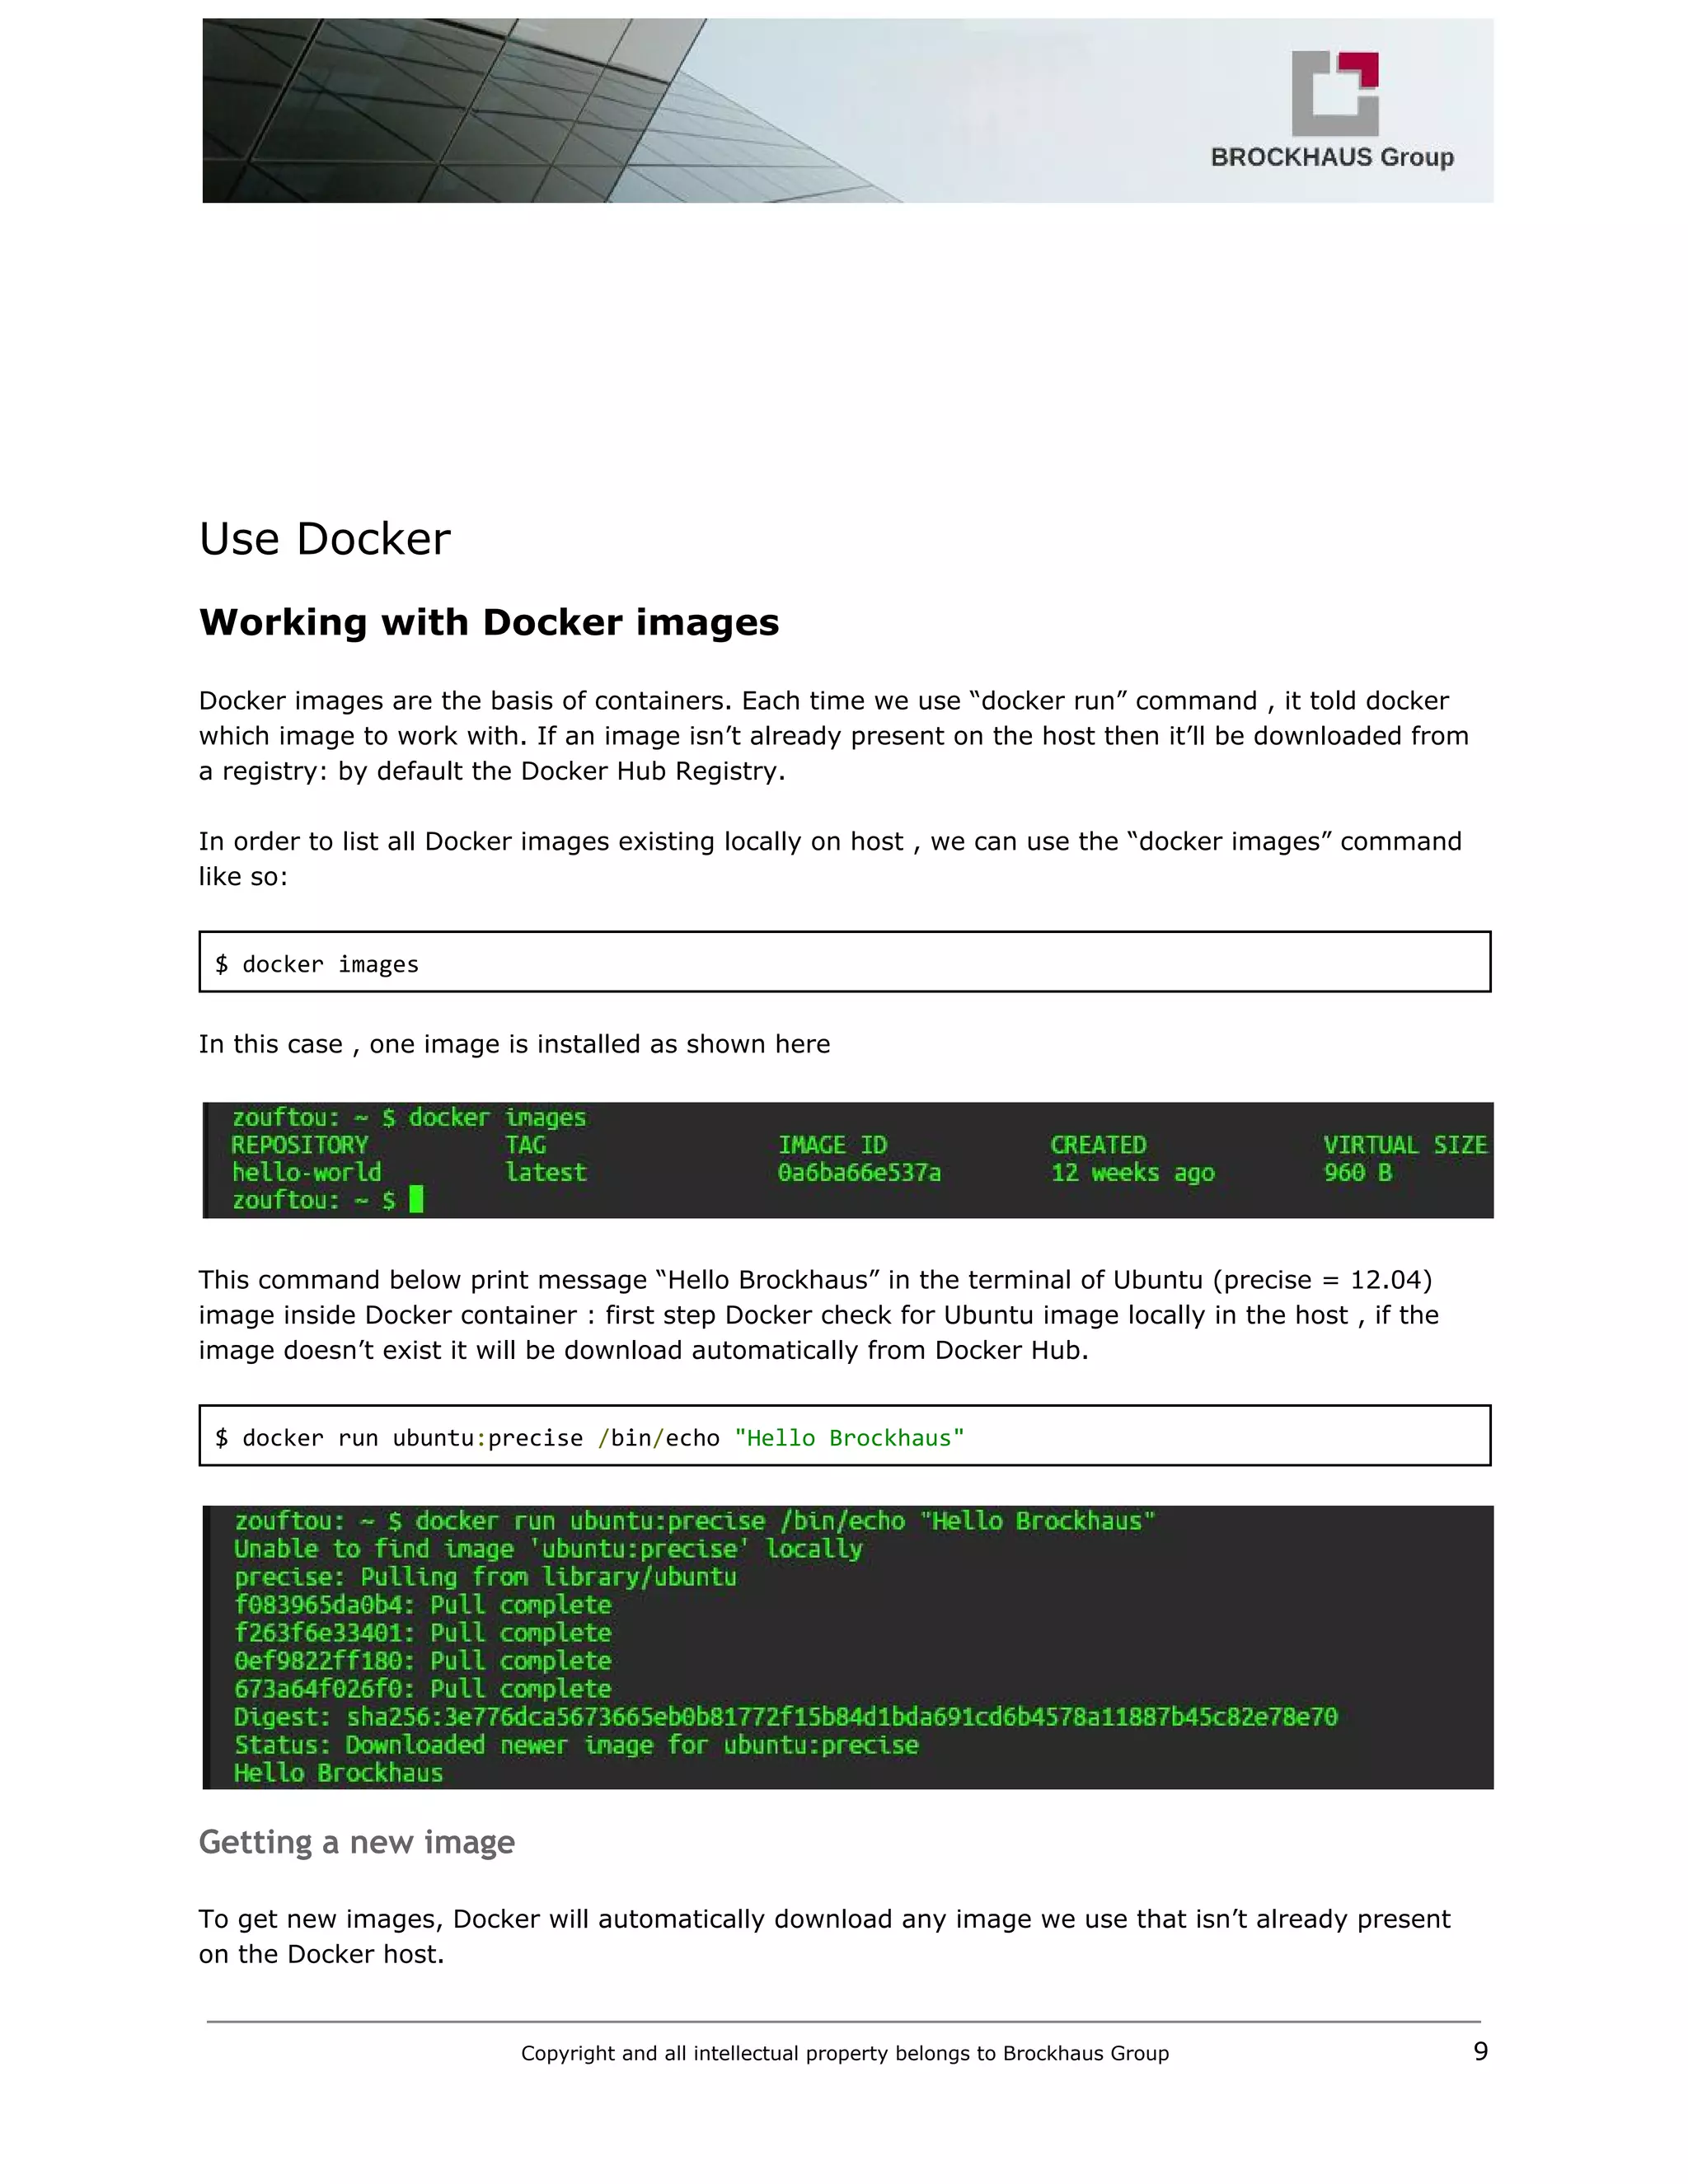
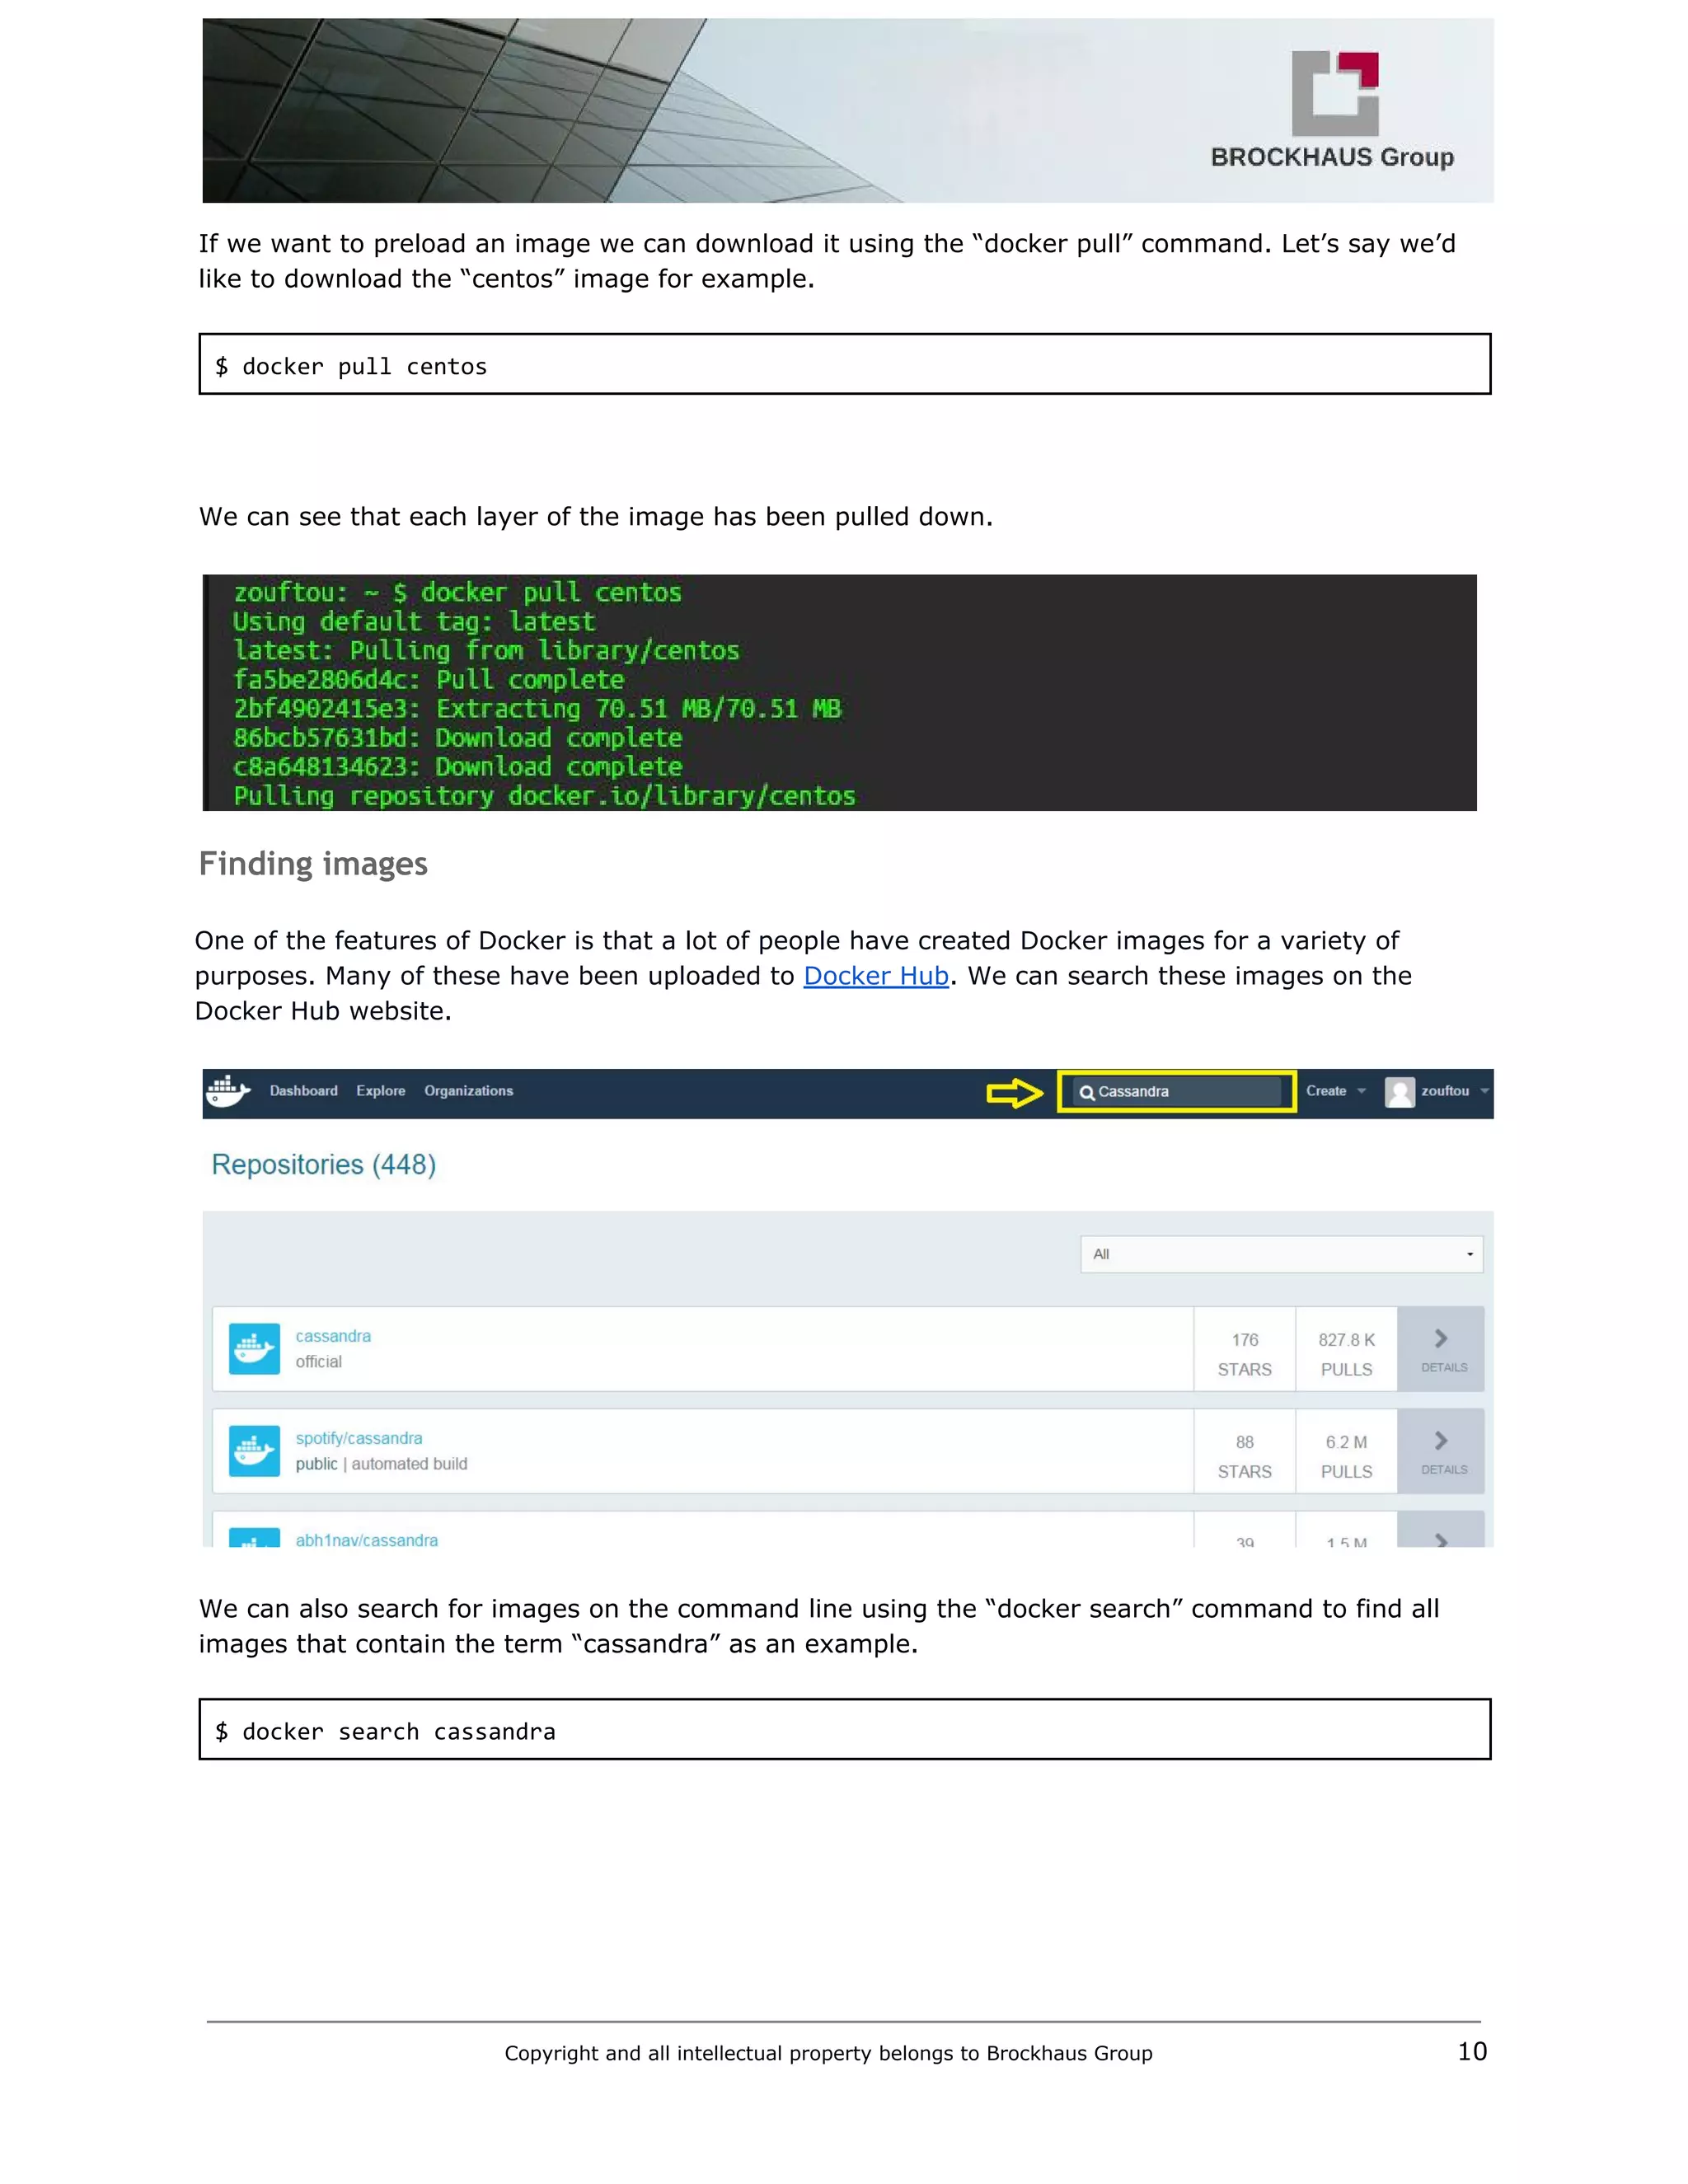
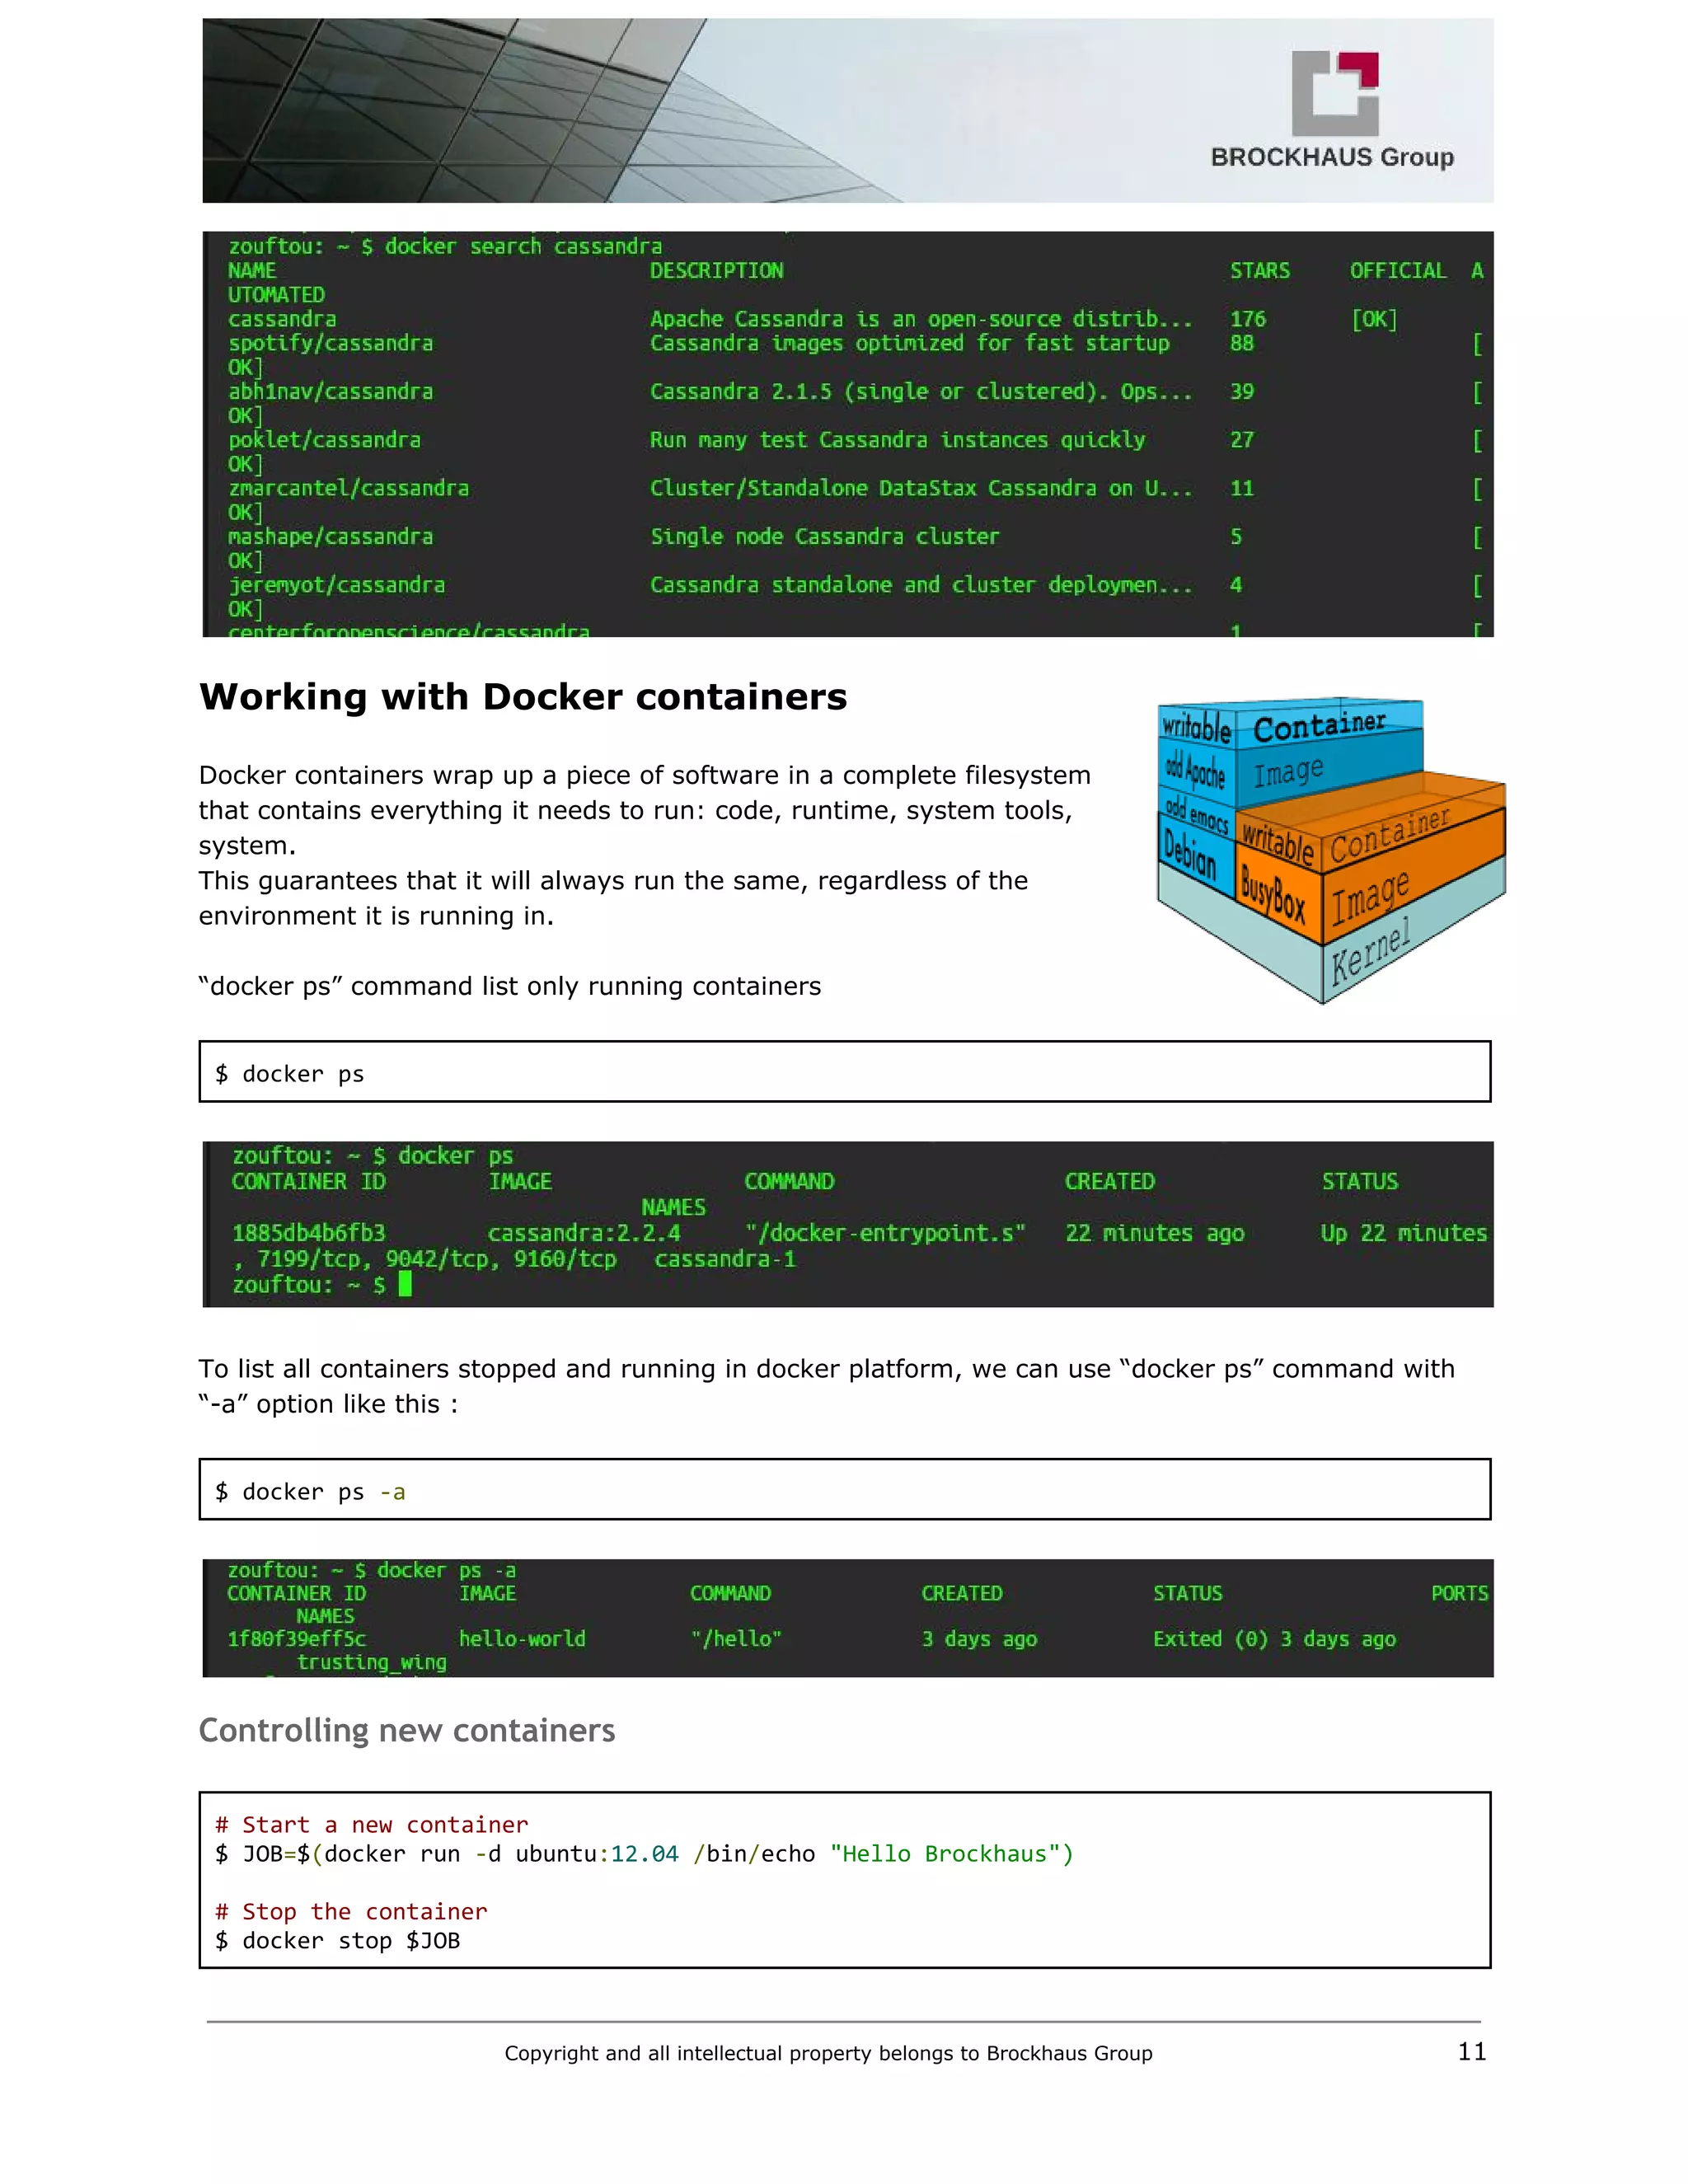
Download to read offline
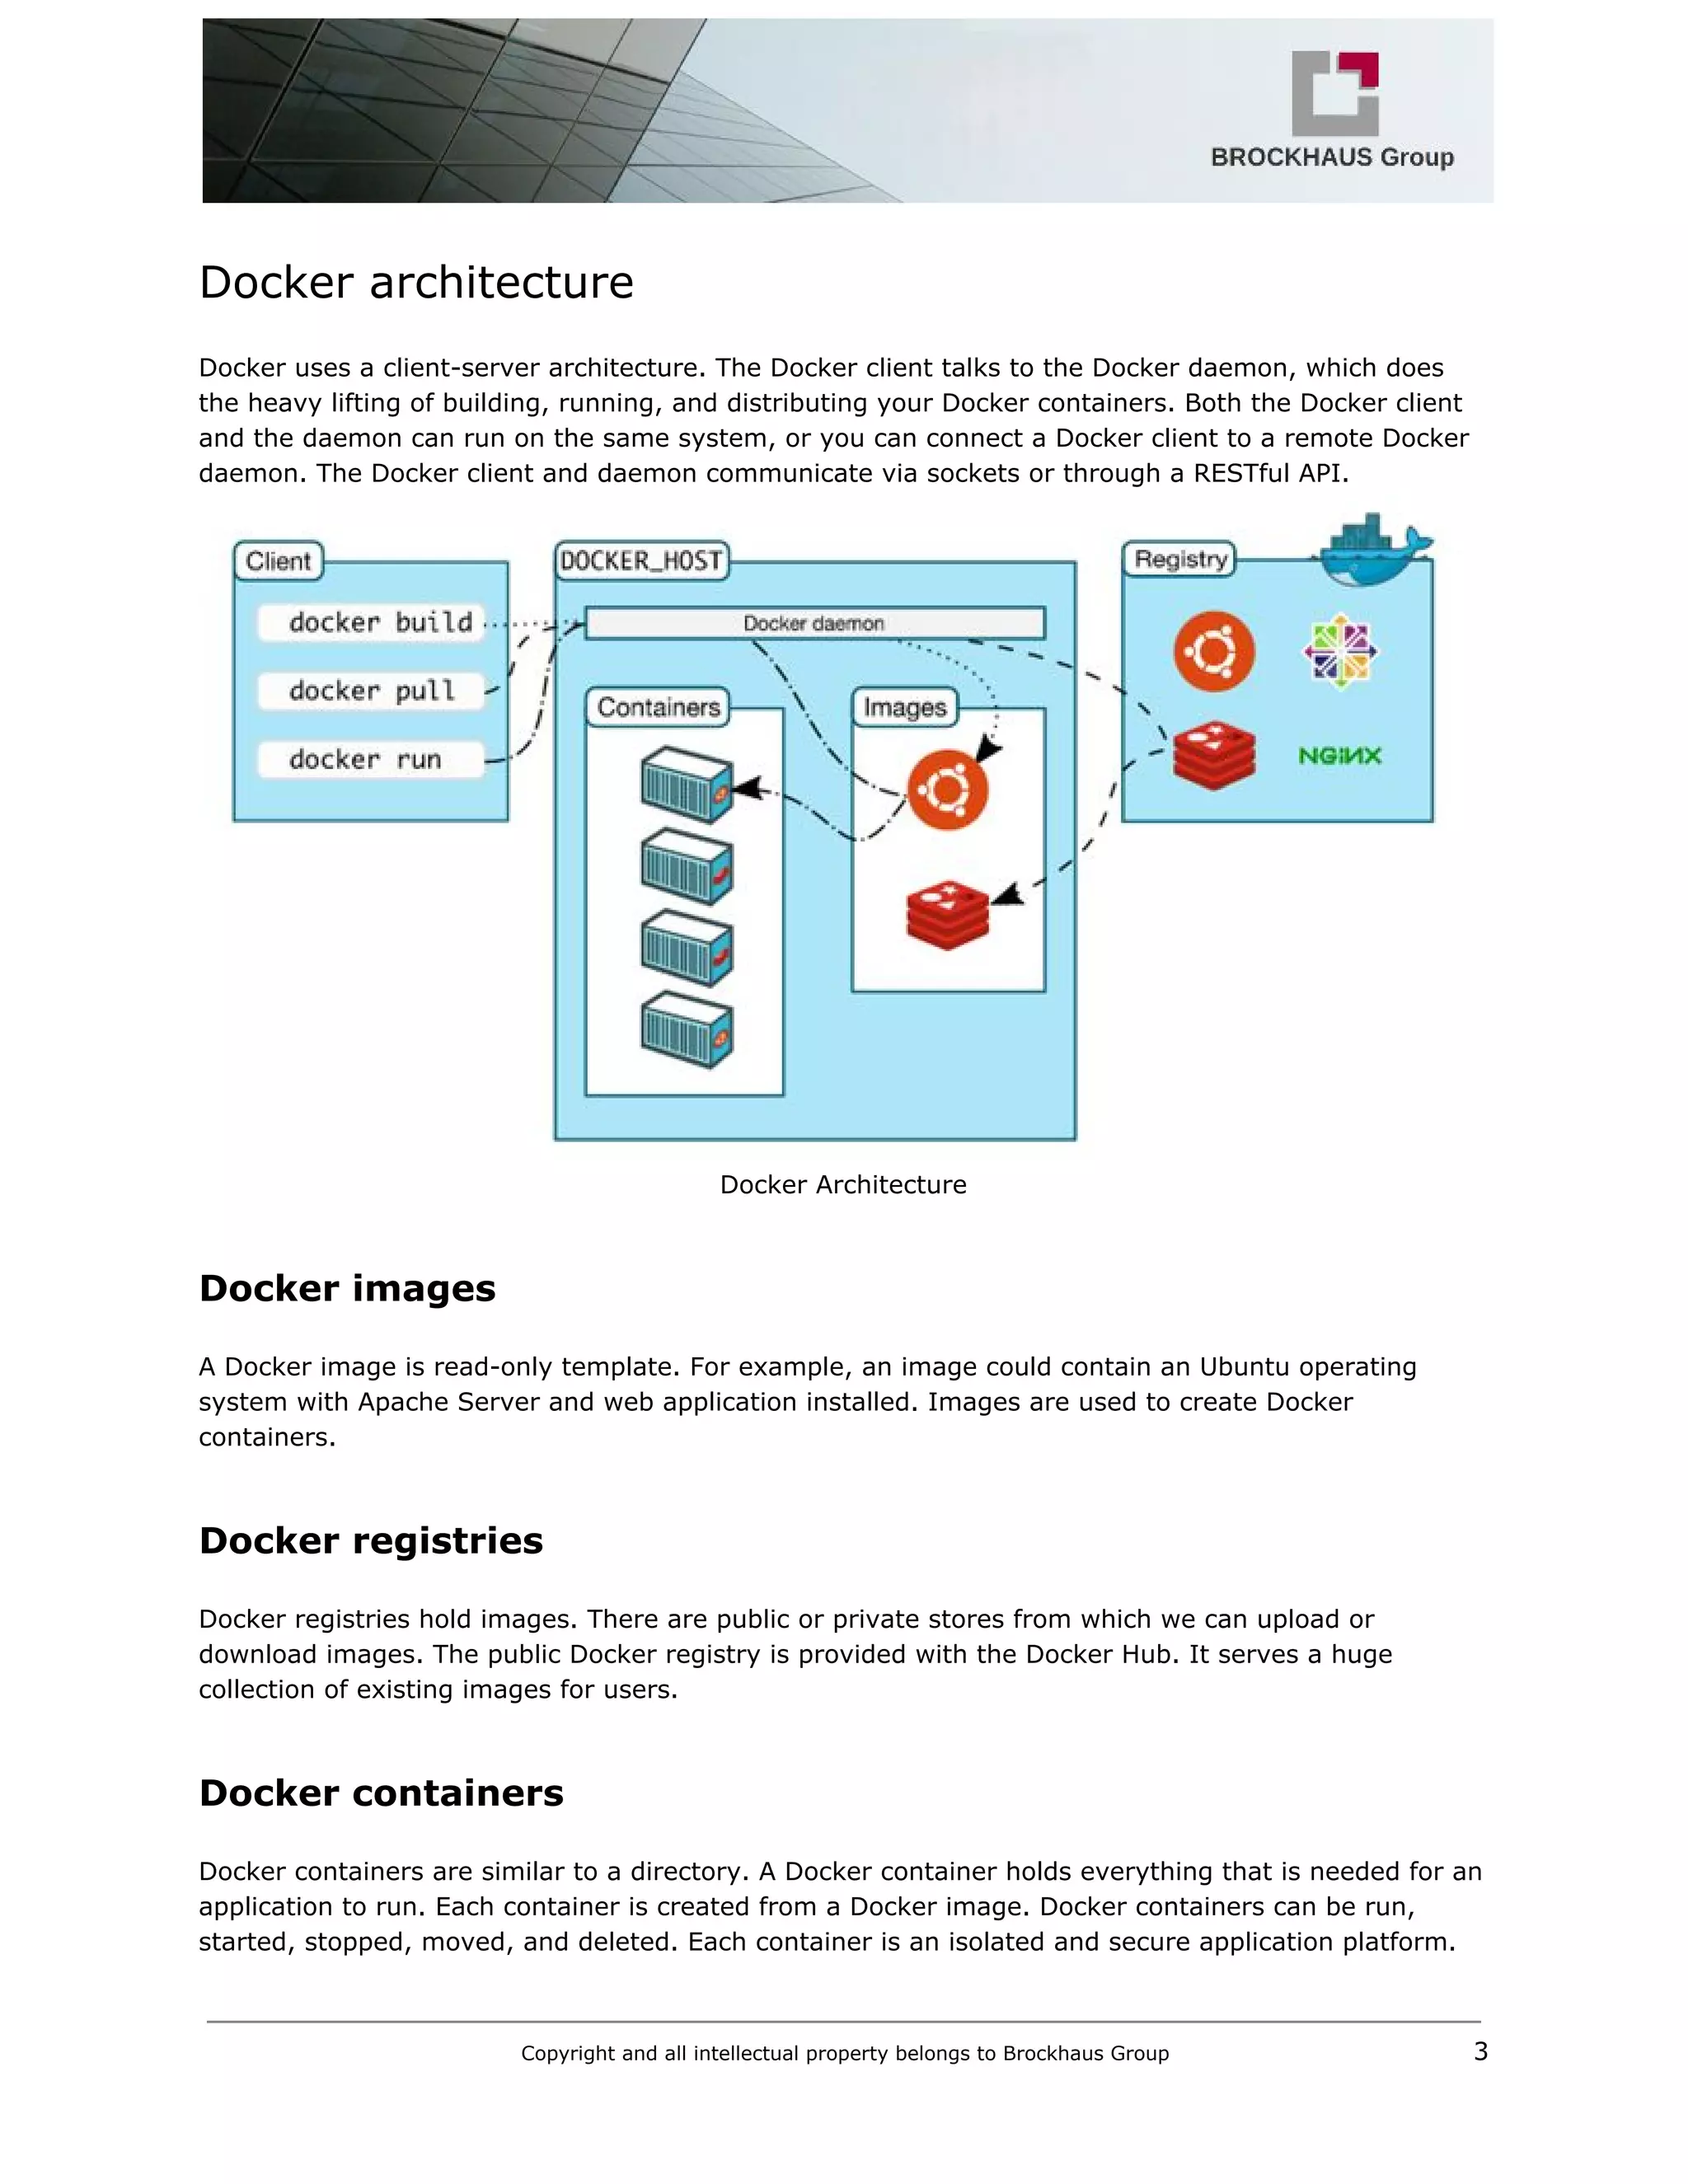
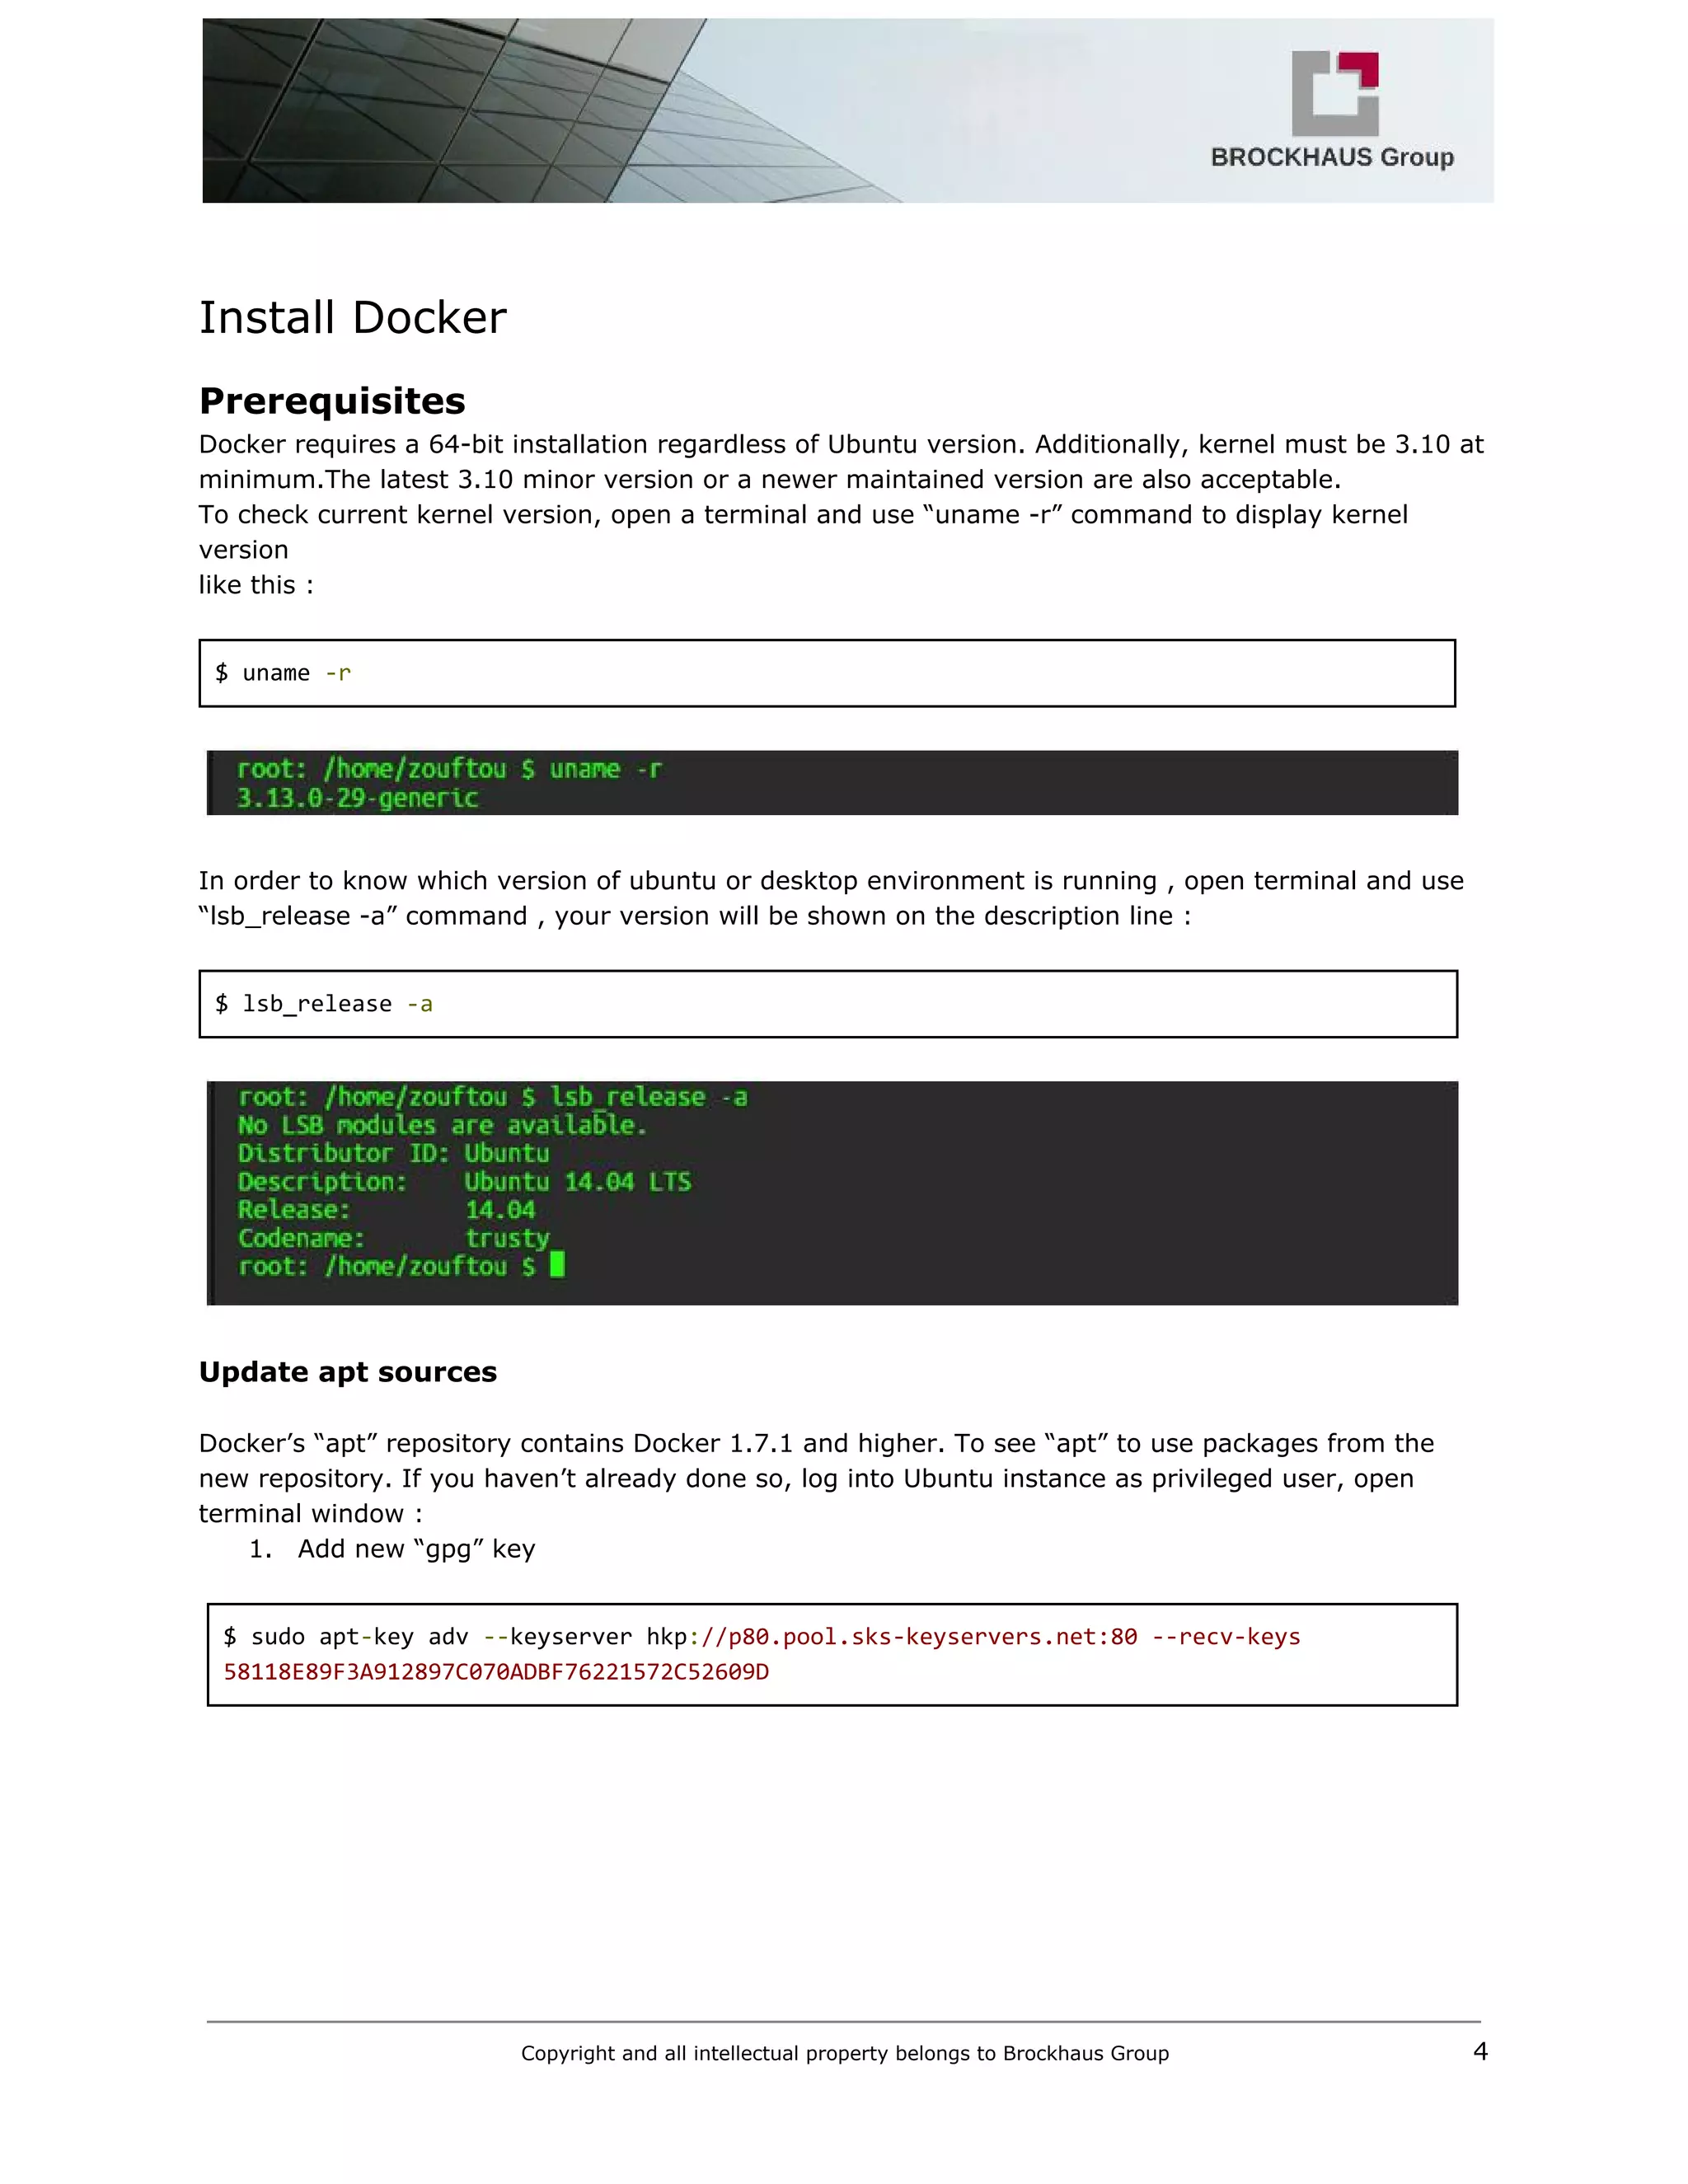
![The IP address of the seed node container can be obtained with
$ SEED=`docker inspect ‐‐format='{{ .NetworkSettings.IPAddress }}' cassandra‐1`
$ echo $SEED
The default Dockerfile configuration of cassandra image can be found on Github web site in this url
Docker Official Image packaging for Cassandra. For cassandra 2.2.4 used in this document, we can
see all configuration instructions here.
FROM debian:jessie‐backports
RUN apt‐key adv ‐‐keyserver ha.pool.sks‐keyservers.net ‐‐recv‐keys
514A2AD631A57A16DD0047EC749D6EEC0353B12C
RUN echo 'deb http://www.apache.org/dist/cassandra/debian 22x main' >>
/etc/apt/sources.list.d/cassandra.list
ENV CASSANDRA_VERSION 2.2.4
RUN apt‐get update
&& apt‐get install ‐y cassandra="$CASSANDRA_VERSION"
&& rm ‐rf /var/lib/apt/lists/*
ENV CASSANDRA_CONFIG /etc/cassandra
COPY docker‐entrypoint.sh /docker‐entrypoint.sh
ENTRYPOINT ["/docker‐entrypoint.sh"]
Copyright and all intellectual property belongs to Brockhaus Group 13](https://image.slidesharecdn.com/m2minfrastructure-160229214215/75/M2M-infrastructure-using-Docker-14-2048.jpg)
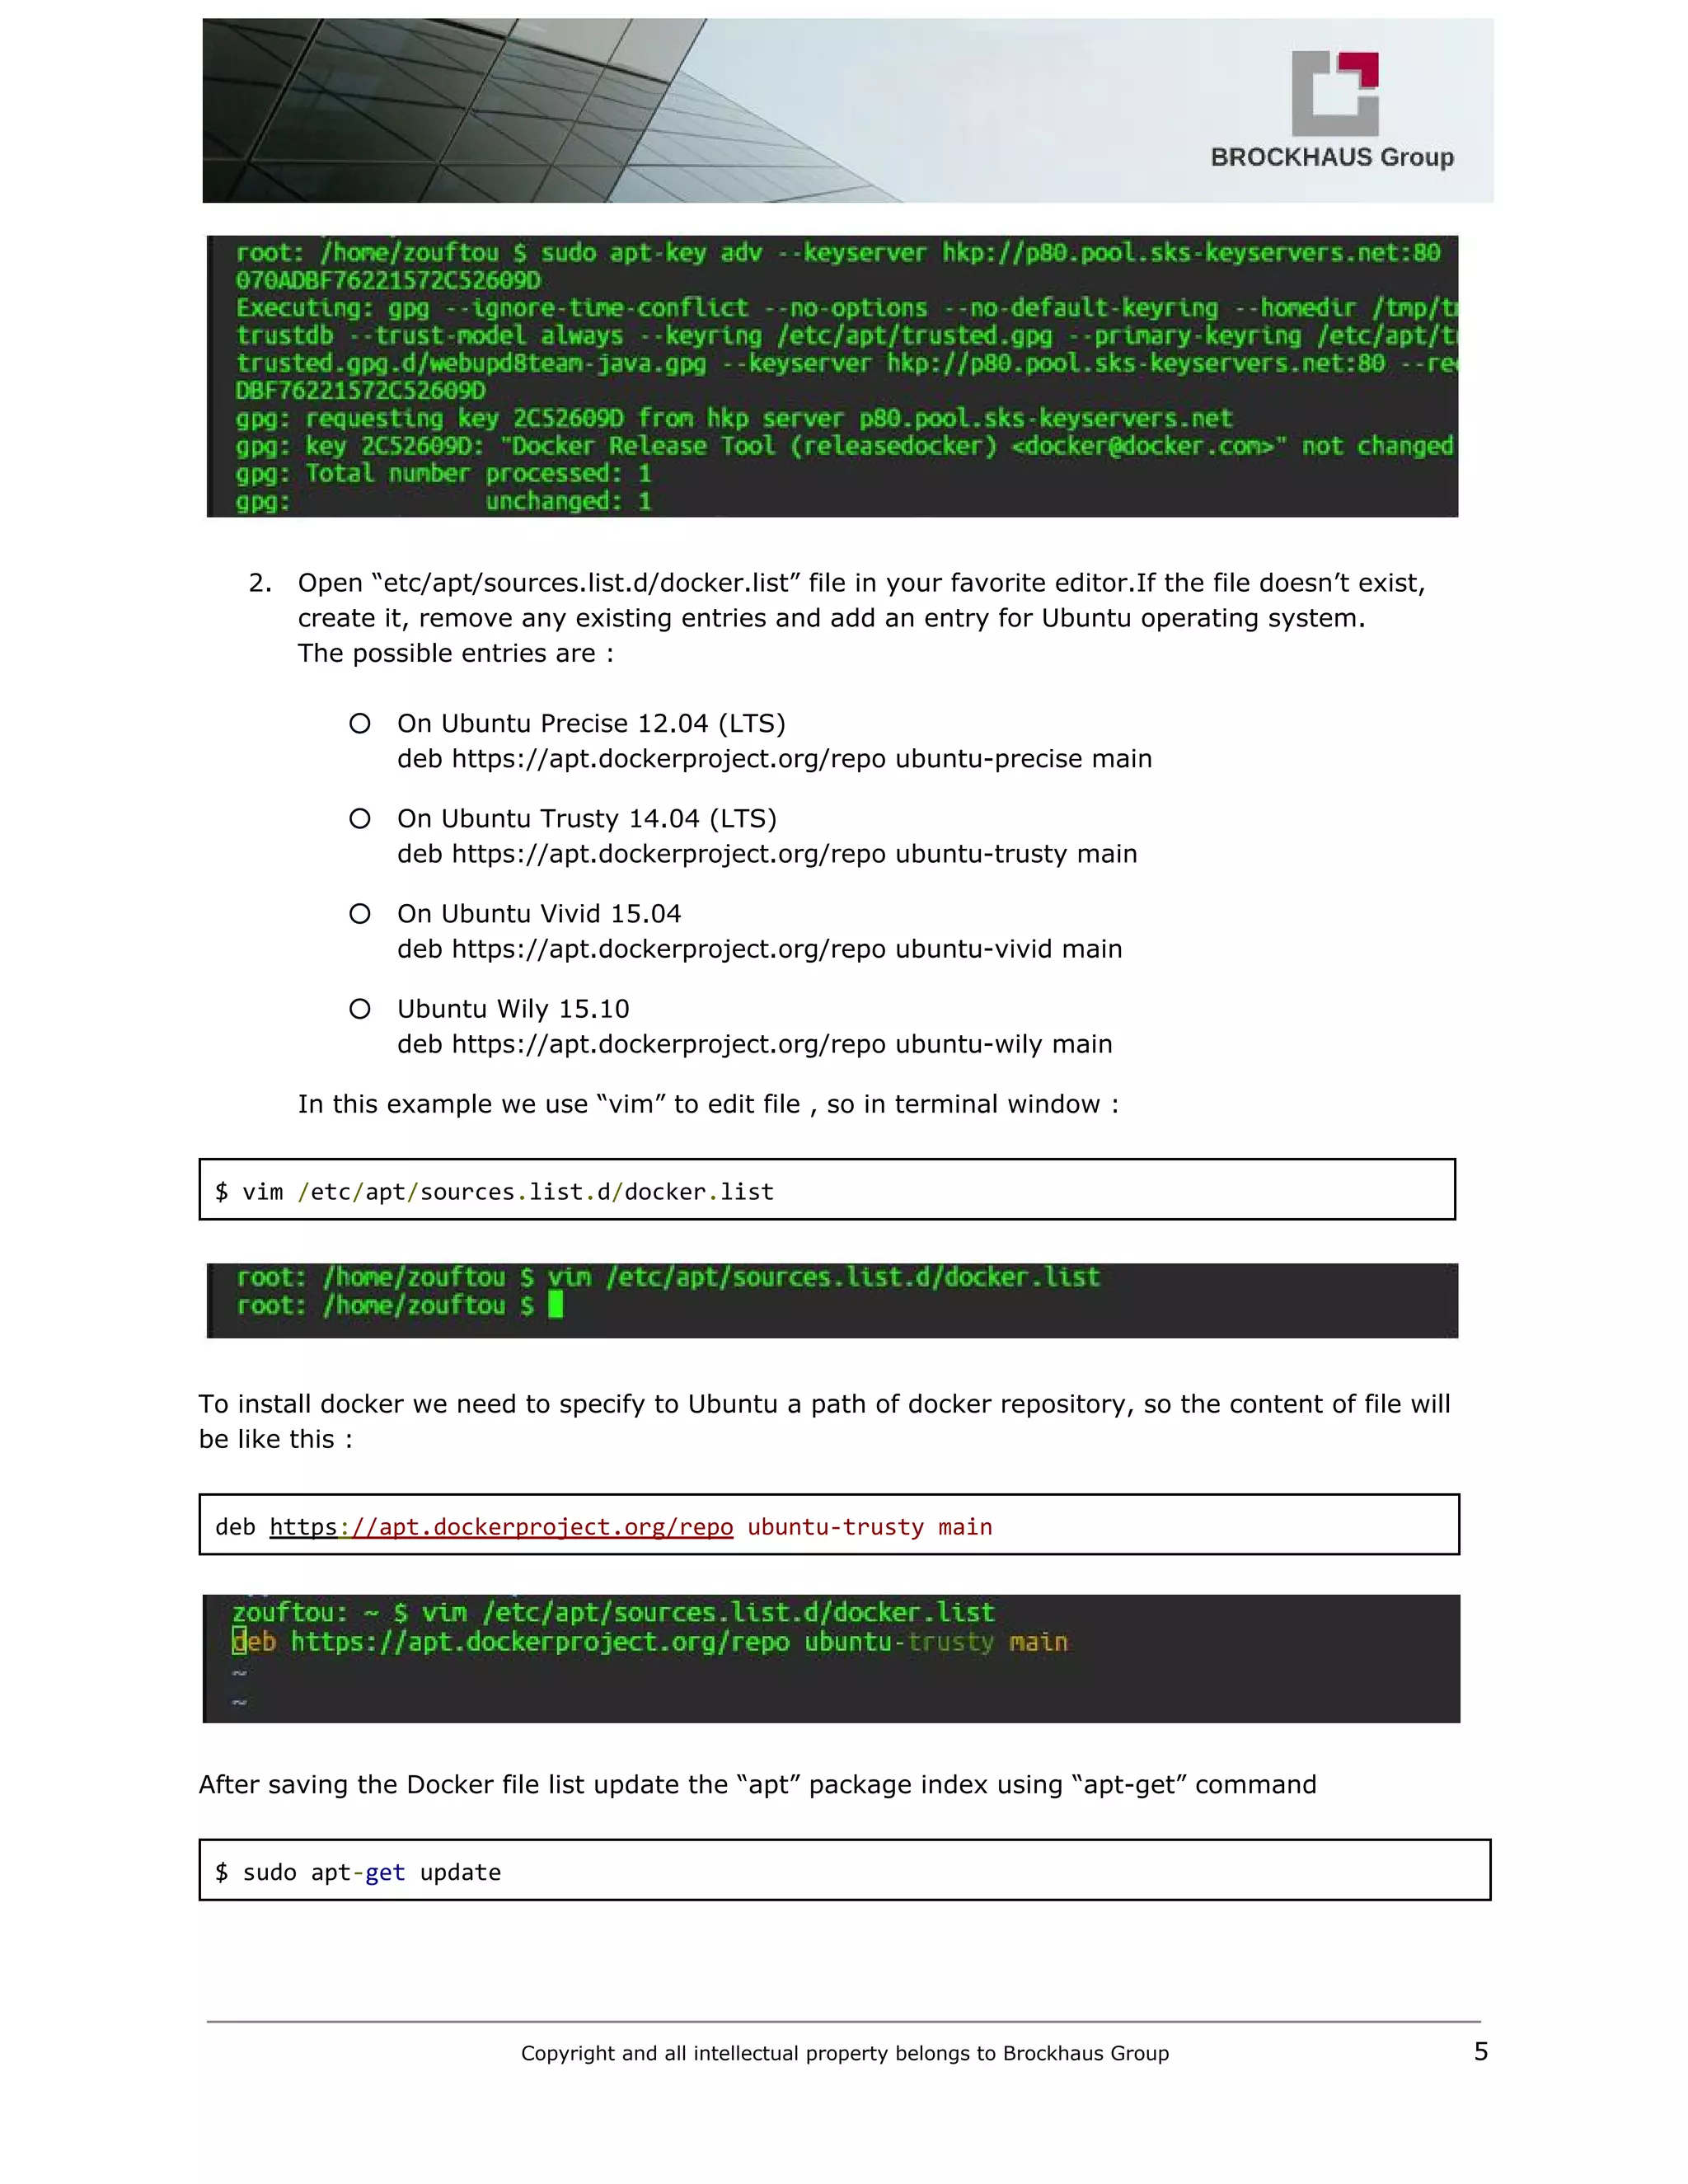
![VOLUME /var/lib/cassandra
# 7000: intra‐node communication
# 7001: TLS intra‐node communication
# 7199: JMX
# 9042: CQL
# 9160: thrift service
EXPOSE 7000 7001 7199 9042 9160
CMD ["cassandra", "‐f"]
Data Replication in Cassandra
In Cassandra, one or more of the nodes in a cluster act as replicas for a given piece of data. If it is
detected that some of the nodes responded with an outofdate value, Cassandra will return the most
recent value to the client.
Let create two nodes Cassandra “cassandra2” and “cassandra3” using SEED value.
$ docker run ‐‐name cassandra‐2 ‐d ‐e CASSANDRA_SEEDS=$SEED cassandra:2.2.4
$ docker run ‐‐name cassandra‐3 ‐d ‐e CASSANDRA_SEEDS=$SEED cassandra:2.2.4
Best practices
It’s very easy to use Shell scripts for starting and stopping Cassandra nodes. For example, starting a
four nodes cluster is as simple as:
Start cluster
$ ./cluster‐start.sh 4
clusterstart.sh
#!/bin/sh
if [ ‐n "$1" ]; then
NODES=$1
else
NODES=3
fi
docker run ‐‐name cassandra‐1 ‐d cassandra:2.2.4 > /dev/null
echo "cassandra‐1"
Copyright and all intellectual property belongs to Brockhaus Group 14](https://image.slidesharecdn.com/m2minfrastructure-160229214215/75/M2M-infrastructure-using-Docker-15-2048.jpg)
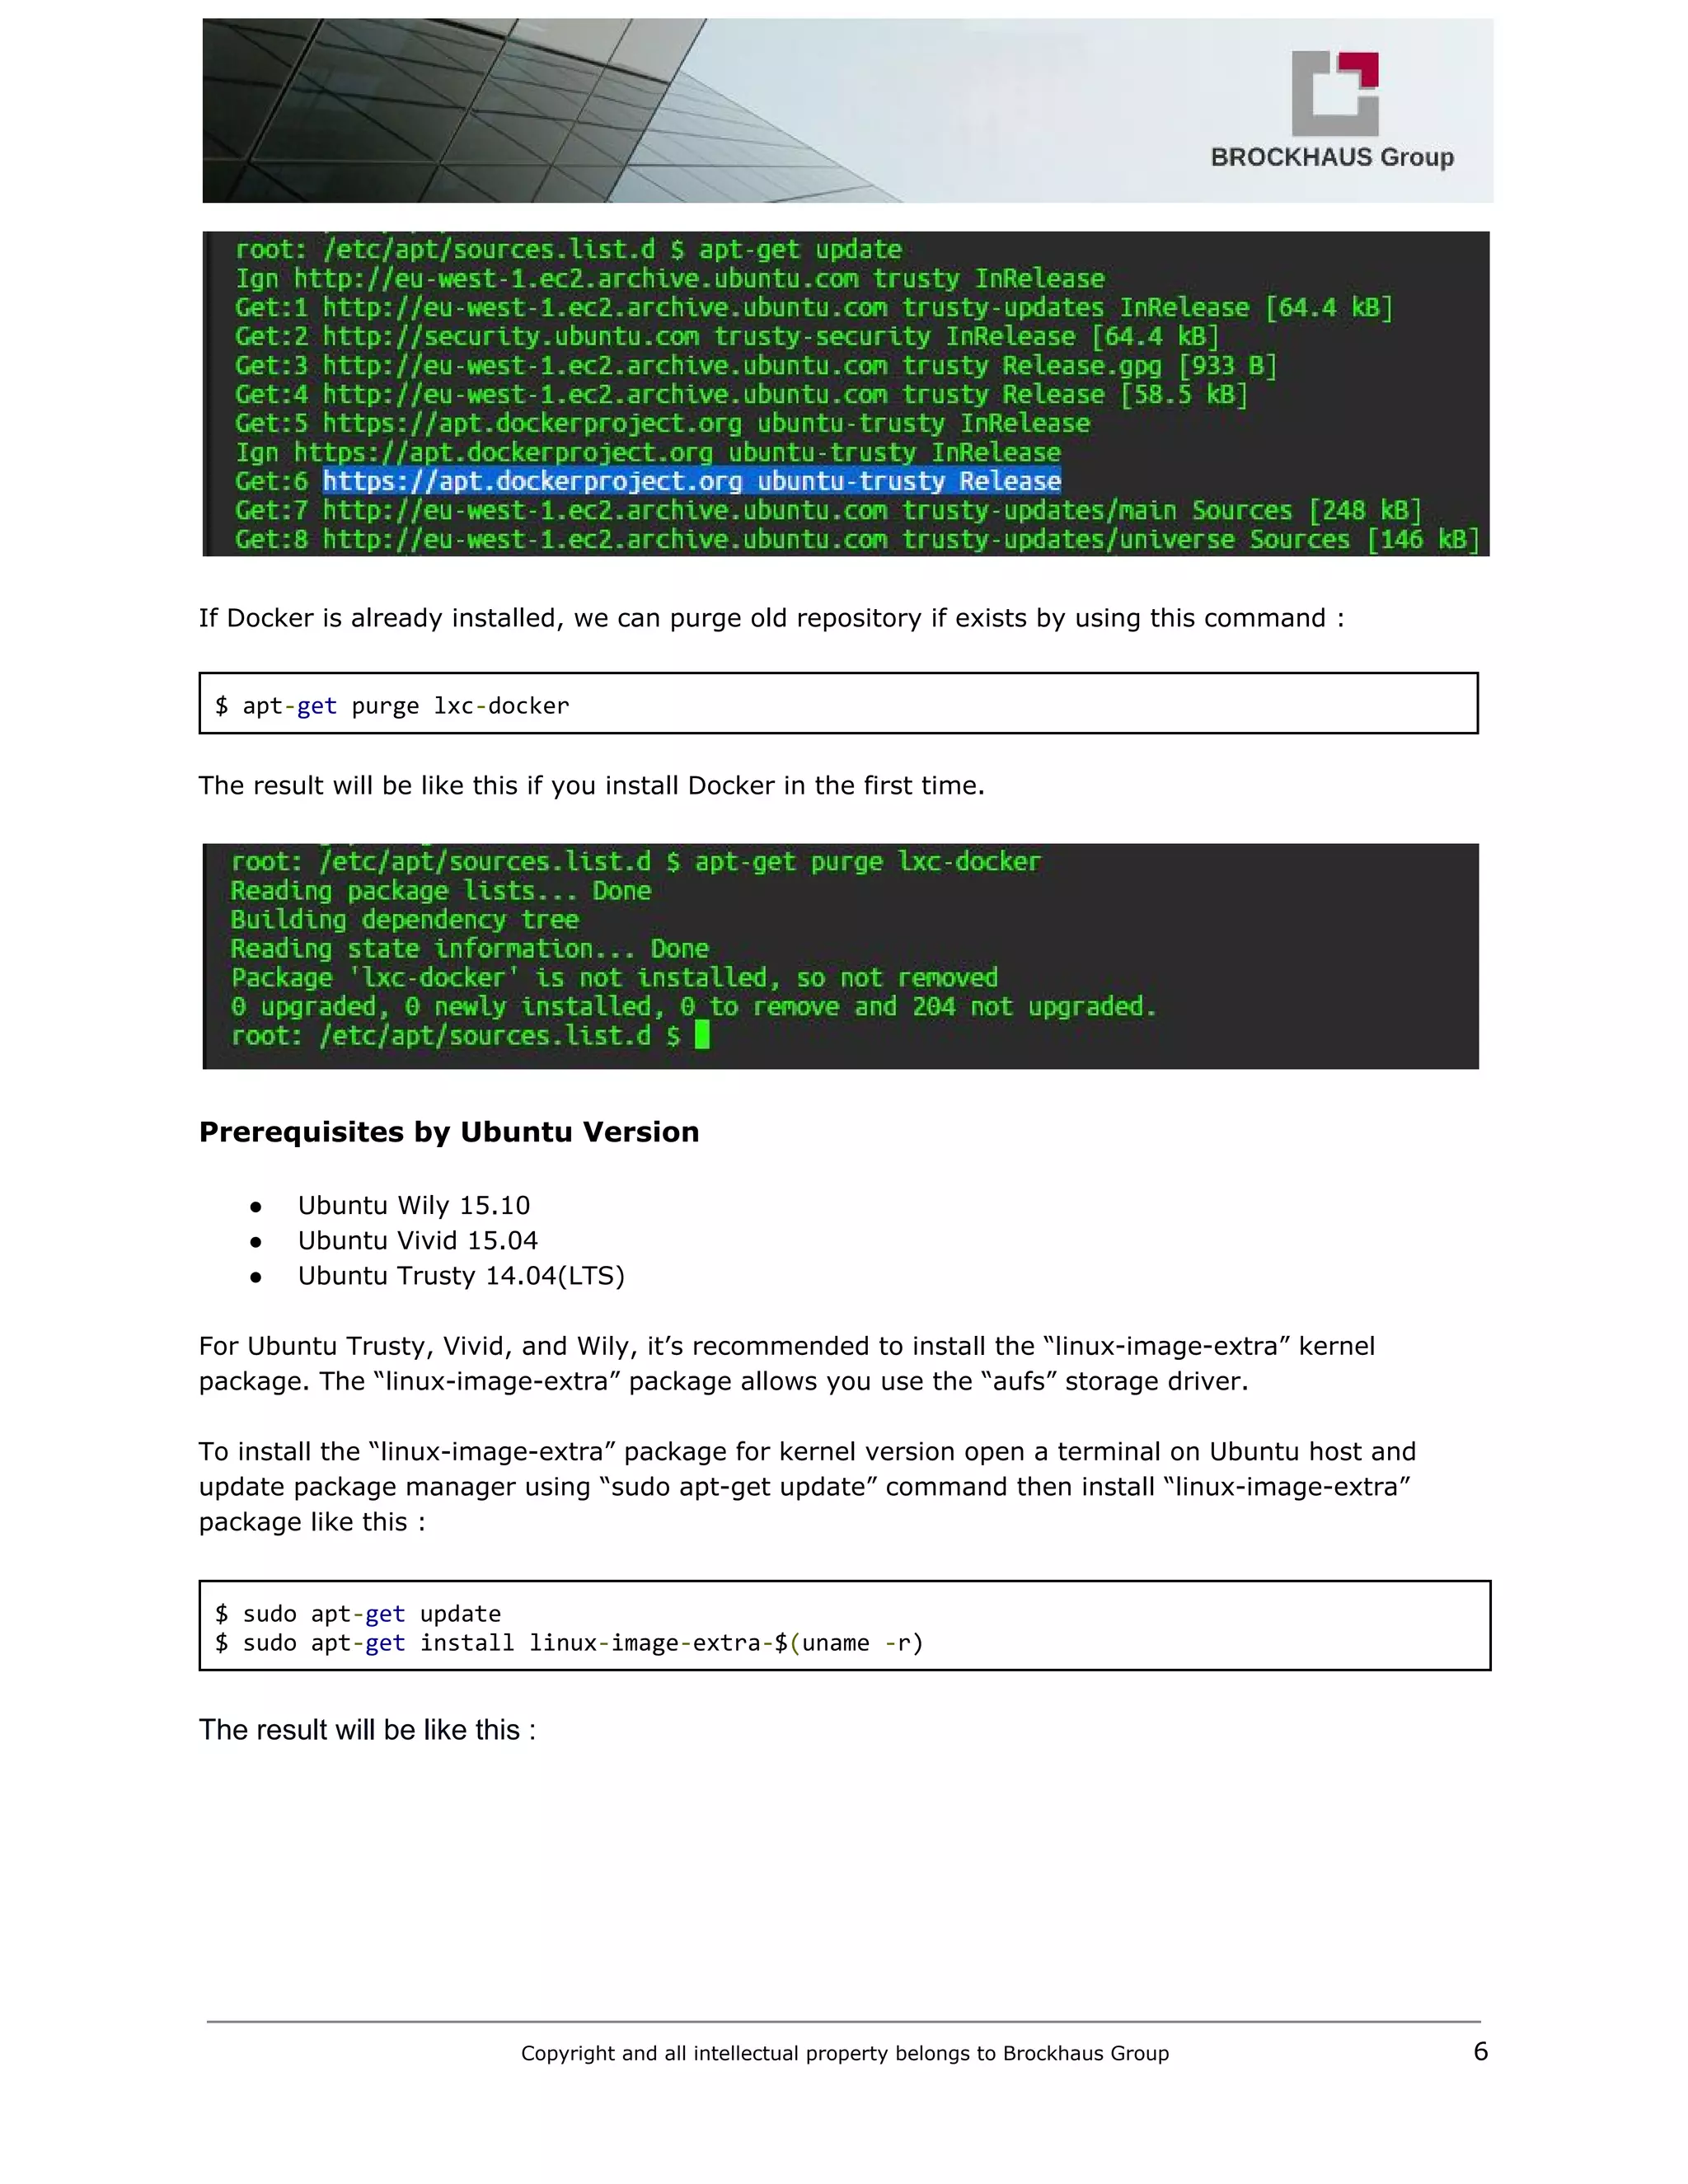
![SEED=`docker inspect ‐‐format='{{ .NetworkSettings.IPAddress }}' cassandra‐1`
if [ $NODES ‐gt 1 ]; then
for i in `seq 2 $NODES`;
do
docker run ‐‐name "cassandra‐$i" ‐d ‐e CASSANDRA_SEEDS=$SEED cassandra:2.2.4 >
/dev/null
echo "cassandra‐$i"
done
fi
Stop cluster
$ ./cluster‐stop.sh
clusterstop.sh
#!/bin/sh
NODES=`docker ps ‐a | grep cassandra‐ | wc ‐l`
for i in `seq 1 $NODES`;
do
docker rm ‐f "cassandra‐$i"
done
Docker Spring Application with Cassandra database
In this example we shall demonstrate how to connect Spring Data Application to Apache Cassandra, a
Column based NoSql Database and run it inside Docker containers.
What we’ll need :
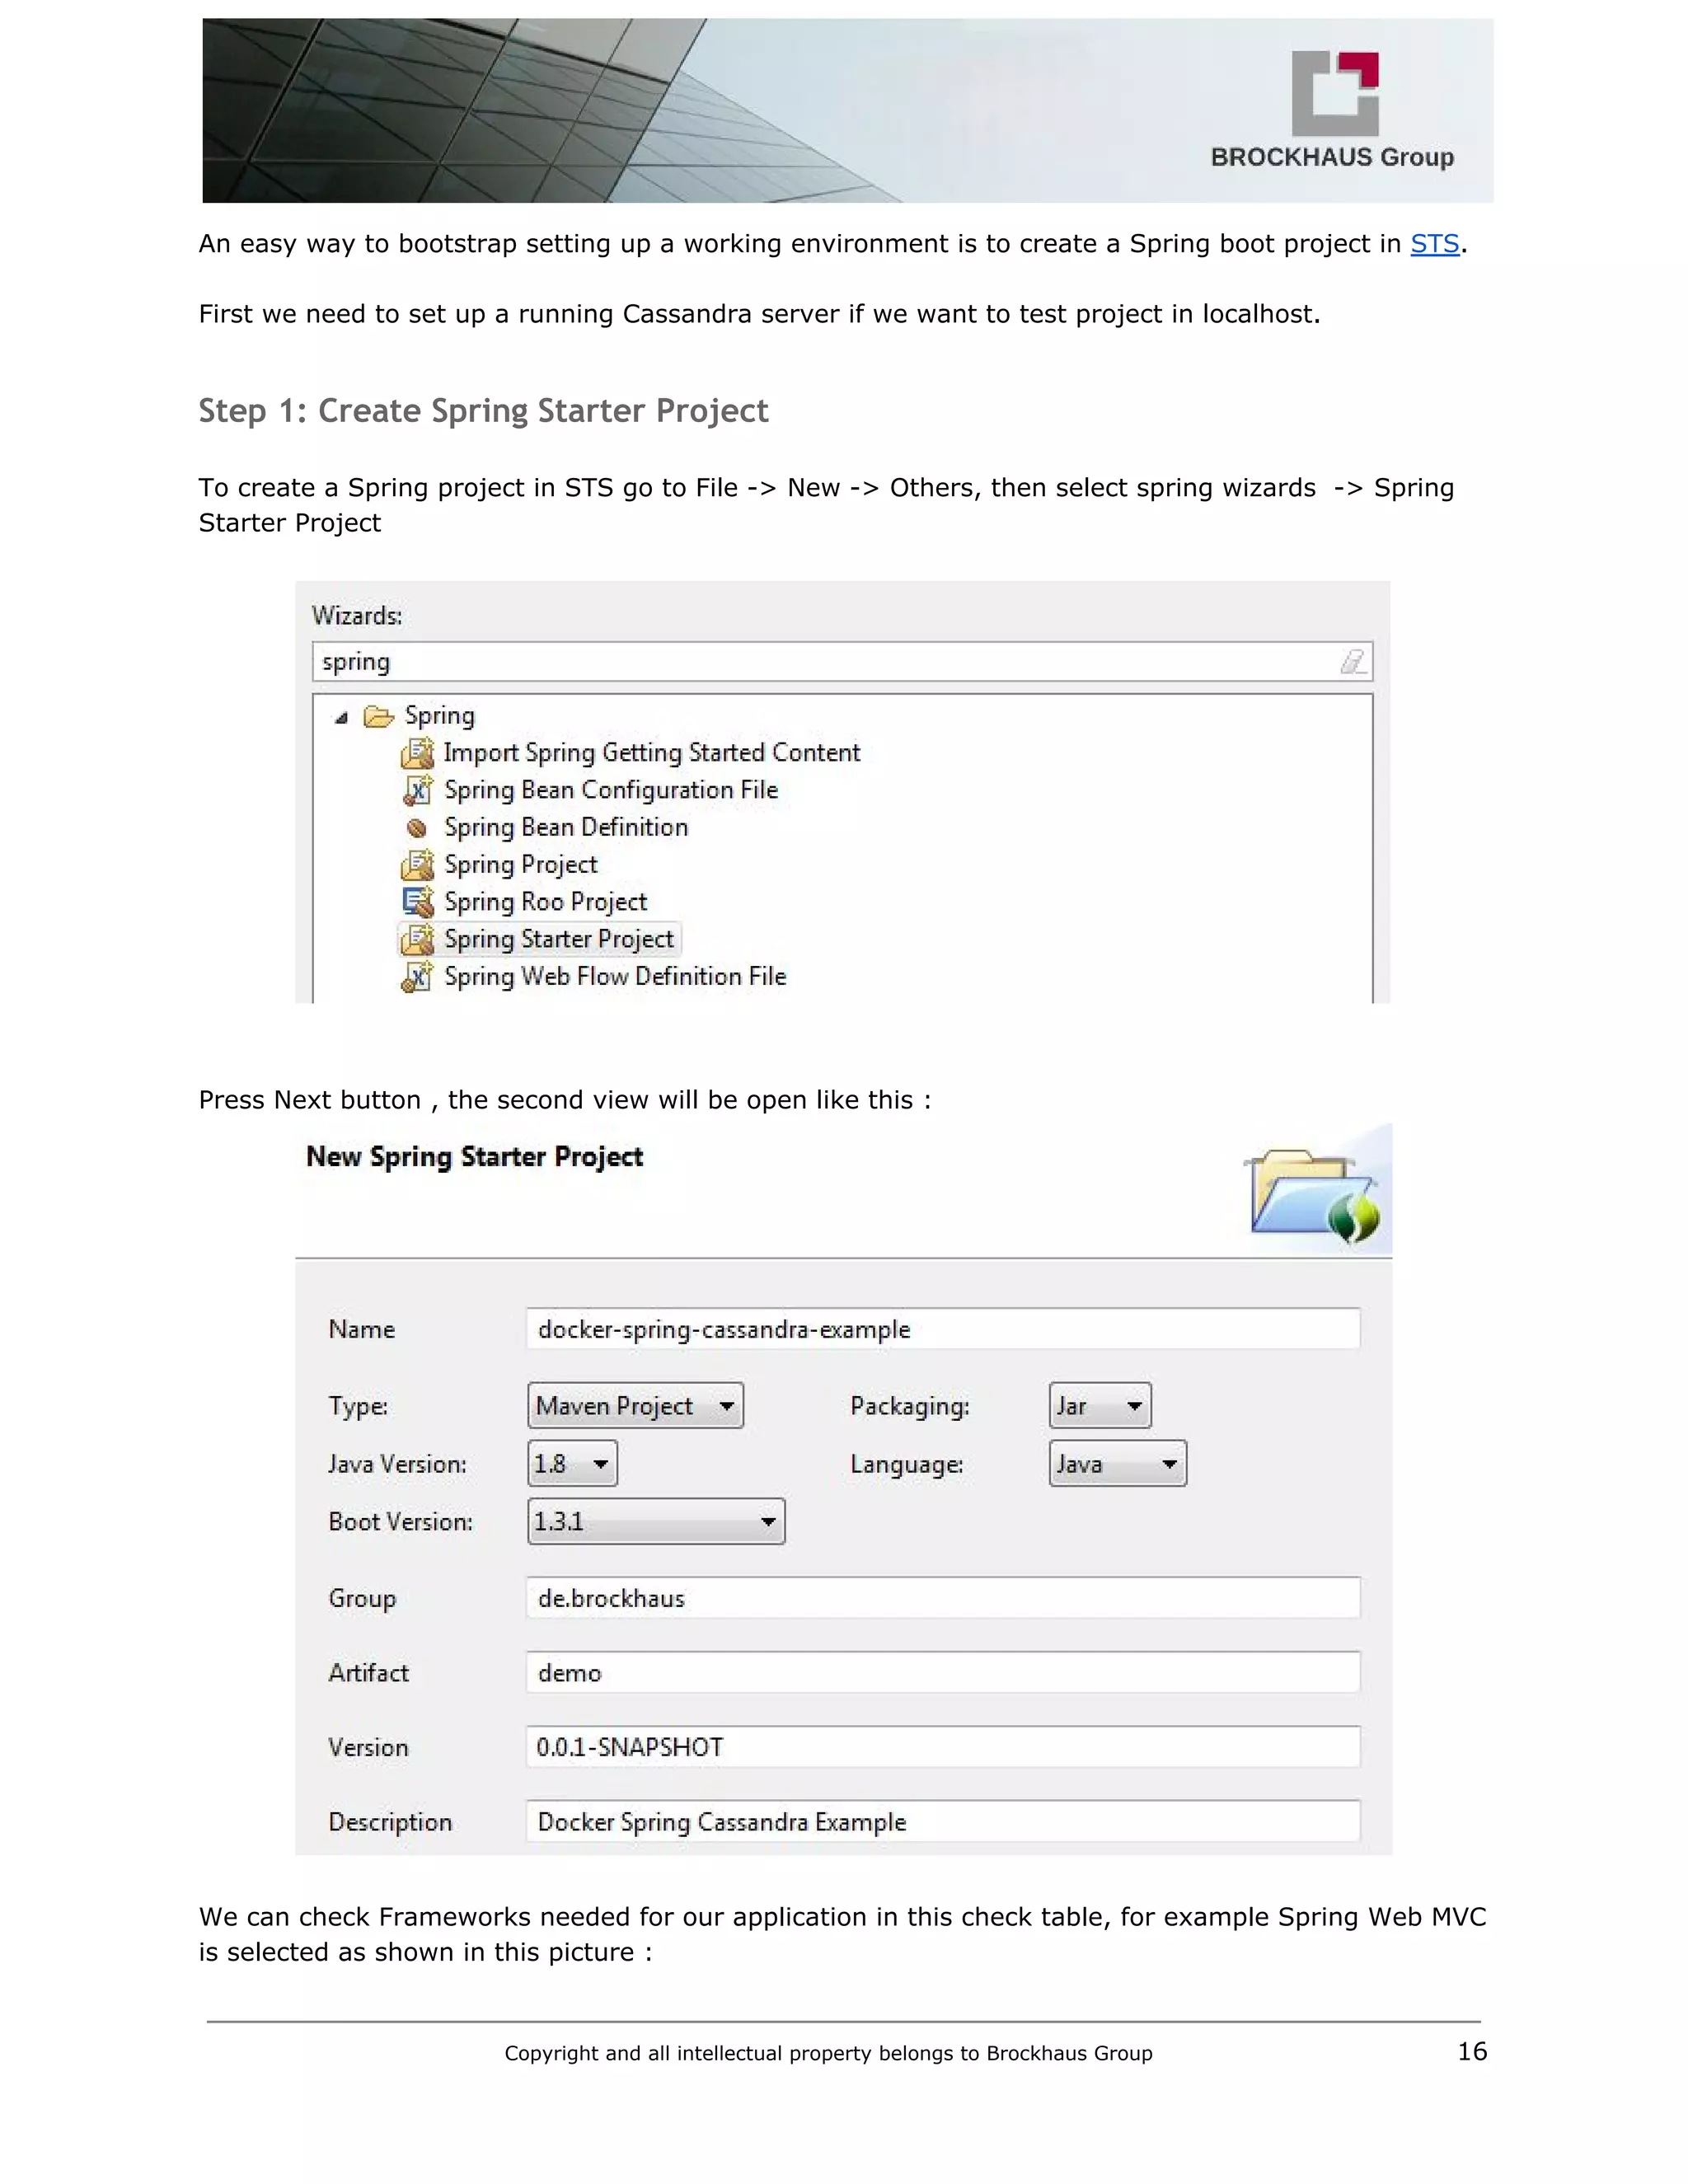
1. Eclipse IDE
2. Spring Tool Suite (STS)
3. Cassandra 2.2.4
4. JDK 1.8
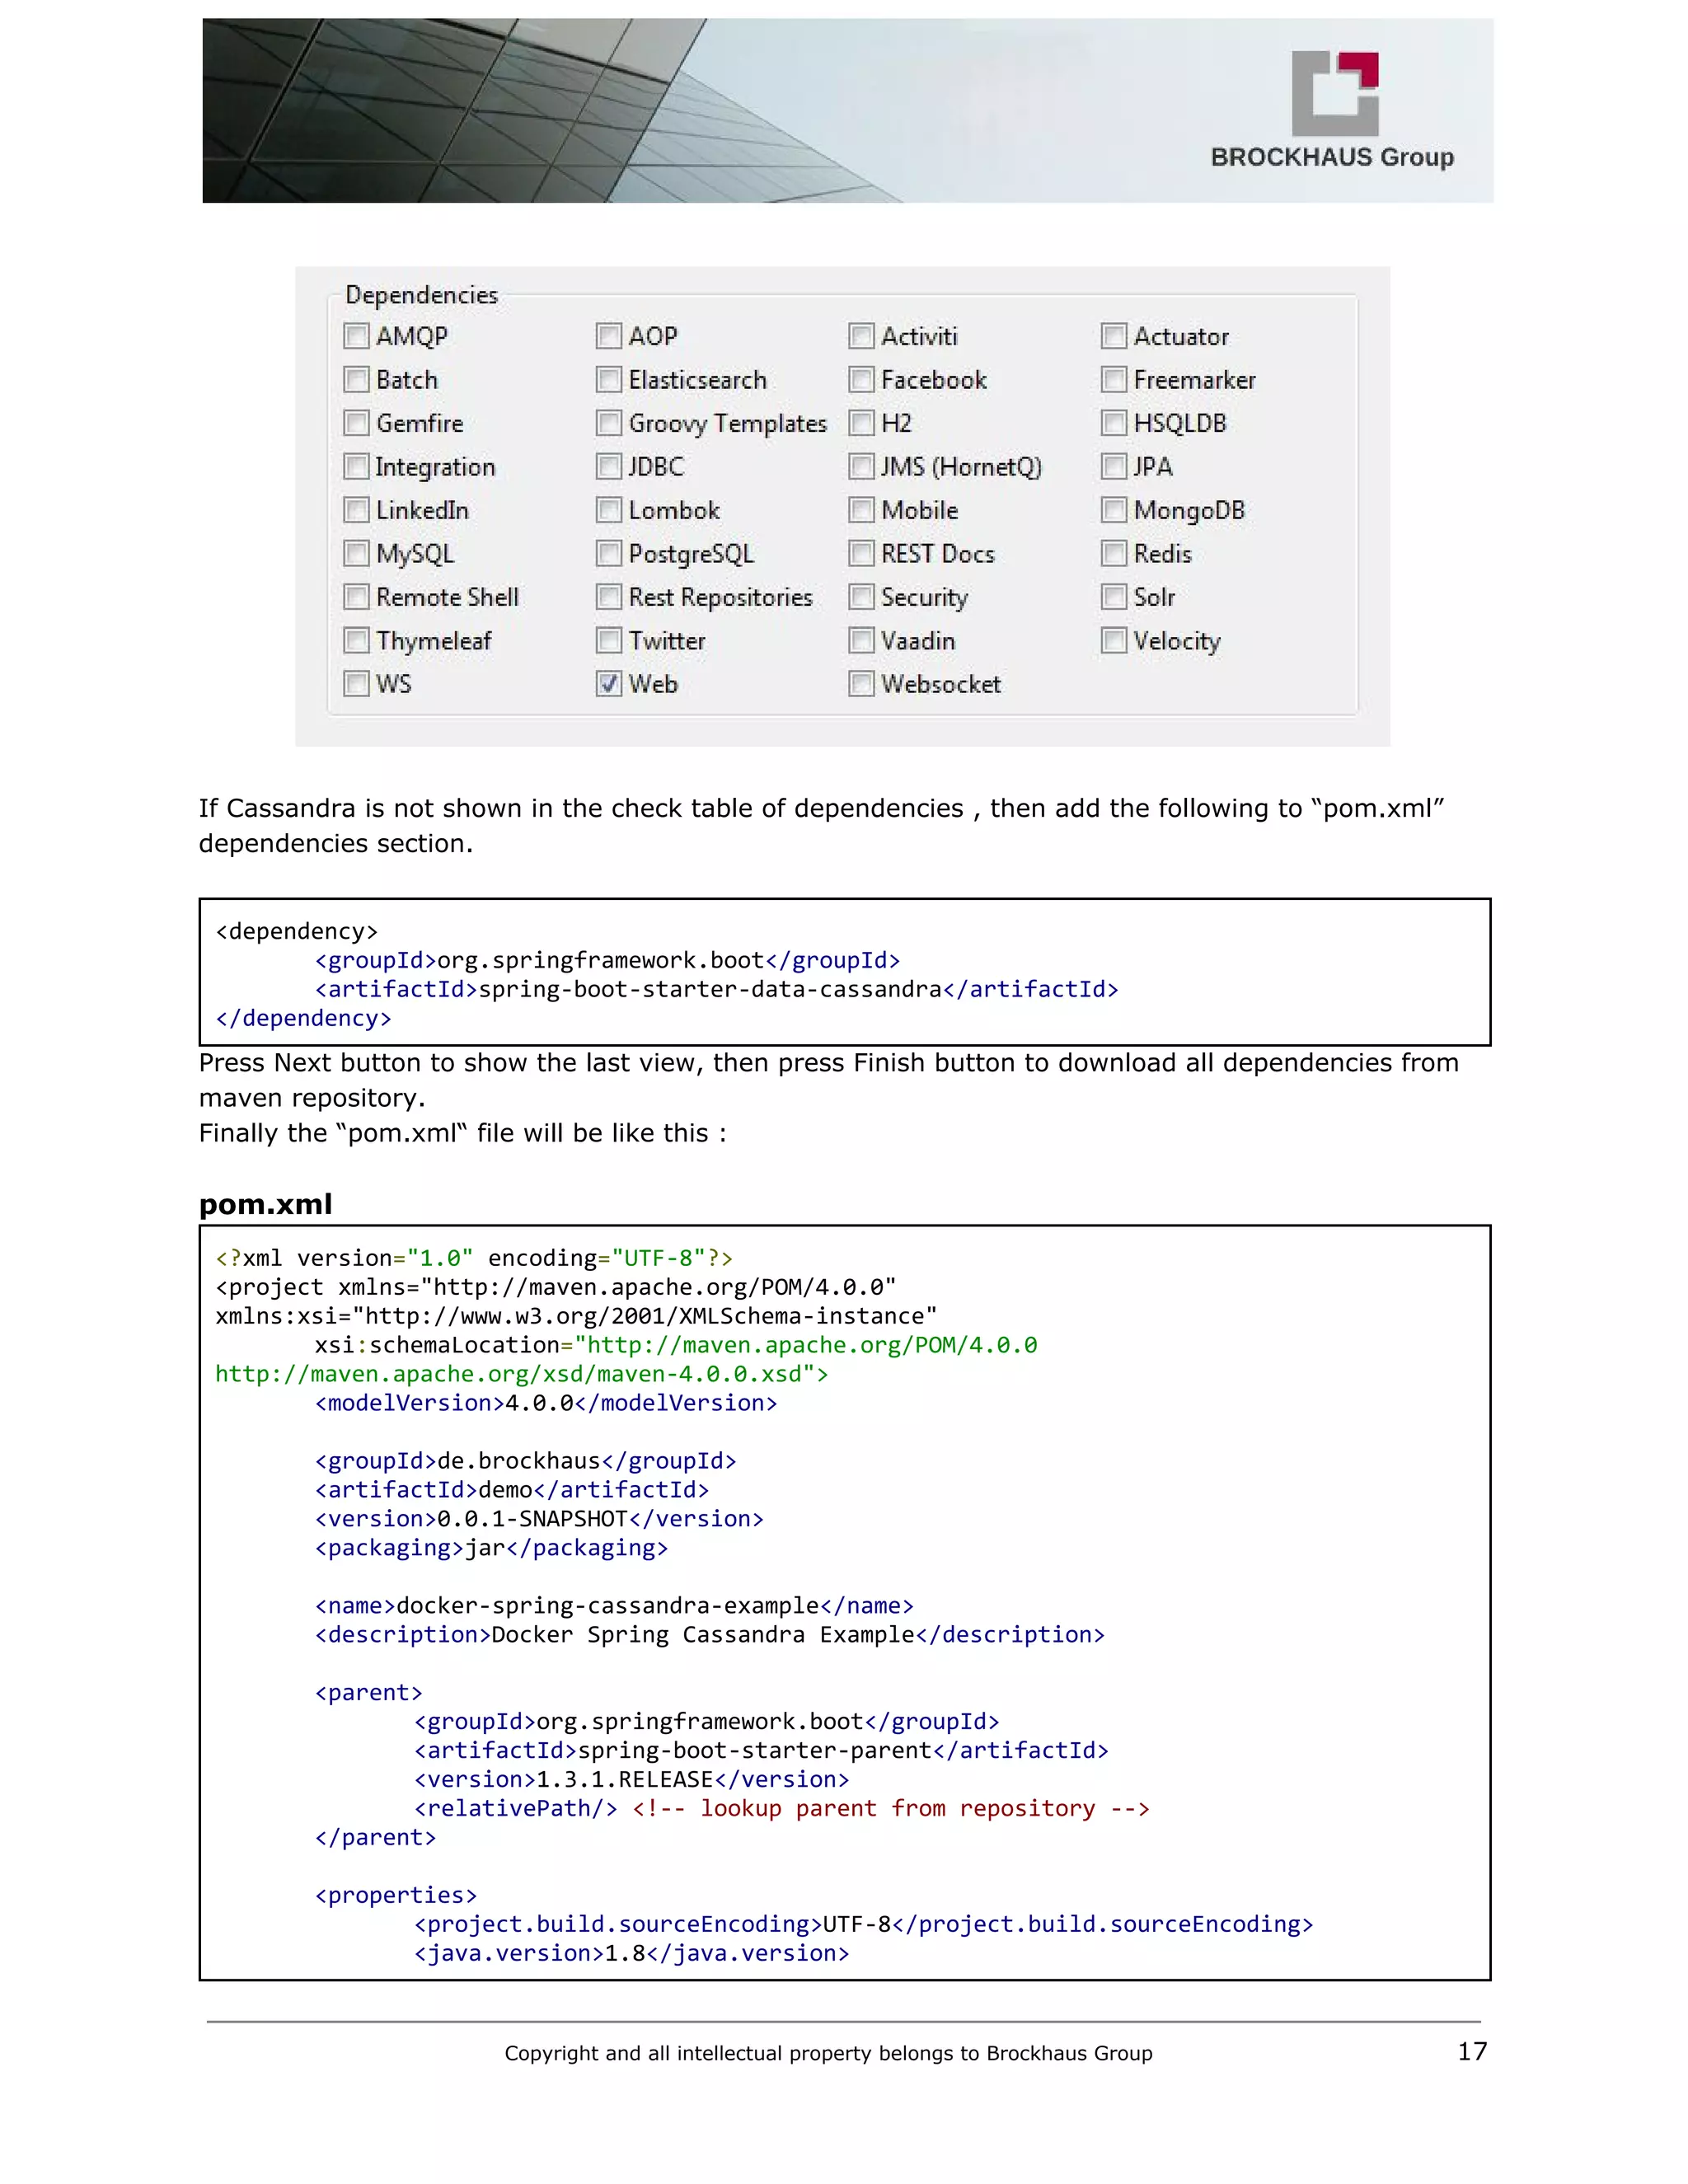
We can find this demo “dockerspringcassandraexample” from brockhausgruppe repository on
Github and clone it using “git clone” command.
$ git clone https://github.com/brockhaus‐gruppe/docker‐spring‐cassandra‐example.git
Getting started
Spring Data Cassandra uses the DataStax Java Driver version 2.X, which supports DataStax Enterprise
4/Cassandra 2.0, and Java SE 6 or higher. The latest commercial release (2.X as of this writing) is
recommended.
Copyright and all intellectual property belongs to Brockhaus Group 15](https://image.slidesharecdn.com/m2minfrastructure-160229214215/75/M2M-infrastructure-using-Docker-16-2048.jpg)
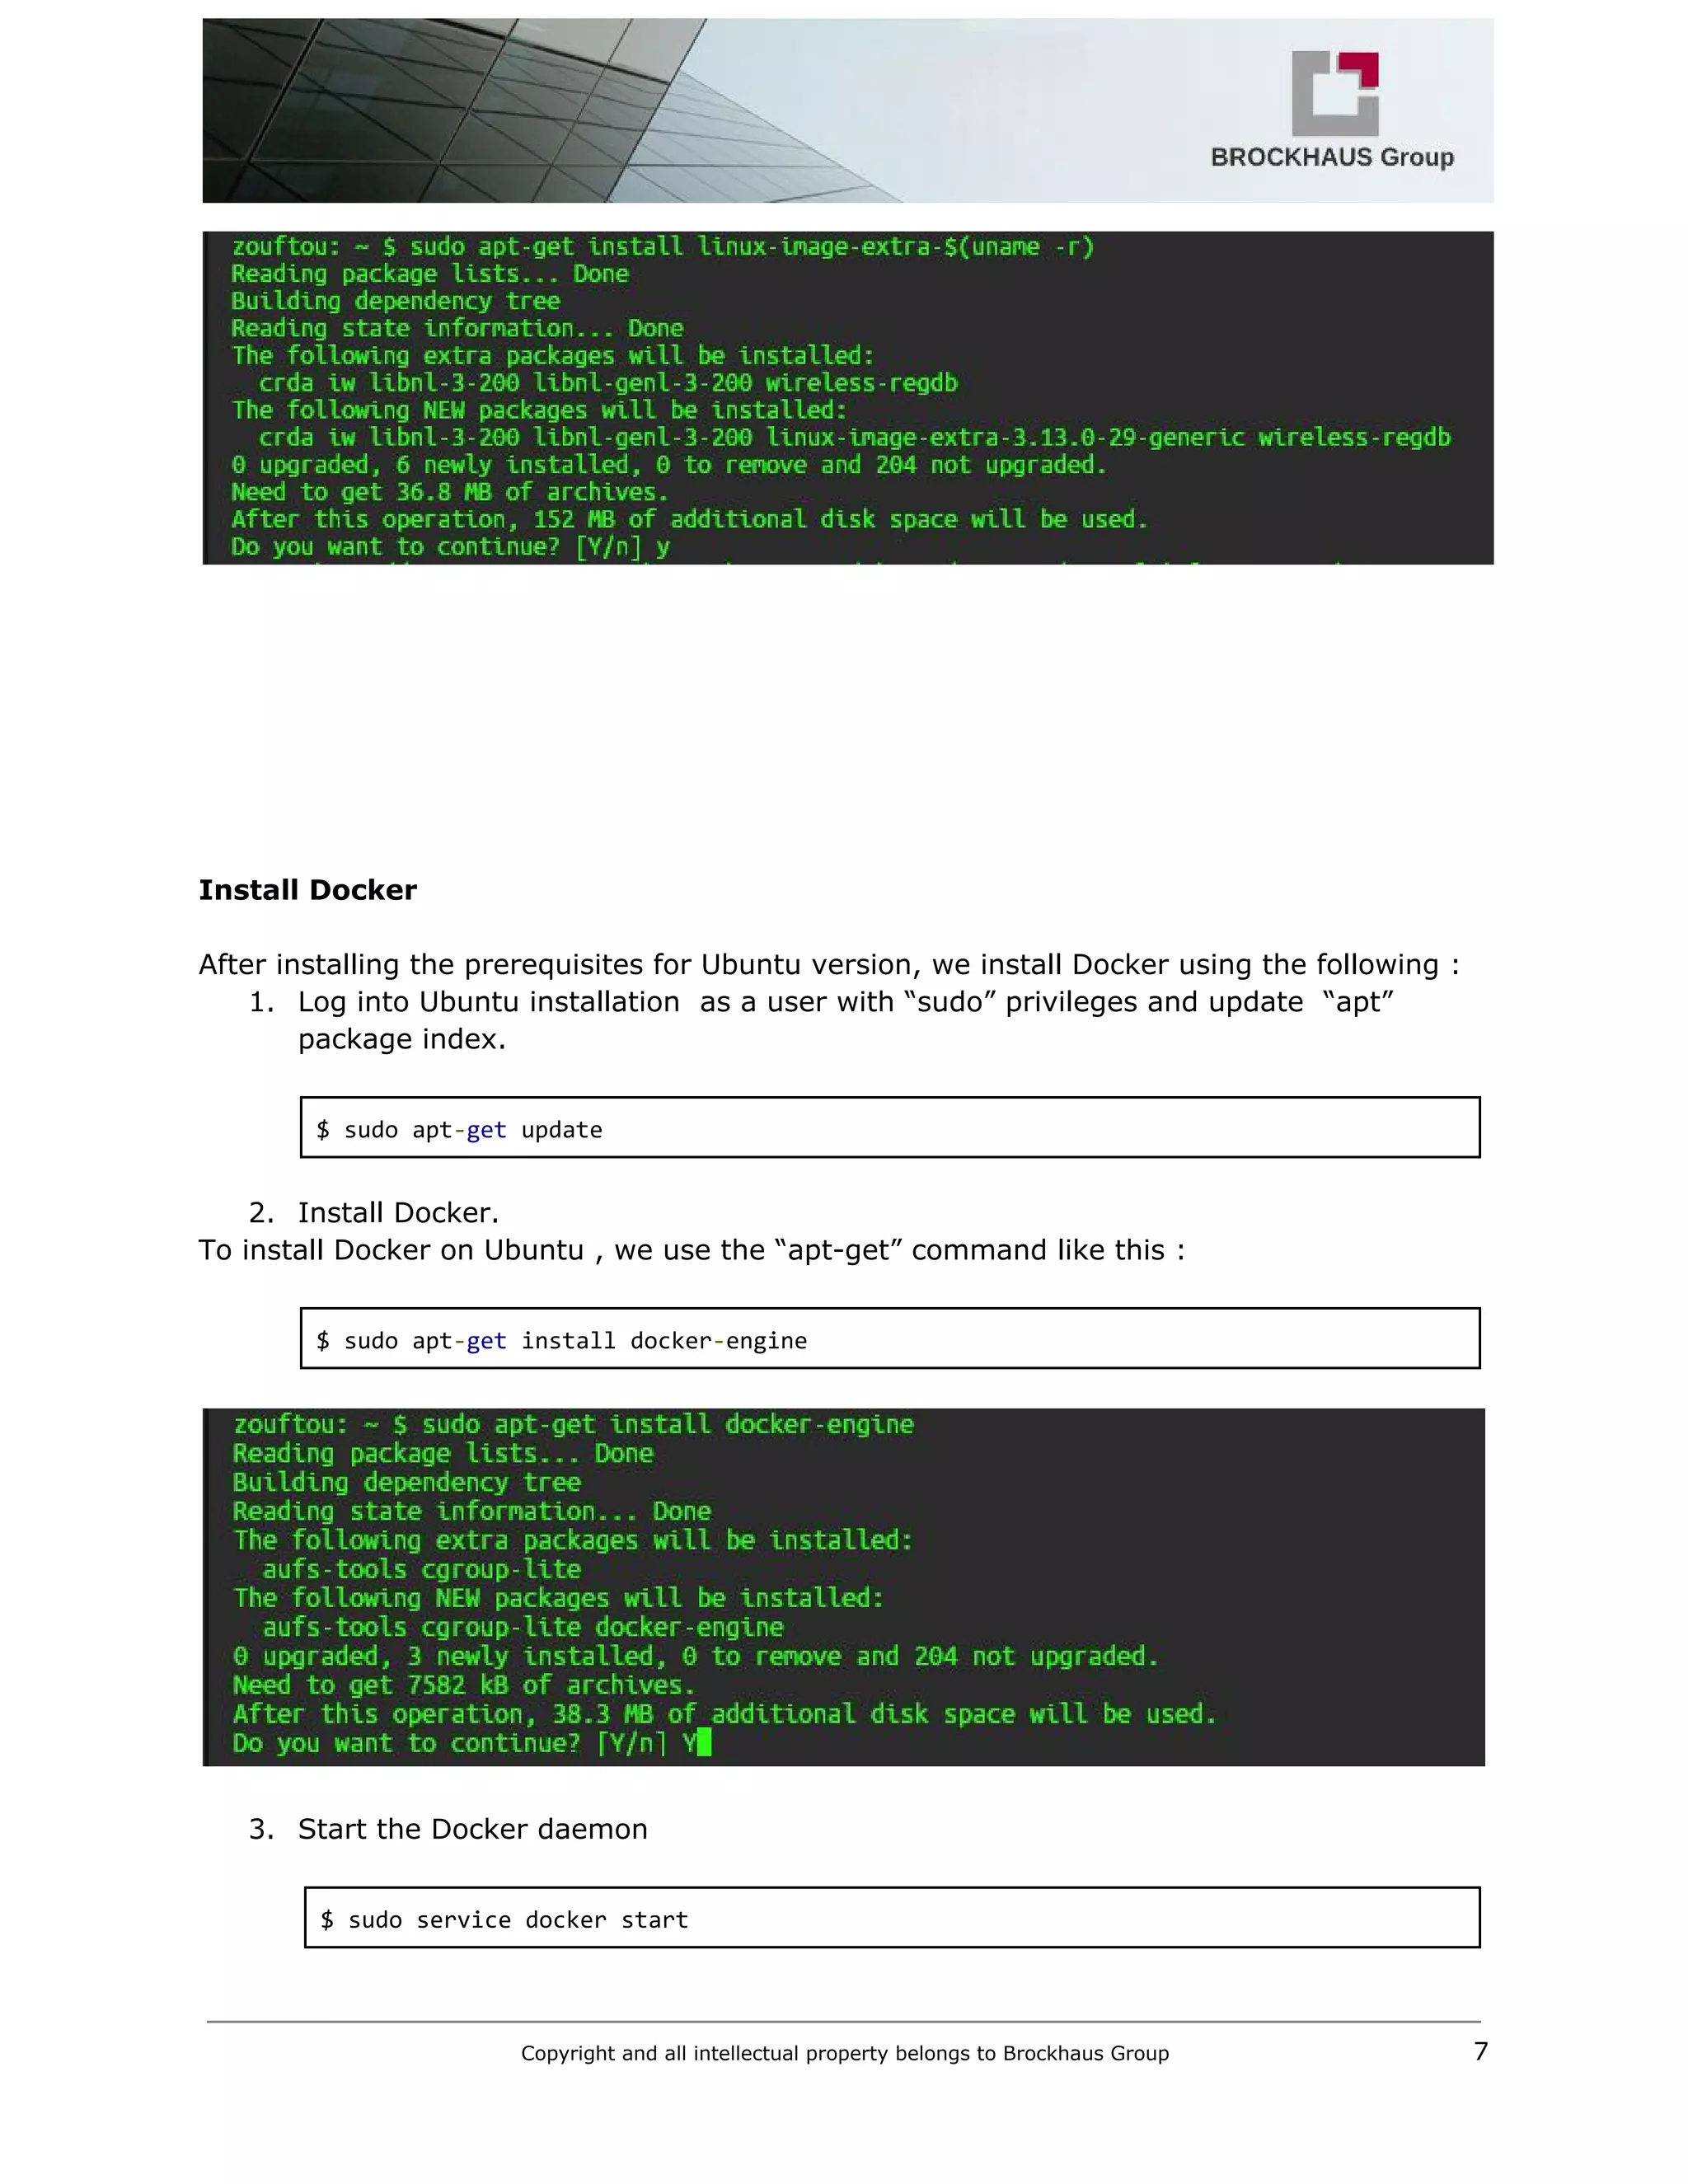
![public String getName() {
return name;
}
public void setName(String name) {
this.name = name;
}
@Override
public String toString() {
return "Sensor [id=" + id + ", name=" + name + "]";
}
}
Step 3: Create spring data cassandra repository
package de.brockhaus.domain;
import org.springframework.data.cassandra.repository.CassandraRepository;
import org.springframework.data.cassandra.repository.Query;
public interface SensorRepository extends CassandraRepository<Sensor> {
@Query("SELECT * FROM sensors WHERE name=?0")
Iterable<Sensor> findByName(String name);
}
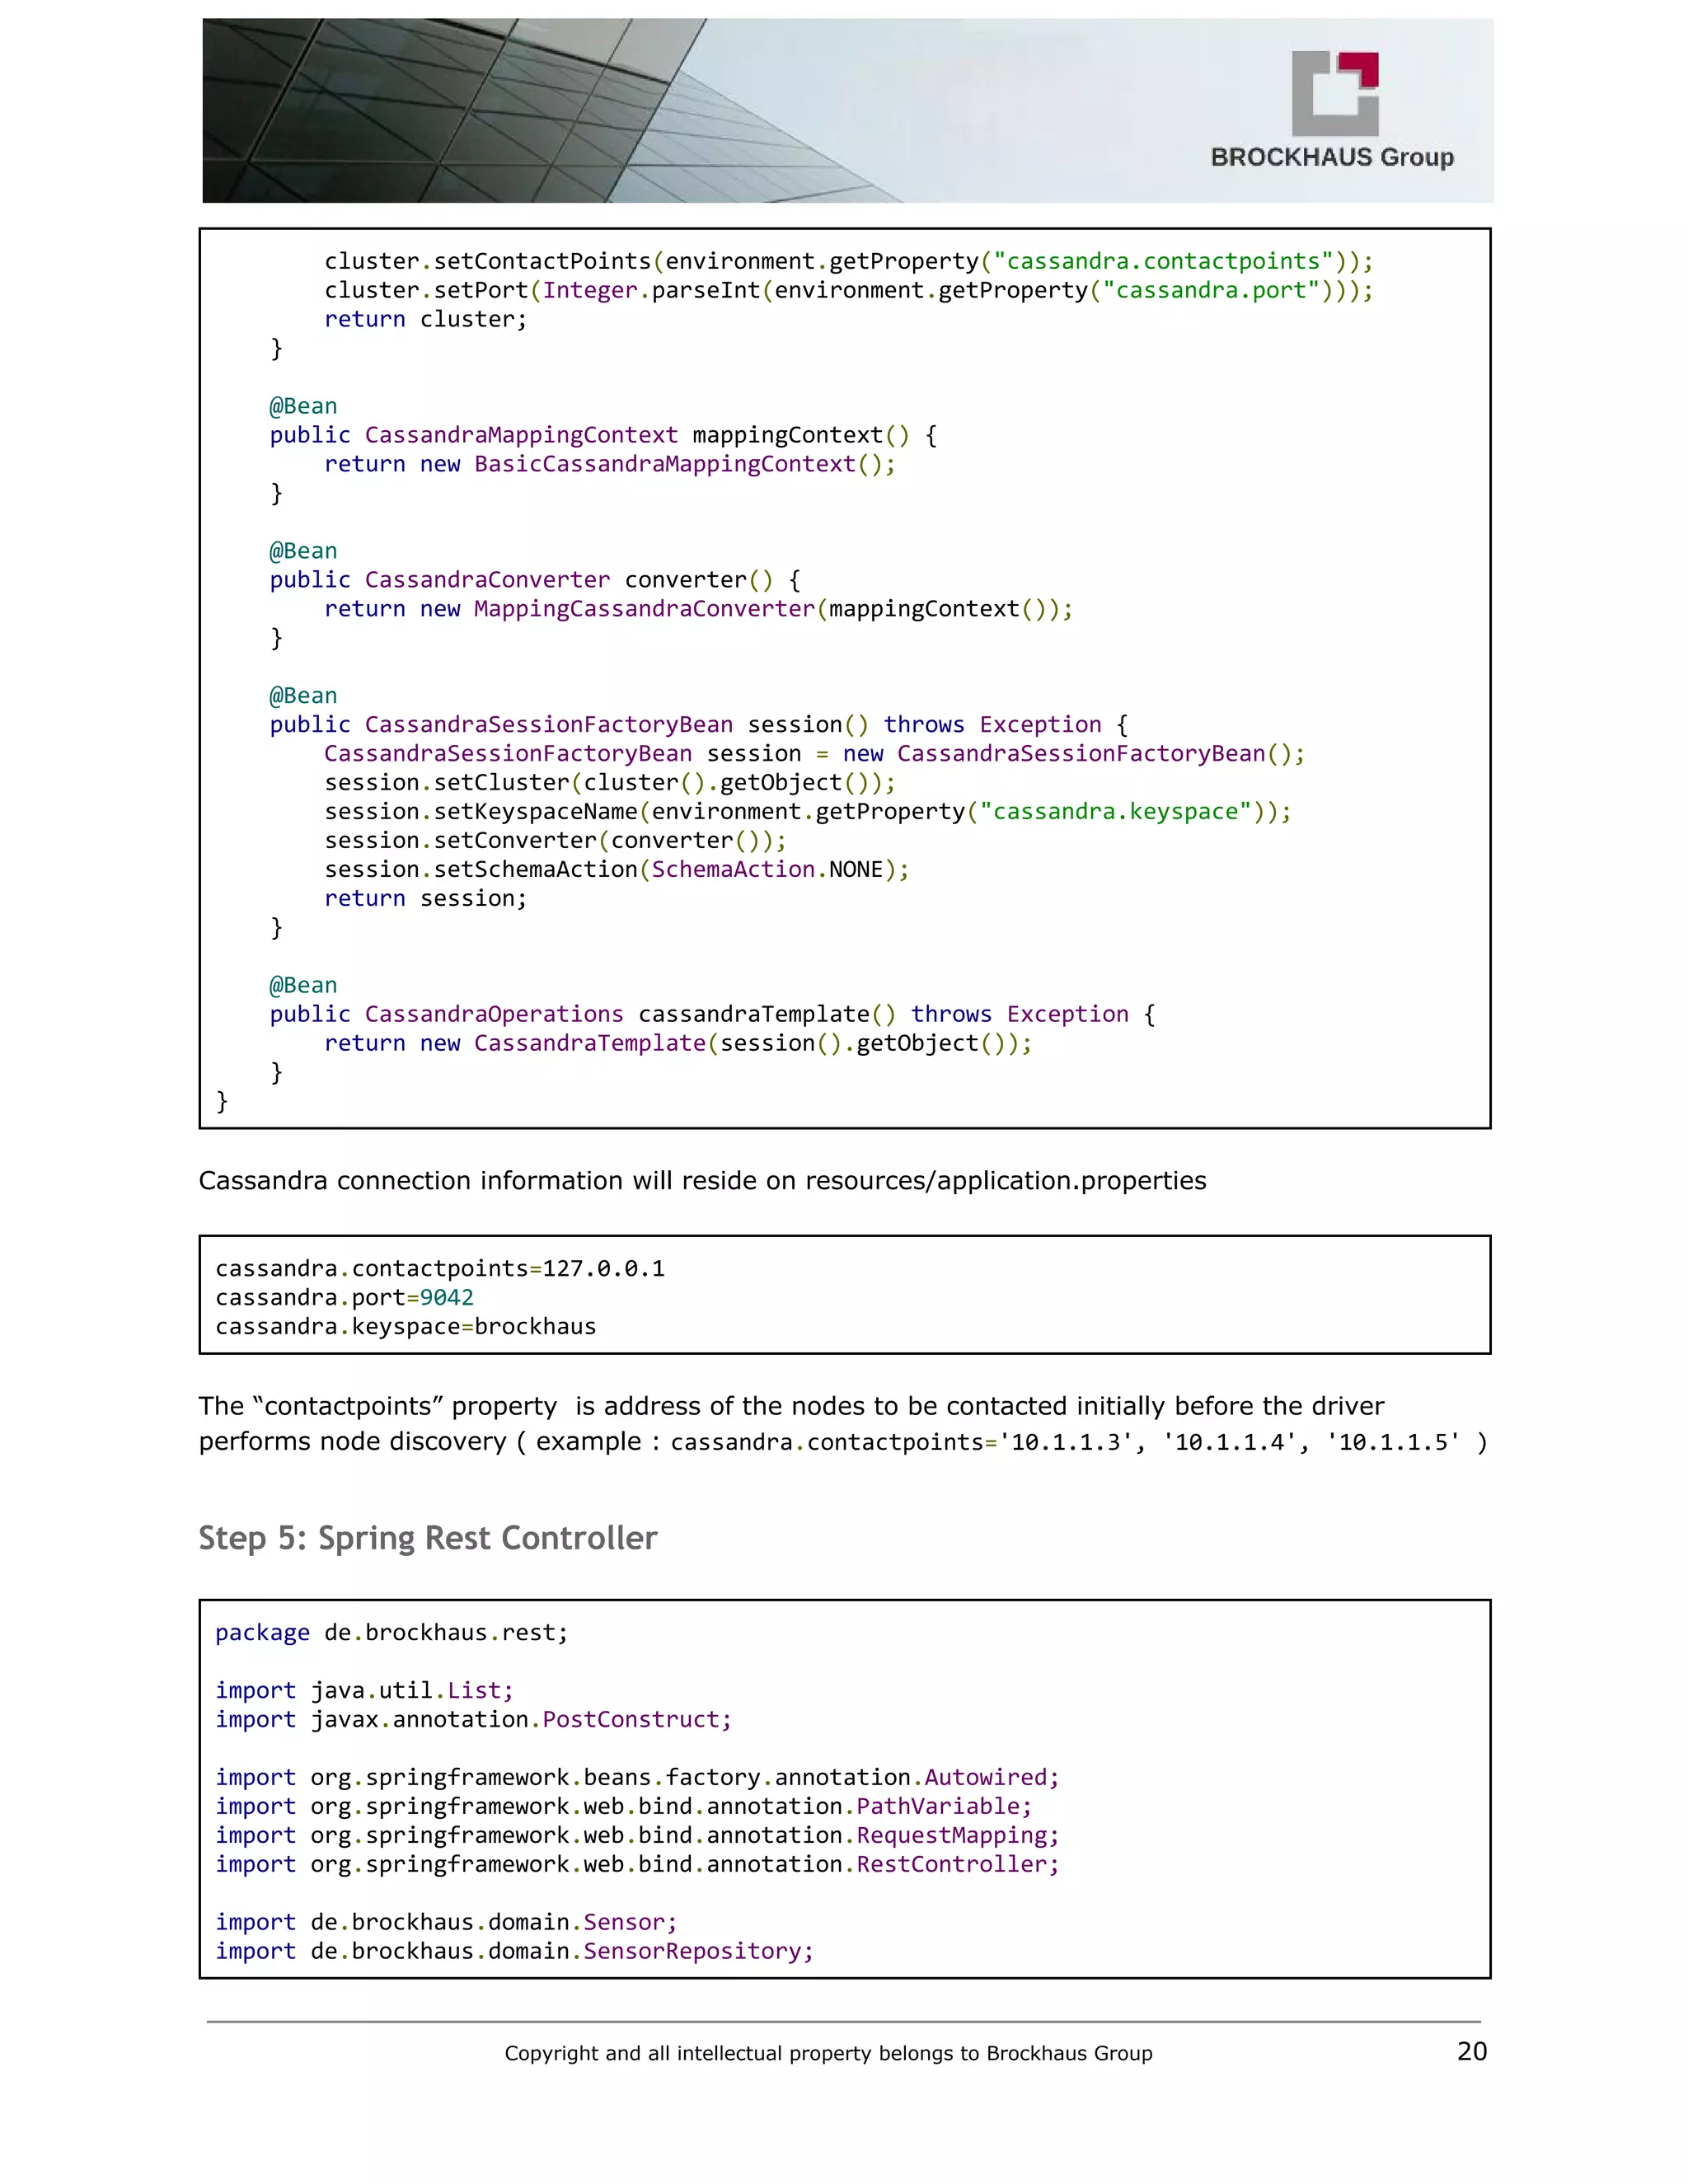
Step 4: Add Cassandra configuration
package de.brockhaus.config;
import org.springframework.beans.factory.annotation.Autowired;
import org.springframework.context.annotation.Bean;
import org.springframework.context.annotation.Configuration;
import org.springframework.core.env.Environment;
import org.springframework.data.cassandra.config.CassandraClusterFactoryBean;
import org.springframework.data.cassandra.config.CassandraSessionFactoryBean;
import org.springframework.data.cassandra.config.SchemaAction;
import org.springframework.data.cassandra.convert.CassandraConverter;
import org.springframework.data.cassandra.convert.MappingCassandraConverter;
import org.springframework.data.cassandra.core.CassandraOperations;
import org.springframework.data.cassandra.core.CassandraTemplate;
import org.springframework.data.cassandra.mapping.BasicCassandraMappingContext;
import org.springframework.data.cassandra.mapping.CassandraMappingContext;
import org.springframework.data.cassandra.repository.config.EnableCassandraRepositories;
@Configuration
@EnableCassandraRepositories(basePackages = {"de.brockhaus.domain"})
public class CassandraConfig {
@Autowired
private Environment environment;
@Bean
public CassandraClusterFactoryBean cluster() {
CassandraClusterFactoryBean cluster = new CassandraClusterFactoryBean();
Copyright and all intellectual property belongs to Brockhaus Group 19](https://image.slidesharecdn.com/m2minfrastructure-160229214215/75/M2M-infrastructure-using-Docker-20-2048.jpg)
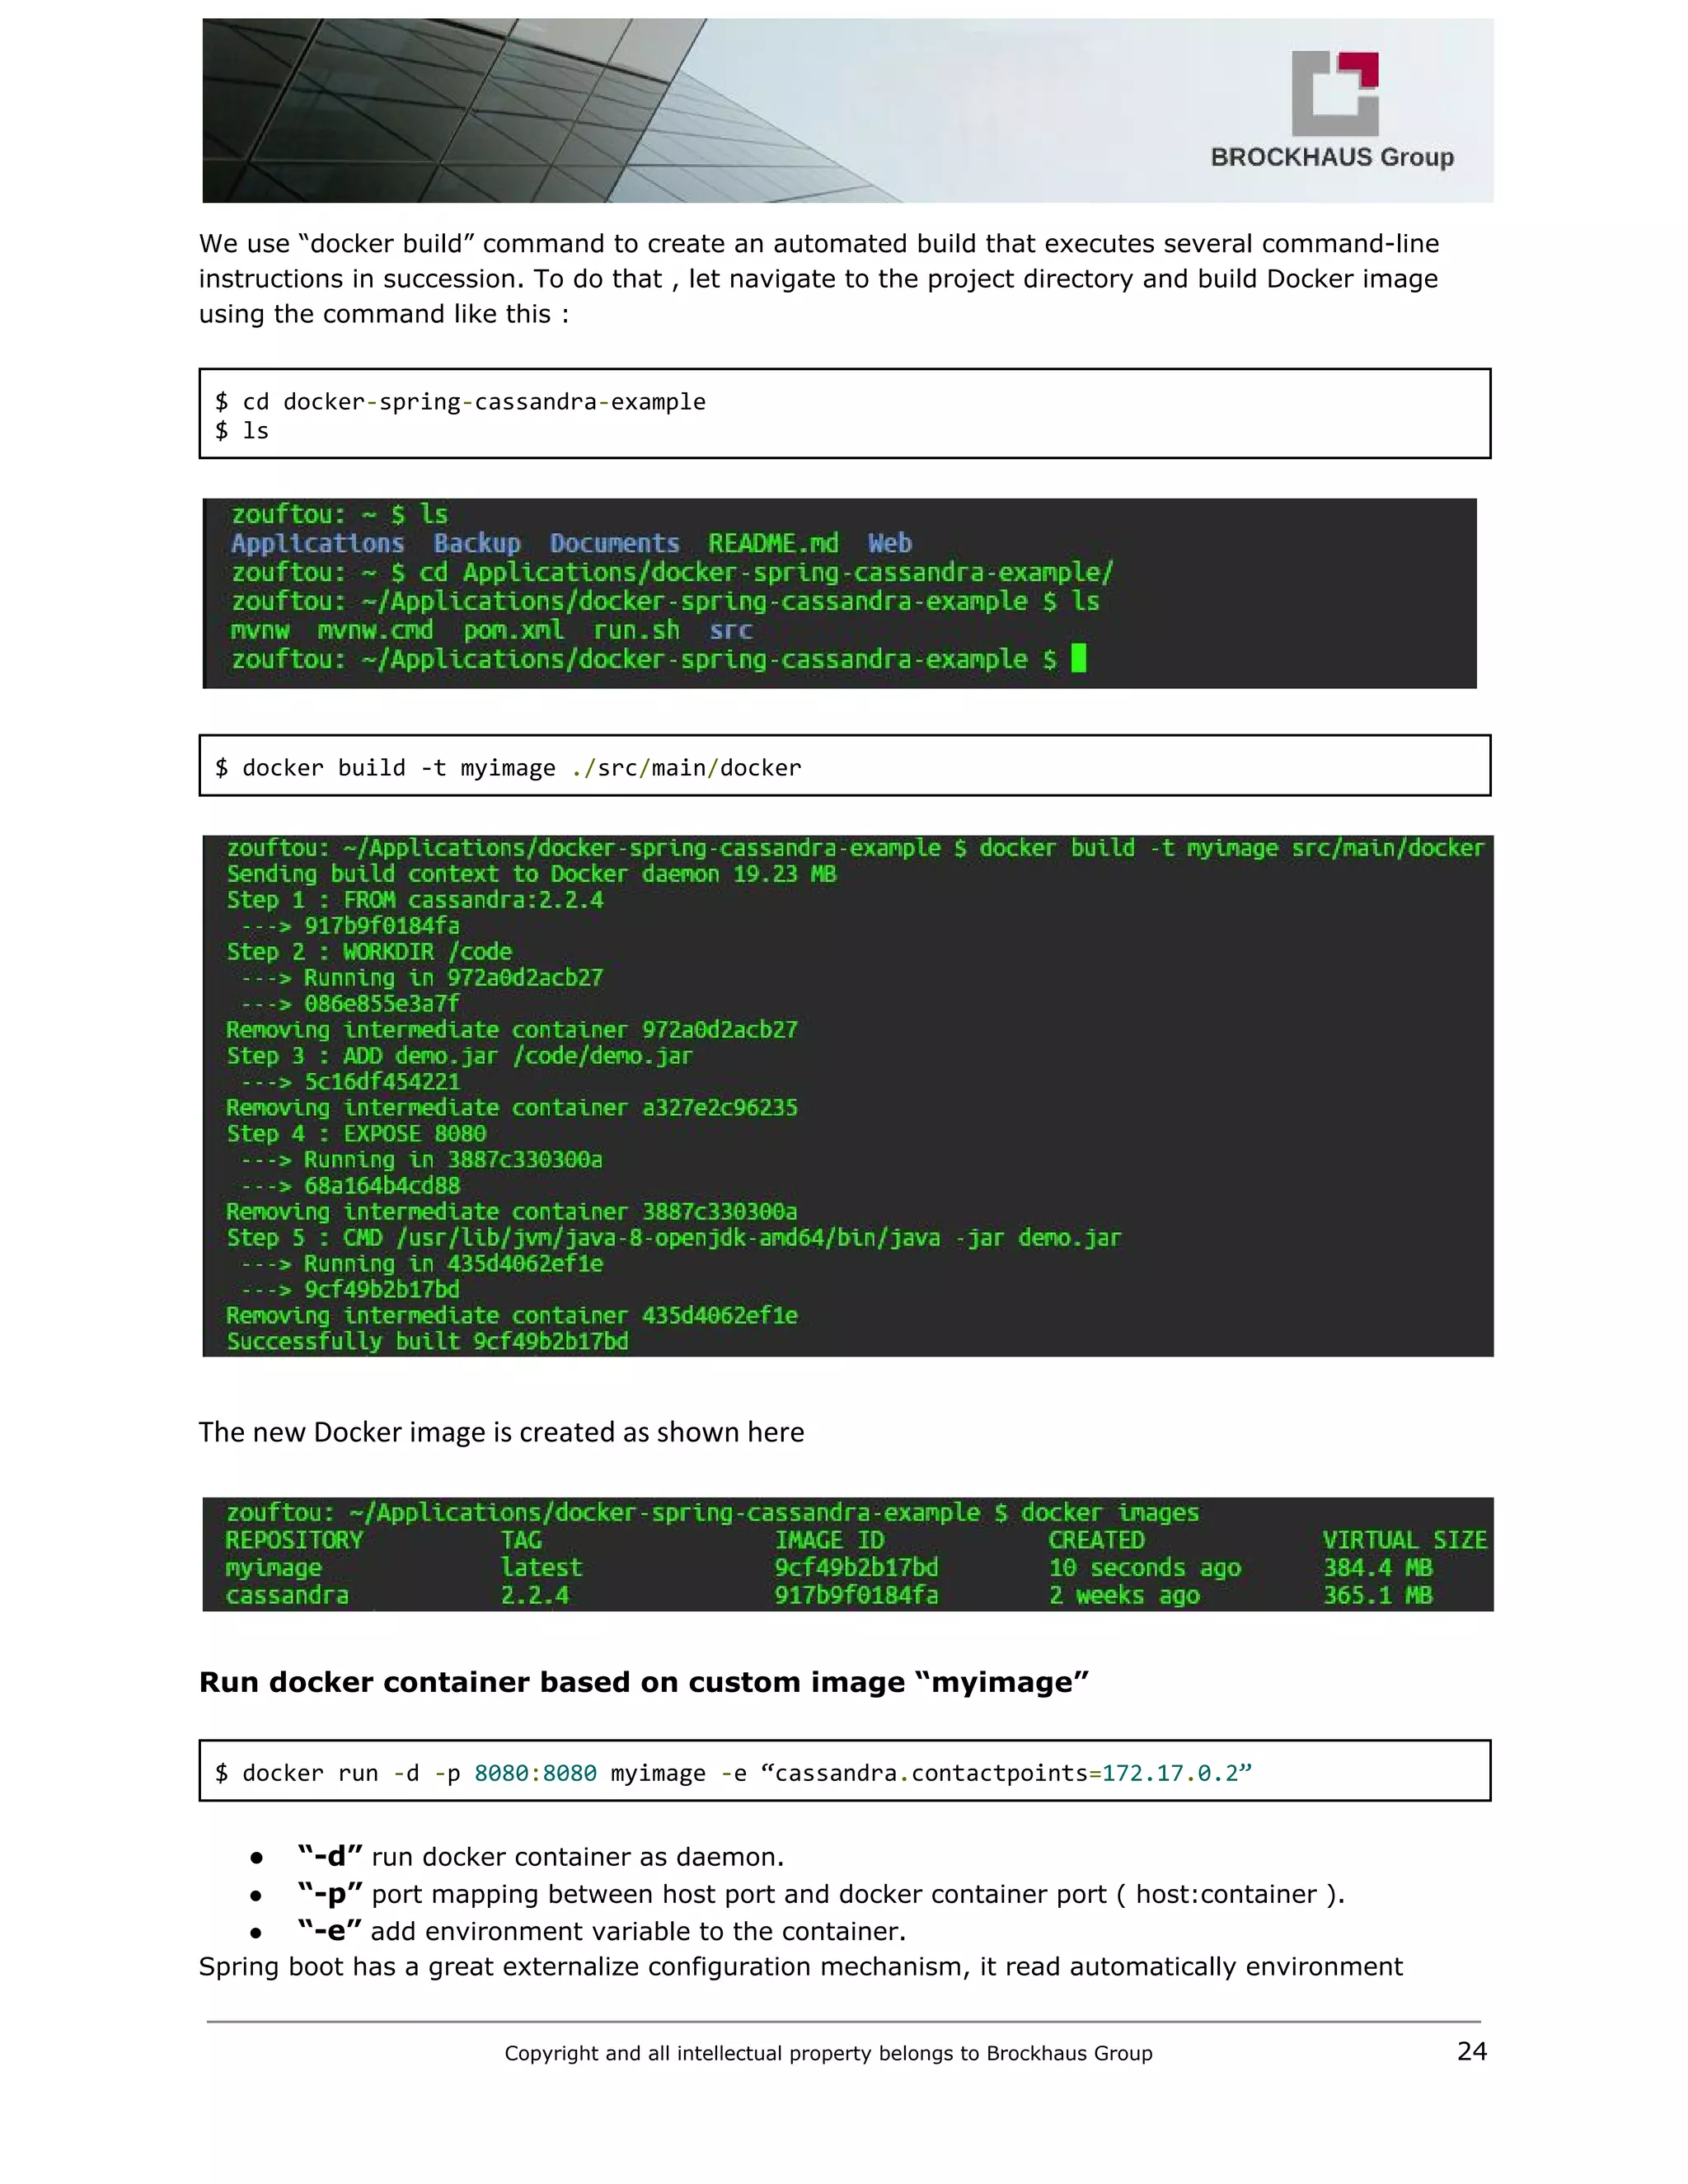
![Step 6: Containerize Application
Docker can build images automatically by reading the instructions from a Dockerfile, a text file that
contains all the commands, in order, needed to build a given image. Dockerfiles adhere to a specific
format and use a specific set of instructions. We can learn the basics on the Dockerfile Reference
page.
Docker has a simple Dockerfile file format that it uses to specify the "layers" of an image. So let’s go
ahead and create a Dockerfile in our Spring Cassandra Example Project:
Dockerfile
FROM java:8
# Install maven
RUN apt‐get update
RUN apt‐get install ‐y maven
WORKDIR /code
# Prepare by downloading dependencies
ADD pom.xml /code/pom.xml
RUN ["mvn", "dependency:resolve"]
RUN ["mvn", "verify"]
# Adding source to WORKDIR
ADD src /code/src
RUN ["mvn", "package"]
EXPOSE 8080
CMD ["java", "‐jar", "target/demo‐0.0.1‐SNAPSHOT.jar"]
Copyright and all intellectual property belongs to Brockhaus Group 23](https://image.slidesharecdn.com/m2minfrastructure-160229214215/75/M2M-infrastructure-using-Docker-24-2048.jpg)


The document discusses Docker, including what it is, its benefits and architecture. Docker provides an abstraction layer that allows applications to be packaged into lightweight containers that can run on any infrastructure. The key components of Docker include images, which are templates used to create containers that run applications in isolated environments. The document then provides instructions on installing Docker and using basic commands like running containers from images and pulling new images from registries.


![[DSC Europe 25] Dusan Jovicic - AI Story: From on-prem to cloud and back agai...](https://cdn.slidesharecdn.com/ss_thumbnails/8kp49m6uq22ifnbwhfnk-2-251205085715-964d11a6-thumbnail.jpg?width=640&height=640&fit=bounds)
![[DSC Europe 25] Nikola Rajovic - Hardware Technologies Under the Hood: RISC-V...](https://cdn.slidesharecdn.com/ss_thumbnails/o2gptrmtoyqndgoshwgq-dsc2025-tenstorrent-rajovic-251205090438-814685f5-thumbnail.jpg?width=640&height=640&fit=bounds)


![[DSC Europe 25] Boris Perkovic - Lost in performance.pptx](https://cdn.slidesharecdn.com/ss_thumbnails/uq5hrp7vsuahqkxzifux-1-251204082258-fd2ee09d-thumbnail.jpg?width=640&height=640&fit=bounds)


![[DSC Europe 25] Bogdan Daniel Maruneac - AI - It starts with you.pptx](https://cdn.slidesharecdn.com/ss_thumbnails/odov3snhrcqs9hx5ny2n-4-251205085715-f1daacfe-thumbnail.jpg?width=640&height=640&fit=bounds)

![[DSC Europe 25] Andy Cotgreave - Nothing is new in analytics.pptx](https://cdn.slidesharecdn.com/ss_thumbnails/mba4vzcurvoh5lfrd5zw-6-251205194645-341bbbbe-thumbnail.jpg?width=640&height=640&fit=bounds)


![[DSC Europe 25] Max Talanov - Non digital NNs.pptx](https://cdn.slidesharecdn.com/ss_thumbnails/wif8tr3gtua74qvtopke-non-digital-nns-251205090438-26b0eea6-thumbnail.jpg?width=640&height=640&fit=bounds)

