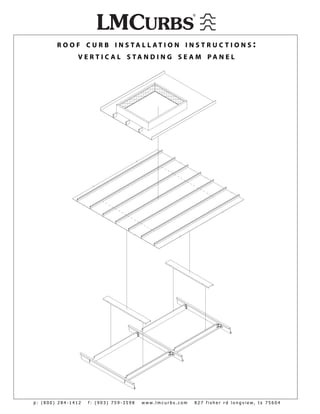
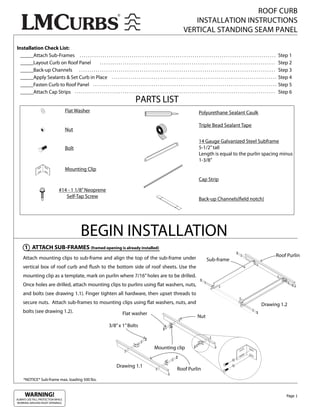
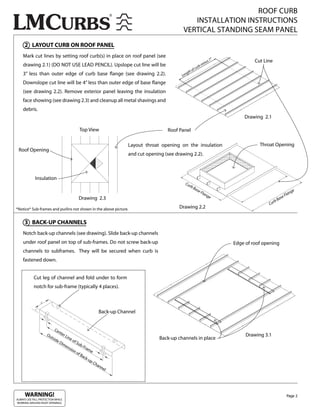
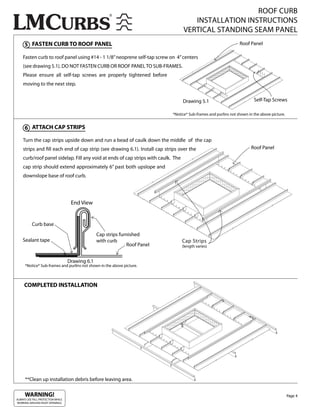
This document provides installation instructions for vertical standing seam roof curbs in 3 steps:
1. Attach sub-frames and layout the curb on the roof panel, cutting the panel as needed.
2. Apply sealants, set the curb in place, and fasten it to the roof panel.
3. Attach cap strips to cover the seam between the curb and roof panel.
CALL ON ➥8923113531 🔝Call Girls Adil Nagar Lucknow best Female service
Roof Curb Installation for Vertical Standing Seam
1. R O O F C U R B I N S TA L L AT I O N I N S T R U C T I O N S :
V E R T I C A L S TA N D I N G S E A M PA N E L
p: (800) 284-1412 f: (903) 759-3598 www.lmcurbs.com 827 fisher rd longview, tx 75604
2. ROOF CURB
INSTALLATION INSTRUCTIONS
VERTICAL STANDING SEAM PANEL
Installation Check List:
_____Attach Sub-Frames Step 1
_____Layout Curb on Roof Panel Step 2
_____Back-up Channels Step 3
_____Apply Sealants & Set Curb in Place Step 4
_____Fasten Curb to Roof Panel Step 5
_____Attach Cap Strips Step 6
PARTS LIST
Flat Washer Polyurethane Sealant Caulk
Triple Bead Sealant Tape
Nut
14 Gauge Galvanized Steel Subframe
Bolt 5-1/2” tall
Length is equal to the purlin spacing minus
1-3/8”
Mounting Clip
Cap Strip
#14 - 1 1/8” Neoprene
Self-Tap Screw
Back-up Channels( eld notch)
BEGIN INSTALLATION
1 ATTACH SUB-FRAMES (framed opening is already installed)
Attach mounting clips to sub-frame and align the top of the sub-frame under Roof Purlin
Sub-frame
vertical box of roof curb and ush to the bottom side of roof sheets. Use the
mounting clip as a template, mark on purlin where 7/16” holes are to be drilled.
Once holes are drilled, attach mounting clips to purlins using at washers, nuts,
and bolts (see drawing 1.1). Finger tighten all hardware, then upset threads to
secure nuts. Attach sub-frames to mounting clips using at washers, nuts, and Drawing 1.2
bolts (see drawing 1.2). Flat washer
Nut
3/8” x 1” Bolts
Mounting clip
Drawing 1.1
Roof Purlin
*NOTICE* Sub-frame max. loading 500 lbs.
WARNING! Page 1
ALWAYS USE FALL PROTECTION WHILE
WORKING AROUND ROOF OPENINGS.
3. ROOF CURB
INSTALLATION INSTRUCTIONS
VERTICAL STANDING SEAM PANEL
2 LAYOUT CURB ON ROOF PANEL
Mark cut lines by setting roof curb(s) in place on roof panel (see
”
inu
s7 Cut Line
drawing 2.1) (DO NOT USE LEAD PENCIL). Upslope cut line will be r bm
o f cu
3” less than outer edge of curb base ange (see drawing 2.2). gth
Len
Downslope cut line will be 4” less than outer edge of base ange
(see drawing 2.2). Remove exterior panel leaving the insulation
face showing (see drawing 2.3) and cleanup all metal shavings and
debris.
Drawing 2.1
Top View Roof Panel
Layout throat opening on the insulation Throat Opening
Roof Opening
and cut opening (see drawing 2.2).
Insulation
Cu
rb
Ba
se ge
Fla n
ng
e Fla
Drawing 2.3 B ase
rb
Cu
*Notice* Sub-frames and purlins not shown in the above picture. Drawing 2.2
3 BACK-UP CHANNELS
Notch back-up channels (see drawing). Slide back-up channels
under roof panel on top of sub-frames. Do not screw back-up Edge of roof opening
channels to subframes. They will be secured when curb is
fastened down.
Cut leg of channel and fold under to form
notch for sub-frame (typically 4 places).
Back-up Channel
Ce
nte
Ou
tsid
rL
ine Drawing 3.1
eD of Back-up channels in place
im Su
en b-F
sio ram
no e
fB
ack
-up
Ch
a nn
el
WARNING! Page 2
ALWAYS USE FALL PROTECTION WHILE
WORKING AROUND ROOF OPENINGS.
4. ROOF CURB
INSTALLATION INSTRUCTIONS
VERTICAL STANDING SEAM PANEL
4 APPLY SEALANTS & SET CURB IN PLACE
Apply a strip of sealant tape and generous bead of caulk on the upslope side of the roof curb and on downslope side of the roof
panel before setting roof curb in place (see drawing 4.1). Position roof curb over roof opening and lower into place, shift curb
to align with sub-frames and roof panel.
Prepare Upslope Panel Seams
/2” Mark rib for cutting Fold over vertical
11 Remove marked
section of rib rib and crimp
tight.
Apply caulk
A before folding C Must ll end of standing
B seam with caulk.
The upslope of curb is to be
The downslope of curb is to be
installed UNDER the roof panel.
installed OVER the roof panel.
Roof Curb
Roof Panel
Caulk
(apply as shown)
Caulk
(apply as shown)
Sealant Tape
Drawing 4.1
*Notice* Sub-frames and purlins not shown in the above picture.
WARNING!
ALWAYS USE FALL PROTECTION WHILE Page 3
WORKING AROUND ROOF OPENINGS.
5. ROOF CURB
INSTALLATION INSTRUCTIONS
VERTICAL STANDING SEAM PANEL
5 FASTEN CURB TO ROOF PANEL Roof Panel
Fasten curb to roof panel using #14 - 1 1/8” neoprene self-tap screw on 4” centers
(see drawing 5.1). DO NOT FASTEN CURB OR ROOF PANEL TO SUB-FRAMES.
Please ensure all self-tap screws are properly tightened before
moving to the next step.
Drawing 5.1 Self-Tap Screws
*Notice* Sub-frames and purlins not shown in the above picture.
6 ATTACH CAP STRIPS
Turn the cap strips upside down and run a bead of caulk down the middle of the cap
strips and ll each end of cap strip (see drawing 6.1). Install cap strips over the Roof Panel
curb/roof panel sidelap. Fill any void at ends of cap strips with caulk. The
cap strip should extend approximately 6” past both upslope and
downslope base of roof curb.
End View
Curb base
Cap strips furnished
Sealant tape with curb Cap Strips
Roof Panel (length varies)
Drawing 6.1
*Notice* Sub-frames and purlins not shown in the above picture.
COMPLETED INSTALLATION
**Clean up installation debris before leaving area.
WARNING! Page 4
ALWAYS USE FALL PROTECTION WHILE
WORKING AROUND ROOF OPENINGS.