Download as PDF, PPTX

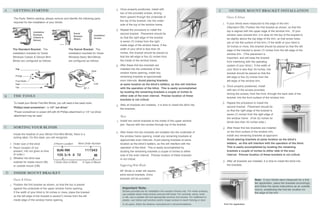

1. The document provides instructions for installing mini blinds. It describes mounting brackets to the window sill and installing the blind rails into the brackets. 2. Safety tips are included, such as avoiding placing brackets where blind ladders will interfere and ensuring proper locking of brackets for child safety. 3. Care instructions are provided for dusting, vacuuming, and spot cleaning mini blinds.


