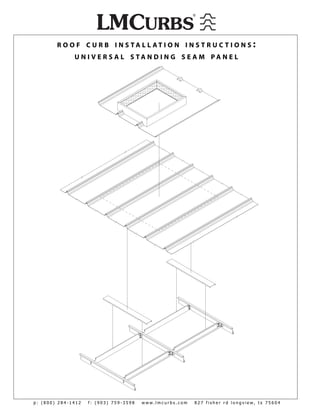
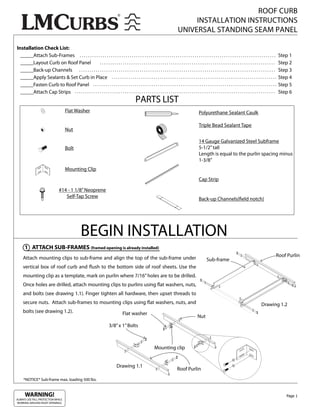
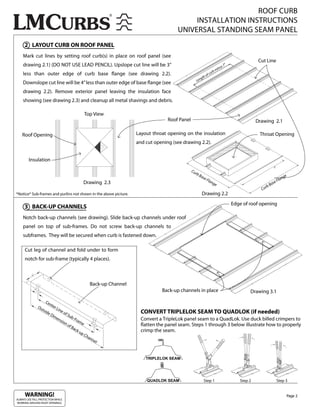
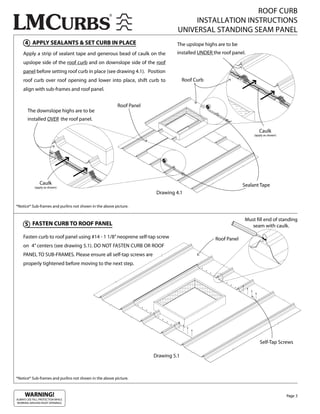
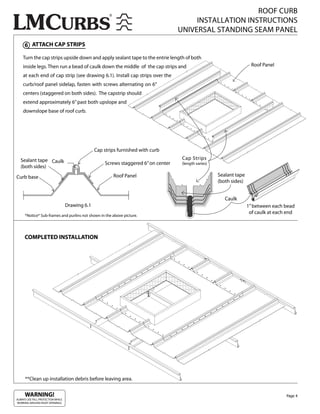
This document provides installation instructions for a universal standing seam panel roof curb in 6 steps:
1) Attach sub-frames to support the roof curb. 2) Mark and cut the roof panel to size. 3) Install backup channels under the roof panel. 4) Apply sealants and set the curb in place. 5) Fasten the curb to the roof panel. 6) Attach cap strips around the roof curb installation.
This document provides installation instructions for vertical standing seam roof curbs in 3 steps:
1. Attach sub-frames and layout the curb on the roof panel, cutting the panel as needed.
2. Apply sealants, set the curb in place, and fasten it to the roof panel.
3. Attach cap strips to cover the seam between the curb and roof panel.
This document provides installation instructions for installing a horizontal standing seam roof curb. The instructions are as follows:
1. Attach sub-frames to support the roof curb opening.
2. Mark and cut the roof panel to size for the curb opening.
3. Slide backup channels under the roof panel.
4. Apply sealants around the curb perimeter and set the curb in place over the opening.
5. Fasten the curb to the roof panel using self-tapping screws.
This document provides installation instructions for S-5! snow retention systems, including Snorail and Snofence. It outlines 6 key steps: 1) establishing a string line and determining appropriate clamp locations, 2) preparing clamp assemblies by threading clamps and posts onto rods, 3) installing clamp assemblies loosely on panel seams, 4) tightening all set screws, 5) securing rods at "E" units, and 6) repeating for additional rods using couplings. Proper set screw tension is emphasized for maximum holding strength. The systems can be installed on various roofing materials, including adjusting installation for batten seams.
BlindsFirst | How to install aluminum mini blindsBlinds First
1. The document provides instructions for installing mini blinds. It describes mounting brackets to the window sill and installing the blind rails into the brackets.
2. Safety tips are included, such as avoiding placing brackets where blind ladders will interfere and ensuring proper locking of brackets for child safety.
3. Care instructions are provided for dusting, vacuuming, and spot cleaning mini blinds.
This document provides information on a security access cover product called the Torlift. The Torlift is a mild steel hinged access cover and frame that is EPDM sealed and weather resistant. It can be operated from above and below, has internal or external frame weep pipes and external balanced lifting points. It also includes standard security features like a double deterrent anti-vibration locking system and hidden tamperproof hinges. The covers are available in single, twin, triple or multiple configurations and a variety of standard and optional load ratings. Dimensions and additional options are also specified.
This document provides installation instructions for the ADEMCO 5815 Door/Window Transmitter. The transmitter has two input loops for wired contacts or a built-in reed switch. It includes instructions for mounting the transmitter, connecting input loops, installing batteries, and specifications. Regular maintenance and testing by the user are recommended to ensure satisfactory alarm system operation.
This document provides information on Steelway, a leading UK engineering company that specializes in steel, aluminum, and GRP products. It specifically discusses their line of LPCB approved high security access covers, upstanding frames, and ventilator covers that meet LPS 1175 level 4 ratings for security and fire protection. Product information is given for various standard sizes of the Sentry access covers, valve covers, and ventilator covers that can be manufactured to non-standard sizes as well.
The document provides installation instructions for the ADEMCO 5816 Door/Window Transmitter. It describes how to enroll the transmitter in the control panel, conduct tests to ensure adequate signal strength, and permanently mount the transmitter and its included mounting plate. It also explains how to connect a wired contact loop to the transmitter's terminals and install a magnet to activate the built-in reed switch. Battery installation and replacement instructions are provided, noting the correct battery type.
This document provides installation and maintenance instructions for rigid moment couplings. It describes how to install the couplings using interference fit hubs or hubs with shrink discs. Key steps include cleaning and preparing the shafts, heating interference fit hubs, mounting and securing the hubs, and torquing fasteners to specified values. It also provides guidelines for annual maintenance and removing the couplings.
The document discusses various yacht accessories manufactured by Seldén that can increase the performance of a yacht's rig, including an extendable gennaker bowsprit, Furlex furling systems, furling masts, MDS and RCB batten cars, booms, and Rodkicker vang systems. Seldén produces rig components and accessories to suit a wide range of yacht sizes and purposes, from racing to cruising.
This document describes the structure and parts used to build a tubular steel structure to support a glass manufacturing plant. The structure consists of galvanized steel tubing fitted together using cast iron fittings. This provides flexibility to modify the structure over time. The document lists common tube sizes and structure fittings like bends, tees, crosses, and brackets that can be combined to form the supporting framework. Guidelines are provided about properly supporting large columns and allowing for thermal expansion of glass equipment on the structure.
The LBC 3090/01 is an economic flush-mounting ceiling loudspeaker suitable for speech and music reproduction in various commercial settings like shops, offices, and hotels. It has a 6W dual cone loudspeaker, 100V matching transformer, protective dust cover, and optional fire dome. Installation is quick with spring-loaded clamps or screws and a template is provided for marking the ceiling cut-out.
Chief's Fusion Series of flat panel mounts provide innovative installation solutions through features like lateral shift and height/level adjustment. These mounts can perfectly position TVs and reduce installation time. A variety of supporting accessories integrate with the mounts to create customized AV configurations for different applications like video conferencing, home theater, and boardrooms.
The ADEMCO 5869 is a finger-operated RF transmitter used to activate a holdup signal. It is typically mounted under a counter or money drawer. When activated, it sends a signal to the control panel which sends an alarm. It contains tamper switches that are activated if the cover is removed or the unit is removed from its location. The 5869 must be programmed as a 24-hour silent zone and treated as an "RF" device during programming. It has a serial number used for enrolling with the control panel and must be used with the 5881ENHC receiver for UL installations.
1) The document provides setup instructions for the Prismasonic Model H-850M lens.
2) Key steps include mounting the lens in front of the projector, using control knobs to move the prisms into pass and wide modes to adjust the image, and tuning the pinstops to match the screen size.
3) Proper cleaning of the prisms and housing is described.
The document summarizes the BS-1030 universal speaker, which is versatile for paging and background music applications. It has a clean, modern design available in black or white, and offers easy installation via direct mounting or optional brackets. The speaker provides high quality sound reproduction from 80Hz to 20kHz and can be used for both low and high impedance systems via rear switches. It has an IPX4 water resistance rating suitable for indoor and outdoor use.
This document provides instructions for installing a trapezoidal standing seam roof curb. The instructions include:
1) Attaching sub-frames to support the curb opening and layout the curb on the roof panel.
2) Cutting the roof panel to size and installing backup channels below the panel.
3) Applying sealants to the curb and panel before setting the curb in place.
4) Fastening the curb to the roof panel with self-tapping screws.
5) Attaching cap strips around the curb opening using sealants and screws.
This document provides instructions for installing R-panel roof curbs. The instructions are as follows:
1. Attach sub-frames to the roof purlins using bolts, washers and nuts.
2. Layout the curb locations and mark the throat area cut lines on the roof panel.
3. Center the back-up channels with the roof openings and slide them underneath the roof panels.
The instructions provide diagrams and details for properly installing and securing the roof curbs.
This document provides installation and maintenance instructions for a multi-mounting kit used with reflective beam smoke detectors. The kit allows detectors and reflectors to be mounted to walls or ceilings and includes brackets, screws, and adjustment components. Instructions are provided to mount the transmitter/receiver unit or the reflector individually using the various brackets included in the kit. Proper alignment and secure mounting of both components is emphasized for correct operation of the beam smoke detection system.
The document provides assembly and operating instructions for the SCA 1 ISOColor Visual Headlamp Alignment System. It includes:
1. An introduction describing the system's components and benefits of the ISOColor technology.
2. Steps for assembling the base and wheels, mast and glide plate, optical alignment head, and sighting unit.
3. Guidelines for preparing the alignment bay and vehicle, and using the system to align a vehicle's headlamps.
Blinds First | How to install vertical blindsBlinds First
1. The document provides instructions for installing and operating vertical blinds. It includes steps for installing vanes, a pulley and cord tensioner, shortening the cord height, and installing brackets.
2. Safety tips are provided, emphasizing that child safety is the top priority. Instructions are given for cleaning and caring for the blinds.
3. An overview of the parts included is presented along with the tools needed for installation. Sorting labels are explained to identify order details.
This document provides information about the No. 710 Unistrobe Warning Light, including its physical dimensions, electrical specifications, installation instructions, wiring diagrams, and troubleshooting tips. It can be installed indoors or outdoors to provide bright flashing lights when activated by an alarm system. It operates on 5-15V DC and has an optional tamper switch for security applications.
This document provides installation instructions for compact laminate toilet partitions using Bobrick hardware. It includes diagrams of common partition layouts and details on anchoring partitions to floors, ceilings and walls. The instructions are organized into sections covering preparation, layout, installation of anchors, brackets and panels, and finishing. Proper safety gear and tools are recommended.
1. The document provides instructions for mounting and installing a security sensor.
2. It describes separating the sensor housings and removing the printed circuit board.
3. The steps include wiring the unit, setting the DIP switch settings for features like sensitivity, and walk-testing the sensor to ensure proper detection range.
CS Unitec Air Powered Concrete Cutting ChainsawCS Unitec
CS Unitec Air Powered Concrete Cutting Chain Saw Model CS71773 Operator’s manual talks about how to operate the concrete cutting chainsaw to reduce chatter, extend diamond life and create a straighter cut, and enable the use of the Walkwalker more quickly.
The 5817CB is a wireless transmitter that can be used with fire and burglary devices to send alarm signals to a control panel. It has three input loops - a primary supervised loop, a built-in reed switch loop, and a normally closed household burglary loop. DIP switches are used to configure the primary loop reporting and tamper switches protect the unit. The transmitter can be mounted using screws anchored to a wall stud.
The document discusses two types of sub-surface ready access terminal closures: the Tri-Seal closure and the Omni-Seal closure. The Tri-Seal closure is designed for butt splice and subsurface terminal use with a flexible oval port and side ports that allow additional cables or wires to be added. The Omni-Seal closure is designed specifically for subsurface terminal use when there are a large number of drops, and can accommodate a looped cable up to 1.6 inches in diameter along with service wires. Both closures come in kits to provide a waterproof seal and allow for reentry of the cables or wires.
Screw and barrel inspection plays a very important part in achieving exceptional production performance. The screw and barrel are major components of extrusion, injection molding and blow molding processes, and should be measured for wear at least once a year (preferably twice a year). Many U.S. companies schedule preventive maintenance (PM) during the week of Independence Day and again during the week of Christmas.
The document provides details on reinforcing concrete structural members. It discusses proper detailing of slabs, beams, columns, foundations and other members. Key points include providing adequate reinforcement and stirrup spacing, ensuring cover over rebar, using development lengths at joints, and following code specifications for seismic and other load conditions. Proper detailing is emphasized as important for structural safety and performance.
This document provides instructions and specifications for bumpers and frames on an XJ vehicle. It includes sections on removing and installing various bumper components like end caps, the front and rear bumpers, and tow hooks. It also covers removing and installing skid plates and describes vehicle dimensions and frame torque specifications.
This document provides installation instructions for heatshrink outdoor armour earthen to suit single core XLPE/AWA/PVC cables ranging from 7.2 to 33kV. The instructions are as follows: (1) position the large outer shrink tube and armour support ring over the cable end, (2) prepare the cable to the required length and expose the armours, (3) bend back the armour wires and fit the support ring, (4) secure the earth braid to the armours, (5) bend the armours back over the support ring, (6) secure the armours and braid with clamps, (7) apply mastic tape and further tape, (8) cover any
1. The document provides installation instructions for heatshrink termination of 3 core polymeric cables with voltages ranging from 7.2kV to 36kV.
2. It describes how to prepare the cable by removing the outer sheath and screen, and installing stress control tape, tubes, cable lugs, and an anti-track tube.
3. It also specifies minimum separation distances between phases and to ground for indoor terminations depending on voltage to ensure long term performance.
The document provides installation and setup instructions for the ADEMCO 5819WHS/5819BRS Shock Processor Transmitter. It has a built-in shock sensor to detect forcible attacks and supports 3 zones. The transmitter can be mounted and oriented as needed. Instructions are provided for setting the response time, sensitivity, and enrolling the transmitter's serial number and zones in the alarm system. The battery is replaced with a CR123A lithium battery, and regular testing is recommended.
1) The document provides installation instructions for heatshrink termination of 3 core polymeric cables with voltages ranging from 7.2kV to 36kV. It describes the steps for preparing the cable, installing stress control tapes and tubes, cable lugs, and rain sheds.
2) Key steps include removing the cable sheath and screens, applying stress control tape, installing cable lugs and boots, and shrinking tubes onto the assembly. Proper distances must be maintained for phase clearance and bending radii.
3) Outdoor terminations require additional rain sheds installed from the bottom up at specified distances between the anti-track tube and shed edges. Indoor distances between phases and grounds are also outlined.
Similar to LMCurbs Roof Curb Installation Instructions For Universal Standing Seam (20)
This document provides installation instructions for ColorGard®, a product for attaching items like snow guards to standing seam metal roofs without piercing the panels. The instructions outline how to properly design and layout the ColorGard® system, prepare the necessary tools and S-5! clamps, and install the ColorGard® crossmembers and color strips. Key steps include using a string line for accurate clamp placement, orienting clamp bolt holes and setscrews correctly, attaching VersaClips as needed, and securing color strips to the crossmembers.
ColorGard is an aluminum roof attachment system manufactured in 8-foot sections for use with S-5 clamps. It comes in punched or unpunched configurations, with punched having slots every 4 inches and unpunched being more versatile to install. Splices are included to join sections together. Accessories like VersaClips and SnoClips are also available to aid installation.
Over the course of thirty plus years in the metal building industry, LMCURBS has experienced tremendous growth by staying committed to offering products and services targeted specifically for customers who require innovative solutions delivered with the highest quality possible in order to fulfill the most challenging aspects of metal roofing applications. We recognize two essential requirements in our continued effort to meet customers’ expectations: our people and our products. This commitment is achieved through our team that has been carefully assembled over the last thirty plus years with each member representing the highest level of expertise in their respective skill. Our workmanship, pride, and reputation are evident in each completed product and project.
In the follow pages, we describe the key features and options available for all of our product lines. These product lines, to name a few, include roof curbs, snow retention, roof walk, louvers, exhaust fans, and much more. With this wide selection of products, we have effectively worked to create an unparalleled buying experience that allows customers to purchase metal roofing accessories from a single source supplier. We value this opportunity to present our company's capabilities and look forward to working with you on your next project.
Over the course of thirty plus years in the metal building industry, LMCURBS has experienced tremendous growth by staying committed to offering products and services targeted specifically for customers who require innovative solutions delivered with the highest quality possible in order to fulfill the most challenging aspects of metal roofing applications. We recognize two essential requirements in our continued effort to meet customers’ expectations: our people and our products. This commitment is achieved through our team that has been
carefully assembled over the last thirty plus years with each member representing the highest level of expertise
in their respective skill. Our workmanship, pride, and reputation are evident in each completed product and
project.
In the follow pages, we describe the key features and options available for all of our product lines. These product
lines, to name a few, include roof curbs, snow retention, roof walk, louvers, exhaust fans, and much more. With
this wide selection of products, we have effectively worked to create an unparalleled buying experience that
allows customers to purchase metal roofing accessories from a single source supplier. We value this opportunity
to present our company's capabilities and look forward to working with you on your next project.
ProSocial Behaviour - Applied Social Psychology - Psychology SuperNotesPsychoTech Services
A proprietary approach developed by bringing together the best of learning theories from Psychology, design principles from the world of visualization, and pedagogical methods from over a decade of training experience, that enables you to: Learn better, faster!
Aggression - Applied Social Psychology - Psychology SuperNotesPsychoTech Services
A proprietary approach developed by bringing together the best of learning theories from Psychology, design principles from the world of visualization, and pedagogical methods from over a decade of training experience, that enables you to: Learn better, faster!
As we navigate through the ebbs and flows of life, it is natural to experience moments of low motivation and dwindling passion for our goals.
However, it is important to remember that this is a common hurdle that can be overcome with the right strategies in place.
In this guide, we will explore ways to rekindle the fire within you and stay motivated towards your aspirations.
You may be stressed about revealing your cancer diagnosis to your child or children.
Children love stories and these often provide parents with a means of broaching tricky subjects and so the ‘The Secret Warrior’ book was especially written for CANSA TLC, by creative writer and social worker, Sally Ann Carter.
Find out more:
https://cansa.org.za/resources-to-help-share-a-parent-or-loved-ones-cancer-diagnosis-with-a-child/
Procrastination is a common challenge that many individuals face when it comes to completing tasks and achieving goals. It can hinder productivity and lead to feelings of stress and frustration.
However, with the right strategies and mindset, it is possible to overcome procrastination and increase productivity.
In this article, we will explore the causes of procrastination, how to recognize the signs of procrastination in oneself, and effective strategies for overcoming procrastination and boosting productivity.
Understanding of Self - Applied Social Psychology - Psychology SuperNotesPsychoTech Services
A proprietary approach developed by bringing together the best of learning theories from Psychology, design principles from the world of visualization, and pedagogical methods from over a decade of training experience, that enables you to: Learn better, faster!
Understanding of Self - Applied Social Psychology - Psychology SuperNotes
LMCurbs Roof Curb Installation Instructions For Universal Standing Seam
1. R O O F C U R B I N S TA L L AT I O N I N S T R U C T I O N S :
U N I V E R S A L S TA N D I N G S E A M PA N E L
p: (800) 284-1412 f: (903) 759-3598 www.lmcurbs.com 827 fisher rd longview, tx 75604
2. ROOF CURB
INSTALLATION INSTRUCTIONS
UNIVERSAL STANDING SEAM PANEL
Installation Check List:
_____Attach Sub-Frames Step 1
_____Layout Curb on Roof Panel Step 2
_____Back-up Channels Step 3
_____Apply Sealants & Set Curb in Place Step 4
_____Fasten Curb to Roof Panel Step 5
_____Attach Cap Strips Step 6
PARTS LIST
Flat Washer Polyurethane Sealant Caulk
Triple Bead Sealant Tape
Nut
14 Gauge Galvanized Steel Subframe
Bolt 5-1/2” tall
Length is equal to the purlin spacing minus
1-3/8”
Mounting Clip
Cap Strip
#14 - 1 1/8” Neoprene
Self-Tap Screw
Back-up Channels( eld notch)
BEGIN INSTALLATION
1 ATTACH SUB-FRAMES (framed opening is already installed)
Attach mounting clips to sub-frame and align the top of the sub-frame under Roof Purlin
Sub-frame
vertical box of roof curb and ush to the bottom side of roof sheets. Use the
mounting clip as a template, mark on purlin where 7/16” holes are to be drilled.
Once holes are drilled, attach mounting clips to purlins using at washers, nuts,
and bolts (see drawing 1.1). Finger tighten all hardware, then upset threads to
secure nuts. Attach sub-frames to mounting clips using at washers, nuts, and Drawing 1.2
bolts (see drawing 1.2). Flat washer
Nut
3/8” x 1” Bolts
Mounting clip
Drawing 1.1
Roof Purlin
*NOTICE* Sub-frame max. loading 500 lbs.
WARNING! Page 1
ALWAYS USE FALL PROTECTION WHILE
WORKING AROUND ROOF OPENINGS.
3. ROOF CURB
INSTALLATION INSTRUCTIONS
UNIVERSAL STANDING SEAM PANEL
2 LAYOUT CURB ON ROOF PANEL
Mark cut lines by setting roof curb(s) in place on roof panel (see
Cut Line
drawing 2.1) (DO NOT USE LEAD PENCIL). Upslope cut line will be 3” s 7”
inu
rbm
less than outer edge of curb base ange (see drawing 2.2). o f cu
g th
Len
Downslope cut line will be 4” less than outer edge of base ange (see
drawing 2.2). Remove exterior panel leaving the insulation face
showing (see drawing 2.3) and cleanup all metal shavings and debris.
Top View
Roof Panel Drawing 2.1
Roof Opening Layout throat opening on the insulation Throat Opening
and cut opening (see drawing 2.2).
Insulation
Cu
rb
Ba ge
se n
Fla Fla
Drawing 2.3 ng
e B ase
rb
Cu
*Notice* Sub-frames and purlins not shown in the above picture. Drawing 2.2
Edge of roof opening
3 BACK-UP CHANNELS
Notch back-up channels (see drawing). Slide back-up channels under roof
panel on top of sub-frames. Do not screw back-up channels to
subframes. They will be secured when curb is fastened down.
Cut leg of channel and fold under to form
notch for sub-frame (typically 4 places).
Back-up Channel
Back-up channels in place Drawing 3.1
Ce
nte
Ou rL
tsid ine
eD of
Su
CONVERT TRIPLELOK SEAM TO QUADLOK (if needed)
im b-F
en ram Convert a TripleLok panel seam to a QuadLok. Use duck billed crimpers to
sio
no e atten the panel seam. Steps 1 through 3 below illustrate how to properly
fB
ack
-up crimp the seam.
Ch
a nn
el
TRIPLELOK SEAM
QUADLOK SEAM Step 1 Step 2 Step 3
WARNING! Page 2
ALWAYS USE FALL PROTECTION WHILE
WORKING AROUND ROOF OPENINGS.
4. ROOF CURB
INSTALLATION INSTRUCTIONS
UNIVERSAL STANDING SEAM PANEL
4 APPLY SEALANTS & SET CURB IN PLACE The upslope highs are to be
Apply a strip of sealant tape and generous bead of caulk on the installed UNDER the roof panel.
upslope side of the roof curb and on downslope side of the roof
panel before setting roof curb in place (see drawing 4.1). Position
roof curb over roof opening and lower into place, shift curb to Roof Curb
align with sub-frames and roof panel.
Roof Panel
The downslope highs are to be
installed OVER the roof panel.
Caulk
(apply as shown)
Caulk Sealant Tape
(apply as shown)
Drawing 4.1
*Notice* Sub-frames and purlins not shown in the above picture.
Must ll end of standing
5 FASTEN CURB TO ROOF PANEL seam with caulk.
Fasten curb to roof panel using #14 - 1 1/8” neoprene self-tap screw Roof Panel
on 4” centers (see drawing 5.1). DO NOT FASTEN CURB OR ROOF
PANEL TO SUB-FRAMES. Please ensure all self-tap screws are
properly tightened before moving to the next step.
Self-Tap Screws
Drawing 5.1
*Notice* Sub-frames and purlins not shown in the above picture.
WARNING! Page 3
ALWAYS USE FALL PROTECTION WHILE
WORKING AROUND ROOF OPENINGS.
5. ROOF CURB
INSTALLATION INSTRUCTIONS
UNIVERSAL STANDING SEAM PANEL
6 ATTACH CAP STRIPS
Turn the cap strips upside down and apply sealant tape to the entrie length of both
inside legs. Then run a bead of caulk down the middle of the cap strips and Roof Panel
at each end of cap strip (see drawing 6.1). Install cap strips over the
curb/roof panel sidelap, fasten with screws alternating on 6”
centers (staggered on both sides). The capstrip should
extend approximately 6” past both upslope and
downslope base of roof curb.
Cap strips furnished with curb
Sealant tape Caulk Cap Strips
Screws staggered 6” on center (length varies)
(both sides)
Curb base Roof Panel Sealant tape
(both sides)
Caulk
Drawing 6.1 1” between each bead
of caulk at each end
*Notice* Sub-frames and purlins not shown in the above picture.
COMPLETED INSTALLATION
**Clean up installation debris before leaving area.
WARNING! Page 4
ALWAYS USE FALL PROTECTION WHILE
WORKING AROUND ROOF OPENINGS.