SlideShare a Scribd company logo
WOODWORKS: aDvanceD pROject 2010-2011
  aDiROnDacK chaiR


There may be no outdoor chair more classic and familiar than the one that hails from upstate New York. With its generous proportions
and laid-back angles, the Adirondack chair is all about taking it easy. Its sturdy yet straightforward construction makes it a great project for
intermediate and advanced woodworkers and even “seasoned” beginners looking to step up their skills in areas such as making and using
templates and working with a router. And after you build it, you will learn more about applying and using finishes to protect the wood and
keep it looking beautiful.


                                                                          ––
CONTINUED - WOODWORKS: aDvaNCED pROjECT 2010-2011 aDIRONDaCK ChaIR


   tOOlS RequiReD                                 ShOppinG liSt
   Hand Tools                                     Wood Recommendation: Pressure-treated pine
   – Sanding block                                Alternate Wood: Oak
   – Back saw                                     Part           Qty.                   Th. x W x L
   – Pipe clamps                                  A, B           1 @ 8'                 1 x 7-1/2
   – Rasp                                         C              1 @ 2'                 1 x 5-1/2
   – Wood chisels                                 D, E, F, G     1 @ 8' 1 @ 10'
                                                                        ,               3/4 x 5-1/2
   – Adjustable square                            H, J, K        1 @ 8' 1 @ 10'
                                                                        ,               3/4 x 3-1/2
                                                  1/4 dowels 4
                                                  #8 x 2 flathead stainless-steel screws 24
   Power Tools
   – Table saw                                    cuttinG liSt
   – Band saw or jigsaw
   – Plunge router                                 Overall Dimensions: 30 W x 36 H x 34 D
   – Biscuit joiner
   – Drill press, 3/8 plug cutter bit             Part      Name                  Qty. Th. x W x L
   – Power drill with drill bits, Phillips-head    A         Front leg             2      1 x 5-1/2 x 20-3/8
     screwdriver bit, 3/8 plug cutter
   – Orbital or finish sander                      B         Back leg              2      1 x 7 x 37-1/2
                                                   C         Stretcher             1      1 x 4-1/2 x 19-3/4
                                                   D         Arms                  2      3/4 x 5 x 30-3/8
   Miscellaneous
   – Epoxy or exterior-grade glue                  E         Center back slat      1      3/4 x 4 x 32
   – Tape measure                                  F         Tall back slats       2      3/4 x 4 x 32
   – Pencil
   – Safety glasses                                G         Short back slats      2      3/4 x 4-1/4 x 26
   – 120-grit sanding belt                         H         Seat slats            8      3/4 x 3 x 21
   – 120-, 150- and 220-grit sandpaper             J         Back rail             1      3/4 x 3-3/8 x 23
   – Clean, lint-free cloths
   – Respirator                                    K         Splines               4      1/4 x 3 x 7/8
   – Gloves for finishing
   – Mineral spirits, for oil based
     waterproofer
   – Good quality, natural-bristle brush
     (for oil based waterproofer)
     or synthetic-bristle brush
     (for water-based waterproofer)


   WOOD FiniShinG pRODuctS
   Recommended Finish                                                        Alternate Finish
   Thompson’s® WaterSeal® Deck  House Oil Waterproofing Stain               Thompson’s® WaterSeal® Advanced Wood Protector Natural Cedar
   in Semi-Transparent Colonial Blue


                                                                       ––
CONTINUED - WOODWORKS: aDvaNCED pROjECT 2010-2011 aDIRONDaCK ChaIR


BeFORe yOu BeGin                                                                6. Cut parts C, J and H to their specified size. One long edge of one
                                                                                of the seat slats, H, requires a 3/4 radius (see Fig. 1), which can be
Good craftsmanship begins and ends with good work habits, so make
                                                                                done on the router table or by hand with a block plane and an orbital
the following steps part of your routine workshop practice. If you have
                                                                                sander. Use a table saw to rip the front edge of J, the back rail, to a
any doubts or questions about how to proceed with a project, always
                                                                                58-1/2º angle.
discuss them with your shop instructor.
• Carefully and fully review plans and instructions before putting a
                                                                                Cut the Joints
  tool to the project lumber.
                                                                                7. Rout 3/8 deep dovetail sockets in the arms, D, and back legs, B
• Work sensibly and safely. Wear safety goggles when doing work that
                                                                                (see Fig. 5). Set the bit to the depth of the cut plus the thickness of
  creates flying chips and sawdust; wear the appropriate respirator
                                                                                the template.
  whenever making sawdust or working with thinners or
  other solvents.
                                                                                8. Cut the dovetails in the stretcher, C, and the front legs on the router
• At the end of every work session, clean up your shop area and put
                                                                                table, using the same dovetail bit used to make the sockets (see Fig. 6).
  away all portable tools.
                                                                                Attaching a tall fence to the router-table fence will help to stabilize the
                                                                                piece. Round the end of each dovetail by making scoring cuts with a
cuttinG anD aSSeMBly                                                            backsaw and then paring to shape with a small chisel (see Fig. 7).
pROceDuRe
Make the Templates                                                              9. Mortise the arms using the plunge router fitted with an edge guide
1. Templates will make it easy to build more than one chair, now                and a 1/4 spiral up-cutting bit. To steady the router, clamp a scrap
and in the future. They’re made from 1/4 hardboard and are used                board to the bench and clamp the arm in the bench vise so its edge is
to guide the bearing of a flush-cutting router bit. Figure 2 shows the          flush with the top of the board. Rout slots for the cross-grain splines,
shapes needed for the back slats (E, F, G). Start with a single 8-3/8          K, in the same manner.
x 26 piece of hardboard. Draw a 6 radius at the top with a com-
pass. Rip the 4 wide center slat template from the right side. Rip the         10. Rout the tenons for the back rail, J , by passing it flat over a router
template for the outside slats to 4 but stop about 6 from the bottom.         bit or dado head. Round the corners with a rasp.
Finish the 1/4 jog as shown with a band saw; cut the top curves and
rasp them smooth.                                                               11. Make the splines by rounding the edges of a 1/4 x 3 x 12
                                                                                board with a rasp so they fit the mortises in the back slats. Cut four
2. Figure 3 shows the remaining templates. The templates for the back           7/8 splines on the table saw.
legs can be enlarged on a copier to full size. Enlarge the image shown
by 200 percent and again by another 200 percent and then one more               12. Use a biscuit joiner to cut the slots in the bottom of the back
time by 183 percent. Measure the last enlargement to make sure it               slats and into the stretcher. You can also groove the parts on the table
matches the dimensions shown. If it doesn’t, increase or decrease the           saw and join the back slats to the stretcher with a 1/4 thick spline.
final enlargement accordingly. (You can also draw your own layout
grid using the scale shown.)                                                    Assemble the Chair
                                                                                13. First join the back legs, B, to the stretcher, C, then the arms,
Woodworker’s Tip: To create the notch on the front leg template,                D, to the front legs, A. Connect the back rail, J, to the arm/front leg
raise the blade on the table saw to full height and rip most of the             assembly. The best material for bonding these joints is epoxy, but
waste. Finish the cut on the band saw. Then use the band saw to                 exterior-grade glues will also work.
taper the front-leg template.
                                                                                14. Use scrap sticks to support the arms while you screw the back
3. When all the templates are cut, smooth the edges with a rasp or              legs to the front legs. Notches cut into the tops of the sticks will help
sandpaper wrapped around a curved block. Note that the templates                hold the back of the arms level with the fronts during assembly. When
for parts B and D have slots for routing dovetail sockets. You must             drilling for screws, first drill a 3/8 x 1/4 deep hole so the screw
make an insert piece that fills these slots when using the template             heads will be recessed and later covered with a wood plug.
with the router or the bit will gouge the workpiece.
                                                                                15. Pull the arms tight to the back rail with a pipe clamp, then drill
Make and Shape the Parts                                                        and peg the four joints with 1/4 dowel pins (see Fig. 1).
4. Cut parts A, B, D, E, F and G to their approximate sizes. (The
dimensions between long parallel sides can be ripped to their exact             16. With the back rail in position, hold a back slat against the rail and
measurements.) Use the templates to trace the finished shapes onto              mark it for the counterbored screw hole (see Fig. 8), using an adjust-
the workpieces. Cut away the waste with a band saw to slightly over-            able square held against the back rail. Run the line from the side of
size, then adhere the template to the piece with double-sided tape,             the slat to the front. Transfer this mark to the other slats. Because the
carefully aligning it with the trace lines.                                     screws go in at an angle, this mark has to coincide with the top of
                                                                                the back rail.
5. Rout each workpiece by riding the template against the bearing of
the flush-cutting router bit (see Fig. 4, showing the technique applied         17. Epoxy the splines, K, into the back slats using 1/8 thick scrap to
to a back leg, B).                                                              create the correct gaps. Use a minimal amount of epoxy so that there
                                                                                is little or no squeeze-out, which can be difficult to remove.
                                                                          ––
CONTINUED - WOODWORKS: aDvaNCED pROjECT 2010-2011 aDIRONDaCK ChaIR


18. Align the tops and bottoms of the slats and clamp them together                directions found on the back of the can of stain. Then do a trial test
with one pipe clamp set along the line of the splines.                             before full application. The surface may darken slightly with applica-
                                                                                   tion and color appearance is different when the wood is fully dry.
19. Epoxy the biscuits into the stretcher, then set the entire slat assem-
bly onto the stretcher. When the slats are properly positioned, screw              24. When applying this product, do not use it with other waterproof-
them to the back rail.                                                             ing or stain products, as variations in final appearance of the wood
                                                                                   may result. Do not thin. To ensure good penetration, do not apply in
20. Install the seat slats using 1/8 spacers and woodscrews counter-              direct sunlight or on hot days. Do not apply if rain is expected within
bored into the ends. Work from front to back, with the first two slats             24 hours. Also, temperature must be above 50º F. and remain above
being installed as shown in Fig. 1.                                                freezing for 24 hours.

21. Make the 3/8 x 1/4 plugs needed to fill the screw holes. Apply               25. Shake or stir contents for a minimum of 2 minutes before
a dab of glue to the bottom face and insert them into the holes. When              use. Intermix all containers (of the same color) to be used to
the glue is dry, cut the plugs flush with the surface using a wood chisel.         assure color uniformity.

Woodworker’s Tip: For the best appearance, the grain of the                        26. Apply using a paint pad or brush. Do not apply using a roller. For
screw plugs should be aligned with that of the surrounding wood.                   small projects, a brush is the preferred applicator.

22. In preparation for finishing, sand all surfaces with                           27. In most applications, only one light coat is necessary. Apply with
120-grit sandpaper.                                                                a brush or applicator pad. Regardless of which application method
                                                                                   is used, remove excess within 15 minutes by redistributing it to drier
pROtectinG yOuR pROject                                                            areas or wiping it off. Stain will dry in 4 hours. A second coat can be
Any type of wood that’s used outdoors needs protection from                        added, if desired, after 4 hours.
water damage. There are a variety of protective coatings available,
including clear and tinted wood protectors and semi-transparent                    28. Brushes and equipment used for water-based products must be
and solid stains. Each of these finishes has a different look and                  cleaned with soap and water.
maintenance requirement.
                                                                                   Alternate Finish
To provide complete protection for your project, use Thompson’s     ®              29. Before applying Thompson’s® WaterSeal® Advanced Wood
WaterSeal® Deck  House Oil Waterproofing Stain or Thompson’s®                     Protector Natural Cedar, read and follow the directions found on the
WaterSeal® Advanced Wood Protector. Both products not only prevent                 back of the package. Be sure that both surface and air temperature
water damage, but also resist damage from mildew and ultraviolet                   are above 50° F. during application and for 48 hours after applica-
radiation in sunlight (UV), and they exceed industry standards for                 tion. And, if you’re working outside, do not apply product if rain is
waterproofing on wood. Plus, the semi-transparent color will give                  forecasted within 24 hours of application.
plain pine just the right amount of rich wood-tone. This stain is
available in over 100 beautiful colors.                                            30. The surfaces must be free of all dirt, wood dust and all other
                                                                                   contaminants. This product can be applied to damp, freshly cleaned
Woodworker’s Tip: always be sure to choose a waterproofer that                     wood. To clean the wood, use either Thompson’s® WaterSeal® Deck
claims to exceed industry standards for waterproofing on wood.                     Cleaner  Brightener or Thompson’s® WaterSeal® Deck Wash.

FINISHING TIPS                                                                     31. Do not mix the product with other waterproofing products
• Coverage: The approximate coverage of Thompson’s® WaterSeal®                     because variations in the final appearance of the surface being
  Deck  House Oil Waterproofing Stain or Thompson’s® WaterSeal®                   treated may result.
  Advanced Wood Protector on pine is 250 square feet per gallon.
                                                                                   32. Before applying the product over the entire surface, a small trial
• When you apply Thompson’s WaterSeal Deck  House Oil
                                ®           ®                                      patch is recommended.
  Waterproofing Stain or Thompson’s® WaterSeal® Advanced Wood
  Protector, do not mix it with other waterproofing products, because              33. Apply only one thin, even coat. DO NOT APPLY A SECOND COAT.
  variations in the final appearance of the surface being treated may              A heavier or additional coat will not improve performance or appear-
  result. Also, do not thin these products.                                        ance. Avoid puddling. Tackiness will result if overapplied. Tackiness
                                                                                   may also occur after application if overnight temperature falls below
Recommended Finish                                                                 50°F. within 48 hours of application. Drying time will vary depending
23. Before applying Thompson’s® WaterSeal® Deck  House Oil                        on wood surface and humidity. Allow a minimum of 12 hours before
Waterproofing Stain, the wood surface must be free of all dirt, wood               using the bench.
dust and all other contaminants. If the wood needs cleaning, use
Thompson’s® WaterSeal® Deck Cleaner  Brightener or Thompson’s®                    34. Allow at least 12 hours to dry before you use the chair.
WaterSeal® Deck Wash. Read and follow the directions found on the
back of the package. After the cleaning is done, read and follow the               35. Clean brushes and equipment with soap and water, then rinse with
                                                                                   clean water.
                                                                             ––
CONTINUED - WOODWORKS: aDvaNCED pROjECT 2010-2011 aDIRONDaCK ChaIR


NOTE: The length of protection will vary depending on environment.                DO NOT TAKE INTERNALLY. KEEP OUT OF REACH
Perform the following splash test once a year to see whether reap-                OF CHILDREN.
plication is necessary. Sprinkle water on various sections of surface
to be sealed. If water absorbs and darkens color of substrate within              SAFE DISPOSAL OF RAGS AND WASTE.
5 seconds, the surface is porous and considered ready to be treated.              DANGER: Rags, steel wool, other waste soaked with this product, and
If water beads up or otherwise sits on top of surface, then surface               sanding residue may spontaneously catch fire if improperly discarded.
doesn’t need protection at this time. For maximum protection from                 Immediately place rags, steel wool, other waste soaked with this
color change and other damage caused by the sun, reapplication is                 product, and sanding residue in a sealed, water-filled metal container.
recommended every year. Vertical and horizontal surfaces will experi-             Dispose of in accordance with local fire regulations.
ence color changes at different rates.

PRODUCT SAFETY
For your safety and the safety of those you work with, always read the
safety warnings, which manufacturers print on their labels, and follow
them to the letter. Typical safety advice and instructions will contain
information such as the following:

WARNING! Removal of old paint by sanding, scraping or other means
may generate dust or fumes that contain lead. Exposure to lead dust
or fumes may cause brain damage or other adverse health effects,
especially in children or pregnant women. Controlling exposure to
lead or other hazardous substances requires the use of proper
protective equipment, such as properly fitted respirator (NIOSH
approved) and proper containment and cleanup. For more informa-
tion, call the National Lead Information Center at 1-800-424-LEAD
(in US) or contact your local health authority.

Contents are COMBUSTIBLE. Keep away from heat and open flame.
Contains ALIPHATIC HYDROCARBONS.
VAPOR HARMFUL. Use Only With Adequate Ventilation. To avoid
overexposure, open windows and doors or use other means to ensure
fresh air entry during application and drying. If you experience eye
watering, headaches, or dizziness, increase fresh air supply or wear
respiratory protection (NIOSH/MSHATC23C or equivalent), or leave
the area. Avoid contact with eyes and skin. Wash hands after using.
Keep container closed when not in use. Do not transfer contents to
other containers for storage.

FIRST AID: In case of eye contact, flush thoroughly with large
amounts of water for 15 minutes and get medical attention. For skin
contact, wash thoroughly with soap and water. In case of respiratory
difficulty, provide fresh air and call physician. If swallowed, get medi-
cal attention immediately.

DELAYED EFFECTS FROM LONG-TERM OVEREXPOSURE.
Contains solvents which can cause permanent brain and nervous
system damage. Intentional misuse by deliberately concentrating and
inhaling contents may be harmful or fatal.

WARNING: This product contains a chemical known to the
State of California to cause cancer and birth defects or other
reproductive harm.


                                                                                        This project originally appeared in American Woodworker
                                                                                        magazine, June 2001, page 60.


                                                                            ––
CONTINUED - WOODWORKS: aDvaNCED pROjECT 2010-2011 aDIRONDaCK ChaIR


FiG 1.


                                                 Orient grain
                                                 horizontally

                                K

                        E

                                                 F
                  F
                                                       G
            G
                                     #8 x 2
                                    Stainless
                                       Steel                                             /  dia. x 1/4 plugs
                                                                                         38

                                      Screw


                                                                                                                 D
                                         J


                                                                                                                 Dovetail Socket
                                                                                                                  3
                                                                                                                    /8 x 3/4 x 4
                                                                      #20 Biscuits                     A
                                                     C
                                                                                                                      3
                                                                                                                          /4 Radius
                                             D
                                                                           B


                                                      Dovetail Socket
                                                       3
                                                         /8 x 3/4 x 4
                            B                                                        H

                                                                                         H


                                                 A


                                                                ––
CONTINUED - WOODWORKS: aDvaNCED pROjECT 2010-2011 aDIRONDaCK ChaIR


FiG 2.
                                                   Rip Here


                                                   6

  Same Radius                                 6
     as F
                                                        2
                                                                             2


                             Outside         Center                26
                                                                                  3
                                                                                      /8 Deep
                              Slats           Slat                                     Mortise
                            Template        Template

                  4             41/4             4


                             1
                              /4 Jog
                            (Template
                       6
                              Only)


            1
                /4 Jog          83/8


                  G               F                E                     F               G
                 41/4


                                                        Slots for Biscuits


                                                             ––
CONTINUED - WOODWORKS: aDvaNCED pROjECT 2010-2011 aDIRONDaCK ChaIR


FiG 3.
                                           1 Square = 1/2


                                                                                                                                                                                  11/4

                                                                                                                                                                                  1
                                                                                                                            7
                                                                                                                                /8 x 4 /8 Notch in Template
                                                                                                                                        1
                                                                                                                                                                                          3
                                                                                                                                                                                              /4
                                                                                                   1 /2
                                                                                                  37
                                                                                                 Back Leg
                                                                                                    B

                                                                                                                        58.5°

                                                                                                           345/8


                     3
                         /8 x 3/4 x 4            Slots for #20 Biscuits
     41/2
                           Dovetail


                                                                        11/8      41/4          41/8                 41/8                 41/4       11/8
                                                          1
                                                              /2                                         Stretcher
                                                                                                              C
                                                                                                                                         3
                                                                                                                                             /8 x 3/4 x 4 Dovetail
    Front Leg
        A
                                                3
                                                    /4
                                                                    1
                                                                        /4 x 1 x 2 Mortise                       7
                                                                                                                        /8 x 41/8 Notch in Template                        37/8

                                           2                                                                                                                        21/2
                                                          3
                                                              /4 Radius                                            Arm                                             Radius
                                                                                                                     D

                    1                               Draw and cut curve on one
                                                      arm, trace onto the other                                                                       111/2


                          71/4
                                                                                                                                                                        5
                                                                                                                                                                            /8
                                                                                                          Back Rail
                                                                                                             J

               3                                                         Bevel edge at 58 1/2°                                  1
                                                                                                                                     /4 x 1 x 2 Tenon
       51/2


                                                                                           ––
CONTINUED - WOODWORKS: aDvaNCED pROjECT 2010-2011 aDIRONDaCK ChaIR


FiG 4.


                                                                Leg Template
                         Insert to
                        Fill Socket


                                            Flush-Cutting Bit


FiG 5.                                                                 FiG 6.
                                                                                                 Stretcher
                                                                                                     C


                                                                           Tall Fence


                                          Leg Template


                                                                                                Dovetail Bit
                                       Guide Bushing

 Dovetail Socket


FiG 7.                                                                 FiG 8.

                                                                                        Back
                                                                                         Slat
                                                                                          G


                     Cut to the Mark
                                                                        Back Rail
                                                                           J


                                                                 ––

More Related Content

Similar to Advanced project-adirondack-chair

Building a mobile chipper
Building a mobile chipperBuilding a mobile chipper
Building a mobile chipper
Segun Bello
 
Make your own equipment (Archery)
Make your own equipment (Archery)Make your own equipment (Archery)
Make your own equipment (Archery)
kelikados
 
F-F-Fiddle Assembly Instructions
F-F-Fiddle Assembly InstructionsF-F-Fiddle Assembly Instructions
F-F-Fiddle Assembly Instructions
dsp39
 
Planta pra "Cam Clamp" (grampo)
Planta pra "Cam Clamp" (grampo)Planta pra "Cam Clamp" (grampo)
Planta pra "Cam Clamp" (grampo)
Gabriel Vandresen
 
Construção de Violões
Construção de ViolõesConstrução de Violões
Construção de Violões
Gabriel Vandresen
 
Do-It-Yourself Fruit Picker Using Thread Clipper Scissor
Do-It-Yourself Fruit Picker Using Thread Clipper ScissorDo-It-Yourself Fruit Picker Using Thread Clipper Scissor
Do-It-Yourself Fruit Picker Using Thread Clipper Scissor
Manohar M Hegde
 
Wood Working on Circular Saw Planer Machine.pptx
Wood Working on Circular Saw Planer Machine.pptxWood Working on Circular Saw Planer Machine.pptx
Wood Working on Circular Saw Planer Machine.pptx
Sai Venkatesh Vadapalli
 
Shop notes issue 131
Shop notes issue 131Shop notes issue 131
Shop notes issue 131
Omar Orozco
 
WOOD ENGINEERING.pptx
WOOD ENGINEERING.pptxWOOD ENGINEERING.pptx
WOOD ENGINEERING.pptx
SANDEEP PRADHAN
 
gaveteiro
gaveteirogaveteiro
소형베틀도면
소형베틀도면소형베틀도면
소형베틀도면
Seongwon Kim
 
400 proyectos de_mini_reloj[1]
400 proyectos de_mini_reloj[1]400 proyectos de_mini_reloj[1]
400 proyectos de_mini_reloj[1]
ruper montes
 
How to Make and Wire a Lamp
How to Make and Wire a LampHow to Make and Wire a Lamp
How to Make and Wire a Lamp
medo41
 
Manufacturing Practice (MP) Training Project
Manufacturing Practice (MP) Training ProjectManufacturing Practice (MP) Training Project
Manufacturing Practice (MP) Training Project
Dushmanta Nath
 
F-F-Fiddle Assembly Instructions
F-F-Fiddle Assembly InstructionsF-F-Fiddle Assembly Instructions
F-F-Fiddle Assembly Instructions
dsp39
 
How to build your dream 12x8 shed
 How to build your dream 12x8 shed  How to build your dream 12x8 shed
How to build your dream 12x8 shed
NADIA نادية
 
Mega Collection of Southwest Inspired Metal Work Jewelry Tutorials
Mega Collection of Southwest Inspired Metal Work Jewelry TutorialsMega Collection of Southwest Inspired Metal Work Jewelry Tutorials
Mega Collection of Southwest Inspired Metal Work Jewelry Tutorials
The Beading Gem's Journal
 
Tying Bass Poppers Tool box
Tying Bass Poppers Tool boxTying Bass Poppers Tool box
Tying Bass Poppers Tool box
Fred Crisp
 
Woodworking projects
Woodworking projectsWoodworking projects
Woodworking projects
jazza patrick
 
EXHIBIDOR DE CAÑAS EN CARROUSEL
EXHIBIDOR DE CAÑAS EN CARROUSELEXHIBIDOR DE CAÑAS EN CARROUSEL
EXHIBIDOR DE CAÑAS EN CARROUSEL
Anibal Ruben Reyes
 

Similar to Advanced project-adirondack-chair (20)

Building a mobile chipper
Building a mobile chipperBuilding a mobile chipper
Building a mobile chipper
 
Make your own equipment (Archery)
Make your own equipment (Archery)Make your own equipment (Archery)
Make your own equipment (Archery)
 
F-F-Fiddle Assembly Instructions
F-F-Fiddle Assembly InstructionsF-F-Fiddle Assembly Instructions
F-F-Fiddle Assembly Instructions
 
Planta pra "Cam Clamp" (grampo)
Planta pra "Cam Clamp" (grampo)Planta pra "Cam Clamp" (grampo)
Planta pra "Cam Clamp" (grampo)
 
Construção de Violões
Construção de ViolõesConstrução de Violões
Construção de Violões
 
Do-It-Yourself Fruit Picker Using Thread Clipper Scissor
Do-It-Yourself Fruit Picker Using Thread Clipper ScissorDo-It-Yourself Fruit Picker Using Thread Clipper Scissor
Do-It-Yourself Fruit Picker Using Thread Clipper Scissor
 
Wood Working on Circular Saw Planer Machine.pptx
Wood Working on Circular Saw Planer Machine.pptxWood Working on Circular Saw Planer Machine.pptx
Wood Working on Circular Saw Planer Machine.pptx
 
Shop notes issue 131
Shop notes issue 131Shop notes issue 131
Shop notes issue 131
 
WOOD ENGINEERING.pptx
WOOD ENGINEERING.pptxWOOD ENGINEERING.pptx
WOOD ENGINEERING.pptx
 
gaveteiro
gaveteirogaveteiro
gaveteiro
 
소형베틀도면
소형베틀도면소형베틀도면
소형베틀도면
 
400 proyectos de_mini_reloj[1]
400 proyectos de_mini_reloj[1]400 proyectos de_mini_reloj[1]
400 proyectos de_mini_reloj[1]
 
How to Make and Wire a Lamp
How to Make and Wire a LampHow to Make and Wire a Lamp
How to Make and Wire a Lamp
 
Manufacturing Practice (MP) Training Project
Manufacturing Practice (MP) Training ProjectManufacturing Practice (MP) Training Project
Manufacturing Practice (MP) Training Project
 
F-F-Fiddle Assembly Instructions
F-F-Fiddle Assembly InstructionsF-F-Fiddle Assembly Instructions
F-F-Fiddle Assembly Instructions
 
How to build your dream 12x8 shed
 How to build your dream 12x8 shed  How to build your dream 12x8 shed
How to build your dream 12x8 shed
 
Mega Collection of Southwest Inspired Metal Work Jewelry Tutorials
Mega Collection of Southwest Inspired Metal Work Jewelry TutorialsMega Collection of Southwest Inspired Metal Work Jewelry Tutorials
Mega Collection of Southwest Inspired Metal Work Jewelry Tutorials
 
Tying Bass Poppers Tool box
Tying Bass Poppers Tool boxTying Bass Poppers Tool box
Tying Bass Poppers Tool box
 
Woodworking projects
Woodworking projectsWoodworking projects
Woodworking projects
 
EXHIBIDOR DE CAÑAS EN CARROUSEL
EXHIBIDOR DE CAÑAS EN CARROUSELEXHIBIDOR DE CAÑAS EN CARROUSEL
EXHIBIDOR DE CAÑAS EN CARROUSEL
 

More from Ayun Restu

investor
investorinvestor
investor
Ayun Restu
 
An essay of self
An essay of selfAn essay of self
An essay of self
Ayun Restu
 
Komputasi simulasi
Komputasi simulasiKomputasi simulasi
Komputasi simulasiAyun Restu
 
Job interview
Job interviewJob interview
Job interview
Ayun Restu
 
Qfd persentasi
Qfd persentasiQfd persentasi
Qfd persentasi
Ayun Restu
 
Cv
CvCv
Contoh cover letter
Contoh cover letterContoh cover letter
Contoh cover letter
Ayun Restu
 
Buku pengantar simulasi statistik
Buku pengantar simulasi statistikBuku pengantar simulasi statistik
Buku pengantar simulasi statistikAyun Restu
 
Manual prosedure wisuda ft ub
Manual prosedure wisuda ft ubManual prosedure wisuda ft ub
Manual prosedure wisuda ft ubAyun Restu
 
31021 2-978915175180
31021 2-97891517518031021 2-978915175180
31021 2-978915175180Ayun Restu
 

More from Ayun Restu (11)

investor
investorinvestor
investor
 
An essay of self
An essay of selfAn essay of self
An essay of self
 
Komputasi simulasi
Komputasi simulasiKomputasi simulasi
Komputasi simulasi
 
Job interview
Job interviewJob interview
Job interview
 
Qfd persentasi
Qfd persentasiQfd persentasi
Qfd persentasi
 
Cv
CvCv
Cv
 
Contoh cover letter
Contoh cover letterContoh cover letter
Contoh cover letter
 
Kaizen
KaizenKaizen
Kaizen
 
Buku pengantar simulasi statistik
Buku pengantar simulasi statistikBuku pengantar simulasi statistik
Buku pengantar simulasi statistik
 
Manual prosedure wisuda ft ub
Manual prosedure wisuda ft ubManual prosedure wisuda ft ub
Manual prosedure wisuda ft ub
 
31021 2-978915175180
31021 2-97891517518031021 2-978915175180
31021 2-978915175180
 

Recently uploaded

Clyde the cat and Space Poems by Basak Serin
Clyde the cat and Space Poems by Basak SerinClyde the cat and Space Poems by Basak Serin
Clyde the cat and Space Poems by Basak Serin
Basak24
 
The Future of Independent Filmmaking Trends and Job Opportunities
The Future of Independent Filmmaking Trends and Job OpportunitiesThe Future of Independent Filmmaking Trends and Job Opportunities
The Future of Independent Filmmaking Trends and Job Opportunities
LetsFAME
 
Anasuya Sengupta Cannes 2024 Award Winner
Anasuya Sengupta Cannes 2024 Award WinnerAnasuya Sengupta Cannes 2024 Award Winner
Anasuya Sengupta Cannes 2024 Award Winner
Diwitya Bajwa
 
Sunny and Rishi 3 Written by Basak Serin
Sunny and Rishi 3 Written by Basak SerinSunny and Rishi 3 Written by Basak Serin
Sunny and Rishi 3 Written by Basak Serin
Basak24
 
The Gallery of Shadows, In the heart of a bustling city
The Gallery of Shadows, In the heart of a bustling cityThe Gallery of Shadows, In the heart of a bustling city
The Gallery of Shadows, In the heart of a bustling city
John Emmett
 
一比一原版(UCSF毕业证)旧金山分校毕业证如何办理
一比一原版(UCSF毕业证)旧金山分校毕业证如何办理一比一原版(UCSF毕业证)旧金山分校毕业证如何办理
一比一原版(UCSF毕业证)旧金山分校毕业证如何办理
ytunuq
 
一比一原版(AUT毕业证)奥克兰理工大学毕业证如何办理
一比一原版(AUT毕业证)奥克兰理工大学毕业证如何办理一比一原版(AUT毕业证)奥克兰理工大学毕业证如何办理
一比一原版(AUT毕业证)奥克兰理工大学毕业证如何办理
etycev
 
From Teacher to OnlyFans: Brianna Coppage's Story at 28
From Teacher to OnlyFans: Brianna Coppage's Story at 28From Teacher to OnlyFans: Brianna Coppage's Story at 28
From Teacher to OnlyFans: Brianna Coppage's Story at 28
get joys
 
原版制作(MUN毕业证书)纽芬兰纪念大学毕业证PDF成绩单一模一样
原版制作(MUN毕业证书)纽芬兰纪念大学毕业证PDF成绩单一模一样原版制作(MUN毕业证书)纽芬兰纪念大学毕业证PDF成绩单一模一样
原版制作(MUN毕业证书)纽芬兰纪念大学毕业证PDF成绩单一模一样
sh8tjqt6
 
Leonardo DiCaprio House: A Journey Through His Extravagant Real Estate Portfolio
Leonardo DiCaprio House: A Journey Through His Extravagant Real Estate PortfolioLeonardo DiCaprio House: A Journey Through His Extravagant Real Estate Portfolio
Leonardo DiCaprio House: A Journey Through His Extravagant Real Estate Portfolio
greendigital
 
一比一原版(mcmaste毕业证书)加拿大麦克马斯特大学毕业证如何办理
一比一原版(mcmaste毕业证书)加拿大麦克马斯特大学毕业证如何办理一比一原版(mcmaste毕业证书)加拿大麦克马斯特大学毕业证如何办理
一比一原版(mcmaste毕业证书)加拿大麦克马斯特大学毕业证如何办理
abqenm
 
Brian Peck Leonardo DiCaprio: A Unique Intersection of Lives and Legacies
Brian Peck Leonardo DiCaprio: A Unique Intersection of Lives and LegaciesBrian Peck Leonardo DiCaprio: A Unique Intersection of Lives and Legacies
Brian Peck Leonardo DiCaprio: A Unique Intersection of Lives and Legacies
greendigital
 
Leonardo DiCaprio Super Bowl: Hollywood Meets America’s Favorite Game
Leonardo DiCaprio Super Bowl: Hollywood Meets America’s Favorite GameLeonardo DiCaprio Super Bowl: Hollywood Meets America’s Favorite Game
Leonardo DiCaprio Super Bowl: Hollywood Meets America’s Favorite Game
greendigital
 
Morgan Freeman is Jimi Hendrix: Unveiling the Intriguing Hypothesis
Morgan Freeman is Jimi Hendrix: Unveiling the Intriguing HypothesisMorgan Freeman is Jimi Hendrix: Unveiling the Intriguing Hypothesis
Morgan Freeman is Jimi Hendrix: Unveiling the Intriguing Hypothesis
greendigital
 
定制(mu毕业证书)美国迈阿密大学牛津分校毕业证学历证书原版一模一样
定制(mu毕业证书)美国迈阿密大学牛津分校毕业证学历证书原版一模一样定制(mu毕业证书)美国迈阿密大学牛津分校毕业证学历证书原版一模一样
定制(mu毕业证书)美国迈阿密大学牛津分校毕业证学历证书原版一模一样
x0l4b5ho
 
Abraham Laboriel Records ‘The Bass Walk’ at Evergreen Stage
Abraham Laboriel Records ‘The Bass Walk’ at Evergreen StageAbraham Laboriel Records ‘The Bass Walk’ at Evergreen Stage
Abraham Laboriel Records ‘The Bass Walk’ at Evergreen Stage
DiaDan Holdings Ltd
 
Taylor Swift: Conquering Fame, Feuds, and Unmatched Success | CIO Women Magazine
Taylor Swift: Conquering Fame, Feuds, and Unmatched Success | CIO Women MagazineTaylor Swift: Conquering Fame, Feuds, and Unmatched Success | CIO Women Magazine
Taylor Swift: Conquering Fame, Feuds, and Unmatched Success | CIO Women Magazine
CIOWomenMagazine
 
The Enigmatic Portrait, In the heart of a sleepy town
The Enigmatic Portrait, In the heart of a sleepy townThe Enigmatic Portrait, In the heart of a sleepy town
The Enigmatic Portrait, In the heart of a sleepy town
John Emmett
 
Sara Saffari: Turning Underweight into Fitness Success at 23
Sara Saffari: Turning Underweight into Fitness Success at 23Sara Saffari: Turning Underweight into Fitness Success at 23
Sara Saffari: Turning Underweight into Fitness Success at 23
get joys
 
HD Video Player All Format - 4k & live stream
HD Video Player All Format - 4k & live streamHD Video Player All Format - 4k & live stream
HD Video Player All Format - 4k & live stream
HD Video Player
 

Recently uploaded (20)

Clyde the cat and Space Poems by Basak Serin
Clyde the cat and Space Poems by Basak SerinClyde the cat and Space Poems by Basak Serin
Clyde the cat and Space Poems by Basak Serin
 
The Future of Independent Filmmaking Trends and Job Opportunities
The Future of Independent Filmmaking Trends and Job OpportunitiesThe Future of Independent Filmmaking Trends and Job Opportunities
The Future of Independent Filmmaking Trends and Job Opportunities
 
Anasuya Sengupta Cannes 2024 Award Winner
Anasuya Sengupta Cannes 2024 Award WinnerAnasuya Sengupta Cannes 2024 Award Winner
Anasuya Sengupta Cannes 2024 Award Winner
 
Sunny and Rishi 3 Written by Basak Serin
Sunny and Rishi 3 Written by Basak SerinSunny and Rishi 3 Written by Basak Serin
Sunny and Rishi 3 Written by Basak Serin
 
The Gallery of Shadows, In the heart of a bustling city
The Gallery of Shadows, In the heart of a bustling cityThe Gallery of Shadows, In the heart of a bustling city
The Gallery of Shadows, In the heart of a bustling city
 
一比一原版(UCSF毕业证)旧金山分校毕业证如何办理
一比一原版(UCSF毕业证)旧金山分校毕业证如何办理一比一原版(UCSF毕业证)旧金山分校毕业证如何办理
一比一原版(UCSF毕业证)旧金山分校毕业证如何办理
 
一比一原版(AUT毕业证)奥克兰理工大学毕业证如何办理
一比一原版(AUT毕业证)奥克兰理工大学毕业证如何办理一比一原版(AUT毕业证)奥克兰理工大学毕业证如何办理
一比一原版(AUT毕业证)奥克兰理工大学毕业证如何办理
 
From Teacher to OnlyFans: Brianna Coppage's Story at 28
From Teacher to OnlyFans: Brianna Coppage's Story at 28From Teacher to OnlyFans: Brianna Coppage's Story at 28
From Teacher to OnlyFans: Brianna Coppage's Story at 28
 
原版制作(MUN毕业证书)纽芬兰纪念大学毕业证PDF成绩单一模一样
原版制作(MUN毕业证书)纽芬兰纪念大学毕业证PDF成绩单一模一样原版制作(MUN毕业证书)纽芬兰纪念大学毕业证PDF成绩单一模一样
原版制作(MUN毕业证书)纽芬兰纪念大学毕业证PDF成绩单一模一样
 
Leonardo DiCaprio House: A Journey Through His Extravagant Real Estate Portfolio
Leonardo DiCaprio House: A Journey Through His Extravagant Real Estate PortfolioLeonardo DiCaprio House: A Journey Through His Extravagant Real Estate Portfolio
Leonardo DiCaprio House: A Journey Through His Extravagant Real Estate Portfolio
 
一比一原版(mcmaste毕业证书)加拿大麦克马斯特大学毕业证如何办理
一比一原版(mcmaste毕业证书)加拿大麦克马斯特大学毕业证如何办理一比一原版(mcmaste毕业证书)加拿大麦克马斯特大学毕业证如何办理
一比一原版(mcmaste毕业证书)加拿大麦克马斯特大学毕业证如何办理
 
Brian Peck Leonardo DiCaprio: A Unique Intersection of Lives and Legacies
Brian Peck Leonardo DiCaprio: A Unique Intersection of Lives and LegaciesBrian Peck Leonardo DiCaprio: A Unique Intersection of Lives and Legacies
Brian Peck Leonardo DiCaprio: A Unique Intersection of Lives and Legacies
 
Leonardo DiCaprio Super Bowl: Hollywood Meets America’s Favorite Game
Leonardo DiCaprio Super Bowl: Hollywood Meets America’s Favorite GameLeonardo DiCaprio Super Bowl: Hollywood Meets America’s Favorite Game
Leonardo DiCaprio Super Bowl: Hollywood Meets America’s Favorite Game
 
Morgan Freeman is Jimi Hendrix: Unveiling the Intriguing Hypothesis
Morgan Freeman is Jimi Hendrix: Unveiling the Intriguing HypothesisMorgan Freeman is Jimi Hendrix: Unveiling the Intriguing Hypothesis
Morgan Freeman is Jimi Hendrix: Unveiling the Intriguing Hypothesis
 
定制(mu毕业证书)美国迈阿密大学牛津分校毕业证学历证书原版一模一样
定制(mu毕业证书)美国迈阿密大学牛津分校毕业证学历证书原版一模一样定制(mu毕业证书)美国迈阿密大学牛津分校毕业证学历证书原版一模一样
定制(mu毕业证书)美国迈阿密大学牛津分校毕业证学历证书原版一模一样
 
Abraham Laboriel Records ‘The Bass Walk’ at Evergreen Stage
Abraham Laboriel Records ‘The Bass Walk’ at Evergreen StageAbraham Laboriel Records ‘The Bass Walk’ at Evergreen Stage
Abraham Laboriel Records ‘The Bass Walk’ at Evergreen Stage
 
Taylor Swift: Conquering Fame, Feuds, and Unmatched Success | CIO Women Magazine
Taylor Swift: Conquering Fame, Feuds, and Unmatched Success | CIO Women MagazineTaylor Swift: Conquering Fame, Feuds, and Unmatched Success | CIO Women Magazine
Taylor Swift: Conquering Fame, Feuds, and Unmatched Success | CIO Women Magazine
 
The Enigmatic Portrait, In the heart of a sleepy town
The Enigmatic Portrait, In the heart of a sleepy townThe Enigmatic Portrait, In the heart of a sleepy town
The Enigmatic Portrait, In the heart of a sleepy town
 
Sara Saffari: Turning Underweight into Fitness Success at 23
Sara Saffari: Turning Underweight into Fitness Success at 23Sara Saffari: Turning Underweight into Fitness Success at 23
Sara Saffari: Turning Underweight into Fitness Success at 23
 
HD Video Player All Format - 4k & live stream
HD Video Player All Format - 4k & live streamHD Video Player All Format - 4k & live stream
HD Video Player All Format - 4k & live stream
 

Advanced project-adirondack-chair

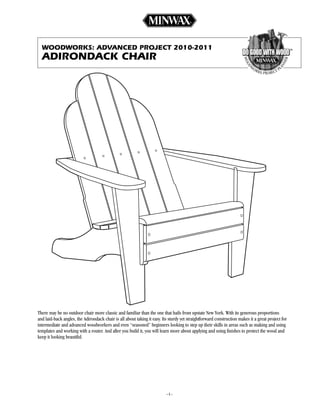
  • 1. WOODWORKS: aDvanceD pROject 2010-2011 aDiROnDacK chaiR There may be no outdoor chair more classic and familiar than the one that hails from upstate New York. With its generous proportions and laid-back angles, the Adirondack chair is all about taking it easy. Its sturdy yet straightforward construction makes it a great project for intermediate and advanced woodworkers and even “seasoned” beginners looking to step up their skills in areas such as making and using templates and working with a router. And after you build it, you will learn more about applying and using finishes to protect the wood and keep it looking beautiful. ––
  • 2. CONTINUED - WOODWORKS: aDvaNCED pROjECT 2010-2011 aDIRONDaCK ChaIR tOOlS RequiReD ShOppinG liSt Hand Tools Wood Recommendation: Pressure-treated pine – Sanding block Alternate Wood: Oak – Back saw Part Qty. Th. x W x L – Pipe clamps A, B 1 @ 8' 1 x 7-1/2 – Rasp C 1 @ 2' 1 x 5-1/2 – Wood chisels D, E, F, G 1 @ 8' 1 @ 10' , 3/4 x 5-1/2 – Adjustable square H, J, K 1 @ 8' 1 @ 10' , 3/4 x 3-1/2 1/4 dowels 4 #8 x 2 flathead stainless-steel screws 24 Power Tools – Table saw cuttinG liSt – Band saw or jigsaw – Plunge router Overall Dimensions: 30 W x 36 H x 34 D – Biscuit joiner – Drill press, 3/8 plug cutter bit Part Name Qty. Th. x W x L – Power drill with drill bits, Phillips-head A Front leg 2 1 x 5-1/2 x 20-3/8 screwdriver bit, 3/8 plug cutter – Orbital or finish sander B Back leg 2 1 x 7 x 37-1/2 C Stretcher 1 1 x 4-1/2 x 19-3/4 D Arms 2 3/4 x 5 x 30-3/8 Miscellaneous – Epoxy or exterior-grade glue E Center back slat 1 3/4 x 4 x 32 – Tape measure F Tall back slats 2 3/4 x 4 x 32 – Pencil – Safety glasses G Short back slats 2 3/4 x 4-1/4 x 26 – 120-grit sanding belt H Seat slats 8 3/4 x 3 x 21 – 120-, 150- and 220-grit sandpaper J Back rail 1 3/4 x 3-3/8 x 23 – Clean, lint-free cloths – Respirator K Splines 4 1/4 x 3 x 7/8 – Gloves for finishing – Mineral spirits, for oil based waterproofer – Good quality, natural-bristle brush (for oil based waterproofer) or synthetic-bristle brush (for water-based waterproofer) WOOD FiniShinG pRODuctS Recommended Finish Alternate Finish Thompson’s® WaterSeal® Deck House Oil Waterproofing Stain Thompson’s® WaterSeal® Advanced Wood Protector Natural Cedar in Semi-Transparent Colonial Blue ––
  • 3. CONTINUED - WOODWORKS: aDvaNCED pROjECT 2010-2011 aDIRONDaCK ChaIR BeFORe yOu BeGin 6. Cut parts C, J and H to their specified size. One long edge of one of the seat slats, H, requires a 3/4 radius (see Fig. 1), which can be Good craftsmanship begins and ends with good work habits, so make done on the router table or by hand with a block plane and an orbital the following steps part of your routine workshop practice. If you have sander. Use a table saw to rip the front edge of J, the back rail, to a any doubts or questions about how to proceed with a project, always 58-1/2º angle. discuss them with your shop instructor. • Carefully and fully review plans and instructions before putting a Cut the Joints tool to the project lumber. 7. Rout 3/8 deep dovetail sockets in the arms, D, and back legs, B • Work sensibly and safely. Wear safety goggles when doing work that (see Fig. 5). Set the bit to the depth of the cut plus the thickness of creates flying chips and sawdust; wear the appropriate respirator the template. whenever making sawdust or working with thinners or other solvents. 8. Cut the dovetails in the stretcher, C, and the front legs on the router • At the end of every work session, clean up your shop area and put table, using the same dovetail bit used to make the sockets (see Fig. 6). away all portable tools. Attaching a tall fence to the router-table fence will help to stabilize the piece. Round the end of each dovetail by making scoring cuts with a cuttinG anD aSSeMBly backsaw and then paring to shape with a small chisel (see Fig. 7). pROceDuRe Make the Templates 9. Mortise the arms using the plunge router fitted with an edge guide 1. Templates will make it easy to build more than one chair, now and a 1/4 spiral up-cutting bit. To steady the router, clamp a scrap and in the future. They’re made from 1/4 hardboard and are used board to the bench and clamp the arm in the bench vise so its edge is to guide the bearing of a flush-cutting router bit. Figure 2 shows the flush with the top of the board. Rout slots for the cross-grain splines, shapes needed for the back slats (E, F, G). Start with a single 8-3/8 K, in the same manner. x 26 piece of hardboard. Draw a 6 radius at the top with a com- pass. Rip the 4 wide center slat template from the right side. Rip the 10. Rout the tenons for the back rail, J , by passing it flat over a router template for the outside slats to 4 but stop about 6 from the bottom. bit or dado head. Round the corners with a rasp. Finish the 1/4 jog as shown with a band saw; cut the top curves and rasp them smooth. 11. Make the splines by rounding the edges of a 1/4 x 3 x 12 board with a rasp so they fit the mortises in the back slats. Cut four 2. Figure 3 shows the remaining templates. The templates for the back 7/8 splines on the table saw. legs can be enlarged on a copier to full size. Enlarge the image shown by 200 percent and again by another 200 percent and then one more 12. Use a biscuit joiner to cut the slots in the bottom of the back time by 183 percent. Measure the last enlargement to make sure it slats and into the stretcher. You can also groove the parts on the table matches the dimensions shown. If it doesn’t, increase or decrease the saw and join the back slats to the stretcher with a 1/4 thick spline. final enlargement accordingly. (You can also draw your own layout grid using the scale shown.) Assemble the Chair 13. First join the back legs, B, to the stretcher, C, then the arms, Woodworker’s Tip: To create the notch on the front leg template, D, to the front legs, A. Connect the back rail, J, to the arm/front leg raise the blade on the table saw to full height and rip most of the assembly. The best material for bonding these joints is epoxy, but waste. Finish the cut on the band saw. Then use the band saw to exterior-grade glues will also work. taper the front-leg template. 14. Use scrap sticks to support the arms while you screw the back 3. When all the templates are cut, smooth the edges with a rasp or legs to the front legs. Notches cut into the tops of the sticks will help sandpaper wrapped around a curved block. Note that the templates hold the back of the arms level with the fronts during assembly. When for parts B and D have slots for routing dovetail sockets. You must drilling for screws, first drill a 3/8 x 1/4 deep hole so the screw make an insert piece that fills these slots when using the template heads will be recessed and later covered with a wood plug. with the router or the bit will gouge the workpiece. 15. Pull the arms tight to the back rail with a pipe clamp, then drill Make and Shape the Parts and peg the four joints with 1/4 dowel pins (see Fig. 1). 4. Cut parts A, B, D, E, F and G to their approximate sizes. (The dimensions between long parallel sides can be ripped to their exact 16. With the back rail in position, hold a back slat against the rail and measurements.) Use the templates to trace the finished shapes onto mark it for the counterbored screw hole (see Fig. 8), using an adjust- the workpieces. Cut away the waste with a band saw to slightly over- able square held against the back rail. Run the line from the side of size, then adhere the template to the piece with double-sided tape, the slat to the front. Transfer this mark to the other slats. Because the carefully aligning it with the trace lines. screws go in at an angle, this mark has to coincide with the top of the back rail. 5. Rout each workpiece by riding the template against the bearing of the flush-cutting router bit (see Fig. 4, showing the technique applied 17. Epoxy the splines, K, into the back slats using 1/8 thick scrap to to a back leg, B). create the correct gaps. Use a minimal amount of epoxy so that there is little or no squeeze-out, which can be difficult to remove. ––
  • 4. CONTINUED - WOODWORKS: aDvaNCED pROjECT 2010-2011 aDIRONDaCK ChaIR 18. Align the tops and bottoms of the slats and clamp them together directions found on the back of the can of stain. Then do a trial test with one pipe clamp set along the line of the splines. before full application. The surface may darken slightly with applica- tion and color appearance is different when the wood is fully dry. 19. Epoxy the biscuits into the stretcher, then set the entire slat assem- bly onto the stretcher. When the slats are properly positioned, screw 24. When applying this product, do not use it with other waterproof- them to the back rail. ing or stain products, as variations in final appearance of the wood may result. Do not thin. To ensure good penetration, do not apply in 20. Install the seat slats using 1/8 spacers and woodscrews counter- direct sunlight or on hot days. Do not apply if rain is expected within bored into the ends. Work from front to back, with the first two slats 24 hours. Also, temperature must be above 50º F. and remain above being installed as shown in Fig. 1. freezing for 24 hours. 21. Make the 3/8 x 1/4 plugs needed to fill the screw holes. Apply 25. Shake or stir contents for a minimum of 2 minutes before a dab of glue to the bottom face and insert them into the holes. When use. Intermix all containers (of the same color) to be used to the glue is dry, cut the plugs flush with the surface using a wood chisel. assure color uniformity. Woodworker’s Tip: For the best appearance, the grain of the 26. Apply using a paint pad or brush. Do not apply using a roller. For screw plugs should be aligned with that of the surrounding wood. small projects, a brush is the preferred applicator. 22. In preparation for finishing, sand all surfaces with 27. In most applications, only one light coat is necessary. Apply with 120-grit sandpaper. a brush or applicator pad. Regardless of which application method is used, remove excess within 15 minutes by redistributing it to drier pROtectinG yOuR pROject areas or wiping it off. Stain will dry in 4 hours. A second coat can be Any type of wood that’s used outdoors needs protection from added, if desired, after 4 hours. water damage. There are a variety of protective coatings available, including clear and tinted wood protectors and semi-transparent 28. Brushes and equipment used for water-based products must be and solid stains. Each of these finishes has a different look and cleaned with soap and water. maintenance requirement. Alternate Finish To provide complete protection for your project, use Thompson’s ® 29. Before applying Thompson’s® WaterSeal® Advanced Wood WaterSeal® Deck House Oil Waterproofing Stain or Thompson’s® Protector Natural Cedar, read and follow the directions found on the WaterSeal® Advanced Wood Protector. Both products not only prevent back of the package. Be sure that both surface and air temperature water damage, but also resist damage from mildew and ultraviolet are above 50° F. during application and for 48 hours after applica- radiation in sunlight (UV), and they exceed industry standards for tion. And, if you’re working outside, do not apply product if rain is waterproofing on wood. Plus, the semi-transparent color will give forecasted within 24 hours of application. plain pine just the right amount of rich wood-tone. This stain is available in over 100 beautiful colors. 30. The surfaces must be free of all dirt, wood dust and all other contaminants. This product can be applied to damp, freshly cleaned Woodworker’s Tip: always be sure to choose a waterproofer that wood. To clean the wood, use either Thompson’s® WaterSeal® Deck claims to exceed industry standards for waterproofing on wood. Cleaner Brightener or Thompson’s® WaterSeal® Deck Wash. FINISHING TIPS 31. Do not mix the product with other waterproofing products • Coverage: The approximate coverage of Thompson’s® WaterSeal® because variations in the final appearance of the surface being Deck House Oil Waterproofing Stain or Thompson’s® WaterSeal® treated may result. Advanced Wood Protector on pine is 250 square feet per gallon. 32. Before applying the product over the entire surface, a small trial • When you apply Thompson’s WaterSeal Deck House Oil ® ® patch is recommended. Waterproofing Stain or Thompson’s® WaterSeal® Advanced Wood Protector, do not mix it with other waterproofing products, because 33. Apply only one thin, even coat. DO NOT APPLY A SECOND COAT. variations in the final appearance of the surface being treated may A heavier or additional coat will not improve performance or appear- result. Also, do not thin these products. ance. Avoid puddling. Tackiness will result if overapplied. Tackiness may also occur after application if overnight temperature falls below Recommended Finish 50°F. within 48 hours of application. Drying time will vary depending 23. Before applying Thompson’s® WaterSeal® Deck House Oil on wood surface and humidity. Allow a minimum of 12 hours before Waterproofing Stain, the wood surface must be free of all dirt, wood using the bench. dust and all other contaminants. If the wood needs cleaning, use Thompson’s® WaterSeal® Deck Cleaner Brightener or Thompson’s® 34. Allow at least 12 hours to dry before you use the chair. WaterSeal® Deck Wash. Read and follow the directions found on the back of the package. After the cleaning is done, read and follow the 35. Clean brushes and equipment with soap and water, then rinse with clean water. ––
  • 5. CONTINUED - WOODWORKS: aDvaNCED pROjECT 2010-2011 aDIRONDaCK ChaIR NOTE: The length of protection will vary depending on environment. DO NOT TAKE INTERNALLY. KEEP OUT OF REACH Perform the following splash test once a year to see whether reap- OF CHILDREN. plication is necessary. Sprinkle water on various sections of surface to be sealed. If water absorbs and darkens color of substrate within SAFE DISPOSAL OF RAGS AND WASTE. 5 seconds, the surface is porous and considered ready to be treated. DANGER: Rags, steel wool, other waste soaked with this product, and If water beads up or otherwise sits on top of surface, then surface sanding residue may spontaneously catch fire if improperly discarded. doesn’t need protection at this time. For maximum protection from Immediately place rags, steel wool, other waste soaked with this color change and other damage caused by the sun, reapplication is product, and sanding residue in a sealed, water-filled metal container. recommended every year. Vertical and horizontal surfaces will experi- Dispose of in accordance with local fire regulations. ence color changes at different rates. PRODUCT SAFETY For your safety and the safety of those you work with, always read the safety warnings, which manufacturers print on their labels, and follow them to the letter. Typical safety advice and instructions will contain information such as the following: WARNING! Removal of old paint by sanding, scraping or other means may generate dust or fumes that contain lead. Exposure to lead dust or fumes may cause brain damage or other adverse health effects, especially in children or pregnant women. Controlling exposure to lead or other hazardous substances requires the use of proper protective equipment, such as properly fitted respirator (NIOSH approved) and proper containment and cleanup. For more informa- tion, call the National Lead Information Center at 1-800-424-LEAD (in US) or contact your local health authority. Contents are COMBUSTIBLE. Keep away from heat and open flame. Contains ALIPHATIC HYDROCARBONS. VAPOR HARMFUL. Use Only With Adequate Ventilation. To avoid overexposure, open windows and doors or use other means to ensure fresh air entry during application and drying. If you experience eye watering, headaches, or dizziness, increase fresh air supply or wear respiratory protection (NIOSH/MSHATC23C or equivalent), or leave the area. Avoid contact with eyes and skin. Wash hands after using. Keep container closed when not in use. Do not transfer contents to other containers for storage. FIRST AID: In case of eye contact, flush thoroughly with large amounts of water for 15 minutes and get medical attention. For skin contact, wash thoroughly with soap and water. In case of respiratory difficulty, provide fresh air and call physician. If swallowed, get medi- cal attention immediately. DELAYED EFFECTS FROM LONG-TERM OVEREXPOSURE. Contains solvents which can cause permanent brain and nervous system damage. Intentional misuse by deliberately concentrating and inhaling contents may be harmful or fatal. WARNING: This product contains a chemical known to the State of California to cause cancer and birth defects or other reproductive harm. This project originally appeared in American Woodworker magazine, June 2001, page 60. ––
  • 6. CONTINUED - WOODWORKS: aDvaNCED pROjECT 2010-2011 aDIRONDaCK ChaIR FiG 1. Orient grain horizontally K E F F G G #8 x 2 Stainless Steel / dia. x 1/4 plugs 38 Screw D J Dovetail Socket 3 /8 x 3/4 x 4 #20 Biscuits A C 3 /4 Radius D B Dovetail Socket 3 /8 x 3/4 x 4 B H H A ––
  • 7. CONTINUED - WOODWORKS: aDvaNCED pROjECT 2010-2011 aDIRONDaCK ChaIR FiG 2. Rip Here 6 Same Radius 6 as F 2 2 Outside Center 26 3 /8 Deep Slats Slat Mortise Template Template 4 41/4 4 1 /4 Jog (Template 6 Only) 1 /4 Jog 83/8 G F E F G 41/4 Slots for Biscuits ––
  • 8. CONTINUED - WOODWORKS: aDvaNCED pROjECT 2010-2011 aDIRONDaCK ChaIR FiG 3. 1 Square = 1/2 11/4 1 7 /8 x 4 /8 Notch in Template 1 3 /4 1 /2 37 Back Leg B 58.5° 345/8 3 /8 x 3/4 x 4 Slots for #20 Biscuits 41/2 Dovetail 11/8 41/4 41/8 41/8 41/4 11/8 1 /2 Stretcher C 3 /8 x 3/4 x 4 Dovetail Front Leg A 3 /4 1 /4 x 1 x 2 Mortise 7 /8 x 41/8 Notch in Template 37/8 2 21/2 3 /4 Radius Arm Radius D 1 Draw and cut curve on one arm, trace onto the other 111/2 71/4 5 /8 Back Rail J 3 Bevel edge at 58 1/2° 1 /4 x 1 x 2 Tenon 51/2 ––
  • 9. CONTINUED - WOODWORKS: aDvaNCED pROjECT 2010-2011 aDIRONDaCK ChaIR FiG 4. Leg Template Insert to Fill Socket Flush-Cutting Bit FiG 5. FiG 6. Stretcher C Tall Fence Leg Template Dovetail Bit Guide Bushing Dovetail Socket FiG 7. FiG 8. Back Slat G Cut to the Mark Back Rail J ––