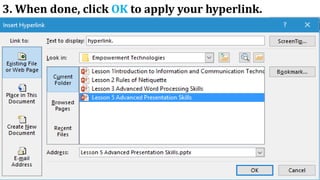
Lesson 5
Advanced
Presentation Skills
List of Presentation Tools
1. Microsoft PowerPoint
Advantages for Design
Quick and easy: the basic features are easy to
master and can make you appear to be
organized, even if you are not
Simple bullet points: it can reduce complicated
messages to simple points. Bullets points are
good basis for presentation and remind the
speaker of main points and the organization of
the message.
Easy to create colorful, attractive design: using
the standard templates and themes, you can
create something visually appealing, even if you
do not have knowledge of basic graphic design
principles.
Easy to modify: when compared to other visual
aids such as charts, posters, or objects, it is easy
to modify.
Easily re-order presentation: with a simple drag
and drop using key stokes, you can move slides to
re-order the presentation.
Advantages for Delivery
Audience size: PowerPoint slides are generally easier
to see by a large audience than other visual aids.
Easy to present: you can easily advance slides in the
presentation one after another with a simple key
stroke while still maintaining eye contact with the
audience.
No need for Handouts: they look good visually and
can be easily read if you a projector and screen that is
large enough to the entire room.
Disadvantages for Design
Design power pointless: gives the illusion and
coherence, when in fact there is really not much
substance or connection between the different points
on the slides.
PowerPoint excess: some speakers create
presentations so they have slides to present rather
than outlining, organizing and focusing the message.
Replaces planning and preparation: PowerPoint is
convenient prop for poor speakers, as it can reduce
complicated messages to simple bullet points and
elevates style over substance.
Oversimplification of the topic: the linear of
PowerPoint forces the presenter to reduce complex
subjects to a set of bullet items that are too weak to
support decision-making or show the complexity of
an issue.
Feature abundance: while the basic features are easy
to use and apply, a speaker can get carried away and
try to use all features at once rather than simply
supporting a message. Too many flying letters,
animations, and sound effects without seeing much
original thought or analysis can be a real issue. In
many cases, the medium shoves the message aside.
Disadvantages for Delivery
Basic equipment required: you will need to have a
computer and projection equipment in place to
display the slides to the audience.
Focus on medium, not message: too many people
forget that they are making a presentation first and
that PowerPoint is just a tool.
2. Prezi
is a great presentation tool for spicing up the
mundane PowerPoint that you’ve been using
for the past 10 years. It allows for new kinds of
visualizations and opportunities to link
imagery to motion, which in turn creates a
deeper understanding and retention duration.
Advantages:
1. Breaks the Mold
Prezi is not your typical slide-based
presentation tool. You start with a blank canvas
and can add and manipulate content anywhere
on the page. There is no such thing as a linear,
slide-by-slide display method (unless you design
it that way, of course). Break the mold and
present in unique ways. It even lets you import
your existing PowerPoint presentations for
conversion!
2. It’s Free and Web-Based
Prezi is completely free. Compared to
PowerPoint, which is both a paid application
and not accessible everywhere, Prezi provides
access from any web-enabled computer. This is
great for students who may not have the Office
suite on their home computers. Students and
staff can easily create Free accounts on Prezi
using their Facebook accounts as well.
3. Link Text and Images to Movement
One of my favorite aspects of Prezi (assuming it is
used correctly) is the ability to have movement
actually become part of the presentation. For
instance, if you are talking about ‘Imagery,’ you can
have Prezi zoom in (past the word Imagery) and
display examples of the imagery you are
discussing. The movement relates to the terms and
examples, creating a visual link for the students.
4. Appropriate for All Ages
The web-based software is designed with all ages in
mind. The simple icon-based design tools ensure
that any age group will be successful in creating
and presenting new creations. I have always been a
proponent of teaching young kids how to use new
technology – and Prezi certainly makes that easier
with their simple design interface.
5. Shows Students You’re “Up-to-date” with Technology
It sounds so simple (and somewhat deflating) but
your students really do pay attention to the
teaching tools you use. By staying current with new
technology, more often than not your students will
appreciate the change of pace from the tools they
are seeing used in all their other classes (and what
they’ve seen for the past few years of their
schooling). Take a chance and try something new –
if it fails miserably (which it won’t) they will
appreciate you for trying something that breaks the
mold.
Disadvantages:
1. Can Cause Motion Sickness
This is totally avoidable if you know what you’re
doing when designing your presentation, though.
Consider your transitions and make sure that you
aren’t constantly moving from one corner of the
presentation board to the other (thus generating
expansive fly-overs). Making simple moves from one
screen area to the next will eliminate the nauseating
effects of cross-screen movement
2. More of a Learning Curve
As with anything new, there is a learning curve and
in the event that you may not have the time to learn
the tool yourself and then teach it to your students,
you may want to pass on Prezi. In this situation, you
could easily include Prezi as an option among
presentation tools. This gives students the option to
teach themselves but does not require them to
learn something new to complete their assignment.
3. Web-Based
If you have limited wireless internet access, or if
your internet connection at your building is
unreliable, a web-based tool may become more of a
hassle than its worth. One nice thing that Prezi
allows is exporting of your completed presentation,
making it viewable offline. This is recommended for
anyone relying on the Prezi for class or a
presentation as it can be used as a backup should
your internet fail.
3. Apple Keynote
4. Google Slides
Advantages:
Compatibility in Google Presentations: Google
Presentation is much more compatible than
PowerPoint. Users can import and export graphics,
text formats, PDFs and even PowerPoint
presentations without a hassle. They can also
publish their creations to the Internet quickly and
easily. PowerPoints meager compatibility options
pale in comparison.
Cloud Based Presentation Creation: Google
Presentation is supported by the cloud. This means
that several different colleagues can access and
modify a presentation as it is being formulated. As
long as you are using an internet connected device,
you'll have access to your team's projects on Google
Presentation. This includes iPhones, iPads and other
mobile devices. It's a significant advantage, as you'll
never have to worry about purchasing software
again. Cloud support also allows employees and
students to make last minute adjustments while they
are on their way to a meeting or other event.
Tips in Creating an Effective Presentation
1. Minimize. Keep slide counts to a minimum to maintain
a clear message and to keep the audience attentive.
Remember that the presentation is just a visual aid. Most
information should still come the reporter.
2. Clarity. Avoid being fancy by using a font style that is
easy to read. Make sure that is also big enough to be read
by the audience. Once you start making your
presentation, consider how big the screen is during your
report.
Tip: a font size is about an inch (depends on the screen
size). A none – inch letter is readable 10 feet away; a
two – inch letter is readable 20 feet away.
3. Simplicity. Use bullets or short sentences. Summarize
the information on the screen to have your audience
focus on what the speaker is saying than on reading the
slide. Limit the content to six lines and seven words per
line.
4. Visuals. Use graphics to help in your presentation but
not too many to distract the audience. In addition,
instead of using a table of data, use charts and graphs.
5. Consistency. Make your design uniform. Avoid having
different font styles and backgrounds.
6. Contrast. Use light font on dark background or vice
versa. This is done so that it is easier to read. In most
instances, it is easier to read on screen if the background
is dark. This is due to the brightness of the screen.
Bazaar Results Presentation
Slide
No. Content
1 Products/Service Name, Group Name and Group Members
2 Initial Products/Service Information: What is your product
or service/ Include a photo if available.
3 – 4 Survey: What were the questions you asked in the sample
before the bazaar took place?
5 – 6 Survey Results: Display the results of the survey and how it
affects the product upon its release (during the bazaar)
7 Bazaar Sale Result: Was your product or service profitable?
8 Improvements: If you were to release the product agaon,
what would be the changes?
Right in the Hertz
Serenade Services
Raye Erika Ortiz
Aaron Kyle Bautista
Jillyn Llanera
Anabelle Petate
Emirose Gonzales
Service Information
Offers a serenade service at the vicinity of the
school
A wide variety of contemporary love songs
Guitarist
Singers
Costumers for ambiance
Survey
On a scale of 1 – 5, how would you rate our
service?
Would you recommend our service to a friend?
How much are you willing to pay for this service?
Do you have any comments or suggestions?
On a scale of 1 – 5, how would you rate our service?
7%
13%
20%
40%
20%
Service Rating
1
2
3
4
5
80%
20%
Yes
No
Would you recommend this service to a friend?
How much are you willing to pay for this service?
7%
36%
14%
21%
22%
Php 10 - 19
Php 20 - 29
Php 30 -39
Php 40 - 49
Php 50
Notable comments and suggestions?
 Add flowers
 More songs
 Have a list of songs
 Keep up the good work
Changes before the Bazaar
Song list
Added new songs
Plastic flowers as an additional purchase (Php20)
Price set to Php 20
0
50
100
150
200
250
Production
Cost
Earnings
Bazaar Sale Result
Summary
We spent 100 PHP for 5 pieces of plastic flowers.
None was spent for materials and equipment.
We accumulated 200 PHP
We earned 100 PHP from our service.
Improvements
Better advertising
Cover services outside the Campus
Add more talent
Capture the “bromance” market (just for fun)
As you can see from the sample presentation, not all
information presented in the visual aid.
Using Hyperlinks in Microsoft PowerPoint
Ways to insert hyperlinks:
1. Select an object or highlight a text.
Guitarist
Singers
Costumes for ambiance
2. Go to Insert > Hyperlinks (under links category) or use
the shortcut key Ctrl + K. The Insert Hyperlink dialog box
would appear.
Link to Options:
a. Existing File or Web Page – creates a hyperlink to website
or a local file saved in your hard drive. Just browse your file in
the dialog box or type the web address.
b. Place in This Document – creates a hyperlink that allows
you to jump to a specific slide in your presentation.
c. Create a New Document – creates a hyperlink that once
clicked, created a new document on your specified location.
d. E- mail Address – creates a hyperlink that opens
Microsoft Outlook that automatically adds your specified
recipient on a new email.
3. When done, click OK to apply your hyperlink.
Embedding Objects in Microsoft PowerPoint
Embedding objects is easy using Microsoft
PowerPoint. With this option, you can insert an Excel file
that would look like a table to a presentation.
Embedding an Excel File to your Slide Presentation
1. Go to the Insert tab.
2. On the Text group, click on Object.
3. The Insert Object dialog box would appear.
Options:
a. Create New – creates a new file from scratch. You
can select on a wide variety of files listed.
b. Create from File – creates a file from an existing
file saved on your hard drive; simply browse the file to
use it. Putting a check on the “link” option will allow you
to modify the Excel file inside your presentation.
4. Once you are done, click OK.
Your Turn To Shine
1. What is the significance of using hyperlinks that
navigate around your presentation instead of just
using keyboard shortcuts?
2. Cite three instances where objects can help you
improve your presentation.

Lesson 5 advanced presentation skills

  • 1.
  • 2.
    List of PresentationTools 1. Microsoft PowerPoint Advantages for Design Quick and easy: the basic features are easy to master and can make you appear to be organized, even if you are not Simple bullet points: it can reduce complicated messages to simple points. Bullets points are good basis for presentation and remind the speaker of main points and the organization of the message.
  • 3.
    Easy to createcolorful, attractive design: using the standard templates and themes, you can create something visually appealing, even if you do not have knowledge of basic graphic design principles. Easy to modify: when compared to other visual aids such as charts, posters, or objects, it is easy to modify. Easily re-order presentation: with a simple drag and drop using key stokes, you can move slides to re-order the presentation.
  • 4.
    Advantages for Delivery Audiencesize: PowerPoint slides are generally easier to see by a large audience than other visual aids. Easy to present: you can easily advance slides in the presentation one after another with a simple key stroke while still maintaining eye contact with the audience. No need for Handouts: they look good visually and can be easily read if you a projector and screen that is large enough to the entire room.
  • 5.
    Disadvantages for Design Designpower pointless: gives the illusion and coherence, when in fact there is really not much substance or connection between the different points on the slides. PowerPoint excess: some speakers create presentations so they have slides to present rather than outlining, organizing and focusing the message. Replaces planning and preparation: PowerPoint is convenient prop for poor speakers, as it can reduce complicated messages to simple bullet points and elevates style over substance.
  • 6.
    Oversimplification of thetopic: the linear of PowerPoint forces the presenter to reduce complex subjects to a set of bullet items that are too weak to support decision-making or show the complexity of an issue. Feature abundance: while the basic features are easy to use and apply, a speaker can get carried away and try to use all features at once rather than simply supporting a message. Too many flying letters, animations, and sound effects without seeing much original thought or analysis can be a real issue. In many cases, the medium shoves the message aside.
  • 7.
    Disadvantages for Delivery Basicequipment required: you will need to have a computer and projection equipment in place to display the slides to the audience. Focus on medium, not message: too many people forget that they are making a presentation first and that PowerPoint is just a tool.
  • 8.
    2. Prezi is agreat presentation tool for spicing up the mundane PowerPoint that you’ve been using for the past 10 years. It allows for new kinds of visualizations and opportunities to link imagery to motion, which in turn creates a deeper understanding and retention duration.
  • 9.
    Advantages: 1. Breaks theMold Prezi is not your typical slide-based presentation tool. You start with a blank canvas and can add and manipulate content anywhere on the page. There is no such thing as a linear, slide-by-slide display method (unless you design it that way, of course). Break the mold and present in unique ways. It even lets you import your existing PowerPoint presentations for conversion!
  • 10.
    2. It’s Freeand Web-Based Prezi is completely free. Compared to PowerPoint, which is both a paid application and not accessible everywhere, Prezi provides access from any web-enabled computer. This is great for students who may not have the Office suite on their home computers. Students and staff can easily create Free accounts on Prezi using their Facebook accounts as well.
  • 11.
    3. Link Textand Images to Movement One of my favorite aspects of Prezi (assuming it is used correctly) is the ability to have movement actually become part of the presentation. For instance, if you are talking about ‘Imagery,’ you can have Prezi zoom in (past the word Imagery) and display examples of the imagery you are discussing. The movement relates to the terms and examples, creating a visual link for the students.
  • 12.
    4. Appropriate forAll Ages The web-based software is designed with all ages in mind. The simple icon-based design tools ensure that any age group will be successful in creating and presenting new creations. I have always been a proponent of teaching young kids how to use new technology – and Prezi certainly makes that easier with their simple design interface.
  • 13.
    5. Shows StudentsYou’re “Up-to-date” with Technology It sounds so simple (and somewhat deflating) but your students really do pay attention to the teaching tools you use. By staying current with new technology, more often than not your students will appreciate the change of pace from the tools they are seeing used in all their other classes (and what they’ve seen for the past few years of their schooling). Take a chance and try something new – if it fails miserably (which it won’t) they will appreciate you for trying something that breaks the mold.
  • 14.
    Disadvantages: 1. Can CauseMotion Sickness This is totally avoidable if you know what you’re doing when designing your presentation, though. Consider your transitions and make sure that you aren’t constantly moving from one corner of the presentation board to the other (thus generating expansive fly-overs). Making simple moves from one screen area to the next will eliminate the nauseating effects of cross-screen movement
  • 15.
    2. More ofa Learning Curve As with anything new, there is a learning curve and in the event that you may not have the time to learn the tool yourself and then teach it to your students, you may want to pass on Prezi. In this situation, you could easily include Prezi as an option among presentation tools. This gives students the option to teach themselves but does not require them to learn something new to complete their assignment.
  • 16.
    3. Web-Based If youhave limited wireless internet access, or if your internet connection at your building is unreliable, a web-based tool may become more of a hassle than its worth. One nice thing that Prezi allows is exporting of your completed presentation, making it viewable offline. This is recommended for anyone relying on the Prezi for class or a presentation as it can be used as a backup should your internet fail.
  • 17.
  • 18.
    4. Google Slides Advantages: Compatibilityin Google Presentations: Google Presentation is much more compatible than PowerPoint. Users can import and export graphics, text formats, PDFs and even PowerPoint presentations without a hassle. They can also publish their creations to the Internet quickly and easily. PowerPoints meager compatibility options pale in comparison.
  • 19.
    Cloud Based PresentationCreation: Google Presentation is supported by the cloud. This means that several different colleagues can access and modify a presentation as it is being formulated. As long as you are using an internet connected device, you'll have access to your team's projects on Google Presentation. This includes iPhones, iPads and other mobile devices. It's a significant advantage, as you'll never have to worry about purchasing software again. Cloud support also allows employees and students to make last minute adjustments while they are on their way to a meeting or other event.
  • 21.
    Tips in Creatingan Effective Presentation 1. Minimize. Keep slide counts to a minimum to maintain a clear message and to keep the audience attentive. Remember that the presentation is just a visual aid. Most information should still come the reporter. 2. Clarity. Avoid being fancy by using a font style that is easy to read. Make sure that is also big enough to be read by the audience. Once you start making your presentation, consider how big the screen is during your report.
  • 22.
    Tip: a fontsize is about an inch (depends on the screen size). A none – inch letter is readable 10 feet away; a two – inch letter is readable 20 feet away. 3. Simplicity. Use bullets or short sentences. Summarize the information on the screen to have your audience focus on what the speaker is saying than on reading the slide. Limit the content to six lines and seven words per line. 4. Visuals. Use graphics to help in your presentation but not too many to distract the audience. In addition, instead of using a table of data, use charts and graphs.
  • 23.
    5. Consistency. Makeyour design uniform. Avoid having different font styles and backgrounds. 6. Contrast. Use light font on dark background or vice versa. This is done so that it is easier to read. In most instances, it is easier to read on screen if the background is dark. This is due to the brightness of the screen.
  • 24.
    Bazaar Results Presentation Slide No.Content 1 Products/Service Name, Group Name and Group Members 2 Initial Products/Service Information: What is your product or service/ Include a photo if available. 3 – 4 Survey: What were the questions you asked in the sample before the bazaar took place? 5 – 6 Survey Results: Display the results of the survey and how it affects the product upon its release (during the bazaar) 7 Bazaar Sale Result: Was your product or service profitable? 8 Improvements: If you were to release the product agaon, what would be the changes?
  • 25.
    Right in theHertz Serenade Services Raye Erika Ortiz Aaron Kyle Bautista Jillyn Llanera Anabelle Petate Emirose Gonzales
  • 26.
    Service Information Offers aserenade service at the vicinity of the school A wide variety of contemporary love songs Guitarist Singers Costumers for ambiance
  • 27.
    Survey On a scaleof 1 – 5, how would you rate our service? Would you recommend our service to a friend? How much are you willing to pay for this service? Do you have any comments or suggestions?
  • 28.
    On a scaleof 1 – 5, how would you rate our service? 7% 13% 20% 40% 20% Service Rating 1 2 3 4 5
  • 29.
    80% 20% Yes No Would you recommendthis service to a friend?
  • 30.
    How much areyou willing to pay for this service? 7% 36% 14% 21% 22% Php 10 - 19 Php 20 - 29 Php 30 -39 Php 40 - 49 Php 50
  • 31.
    Notable comments andsuggestions?  Add flowers  More songs  Have a list of songs  Keep up the good work
  • 32.
    Changes before theBazaar Song list Added new songs Plastic flowers as an additional purchase (Php20) Price set to Php 20
  • 33.
  • 34.
    Summary We spent 100PHP for 5 pieces of plastic flowers. None was spent for materials and equipment. We accumulated 200 PHP We earned 100 PHP from our service.
  • 35.
    Improvements Better advertising Cover servicesoutside the Campus Add more talent Capture the “bromance” market (just for fun) As you can see from the sample presentation, not all information presented in the visual aid.
  • 36.
    Using Hyperlinks inMicrosoft PowerPoint Ways to insert hyperlinks: 1. Select an object or highlight a text. Guitarist Singers Costumes for ambiance
  • 37.
    2. Go toInsert > Hyperlinks (under links category) or use the shortcut key Ctrl + K. The Insert Hyperlink dialog box would appear.
  • 38.
    Link to Options: a.Existing File or Web Page – creates a hyperlink to website or a local file saved in your hard drive. Just browse your file in the dialog box or type the web address. b. Place in This Document – creates a hyperlink that allows you to jump to a specific slide in your presentation. c. Create a New Document – creates a hyperlink that once clicked, created a new document on your specified location. d. E- mail Address – creates a hyperlink that opens Microsoft Outlook that automatically adds your specified recipient on a new email.
  • 39.
    3. When done,click OK to apply your hyperlink.
  • 40.
    Embedding Objects inMicrosoft PowerPoint Embedding objects is easy using Microsoft PowerPoint. With this option, you can insert an Excel file that would look like a table to a presentation.
  • 41.
    Embedding an ExcelFile to your Slide Presentation 1. Go to the Insert tab. 2. On the Text group, click on Object. 3. The Insert Object dialog box would appear.
  • 43.
    Options: a. Create New– creates a new file from scratch. You can select on a wide variety of files listed. b. Create from File – creates a file from an existing file saved on your hard drive; simply browse the file to use it. Putting a check on the “link” option will allow you to modify the Excel file inside your presentation. 4. Once you are done, click OK.
  • 44.
    Your Turn ToShine 1. What is the significance of using hyperlinks that navigate around your presentation instead of just using keyboard shortcuts? 2. Cite three instances where objects can help you improve your presentation.