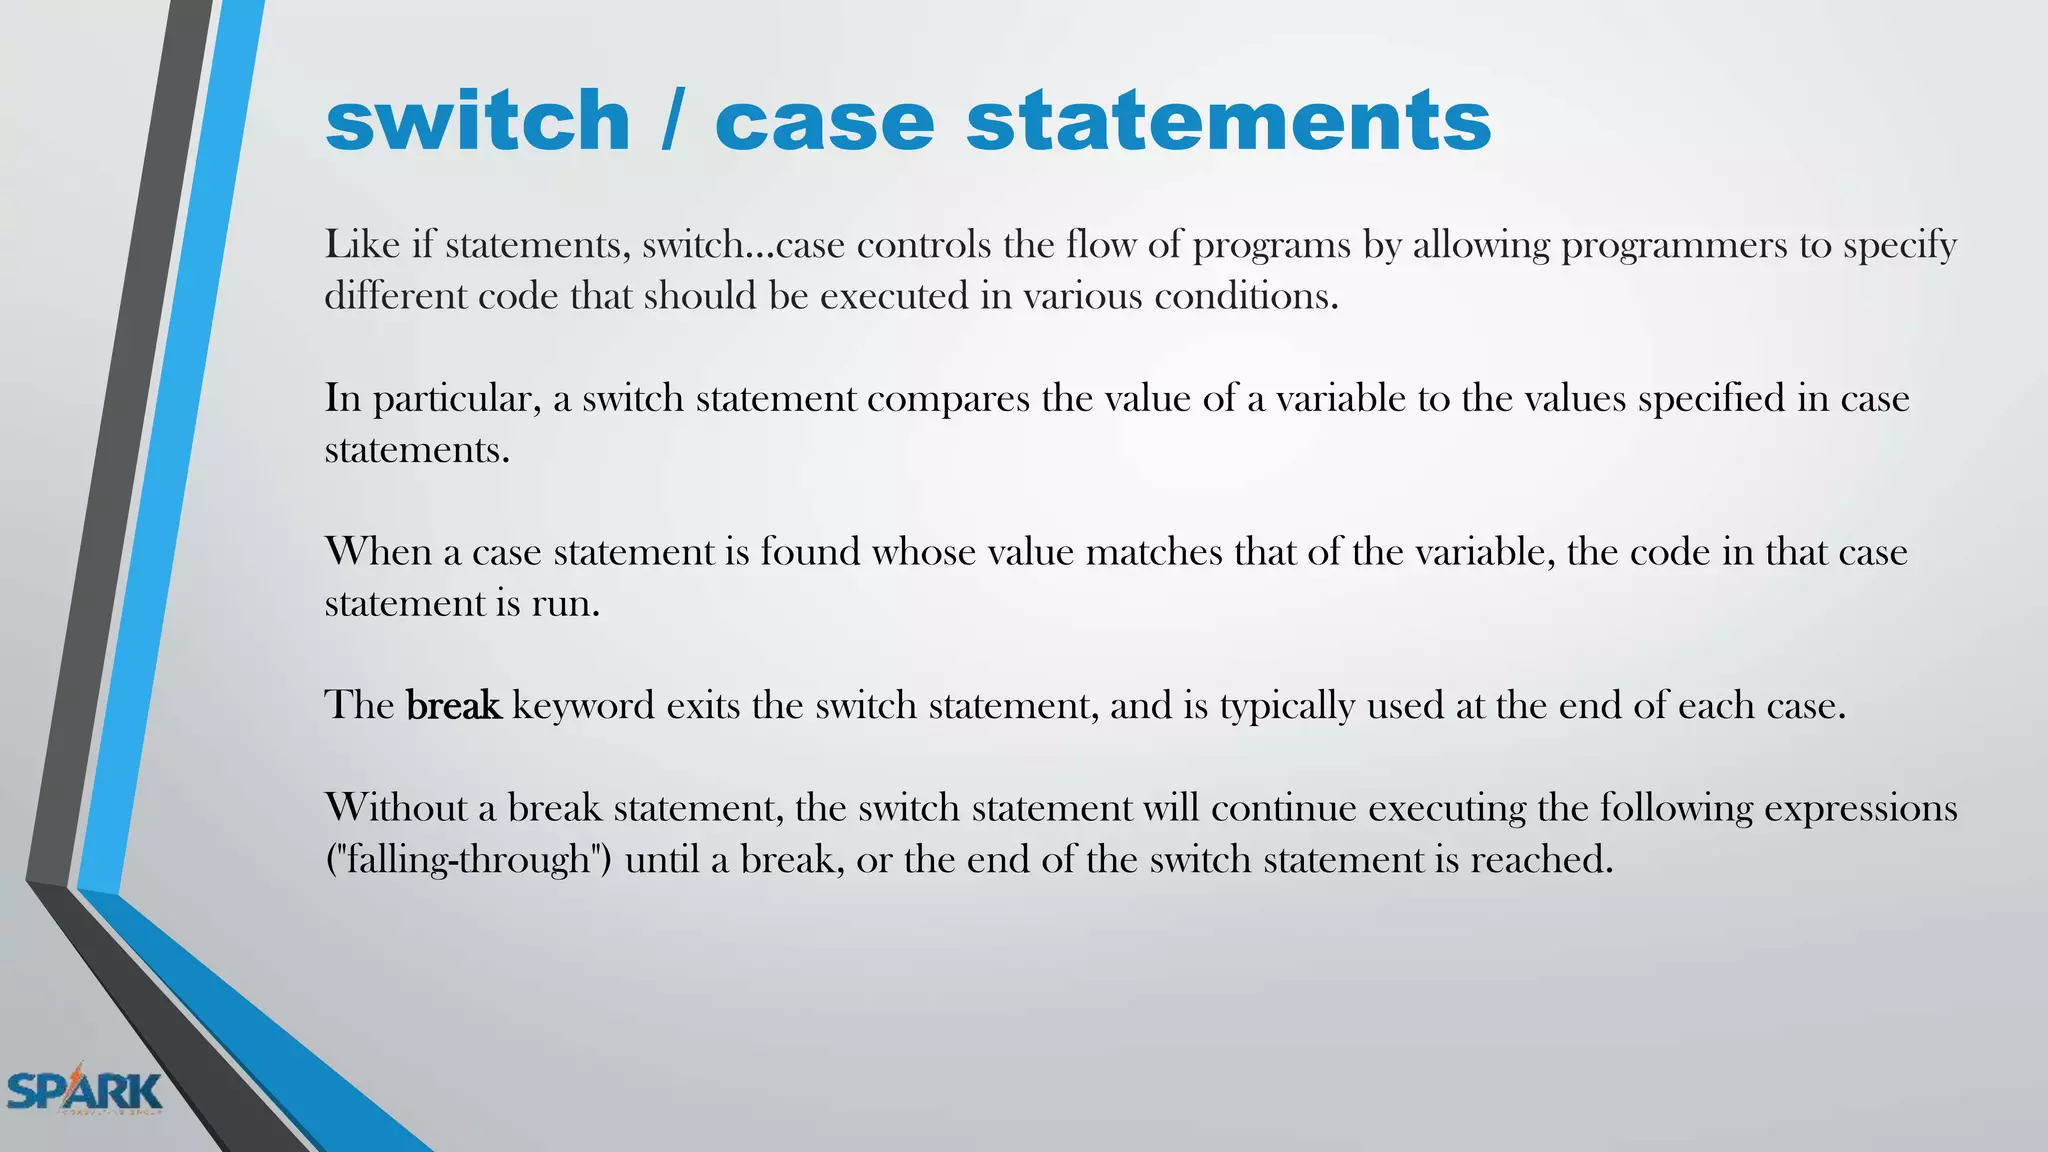
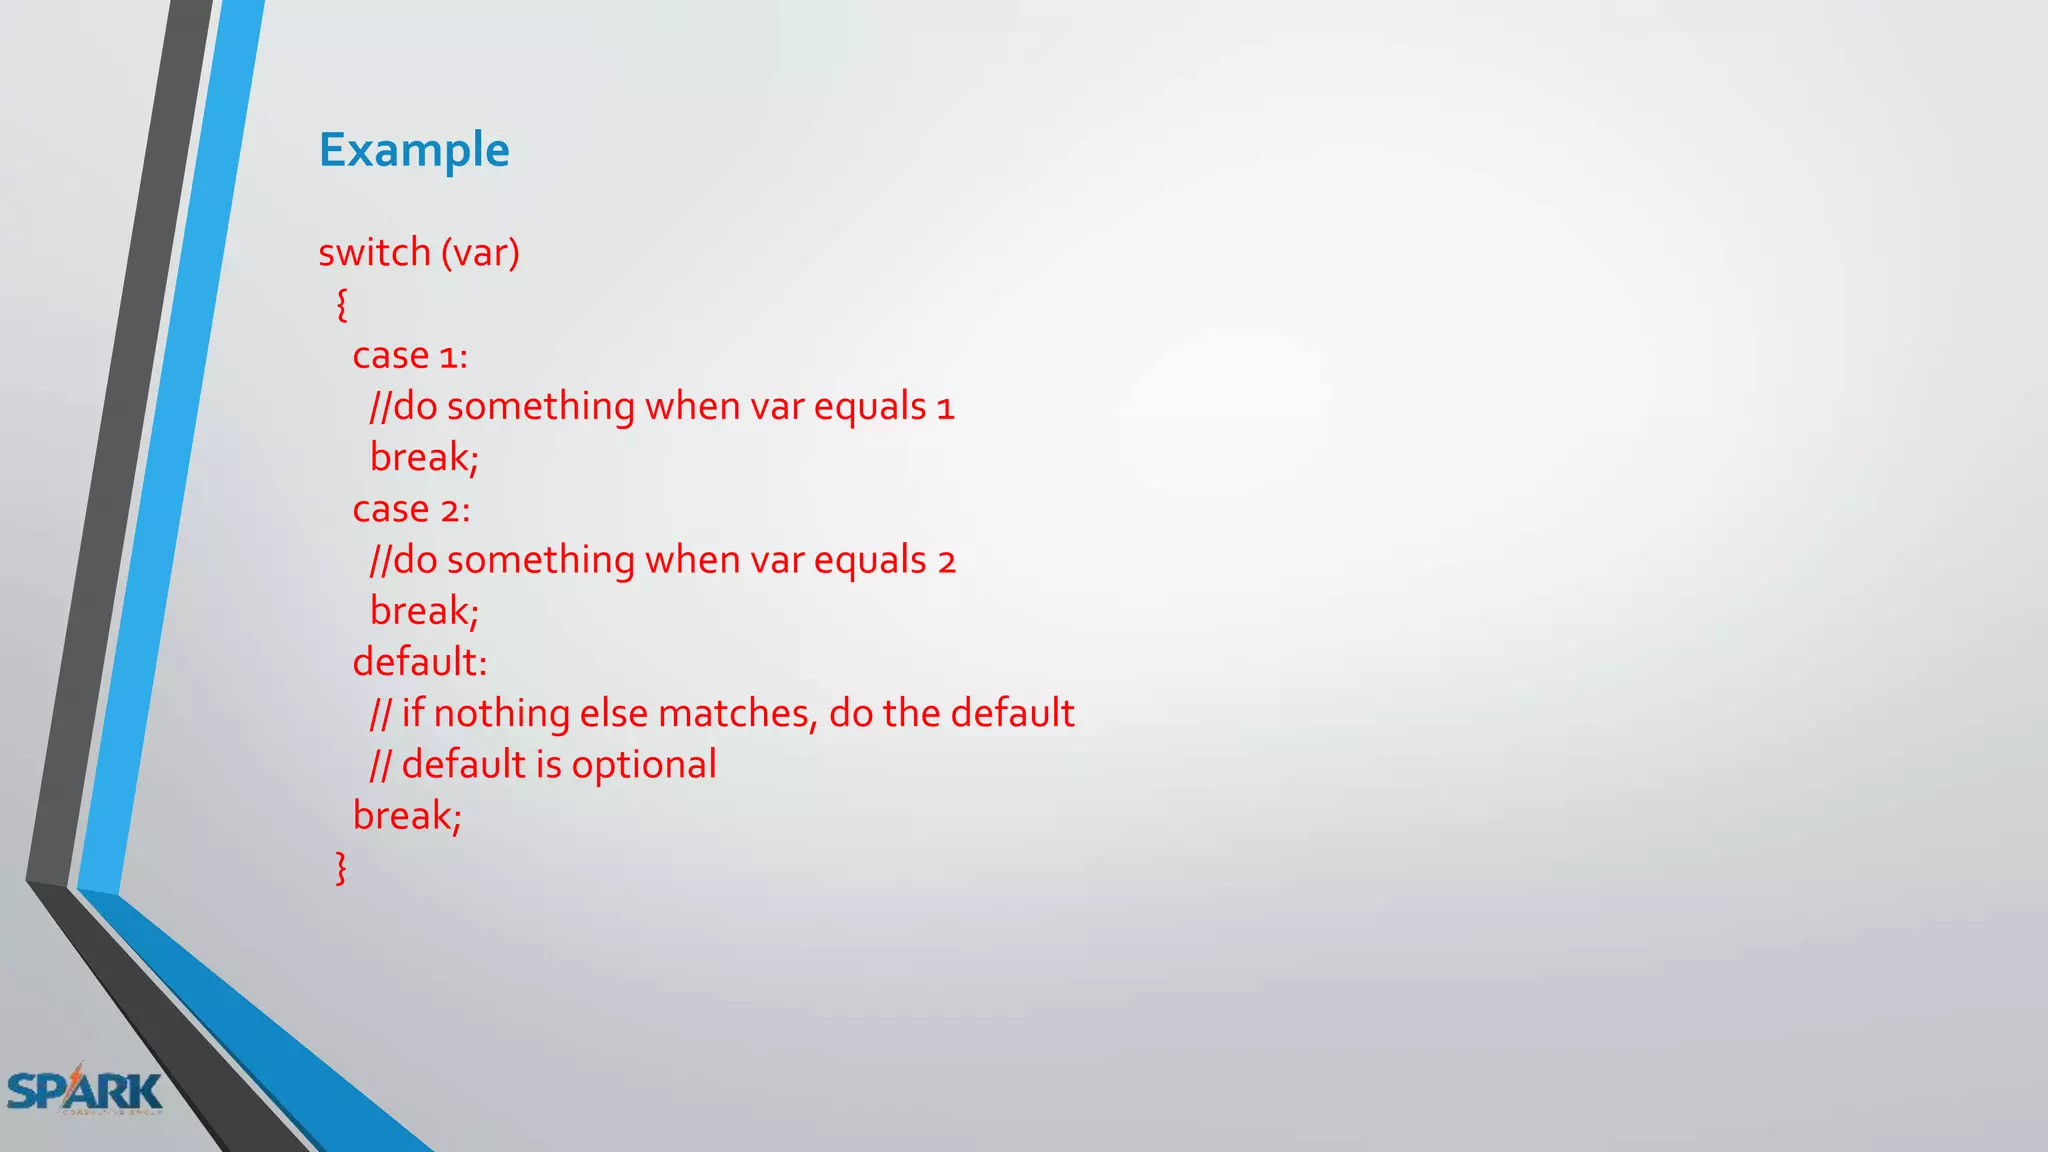
ARDUINO COURSE
Edited By : Mohamed Zain Allam
Lecture 2
Arduino C
Structure
• setup( )
• loop( )
setup( )
• The setup() function is called when a sketch starts.
• Use it to initialize variables, pin modes, start using libraries, etc.
• The setup function will only run once, after each powerup or reset of the Arduino board.
Example :
int buttonPin = 3;
void setup()
{
Serial.begin(9600);
pinMode(buttonPin, INPUT);
}
void loop()
{
// ...
}
loop( )
After creating a setup() function, which initializes and sets the initial values, the loop() function
does precisely what its name suggests, and loops consecutively, allowing your program to
change and respond. Use it to actively control the Arduino board.
Example
const int buttonPin = 3;
// setup initializes serial and the button pin
void setup()
{
Serial.begin(9600);
pinMode(buttonPin, INPUT);
}
// loop checks the button pin each time, and will send serial if it is pressed
void loop()
{
if (digitalRead(buttonPin) == HIGH)
Serial.write('H');
else
Serial.write('L');
delay(1000);
}
Comments
x = 5; //This is a single line comment. Anything after the slashes is a comment
// to the end of the line
/* this is multiline comment - use it to comment out whole blocks of code
if (gwb == 0){ // single line comment is OK inside a multiline comment
x = 3; /* but not another multiline comment - this is invalid */
}
// don't forget the "closing" comment - they have to be balanced!
*/
; semicolon
Used to end a statement.
Example
int a = 13;
#include
#include is used to include outside libraries in your sketch. This gives the programmer access to a
large group of standard C libraries (groups of pre-made functions), and also libraries written
especially for Arduino.
Example
This example includes a library that is used to put data into the program space flash instead of
ram. This saves the ram space for dynamic memory needs and makes large lookup tables more
practical.
#include <avr/pgmspace.h>
prog_uint16_t myConstants[] PROGMEM = {0, 21140, 702 , 9128, 0, 25764, 8456,
0,0,0,0,0,0,0,0,29810,8968,29762,29762,4500};
Constants
• HIGH
• LOW
• INPUT
• OUTPUT
• INPUT_PULLUP
• LED_BUILTIN
• true
• false
Data Types
• boolean
• char
• unsigned char
• byte
• int
• unsigned int
• word
• long
• unsigned long
• short
• float
• double
• array
boolean
A boolean holds one of two values, true or false.
(Each boolean variable occupies one byte of memory.)
int
Integers are your primary data-type for number storage.
• On the Arduino Uno (and other ATMega based boards) an int stores a 16-bit (2-byte) value.
This yields a range of -32,768 to 32,767 (minimum value of -2^15 and a maximum value of
(2^15) - 1).
• On the Arduino Due and SAMD based boards (like MKR1000 and Zero), an int stores a 32-
bit (4-byte) value. This yields a range of -2,147,483,648 to 2,147,483,647 (minimum value of -
2^31 and a maximum value of (2^31) - 1).
Example
int LEDpin = 5; // LED on pin 5
int switchPin = 13; // momentary switch on 13, other side connected to ground
boolean running = false;
void setup()
{
pinMode(LEDpin,OUTPUT);
pinMode(switchPin, INPUT);
digitalWrite(switchPin, HIGH); // turn on pullup resistor
}
void loop()
{
if (digitalRead(switchPin) == LOW)
{ // switch is pressed - pullup keeps pin high normally
delay(100); // delay to debounce switch
running = !running; // toggle running variable
digitalWrite(LEDpin, running); // indicate via LED
}
}
unsigned int
• On the Uno and other ATMEGA based boards, unsigned ints (unsigned integers) are the same as
ints in that they store a 2 byte value.
• Instead of storing negative numbers however they only store positive values,
yielding a useful range of 0 to 65,535 (2^16) - 1).
Example
unsigned int ledPin = 13;
byte
• A byte stores an 8-bit unsigned number, from 0 to 255.
Example
byte b = B10010; // "B" is the binary formatter (B10010 = 18 decimal)
char
A data type that takes up 1 byte of memory that stores a character value. Character literals are written
in single quotes, like this: 'A' (for multiple characters - strings - use double quotes: "ABC").
Characters are stored as numbers however. You can see the specific encoding in the ASCII chart.
This means that it is possible to do arithmetic on characters, in which the ASCII value of the character
is used (e.g. 'A' + 1 has the value 66, since the ASCII value of the capital letter A is 65).
See Serial.println reference for more on how characters are translated to numbers.
The char datatype is a signed type, meaning that it encodes numbers from -128 to 127.
For an unsigned, one-byte (8 bit) data type, use the byte data type.
Example
char myChar = 'A';
char myChar = 65; // both are equivalent
byte
A byte stores an 8-bit unsigned number, from 0 to 255.
Example
byte b = B10010; // "B" is the binary formatter (B10010 = 18 decimal)
word
On the Uno and other ATMEGA based boards, a word stores a 16-bit unsigned number.
Example
word w = 10000;
long
• Long variables are extended size variables for number storage,
and store 32 bits (4 bytes), from -2,147,483,648 to 2,147,483,647.
• If doing math with integers, at least one of the numbers must be followed by an L,
forcing it to be a long.
Example
long speedOfLight = 186000L; // see the Integer Constants page for explanation of the 'L'
unsigned long
• Unsigned long variables are extended size variables for number storage,
and store 32 bits (4 bytes).
• Unlike standard longs unsigned longs won't store negative numbers,
making their range from 0 to 4,294,967,295 (2^32 - 1).
Example
unsigned long time;
void setup()
{
Serial.begin(9600);
}
void loop()
{
Serial.print("Time: ");
time = millis(); //prints time since program started
Serial.println(time); // wait a second so as not to send massive amounts of data
delay(1000);
}
short
A short is a 16-bit data-type.
On all Arduinos (ATMega and ARM based) a short stores a 16-bit (2-byte) value.
This yields a range of -32,768 to 32,767 (minimum value of -2^15 and a maximum value of (2^15) - 1).
Example
short ledPin = 13;
float
• Datatype for floating-point numbers, a number that has a decimal point.
• Floating-point numbers are often used to approximate analog and continuous values because they
have greater resolution than integers.
• Floating-point numbers can be as large as 3.4028235E+38 and as low as -3.4028235E+38. They
are stored as 32 bits (4 bytes) of information.
Examples
int x;
int y;
float z;
x = 1;
y = x / 2; // y now contains 0, ints can't hold fractions
z = (float)x / 2.0; // z now contains .5 (you have to use 2.0, not 2)
Control Structures :
•if
•if...else
•for
•switch case
•while
•do... while
•break
•continue
•return
•goto
if statement
which is used in conjunction with a comparison operator, tests whether a certain condition has been
reached, such as an input being above a certain number. The format for an if test is:
Example:
if (someVariable > 50)
{
// do something here
}
The program tests to see if someVariable is greater than 50.
If it is, the program takes a particular action. Put another way,
if the statement in parentheses is true, the statements inside the brackets are run.
If not, the program skips over the code.
The brackets may be omitted after an if statement.
If this is done, the next line (defined by the semicolon) becomes the only conditional statement.
Example:
if (x > 120) digitalWrite(LEDpin, HIGH);
if (x > 120)
digitalWrite(LEDpin, HIGH);
if (x > 120){ digitalWrite(LEDpin, HIGH); }
if (x > 120){
digitalWrite(LEDpin1, HIGH);
digitalWrite(LEDpin2, HIGH);
} // all are correct
Comparison Operators:
• x == y (x is equal to y)
• x != y (x is not equal to y)
• x < y (x is less than y)
• x > y (x is greater than y)
• x <= y (x is less than or equal to y)
• x >= y (x is greater than or equal to y)
Boolean Operators
- These can be used inside the condition of an if statement.
• && (logical and)
• || (logical or)
• ! (not)
&& (logical and)
True only if both operands are true, e.g.
if (digitalRead(2) == HIGH && digitalRead(3) == HIGH)
{
// read two switches
// ...
}
is true only if both inputs are high.
|| (logical or)
True if either operand is true, e.g.
if (x > 0 || y > 0)
{
// ...
}
is true if either x or y is greater than 0.
! (not)
True if the operand is false, e.g.
if (!x)
{
// ...
}
is true if x is false (i.e. if x equals 0).
if / else
if/else allows greater control over the flow of code than the basic if statement,
by allowing multiple tests to be grouped together.
For example, an analog input could be tested and one action taken if the input was less than 500,
and another action taken if the input was 500 or greater.
The code would look like this:
if (pinFiveInput < 500)
{
// action A
}
else
{
// action B
}
Note that an else if block may be used with or without a terminating else block and vice versa.
An unlimited number of such else if branches is allowed.
if (pinFiveInput < 500)
{
// do Thing A
}
else if (pinFiveInput >= 1000)
{
// do Thing B
}
else
{
// do Thing C
}
switch / case statements
Like if statements, switch...case controls the flow of programs by allowing programmers to specify
different code that should be executed in various conditions.
In particular, a switch statement compares the value of a variable to the values specified in case
statements.
When a case statement is found whose value matches that of the variable, the code in that case
statement is run.
The break keyword exits the switch statement, and is typically used at the end of each case.
Without a break statement, the switch statement will continue executing the following expressions
("falling-through") until a break, or the end of the switch statement is reached.
Example
switch (var)
{
case 1:
//do something when var equals 1
break;
case 2:
//do something when var equals 2
break;
default:
// if nothing else matches, do the default
// default is optional
break;
}
Syntax
switch (var) {
case label:
// statements
break;
case label:
// statements
break;
default:
// statements
break;
}
Parameters
var: the variable whose value to compare to the various cases
label: a value to compare the variable to
Please note that in order to declare variables within a case brackets are needed.
An example is showed below.
switch (var)
{
case 1:
{
//do something when var equals 1
int a = 0;
.......
.......
}
break;
default:
// if nothing else matches, do the default
// default is optional
break;
}
for statements
The for statement is used to repeat a block of statements enclosed in curly braces.
An increment counter is usually used to increment and terminate the loop.
The for statement is useful for any repetitive operation, and is often used in combination with arrays
to operate on collections of data/pins.
Example
for(int x = 2; x < 100; x = x * 1.5)
{
println(x);
}
- Generates: 2,3,4,6,9,13,19,28,42,63,94
Example
// Dim an LED using a PWM pin
int PWMpin = 10;
void setup()
{
// no setup needed
}
void loop()
{
for (int i=0; i <= 255; i++){
analogWrite(PWMpin, i);
delay(10);
}
}
while loops
while loops will loop continuously, and infinitely, until the expression inside the parenthesis,
() becomes false.
Something must change the tested variable, or the while loop will never exit.
This could be in your code, such as an incremented variable, or an external condition, such as
testing a sensor.
Example
var = 0;
while(var < 200)
{
// do something repetitive 200 times
var++;
}
do – while
The do loop works in the same manner as the while loop, with the exception that the condition is
tested at the end of the loop, so the do loop will always run at least once.
Example
do
{
delay(50); // wait for sensors to stabilize
x = readSensors(); // check the sensors
} while (x < 100);
Lecture 2

Lecture 2

  • 1.
    ARDUINO COURSE Edited By: Mohamed Zain Allam
  • 2.
  • 3.
  • 4.
    setup( ) • Thesetup() function is called when a sketch starts. • Use it to initialize variables, pin modes, start using libraries, etc. • The setup function will only run once, after each powerup or reset of the Arduino board. Example : int buttonPin = 3; void setup() { Serial.begin(9600); pinMode(buttonPin, INPUT); } void loop() { // ... }
  • 5.
    loop( ) After creatinga setup() function, which initializes and sets the initial values, the loop() function does precisely what its name suggests, and loops consecutively, allowing your program to change and respond. Use it to actively control the Arduino board. Example const int buttonPin = 3; // setup initializes serial and the button pin void setup() { Serial.begin(9600); pinMode(buttonPin, INPUT); } // loop checks the button pin each time, and will send serial if it is pressed void loop() { if (digitalRead(buttonPin) == HIGH) Serial.write('H'); else Serial.write('L'); delay(1000); }
  • 6.
    Comments x = 5;//This is a single line comment. Anything after the slashes is a comment // to the end of the line /* this is multiline comment - use it to comment out whole blocks of code if (gwb == 0){ // single line comment is OK inside a multiline comment x = 3; /* but not another multiline comment - this is invalid */ } // don't forget the "closing" comment - they have to be balanced! */ ; semicolon Used to end a statement. Example int a = 13;
  • 7.
    #include #include is usedto include outside libraries in your sketch. This gives the programmer access to a large group of standard C libraries (groups of pre-made functions), and also libraries written especially for Arduino. Example This example includes a library that is used to put data into the program space flash instead of ram. This saves the ram space for dynamic memory needs and makes large lookup tables more practical. #include <avr/pgmspace.h> prog_uint16_t myConstants[] PROGMEM = {0, 21140, 702 , 9128, 0, 25764, 8456, 0,0,0,0,0,0,0,0,29810,8968,29762,29762,4500};
  • 8.
    Constants • HIGH • LOW •INPUT • OUTPUT • INPUT_PULLUP • LED_BUILTIN • true • false
  • 9.
    Data Types • boolean •char • unsigned char • byte • int • unsigned int • word • long • unsigned long • short • float • double • array
  • 10.
    boolean A boolean holdsone of two values, true or false. (Each boolean variable occupies one byte of memory.) int Integers are your primary data-type for number storage. • On the Arduino Uno (and other ATMega based boards) an int stores a 16-bit (2-byte) value. This yields a range of -32,768 to 32,767 (minimum value of -2^15 and a maximum value of (2^15) - 1). • On the Arduino Due and SAMD based boards (like MKR1000 and Zero), an int stores a 32- bit (4-byte) value. This yields a range of -2,147,483,648 to 2,147,483,647 (minimum value of - 2^31 and a maximum value of (2^31) - 1).
  • 11.
    Example int LEDpin =5; // LED on pin 5 int switchPin = 13; // momentary switch on 13, other side connected to ground boolean running = false; void setup() { pinMode(LEDpin,OUTPUT); pinMode(switchPin, INPUT); digitalWrite(switchPin, HIGH); // turn on pullup resistor } void loop() { if (digitalRead(switchPin) == LOW) { // switch is pressed - pullup keeps pin high normally delay(100); // delay to debounce switch running = !running; // toggle running variable digitalWrite(LEDpin, running); // indicate via LED } }
  • 12.
    unsigned int • Onthe Uno and other ATMEGA based boards, unsigned ints (unsigned integers) are the same as ints in that they store a 2 byte value. • Instead of storing negative numbers however they only store positive values, yielding a useful range of 0 to 65,535 (2^16) - 1). Example unsigned int ledPin = 13; byte • A byte stores an 8-bit unsigned number, from 0 to 255. Example byte b = B10010; // "B" is the binary formatter (B10010 = 18 decimal)
  • 13.
    char A data typethat takes up 1 byte of memory that stores a character value. Character literals are written in single quotes, like this: 'A' (for multiple characters - strings - use double quotes: "ABC"). Characters are stored as numbers however. You can see the specific encoding in the ASCII chart. This means that it is possible to do arithmetic on characters, in which the ASCII value of the character is used (e.g. 'A' + 1 has the value 66, since the ASCII value of the capital letter A is 65). See Serial.println reference for more on how characters are translated to numbers. The char datatype is a signed type, meaning that it encodes numbers from -128 to 127. For an unsigned, one-byte (8 bit) data type, use the byte data type. Example char myChar = 'A'; char myChar = 65; // both are equivalent
  • 14.
    byte A byte storesan 8-bit unsigned number, from 0 to 255. Example byte b = B10010; // "B" is the binary formatter (B10010 = 18 decimal) word On the Uno and other ATMEGA based boards, a word stores a 16-bit unsigned number. Example word w = 10000;
  • 15.
    long • Long variablesare extended size variables for number storage, and store 32 bits (4 bytes), from -2,147,483,648 to 2,147,483,647. • If doing math with integers, at least one of the numbers must be followed by an L, forcing it to be a long. Example long speedOfLight = 186000L; // see the Integer Constants page for explanation of the 'L'
  • 16.
    unsigned long • Unsignedlong variables are extended size variables for number storage, and store 32 bits (4 bytes). • Unlike standard longs unsigned longs won't store negative numbers, making their range from 0 to 4,294,967,295 (2^32 - 1). Example unsigned long time; void setup() { Serial.begin(9600); } void loop() { Serial.print("Time: "); time = millis(); //prints time since program started Serial.println(time); // wait a second so as not to send massive amounts of data delay(1000); }
  • 17.
    short A short isa 16-bit data-type. On all Arduinos (ATMega and ARM based) a short stores a 16-bit (2-byte) value. This yields a range of -32,768 to 32,767 (minimum value of -2^15 and a maximum value of (2^15) - 1). Example short ledPin = 13;
  • 18.
    float • Datatype forfloating-point numbers, a number that has a decimal point. • Floating-point numbers are often used to approximate analog and continuous values because they have greater resolution than integers. • Floating-point numbers can be as large as 3.4028235E+38 and as low as -3.4028235E+38. They are stored as 32 bits (4 bytes) of information. Examples int x; int y; float z; x = 1; y = x / 2; // y now contains 0, ints can't hold fractions z = (float)x / 2.0; // z now contains .5 (you have to use 2.0, not 2)
  • 19.
    Control Structures : •if •if...else •for •switchcase •while •do... while •break •continue •return •goto
  • 20.
    if statement which isused in conjunction with a comparison operator, tests whether a certain condition has been reached, such as an input being above a certain number. The format for an if test is: Example: if (someVariable > 50) { // do something here } The program tests to see if someVariable is greater than 50. If it is, the program takes a particular action. Put another way, if the statement in parentheses is true, the statements inside the brackets are run. If not, the program skips over the code.
  • 21.
    The brackets maybe omitted after an if statement. If this is done, the next line (defined by the semicolon) becomes the only conditional statement. Example: if (x > 120) digitalWrite(LEDpin, HIGH); if (x > 120) digitalWrite(LEDpin, HIGH); if (x > 120){ digitalWrite(LEDpin, HIGH); } if (x > 120){ digitalWrite(LEDpin1, HIGH); digitalWrite(LEDpin2, HIGH); } // all are correct
  • 22.
    Comparison Operators: • x== y (x is equal to y) • x != y (x is not equal to y) • x < y (x is less than y) • x > y (x is greater than y) • x <= y (x is less than or equal to y) • x >= y (x is greater than or equal to y)
  • 23.
    Boolean Operators - Thesecan be used inside the condition of an if statement. • && (logical and) • || (logical or) • ! (not)
  • 24.
    && (logical and) Trueonly if both operands are true, e.g. if (digitalRead(2) == HIGH && digitalRead(3) == HIGH) { // read two switches // ... } is true only if both inputs are high.
  • 25.
    || (logical or) Trueif either operand is true, e.g. if (x > 0 || y > 0) { // ... } is true if either x or y is greater than 0. ! (not) True if the operand is false, e.g. if (!x) { // ... } is true if x is false (i.e. if x equals 0).
  • 26.
    if / else if/elseallows greater control over the flow of code than the basic if statement, by allowing multiple tests to be grouped together. For example, an analog input could be tested and one action taken if the input was less than 500, and another action taken if the input was 500 or greater. The code would look like this: if (pinFiveInput < 500) { // action A } else { // action B }
  • 27.
    Note that anelse if block may be used with or without a terminating else block and vice versa. An unlimited number of such else if branches is allowed. if (pinFiveInput < 500) { // do Thing A } else if (pinFiveInput >= 1000) { // do Thing B } else { // do Thing C }
  • 28.
    switch / casestatements Like if statements, switch...case controls the flow of programs by allowing programmers to specify different code that should be executed in various conditions. In particular, a switch statement compares the value of a variable to the values specified in case statements. When a case statement is found whose value matches that of the variable, the code in that case statement is run. The break keyword exits the switch statement, and is typically used at the end of each case. Without a break statement, the switch statement will continue executing the following expressions ("falling-through") until a break, or the end of the switch statement is reached.
  • 29.
    Example switch (var) { case 1: //dosomething when var equals 1 break; case 2: //do something when var equals 2 break; default: // if nothing else matches, do the default // default is optional break; }
  • 30.
    Syntax switch (var) { caselabel: // statements break; case label: // statements break; default: // statements break; } Parameters var: the variable whose value to compare to the various cases label: a value to compare the variable to
  • 31.
    Please note thatin order to declare variables within a case brackets are needed. An example is showed below. switch (var) { case 1: { //do something when var equals 1 int a = 0; ....... ....... } break; default: // if nothing else matches, do the default // default is optional break; }
  • 32.
    for statements The forstatement is used to repeat a block of statements enclosed in curly braces. An increment counter is usually used to increment and terminate the loop. The for statement is useful for any repetitive operation, and is often used in combination with arrays to operate on collections of data/pins.
  • 33.
    Example for(int x =2; x < 100; x = x * 1.5) { println(x); } - Generates: 2,3,4,6,9,13,19,28,42,63,94 Example // Dim an LED using a PWM pin int PWMpin = 10; void setup() { // no setup needed } void loop() { for (int i=0; i <= 255; i++){ analogWrite(PWMpin, i); delay(10); } }
  • 34.
    while loops while loopswill loop continuously, and infinitely, until the expression inside the parenthesis, () becomes false. Something must change the tested variable, or the while loop will never exit. This could be in your code, such as an incremented variable, or an external condition, such as testing a sensor. Example var = 0; while(var < 200) { // do something repetitive 200 times var++; }
  • 35.
    do – while Thedo loop works in the same manner as the while loop, with the exception that the condition is tested at the end of the loop, so the do loop will always run at least once. Example do { delay(50); // wait for sensors to stabilize x = readSensors(); // check the sensors } while (x < 100);