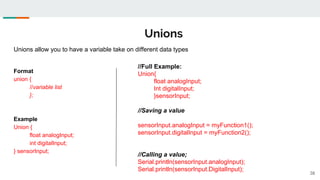
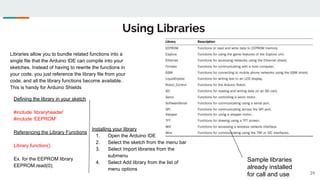
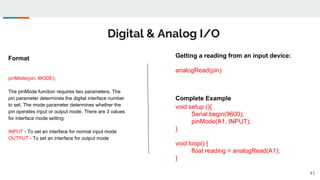
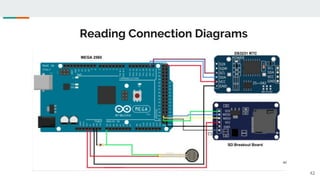
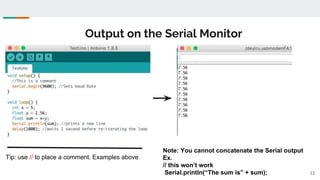
This document provides an introduction and overview of Arduino and C programming. It covers the following key points:
1. The presentation covers assumptions about the audience's programming experience and goals of being able to create Arduino applications using shields, libraries, control flows, functions, reading connection diagrams, and debugging.
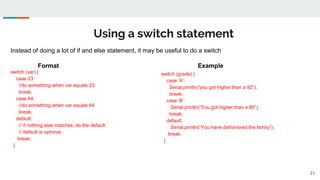
2. The agenda includes introductions to the Arduino hardware, IDE, variables, control flow, loops, arrays, strings, functions, libraries, I/O, connection diagrams, and EEPROM.
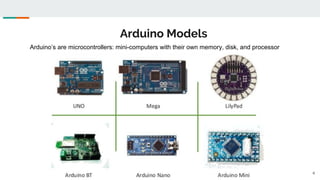
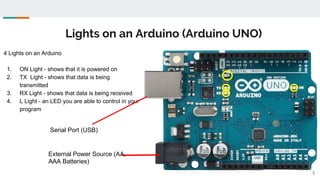
3. The Arduino is a microcontroller that can be programmed to read sensors, run motors and lights, and send/receive data via various shields and accessories. The Arduino IDE is


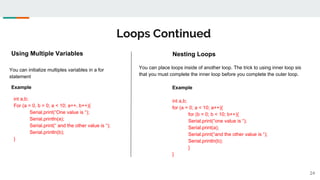
![for
for (statement1; condition; statement 2){
Code statements
}
while
while (condition){
Code statements
}
do while
do {
Code statements
} while (condition);
int values[5] = {10, 20, 30, 40, 50};
for (int counter = 0; counter < 5; counter ++){
Serial.print(“one value in the array is “ );
Serial.println(values[counter]);
}
Example Example Example
executes at least once, and
until condition is met
executes until condition is met
executes until condition is met
int i = 0;
while (i<3) {//hearts for days
Serial.println(“ i is : “ i);
i++;
}
int i = 0;
Serial.println(“Hi”);
do {
Serial.println(“my name is”);
if(i==0) Serial.println(“What”);
if(i==1) Serial.println(“Who”);
i++;
} while (i < 2);
Serial.println(“slicka chika slim shady”); 23](https://image.slidesharecdn.com/introtoarduinoprogramming-231015185158-ac665137/85/Intro-to-Arduino-Programming-pdf-23-320.jpg)


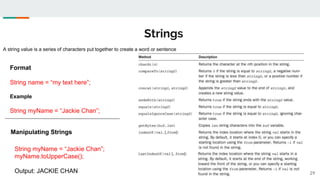
![Arrays
An array stores multiple data values of the same data type in a block of memory, allowing you to reference the variables using the
same variable name. It does it through an index value.
datatype variableName[size];
Format
Example 1:
int myarray[10]; //able to store 10 values
myarray[0] = 20; //stores values in index 0
myarray[1] = 30; // stores values in index 1
Example 2:
// assigns values to first 5 data locations (index 0-4)
Int myarray[10] = {20, 30, 40, 50, 100};
Example 3
int myarray[ ] = {20, 30, 40, 50 100};
Using Loops with Arrays
int values[5] = {10, 20, 30, 40, 50};
for (int counter = 0; counter < 5; counter ++){
Serial.print(“one value in the array is “ );
Serial.print(values[counter]);
}
27](https://image.slidesharecdn.com/introtoarduinoprogramming-231015185158-ac665137/85/Intro-to-Arduino-Programming-pdf-27-320.jpg)
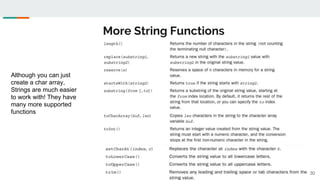
![Arrays Continued
Determining the size of an Array
● You may not remember how many
data points are in your array
● You can use the handy sizeof function
size = sizeof(myArray) / sizeof(int);
for (counter =0; counter < (sizeof(value)/sizeof(int)); counter++){
//This will only iterate through number of points in an array
statements;
}
Example:
Challenge Question 1: What is the array
‘myArray’ look like in the program below?
int myArray[3][4];
for (int i = 0; counter < 3; i ++){
for (int j = 0; j < 4; i++) {
myArray[ i ] [ j ] = 1;
}
}
Challenge Question 2: What is
syntactically wrong with the array below?
How do i fix it?
char myArray[ ] = { “mon”, “tue”, “wed”, “thu”, “fri”};
28](https://image.slidesharecdn.com/introtoarduinoprogramming-231015185158-ac665137/85/Intro-to-Arduino-Programming-pdf-28-320.jpg)

![Structs
37
Data structures allow us to define custom data types
that group related data elements together into a
single object.
Before you can use a data structure in your sketch,
you need to define it. To define a data structure in
the Arduino, you can use the struct statement. Here
is the generic format for declaration
Format
struct name {
variable list
};
Example of declaration
struct sensorinfo {
char date[9];
int indoortemp;
int outdoortemp;
}morningTemps, noonTemps, eveningTemps;
struct sensorinfo {
char date[9];
int indoortemp;
int outdoortemp;
}morningTemps
void setup() {
// put your setup code here, to run once:
Serial.begin(9600);
strcpy(morningTemps.date, "01/01/14");
morningTemps.indoortemp = 72;
morningTemps.outdoortemp = 25;
Serial.print ("Today's date is ");
Serial.println(morningTemps.date);
Serial.print("The morning outdoor temperate
is ");
Serial.println(morningTemps.outdoortemp);
}
Full Example: Declaring and Calling](https://image.slidesharecdn.com/introtoarduinoprogramming-231015185158-ac665137/85/Intro-to-Arduino-Programming-pdf-37-320.jpg)