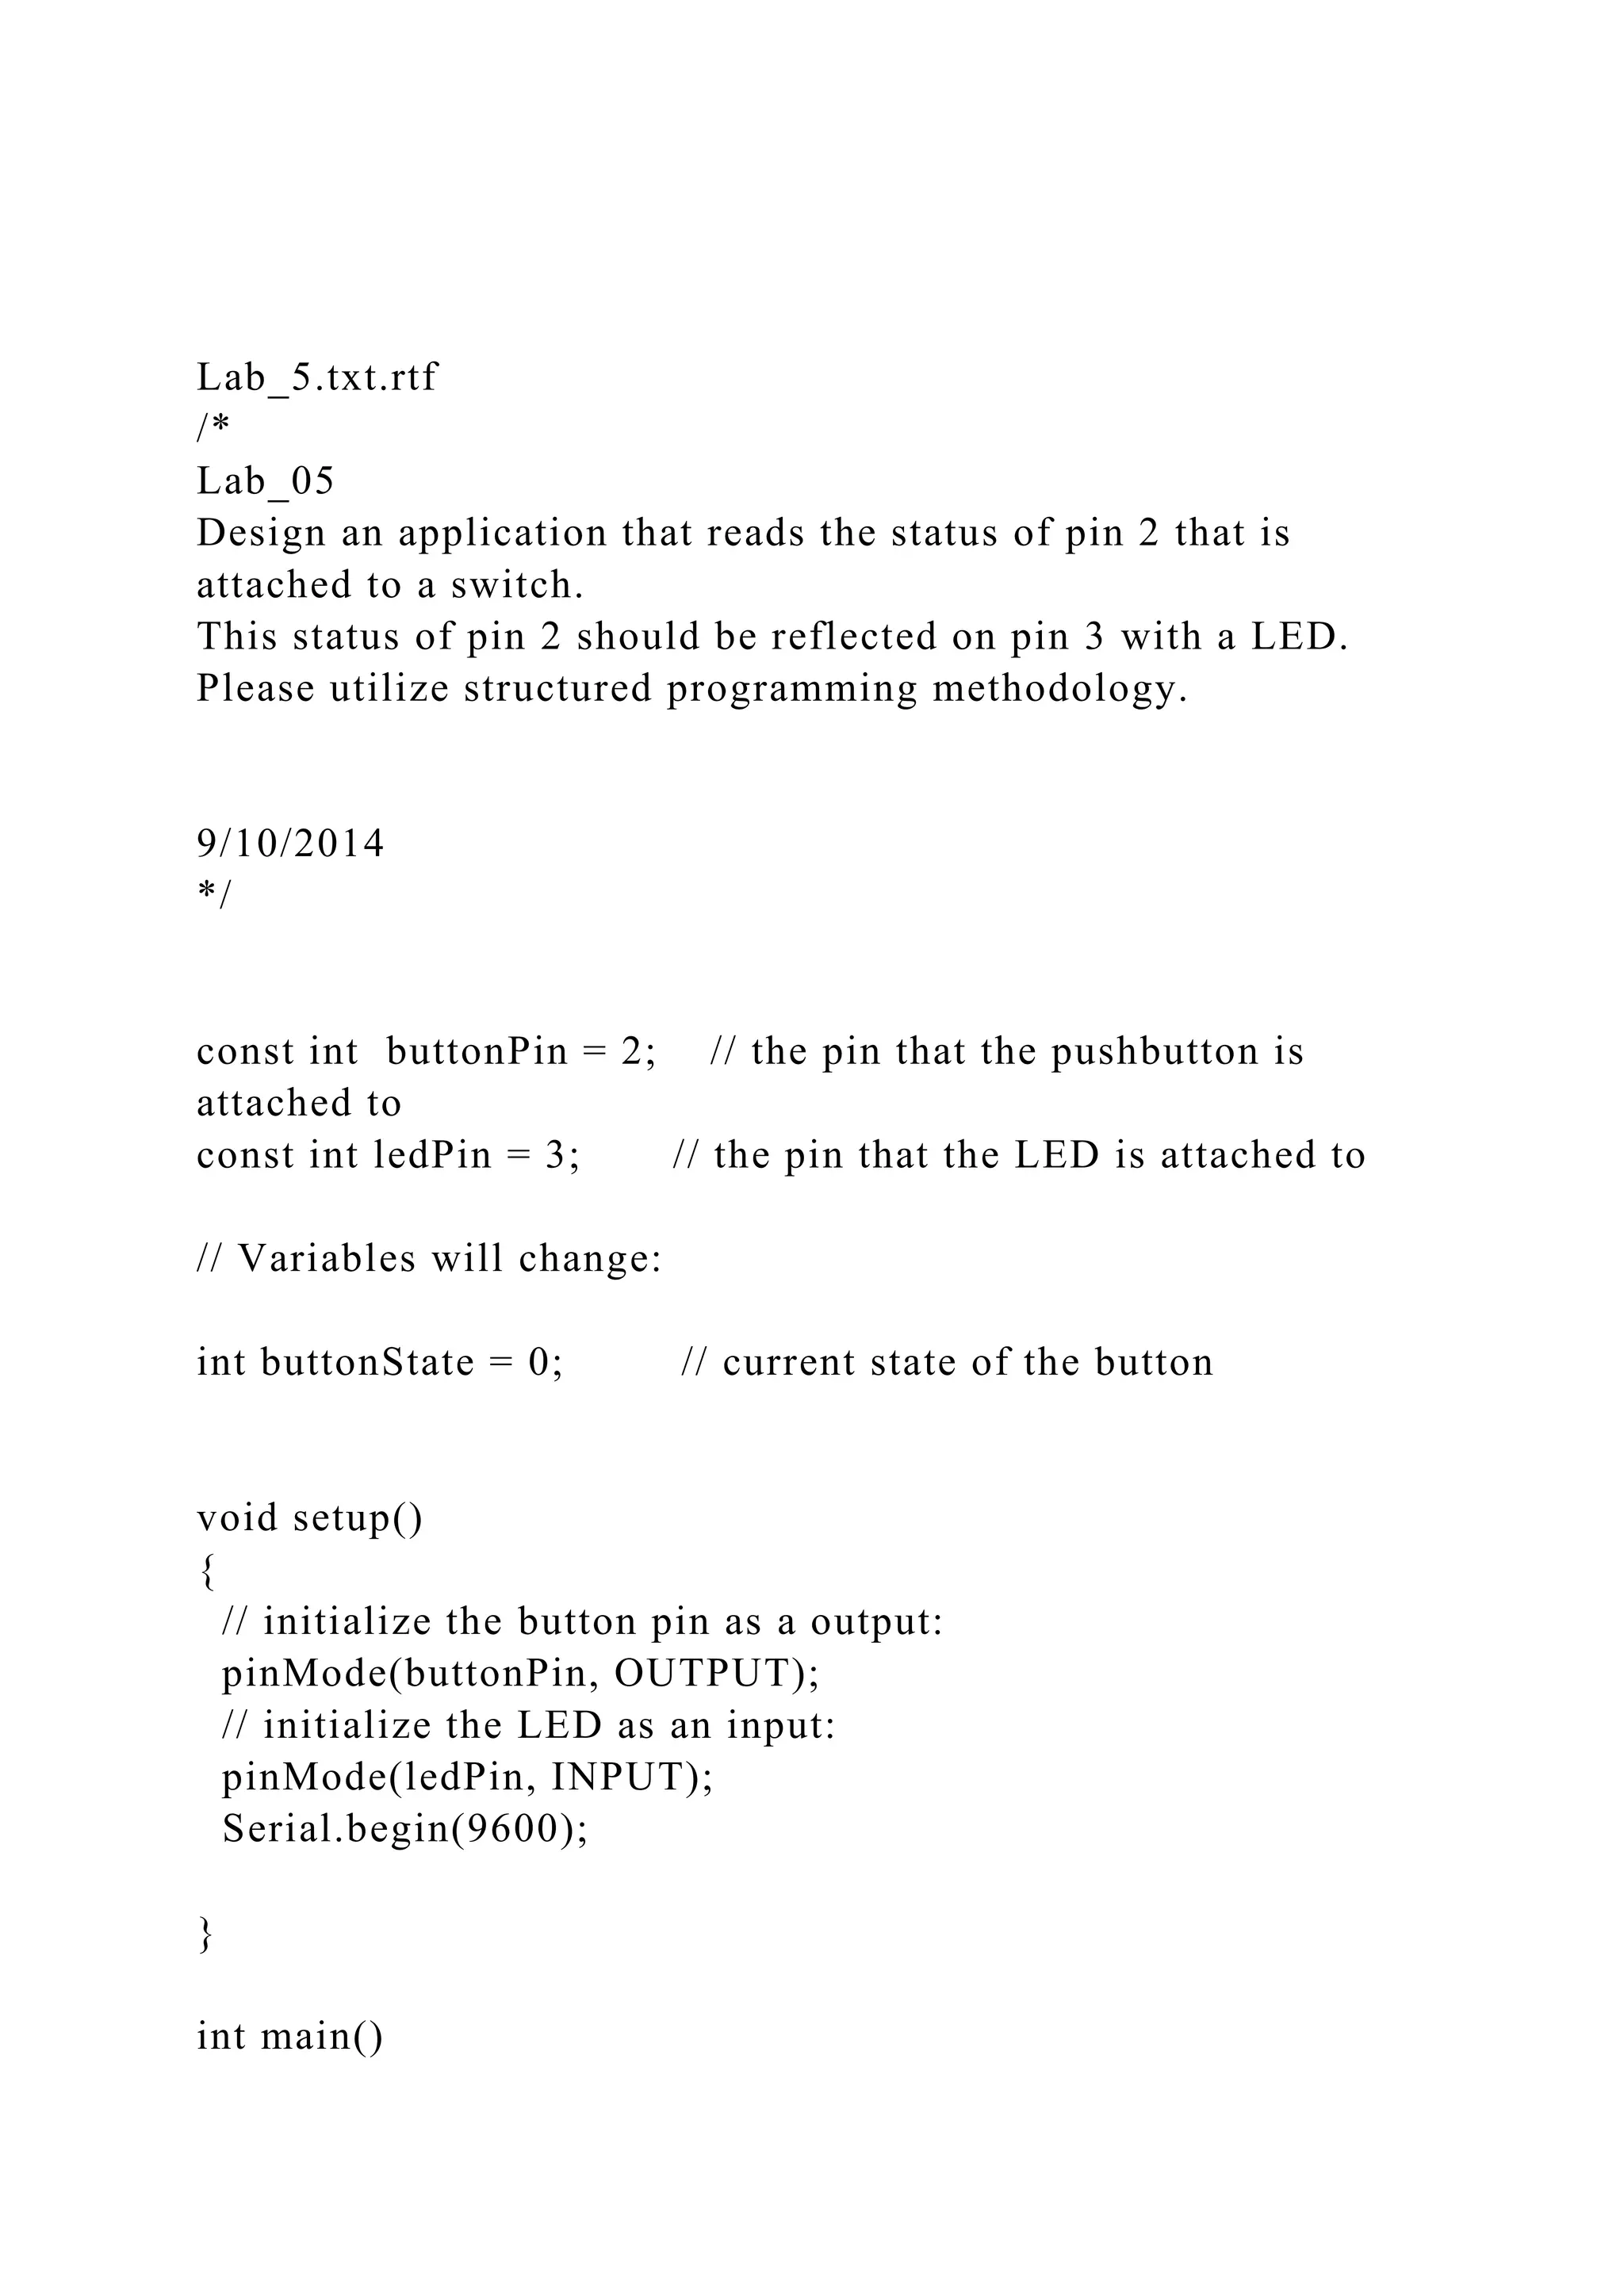
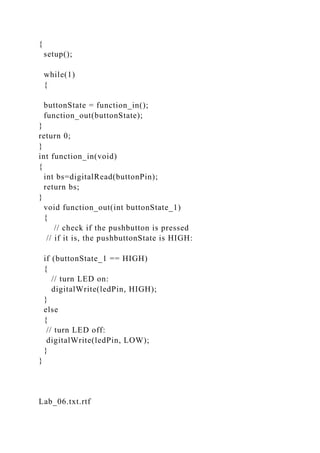
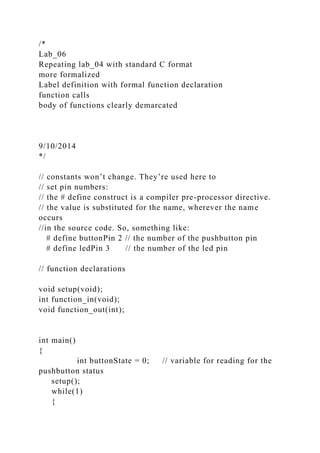
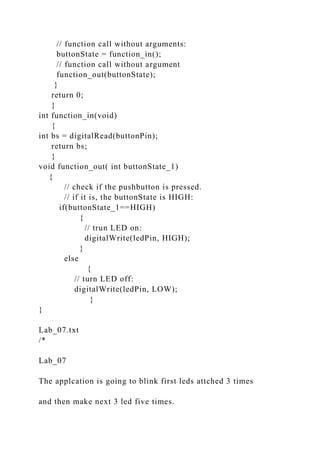
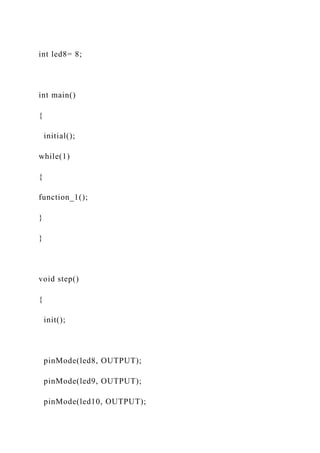
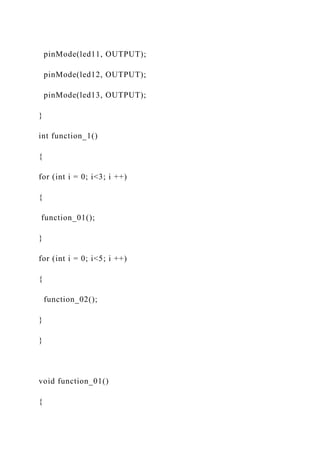
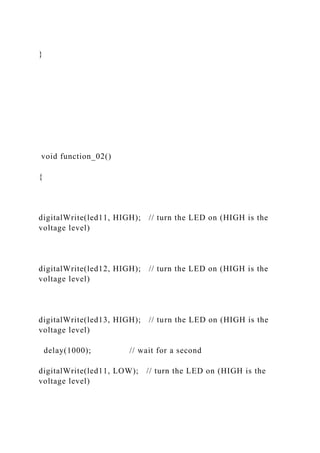
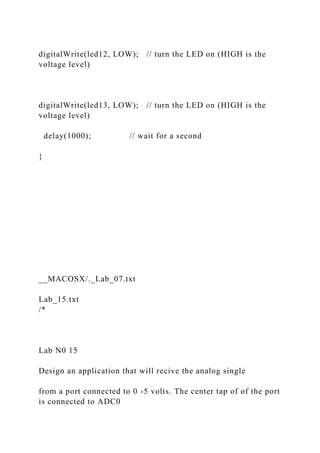
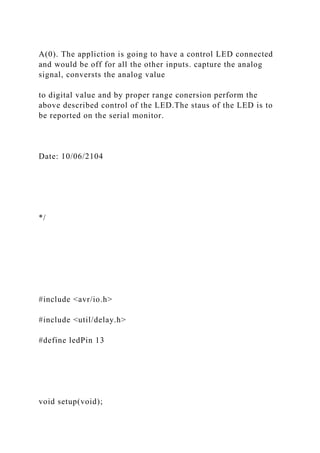
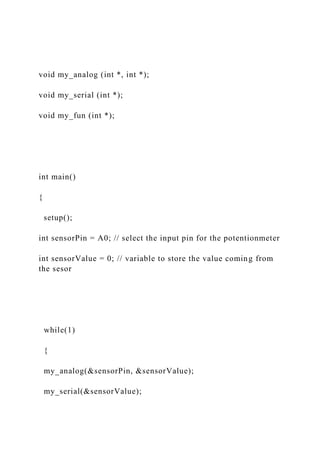
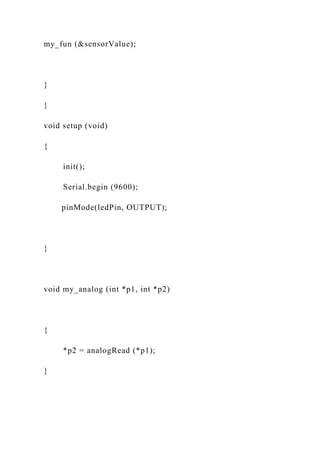
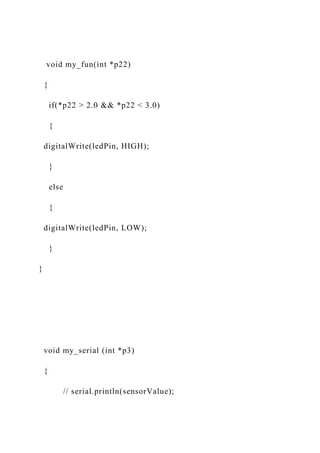
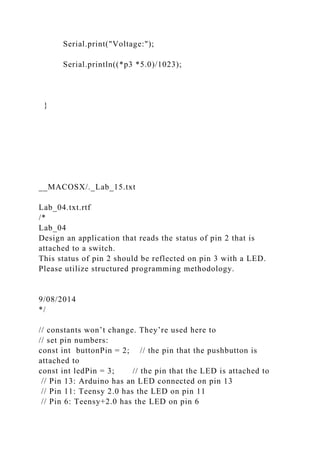
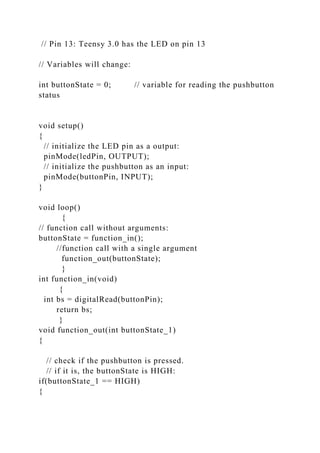
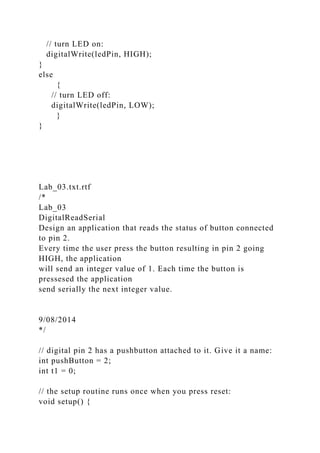
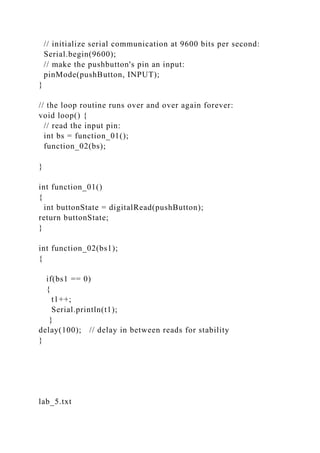
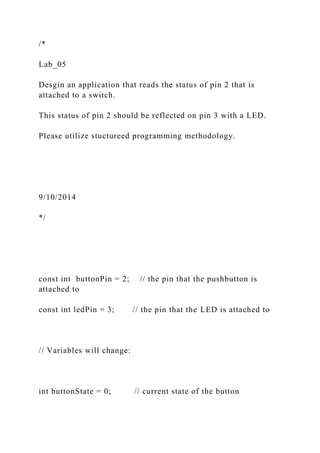
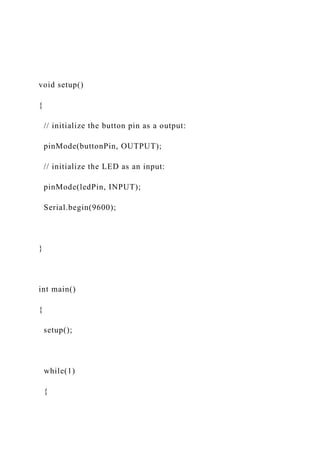
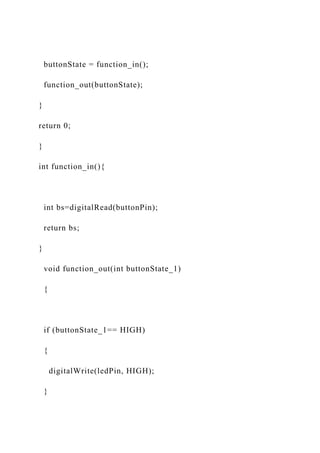
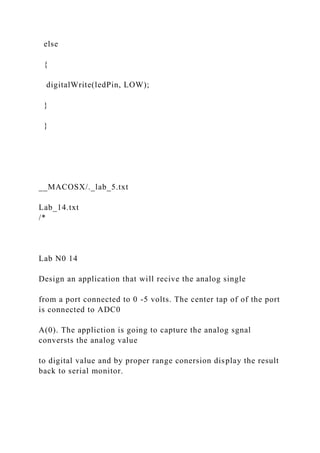
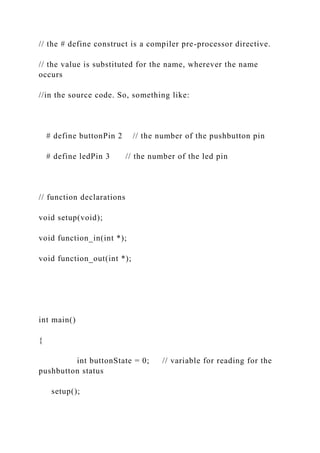
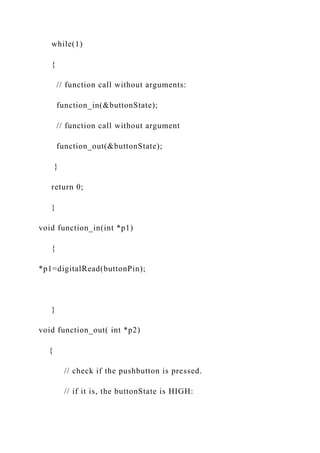
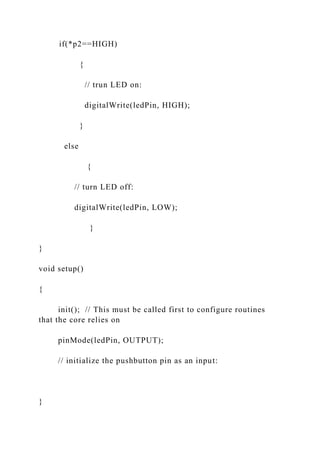
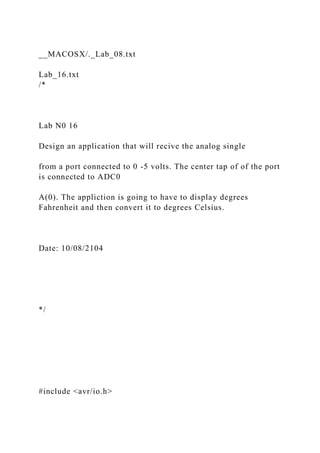
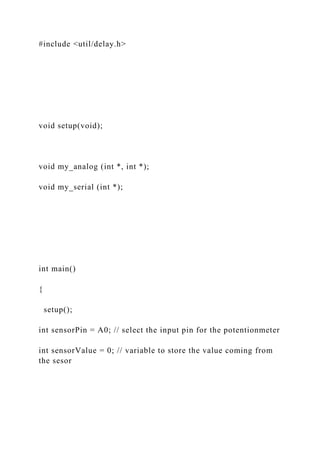
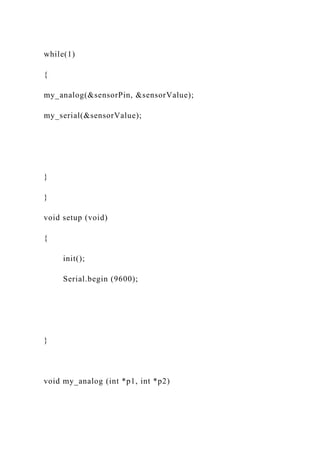
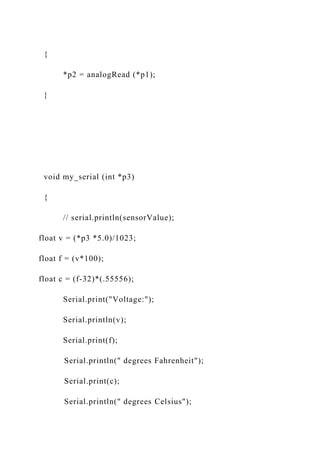
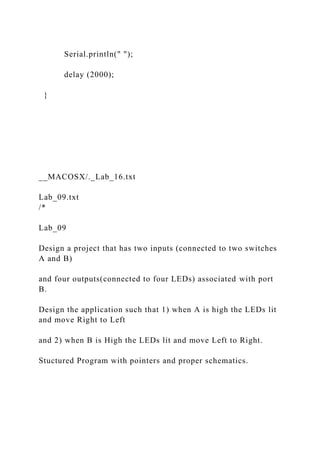
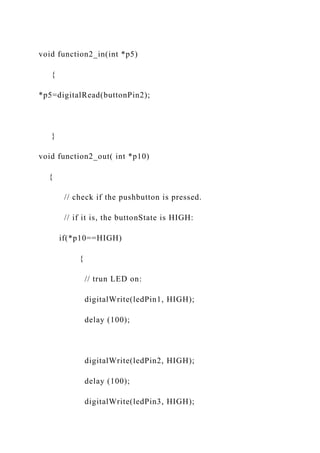
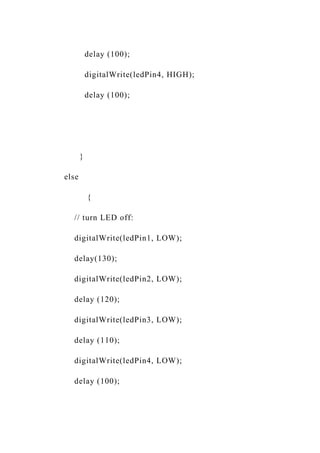
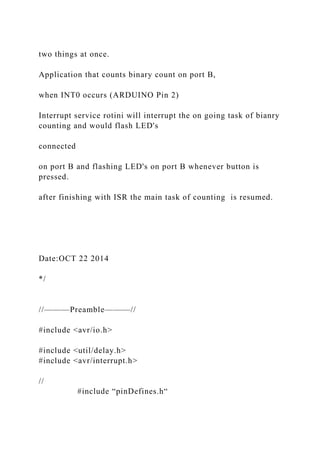
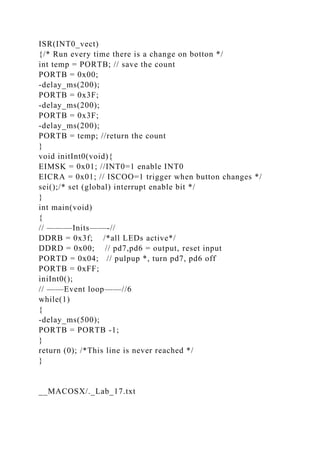
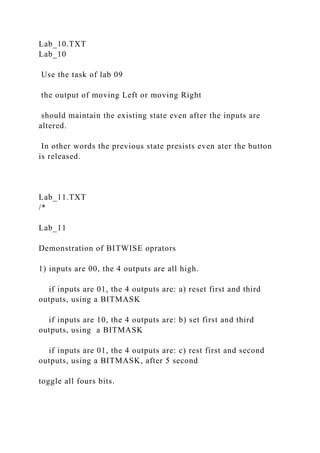
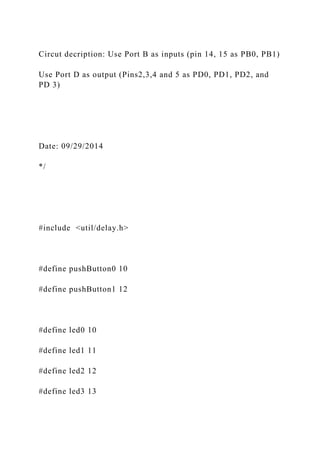
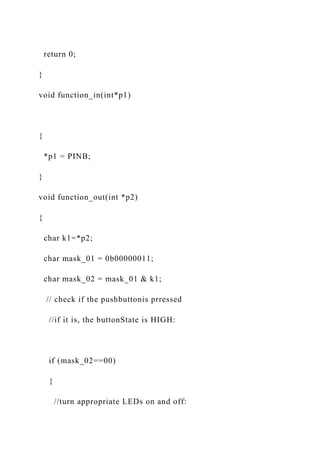
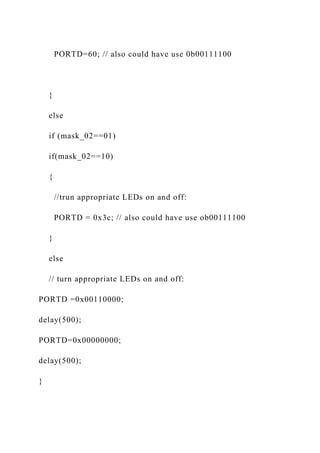
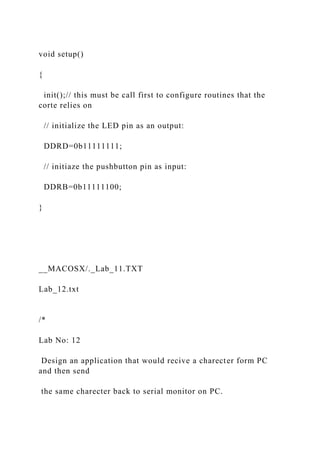
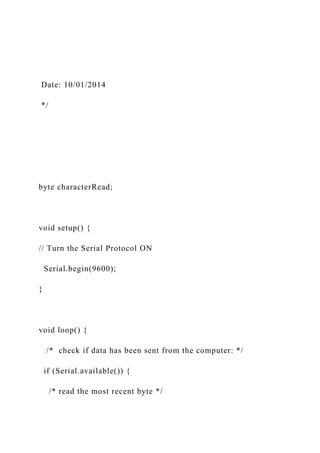
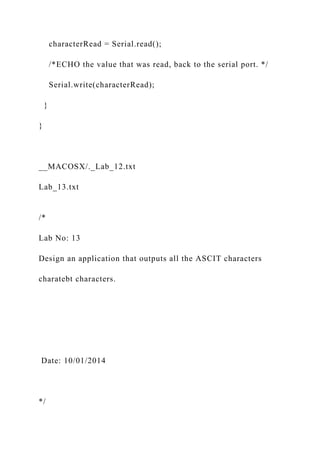
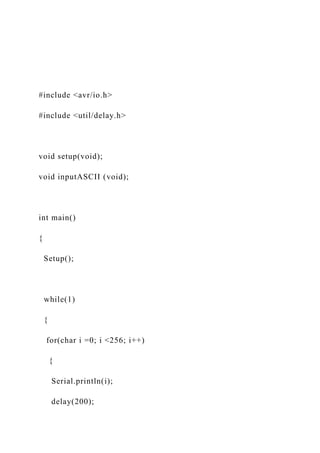
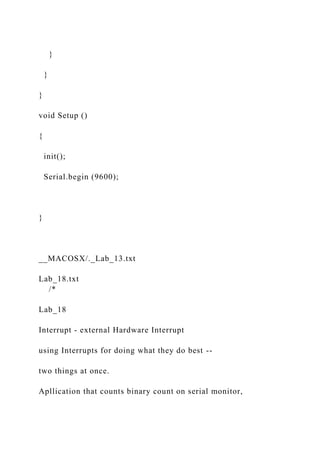
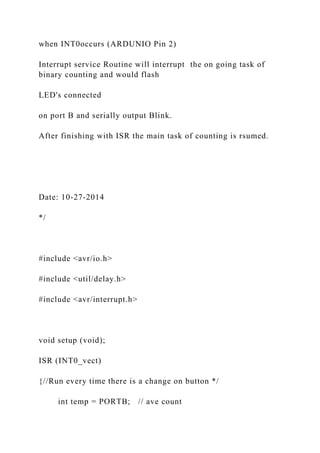
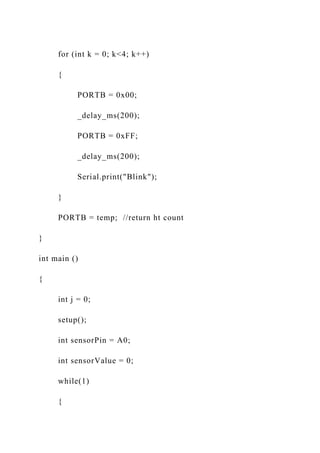
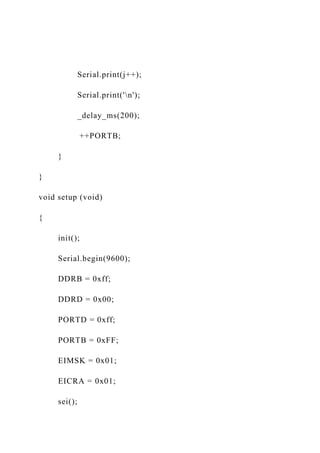
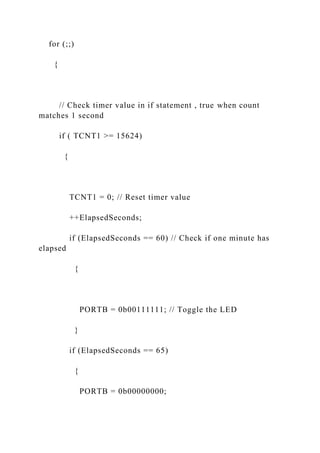
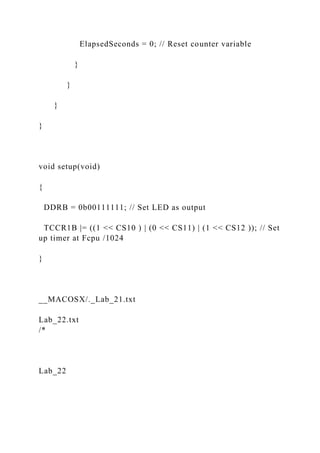
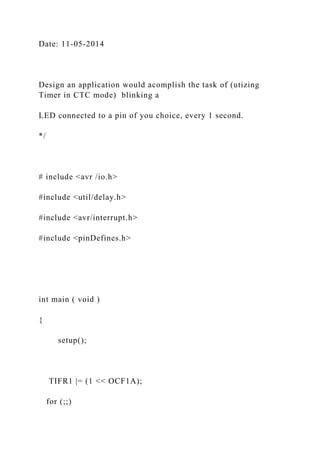
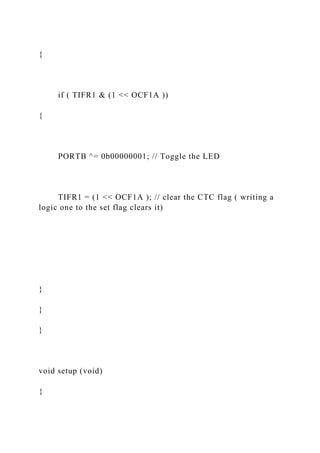
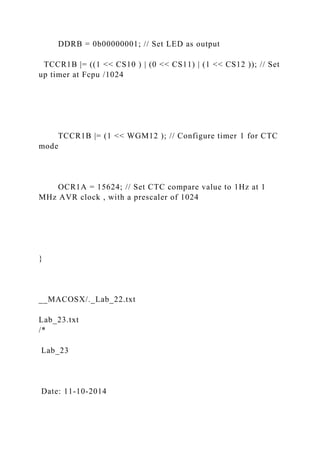
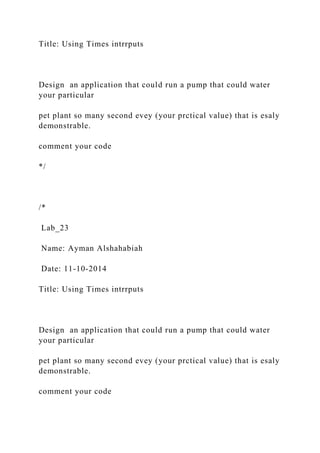
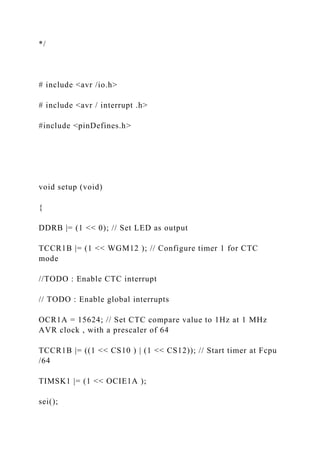
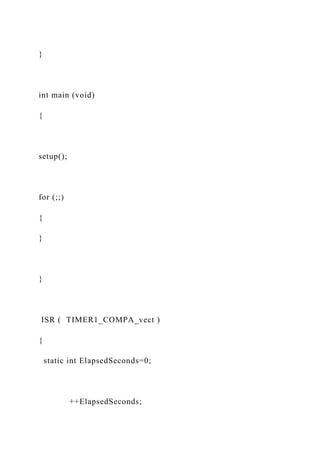
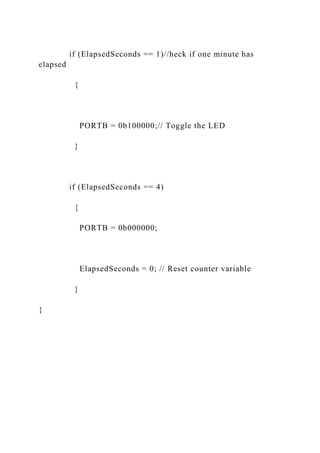
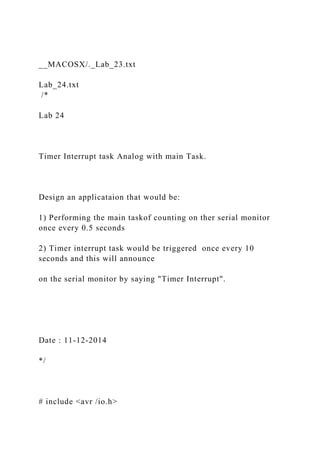
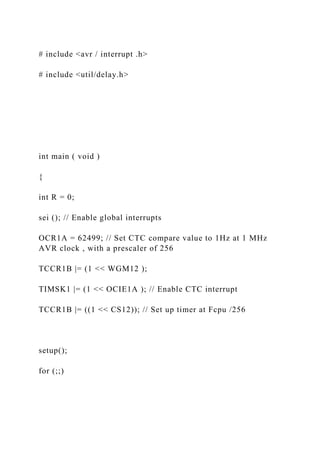
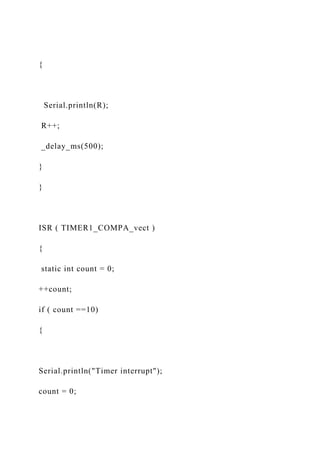
Lab_5.txt.rtf
/*
Lab_05
Design an application that reads the status of pin 2 that is
attached to a switch.
This status of pin 2 should be reflected on pin 3 with a LED.
Please utilize structured programming methodology.
9/10/2014
*/
const int buttonPin = 2; // the pin that the pushbutton is
attached to
const int ledPin = 3; // the pin that the LED is attached to
// Variables will change:
int buttonState = 0; // current state of the button
void setup()
{
// initialize the button pin as a output:
pinMode(buttonPin, OUTPUT);
// initialize the LED as an input:
pinMode(ledPin, INPUT);
Serial.begin(9600);
}
int main()
{
setup();
while(1)
{
buttonState = function_in();
function_out(buttonState);
}
return 0;
}
int function_in(void)
{
int bs=digitalRead(buttonPin);
return bs;
}
void function_out(int buttonState_1)
{
// check if the pushbutton is pressed
// if it is, the pushbuttonState is HIGH:
if (buttonState_1 == HIGH)
{
// turn LED on:
digitalWrite(ledPin, HIGH);
}
else
{
// turn LED off:
digitalWrite(ledPin, LOW);
}
}
Lab_06.txt.rtf
/*
Lab_06
Repeating lab_04 with standard C format
more formalized
Label definition with formal function declaration
function calls
body of functions clearly demarcated
9/10/2014
*/
// constants won’t change. They’re used here to
// set pin numbers:
// the # define construct is a compiler pre-processor directive.
// the value is substituted for the name, wherever the name
occurs
//in the source code. So, something like:
# define buttonPin 2 // the number of the pushbutton pin
# define ledPin 3 // the number of the led pin
// function declarations
void setup(void);
int function_in(void);
void function_out(int);
int main()
{
int buttonState = 0; // variable for reading for the
pushbutton status
setup();
while(1)
{
// function call without arguments:
buttonState = function_in();
// function call without argument
function_out(buttonState);
}
return 0;
}
int function_in(void)
{
int bs = digitalRead(buttonPin);
return bs;
}
void function_out( int buttonState_1)
{
// check if the pushbutton is pressed.
// if it is, the buttonState is HIGH:
if(buttonState_1==HIGH)
{
// trun LED on:
digitalWrite(ledPin, HIGH);
}
else
{
// turn LED off:
digitalWrite(ledPin, LOW);
}
}
Lab_07.txt
/*
Lab_07
The applcation is going to blink first leds attched 3 times
and then make next 3 led five times.
Date: 09/15/2014
*/
// Pin 13 has an LED connected on most Arduino boards.
// Pin 12 has the LED on Teensy 2.0
// Pin 11 has the LED on Teensy++ 2.0
// Pin 10 has the LED on Teensy 3.0
// Pin 9 has the LED on Teensy 2.0
// Pin 8 has the LED on Teensy++ 2.0
// give it a name:
int led13 = 13;
int led12 = 12;
int led11 = 11;
int led10 = 10;
int led9 = 9;
int led8= 8;
int main()
{
initial();
while(1)
{
function_1();
}
}
void step()
{
init();
pinMode(led8, OUTPUT);
pinMode(led9, OUTPUT);
pinMode(led10, OUTPUT);
pinMode(led11, OUTPUT);
pinMode(led12, OUTPUT);
pinMode(led13, OUTPUT);
}
int function_1()
{
for (int i = 0; i<3; i ++)
{
function_01();
}
for (int i = 0; i<5; i ++)
{
function_02();
}
}
void function_01()
{
digitalWrite(led8, HIGH); // turn the LED on (HIGH is the
voltage level)
digitalWrite(led9, HIGH); // turn the LED on (HIGH is the
voltage level)
digitalWrite(led10, HIGH); // turn the LED on (HIGH is the
voltage level)
delay(1000);
digitalWrite(led8, LOW); // turn the LED on (HIGH is the
voltage level)
digitalWrite(led9, LOW); // turn the LED on (HIGH is the
voltage level)
digitalWrite(led10, LOW); // turn the LED on (HIGH is the
voltage level)
}
void function_02()
{
digitalWrite(led11, HIGH); // turn the LED on (HIGH is the
voltage level)
digitalWrite(led12, HIGH); // turn the LED on (HIGH is the
voltage level)
digitalWrite(led13, HIGH); // turn the LED on (HIGH is the
voltage level)
delay(1000); // wait for a second
digitalWrite(led11, LOW); // turn the LED on (HIGH is the
voltage level)
digitalWrite(led12, LOW); // turn the LED on (HIGH is the
voltage level)
digitalWrite(led13, LOW); // turn the LED on (HIGH is the
voltage level)
delay(1000); // wait for a second
}
__MACOSX/._Lab_07.txt
Lab_15.txt
/*
Lab N0 15
Design an application that will recive the analog single
from a port connected to 0 -5 volts. The center tap of of the port
is connected to ADC0
A(0). The appliction is going to have a control LED connected
and would be off for all the other inputs. capture the analog
signal, conversts the analog value
to digital value and by proper range conersion perform the
above described control of the LED.The staus of the LED is to
be reported on the serial monitor.
Date: 10/06/2104
*/
#include <avr/io.h>
#include <util/delay.h>
#define ledPin 13
void setup(void);
void my_analog (int *, int *);
void my_serial (int *);
void my_fun (int *);
int main()
{
setup();
int sensorPin = A0; // select the input pin for the potentionmeter
int sensorValue = 0; // variable to store the value coming from
the sesor
while(1)
{
my_analog(&sensorPin, &sensorValue);
my_serial(&sensorValue);
my_fun (&sensorValue);
}
}
void setup (void)
{
init();
Serial.begin (9600);
pinMode(ledPin, OUTPUT);
}
void my_analog (int *p1, int *p2)
{
*p2 = analogRead (*p1);
}
void my_fun(int *p22)
{
if(*p22 > 2.0 && *p22 < 3.0)
{
digitalWrite(ledPin, HIGH);
}
else
{
digitalWrite(ledPin, LOW);
}
}
void my_serial (int *p3)
{
// serial.println(sensorValue);
Serial.print("Voltage:");
Serial.println((*p3 *5.0)/1023);
}
__MACOSX/._Lab_15.txt
Lab_04.txt.rtf
/*
Lab_04
Design an application that reads the status of pin 2 that is
attached to a switch.
This status of pin 2 should be reflected on pin 3 with a LED.
Please utilize structured programming methodology.
9/08/2014
*/
// constants won’t change. They’re used here to
// set pin numbers:
const int buttonPin = 2; // the pin that the pushbutton is
attached to
const int ledPin = 3; // the pin that the LED is attached to
// Pin 13: Arduino has an LED connected on pin 13
// Pin 11: Teensy 2.0 has the LED on pin 11
// Pin 6: Teensy+2.0 has the LED on pin 6
// Pin 13: Teensy 3.0 has the LED on pin 13
// Variables will change:
int buttonState = 0; // variable for reading the pushbutton
status
void setup()
{
// initialize the LED pin as a output:
pinMode(ledPin, OUTPUT);
// initialize the pushbutton as an input:
pinMode(buttonPin, INPUT);
}
void loop()
{
// function call without arguments:
buttonState = function_in();
//function call with a single argument
function_out(buttonState);
}
int function_in(void)
{
int bs = digitalRead(buttonPin);
return bs;
}
void function_out(int buttonState_1)
{
// check if the pushbutton is pressed.
// if it is, the buttonState is HIGH:
if(buttonState_1 == HIGH)
{
// turn LED on:
digitalWrite(ledPin, HIGH);
}
else
{
// turn LED off:
digitalWrite(ledPin, LOW);
}
}
Lab_03.txt.rtf
/*
Lab_03
DigitalReadSerial
Design an application that reads the status of button connected
to pin 2.
Every time the user press the button resulting in pin 2 going
HIGH, the application
will send an integer value of 1. Each time the button is
pressesed the application
send serially the next integer value.
9/08/2014
*/
// digital pin 2 has a pushbutton attached to it. Give it a name:
int pushButton = 2;
int t1 = 0;
// the setup routine runs once when you press reset:
void setup() {
// initialize serial communication at 9600 bits per second:
Serial.begin(9600);
// make the pushbutton's pin an input:
pinMode(pushButton, INPUT);
}
// the loop routine runs over and over again forever:
void loop() {
// read the input pin:
int bs = function_01();
function_02(bs);
}
int function_01()
{
int buttonState = digitalRead(pushButton);
return buttonState;
}
int function_02(bs1);
{
if(bs1 == 0)
{
t1++;
Serial.println(t1);
}
delay(100); // delay in between reads for stability
}
lab_5.txt
/*
Lab_05
Desgin an application that reads the status of pin 2 that is
attached to a switch.
This status of pin 2 should be reflected on pin 3 with a LED.
Please utilize stuctureed programming methodology.
9/10/2014
*/
const int buttonPin = 2; // the pin that the pushbutton is
attached to
const int ledPin = 3; // the pin that the LED is attached to
// Variables will change:
int buttonState = 0; // current state of the button
void setup()
{
// initialize the button pin as a output:
pinMode(buttonPin, OUTPUT);
// initialize the LED as an input:
pinMode(ledPin, INPUT);
Serial.begin(9600);
}
int main()
{
setup();
while(1)
{
buttonState = function_in();
function_out(buttonState);
}
return 0;
}
int function_in(){
int bs=digitalRead(buttonPin);
return bs;
}
void function_out(int buttonState_1)
{
if (buttonState_1== HIGH)
{
digitalWrite(ledPin, HIGH);
}
else
{
digitalWrite(ledPin, LOW);
}
}
__MACOSX/._lab_5.txt
Lab_14.txt
/*
Lab N0 14
Design an application that will recive the analog single
from a port connected to 0 -5 volts. The center tap of of the port
is connected to ADC0
A(0). The appliction is going to capture the analog sgnal
conversts the analog value
to digital value and by proper range conersion display the result
back to serial monitor.
Date: 10/06/2104
*/
#include <avr/io.h>
#include <util/delay.h>
void setup(void);
void my_analog (int *, int *);
void my_serial (int *);
int main()
{
setup();
int sensorPin = A0; // select the input pin for the potentionmeter
int sensorValue = 0; // variable to store the value coming from
the sesor
while(1)
{
my_analog(&sensorPin, &sensorValue);
my_serial(&sensorValue);
}
}
void setup (void)
{
init();
Serial.begin (9600);
}
void my_analog (int *p1, int *p2)
{
*p2 = analogRead (*p1);
}
void my_serial (int *p3)
{
// serial.println(sensorValue);
Serial.print("Voltage:");
Serial.println((*p3 *5.0)/1023);
delay(500);
}
__MACOSX/._Lab_14.txt
Lab_08.txt
/*
Lab_08
Repeating lab_04 with standard C format
more formalized
Label definition with formal function declaration
function calls
body of functions clearly demarcated
9/17/2014
*/
#include <avr/io.h>
#include <util/delay.h>
// constants won’t change. They’re used here to
// set pin numbers:
// the # define construct is a compiler pre-processor directive.
// the value is substituted for the name, wherever the name
occurs
//in the source code. So, something like:
# define buttonPin 2 // the number of the pushbutton pin
# define ledPin 3 // the number of the led pin
// function declarations
void setup(void);
void function_in(int *);
void function_out(int *);
int main()
{
int buttonState = 0; // variable for reading for the
pushbutton status
setup();
while(1)
{
// function call without arguments:
function_in(&buttonState);
// function call without argument
function_out(&buttonState);
}
return 0;
}
void function_in(int *p1)
{
*p1=digitalRead(buttonPin);
}
void function_out( int *p2)
{
// check if the pushbutton is pressed.
// if it is, the buttonState is HIGH:
if(*p2==HIGH)
{
// trun LED on:
digitalWrite(ledPin, HIGH);
}
else
{
// turn LED off:
digitalWrite(ledPin, LOW);
}
}
void setup()
{
init(); // This must be called first to configure routines
that the core relies on
pinMode(ledPin, OUTPUT);
// initialize the pushbutton pin as an input:
}
__MACOSX/._Lab_08.txt
Lab_16.txt
/*
Lab N0 16
Design an application that will recive the analog single
from a port connected to 0 -5 volts. The center tap of of the port
is connected to ADC0
A(0). The appliction is going to have to display degrees
Fahrenheit and then convert it to degrees Celsius.
Date: 10/08/2104
*/
#include <avr/io.h>
#include <util/delay.h>
void setup(void);
void my_analog (int *, int *);
void my_serial (int *);
int main()
{
setup();
int sensorPin = A0; // select the input pin for the potentionmeter
int sensorValue = 0; // variable to store the value coming from
the sesor
while(1)
{
my_analog(&sensorPin, &sensorValue);
my_serial(&sensorValue);
}
}
void setup (void)
{
init();
Serial.begin (9600);
}
void my_analog (int *p1, int *p2)
{
*p2 = analogRead (*p1);
}
void my_serial (int *p3)
{
// serial.println(sensorValue);
float v = (*p3 *5.0)/1023;
float f = (v*100);
float c = (f-32)*(.55556);
Serial.print("Voltage:");
Serial.println(v);
Serial.print(f);
Serial.println(" degrees Fahrenheit");
Serial.print(c);
Serial.println(" degrees Celsius");
Serial.println(" ");
delay (2000);
}
__MACOSX/._Lab_16.txt
Lab_09.txt
/*
Lab_09
Design a project that has two inputs (connected to two switches
A and B)
and four outputs(connected to four LEDs) associated with port
B.
Design the application such that 1) when A is high the LEDs lit
and move Right to Left
and 2) when B is High the LEDs lit and move Left to Right.
Stuctured Program with pointers and proper schematics.
9/22/2014
*/
#include <avr/io.h>
#include <util/delay.h>
// constants won’t change. They’re used here to
// set pin numbers:
// the # define construct is a compiler pre-processor directive.
// the value is substituted for the name, wherever the name
occurs
//in the source code. So, something like:
# define buttonPin 2 // the number of the pushbutton pin
# define buttonPin2 3 // the number of the pushbutton pin
# define ledPin1 13 // the number of the led pin
# define ledPin2 12 // the number of the led pin
# define ledPin3 11 // the number of the led pin
# define ledPin4 10 // the number of the led pin
// function declarations
void setup(void);
void function1_in(int *);
void function1_out(int *);
void function2_in(int *);
void function2_out(int *);
int main()
{
int buttonState = 0; // variable for reading for the
pushbutton status
int buttonState5 = 0;
setup();
while(1)
{
// function call without arguments:
function1_in(&buttonState);
// function call without argument
function1_out(&buttonState);
function2_in(&buttonState5);
function2_out(&buttonState5);
}
return 0;
}
void function1_in(int *p1)
{
*p1=digitalRead(buttonPin);
}
void function1_out( int *p2)
{
// check if the pushbutton is pressed.
// if it is, the buttonState is HIGH:
if(*p2==HIGH)
{
// trun LED on:
digitalWrite(ledPin1, HIGH);
delay (100);
digitalWrite(ledPin2, HIGH);
delay (100);
digitalWrite(ledPin3, HIGH);
delay (100);
digitalWrite(ledPin4, HIGH);
delay (100);
}
else
{
// turn LED off:
digitalWrite(ledPin1, LOW);
delay(110);
digitalWrite(ledPin2, LOW);
delay (120);
digitalWrite(ledPin3, LOW);
delay (130);
digitalWrite(ledPin4, LOW);
delay (140);
}
}
void function2_in(int *p5)
{
*p5=digitalRead(buttonPin2);
}
void function2_out( int *p10)
{
// check if the pushbutton is pressed.
// if it is, the buttonState is HIGH:
if(*p10==HIGH)
{
// trun LED on:
digitalWrite(ledPin1, HIGH);
delay (100);
digitalWrite(ledPin2, HIGH);
delay (100);
digitalWrite(ledPin3, HIGH);
delay (100);
digitalWrite(ledPin4, HIGH);
delay (100);
}
else
{
// turn LED off:
digitalWrite(ledPin1, LOW);
delay(130);
digitalWrite(ledPin2, LOW);
delay (120);
digitalWrite(ledPin3, LOW);
delay (110);
digitalWrite(ledPin4, LOW);
delay (100);
}
}
void setup()
{
init(); // This must be called first to configure routines
that the core relies on
pinMode(ledPin4, OUTPUT);
pinMode(ledPin3, OUTPUT);
pinMode(ledPin2, OUTPUT);
pinMode(ledPin1, OUTPUT);
// initialize the pushbutton pin as an input:
}
__MACOSX/._Lab_09.txt
Lab_17.txt
/*
Lab_17
interrupt - External Hardware Interrupt
using interrupts for doing what they do best--
two things at once.
Application that counts binary count on port B,
when INT0 occurs (ARDUINO Pin 2)
Interrupt service rotini will interrupt the on going task of bianry
counting and would flash LED's
connected
on port B and flashing LED's on port B whenever button is
pressed.
after finishing with ISR the main task of counting is resumed.
Date:OCT 22 2014
*/
//———Preamble———//
#include <avr/io.h>
#include <util/delay.h>
#include <avr/interrupt.h>
//
#include “pinDefines.h“
ISR(INT0_vect)
{/* Run every time there is a change on botton */
int temp = PORTB; // save the count
PORTB = 0x00;
-delay_ms(200);
PORTB = 0x3F;
-delay_ms(200);
PORTB = 0x3F;
-delay_ms(200);
PORTB = temp; //return the count
}
void initInt0(void){
EIMSK = 0x01; //INT0=1 enable INT0
EICRA = 0x01; // ISCOO=1 trigger when button changes */
sei();/* set (global) interrupt enable bit */
}
int main(void)
{
// ———Inits——-//
DDRB = 0x3f; /*all LEDs active*/
DDRD = 0x00; // pd7,pd6 = output, reset input
PORTD = 0x04; // pulpup *, turn pd7, pd6 off
PORTB = 0xFF;
iniInt0();
// ——Event loop——//6
while(1)
{
-delay_ms(500);
PORTB = PORTB -1;
}
return (0); /*This line is never reached */
}
__MACOSX/._Lab_17.txt
Lab_10.TXT
Lab_10
Use the task of lab 09
the output of moving Left or moving Right
should maintain the existing state even after the inputs are
altered.
In other words the previous state presists even ater the button
is released.
Lab_11.TXT
/*
Lab_11
Demonstration of BITWISE oprators
1) inputs are 00, the 4 outputs are all high.
if inputs are 01, the 4 outputs are: a) reset first and third
outputs, using a BITMASK
if inputs are 10, the 4 outputs are: b) set first and third
outputs, using a BITMASK
if inputs are 01, the 4 outputs are: c) rest first and second
outputs, using a BITMASK, after 5 second
toggle all fours bits.
Circut decription: Use Port B as inputs (pin 14, 15 as PB0, PB1)
Use Port D as output (Pins2,3,4 and 5 as PD0, PD1, PD2, and
PD 3)
Date: 09/29/2014
*/
#include <util/delay.h>
#define pushButton0 10
#define pushButton1 12
#define led0 10
#define led1 11
#define led2 12
#define led3 13
// function declaraction
void step(void);
void function_int(int*);
void function_out(int*);
int main()
{
setup();
int buttonState = 0; // variable for reading the pushbutton
state
while(1)
{
// function call without arguments
function_in(&buttonState);
function_out(&buttonState);
}
return 0;
}
void function_in(int*p1)
{
*p1 = PINB;
}
void function_out(int *p2)
{
char k1=*p2;
char mask_01 = 0b00000011;
char mask_02 = mask_01 & k1;
// check if the pushbuttonis prressed
//if it is, the buttonState is HIGH:
if (mask_02==00)
{
//turn appropriate LEDs on and off:
PORTD=60; // also could have use 0b00111100
}
else
if (mask_02==01)
if(mask_02==10)
{
//trun appropriate LEDs on and off:
PORTD = 0x3c; // also could have use ob00111100
}
else
// turn appropriate LEDs on and off:
PORTD =0x00110000;
delay(500);
PORTD=0x00000000;
delay(500);
}
void setup()
{
init();// this must be call first to configure routines that the
corte relies on
// initialize the LED pin as an output:
DDRD=0b11111111;
// initiaze the pushbutton pin as input:
DDRB=0b11111100;
}
__MACOSX/._Lab_11.TXT
Lab_12.txt
/*
Lab No: 12
Design an application that would recive a charecter form PC
and then send
the same charecter back to serial monitor on PC.
Date: 10/01/2014
*/
byte characterRead;
void setup() {
// Turn the Serial Protocol ON
Serial.begin(9600);
}
void loop() {
/* check if data has been sent from the computer: */
if (Serial.available()) {
/* read the most recent byte */
characterRead = Serial.read();
/*ECHO the value that was read, back to the serial port. */
Serial.write(characterRead);
}
}
__MACOSX/._Lab_12.txt
Lab_13.txt
/*
Lab No: 13
Design an application that outputs all the ASCIT characters
charatebt characters.
Date: 10/01/2014
*/
#include <avr/io.h>
#include <util/delay.h>
void setup(void);
void inputASCII (void);
int main()
{
Setup();
while(1)
{
for(char i =0; i <256; i++)
{
Serial.println(i);
delay(200);
}
}
}
void Setup ()
{
init();
Serial.begin (9600);
}
__MACOSX/._Lab_13.txt
Lab_18.txt
/*
Lab_18
Interrupt - external Hardware Interrupt
using Interrupts for doing what they do best --
two things at once.
Apllication that counts binary count on serial monitor,
when INT0occurs (ARDUNIO Pin 2)
Interrupt service Routine will interrupt the on going task of
binary counting and would flash
LED's connected
on port B and serially output Blink.
After finishing with ISR the main task of counting is rsumed.
Date: 10-27-2014
*/
#include <avr/io.h>
#include <util/delay.h>
#include <avr/interrupt.h>
void setup (void);
ISR (INT0_vect)
{//Run every time there is a change on button */
int temp = PORTB; // ave count
for (int k = 0; k<4; k++)
{
PORTB = 0x00;
_delay_ms(200);
PORTB = 0xFF;
_delay_ms(200);
Serial.print("Blink");
}
PORTB = temp; //return ht count
}
int main ()
{
int j = 0;
setup();
int sensorPin = A0;
int sensorValue = 0;
while(1)
{
Serial.print(j++);
Serial.print('n');
_delay_ms(200);
++PORTB;
}
}
void setup (void)
{
init();
Serial.begin(9600);
DDRB = 0xff;
DDRD = 0x00;
PORTD = 0xff;
PORTB = 0xFF;
EIMSK = 0x01;
EICRA = 0x01;
sei();
}
__MACOSX/._Lab_18.txt
Lab_19.txt
/*
Lab_19
Design an application that demonstrates or make use
of the exrnal Hardware Inerrupts coming from INT1.
Design the smpliest applcation that is demonstrable
(as per your defination) running with your perpetual loop.
when interupted this task should be replace by the task defined
in your ISR.
Date: 10-27-2014
*/
#include <avr/io.h>
#include <util/delay.h>
#include <avr/interrupt.h>
#include <pinDefines.h>
void setup(void)
{
init();
Serial.begin(9600);
DDRB = 0b11111111; // 0xff;
DDRD = 0b00; // 0x00;
PORTD = 0b11111111; // 0xff;
PORTB = 0b11111111; // 0xff;
EIMSK = 0x02; // |=(1<<INT1); //0b1; // 0x01;
EICRA = 0x05; // 0x01;
sei();
}
ISR(INT1_vect)
{
int temp= PORTB;
for ( int k=0; k < 4; k++)
{
PORTB=0b00011111;
_delay_ms(200);
PORTB=0b00000000; // PORTB=0xFF;
_delay_ms(200);
Serial.print(" Stop ");
// Serial.println();
}
PORTB = temp;
}
int main()
{
int j=0;
setup();
int sensorpin = A0;
int sensorvalue = 0;
while(1)
{
PORTB=0b00000000; // PORTB=0xFF;
_delay_ms(200);
PORTB=0b00000001;
_delay_ms(200);
PORTB=0b00000010;
_delay_ms(200);
PORTB=0b00000100;
_delay_ms(200);
PORTB=0b00001000;
_delay_ms(200);
PORTB=0b00010000;
_delay_ms(200);
}
}
__MACOSX/._Lab_19.txt
Lab_20.txt
/*
Date: 11-03-2014
Lab_20
*/
#define ledPin 13
void setup()
{
pinMode(ledPin, OUTPUT);
// initialize timer1
noInterrupts(); // disable all interrupts
TCCR1A = 0;
TCCR1B = 0;
TCNT1 = 34286; // preload timer 65536-
16MHz/256/2Hz
TCCR1B |= (1 << CS12); // 256 prescaler
TIMSK1 |= (1 << TOIE1); // enable timer overflow interrupt
interrupts(); // enable all interrupts
}
ISR(TIMER1_OVF_vect) // interrupt service routine that
wraps a user defined function supplied by attachInterrupt
{
TCNT1 = 34286; // preload timer
digitalWrite(ledPin, digitalRead(ledPin) ^ 1);
}
void loop()
{
}
__MACOSX/._Lab_20.txt
Lab_21.txt
/*
Date: 11-03-2014
Lab_21 "Exam_02"
Design an application that would turn the LED's ON for 5
seconds
evry 60 seconds. "Long time delays using timers"
*/
# include <avr /io.h>
#include <util/delay.h>
#include <avr/interrupt.h>
int main ( void )
{
setup();
int ElapsedSeconds = 0;
for (;;)
{
// Check timer value in if statement , true when count
matches 1 second
if ( TCNT1 >= 15624)
{
TCNT1 = 0; // Reset timer value
++ElapsedSeconds;
if (ElapsedSeconds == 60) // Check if one minute has
elapsed
{
PORTB = 0b00111111; // Toggle the LED
}
if (ElapsedSeconds == 65)
{
PORTB = 0b00000000;
ElapsedSeconds = 0; // Reset counter variable
}
}
}
}
void setup(void)
{
DDRB = 0b00111111; // Set LED as output
TCCR1B |= ((1 << CS10 ) | (0 << CS11) | (1 << CS12 )); // Set
up timer at Fcpu /1024
}
__MACOSX/._Lab_21.txt
Lab_22.txt
/*
Lab_22
Date: 11-05-2014
Design an application would acomplish the task of (utizing
Timer in CTC mode) blinking a
LED connected to a pin of you choice, every 1 second.
*/
# include <avr /io.h>
#include <util/delay.h>
#include <avr/interrupt.h>
#include <pinDefines.h>
int main ( void )
{
setup();
TIFR1 |= (1 << OCF1A);
for (;;)
{
if ( TIFR1 & (1 << OCF1A ))
{
PORTB ^= 0b00000001; // Toggle the LED
TIFR1 = (1 << OCF1A ); // clear the CTC flag ( writing a
logic one to the set flag clears it)
}
}
}
void setup (void)
{
DDRB = 0b00000001; // Set LED as output
TCCR1B |= ((1 << CS10 ) | (0 << CS11) | (1 << CS12 )); // Set
up timer at Fcpu /1024
TCCR1B |= (1 << WGM12 ); // Configure timer 1 for CTC
mode
OCR1A = 15624; // Set CTC compare value to 1Hz at 1
MHz AVR clock , with a prescaler of 1024
}
__MACOSX/._Lab_22.txt
Lab_23.txt
/*
Lab_23
Date: 11-10-2014
Title: Using Times intrrputs
Design an application that could run a pump that could water
your particular
pet plant so many second evey (your prctical value) that is esaly
demonstrable.
comment your code
*/
/*
Lab_23
Name: Ayman Alshahabiah
Date: 11-10-2014
Title: Using Times intrrputs
Design an application that could run a pump that could water
your particular
pet plant so many second evey (your prctical value) that is esaly
demonstrable.
comment your code
*/
# include <avr /io.h>
# include <avr / interrupt .h>
#include <pinDefines.h>
void setup (void)
{
DDRB |= (1 << 0); // Set LED as output
TCCR1B |= (1 << WGM12 ); // Configure timer 1 for CTC
mode
//TODO : Enable CTC interrupt
// TODO : Enable global interrupts
OCR1A = 15624; // Set CTC compare value to 1Hz at 1 MHz
AVR clock , with a prescaler of 64
TCCR1B |= ((1 << CS10 ) | (1 << CS12)); // Start timer at Fcpu
/64
TIMSK1 |= (1 << OCIE1A );
sei();
}
int main (void)
{
setup();
for (;;)
{
}
}
ISR ( TIMER1_COMPA_vect )
{
static int ElapsedSeconds=0;
++ElapsedSeconds;
if (ElapsedSeconds == 1)//heck if one minute has
elapsed
{
PORTB = 0b100000;// Toggle the LED
}
if (ElapsedSeconds == 4)
{
PORTB = 0b000000;
ElapsedSeconds = 0; // Reset counter variable
}
}
__MACOSX/._Lab_23.txt
Lab_24.txt
/*
Lab 24
Timer Interrupt task Analog with main Task.
Design an applicataion that would be:
1) Performing the main taskof counting on ther serial monitor
once every 0.5 seconds
2) Timer interrupt task would be triggered once every 10
seconds and this will announce
on the serial monitor by saying "Timer Interrupt".
Date : 11-12-2014
*/
# include <avr /io.h>
# include <avr / interrupt .h>
# include <util/delay.h>
int main ( void )
{
int R = 0;
sei (); // Enable global interrupts
OCR1A = 62499; // Set CTC compare value to 1Hz at 1 MHz
AVR clock , with a prescaler of 256
TCCR1B |= (1 << WGM12 );
TIMSK1 |= (1 << OCIE1A ); // Enable CTC interrupt
TCCR1B |= ((1 << CS12)); // Set up timer at Fcpu /256
setup();
for (;;)
{
Serial.println(R);
R++;
_delay_ms(500);
}
}
ISR ( TIMER1_COMPA_vect )
{
static int count = 0;
++count;
if ( count ==10)
{
Serial.println("Timer interrupt");
count = 0;
}
}
void setup(void)
{
Serial.begin(9600);
}
__MACOSX/._Lab_24.txt
Lab_25.txt
/*
Lab_25
Date: 11-17-2014
Utilize timer intrurpt as means to achived p.w.m that intrupts
would controls
a DC motor.
*/
# include <avr /io.h>
#include <util/delay.h>
#include <avr/interrupt.h>
#include <pinDefines.h>
int main ( void )
{
setup();
TIFR1 |= (1 << OCF1A);
for (;;)
{
if ( TIFR1 & (1 << OCF1A ))
{
PORTB ^= 0b00000001; // Toggle the LED
TIFR1 = (1 << OCF1A ); // clear the CTC flag ( writing a
logic one to the set flag clears it)
}
}
}
void setup (void)
{
DDRB = 0b00000001; // Set LED as output
TCCR1B |= ((1 << CS10 ) | (0 << CS11) | (1 << CS12 )); // Set
up timer at Fcpu /1024
TCCR1B |= (1 << WGM12 ); // Configure timer 1 for CTC
mode
OCR1A =9; // Set CTC compare value to 1Hz at 1 MHz
AVR clock , with a prescaler of 1024
}
__MACOSX/._Lab_25.txt
Lab_26.txt
/*
Lab_26
Date: 11-19-2014
Utilizing one of the timers intrurpt to achived p.w.m that would
controls
a 12 volts D.C motor reuminine at 1/3 speed (4 volts).
*/
# include <avr /io.h>
#include <util/delay.h>
#include <avr/interrupt.h>
#include <pinDefines.h>
int main ( void )
{
setup();
TIFR1 |= (1 << OCF1A);
for (;;)
{
if ( TIFR1 & (1 << OCF1A ))
{
PORTB ^= 0b00000001; // Toggle the motor
TIFR1 = (1 << OCF1A ); // clear the CTC flag ( writing a
logic one to the set flag clears it)
}
}
}
void setup (void)
{
DDRB = 0b00000001; // Set LED as output
TCCR1B |= ((1 << CS10 ) | (0 << CS11) | (1 << CS12 )); // Set
up timer at Fcpu /1024
TCCR1B |= (1 << WGM12 ); // Configure timer 1 for CTC
mode
OCR1A =9; // Set CTC compare value to 1Hz at 1 MHz
AVR clock , with a prescaler of 1024
}
__MACOSX/._Lab_26.txt

Lab_5.txt.rtfLab_05Design an application that reads the .docx

  • 1.
    Lab_5.txt.rtf /* Lab_05 Design an applicationthat reads the status of pin 2 that is attached to a switch. This status of pin 2 should be reflected on pin 3 with a LED. Please utilize structured programming methodology. 9/10/2014 */ const int buttonPin = 2; // the pin that the pushbutton is attached to const int ledPin = 3; // the pin that the LED is attached to // Variables will change: int buttonState = 0; // current state of the button void setup() { // initialize the button pin as a output: pinMode(buttonPin, OUTPUT); // initialize the LED as an input: pinMode(ledPin, INPUT); Serial.begin(9600); } int main()
  • 2.
    { setup(); while(1) { buttonState = function_in(); function_out(buttonState); } return0; } int function_in(void) { int bs=digitalRead(buttonPin); return bs; } void function_out(int buttonState_1) { // check if the pushbutton is pressed // if it is, the pushbuttonState is HIGH: if (buttonState_1 == HIGH) { // turn LED on: digitalWrite(ledPin, HIGH); } else { // turn LED off: digitalWrite(ledPin, LOW); } } Lab_06.txt.rtf
  • 3.
    /* Lab_06 Repeating lab_04 withstandard C format more formalized Label definition with formal function declaration function calls body of functions clearly demarcated 9/10/2014 */ // constants won’t change. They’re used here to // set pin numbers: // the # define construct is a compiler pre-processor directive. // the value is substituted for the name, wherever the name occurs //in the source code. So, something like: # define buttonPin 2 // the number of the pushbutton pin # define ledPin 3 // the number of the led pin // function declarations void setup(void); int function_in(void); void function_out(int); int main() { int buttonState = 0; // variable for reading for the pushbutton status setup(); while(1) {
  • 4.
    // function callwithout arguments: buttonState = function_in(); // function call without argument function_out(buttonState); } return 0; } int function_in(void) { int bs = digitalRead(buttonPin); return bs; } void function_out( int buttonState_1) { // check if the pushbutton is pressed. // if it is, the buttonState is HIGH: if(buttonState_1==HIGH) { // trun LED on: digitalWrite(ledPin, HIGH); } else { // turn LED off: digitalWrite(ledPin, LOW); } } Lab_07.txt /* Lab_07 The applcation is going to blink first leds attched 3 times and then make next 3 led five times.
  • 5.
    Date: 09/15/2014 */ // Pin13 has an LED connected on most Arduino boards. // Pin 12 has the LED on Teensy 2.0 // Pin 11 has the LED on Teensy++ 2.0 // Pin 10 has the LED on Teensy 3.0 // Pin 9 has the LED on Teensy 2.0 // Pin 8 has the LED on Teensy++ 2.0 // give it a name: int led13 = 13; int led12 = 12; int led11 = 11; int led10 = 10; int led9 = 9;
  • 6.
    int led8= 8; intmain() { initial(); while(1) { function_1(); } } void step() { init(); pinMode(led8, OUTPUT); pinMode(led9, OUTPUT); pinMode(led10, OUTPUT);
  • 7.
    pinMode(led11, OUTPUT); pinMode(led12, OUTPUT); pinMode(led13,OUTPUT); } int function_1() { for (int i = 0; i<3; i ++) { function_01(); } for (int i = 0; i<5; i ++) { function_02(); } } void function_01() {
  • 8.
    digitalWrite(led8, HIGH); //turn the LED on (HIGH is the voltage level) digitalWrite(led9, HIGH); // turn the LED on (HIGH is the voltage level) digitalWrite(led10, HIGH); // turn the LED on (HIGH is the voltage level) delay(1000); digitalWrite(led8, LOW); // turn the LED on (HIGH is the voltage level) digitalWrite(led9, LOW); // turn the LED on (HIGH is the voltage level) digitalWrite(led10, LOW); // turn the LED on (HIGH is the voltage level)
  • 9.
    } void function_02() { digitalWrite(led11, HIGH);// turn the LED on (HIGH is the voltage level) digitalWrite(led12, HIGH); // turn the LED on (HIGH is the voltage level) digitalWrite(led13, HIGH); // turn the LED on (HIGH is the voltage level) delay(1000); // wait for a second digitalWrite(led11, LOW); // turn the LED on (HIGH is the voltage level)
  • 10.
    digitalWrite(led12, LOW); //turn the LED on (HIGH is the voltage level) digitalWrite(led13, LOW); // turn the LED on (HIGH is the voltage level) delay(1000); // wait for a second } __MACOSX/._Lab_07.txt Lab_15.txt /* Lab N0 15 Design an application that will recive the analog single from a port connected to 0 -5 volts. The center tap of of the port is connected to ADC0
  • 11.
    A(0). The applictionis going to have a control LED connected and would be off for all the other inputs. capture the analog signal, conversts the analog value to digital value and by proper range conersion perform the above described control of the LED.The staus of the LED is to be reported on the serial monitor. Date: 10/06/2104 */ #include <avr/io.h> #include <util/delay.h> #define ledPin 13 void setup(void);
  • 12.
    void my_analog (int*, int *); void my_serial (int *); void my_fun (int *); int main() { setup(); int sensorPin = A0; // select the input pin for the potentionmeter int sensorValue = 0; // variable to store the value coming from the sesor while(1) { my_analog(&sensorPin, &sensorValue); my_serial(&sensorValue);
  • 13.
    my_fun (&sensorValue); } } void setup(void) { init(); Serial.begin (9600); pinMode(ledPin, OUTPUT); } void my_analog (int *p1, int *p2) { *p2 = analogRead (*p1); }
  • 14.
    void my_fun(int *p22) { if(*p22> 2.0 && *p22 < 3.0) { digitalWrite(ledPin, HIGH); } else { digitalWrite(ledPin, LOW); } } void my_serial (int *p3) { // serial.println(sensorValue);
  • 15.
    Serial.print("Voltage:"); Serial.println((*p3 *5.0)/1023); } __MACOSX/._Lab_15.txt Lab_04.txt.rtf /* Lab_04 Design anapplication that reads the status of pin 2 that is attached to a switch. This status of pin 2 should be reflected on pin 3 with a LED. Please utilize structured programming methodology. 9/08/2014 */ // constants won’t change. They’re used here to // set pin numbers: const int buttonPin = 2; // the pin that the pushbutton is attached to const int ledPin = 3; // the pin that the LED is attached to // Pin 13: Arduino has an LED connected on pin 13 // Pin 11: Teensy 2.0 has the LED on pin 11 // Pin 6: Teensy+2.0 has the LED on pin 6
  • 16.
    // Pin 13:Teensy 3.0 has the LED on pin 13 // Variables will change: int buttonState = 0; // variable for reading the pushbutton status void setup() { // initialize the LED pin as a output: pinMode(ledPin, OUTPUT); // initialize the pushbutton as an input: pinMode(buttonPin, INPUT); } void loop() { // function call without arguments: buttonState = function_in(); //function call with a single argument function_out(buttonState); } int function_in(void) { int bs = digitalRead(buttonPin); return bs; } void function_out(int buttonState_1) { // check if the pushbutton is pressed. // if it is, the buttonState is HIGH: if(buttonState_1 == HIGH) {
  • 17.
    // turn LEDon: digitalWrite(ledPin, HIGH); } else { // turn LED off: digitalWrite(ledPin, LOW); } } Lab_03.txt.rtf /* Lab_03 DigitalReadSerial Design an application that reads the status of button connected to pin 2. Every time the user press the button resulting in pin 2 going HIGH, the application will send an integer value of 1. Each time the button is pressesed the application send serially the next integer value. 9/08/2014 */ // digital pin 2 has a pushbutton attached to it. Give it a name: int pushButton = 2; int t1 = 0; // the setup routine runs once when you press reset: void setup() {
  • 18.
    // initialize serialcommunication at 9600 bits per second: Serial.begin(9600); // make the pushbutton's pin an input: pinMode(pushButton, INPUT); } // the loop routine runs over and over again forever: void loop() { // read the input pin: int bs = function_01(); function_02(bs); } int function_01() { int buttonState = digitalRead(pushButton); return buttonState; } int function_02(bs1); { if(bs1 == 0) { t1++; Serial.println(t1); } delay(100); // delay in between reads for stability } lab_5.txt
  • 19.
    /* Lab_05 Desgin an applicationthat reads the status of pin 2 that is attached to a switch. This status of pin 2 should be reflected on pin 3 with a LED. Please utilize stuctureed programming methodology. 9/10/2014 */ const int buttonPin = 2; // the pin that the pushbutton is attached to const int ledPin = 3; // the pin that the LED is attached to // Variables will change: int buttonState = 0; // current state of the button
  • 20.
    void setup() { // initializethe button pin as a output: pinMode(buttonPin, OUTPUT); // initialize the LED as an input: pinMode(ledPin, INPUT); Serial.begin(9600); } int main() { setup(); while(1) {
  • 21.
    buttonState = function_in(); function_out(buttonState); } return0; } int function_in(){ int bs=digitalRead(buttonPin); return bs; } void function_out(int buttonState_1) { if (buttonState_1== HIGH) { digitalWrite(ledPin, HIGH); }
  • 22.
    else { digitalWrite(ledPin, LOW); } } __MACOSX/._lab_5.txt Lab_14.txt /* Lab N014 Design an application that will recive the analog single from a port connected to 0 -5 volts. The center tap of of the port is connected to ADC0 A(0). The appliction is going to capture the analog sgnal conversts the analog value to digital value and by proper range conersion display the result back to serial monitor.
  • 23.
    Date: 10/06/2104 */ #include <avr/io.h> #include<util/delay.h> void setup(void); void my_analog (int *, int *); void my_serial (int *); int main() { setup();
  • 24.
    int sensorPin =A0; // select the input pin for the potentionmeter int sensorValue = 0; // variable to store the value coming from the sesor while(1) { my_analog(&sensorPin, &sensorValue); my_serial(&sensorValue); } } void setup (void) { init(); Serial.begin (9600); } void my_analog (int *p1, int *p2)
  • 25.
    { *p2 = analogRead(*p1); } void my_serial (int *p3) { // serial.println(sensorValue); Serial.print("Voltage:"); Serial.println((*p3 *5.0)/1023); delay(500); } __MACOSX/._Lab_14.txt Lab_08.txt /* Lab_08 Repeating lab_04 with standard C format
  • 26.
    more formalized Label definitionwith formal function declaration function calls body of functions clearly demarcated 9/17/2014 */ #include <avr/io.h> #include <util/delay.h> // constants won’t change. They’re used here to // set pin numbers:
  • 27.
    // the #define construct is a compiler pre-processor directive. // the value is substituted for the name, wherever the name occurs //in the source code. So, something like: # define buttonPin 2 // the number of the pushbutton pin # define ledPin 3 // the number of the led pin // function declarations void setup(void); void function_in(int *); void function_out(int *); int main() { int buttonState = 0; // variable for reading for the pushbutton status setup();
  • 28.
    while(1) { // function callwithout arguments: function_in(&buttonState); // function call without argument function_out(&buttonState); } return 0; } void function_in(int *p1) { *p1=digitalRead(buttonPin); } void function_out( int *p2) { // check if the pushbutton is pressed. // if it is, the buttonState is HIGH:
  • 29.
    if(*p2==HIGH) { // trun LEDon: digitalWrite(ledPin, HIGH); } else { // turn LED off: digitalWrite(ledPin, LOW); } } void setup() { init(); // This must be called first to configure routines that the core relies on pinMode(ledPin, OUTPUT); // initialize the pushbutton pin as an input: }
  • 30.
    __MACOSX/._Lab_08.txt Lab_16.txt /* Lab N0 16 Designan application that will recive the analog single from a port connected to 0 -5 volts. The center tap of of the port is connected to ADC0 A(0). The appliction is going to have to display degrees Fahrenheit and then convert it to degrees Celsius. Date: 10/08/2104 */ #include <avr/io.h>
  • 31.
    #include <util/delay.h> void setup(void); voidmy_analog (int *, int *); void my_serial (int *); int main() { setup(); int sensorPin = A0; // select the input pin for the potentionmeter int sensorValue = 0; // variable to store the value coming from the sesor
  • 32.
    while(1) { my_analog(&sensorPin, &sensorValue); my_serial(&sensorValue); } } void setup(void) { init(); Serial.begin (9600); } void my_analog (int *p1, int *p2)
  • 33.
    { *p2 = analogRead(*p1); } void my_serial (int *p3) { // serial.println(sensorValue); float v = (*p3 *5.0)/1023; float f = (v*100); float c = (f-32)*(.55556); Serial.print("Voltage:"); Serial.println(v); Serial.print(f); Serial.println(" degrees Fahrenheit"); Serial.print(c); Serial.println(" degrees Celsius");
  • 34.
    Serial.println(" "); delay (2000); } __MACOSX/._Lab_16.txt Lab_09.txt /* Lab_09 Designa project that has two inputs (connected to two switches A and B) and four outputs(connected to four LEDs) associated with port B. Design the application such that 1) when A is high the LEDs lit and move Right to Left and 2) when B is High the LEDs lit and move Left to Right. Stuctured Program with pointers and proper schematics.
  • 35.
    9/22/2014 */ #include <avr/io.h> #include <util/delay.h> //constants won’t change. They’re used here to // set pin numbers: // the # define construct is a compiler pre-processor directive. // the value is substituted for the name, wherever the name occurs //in the source code. So, something like: # define buttonPin 2 // the number of the pushbutton pin # define buttonPin2 3 // the number of the pushbutton pin
  • 36.
    # define ledPin113 // the number of the led pin # define ledPin2 12 // the number of the led pin # define ledPin3 11 // the number of the led pin # define ledPin4 10 // the number of the led pin // function declarations void setup(void); void function1_in(int *); void function1_out(int *); void function2_in(int *); void function2_out(int *); int main() {
  • 37.
    int buttonState =0; // variable for reading for the pushbutton status int buttonState5 = 0; setup(); while(1) { // function call without arguments: function1_in(&buttonState); // function call without argument function1_out(&buttonState); function2_in(&buttonState5); function2_out(&buttonState5); } return 0; } void function1_in(int *p1) { *p1=digitalRead(buttonPin);
  • 38.
    } void function1_out( int*p2) { // check if the pushbutton is pressed. // if it is, the buttonState is HIGH: if(*p2==HIGH) { // trun LED on: digitalWrite(ledPin1, HIGH); delay (100); digitalWrite(ledPin2, HIGH); delay (100); digitalWrite(ledPin3, HIGH); delay (100); digitalWrite(ledPin4, HIGH); delay (100);
  • 39.
    } else { // turn LEDoff: digitalWrite(ledPin1, LOW); delay(110); digitalWrite(ledPin2, LOW); delay (120); digitalWrite(ledPin3, LOW); delay (130); digitalWrite(ledPin4, LOW); delay (140); } }
  • 40.
    void function2_in(int *p5) { *p5=digitalRead(buttonPin2); } voidfunction2_out( int *p10) { // check if the pushbutton is pressed. // if it is, the buttonState is HIGH: if(*p10==HIGH) { // trun LED on: digitalWrite(ledPin1, HIGH); delay (100); digitalWrite(ledPin2, HIGH); delay (100); digitalWrite(ledPin3, HIGH);
  • 41.
    delay (100); digitalWrite(ledPin4, HIGH); delay(100); } else { // turn LED off: digitalWrite(ledPin1, LOW); delay(130); digitalWrite(ledPin2, LOW); delay (120); digitalWrite(ledPin3, LOW); delay (110); digitalWrite(ledPin4, LOW); delay (100);
  • 42.
    } } void setup() { init(); //This must be called first to configure routines that the core relies on pinMode(ledPin4, OUTPUT); pinMode(ledPin3, OUTPUT); pinMode(ledPin2, OUTPUT); pinMode(ledPin1, OUTPUT); // initialize the pushbutton pin as an input: } __MACOSX/._Lab_09.txt Lab_17.txt /* Lab_17 interrupt - External Hardware Interrupt using interrupts for doing what they do best--
  • 43.
    two things atonce. Application that counts binary count on port B, when INT0 occurs (ARDUINO Pin 2) Interrupt service rotini will interrupt the on going task of bianry counting and would flash LED's connected on port B and flashing LED's on port B whenever button is pressed. after finishing with ISR the main task of counting is resumed. Date:OCT 22 2014 */ //———Preamble———// #include <avr/io.h> #include <util/delay.h> #include <avr/interrupt.h> // #include “pinDefines.h“
  • 44.
    ISR(INT0_vect) {/* Run everytime there is a change on botton */ int temp = PORTB; // save the count PORTB = 0x00; -delay_ms(200); PORTB = 0x3F; -delay_ms(200); PORTB = 0x3F; -delay_ms(200); PORTB = temp; //return the count } void initInt0(void){ EIMSK = 0x01; //INT0=1 enable INT0 EICRA = 0x01; // ISCOO=1 trigger when button changes */ sei();/* set (global) interrupt enable bit */ } int main(void) { // ———Inits——-// DDRB = 0x3f; /*all LEDs active*/ DDRD = 0x00; // pd7,pd6 = output, reset input PORTD = 0x04; // pulpup *, turn pd7, pd6 off PORTB = 0xFF; iniInt0(); // ——Event loop——//6 while(1) { -delay_ms(500); PORTB = PORTB -1; } return (0); /*This line is never reached */ } __MACOSX/._Lab_17.txt
  • 45.
    Lab_10.TXT Lab_10 Use the taskof lab 09 the output of moving Left or moving Right should maintain the existing state even after the inputs are altered. In other words the previous state presists even ater the button is released. Lab_11.TXT /* Lab_11 Demonstration of BITWISE oprators 1) inputs are 00, the 4 outputs are all high. if inputs are 01, the 4 outputs are: a) reset first and third outputs, using a BITMASK if inputs are 10, the 4 outputs are: b) set first and third outputs, using a BITMASK if inputs are 01, the 4 outputs are: c) rest first and second outputs, using a BITMASK, after 5 second toggle all fours bits.
  • 46.
    Circut decription: UsePort B as inputs (pin 14, 15 as PB0, PB1) Use Port D as output (Pins2,3,4 and 5 as PD0, PD1, PD2, and PD 3) Date: 09/29/2014 */ #include <util/delay.h> #define pushButton0 10 #define pushButton1 12 #define led0 10 #define led1 11 #define led2 12 #define led3 13
  • 47.
    // function declaraction voidstep(void); void function_int(int*); void function_out(int*); int main() { setup(); int buttonState = 0; // variable for reading the pushbutton state while(1) { // function call without arguments function_in(&buttonState); function_out(&buttonState); }
  • 48.
    return 0; } void function_in(int*p1) { *p1= PINB; } void function_out(int *p2) { char k1=*p2; char mask_01 = 0b00000011; char mask_02 = mask_01 & k1; // check if the pushbuttonis prressed //if it is, the buttonState is HIGH: if (mask_02==00) { //turn appropriate LEDs on and off:
  • 49.
    PORTD=60; // alsocould have use 0b00111100 } else if (mask_02==01) if(mask_02==10) { //trun appropriate LEDs on and off: PORTD = 0x3c; // also could have use ob00111100 } else // turn appropriate LEDs on and off: PORTD =0x00110000; delay(500); PORTD=0x00000000; delay(500); }
  • 50.
    void setup() { init();// thismust be call first to configure routines that the corte relies on // initialize the LED pin as an output: DDRD=0b11111111; // initiaze the pushbutton pin as input: DDRB=0b11111100; } __MACOSX/._Lab_11.TXT Lab_12.txt /* Lab No: 12 Design an application that would recive a charecter form PC and then send the same charecter back to serial monitor on PC.
  • 51.
    Date: 10/01/2014 */ byte characterRead; voidsetup() { // Turn the Serial Protocol ON Serial.begin(9600); } void loop() { /* check if data has been sent from the computer: */ if (Serial.available()) { /* read the most recent byte */
  • 52.
    characterRead = Serial.read(); /*ECHOthe value that was read, back to the serial port. */ Serial.write(characterRead); } } __MACOSX/._Lab_12.txt Lab_13.txt /* Lab No: 13 Design an application that outputs all the ASCIT characters charatebt characters. Date: 10/01/2014 */
  • 53.
    #include <avr/io.h> #include <util/delay.h> voidsetup(void); void inputASCII (void); int main() { Setup(); while(1) { for(char i =0; i <256; i++) { Serial.println(i); delay(200);
  • 54.
    } } } void Setup () { init(); Serial.begin(9600); } __MACOSX/._Lab_13.txt Lab_18.txt /* Lab_18 Interrupt - external Hardware Interrupt using Interrupts for doing what they do best -- two things at once. Apllication that counts binary count on serial monitor,
  • 55.
    when INT0occurs (ARDUNIOPin 2) Interrupt service Routine will interrupt the on going task of binary counting and would flash LED's connected on port B and serially output Blink. After finishing with ISR the main task of counting is rsumed. Date: 10-27-2014 */ #include <avr/io.h> #include <util/delay.h> #include <avr/interrupt.h> void setup (void); ISR (INT0_vect) {//Run every time there is a change on button */ int temp = PORTB; // ave count
  • 56.
    for (int k= 0; k<4; k++) { PORTB = 0x00; _delay_ms(200); PORTB = 0xFF; _delay_ms(200); Serial.print("Blink"); } PORTB = temp; //return ht count } int main () { int j = 0; setup(); int sensorPin = A0; int sensorValue = 0; while(1) {
  • 57.
    Serial.print(j++); Serial.print('n'); _delay_ms(200); ++PORTB; } } void setup (void) { init(); Serial.begin(9600); DDRB= 0xff; DDRD = 0x00; PORTD = 0xff; PORTB = 0xFF; EIMSK = 0x01; EICRA = 0x01; sei();
  • 58.
    } __MACOSX/._Lab_18.txt Lab_19.txt /* Lab_19 Design an applicationthat demonstrates or make use of the exrnal Hardware Inerrupts coming from INT1. Design the smpliest applcation that is demonstrable (as per your defination) running with your perpetual loop. when interupted this task should be replace by the task defined in your ISR. Date: 10-27-2014 */
  • 59.
    #include <avr/io.h> #include <util/delay.h> #include<avr/interrupt.h> #include <pinDefines.h> void setup(void) { init(); Serial.begin(9600); DDRB = 0b11111111; // 0xff; DDRD = 0b00; // 0x00; PORTD = 0b11111111; // 0xff; PORTB = 0b11111111; // 0xff; EIMSK = 0x02; // |=(1<<INT1); //0b1; // 0x01; EICRA = 0x05; // 0x01;
  • 60.
    sei(); } ISR(INT1_vect) { int temp= PORTB; for( int k=0; k < 4; k++) { PORTB=0b00011111; _delay_ms(200); PORTB=0b00000000; // PORTB=0xFF; _delay_ms(200); Serial.print(" Stop "); // Serial.println(); } PORTB = temp;
  • 61.
    } int main() { int j=0; setup(); intsensorpin = A0; int sensorvalue = 0; while(1) { PORTB=0b00000000; // PORTB=0xFF; _delay_ms(200); PORTB=0b00000001; _delay_ms(200); PORTB=0b00000010; _delay_ms(200); PORTB=0b00000100; _delay_ms(200); PORTB=0b00001000;
  • 62.
  • 63.
    #define ledPin 13 voidsetup() { pinMode(ledPin, OUTPUT); // initialize timer1 noInterrupts(); // disable all interrupts TCCR1A = 0; TCCR1B = 0; TCNT1 = 34286; // preload timer 65536- 16MHz/256/2Hz TCCR1B |= (1 << CS12); // 256 prescaler TIMSK1 |= (1 << TOIE1); // enable timer overflow interrupt interrupts(); // enable all interrupts } ISR(TIMER1_OVF_vect) // interrupt service routine that
  • 64.
    wraps a userdefined function supplied by attachInterrupt { TCNT1 = 34286; // preload timer digitalWrite(ledPin, digitalRead(ledPin) ^ 1); } void loop() { } __MACOSX/._Lab_20.txt Lab_21.txt /* Date: 11-03-2014 Lab_21 "Exam_02" Design an application that would turn the LED's ON for 5
  • 65.
    seconds evry 60 seconds."Long time delays using timers" */ # include <avr /io.h> #include <util/delay.h> #include <avr/interrupt.h> int main ( void ) { setup(); int ElapsedSeconds = 0;
  • 66.
    for (;;) { // Checktimer value in if statement , true when count matches 1 second if ( TCNT1 >= 15624) { TCNT1 = 0; // Reset timer value ++ElapsedSeconds; if (ElapsedSeconds == 60) // Check if one minute has elapsed { PORTB = 0b00111111; // Toggle the LED } if (ElapsedSeconds == 65) { PORTB = 0b00000000;
  • 67.
    ElapsedSeconds = 0;// Reset counter variable } } } } void setup(void) { DDRB = 0b00111111; // Set LED as output TCCR1B |= ((1 << CS10 ) | (0 << CS11) | (1 << CS12 )); // Set up timer at Fcpu /1024 } __MACOSX/._Lab_21.txt Lab_22.txt /* Lab_22
  • 68.
    Date: 11-05-2014 Design anapplication would acomplish the task of (utizing Timer in CTC mode) blinking a LED connected to a pin of you choice, every 1 second. */ # include <avr /io.h> #include <util/delay.h> #include <avr/interrupt.h> #include <pinDefines.h> int main ( void ) { setup(); TIFR1 |= (1 << OCF1A); for (;;)
  • 69.
    { if ( TIFR1& (1 << OCF1A )) { PORTB ^= 0b00000001; // Toggle the LED TIFR1 = (1 << OCF1A ); // clear the CTC flag ( writing a logic one to the set flag clears it) } } } void setup (void) {
  • 70.
    DDRB = 0b00000001;// Set LED as output TCCR1B |= ((1 << CS10 ) | (0 << CS11) | (1 << CS12 )); // Set up timer at Fcpu /1024 TCCR1B |= (1 << WGM12 ); // Configure timer 1 for CTC mode OCR1A = 15624; // Set CTC compare value to 1Hz at 1 MHz AVR clock , with a prescaler of 1024 } __MACOSX/._Lab_22.txt Lab_23.txt /* Lab_23 Date: 11-10-2014
  • 71.
    Title: Using Timesintrrputs Design an application that could run a pump that could water your particular pet plant so many second evey (your prctical value) that is esaly demonstrable. comment your code */ /* Lab_23 Name: Ayman Alshahabiah Date: 11-10-2014 Title: Using Times intrrputs Design an application that could run a pump that could water your particular pet plant so many second evey (your prctical value) that is esaly demonstrable. comment your code
  • 72.
    */ # include <avr/io.h> # include <avr / interrupt .h> #include <pinDefines.h> void setup (void) { DDRB |= (1 << 0); // Set LED as output TCCR1B |= (1 << WGM12 ); // Configure timer 1 for CTC mode //TODO : Enable CTC interrupt // TODO : Enable global interrupts OCR1A = 15624; // Set CTC compare value to 1Hz at 1 MHz AVR clock , with a prescaler of 64 TCCR1B |= ((1 << CS10 ) | (1 << CS12)); // Start timer at Fcpu /64 TIMSK1 |= (1 << OCIE1A ); sei();
  • 73.
    } int main (void) { setup(); for(;;) { } } ISR ( TIMER1_COMPA_vect ) { static int ElapsedSeconds=0; ++ElapsedSeconds;
  • 74.
    if (ElapsedSeconds ==1)//heck if one minute has elapsed { PORTB = 0b100000;// Toggle the LED } if (ElapsedSeconds == 4) { PORTB = 0b000000; ElapsedSeconds = 0; // Reset counter variable } }
  • 75.
    __MACOSX/._Lab_23.txt Lab_24.txt /* Lab 24 Timer Interrupttask Analog with main Task. Design an applicataion that would be: 1) Performing the main taskof counting on ther serial monitor once every 0.5 seconds 2) Timer interrupt task would be triggered once every 10 seconds and this will announce on the serial monitor by saying "Timer Interrupt". Date : 11-12-2014 */ # include <avr /io.h>
  • 76.
    # include <avr/ interrupt .h> # include <util/delay.h> int main ( void ) { int R = 0; sei (); // Enable global interrupts OCR1A = 62499; // Set CTC compare value to 1Hz at 1 MHz AVR clock , with a prescaler of 256 TCCR1B |= (1 << WGM12 ); TIMSK1 |= (1 << OCIE1A ); // Enable CTC interrupt TCCR1B |= ((1 << CS12)); // Set up timer at Fcpu /256 setup(); for (;;)
  • 77.
    { Serial.println(R); R++; _delay_ms(500); } } ISR ( TIMER1_COMPA_vect) { static int count = 0; ++count; if ( count ==10) { Serial.println("Timer interrupt"); count = 0;
  • 78.
  • 79.
    Lab_25 Date: 11-17-2014 Utilize timerintrurpt as means to achived p.w.m that intrupts would controls a DC motor. */ # include <avr /io.h> #include <util/delay.h> #include <avr/interrupt.h> #include <pinDefines.h> int main ( void )
  • 80.
    { setup(); TIFR1 |= (1<< OCF1A); for (;;) { if ( TIFR1 & (1 << OCF1A )) { PORTB ^= 0b00000001; // Toggle the LED TIFR1 = (1 << OCF1A ); // clear the CTC flag ( writing a logic one to the set flag clears it) } }
  • 81.
    } void setup (void) { DDRB= 0b00000001; // Set LED as output TCCR1B |= ((1 << CS10 ) | (0 << CS11) | (1 << CS12 )); // Set up timer at Fcpu /1024 TCCR1B |= (1 << WGM12 ); // Configure timer 1 for CTC mode OCR1A =9; // Set CTC compare value to 1Hz at 1 MHz AVR clock , with a prescaler of 1024 } __MACOSX/._Lab_25.txt
  • 82.
    Lab_26.txt /* Lab_26 Date: 11-19-2014 Utilizing oneof the timers intrurpt to achived p.w.m that would controls a 12 volts D.C motor reuminine at 1/3 speed (4 volts). */ # include <avr /io.h> #include <util/delay.h> #include <avr/interrupt.h> #include <pinDefines.h>
  • 83.
    int main (void ) { setup(); TIFR1 |= (1 << OCF1A); for (;;) { if ( TIFR1 & (1 << OCF1A )) { PORTB ^= 0b00000001; // Toggle the motor TIFR1 = (1 << OCF1A ); // clear the CTC flag ( writing a logic one to the set flag clears it)
  • 84.
    } } } void setup (void) { DDRB= 0b00000001; // Set LED as output TCCR1B |= ((1 << CS10 ) | (0 << CS11) | (1 << CS12 )); // Set up timer at Fcpu /1024 TCCR1B |= (1 << WGM12 ); // Configure timer 1 for CTC mode OCR1A =9; // Set CTC compare value to 1Hz at 1 MHz AVR clock , with a prescaler of 1024 }
  • 85.