JDK and AWT
•
0 likes•138 views

The original JDK 1.0 had a very simple mechanism for drawing shapes. You select color and paint mode, and call methods of the Graphics class. ThesisScientist.com

Recommended
Recommended
More Related Content
What's hot
What's hot (20)
Similar to JDK and AWT
Similar to JDK and AWT (20)
More from Thesis Scientist Private Limited
More from Thesis Scientist Private Limited (20)
Recently uploaded
Recently uploaded (20)
JDK and AWT
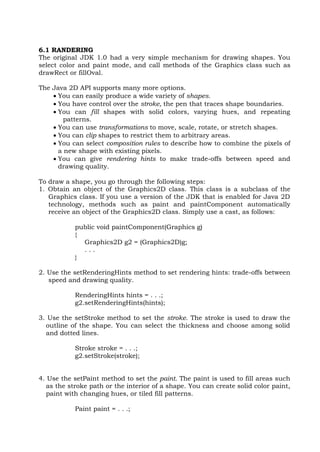
- 1. 6.1 RANDERING The original JDK 1.0 had a very simple mechanism for drawing shapes. You select color and paint mode, and call methods of the Graphics class such as drawRect or fillOval. The Java 2D API supports many more options. You can easily produce a wide variety of shapes. You have control over the stroke, the pen that traces shape boundaries. You can fill shapes with solid colors, varying hues, and repeating patterns. You can use transformations to move, scale, rotate, or stretch shapes. You can clip shapes to restrict them to arbitrary areas. You can select composition rules to describe how to combine the pixels of a new shape with existing pixels. You can give rendering hints to make trade-offs between speed and drawing quality. To draw a shape, you go through the following steps: 1. Obtain an object of the Graphics2D class. This class is a subclass of the Graphics class. If you use a version of the JDK that is enabled for Java 2D technology, methods such as paint and paintComponent automatically receive an object of the Graphics2D class. Simply use a cast, as follows: public void paintComponent(Graphics g) { Graphics2D g2 = (Graphics2D)g; . . . } 2. Use the setRenderingHints method to set rendering hints: trade-offs between speed and drawing quality. RenderingHints hints = . . .; g2.setRenderingHints(hints); 3. Use the setStroke method to set the stroke. The stroke is used to draw the outline of the shape. You can select the thickness and choose among solid and dotted lines. Stroke stroke = . . .; g2.setStroke(stroke); 4. Use the setPaint method to set the paint. The paint is used to fill areas such as the stroke path or the interior of a shape. You can create solid color paint, paint with changing hues, or tiled fill patterns. Paint paint = . . .;
- 2. g2.setPaint(paint); 5. Use the setClip method to set the clipping region. Shape clip = . . .; g2.clip(clip); 6. Use the setTransform method to set a transformation from user space to device space. You use transformations if it is easier for you to define your shapes in a custom coordinate system than by using pixel coordinates. AffineTransform transform = . . .; g2.transform(transform); 7. Use the setComposite method to set a composition rule that describes how to combine the new pixels with the existing pixels. Composite composite = . . .; g2.setComposite(composite); 8. Create a shape. The Java 2D API supplies many shape objects and methods to combine shapes. Shape shape = . . .; 9. Draw or fill the shape. If you draw the shape, its outline is stroked. If you fill the shape, the interior is painted. g2.draw(shape); g2.fill(shape); The various set methods simply set the state of the 2D graphics context. They don't cause any drawing. Similarly, when you construct Shape objects, no drawing takes place. A shape is only rendered when you call draw() or fill(). At that time, the new shape is computed in a rendering pipeline. java.awt.Graphics2D package contains two methods: a) void draw(Shape s) – draws the outline of the given shape. b) void fill(Shape s) – fills the interior of the given shape. In the rendering pipeline, the following steps take place to render a shape: 1) The path of the shape is stroked. 2) The shape is transformed.
- 3. 3) The shape is clipped. If there is no intersection b/w the shape & the clipping area, then the process stops. 4) The remainder of the shape after clipping is filled. 5) The pixels of the filled shape are composed with the existing pixels. 6.2 SHAPES Here are some of the methods in the Graphics class to draw shapes: drawLine drawRectangle drawRoundRect draw3DRect drawPolygon drawPolyline drawOval drawArc There are also corresponding fill methods. These methods have been in the Graphics class ever since JDK 1.0. The Java 2D API uses a completely different, object-oriented approach. Instead of methods, there are classes: Line2D Rectangle2D RoundRectangle2D Ellipse2D Arc2D QuadCurve2D CubicCurve2D GeneralPath These classes all implement the Shape interface. Finally, there is a Point2D class that describes a point with an x- and a y- coordinate. Points are useful to define shapes, but they aren't themselves shapes. To draw a shape, you first create an object of a class that implements the Shape interface and then call the draw method of the Graphics2D class.
- 4. Each of the classes whose name ends in "2D" has two subclasses for specifying coordinates as float or double quantities. Internally all graphics classes use float coordinates because float numbers use less storage space, but java programming language makes it a bit more tedious to manipulate float numbers. For this reason most methods of the graphics classes use double parameters & return values. Only when constructing a 2D object you must choose between a constructor with float or double coordinates. For ex: Rectangle2D floatRect=new Rectangle2D.Float(5F,10F,7.5F,15F); Rectangle2D doubleRect=new Rectangle2D.Double(5,10,7.5,15); 6.2.1 2D SHAPES CLASSES For the RoundRectangle2D shape, you specify the top left corner, width & height & the x & y dimensions of the corner area that should be rounded. RoundRectangle2D r = new RoundRectangle2D.Double(150,200,100,50,20,20); here w=150, h=200, x=100, y=50, r=20. The code above, produces a rounded rectangle with circles of radius 20 at each of the corners. The Java 2D API supplies two additional classes: Quadratic & cubic curves. Quadratic & cubic curves are specified by two end points & one or two control points. Moving the control points changes the shape of the curves. To construct quadratic & cubic curves, you give the coordinates of the end points & the control points. For Ex: Quadcurve2d q =new QuadCurve2d.Double(startX, startY, controlX, controlY, endX, endY ); CubicCurve2D c = new CubicCurve2D.Double(startX, startY,control1X, control1Y, control2X,control2Y endX, endY);
- 5. A quadratic curve A cubic curve Quadratic curves are not very flexible & they are not commonly used, whereas cubic curves are common. You can build arbitrary sequences of line segments, quadratic curves & cubic curves & store them in a GeneralPath object. You specify the first coordinate of the path with the moveTo method. GeneralPath class describes paths that are made up from lines, quadratic & cubic curves. For Ex: GeneralPath path =new GeneralPath(); path.moveTo(10, 20); You then extend the path by calling one of the methods lineTo, quadTo or curveTo. These methods extend the path by a line, a quadratic curve, or a cubic curve. To call lineTo, supply the endpoint. For Ex: Path.lineTo(20, 30); 6.3 AREAS However, occasionally, it is easier to describe a shape by composing it from areas, such as rectangles, polygons, or ellipses. The Java 2D API supports four constructive area geometry operations that combine two areas to a new area: add— The combined area contains all points that are in the first or the second area.
- 6. subtract— The combined area contains all points that are in the first but not the second area. intersect— The combined area contains all points that are in the first and the second area. exclusiveOr— The combined area contains all points that are in either the first or the second area, but not in both. To construct a complex area, you start out with a default area object. Area a = new Area(); Then, you combine the area with any shape: a.add(new Rectangle2D.Double(. . .)); a.subtract(path); . . . The Area class implements the Shape interface. You can stroke the boundary of the area with the draw method or paint the interior with the fill method of the Graphics2D class.
- 7. 6.4 STROKE The draw operation of the Graphics2D class draws the boundary of a shape by using the currently selected stroke. By default, the stroke is a solid line that is one pixel wide. You can select a different stroke by calling the setStroke method. You supply an object of a class that implements the Stroke interface. The Java 2D API defines only one such class, called BasicStroke. You can construct strokes of arbitrary thickness. For example, here is how you draw lines that are 10 pixels wide. g2.setStroke(new BasicStroke(10.0F)); g2.draw(new Line2D.Double(. . .)); When a stroke is more than a pixel thick, then the end of the stroke can have different styles. These are called end cap styles. There are three choices:
- 8. A butt cap simply ends the stroke at its end point. A round cap adds a half-circle to the end of the stroke. A square cap adds a half-square to the end of the stroke. When two thick strokes meet, there are three choices for the join style:
- 9. A bevel join joins the strokes with a straight line that is perpendicular to the bisector of the angle between the two strokes. A round join extends each stroke to have a round cap. A miter join extends both strokes by adding a "spike." The miter join is not suitable for lines that meet at small angles. If two lines join with an angle that is less than the miter limit, then a bevel join is used instead. That usage prevents extremely long spikes. By default, the miter limit is ten degrees. These choices can be specified in the BasicStroke constructor, for example: g2.setStroke(new BasicStroke(10.0F, BasicStroke.CAP_ROUND, BasicStroke.JOIN_ROUND)); g2.setStroke(new BasicStroke(10.0F, BasicStroke.CAP_BUTT, BasicStroke.JOIN_MITER, 15.0F /* miter limit */)); Finally, one can specify dashed lines by setting a dash pattern. The dash pattern is a float[ ] array of numbers that contains the lengths of the ―on‖ & ― off― strokes. The dash pattern & a dash phase are specified when constructing the BasicStroke. The dash phase indicates where in the dash pattern each line should start. For Ex: float[ ] dashPattern= {10,10,10,10,10, 10, 30, 10 ,30 …..}; g2.setStroke(new BasicStroke(10.0F,BasicStroke.CAP_BUTT,basicStroke.JOIN_MITER, 10.0F)); 6.5 When you fill a shape, its inside is covered with paint. Use the setPaint() method to set the paint style to an object with a class that implements the Paint interface. The java 2D API provides three such classes:
- 10. a) Color class – To fill shapes with a solid color, simply call setPaint with a color object, such as: g2.setPaint(Color.red); b) GradientPaint class – It varies colors by interpolating b/w two given colors values. u construct a GradientPaint object by specifying two points & the colors u want at these two points, such as: g2.setPaint(new GradientPaint(p1,color.red, p2, color.pink)); Colors are interpolated along the line joining the two points. Colors are constant along lines that are perpendicular to that joining line. c) TexturePaint class – It fills an area with repetitions of an image. To construct a TexturePaint object, you specify a BufferedImage & an anchor rectangle. The anchor rectangle is extended indefinitely in x & y directions to tile the entire coordinate plane. The image is scaled to fit into the anchor & then replicated into each tile.
- 11. You create a BufferedImage object by giving the image size & image type. The most common image type is TYPE_INT_ARGB, in which each pixel is specified by an integer that describes the alpha or red, green & blue values. For Ex: BufferedImage bufferedImage = new BufferedImage(width, height, BufferedImage.TYPE_INT_ARGB); You then obtain a graphics context to draw into the buffered image: Graphics 2D g2 = bufferedImage.createGraphics(); Any drawing operations on g2 now fill the buffered image with pixels. Now you can create your TexturePaint object: g2.setPaint(new TexturePaint( bufferedImage, anchorRectangle));