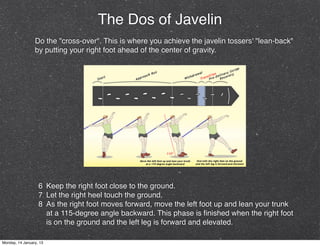
Javelin
                         The history of Javelin, how to put it to good use
                                  and the Dos and Don’ts of it.
                                         By: Blue House


Monday, 14 January, 13
History of Javelin
                         During the era between the Mycenaean times and the Roman Empire, the javelin was a commonly used offensive
                         weapon. Being lighter than the spear, the javelin would be thrown rather than thrust and thus allowed long distance
                         attacks against one’s enemy. Athletes, however, used javelins that were much lighter than military ones because
                         the idea of the event was to demonstrate distance rather than penetration. The one major difference between the
                         javelin of the ancient games and the javelin of more modern times is a leather thong, called an ankyle that was
                         wound around the middle of the shaft. Athletes would hold the javelin by the thong and when the javelin released
                         this thong unwound giving the javelin a spiraled flight.


          The javelin throw has a particularly strong tradition in the Nordic nations of Europe. Of the 69 Olympic medals that have been
          awarded in the men's javelin, 32 have gone to competitors from Norway, Sweden, or Finland.[3] Finland is the only nation to
          have ever swept the medals at a currently recognized official Olympics, and has done so twice, in 1920 and 1932. (However,
          Sweden swept the first four places at the 1906 Intercalated Games. Finland's 1920 sweep also featured an additional fourth
          place finish. Sweeping the first four places is no longer possible, as only three entrants per country are allowed.) In 1912,
          Finland also swept the medals in the only appearance in the Olympics of two-handed javelin, an event in which the
          implement was separately thrown with both the right hand and the left hand and the marks were added together. Quite
          popular in Finland and Sweden at the time, this event soon faded into obscurity, together with similar variations of the shot
          and the discus.


Monday, 14 January, 13
How to throw a Javelin right

                         Things You'll Need

            1 Javelin
            2 Athletic shoes


          Determine the style of grip you wish to use to hold and throw the javelin. Choose between the American style, where the javelin cord is
          gripped between thumb and forefinger; Finnish style where you use your thumb and middle finger; or Fork style, gripping between your
          index and two middle fingers. Experiment using the three different grip styles until you find one that one is most comfortable and effective
          for you.

          Hold the javelin aloft over your shoulder, parallel to the ground, using your chosen grip and ensuring your palm faces the sky. Wait until
          you are two steps from the line to draw the javelin back behind your shoulder.
          The javelin is held between the index and middle fingers behind the cord. The position of the fingers assists the throwing arm in staying
          at shoulder height during the approach.


Monday, 14 January, 13
The ‘Dos’ of Javelin
                         Take the "Approach Run." After you've practiced this a while, the approach
                         run can take 13 to 17 steps. The run-up is shorter for inexperienced
                         throwers.


                 1 Keep your hips high and run on the heels of your feet.
                 2 Let your free arm swing more across the body.
                 3 Flex the arm carrying the javelin to fix its position.


Monday, 14 January, 13
The Dos of Javelin
                         Perform the "Withdrawal." It's a good idea to use a check mark to note where this phase starts,
                         beginning with the right foot and lasting about two strides. It's important to make sure that this
                         movement doesn't harm your momentum.


             10 1) Upon reaching the check mark, speed a little bit ahead of the javelin instead of pushing your shoulders
                and the javelin backward (try to relax arm and shoulder allowing javelin to reach the point of full arm
                extension and fully rotated shoulder).
             11 2) Keep your head facing the way you're throwing.
             12 3) Keep your hips at right angles to the running direction.
             13 4) Shift your right leg forward and up to help keep hips in proper position.


Monday, 14 January, 13
The Dos of Javelin
                 Do the "cross-over". This is where you achieve the javelin tossers' "lean-back"
                 by putting your right foot ahead of the center of gravity.


                   6 Keep the right foot close to the ground.
                   7 Let the right heel touch the ground.
                   8 As the right foot moves forward, move the left foot up and lean your trunk
                     at a 115-degree angle backward. This phase is finished when the right foot
                     is on the ground and the left leg is forward and elevated.

Monday, 14 January, 13
Dos for Javelin

                         Do the "Pre-Delivery Stride." Move the left leg forward and align the
                         shoulders and hips with the throwing direction.


               6 Wait for the left foot to touch the ground.
               7 Straighten the torso.
               8 Turn the face toward direction of the throw. The javelin and shoulders should
                 be parallel.
               9 Position the throwing hand above shoulder level.

Monday, 14 January, 13
Dos for Javelin
                    Once the left foot hits the ground, your left side must be ready to handle the
                    thrusting of the right leg, which drives up and forward and brings the hips into a
                    right angle with the throw.


          5 After the hip thrust, pull back with left arm keeping it parallel to right shoulder this will
            assist with right shoulder and chest moving forward and aligned with the hips,as this
            is taking place continue through with the throwing arm with the elbow leading.
          6 Move the throwing shoulder over the left leg, your hand should follow through(the
            entire shoulder, elbow, and hand should move through similar to a bullwhip acting as
            one but building on each section before it).Slow motion photography would be the
            only way to really see this effect.
          7 Lift the left leg and move the throwing arm, with the elbow placed high and close to
            the mid line. The javelin release angle should account for aerodynamic lift and drag.
            Experts recommend 33 degrees as the optimum release angle.
Monday, 14 January, 13
Dos for Javelin
                         Hold the javelin spear the correct way (spear in
                         front)

                         Always aim at the TARGET. Not your enemies

                           Wait until the field is clear before throwing
                           (beginners)

                           Make sure you’re in sports shoes (not slippers,
                           sandals)

                           Always listen to the instructor/teacher


Monday, 14 January, 13
Don’ts of Javelin

                         Do not stop halfway when running. It will only end
                         up to this


Monday, 14 January, 13
Don’ts of Javelin
                         Do not wear watches or any jewelry as it may
                         distract you or hurt others

                         When you are lethargic, do not throw a javelin as
                         you may hurt yourself as a result.

                         Foul throws-The javelin must not touch any lines
                         in the field

                         Foul throws- Your body should not touch any lines
                         on the field or your throw will NOT be counted


Monday, 14 January, 13

Javelin

  • 1.
    Javelin The history of Javelin, how to put it to good use and the Dos and Don’ts of it. By: Blue House Monday, 14 January, 13
  • 2.
    History of Javelin During the era between the Mycenaean times and the Roman Empire, the javelin was a commonly used offensive weapon. Being lighter than the spear, the javelin would be thrown rather than thrust and thus allowed long distance attacks against one’s enemy. Athletes, however, used javelins that were much lighter than military ones because the idea of the event was to demonstrate distance rather than penetration. The one major difference between the javelin of the ancient games and the javelin of more modern times is a leather thong, called an ankyle that was wound around the middle of the shaft. Athletes would hold the javelin by the thong and when the javelin released this thong unwound giving the javelin a spiraled flight. The javelin throw has a particularly strong tradition in the Nordic nations of Europe. Of the 69 Olympic medals that have been awarded in the men's javelin, 32 have gone to competitors from Norway, Sweden, or Finland.[3] Finland is the only nation to have ever swept the medals at a currently recognized official Olympics, and has done so twice, in 1920 and 1932. (However, Sweden swept the first four places at the 1906 Intercalated Games. Finland's 1920 sweep also featured an additional fourth place finish. Sweeping the first four places is no longer possible, as only three entrants per country are allowed.) In 1912, Finland also swept the medals in the only appearance in the Olympics of two-handed javelin, an event in which the implement was separately thrown with both the right hand and the left hand and the marks were added together. Quite popular in Finland and Sweden at the time, this event soon faded into obscurity, together with similar variations of the shot and the discus. Monday, 14 January, 13
  • 3.
    How to throwa Javelin right Things You'll Need 1 Javelin 2 Athletic shoes Determine the style of grip you wish to use to hold and throw the javelin. Choose between the American style, where the javelin cord is gripped between thumb and forefinger; Finnish style where you use your thumb and middle finger; or Fork style, gripping between your index and two middle fingers. Experiment using the three different grip styles until you find one that one is most comfortable and effective for you. Hold the javelin aloft over your shoulder, parallel to the ground, using your chosen grip and ensuring your palm faces the sky. Wait until you are two steps from the line to draw the javelin back behind your shoulder. The javelin is held between the index and middle fingers behind the cord. The position of the fingers assists the throwing arm in staying at shoulder height during the approach. Monday, 14 January, 13
  • 4.
    The ‘Dos’ ofJavelin Take the "Approach Run." After you've practiced this a while, the approach run can take 13 to 17 steps. The run-up is shorter for inexperienced throwers. 1 Keep your hips high and run on the heels of your feet. 2 Let your free arm swing more across the body. 3 Flex the arm carrying the javelin to fix its position. Monday, 14 January, 13
  • 5.
    The Dos ofJavelin Perform the "Withdrawal." It's a good idea to use a check mark to note where this phase starts, beginning with the right foot and lasting about two strides. It's important to make sure that this movement doesn't harm your momentum. 10 1) Upon reaching the check mark, speed a little bit ahead of the javelin instead of pushing your shoulders and the javelin backward (try to relax arm and shoulder allowing javelin to reach the point of full arm extension and fully rotated shoulder). 11 2) Keep your head facing the way you're throwing. 12 3) Keep your hips at right angles to the running direction. 13 4) Shift your right leg forward and up to help keep hips in proper position. Monday, 14 January, 13
  • 6.
    The Dos ofJavelin Do the "cross-over". This is where you achieve the javelin tossers' "lean-back" by putting your right foot ahead of the center of gravity. 6 Keep the right foot close to the ground. 7 Let the right heel touch the ground. 8 As the right foot moves forward, move the left foot up and lean your trunk at a 115-degree angle backward. This phase is finished when the right foot is on the ground and the left leg is forward and elevated. Monday, 14 January, 13
  • 7.
    Dos for Javelin Do the "Pre-Delivery Stride." Move the left leg forward and align the shoulders and hips with the throwing direction. 6 Wait for the left foot to touch the ground. 7 Straighten the torso. 8 Turn the face toward direction of the throw. The javelin and shoulders should be parallel. 9 Position the throwing hand above shoulder level. Monday, 14 January, 13
  • 8.
    Dos for Javelin Once the left foot hits the ground, your left side must be ready to handle the thrusting of the right leg, which drives up and forward and brings the hips into a right angle with the throw. 5 After the hip thrust, pull back with left arm keeping it parallel to right shoulder this will assist with right shoulder and chest moving forward and aligned with the hips,as this is taking place continue through with the throwing arm with the elbow leading. 6 Move the throwing shoulder over the left leg, your hand should follow through(the entire shoulder, elbow, and hand should move through similar to a bullwhip acting as one but building on each section before it).Slow motion photography would be the only way to really see this effect. 7 Lift the left leg and move the throwing arm, with the elbow placed high and close to the mid line. The javelin release angle should account for aerodynamic lift and drag. Experts recommend 33 degrees as the optimum release angle. Monday, 14 January, 13
  • 9.
    Dos for Javelin Hold the javelin spear the correct way (spear in front) Always aim at the TARGET. Not your enemies Wait until the field is clear before throwing (beginners) Make sure you’re in sports shoes (not slippers, sandals) Always listen to the instructor/teacher Monday, 14 January, 13
  • 10.
    Don’ts of Javelin Do not stop halfway when running. It will only end up to this Monday, 14 January, 13
  • 11.
    Don’ts of Javelin Do not wear watches or any jewelry as it may distract you or hurt others When you are lethargic, do not throw a javelin as you may hurt yourself as a result. Foul throws-The javelin must not touch any lines in the field Foul throws- Your body should not touch any lines on the field or your throw will NOT be counted Monday, 14 January, 13