The document contains code examples demonstrating Java programming concepts like:
1) Printing output to the console using System.out.println();
2) Declaring and initializing variables of different primitive data types;
3) Using the Scanner class to take user input;
4) Demonstrating inheritance between classes through extending superclasses; and
5) Overloading constructors.
![/*
* The first program will print a sentance on the screen "hallo world"
*/
package hallo;
public class Hallo {
public static void main(String[] args) /*this is the start point for the every Java program. it is fixed*/
{
String firstprogram = " Hello world";
System.out.println("Hallo BolyTech students"); /*short cut for that is sout + tab*/
System.out.println("firstprogram = " + firstprogram); /*the shout cut for that is soutv + tab*/
}
}
/*
second program show the type of variable used in JAVA and how to print Ascii code
*/
package variable;
public class Variable {
public static void main(String[] args)
{
byte b=127; // 8 bits signed
short s=32000; // 16 bits signed
int i=200; // 32 bits signed
long L=200; // 64 bits signed
float f=2.5f; // 32 bits single-precision suiable for currency
double d=2.5; // 64 bits double-precision
char c='A'; // 16 bits](https://image.slidesharecdn.com/javadoc-171024225520/85/Java-doc-Pr-ITM2-1-320.jpg)

![/*third program used to deal with Scanner library.
you can read more about it using this link
http://www.tutorialspoint.com/java/util/java_util_scanner.htm*/
package scannerlibrary;
import java.util.Scanner; /*to import the library to deal read from screen*/
public class ScannerLibrary {
public static void main(String[] args)
{
// test about Scanner library
Scanner input = new Scanner(System.in); /*create a new scanner to read from screen*/
System.out.println("enter your name : ");
String name=input.next();
System.out.println(name);
System.out.println("enter your name : " + input.next()); // short way to do the last three sentence
}
}
/*
scan two integer number and gives the sum
*/
package scanner_int_num;
import java.util.Scanner;
public class Scanner_int_num {
public static void main(String[] args) {
Scanner myobject= new Scanner (System.in);
System.out.println("enter first num ");](https://image.slidesharecdn.com/javadoc-171024225520/85/Java-doc-Pr-ITM2-3-320.jpg)
![int num1=myobject.nextInt();
System.out.println("enter Second num");
int num2=myobject.nextInt();
System.out.println("sum = " + (num1+num2) );
}
}
/*
more about Scanner used
*/
package scannerstring;
import java.util.Scanner;
public class ScannerString {
public static void main(String[] args) {
String s = "Hello World 3 + 3.0 = 6 ";
// create a new scanner with the specified String Object
Scanner str = new Scanner(s);
// find the next token and print it
System.out.println(str.next());
// find the next token and print it
System.out.println(str.next());
System.out.println(str.next());
System.out.println(str.next());
System.out.println(str.next());
System.out.println(str.next());
System.out.println(str.next());
// close the scanner
str.close(); } }](https://image.slidesharecdn.com/javadoc-171024225520/85/Java-doc-Pr-ITM2-4-320.jpg)
![Constructor:
- Each class has a constructor whether define or not. It is use to initialize all variables to zero.
- Each time a new object invoked, at least one constructor will be invoked.
- Constructor does not have return value.
- Main rule of constructor it should has the same name of the class.
- How to call a constructor?
( name_of_class variable_name = new constructor_name)
Scanner input = new Scanner();
Example (1):
Simple example that uses a constructor without parameters:
class Car{
int x;
Car( ){
x = 10;
}
}
public class ConstrutorTest {
public static void main(String[] args) {
Car mycar= new Car();
System.out.println("x = "+ mycar.x);
}
}
Example (2):
Here is a simple example that uses a constructor with parameter:
class Car{
int x;
Car(int i){
x = i;
}
}
public class ConstrutorTest {
public static void main(String[] args) {
Car mycar= new Car(12);](https://image.slidesharecdn.com/javadoc-171024225520/85/Java-doc-Pr-ITM2-5-320.jpg)

![Example (4) of Constructor Overloading
class Student{
int id;
String name;
int age;
Student(int i,String n){
id = i;
name = n;
}
Student(int i,String n,int a){
id = i;
name = n;
age=a;
}
void display(){
System.out.println(id+" "+name+" "+age);
}
public static void main(String args[]){
Student s1 = new Student (12,"Ahmed");
Student s2 = new Student (22,"Ali",25);
s1.display();
s2.display();
}
}](https://image.slidesharecdn.com/javadoc-171024225520/85/Java-doc-Pr-ITM2-7-320.jpg)

![public class ConstrutorTest {
public static void main(String[] args) {
Example obj1= new Example();
System.out.println(+obj1.getValue());
obj1= new Example(12);
System.out.println(+obj1.getValue());
obj1= new Example(20.6);
System.out.println(+obj1.getValue());
} }
Inheritance:
Example (1): to understand super class and sub class :
package inheritance;
class super_class {
super_class(){
System.out.println("super class");
}
}
public class sub_class extends super_class{
public sub_class () {
super();
System.out.println("sub class");
}
public static void main(String[] args) {
sub_class supclass = new sub_class ();
} }](https://image.slidesharecdn.com/javadoc-171024225520/85/Java-doc-Pr-ITM2-9-320.jpg)
![//example of super keyword
class Vehicle{
int speed=50;
}
class Bike4 extends Vehicle{
int speed=100;
void display(){
System.out.println(super.speed);//will print speed of Vehicle now
}
public static void main(String args[]){
Bike4 b=new Bike4();
b.display();
}
}
Output:50](https://image.slidesharecdn.com/javadoc-171024225520/85/Java-doc-Pr-ITM2-10-320.jpg)
![class Vehicle{
Vehicle(){System.out.println("Vehicle is created");}
}
class Bike5 extends Vehicle{
Bike5(){
super();//will invoke parent class constructor
System.out.println("Bike is created");
}
public static void main(String args[]){
Bike5 b=new Bike5();
}
}
Output:
Vehicle is created
Bike is created](https://image.slidesharecdn.com/javadoc-171024225520/85/Java-doc-Pr-ITM2-11-320.jpg)
![class Vehicle{
Vehicle(){System.out.println("Vehicle is created");}
}
class Bike6 extends Vehicle{
int speed;
Bike6(int speed){
this.speed=speed;
System.out.println(speed);
}
public static void main(String args[]){
Bike6 b=new Bike6(10);
}
}
Output:Vehicle is created
10](https://image.slidesharecdn.com/javadoc-171024225520/85/Java-doc-Pr-ITM2-12-320.jpg)
![class Person{
void message(){System.out.println("welcome");}
}
class Student16 extends Person{
void message(){System.out.println("welcome to java");}
void display(){
message();//will invoke current class message() method
super.message();//will invoke parent class message() method
}
public static void main(String args[]){
Student16 s=new Student16();
s.display();
}
}
Output:welcome to java
welcome](https://image.slidesharecdn.com/javadoc-171024225520/85/Java-doc-Pr-ITM2-13-320.jpg)
![Example (2):
package arraytest;
import java.util.Scanner;
class arrayone
{
protected int a[]=new int[6];
}
class arraytwo extends arrayone
{
public void set()
{ System.out.println("Enter the elements of array : ");
Scanner input= new Scanner(System.in);
for (int i = 0; i <6; i++) {
System.out.print("a["+i+"]=");
a[i]=input.nextInt();
}}
public void display()
{
System.out.print("The elemnts of a = ");
for (int i = 0; i <6; i++) {
System.out.print(a[i]+" ");
}}
public class Arraytest {
public static void main(String[] args) {
arraytwo two=new arraytwo();
two.set();
two.display(); }}](https://image.slidesharecdn.com/javadoc-171024225520/85/Java-doc-Pr-ITM2-14-320.jpg)

![package firstdigitchange;
public class FirstDigitChange {
public static void main(String[] args) {
// TODO code application logic here
int x=7458;
int t=1;
int s=0,x2=0;
int num=2;
x2=x;
while(x2>=10){
x2=x2/10;
t=t*10;
}
num=num*t+(x%t);
System.out.println("after change "+ num);
}
}](https://image.slidesharecdn.com/javadoc-171024225520/85/Java-doc-Pr-ITM2-16-320.jpg)
![//practical exam solution :
package exam;
import java.util.Scanner;
class Deparments
{
private String[]Names=new String[5];
public String GetDepName(int i)
{
try
{
return Names[i];
}
catch(IndexOutOfBoundsException e)
{
return "error ";
}
}
public void SetDepNames()
{
Scanner S=new Scanner(System.in);
System.out.println("Set elements to your array:");](https://image.slidesharecdn.com/javadoc-171024225520/85/Java-doc-Pr-ITM2-17-320.jpg)
![for (int i = 0; i < 5; i++)
{
System.out.print("a["+i+"]=");
Names[i]=S.next();
}
}
}
class Employee extends Deparments
{
private String Name;
private int DepID;
private double Salary;
public void SetEmpName(String i)
{
Name=i;
}
public void SetSalary(double i)
{
Salary=i;
}
public void SetDepID(int i)
{
DepID=i;](https://image.slidesharecdn.com/javadoc-171024225520/85/Java-doc-Pr-ITM2-18-320.jpg)
![}
public String GetEmpName()
{
return Name;
}
public double GetSalary()
{
return Salary;
}
public int GetDepID()
{
return DepID;
}
}
public class Exam
{
public static void main(String[] args)
{
try
{
Employee A1=new Employee();
Employee A2=new Employee();
Employee A3=new Employee();](https://image.slidesharecdn.com/javadoc-171024225520/85/Java-doc-Pr-ITM2-19-320.jpg)


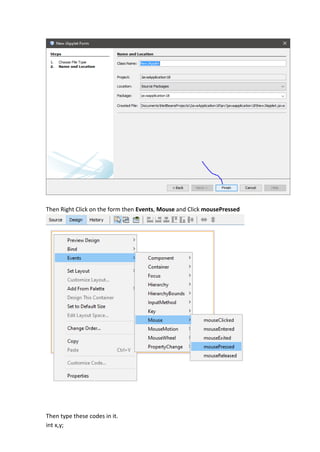


![type these codes inside ADD Button:
private void jButton1ActionPerformed(java.awt.event.ActionEvent evt) {
DefaultTableModel t=(DefaultTableModel) jTable1.getModel();
t.addRow(new Object[]{jTextField1.getText(),jTextField2.getText(),jTextField3.getText()});
}
type these codes inside Edit Button:
private void jButton2ActionPerformed(java.awt.event.ActionEvent evt) {
DefaultTableModel t=(DefaultTableModel) jTable1.getModel();
t.setValueAt(jTextField1.getText(),jTable1.getSelectedRow(),0);
t.setValueAt(jTextField2.getText(),jTable1.getSelectedRow(),1);
t.setValueAt(jTextField3.getText(),jTable1.getSelectedRow(),2);
}
type these codes inside Delete Button:
private void jButton3ActionPerformed(java.awt.event.ActionEvent evt) {
DefaultTableModel t=(DefaultTableModel) jTable1.getModel();
t.removeRow(jTable1.getSelectedRow());
}
If you want to use exception , you can change the code to this below:
private void jButton3ActionPerformed(java.awt.event.ActionEvent evt) {
// TODO add your handling code here:
DefaultTableModel t=(DefaultTableModel) jTable1.getModel();
try{
t.removeRow(jTable1.getSelectedRow());}
catch(ArrayIndexOutOfBoundsException e){
JOptionPane.showMessageDialog(rootPane, "please select at least one row " +e);
}](https://image.slidesharecdn.com/javadoc-171024225520/85/Java-doc-Pr-ITM2-41-320.jpg)
![//Insert by specific row number:
private void jButton1ActionPerformed(java.awt.event.ActionEvent evt) {
if(Integer.parseInt(jTextField4.getText())>=0
&&Integer.parseInt(jTextField4.getText())<=jTable1.getRowCount())
{
DefaultTableModel t=(DefaultTableModel) jTable1.getModel();
String g="Male";
if(jRadioButton2.isSelected())
g="Female";
t.insertRow(Integer.parseInt(jTextField4.getText()), new
Object[]{jTextField1.getText(),jTextField2.getText(),jTextField3.getText(),g});
}
}
// to delete row or more rows
private void jButton2ActionPerformed(java.awt.event.ActionEvent evt) {
DefaultTableModel t=(DefaultTableModel) jTable1.getModel();
if(jTable1.getSelectedRow()!=-1)
t.removeRow(jTable1.getSelectedRow());
}
//For more than one row
private void jButton3ActionPerformed(java.awt.event.ActionEvent evt) {
DefaultTableModel t=(DefaultTableModel) jTable1.getModel();
while(jTable1.getSelectedRow()!=-1)
t.removeRow(jTable1.getSelectedRow());
}](https://image.slidesharecdn.com/javadoc-171024225520/85/Java-doc-Pr-ITM2-42-320.jpg)