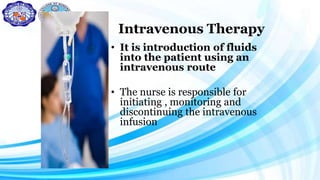
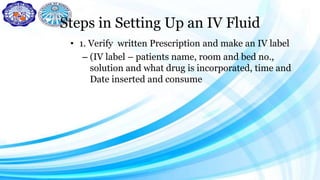
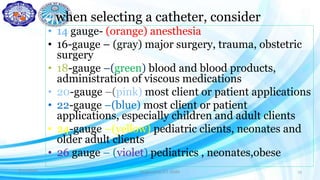
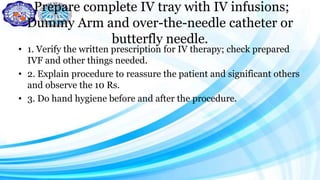
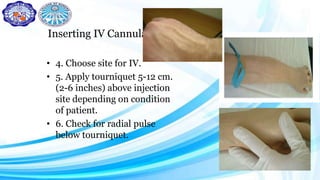
IV THERAPY PROCEDURE
A. SETTING UP
Darwina Iribani Halbi RN MAN
Clinical Instructor
Ateneo De Zamboanga University
Zamboanga City , Philippines
IV THERAPY
PROCEDURE
A. SETTING UP
Darwina Iribani Halbi RN MAN
Clinical Instructor
Ateneo De Zamboanga University
Zamboanga City , Philippines
Intravenous Therapy
• It is introduction of fluids
into the patient using an
intravenous route
• The nurse is responsible for
initiating , monitoring and
discontinuing the intravenous
infusion
Trends in IV Therapy
• 81% - 85% patients in the
hospital receive some
form of IV therapy
• More nursing time is spent
to IV therapy
.
8/11/2020 Prepared by D.I. Halbi 6
IV TUBING
Slide clamp
Steps in Setting Up an IV Fluid
• 1. Verify written Prescription and make an IV label
– (IV label – patients name, room and bed no.,
solution and what drug is incorporated, time and
Date inserted and consume
2. Observe the 10 Rs in preparing and
administering IVF
• 10 Golden rules for administering drugs safely
1. Administer the right drug.
2. Administer the right drug to the right patient.
3. Administer the right dose.
4. Administer the right dose by the right route.
5. Administer the right drug at the right time.
6.Document each drug you administer.
7. Teach the patient about the drugs he is receiving.
8. Take a complete patient drug history.
9.Find out if the patient has any drug allergies.
10.Be aware of potential drugs – drug or drug food
interactions.
Steps
• 3. Explain the procedure to reassure patient and /or
significant
• other, secure consent if necessary.
• 4. Assess patient’s vein, choose appropriate site,
location, size /
• condition.
• 5. Do hand hygiene before and after the procedure.
6. Prepare necessary
materials for procedure
1. ( IV tray with IV solution,
2. administration set, OR iv TUBING
3. IV cannula,
4. forceps soaked in antiseptic
solution,
5. alcohol swabs or cotton balls
soaked in alcohol with cover (this
should be exclusively used for IV),
6. Prepare necessary materials for procedure
• 6.plaster,
• 7.tourniquet,
• 8.gloves,
• 9. splint, and
• 10.IV hook,
• 11. sterile 2x2 gauze or transparent
dressing
• 12.. Include a 3 way stopcock.
Setting Up
• 7. Check the sterility and integrity of the IV solution, IV set and
other devices.
• 8. Place IV label on IVF bottle duly signed by RN who
prepared it (patient’s name, room number, solution,
time and date)
• 9. Open IV administration set aseptically following the
infection control measure
Setting Up
• 10. Open IV administration set aseptically and close the
roller clamp and spike the infusate container
aseptically.
• 11. Fill drip chamber to at least half and prime it with IV
fluid aseptically.
• 12. Expel air bubbles if any and put back the cover to the distal end
of the IV set ( get ready for IV insertion
B. INSERTING IV CANNULA UTILIZING
DUMMY ARM AND OVER THE NEEDLE
CATHETER OR A BUTTERFLY NEEDLE
when selecting a catheter, consider
• 14 gauge- (orange) anesthesia
• 16-gauge – (gray) major surgery, trauma, obstetric
surgery
• 18-gauge –(green) blood and blood products,
administration of viscous medications
• 20-gauge –(pink) most client or patient applications
• 22-gauge –(blue) most client or patient
applications, especially children and adult clients
• 24-gauge –(yellow) pediatric clients, neonates and
older adult clients
• 26 gauge – (violet) pediatrics , neonates,obese
8/11/2020 Prepared by D.I. Halbi 15
TYPES OF CANNULA
1. Iv cannula pen-like
model.
2. Iv cannula with wings
model.
3. Iv cannula with
injection part model.
4. Iv cannula y-type
model.
Prepare complete IV tray with IV infusions;
Dummy Arm and over-the-needle catheter or
butterfly needle.
• 1. Verify the written prescription for IV therapy; check prepared
IVF and other things needed.
• 2. Explain procedure to reassure the patient and significant others
and observe the 10 Rs.
• 3. Do hand hygiene before and after the procedure.
Inserting IV Cannula
• 4. Choose site for IV.
• 5. Apply tourniquet 5-12 cm.
(2-6 inches) above injection
site depending on condition
of patient.
• 6. Check for radial pulse
below tourniquet.
Inserting IV Cannula
• 7. Prepare site with effective topical
antiseptic according to hospital policy or
cotton balls with alcohol in circular motion
and allow 30 seconds to dry (no touch
technique).
• Note: Always wear gloves when doing
any venipuncture.
Inserting IV cannula• 8. Using the appropriate IV
cannula, pierce skin with the
correct technique.
• 9. Upon backflow visualization,
continue inserting the catheter
into the vein.
• 10. Position the IV catheter
parallel to the skin.
• 11. Hold stylet stationary and
slowly advance the catheter until
the hub is 1 mm to the puncture
site.
Inserting IV Cannula
• 10. Slip a sterilize gauze under the hub.
Release the tourniquet; remove the stylet
while applying digital pressure over the
catheter with one finger about 1-2 inches from
the tip of the inserted catheter.
Inserting IV Cannula
• 13. Connect the infusion tubing of the
prepared IVF aseptically to the IV catheter.
• 14. Open the clamp and regulate the flow rate.
• 15. Reassure patient.
• 16. Anchor needle firmly in place with the use
of:
– a. Transparent tape/dressing directly on the
puncture site.
– b. Tape (using any appropriate anchoring
style)
– c. Band Aid
Inserting IV Cannula
• Note: Never place unsterile tape directly on IV insertion
site. Instead, place a small piece of sterile OS and then
secure it with adhesive tape.
Inserting IV
Cannula
• 17. Tape a small loop of IV tubing for
additional anchoring. Apply splint, if
needed.
• 18. Calibrate the IV fluid bottle and regulate
flow of infusion according to prescribed
duration.
• 19. Label on IV tape near the IV site to
indicate the date of insertion, type and
gauge of IV catheter and countersign.
Inserting IV Cannula
• 20. Label with plaster on the IV tubing to indicate the
date when to change the IV tubing.
• 21. Observe patient and report any untoward effect.
• 22. Discard sharps and waste according to Health
Care Waste Management (DOH/DENR).
• 23. Document in the patient’s chart and endorse to
incoming shift.
CHANGING AN IV
SOLUTION
Darwina I. Halbi RN
MAN
Darwina I. Halbi RN MAN 26
Changing An IV solutions
• 1. Verify doctors prescription in doctors order sheet
Countercheck IV label, IV card, infusate sequence, type amount,
additives(if any, and duration of infusion
2. Observe the 12 R’s
3. Explain the procedure to reassure the patient and significant
others and assess IV sites for redness, swelling and pain, et5c
4. Change IV tubing upon the
discretion of the health care practitioner
when clinically indicated .
Darwina I. Halbi RN MAN 27
Changing An IV solution
5. Wash hands before the procedures
6. Prepare the necessary materials place in an IV tray
7. Check sterility and integrity of the IV solution
8. Place an IV label on the IV bottle
9. Calibrate new IV bottle according to duration on infusion
as per prescription
10. Open and connect the IV tubing into the solution bottle
Darwina I. Halbi RN MAN 28
Changing an IV solution
11.Close the roller clamp
12.Regulate the flow rate according to the prescribe infusion
Rate, expel the air bubbles if evident
13. Reiterate assurance to patients and significant others
14. Discard all waste materials
Document and endorse accordingly
Darwina I. Halbi RN MAN 29
Discontinuing an IV infusion
Darwina I Halbi RN MAN
Darwina I. Halbi RN MAN 30
Discontinuing an IV solutions
• 1. Verify doctors order
• 2. Observe the 12 R’s
• 3. Assess and inform the patient
• 4. Prepare the necessary materials, IV tray or injection
Tray with sterile cotton balls with
– alcohol, -kidney basin
– Plaster -band aid
– pick up forceps in antiseptic solutions
Darwina I. Halbi RN MAN 31
• 5. Wash Hands before and after the procedure
• 6. close the rubber clamp of the of the administration set
• 7. Moistened adhesive tapes around the catheter with
cotton balls and alcohol, remove plaster gently
• Use pick up forceps to get cotton balls with alcohol and
without applying pressure, remove needle or IV catheter ,
the emmediately apply pressure over the venipuncture
site.
Darwina I. Halbi RN MAN 32
Discontinue an IV Infusion
• 9. Inspect IV catheter for completeness
• 10. Place dressing over the venipuncture site
• 11. Discard all waste materials including IV cannula
according to health care waste management
• 12. Reassure the patient
• 13.Document time of discontinuance, status of insertion
site and integrity of the iv catheter
Darwina I. Halbi RN MAN 33
Blood
Transfusion
PROCEDURE
Darwina Iribani Halbi RN MAN
Clinical Instructor
Ateneo De Zamboanga University
Zamboanga City , Philippines
Blood Transfusion
1. Verify the Doctors Order and make a treatment card according to hospital
policy
2. Observe the 10 rights
3. Explain the importance and benefits of voluntary blood donation
4. Request prescribed blood or blood components from blood bank to include
blood typing and cross matching
5. Use a clean and safe container to get the blood from the blood bank and keep
it at room temperature
Blood transfusion
7. Assess the patients condition
• The doctor and the Nurse Countercheck the compatibility of blood and blood
products to be transfused against the crossmatching sheet note
– the ABO grouping( A ,B ,AB, O )
– and RH, (- or +)
– serial no. and each blood unit and
– the expiry date with the bag label and
– other laboratory blood exams as required before transfusion
• HEMOGLOBIN, HEMATOCRIT, ETC
Blood transfusion
• 8. Get the base line vital signs and refer to the doctor accordingly
– (T,P,R,BP)
• 9. Give premedication 30 minutes before transfusions
– (Diphenhydramine)
10. Prepare the Equipment's
• IV Injection Tray
• Compatible BT set
• IV catheter/needle gauge 18
• Plaster tourniquet
• Blood/ or blood components to be transfuse
• Plain NSS
• IV set
• needle gauge
• IV Hook
• gloves
• 2x2 gauze or transparent dressing, plaster
Blood transfusion
• 11. Do hand hygiene before the procedure
• 12. If the main IV is D5% initiate an IV line , with plain NSS on the other
site and regulate IVF
• 13. Open a compatible blood set aseptically and
– close the roller clamp
– Spike blood bag carefully,
– fill the drip chamber at least half full
– Prime tubing ang remove air bubbles if any
– Use needle gauge 18 0r 19 side drip for adult and 22 for pedia
• If blood is given through the Y injection port the gauge of the needle is
disregarded
STEPs in Blood transfusion
• 14. Disinfect the Y injection port of IV tubing NSS and insert
the blood needle from BT administration set and secure with
adhesive tape
• 15. Close the roller clamp of IV tubing of plain NSS and
regulate in KVO while the transfusion is going on
• 16. Transfuse the blood via the injection and regulate and
regulate it at 10-15 gtts/min and then at the prescribe
rate(usually 25 gtts/min)
• Monitor the patient for any adverse reaction
18. Observe for any untoward reaction
• Flush skin
• Chills or
• elevated temperature
• Itchiness,
• or urticaria
• dysnea
Blood transfusion
• 19. Swirl the blood from time to time to mix the solid with the
plasma
– Only one BT set for two units of blood,
• 20. When blood is consumed, close the roller clamp of BT,
and disconnect from the IV line then regulate the IV plain
NSS
• 21. Continue to observe and monitor patient for delayed
reaction
• 22. Recheck Hgb, Hct, bleeding time, serial platelet within
specified hours as prescribe
Blood Transfusion
• 23.Discard blood bag, BT set, sharps properly
• 24. Fill out adverse reaction set per hospital policy and return
the blood and whole set to the bloodbank
• 25. Remind the doctor about the administration of Calcium
Gluconate if patient Hs several units of blood transfusion
– or Fusosemide as order
• 26 Document time of discontinuance or consume, status of
insertion site, integrity of IV catheter and endorse accordingly
Reference : Association of Nursing Service in the Philippines IV Therapy Procedures

IV FLUID THERAPY

  • 1.
    IV THERAPY PROCEDURE A.SETTING UP Darwina Iribani Halbi RN MAN Clinical Instructor Ateneo De Zamboanga University Zamboanga City , Philippines
  • 2.
    IV THERAPY PROCEDURE A. SETTINGUP Darwina Iribani Halbi RN MAN Clinical Instructor Ateneo De Zamboanga University Zamboanga City , Philippines
  • 3.
    Intravenous Therapy • Itis introduction of fluids into the patient using an intravenous route • The nurse is responsible for initiating , monitoring and discontinuing the intravenous infusion
  • 4.
    Trends in IVTherapy • 81% - 85% patients in the hospital receive some form of IV therapy • More nursing time is spent to IV therapy
  • 5.
  • 6.
    8/11/2020 Prepared byD.I. Halbi 6 IV TUBING Slide clamp
  • 7.
    Steps in SettingUp an IV Fluid • 1. Verify written Prescription and make an IV label – (IV label – patients name, room and bed no., solution and what drug is incorporated, time and Date inserted and consume
  • 8.
    2. Observe the10 Rs in preparing and administering IVF • 10 Golden rules for administering drugs safely 1. Administer the right drug. 2. Administer the right drug to the right patient. 3. Administer the right dose. 4. Administer the right dose by the right route. 5. Administer the right drug at the right time. 6.Document each drug you administer. 7. Teach the patient about the drugs he is receiving. 8. Take a complete patient drug history. 9.Find out if the patient has any drug allergies. 10.Be aware of potential drugs – drug or drug food interactions.
  • 9.
    Steps • 3. Explainthe procedure to reassure patient and /or significant • other, secure consent if necessary. • 4. Assess patient’s vein, choose appropriate site, location, size / • condition. • 5. Do hand hygiene before and after the procedure.
  • 10.
    6. Prepare necessary materialsfor procedure 1. ( IV tray with IV solution, 2. administration set, OR iv TUBING 3. IV cannula, 4. forceps soaked in antiseptic solution, 5. alcohol swabs or cotton balls soaked in alcohol with cover (this should be exclusively used for IV),
  • 11.
    6. Prepare necessarymaterials for procedure • 6.plaster, • 7.tourniquet, • 8.gloves, • 9. splint, and • 10.IV hook, • 11. sterile 2x2 gauze or transparent dressing • 12.. Include a 3 way stopcock.
  • 12.
    Setting Up • 7.Check the sterility and integrity of the IV solution, IV set and other devices. • 8. Place IV label on IVF bottle duly signed by RN who prepared it (patient’s name, room number, solution, time and date) • 9. Open IV administration set aseptically following the infection control measure
  • 13.
    Setting Up • 10.Open IV administration set aseptically and close the roller clamp and spike the infusate container aseptically. • 11. Fill drip chamber to at least half and prime it with IV fluid aseptically. • 12. Expel air bubbles if any and put back the cover to the distal end of the IV set ( get ready for IV insertion
  • 14.
    B. INSERTING IVCANNULA UTILIZING DUMMY ARM AND OVER THE NEEDLE CATHETER OR A BUTTERFLY NEEDLE
  • 15.
    when selecting acatheter, consider • 14 gauge- (orange) anesthesia • 16-gauge – (gray) major surgery, trauma, obstetric surgery • 18-gauge –(green) blood and blood products, administration of viscous medications • 20-gauge –(pink) most client or patient applications • 22-gauge –(blue) most client or patient applications, especially children and adult clients • 24-gauge –(yellow) pediatric clients, neonates and older adult clients • 26 gauge – (violet) pediatrics , neonates,obese 8/11/2020 Prepared by D.I. Halbi 15
  • 16.
    TYPES OF CANNULA 1.Iv cannula pen-like model. 2. Iv cannula with wings model. 3. Iv cannula with injection part model. 4. Iv cannula y-type model.
  • 17.
    Prepare complete IVtray with IV infusions; Dummy Arm and over-the-needle catheter or butterfly needle. • 1. Verify the written prescription for IV therapy; check prepared IVF and other things needed. • 2. Explain procedure to reassure the patient and significant others and observe the 10 Rs. • 3. Do hand hygiene before and after the procedure.
  • 18.
    Inserting IV Cannula •4. Choose site for IV. • 5. Apply tourniquet 5-12 cm. (2-6 inches) above injection site depending on condition of patient. • 6. Check for radial pulse below tourniquet.
  • 19.
    Inserting IV Cannula •7. Prepare site with effective topical antiseptic according to hospital policy or cotton balls with alcohol in circular motion and allow 30 seconds to dry (no touch technique). • Note: Always wear gloves when doing any venipuncture.
  • 20.
    Inserting IV cannula•8. Using the appropriate IV cannula, pierce skin with the correct technique. • 9. Upon backflow visualization, continue inserting the catheter into the vein. • 10. Position the IV catheter parallel to the skin. • 11. Hold stylet stationary and slowly advance the catheter until the hub is 1 mm to the puncture site.
  • 21.
    Inserting IV Cannula •10. Slip a sterilize gauze under the hub. Release the tourniquet; remove the stylet while applying digital pressure over the catheter with one finger about 1-2 inches from the tip of the inserted catheter.
  • 22.
    Inserting IV Cannula •13. Connect the infusion tubing of the prepared IVF aseptically to the IV catheter. • 14. Open the clamp and regulate the flow rate. • 15. Reassure patient. • 16. Anchor needle firmly in place with the use of: – a. Transparent tape/dressing directly on the puncture site. – b. Tape (using any appropriate anchoring style) – c. Band Aid
  • 23.
    Inserting IV Cannula •Note: Never place unsterile tape directly on IV insertion site. Instead, place a small piece of sterile OS and then secure it with adhesive tape.
  • 24.
    Inserting IV Cannula • 17.Tape a small loop of IV tubing for additional anchoring. Apply splint, if needed. • 18. Calibrate the IV fluid bottle and regulate flow of infusion according to prescribed duration. • 19. Label on IV tape near the IV site to indicate the date of insertion, type and gauge of IV catheter and countersign.
  • 25.
    Inserting IV Cannula •20. Label with plaster on the IV tubing to indicate the date when to change the IV tubing. • 21. Observe patient and report any untoward effect. • 22. Discard sharps and waste according to Health Care Waste Management (DOH/DENR). • 23. Document in the patient’s chart and endorse to incoming shift.
  • 26.
    CHANGING AN IV SOLUTION DarwinaI. Halbi RN MAN Darwina I. Halbi RN MAN 26
  • 27.
    Changing An IVsolutions • 1. Verify doctors prescription in doctors order sheet Countercheck IV label, IV card, infusate sequence, type amount, additives(if any, and duration of infusion 2. Observe the 12 R’s 3. Explain the procedure to reassure the patient and significant others and assess IV sites for redness, swelling and pain, et5c 4. Change IV tubing upon the discretion of the health care practitioner when clinically indicated . Darwina I. Halbi RN MAN 27
  • 28.
    Changing An IVsolution 5. Wash hands before the procedures 6. Prepare the necessary materials place in an IV tray 7. Check sterility and integrity of the IV solution 8. Place an IV label on the IV bottle 9. Calibrate new IV bottle according to duration on infusion as per prescription 10. Open and connect the IV tubing into the solution bottle Darwina I. Halbi RN MAN 28
  • 29.
    Changing an IVsolution 11.Close the roller clamp 12.Regulate the flow rate according to the prescribe infusion Rate, expel the air bubbles if evident 13. Reiterate assurance to patients and significant others 14. Discard all waste materials Document and endorse accordingly Darwina I. Halbi RN MAN 29
  • 30.
    Discontinuing an IVinfusion Darwina I Halbi RN MAN Darwina I. Halbi RN MAN 30
  • 31.
    Discontinuing an IVsolutions • 1. Verify doctors order • 2. Observe the 12 R’s • 3. Assess and inform the patient • 4. Prepare the necessary materials, IV tray or injection Tray with sterile cotton balls with – alcohol, -kidney basin – Plaster -band aid – pick up forceps in antiseptic solutions Darwina I. Halbi RN MAN 31
  • 32.
    • 5. WashHands before and after the procedure • 6. close the rubber clamp of the of the administration set • 7. Moistened adhesive tapes around the catheter with cotton balls and alcohol, remove plaster gently • Use pick up forceps to get cotton balls with alcohol and without applying pressure, remove needle or IV catheter , the emmediately apply pressure over the venipuncture site. Darwina I. Halbi RN MAN 32
  • 33.
    Discontinue an IVInfusion • 9. Inspect IV catheter for completeness • 10. Place dressing over the venipuncture site • 11. Discard all waste materials including IV cannula according to health care waste management • 12. Reassure the patient • 13.Document time of discontinuance, status of insertion site and integrity of the iv catheter Darwina I. Halbi RN MAN 33
  • 34.
    Blood Transfusion PROCEDURE Darwina Iribani HalbiRN MAN Clinical Instructor Ateneo De Zamboanga University Zamboanga City , Philippines
  • 35.
    Blood Transfusion 1. Verifythe Doctors Order and make a treatment card according to hospital policy 2. Observe the 10 rights 3. Explain the importance and benefits of voluntary blood donation 4. Request prescribed blood or blood components from blood bank to include blood typing and cross matching 5. Use a clean and safe container to get the blood from the blood bank and keep it at room temperature
  • 36.
    Blood transfusion 7. Assessthe patients condition • The doctor and the Nurse Countercheck the compatibility of blood and blood products to be transfused against the crossmatching sheet note – the ABO grouping( A ,B ,AB, O ) – and RH, (- or +) – serial no. and each blood unit and – the expiry date with the bag label and – other laboratory blood exams as required before transfusion • HEMOGLOBIN, HEMATOCRIT, ETC
  • 37.
    Blood transfusion • 8.Get the base line vital signs and refer to the doctor accordingly – (T,P,R,BP) • 9. Give premedication 30 minutes before transfusions – (Diphenhydramine)
  • 38.
    10. Prepare theEquipment's • IV Injection Tray • Compatible BT set • IV catheter/needle gauge 18 • Plaster tourniquet • Blood/ or blood components to be transfuse • Plain NSS • IV set • needle gauge • IV Hook • gloves • 2x2 gauze or transparent dressing, plaster
  • 39.
    Blood transfusion • 11.Do hand hygiene before the procedure • 12. If the main IV is D5% initiate an IV line , with plain NSS on the other site and regulate IVF • 13. Open a compatible blood set aseptically and – close the roller clamp – Spike blood bag carefully, – fill the drip chamber at least half full – Prime tubing ang remove air bubbles if any – Use needle gauge 18 0r 19 side drip for adult and 22 for pedia • If blood is given through the Y injection port the gauge of the needle is disregarded
  • 40.
    STEPs in Bloodtransfusion • 14. Disinfect the Y injection port of IV tubing NSS and insert the blood needle from BT administration set and secure with adhesive tape • 15. Close the roller clamp of IV tubing of plain NSS and regulate in KVO while the transfusion is going on • 16. Transfuse the blood via the injection and regulate and regulate it at 10-15 gtts/min and then at the prescribe rate(usually 25 gtts/min) • Monitor the patient for any adverse reaction
  • 41.
    18. Observe forany untoward reaction • Flush skin • Chills or • elevated temperature • Itchiness, • or urticaria • dysnea
  • 42.
    Blood transfusion • 19.Swirl the blood from time to time to mix the solid with the plasma – Only one BT set for two units of blood, • 20. When blood is consumed, close the roller clamp of BT, and disconnect from the IV line then regulate the IV plain NSS • 21. Continue to observe and monitor patient for delayed reaction • 22. Recheck Hgb, Hct, bleeding time, serial platelet within specified hours as prescribe
  • 43.
    Blood Transfusion • 23.Discardblood bag, BT set, sharps properly • 24. Fill out adverse reaction set per hospital policy and return the blood and whole set to the bloodbank • 25. Remind the doctor about the administration of Calcium Gluconate if patient Hs several units of blood transfusion – or Fusosemide as order • 26 Document time of discontinuance or consume, status of insertion site, integrity of IV catheter and endorse accordingly
  • 44.
    Reference : Associationof Nursing Service in the Philippines IV Therapy Procedures

Editor's Notes

  • #4 Intravenous therapy is frequently used with hospitalised patients to prevent , or treat fluid and electrolyte imbalances
  • #9 *** To protect your patient and your license, follow these guidelines for avoiding medication error.