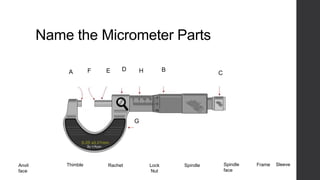
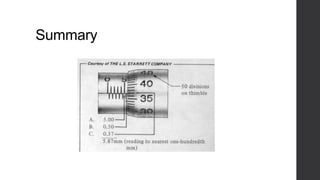
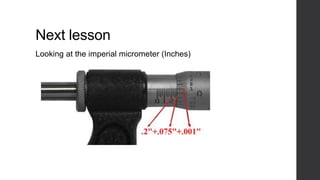
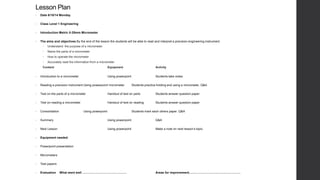
Interpreting 
Engineering 
Information 
Reece Hancock
Prelims 
• Fire Exit 
•Mobiles turned off/ silent 
• No smoking 
• Questions- nominate/ wait for pause 
• Notes- handout 
• Content- power point/ open discussion 
• Time 15mins 
• Test/ confirmation
Introduction 
Metric 0-25mm Micrometer
The aims and objectives 
By the end of the lesson the students will be able to read and interpret a precision 
engineering instrument. 
• Understand the purpose of a micrometer 
• Name the parts of a micrometer 
• How to operate the micrometer 
• Accurately read the information from a micrometer
Content 
Introduction to a micrometer 
Reading a precision instrument 
Test on the parts of a micrometer 
Test on reading a micrometer 
Consolidation 
Summary 
Next Lesson
Metric 0-25mm Micrometer 
The micrometer is a precision measuring instrument, used by engineers. 
Each revolution of the ratchet moves the spindle face 0.5mm towards the anvil face. 
The object to be measured is placed between the anvil face and the spindle face. 
The ratchet is turned clockwise until the object is ‘trapped’ between these two surfaces and 
the ratchet makes a ‘clicking’ noise. 
This means that the ratchet cannot be tightened any more and the measurement can be 
read.
Metric 0-25mm Micrometer 
The micrometer is also available in a range of sizes:- 0-25mm, 
25-50mm, 50-75mm……….. 
The micrometer when not in use must be stored in its supplied 
case with it spanner to prevent damage. 
Before using the micrometer it should be checked to see if it has 
Quality Control (Q.C) sticker on the frame. 
The daily use of a micrometer means that it should be checked 
regularly during the course of the day. This can be achieved by 
using a range of engineers slip gauges e.g. 5mm/10mm to prove 
its accuracy. 
The micrometer can be adjusted using its supplied spanner. 
However this must only be completed by a trained person from 
the quality control department.
0-25mm Micrometer Parts 
Accurate to 0.01mm 
The anvil and spindle face are made 
from tungsten carbide to prevent 
wear and maintain an accurate 
surface to measure from.
Name the Micrometer Parts 
F E D 
C 
A H B 
Anvil 
face 
G 
Thimble Lock 
Nut 
Spindle 
face 
Rachet Spindle Frame 
Sleeve
Understanding the scale
Reading the scale
Example of Measuring Readings 
12.66mm 
16.355mm 
7.76mm
12.66mm 
16.355mm 
7.76mm
Written Test
Name the Micrometer Parts 
F E D 
C 
A H B 
Anvil 
face 
G 
Thimble Lock 
Nut 
Spindle 
face 
Rachet Spindle Frame 
Sleeve
.ANSWER: 
A 
B 
C 
D 
E 
F 
16.16mm 
6.26mm 
12.855mm 
10.66mm 
3.26mm 
5.855mm
Consolidation 
• Understand the purpose of a micrometer 
• Name the parts of a micrometer 
• How to operate the micrometer 
• Accurately read the information from a micrometer
Summary
Next lesson 
Looking at the imperial micrometer (Inches)
Reference 
• http://en.wikipedia.org/wiki/Micrometer 
• http://its.foxvalleytech.com/MachShop1/Inspection/MetricMic.htm 
• http://www.technologystudent.com/equip1/microm1.htm 
• http://www.cityandguilds.com/qualifications-and-apprenticeships/ 
engineering/mechanical/2850- 
engineering#tab=information&acc=level1
Pack away.
.ANSWER: 
A 
B 
C 
D 
E 
F
Name the Micrometer Parts 
F E D 
C 
A H B 
Anvil 
face 
G 
Thimble Lock 
Nut 
Spindle 
face 
Ratchet Spindle Frame 
Sleeve
Lesson Plan 
• Date 6/10/14 Monday 
• Class Level 1 Engineering 
• Introduction Metric 0-25mm Micrometer 
• The aims and objectives By the end of the lesson the students will be able to read and interpret a precision engineering instrument. 
 Understand the purpose of a micrometer 
 Name the parts of a micrometer 
 How to operate the micrometer 
 Accurately read the information from a micrometer 
Content Equipment Activity 
• Introduction to a micrometer Using powerpoint Students take notes 
• Reading a precision instrument Using powerpoint/ micrometer Students practice holding and using a micrometer. Q&A 
• Test on the parts of a micrometer Handout of test on parts Students answer question paper 
• Test on reading a micrometer Handout of test on reading Students answer question paper 
• Consolidation Using powerpoint Students mark each others paper. Q&A 
• Summary Using powerpoint Q&A 
• Next Lesson Using powerpoint Make a note on next lesson’s topic 
• Equipment needed 
• Powerpoint presentation 
• Micrometers 
• Test papers 
• Evaluation What went well …………………………………….. Areas for improvement……………………………………………

Interpreting engineering micrometer

  • 1.
  • 2.
    Prelims • FireExit •Mobiles turned off/ silent • No smoking • Questions- nominate/ wait for pause • Notes- handout • Content- power point/ open discussion • Time 15mins • Test/ confirmation
  • 3.
  • 4.
    The aims andobjectives By the end of the lesson the students will be able to read and interpret a precision engineering instrument. • Understand the purpose of a micrometer • Name the parts of a micrometer • How to operate the micrometer • Accurately read the information from a micrometer
  • 5.
    Content Introduction toa micrometer Reading a precision instrument Test on the parts of a micrometer Test on reading a micrometer Consolidation Summary Next Lesson
  • 6.
    Metric 0-25mm Micrometer The micrometer is a precision measuring instrument, used by engineers. Each revolution of the ratchet moves the spindle face 0.5mm towards the anvil face. The object to be measured is placed between the anvil face and the spindle face. The ratchet is turned clockwise until the object is ‘trapped’ between these two surfaces and the ratchet makes a ‘clicking’ noise. This means that the ratchet cannot be tightened any more and the measurement can be read.
  • 7.
    Metric 0-25mm Micrometer The micrometer is also available in a range of sizes:- 0-25mm, 25-50mm, 50-75mm……….. The micrometer when not in use must be stored in its supplied case with it spanner to prevent damage. Before using the micrometer it should be checked to see if it has Quality Control (Q.C) sticker on the frame. The daily use of a micrometer means that it should be checked regularly during the course of the day. This can be achieved by using a range of engineers slip gauges e.g. 5mm/10mm to prove its accuracy. The micrometer can be adjusted using its supplied spanner. However this must only be completed by a trained person from the quality control department.
  • 8.
    0-25mm Micrometer Parts Accurate to 0.01mm The anvil and spindle face are made from tungsten carbide to prevent wear and maintain an accurate surface to measure from.
  • 9.
    Name the MicrometerParts F E D C A H B Anvil face G Thimble Lock Nut Spindle face Rachet Spindle Frame Sleeve
  • 10.
  • 11.
  • 12.
    Example of MeasuringReadings 12.66mm 16.355mm 7.76mm
  • 13.
  • 14.
  • 15.
    Name the MicrometerParts F E D C A H B Anvil face G Thimble Lock Nut Spindle face Rachet Spindle Frame Sleeve
  • 16.
    .ANSWER: A B C D E F 16.16mm 6.26mm 12.855mm 10.66mm 3.26mm 5.855mm
  • 17.
    Consolidation • Understandthe purpose of a micrometer • Name the parts of a micrometer • How to operate the micrometer • Accurately read the information from a micrometer
  • 18.
  • 19.
    Next lesson Lookingat the imperial micrometer (Inches)
  • 20.
    Reference • http://en.wikipedia.org/wiki/Micrometer • http://its.foxvalleytech.com/MachShop1/Inspection/MetricMic.htm • http://www.technologystudent.com/equip1/microm1.htm • http://www.cityandguilds.com/qualifications-and-apprenticeships/ engineering/mechanical/2850- engineering#tab=information&acc=level1
  • 21.
  • 22.
    .ANSWER: A B C D E F
  • 23.
    Name the MicrometerParts F E D C A H B Anvil face G Thimble Lock Nut Spindle face Ratchet Spindle Frame Sleeve
  • 24.
    Lesson Plan •Date 6/10/14 Monday • Class Level 1 Engineering • Introduction Metric 0-25mm Micrometer • The aims and objectives By the end of the lesson the students will be able to read and interpret a precision engineering instrument.  Understand the purpose of a micrometer  Name the parts of a micrometer  How to operate the micrometer  Accurately read the information from a micrometer Content Equipment Activity • Introduction to a micrometer Using powerpoint Students take notes • Reading a precision instrument Using powerpoint/ micrometer Students practice holding and using a micrometer. Q&A • Test on the parts of a micrometer Handout of test on parts Students answer question paper • Test on reading a micrometer Handout of test on reading Students answer question paper • Consolidation Using powerpoint Students mark each others paper. Q&A • Summary Using powerpoint Q&A • Next Lesson Using powerpoint Make a note on next lesson’s topic • Equipment needed • Powerpoint presentation • Micrometers • Test papers • Evaluation What went well …………………………………….. Areas for improvement……………………………………………