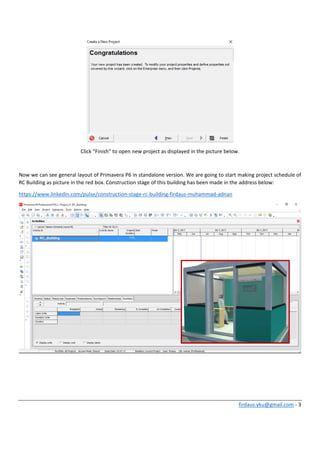
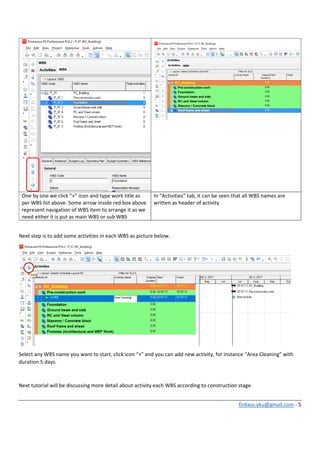
firdaus.yku@gmail.com ‐ 1 
 
How to Start Primavera P6 
 
If you do not find any P6 shortcut on your desktop, you can follow this step. 
 
Type “P6” or primavera on taskbar or select it from 
start menu. Right click and select open file location 
Right click “P6 Professional R16.2 (x64)” file and select “send 
to” and click “Desktop (create shortcut)” 
 
Shortcut of Primavera P6 is now visible on the desktop, 
then double click it 
Type your login name and password which was made in the 
previous tutorial.  
 
 
firdaus.yku@gmail.com ‐ 2 


Click “Create new..”  Click “Next”, EPS will be discussed in the further chapter. 
Type “Project ID” and “Project Name” as you need for 
your practice 
Select you project duration. In this tutorial, I’m planning to 
construct RC building for 3 months. 
Click “Next”, Responsible Manager will be discussed in 
the further chapter. 
Select “Next”, Standard rate will be discussed in the 
further chapter. 
firdaus.yku@gmail.com ‐ 3 
 
 
Click “Finish” to open new project as displayed in the picture below. 
 
Now we can see general layout of Primavera P6 in standalone version. We are going to start making project schedule of 
RC Building as picture in the red box. Construction stage of this building has been made in the address below: 
https://www.linkedin.com/pulse/construction‐stage‐rc‐building‐firdaus‐muhammad‐adnan 


firdaus.yku@gmail.com ‐ 4 
 
According to tutorial explained in the link above, there are 6 steps of constructions to be developed in project 
management (Primavera P6). 
1. Pre‐construction work 
2. Foundation 
3. Ground beam and slab 
4. RC (Reinforced Concrete) and Steel column 
5. Masonry / Concrete block 
6. Roof frame and sheet 
7. Finishes (Architectural and MEP Work) 
These 6 steps above represent Work Breakdown Structure (WBS) in Primavera P6. 
 
Click blue box, WBS icon  Klick “+” icon to add WBS  Double click WBS Code field to edit code name 
 
firdaus.yku@gmail.com ‐ 5 
 
One by one we click “+” icon and type work title as 
per WBS list above. Some arrow inside red box above 
represent navigation of WBS item to arrange it as we 
need either it is put as main WBS or sub WBS 
In “Activities” tab, it can be seen that all WBS names are 
written as header of activity 
 
Next step is to add some activities in each WBS as picture below. 
 
Select any WBS name you want to start, click icon “+” and you can add new activity, for instance “Area Cleaning” with 
duration 5 days. 
 
Next tutorial will be discussing more detail about activity each WBS according to construction stage. 

How to start primavera p6