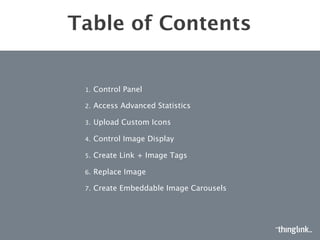
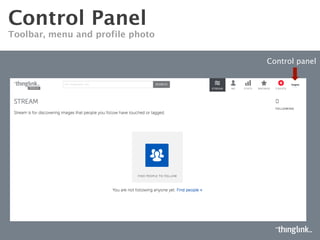
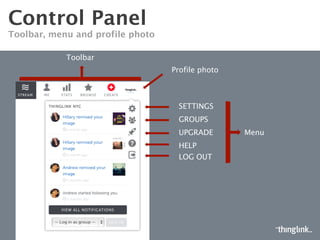
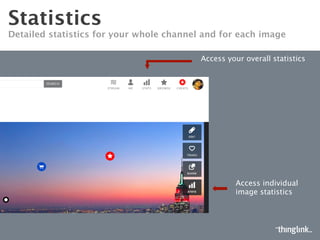
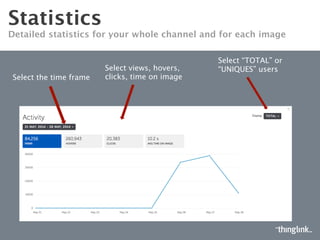
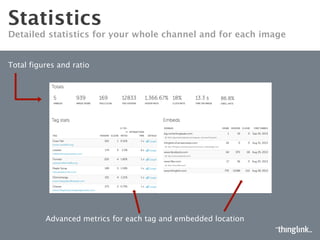
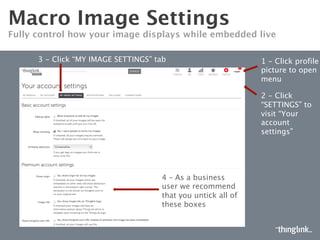
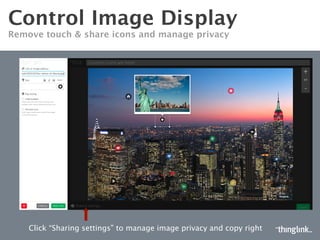
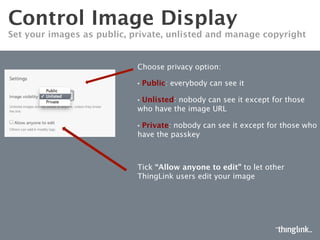
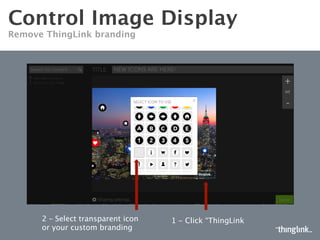
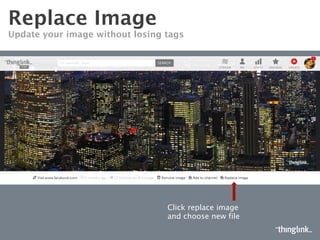
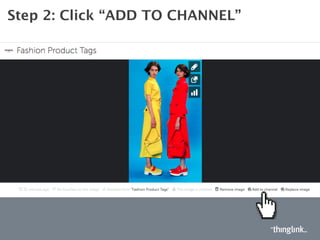
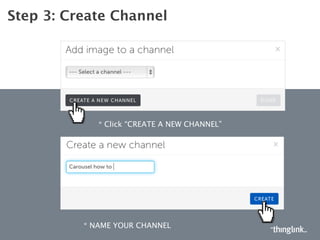
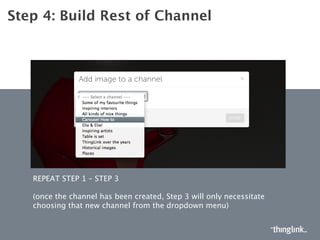
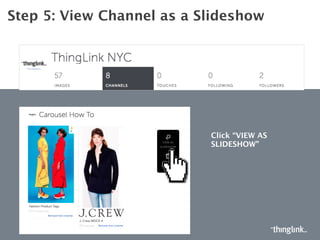
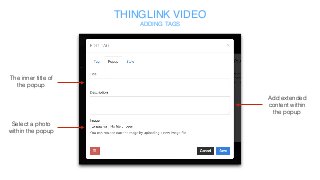
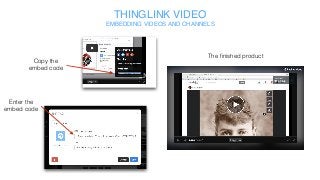
HOW TO USE
THINGLINK PRO
FEATURES
TABLE OF CONTENTS
1. Control Panel
2. Advanced Statistics
3. Upload Custom Icons
4. Control Image Display
5. Control Tag Display
6. Replace background image
7. Create interactive channels
8. Use Thinglink Video
CONTROL PANEL
HOW TO
CONTROL PANEL
TOOLBAR AND MENU
Hosting (if needed)
Control
Panel
Toolbar
Settings
*Groups
Upgrade
Help
Log out
*Contact sales@thinglink.com to learn more about groups*
CONTROL PANEL
TOOLBAR AND MENU
Menu
ACCESS YOUR
ADVANCED STATISTICS
HOW TO
STATISTICS
DETAILED STATISTICS FOR YOUR WHOLE ACCOUNT AND FOR EACH IMAGE
Access individual
image statistics
Access overall
statistics
STATISTICS
DETAILED STATISTICS FOR YOUR WHOLE ACCOUNT AND FOR EACH IMAGE
Select the time frame
Select views, hovers,
clicks, or time on image
Select ‘Total’ or
‘Unique’ users
STATISTICS
DETAILED STATISTICS FOR YOUR WHOLE ACCOUNT AND FOR EACH IMAGE
Total figures
and ratio
Advanced metrics for each tag and
embedded location
UPLOAD CUSTOM ICONS
HOW TO
CUSTOM ICONS
UPLOAD AND USE YOUR OWN ICONS
Click on the menu
to open the drop down
Click on “SETTINGS”
CUSTOM ICONS
UPLOAD AND USE YOUR OWN ICONS
Click “UPLOAD ICON SET”
Click “TAG ICONS” tab
Click “SELECT” to upload the icons from
you computer for each option
Lastly, click “UPLOAD SET”
CONTROL IMAGE DISPLAY
HOW TO
MACRO IMAGE SETTINGS
CONTROL HOW YOUR IMAGE DISPLAYS ON THINGLINK.COM
Click “MY
IMAGE
SETTINGS”
tab
Click to reveal
drop down,
then select
gear icon
Allows anyone to edit your images
Allows other users to remix your images
Turn on safe browsing to
only see kid-safe images
Control similar images
displayed with your images
CONTROL IMAGE DISPLAY
SET IMAGE VISIBILITY AND ALLOW ANYONE TO EDIT
Select “Sharing settings” to manage image privacy
Public: everybody
can see it
Unlisted: image can
only be accessed
with the image URL
Allows other ThingLink users
to edit your image
CONTROL TAG DISPLAY
HOW TO
MICRO IMAGE SETTINGS
FULLY CONTROL HOW YOUR TAGS DISPLAYS WHILE EMBEDDED
Hide icon: Icon is invisible
Link
Click to choose icon
Select colors for
bubble and text
Choose small, normal, large, or x-large
Choose between
16 font options
Upload a tag image
from your hard drive
Enter a link
for photo or
click through
Hide bubble: Bubble is
always invisible
Pinned icon: Icon
is always visible
Select new tab, same
tab or nothing
Select tag type
Bold
Italic
Numbered List
Bulleted List
Justification
Enter caption
HOW TO
REPLACE THE
BACKGROUND IMAGE
REPLACE IMAGE
UPDATE YOUR IMAGE WITHOUT LOSING TAGS
Click “Replace image” and choose new file
HOW TO
CREATE IMAGE CHANNELS
STEP 1: CLICK “POST”
Click “POST”
STEP 2: CREATE CHANNEL
Name your
channel Click
“CREATE NEW
CHANNEL”
STEP 3: BUILD REST OF CHANNEL
Repeat Steps 1 and 2
Once the channel has been created, Step 2 will only necessitate
choosing that new channel from the list
STEP 4: VIEW CHANNEL AS A SLIDESHOW
Click “VIEW AS
SLIDESHOW”
STEP 5: SHARE INTERACTIVE IMAGE SLIDESHOW
Click the share
icon
Use this code to
embed the
channel to your
website or blog
HOW TO
USE THINGLINK VIDEO
THINGLINK VIDEO
UPLOADING VIDEOS
Click “CREATE” on the top bar
Enter the URL of the video
you want to tag and click
“TAG THIS MEDIA”
Or upload from hard drive
THINGLINK VIDEO
ADDING TAGS
1. Choose a time in the video to add your tag
2. Click “ADD
NEW TAG”
THINGLINK VIDEO
ADDING TAGS
Text font
Text and tag
color
The text on
the tag
Duration of the tag
Tag
icon
Tag destination
Tag: the initial message that appears
Popup: the larger message once the tag is clicked open
Always
save!
THINGLINK VIDEO
ADDING TAGS
Add extended
content within
the popup
Select a photo
within the popup
The inner title of
the popup
THINGLINK VIDEO
EMBEDDING VIDEOS AND CHANNELS
Copy the
embed code
Enter the
embed code
The finished product

How to ThingLink Pro features