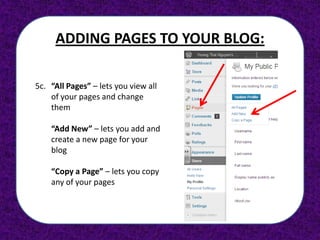
CREATING A WORDPRESS BLOG
Table of Contents
3.    Creating a Wordpress Blog        22.   Changing the Appearance of Your Blog
5.    Changing Your Profile            23.   -   Themes
6.    Changing Your “Gravatar”         24.   -   Widgets
7.    Adding Pages to Your Blog        26.   -   Headers (i.e., “Banners”)
12.   Adding a New Post                29.   -   Adding a “Ratings” button
13.   Managing Your Posts              30.   -   Add a Background to Your Site
14.   Adding Media Into Your Library
16.   Adding Images to A Page
21.   Managing Comments

32.   Add a Photo Gallery
      (better alternative to #16)

36.   Add a Slideshow
      (alternative to #32)
CREATING A WORDPRESS BLOG:
1.    Go to this site:   https://en.wordpress.com/signup/

      Sign up:           Blog Address (“yourname.wordpress.com”)
                         Username
                         (the name that will be displayed on your site)
                         Password
                         E-mail Address

      Create:            On the bottom, click on “Create Blog” after
                         everything is filled out.
CREATING A WORDPRESS BLOG:

2.    To Log In, search the upper-LEFT corner for these boxes and
      type in your e-mail and password:
CHANGING YOUR PROFILE:
3.   To CHANGE your profile,                            UPDATE:
     search the UPPER-RIGHT side                      WORDPRESS’
     and hover over your name; it                      NEW LOOK
     gives you several options:

     Edit My Profile
     Comments
     Manage My Blogs
     Help
     Sign Out

     Click on “Edit My Profile” and
     make any necessary changes         Hover over your name
     and save.                        and click on DASHBOARD
                                      to begin editing your site.
CHANGING YOUR “GRAVATAR”:
4a. To CHANGE your Gravatar (the
    image other people will see
    when they see your profile),
    search the UPPER-RIGHT side
    and CLICK on your name; on
    the RIGHT SIDE, you should
    see a blank “Gravatar”.


4b. Click on “Change your
    Gravatar” and upload an
    image to update your
    Gravatar.
ADDING PAGES TO YOUR BLOG:
    Hover over your name and click on
    DASHBOARD, as shown on slide 5.

5a. On the left side is where you’ll find
    all the tabs that will help design
    your Wordpress Blog.

5b. Let’s start with adding a new page.
    Look for “Pages” in the middle-left
    of the tabs and hover your cursor
    over it.

    You will find that there are several
    options.
ADDING PAGES TO YOUR BLOG:

5c. “All Pages” – lets you view all
    of your pages and change
    them

    “Add New” – lets you add and
    create a new page for your
    blog

    “Copy a Page” – lets you copy
    any of your pages
ADDING PAGES TO YOUR BLOG:


5d. Click on “Add New” to create
    a new page…you’ll see the
    upcoming screen…
Add a Title for
your page here


  Add text,        You’ll need to add
images, etc.,     images from another
    here           image hosting site
“Parent” pages let you
                               organize your pages
                                into sub-categories
You can change the order of
your pages here by number
   them “0, 1, 2, 3…etc.”


   You can use these
   word editing tools
     for your text


                 Once you are finished, you will
                  need to click on “Publish” to
                        create the page
ADDING A NEW POST:
    Click on “New Post”
      and write a new
            post!
MANAGING YOUR POSTS:
          If you click on
         “Posts”, you can
        manage your posts


    If you click on any of the boxes,
   you can edit, delete (“Trash”), or
            preview the post
ADDING MEDIA INTO YOUR LIBRARY:
    If you click on “Media”, you can manage
    any media that you’ve uploaded (video,
                audio, images, etc.)
                                              Click “Add New”
                                                 to upload a
                                                  media file
ADDING MEDIA INTO YOUR LIBRARY:
6.    Just click on “Select Files” to
      choose which files you will
      upload                            Note that you may upload up to
                                        1GB on Wordpress; for images, it
                                            shouldn’t be a problem
ADDING IMAGES TO A PAGE:
7.   Click on “Pages”, and
     then choose which
     page you are going to
     edit by hovering
     underneath the page
     and clicking on “Edit”.


     …you will return back to the Page Editing screen, as shown on the next
     slide…
ADDING IMAGES TO A PAGE:
8a.   Go to the Media Library where you uploaded all of your images.

8b.   Click on an image.

8c.   Copy the “File URL” on the bottom.
ADDING IMAGES TO A PAGE:
Choose a page to edit from the “All Pages” tab under “Pages; open it…


…the screen will look similar to this one.
ADDING IMAGES TO A PAGE:
8d.   Type this code out in the text box for each image:
      <img src=“PASTEYOURURLHERE”>              You can also preview your
                                              changes before you publish
                                               it if you press this button.


                                  Click “Publish” when
                                   you have finished
                                 typing the code(s) for
                                       the images.


8e.   Make sure you have the brackets properly typed in, or the code
      won’t display the image when you publish it.
ADDING IMAGES TO A PAGE:


              Your changes should be
                 displayed like this
MANAGING COMMENTS:


9.   If you click on “Comments” on the left side of the dashboard, you
     can reply, edit, and delete the comments on your posts. This is
     good to moderate what is posted on your site.
CHANGING THE APPEARANCE OF
       YOUR BLOG:
                  9.   If you click on
                       “Appearance” on
                       the left tab, you
                       can change a lot
                       of things, as seen
                       here. In the next
                       few slides, we’ll
                       go over the
                       important ones.
CHANGING THE APPEARANCE OF
             YOUR BLOG:
                              Current
                THEMES        theme.


10. Click on “Appearance”, and you
    will be sent to a Theme
    template site.

    You may choose a new theme.

    Clicking on “Preview” will show
    you what your site will look like
    before you “Activate” it.
                           Sample
                           themes
CHANGING THE APPEARANCE OF
       YOUR BLOG:
         WIDGETS


   Widgets are kind of like “apps”; they do a variety of
   tasks. They’re usually located on the sidebar(s) of a
                         blog site.
CHANGING THE APPEARANCE OF
       YOUR BLOG:
         WIDGETS


    Drag the Widgets over to the RIGHT SIDE, where the
  SIDEBARS are located. They will be active the next time
                 you load your Blog site.
CHANGING THE APPEARANCE OF
       YOUR BLOG:
   HEADERS (and Footers)


  You can make your own Headers (i.e., “Banners”) that
  pop up on the top of your Home page. You can even
              make a Footer, if you’d like.
CHANGING THE APPEARANCE OF
       YOUR BLOG:
   HEADERS (and Footers)


       You can design your own on Photoshop,
   Paintshop, or Pixlr.com. If you feel comfortable,
     you can also make the Header on the Ipad or
   Iphone and upload it, using photo-editing tools.
CHANGING THE APPEARANCE OF
       YOUR BLOG:
   HEADERS (and Footers)


   Once you’ve uploaded the image that will be used
   for the Header, click on “Save Changes” to update
     your site. You may remove it later if you’d like.
CHANGING THE APPEARANCE OF
       YOUR BLOG:
     ADDING “RATINGS”
 Do you want to add “Ratings” (where your
  viewers can add up to 5 stars to a post)?
  Click on the left tab that says “Ratings”.


 This screen will pop up; you may click on
 the boxes to enable “Ratings”; make sure
   to click “Save Changes” to activate it.
CHANGING THE APPEARANCE OF
              YOUR BLOG:
         ADDING A BACKGROUND
11. If you’d like a custom
    background that is
    embedded into your blog
    site, just click on
    “Background” in the
    “Appearance tab.

    The screen on the right is
    what will be displayed.
CHANGING THE APPEARANCE OF
              YOUR BLOG:
         ADDING A BACKGROUND
11. If you’d like a custom
    background that is
    embedded into your blog
    site, just click on
    “Background” in the
    “Appearance tab.

    The screen on the right is
    what will be displayed.
ADD A GALLERY ON YOUR PAGE
Adding a gallery can gives
                             …if you click on any
 lots of character to your
                               of the images…
   collection of images.
ADD A GALLERY ON YOUR PAGE
A “lightbox” gallery should appear,
allowing you to scroll through the
    images saved on that page.
ADD A GALLERY ON YOUR PAGE
To make a gallery, choose a
page, and click “Edit”. The
 Edit Page should come up
                              Click on this icon (“the camera”)
                                right here; it lets you upload
                                         your images
ADD A GALLERY ON YOUR PAGE
This screen should pop
up in the middle. Click
“Select Files” to begin
uploading your images


    Once the uploads have
 finished, make sure to save
 (located by scrolling to the
bottom – “Save All Changes”)

  Scroll to the bottom, and
click on “Insert Gallery”; the
 alternate way would be to
code the gallery in by typing:
           [gallery]
ADD A SLIDESHOW ON YOUR PAGE
 To make a slideshow, choose a
 page, and click “Edit”. The Edit
     Page should come up
                                    Click on this icon (“the camera”)
                                      right here; it lets you upload
                                               your images
ADD A SLIDESHOW ON YOUR PAGE
 This screen should pop
 up in the middle. Click
 “Select Files” to begin
 uploading your images


    Once the uploads have
 finished, make sure to save
 (located by scrolling to the
bottom – “Save All Changes”)

  Scroll to the bottom, and
 click on “Insert Slideshow”;
 the alternate way would be
   to code the gallery in by
     typing: [slideshow]

Wordpress e-portfolio tutorial

  • 1.
  • 2.
    Table of Contents 3. Creating a Wordpress Blog 22. Changing the Appearance of Your Blog 5. Changing Your Profile 23. - Themes 6. Changing Your “Gravatar” 24. - Widgets 7. Adding Pages to Your Blog 26. - Headers (i.e., “Banners”) 12. Adding a New Post 29. - Adding a “Ratings” button 13. Managing Your Posts 30. - Add a Background to Your Site 14. Adding Media Into Your Library 16. Adding Images to A Page 21. Managing Comments 32. Add a Photo Gallery (better alternative to #16) 36. Add a Slideshow (alternative to #32)
  • 3.
    CREATING A WORDPRESSBLOG: 1. Go to this site: https://en.wordpress.com/signup/ Sign up: Blog Address (“yourname.wordpress.com”) Username (the name that will be displayed on your site) Password E-mail Address Create: On the bottom, click on “Create Blog” after everything is filled out.
  • 4.
    CREATING A WORDPRESSBLOG: 2. To Log In, search the upper-LEFT corner for these boxes and type in your e-mail and password:
  • 5.
    CHANGING YOUR PROFILE: 3. To CHANGE your profile, UPDATE: search the UPPER-RIGHT side WORDPRESS’ and hover over your name; it NEW LOOK gives you several options: Edit My Profile Comments Manage My Blogs Help Sign Out Click on “Edit My Profile” and make any necessary changes Hover over your name and save. and click on DASHBOARD to begin editing your site.
  • 6.
    CHANGING YOUR “GRAVATAR”: 4a.To CHANGE your Gravatar (the image other people will see when they see your profile), search the UPPER-RIGHT side and CLICK on your name; on the RIGHT SIDE, you should see a blank “Gravatar”. 4b. Click on “Change your Gravatar” and upload an image to update your Gravatar.
  • 7.
    ADDING PAGES TOYOUR BLOG: Hover over your name and click on DASHBOARD, as shown on slide 5. 5a. On the left side is where you’ll find all the tabs that will help design your Wordpress Blog. 5b. Let’s start with adding a new page. Look for “Pages” in the middle-left of the tabs and hover your cursor over it. You will find that there are several options.
  • 8.
    ADDING PAGES TOYOUR BLOG: 5c. “All Pages” – lets you view all of your pages and change them “Add New” – lets you add and create a new page for your blog “Copy a Page” – lets you copy any of your pages
  • 9.
    ADDING PAGES TOYOUR BLOG: 5d. Click on “Add New” to create a new page…you’ll see the upcoming screen…
  • 10.
    Add a Titlefor your page here Add text, You’ll need to add images, etc., images from another here image hosting site
  • 11.
    “Parent” pages letyou organize your pages into sub-categories You can change the order of your pages here by number them “0, 1, 2, 3…etc.” You can use these word editing tools for your text Once you are finished, you will need to click on “Publish” to create the page
  • 12.
    ADDING A NEWPOST: Click on “New Post” and write a new post!
  • 13.
    MANAGING YOUR POSTS: If you click on “Posts”, you can manage your posts If you click on any of the boxes, you can edit, delete (“Trash”), or preview the post
  • 14.
    ADDING MEDIA INTOYOUR LIBRARY: If you click on “Media”, you can manage any media that you’ve uploaded (video, audio, images, etc.) Click “Add New” to upload a media file
  • 15.
    ADDING MEDIA INTOYOUR LIBRARY: 6. Just click on “Select Files” to choose which files you will upload Note that you may upload up to 1GB on Wordpress; for images, it shouldn’t be a problem
  • 16.
    ADDING IMAGES TOA PAGE: 7. Click on “Pages”, and then choose which page you are going to edit by hovering underneath the page and clicking on “Edit”. …you will return back to the Page Editing screen, as shown on the next slide…
  • 17.
    ADDING IMAGES TOA PAGE: 8a. Go to the Media Library where you uploaded all of your images. 8b. Click on an image. 8c. Copy the “File URL” on the bottom.
  • 18.
    ADDING IMAGES TOA PAGE: Choose a page to edit from the “All Pages” tab under “Pages; open it… …the screen will look similar to this one.
  • 19.
    ADDING IMAGES TOA PAGE: 8d. Type this code out in the text box for each image: <img src=“PASTEYOURURLHERE”> You can also preview your changes before you publish it if you press this button. Click “Publish” when you have finished typing the code(s) for the images. 8e. Make sure you have the brackets properly typed in, or the code won’t display the image when you publish it.
  • 20.
    ADDING IMAGES TOA PAGE: Your changes should be displayed like this
  • 21.
    MANAGING COMMENTS: 9. If you click on “Comments” on the left side of the dashboard, you can reply, edit, and delete the comments on your posts. This is good to moderate what is posted on your site.
  • 22.
    CHANGING THE APPEARANCEOF YOUR BLOG: 9. If you click on “Appearance” on the left tab, you can change a lot of things, as seen here. In the next few slides, we’ll go over the important ones.
  • 23.
    CHANGING THE APPEARANCEOF YOUR BLOG: Current THEMES theme. 10. Click on “Appearance”, and you will be sent to a Theme template site. You may choose a new theme. Clicking on “Preview” will show you what your site will look like before you “Activate” it. Sample themes
  • 24.
    CHANGING THE APPEARANCEOF YOUR BLOG: WIDGETS Widgets are kind of like “apps”; they do a variety of tasks. They’re usually located on the sidebar(s) of a blog site.
  • 25.
    CHANGING THE APPEARANCEOF YOUR BLOG: WIDGETS Drag the Widgets over to the RIGHT SIDE, where the SIDEBARS are located. They will be active the next time you load your Blog site.
  • 26.
    CHANGING THE APPEARANCEOF YOUR BLOG: HEADERS (and Footers) You can make your own Headers (i.e., “Banners”) that pop up on the top of your Home page. You can even make a Footer, if you’d like.
  • 27.
    CHANGING THE APPEARANCEOF YOUR BLOG: HEADERS (and Footers) You can design your own on Photoshop, Paintshop, or Pixlr.com. If you feel comfortable, you can also make the Header on the Ipad or Iphone and upload it, using photo-editing tools.
  • 28.
    CHANGING THE APPEARANCEOF YOUR BLOG: HEADERS (and Footers) Once you’ve uploaded the image that will be used for the Header, click on “Save Changes” to update your site. You may remove it later if you’d like.
  • 29.
    CHANGING THE APPEARANCEOF YOUR BLOG: ADDING “RATINGS” Do you want to add “Ratings” (where your viewers can add up to 5 stars to a post)? Click on the left tab that says “Ratings”. This screen will pop up; you may click on the boxes to enable “Ratings”; make sure to click “Save Changes” to activate it.
  • 30.
    CHANGING THE APPEARANCEOF YOUR BLOG: ADDING A BACKGROUND 11. If you’d like a custom background that is embedded into your blog site, just click on “Background” in the “Appearance tab. The screen on the right is what will be displayed.
  • 31.
    CHANGING THE APPEARANCEOF YOUR BLOG: ADDING A BACKGROUND 11. If you’d like a custom background that is embedded into your blog site, just click on “Background” in the “Appearance tab. The screen on the right is what will be displayed.
  • 32.
    ADD A GALLERYON YOUR PAGE Adding a gallery can gives …if you click on any lots of character to your of the images… collection of images.
  • 33.
    ADD A GALLERYON YOUR PAGE A “lightbox” gallery should appear, allowing you to scroll through the images saved on that page.
  • 34.
    ADD A GALLERYON YOUR PAGE To make a gallery, choose a page, and click “Edit”. The Edit Page should come up Click on this icon (“the camera”) right here; it lets you upload your images
  • 35.
    ADD A GALLERYON YOUR PAGE This screen should pop up in the middle. Click “Select Files” to begin uploading your images Once the uploads have finished, make sure to save (located by scrolling to the bottom – “Save All Changes”) Scroll to the bottom, and click on “Insert Gallery”; the alternate way would be to code the gallery in by typing: [gallery]
  • 36.
    ADD A SLIDESHOWON YOUR PAGE To make a slideshow, choose a page, and click “Edit”. The Edit Page should come up Click on this icon (“the camera”) right here; it lets you upload your images
  • 37.
    ADD A SLIDESHOWON YOUR PAGE This screen should pop up in the middle. Click “Select Files” to begin uploading your images Once the uploads have finished, make sure to save (located by scrolling to the bottom – “Save All Changes”) Scroll to the bottom, and click on “Insert Slideshow”; the alternate way would be to code the gallery in by typing: [slideshow]