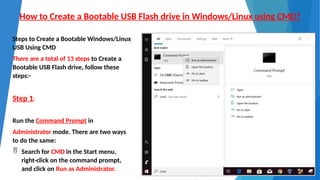
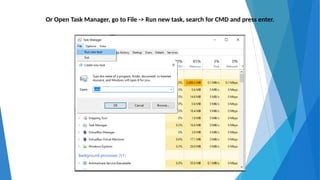
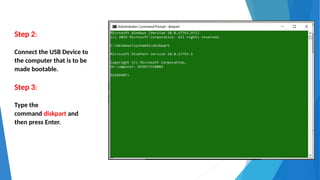
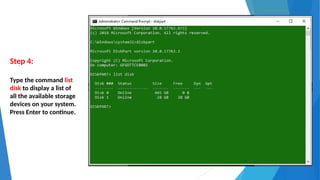
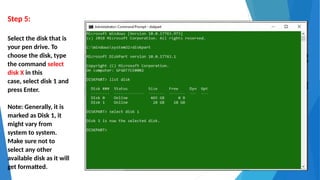
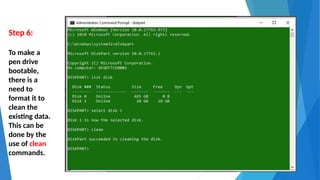
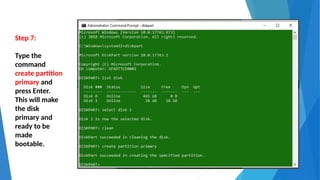
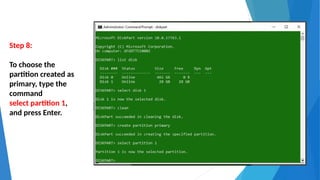
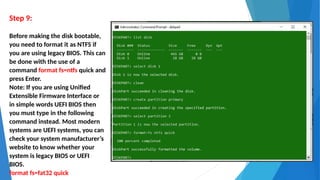
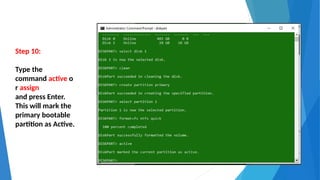
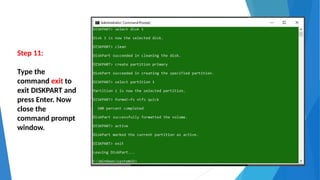
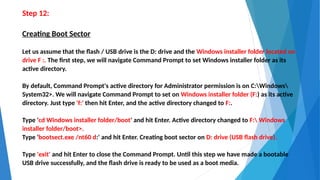
How to Create a Bootable USB Flash drive in Windows/Linux using CMD?
Steps to Create a Bootable Windows/Linux
USB Using CMD
There are a total of 13 steps to Create a
Bootable USB Flash drive, follow these
steps:-
Step 1:
Run the Command Prompt in
Administrator mode. There are two ways
to do the same:
 Search for CMD in the Start menu,
right-click on the command prompt,
and click on Run as Administrator.
Or Open Task Manager, go to File -> Run new task, search for CMD and press enter.
Step 2:
Connect the USB Device to
the computer that is to be
made bootable.
Step 3:
Type the
command diskpart and
then press Enter.
Step 4:
Type the command list
disk to display a list of
all the available storage
devices on your system.
Press Enter to continue.
Step 5:
Select the disk that is
your pen drive. To
choose the disk, type
the command select
disk X in this
case, select disk 1 and
press Enter.
Note: Generally, it is
marked as Disk 1, it
might vary from
system to system.
Make sure not to
select any other
available disk as it will
get formatted.
Step 6:
To make a
pen drive
bootable,
there is a
need to
format it to
clean the
existing data.
This can be
done by the
use of clean
commands.
Step 7:
Type the
command
create partition
primary and
press Enter.
This will make
the disk
primary and
ready to be
made
bootable.
Step 8:
To choose the
partition created as
primary, type the
command
select partition 1,
and press Enter.
Step 9:
Before making the disk bootable,
you need to format it as NTFS if
you are using legacy BIOS. This can
be done with the use of a
command format fs=ntfs quick and
press Enter.
Note: If you are using Unified
Extensible Firmware Interface or
in simple words UEFI BIOS then
you must type in the following
command instead. Most modern
systems are UEFI systems, you can
check your system manufacturer’s
website to know whether your
system is legacy BIOS or UEFI
BIOS.
format fs=fat32 quick
Step 10:
Type the
command active o
r assign
and press Enter.
This will mark the
primary bootable
partition as Active.
Step 11:
Type the
command exit to
exit DISKPART and
press Enter. Now
close the
command prompt
window.
Step 12:
Creating Boot Sector
Let us assume that the flash / USB drive is the D: drive and the Windows installer folder located on
drive F :. The first step, we will navigate Command Prompt to set Windows installer folder as its
active directory.
By default, Command Prompt's active directory for Administrator permission is on C:Windows
System32>. We will navigate Command Prompt to set on Windows installer folder (F:) as its active
directory. Just type 'f:' then hit Enter, and the active directory changed to F:.
Type 'cd Windows installer folder/boot' and hit Enter. Active directory changed to F: Windows
installer folder/boot>.
Type 'bootsect.exe /nt60 d:' and hit Enter. Creating boot sector on D: drive (USB flash drive).
Type 'exit' and hit Enter to close the Command Prompt. Until this step we have made a bootable
USB drive successfully, and the flash drive is ready to be used as a boot media.
Step 13:
Copying all Installation Files
To install Windows from a bootable USB drive, we just need to copy the whole installation files
contained on the Windows installer folder to flash drive. To do this, open the Command Prompt
as in previous steps. Once it opens, type 'xcopy f:  *. * d:  / E / H / F' and then press Enter.
Wait until all the files in the Windows installer folder copied to the flash drive. Now bootable
USB drive is ready to be used for installing Windows from flash drive and you're done !
Or
Open Windows installer folder select all files and folders in this folder and copy and paste in
yours pen drive. Now bootable USB drive is ready to be used for installing Windows from flash
drive and you're done !
Thank you
Created By: M. Farooq Usta
JE/Tele/Bikaner

How to Create a Bootable USB Flash drive.pptx

  • 1.
    How to Createa Bootable USB Flash drive in Windows/Linux using CMD? Steps to Create a Bootable Windows/Linux USB Using CMD There are a total of 13 steps to Create a Bootable USB Flash drive, follow these steps:- Step 1: Run the Command Prompt in Administrator mode. There are two ways to do the same:  Search for CMD in the Start menu, right-click on the command prompt, and click on Run as Administrator.
  • 2.
    Or Open TaskManager, go to File -> Run new task, search for CMD and press enter.
  • 3.
    Step 2: Connect theUSB Device to the computer that is to be made bootable. Step 3: Type the command diskpart and then press Enter.
  • 4.
    Step 4: Type thecommand list disk to display a list of all the available storage devices on your system. Press Enter to continue.
  • 5.
    Step 5: Select thedisk that is your pen drive. To choose the disk, type the command select disk X in this case, select disk 1 and press Enter. Note: Generally, it is marked as Disk 1, it might vary from system to system. Make sure not to select any other available disk as it will get formatted.
  • 6.
    Step 6: To makea pen drive bootable, there is a need to format it to clean the existing data. This can be done by the use of clean commands.
  • 7.
    Step 7: Type the command createpartition primary and press Enter. This will make the disk primary and ready to be made bootable.
  • 8.
    Step 8: To choosethe partition created as primary, type the command select partition 1, and press Enter.
  • 9.
    Step 9: Before makingthe disk bootable, you need to format it as NTFS if you are using legacy BIOS. This can be done with the use of a command format fs=ntfs quick and press Enter. Note: If you are using Unified Extensible Firmware Interface or in simple words UEFI BIOS then you must type in the following command instead. Most modern systems are UEFI systems, you can check your system manufacturer’s website to know whether your system is legacy BIOS or UEFI BIOS. format fs=fat32 quick
  • 10.
    Step 10: Type the commandactive o r assign and press Enter. This will mark the primary bootable partition as Active.
  • 11.
    Step 11: Type the commandexit to exit DISKPART and press Enter. Now close the command prompt window.
  • 12.
    Step 12: Creating BootSector Let us assume that the flash / USB drive is the D: drive and the Windows installer folder located on drive F :. The first step, we will navigate Command Prompt to set Windows installer folder as its active directory. By default, Command Prompt's active directory for Administrator permission is on C:Windows System32>. We will navigate Command Prompt to set on Windows installer folder (F:) as its active directory. Just type 'f:' then hit Enter, and the active directory changed to F:. Type 'cd Windows installer folder/boot' and hit Enter. Active directory changed to F: Windows installer folder/boot>. Type 'bootsect.exe /nt60 d:' and hit Enter. Creating boot sector on D: drive (USB flash drive). Type 'exit' and hit Enter to close the Command Prompt. Until this step we have made a bootable USB drive successfully, and the flash drive is ready to be used as a boot media.
  • 13.
    Step 13: Copying allInstallation Files To install Windows from a bootable USB drive, we just need to copy the whole installation files contained on the Windows installer folder to flash drive. To do this, open the Command Prompt as in previous steps. Once it opens, type 'xcopy f: *. * d: / E / H / F' and then press Enter. Wait until all the files in the Windows installer folder copied to the flash drive. Now bootable USB drive is ready to be used for installing Windows from flash drive and you're done ! Or Open Windows installer folder select all files and folders in this folder and copy and paste in yours pen drive. Now bootable USB drive is ready to be used for installing Windows from flash drive and you're done !
  • 14.
    Thank you Created By:M. Farooq Usta JE/Tele/Bikaner