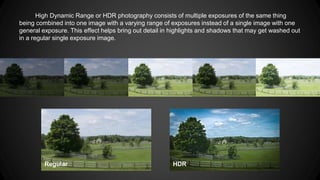
High Dynamic Range
Photography
By: Mathew Seifried
High Dynamic Range or HDR photography consists of multiple exposures of the same thing
being combined into one image with a varying range of exposures instead of a single image with one
general exposure. This effect helps bring out detail in highlights and shadows that may get washed out
in a regular single exposure image.
HDRRegular
How to?
There are different ways to achieve the HDR effect in a photograph but each method requires
multiple exposures as explained before. You can combine the exposures with Photoshop by using
Photoshops built in plugin “Merge to HDR”. There are other plugins for Photoshop that can be used to
combine exposures into HDRs like HDR EFEX or Photomatix but these cost extra. Lastly some
cameras have built in HDR functionality but do not always achieve great results.
Required Equipment
Today we are going to use Photoshop to create our HDR images. Photoshop can be obtained from
Adobe on a subscription or trial basis.
You will require…
● A DSLR camera or a camera that allows for manual & RAW shooting
● A tripod for still images
● Computer for post production
Optional...
● Shutter remote for camera
Camera Setup
Depending on your camera brand and model settings will differ. You want to use the settings below to
achieve the best quality of image.
● Aperture priority or manual
● Lowest ISO possible
● Raw not Jpeg
● Bracketed shooting if possible
I will be using Canon for this tutorial but the instructions can be applied to most other DSLR’s.
Canon DSLR
Once you have set up your camera using the recommended settings you will want to enter your
camera's “Menu” and find the Expo.comp./AEB setting, then you will set your exposure bracket using
the camera's dial.
Next you want to mount your camera on a
tripod and set up your shot. When you are
finally ready to take your three exposures
simply use the camera’s shot timer so that
there is no shake from your hand and it
will take all three shots for you.
This method is simplest for Canon users and works well
because it takes all three exposures quickly. You can also
achieve this the same exposures by manually changing the
exposure before taking each shot. This method is good for
those who want to use more than three exposures for their
HDR image.
Next
Offload your images to your computer, the RAW files are large and are easiest to work with once they
are transferred off of the camera’s memory card. Next open your files in Adobe Bridge and select them.
Than navigate to tools - photoshop - merge to HDR pro
Almost Done
Now that you have opened your exposures into Photoshop’s “Merge to HDR” plugin you can tweak the
settings to achieve your desired high dynamic range image.
If your image involved movement like tree
branches or maybe a car or person in the
background check the “Remove Ghosts”
option. This will remove any ghosting
effect caused by the moving object.
When you are finished with merging click
ok and your HDR photograph is imported
to photoshop for further editing.
Tips and Conclusion
One thing I have learned from HDR is that the scene has to be right, if you try to accomplish this effect
and there is not enough detail in the scene initially you won't see any huge improvements. This
technique has many different outcomes and ranges from realistic photographs to surreal looking
scenes. It is simple to accomplish but difficult to do well and you will see that in the next few slides
when comparing my work to a professionals.
This photography technique is an awesome one as it allows for the viewer to see all the details in the
scene and can have outstanding results when time is invested.
Thanks and goodluck!
My HDR Work
Professional HDR
Trey Ratcliff
Ken Kaminesky
Elia Locardi
Tim Clarke
Sources
Canon DSLR Menu Images
● http://www.digitalcameraworld.com - Jeff Meyer
● http://www.hdrone.com - Curt Fleenor
Software
● http://www.adobe.com
● www.google.com/nikcollection
● http://www.hdrsoft.com
Other
● http://hdrguide.com/best-hdr-photographers
● http://timclarkehdr.com
● http://www.blamethemonkey.com
● http://www.stuckincustoms.com

HDR Tutorial

  • 1.
  • 2.
    High Dynamic Rangeor HDR photography consists of multiple exposures of the same thing being combined into one image with a varying range of exposures instead of a single image with one general exposure. This effect helps bring out detail in highlights and shadows that may get washed out in a regular single exposure image. HDRRegular
  • 3.
    How to? There aredifferent ways to achieve the HDR effect in a photograph but each method requires multiple exposures as explained before. You can combine the exposures with Photoshop by using Photoshops built in plugin “Merge to HDR”. There are other plugins for Photoshop that can be used to combine exposures into HDRs like HDR EFEX or Photomatix but these cost extra. Lastly some cameras have built in HDR functionality but do not always achieve great results.
  • 4.
    Required Equipment Today weare going to use Photoshop to create our HDR images. Photoshop can be obtained from Adobe on a subscription or trial basis. You will require… ● A DSLR camera or a camera that allows for manual & RAW shooting ● A tripod for still images ● Computer for post production Optional... ● Shutter remote for camera
  • 5.
    Camera Setup Depending onyour camera brand and model settings will differ. You want to use the settings below to achieve the best quality of image. ● Aperture priority or manual ● Lowest ISO possible ● Raw not Jpeg ● Bracketed shooting if possible I will be using Canon for this tutorial but the instructions can be applied to most other DSLR’s.
  • 6.
    Canon DSLR Once youhave set up your camera using the recommended settings you will want to enter your camera's “Menu” and find the Expo.comp./AEB setting, then you will set your exposure bracket using the camera's dial. Next you want to mount your camera on a tripod and set up your shot. When you are finally ready to take your three exposures simply use the camera’s shot timer so that there is no shake from your hand and it will take all three shots for you. This method is simplest for Canon users and works well because it takes all three exposures quickly. You can also achieve this the same exposures by manually changing the exposure before taking each shot. This method is good for those who want to use more than three exposures for their HDR image.
  • 7.
    Next Offload your imagesto your computer, the RAW files are large and are easiest to work with once they are transferred off of the camera’s memory card. Next open your files in Adobe Bridge and select them. Than navigate to tools - photoshop - merge to HDR pro
  • 8.
    Almost Done Now thatyou have opened your exposures into Photoshop’s “Merge to HDR” plugin you can tweak the settings to achieve your desired high dynamic range image. If your image involved movement like tree branches or maybe a car or person in the background check the “Remove Ghosts” option. This will remove any ghosting effect caused by the moving object. When you are finished with merging click ok and your HDR photograph is imported to photoshop for further editing.
  • 9.
    Tips and Conclusion Onething I have learned from HDR is that the scene has to be right, if you try to accomplish this effect and there is not enough detail in the scene initially you won't see any huge improvements. This technique has many different outcomes and ranges from realistic photographs to surreal looking scenes. It is simple to accomplish but difficult to do well and you will see that in the next few slides when comparing my work to a professionals. This photography technique is an awesome one as it allows for the viewer to see all the details in the scene and can have outstanding results when time is invested. Thanks and goodluck!
  • 10.
  • 11.
    Professional HDR Trey Ratcliff KenKaminesky Elia Locardi Tim Clarke
  • 12.
    Sources Canon DSLR MenuImages ● http://www.digitalcameraworld.com - Jeff Meyer ● http://www.hdrone.com - Curt Fleenor Software ● http://www.adobe.com ● www.google.com/nikcollection ● http://www.hdrsoft.com Other ● http://hdrguide.com/best-hdr-photographers ● http://timclarkehdr.com ● http://www.blamethemonkey.com ● http://www.stuckincustoms.com