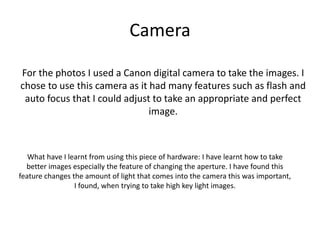
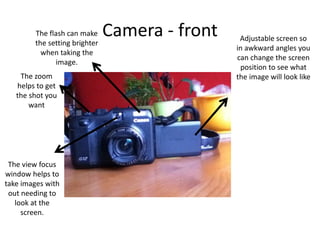
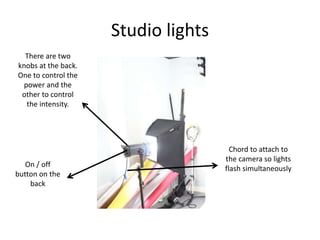
Question 6:
What have you learnt about
technologies from the process of
constructing this product?
Hardware
Camera
For the photos I used a Canon digital camera to take the images. I
chose to use this camera as it had many features such as flash and
auto focus that I could adjust to take an appropriate and perfect
image.
What have I learnt from using this piece of hardware: I have learnt how to take
better images especially the feature of changing the aperture. I have found this
feature changes the amount of light that comes into the camera this was important,
I found, when trying to take high key light images.
Camera - front Adjustable screen so
in awkward angles you
can change the screen
position to see what
the image will look like
The flash can make
the setting brighter
when taking the
image.
The view focus
window helps to
take images with
out needing to
look at the
screen.
The zoom
helps to get
the shot you
want
Camera - back This knob lets you
change the settings of
the camera from auto
to face recognition
This button lets
you look back at
the images you
have taken
You can change
settings and
look at images
quickly by
twisting this
button
You can insert a
device into the
camera here so when
you click to take the
image the lights in
the studio
simultaneously flash
Apple Mac
To assemble my magazine I used the Apple Macs because they were effective
at using the software I needed to use. Plus, the graphics of the screen were
bright so making it easier to see colour differences that needed changing. Also,
it had many USB ports and photo card inserts which helped me get all my
images onto the computer. A disadvantage of using the Apple Macs was when
trying to work on the same thing on a normal computer it wouldn’t load as the
software wasn’t installed so I could only use Apple Macs but sometimes I
couldn’t use them as other people were using them.
What I have learnt: after using the Apple Mac I have learnt how to right click and copy
and paste using the keyboard due to not knowing how to use the computer at first.
Apple Mac
On the side there is a
memory card slot
On the back there are 4 USB ports and a microphone and headphone slot.
On the side of
the keyboard
there is also
another USB port
Studio lights
I used studio lights when taking the photos
because it brightens the image so giving me the
effect I wanted.
What I have learnt: I have learnt that to increase the brightness of the light in need to
increase the intensity of the bulb to get the effect I wanted and if I wanted the bulb less
bright then I need to decrease the intensity and power. Also, I have learnt that to get a
high key lit image all the lights should be on and surround the model so no shadow
occurred.
Studio lights
There are two
knobs at the back.
One to control the
power and the
other to control
the intensity.
On / off
button on the
back
Chord to attach to
the camera so lights
flash simultaneously
Scanner
I used the scanner to scan in important
documents like Model release forms and call
sheets so I could add them to my blog.
What I have learnt: I have learnt that when scanning the document it
needs to be face down and the corner needs to touch the corner which
the arrow is pointing at so the scan works.
USB stick
I used this to save my work on top as a copy so if
I did loose it on the computer I had a second
copy on my USB.
What I have learnt: I have found how to correctly eject my USB stick properly
especially on the Apple Macs. Also, I found having a second copy of your work is
vial so you don’t need to start again.
Memory Card
I used this to take images with. I would put it in
the camera then take the images and then
take it out and upload the images onto the
computer from the card so I could upload
them.
Software
Prezi
I chose to use Prezi because of it’s wide range of presentation tools plus I thought it
would give me the potential benefit of once embedding it into my blog that I would be
able to refer back to it so I can use what I had found in my product.
What have I learnt: after using Prezi I have learnt how to use the software and it’s tools
especially when adding images to your favourites on Prezi. Adding images to your
favourites makes getting the image on the presentation easier as you don’t need to
insert it again from the computer but need to just go into my content to get the image
again.
Prezi
These are the
slides that you
create when
making the
presentation
The edit path
button changes the
order in which the
slides are shown
when presenting
the presentation.
This is good because
if you add an extra
slide between two
other slides you can
incorporate it into
the transition path
Re do and undo buttons are
useful if you make a mistake
and you want to un do it
1- Save button saves your
work so you can go back to
it and edit it
1
The insert button allows you to add
pictures, videos and shapes. This
button is useful because you can
add elements to your presentation
to make it more interesting and add
extra information to the text you
write.
The customize
button lets you
change the
theme and
background of
your
presentation.
This gives a
more appealing
presentation to
watch.
Prezi
Makes the text you write into
the title/ subtitle or body
format. This is good for showing
audiences the difference
between the title and the
information on the
presentation.
These make your text bigger and
smaller. This good as it makes it easier
to fit text into boxes.
This button changes the colour of the
text. This is good because you can add
emphasis on certain bits of text.
These buttons make the text either
bold or italic which is good if you
want to draw attention to certain
words.
This button changes the
alignment of the text
This adds a background
to your text. This makes
it easier to read
Prezi
Allows you to make further changes. This is good
because if I found extra information I could always
still add it to my findings
Lastly, this button allows me to
embed the presentation into
my blog. This was good
because it was easy to do so
time wasn’t spent trying to
figure how to do it.
Blogger
I chose to use blogger because it documents your work from day to day. Also, the main
benefit I found from using blogger was that you could upload and embed a lot of
different format software from pictures and videos to online presentations. Another
point is it’s easy to go back and edit previous posts.
What I have learnt: I have mainly learnt how to change the scheduled time so my blog
posts are in order. Also, I have learnt how to embed a presentation into blogger.
Blogger
See blog posts, this is good
because you can then see what
you have done and what you
still need to do.
Past blog posts can be seen here in a
chronological order. This is good because
it’s easier to find posts to view them.
This button allows you to create a
blog post. It’s position made it
quick and easy for me to find how
to add a post so saving me time.
The sign out
button quickly
logs me out of
the site when
I’m finished.
The pencil
allows me to
edit posts I
have already
posted. This is
good because
if you want to
add anything
else to the
post you can
with this
pencil.
Blogger
The compose button allows
me to write text to post onto
my blog. This is good because
if you didn’t want to present
your finding you could quickly
upload the text onto a blog
post.
This text box allows you to write a
title for your post. This is good
because when looking back for it
you can find it in the list of posts.
This button changes
the layout of the
post from a text
format to where you
can copy and paste
an embedding code
into the post.
These buttons allow you to
change the format of the
text you write such as the:
font, colour or bold. This is
good because you can then
emphasis words on the
post.
These buttons allow you to add
pictures and videos from your
computer.
On the side you can
schedule the time and
date you send the post
Blogger
When uploading pictures and
videos you can choose files
from your computer. This is
good because if the image etc
doesn’t have a URL you can
still upload it direct from your
computer.
You can add
images that
you’ve already
uploaded using
the from the
blog button.
The from Picasa web albums allows you to add
images from the internet
You can also upload pictures from your phone
or web cam. This is useful because you can go
outside take an image then be able to upload
the image straight from your phone without
needing to put it onto the computer first.
Lastly, you can add images
from the internet using the
URL. This is useful because
you can add images straight
from the internet without
needing to save them onto
the computer and taking up
memory space which could
have been used for the
product.
Real-time board
I chose to use Real-time board for my course work because it had a simple layout so
was easy to use plus I could embed the presentation into my blog. The downside for
using Real-time board is you can only make 3 boards so I couldn’t use it a lot for my
work.
What I have learnt: I have learnt how to use the tools on this software
Real-time board
These buttons
zoom in and
out of the
page. This is
useful because
you can add
small details.
This hand allows you to
drag yourself around the
page. This is useful
because it saves you
time getting around the
page.
This allows
you to select
things. This is
good because
you can then
select and
edit elements
on the
presentation.
This allows you
to annotate the
presentation.
This button
allows you to
add text to the
presentation.
This is good
because you can
then add
information to
the presentation.
This allows you to add post in notes
to the presentation.
The redo and undo
button is good if you
make a mistake and
want to reverse it.
Pinterest
I chose to use Pinterest because it has a easy way of uploading images onto the
board and the embedding it is easy to. The disadvantage of using Pinterest is
that you can only upload images however you can add captions to the images.
What I have learnt: I have learnt how to add a description to the images to
explain what you are trying to convey.
Pinterest
To add an image you just click on
here. This is good because it’s easy
and simple so making the process
easier.
The friends
button
allows you
to let people
see your
board.
By clicking this button you can
change the layout of your
images on the board. This is
good because you can then
make the board look
aesthetically pleasing and you
can change the order of the
images.
By clicking this button you can
edit the board. This good because
you can then change any initial
details such as the board title and
the category.
Pinterest
When adding a pin or picture
you can either choose from the
web or your device. This is good
because you can find images of
the internet and quickly add
them to your board with out
needing to save them. And your
device button is good if you
have a picture form your
computer or phone you quickly
want to upload without needing
to put it on the internet.
Emaze
I chose to use Emaze because it was a bit different to PowerPoint plus it has some really
nice graphics. Lastly, it was easy to use and to embed however you could only add a
limited amount of slides before the space was full so I couldn’t make a lengthy
presentation.
What I have learnt: I have learnt how to embed this software into my blog
Emaze
These are the
slides you make.
It’s good that
you can see
them on the side
because if you
want to go back
and edit a slide
you can quickly
just click it.
You can add slides here and
group them. Grouping them is
good because you can then
quickly find the slide your looking
for in the groups you have made
without needing to go through all
the slides you have made.
Here you can add shapes, text and
charts. This good because you can
then add elements onto your
presentation to make them look
interesting.
Here you can save your
work. This is good because
you can then go back to it
later to finish or add to it.
This button allows
you to present
your presentation.
This is good
because you can
then show people
your findings.
Survey monkey
I chose to use this website because it was a quick way for me to send a survey to a lot of
people. Plus it was easy to use with a variety of question formats to use. I also chose to use
this software because it was easy to access the responses plus it would e-mail you to tell
you when someone had completed the survey.
What I have learnt: I have learnt how to set up a survey and have understood what the
different question formats are
Survey monkey
This is where you can
click and add question
formats, images and
text. This was good
because it gave you a
wide range of elements
you could add to your
survey to explain what
type of responses you
wanted.
By clicking next it will
then give you a URL. This
was useful because when
e-mailing it to people I
just needed to add the
URL for them to complete
it instead of having to
copy and paste the survey
to them.
The preview and test button
lets you complete the survey.
This was good because you
could trail your survey to find
if the question formats you
used worked.
Survey monkey
By clicking analyze results you can then see
people’s responses to your survey. This is
good because you can then analyse the
results and write about what I found out.
Slides
I chose to use this software because I liked how the presentation could be controlled
using the different arrows. I also chose to use it because the format was like
PowerPoint's so it was easy to use and navigate around. I didn’t like how there was no
set order to the slides though.
What I have learnt: I have learnt how to present it so generically you would click right
to go to the next slide well with this software you can press up, down, left or right to
go to a different slide.
Slides
This button allows you to preview the
presentation. This was useful because
you could then watch your
presentation and find faults with it and
fix it.
These buttons allows you to add
text, images and shapes to the
presentation. This was good because
you could then present your work
making it look interesting.
The style button
allows you to change
the theme and colour
of the presentation.
This was good
because you could
then make your
presentation more
synthetically pleasing.
The export button
allows you to embed
the presentation. This
was good because I
could then add it to
my blog.
Photoshop
“Photoshop is a piece of software downloaded onto the
computer where you can edit and compile images. I used this to
create my product”
I chose to use Photoshop because it has a wide range of tools that can be used to edit
and create images and magazines. The only disadvantage of using it was there were so
many applications I could use that I may not have used Photoshop to it’s full potential.
What I have learnt: I have learnt how to use a variety of different tools on Photoshop
that I didn’t know how to use before. Some of the links I visited when editing my
magazine in Photoshop:
https://www.youtube.com/watch?v=bNB9Mepi1VI
https://www.youtube.com/watch?v=N8XqJ8CQFVY
http://www.smashingmagazine.com/2008/07/15/70-beauty-retouching-photoshop-
tutorials/
Photoshop
On the side
there are
tools to edit
photos and
add text and
shapes. This is
good because
it can improve
my magazine.
These show
you the layers
on the page.
This is good
because it
shows you
what is on the
page and
what’s in
front and
behind other
layers so if
you wanted
to change this
it would be
easily done.
This button changed the setting
of the settings you were on for
example typography to
essentials. This setting changer
made finding tools for images
or text easier to so altering
them quicker.
This is where you can change the
brush size and stroke. This was
useful because if you were working
on small details you could change
the brush to adapt to what you
wanted to do.
In design
“In design is a downloaded software that is used to compose
magazines and alter texts. I used it in the production of my
magazine”
I chose to use In design because it exports my magazine in the right format plus as a
spread and it has a text feature to align it like a professional pop magazine article.
However I found it hard to use as I found it hard to navigate around.
What I have learnt: I have learnt how to text align like a professional magazine does
plus I know how to export in this software.
In design
These top buttons allow
you to select and edit
things on the
document. This is useful
because you can then
change things if you
want to.
These buttons allow
you to add text and
shapes. This is good
because you can
then add elements
onto the page to
make it how you
want.
These allow you to
change the view of the
page from zooming to
draging around the page.
This is good because you
can then go to the area of
the page you want to
change and change it.
This is where you can change the colour
and weight of the text. This is good because
if you want to emphasis certain aspect you
can with this.
Windows Movie Maker
“Windows Movie Maker is a downloaded piece of software that
allows you to add text, sound and images or videos into one
to make a movie. I used this in the evaluation”
I chose to use Windows Movie Maker in my evaluation because I found it was easier
to explain what I was talking about when the images moved along the screen with
the text. Also, I chose to use it because it was easy to alter timings when compiling
the video.
What I have learnt: I have learnt how to use this piece of software and add text to
images. Also, I know how to change timings and create animation between slides.
Some of the websites I visited to create this:
http://windows.microsoft.com/en-gb/windows-vista/getting-started-with-windows-
movie-maker
http://www.wikihow.com/Make-a-Simple-Video-in-Windows-Live-Movie-Maker
Windows Movie Maker
Clicking this
button allows
you to add
videos or
pictures. This
was useful
because once
added you can
then add text
and sound to
explain what is
happening.
The animation section makes slide
transitions different. This was good
because it made the presentation look
more interesting.
This is where
you can add
music to go
with the
images.
You Tube
I chose to use YouTube because it made finding my uploaded video easy to find as
you just type your name in. Also, when researching it was good because you typed in
your question and a step by step video would be found helping me resolve my issue
quickly.
What I have learnt: I have learnt I first need to export my Windows Movie Maker file
into a compatible file before uploading it to You Tube so it can then be uploaded and
embedded.
You Tube
Quick and easy you just
click there to find the file
you want to upload. Then
you press upload wait a
couple of seconds where it
confirms that it has
successfully uploaded. Sign
out then in the search bar
search your username or
video title to find it. Click
on it then there’s an
embed button. This was
good because it was quick
and easy to get your video
uploaded then embedded.
Poster My Wall
I chose to use this because it was easy to use with a wide range of layouts to use.
However, it’s difficult to save the poster as an image onto the computer and when
beginning the poster you need to clear all the elements that were put on there and
it’s difficult to find the delete button.
What I have learnt: I have learnt that there are many different fonts on this software
so if I need any fonts this software is a good one to use.
Poster My Wall
These buttons
let you add
things to the
poster like
text, images
and clip art.
This was good
because you
could add
what you
wanted to
make the
poster look
more
interesting.
You can also save the poster so you can back to it later.
This was good because if you wanted to make more
adjustments you could.
Poster my Wall
If you click on an image or a bit of text this editing box
appears where you can change and edit the element
for it to have a shadow or a glow or to send it to the
back. This was good because it had a wide range of
options to change the element allowing you to create
the poster you wanted to create.
Capture / Snipping tool
“Capture is a application on the computer that allows you to take
a screen shot. I used this to evidence all the images I used.”
I chose to use this application because if the software I was using didn’t save the
image in the correct format for what I needed I could this application to take a picture
of the image then save it as I want as it has a lot of saving formats.
What I have learnt: I have learnt that this application is on all computers even Apple
Macs and that to access it on a Apple Mac I need to look under the application folder.
Capture / Snipping toolThis is where
you can find
save as. This
was good
because the
save as button
could save the
image in a lot
of formats that
I needed to
use.
This allows you to annotate the image. This was
good because if you want to add notes around the
image you could without needing to type them
up.
Slide Share
I chose to use Slide Share because it was the quickest and easiest way to get my
Powerpoints uploaded so they could be embedded into my blog. It was also good for
uploading multiple files at once.
Slide Share
All you do is click
here to select the
PowerPoint you
want to upload then
you add a title and
save it. It then gives
you an embed code.
This was good
because it was quick
and instant so no
time was wasted.
PowerPoint
“PowerPoint is a downloaded presentation software. I used it for
all my presentations”
I chose to use PowerPoint because I’m familiar with the layout so making it easy to use.
Also it has a lot of presentation elements to use which was good to make the
presentation interesting. I didn’t like how it couldn’t be instantly uploaded from the
computer to the blog with out using slide share as PowerPoint was in the wrong format
for the blog.
What I have learnt: I need to convert PowerPoint formats to get them onto blogs.
PowerPoint
The slides show you
what you have created.
This was good because
if you wanted to go
back a couple of slides
all you do is click on
the slide you want to
go back to making it
easy to use.
These buttons allow
you to add a new slide,
to delete slides and
change the layout of
them. This was useful
because you could
alter the presentation
to fit you.
These are all the shapes you
can add. It was good having
them there because you
could just go to the top and
click on what you want
without needing to go
through all the settings.
This is where text can be
changed. Having it on the top
was handy because it was easy
to access.
Word
“Word is a downloaded piece of software made for documents. I
used this mainly in the research and planning”
I chose to use Word because when writing documents and forms it had the best
variety in altering text.
What I have learnt: I have learnt I need to convert the Word format to a different one
so it will be compatible to be put onto my blog.
Word
This where you can
change the font and text
size. Having them at the
top was good because it
was easy to get to so
making text changes
quicker.
This is where
you can
highlight and
change text
colour. This
was good if I
wanted to
emphasis
words.
You can change the style of
the text to fit if it was a title
or subtitle. This was good if
you wanted to clearly show
people what the document
was about.
Scribd
I chose to use Scribd because it was a quick and easy way to upload my Word
documents and get an embed code for it.
ScribdAll you do is click
here to select the
Word document you
want to upload then
you add a title and
save it. It then gives
you an embed code.
This was good
because it was quick
and instant so no
time was wasted
Excel
“Excel is a downloaded software that is mainly used to create
spreadsheets however I used it to present my survey results in
a graph for my evaluation”
I chose to use Excel because I could create a table with my survey results then quickly
turn my table into a graph or chart.
Excel
It has text altering features.
This was good to have
because I could then title
my graphs so I knew what
graph was for what
question.
Once inserting the
survey data you then
press insert to change it
into a graph. This
feature was useful
because I could then
show my findings in
statistical terms and not
just numbers.
Paint
“Paint is a downloaded programme where you can draw images
with it’s paintbrushes. I sued this for my planning.”
I chose to use paint because I could take advantage of the bright and block colours
it offers that I wanted to use in my flat plan.
What I have learnt: I have learnt that once you begin painting on a document you
have scanned in you can’t use the paint bucket to fill large gaps as there are no
lines. So to fill the gaps you need to hand paint it all.
Paint
The colours available. Having them
on the top was good because it
was easy to find and quick to use.
It had a range of tools
to use like paint
brushes to shapes. The
simplicity made it easy
to use as I could
quickly find what I
want then use it.
I could save the image as a JPEG as
well which was handy as I could
upload it straight to the blog.
Gmail
I chose to use Gmail because in the address book it had everyone’s e-mail address so it was
easy finding my target audience and sending my survey to them.
What I have learnt: the easiest method of sending out the survey is just to copy and paste
the link to survey on the e-mail instead of copying and pasting the survey onto the e-mail
it’s self.
Gmail
This is where you can attach
pictures and documents to the
e-mail. This is useful because
you can then get images from
your phone onto the
computer or get the document
your working on at home to
the college computer so you
can finish it.
See e-mails you receive here.
This is useful because when
you log on you can instantly
see if you have e-mails or not
and your not scrolling through
folders looking for received
e-mails.
You can add e-mails to
folders. This is useful
because you can
organise e-mails into
groups making them
easier to find.

Hard ware 2

  • 1.
    Question 6: What haveyou learnt about technologies from the process of constructing this product?
  • 2.
  • 3.
    Camera For the photosI used a Canon digital camera to take the images. I chose to use this camera as it had many features such as flash and auto focus that I could adjust to take an appropriate and perfect image. What have I learnt from using this piece of hardware: I have learnt how to take better images especially the feature of changing the aperture. I have found this feature changes the amount of light that comes into the camera this was important, I found, when trying to take high key light images.
  • 4.
    Camera - frontAdjustable screen so in awkward angles you can change the screen position to see what the image will look like The flash can make the setting brighter when taking the image. The view focus window helps to take images with out needing to look at the screen. The zoom helps to get the shot you want
  • 5.
    Camera - backThis knob lets you change the settings of the camera from auto to face recognition This button lets you look back at the images you have taken You can change settings and look at images quickly by twisting this button You can insert a device into the camera here so when you click to take the image the lights in the studio simultaneously flash
  • 6.
    Apple Mac To assemblemy magazine I used the Apple Macs because they were effective at using the software I needed to use. Plus, the graphics of the screen were bright so making it easier to see colour differences that needed changing. Also, it had many USB ports and photo card inserts which helped me get all my images onto the computer. A disadvantage of using the Apple Macs was when trying to work on the same thing on a normal computer it wouldn’t load as the software wasn’t installed so I could only use Apple Macs but sometimes I couldn’t use them as other people were using them. What I have learnt: after using the Apple Mac I have learnt how to right click and copy and paste using the keyboard due to not knowing how to use the computer at first.
  • 7.
    Apple Mac On theside there is a memory card slot On the back there are 4 USB ports and a microphone and headphone slot. On the side of the keyboard there is also another USB port
  • 8.
    Studio lights I usedstudio lights when taking the photos because it brightens the image so giving me the effect I wanted. What I have learnt: I have learnt that to increase the brightness of the light in need to increase the intensity of the bulb to get the effect I wanted and if I wanted the bulb less bright then I need to decrease the intensity and power. Also, I have learnt that to get a high key lit image all the lights should be on and surround the model so no shadow occurred.
  • 9.
    Studio lights There aretwo knobs at the back. One to control the power and the other to control the intensity. On / off button on the back Chord to attach to the camera so lights flash simultaneously
  • 10.
    Scanner I used thescanner to scan in important documents like Model release forms and call sheets so I could add them to my blog. What I have learnt: I have learnt that when scanning the document it needs to be face down and the corner needs to touch the corner which the arrow is pointing at so the scan works.
  • 11.
    USB stick I usedthis to save my work on top as a copy so if I did loose it on the computer I had a second copy on my USB. What I have learnt: I have found how to correctly eject my USB stick properly especially on the Apple Macs. Also, I found having a second copy of your work is vial so you don’t need to start again.
  • 12.
    Memory Card I usedthis to take images with. I would put it in the camera then take the images and then take it out and upload the images onto the computer from the card so I could upload them.
  • 13.
  • 14.
    Prezi I chose touse Prezi because of it’s wide range of presentation tools plus I thought it would give me the potential benefit of once embedding it into my blog that I would be able to refer back to it so I can use what I had found in my product. What have I learnt: after using Prezi I have learnt how to use the software and it’s tools especially when adding images to your favourites on Prezi. Adding images to your favourites makes getting the image on the presentation easier as you don’t need to insert it again from the computer but need to just go into my content to get the image again.
  • 15.
    Prezi These are the slidesthat you create when making the presentation The edit path button changes the order in which the slides are shown when presenting the presentation. This is good because if you add an extra slide between two other slides you can incorporate it into the transition path Re do and undo buttons are useful if you make a mistake and you want to un do it 1- Save button saves your work so you can go back to it and edit it 1 The insert button allows you to add pictures, videos and shapes. This button is useful because you can add elements to your presentation to make it more interesting and add extra information to the text you write. The customize button lets you change the theme and background of your presentation. This gives a more appealing presentation to watch.
  • 16.
    Prezi Makes the textyou write into the title/ subtitle or body format. This is good for showing audiences the difference between the title and the information on the presentation. These make your text bigger and smaller. This good as it makes it easier to fit text into boxes. This button changes the colour of the text. This is good because you can add emphasis on certain bits of text. These buttons make the text either bold or italic which is good if you want to draw attention to certain words. This button changes the alignment of the text This adds a background to your text. This makes it easier to read
  • 17.
    Prezi Allows you tomake further changes. This is good because if I found extra information I could always still add it to my findings Lastly, this button allows me to embed the presentation into my blog. This was good because it was easy to do so time wasn’t spent trying to figure how to do it.
  • 18.
    Blogger I chose touse blogger because it documents your work from day to day. Also, the main benefit I found from using blogger was that you could upload and embed a lot of different format software from pictures and videos to online presentations. Another point is it’s easy to go back and edit previous posts. What I have learnt: I have mainly learnt how to change the scheduled time so my blog posts are in order. Also, I have learnt how to embed a presentation into blogger.
  • 19.
    Blogger See blog posts,this is good because you can then see what you have done and what you still need to do. Past blog posts can be seen here in a chronological order. This is good because it’s easier to find posts to view them. This button allows you to create a blog post. It’s position made it quick and easy for me to find how to add a post so saving me time. The sign out button quickly logs me out of the site when I’m finished. The pencil allows me to edit posts I have already posted. This is good because if you want to add anything else to the post you can with this pencil.
  • 20.
    Blogger The compose buttonallows me to write text to post onto my blog. This is good because if you didn’t want to present your finding you could quickly upload the text onto a blog post. This text box allows you to write a title for your post. This is good because when looking back for it you can find it in the list of posts. This button changes the layout of the post from a text format to where you can copy and paste an embedding code into the post. These buttons allow you to change the format of the text you write such as the: font, colour or bold. This is good because you can then emphasis words on the post. These buttons allow you to add pictures and videos from your computer. On the side you can schedule the time and date you send the post
  • 21.
    Blogger When uploading picturesand videos you can choose files from your computer. This is good because if the image etc doesn’t have a URL you can still upload it direct from your computer. You can add images that you’ve already uploaded using the from the blog button. The from Picasa web albums allows you to add images from the internet You can also upload pictures from your phone or web cam. This is useful because you can go outside take an image then be able to upload the image straight from your phone without needing to put it onto the computer first. Lastly, you can add images from the internet using the URL. This is useful because you can add images straight from the internet without needing to save them onto the computer and taking up memory space which could have been used for the product.
  • 22.
    Real-time board I choseto use Real-time board for my course work because it had a simple layout so was easy to use plus I could embed the presentation into my blog. The downside for using Real-time board is you can only make 3 boards so I couldn’t use it a lot for my work. What I have learnt: I have learnt how to use the tools on this software
  • 23.
    Real-time board These buttons zoomin and out of the page. This is useful because you can add small details. This hand allows you to drag yourself around the page. This is useful because it saves you time getting around the page. This allows you to select things. This is good because you can then select and edit elements on the presentation. This allows you to annotate the presentation. This button allows you to add text to the presentation. This is good because you can then add information to the presentation. This allows you to add post in notes to the presentation. The redo and undo button is good if you make a mistake and want to reverse it.
  • 24.
    Pinterest I chose touse Pinterest because it has a easy way of uploading images onto the board and the embedding it is easy to. The disadvantage of using Pinterest is that you can only upload images however you can add captions to the images. What I have learnt: I have learnt how to add a description to the images to explain what you are trying to convey.
  • 25.
    Pinterest To add animage you just click on here. This is good because it’s easy and simple so making the process easier. The friends button allows you to let people see your board. By clicking this button you can change the layout of your images on the board. This is good because you can then make the board look aesthetically pleasing and you can change the order of the images. By clicking this button you can edit the board. This good because you can then change any initial details such as the board title and the category.
  • 26.
    Pinterest When adding apin or picture you can either choose from the web or your device. This is good because you can find images of the internet and quickly add them to your board with out needing to save them. And your device button is good if you have a picture form your computer or phone you quickly want to upload without needing to put it on the internet.
  • 27.
    Emaze I chose touse Emaze because it was a bit different to PowerPoint plus it has some really nice graphics. Lastly, it was easy to use and to embed however you could only add a limited amount of slides before the space was full so I couldn’t make a lengthy presentation. What I have learnt: I have learnt how to embed this software into my blog
  • 28.
    Emaze These are the slidesyou make. It’s good that you can see them on the side because if you want to go back and edit a slide you can quickly just click it. You can add slides here and group them. Grouping them is good because you can then quickly find the slide your looking for in the groups you have made without needing to go through all the slides you have made. Here you can add shapes, text and charts. This good because you can then add elements onto your presentation to make them look interesting. Here you can save your work. This is good because you can then go back to it later to finish or add to it. This button allows you to present your presentation. This is good because you can then show people your findings.
  • 29.
    Survey monkey I choseto use this website because it was a quick way for me to send a survey to a lot of people. Plus it was easy to use with a variety of question formats to use. I also chose to use this software because it was easy to access the responses plus it would e-mail you to tell you when someone had completed the survey. What I have learnt: I have learnt how to set up a survey and have understood what the different question formats are
  • 30.
    Survey monkey This iswhere you can click and add question formats, images and text. This was good because it gave you a wide range of elements you could add to your survey to explain what type of responses you wanted. By clicking next it will then give you a URL. This was useful because when e-mailing it to people I just needed to add the URL for them to complete it instead of having to copy and paste the survey to them. The preview and test button lets you complete the survey. This was good because you could trail your survey to find if the question formats you used worked.
  • 31.
    Survey monkey By clickinganalyze results you can then see people’s responses to your survey. This is good because you can then analyse the results and write about what I found out.
  • 32.
    Slides I chose touse this software because I liked how the presentation could be controlled using the different arrows. I also chose to use it because the format was like PowerPoint's so it was easy to use and navigate around. I didn’t like how there was no set order to the slides though. What I have learnt: I have learnt how to present it so generically you would click right to go to the next slide well with this software you can press up, down, left or right to go to a different slide.
  • 33.
    Slides This button allowsyou to preview the presentation. This was useful because you could then watch your presentation and find faults with it and fix it. These buttons allows you to add text, images and shapes to the presentation. This was good because you could then present your work making it look interesting. The style button allows you to change the theme and colour of the presentation. This was good because you could then make your presentation more synthetically pleasing. The export button allows you to embed the presentation. This was good because I could then add it to my blog.
  • 34.
    Photoshop “Photoshop is apiece of software downloaded onto the computer where you can edit and compile images. I used this to create my product” I chose to use Photoshop because it has a wide range of tools that can be used to edit and create images and magazines. The only disadvantage of using it was there were so many applications I could use that I may not have used Photoshop to it’s full potential. What I have learnt: I have learnt how to use a variety of different tools on Photoshop that I didn’t know how to use before. Some of the links I visited when editing my magazine in Photoshop: https://www.youtube.com/watch?v=bNB9Mepi1VI https://www.youtube.com/watch?v=N8XqJ8CQFVY http://www.smashingmagazine.com/2008/07/15/70-beauty-retouching-photoshop- tutorials/
  • 35.
    Photoshop On the side thereare tools to edit photos and add text and shapes. This is good because it can improve my magazine. These show you the layers on the page. This is good because it shows you what is on the page and what’s in front and behind other layers so if you wanted to change this it would be easily done. This button changed the setting of the settings you were on for example typography to essentials. This setting changer made finding tools for images or text easier to so altering them quicker. This is where you can change the brush size and stroke. This was useful because if you were working on small details you could change the brush to adapt to what you wanted to do.
  • 36.
    In design “In designis a downloaded software that is used to compose magazines and alter texts. I used it in the production of my magazine” I chose to use In design because it exports my magazine in the right format plus as a spread and it has a text feature to align it like a professional pop magazine article. However I found it hard to use as I found it hard to navigate around. What I have learnt: I have learnt how to text align like a professional magazine does plus I know how to export in this software.
  • 37.
    In design These topbuttons allow you to select and edit things on the document. This is useful because you can then change things if you want to. These buttons allow you to add text and shapes. This is good because you can then add elements onto the page to make it how you want. These allow you to change the view of the page from zooming to draging around the page. This is good because you can then go to the area of the page you want to change and change it. This is where you can change the colour and weight of the text. This is good because if you want to emphasis certain aspect you can with this.
  • 38.
    Windows Movie Maker “WindowsMovie Maker is a downloaded piece of software that allows you to add text, sound and images or videos into one to make a movie. I used this in the evaluation” I chose to use Windows Movie Maker in my evaluation because I found it was easier to explain what I was talking about when the images moved along the screen with the text. Also, I chose to use it because it was easy to alter timings when compiling the video. What I have learnt: I have learnt how to use this piece of software and add text to images. Also, I know how to change timings and create animation between slides. Some of the websites I visited to create this: http://windows.microsoft.com/en-gb/windows-vista/getting-started-with-windows- movie-maker http://www.wikihow.com/Make-a-Simple-Video-in-Windows-Live-Movie-Maker
  • 39.
    Windows Movie Maker Clickingthis button allows you to add videos or pictures. This was useful because once added you can then add text and sound to explain what is happening. The animation section makes slide transitions different. This was good because it made the presentation look more interesting. This is where you can add music to go with the images.
  • 40.
    You Tube I choseto use YouTube because it made finding my uploaded video easy to find as you just type your name in. Also, when researching it was good because you typed in your question and a step by step video would be found helping me resolve my issue quickly. What I have learnt: I have learnt I first need to export my Windows Movie Maker file into a compatible file before uploading it to You Tube so it can then be uploaded and embedded.
  • 41.
    You Tube Quick andeasy you just click there to find the file you want to upload. Then you press upload wait a couple of seconds where it confirms that it has successfully uploaded. Sign out then in the search bar search your username or video title to find it. Click on it then there’s an embed button. This was good because it was quick and easy to get your video uploaded then embedded.
  • 42.
    Poster My Wall Ichose to use this because it was easy to use with a wide range of layouts to use. However, it’s difficult to save the poster as an image onto the computer and when beginning the poster you need to clear all the elements that were put on there and it’s difficult to find the delete button. What I have learnt: I have learnt that there are many different fonts on this software so if I need any fonts this software is a good one to use.
  • 43.
    Poster My Wall Thesebuttons let you add things to the poster like text, images and clip art. This was good because you could add what you wanted to make the poster look more interesting. You can also save the poster so you can back to it later. This was good because if you wanted to make more adjustments you could.
  • 44.
    Poster my Wall Ifyou click on an image or a bit of text this editing box appears where you can change and edit the element for it to have a shadow or a glow or to send it to the back. This was good because it had a wide range of options to change the element allowing you to create the poster you wanted to create.
  • 45.
    Capture / Snippingtool “Capture is a application on the computer that allows you to take a screen shot. I used this to evidence all the images I used.” I chose to use this application because if the software I was using didn’t save the image in the correct format for what I needed I could this application to take a picture of the image then save it as I want as it has a lot of saving formats. What I have learnt: I have learnt that this application is on all computers even Apple Macs and that to access it on a Apple Mac I need to look under the application folder.
  • 46.
    Capture / SnippingtoolThis is where you can find save as. This was good because the save as button could save the image in a lot of formats that I needed to use. This allows you to annotate the image. This was good because if you want to add notes around the image you could without needing to type them up.
  • 47.
    Slide Share I choseto use Slide Share because it was the quickest and easiest way to get my Powerpoints uploaded so they could be embedded into my blog. It was also good for uploading multiple files at once.
  • 48.
    Slide Share All youdo is click here to select the PowerPoint you want to upload then you add a title and save it. It then gives you an embed code. This was good because it was quick and instant so no time was wasted.
  • 49.
    PowerPoint “PowerPoint is adownloaded presentation software. I used it for all my presentations” I chose to use PowerPoint because I’m familiar with the layout so making it easy to use. Also it has a lot of presentation elements to use which was good to make the presentation interesting. I didn’t like how it couldn’t be instantly uploaded from the computer to the blog with out using slide share as PowerPoint was in the wrong format for the blog. What I have learnt: I need to convert PowerPoint formats to get them onto blogs.
  • 50.
    PowerPoint The slides showyou what you have created. This was good because if you wanted to go back a couple of slides all you do is click on the slide you want to go back to making it easy to use. These buttons allow you to add a new slide, to delete slides and change the layout of them. This was useful because you could alter the presentation to fit you. These are all the shapes you can add. It was good having them there because you could just go to the top and click on what you want without needing to go through all the settings. This is where text can be changed. Having it on the top was handy because it was easy to access.
  • 51.
    Word “Word is adownloaded piece of software made for documents. I used this mainly in the research and planning” I chose to use Word because when writing documents and forms it had the best variety in altering text. What I have learnt: I have learnt I need to convert the Word format to a different one so it will be compatible to be put onto my blog.
  • 52.
    Word This where youcan change the font and text size. Having them at the top was good because it was easy to get to so making text changes quicker. This is where you can highlight and change text colour. This was good if I wanted to emphasis words. You can change the style of the text to fit if it was a title or subtitle. This was good if you wanted to clearly show people what the document was about.
  • 53.
    Scribd I chose touse Scribd because it was a quick and easy way to upload my Word documents and get an embed code for it.
  • 54.
    ScribdAll you dois click here to select the Word document you want to upload then you add a title and save it. It then gives you an embed code. This was good because it was quick and instant so no time was wasted
  • 55.
    Excel “Excel is adownloaded software that is mainly used to create spreadsheets however I used it to present my survey results in a graph for my evaluation” I chose to use Excel because I could create a table with my survey results then quickly turn my table into a graph or chart.
  • 56.
    Excel It has textaltering features. This was good to have because I could then title my graphs so I knew what graph was for what question. Once inserting the survey data you then press insert to change it into a graph. This feature was useful because I could then show my findings in statistical terms and not just numbers.
  • 57.
    Paint “Paint is adownloaded programme where you can draw images with it’s paintbrushes. I sued this for my planning.” I chose to use paint because I could take advantage of the bright and block colours it offers that I wanted to use in my flat plan. What I have learnt: I have learnt that once you begin painting on a document you have scanned in you can’t use the paint bucket to fill large gaps as there are no lines. So to fill the gaps you need to hand paint it all.
  • 58.
    Paint The colours available.Having them on the top was good because it was easy to find and quick to use. It had a range of tools to use like paint brushes to shapes. The simplicity made it easy to use as I could quickly find what I want then use it. I could save the image as a JPEG as well which was handy as I could upload it straight to the blog.
  • 59.
    Gmail I chose touse Gmail because in the address book it had everyone’s e-mail address so it was easy finding my target audience and sending my survey to them. What I have learnt: the easiest method of sending out the survey is just to copy and paste the link to survey on the e-mail instead of copying and pasting the survey onto the e-mail it’s self.
  • 60.
    Gmail This is whereyou can attach pictures and documents to the e-mail. This is useful because you can then get images from your phone onto the computer or get the document your working on at home to the college computer so you can finish it. See e-mails you receive here. This is useful because when you log on you can instantly see if you have e-mails or not and your not scrolling through folders looking for received e-mails. You can add e-mails to folders. This is useful because you can organise e-mails into groups making them easier to find.