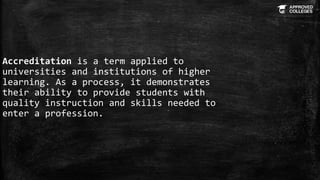
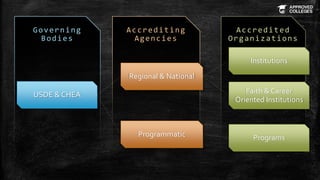
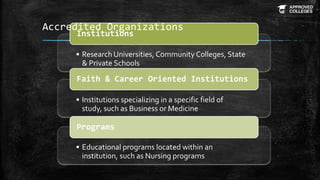
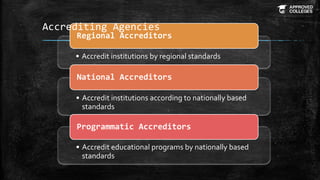
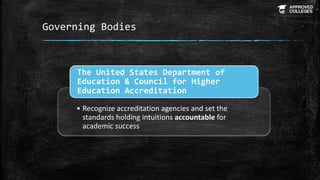
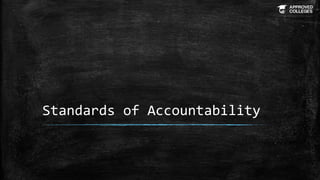
Accreditation is a process that demonstrates a university or institution's ability to provide quality education and skills needed for a profession. There is a hierarchy of accreditation with the US Department of Education and Council for Higher Education Accreditation setting standards, regional and national accrediting agencies accrediting institutions, and programmatic accreditors reviewing specific programs. Accreditation ensures transparency about a school's programs and degrees, quality through marketing and admissions practices, and assurance of student success through graduation rates and job placements.
This document provides information about Marist College's Paralegal Program. The program offers both weekend and evening formats. The weekend program can be completed in 12 months and is offered at the Fishkill Center, with classes meeting on alternating weekends. The evening program is offered in Poughkeepsie with classes meeting weekdays from 6:30-9:00pm. Both programs require 36 transferable credits and proof of immunizations. Tuition is $475 per credit for the weekend program and $550 per credit for the evening program. The program benefits include a quality education, practical legal training, ABA approval, and career assistance.
Nursing School Requirements Article SampleTammy Jones
Nursing school requirements vary by state and university but generally include:
- Obtaining a high school diploma or GED
- Submitting a completed application by the deadline including transcripts
- Meeting GPA requirements and applying for financial aid like FAFSA if needed
- Taking entrance exams such as the SAT, PAX-RN, TEAS, NET, or HESI by the required deadlines which test math, science, reading, and English abilities
- Researching the specific requirements for your target nursing program and state to ensure all are met.
The document discusses South Texas College policies regarding dual credit student attendance, conduct, course limits, deadlines, and schedule changes. It states that regular attendance is expected, students are responsible for communicating absences to instructors, and may be dropped for poor attendance. It also outlines dual credit course limits based on grade level, registration and withdrawal deadlines students must follow, and the process for making schedule changes through the Dual2Degree department.
Learn how you can fund scholarships using Rotary
grants. The session will cover the basics of funding
scholarships using Rotary grants and dive a little deeper
into global grant scholarships. You’ll learn ways to recruit
good global grant scholars and how to partner with local
universities to find qualified candidates.
The Grand River Post Secondary Education Office (GRPSEO) provides funding assistance to Six Nations members pursuing post-secondary education. It assists students with the application process, monitors academic progress, and provides funding for tuition, books, and living expenses. Eligible programs include college diplomas or university degrees that are at least two years. Funding levels are determined based on the type of program. The GRPSEO application deadlines are February 1st for summer semesters and May 1st for fall/winter semesters. Students must maintain satisfactory academic performance for continued funding support.
This document provides information about South Texas College's dual credit program. It welcomes new dual credit students and outlines an overview for the First-time Dual Credit Module, which reviews responsibilities and resources to ensure dual credit success. It provides details about South Texas College, including that it has over 31,000 students, more than 15,000 of which are dual credit students, and it serves 6 campuses and 2 higher education centers in Hidalgo and Starr Counties.
The Grand River Post Secondary Education Office (GRSPEO) provides educational assistance to First Nations students from Six Nations. The summary provides information on eligibility requirements, levels and types of funding available, application deadlines and processes, and expectations for student success and accountability.
If you’re graduating this May, or looking to advance in your career, you may have graduate school in mind. A graduate degree can provide a valuable boost to your resume and give you a leg up as you search for jobs. But it’s important to take cost into mind before you decide to head back to school - make sure to find a program that’s compatible with your career goals and affordable. We know the price tag for graduate programs can be significant, so we’ve pulled together a summary of different options to help you pay for school. From fellowships to tax credits to federal grants, you’ll find something that can help reduce your out-of-pocket costs in our slideshow below.
The document defines key terms related to the college experience including: college, a self-governing body within a university that provides living quarters; bachelors, the lowest degree conferred by a 4-year institution; room and board, lodging and food provided for a set price; SAT and ACT, standardized tests used for college admission; tuition, the price of instruction; admissions, the process of being admitted; enrollment, becoming a member; university, an institution of higher education that grants degrees; vocational, relating to career training; and associates, a 2-year degree.
Module 6 Connecting Student to MDC Resourcesvzayas
This document outlines various resources available to students at MDC, including financial aid and scholarships, disability services, tutoring and study groups, career exploration tools, financial counseling and legal assistance through Single Stop, and opportunities for service learning and internships. To maintain financial aid eligibility, students must meet requirements such as maintaining a 2.0 GPA, being degree-seeking, enrolled in required courses, and taking a minimum number of credits per term. Financial aid will cover the cost of retaking a failed course once. The 150% rule limits financial aid to cover up to 150% of the credits required for a student's program of study.
The document provides information about the Grand River Post Secondary Education Office (GRPSEO), which assists Six Nations members in pursuing higher education. It outlines the application process and eligibility requirements for funding, levels of funding available for tuition, books, living expenses, and priorities for funding approval. Deadlines for applications and continuing obligations are also summarized.
The document describes DISCOVER, an online application system developed by M. D. Anderson's Department of Trainee & Alumni Affairs to streamline the educational trainee application, selection, and appointment process. DISCOVER allows applicants to submit application forms and documents online, request letters of recommendation electronically, and allows administrators, faculty, and staff to manage the application process. The system is accessible via the internet for applicants and the intranet for internal users. Technical support is available 24/7 and questions regarding policies should be directed to academic coordinators in the Department of Trainee & Alumni Affairs.
This document provides training information for enrollment coordinators at CSU-Global, including admissions requirements. It outlines that CSU-Global is a 100% online public university that offers bachelor's and graduate degree programs as well as certificates. Admissions can be standard, non-degree seeking, or for certificate programs. Undergraduate requirements include a 2.3 GPA and 13 credits from a regionally accredited school. Graduate requirements are a 3.0 GPA and a bachelor's degree. International transcripts must be evaluated. Regional accreditation is preferred over national accreditation.
The document discusses Texas 4-H academic eligibility policies and guidelines. It states that all 4-H competitive events require participants to meet academic eligibility standards as outlined in the Texas Education Code. County agents should consult with school officials at the start of each year to discuss obtaining excused absences, determining student eligibility, and when to check on eligibility for events. The document also provides information on designating 4-H as an extracurricular activity and appointing agents as adjunct faculty to enable student attendance counting.
This document provides an introduction to common study abroad terminology used at Texas A&M University. It defines key words and acronyms related to study abroad programs, the application process, financing study abroad, and resources for studying abroad. Terms defined include study abroad advisor, contact hours, faculty-led programs, transfer credit programs, FAFSA, scholarships, and expectations for study abroad assignments. The document aims to clarify study abroad "lingo" for Texas A&M students.
South Texas College Dual Credit Campus Resourceskgarz175
The document provides information about various campus resources available to South Texas College dual credit students, including counseling services, transfer assistance, tutoring centers, libraries, career coaching, honors programs, and student life activities. Counseling services are available for academic, career, mental health, and other counseling needs. The transfer center assists with articulation agreements and identifying transferable courses. Tutoring centers provide academic support. Libraries offer study spaces, online resources, and printing. Career coaching includes assessments and information about career options. An honors program is available for high-achieving students. Students are also invited to participate in campus clubs and activities.
SUNY Broome offers support services for veterans through their Veterans and Military Affairs office. The office handles over 110 veterans, providing referrals for counseling, academic support, and work-study job information. Veterans can receive benefits like the Post-9/11 GI Bill, which guarantees up to 36 months of education benefits and a monthly housing allowance. To apply, veterans determine their eligible benefit and apply through the VA website, submitting military transcripts and records to SUNY Broome for evaluation of transfer credits.
The university outreach services provides information to high school students about admission requirements, financial aid, and academic programs to help students apply to and attend a 4-year university. It maintains student files and follows up with admitted students. The director oversees outreach counselors and student ambassadors who are assigned to local high schools to help students with the application process and inform them of important deadlines and events. The goal is to help students, especially those from underserved communities, gain access to higher education opportunities.
College grants are provided to students who demonstrate financial need, displaced workers who need to get retrained in order to compete and re-join the workforce, and students enrolled in a post baccalaureate teaching certificate program. This particular type of grant does not need to be repaid by the student and there are no application fees. Also, you don’t need to have a good credit to apply. For more information, please visit www.allamericangrantguide.com
The Virginia Education Wizard is an online resource developed by Virginia's Community Colleges that provides information to help users explore careers, curriculum choices, and financial assistance options. The Wizard can be used by prospective students to identify career paths and funding sources, current students to plan degree progress and transfers, and experienced workers looking to explore new careers or education. Key features include an interest and values assessment, browsing careers by name or cluster, program and course information, a financial aid award estimator, and transfer planning tools.
The Virginia Education Wizard is an online resource developed by Virginia's Community Colleges that provides information to help users explore careers, curriculum choices, and financial assistance options. The Wizard allows prospective students to identify career paths and curriculum choices, current students to track degree progress and transfer plans, and experienced workers to explore new careers or education requirements. Key features include an interest and values assessment, browsing careers by name or cluster, program and course information, a financial aid award estimator, and transfer planning tools.
The ApplyTexas application for Texas public universities covers testing scores, recommendations, extracurricular activities, essays, and transcripts. For testing, it looks at highest ACT or SAT scores. Recommendations should be from teachers who can address the applicant's strengths. Extracurriculars include both in-school and out-of-school activities. Essays allow applicants to share what makes them unique and any special circumstances. Transcripts are reviewed for challenging coursework and continuity in subjects.
The document summarizes information about studying abroad through North Carolina State University. It discusses the study abroad office's mission, the number of students who received scholarships in 2009-2010, and provides an overview of the different types of study abroad programs available including exchanges, direct enrollments, group programs, and summer programs. It also offers tips for students to consider when choosing a program and location as well as the step-by-step process for applying.
Residents Medical is a company based in Los Angeles that offers various services to medical school graduates participating in the National Resident Matching Program. The services include research fellowships, clinical externships, USMLE preparation, interview coaching, and application assistance. The National Resident Matching Program uses an algorithm to match graduates to residency programs based on ranked preference lists submitted by both parties. Applicants interview in fall and winter, then programs and applicants each rank their preferences, with the algorithm producing the final matches.
The Ontario Student Assistance Program (OSAP) provides needs-based loans and grants to help Ontario students finance their post-secondary education, with eligibility determined by factors like residency, enrollment status, and financial need calculated from expenses, income, assets, and expected parental contribution. OSAP assistance includes integrated loans, grants, bursaries, and work programs while in school as well as repayment options after completing studies. The document provides information on how to apply for OSAP, the application process, responsibilities, and additional resources for financing one's education.
The document discusses financial aid options for students attending Colegio San Patricio in Mexico. It provides information on tuition costs and lists several types of scholarships available, including university scholarships based on merit or service, athletic scholarships, and educational credits granted by the university or its partners to help students fund their tuition.
The document discusses the boreal forest biome, also known as taiga. It covers over 11% of the Earth's land area in a band between 50-65 degrees north latitude, across northern Europe, Asia and North America. Boreal forests have low soil fertility, thin acidic soils with permafrost. Trees are adapted to the cold with conical shapes, needle-like leaves and dark colors. Animals found in boreal forests like black bears and lynx also have adaptations for the cold climate. The biome faces threats from deforestation, acid rain and global warming.
This document provides an overview of a seminar-workshop on business correspondence to be held on October 27-28, 2011 at the Mines and Geosciences Bureau in Quezon City. The seminar will cover topics such as the types and purposes of business correspondence including letters, memoranda, and emails. It will discuss best practices for effective business communication including being concise, complete, concrete, correct, coherent, clear, and courteous. The seminar will also cover the proper format and components of business letters as well as types of business letters and letter writing.
The document discusses the benefits and disadvantages of technology in education. It notes that while technology can enhance learning when used properly, it can also be detrimental when it replaces active, critical thinking. Some ways technology hinders learning mentioned include students passively accepting online information without verification, using technology for pornography or non-educational purposes, and replacing human interaction and development of social skills with excessive computer use. The document advocates for technology to be integrated in a way that promotes interactive, creative, and team-based learning rather than replacing the teacher or passive consumption.
This document contains summaries of several topics related to educational technology:
- It discusses what educational technology is and how it can be integrated into classroom discussions to help students learn in a fast-changing world.
- It also examines the roles of technology in learning, how it can serve as a delivery vehicle for instructional lessons or partner in the learning process.
- Other topics summarized include the cone of experience model, conceptual learning approaches, and the importance of teaching students how to properly use educational technology.
Technology has brought both benefits and challenges to society. While technology can enhance communication and access to information, some worry it may replace valuable human interaction over time. There is a concern that overreliance on technology could negatively impact people's ability to engage with others in meaningful ways.
The document discusses technology and whether it is a boon or bane. It first defines technology as the making, modification, usage and knowledge of tools and techniques to solve problems or improve solutions. When used properly, technology can benefit education and bring people closer together through communication tools. However, when misused, technology can damage relationships and learning. It concludes that technology improves life when used correctly, but becomes detrimental when abused.
The document discusses the impact of technology in the classroom from the perspectives of both teachers and students. It outlines several benefits of educational technology, such as making lessons more interactive, allowing students to learn in different ways, and giving them access to more resources and information. However, it also notes some potential downsides, such as over-reliance on technology hindering basic skills development and distracting some students from learning. Overall, the document seems to argue that when used appropriately to enhance teaching and engage students, technology can have a positive effect, but its impact depends on how it is implemented in the classroom.
Technology has greatly impacted our lives both positively and negatively. While technology has increased productivity and connectivity, it has also increased distractions and the potential for addiction. Overall, technology provides benefits if used responsibly and balanced with other activities, but can become problematic if overused.
The document discusses technology as both a boon and bane. It notes the benefits of technology in connecting people over long distances, enhancing education through multimedia, and allowing people to watch global events. However, it also discusses downsides like learners uncritically accepting online information, using technology for pornography or idle entertainment, and overusing cell phones to the detriment of classroom focus. The document concludes that technology should be integrated into education to promote interactive, creative, and team-based learning rather than replacing the teacher or student experience.
The document discusses whether technology is a boon or bane. It notes that technology can be used to both build up and destroy. While technology can enhance teaching and learning, as well as connect people over long distances, it can also be detrimental if not used properly. Specifically, overuse of the internet, cellphones, television and other technologies can damage relationships and learning if it replaces direct interaction and critical thinking. The document provides examples of both the positive and negative impacts of technology on education and relationships.
DEVELOPMENT AND MAINTENANCE OF STANDARDS ,ACCREDITATION (2).pptxKaranSingh321255
This document discusses standards and accreditation in nursing education programs. It defines accreditation as the process by which an organization recognizes a program as meeting certain quality standards. There are different types of accreditation bodies, including national agencies, national professional organizations, and state bodies. Standards serve as guidelines for developing, evaluating, and improving nursing education programs to ensure graduates are prepared for safe practice. The document outlines four common standards related to mission/governance, curriculum/teaching, resources, and program/student outcomes. Maintaining accredited status helps programs obtain resources and allows graduates to pursue further education and licensure.
This document outlines the objectives and content of a presentation on accreditation. The presentation will define key terms related to quality assurance and accreditation. It will describe the types of educational institutes in Egypt and characteristics of accreditation processes. The presentation will cover principles of accreditation, benefits of accreditation, and differences between program and institutional accreditation. It will also discuss the accreditation process and challenges of obtaining accreditation.
South East Asian Association of Higher Education (SEAAFHE) is a completely recognized accrediting body, which is established to accredit schools, colleges, universities and vocational institutes, operating in Brunei, Cambodia, East Timor, Indonesia, Laos, Malaysia, Myanmar, Philippines, Singapore, Thailand & Vietnam. SEAAFHE ensures and evaluates that academic institutions are providing education, according to internationally set standards of education.
Students in college hail from a wide range of backgrounds and experiences, including college-level study.
Credit for Prior Learning (CPL), also known as Prior Learning Assessment, is an academic method that allows students to obtain college credits for learning outside of the classroom.
https://www.myassignmenthelpau.com/
United States Board for Education Standardization (USBES) Accreditation services help students feel comfortable about their academic credentials by obtaining degrees from accredited institutes and universities.
This document provides an introduction to accreditation for librarians. It outlines the goals of preparing librarians for accreditation, introducing concepts like integrated planning, outcomes assessment, evidence-based practices, and data-driven decision making. The accreditation process is summarized as involving a self-study, peer review, and accreditation decision. Standards emphasized include integrated planning, outcomes assessment, providing evidence, and using data to make decisions. The document also lists the major US regional accrediting agencies.
The document discusses quality assessment in higher education programs. It defines key terms like quality assurance, self-assessment, and self-evaluation. It also outlines the purposes and processes of conducting self-assessments of academic programs using frameworks like the Baldrige Criteria. The goals of self-assessment are to evaluate whether programs meet their objectives and identify areas for improvement to enhance student learning. Conducting self-assessments in a systematic, ongoing manner can benefit organizations by focusing them on goals and assessing performance.
The document discusses quality assessment in higher education programs. It defines key terms like quality assurance, self-assessment, and self-evaluation. It also outlines the purposes and processes of conducting self-assessments of academic programs using frameworks like the Baldrige Criteria. The goals of self-assessment are to evaluate whether programs meet their objectives and identify areas for improvement to enhance student learning outcomes. Conducting self-assessments in a systematic, ongoing manner can benefit organizations by focusing them on goals and assessing performance relative to competitors.
After completion of the presentation, the participants will be able to know:
- The Origins of Quality Assurance in Higher Education
- Definitions in Quality Assurance
- Quality Enhancement
- Quality Assessment
- Accreditation
- The importance of Accreditation
- What is QA’s relationship to Accreditation?
- Why accreditation?
- Actors and factors in HE Quality
- Internal Quality Assurance Applied by Asian Universities
- Regional and International Quality Standards
- National Quality Standards
- Characteristics of QA in Asia
- QA Challenges in Asia
Benchmarking is used both academically and for management purposes in educational institutions. Academic benchmarking involves establishing standards for student learning and assessing student performance against those standards. Management benchmarking allows institutions to compare their performance to others in areas like training methods and teaching strategies. Accreditation bodies also use benchmarking to establish standards for educational quality and monitor member institutions. The document discusses several accreditation organizations in the Philippines and their multi-phase accreditation process.
SFJ Awards Custom Certification for Bespoke LearningCharlotte Hallas
Certificate learners for your bespoke learning programmes, elearning, training courses and much more with custom certification and quality assurance for learning from a recognised awarding organisation, SFJ Awards
How do you think naac is ensuring external and internal quality at higher edu...Abhishek Nayan
National Assessment and Accreditation Council (NAAC) was established by the UGC in September 1994 at Bangalore for evaluating the performance of the Universities and Colleges in the Country. NAAC's mandate includes the task of performance evaluation, assessment and accreditation of universities and colleges in the country. Since its eastablishment, NAAC is working towards quality enhancement in Higher education. Check the slides to know more.
The document discusses accreditation in nursing education. It defines accreditation as a voluntary process where an organization is officially recognized by a board after meeting certain written standards. The purposes of accreditation include maintaining quality standards, encouraging self-evaluation, and protecting nursing institutions from external pressures. The accreditation process involves a self-study, site visits, and a final decision on accreditation status. Key accrediting bodies for nursing education in India are the Indian Nursing Council, state nursing councils, and the National Assessment and Accreditation Council.
This document outlines the purpose and components of a professional portfolio used to document competencies, expertise, and professional development. It discusses four dimensions of scholarship and provides examples of materials to include in a portfolio such as publications, presentations, teaching evaluations, and evidence of research, grants, and clinical practice. The document recommends that the portfolio be continuously updated and used for self-assessment, professional advancement, and employment purposes.
This document discusses accreditation in education. It begins by defining accreditation and stating its objectives, which are to define accreditation, present different accrediting agencies, discuss the benefits of accreditation, and provide exhibits and examples used in accreditation. It then discusses relevant Philippine laws and the Commission on Higher Education. It provides definitions of accreditation, including that it is a self-regulation process focused on self-study and evaluation to improve quality. It also discusses the major accrediting agencies in the Philippines - AACCUP, PAASCU, and PACUCOA - and the benefits accreditation provides such as prestige and knowledge of program quality. Finally, it discusses ways accredit
MM Bagali.......PhD...... Papers.... Research......Management research,.....dr m m bagali, phd in hr
Faculty accreditation in higher education is important to recognize excellence beyond degrees. The author proposes a model for accrediting management faculty across countries to establish them as certified teachers. There is currently only one organization in India that accredits management faculty. The model would emphasize faculty accreditation at a larger level with reputable councils evaluating faculty based on academic contribution, intellectual contribution, professional development and more. Faculty accreditation would benefit students, faculty, management schools and the public by ensuring accountability and quality of education.
This presentation discusses accreditation in healthcare education. Accreditation involves an official review and approval of an institution to ensure it meets set standards. It aims to maintain quality, improve institutions, and protect the public. The process involves a self-study report and site visit, followed by a decision on accreditation. In India, the Indian Nursing Council plays a key role in accrediting nursing programs and regulating nursing education standards.
US Credential Evaluation is an essential process for individuals who have studied outside of the United States and wish to continue their education or work in the country.
How to Fix the Import Error in the Odoo 17Celine George
An import error occurs when a program fails to import a module or library, disrupting its execution. In languages like Python, this issue arises when the specified module cannot be found or accessed, hindering the program's functionality. Resolving import errors is crucial for maintaining smooth software operation and uninterrupted development processes.
How to Make a Field Mandatory in Odoo 17Celine George
In Odoo, making a field required can be done through both Python code and XML views. When you set the required attribute to True in Python code, it makes the field required across all views where it's used. Conversely, when you set the required attribute in XML views, it makes the field required only in the context of that particular view.
Exploiting Artificial Intelligence for Empowering Researchers and Faculty, In...Dr. Vinod Kumar Kanvaria
Exploiting Artificial Intelligence for Empowering Researchers and Faculty,
International FDP on Fundamentals of Research in Social Sciences
at Integral University, Lucknow, 06.06.2024
By Dr. Vinod Kumar Kanvaria
This slide is special for master students (MIBS & MIFB) in UUM. Also useful for readers who are interested in the topic of contemporary Islamic banking.
This presentation includes basic of PCOS their pathology and treatment and also Ayurveda correlation of PCOS and Ayurvedic line of treatment mentioned in classics.
A workshop hosted by the South African Journal of Science aimed at postgraduate students and early career researchers with little or no experience in writing and publishing journal articles.
A review of the growth of the Israel Genealogy Research Association Database Collection for the last 12 months. Our collection is now passed the 3 million mark and still growing. See which archives have contributed the most. See the different types of records we have, and which years have had records added. You can also see what we have for the future.
বাংলাদেশের অর্থনৈতিক সমীক্ষা ২০২৪ [Bangladesh Economic Review 2024 Bangla.pdf] কম্পিউটার , ট্যাব ও স্মার্ট ফোন ভার্সন সহ সম্পূর্ণ বাংলা ই-বুক বা pdf বই " সুচিপত্র ...বুকমার্ক মেনু 🔖 ও হাইপার লিংক মেনু 📝👆 যুক্ত ..
আমাদের সবার জন্য খুব খুব গুরুত্বপূর্ণ একটি বই ..বিসিএস, ব্যাংক, ইউনিভার্সিটি ভর্তি ও যে কোন প্রতিযোগিতা মূলক পরীক্ষার জন্য এর খুব ইম্পরট্যান্ট একটি বিষয় ...তাছাড়া বাংলাদেশের সাম্প্রতিক যে কোন ডাটা বা তথ্য এই বইতে পাবেন ...
তাই একজন নাগরিক হিসাবে এই তথ্য গুলো আপনার জানা প্রয়োজন ...।
বিসিএস ও ব্যাংক এর লিখিত পরীক্ষা ...+এছাড়া মাধ্যমিক ও উচ্চমাধ্যমিকের স্টুডেন্টদের জন্য অনেক কাজে আসবে ...
How to Setup Warehouse & Location in Odoo 17 InventoryCeline George
In this slide, we'll explore how to set up warehouses and locations in Odoo 17 Inventory. This will help us manage our stock effectively, track inventory levels, and streamline warehouse operations.
Chapter wise All Notes of First year Basic Civil Engineering.pptxDenish Jangid
Chapter wise All Notes of First year Basic Civil Engineering
Syllabus
Chapter-1
Introduction to objective, scope and outcome the subject
Chapter 2
Introduction: Scope and Specialization of Civil Engineering, Role of civil Engineer in Society, Impact of infrastructural development on economy of country.
Chapter 3
Surveying: Object Principles & Types of Surveying; Site Plans, Plans & Maps; Scales & Unit of different Measurements.
Linear Measurements: Instruments used. Linear Measurement by Tape, Ranging out Survey Lines and overcoming Obstructions; Measurements on sloping ground; Tape corrections, conventional symbols. Angular Measurements: Instruments used; Introduction to Compass Surveying, Bearings and Longitude & Latitude of a Line, Introduction to total station.
Levelling: Instrument used Object of levelling, Methods of levelling in brief, and Contour maps.
Chapter 4
Buildings: Selection of site for Buildings, Layout of Building Plan, Types of buildings, Plinth area, carpet area, floor space index, Introduction to building byelaws, concept of sun light & ventilation. Components of Buildings & their functions, Basic concept of R.C.C., Introduction to types of foundation
Chapter 5
Transportation: Introduction to Transportation Engineering; Traffic and Road Safety: Types and Characteristics of Various Modes of Transportation; Various Road Traffic Signs, Causes of Accidents and Road Safety Measures.
Chapter 6
Environmental Engineering: Environmental Pollution, Environmental Acts and Regulations, Functional Concepts of Ecology, Basics of Species, Biodiversity, Ecosystem, Hydrological Cycle; Chemical Cycles: Carbon, Nitrogen & Phosphorus; Energy Flow in Ecosystems.
Water Pollution: Water Quality standards, Introduction to Treatment & Disposal of Waste Water. Reuse and Saving of Water, Rain Water Harvesting. Solid Waste Management: Classification of Solid Waste, Collection, Transportation and Disposal of Solid. Recycling of Solid Waste: Energy Recovery, Sanitary Landfill, On-Site Sanitation. Air & Noise Pollution: Primary and Secondary air pollutants, Harmful effects of Air Pollution, Control of Air Pollution. . Noise Pollution Harmful Effects of noise pollution, control of noise pollution, Global warming & Climate Change, Ozone depletion, Greenhouse effect
Text Books:
1. Palancharmy, Basic Civil Engineering, McGraw Hill publishers.
2. Satheesh Gopi, Basic Civil Engineering, Pearson Publishers.
3. Ketki Rangwala Dalal, Essentials of Civil Engineering, Charotar Publishing House.
4. BCP, Surveying volume 1
How to Manage Your Lost Opportunities in Odoo 17 CRMCeline George
Odoo 17 CRM allows us to track why we lose sales opportunities with "Lost Reasons." This helps analyze our sales process and identify areas for improvement. Here's how to configure lost reasons in Odoo 17 CRM
2. Accreditation is a term applied to
universities and institutions of higher
learning. As a process, it demonstrates
their ability to provide students with
quality instruction and skills needed to
enter a profession.
5. • Research Universities, Community Colleges, State
& Private Schools
Institutions
• Institutions specializing in a specific field of
study, such as Business or Medicine
Faith & Career Oriented Institutions
• Educational programs located within an
institution, such as Nursing programs
Programs
Accredited Organizations
6. • Accredit institutions by regional standards
Regional Accreditors
• Accredit institutions according to nationally based
standards
National Accreditors
• Accredit educational programs by nationally based
standards
Programmatic Accreditors
Accrediting Agencies
7. • Recognize accreditation agencies and set the
standards holding intuitions accountable for
academic success
The United States Department of
Education & Council for Higher
Education Accreditation
Governing Bodies
10. Transparency
▪ Transparency protects students from small print and word games
▪ It is based on an Institution’s:
– Enrollment
– Degrees Offered
– Distance Education Programs
– Accreditors
11. Quality
▪ Quality protects students from false advertising
▪ It is determined by an institution’s:
– MarketingCampaigns
– Recruitment Practices
12. Assurance
▪ Assurance is evidence of an institutions commitment to student
success.
▪ Evidence includes:
– Graduation Rates
– CreditTransfers
– Job Placements
13. Why You Should Care
Accredited education allows you to . . .
SmartArt custom animation effects: horizontal organization chart(Intermediate)Tip: The instructions below describe how to reproduce the exact organization chart and animation effects in the example above. In the animation procedures, the number of animation effects that require modification in the Custom Animation task pane will vary if the chart contains a different number of managers and employees.To reproduce the background effects on this slide, do the following:On the Home tab, in the Slides group, click Layout, and then clickBlank. On the Design tab, in the Background group, click BackgroundStyles, and then click Style 8 (second row, fourth option from the left). (Note: If this action is taken in a PowerPoint presentation containing more than one slide, the background style will be applied to all of the slides.)To insert and arrange the SmartArt effects on this slide, do the following:On the Insert tab, in the Illustrations group, click SmartArt. In the Choose a SmartArt Graphic dialog box, in the left pane, click Hierarchy. In the Hierarchy pane, click Horizontal Labeled Hierarchy (second row, second option from the left), and then click OK to insert the graphic into the slide.Select the graphic, and then click one of the arrows on the left border. In the Type your text here dialog box, next to the first first-level bullet, enter DIRECTOR (or the name of the director). Next to the bullets for the second-level rectangles, enter MANAGER 1 and MANAGER 2 (or the names of the managers). Also in the Typeyourtext here dialog box, do the following:In the second first-level bullet, enter LEVEL 1.In the third first-level bullet, enter LEVEL 2.In the fourth first-level bullet, enter LEVEL 3.On the slide, do the following to add employee rectangles:Right-click the MANAGER 1 rectangle, point to Add Shape, and then click Add Shape Below. Right-click the MANAGER 2 rectangle, point to Add Shape, and then click Add Shape Below.Select the graphic, and then click one of the arrows on the left border. In the Type your text here dialog box, next to each of the five third-level bullets, enter EMPLOYEE (or the names of the employees).Select the graphic. Under SmartArt Tools, on the Format tab, click Size, and then do the following:In the Height box, enter6.82”.In the Width box, enter 9.3”. Under SmartArt Tools, on the Format tab, click Arrange, click Align, and then do the following:Click Align to Slide.Click Align Bottom. Click Align Center. Press and hold SHIFT, and then select all of the rectangles in the graphic. Under SmartArtTools, on the Format tab, in the Shapes group, click ChangeShape, and then under Rectangles click SnipDiagonalCornerRectangle (fifth option from the left).Press and hold SHIFT, and then select all three large level rectangles in the graphic. On the LEVEL 1 rectangle, on the middle of the left edge, drag the blue square adjustment handle slightly to the left to increase the width of all three rectangles. Press and hold SHIFT, and then select all of the director, manager, and employee rectangles. On the director rectangle, on the middle of the left edge, drag the blue square adjustment handle slightly to the left to increase the width of all the selected rectangles. If you would like to modify the number of directors, managers, and employees in the chart to match the structure of your organization, do one or more of the following: To add a rectangle within a particular level, right-click one of the rectangles in that level, point to Add Shape, and then click Add Shape After or Add Shape Before. To add a rectangle above another rectangle, right-click the lower-level rectangle, point to Add Shape, and then click Add Shape Above. To add a rectangle below another rectangle, right-click the higher-level rectangle, point to Add Shape, and then click Add Shape Below. To delete a rectangle, select the rectangle and then press DELETE.To add text to new rectangles, select the graphic, and then click one of the arrows on the left border. In the Type your text here dialog box, enter text. To reproduce the LEVEL 1 rectangle effects on this slide, do the following:On the slide, select the LEVEL 1 rectangle. On the Home tab, in the Font group, enter 24 in the Font Size box, click Character Spacing and then click Loose, and then click the arrow next to Font Color and click Blue, Accent 1, Lighter 40% (fourth row, fifth option from the left).On the Home tab, in the bottom right corner of the Drawing group, click the FormatShape dialog box launcher. In the FormatShape dialog box, click Fill in the left pane, select Gradient fill in the Fill pane, and then do the following:In the Type list, select Linear.Click the button next to Direction, and then click LinearDown (first row, second option from the left).Under Gradient stops, click Add or Remove until two stops appear in the drop-down list.Also under Gradient stops, customize the gradient stops as follows:Select Stop 1 from the list, and then do the following:In the Stop position box, enter 0%.Click the button next to Color, and then under Theme Colors click Black, Background 1 (first row, first option from the left). Select Stop 2 from the list, and then do the following: In the Stop position box, enter 100%.Click the button next to Color, and then under Theme Colors clickBlack, Background 1(first row, first option from the left).In the Transparency box, enter 100%.Also in the FormatShape dialog box, click LineColor in the left pane, select Gradient line in the LineColor pane, and then do the following:In the Type list, select Linear.Click the button next to Direction, and then click LinearDown (first row, second option from the left).Under Gradient stops, click Add or Remove until two stops appear in the drop-down list. Also under Gradient stops, customize the gradient stops as follows:Select Stop 1 from the list, and then do the following:In the Stop position box, enter 0%.Click the button next to Color, and then under Theme Colors click Blue, Accent 1, Lighter 40% (fourth row, fifth option from the left). Select Stop 2 from the list, and then do the following: In the Stop position box, enter 100%.Click the button next to Color, and then under Theme Colors clickBlack, Background 1 (first row, first option from the left). In the Transparency box, enter 100%.Also in the FormatShape dialog box, click LineStyle in the left pane. In the LineStyle pane, in the Width box, enter 1.5pt.Also in the FormatShape dialog box, click TextBox in the left pane, and then do the following in the TextBox pane:Under Textlayout, in the Verticalalignment list, select Top. Under Internalmargin, in the Left box, enter 0.19”.Under Internalmargin, in the Top box, enter 0.4”.Under Internalmargin, in the Right box, enter 0.19”.Under Internalmargin, in the Bottom box, enter 0.19”.To reproduce the LEVEL 2 rectangle effects on this slide, do the following:On the slide, select the LEVEL 2 rectangle. On the Home tab, in the Font group, enter 24 in the Font Size box, click Character Spacing and then click Loose, and then click the arrow next to Font Color and click Purple, Accent 4, Lighter 40% (fourth row, eighth option from the left).On the Home tab, in the bottom right corner of the Drawing group, click the FormatShape dialog box launcher. In the FormatShape dialog box, click Fill in the left pane, select Gradient fill in the Fill pane, and then do the following:In the Type list, select Linear.Click the button next to Direction, and then click LinearDown (first row, second option from the left).Under Gradient stops, click Add or Remove until two stops appear in the drop-down list.Also under Gradient stops, customize the gradient stops as follows:Select Stop 1 from the list, and then do the following:In the Stop position box, enter 0%.Click the button next to Color, and then under Theme Colors click Black, Background 1 (first row, first option from the left). Select Stop 2 from the list, and then do the following: In the Stop position box, enter 100%.Click the button next to Color, and then under Theme Colors clickBlack, Background 1(first row, first option from the left).In the Transparency box, enter 100%.Also in the FormatShape dialog box, click LineColor in the left pane, select Gradient line in the LineColor pane, and then do the following:In the Type list, select Linear.Click the button next to Direction, and then click LinearDown (first row, second option from the left).Under Gradient stops, click Add or Remove until two stops appear in the drop-down list. Also under Gradient stops, customize the gradient stops as follows:Select Stop 1 from the list, and then do the following:In the Stop position box, enter 0%.Click the button next to Color, and then under Theme Colors click Purple, Accent 4, Lighter 40% (fourth row, eighth option from the left). Select Stop 2 from the list, and then do the following: In the Stop position box, enter 100%.Click the button next to Color, and then under Theme Colors clickBlack, Background 1 (first row, first option from the left). In the Transparency box, enter 100%.Also in the FormatShape dialog box, click LineStyle in the left pane. In the LineStyle pane, in the Width box, enter 1.5pt.Also in the FormatShape dialog box, click TextBox in the left pane, and then do the following in the TextBox pane:Under Textlayout, in the Verticalalignment list, select Top. Under Internalmargin, in the Left box, enter 0.19”.Under Internalmargin, in the Top box, enter 0.4”.Under Internalmargin, in the Right box, enter 0.19”.Under Internalmargin, in the Bottom box, enter 0.19”.To reproduce the LEVEL 3 rectangle effects on this slide, do the following:On the slide, select the LEVEL 3 rectangle. On the Home tab, in the Font group, enter 24 in the Font Size box, click Character Spacing and then click Loose, and then click the arrow next to Font Color and click Olive Green, Accent 3, Lighter 40% (fourth row, seventh option from the left).On the Home tab, in the Drawing group, click the FormatShape Dialog Box Launcher. In the FormatShape dialog box, click Fill in the left pane, select Gradient fill in the Fill pane, and then do the following:In the Type list select Linear.Click the button next to Direction, and then clickLinearDown (first row, second option from the left).Under Gradient stops, click Add or Remove until two stops appear in the drop-down list.Also under Gradient stops, customize the gradient stops as follows:Select Stop 1 from the list, and then do the following:In the Stop position box, enter 0%.Click the button next to Color, and then under Theme Colors click Black, Background 1 (first row, first option from the left). Select Stop 2 from the list, and then do the following: In the Stop position box, enter 100%.Click the button next to Color, and then under Theme Colors clickBlack, Background 1(first row, first option from the left).In the Transparency box, enter 100%.Also in the FormatShape dialog box, click LineColor in the left pane, select Gradient line in the LineColor pane, and then do the following:In the Type list, select Linear.Click the button next to Direction, and then click LinearDown (first row, second option from the left).Under Gradient stops, click Add or Remove until two stops appear in the drop-down list. Also under Gradient stops, customize the gradient stops as follows:Select Stop 1 from the list, and then do the following:In the Stop position box, enter 0%.Click the button next to Color, and then under Theme Colors click Olive Green, Accent 3, Lighter 40% (fourth row, seventh option from the left). Select Stop 2 from the list, and then do the following: In the Stop position box, enter 100%.Click the button next to Color, and then under Theme Colors clickBlack, Background 1 (first row, first option from the left). In the Transparency box, enter 100%.Also in the FormatShape dialog box, click LineStyle in the left pane. In the LineStyle pane, in the Width box, enter 1.5pt.Also in the FormatShape dialog box, click TextBox in the left pane, and then do the following in the TextBox pane:Under Textlayout, in the Verticalalignment list, select Top. Under Internalmargin, in the Left box, enter 0.19”.Under Internalmargin, in the Top box, enter 0.4”.Under Internalmargin, in the Right box, enter 0.19”.Under Internalmargin, in the Bottom box, enter 0.19”.To reproduce the director rectangle effects on this slide, do the following:On the slide, select the director rectangle. Press the RIGHT ARROW key as needed to move the rectangle slightly off the right edge of the LEVEL 1 rectangle.On the Home tab, in the Font group, enter 23 in the FontSize box, and then click TextShadow. On the Home tab, in the bottom right corner of the Drawing group, click the FormatShape dialog box launcher. In the FormatShape dialog box, in the left pane, click Fill, select Gradient fill in the Fill pane, and then do the following:In the Type list, select Linear.Click the button next to Direction, and then click LinearDown (first row, second option from the left).Under Gradient stops, click Add or Remove until two stops appear in the drop-down list. Also under Gradient stops, customize the gradient stops as follows:Select Stop 1 from the list, and then do the following:In the Stop position box, enter 0%.Click the button next to Color, and then under Theme Colors click Blue, Accent 1, Lighter 40% (fourth row, fifth option from the left). Select Stop 2 from the list, and then do the following: In the Stop position box, enter 100%.Click the button next to Color, and then under Theme Colors clickBlue , Accent 1, Darker 25% (fifth row, fifth option from the left). Also in the FormatShape dialog box, click LineColor in the left pane. In the LineColor pane, select Solidline, click the button next to Color, and then click Blue, Accent 1, Darker 25% (fifth row, fifth option from the left). Also in the FormatShape dialog box, click LineStyle in the left pane. In the LineStyle pane, in the Width box, enter 1 pt.Also in the FormatShape dialog box, click Shadow in the left pane. In the Shadow pane, click the button next to Presets, and then under Outer click OffsetCenter (second row, second option from the left).To reproduce the manager rectangle effects on this slide, do the following:Press and hold SHIFT, and then select the manager rectangles. Press the RIGHT ARROW key as needed to move the manager rectangles slightly off the right edge of the LEVEL 2 rectangle.On the Home tab, in the Font group, enter 23 pt in the FontSize box, and then click TextShadow. On the Home tab, in the bottom right corner of the Drawing group, click the FormatShape dialog box launcher. In the FormatShape dialog box, in the left pane, click Fill, select Gradient fill in the Fill pane, and then do the following:In the Type list, select Linear.Click the button next to Direction, and then click LinearDown (first row, second option from the left).Under Gradient stops, click Add or Remove until two stops appear in the drop-down list. Also under Gradient stops, customize the gradient stops as follows:Select Stop 1 from the list, and then do the following:In the Stop position box, enter 0%.Click the button next to Color, and then under Theme Colors click Purple, Accent 4, Lighter 40% (fourth row, eighth option from the left). Select Stop 2 from the list, and then do the following: In the Stop position box, enter 100%.Click the button next to Color, and then under Theme Colors clickPurple , Accent 4, Darker 25% (fifth row, eighth option from the left). Also in the FormatShape dialog box, click LineColor in the left pane. In the LineColor pane, select Solidline, click the button next to Color, and then clickPurple, Accent 4, Darker 25% (fifth row, eighth option from the left).Also in the FormatShape dialog box, click LineStyle in the left pane. In the LineStyle pane, in the Width box, enter 1 pt. Also in the FormatShape dialog box, click Shadow in the left pane. In the Shadow pane, click the button next to Presets , and then under Outer click OffsetCenter (second row, second option from the left). To reproduce the employee rectangle effects on this slide, do the following:Press and hold SHIFT, and then select the employee rectangles. Press the RIGHT ARROW key as needed to move the employee rectangles slightly off the right edge of the LEVEL 3 rectangle.On the Home tab, in the Font group, enter 23 pt in the FontSize box, and then click TextShadow. On the Home tab, in the bottom right corner of the Drawing group, click the FormatShape dialog box launcher. In the FormatShape dialog box, in the left pane, click Fill, select Gradient fill in the Fill pane, and then do the following:In the Type list, select Linear.Click the button next to Direction, and then click LinearDown (first row, second option from the left).Under Gradient stops, click Add or Remove until two stops appear in the drop-down list. Also under Gradient stops, customize the gradient stops as follows:Select Stop 1 from the list, and then do the following:In the Stop position box, enter 0%.Click the button next to Color, and then under Theme Colors click Olive Green, Accent 3, Lighter 40% (fourth row, seventh option from the left). Select Stop 2 from the list, and then do the following: In the Stop position box, enter 100%.Click the button next to Color, and then under Theme Colors clickOlive Green, Accent 3, Darker 25% (fifth row, seventh option from the left). Also in the FormatShape dialog box, click LineColor in the left pane. In the LineColor pane, select Solidline, click the button next to Color, and then clickPurple, Accent 4, Darker 25% (fifth row, eighth option from the left).Also in the FormatShape dialog box, click LineStyle in the left pane. In the LineStyle pane, in the Width box, enter 1 pt. Also in the FormatShape dialog box, click Shadow in the left pane. In the Shadow pane, click the button next to Presets , and then under Outer click OffsetCenter (second row, second option from the left). To vertically position the director, manager, and employee rectangles on the slide, do the following:Press and hold SHIFT, and then select the top three employee rectangles. Press the UP ARROW key as needed to move the rectangles up, just below the Level 3 text box.Select the MANAGER 1 rectangle. Press the UP ARROW key as needed to move this rectangle up slightly, to realign the connecting lines to the top three employee rectangles. Select the director rectangle. Press the UP ARROW key as needed to move this rectangle up slightly, to realign the connecting lines to the manager rectangles. To reproduce the line effects on this slide, do the following:Press and hold SHIFT, and then select all of the connecting lines. On the Home tab, in the bottom right corner of theDrawing group, click the FormatShape dialog box launcher. In the FormatShape dialog box, in the left pane, click LineColor, select Solid line in the LineColor pane, and then do the following:Click the button next to Color, and then under Theme Colors clickWhite, Text 1 (first row, second option from the left).In the Transparency box, enter 80%. Also in the FormatShape dialog box, click LineStyle in the left pane. In the LineStyle pane, do the following:In the Width box, enter 2.5 pt.In the Dashtype list select RoundDot (second option from the top).To reproduce the animation effects for the rectangles on this slide, do the following:On the Animations tab, in the Animations group, click CustomAnimation.On the slide, select the graphic. In the CustomAnimationtask pane, do the following:Click the arrow next to AddEffect, point to Entrance, and then click MoreEffects. In the AddEntranceEffect dialog box, under Moderate, click Descend.Under Modify: Descend, in the Speed list, select Fast. Also in the Custom Animation task pane, select the animation effect (descend effect). Click the arrow to the right of the effect, and then click EffectOptions. In the Descend dialog box, on the SmartArtAnimation tab, in the Group graphic list, select By level one by one. Also in the Custom Animation task pane, click the double arrow under the animation effect to expand the contents of the list of effects, and then do the following:Press and hold CTRL, and then select the first four animationeffects (descend effects). Under Modify: Descend, in the Start list, select WithPrevious.Select the first animation effect. Click the arrow to the right of the effect, and then click Timing. In the Descend dialog box, on the Timing tab, in the Delay box, enter 2.Select the second animation effect. ClickChange, point to Entrance, and then click MoreEffects. In the ChangeEntranceEffect dialog box, under Moderate, click RiseUp.Select the third animation effect, and then do the following: Click Change, point to Entrance, and then click MoreEffects. In the ChangeEntranceEffect dialog box, under Moderate,click RiseUp.Click the arrow to the right of the effect (rise up entrance effect), and then click Timing. In the RiseUp dialog box, on the Timing tab, in the Delay box, enter 0.5.Select the fourth animation effect, and then do the following:Click Change, point to Entrance, and then click MoreEffects. In the ChangeEntranceEffect dialog box, under Moderate, click RiseUp.Click the arrow to the right of the effect, and then click Timing. In the RiseUp dialog box, on the Timing tab, in the Delay box, enter 1. To reproduce the animation effects for the connecting lines on this slide, do the following:Press and hold CTRL, and then select the fifth and ninth animation effects (descend entrance effects) in the Custom Animation task pane. Click Change, point to Entrance, and then click MoreEffects. In the ChangeEntranceEffect dialog box, under Basic, click Wipe. Under Modify: Wipe, do the following:In the Start list, select OnClick. In the Direction list, select FromLeft.In the Speed list, select Fast.Press and hold CTRL, and then select the seventh and 11th animation effects (descend entrance effects). Click Change, point to Entrance, and then click MoreEffects. In the ChangeEntranceEffect dialog box, under Basic, click Wipe. Under Modify: Wipe, do the following:In the Start list, select With Previous.In the Direction list, select FromLeft.In the Speed list, select Fast.With the seventh and 11th animation effects still selected, click the arrow to the right of the eleventh effect (wipe entrance effect), and then click Timing. In the Wipe dialog box, on the Timing tab, in the Delay box, enter 0.5.Select the eighth animation effect (descend entrance effect). Click the arrow to the right of the effect, and then click Timing. In the Descend dialog box, on the Timing tab, in the Delay box, enter 0.5. Press and hold CTRL, and then select the 13th, 15th, and 17th animation effects (descend entrance effects). Click Change, point to Entrance, and then click MoreEffects. In the ChangeEntranceEffects dialog box, under Basic, click Wipe. Under Modify: Wipe, do the following:In the Start list, select WithPrevious.In the Direction list, select FromLeft.In the Speed list, select Fast.Select the 13th animation effect (wipe entrance effect). Click the arrow to the right of the effect, and then click Timing. In the Wipe dialog box, on the Timing tab, in the Delay box, enter 1. Select the 15th animation effect (wipe entrance effect). Click the arrow to the right of the effect, and then click Timing. In the Wipe dialog box, on the Timing tab, in the Delay box, enter 1.5. Select the 17th animation effect (wipe entrance effect). Click the arrow to the right of the effect and select Timing. In the Wipe dialog box, on the Timing tab, in the Delay box enter 2 seconds. Select the 12th, 14th, 16th, and 18th animation effects (descend entrance effects). Under Modify: Descend, in the Start list, select WithPrevious.
SmartArt custom animation effects: vertical box list(Intermediate)To reproduce the SmartArt effects on this slide, do the following:On the Home tab, in the Slides group, click Layout, and then clickBlank. On the Insert tab, in the Illustrations group, click SmartArt. In the Choose a SmartArt Graphic dialog box, in the left pane, click List. In the List pane, click Vertical Box List (first row, fourth option from the left), and then click OK to insert the graphic into the slide.Press and hold CTRL, and then select the third pair of rectangles from the top (both the smaller, first-level rectangle and the larger, second-level rectangle). Under SmartArtTools, on the Design tab, in the CreateGraphic group, click the arrow next to AddShape, and then click AddShapeAfter.Select the graphic, and then click one of the arrows on the left border. In the Type your text here dialog box, enter text. (Note: To create a bullet below each heading, select the heading text box in the Type your text here dialog box, and then under SmartArtTools, on the Design tab, in the CreateGraphic group, click AddBullet. Enter text into the new bullet text box.)Select the graphic. Under SmartArt Tools, on the Format tab, click Size, and then do the following:In the Height box, enter 5.92”.In the Width box, enter 6.67”.Under SmartArt Tools, on the Format tab, click Arrange, click Align, and then do the following:Click Align to Slide.Click Align Middle. Click Align Center. On the Design tab, in the Themes group, click Colors, and then under Built-in click Civic. (Note: if this action is taken in a PowerPoint presentation containing more than one slide, the color scheme will be applied to all of the slides.)Under SmartArtTools, on the Design tab, in the SmartArtStyles group, do the following:Click ChangeColors, and then under Accent 1 click Colored Fill – Accent 1 (second option from the left).Click More, and then under 3-D click Polished (first row, first option from the left).Press and hold CTRL, and then select the four larger, second-level rectangles. Under SmartArtTools, on the Format tab, in the Shapes group, click ChangeShape, and then under Rectangles click Rounded Rectangle (second option from the left).On the Home tab, in the Font group, select Franklin Gothic Book from the Font list, and then select 24 from the Font Size list.Under SmartArtTools, on the Format tab, in the Shape Styles group, click the arrow next to Shape Fill, point to Gradient, and then click More Gradients. In the Format Shape dialog box, in the left pane, click Fill, select Gradient fill in the Fill pane, and then do the following:In the Type list, select Linear.Click the button next to Direction, and then click Linear Up (second row, second option from the left).Under Gradient stops, click Add or Remove until two stops appear in the drop-down list.Also under Gradient stops, customize the gradient stops as follows:Select Stop 1 from the list, and then do the following:In the Stop position box, enter 0%.Click the button next to Color, and then under Theme Colors click White, Background 1, Darker 35% (fifth row, first option from the left).Select Stop 2 from the list, and then do the following: In the Stop position box, enter 100%.Click the button next to Color, and then click Black, Text 1, Lighter 25% (fourth row, second option from the left). Also in the Format Shape dialog box, in the left pane, click 3-D Format, and then do the following in the 3-D Format pane:Under Bevel, click the button next to Top, and then under Bevel click Circle (first row, first option from the left).Next to Top, in the Width box, enter 4 pt,and in the Height box, enter 4 pt.Under Depth,in the Depth box, enter 1 pt.Under Surface, click the button next to Material, and then under Standard click Plastic (third option from the left). Click the button next to Lighting, and then under Special click Flat (first option from the left). On the slide, press and hold CTRL, and then select the four smaller, first-level rectangles. On the Home tab, in the Font group, select Franklin Gothic Medium from the Font list, and then enter 26 in the Font Size box.Select the top first-level rectangle. Under SmartArtTools, on the Format tab, in the Shape Styles group, click the arrow next to Shape Fill, point to Gradient, and then click More Gradients. In the Format Shape dialog box, in the left pane, click Fill, select Gradient fill in the Fill pane, and then do the following:In the Type list, select Linear.Click the button next to Direction, and then click Linear Up (second row, second option from the left).Under Gradient stops, click Add or Remove until two stops appear in the drop-down list.Also under Gradient stops, customize the gradient stops as follows:Select Stop 1 from the list, and then do the following:In the Stop position box, enter 0%.Click the button next to Color, and then under Theme Colors click Teal, Accent 3, Darker 50% (sixth row, seventh option from the left).Select Stop 2 from the list, and then do the following: In the Stop position box, enter 100%.Click the button next to Color, and then under Theme Colors click Teal, Accent 3, Darker 25% (fifth row, seventh option from the left).Select the second first-level rectangle. Under SmartArtTools, on the Format tab, in the Shape Styles group, click the arrow next to Shape Fill, point to Gradient, and then click More Gradients. In the Format Shape dialog box, in the left pane, click Fill, select Gradient fill in the Fill pane, and then do the following:In the Type list, select Linear.Click the button next to Direction, and then click Linear Up (second row, second option from the left).Under Gradient stops, click Add or Remove until two stops appear in the drop-down list.Also under Gradient stops, customize the gradient stops as follows:Select Stop 1 from the list, and then do the following:In the Stop position box, enter 0%.Click the button next to Color, and then under Theme Colors click Brown, Accent 4, Darker 50% (sixth row, eighth option from the left).Select Stop 2 from the list, and then do the following: In the Stop position box, enter 100%.Click the button next to Color, and then under Theme Colors click Brown, Accent 4, Darker 25% (fifth row, eighth option from the left).Select the third first-level rectangle. Under SmartArtTools, on the Format tab, in the Shape Styles group, click the arrow next to Shape Fill, point to Gradient, and then click More Gradients. In the Format Shape dialog box, in the left pane, click Fill, select Gradient fill in the Fill pane, and then do the following:In the Type list, select Linear.Click the button next to Direction, and then click Linear Up (second row, second option from the left).Under Gradient stops, click Add or Remove until two stops appear in the drop-down list.Also under Gradient stops, customize the gradient stops as follows:Select Stop 1 from the list, and then do the following:In the Stop position box, enter 0%.Click the button next to Color, and then under Theme Colors click Green, Accent 5, Darker 50% (sixth row, ninth option from the left).Select Stop 2 from the list, and then do the following: In the Stop position box, enter 100%.Click the button next to Color, and then under Theme Colors click Green, Accent 5, Darker 25% (fifth row, ninth option from the left).Select the fourth first-level rectangle. Under SmartArtTools, on the Format tab, in the Shape Styles group, click the arrow next to Shape Fill, point to Gradient, and then click More Gradients. In the Format Shape dialog box, in the left pane, click Fill, select Gradient fill in the Fill pane, and then do the following:In the Type list, select Linear.Click the button next to Direction, and then click Linear Up (second row, second option from the left).Under Gradient stops, click Add or Remove until two stops appear in the drop-down list.Also under Gradient stops, customize the gradient stops as follows:Select Stop 1 from the list, and then do the following:In the Stop position box, enter 0%.Click the button next to Color, and then under Theme Colors click Orange, Accent 6, Darker 50% (sixth row, 10th option from the left).Select Stop 2 from the list, and then do the following: In the Stop position box, enter 100%.Click the button next to Color, and then under Theme Colors click Orange, Accent 6, Darker 20% (fifth row, 10th option from the left).To reproduce the animation effects on this slide, do the following:On the Animations tab, in the Animations group, click CustomAnimation.On the slide, select the graphic. In the CustomAnimation task pane, do the following:Click Add Effect, point to Entrance, and then click MoreEffects. In the Add Entrance Effect dialog box, under Subtle, click Expand.Under Modify: Expand, in the Speed list, select Fast.Also in the CustomAnimation task pane, select the animation effect. Click the arrow to the right of the animation effect, and then click EffectOptions. In the Expand dialog box, on the SmartArtAnimation tab, in the Group graphic list, select One by one.Also in the Custom Animation task pane, click the double arrow under the animation effect to expand the contents of the list of effects, and then do the following:Press and hold CTRL, and then select all of the animation effects. Under Modify: Expand, in the Start list, select With Previous.Press and hold CTRL, and then select the second, fourth, sixth and eighth animation effects (expand effects for the larger, second-level rectangles). Click Change, point to Entrance, and then click MoreEffects. In the Change Entrance Effect dialog box, under Moderate, click Compress. Press and hold CTRL, and then select the third, fifth, and seventh animation effects. Under Modify: Expand, in the Start list, select On Click.To reproduce the background effects on this slide, do the following:Right-click the slide background area, and then click Format Background. In the Format Background dialog box, click Fill in the left pane, select Gradient fill in the Fill pane, and then do the following:In the Type list, select Linear.Click the button next to Direction, and then click Linear Down (first row, second option from the left).Under Gradient stops, click Add or Remove until two stops appear in the drop-down list.Also under Gradient stops, customize the gradient stops that you added as follows:Select Stop 1 from the list, and then do the following:In the Stop position box, enter 63%.Click the button next to Color, and then under Theme Colors click Black, Text 1 (first row, second option from the left).Select Stop 2 from the list, and then do the following: In the Stop position box, enter 100%.Click the button next to Color, and then under Theme Colors clickBlack, Text 1, Lighter 50% (second row, second option from the left).
SmartArt custom animation effects: continuous picture list(Basic)To reproduce the SmartArt effects on this slide, do the following:On the Home tab, in the Slides group, click Layout, and then clickBlank. On the Insert tab, in the Illustrations group, click SmartArt. In the Choose a SmartArt Graphic dialog box, in the left pane, click List. In the List pane, double-click Continuous Picture List (third row, fourth option from the left) to insert the graphic into the slide.On the slide, select the graphic. Under SmartArt Tools, on the Format tab, click Size, and then do the following:In the Height box, enter 5.05”.In the Width box, enter 7.57”.Under SmartArt Tools, on the Format tab, click Arrange, click Align, and then do the following:Click Align to Slide.Click Align Middle. Click Align Center. Select the graphic, and then click one of the arrows on the left border. In the Type your text here dialog box, enter text.Select the graphic. Under SmartArtTools, on the Design tab, in the SmartArtStyles group, click More, and then under Best Match for Document clickselect Moderate Effect (fourth option from the left).Click each of the three picture placeholders in the SmartArt graphic, and then in the Insert Picture dialog box, select a picture and click Insert.Press and hold CTRL, and then select the three circle pictures on the slide.Under PictureTools, on theFormat tab, in the PictureStyles group, click PictureEffects, point toGlow, and then do the following:Under Glow Variations, click Accent color 1, 8 pt glow(second row, first option from the left).Point to MoreGlowColors,and then under Theme Colors click Orange, Accent 6, Lighter 80% (second row, 10th option from the left).Select the left-right arrow at the bottom of the SmartArt graphic. Under SmartArtTools, on the Format tab, in the ShapeStyles group, click the arrow next to ShapeFill, point to Gradient, and then click MoreGradients. In the Format Shape dialog box, click Fill in the left pane,select Gradient fill in the Fill pane, and then do the following:In the Type list, select Linear.Click the button next to Direction, and then select Linear Right (first row, fourth option from the left).Under Gradient stops, click Add or Remove until three stops appear in the drop-down list.Also under Gradient stops, customize the gradient stops as follows:Select Stop 1 from the list, and then do the following:In the Stop position box, enter 0%.Click the button next to Color, and then under Theme ColorsclickOrange, Accent 6, Darker 25% (fifth row, 10th option from the left).Select Stop 2 from the list, and then do the following: In the Stop position box, enter 50%.Click the button next to Color, and then click MoreColors. In the Colors dialog box,on theCustom tab, enter values for Red: 255, Green: 192, Blue: 0.Select Stop 3 from the list, and then do the following: In the Stop position box, enter 100%.Click the button next to Color, and then under Theme ColorsclickOrange, Accent 6, Darker 25% (fifth row, 10th option from the left).Press and hold CTRL, and then select the three rounded rectangles on the slide. On the Home tab, in the Font group, select Gill Sans MT from the Font list, enter 30 pt in the Font Size box, click the arrow next to Font Color, and then click White, Background 1 (first row, first option from the left).Under SmartArtTools, on the Format tab, in the ShapeStyles group, click Shape Effects, point to Reflection, and then under ReflectionVariations click Tight reflection, touching (first row, first option from the left).Under SmartArtTools, on the Format tab, in the ShapeStyles group, click Shape Fill, point to Gradient, and then click More Gradients. In the Format Shape dialog box, in the left pane, click Fill, select Gradient fill in the Fill pane, and then do the following:In the Type list, select Linear.In the Direction list, select Linear Down (first row, second option from the left).Under Gradient stops, click Add or Remove until two stops appear in the drop-down list.Also under Gradient stops, customize the gradient stops as follows:Select Stop 1 from the list, and then do the following:In the Stop position box, enter 19%.Click the button next to Color, and then under Theme ColorsclickBlack, Text 1 (first row, second option from the left). Select Stop 2 from the list, and then do the following: In the Stop position box, enter100%.Click the button next to Color, and then under Theme ColorsclickBlack, Text 1, Lighter 50% (second row, second option from the left).To reproduce the animation effects on this slide, do the following:On the Animations tab, in the Animations group, click CustomAnimation.On the slide, select the graphic. In the Custom Animation task pane, do the following:Click Add Effect, point to Entrance, and then clickMoreEffects. In the Add Entrance Effect dialog box, underModerate, clickStretch. Under Modify: Stretch, in the Speed list, selectFast.Also in the CustomAnimation task pane, click the arrow to the right of the animation effect, and then click Effect Options. In the Stretch dialog box, on the SmartArtAnimation tab, in the Group graphic list, select One by One.Also in the CustomAnimation task pane, click the double arrows under the animation effect to expand the list of effects. Press and hold CTRL, and then select all of the animation effects in the Custom Animation task pane. Under Modify: Stretch, in the Start list, selectWith Previous.Select the first animation effect (stretch effect for the left-right arrow) in the CustomAnimation task pane. Under Modify: Stretch, click the arrow to the right of the effect, and then click Timing. In the Stretch dialog box, on the Timing tab, do the following: In the Delay box, enter 0.5.In the Speed box, enter 1.5 seconds.Press and hold CTRL, and then select the second and third animation effects (stretch effects for the left panel) in the CustomAnimation task pane. Under Modify: Stretch, in the Direction list, select From Right. Also in the Custom Animation task pane, with the second and third animation effects still selected, click the arrow to the right of one of those effects, and then click Timing. In the Stretch dialog box, on the Timing tab, in the Delay box, enter 1, and then click OK.Press and hold CTRL, and then select the sixth and seventh animation effects (stretch effects for the right panel) in the Custom Animation task pane. Under Modify: Stretch, in the Direction list, select From Left. Also in the Custom Animation task pane, with the sixth and seventh animation effects still selected, click the arrow to the right of one of those effects, and then click Timing. In the Stretch dialog box, on the Timing tab, in the Delay box, enter 1.To reproduce the background effects on this slide, do the following:Right-click the slide background area, and then click Format Background. In the Format Background dialog box, click Fill in the left pane, select Gradient fill in the Fill pane, and then do the following:In the Type list, select Radial.Click the button next to Direction, and then click From Center(third option from the left). Under Gradient stops, click Add or Remove until two stops appear in the drop-down list.Also under Gradient stops, customize the gradient stops as follows:Select Stop 1 from the list, and then do the following:In the Stop position box, enter 0%.Click the button next to Color, and then under Theme Colors click White, Background 1 (first row, first option from the left).Select Stop 2 from the list, and then do the following: In the Stop position box, enter 100%.Click the button next to Color, and then under Theme Colors click Black, Text 1, Lighter 25% (fourth row, second option from the left).
Animated picture changes during motion path(Advanced)To reproduce the first picture effect on this slide, do the following:On the Home tab, in the Slides group, click Layout and then click Blank. On the Insert tab, in the Images group, click Picture. In the Insert Picture dialog box, select a picture, and then click Insert. Under Picture Tools, on the Format tab, in the bottom right corner of the Size group, click the Size and Position dialog box launcher. In the Format Picture dialog box, resize or crop the picture as needed so that the height is set to 2” and the width is set to 2”. To crop the picture, click Crop in the left pane, and in the Crop pane, under Crop position, enter values into the Height, Width, Left, and Top boxes. To resize the picture, click Size in the left pane, and in the Size pane, under Size and rotate, enter values into the Height and Width boxes.Also in the Format Picture dialog box, click Line Color in the left pane. In the Line Color pane, select Solid line, click the button next to Color, and then under Theme Colors click White, Background 1 (first row, first option from the left).Also in the Format Picture dialog box, click Line Style in the left pane, and then in the Line Style pane, in the Width box, enter 1.5 pt. Also in the Format Picture dialog box, click Shadow in the left pane. In the Shadow pane, click the button next to Presets, and then under Outer click Offset Center (second row, second option from the left). On the slide, select the picture. On the Animations tab, in the Advanced Animation group, click Add Animation, and then under Entrance click Fade.Also on the Animations tab, in the Timing group, do the following:In the Start list, select With Previous.In the Duration list, select 1.00 seconds.Also on the Animations tab, in the Advanced Animation group, click Add Animation, and then under Motion Paths click Lines.Also on the Animations tab, in the Animation group, click Effect Options, and then click Right.Also on the Animations tab, in the Timing group, do the following:In the Start list, select With PreviousIn the Duration box, enter 10.00 seconds.On the slide, select the motion path. Press and hold SHIFT to constrain the path to a straight, horizontal line, and then drag the right adjustment handle to the right, stopping approximately 1.5” left of the right edge of the slide. (Note: On the View tab, in the Show/Hide group, select Ruler to measure approximately where the endpoint is on the slide.)To reproduce the other pictures on this slide, do the following:Select the picture. On the Home tab, in the Clipboard group, click the arrow to the right of Copy, and then click Duplicate. Repeat this process for a total of four duplicate pictures. Select a duplicate picture. Under Picture Tools, on the Format tab, in the Adjust group, click Change Picture. In the Insert Picture dialog box, select a new picture, and then click Insert. Under Picture Tools, on the Format tab, in the bottom right corner of the Size group, click the Size and Position dialog box launcherIn the Format Picture dialog box, resize or crop the picture as needed so that the height is set to 2” and the width is set to 2”. To crop the picture, click Crop in the left pane, and in the Crop pane, under Crop position, enter values into the Height, Width, Left, and Top boxes. To resize the picture, click Size in the left pane, and in the Size pane, under Size and rotate, enter values into the Height and Width boxes.Repeat steps 2-4 for the other duplicate pictures. To reproduce the other animation effects on this slide, do the following:On the Animations tab, in the Advanced Animation group, click Animation Pane.In the Animation Pane, select the third animation effect (fade effect for the second picture). On the Animations tab, in the Timing group, in the Delay box, enter 2.5. In the Animation Pane, select the fifth animation effect (fade effect for the third picture). On the Animations tab, in the Timing group, in the Delay box, enter 5. In the Animation Pane, select the seventh animation effect (fade effect for the fourth picture). On the Animations tab, in the Timing group, in the Delay box, enter 7.5. On the slide, press and hold SHIFT and select all four pictures. On the Home tab, in the Drawing group, click Arrange, point to Align, and then do the following:Click Align Selected Objects.Click Align Center. Click Align Middle. Drag the pictures into the top left corner of the slide. To reproduce the background effects on this slide, do the following:On the Home tab, in the Drawing group, click Shapes, and then under Rectangles click Rectangle (first option from the left). On the slide, drag to draw a rectangle. Select the rectangle. Under Drawing Tools, on the Format tab, in the Size group, do the following:In the Shape Height box, enter 3.42”.In the Shape Width box, enter 10”.Under DrawingTools, on the Format tab, in the Shape Styles group, click the Format Shape dialog box launcher. In the Format Shape dialog box, click Line Color in the left pane, in the LineColor pane, select No line. Also in the Format Shape dialog box, click Fill in the left pane, in the Fill pane, select Gradient fill, and then do the following:In the Type list, select Linear.Click the button next to Direction, and then click Linear Down (first row, second option from the left).Under Gradient stops, click Add gradient stops or Remove gradient stops until two stops appear in the drop-down list.Also under Gradient stops, customize the gradient stops that you added as follows:Select the first stop in the slider, and then do the following:In the Position box, enter 1%.Click the button next to Color, click More Colors, and then in the Colors dialog box, on the Custom tab, enter values for Red: 94, Green: 156, Blue: 198.In the Transparency box, enter 60%.Select the last stop in the slider, and then do the following: In the Position box, enter 100%.Click the button next to Color, click More Colors, and then in the Colors dialog box, on the Custom tab, enter values for Red: 94, Green: 156, Blue: 198.In the Transparency box, enter 90%.On the slide, drag the rectangle vertically to position it just above the middle of the slide. On the Home tab, in the Drawing group, click Arrange, and then do the following:Point to Align, and then click Align to Slide.Point to Align, and then click Align Center.Click Send to Back. Right-click the slide background area, and then click Format Background. In the Format Background dialog box, click Fill in the left pane, in the Fill pane, select Gradient fill,and then do the following:In the Type list, select Linear.Click the button next to Direction, and then click Linear Down (first row, second option from the left)In the Angle box, enter 90⁰.Under Gradient stops, click Add gradient stops or Remove gradient stops until two stops appear in the drop-down list.Also under Gradient stops, customize the gradient stops that you added as follows:Select the first stop in the slider, and then do the following:In the Position box, enter 70%.Click the button next to Color, and then click White, Background 1, Darker 5% (second row, first option from the left).Select the last stop in the slider, and then do the following: In the Position box, enter 100%.Click the button next to Color, and then click White, Background 1, Darker 25% (fourth row, first option from the left).
4 – Text Over Video (Advanced)To reproduce the effects on this slide, do the following:1. On the Home tab, in the Slides group, click Layout and then click Blank. 2. On the Design tab, in the Themes group, click the arrow next to Colors and then click Pushpin.3. On the Insert tab, in the Media group, click Video, and then click Video from file. 4. In the left pane of the Insert Video dialog box, click the drive or library that contains the video. In the right pane of the dialog box, click the video that you want and then click Insert.5. Select the video and under Video Tools, on the Format tab, in the Size group, set the Width to 9”.6. Select the video. On the Home tab, in the Drawing group, click Arrange, point to Align, and then do the following: Click Align Center.Click Align Middle. 7. With the video still selected, under VideoTools, on the Format tab, in the bottom right corner of the Video Styles group, click the arrow to open the Format Video dialog box.8.Click Shadow in the left pane, under Shadow in the right pane, do the following:Color: Green, Accent 4, Darker 50%(sixth row, eighth option from the left)Transparency: 40%.Size: 100%.Blur: 10 pt.Angle: 45⁰.Distance: 10 pt.9. Close the Format Video dialog box. To insert and format text boxes, do the following:1. On the Insert tab, in the Text group, click TextBox, and then on the slide drag to draw your text box.2. Type “Video with drop shadow.” in the text box, and then select the text. On the Home tab, in the Font group, choose from the theme Font list, and then select 32 pt. from the FontSize list and click the Bold icon.3. On the Format tab, in the WordArt Styles group, click the arrow at the bottom right to open the Format Text Effects dialog box and do the following:Click Text Fill in the left pane, under Text Fill in the right pane, select Solid fill, then click the arrow next to Color and choose White, Background 1 (first row, first option from left).Click Glow and Soft Edges in the left pane, under Glow in the right pane, enter the following values:Color: White (first row, first option from left).Size: 7 pt.Transparency: 80%.Click Shadow in the left pane, under Shadow in the right pane, click the arrow next to Presets and select Outer Offset Diagonal Top Right (under outer, third row, first option from left).Close the Format Text Effects dialog box.4. Select the text box, and under Drawing Tools, on the Format tab, in the bottom right corner of the Shape Styles group, click the arrow opening the Format shape dialog box.5. Select Size on the left pane and under Size and Rotate on the right pane, set the Rotation to 358 Degrees.6. Still in the Format Shape dialog, select Position on the left pane, under Position on Slide in the right pane, set Horizontal to 2.08” and Vertical to 1.48”, and then close the Format Shape dialog.7. Select the text box. On the Home tab, in the Clipboard group, click the arrow to the right of Copy, and then click Duplicate.8. In second text box, type “Text over video!”, and then select the text. On the Home tab, in the Font group, choose from the theme Font list, and then select 36 ptfrom the FontSize list.9. With the new text box selected, under Drawing Tools, in the Format tab, in the bottom right corner of the Shape Styles group, click the arrow opening the Format shape dialog box. Select Position on the left pane and under Position on Slide in the right pane set Horizontal to 2.1” and Vertical to 2.35”, and then close the Format Shape dialog. 10. Select the text box. On the Home tab, in the Clipboard group, click the arrow to the right of Copy, and then click Duplicate.11. In third text box, type “Animations sync’d”, and then select the text. On the Home tab, in the Font group, choose from the theme Font list, and then select 44 ptfrom the FontSize list.12. With the new text box selected, under Drawing Tools, on the Format tab, in the bottom right corner of the Shape Styles group, click the arrow opening the Format shape dialog box. Select Position on the left pane and under Position on Slide in the right pane set Horizontal to 2.15” and Vertical to 3.14”, and then close the Format Shape dialog. 13. Select the text box. On the Home tab, in the Clipboard group, click the arrow to the right of Copy, and then click Duplicate.14. In fourth text box, type “Video bookmarks.”, and then select the text. On the Home tab, in the Font group, choose from the theme Font list, and then select 54 ptfrom the FontSize list.15. With the new text box selected, under Drawing Tools, on the Format tab, in the bottom right corner of the Shape Styles group, click the arrow opening the Format shape dialog box. Select Position on the left pane and under Position on Slide in the right pane set Horizontal to 2.21” and Vertical to 4.01”, and then close the Format Shape dialog. 16. Select the text box. On the Home tab, in the Clipboard group, click the arrow to the right of Copy, and then click Duplicate.17. In fifth text box, type “Great!”, and then select the text. On the Home tab, in the Font group, choose from the theme Font list, and then type 64 pton the FontSize list, or select a value that is on the list.18.With the new text box selected, under Drawing Tools, on the Format tab, in the bottom right corner of the Shape Styles group, click the arrow opening the Format shape dialog box. Select Position on the left pane and under Position on Slide in the right pane set Horizontal to 2.19” and Vertical to 4.92”. 19. Close the Format Shape dialog. To reproduce the Animation effects on this slide, do the following:1. Select the video, on the Animations tab, in the Animation group, select Play.2. Also on the Animations tab, in the Timing group, click the arrow to the right of Start and select With Previous.3. Push and hold the Shift key, select all five text boxes and do the following:On the Animations tab, in the Animation group select Wipe.On the Animations tab, in the Animation group, click Effect Options and select From Left.On the Animations tab, in the Timing group, in the Start list, select With Previous.On the Animations tab, in the Timing group, in the Start list, set Duration to .75.4. Select the video and do the following:Under the video, in the playback bar, on the right, click the Move Forward 0.25 seconds arrow until playback on the right is approximately 5.5 seconds. Under Video Tools, on the Playback tab, in the Bookmarks group click Add Bookmark.Click the Move Forward 0.25 seconds arrow until playback on the right is approximately 11.9 seconds. Under Video Tools, on the Playback tab, in the Bookmarks group click Add Bookmark.Click the Move Forward 0.25 seconds arrow until playback on the right is approximately 19.7 seconds. Under Video Tools, on the Playback tab, in the Bookmarks group click Add Bookmark.Click the Move Forward 0.25 seconds arrow until playback on the right is approximately 23.9 seconds. Under Video Tools, on the Playback tab, in the Bookmarks group click Add Bookmark.Click the Move Forward 0.25 seconds arrow until playback on the right is approximately 28.4 seconds. Under Video Tools, on the Playback tab, in the Bookmarks group click Add Bookmark.5. Select the first text box (“Video with Drop shadow.”). On the Animations tab in the Advanced Animation group, click Trigger, under On Bookmark and select Bookmark 1.6. Select the second text box. On the Animations tab in the Advanced Animation group, click Trigger, under On Bookmark and select Bookmark 2.7. Select the third text box. On the Animations tab in the Advanced Animation group, click Trigger, under On Bookmark and select Bookmark 3.8. Select the fourth text box. On the Animations tab in the Advanced Animation group, click Trigger, under On Bookmark and select Bookmark 4.9. Select the fifth text box. On the Animations tab in the Advanced Animation group, click Trigger, under On Bookmark and select Bookmark 5. To reproduce the background effects on this slide, do the following:1. On the Design tab, in the bottom right corner of the Background group, click the arrow opening the Format Background dialog box. 2. In the Format Background dialog, click Fill in the left pane, under the Fill pane on the right select Gradient fill, and then do the following:1. In the Type list, select Linear.2. Click the button next to Direction, and then click Linear Down (First row, second option from the left). 3. Under Gradient stops, click Add gradient stop or Remove gradient stop until three stops appear on the slider. Customize the gradient stops as follows:1. Select the first stop on the slider, and then do the following:1. In the Position box, enter 0%.2. Click the button next to Color, and then under Theme Colors select Green, Accent 4, Lighter 40% (fourth row, eighth option from the left).2. Select the second stop on the slider, and then do the following:1. In the Position box, enter 50%.2. Click the button next to Color, and then under Theme Colors select Green, Accent 4, Lighter 80% (second row, eighth option from the left).3. Select the last stop on the list, and then do the following: 1. In the Position box, enter 100%.2. Click the button next to Color, and then under Theme Colors select Green, Accent 4, Lighter 40% (fourth row, eighth option from the left).4. Close the Format Background dialog.