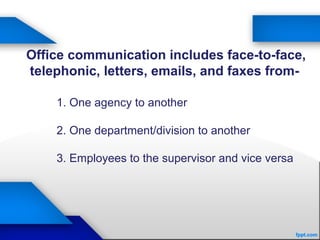
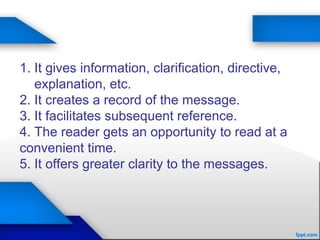
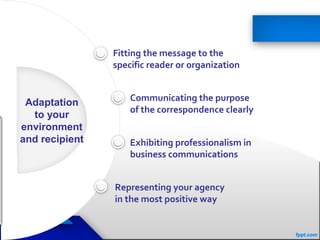
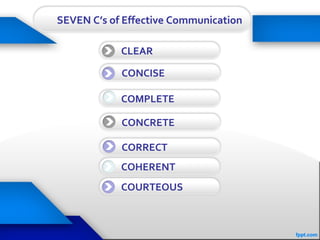
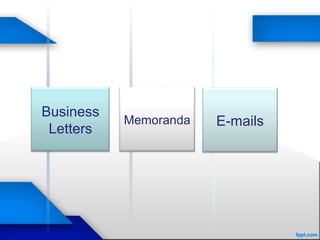
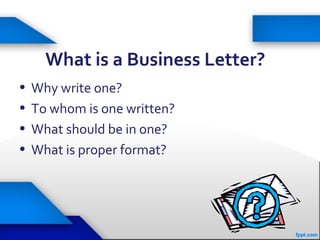
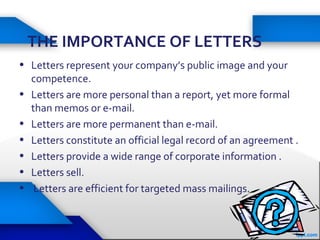
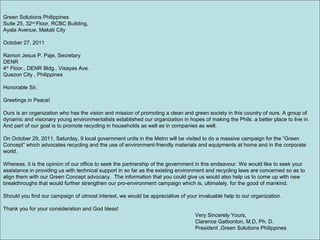
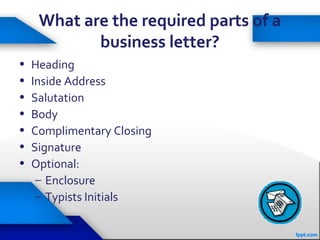
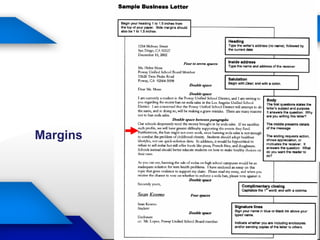
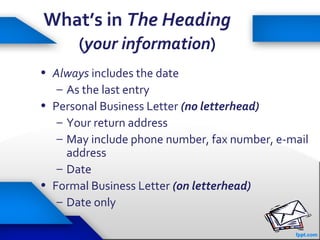
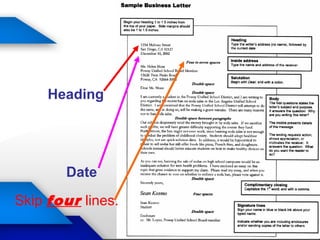
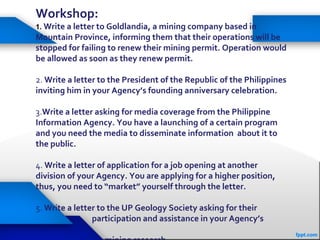
This document provides an overview of a seminar-workshop on business correspondence to be held on October 27-28, 2011 at the Mines and Geosciences Bureau in Quezon City. The seminar will cover topics such as the types and purposes of business correspondence including letters, memoranda, and emails. It will discuss best practices for effective business communication including being concise, complete, concrete, correct, coherent, clear, and courteous. The seminar will also cover the proper format and components of business letters as well as types of business letters and letter writing.
Writing Effective Business CorrespondenceSaied Eshaghi
This document provides guidance on writing effective business correspondence. It discusses that business correspondence is important for professional communication and decision making. Well-written correspondence helps create a positive impression of the sender's competence and the organization, while poorly written correspondence has the opposite effect. The document outlines characteristics of effective business writing, including being clear, concise, correct, and courteous. It also reviews the typical parts of a business letter like the heading, inside address, salutation, body, complimentary close, and signature. The goal is to help readers understand different types of business letters and proper letter format.
The document provides information about effective business correspondence and communication. It discusses the importance of business correspondence as a link between people and as an instrument for professional exchange of ideas. It outlines the seven C's of effective communication - clear, concise, complete, concrete, correct, coherent and courteous. The document also discusses different types of business letters and memoranda, and provides guidelines for writing effective business letters, including the required parts like the heading, inside address, salutation, body, complimentary closing and signature.
The document provides guidance on writing professional correspondence. It discusses the importance of correspondence in reflecting a company's professionalism. It outlines the general parts of a letter including the letterhead, salutation, body, complimentary close, and signature. It describes the formatting of correspondence and different styles including full-block and modified-block. The document also discusses tone, various types of letters including inquiry/response and complaint letters, and emphasizes accuracy in correspondence.
Business correspondence ppt by Rayees Ahmad Ganaie (Research Scholar at D.A....Rayees Ganaie
The document discusses business correspondence and its various types, including business letters, memos, faxes, and emails. It describes the major parts of business letters, such as the heading, date, greeting, body, complimentary close, and signature. It also discusses letter styles, such as full-block, modified block, and indented styles. Finally, it outlines the key parts of an application letter, including the heading, date, greeting, four paragraph body emphasizing qualifications and requesting action, and closing.
This document provides information on various types of business communication including correspondence, memorandums, office orders, office circulars, agendas, minutes, and meeting layouts. It defines correspondence as communication in writing between parties on matters of personal, official, or business interest. Memorandums are used for internal communication within an organization. Office orders and circulars provide instructions and circulate information to employees. Agendas structure meetings by listing discussion topics, and minutes serve as the formal record of meetings including discussions, decisions, and action items.
The document discusses four major types of workplace correspondence: letters, memos, emails, and microblogs. It provides guidelines for writing each type effectively, including choosing the appropriate level of formality, avoiding cliches, communicating honestly, and adhering to etiquette standards. The key steps for writing any correspondence are to analyze the audience and purpose, gather relevant information, choose the correspondence type, draft, format, revise, and send the message.
Business correspondence by vanitha balakrishnanvanibala2
The document provides guidance on writing effective business letters and job application letters. It discusses the key components of business letters such as the letterhead, salutation, complimentary close, and signature. It also outlines the standard format and style for business letters, including full block and indented styles. Additionally, it provides tips for writing different parts of an application letter, including opening, body, and closing paragraphs. Key principles for business letters are to be considerate, complete, correct, concise, clear, and courteous.
Business correspondence refers to written communication used for business purposes. It can occur between organizations, within organizations, or between customers and organizations. There are several types of business correspondence, including business letters, emails, and memorandums. Business letters are the most formal type and follow specific formats, while emails are less formal and used widely. Memorandums are for internal communication within an organization. Maintaining relationships, having written records, creating goodwill, low cost, and formality are reasons why written communication is important for businesses.
This document discusses business correspondence, which refers to written communication related to business activities. It occurs between organizations, within organizations, or between customers and organizations. Business correspondence is needed to maintain relationships, serve as evidence, create goodwill, allow for formal communication, and be inexpensive. The main types discussed are business letters, emails, memorandums, and sales/application letters. Business letters are the most formal type, usually sent between companies, while emails are less formal for internal communication and memorandums are even less formal messages within a company.
This document discusses the basic principles of business correspondence. It begins by defining correspondence and providing examples like email, messages, letters, and post. It then covers the style of business correspondence, including the proper format, grammar, word usage, and stylistics. The rest of the document explains the typical parts of a business letter like the letterhead, date line, inside address, salutation, body, complimentary close, signature, and notations. It also gives examples of different types of business letters such as inquiries, claims, transmittals, reservations, appreciation, credit, collections, adjustments, and applications.
Business correspondence refers to communication through the exchange of letters in a business context. It helps maintain proper relationships between businesses and customers who are scattered in different locations. Business letters are an inexpensive and convenient way to provide and obtain business information. They can also help create and maintain goodwill, as well as serve as evidence in case of disputes. The essential qualities of a good business letter include simplicity, clarity, accuracy, completeness, relevance, courtesy, and neatness both in terms of language and appearance. Common types of business letters are enquiry letters, quotation letters, order letters, complaint letters, and recovery letters.
This document provides guidance on writing an effective inquiry letter to request information. It discusses the key components of an inquiry letter, including stating what information is being requested, clearly indicating why the information is needed, and specifying a deadline. It also lists important language to use, such as salutations, references to advertisements, and requests for catalogs. Additionally, it outlines characteristics an inquiry letter should have, such as stating the need for information, using a courteous tone, being specific and concise, and showing appreciation. Finally, the document provides a sample inquiry letter requesting information from a local government on endangered species.
Business Letters and Essential Qualities.Chetan Pandey
In this digital world , letters play a crucial role in the process of communication.
We share our emotions , feelings , ideas and information in a letter.
The above presentation is about
:-Business Letter
:-Importance
:-Essential Qualities
:-Inner And Outer Qualities
Help with formal and business letter writing. A summary of writing rules including outlines for business letters and letters of inquiry, and abbreviations used in letters.
The document provides guidance on writing business and personal letters, including objectives, definitions, formats, mechanics, etiquette, and types of letters. It discusses letter structure, parts, and styles. Guidelines are given for writing thank you notes, apologies, complaints, and invitations. Sample letters are also included to demonstrate formats and content.
This document provides guidance on writing different types of business correspondence, including memos, emails, and letters. It discusses determining the purpose and audience for the correspondence and outlines the key components and best practices for each format. For each type of correspondence, the document describes how to structure the introduction, discussion, and conclusion sections. It also provides examples and scenarios to help readers practice applying the guidelines. The overall message is that writers should carefully consider the purpose and intended audience before selecting a correspondence format and should follow best practices for structure and tone specific to that format.
Here are the key parts of an application letter:
- Heading (return address) or letterhead
- Date
- Inside address (name and title of contact person)
- Salutation (Dear [Contact Name])
- Paragraph 1: State the purpose and how you learned of the position
- Paragraph 2: Highlight relevant qualifications and experience
- Paragraph 3: Emphasize what value you can provide the company
- Paragraph 4: Request an interview and provide contact information
- Complimentary close (Sincerely, etc.)
- Signature
- Typed name
The letter should be 3-4 paragraphs highlighting your interest in the role, relevant qualifications, and requesting next steps like an interview
The document provides information on the structure, format, and types of business letters. It discusses the key components of business letters including the heading, date, salutation, body, complementary close, and enclosures. It describes the different sections within the letter body like the introduction, main paragraph, and closing paragraph. It also explains the different types of business letters such as official letters, demi-official letters, internal letters, and form letters. Finally, it provides examples of business letter formatting and layouts.
Business letters are formal letters used for business communications. There are standard parts to a business letter including the heading, date, letter address, salutation, body, complimentary close, signature block, and reference initials. Common types of business letters include appreciation letters, recommendation letters, invoices, marketing letters, and letters introducing new businesses or products. Business letters can be written in block, modified block, or simplified block formats.
The document discusses the different types and structures of business letters, including their purpose, components, and classifications. It describes letters such as official, demi-official, internal, and form letters. The structure of a business letter is also explained, outlining the typical headings, salutation, body, closing, and other identifying information included in correspondence.
The document discusses business communication, defining it as the exchange of information, ideas, and opinions between a sender and receiver for business purposes. It outlines the communication process, including elements like the sender, receiver, channel, and feedback. The objectives of communication are also presented, such as implementing plans and achieving organizational goals. Effective business communication skills are said to be vital, and examples of good skills are provided like using familiar words and adopting a "you" attitude. Potential barriers to communication are then described, which can be sender-related, receiver-related, or situation-related. The document concludes with the responsibilities of both the sender and receiver to overcome barriers through actions like setting clear goals and encouraging feedback.
Business Letter Writing, E-mail Guidelines & Etiquette CEO SUITE
We from CEO SUITE also shares very important details on business writings, email guidelines and etiquette. These are very important in corporate world.
Resume ppt by Rayees Ahmad Ganaie (Ph.D. Research Scholar, School of Comparat...Rayees Ganaie
A resume is a 1-2 page formal document that lists work experience, education, and skills to provide a summary of qualifications for a specific job. When writing a resume, it is recommended to use a 10-12 point font, simple standard font, proper margins, and resume paper to make the copy stand out. Resumes should include an executive summary that pinpoints skills and objectives and should be tailored for each specific job by not using more than 3 pages or less than 1 page and including a cover letter. Exaggerations or lies on a resume could be discovered during an interview or on the job.
This document provides information on writing effective business letters. It discusses the different types of business letters and their purposes. The main components of a business letter are outlined, including the salutation, body, closing, and signature. Formats, grammar, and style tips are provided. Drafting letters is presented as an important skill to master formal business communication and represent an organization professionally. Exercises are suggested to practice business letter writing.
Here is a revised version of the email message that is more direct and concise with a subject line:
Subject: Request for Recommendation Letter
I am writing to request a letter of recommendation for graduate school. As you know from our time working together at ABC Company, I am pursuing a Master's degree in Business Administration beginning this fall. Your insights into my work ethic and leadership skills would be greatly appreciated. Please let me know if you are able to write a recommendation by this Friday. Thank you for your consideration.
This document discusses various aspects of professional communication and business writing. It covers topics such as [1] the purpose and forms of communication, [2] cultural differences that can impact communication styles, [3] common types of business writing like letters, memos, reports and presentations, [4] principles of effective presenting, and [5] the meaning of ethics and its importance in business. The overall message is the importance of understanding communication differences across cultures and using appropriate channels and styles for different business writing needs.
This document provides an overview of professional communication practices in business. It discusses key concepts like communication processes, purposes of communication, forms of communication like oral, written, non-verbal and paraverbal. It also touches upon cultural differences in communication styles and gestures. The document then focuses on different types of business writing like letters, memos, proposals, reports, presentations, newsletters, marketing materials and resumes. It concludes with discussing principles of preparing presentations and the meaning of ethics in business.
The letter is a business proposal from a company to Mr. Blake to help cut his company's costs by 50%. The company proposes to review Mr. Blake's current systems and processes to find inefficiencies and ways to save on printing and stationery costs by transitioning documents to electronic format. The enclosed proposal provides more details on the services offered and past successful projects. The letter writer says they will call Mr. Blake after he has reviewed the proposal and hopes they can work together mutually beneficially.
This document provides an overview of key concepts in business communication. It defines business communication and explains that it encompasses both internal communication within an organization as well as external communication with outside parties regarding business affairs. The document outlines various topics that business communication includes, such as marketing, branding, and public relations. It discusses the importance of effective business communication for organizational efficiency, leadership, employee morale, and more. The document also describes different methods of business communication and concepts like business correspondence and essential business communication vocabulary and abbreviations.
This document provides an overview of key concepts in business communication. It defines business communication and explains that it encompasses both internal communication within an organization as well as external communication with outside parties regarding business affairs. The document outlines various topics that business communication includes, such as marketing, branding, and public relations. It discusses the importance of effective business communication for organizational efficiency, leadership, employee morale, and more. Additionally, it describes different methods of business communication and defines some essential business communication terminology and abbreviations.
This document provides an overview of business communication concepts. It defines business communication and explains that it encompasses both internal communication within an organization as well as external communication with outside parties regarding business affairs. The document outlines the importance of effective business communication for organizational efficiency, leadership, employee morale, and more. It also discusses various methods of business communication including emails, reports, presentations, and meetings. Finally, it covers essential business communication vocabulary, abbreviations, and workplace greetings and conversations.
Communication 4 success Oral & Written.pptxMoazzam Ali
This document provides guidance on communication techniques for success. It begins by outlining objectives of learning, inspiring and motivating others. It then discusses various aspects of communication including definitions, types of communication systems, listening skills, why we communicate, and overcoming communication barriers. The document also provides tips on public speaking, etiquette, nonverbal communication cues, and choices for men's corporate attire. Overall, the document offers a comprehensive overview of best practices, skills and etiquette for effective communication.
The document provides information on key aspects of the New Zealand workplace culture, including values, biculturalism, multiculturalism, legal environment, and professionalism. It discusses characteristics of Kiwi culture such as pragmatism, humility, fairness, and informality. The implications of these cultural traits for the workplace are outlined, such as communicating in a down-to-earth manner, restraining emotions, and ensuring fairness. The document also covers the implications of biculturalism between Maori and Pakeha, multiculturalism, and the legal environment in New Zealand workplaces.
This document provides an overview of business communication techniques for writing reports, letters, emails and other documents. It discusses various report types and structures, how to organize information in reports, and styles for writing clearly and concisely. Guidelines are presented for writing different types of letters and emails, including complaint letters, meeting agendas, and resumes. The document also covers international and bias-free communication practices.
The document provides guidance on various business communication skills including networking, telephone skills, discussions and meetings, presentations, business writing, memos, emails, faxes, cover letters, resumes, and business reports. Some key points covered include introducing yourself at networking events, using appropriate etiquette on phone calls, giving structured presentations with visual aids, writing formal business letters and emails, and producing short and long reports with clear introductions, bodies, and conclusions.
This document provides an overview of topics related to managerial communication. It discusses introducing managerial communication and planning communication. It also covers business writing principles, legal aspects of communication, and the appearance of business letters. Additionally, it addresses sales and sales promotion letters, inquiry and order letters, complaint/claim letters, job letters, collection letters, and business reports. Finally, it examines oral presentation/communication including speaking, listening, leading, participating, interviewing, and dictating. The document is authored by Hassan Samoon and is intended as an introduction to managerial communication.
Here are corrections for the commonly misused words:
1. Your jewelry and other luggage will be taken care of by your assistant.
2. We would appreciate it if you could be present at your regular meeting for trainers.
3. The applicants will please fill out the entire form regardless of the position applied for.
4. He was caught unaware despite precautions.
5. One of the faculty members requests student assistants.
6. He could not cope with difficulties; the reason is that he is not used to failures.
7. I was totally unaware that somebody had filled her glass with hot water.
8. I am submitting this proposal as a regular output regarding the semin
Communication is a natural process that involves at least two living things exchanging information. In an organization, communication is essential and involves at least two people, a sender and receiver. When planning communication, it is important to understand the objective, audience, and how to deliver a simple and straightforward message. Effective organizational communication can occur through both formal and informal channels, while poor communication can lead to issues like wasted time and money, lower productivity and morale.
The presentation covered business communication, including chapters on communication in the workplace, word adaptation and selection, and the writing process for business messages. The chapters discussed the importance of communication, different forms of communication, factors that affect communication, and strategies for effective writing. Specific topics included communication styles, the business communication process, problem solving, selecting words, formatting letters and emails, and writing direct messages, requests, responses, and claims in a clear and courteous manner.
Here are the key parts of an application letter:
- Heading (return address) or letterhead
- Date
- Inside address (name and title of contact person)
- Salutation (Dear [Contact Name])
- Paragraph 1: State the purpose and how you learned of the position
- Paragraph 2: Highlight relevant qualifications and experience
- Paragraph 3: Emphasize what value you can provide the company
- Paragraph 4: Request an interview and provide contact information
- Complimentary close (Sincerely, etc.)
- Signature
- Typed name
The letter should be 3-4 paragraphs highlighting your interest in the role, relevant qualifications, and requesting next steps like an interview
The document provides guidance on writing formal letters and cover letters in English. It discusses the typical structure and components of formal letters, including addresses, dates, salutations, endings, and abbreviations commonly used. It then describes the typical paragraphs in a cover letter for a job application and a letter of inquiry. Finally, it gives examples of opening and closing paragraphs for these letters. The document serves as a reference for correctly formatting and structuring different types of formal letters in English.
This ppt slideshow is a compact capsule about various documents used for official communication.
Notice
Agenda
Memo
Minutes
House Organ
Bulletin
Enquiry Letter
Quotation
Offers
A brief description of various official documents are provided. For some documents, formats are provided.
The document provides guidance on writing positive messages and direct communication. It discusses organizing direct messages by putting the good news first, followed by details, negatives, and reader benefits. It also covers the 7 Cs of effective communication: being clear, concise, concrete, coherent, correct, complete, and courteous. Examples of direct messages include requests, replies to requests, recommendations, claims and adjustments, announcements, and fostering goodwill. The document emphasizes starting and closing messages effectively and provides sample messages and letters to illustrate best practices.
The three-step writing process involves planning, writing, and completing a message. The planning step includes analyzing the purpose and audience, gathering relevant information, and selecting an appropriate medium. In the writing step, the message is composed using techniques like a positive tone and unbiased language. Finally, the message is revised, produced, proofread, and distributed to complete the process. Written communication is important for business for tasks like advertising and instruction. This process helps create effective written pieces.
Similar to Writing Effective Business Correspondenc (20)
FIA officials brutally tortured innocent and snatched 200 Bitcoins of worth 4...jamalseoexpert1978
Farman Ayaz Khattak and Ehtesham Matloob are government officials in CTW Counter terrorism wing Islamabad, in Federal Investigation Agency FIA Headquarters. CTW and FIA kidnapped crypto currency owner from Islamabad and snatched 200 Bitcoins those worth of 4 billion rupees in Pakistan currency. There is not Cryptocurrency Regulations in Pakistan & CTW is official dacoit and stealing digital assets from the innocent crypto holders and making fake cases of terrorism to keep them silent.
Best practices for project execution and deliveryCLIVE MINCHIN
A select set of project management best practices to keep your project on-track, on-cost and aligned to scope. Many firms have don't have the necessary skills, diligence, methods and oversight of their projects; this leads to slippage, higher costs and longer timeframes. Often firms have a history of projects that simply failed to move the needle. These best practices will help your firm avoid these pitfalls but they require fortitude to apply.
Industrial Tech SW: Category Renewal and CreationChristian Dahlen
Every industrial revolution has created a new set of categories and a new set of players.
Multiple new technologies have emerged, but Samsara and C3.ai are only two companies which have gone public so far.
Manufacturing startups constitute the largest pipeline share of unicorns and IPO candidates in the SF Bay Area, and software startups dominate in Germany.
Building Your Employer Brand with Social MediaLuanWise
Presented at The Global HR Summit, 6th June 2024
In this keynote, Luan Wise will provide invaluable insights to elevate your employer brand on social media platforms including LinkedIn, Facebook, Instagram, X (formerly Twitter) and TikTok. You'll learn how compelling content can authentically showcase your company culture, values, and employee experiences to support your talent acquisition and retention objectives. Additionally, you'll understand the power of employee advocacy to amplify reach and engagement – helping to position your organization as an employer of choice in today's competitive talent landscape.
Zodiac Signs and Food Preferences_ What Your Sign Says About Your Tastemy Pandit
Know what your zodiac sign says about your taste in food! Explore how the 12 zodiac signs influence your culinary preferences with insights from MyPandit. Dive into astrology and flavors!
Company Valuation webinar series - Tuesday, 4 June 2024FelixPerez547899
This session provided an update as to the latest valuation data in the UK and then delved into a discussion on the upcoming election and the impacts on valuation. We finished, as always with a Q&A
The 10 Most Influential Leaders Guiding Corporate Evolution, 2024.pdfthesiliconleaders
In the recent edition, The 10 Most Influential Leaders Guiding Corporate Evolution, 2024, The Silicon Leaders magazine gladly features Dejan Štancer, President of the Global Chamber of Business Leaders (GCBL), along with other leaders.
Implicitly or explicitly all competing businesses employ a strategy to select a mix
of marketing resources. Formulating such competitive strategies fundamentally
involves recognizing relationships between elements of the marketing mix (e.g.,
price and product quality), as well as assessing competitive and market conditions
(i.e., industry structure in the language of economics).
Event Report - SAP Sapphire 2024 Orlando - lots of innovation and old challengesHolger Mueller
Holger Mueller of Constellation Research shares his key takeaways from SAP's Sapphire confernece, held in Orlando, June 3rd till 5th 2024, in the Orange Convention Center.
Anny Serafina Love - Letter of Recommendation by Kellen Harkins, MS.AnnySerafinaLove
This letter, written by Kellen Harkins, Course Director at Full Sail University, commends Anny Love's exemplary performance in the Video Sharing Platforms class. It highlights her dedication, willingness to challenge herself, and exceptional skills in production, editing, and marketing across various video platforms like YouTube, TikTok, and Instagram.
3. Business correspondence is an instrument of
decision making in the professional world.
Business correspondence is a link between
people.
It helps to reinforce professional exchange of
ideas, opinion, and information.
4. Office communication includes face-to-face,
telephonic, letters, emails, and faxes from-
1. One agency to another
2. One department/division to another
3. Employees to the supervisor and vice versa
5. Type of medium used would depend on
the situation, importance, and urgency.
Written communication, however, has
certain distinct advantages.
6. 1. It gives information, clarification, directive,
explanation, etc.
2. It creates a record of the message.
3. It facilitates subsequent reference.
4. The reader gets an opportunity to read at a
convenient time.
5. It offers greater clarity to the messages.
7. Fitting the message to the
specific reader or organization
Communicating the purpose
of the correspondence clearly
Exhibiting professionalism in
business communications
Representing your agency
in the most positive way
Adaptation
to your
environment
and recipient
8. •••••The Seven C’s of Effective
Communication
•••••••••••••••••••••••••••••
12. What is a Business Letter?
• Why write one?
• To whom is one written?
• What should be in one?
• What is proper format?
13. THE IMPORTANCE OF LETTERS
• Letters represent your company’s public image and your
competence.
• Letters are more personal than a report, yet more formal
than memos or e-mail.
• Letters are more permanent than e-mail.
• Letters constitute an official legal record of an agreement .
• Letters provide a wide range of corporate information .
• Letters sell.
• Letters are efficient for targeted mass mailings.
14. 14
What are the types of business letters?
• Personal Business
– Not on Letterhead
– Contains your typed return address
• Formal Business
– Typed on Letterhead
– Letterhead
• Already contains your agency’s return address
• You don’t retype it
15. PURPOSE
• What do I want the reader to know?
• What kind of business letter am I writing?
– Letter of inquiry
– Letter of application
– Letter of complaint
– Letter of regret
– Thank you letter
16. Why write Business Letters?
· To persuade
· To inform
· To request
· To express thanks
· To remind
· To recommend
· To apologize
· To congratulate
· To reject a proposal or offer
· To introduce a person or policy
· To invite or welcome
· To follow up
· To formalize decisions
17. Green Solutions Philippines
Suite 25, 32nd
Floor, RCBC Building,
Ayala Avenue, Makati City
October 27, 2011
Ramon Jesus P. Paje, Secretary
DENR
4th
Floor., DENR Bldg., Visayas Ave.
Quezon City , Philippines
Honorable Sir,
Greetings in Peace!
Ours is an organization who has the vision and mission of promoting a clean and green society in this country of ours. A group of
dynamic and visionary young environmentalists established our organization in hopes of making the Phils. a better place to live in.
And part of our goal is to promote recycling in households as well as in companies as well.
On October 29, 2011, Saturday, 9 local government units in the Metro will be visited to do a massive campaign for the “Green
Concept” which advocates recycling and the use of environment-friendly materials and equipments at home and in the corporate
world.
Whereas, it is the opinion of our office to seek the partnership of the government in this endeavour. We would like to seek your
assistance in providing us with technical support in so far as the existing environment and recycling laws are concerned so as to
align them with our Green Concept advocacy. The information that you could give us would also help us to come up with new
breakthroughs that would further strengthen our pro-environment campaign which is, ultimately, for the good of mankind.
Should you find our campaign of utmost interest, we would be appreciative of your invaluable help to our organization.
Thank you for your consideration and God bless!
Very Sincerely Yours,
Clarence Gatbonton, M.D, Ph. D.
President ,Green Solutions Philippines
18. What are the required parts of a
business letter?
• Heading
• Inside Address
• Salutation
• Body
• Complimentary Closing
• Signature
• Optional:
– Enclosure
– Typists Initials
20. 20
What’s in The Heading
(your information)
• Always includes the date
– As the last entry
• Personal Business Letter (no letterhead)
– Your return address
– May include phone number, fax number, e-mail
address
– Date
• Formal Business Letter (on letterhead)
– Date only
22. 22
What is the Inside Address
(addressee’s information)
• Person’s Name, Title
• Company/Agency Name/Department
• Company/Agency Address
(single spaced)
23. RULES OF THUMB…
AVOID ABBREVIATIONS EXCEPT FOR STATES AND TITLES.
(Mr., Mrs., Ms., etc. – FL, NJ, OH)
PLACE A SINGLE WORD TITLE AFTER THE NAME SEPARATED BY
A COMMA.
Mr. Ronald F. Naguit, Director
PLACE A LONGER TITLE ON A SEPARATE LINE.
Ms. Camilla D. Sanchez
Executive Director of Safety
27. 27
What is the Body?
(The actual letter)
• Brief and to the point!
– Strictly Business
• Guideline – 3 paragraphs
– Brief Introduction
– Content - What I want/ message
– Conclusion and thank you
31. Closing:
Sincerely yours
Four spaces after the
closing
Then your name. In
between the closing and
your name, that is where
you would sign your
name.
32. 32
Signature
• Your full name
– Mr. Alfred Guiang
• Your title and division(if appropriate)
– Information Officer
– PIA-NCR
33. 33
Optional Parts
• Enclosure
– If something else is in the letter or package
• P.S: additional information
• Cc: copies sent to other concerned persons
35. 35
What are acceptable formats
of a business letter?
• Unblocked
• Blocked
– All parts are Left Justified to the margin
• Modified Block
– All parts Left Justified
– Heading, Close, Signature at
tab position 3
– Indentation – choose either
• No paragraph indentation
• All paragraphs first line indent .5
36.
37.
38.
39. Green Solutions Philippines
Suite 25, 32nd
Floor, RCBC Building,
Ayala Avenue, Makati City
723-4556 e-mail: gsp@gmail.com
October 27, 2011
Ramon Jesus P. Paje, Secretary
Department of Environment and Natural Resources
4th
Floor., DENR Bldg., Visayas Avenue
Quezon City , Philippines
Dear Sir:
Green Solutions Philippines, a non-profit pro-environment organization,
is launching its “Green Concept” campaign in nine cities in Metro Manila
on October 29, 2011. We are going to the following cities: Caloocan,
Marikina, Valenzuela, Malabon, Quezon, Navotas, Taguig, Makati, and
Mandaluyong to promote recycling in households and in the workplace.
May we ask your office for copies of recent environmental laws that will
help us in implementing our advocacy and in providing us with
information for our upcoming projects.
Thank you for your support in our organization’s advocacy.
Truly yours,
Dr. Clarence Gatbonton
President
Green Solutions Philippines
40. Workshop:
1. Write a letter to Goldlandia, a mining company based in
Mountain Province, informing them that their operations will be
stopped for failing to renew their mining permit. Operation would
be allowed as soon as they renew permit.
2. Write a letter to the President of the Republic of the Philippines
inviting him in your Agency’s founding anniversary celebration.
3.Write a letter asking for media coverage from the Philippine
Information Agency. You have a launching of a certain program
and you need the media to disseminate information about it to
the public.
4. Write a letter of application for a job opening at another
division of your Agency. You are applying for a higher position,
thus, you need to “market” yourself through the letter.
5. Write a letter to the UP Geology Society asking for their
participation and assistance in your Agency’s
41. Workshop:
6. Write a letter to the Personnel asking their office to reverse the
suspension order sent to you for your habitual tardiness. It was
just your first offense.
7. Write a letter to your immediate supervisor and your Agency
Head regarding your planned one-month vacation in France.
8. Write a letter of response to a mining company explaining the
steps in the application of mining permits.
9. Write a letter of complaint to a computer hardware company
regarding the laptop that you bought which had defects. You plan
to exchange the product to another brand.
10. Write a letter of explanation telling why you weren’t able to
time out from the office (using your time card) last October
12, 2011. You simply forgot to log out.
Custom animation effects: text rebound (Intermediate) To reproduce the text effects on this slide, do the following: On the Home tab, in the Slides group, click Layout , and then click Blank . On the Insert tab, in the Text group, click Text Box . Drag to draw a text box on the slide. In the text box, enter text and select it. On the Home tab, in the Font group, do the following: In the Font list, select Corbel . In the Font Size box, enter 50 . Click Bold . On the Home tab, in the Paragraph group, click Center . Select the text box on the slide. Under Drawing Tools , on the Format tab, in the WordArt Styles group, click More WordArt , and then under Applies to All Text in Shape click Fill - Accent 1, Plastic Bevel, Reflection (first row, fifth option from the left). To reproduce the animation effects on this slide, do the following: On the View tab, in the Zoom group, click Zoom , and then in the Zoom dialog box, select 66% . On the Animations tab, in the Animations group, click Custom Animation . On the slide, select the text box. In the Custom Animation task pane, do the following: Click Add Effect , point to Entrance , and then click More Effects . In the Add Entrance Effects dialog box, under Subtle , click Fade . Select the animation effect (fade effect for the text box). Under Modify: Fade , do the following: In the Start list, select With Previous . In the Speed list, select Fast . Click Add Effect , point to Motion Path , point to Draw Custom Path , and then click Freeform . Press and hold SHIFT, and then do the following to draw the freeform line on the slide: Click the first point in the center of the text box. Click the second point on the right edge of the text box. Double-click the third and final point 2” beyond the left edge of the slide. In the Custom Animation task pane, select the custom path effect. Under Modify: Custom Path , do the following: In the Start list, select With Previous . In the Speed list, select Medium . On the slide, right-click the motion path on the slide, and select Reverse Path Direction . To reproduce the background effects on this slide, do the following: Right-click the slide background area, and then click Format Background . In the Format Background dialog box, click Fill in the left pane, select Gradient fill in the Fill pane, and then do the following: In the Type list, select Radial . Click the button next to Direction , and then click From Center (first row, second option from the left). Under Gradient stops , click Add or Remove until two stops appear in the drop-down list. Also under Gradient stops , customize the gradient stops that you added as follows: Select Stop 1 from the list, and then do the following: In the Stop position box, enter 0% . Click the button next to Color , and then under Theme Colors click White, Background 1 (first row, first option from the left). Select Stop 2 from the list, and then do the following: In the Stop position box, enter 100% . Click the button next to Color , click More Colors , and then in the Colors dialog box, on the Custom tab, enter values for Red: 200 , Green: 209 , and Blue: 218 .
Custom animation effects: object spins on end (Advanced) To reproduce the background effects on this slide, do the following: On the Home tab, in the Slides group, click Layout , and then click Blank . Right-click the slide background area, and then click Format Background . In the Format Background dialog box, click Fill in the left pane, and then select Solid fill in the Fill pane. Click the button next to Color , and then under Theme Colors click White, Background 1 (first row, first option from the left). To reproduce the rectangle on this slide, do the following: On the Home tab, in the Drawing group, click Shapes , and then under Rectangles click Rounded Rectangle (second option from the left). On the slide, drag to draw a rounded rectangle. Select the rectangle. Drag the yellow diamond adjustment handle to the left to decrease the amount of rounding on the corners. With the rounded rectangle still selected, under Drawing Tools , on the Format tab, in the Size group, do the following: In the Shape Height box, enter 3.5” . In the Shape Width box, enter 0.25” . Under Drawing Tools , on the Format tab, in the bottom right corner of the Shape Styles group, click the Format Shape dialog box launcher. In the Format Shape dialog box, click Fill in the left pane. In the Fill pane, select Solid fill , click the button next to Color , and then under Theme Colors click White, Background 1, Darker 15% (third row, first option from the left). Also in the Format Shape dialog box, click Line Color in the left pane. In the Line Color pane, select No line . Also in the Format Shape dialog box, click Shadow in the left pane. In the Shadow pane, click the button next to Presets , under Outer select Offset Bottom (first row, second option from the left), and then do the following: In the Transparency box, enter 0% . In the Size box, enter 100% . In the Blur box, enter 8.5 pt . In the Angle box, enter 90 ° . In the Distance box, enter 1 pt . Also in the Format Shape dialog box, click 3-D Format in the left pane. In the 3-D Format pane, do the following: Under Bevel , click the button next to Top , and then under Bevel click Circle (first row, first option from the left). Next to Top , in the Width box, enter 5 pt , and in the Height box, enter 5 pt . Under Surface , click the button next to Material , and then under Standard click Matte (first row, first option from the left). Click the button next to Lighting , and then under Neutral click Soft (first row, third option from the left). On the slide, select the rounded rectangle. On the Home tab, in the Clipboard group, click the arrow under Paste , and then click Duplicate . Select the duplicate rectangle. On the Home tab, in the Drawing group, do the following: Click the arrow next to Shape Fill , and then click No Fill . Click the arrow next to Shape Outline , and then click No Outline . Drag the second rectangle above the first rectangle until the lower edge overlays the top edge of the first rectangle. ( Note: When the spinning animation effect is created later for these rectangles, the spin will center where the edges of the rectangles meet.) Press and hold CTRL, and then select both rectangles. On the Home tab, in the Drawing group, click Arrange , and do the following: Point to Align , and then click Align Selected Objects . Point to Align , and then click Align Center . Click Group . On the slide, drag the group until it is centered horizontally on the left edge of the slide (straddling the edge). On the Home tab, in the Drawing group, click Arrange , point to Align , and then do the following: Click Align to Slide . Click Align Middle . To reproduce the dashed arc on this slide, do the following: On the Home tab, in the Drawing group, click Shapes , and then under Basic Shapes click Arc (third row, 12 th option from the left). On the slide, drag to draw an arc. Select the arc. Under Drawing Tools , on the Format tab, in the Size group, do the following: In the Shape Height box, enter 7.5” . In the Shape Width box, enter 7.5” . With the arc still selected, on the Home tab, in the Drawing group, click the arrow next to Shape Outline , and then do the following: Under Theme Colors , click White, Background 1, Darker 15% (third row, first option from the left). Point to Dashes , and then click Dash (fourth option from the top). On the slide, drag the yellow diamond adjustment handle on the right side of the arc to the bottom of the arc to create a half circle. Drag the arc until the yellow diamond adjustment handles are on the left edge of the slide. With the arc still selected, on the Home tab, in the Drawing group, click Arrange , point to Align , and then do the following: Click Align to Slide . Click Align Middle . To reproduce the half circle on this slide, do the following: On the slide, select the arc. On the Home tab, in the Clipboard group, click the arrow under Paste , and then click Duplicate . Select the duplicate arc. Under Drawing Tools , on the Format tab, in the Size group, do the following: In the Shape Height box, enter 3.33” . In the Shape Width box, enter 3.33” . With the second arc still selected, under Drawing Tools , on the Format tab, in the Shape Styles group, click the arrow next to Shape Fill , and then under Theme Colors click White, Background 1, Darker 5% (second row, first option from the left). Under Drawing Tools , on the Format tab, in the Shape Styles group, click the arrow next to Shape Outline , and then click No Outline . Under Drawing Tools , on the Format tab, in the Shape Styles group, click Shape Effects , point to Shadow , and then click Shadow Options . In the Format Shape dialog box, click Shadow in the left pane. In the Shadow pane, click the button next to Presets , under Inner click Inside Right (second row, third option from the left), and then do the following: In the Transparency box, enter 86% . In the Blur box, enter 24 pt . In the Angle box, enter 315 ° . In the Distance box, enter 4 pt . On the slide, drag the second arc until the yellow diamond adjustment handles are on the left edge of the slide. On the Home tab, in the Drawing group, click Arrange , and then do the following: Point to Align , and then click Align to Slide . Point to Align , and then click Align Middle . Click Send to Back . To reproduce the button shapes on this slide, do the following: On the Home tab, in the Drawing group, click Shapes , and then under Basic Shapes click Oval (first row, second option from the left). On the slide, drag to draw an oval. Select the oval. Under Drawing Tools , on the Format tab, in the Size group, do the following: In the Shape Height box, enter 0.34” . In the Shape Width box, enter 0.34” . Under Drawing Tools , on the Format tab, in the Shape Styles group, click More , and then click Light 1 Outline, Colored Fill – Dark 1 (third row, first option from the left). Under Drawing Tools , on the Format tab, in the bottom right corner of the Shape Styles group, click the Format Shape dialog box launcher. In the Format Shape dialog box, click Fill in the left pane. In the Fill pane, select Solid Fill . Click the button next to Color , and then under Theme Colors click Olive Green, Accent 3, Lighter 80 ° (second row, seventh option from the left). Also in the Format Shape dialog box, click Line Color in the left pane. In the Line Color pane, select No line . Also in the Format Shape dialog box, click Shadow in the left pane. In the Shadow pane, click the button next to Presets , under Outer click Offset Bottom (first row, second option from the left), and then do the following: In the Transparency box, enter 0% . In the Size box, enter 100% . In the Blur box, enter 8.5 pt . In the Angle box, enter 90 ° . In the Distance box, enter 1 pt . Also in the Format Shape dialog box, click 3-D Format in the left pane, and then do the following in the 3-D Format pane: Under Bevel , click the button next to Top , and then under Bevel click Art Deco (third row, fourth option from the left). Next to Top , in the Width box, enter 5 pt , and in the Height box, enter 5 pt . Under Contour , click the button next to Color , and then under Theme Colors click White, Background 1 (first row, first option from the left). In the Size box, enter 3.5 pt . Under Surface , click the button next to Material , and then under Standard click Matte (first row, first option from the left). Click the button next to Lighting , and then under Neutral click Soft (first row, third option from the left). On the slide, select the oval. Under Drawing Tools , on the Format tab, in the bottom right corner of the Size group, click the Size and Position dialog box launcher. In the Size and Position dialog box, on the Position tab, do the following: In the Horizontal box, enter 2.98” . In the Vertical box, enter 1.5” . Select the oval. On the Home tab, in the Clipboard group, click the arrow under Paste , and then click Duplicate . Select the duplicate oval. Under Drawing Tools , on the Format tab, in the bottom right corner of the Size group, click the Size and Position dialog box launcher. In the Size and Position dialog box, on the Position tab, do the following: In the Horizontal box, enter 3.52” . In the Vertical box, enter 2.98” . Repeat step 9 two more times, for a total of four ovals. Under Drawing Tools , on the Format tab, in the bottom right corner of the Size group, click the Size and Position dialog box launcher. In the Size and Position dialog box, on the Position tab, do the following to position the third and fourth ovals: Select the third oval on the slide, and then enter 3.52” in the Horizontal box and 4.27” in the Vertical box. Select the fourth oval on the slide, and then enter 2.99” in the Horizontal box and 5.66” in the Vertical box. To reproduce the text on this slide, do the following: On the Insert tab, in the Text group, click Text Box , and then on the slide, drag to draw the text box. Enter text in the text box and select the text. On the Home tab, in the Font group, do the following: In the Font list, select Corbel . In the Font Size list, select 22 . Click the arrow next to Font Color , and then under Theme Colors click White, Background 1, Darker 50% (sixth row, first option from the left). On the Home tab, in the Paragraph group, click Align Text Left to align the text left in the text box. On the slide, drag the text box to the right of the first oval. Select the text box. On the Home tab, in the Clipboard group, click the arrow under Paste , and then click Duplicate . Click in the text box and edit the text. Drag the second text box to the right of the second oval. Repeat steps 5-7 to create the third and fourth text boxes, dragging them to the right of the third and fourth ovals. To reproduce the animation effects on this slide, do the following: On the Animations tab, in the Animations group, click Custom Animation . On the Home tab, in the Editing group, click Select , and then click Selection Pane . In the Selection and Visibility pane, select the rectangle group. In the Custom Animation task pane, do the following: Click Add Effect , point to Emphasis , and then click More Effects . In the Add Emphasis Effect dialog box, under Basic , click Spin . Select the animation effect (spin effect for the rectangle group). Under Modify: Spin , do the following: In the Start list, select With Previous . In the Amount list, in the Custom box, enter 123 ° , and then press ENTER. Also in the Amount list, click Counterclockwise . In the Speed list, select Fast . On the slide, select the first oval. In the Custom Animation task pane, do the following: Click Add Effect , point to Emphasis , and then click More Effects . In the Add Emphasis Effect dialog box, under Basic , click Change Fill Color . Select the second animation effect (change fill color effect for the first oval). Under Modify: Change Fill Color , do the following: In the Start list, select After Previous . In the Fill Color list, click More Colors . In the Colors dialog box, on the Custom tab, enter values for Red: 130 , Green: 153 , Blue: 117 . In the Speed list, select Very Fast . On the slide, select the first text box. In the Custom Animation task pane, do the following: Click Add Effect , point to Entrance , and then click More Effects . In the Add Entrance Effect dialog box, under Subtle , click Fade . Select the third animation effect (fade effect for the first text box). Under Modify: Fade , do the following: In the Start list, select With Previous . In the Speed list, select Very Fast . In the Selection and Visibility pane, select the rectangle group. In the Custom Animation task pane, do the following: Click Add Effect , point to Emphasis , and then click More Effects . In the Add Emphasis Effect dialog box, under Basic , click Spin . Select the fourth animation effect (spin effect for the rectangle group). Under Modify: Spin , do the following: In the Start list, select On Click . In the Amount list, in the Custom box, enter 22 ° , and then press ENTER. Also in the Amount list, click Clockwise . In the Speed list, select Very Fast . On the slide, select the second oval. In the Custom Animation task pane, do the following: Click Add Effect , point to Emphasis , and then click More Effects . In the Add Emphasis Effect dialog box, under Basic , click Change Fill Color . Select the fifth animation effect (change fill color effect for the second oval). Under Modify: Change Fill Color , do the following: In the Start list, select After Previous . In the Fill Color list, click More Colors . In the Colors dialog box, on the Custom tab, enter values for Red: 130 , Green: 153 , Blue: 117 . In the Speed list, select Very Fast . On the slide, select the second text box. In the Custom Animation task pane, do the following: Click Add Effect , point to Entrance and then click More Effects . In the Add Entrance Effect dialog box, under Subtle , click Fade . Select the sixth animation effect (fade effect for the second text box). Under Modify: Fade , do the following: In the Start list, select With Previous . In the Speed list, select Very Fast . On the slide, select the third oval. In the Custom Animation task pane, do the following: Click Add Effect , point to Emphasis , and then click More Effects . In the Add Emphasis Effect dialog box, under Basic , click Change Fill Color . Select the seventh animation effect (change fill color effect for the third oval). Under Modify: Change Fill Color , do the following: In the Start list, select After Previous . In the Fill Color list, click More Colors . In the Colors dialog box, on the Custom tab, enter values for Red: 130 , Green: 153 , Blue: 117 . In the Speed list, select Very Fast . On the slide, select the third text box. In the Custom Animation task pane, do the following: Click Add Effect , point to Entrance and then click More Effects . In the Add Entrance Effect dialog box, under Subtle , click Fade . Select the eighth animation effect (fade effect for the third text box). Under Modify: Fade , do the following: In the Start list, select With Previous . In the Speed list, select Very Fast . On the slide, select the fourth oval. In the Custom Animation task pane, do the following: Click Add Effect , point to Emphasis , and then click More Effects . In the Add Emphasis Effect dialog box, under Basic , click Change Fill Color . Select the ninth animation effect (change fill color effect for the fourth oval). Under Modify: Change Fill Color , do the following: In the Start list, select After Previous . In the Fill Color list, click More Colors . In the Colors dialog box, on the Custom tab, enter values for Red: 130 , Green: 153 , Blue: 117 . In the Speed list, select Very Fast . On the slide, select the fourth text box. In the Custom Animation task pane, do the following: Click Add Effect , point to Entrance , and then click More Effects . In the Add Entrance Effect dialog box, under Subtle , click Fade . Select the 10 th animation effect (fade effect for the fourth text box). Under Modify: Fade , do the following: In the Start list, select With Previous . In the Speed list, select Very Fast .
Custom animation effects: dotted line with text fade by letter (Basic) To reproduce the text effects on this slide, do the following: On the Home tab, in the Slides group, click Layout , and then click Blank . On the Insert tab, in the Text group, click Text Box , and then on the slide, drag to draw a text box that spans the entire width of the slide. On the Insert tab, in the Text group, click Symbol . In the Symbol dialog box, do the following: In the Font list, select (normal text) . In the Subset list, select General Punctuation . In the Character Code box, enter 2022 to select BULLET , and then click Insert . Click Insert 33 more times until there is a row of 34 bullets in the text box. In the text box, select the text, and then on the Home tab, in the Font group do the following: In the Font list, select Arial Black . In the Font Size list, select 44 . Click the arrow next to Font Color , and then under Theme Colors click White, Background 1 (first row, first option from the left). On the Home tab, in the Drawing group, click Arrange , point to Align , and then do the following: Click Align to Slide . Click Align Center . Click Align Middle . On the Insert tab, in the Text group, click Text Box . Drag to draw a text box on the slide. Enter and select the text. On the Home tab, in the Font group, do the following: In the Font list, select Corbel . In the Font Size box, enter 50 . Click the arrow next to Font Color , and then under Theme Colors click White, Background 1 (first row, first option from the left). Click Bold . With the text still selected, on the Home tab, in the Paragraph group, click Center . Select the second text box. On the Home tab, in the Drawing group, click Arrange , point to Align , and then do the following: Click Align to Slide . Click Align Center . Click Align Middle . To reproduce the background effects on this slide, do the following: Right-click the slide background area, and then click Format Background . In the Format Background dialog box, click Fill in the left pane, select Gradient fill in the Fill pane, and then do the following: In the Type list, select Radial . Click the button next to Direction , and then click From Center (third option from the left). Under Gradient stops , click Add or Remove until two stops appear in the drop-down list. Also under Gradient stops , customize the gradient stops that you added as follows: Select Stop 1 from the list, and then do the following: In the Stop position box, enter 0% . Click the button next to Color , and then under Theme Colors select Blue, Accent 1, Darker 25% (fifth row, fifth option from the left). Select Stop 2 from the list, and then do the following: In the Stop position box, enter 100% . Click the button next to Color , and then under Theme Colors select Black, Text 1 (first row, second option from the left). To reproduce the animation effects on this slide, do the following: On the Animations tab, in the Animations group, click Custom Animation . On the slide, select the first text box. In the Custom Animation task pane, do the following: Click Add Effect , point to Entrance , and then click More Effects . In the Add Entrance Effect dialog box, under Basic , click Fly In . Select the animation effect (fly-in effect for the first text box). Click the arrow to the right of the selected effect, and then click Effect Options . In the Fly In dialog box, do the following: On the Effect tab, do the following: In the Direction list, select From Left . In the Animate text list, select By Letter . In the % delay between letters box, enter 10 . On the Timing tab, do the following: In the Start list, select With Previous . In the Speed list, select 0.5 seconds (Very Fast) . On the slide, select the first text box. In the Custom Animation task pane, do the following: Click Add Effect , point to Exit , and then click More Effects . In the Add Exit Effect dialog box, under Subtle , click Fade . Select the second animation effect (fade effect for the first text box). Click the arrow to the right of the selected effect, and then click Effect Options . In the Fade dialog box, do the following: On the Effect tab, do the following: In the Animate text list, select By Letter . In the % delay between letters box, enter 10 . On the Timing tab, do the following: In the Start list, select With Previous . In the Delay box, enter 1.5 . In the Speed list, select 0.5 seconds (Very Fast) . On the slide, select the second text box. In the Custom Animation task pane, do the following. Click Add Effect , point to Entrance , and then click More Effects . In the Add Entrance Effect dialog box, under Subtle , click Fade . Select the third animation effect (fade effect for the second text box). Click the arrow to the right of the selected effect, and then click Effect Options . In the Fade dialog box, do the following: On the Effect tab, do the following: In the Animate text list, select By Letter . In the % delay between letters box, enter 6 . On the Timing tab, do the following: In the Start list, select With Previous . In the Delay box, enter 2 . In the Speed list, select 0.5 seconds (Very Fast) .
Shaded text boxes with arrows (Intermediate) To reproduce the top shape with text effects on this slide, do the following: On the Home tab, in the Slides group, click Layout , and then click Blank . On the Home tab, in the Drawing group, click Shapes , and then under Rectangles , click Rounded Rectangle (second option from the left). On the slide, drag to draw a rounded rectangle. Select the rectangle. Under Drawing Tools , on the Format tab, in the Size group, do the following: In the Shape Height box, enter .52” . In the Shape Width box, enter 3.75” . Drag the yellow diamond adjustment handle (at the top left of the rectangle) to the right to increase the amount of rounding at the corners of the rectangle. Select the rectangle. On the Home tab, in the bottom right corner of the Drawing group, click the Format Shape dialog box launcher. In the Format Shape dialog box, click Fill in the left pane, select Gradient fill in the Fill pane, and then do the following: In the Type list, select Linear . Click the button next to Direction , and then click Linear Down (first row, second option from the left). Under Gradient stops , click Add or Remove until two stops appear in the drop-down list. Also under Gradient stops , customize the gradient stops that you added as follows: Select Stop 1 from the list, and then do the following: In the Stop position box, enter 0% . Click the button next to Color , and then under Theme Colors click White, Background 1 (first row, first option from the left). Select Stop 2 from the list, and then do the following: In the Stop position box, enter 100% . Click the button next to Color , and then under Theme Colors click White, Background 1, Darker 15% (third row, first option from the left). Also in the Format Shape dialog box, click Line Color in the left pane, select Gradient Line in the Line Color pane, and then do the following: In the Type list, select Linear . Click the button next to Direction , and then click Linear Up (second row, second option from the left). Under Gradient stops , click Add or Remove until two stops appear in the drop-down list. Also under Gradient stops , customize the gradient stops that you added as follows: Select Stop 1 from the list, and then do the following: In the Stop position box, enter 0% . Click the button next to Color , and then under Theme Colors click White, Background 1 (first row, first option from the left). Select Stop 2 from the list, and then do the following: In the Stop position box, enter 100% . Click the button next to Color , and then under Theme Colors click White, Background 1, Darker 25% (fourth row, first option from the left). Also in the Format Shape dialog box, click Line Style in the left pane, and then in the Line Style pane, in the Width box, enter 2 pt . On the Home tab, in the Drawing group, click Shape Effects , and then do the following: Point to Glow , and then under Glow Variations click any option in the first row to set a 5 pt glow. Point to Glow , point to More Glow Colors , and then under Theme Colors click White, Background 1, Darker 25% (fourth row, first option from the left). On the slide, right-click the rounded rectangle, click Edit Text , then enter text. Select the text. On the Home tab, in the Font group, select Franklin Gothic Medium Cond from the Font list, select 24 from the Font Size list, and then click the arrow next to Font Color and under Theme Colors click White, Background 1, Darker 35% (fifth row, first option from the left ) . On the Home tab, in the Paragraph group, click Align Text Left to align the text left in the text box. Under Drawing Tools , on the Format tab, in the bottom right corner of the WordArt Styles group, click the Format Text Effects dialog box launcher. In the Format Text Effects dialog box, click Text Box in the left pane. In the Text Box pane, under Internal margin , enter 0.6” in the Left box to increase the left margin in the rounded rectangle to accommodate the embossed circle. To reproduce the olive-green circle and arrow for the top shape on this slide, do the following: On the Home tab, in the Drawing group, click Shapes , and then under Basic Shapes click Oval (first row, second option from the left). Press and hold SHIFT to constrain the shape to a circle, and then on the slide, drag to draw a circle. Select the circle. Under Drawing Tools , on the Format tab, in the Size group, do the following: In the Shape Height box, enter .4” . In the Shape Width box, enter .4” . On the Home tab, in the bottom right corner of the Drawing group, click the Format Shape dialog box launcher. In the Format Shape dialog box, click Fill in the left pane. In the Fill pane, select Solid Fill , and then click the button next to Color and under Theme Colors click Olive Green, Accent 3, Lighter 60% (third row, seventh option from the left). Also in the Format Shape dialog box, click Line Color in the left pane, and then select No line in the Line Color pane. Also in the Format Shape dialog box, click Shadow in the left pane, and then in the Shadow pane, do the following: Click the button next to Presets , and then under Inner click Inside Diagonal Top Left (first row, first option from the left). In the Transparency box, enter 80% . In the Distance box, enter 2 pt . Drag the circle onto the left side of the rounded rectangle. On the Home tab, in the Drawing group, click Shapes , and then under Block Arrows click Chevron (second row, eighth option from the left). On the slide, drag to draw the chevron on the circle. Select the chevron. Under Drawing Tools , on the Format tab, in the Size group, do the following: In the Shape Height box, enter .23” . In the Shape Width box, enter .23” . On the Home tab, in the Drawing group, click Shape Fill , and then click White, Background 1 (first row, first option from the left). On the Home tab, in the Drawing group, click Shape Outline, and then click No Outline . Press and hold SHIFT and select all three shapes. On the Home tab, in the Drawing group, click Arrange , point to Align , and then click Align Middle . To reproduce the other shapes and arrange them on this slide, do the following: Press and hold SHIFT and select all three shapes. On the Home tab, in the Drawing group, click Arrange , and then under Group Objects click Group . On the Home tab, in the Clipboard group, click the arrow under Paste, and then click Duplicate . Repeat the process until there is a total of four groups of shapes. Separate each group of shapes and loosely arrange them on the slide. Press and hold SHIFT and select all four groups of shapes. On the Home tab, in the Drawing group, click Arrange , and then do the following: Point to Align , and then click Align Selected Objects . Point to Align , and click Distribute Vertically . Point to Align , and then click Align Center . Under Group Objects click Group . With the group still selected on the slide, on the Home tab, in the Drawing group, click Arrange , point to Align , and then do the following: Click Align to Slide . Click Align Center . Click Align Middle . To change the color for the duplicate circles (second, third, and fourth from the top), do the following: Press and hold SHIFT and select all four groups of shapes. On the Home tab, in the Drawing group, click Arrange , and click Ungroup . Select the circle that you would like to change. Under Drawing Tools , on the Format tab, in the Shape Styles group, click the arrow next to Shape Fill , and then do the following: For the second circle from the top, under Theme Colors , click Blue, Accent 1, Lighter 60% (third row, fifth option from the left). For the third circle from the top, under Theme Colors , click Purple, Accent 4, Lighter 60% (third row, eighth option from the left). For the fourth circle from the top, under Theme Colors , click Red, Accent 2, Lighter 60% (third row, sixth option from the left). To reproduce the background on this slide, do the following: Right-click the slide background area, and then click Format Background . In the Format Background dialog box, click Fill in the left pane, select Gradient fill in the Fill pane, and then do the following: In the Type list, select Radial . Click the button next to Direction , and then click From Center (third option from the left). Under Gradient stops , click Add or Remove until two stops appear in the drop-down list. Also under Gradient stops , customize the gradient stops that you added as follows: Select Stop 1 from the list, and then do the following: In the Stop position box, enter 0% . Click the button next to Color , and then under Theme Colors click White, Background 1, Darker 15% (third row, first option from the left). Select Stop 2 from the list, and then do the following: In the Stop position box, enter 80% . Click the button next to Color , and then under Theme Colors click White, Background 1 (first row, first option from the left).
Custom animation effects: fly-in and shrink lines, stretch rectangles (Intermediate) To reproduce the first vertical line on this slide, do the following: On the Home tab, in the Slides group, click Layout , and then click Blank . On the Home tab, in the Drawing group, click Shapes , and then under Lines click Line . On the slide, press and hold SHIFT, and then drag to draw a straight, vertical line. Under Drawing Tools , on the Format tab, in the Size group, in the Shape Width box, enter 4.5” . On the Home tab, in the bottom right corner of the Drawing group, click the Format Shape dialog box launcher. In the Format Shape dialog box, click Line Color in the left pane, select Gradient fill in the Line Color pane, and then do the following: In the Type list, select Linear . Click the button next to Direction , and then click Linear Right (first row, fourth option from the left). In the Angle box, enter 0 ° . Under Gradient stops , click Add or Remove until three stops appear in the drop-down list. Also under Gradient stops , customize the gradient stops that you added as follows: Select Stop 1 from the list, and then do the following: In the Stop position box, enter 0% . Click the button next to Color , select More Colors , and then in the Colors dialog box, on the Custom tab, enter values for Red: 148 , Green: 172 , and Blue: 208 . In the Transparency box, enter 100% . Select Stop 2 from the list, and then do the following: In the Stop position box, enter 50% . Click the button next to Color , select More Colors , and then in the Colors dialog box, on the Custom tab, enter values for Red: 148 , Green: 172 , and Blue: 208 . In the Transparency box, enter 0% . Select Stop 3 from the list, and then do the following: In the Stop position box, enter 99% . Click the button next to Color , select More Colors , and then in the Colors dialog box, on the Custom tab, enter values for Red: 148 , Green: 172 , and Blue: 208 . In the Transparency box, enter 100% . Also in the Format Shape dialog box, click Line Style in the left pane. In the Line Style pane, in the Width box, enter 6 pt . To reproduce the first rectangle on this slide, do the following: On the Home tab, in the Drawing group, click Shapes , and then under Rectangles click Rectangle (first option from the left). On the slide, drag to draw a rectangle. Select the rectangle. Under Drawing Tools , on the Format tab, in the Size group, do the following: In the Shape Height box, enter 2”. In the Shape Width box, enter 2” . Under Drawing Tools , on the Format tab, in the bottom right corner of the Shape Styles group, click the Format Shape dialog box launcher. In the Format Shape dialog box, click Fill in the left pane, select Gradient fill in the Fill pane, and then do the following: In the Type list, select Linear . Click the button next to Direction , and then click Linear Up (second row, second option from the left). In the Angle box, enter 270 ° . Under Gradient stops , click Add or Remove until three stops appear in the drop-down list. Also under Gradient stops , customize the gradient stops that you added as follows: Select Stop 1 from the list, and then do the following: In the Stop position box, enter 0% . Click the button next to Color , click More Colors , and then in the Colors dialog box, on the Custom tab, enter values for Red: 44 , Green: 93 , and Blue: 152 . In the Transparency box, enter 0% . Select Stop 2 from the list, and then do the following: In the Stop position box, enter 80% . Click the button next to Color , click More Colors , and then in the Colors dialog box, on the Custom tab, enter values for Red: 60 , Green: 123 , Blue: 199 . In the Transparency box, enter 0% . Select Stop 3 from the list, and then do the following: In the Stop position box, enter 100% . Click the button next to Color , click More Colors , and then in the Colors dialog box, on the Custom tab, enter values for Red: 58 , Green: 124 , Blue: 203 . In the Transparency box, enter 0% . Also in the Format Shape dialog box, click Line Color in the left pane. In the Line Color pane, select No line . Also in the Format Shape dialog box, click 3-D Format in the left pane, and in the 3-D Format pane, do the following: Under Bevel , click the button next to Top , and then under Bevel click Circle (first row, first option from the left). Next to Top , in the Width box, enter 5 pt , and in the Height box, enter 2 pt . Under Surface , in the Angle box, enter 20 ° . On the slide, right-click the rectangle and then click Edit Text . Enter text in the text box and select the text. On the Home tab, in the Font group, do the following: In the Font list, select Calibri . In the Font Size list, select 32 . Click the button next to Font Color , and then under Theme Colors click White, Background 1 (first row, first option from the left). On the slide, press and hold CTRL, and then select the line and the rectangle. On the Home tab, in the Drawing group, click Arrange , point to Align , and then do the following: Click Align Selected Objects . Click Align Left . With the line and rectangle still selected, drag them to the left side of the slide. To reproduce the animation effects for the first vertical line and rectangle on this slide, do the following: On the Animations tab, in the Animations group, click Custom Animation . On the slide, select the line. In the Custom Animation task pane, do the following: Click Add Effect , point to Entrance , and then click More Effects . In the Add Entrance Effect dialog box, under Basic , click Fly In . Select the first animation effect (fly-in effect for the line), and then under Modify: Fly In , do the following: In the Start list, select With Previous . In the Direction list, select From Top . In the Speed list, select Fast . On the slide, select the line. In the Custom Animation task pane, do the following: Click Add Effect , point to Emphasis , and then click More Effects . In the Add Emphasis Effect dialog box, under Basic , click Grow/Shrink . Select the second animation effect (grow/shrink effect for the line). Click the arrow to the right of the effect, and then click Effect Options . In the Grow/Shrink dialog box, do the following: On the Effect tab, do the following: In the Size list, select Tiny . Also in the Size list, select Vertical . On the Timing tab, do the following: In the Start list, select With Previous . In the Delay box, enter 0.5 . In the Speed list, select 1 seconds (Fast) . On the slide, select the rectangle. In the Custom Animation task pane, do the following: Click Add Effect , point to Entrance , and then click More Effects . In the Add Entrance Effect dialog box, under Moderate , click Stretch . Select the third animation effect (stretch effect for the rectangle), and then under Modify: Stretch , do the following: In the Start list, select After Previous . In the Direction list, select From Left . In the Speed list, select Fast . To reproduce the other shapes with animation effects on this slide, do the following: On the slide, press and hold CTRL, and then select the rectangle and the line. On the Home tab, in the Clipboard group, click the arrow under Paste , and then click Duplicate . On the slide, drag the second line and rectangle to the center of the slide. With the second line and rectangle still selected, on the Home tab, in the Clipboard group, click the arrow under Paste , and then click Duplicate . On the slide, drag the third line and rectangle to the right side of the slide. On the slide, press CTRL+A to select all the objects. On the Home tab, in the Drawing group, click Arrange , point to Align , and then do the following: Click Align to Slide . Click Align Middle . Click the text in each of the duplicate rectangles, and then edit the text. On the slide, select the second (middle) line. On the Home tab, in the bottom right corner of the Drawing group, click the Format Shape dialog box launcher. In the Format Shape dialog box, click Line Color in the left pane, select Gradient fill in the Line Color pane, and then do the following: In the Type list, select Linear . Click the button next to Direction , and then click Linear Right (first row, fourth option from the left). In the Angle box, enter 0 ° . Under Gradient stops , click Add or Remove until three stops appear in the drop-down list. Also under Gradient stops , customize the gradient stops that you added as follows: Select Stop 1 from the list, and then do the following: In the Stop position box, enter 0% . Click the button next to Color , select More Colors , and then in the Colors dialog box, on the Custom tab, enter values for Red: 154 , Green: 181 , Blue: 228 . In the Transparency box, enter 100% . Select Stop 2 from the list, and then do the following: In the Stop position box, enter 50% . Click the button next to Color , and then under Theme Colors click White, Background 1, Darker 25% (fourth row, first option from the left). In the Transparency box, enter 0% . Select Stop 3 from the list, and then do the following: In the Stop position box, enter 99% . Click the button next to Color , and then under Theme Colors click White, Background 1, Darker 25% (fourth row, first option from the left). In the Transparency box, enter 100% . On the slide, select the second (middle) rectangle. On the Home tab, in the bottom right corner of the Drawing group, click the Format Shape dialog box launcher. In the Format Shape dialog box, click Fill in the left pane, select Gradient fill in the Fill pane, and then do the following: In the Type list, select Linear . Click the button next to Direction , and then click Linear Up (second row, second option from the left). In the Angle box, enter 270 ° . Under Gradient stops , click Add or Remove until three stops appear in the drop-down list. Also under Gradient stops , customize the gradient stops that you added as follows: Select Stop 1 from the list, and then do the following: In the Stop position box, enter 0% . Click the button next to Color , click More Colors , and then in the Colors dialog box, on the Custom tab, enter values for Red: 118 , Green: 149 , Blue: 53 . Select Stop 2 from the list, and then do the following: In the Stop position box, enter 80% . Click the button next to Color , click More Colors , and then in the Colors dialog box, on the Custom tab, enter values for Red: 115 , Green: 195 , Blue: 72 . Select Stop 3 from the list, and then do the following: In the Stop position box, enter 100% . Click the button next to Color , click More Colors , and then in the Colors dialog box, on the Custom tab, enter values for Red: 156 , Green: 199 , Blue: 70 . On the slide, select the third (right) line. On the Home tab, in the bottom right corner of the Drawing group, click the Format Shape dialog box launcher. In the Format Shape dialog box, click Line Color in the left pane, select Gradient fill in the Line Color pane, and then do the following: In the Type list, select Linear . Click the button next to Direction , and then click Linear Right (first row, fourth option from the left). In the Angle box, enter 0 ° . Under Gradient stops , click Add or Remove until three stops appear in the drop-down list. Also under Gradient stops , customize the gradient stops that you added as follows: Select Stop 1 from the list, and then do the following: In the Stop position box, enter 0% . Click the button next to Color , and then under Theme Colors click Aqua, Accent 5, Lighter 40% (fourth row, ninth option from the left). In the Transparency box, enter 100% . Select Stop 2 from the list, and then do the following: In the Stop position box, enter 50% . Click the button next to Color , and then under Theme Colors click Aqua, Accent 5, Lighter 40% (fourth row, ninth option from the left). In the Transparency box, enter 0% . Select Stop 3 from the list, and then do the following: In the Stop position box, enter 99% . Click the button next to Color , and then under Theme Colors click Aqua, Accent 5, Lighter 40% (fourth row, ninth option from the left). In the Transparency box, enter 100% . On the slide, select the third (right) rectangle. On the Home tab, in the bottom right corner of the Drawing group, click the Format Shape dialog box launcher. In the Format Shape dialog box, click Fill in the left pane, select Gradient fill in the Fill pane, and then do the following: In the Type list, select Linear . Click the button next to Direction , and then click Linear Up (second row, second option from the left). In the Angle box, enter 270 ° . Under Gradient stops , click Add or Remove until three stops appear in the drop-down list. Also under Gradient stops , customize the gradient stops that you added as follows: Select Stop 1 from the list, and then do the following: In the Stop position box, enter 0% . Click the button next to Color , select More Colors , and then in the Colors dialog box, on the Custom tab, enter values for Red: 39 , Green: 135 , Blue: 160 . Select Stop 2 from the list, and then do the following: In the Stop position box, enter 80% . Click the button next to Color , select More Colors , and then in the Colors dialog box, on the Custom tab, enter values for Red: 54 , Green: 177 , Blue: 210 . Select Stop 3 from the list, and then do the following: In the Stop position box, enter 100% . Click the button next to Color , select More Colors , and then in the Colors dialog box, on the Custom tab, enter values for Red: 52 , Green: 179 , Blue: 214 . To reproduce the background effects on this slide, do the following: Right-click the slide background area, and then click Format Background . In the Format Background dialog box, click Fill in the left pane, select Gradient fill in the Fill pane, and then do the following: In the Type list, select Radial . Click the button next to Direction , and then click From Center (third option from the left). Under Gradient stops , click Add or Remove until three stops appear in the drop-down list. Also under Gradient stops , customize the gradient stops that you added as follows: Select Stop 1 from the list, and then do the following: In the Stop position box, enter 33% . Click the button next to Color , and then under Theme Colors click White, Background 1 (first row, first option from the left). Select Stop 2 from the list, and then do the following: In the Stop position box, enter 67% . Click the button next to Color , select More Colors , and then in the Colors dialog box, on the Custom tab, enter values for Red: 228 , Green: 233 , Blue: 236 . Select Stop 3 from the list, and then do the following: In the Stop position box, enter 100% . Click the button next to Color , select More Colors , and then in the Colors dialog box, on the Custom tab, enter values for Red: 178 , Green: 186 , Blue: 210 .
Custom animation effects: dotted line with text fade by letter (Basic) To reproduce the text effects on this slide, do the following: On the Home tab, in the Slides group, click Layout , and then click Blank . On the Insert tab, in the Text group, click Text Box , and then on the slide, drag to draw a text box that spans the entire width of the slide. On the Insert tab, in the Text group, click Symbol . In the Symbol dialog box, do the following: In the Font list, select (normal text) . In the Subset list, select General Punctuation . In the Character Code box, enter 2022 to select BULLET , and then click Insert . Click Insert 33 more times until there is a row of 34 bullets in the text box. In the text box, select the text, and then on the Home tab, in the Font group do the following: In the Font list, select Arial Black . In the Font Size list, select 44 . Click the arrow next to Font Color , and then under Theme Colors click White, Background 1 (first row, first option from the left). On the Home tab, in the Drawing group, click Arrange , point to Align , and then do the following: Click Align to Slide . Click Align Center . Click Align Middle . On the Insert tab, in the Text group, click Text Box . Drag to draw a text box on the slide. Enter and select the text. On the Home tab, in the Font group, do the following: In the Font list, select Corbel . In the Font Size box, enter 50 . Click the arrow next to Font Color , and then under Theme Colors click White, Background 1 (first row, first option from the left). Click Bold . With the text still selected, on the Home tab, in the Paragraph group, click Center . Select the second text box. On the Home tab, in the Drawing group, click Arrange , point to Align , and then do the following: Click Align to Slide . Click Align Center . Click Align Middle . To reproduce the background effects on this slide, do the following: Right-click the slide background area, and then click Format Background . In the Format Background dialog box, click Fill in the left pane, select Gradient fill in the Fill pane, and then do the following: In the Type list, select Radial . Click the button next to Direction , and then click From Center (third option from the left). Under Gradient stops , click Add or Remove until two stops appear in the drop-down list. Also under Gradient stops , customize the gradient stops that you added as follows: Select Stop 1 from the list, and then do the following: In the Stop position box, enter 0% . Click the button next to Color , and then under Theme Colors select Blue, Accent 1, Darker 25% (fifth row, fifth option from the left). Select Stop 2 from the list, and then do the following: In the Stop position box, enter 100% . Click the button next to Color , and then under Theme Colors select Black, Text 1 (first row, second option from the left). To reproduce the animation effects on this slide, do the following: On the Animations tab, in the Animations group, click Custom Animation . On the slide, select the first text box. In the Custom Animation task pane, do the following: Click Add Effect , point to Entrance , and then click More Effects . In the Add Entrance Effect dialog box, under Basic , click Fly In . Select the animation effect (fly-in effect for the first text box). Click the arrow to the right of the selected effect, and then click Effect Options . In the Fly In dialog box, do the following: On the Effect tab, do the following: In the Direction list, select From Left . In the Animate text list, select By Letter . In the % delay between letters box, enter 10 . On the Timing tab, do the following: In the Start list, select With Previous . In the Speed list, select 0.5 seconds (Very Fast) . On the slide, select the first text box. In the Custom Animation task pane, do the following: Click Add Effect , point to Exit , and then click More Effects . In the Add Exit Effect dialog box, under Subtle , click Fade . Select the second animation effect (fade effect for the first text box). Click the arrow to the right of the selected effect, and then click Effect Options . In the Fade dialog box, do the following: On the Effect tab, do the following: In the Animate text list, select By Letter . In the % delay between letters box, enter 10 . On the Timing tab, do the following: In the Start list, select With Previous . In the Delay box, enter 1.5 . In the Speed list, select 0.5 seconds (Very Fast) . On the slide, select the second text box. In the Custom Animation task pane, do the following. Click Add Effect , point to Entrance , and then click More Effects . In the Add Entrance Effect dialog box, under Subtle , click Fade . Select the third animation effect (fade effect for the second text box). Click the arrow to the right of the selected effect, and then click Effect Options . In the Fade dialog box, do the following: On the Effect tab, do the following: In the Animate text list, select By Letter . In the % delay between letters box, enter 6 . On the Timing tab, do the following: In the Start list, select With Previous . In the Delay box, enter 2 . In the Speed list, select 0.5 seconds (Very Fast) .
A personal letter is written to a friend or family member. A business letter is written to an organization or a company. Business letters should be brief and to the point. They have a proper format which we will discuss. A guideline is three paragraphs, including an introductory paragraph that explains who you are and why you are writing. A main paragraph that includes what you would like the person to whom you are writing to do A final paragraph thanking the addressee for listening
Personal Business Letters are the ones you would most often write. Formal Business Letters are written on Letterhead, such as NorthenHighlands letterhead. Some folks create their own letterhead. We will learn how to do that in a future lesson. IN the mean time we will concentrate on creating Personal Business Letters, which mean you will put your return address in the heading
All parts of the letter are required except for Enclosure and Typist Initials. These are only used under specific conditions Click on the hyperlink to show one sample
There are exact spacing rules for each part of the business letter. The date is always placed in the heading. Your return address (and other optional parts) is mandatory in a Personal Business Letter (not on LetterHead)
The inside address is required. Try to find the exact name and title of the person to whom you are writing. If you cannot, you might try something like Customer Relations Department Manager.
It is best if you know the person’s name and title to write Dear “that”. If you do not know the person’s name, use one of the last two choices.
The letter should be brief and to the point. Ideally, it is no longer than one page. There should not be any unnecessary information in it, but it should contain all important facts. It should succinctly describe your reason for writing the letter, and what you expect the result of your letter to be.
These are samples of acceptable closing statements. Always allow four spaces after your close, so you can sign the printed letter in ink
If you are writing in a specific capacity (e.g. Secretary of Freshman Class), use your title. If not, skip the title line. Put your Title (Miss, Ms, Mr) in the signature, so the person replying knows how to address you.
If there is anything else in the letter or package use Enclosure. If you type this for someone else, or your secretary typed it for you (e.g. Mr. Keenan’s secretary types letters for his signature) the Typists initials should be the last thing on the page
Block is easiest. There is no indenting. Set your paragraphs to Left Justified, and don’t tab anything. Modified Block – set paragraphs to left justified, and set tabs at .5 and 3.5 Tab to 3.5 for all lines in the Heading, Complimentary Close, and Signature Choose: Either tab all paragraphs to .5, or no paragraphs to .5 (BE CONSISTENT)