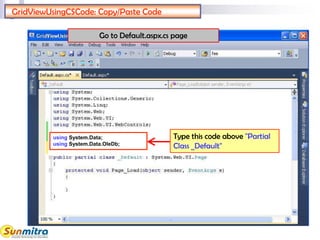
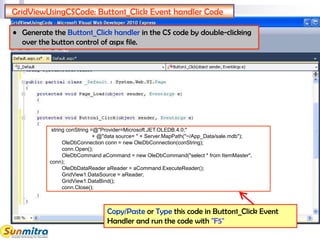
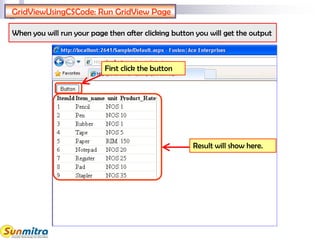
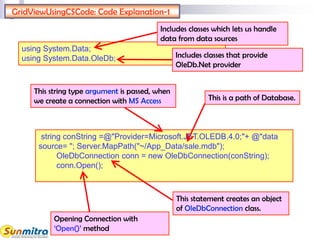
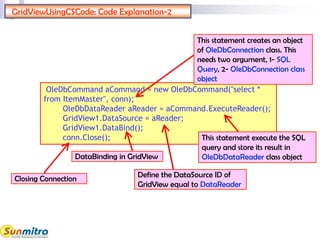
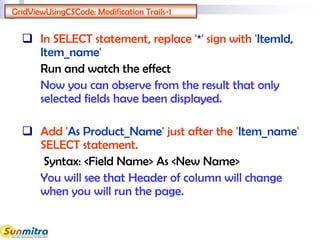
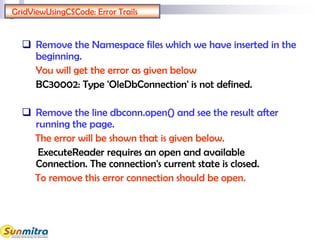
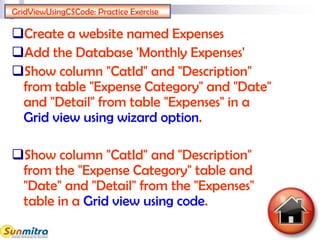
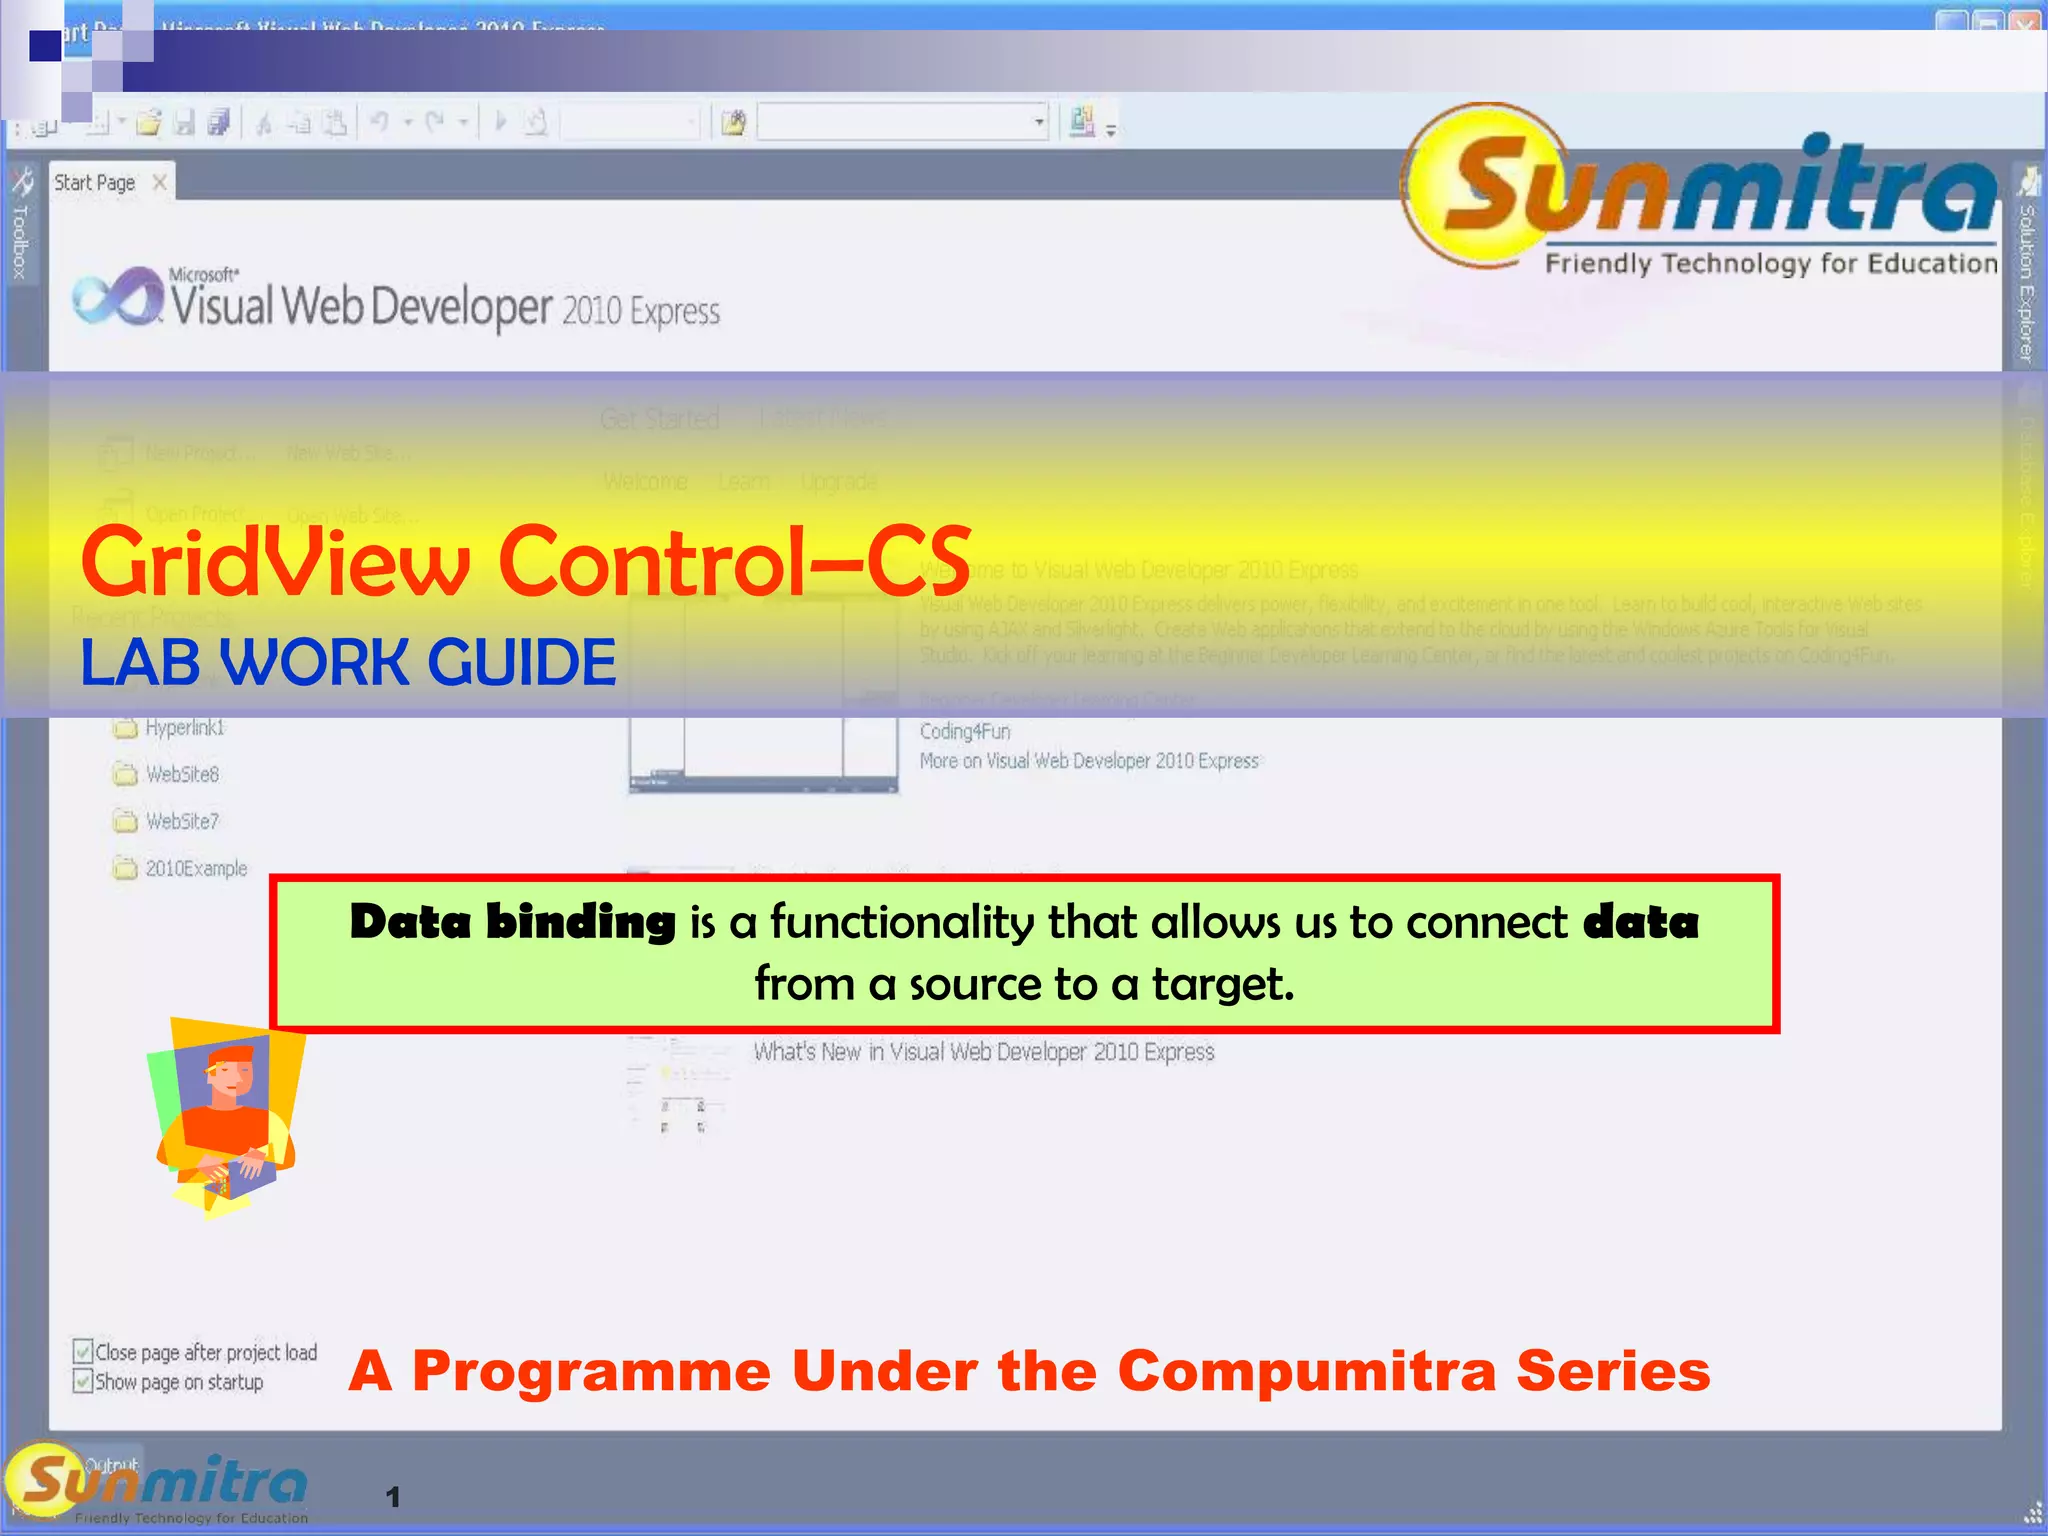
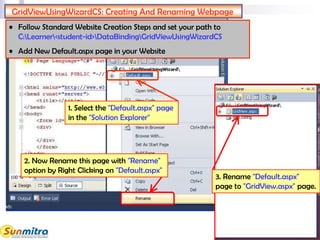
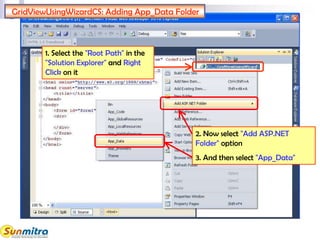
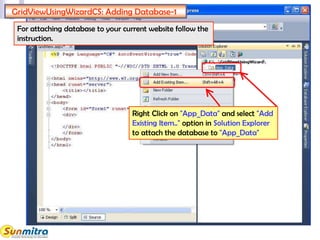
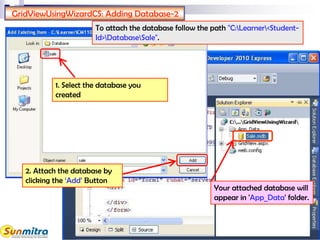
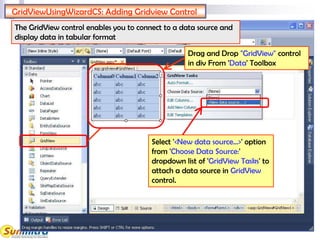
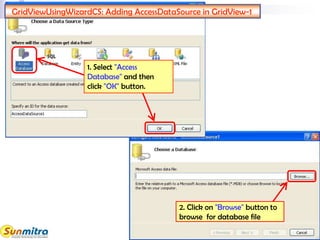
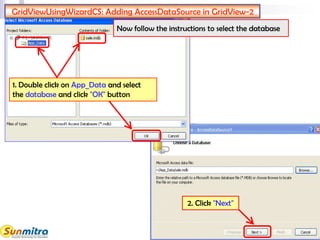
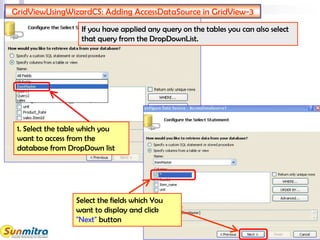
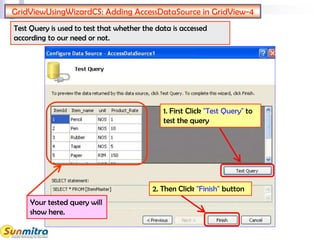
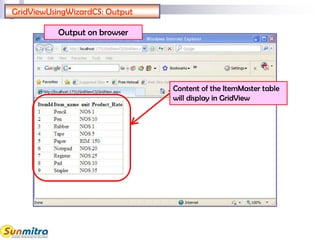
1
A Programme Under the Compumitra Series
GridView Control–CS
LAB WORK GUIDE
Data binding is a functionality that allows us to connect data
from a source to a target.
Data Binding in GridView using wizard
 Example Template Creation.
 Database file addition in App_data
 Data Binding with GridView using wizard
 Output
 Code explanation
 Modification Trials
Data Binding in GridView using CS Code
 Example Template Creation.
 Data Binding with GridView using vb code
 Output
 Code explanation
 Modification Trials
 Error Trials
 Practice Exercise
 Learning Summary Review
 References.
OUTLINE
Data Binding
Using GridView control through wizard
Data binding is a general technique that binds
two data/information sources together and
maintains them in sync.
The GridView control enables you to connect to a
data source and display data in tabular format.
GridViewUsingWizardCS: Creating And Renaming Webpage
2. Now Rename this page with "Rename"
option by Right Clicking on "Default.aspx"
1. Select the "Default.aspx" page
in the "Solution Explorer"
3. Rename "Default.aspx"
page to "GridView.aspx" page.
• Follow Standard Website Creation Steps and set your path to
C:Learner<student-id>DataBindingGridViewUsingWizardCS
• Add New Default.aspx page in your Website
1. Select the "Root Path" in the
"Solution Explorer" and Right
Click on it
2. Now select "Add ASP.NET
Folder" option
3. And then select "App_Data"
GridViewUsingWizardCS: Adding App_Data Folder
Adding Database To App_Data
GridViewUsingWizardCS: Adding Database-1
Right Click on "App_Data" and select "Add
Existing Item.." option in Solution Explorer
to attach the database to "App_Data"
For attaching database to your current website follow the
instruction.
GridViewUsingWizardCS: Adding Database-2
1. Select the database you
created
2. Attach the database by
clicking the ‘Add’ Button
Your attached database will
appear in 'App_Data' folder.
To attach the database follow the path "C:Learner<Student-
Id>DatabaseSale".
GridViewUsingWizardCS: Adding Gridview Control
The GridView control enables you to connect to a data source and
display data in tabular format
Drag and Drop "GridView" control
in div From 'Data' Toolbox
Select '<New data source…>' option
from 'Choose Data Source:'
dropdown list of 'GridView Tasks' to
attach a data source in GridView
control.
GridViewUsingWizardCS: Adding AccessDataSource in GridView-1
1. Select "Access
Database" and then
click "OK" button.
2. Click on "Browse" button to
browse for database file
1. Double click on App_Data and select
the database and click "OK" button
Now follow the instructions to select the database
GridViewUsingWizardCS: Adding AccessDataSource in GridView-2
2. Click "Next"
GridViewUsingWizardCS: Adding AccessDataSource in GridView-3
1. Select the table which you
want to access from the
database from DropDown list
If you have applied any query on the tables you can also select
that query from the DropDownList.
Select the fields which You
want to display and click
"Next" button
GridViewUsingWizardCS: Adding AccessDataSource in GridView-4
1. First Click "Test Query" to
test the query
2. Then Click "Finish" button
Test Query is used to test that whether the data is accessed
according to our need or not.
Your tested query will
show here.
GridViewUsingWizardCS: View Of AccessDataSource
'AccessDataSource' control
will automatically appear
here.
Now Run Code By
pressing 'F5'
GridViewUsingWizardCS: Output
Output on browser
Content of the ItemMaster table
will display in GridView
GridViewUsingWizardCS: Source Code Explanation -1
"AutoGenerateColumn" is
used to generate bound
fields automatically.
This source code describes your attached database
and select query
<asp:GridView ID="GridView1" runat="server" AutoGenerateColumns="False"
DataKeyNames="ItemId" DataSourceID="AccessDataSource1">
<Columns>
<asp:BoundField DataField="ItemId" HeaderText="ItemId" InsertVisible="False"
ReadOnly="True" SortExpression="ItemId" />
<asp:BoundField DataField="Item_name" HeaderText="Item_name"
SortExpression="Item_name" />
<asp:BoundField DataField="unit" HeaderText="unit" SortExpression="unit" />
<asp:BoundField DataField="Product_Rate" HeaderText="Product_Rate"
SortExpression="Product_Rate" />
</Columns>
</asp:GridView>
<asp:AccessDataSource ID="AccessDataSource1" runat="server"
DataFile="~/App_Data/sale.mdb" SelectCommand="SELECT * FROM [ItemMaster]">
</asp:AccessDataSource>
"DataKeyNames" defines
Primary key in the table
"DataSourceID" defines
data source as
"AccessdataSource1"
GridViewUsingWizardCS: Source Code Explanation -2
"DataField" Displays name
of the field
<asp:GridView ID="GridView1" runat="server" AutoGenerateColumns="False"
DataKeyNames="ItemId" DataSourceID="AccessDataSource1">
<Columns>
<asp:BoundField DataField="ItemId" HeaderText="ItemId" InsertVisible="False"
ReadOnly="True" SortExpression="ItemId" />
<asp:BoundField DataField="Item_name" HeaderText="Item_name"
SortExpression="Item_name" />
<asp:BoundField DataField="unit" HeaderText="unit" SortExpression="unit" />
<asp:BoundField DataField="Product_Rate" HeaderText="Product_Rate"
SortExpression="Product_Rate" />
</Columns>
</asp:GridView>
<asp:AccessDataSource ID="AccessDataSource1" runat="server"
DataFile="~/App_Data/sale.mdb" SelectCommand="SELECT * FROM [ItemMaster]">
</asp:AccessDataSource>
"BoundField" is to define
different fields in the
GridView.
"SortExpression" Defines
name of the field on which
sorting can be performed
"HeaderText" shows Header
name of the column
GridViewUsingWizardCS: Modification trials
 Select "All Fields" query instead of "ItemMaster" and observe
the difference.
You will see that you are getting the data from all the
tables.
 Instead of selecting ‘*’ while selecting columns select any three
column and see the difference.
Now you can observe from the result that only selected fields
are showing.
 Change the Header Text of column "Item_name" from
"Item_name" to "Product Name" and see the difference after
running the page.
You will see that Header of column is changed.
Data Binding
Using GridView control through CS Code
Data binding provides a simple and consistent
way for applications to present and interact
with data.
The GridView control enables you to connect to
a data source and display data in tabular
format.
GridViewUsingCSCode: .aspx File Creation
1. Drag and Drop a 'Button' control
in div from Standard Toolbox
• Follow Standard Website Creation Steps and set your path to
"C:Learner<student-id>DataBindingGridViewUsingCSCode"
• Add New Default.aspx page in your Website
2. Introduce a new line and Drag and Drop
a 'GridView' control from Data Toolbox
•Add the 'App_Data' folder
•To add the database, follow the path "C:Learner<Student-
Id>DatabaseSale".
GridViewUsingCSCode: Adding Database
1. Add 'App_Data' folder
2. And Database 'Sale.mdb' in
App_Data like previous exercise.
GridViewUsingCSCode: Copy/Paste Code
using System.Data;
using System.Data.OleDb;
Type this code above "Partial
Class _Default"
Go to Default.aspx.cs page
GridViewUsingCSCode: Button1_Click Event handler Code
string conString =@"Provider=Microsoft.JET.OLEDB.4.0;"
+ @"data source= " + Server.MapPath("~/App_Data/sale.mdb");
OleDbConnection conn = new OleDbConnection(conString);
conn.Open();
OleDbCommand aCommand = new OleDbCommand("select * from ItemMaster",
conn);
OleDbDataReader aReader = aCommand.ExecuteReader();
GridView1.DataSource = aReader;
GridView1.DataBind();
conn.Close();
• Generate the Button1_Click handler in the CS code by double-clicking
over the button control of aspx file.
Copy/Paste or Type this code in Button1_Click Event
Handler and run the code with "F5"
GridViewUsingCSCode: Run GridView Page
First click the button
Result will show here.
When you will run your page then after clicking button you will get the output
GridViewUsingCSCode: Code Explanation-1
string conString =@"Provider=Microsoft.JET.OLEDB.4.0;"+ @"data
source= "; Server.MapPath("~/App_Data/sale.mdb");
OleDbConnection conn = new OleDbConnection(conString);
conn.Open();
Opening Connection with
‘Open()’ method
This string type argument is passed, when
we create a connection with MS Access
This statement creates an object
of OleDbConnection class.
This is a path of Database.
using System.Data;
using System.Data.OleDb;
Includes classes which lets us handle
data from data sources
Includes classes that provide
OleDb.Net provider
GridViewUsingCSCode: Code Explanation-2
OleDbCommand aCommand = new OleDbCommand("select *
from ItemMaster", conn);
OleDbDataReader aReader = aCommand.ExecuteReader();
GridView1.DataSource = aReader;
GridView1.DataBind();
conn.Close();
Define the DataSource ID of
GridView equal to DataReader
This statement execute the SQL
query and store its result in
OleDbDataReader class object
This statement creates an object
of OleDbConnection class. This
needs two argument, 1- SQL
Query, 2- OleDbConnection class
object
DataBinding in GridView
Closing Connection
GridViewUsingCSCode: Modification Trails-1
 In SELECT statement, replace '*' sign with 'ItemId,
Item_name'
Run and watch the effect
Now you can observe from the result that only
selected fields have been displayed.
 Add 'As Product_Name' just after the 'Item_name'
SELECT statement.
Syntax: <Field Name> As <New Name>
You will see that Header of column will change
when you will run the page.
GridViewUsingCSCode: Modification Trails-2
 Click on 'Auto Format…' link in 'GridView
Task' and select the 'scheme' equal to 'Black
& Blue 2'
Run and watch the effect
GridViewUsingCSCode: Error Trails
 Remove the Namespace files which we have inserted in the
beginning.
You will get the error as given below
BC30002: Type 'OleDbConnection' is not defined.
 Remove the line dbconn.open() and see the result after
running the page.
The error will be shown that is given below.
ExecuteReader requires an open and available
Connection. The connection's current state is closed.
To remove this error connection should be open.
GridViewUsingCSCode: Practice Exercise
Create a website named Expenses
Add the Database 'Monthly Expenses'
Show column "CatId" and "Description"
from table "Expense Category" and "Date"
and "Detail" from table "Expenses" in a
Grid view using wizard option.
Show column "CatId" and "Description"
from the "Expense Category" table and
"Date" and "Detail" from the "Expenses"
table in a Grid view using code.
GridViewUsingCSCode: Learning Summary Review
Use of GridView control
Adding database to App_Data.
Linking of MS Access database with Grid View
through wizard.
Linking of MS Access database with Grid View
through Code.
Use of OleDb classes.
Bibliography
http://msdn.microsoft.com/en-
us/library/fbk67b6z.aspx
http://www.w3Schools.com
http://www.switchonthecode.com/tutorials/csharp-
tutorial-binding-a-datagridview-to-a-database
http://www.codeproject.com/KB/aspnet/DataGridVi
ew__GridView.aspx
http://www.codersource.net/asp-net/asp-net-2-
0/grid-view-control-in-asp-net-2-0.aspx
Ask and guide me at
sunmitraeducation@gmail.com
Share this information with as many people as
possible.
Keep visiting www.sunmitra.com for
programme updates.

Grid View Control CS

  • 1.
    1 A Programme Underthe Compumitra Series GridView Control–CS LAB WORK GUIDE Data binding is a functionality that allows us to connect data from a source to a target.
  • 2.
    Data Binding inGridView using wizard  Example Template Creation.  Database file addition in App_data  Data Binding with GridView using wizard  Output  Code explanation  Modification Trials Data Binding in GridView using CS Code  Example Template Creation.  Data Binding with GridView using vb code  Output  Code explanation  Modification Trials  Error Trials  Practice Exercise  Learning Summary Review  References. OUTLINE
  • 3.
    Data Binding Using GridViewcontrol through wizard Data binding is a general technique that binds two data/information sources together and maintains them in sync. The GridView control enables you to connect to a data source and display data in tabular format.
  • 4.
    GridViewUsingWizardCS: Creating AndRenaming Webpage 2. Now Rename this page with "Rename" option by Right Clicking on "Default.aspx" 1. Select the "Default.aspx" page in the "Solution Explorer" 3. Rename "Default.aspx" page to "GridView.aspx" page. • Follow Standard Website Creation Steps and set your path to C:Learner<student-id>DataBindingGridViewUsingWizardCS • Add New Default.aspx page in your Website
  • 5.
    1. Select the"Root Path" in the "Solution Explorer" and Right Click on it 2. Now select "Add ASP.NET Folder" option 3. And then select "App_Data" GridViewUsingWizardCS: Adding App_Data Folder
  • 6.
  • 7.
    GridViewUsingWizardCS: Adding Database-1 RightClick on "App_Data" and select "Add Existing Item.." option in Solution Explorer to attach the database to "App_Data" For attaching database to your current website follow the instruction.
  • 8.
    GridViewUsingWizardCS: Adding Database-2 1.Select the database you created 2. Attach the database by clicking the ‘Add’ Button Your attached database will appear in 'App_Data' folder. To attach the database follow the path "C:Learner<Student- Id>DatabaseSale".
  • 9.
    GridViewUsingWizardCS: Adding GridviewControl The GridView control enables you to connect to a data source and display data in tabular format Drag and Drop "GridView" control in div From 'Data' Toolbox Select '<New data source…>' option from 'Choose Data Source:' dropdown list of 'GridView Tasks' to attach a data source in GridView control.
  • 10.
    GridViewUsingWizardCS: Adding AccessDataSourcein GridView-1 1. Select "Access Database" and then click "OK" button. 2. Click on "Browse" button to browse for database file
  • 11.
    1. Double clickon App_Data and select the database and click "OK" button Now follow the instructions to select the database GridViewUsingWizardCS: Adding AccessDataSource in GridView-2 2. Click "Next"
  • 12.
    GridViewUsingWizardCS: Adding AccessDataSourcein GridView-3 1. Select the table which you want to access from the database from DropDown list If you have applied any query on the tables you can also select that query from the DropDownList. Select the fields which You want to display and click "Next" button
  • 13.
    GridViewUsingWizardCS: Adding AccessDataSourcein GridView-4 1. First Click "Test Query" to test the query 2. Then Click "Finish" button Test Query is used to test that whether the data is accessed according to our need or not. Your tested query will show here.
  • 14.
    GridViewUsingWizardCS: View OfAccessDataSource 'AccessDataSource' control will automatically appear here. Now Run Code By pressing 'F5'
  • 15.
    GridViewUsingWizardCS: Output Output onbrowser Content of the ItemMaster table will display in GridView
  • 16.
    GridViewUsingWizardCS: Source CodeExplanation -1 "AutoGenerateColumn" is used to generate bound fields automatically. This source code describes your attached database and select query <asp:GridView ID="GridView1" runat="server" AutoGenerateColumns="False" DataKeyNames="ItemId" DataSourceID="AccessDataSource1"> <Columns> <asp:BoundField DataField="ItemId" HeaderText="ItemId" InsertVisible="False" ReadOnly="True" SortExpression="ItemId" /> <asp:BoundField DataField="Item_name" HeaderText="Item_name" SortExpression="Item_name" /> <asp:BoundField DataField="unit" HeaderText="unit" SortExpression="unit" /> <asp:BoundField DataField="Product_Rate" HeaderText="Product_Rate" SortExpression="Product_Rate" /> </Columns> </asp:GridView> <asp:AccessDataSource ID="AccessDataSource1" runat="server" DataFile="~/App_Data/sale.mdb" SelectCommand="SELECT * FROM [ItemMaster]"> </asp:AccessDataSource> "DataKeyNames" defines Primary key in the table "DataSourceID" defines data source as "AccessdataSource1"
  • 17.
    GridViewUsingWizardCS: Source CodeExplanation -2 "DataField" Displays name of the field <asp:GridView ID="GridView1" runat="server" AutoGenerateColumns="False" DataKeyNames="ItemId" DataSourceID="AccessDataSource1"> <Columns> <asp:BoundField DataField="ItemId" HeaderText="ItemId" InsertVisible="False" ReadOnly="True" SortExpression="ItemId" /> <asp:BoundField DataField="Item_name" HeaderText="Item_name" SortExpression="Item_name" /> <asp:BoundField DataField="unit" HeaderText="unit" SortExpression="unit" /> <asp:BoundField DataField="Product_Rate" HeaderText="Product_Rate" SortExpression="Product_Rate" /> </Columns> </asp:GridView> <asp:AccessDataSource ID="AccessDataSource1" runat="server" DataFile="~/App_Data/sale.mdb" SelectCommand="SELECT * FROM [ItemMaster]"> </asp:AccessDataSource> "BoundField" is to define different fields in the GridView. "SortExpression" Defines name of the field on which sorting can be performed "HeaderText" shows Header name of the column
  • 18.
    GridViewUsingWizardCS: Modification trials Select "All Fields" query instead of "ItemMaster" and observe the difference. You will see that you are getting the data from all the tables.  Instead of selecting ‘*’ while selecting columns select any three column and see the difference. Now you can observe from the result that only selected fields are showing.  Change the Header Text of column "Item_name" from "Item_name" to "Product Name" and see the difference after running the page. You will see that Header of column is changed.
  • 19.
    Data Binding Using GridViewcontrol through CS Code Data binding provides a simple and consistent way for applications to present and interact with data. The GridView control enables you to connect to a data source and display data in tabular format.
  • 20.
    GridViewUsingCSCode: .aspx FileCreation 1. Drag and Drop a 'Button' control in div from Standard Toolbox • Follow Standard Website Creation Steps and set your path to "C:Learner<student-id>DataBindingGridViewUsingCSCode" • Add New Default.aspx page in your Website 2. Introduce a new line and Drag and Drop a 'GridView' control from Data Toolbox
  • 21.
    •Add the 'App_Data'folder •To add the database, follow the path "C:Learner<Student- Id>DatabaseSale". GridViewUsingCSCode: Adding Database 1. Add 'App_Data' folder 2. And Database 'Sale.mdb' in App_Data like previous exercise.
  • 22.
    GridViewUsingCSCode: Copy/Paste Code usingSystem.Data; using System.Data.OleDb; Type this code above "Partial Class _Default" Go to Default.aspx.cs page
  • 23.
    GridViewUsingCSCode: Button1_Click Eventhandler Code string conString =@"Provider=Microsoft.JET.OLEDB.4.0;" + @"data source= " + Server.MapPath("~/App_Data/sale.mdb"); OleDbConnection conn = new OleDbConnection(conString); conn.Open(); OleDbCommand aCommand = new OleDbCommand("select * from ItemMaster", conn); OleDbDataReader aReader = aCommand.ExecuteReader(); GridView1.DataSource = aReader; GridView1.DataBind(); conn.Close(); • Generate the Button1_Click handler in the CS code by double-clicking over the button control of aspx file. Copy/Paste or Type this code in Button1_Click Event Handler and run the code with "F5"
  • 24.
    GridViewUsingCSCode: Run GridViewPage First click the button Result will show here. When you will run your page then after clicking button you will get the output
  • 25.
    GridViewUsingCSCode: Code Explanation-1 stringconString =@"Provider=Microsoft.JET.OLEDB.4.0;"+ @"data source= "; Server.MapPath("~/App_Data/sale.mdb"); OleDbConnection conn = new OleDbConnection(conString); conn.Open(); Opening Connection with ‘Open()’ method This string type argument is passed, when we create a connection with MS Access This statement creates an object of OleDbConnection class. This is a path of Database. using System.Data; using System.Data.OleDb; Includes classes which lets us handle data from data sources Includes classes that provide OleDb.Net provider
  • 26.
    GridViewUsingCSCode: Code Explanation-2 OleDbCommandaCommand = new OleDbCommand("select * from ItemMaster", conn); OleDbDataReader aReader = aCommand.ExecuteReader(); GridView1.DataSource = aReader; GridView1.DataBind(); conn.Close(); Define the DataSource ID of GridView equal to DataReader This statement execute the SQL query and store its result in OleDbDataReader class object This statement creates an object of OleDbConnection class. This needs two argument, 1- SQL Query, 2- OleDbConnection class object DataBinding in GridView Closing Connection
  • 27.
    GridViewUsingCSCode: Modification Trails-1 In SELECT statement, replace '*' sign with 'ItemId, Item_name' Run and watch the effect Now you can observe from the result that only selected fields have been displayed.  Add 'As Product_Name' just after the 'Item_name' SELECT statement. Syntax: <Field Name> As <New Name> You will see that Header of column will change when you will run the page.
  • 28.
    GridViewUsingCSCode: Modification Trails-2 Click on 'Auto Format…' link in 'GridView Task' and select the 'scheme' equal to 'Black & Blue 2' Run and watch the effect
  • 29.
    GridViewUsingCSCode: Error Trails Remove the Namespace files which we have inserted in the beginning. You will get the error as given below BC30002: Type 'OleDbConnection' is not defined.  Remove the line dbconn.open() and see the result after running the page. The error will be shown that is given below. ExecuteReader requires an open and available Connection. The connection's current state is closed. To remove this error connection should be open.
  • 30.
    GridViewUsingCSCode: Practice Exercise Createa website named Expenses Add the Database 'Monthly Expenses' Show column "CatId" and "Description" from table "Expense Category" and "Date" and "Detail" from table "Expenses" in a Grid view using wizard option. Show column "CatId" and "Description" from the "Expense Category" table and "Date" and "Detail" from the "Expenses" table in a Grid view using code.
  • 31.
    GridViewUsingCSCode: Learning SummaryReview Use of GridView control Adding database to App_Data. Linking of MS Access database with Grid View through wizard. Linking of MS Access database with Grid View through Code. Use of OleDb classes.
  • 32.
  • 33.
    Ask and guideme at sunmitraeducation@gmail.com Share this information with as many people as possible. Keep visiting www.sunmitra.com for programme updates.