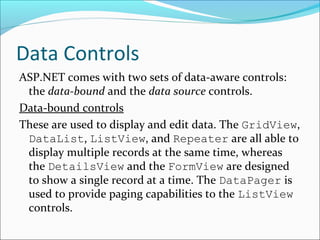
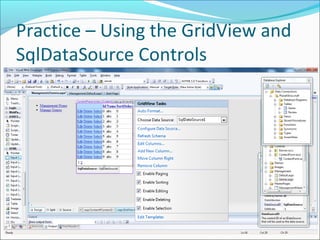
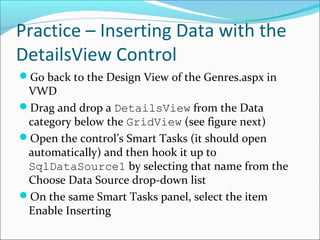
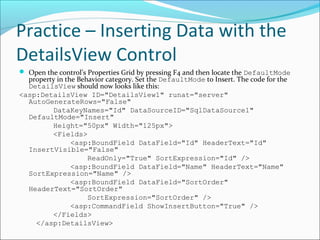
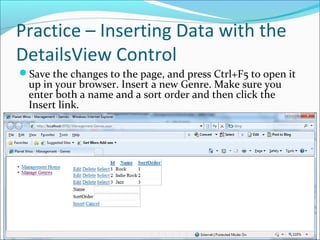
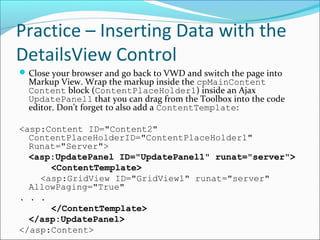
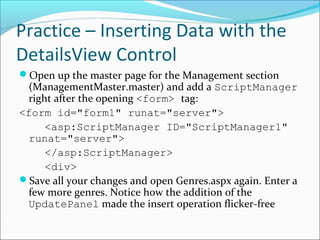
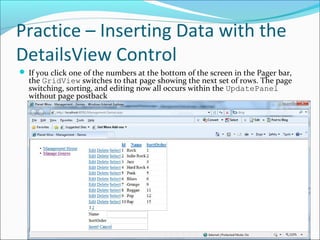
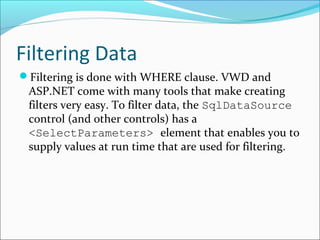
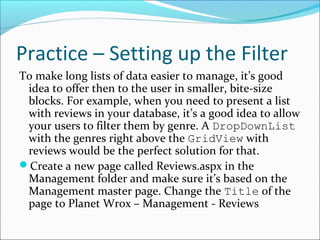
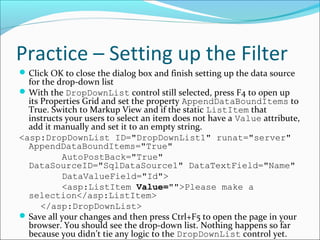
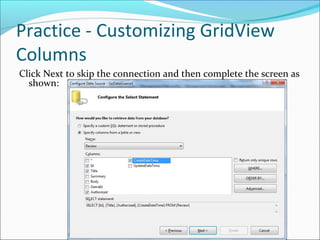
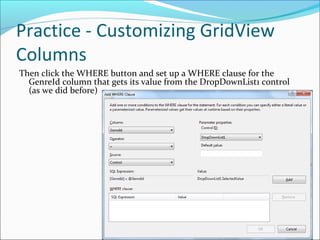
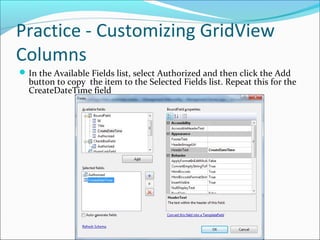
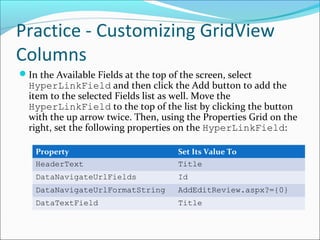
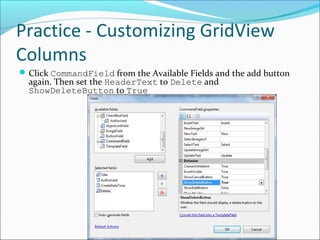
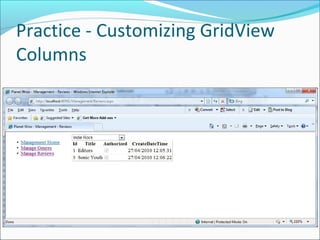
Chapter 12 – Displaying and Updating Data
Dr. Stephanos Mavromoustakos
Chapter Overview
This chapter will cover:
Controls that display and maintain data in your web site
How to display data using the GridView control
How to access the database to retrieve and update data
using a SqlDataSource control
How to insert, edit, and delete data using the data
controls like the GridView and the DetailsView
How to create a rich interface that allows a user to insert
and edit data while maintaining data integrity with the
ASP.NET validation controls
The best way to store your connection strings in your
application so they are easily updateable
Data Controls
ASP.NET comes with two sets of data-aware controls:
the data-bound and the data source controls.
Data-bound controls
These are used to display and edit data. The GridView,
DataList, ListView, and Repeater are all able to
display multiple records at the same time, whereas
the DetailsView and the FormView are designed
to show a single record at a time. The DataPager is
used to provide paging capabilities to the ListView
controls.
Data Controls
List Controls
GridView – Supports automatic paging, sorting, editing,
deleting, and selecting. It does not allow you to insert records in
the data source directly. It is often used for complex list of data,
such as a list of reviews in the management section of the
PlanetWrox web site, items in a shopping cart, and so on
DataList – Presents your data not only in rows as with the
GridView, but in columns as well. Also, you can define the
look and feel of the data through a set of templates. As a
downside, the control does not support paging and sorting
natively, and doesn’t allow you to insert new records or update
or delete existing ones. It is often used to display repeating data
in rows and columns, e.g. pictures in a photo album or products
in a product catalog.
Data Controls
Repeater – It gives you the greatest flexibility in terms of
the HTML that you output to the browser as the control
by itself does not add any HTML to the page output. The
control has no built-in capabilities for the paging, sorting
and modification of data. It is often used when you need
precise control over the markup that is generated by the
control. As such, it’s often used for HTML ordered or
unordered lists (<ol> and <ul>), etc.
ListView – New to the ASP.NET 3.5, it is a very good
combination of the GridView, the DataList, and the
Repeater. It supports editing, deleting, and paging of
data, multi-column and multi-row layouts, and it allows
you to completely control the markup generated by the
control, just as the Repeater does.
Data Controls
Single Item Controls - Display one record at a time
DetailsView – It uses a built-in tabular form to
display data
FormView – It uses templates to let you define the
look and feel of your data
Paging Controls
DataPager – It enables paging on other controls
Data Controls
Data Source Controls
These are used to bind data to your data-bound
controls. The XmlDataSource and
SiteMapSource, are used to bind hierarchical,
XML-based data to these controls.
The AccessDataSource is used to display data from
a Microsoft Access database in your web pages.
The ObjectDataSource allows you to connect your
data-bound controls to separate objects in your
application.
Practice – Using the GridView and
SqlDataSource Controls
In this exercise, you start building the Management
section of the web site that will be your main entry
point to manage things like reviews and genres in
your site.
Open the Planet Wrox project
Right-click the MasterPages folder, choose Add New
Item, and add a new Master Page called
ManagementMaster.master to the site. Make sure it’s
not based on an existing master page (see figure next)
Practice – Using the GridView and
SqlDataSource Controls
Practice – Using the GridView and
SqlDataSource Controls
 Change the HTML inside the <form> element to the following code.
<form id="form1" runat="server">
<div>
<div style="width: 200px; float: left;">
<ul>
<li><a href="~/Management/Default.aspx"
runat="server">Management Home</a></li>
<li><a href="~/Management/Genres.aspx"
runat="server">Manage Genres</a></li>
</ul>
</div>
<div style="width: 750px; float: left;">
<asp:ContentPlaceHolder id="ContentPlaceHolder1"
runat="server"></asp:ContentPlaceHolder>
</div>
</div>
</form>
Practice – Using the GridView and
SqlDataSource Controls
Add a new folder to the root of the site and call it Management.
Right-click this new folder, choose Add New Item, and create a
new page called Default.aspx. Make sure the page is based on
the new ManagementMaster.master file
Practice – Using the GridView and
SqlDataSource Controls
Add some text to the cpMainContent block:
<asp:Content ID="Content2"
ContentPlaceHolderID="ContentPlaceHolder1"
Runat="Server">
<h1>Planet Wrox Management Section</h1>
<p>Welcome to the Management Section of this
web site. Please choose an item from the
menu on the left to continue.</p>
</asp:Content>
Give the page a Title of Planet Wrox – Management -
Home
Practice – Using the GridView and
SqlDataSource Controls
Create another page in the Management folder and call it
Genres.aspx. Base it on the same master page and then
change its Title to Planet Wrox – Management – Genres
Switch the page into Design View. Expand the
PlanetWrox.mdf database from the Database Exxplorer,
and then the Tables node. Then drag the Genre table from
the Database Explorer and drop it in the cpMainContent
area of the Genres page. VWD creates a GridView and a
SqlDataSource for you automatically
On the Smart Tasks panel for the GridView control that
should open automatically, select all the available options
as shown:
Practice – Using the GridView and
SqlDataSource Controls
Practice – Using the GridView and
SqlDataSource Controls
Right-click the Management folder and choose Add New Item.
Click Web Configuration File once and then click Add to add a
web.config file that applies to the Management folder only. In
the file that opens, add a <pages> element between the
<system.web> elements that sets the theme to an empty
string:
<system.web>
<pages theme=""></pages>
</system.web>
Save all changes and request Genres.aspx from the Management
folder in your browser. The links in the left columns allow you
to edit, delete, and select the relevant genres. Note that you
can’t delete genres that have reviews attached to them. If the
list with reviews ends up below the menu on the left, you may
need to make your browser window a little wider
Practice – Using the GridView and
SqlDataSource Controls
You can click the column headers to sort the data in the grid on
that column. If you click the same header again, the data is
sorted in reversed order
Click the Edit link for one of the genres, change the name in the
text box that has appeared and click the Update button. The
GridView should now display the new name
Inserting Data with DetailsView
The DetailsView has a <FooterTemplate>, a
<HeaderTemplate>, and a <PageTemplate>
element that enable you to define the looks of the top
and bottom parts of the control. In addition, the
control has a <Fields> element that allows you to
define the rows that should appear in the control.
The DetailsView allows you to display records in
read-only mode, to insert new records, and to update
records. You control the mode of the DetailsView
with the DefaultMode property that you can set to
ReadOnly, Insert, and Edit.
Practice – Inserting Data with the
DetailsView Control
Go back to the Design View of the Genres.aspx in
VWD
Drag and drop a DetailsView from the Data
category below the GridView (see figure next)
Open the control’s Smart Tasks (it should open
automatically) and then hook it up to
SqlDataSource1 by selecting that name from the
Choose Data Source drop-down list
On the same Smart Tasks panel, select the item
Enable Inserting
Practice – Inserting Data with the
DetailsView Control
Practice – Inserting Data with the
DetailsView Control
 Open the control’s Properties Grid by pressing F4 and then locate the DefaultMode
property in the Behavior category. Set the DefaultMode to Insert. The code for the
DetailsView should now looks like this:
<asp:DetailsView ID="DetailsView1" runat="server"
AutoGenerateRows="False"
DataKeyNames="Id" DataSourceID="SqlDataSource1"
DefaultMode="Insert"
Height="50px" Width="125px">
<Fields>
<asp:BoundField DataField="Id" HeaderText="Id"
InsertVisible="False"
ReadOnly="True" SortExpression="Id" />
<asp:BoundField DataField="Name" HeaderText="Name"
SortExpression="Name" />
<asp:BoundField DataField="SortOrder"
HeaderText="SortOrder"
SortExpression="SortOrder" />
<asp:CommandField ShowInsertButton="True" />
</Fields>
</asp:DetailsView>
Practice – Inserting Data with the
DetailsView Control
Save the changes to the page, and press Ctrl+F5 to open it
up in your browser. Insert a new Genre. Make sure you
enter both a name and a sort order and then click the
Insert link.
Practice – Inserting Data with the
DetailsView Control
Close your browser and go back to VWD and switch the page into
Markup View. Wrap the markup inside the cpMainContent
Content block (ContentPlaceHolder1) inside an Ajax
UpdatePanel1 that you can drag from the Toolbox into the code
editor. Don’t forget to also add a ContentTemplate:
<asp:Content ID="Content2"
ContentPlaceHolderID="ContentPlaceHolder1"
Runat="Server">
<asp:UpdatePanel ID="UpdatePanel1" runat="server">
<ContentTemplate>
<asp:GridView ID="GridView1" runat="server"
AllowPaging="True"
. . .
</ContentTemplate>
</asp:UpdatePanel>
</asp:Content>
Practice – Inserting Data with the
DetailsView Control
Open up the master page for the Management section
(ManagementMaster.master) and add a ScriptManager
right after the opening <form> tag:
<form id="form1" runat="server">
<asp:ScriptManager ID="ScriptManager1"
runat="server">
</asp:ScriptManager>
<div>
Save all your changes and open Genres.aspx again. Enter a
few more genres. Notice how the addition of the
UpdatePanel made the insert operation flicker-free
Practice – Inserting Data with the
DetailsView Control
 If you click one of the numbers at the bottom of the screen in the Pager bar,
the GridView switches to that page showing the next set of rows. The page
switching, sorting, and editing now all occurs within the UpdatePanel
without page postback
Filtering Data
Filtering is done with WHERE clause. VWD and
ASP.NET come with many tools that make creating
filters very easy. To filter data, the SqlDataSource
control (and other controls) has a
<SelectParameters> element that enables you to
supply values at run time that are used for filtering.
Practice – Setting up the Filter
To make long lists of data easier to manage, it’s good
idea to offer then to the user in smaller, bite-size
blocks. For example, when you need to present a list
with reviews in your database, it’s a good idea to allow
your users to filter them by genre. A DropDownList
with the genres right above the GridView with
reviews would be the perfect solution for that.
Create a new page called Reviews.aspx in the
Management folder and make sure it’s based on the
Management master page. Change the Title of the
page to Planet Wrox – Management - Reviews
Practice – Setting up the Filter
Add a link to this page in the master page for the Management
section:
<li><a href="~/Management/Genres.aspx"
runat="server">Manage Genres</a></li>
<li><a
href="~/Management/Reviews.aspx"
runat="server">Manage Reviews</a></li>
</ul>
Go back to Reviews.aspx and switch the page into Design View.
From the Standard category of the Toolbox, drag a
DropDownList control into the page. On its Smart Tasks
panel, select Enable AutoPostBack and then click the Edit Items
link. Insert an item with its Text set to Please make a
selection, and then clear its Value that was inserted for you
automatically.
Practice – Setting up the Filter
Click the Choose Data Source dialog box and choose <New
data source> from the drop-down list.
Click Database, leave the ID set to SqlDataSource1, and
click OK
In the dialog box that follows, select the connection string
called PlanetWroxConnectionString1 from the drop-down
list and click Next
Verify that the radio button for Specify Columns from a
Table or View is selected. Also ensure that Genre is
selected in the drop-down list with table names and then
select the Id and Name columns in the Columns section.
Click the ORDER BY button and choose SortOrder from
the Sort by drop-down list and click OK. (see figure next)
Practice – Setting up the Filter
Click Next and then Finish. Choose Name for the first drop-
down list. Leave the second drop-down list set to Id.
Practice – Setting up the Filter
Click OK to close the dialog box and finish setting up the data source
for the drop-down list
With the DropDownList control still selected, press F4 to open up
its Properties Grid and set the property AppendDataBoundItems to
True. Switch to Markup View and if the static ListItem that
instructs your users to select an item does not have a Value attribute,
add it manually and set it to an empty string.
<asp:DropDownList ID="DropDownList1" runat="server"
AppendDataBoundItems="True"
AutoPostBack="True"
DataSourceID="SqlDataSource1" DataTextField="Name"
DataValueField="Id">
<asp:ListItem Value="">Please make a
selection</asp:ListItem>
</asp:DropDownList>
Save all your changes and then press Ctrl+F5 to open the page in your
browser. You should see the drop-down list. Nothing happens so far
because you didn’t tie any logic to the DropDownList control yet.
Practice – Setting up the Filter
Practice – Applying the Filter
Switch the page Reviews.aspx to Design View and drag a
GridView on top of the existing SqlDataSource control.
The GridView is added right above it and the Smart Tasks
panel opens
In the Choose Data Source drop-down list, choose <New data
source>. In the Data Source Configuration Wizard, click
Database and click OK
In the dialog box that follows, select the Planet Wrox
connection string from the drop-down list and click Next again
Select the Review table in the Name drop-down list and then
click the asterisk (*) in the Columns list
Click the WHERE button and in the dialog box that follows
enter the details as shown in the next figure:
Practice – Applying the Filter
Each of
your
controls
may show
up twice in
the control
ID drop-
down list.
It doesn’t
matter
which of
the
DropDown
List1
options you
choose
Practice – Applying the Filter
Click the Add button and then click OK
Back in the Configure Data Source wizard, click Next.
To test the query, click the Test Query button. Enter a
number at Value that you know exists in the Genre
table and click OK. If there are records in the Review
table for the chosen genre, they are displayed in the
Test Query window.
Practice – Applying the Filter
Finally, click Finish to finalize the wizard. If you get a dialog
box about refreshing parameters, click Yes.
Practice – Applying the Filter
Wrap the markup inside the cpMainContent Content block
(ContentPlaceHolder1) inside an Ajax UpdatePanel1 that you
can drag from the Toolbox into the code editor. Don’t forget to also
add a ContentTemplate:
<asp:Content ID="Content2"
ContentPlaceHolderID="ContentPlaceHolder1"
Runat="Server">
<asp:UpdatePanel ID="UpdatePanel1"
runat="server">
<ContentTemplate>
. . .
</ContentTemplate>
</asp:UpdatePanel>
</asp:Content>
Save all your changes and open Reviews.aspx in your browser. If you
get an error, ensure that you set the Value of the static ListItem in
the drop-down list to an empty string(““)
Practice – Applying the Filter
Select a new item in the drop-down list. The page refreshes, and
now shows the reviews that belong to the chosen genre.
Practice - Customizing GridView
Columns
In Reviews.aspx, open the Smart Tasks panel for the
SqlDataSource2 control and click Configure Data Source
Practice - Customizing GridView
Columns
Click Next to skip the connection and then complete the screen as
shown:
Practice - Customizing GridView
Columns
Then click the WHERE button and set up a WHERE clause for the
GenreId column that gets its value from the DropDownList1 control
(as we did before)
Practice - Customizing GridView
Columns
Click the Advanced button and have VWD generate
commands for the INSERT, UPDATE, and DELETE
statements. Leave the Optimistic Concurrency check box
unchecked. Click OK to close the Advanced SQL
Generation Options dialog box, then click Next and finally
Finish to update the SQL statement in the source for the
page. When asked whether you want to reset the fields
and keys for the GridView, click Yes
Open the Smart Tasks panel for the GridView and click
Edit Columns. If the Selected Fields list already contains
items, use the Delete button to clear the list first.
Practice - Customizing GridView
Columns
In the Available Fields list, select Authorized and then click the Add
button to copy the item to the Selected Fields list. Repeat this for the
CreateDateTime field
Practice - Customizing GridView
Columns
In the Available Fields at the top of the screen, select
HyperLinkField and then click the Add button to add the
item to the selected Fields list as well. Move the
HyperLinkField to the top of the list by clicking the button
with the up arrow twice. Then, using the Properties Grid on the
right, set the following properties on the HyperLinkField:
Property Set Its Value To
HeaderText Title
DataNavigateUrlFields Id
DataNavigateUrlFormatString AddEditReview.aspx?={0}
DataTextField Title
Practice - Customizing GridView
Columns
Click CommandField from the Available Fields and the add button
again. Then set the HeaderText to Delete and
ShowDeleteButton to True
Practice - Customizing GridView
Columns
Click the Authorized column in the Selected Fields
list and then click the blue “Convert This Field into a
TemplateField” link at the bottom right of the dialog
box.
Click the CreateDateTime column on the left and
set its DataFormatString to {0:g}
Click OK to apply the changes
Save all your changes and request the Reviews.aspx in
the browser.
Practice - Customizing GridView
Columns

Chapter12 (1)

  • 1.
    Chapter 12 –Displaying and Updating Data Dr. Stephanos Mavromoustakos
  • 2.
    Chapter Overview This chapterwill cover: Controls that display and maintain data in your web site How to display data using the GridView control How to access the database to retrieve and update data using a SqlDataSource control How to insert, edit, and delete data using the data controls like the GridView and the DetailsView How to create a rich interface that allows a user to insert and edit data while maintaining data integrity with the ASP.NET validation controls The best way to store your connection strings in your application so they are easily updateable
  • 3.
    Data Controls ASP.NET comeswith two sets of data-aware controls: the data-bound and the data source controls. Data-bound controls These are used to display and edit data. The GridView, DataList, ListView, and Repeater are all able to display multiple records at the same time, whereas the DetailsView and the FormView are designed to show a single record at a time. The DataPager is used to provide paging capabilities to the ListView controls.
  • 4.
    Data Controls List Controls GridView– Supports automatic paging, sorting, editing, deleting, and selecting. It does not allow you to insert records in the data source directly. It is often used for complex list of data, such as a list of reviews in the management section of the PlanetWrox web site, items in a shopping cart, and so on DataList – Presents your data not only in rows as with the GridView, but in columns as well. Also, you can define the look and feel of the data through a set of templates. As a downside, the control does not support paging and sorting natively, and doesn’t allow you to insert new records or update or delete existing ones. It is often used to display repeating data in rows and columns, e.g. pictures in a photo album or products in a product catalog.
  • 5.
    Data Controls Repeater –It gives you the greatest flexibility in terms of the HTML that you output to the browser as the control by itself does not add any HTML to the page output. The control has no built-in capabilities for the paging, sorting and modification of data. It is often used when you need precise control over the markup that is generated by the control. As such, it’s often used for HTML ordered or unordered lists (<ol> and <ul>), etc. ListView – New to the ASP.NET 3.5, it is a very good combination of the GridView, the DataList, and the Repeater. It supports editing, deleting, and paging of data, multi-column and multi-row layouts, and it allows you to completely control the markup generated by the control, just as the Repeater does.
  • 6.
    Data Controls Single ItemControls - Display one record at a time DetailsView – It uses a built-in tabular form to display data FormView – It uses templates to let you define the look and feel of your data Paging Controls DataPager – It enables paging on other controls
  • 7.
    Data Controls Data SourceControls These are used to bind data to your data-bound controls. The XmlDataSource and SiteMapSource, are used to bind hierarchical, XML-based data to these controls. The AccessDataSource is used to display data from a Microsoft Access database in your web pages. The ObjectDataSource allows you to connect your data-bound controls to separate objects in your application.
  • 8.
    Practice – Usingthe GridView and SqlDataSource Controls In this exercise, you start building the Management section of the web site that will be your main entry point to manage things like reviews and genres in your site. Open the Planet Wrox project Right-click the MasterPages folder, choose Add New Item, and add a new Master Page called ManagementMaster.master to the site. Make sure it’s not based on an existing master page (see figure next)
  • 9.
    Practice – Usingthe GridView and SqlDataSource Controls
  • 10.
    Practice – Usingthe GridView and SqlDataSource Controls  Change the HTML inside the <form> element to the following code. <form id="form1" runat="server"> <div> <div style="width: 200px; float: left;"> <ul> <li><a href="~/Management/Default.aspx" runat="server">Management Home</a></li> <li><a href="~/Management/Genres.aspx" runat="server">Manage Genres</a></li> </ul> </div> <div style="width: 750px; float: left;"> <asp:ContentPlaceHolder id="ContentPlaceHolder1" runat="server"></asp:ContentPlaceHolder> </div> </div> </form>
  • 11.
    Practice – Usingthe GridView and SqlDataSource Controls Add a new folder to the root of the site and call it Management. Right-click this new folder, choose Add New Item, and create a new page called Default.aspx. Make sure the page is based on the new ManagementMaster.master file
  • 12.
    Practice – Usingthe GridView and SqlDataSource Controls Add some text to the cpMainContent block: <asp:Content ID="Content2" ContentPlaceHolderID="ContentPlaceHolder1" Runat="Server"> <h1>Planet Wrox Management Section</h1> <p>Welcome to the Management Section of this web site. Please choose an item from the menu on the left to continue.</p> </asp:Content> Give the page a Title of Planet Wrox – Management - Home
  • 13.
    Practice – Usingthe GridView and SqlDataSource Controls Create another page in the Management folder and call it Genres.aspx. Base it on the same master page and then change its Title to Planet Wrox – Management – Genres Switch the page into Design View. Expand the PlanetWrox.mdf database from the Database Exxplorer, and then the Tables node. Then drag the Genre table from the Database Explorer and drop it in the cpMainContent area of the Genres page. VWD creates a GridView and a SqlDataSource for you automatically On the Smart Tasks panel for the GridView control that should open automatically, select all the available options as shown:
  • 14.
    Practice – Usingthe GridView and SqlDataSource Controls
  • 15.
    Practice – Usingthe GridView and SqlDataSource Controls Right-click the Management folder and choose Add New Item. Click Web Configuration File once and then click Add to add a web.config file that applies to the Management folder only. In the file that opens, add a <pages> element between the <system.web> elements that sets the theme to an empty string: <system.web> <pages theme=""></pages> </system.web> Save all changes and request Genres.aspx from the Management folder in your browser. The links in the left columns allow you to edit, delete, and select the relevant genres. Note that you can’t delete genres that have reviews attached to them. If the list with reviews ends up below the menu on the left, you may need to make your browser window a little wider
  • 16.
    Practice – Usingthe GridView and SqlDataSource Controls You can click the column headers to sort the data in the grid on that column. If you click the same header again, the data is sorted in reversed order Click the Edit link for one of the genres, change the name in the text box that has appeared and click the Update button. The GridView should now display the new name
  • 17.
    Inserting Data withDetailsView The DetailsView has a <FooterTemplate>, a <HeaderTemplate>, and a <PageTemplate> element that enable you to define the looks of the top and bottom parts of the control. In addition, the control has a <Fields> element that allows you to define the rows that should appear in the control. The DetailsView allows you to display records in read-only mode, to insert new records, and to update records. You control the mode of the DetailsView with the DefaultMode property that you can set to ReadOnly, Insert, and Edit.
  • 18.
    Practice – InsertingData with the DetailsView Control Go back to the Design View of the Genres.aspx in VWD Drag and drop a DetailsView from the Data category below the GridView (see figure next) Open the control’s Smart Tasks (it should open automatically) and then hook it up to SqlDataSource1 by selecting that name from the Choose Data Source drop-down list On the same Smart Tasks panel, select the item Enable Inserting
  • 19.
    Practice – InsertingData with the DetailsView Control
  • 20.
    Practice – InsertingData with the DetailsView Control  Open the control’s Properties Grid by pressing F4 and then locate the DefaultMode property in the Behavior category. Set the DefaultMode to Insert. The code for the DetailsView should now looks like this: <asp:DetailsView ID="DetailsView1" runat="server" AutoGenerateRows="False" DataKeyNames="Id" DataSourceID="SqlDataSource1" DefaultMode="Insert" Height="50px" Width="125px"> <Fields> <asp:BoundField DataField="Id" HeaderText="Id" InsertVisible="False" ReadOnly="True" SortExpression="Id" /> <asp:BoundField DataField="Name" HeaderText="Name" SortExpression="Name" /> <asp:BoundField DataField="SortOrder" HeaderText="SortOrder" SortExpression="SortOrder" /> <asp:CommandField ShowInsertButton="True" /> </Fields> </asp:DetailsView>
  • 21.
    Practice – InsertingData with the DetailsView Control Save the changes to the page, and press Ctrl+F5 to open it up in your browser. Insert a new Genre. Make sure you enter both a name and a sort order and then click the Insert link.
  • 22.
    Practice – InsertingData with the DetailsView Control Close your browser and go back to VWD and switch the page into Markup View. Wrap the markup inside the cpMainContent Content block (ContentPlaceHolder1) inside an Ajax UpdatePanel1 that you can drag from the Toolbox into the code editor. Don’t forget to also add a ContentTemplate: <asp:Content ID="Content2" ContentPlaceHolderID="ContentPlaceHolder1" Runat="Server"> <asp:UpdatePanel ID="UpdatePanel1" runat="server"> <ContentTemplate> <asp:GridView ID="GridView1" runat="server" AllowPaging="True" . . . </ContentTemplate> </asp:UpdatePanel> </asp:Content>
  • 23.
    Practice – InsertingData with the DetailsView Control Open up the master page for the Management section (ManagementMaster.master) and add a ScriptManager right after the opening <form> tag: <form id="form1" runat="server"> <asp:ScriptManager ID="ScriptManager1" runat="server"> </asp:ScriptManager> <div> Save all your changes and open Genres.aspx again. Enter a few more genres. Notice how the addition of the UpdatePanel made the insert operation flicker-free
  • 24.
    Practice – InsertingData with the DetailsView Control  If you click one of the numbers at the bottom of the screen in the Pager bar, the GridView switches to that page showing the next set of rows. The page switching, sorting, and editing now all occurs within the UpdatePanel without page postback
  • 25.
    Filtering Data Filtering isdone with WHERE clause. VWD and ASP.NET come with many tools that make creating filters very easy. To filter data, the SqlDataSource control (and other controls) has a <SelectParameters> element that enables you to supply values at run time that are used for filtering.
  • 26.
    Practice – Settingup the Filter To make long lists of data easier to manage, it’s good idea to offer then to the user in smaller, bite-size blocks. For example, when you need to present a list with reviews in your database, it’s a good idea to allow your users to filter them by genre. A DropDownList with the genres right above the GridView with reviews would be the perfect solution for that. Create a new page called Reviews.aspx in the Management folder and make sure it’s based on the Management master page. Change the Title of the page to Planet Wrox – Management - Reviews
  • 27.
    Practice – Settingup the Filter Add a link to this page in the master page for the Management section: <li><a href="~/Management/Genres.aspx" runat="server">Manage Genres</a></li> <li><a href="~/Management/Reviews.aspx" runat="server">Manage Reviews</a></li> </ul> Go back to Reviews.aspx and switch the page into Design View. From the Standard category of the Toolbox, drag a DropDownList control into the page. On its Smart Tasks panel, select Enable AutoPostBack and then click the Edit Items link. Insert an item with its Text set to Please make a selection, and then clear its Value that was inserted for you automatically.
  • 28.
    Practice – Settingup the Filter Click the Choose Data Source dialog box and choose <New data source> from the drop-down list. Click Database, leave the ID set to SqlDataSource1, and click OK In the dialog box that follows, select the connection string called PlanetWroxConnectionString1 from the drop-down list and click Next Verify that the radio button for Specify Columns from a Table or View is selected. Also ensure that Genre is selected in the drop-down list with table names and then select the Id and Name columns in the Columns section. Click the ORDER BY button and choose SortOrder from the Sort by drop-down list and click OK. (see figure next)
  • 29.
    Practice – Settingup the Filter
  • 30.
    Practice – Settingup the Filter Click Next and then Finish. Choose Name for the first drop- down list. Leave the second drop-down list set to Id.
  • 31.
    Practice – Settingup the Filter Click OK to close the dialog box and finish setting up the data source for the drop-down list With the DropDownList control still selected, press F4 to open up its Properties Grid and set the property AppendDataBoundItems to True. Switch to Markup View and if the static ListItem that instructs your users to select an item does not have a Value attribute, add it manually and set it to an empty string. <asp:DropDownList ID="DropDownList1" runat="server" AppendDataBoundItems="True" AutoPostBack="True" DataSourceID="SqlDataSource1" DataTextField="Name" DataValueField="Id"> <asp:ListItem Value="">Please make a selection</asp:ListItem> </asp:DropDownList> Save all your changes and then press Ctrl+F5 to open the page in your browser. You should see the drop-down list. Nothing happens so far because you didn’t tie any logic to the DropDownList control yet.
  • 32.
    Practice – Settingup the Filter
  • 33.
    Practice – Applyingthe Filter Switch the page Reviews.aspx to Design View and drag a GridView on top of the existing SqlDataSource control. The GridView is added right above it and the Smart Tasks panel opens In the Choose Data Source drop-down list, choose <New data source>. In the Data Source Configuration Wizard, click Database and click OK In the dialog box that follows, select the Planet Wrox connection string from the drop-down list and click Next again Select the Review table in the Name drop-down list and then click the asterisk (*) in the Columns list Click the WHERE button and in the dialog box that follows enter the details as shown in the next figure:
  • 34.
    Practice – Applyingthe Filter Each of your controls may show up twice in the control ID drop- down list. It doesn’t matter which of the DropDown List1 options you choose
  • 35.
    Practice – Applyingthe Filter Click the Add button and then click OK Back in the Configure Data Source wizard, click Next. To test the query, click the Test Query button. Enter a number at Value that you know exists in the Genre table and click OK. If there are records in the Review table for the chosen genre, they are displayed in the Test Query window.
  • 36.
    Practice – Applyingthe Filter Finally, click Finish to finalize the wizard. If you get a dialog box about refreshing parameters, click Yes.
  • 37.
    Practice – Applyingthe Filter Wrap the markup inside the cpMainContent Content block (ContentPlaceHolder1) inside an Ajax UpdatePanel1 that you can drag from the Toolbox into the code editor. Don’t forget to also add a ContentTemplate: <asp:Content ID="Content2" ContentPlaceHolderID="ContentPlaceHolder1" Runat="Server"> <asp:UpdatePanel ID="UpdatePanel1" runat="server"> <ContentTemplate> . . . </ContentTemplate> </asp:UpdatePanel> </asp:Content> Save all your changes and open Reviews.aspx in your browser. If you get an error, ensure that you set the Value of the static ListItem in the drop-down list to an empty string(““)
  • 38.
    Practice – Applyingthe Filter Select a new item in the drop-down list. The page refreshes, and now shows the reviews that belong to the chosen genre.
  • 39.
    Practice - CustomizingGridView Columns In Reviews.aspx, open the Smart Tasks panel for the SqlDataSource2 control and click Configure Data Source
  • 40.
    Practice - CustomizingGridView Columns Click Next to skip the connection and then complete the screen as shown:
  • 41.
    Practice - CustomizingGridView Columns Then click the WHERE button and set up a WHERE clause for the GenreId column that gets its value from the DropDownList1 control (as we did before)
  • 42.
    Practice - CustomizingGridView Columns Click the Advanced button and have VWD generate commands for the INSERT, UPDATE, and DELETE statements. Leave the Optimistic Concurrency check box unchecked. Click OK to close the Advanced SQL Generation Options dialog box, then click Next and finally Finish to update the SQL statement in the source for the page. When asked whether you want to reset the fields and keys for the GridView, click Yes Open the Smart Tasks panel for the GridView and click Edit Columns. If the Selected Fields list already contains items, use the Delete button to clear the list first.
  • 43.
    Practice - CustomizingGridView Columns In the Available Fields list, select Authorized and then click the Add button to copy the item to the Selected Fields list. Repeat this for the CreateDateTime field
  • 44.
    Practice - CustomizingGridView Columns In the Available Fields at the top of the screen, select HyperLinkField and then click the Add button to add the item to the selected Fields list as well. Move the HyperLinkField to the top of the list by clicking the button with the up arrow twice. Then, using the Properties Grid on the right, set the following properties on the HyperLinkField: Property Set Its Value To HeaderText Title DataNavigateUrlFields Id DataNavigateUrlFormatString AddEditReview.aspx?={0} DataTextField Title
  • 45.
    Practice - CustomizingGridView Columns Click CommandField from the Available Fields and the add button again. Then set the HeaderText to Delete and ShowDeleteButton to True
  • 46.
    Practice - CustomizingGridView Columns Click the Authorized column in the Selected Fields list and then click the blue “Convert This Field into a TemplateField” link at the bottom right of the dialog box. Click the CreateDateTime column on the left and set its DataFormatString to {0:g} Click OK to apply the changes Save all your changes and request the Reviews.aspx in the browser.
  • 47.
    Practice - CustomizingGridView Columns