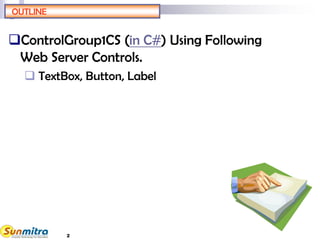
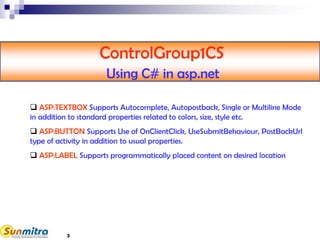
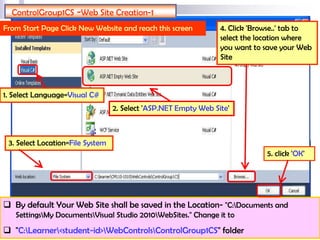
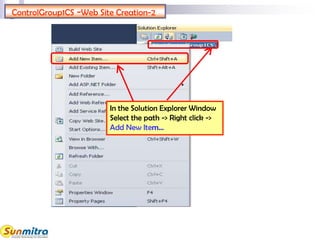
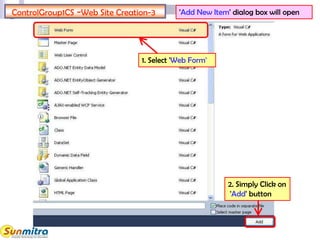
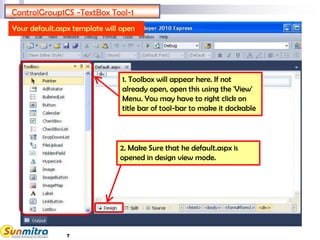
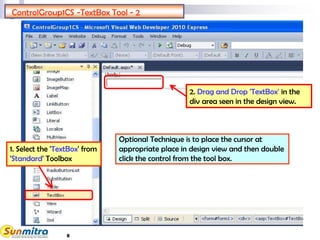
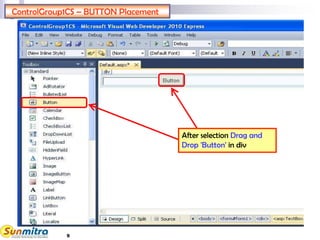
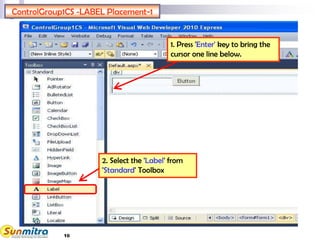
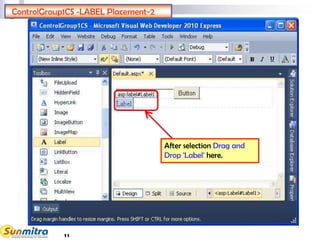
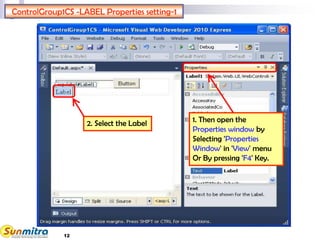
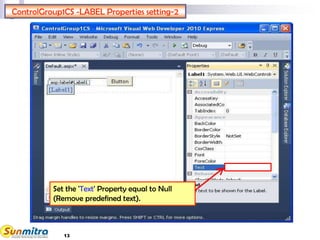
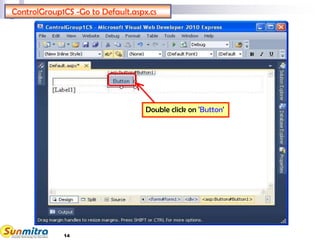
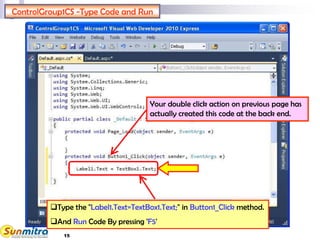
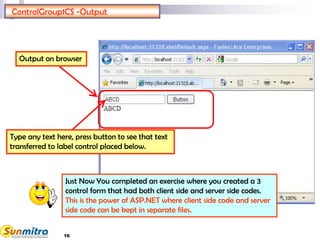
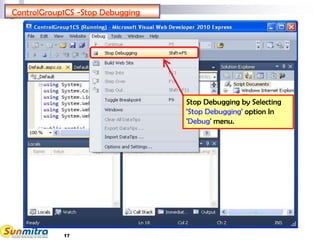
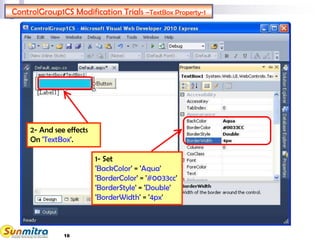
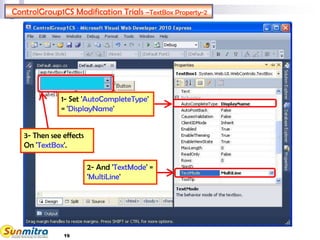
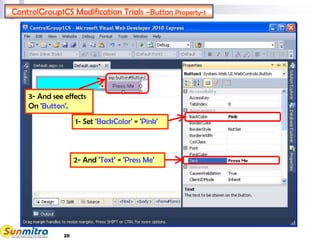
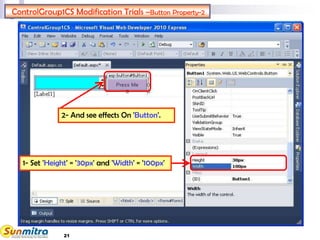
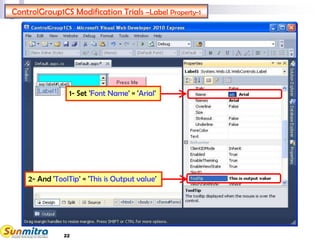
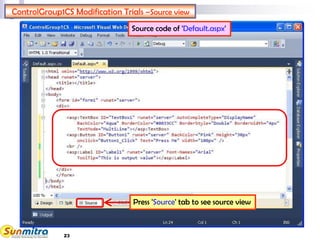
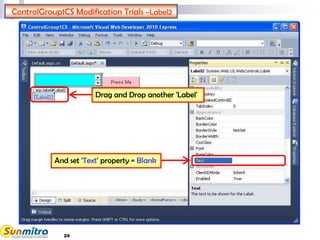
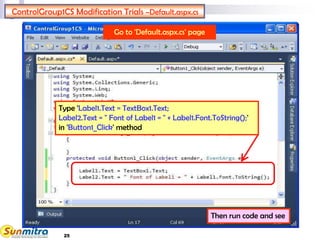
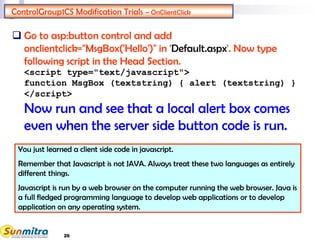
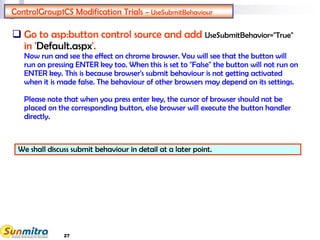
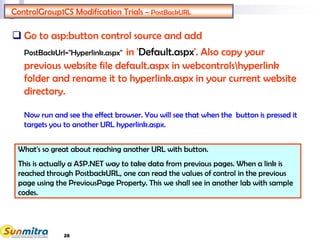
A Programme Under the Compumitra Series
WEB SERVER CONTROLS SET – 2
LAB WORK GUIDE
2
OUTLINE
ControlGroup1CS (in C#) Using Following
Web Server Controls.
 TextBox, Button, Label
3
ControlGroup1CS
Using C# in asp.net
 ASP:TEXTBOX Supports Autocomplete, Autopostback, Single or Multiline Mode
in addition to standard properties related to colors, size, style etc.
 ASP:BUTTON Supports Use of OnClientClick, UseSubmitBehaviour, PostBackUrl
type of activity in addition to usual properties.
 ASP:LABEL Supports programmatically placed content on desired location
 By default Your Web Site shall be saved in the Location- "C:Documents and
SettingsMy DocumentsVisual Studio 2010WebSites." Change it to
 "C:Learner<student-id>WebControlsControlGroup1CS" folder
ControlGroup1CS -Web Site Creation-1
From Start Page Click New Website and reach this screen
2. Select 'ASP.NET Empty Web Site'
3. Select Location=File System
4. Click 'Browse..' tab to
select the location where
you want to save your Web
Site
5. click 'OK'
1. Select Language=Visual C#
ControlGroup1CS -Web Site Creation-2
In the Solution Explorer Window
Select the path -> Right click ->
Add New Item…
ControlGroup1CS -Web Site Creation-3 'Add New Item' dialog box will open
1. Select 'Web Form'
2. Simply Click on
'Add' button
7
ControlGroup1CS -TextBox Tool-1
1. Toolbox will appear here. If not
already open, open this using the 'View'
Menu. You may have to right click on
title bar of tool-bar to make it dockable
Your default.aspx template will open
2. Make Sure that he default.aspx is
opened in design view mode.
8
Drag and Drop TEXTBOX
2. Drag and Drop 'TextBox' in the
div area seen in the design view.
ControlGroup1CS -TextBox Tool - 2
1. Select the 'TextBox' from
'Standard' Toolbox
Optional Technique is to place the cursor at
appropriate place in design view and then double
click the control from the tool box.
9
ControlGroup1CS – BUTTON Placement
After selection Drag and
Drop 'Button' in div
10
ControlGroup1CS -LABEL Placement-1
2. Select the 'Label' from
'Standard' Toolbox
1. Press 'Enter' key to bring the
cursor one line below.
11
ControlGroup1CS -LABEL Placement-2
After selection Drag and
Drop 'Label' here.
12
ControlGroup1CS -LABEL Properties setting-1
2. Select the Label 1. Then open the
Properties window by
Selecting 'Properties
Window' in 'View' menu
Or By pressing 'F4' Key.
13
ControlGroup1CS -LABEL Properties setting-2
Set the 'Text' Property equal to Null
(Remove predefined text).
14
ControlGroup1CS -Go to Default.aspx.cs
Double click on 'Button'
15
ControlGroup1CS -Type Code and Run
Type the "Label1.Text=TextBox1.Text;" in Button1_Click method.
And Run Code By pressing 'F5'
Your double click action on previous page has
actually created this code at the back end.
16
ControlGroup1CS -Output
Type any text here, press button to see that text
transferred to label control placed below.
Output on browser
Just Now You completed an exercise where you created a 3
control form that had both client side and server side codes.
This is the power of ASP.NET where client side code and server
side code can be kept in separate files.
17
ControlGroup1CS -Stop Debugging
Stop Debugging by Selecting
'Stop Debugging' option In
'Debug' menu.
18
ControlGroup1CS Modification Trials –TextBox Property-1
1- Set
'BackColor' = 'Aqua'
'BorderColor' = '#0033cc'
'BorderStyle' = 'Double'
'BorderWidth' = '4px'
2- And see effects
On 'TextBox'.
19
ControlGroup1CS Modification Trials –TextBox Property-2
3- Then see effects
On 'TextBox'.
2- And 'TextMode' =
'MultiLine'
1- Set 'AutoCompleteType'
= 'DisplayName'
20
ControlGroup1CS Modification Trials –Button Property-1
3- And see effects
On 'Button'.
1- Set 'BackColor' = 'Pink'
2- And 'Text' = 'Press Me'
21
ControlGroup1CS Modification Trials –Button Property-2
2- And see effects On 'Button'.
1- Set 'Height' = '30px' and 'Width' = '100px'
22
ControlGroup1CS Modification Trials –Label Property-1
1- Set 'Font Name' = 'Arial'
2- And 'ToolTip' = 'This is Output value'
23
ControlGroup1CS Modification Trials –Source view
Press 'Source' tab to see source view
Source code of 'Default.aspx'
24
ControlGroup1CS Modification Trials –Label2
And set 'Text' property = Blank
Drag and Drop another 'Label'
25
ControlGroup1CS Modification Trials –Default.aspx.cs
Type 'Label1.Text = TextBox1.Text;
Label2.Text = " Font of Label1 = " + Label1.Font.ToString();'
in 'Button1_Click' method
Then run code and see
Go to 'Default.aspx.cs' page
26
ControlGroup1CS Modification Trials – OnClientClick
 Go to asp:button control and add
onclientclick="MsgBox('Hello')" in 'Default.aspx'. Now type
following script in the Head Section.
<script type="text/javascript">
function MsgBox (textstring) { alert (textstring) }
</script>
Now run and see that a local alert box comes
even when the server side button code is run.
You just learned a client side code in javascript.
Remember that Javascript is not JAVA. Always treat these two languages as entirely
different things.
Javascript is run by a web browser on the computer running the web browser. Java is
a full fledged programming language to develop web applications or to develop
application on any operating system.
27
ControlGroup1CS Modification Trials – UseSubmitBehaviour
 Go to asp:button control source and add UseSubmitBehavior="True"
in 'Default.aspx'.
Now run and see the effect on chrome browser. You will see that the button will
run on pressing ENTER key too. When this is set to "False" the button will not run on
ENTER key. This is because browser's submit behaviour is not getting activated
when it is made false. The behaviour of other browsers may depend on its settings.
Please note that when you press enter key, the cursor of browser should not be
placed on the corresponding button, else browser will execute the button handler
directly.
We shall discuss submit behaviour in detail at a later point.
28
ControlGroup1CS Modification Trials – PostBackURL
 Go to asp:button control source and add
PostBackUrl="Hyperlink.aspx" in 'Default.aspx'. Also copy your
previous website file default.aspx in webcontrolshyperlink
folder and rename it to hyperlink.aspx in your current website
directory.
Now run and see the effect browser. You will see that when the button is pressed it
targets you to another URL hyperlink.aspx.
What's so great about reaching another URL with button.
This is actually a ASP.NET way to take data from previous pages. When a link is
reached through PostbackURL, one can read the values of control in the previous
page using the PreviousPage Property. This we shall see in another lab with sample
codes.
29
Ask and guide me at
sunmitraeducation@gmail.com
Share this information with as
many people as possible.
Keep visiting www.sunmitra.com
for programme updates.

Web Server Controls CS Set

  • 1.
    A Programme Underthe Compumitra Series WEB SERVER CONTROLS SET – 2 LAB WORK GUIDE
  • 2.
    2 OUTLINE ControlGroup1CS (in C#)Using Following Web Server Controls.  TextBox, Button, Label
  • 3.
    3 ControlGroup1CS Using C# inasp.net  ASP:TEXTBOX Supports Autocomplete, Autopostback, Single or Multiline Mode in addition to standard properties related to colors, size, style etc.  ASP:BUTTON Supports Use of OnClientClick, UseSubmitBehaviour, PostBackUrl type of activity in addition to usual properties.  ASP:LABEL Supports programmatically placed content on desired location
  • 4.
     By defaultYour Web Site shall be saved in the Location- "C:Documents and SettingsMy DocumentsVisual Studio 2010WebSites." Change it to  "C:Learner<student-id>WebControlsControlGroup1CS" folder ControlGroup1CS -Web Site Creation-1 From Start Page Click New Website and reach this screen 2. Select 'ASP.NET Empty Web Site' 3. Select Location=File System 4. Click 'Browse..' tab to select the location where you want to save your Web Site 5. click 'OK' 1. Select Language=Visual C#
  • 5.
    ControlGroup1CS -Web SiteCreation-2 In the Solution Explorer Window Select the path -> Right click -> Add New Item…
  • 6.
    ControlGroup1CS -Web SiteCreation-3 'Add New Item' dialog box will open 1. Select 'Web Form' 2. Simply Click on 'Add' button
  • 7.
    7 ControlGroup1CS -TextBox Tool-1 1.Toolbox will appear here. If not already open, open this using the 'View' Menu. You may have to right click on title bar of tool-bar to make it dockable Your default.aspx template will open 2. Make Sure that he default.aspx is opened in design view mode.
  • 8.
    8 Drag and DropTEXTBOX 2. Drag and Drop 'TextBox' in the div area seen in the design view. ControlGroup1CS -TextBox Tool - 2 1. Select the 'TextBox' from 'Standard' Toolbox Optional Technique is to place the cursor at appropriate place in design view and then double click the control from the tool box.
  • 9.
    9 ControlGroup1CS – BUTTONPlacement After selection Drag and Drop 'Button' in div
  • 10.
    10 ControlGroup1CS -LABEL Placement-1 2.Select the 'Label' from 'Standard' Toolbox 1. Press 'Enter' key to bring the cursor one line below.
  • 11.
    11 ControlGroup1CS -LABEL Placement-2 Afterselection Drag and Drop 'Label' here.
  • 12.
    12 ControlGroup1CS -LABEL Propertiessetting-1 2. Select the Label 1. Then open the Properties window by Selecting 'Properties Window' in 'View' menu Or By pressing 'F4' Key.
  • 13.
    13 ControlGroup1CS -LABEL Propertiessetting-2 Set the 'Text' Property equal to Null (Remove predefined text).
  • 14.
    14 ControlGroup1CS -Go toDefault.aspx.cs Double click on 'Button'
  • 15.
    15 ControlGroup1CS -Type Codeand Run Type the "Label1.Text=TextBox1.Text;" in Button1_Click method. And Run Code By pressing 'F5' Your double click action on previous page has actually created this code at the back end.
  • 16.
    16 ControlGroup1CS -Output Type anytext here, press button to see that text transferred to label control placed below. Output on browser Just Now You completed an exercise where you created a 3 control form that had both client side and server side codes. This is the power of ASP.NET where client side code and server side code can be kept in separate files.
  • 17.
    17 ControlGroup1CS -Stop Debugging StopDebugging by Selecting 'Stop Debugging' option In 'Debug' menu.
  • 18.
    18 ControlGroup1CS Modification Trials–TextBox Property-1 1- Set 'BackColor' = 'Aqua' 'BorderColor' = '#0033cc' 'BorderStyle' = 'Double' 'BorderWidth' = '4px' 2- And see effects On 'TextBox'.
  • 19.
    19 ControlGroup1CS Modification Trials–TextBox Property-2 3- Then see effects On 'TextBox'. 2- And 'TextMode' = 'MultiLine' 1- Set 'AutoCompleteType' = 'DisplayName'
  • 20.
    20 ControlGroup1CS Modification Trials–Button Property-1 3- And see effects On 'Button'. 1- Set 'BackColor' = 'Pink' 2- And 'Text' = 'Press Me'
  • 21.
    21 ControlGroup1CS Modification Trials–Button Property-2 2- And see effects On 'Button'. 1- Set 'Height' = '30px' and 'Width' = '100px'
  • 22.
    22 ControlGroup1CS Modification Trials–Label Property-1 1- Set 'Font Name' = 'Arial' 2- And 'ToolTip' = 'This is Output value'
  • 23.
    23 ControlGroup1CS Modification Trials–Source view Press 'Source' tab to see source view Source code of 'Default.aspx'
  • 24.
    24 ControlGroup1CS Modification Trials–Label2 And set 'Text' property = Blank Drag and Drop another 'Label'
  • 25.
    25 ControlGroup1CS Modification Trials–Default.aspx.cs Type 'Label1.Text = TextBox1.Text; Label2.Text = " Font of Label1 = " + Label1.Font.ToString();' in 'Button1_Click' method Then run code and see Go to 'Default.aspx.cs' page
  • 26.
    26 ControlGroup1CS Modification Trials– OnClientClick  Go to asp:button control and add onclientclick="MsgBox('Hello')" in 'Default.aspx'. Now type following script in the Head Section. <script type="text/javascript"> function MsgBox (textstring) { alert (textstring) } </script> Now run and see that a local alert box comes even when the server side button code is run. You just learned a client side code in javascript. Remember that Javascript is not JAVA. Always treat these two languages as entirely different things. Javascript is run by a web browser on the computer running the web browser. Java is a full fledged programming language to develop web applications or to develop application on any operating system.
  • 27.
    27 ControlGroup1CS Modification Trials– UseSubmitBehaviour  Go to asp:button control source and add UseSubmitBehavior="True" in 'Default.aspx'. Now run and see the effect on chrome browser. You will see that the button will run on pressing ENTER key too. When this is set to "False" the button will not run on ENTER key. This is because browser's submit behaviour is not getting activated when it is made false. The behaviour of other browsers may depend on its settings. Please note that when you press enter key, the cursor of browser should not be placed on the corresponding button, else browser will execute the button handler directly. We shall discuss submit behaviour in detail at a later point.
  • 28.
    28 ControlGroup1CS Modification Trials– PostBackURL  Go to asp:button control source and add PostBackUrl="Hyperlink.aspx" in 'Default.aspx'. Also copy your previous website file default.aspx in webcontrolshyperlink folder and rename it to hyperlink.aspx in your current website directory. Now run and see the effect browser. You will see that when the button is pressed it targets you to another URL hyperlink.aspx. What's so great about reaching another URL with button. This is actually a ASP.NET way to take data from previous pages. When a link is reached through PostbackURL, one can read the values of control in the previous page using the PreviousPage Property. This we shall see in another lab with sample codes.
  • 29.
    29 Ask and guideme at sunmitraeducation@gmail.com Share this information with as many people as possible. Keep visiting www.sunmitra.com for programme updates.