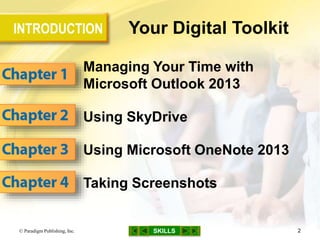
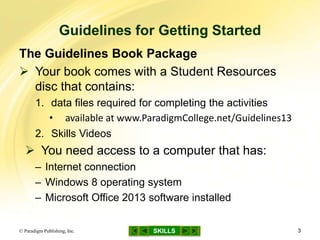
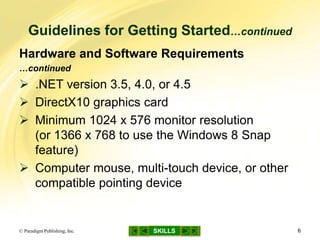
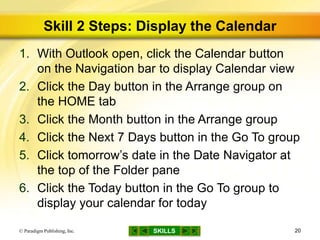
SKILLS© Paradigm Publishing, Inc.
1
INTRODUCTION
SKILLS
Your Digital Toolkit
Managing Your Time with
Microsoft Outlook 2013
Using SkyDrive
Using Microsoft OneNote 2013
Taking Screenshots
© Paradigm Publishing, Inc. 2
SKILLS
Guidelines for Getting Started
© Paradigm Publishing, Inc. 3
The Guidelines Book Package
 Your book comes with a Student Resources
disc that contains:
1. data files required for completing the activities
• available at www.ParadigmCollege.net/Guidelines13
2. Skills Videos
 You need access to a computer that has:
– Internet connection
– Windows 8 operating system
– Microsoft Office 2013 software installed
SKILLS
Guidelines for Getting Started…continued
© Paradigm Publishing, Inc. 4
Hardware and Software Requirements
SKILLS
Guidelines for Getting Started…continued
© Paradigm Publishing, Inc. 5
Hardware and Software Requirements
…continued
 1 GHz processor or higher; 1 GB RAM (32-bit)
or 2 GB RAM (64-bit)
 CD/DVD drive, USB port and USB flash drive,
SkyDrive account with a live Internet
connection, or other removable storage
medium
 3 GB of available hard-disk space
SKILLS
Guidelines for Getting Started…continued
© Paradigm Publishing, Inc. 6
Hardware and Software Requirements
…continued
 .NET version 3.5, 4.0, or 4.5
 DirectX10 graphics card
 Minimum 1024 x 576 monitor resolution
(or 1366 x 768 to use the Windows 8 Snap
feature)
 Computer mouse, multi-touch device, or other
compatible pointing device
SKILLS
Guidelines for Getting Started…continued
© Paradigm Publishing, Inc. 7
Start-Up and Shut-Down Procedures
 To turn on the computer:
– press the power button to load the Windows 8
operating system
– you may need to log in using an assigned user name
and password
 To insert a CD or DVD:
– press the Open button on the CD or DVD drive to
open the tray
– place the disc in the tray with the disc label facing up
– press the Open button again to close the tray
SKILLS
Guidelines for Getting Started…continued
© Paradigm Publishing, Inc. 8
Start-Up and Shut-Down Procedures…continued
 To insert a flash drive:
– insert your flash drive into a USB port
 To access SkyDrive:
– refer to Chapter 2—Using SkyDrive
 To turn off the computer:
– press Win + C, click Settings, click Power, and then
click Shut Down
SKILLS
Guidelines for Getting Started…continued
© Paradigm Publishing, Inc. 9
Using the Student Resources Disc
 The Student Resources disc contains videos
demonstrating the steps for each skill in the
book
– preview skills before you start working
– clarify how to perform the steps if you
have difficulty completing a skill
 To run the skills videos, your computer needs
– a web browser
– Adobe Flash Player
• installed with Windows 8 and available free from
get.adobe.com/flashplayer
SKILLS
Guidelines for Getting Started…continued
© Paradigm Publishing, Inc. 10
Steps for Starting an Office 2013 Application
1. Press Win + C to display the Charms bar
2. Click the Search charm
3. Type the name of the app in the search box
4. Click Apps in the Search pane if it is not
already selected
5. Click the name of the app in the Apps results
list
SKILLS
Guidelines for Getting Started…continued
© Paradigm Publishing, Inc. 11
Visual for Starting an Office 2013 Application
Search
charm
SKILLS© Paradigm Publishing, Inc. 12
Managing Your Time with
Microsoft Outlook 2013
SKILLS
Skills You Learn
1. Open Outlook and use Peeks
2. Display the Calendar
3. Schedule an appointment
4. Schedule a meeting
5. Add people
6. Search for people and appointments
© Paradigm Publishing, Inc. 13
SKILLS
Managing Your Time with Microsoft Outlook 2013
© Paradigm Publishing, Inc. 14
 Developing good organizational and time
management skills can help you succeed
 Personal information management software,
such as Outlook, can simplify the organization
of personal and business activities and help you
stay on top of things
 Outlook contains tools for organizing
appointments, managing email, and keeping
track of people
SKILLS
Skill 1 Steps: Open Outlook and Use Peeks
Open Outlook
1. From the Start screen, press Win + C to display
the Charms bar
2. Click Search in the Charms bar
3. Type outlook in the search box
4. Click Outlook 2013 in the Apps results list
© Paradigm Publishing, Inc. 15
SKILLS
Skill 1 Visual: Open Outlook and Use Peeks
Open Outlook
© Paradigm Publishing, Inc. 16
Type outlook
in the search
box.
Click Outlook
2013 in the
Apps results list.
SKILLS
Skill 1 Steps…continued
Use Peeks
1. Hover over the Calendar button in the
Navigation bar to peek at the Calendar
– move the mouse off the Calendar button to make the
Calendar peek disappear
2. Click the Dock the peek button to pin the
Calendar peek to the right edge of the Outlook
window
– click the Remove the peek button to remove the
Calendar peek
© Paradigm Publishing, Inc. 17
SKILLS
Skill 1 Visual…continued
Use Peeks
© Paradigm Publishing, Inc. 18
Hover over the
Calendar button in the
Navigation bar to peek
at the Calendar.
Click the Dock the peek
button to pin the Calendar
peek to the right edge
of the Outlook window.
SKILLS© Paradigm Publishing, Inc. 19
Customizing the Look of Your Navigation Bar
 By default, the Navigation bar displays buttons
for four views: Mail, Calendar, People, and
Tasks
 Change the number of view buttons displayed
and the order in which the buttons appear by
clicking the ellipsis on the Navigation bar and
then clicking Navigation Options
SKILLS
Skill 2 Steps: Display the Calendar
1. With Outlook open, click the Calendar button
on the Navigation bar to display Calendar view
2. Click the Day button in the Arrange group on
the HOME tab
3. Click the Month button in the Arrange group
4. Click the Next 7 Days button in the Go To group
5. Click tomorrow’s date in the Date Navigator at
the top of the Folder pane
6. Click the Today button in the Go To group to
display your calendar for today
© Paradigm Publishing, Inc. 20
SKILLS
Skill 2 Visual: Display the Calendar
© Paradigm Publishing, Inc. 21
Date Navigator
Click the Day button in
the Arrange group on
the HOME tab.
SKILLS© Paradigm Publishing, Inc. 22
Customizing the Look of Your Calendar
 The VIEW tab contains many options for
customizing the look of your calendar such as:
– change the time intervals shown in the Calendar by
clicking the Time Scale button in the Arrangement
group and selecting an interval from the drop-down
list
– change the time zone by using the Time Scale button
SKILLS
Skill 3 Steps: Schedule an Appointment
1. With Outlook Calendar open, click the Today
button in the Go To group on the HOME tab
2. If Day view is not active, click the Day button
3. Click the New Appointment button in the New
group
4. Type a subject in the Subject text box and press
the Tab key
5. Type the location in the Location text box
© Paradigm Publishing, Inc. 23
SKILLS
Skill 3 Steps…continued
6. Click the Start time option box arrow and click the
start time
7. Click the End time option box arrow and click the
end time
8. Click the Reminder option box arrow in the
Options group on the APPOINTMENT tab and
click the reminder time
9. Click the Save & Close button in the Actions
group on the APPOINTMENT tab
© Paradigm Publishing, Inc. 24
SKILLS
Skill 3 Visual: Schedule an Appointment
© Paradigm Publishing, Inc. 25
Click the Reminder
option box arrow in the
Options group on the
APPOINTMENT tab
and then click the
reminder time.
SKILLS© Paradigm Publishing, Inc. 26
Organizing Your Calendar
 To help organize your school schedule, you can
create appointments for project due dates and
homework assignments
– you may want to add reminders to these
appointments to help you get your work finished on
time
SKILLS
Skill 4 Steps: Schedule a Meeting
1. With Outlook Calendar open, click the Day button
in the Arrange group on the HOME tab
2. Click the New Meeting button in the New group
3. Type a subject in the Subject text box and press
the Tab key
4. Type the location in the Location text box
5. Click the Calendar button in the Start time text
box and then click a date
© Paradigm Publishing, Inc. 27
SKILLS
Skill 4 Steps…continued
6. Click the Start time option box arrow and then
click the start time
7. Click the End time option box arrow and then
click the end time
8. Type a message in the body of the meeting
request
9. Type an email address in the To text box and
click the Send button
© Paradigm Publishing, Inc. 28
SKILLS
Skill 4 Visual: Schedule a Meeting
© Paradigm Publishing, Inc. 29
Type a message in the
body of the meeting
request.
SKILLS© Paradigm Publishing, Inc. 30
Configuring Outlook
 Outlook needs to be set up or configured for a
specific user
 If you are using Outlook on a shared computer,
you will need to log in to Outlook before you
can use it
SKILLS
Skill 5 Steps: Add People
1. With Outlook open, click the People button in
the Navigation bar to display People view
2. Click the New Contact button in the New group
on the HOME tab
3. Type the data in the fields
4. Click the Save & Close button in the Actions
group on the CONTACT tab
© Paradigm Publishing, Inc. 31
SKILLS
Skill 5 Visual: Add People
© Paradigm Publishing, Inc. 32
Click the New Contact
button in the New group
on the HOME tab.
SKILLS© Paradigm Publishing, Inc. 33
Adding a Picture
 You can add a picture of your contact to help
you quickly connect a face to a name or a logo
to a business contact
 To add a picture, click the image icon in the
New Contact window, browse to locate the
picture that you want to add, and then double-
click the file name
SKILLS
Skill 6 Steps: Search for People and Appointments
1. With Outlook open, click the People button in
the Navigation bar
2. Click in the Search Contacts text box and type
the search text
3. Click the Close Search button in the Close
group on the SEARCH TOOLS SEARCH tab
© Paradigm Publishing, Inc. 34
SKILLS
Skill 6 Visual: Search for People and Appointments
© Paradigm Publishing, Inc. 35
Click in the Search
Contacts text box and
type the search text.
SKILLS© Paradigm Publishing, Inc. 36
Exploring the SEARCH TOOLS SEARCH Tab
 When you click in the Search Contacts text box
or Search Calendar text box, the SEARCH
TOOLS SEARCH tab appears
 This tab enables you to refine your search in
ways such as these:
– use commands in the Scope group to specify which
Outlook folders are included in your search
– use commands in the Refine group to narrow your
search
– use commands in the Options group to reuse
previous searches, saving you the time and effort of
retyping search criteria

Gl13 m0-c1-presentation

  • 1.
  • 2.
    INTRODUCTION SKILLS Your Digital Toolkit ManagingYour Time with Microsoft Outlook 2013 Using SkyDrive Using Microsoft OneNote 2013 Taking Screenshots © Paradigm Publishing, Inc. 2
  • 3.
    SKILLS Guidelines for GettingStarted © Paradigm Publishing, Inc. 3 The Guidelines Book Package  Your book comes with a Student Resources disc that contains: 1. data files required for completing the activities • available at www.ParadigmCollege.net/Guidelines13 2. Skills Videos  You need access to a computer that has: – Internet connection – Windows 8 operating system – Microsoft Office 2013 software installed
  • 4.
    SKILLS Guidelines for GettingStarted…continued © Paradigm Publishing, Inc. 4 Hardware and Software Requirements
  • 5.
    SKILLS Guidelines for GettingStarted…continued © Paradigm Publishing, Inc. 5 Hardware and Software Requirements …continued  1 GHz processor or higher; 1 GB RAM (32-bit) or 2 GB RAM (64-bit)  CD/DVD drive, USB port and USB flash drive, SkyDrive account with a live Internet connection, or other removable storage medium  3 GB of available hard-disk space
  • 6.
    SKILLS Guidelines for GettingStarted…continued © Paradigm Publishing, Inc. 6 Hardware and Software Requirements …continued  .NET version 3.5, 4.0, or 4.5  DirectX10 graphics card  Minimum 1024 x 576 monitor resolution (or 1366 x 768 to use the Windows 8 Snap feature)  Computer mouse, multi-touch device, or other compatible pointing device
  • 7.
    SKILLS Guidelines for GettingStarted…continued © Paradigm Publishing, Inc. 7 Start-Up and Shut-Down Procedures  To turn on the computer: – press the power button to load the Windows 8 operating system – you may need to log in using an assigned user name and password  To insert a CD or DVD: – press the Open button on the CD or DVD drive to open the tray – place the disc in the tray with the disc label facing up – press the Open button again to close the tray
  • 8.
    SKILLS Guidelines for GettingStarted…continued © Paradigm Publishing, Inc. 8 Start-Up and Shut-Down Procedures…continued  To insert a flash drive: – insert your flash drive into a USB port  To access SkyDrive: – refer to Chapter 2—Using SkyDrive  To turn off the computer: – press Win + C, click Settings, click Power, and then click Shut Down
  • 9.
    SKILLS Guidelines for GettingStarted…continued © Paradigm Publishing, Inc. 9 Using the Student Resources Disc  The Student Resources disc contains videos demonstrating the steps for each skill in the book – preview skills before you start working – clarify how to perform the steps if you have difficulty completing a skill  To run the skills videos, your computer needs – a web browser – Adobe Flash Player • installed with Windows 8 and available free from get.adobe.com/flashplayer
  • 10.
    SKILLS Guidelines for GettingStarted…continued © Paradigm Publishing, Inc. 10 Steps for Starting an Office 2013 Application 1. Press Win + C to display the Charms bar 2. Click the Search charm 3. Type the name of the app in the search box 4. Click Apps in the Search pane if it is not already selected 5. Click the name of the app in the Apps results list
  • 11.
    SKILLS Guidelines for GettingStarted…continued © Paradigm Publishing, Inc. 11 Visual for Starting an Office 2013 Application Search charm
  • 12.
    SKILLS© Paradigm Publishing,Inc. 12 Managing Your Time with Microsoft Outlook 2013
  • 13.
    SKILLS Skills You Learn 1.Open Outlook and use Peeks 2. Display the Calendar 3. Schedule an appointment 4. Schedule a meeting 5. Add people 6. Search for people and appointments © Paradigm Publishing, Inc. 13
  • 14.
    SKILLS Managing Your Timewith Microsoft Outlook 2013 © Paradigm Publishing, Inc. 14  Developing good organizational and time management skills can help you succeed  Personal information management software, such as Outlook, can simplify the organization of personal and business activities and help you stay on top of things  Outlook contains tools for organizing appointments, managing email, and keeping track of people
  • 15.
    SKILLS Skill 1 Steps:Open Outlook and Use Peeks Open Outlook 1. From the Start screen, press Win + C to display the Charms bar 2. Click Search in the Charms bar 3. Type outlook in the search box 4. Click Outlook 2013 in the Apps results list © Paradigm Publishing, Inc. 15
  • 16.
    SKILLS Skill 1 Visual:Open Outlook and Use Peeks Open Outlook © Paradigm Publishing, Inc. 16 Type outlook in the search box. Click Outlook 2013 in the Apps results list.
  • 17.
    SKILLS Skill 1 Steps…continued UsePeeks 1. Hover over the Calendar button in the Navigation bar to peek at the Calendar – move the mouse off the Calendar button to make the Calendar peek disappear 2. Click the Dock the peek button to pin the Calendar peek to the right edge of the Outlook window – click the Remove the peek button to remove the Calendar peek © Paradigm Publishing, Inc. 17
  • 18.
    SKILLS Skill 1 Visual…continued UsePeeks © Paradigm Publishing, Inc. 18 Hover over the Calendar button in the Navigation bar to peek at the Calendar. Click the Dock the peek button to pin the Calendar peek to the right edge of the Outlook window.
  • 19.
    SKILLS© Paradigm Publishing,Inc. 19 Customizing the Look of Your Navigation Bar  By default, the Navigation bar displays buttons for four views: Mail, Calendar, People, and Tasks  Change the number of view buttons displayed and the order in which the buttons appear by clicking the ellipsis on the Navigation bar and then clicking Navigation Options
  • 20.
    SKILLS Skill 2 Steps:Display the Calendar 1. With Outlook open, click the Calendar button on the Navigation bar to display Calendar view 2. Click the Day button in the Arrange group on the HOME tab 3. Click the Month button in the Arrange group 4. Click the Next 7 Days button in the Go To group 5. Click tomorrow’s date in the Date Navigator at the top of the Folder pane 6. Click the Today button in the Go To group to display your calendar for today © Paradigm Publishing, Inc. 20
  • 21.
    SKILLS Skill 2 Visual:Display the Calendar © Paradigm Publishing, Inc. 21 Date Navigator Click the Day button in the Arrange group on the HOME tab.
  • 22.
    SKILLS© Paradigm Publishing,Inc. 22 Customizing the Look of Your Calendar  The VIEW tab contains many options for customizing the look of your calendar such as: – change the time intervals shown in the Calendar by clicking the Time Scale button in the Arrangement group and selecting an interval from the drop-down list – change the time zone by using the Time Scale button
  • 23.
    SKILLS Skill 3 Steps:Schedule an Appointment 1. With Outlook Calendar open, click the Today button in the Go To group on the HOME tab 2. If Day view is not active, click the Day button 3. Click the New Appointment button in the New group 4. Type a subject in the Subject text box and press the Tab key 5. Type the location in the Location text box © Paradigm Publishing, Inc. 23
  • 24.
    SKILLS Skill 3 Steps…continued 6.Click the Start time option box arrow and click the start time 7. Click the End time option box arrow and click the end time 8. Click the Reminder option box arrow in the Options group on the APPOINTMENT tab and click the reminder time 9. Click the Save & Close button in the Actions group on the APPOINTMENT tab © Paradigm Publishing, Inc. 24
  • 25.
    SKILLS Skill 3 Visual:Schedule an Appointment © Paradigm Publishing, Inc. 25 Click the Reminder option box arrow in the Options group on the APPOINTMENT tab and then click the reminder time.
  • 26.
    SKILLS© Paradigm Publishing,Inc. 26 Organizing Your Calendar  To help organize your school schedule, you can create appointments for project due dates and homework assignments – you may want to add reminders to these appointments to help you get your work finished on time
  • 27.
    SKILLS Skill 4 Steps:Schedule a Meeting 1. With Outlook Calendar open, click the Day button in the Arrange group on the HOME tab 2. Click the New Meeting button in the New group 3. Type a subject in the Subject text box and press the Tab key 4. Type the location in the Location text box 5. Click the Calendar button in the Start time text box and then click a date © Paradigm Publishing, Inc. 27
  • 28.
    SKILLS Skill 4 Steps…continued 6.Click the Start time option box arrow and then click the start time 7. Click the End time option box arrow and then click the end time 8. Type a message in the body of the meeting request 9. Type an email address in the To text box and click the Send button © Paradigm Publishing, Inc. 28
  • 29.
    SKILLS Skill 4 Visual:Schedule a Meeting © Paradigm Publishing, Inc. 29 Type a message in the body of the meeting request.
  • 30.
    SKILLS© Paradigm Publishing,Inc. 30 Configuring Outlook  Outlook needs to be set up or configured for a specific user  If you are using Outlook on a shared computer, you will need to log in to Outlook before you can use it
  • 31.
    SKILLS Skill 5 Steps:Add People 1. With Outlook open, click the People button in the Navigation bar to display People view 2. Click the New Contact button in the New group on the HOME tab 3. Type the data in the fields 4. Click the Save & Close button in the Actions group on the CONTACT tab © Paradigm Publishing, Inc. 31
  • 32.
    SKILLS Skill 5 Visual:Add People © Paradigm Publishing, Inc. 32 Click the New Contact button in the New group on the HOME tab.
  • 33.
    SKILLS© Paradigm Publishing,Inc. 33 Adding a Picture  You can add a picture of your contact to help you quickly connect a face to a name or a logo to a business contact  To add a picture, click the image icon in the New Contact window, browse to locate the picture that you want to add, and then double- click the file name
  • 34.
    SKILLS Skill 6 Steps:Search for People and Appointments 1. With Outlook open, click the People button in the Navigation bar 2. Click in the Search Contacts text box and type the search text 3. Click the Close Search button in the Close group on the SEARCH TOOLS SEARCH tab © Paradigm Publishing, Inc. 34
  • 35.
    SKILLS Skill 6 Visual:Search for People and Appointments © Paradigm Publishing, Inc. 35 Click in the Search Contacts text box and type the search text.
  • 36.
    SKILLS© Paradigm Publishing,Inc. 36 Exploring the SEARCH TOOLS SEARCH Tab  When you click in the Search Contacts text box or Search Calendar text box, the SEARCH TOOLS SEARCH tab appears  This tab enables you to refine your search in ways such as these: – use commands in the Scope group to specify which Outlook folders are included in your search – use commands in the Refine group to narrow your search – use commands in the Options group to reuse previous searches, saving you the time and effort of retyping search criteria

Editor's Notes

  • #2 In this book, you learn to use several computer application programs (also called apps) that combine to make an application suite. This suite of programs is called Microsoft Office 2013. The programs you learn to use, also referred to as software, work with your operating system to enable you to perform various types of tasks. The programs in the suite include Word, a word processing program; Excel, a spreadsheet program; Access, a database program; OneNote, an electronic notebook program; Outlook, a personal information manager; and PowerPoint, a presentation program. You also learn the basic features of the Windows 8 operating system and the Web browsers Internet Explorer, Chrome, and Mozilla Firefox.
  • #3 In this module, you learn to manage your time with Microsoft Outlook 2013, use SkyDrive, use Microsoft OneNote 2013, and take screenshots.
  • #4 Student Resources disc In addition to the data files, references and resources are also available at the book’s website. The Skills Videos, step by step, demonstrate each skill in the book.
  • #5 Your book is designed for a computer running a standard installation of the Microsoft Office 365 Home Premium or Small Business and the Microsoft Windows 8 (Windows 8 Pro, Windows 8 Enterprise, Windows RT) operating system.
  • #6 To run this suite and operating system effectively, your computer should have the capabilities listed in this slide and the next slide.
  • #7 To run this suite and operating system effectively, your computer should have the capabilities listed in the previous slide and this slide.
  • #8 You need to know how to turn the computer on and off and, depending on where you will store your course work, how to insert a CD or DVD and flash drive, and how to access SkyDrive.
  • #9 Note that there is only one way to insert the flash drive, so you may have to flip it over so that it fits. Do not force the flash drive into the port. If you need help ejecting the flash drive, check with your instructor.
  • #10 The Student Resources disc also contains files you need to complete the module or chapter skills, chapter assessments, and module assessments. Module 2, Chapter 2 teaches you how to download or copy each module’s folder of files from the disc to your hard disk, flash drive, SkyDrive, or other storage medium. Note that you don’t need any student data files for Module 1.
  • #11 The first module in your book uses the Outlook and OneNote programs. To start Outlook or another program in the Office suite, follow the steps listed in this slide. See also the illustration on the next slide.
  • #12 The illustration in this slide shows the location of the Search charm after Win + C has been pressed to display the Charms bar.
  • #13 In this chapter, you learn how to use Outlook to organize your personal, school, and career life. You schedule an appointment and a meeting in Outlook’s digital Calendar. You then send an electronic invitation to others, inviting them to attend a scheduled meeting. You also add your personal and business contacts to Outlook’s People list and you learn how to always have schedule and contact information at your fingertips.
  • #14 You may have noticed that a Calendar app and a People app are installed with Windows 8. These apps are also designed to help you manage your time. However the focus of this chapter is Outlook, which is part of the Microsoft Office 2013 suite. Navigation Tip: In Slide Show view, click an underlined skill on this slide to navigate directly to the related slide. At any time in Slide Show view, you may navigate to the beginning of this presentation by clicking the left-most button at the bottom center of the slide. To navigate to the previous slide in this presentation, click the second button from the left. Click the SKILLS button to return to this slide. Click the button to the right of the SKILLS button to navigate to the next slide in this presentation, and click the right-most button to navigate to the end of this presentation.
  • #15 One aspect of managing time involves keeping an organized schedule. Calendar is an Outlook scheduling tool that you can use to keep track of appointments, create reminders about events, and schedule meetings. Knowing where to quickly find email addresses or phone numbers for personal and business contacts is also an essential organizational and time management skill. People is an Outlook tool for creating an electronic address book that stores contact information for the people you communicate with. Because People is linked to your Outlook email address book and the Outlook Social Connector, you can stay up-to-date on your social networks without leaving Outlook.
  • #16 Outlook contains four main views—Mail, Calendar, People, and Tasks. When you start Outlook, Mail view displays by default. Another Way: You may have an Outlook 2013 tile on the Start screen. If you do, click this tile to start Outlook 2013. If you do not have an Outlook account, you will be prompted to set one up.
  • #17 The illustration in this slide shows how to search for Outlook using the Charms bar. To pin Outlook 2013 to your Start screen, right-click Outlook 2013 in the Apps results list and then click Pin to Start.
  • #18 Use the Navigation bar in the bottom left of the screen to switch to Calendar view. You can also use a feature called Peeks to view your Calendar, People, or Tasks without having to switch views.
  • #19 The illustration in this slide displays how to peek at the Calendar. When a peek is pinned within a view, it only displays in that view. For example, if you want to see the Calendar peek in both the Mail view and the People view, you will need to pin it in both views.
  • #20 To change how many buttons appear, change the maximum number of visible items. To change the order in which the buttons appear, click a button and then click the Move Up or Move Down button.
  • #21 You can display your calendar in a daily, weekly, or monthly view. You can also navigate to different days using buttons on the HOME tab or using the Date Navigator. If you do not see the Date Navigator, click the Folder Pane Minimize/Maximize button. You can also display the Calendar using the shortcut Ctrl + 2. To move forward or backward a day in Day view, or to move to the next or previous month in Month view, you can use the Forward and Back navigation buttons.
  • #22 The illustration in this slide displays the calendar in the daily view and shows the Date Navigator. While you are viewing your calendar, you are also able to view your local weather forecast on the Weather bar. Hover over Today on the Weather bar to display additional weather details. Hover over Tomorrow on the Weather bar to display additional weather details. To add another city to the Weather bar, click the down arrow next to the city, click Add Location, type the name of the city, and then press Enter. Depending on the size of your monitor screen, you may need to minimize the Folder pane to see Tomorrow on the Weather bar.
  • #23 To change the background color, click the Color button in the Color group and then click a background color.
  • #24 Your Outlook Calendar can help keep you organized when you use it to schedule appointments. An appointment is any activity that you schedule in your calendar with a starting time and an ending time. You can schedule homework assignments and exams as appointments. If you specify an appointment location, it is shown in parentheses next to the appointment information. You can add appointments in any view. You can also create a new appointment by pressing Ctrl + N.
  • #25 Choose another date for End time in order to schedule a multiple-day appointment, such as a vacation or conference. Click the All day event check box if the activity lasts the entire day and does not have a start or end time, such as a vacation day. In the Options group, use the Recurrence button to enter an appointment that occurs on a regular basis, such as daily, weekly, monthly, or yearly.
  • #26 You can also set an appointment reminder to help you remember the appointment as shown in the illustration in this slide.
  • #27 You can also plan your course work by creating a multiple-day appointment with the subject Chapter 1 to show which days you plan to work on this chapter.
  • #28 If you need to schedule a meeting, you can use Outlook Calendar to send out a meeting request. A meeting request is an appointment that is sent to other people and can include the meeting location and other important information about the meeting, such as its topic and goals. The date displayed in the End time text box also changes.
  • #29 You can also click the To button to select email addresses from your Address Book. Separate email addresses with a comma (,) or semi-colon (;) if you are inviting more than one person to the meeting.
  • #30 The illustration in this slide displays a meeting request. Sending a meeting request is one way you can integrate the Outlook Calendar and Email tools. Responses to your meeting requests appear in your email Inbox folder. Recipients can respond to a meeting request by adding the meeting to their Outlook Calendars or by declining the request.
  • #31 For security purposes most schools do not permit students to configure Outlook
  • #32 People is an Outlook tool that you can use to organize and save information about the people and businesses that you communicate with. The information you enter about a person or business can include just the contact’s name and email address, or it can include additional information, such as the contact’s street address, cell phone number, picture, and birthday. You can also display People by using the shortcut Ctrl + 3. The File as text box is completed automatically after you enter the full name. This entry is used to organize the People list in alphabetical order. The Display as text box is completed automatically after you enter the email address. Click the Business Card button in the Current View group on the HOME tab to change to Business Card view. When you receive an email message in Outlook, you can add the sender as a new contact by right-clicking the person’s name at the top of the message and then clicking Add to Outlook Contacts.
  • #33 The illustration in this slide shows Outlook open in People view.
  • #34 If both the sender and the recipient use Microsoft Outlook 2013, 2010, or 2007, the person’s picture will appear in the email message header.
  • #35 Being organized means having information at your fingertips and knowing how best to manage it. With Outlook, you can easily find people and appointments by using the Search Contacts and Search Calendar text boxes. You can also open the Search Contacts text box with the shortcut Ctrl + E. To search for an appointment, click the Calendar button in the Navigation bar. You can also open the Search Calendar text box with the shortcut Ctrl + E. Click in the Search Calendar text box and type the search text. You can refine your search by using the buttons on the SEARCH TOOLS SEARCH tab. Outlook displays the appointment. Double-click the appointment and make the desired changes. Click the Save & Close button in the Actions group.
  • #36 You only need to type in the information you are looking for—and you can even search using partial information. For example, you can type part of a business name or phone number as shown in the illustration in this slide.
  • #37 Click the Recent Searches button and you will find the search you conducted in this skill in the drop-down list.