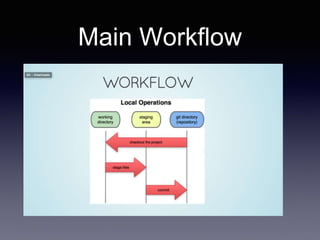
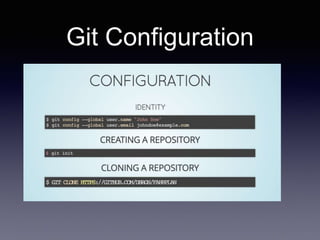
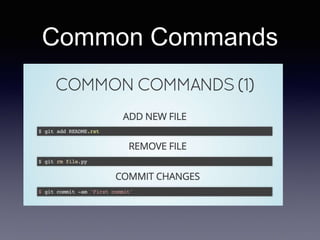
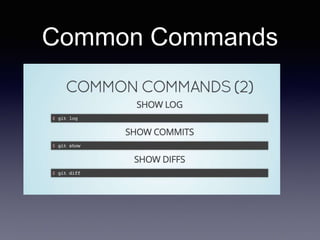
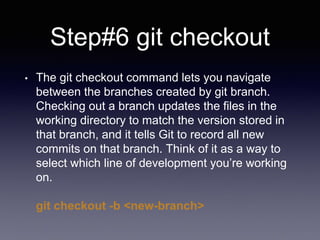
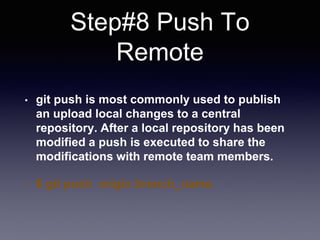
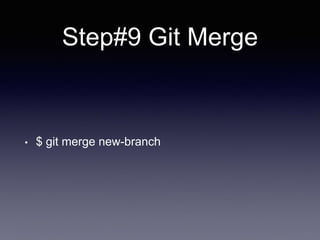
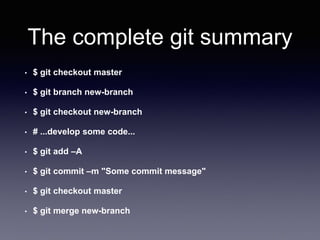
GIT-Version Control
System
By Anil Upadhyay
Main Workflow
Download GIT Software from
the GIT Website
GIT vs GITHUB
Git Configuration
Common Commands
Common Commands
Step#1
Initialising a new repository: git init
• To create a new repo, you'll use the git init command.
git init is a one-time command you use during the initial
setup of a new repo. Executing this command will
create a new .git subdirectory in your current working
directory. This will also create a new master branch.
A HEAD file is also created which points to the currently
checked out commit.
NOTE: THIS IS DONE WHEN THERE IS NO
PROJECT CREATED IN GITHUB
Step#2
Cloning an existing repository: git clone
• If a project has already been set up in a central
repository, the clone command is the most common
way for users to obtain a local development clone.
Like git init, cloning is generally a one-time
operation. Once a developer has obtained a working
copy, all version control operations are managed
through their local repository.
git clone <repo url>
NOTE: THIS IS DONE WHEN THERE ALREADY A
PROJECT CREATED IN GITHUB
Step#3
Don’t Mess with the Master: Working with Branches in Git
and GitHub
• Do not mess with the master. If you make changes to the master
branch of a group project while other people are also working on
it, your on-the-fly changes will ripple out to affect everyone else
and very quickly there will be merge conflicts, weeping, rending
of garments, and plagues of locusts. It’s that serious.
Why is the master so important to not mess with? One word: the
master branch is deployable. It is your production code, ready to
roll out into the world. The master branch is meant to be stable,
and it is the social contract of open source software to never,
ever push anything to master that is not tested, or that breaks
the build. The entire reason GitHub works is that it is always
safe to work from the master.
Step#4 Working With
Branches
Step#5 Create Branches
• It's important to understand that branches are just
pointers to commits. When you create a branch, all
Git needs to do is create a new pointer, it doesn’t
change the repository in any other way. If you start
with a repository that looks like this:
git branch crazy-experiment
To start adding commits to it, you need to
select it with git checkout, and then use the
standard git add and git commit commands.
Step#6 git checkout
• The git checkout command lets you navigate
between the branches created by git branch.
Checking out a branch updates the files in the
working directory to match the version stored in
that branch, and it tells Git to record all new
commits on that branch. Think of it as a way to
select which line of development you’re working
on.
git checkout -b <new-branch>
Step#7 Deleting Branches
• Once you’ve finished working on a branch and have
merged it into the main code base, you’re free to delete
the branch without losing any history:
git branch -d crazy-experiment
However, if the branch hasn’t been merged, the above
command will output an error message:
error: The branch 'crazy-experiment' is not fully merged.If
you are sure you want to delete it, run 'git branch -D
crazy-experiment'.
Step#8 Push To
Remote
• git push is most commonly used to publish
an upload local changes to a central
repository. After a local repository has been
modified a push is executed to share the
modifications with remote team members.
• $ git push origin branch_name
Step#9 Git Merge
• $ git merge new-branch
The complete git summary
• $ git checkout master
• $ git branch new-branch
• $ git checkout new-branch
• # ...develop some code...
• $ git add –A
• $ git commit –m "Some commit message"
• $ git checkout master
• $ git merge new-branch
Thank You
• Have a Git Day

Git - Simplified For Testers

  • 1.
  • 2.
  • 3.
    Download GIT Softwarefrom the GIT Website
  • 4.
  • 5.
  • 6.
  • 7.
  • 8.
    Step#1 Initialising a newrepository: git init • To create a new repo, you'll use the git init command. git init is a one-time command you use during the initial setup of a new repo. Executing this command will create a new .git subdirectory in your current working directory. This will also create a new master branch. A HEAD file is also created which points to the currently checked out commit. NOTE: THIS IS DONE WHEN THERE IS NO PROJECT CREATED IN GITHUB
  • 9.
    Step#2 Cloning an existingrepository: git clone • If a project has already been set up in a central repository, the clone command is the most common way for users to obtain a local development clone. Like git init, cloning is generally a one-time operation. Once a developer has obtained a working copy, all version control operations are managed through their local repository. git clone <repo url> NOTE: THIS IS DONE WHEN THERE ALREADY A PROJECT CREATED IN GITHUB
  • 10.
    Step#3 Don’t Mess withthe Master: Working with Branches in Git and GitHub • Do not mess with the master. If you make changes to the master branch of a group project while other people are also working on it, your on-the-fly changes will ripple out to affect everyone else and very quickly there will be merge conflicts, weeping, rending of garments, and plagues of locusts. It’s that serious. Why is the master so important to not mess with? One word: the master branch is deployable. It is your production code, ready to roll out into the world. The master branch is meant to be stable, and it is the social contract of open source software to never, ever push anything to master that is not tested, or that breaks the build. The entire reason GitHub works is that it is always safe to work from the master.
  • 11.
  • 12.
    Step#5 Create Branches •It's important to understand that branches are just pointers to commits. When you create a branch, all Git needs to do is create a new pointer, it doesn’t change the repository in any other way. If you start with a repository that looks like this: git branch crazy-experiment To start adding commits to it, you need to select it with git checkout, and then use the standard git add and git commit commands.
  • 13.
    Step#6 git checkout •The git checkout command lets you navigate between the branches created by git branch. Checking out a branch updates the files in the working directory to match the version stored in that branch, and it tells Git to record all new commits on that branch. Think of it as a way to select which line of development you’re working on. git checkout -b <new-branch>
  • 14.
    Step#7 Deleting Branches •Once you’ve finished working on a branch and have merged it into the main code base, you’re free to delete the branch without losing any history: git branch -d crazy-experiment However, if the branch hasn’t been merged, the above command will output an error message: error: The branch 'crazy-experiment' is not fully merged.If you are sure you want to delete it, run 'git branch -D crazy-experiment'.
  • 15.
    Step#8 Push To Remote •git push is most commonly used to publish an upload local changes to a central repository. After a local repository has been modified a push is executed to share the modifications with remote team members. • $ git push origin branch_name
  • 16.
    Step#9 Git Merge •$ git merge new-branch
  • 17.
    The complete gitsummary • $ git checkout master • $ git branch new-branch • $ git checkout new-branch • # ...develop some code... • $ git add –A • $ git commit –m "Some commit message" • $ git checkout master • $ git merge new-branch
  • 18.