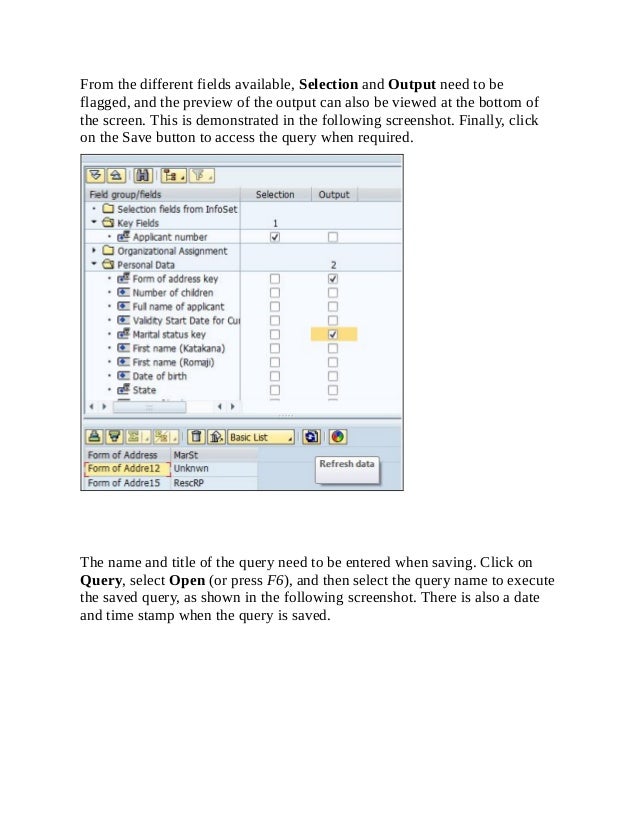
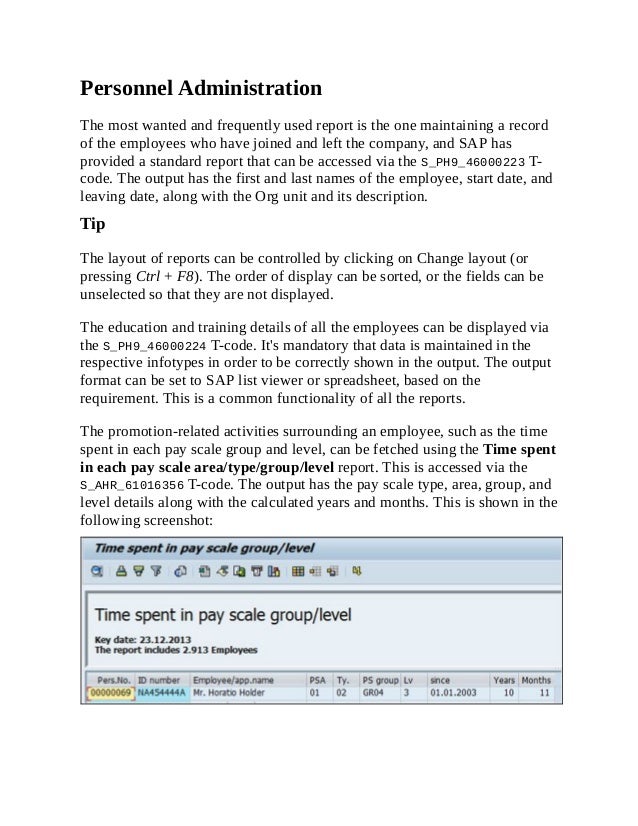
SAP HCM – A Complete Tutorial
Table of Contents
SAP HCM – A Complete Tutorial
Credits
Disclaimer
About the Author
Acknowledgments
About the Reviewers
www.PacktPub.com
Support files, eBooks, discount offers, and more
Why subscribe?
Free access for Packt account holders
Instant updates on new Packt books
Preface
What this book covers
What you need for this book
Who this book is for
Conventions
Reader feedback
Customer support
Errata
Piracy
Questions
1. End User Transactions
Daily transactional codes
Frequently used T-codes
The Recruitment submodule
The Organization Management submodule
The Personnel Administration submodule
The Time Management submodule
The Payroll Accounting submodule
The Talent Management submodule
The Training and Event Management submodule
The Travel Management submodule
Standard reports
Recruitment
Organizational Management
Personnel Administration
Time Management
Payroll Accounting
Talent Management
Training and Event Management
Travel Management
Creating a folder and moving the T-codes
An overview of SAP standard reports
Recruitment
Organization Management
Personnel Administration
Time Management
Payroll Accounting
Talent Management
Training and Event Management
Travel Management
Summary
2. Recruitment Configuration
Handling vacancies
Vacancy maintenance steps
Advertising vacancies
Channels or recruitment instruments
Vacant position mapping using recruitment instruments
Recruitment medium
Applicant cycle
Integration with personnel administration
Integration tools
Common error message during data transfer
Tips and tricks
Features
Transport requests in SAP
Summary
3. SPOCK – the Building Block of OM
The concepts of Organization Management
Elucidating an organizational structure
Basic relationships between organizational objects
Building an organizational structure
Creating an organizational structure with different interfaces
Organization and Staffing
The relationship between an Org unit and Position
The relationship between Position and Job
Simple Maintenance
Creating a Cost Center
The Expert Mode
Creating an organizational unit object in the Expert Mode
Creating a position object in the Expert Mode
Creating a Job object in the Expert Mode
The concept of Number Ranges
Scenarios where we use external number assignment
The Plan Version
Creating an organizational structure using the Expert Mode
Configuring the table
Integrating Organization Management with Personnel Administration
Integration switches
Data Transfer Tools
RHINTE Reports
The purpose of the OM tool
Summary
4. PA Configuration in Less Than 24 Hours
Personnel Administration infotypes
Important infotypes that are mandatory and their configuration steps
Functions of infotypes
The 0000 (Actions) infotype
The 0001 (Organization Assignment) infotype
The 0002 (Personal Data) infotype
The 0006 (Address) infotype
The 0007 (Planned Working Time) infotype
The 0008 (Basic Pay) infotype
The 0009 (Bank Details) infotype
Configuration steps
What makes the enterprise structure?
What makes the personnel structure?
Tips and tricks that will be handy while configuring the submodule
Recommendation on number range assignment
Configuring mandatory infotypes
Customizing the infotype menu and info groups
Configuring personnel actions
Dynamic actions
Summary
5. Time Management Configuration – Negative Time
Nodes for configuring the Work schedule rule and Absence Quotas
Time Management infotypes
The Planned Working Time infotype (0007)
The Absences infotype (2001)
The Attendances infotype (2002)
The Absence Quotas infotype (2006)
The Attendance Quotas infotype (2007)
The Overtime infotype (2005)
The Employee Remuneration infotype (2010)
The Quota Correction infotype (2013)
The Time Quota Compensation infotype (0416)
Important nodes and/or customizing tables for the Work schedule rule
The holiday calendar
The daily work schedule
The period work schedule
The day type
The Work schedule rule
Important nodes and/or customizing tables for Absence Quotas
Absence Quotas generation rule configuration
Tips to generate Absence Quotas without any hassles
Frequent error message and workaround
Important Time Management-related tables
Important functions, operations, and features
Internal tables and cluster tables used in time evaluation
Tool to check the configuration settings for quota generation
Summary
6. Payroll Configuration
Infotypes mandatory for payroll processing
Payroll infotypes
The 0000 (Actions) infotype
The 0001 (Organizational Assignment) infotype
Payroll area
Control record elucidated
The 0003 (Payroll Status) infotype
The 0007 (Planned Working Time) infotype
The 0008 (Basic Pay) infotype
The 0027 (Cost Distribution) infotype
The 0014 (Recurring Payment and Deduction) infotype
The 0015 (Additional Payments) infotype
The 0267 (Additional off-cycle payments) infotype
Steps to configure the payroll
Wage types
The 0008 (Basic Pay) configuration
The 0014 (Recurring Payments and Deductions) configuration
The 0015 (Additional Payments) configuration
The 0267 (On-demand or Additional Payments) configuration
Writing a PCR to meet your customer's requirements
Schematic payroll schema
Personnel calculation rule (PCR)
Important payroll functions
Important payroll operations
Frequent error messages and workaround
Configuring a payslip
Integration with the finance module
Activities in the HR system
Activities in an accounting AC system
Posting payroll results to finance steps
Different statuses of a posting run
Summary
7. Talent Management and Development Configuration
Basic settings – Personnel Development
Integration aspects with other submodules of HCM
Master data for the Personnel Development component
The qualification catalogue
Career maintenance
Functions in Personnel Development
Standard tools in the PD component
Development plans
Objective setting and an appraisal's template configuration
Category group creation
Category creation
Steps to create an appraisal template
Summary
8. Training and Event Management Configuration
The basic settings in TEM
Integration aspects in the Training and Event Management module
Configuring a business event preparation/event catalog
Time schedule
Physical location
Master data
Resource management
The business event catalog
Day-to-day activities
Booking
Recurring activities
Follow-up processing
Employee Self-Service (ESS)
Summary
9. Travel Management Configuration
Travel Management – features and functions
Basic settings for number ranges
Master data required for Travel Management
Important transaction codes
Travel Request configuration steps
Configuring Travel Planning
Configuring Travel Expenses
Integration aspects with other application components
Summary
10. Building a Report Using SAP Query Viewer
Building an ad hoc query using the SQ01 transaction code
Steps for creating the user group
Steps for creating the infoset
Steps for creating a query
Executing a report using an ad hoc query
Frequent error messages when building an ad hoc query
Analysis
Workaround
An interesting feature to tag the T-code with the report
Transport a query across clients
Develop a report using SAP Query Viewer (SQVI)
Converting the query view to a SAP query
Summary
Index
SAP HCM – A Complete Tutorial
Copyright © 2014 Packt Publishing
All rights reserved. No part of this book may be reproduced, stored in a
retrieval system, or transmitted in any form or by any means, without the
prior written permission of the publisher, except in the case of brief
quotations embedded in critical articles or reviews.
Every effort has been made in the preparation of this book to ensure the
accuracy of the information presented. However, the information contained
in this book is sold without warranty, either express or implied. Neither the
author, nor Packt Publishing, and its dealers and distributors will be held
liable for any damages caused or alleged to be caused directly or indirectly
by this book.
Packt Publishing has endeavored to provide trademark information about all
of the companies and products mentioned in this book by the appropriate
use of capitals. However, Packt Publishing cannot guarantee the accuracy of
this information.
First published: June 2014
Production reference: 1180614
Published by Packt Publishing Ltd.
Livery Place
35 Livery Street
Birmingham B3 2PB, UK.
ISBN 978-1-78217-220-8
www.packtpub.com
Cover image by Asher Wishkerman (<wishkerman@hotmail.com>)
Credits
Author
Ganesh Karthik S
Reviewers
Gordon Du
Vladimir Mikhaylenko
Eric Wildenstein
Commissioning Editor
Amarabha Banerjee
Acquisition Editor
Mohammad Rizvi
Content Development Editor
Shaon Basu
Technical Editors
Manan Badani
Menza Mathew
Akash Rajiv Sharma
Copy Editor
Karuna Narayanan
Project Coordinator
Venitha Cutinho
Proofreaders
Simran Bhogal
Ameesha Green
Paul Hindle
Indexers
Mehreen Deshmukh
Rekha Nair
Tejal Soni
Graphics
Ronak Dhruv
Production Coordinator
Arvindkumar Gupta
Cover Work
Arvindkumar Gupta
Disclaimer
The author would like to advice consultants, end users, and aspirants to do a
scrupulous testing of the configuration/customization in the Development
client before moving the objects to the Production system. The author will
not be held accountable for any damage caused by using or misusing the
information, code, or methods suggested in this book, and anyone using
them does so at his/her own risk. The evolution of the book is from the
author's own interests and book publisher's trust in the author's abilities and
not necessarily from the interests of his current and former employers.
About the Author
Ganesh Karthik S, who prefers to be called Karthik, is a senior SAP HCM
functional consultant with Cognizant (NASDAQ: CTSH), based in
Chennai, India. He holds a Master's degree in Human Resource
Management from Monash University (Go8 universities), Melbourne,
Australia (2005-2006). In December 2010, he earned a certification in SAP
Certified Application Associate - Human Capital Management with SAP
ERP 6.0 EHP4. He has close to 120 man months of progressive IT
experience, which includes working on SAP and Oracle ERP products. He
has been associated with multiple end-to-end implementation projects,
along with projects on rollouts, upgradation, and production support. He is
also determined to share his experiences with SAP aspirants and consultants
in the form of a book. He is passionate about SAP and takes joy in sharing
knowledge with others. He is an avid blogger and frequently writes on his
blog (http://saperphcm.blogspot.in/). He loves sports, and his favorite
movie is The Pursuit of Happiness (2006). This book, SAP HCM – A
Complete Tutorial, is his first attempt at an endeavor of this kind, and he
would like to wholeheartedly thank the entire team at Packt Publishing for
this opportunity. He likes to network and can be contacted via his Skype ID,
Dreambeckons or via his Google Talk ID, sapenjooy.
Acknowledgments
At the very outset, I am thankful to my parents, sister, athimber (ak), nieces
(Ananya and Mridini), Sarayu maami, Jayaram mama, Babu mama,
Saraswati manni, chittappas, grandpa (ICF) for all their support and wishes.
Special thanks to my grandpa and grandma (chrompet), who aren't with me
now physically, for their blessings. I would also like to thank my friends
Raja, Madhan, Venki, Rajesh, Matheen, Jean, Bean, Anbu (Ramesh), Yogi,
Chaks, Machan R, and Mahesh (Alwarpet) for their encouragement. I
would like to thank some of my mates in the SAP sphere: Sivabalan, Eswar
(Income Tax), Thomas, Arun Vajrakantham, Dinakar, Gopalraj, Arathi,
Sankaraman Subramaniam, Santhosh Somasekaran, Rajesh Burra,
Kamlesh, Lokesh Sharma, Lokesh, Shankar, Thaneesh, Bala, Guna, Singh,
Kamba, Gyan, Prasanna, Charmi, Papri, Suneeta, Eswar (ISU), Kishore,
Raju, Govind Rao, Laxmi Rao, Ashok (ABAP), Ganesh (FI), Radhey
Shyam, Saravanagopal, and Vijay NR for their continuous support. It's a big
list and I apologize if I have inadvertently missed mentioning any of you. I
am indebted to the entire team of Packt Publishing for this opportunity and
a special mention to Rahul Nair, Mohammad Rizvi, and Shaon Basu for
entrusting me with the responsibility, and the technical reviewers, Alexey
Tveritinov, Eric Wildenstein, Vladimir Mikhaylenko, and Gordon Du, for
their invaluable suggestions and inputs.
About the Reviewers
Gordon Du has been working in the Information Technology sector for
over 30 years now. He is passionate about helping others whenever he can.
Being the top contributor in the SAP Community Network since 2008, he
has helped thousands of users to utilize ERP package more efficiently and
solve their problems. He has broad knowledge in all aspects of ERP,
especially for SAP.
Gordon has worked and trained in Canada, China, Singapore, and the USA.
In China, he was the first person to successfully implement an international
ERP software package in a domestic company. He is the author of
Mastering SQL Queries for SAP Business One, Packt Publishing.
Vladimir Mikhaylenko is a SAP developer with more than five years of
development experience in various SAP modules including, but not limited
to, Financials, Material Management, Sales, and Distribution. At present,
Vladimir works with SAP Globalization Services in the Russian Federation,
and participates in development projects for the localization of SAP Human
Capital Management for CIS and Ukraine.
Eric Wildenstein is a SAP techno-functional independent consultant, and
has been working on ERP implementations for blue chip companies in
Western Europe and Northern Africa regions since 1997. He mainly
specializes in ABAP object-oriented programming, NetWeaver XI/PI/AIF,
and SAP Business Workflow, providing technical expertise across the core
business modules of SAP. Prior to becoming self-employed in 2000, he
worked as an in-house programmer analyst for PricewaterhouseCoopers,
UK, and Andersen Consulting, France, on both SAP R/3 and C/S
architectures.
Eric has already reviewed several SAP books, including the very
informative SAP ABAP Advanced Cookbook, Rehan Zaidi, Packt
Publishing.
I would like to thank my dear Laurence for her patience and understanding.
While I have been away from home working on various projects for the past
19 years, she is still very supportive, although I, myself, sometimes don't
have much time to share with her.
www.PacktPub.com
Support files, eBooks, discount offers,
and more
You might want to visit www.PacktPub.com for support files and
downloads related to your book.
Did you know that Packt offers eBook versions of every book published,
with PDF and ePub files available? You can upgrade to the eBook version
at www.PacktPub.com and as a print book customer, you are entitled to a
discount on the eBook copy. Get in touch with us at
<service@packtpub.com> for more details.
At www.PacktPub.com, you can also read a collection of free technical
articles, sign up for a range of free newsletters and receive exclusive
discounts and offers on Packt books and eBooks.
http://PacktLib.PacktPub.com
Do you need instant solutions to your IT questions? PacktLib is Packt's
online digital book library. Here, you can access, read and search across
Packt's entire library of books.
Why subscribe?
Fully searchable across every book published by Packt
Copy and paste, print and bookmark content
On demand and accessible via web browser
Free access for Packt account holders
If you have an account with Packt at www.PacktPub.com, you can use this
to access PacktLib today and view nine entirely free books. Simply use
your login credentials for immediate access.
Instant updates on new Packt books
Get notified! Find out when new books are published by following
@PacktEnterprise on Twitter, or the Packt Enterprise Facebook page.
Preface
The HR or HCM function plays the role of strategic partner/business
partner in current business scenarios, and the SAP HCM module is a great
plugin for SAP. This book attempts to cover most of the modules in HCM
such as Payroll, Time, and Travel to mention a few. There are plenty of
excellent books written by experts in SAP HCM space, but you will not
come across one that covers most of the topics under this module, and that
is where I got the inspiration. I hope this book will serve as a one-stop shop
to learn SAP HCM module configuration. Many real-time examples are
covered along with configuration steps and many snapshots for easy
understanding.
What this book covers
Chapter 1, End User Transactions, discusses all of the SAP HCM modules'
important transaction codes and standard reports that can be used for daily
operations.
Chapter 2, Recruitment Configuration, shows how to configure the
recruitment submodules.
Chapter 3, SPOCK – the Building Block of OM, introduces you to important
concepts of OM and multiple interfaces that can be used to build an
organization structure.
Chapter 4, PA Configuration in Less Than 24 Hours, shows how to
configure the PA module and understand the standard customizing settings
to map the business process.
Chapter 5, Time Management Configuration – Negative Time, covers
negative time configuration in detail along with how to generate quotas, and
error messages that occur frequently and steps to fix the errors.
Chapter 6, Payroll Configuration, tells you about the payroll schema and
how to customize the PCR. You will also delve into posting the pay results
to the FI module, which covers integration with the Finance module.
Chapter 7, Talent Management and Development Configuration, shows you
how to configure the appraisal template in less time and understand its
functionality in detail.
Chapter 8, Training and Event Management Configuration, helps you to
understand the various features that TEM module covers in detail.
Chapter 9, Travel Management Configuration, explores the various
standard configuration features that the Travel Management module offers.
Chapter 10, Building a Report Using SAP Query Viewer, enlightens you on
ways to build bespoke reports without any programming skills.
What you need for this book
You are expected to have basic knowledge of computers and know-how of
Enterprise Resource Planning products and domain experience.
Who this book is for
This book is for SAP HCM aspirants, end users, and consultants who are
keen on learning or fine-tuning their configuration knowledge. This book
will attempt to help learn concepts and apply them in real-time projects.
There are plenty of screenshots for better understanding. Some of the error
messages frequently raised in real-time environment are covered and
solutions for the same are also proposed.
Conventions
In this book, you will find a number of styles of text that distinguish
between different kinds of information. Here are some examples of these
styles and an explanation of their meaning.
Code words in text, database table names, folder names, filenames, file
extensions, pathnames, dummy URLs, user input, and Twitter handles are
shown as follows: "They define the nature of absence such as Sick, Casual,
and so on."
A block of code is set as follows:
ZLEN (PCR name)
3(ESG Grouping for PCR)
1234 (Leave encashment Wage type that holds number)
AMT=6789(Wage type)
AMT/30
MULTI ANA (Multiply Amount and Number, place it in Amount
field)
ADDWT 1234(Wage type)
New terms and important words are shown in bold. Words that you see on
the screen, in menus or dialog boxes for example, appear in the text like
this: "The Sort Criterion option is very handy when we try to find the
holiday that we defined in order to map it in the holiday calendar."
Note
Warnings or important notes appear in a box like this.
Tip
Tips and tricks appear like this.
Reader feedback
Feedback from our readers is always welcome. Let us know what you think
about this book—what you liked or may have disliked. Reader feedback is
important for us to develop titles that you really get the most out of.
To send us general feedback, simply send an e-mail to
<feedback@packtpub.com>, and mention the book title via the subject of
your message.
If there is a topic that you have expertise in and you are interested in either
writing or contributing to a book, see our author guide on
www.packtpub.com/authors.
Customer support
Now that you are the proud owner of a Packt book, we have a number of
things to help you to get the most from your purchase.
Errata
Although we have taken every care to ensure the accuracy of our content,
mistakes do happen. If you find a mistake in one of our books—maybe a
mistake in the text or the code—we would be grateful if you would report
this to us. By doing so, you can save other readers from frustration and help
us improve subsequent versions of this book. If you find any errata, please
report them by visiting http://www.packtpub.com/submit-errata, selecting
your book, clicking on the errata submission form link, and entering the
details of your errata. Once your errata are verified, your submission will be
accepted and the errata will be uploaded on our website, or added to any list
of existing errata, under the Errata section of that title. Any existing errata
can be viewed by selecting your title from
http://www.packtpub.com/support.
Piracy
Piracy of copyright material on the Internet is an ongoing problem across
all media. At Packt, we take the protection of our copyright and licenses
very seriously. If you come across any illegal copies of our works, in any
form, on the Internet, please provide us with the location address or website
name immediately so that we can pursue a remedy.
Please contact us at <copyright@packtpub.com> with a link to the
suspected pirated material.
We appreciate your help in protecting our authors, and our ability to bring
you valuable content.
Questions
You can contact us at <questions@packtpub.com> if you are having a
problem with any aspect of the book, and we will do our best to address it.
Chapter 1. End User Transactions
End user transaction code or simply T-code is a functionality provided by
SAP that calls a new screen to carry out day-to-day operational activities. A
transaction code is a four-character command entered in SAP by the end user
to perform routine tasks. It can also be a combination of characters and
numbers, for example, FS01. Each module has a different T-code that is
uniquely named. For instance, the FICO module's T-code is FI01, while the
Project Systems module's T-code will be CJ20.
The T-code, as we will call it throughout the chapters, is a technical name
that is entered in the command field to initiate a new GUI window. In this
chapter, we will cover all the important T-codes that end users or
administrators use on a daily basis. Further, you will also learn more about
the standard reports that SAP has delivered to ease daily activities.
Daily transactional codes
On a daily basis, an end user needs to access the T-code to perform daily
transactions. All the T-code is entered in a command field. A command field
is a space designed by SAP for entering T-codes. There are multiple ways to
enter a T-code; we will gradually learn about the different approaches.
The first approach is to enter the T-code in the command field, as shown in
the following screenshot:
Second, the T-codes can be accessed via SAP Easy Access. By double-
clicking on a node, the associated application is called and the start of
application message is populated at the bottom of the screen. SAP Easy
Access is the first screen you see when you log on. The following screenshot
shows the SAP Easy Access window:
Tip
We don't have to remember any T-codes. SAP has given a functionality to
store the T-codes by adding it under Favorites.
To add a T-code to Favorites, navigate to Favorites | Insert transaction, as
shown in the following screenshot, or simply press Ctrl + Shift + F4 and
then enter the T-code that we wish to add as favorite:
There are different ways to call a technical screen using a T-code. They are
shown in the following table:
Command+T-
code
Description
/n+T-code, for
example, /nPA20
If we wish to call the technical screen in the same
session, we may use the /n+T-code function.
/o+T-code, for
example, /oFS01
If we wish to call the screen in a different session, we
may use the /n+T-code function.
Frequently used T-codes
Let's look closely at the important or frequently used T-codes for
administration or transactional purposes.
The Recruitment submodule
The following are the essential T-codes in the Recruitment submodule:
T-
code
Description
PB10 This T-code is used for initial data entry. It performs actions similar to
the PB40 T-code. The mandatory fields ought to be filled by the user
to proceed to the next infotype.
PB20 This T-code is used for display purposes only.
PB30 This T-code is used to make changes to an applicant's data, for
example, changing a wrongly entered date of birth or incorrect
address.
PBA1 This T-code provides the functionality to bulk process an applicants'
data. Multiple applicants can be processed at the same time unlike the
PB30 T-code, which processes every applicant's data individually.
Applicants' IDs along with their names are fetched using this T-code
for easy processing.
PBA2 This T-code is useful when listing applicants based on their
advertising medium for bulk processing. It helps to filter applicants
based on a particular advertising channel such as a portal.
T-
code
Description
PBAW It's used to maintain the advertisements used by the client to process
an applicants' data.
PBAY All the vacant positions can be listed using this T-code. If positions
are not flagged as vacant in the Organizational Management (OM)
submodule, they can be maintained via this T-code.
PBAA A recruitment medium, such as job portal sites, that is linked with an
advertisement medium is evaluated using this T-code.
PBA7 This is an important T-code to transfer an applicant to employee.
Applicant gets converted to an employee using this T-code. The
integration between Recruitment and Personnel Administration
submodules come into picture.
PBA8 To confirm whether an applicant has been transferred to employee,
PBA8 needs to be executed. The system throws a message that
processing has been carried out successfully for the applicants.
After PBA8 T-code is executed, we will see a message similar to the one
shown in the following screenshot:
The Organization Management submodule
We will cover some of the important T-codes used to design and develop the
organization structure in the following table:
T-code Description
PPOCE This T-code is used to create an organizational structure. It is a
graphically supported interface with icons to easily differentiate
between object types such as org unit and position.
PPOC_OLD SAP provides multiple interfaces to create a structure. This T-
code is one such interface that is pretty simple and easy to use.
PP01 This is also referred to as the Expert Mode, because one needs to
know the object types like SPOCK, where S represents position,
O represents organization unit, and relationships A/B, where A is
the bottom-up approach and B is the top-down approach, in
depth to work in this interface.
T-code Description
PO10 This T-code is used to build structures using object types
individually based on SPOCK. This is used to create an Org unit;
this T-code creates the object type O, organization unit.
PO13 This is used to create the position object type.
PO03 This T-code is used to create the job object type.
PP03 This is an action-based T-code that helps infotypes get populated
one after another. All of the infotypes such as 1000-object, 1001-
relationships, and 1002-description can be created using this
interface.
PO14 Tasks, which are the day-to-day activities performed by the
personnel, can be maintained using this T-code.
The Personnel Administration submodule
The Personnel Administration submodule deals with everything related to
the master data of employees. Some of the frequently used T-codes are listed
as follows:
T-
code
Description
PA20 The master data of an employee is displayed using this T-code.
PA30 The master data is maintained via this T-code. Employee details such
as address and date of birth can be edited using this T-code.
T-
code
Description
PA40
Personnel actions are performed using this T-code. Personnel actions
such as hiring and promotions, known as the action type, are executed
for employees.
PA42 This T-code, known as the fast entry for action solution, helps a
company maintain large amount of data. The information captured
using this solution is highly accurate.
PA70 This T-code, known as the fast entry functionality, allows the
maintenance of master data for multiple employees at the same time.
For example, the recurring payments and deduction (0014) infotype
can be maintained for multiple employees.
The usage of the PA70 T-code is shown in the following screenshot. Multiple
employees can be entered, and the corresponding wage type, amount,
currency, and so on can be provided for these employees. Using this
functionality saves the administrator's time.
The Time Management submodule
The Time Management submodule is used to capture the time an employee
has spent at their work place or make a note of their absenteeism. The
important T-codes that maintain time data are covered in the following table:
T-code Description
PT01 The work schedule of the employee is created using this T-
code. The work schedule is simply the duration of work, say,
for instance, 9 a.m. to 6 p.m.
PTMW The time manager's workplace action allows us to have multiple
views such as one-day view and multiday view. It is used to
administer and manage time.
PP61 This T-code is used to change a shift plan for the employee.
PA61 This T-code, known as maintain time data, is used to maintain
time data for the employees. Only time-related infotypes such
as Absences, Attendances, and Overtime are maintained via this
T-code.
PA71 This T-code, known as the fast entry time data action, is used to
capture multiple employees' time-related data.
PT50 This T-code, known as quota overview, is used to display the
quota entitlements and leave balances of an employee.
PT62 The attendance check T-code is used to create a list of
employees who are absent, along with their reasons and the
attendance time.
T-code Description
PT60
This T-code is used for time evaluation. It is a program that
evaluates the time data of employee. Also, the wage types are
processed using this program.
PT_ERL00 Time evaluation messages are displayed using this T-code.
PT_CLSTB2 Time evaluation results can be accessed via this T-code.
CAC1 Using this T-code, data entry profile is created. Data entry
profiles are maintained for employees to capture their daily
working hours, absence, and so on.
CATA This T-code is used to transfer data to target components such
as PS, HR, and CO.
The Payroll Accounting submodule
The gross and net calculations of wages are performed using this submodule.
We will cover all the important T-codes that are used on a daily basis in the
following table:
T-code Description
T-code Description
PU03 This T-code can be used to change the payroll status
of an employee if necessary. It lets us change the
master data that already exists, for example, locking
a personnel's number.
One must exercise caution when working on this T-
code. It's a sensitive T-code because it is related to
an employee's pay. Also, time data for the
employees is controlled using this T-code.
PA03 The control record is accessed via this T-code. The
control record has key characteristics of how a
payroll is processed. This T-code is normally not
authorized by administrators.
PC00_MXX_SIMU This is the T-code used for the simulation run of a
payroll. The test is automatically flagged when this
T-code is executed.
PC00_MXX_CALC A live payroll run can be performed using this T-
code. The test flag is still available to be used if
required.
PC00_MXX_PA03_RELEA This T-code is used normally by end users to
release the control record. Master data and time
data is normally locked when this T-code is
executed. Changes cannot be made when this T-
code is executed.
T-code Description
PC00_MXX_PA03_CORR This T-code is used to make any changes to the
master data or time data. The status has to be
reverted to "release" to run a payroll for the payroll
period.
PC00_MXX_PA03_END Once all the activities are performed for the payroll
period, the control record must be exited in order to
proceed for the subsequent periods.
PC00_MXX_CEDT The remuneration statement or payslip can be
displayed using this T-code.
PE51 The payslip is designed using this T-code. The
payments, deductions, and net can be designed
using this T-code.
PC00_MXX_CDTA The data medium exchange for banks can be
achieved using this tool.
PUOC_99 The off-cycle payroll or on-demand payroll, as it's
called in SAP, is used to make payments or
deductions in a nonregular pay period such as in the
middle of the payroll period.
PC00_M99_CIPE The payroll results are posted to the finance
department using this T-code.
T-code Description
PCP0 The payroll posting runs are displayed using this T-
code. The release of posting documents is
controlled using this T-code.
PC00_M99_CIPC The completeness check is performed using this T-
code. We can find the pay results that are not posted
using this T-code.
OH11/PU30 The wage type maintenance tool is useful when
creating wage type or pay components such as
housing, dearness allowance.
PE01 The schema, which is the warehouse of logic, is
accessed and/or maintained via this T-code.
PE02 The Personnel Calculation Rule is accessed via
this T-code. The PCR is used to perform small
calculations.
PE04 The function and operations used can be accessed
via this T-code. The documentation of most of these
functions and operations can also be accessed via
this T-code.
PC00_M99_DLGA20 This shows the wage types used and their process
class and cummulation class assignment. The wage
type used in a payroll is analyzed using this T-code.
T-code Description
PC00_M99_DKON The wage type mapped to general ledgers for FICO
integration can be analyzed using this T-code
PCXX Country-specific payroll can be accessed via this T-
code.
PC00 Payroll of all the countries, such as Europe,
Americas, and so on, can be accessed via this T-
code.
PC_Payresult The payroll results of the employee can be analyzed
via this T-code. The following screenshot shows
how the payroll results are shown when the T-code
is executed.
Tip
The "XX" part in PCXX denotes the country grouping. For example, its 10
for USA, 01 for Germany, and so on. SAP has localized country-specific
payroll solution, and hence, each country has a specific number. The
country-specific settings are enabled using MOLGA, which is a technical
name for the country, and it needs to be activated. It is the foundation of the
SAP HCM solution.
It's always 99 for Offcyle run for any country grouping. It's the same for
posting as well.
The following screenshot shows the output of the PC_Payresult T-code:
The Talent Management submodule
The Talent Management module deals with assessing the performance of the
employees, such as feedback from supervisors, peers, and so on. We will
explore all the T-codes used in this submodule. They are described in the
following table:
T-code Description
PHAP_CATALOG This is used to create an appraisal template that can be
filled by the respective persons, based on the Key
Result Areas (KRA) such as attendance,
certification, and performance.
PPEM Career and succession planning for an entire org unit
can be performed via this T-code.
PPCP Career planning for a person can be performed via
this T-code. The qualifications and preferences can be
checked, based on which suitable persons can be
shortlisted.
T-code Description
PPSP Succession planning can be performed via this T-code.
The successor for a particular position can be
determined using this T-code. Different object types
such as position and job can be used to plan the
successor.
OOB1 The form of appraisals is accessed via this T-code.
The possible combination of appraiser and appraisee
is determined based on the evaluation path.
APPSEARCH This T-code is used to evaluate the appraisal template
based on different statuses such as "in preparation"
and "completed".
PHAP_CATALOG_PA This is used to create an appraisal template that can be
filled in by the respective persons based on the KRAs
such as attendance, certification, and performance.
The appraisers and appraisee allowed can be defined.
OOHAP_SETTINGS_PA The integration check-related switches can be
accessed via this T-code.
APPCREATE Once the created appraisal template is released, we
would be able to find the template in this T-code.
The Training and Event Management submodule
The Training and Event Management submodule caters to the company's
need of bridging the gap between supply and demand. This submodule caters
to identifying the right skill that needs to be provided to carry out the task
successfully. Let's take a look at the important T-codes and their
functionalities in the following table:
T-code Description
S_AHR_61011845 The necessary master data needs to be set up before using
the Training and Event Management submodule. The cost
item T-code is used to determine and represent the cost
incurred for a business event.
S_AHR_61011843 The address or physical location is maintained using this
T-code.
S_AHR_61011841 The business event location is set up using this T-code,
for example, Training Center, Atlanta.
PSVQ This function lets you change/display external organizers
such as your company.
S_AHR_61011893 The instructor who doesn't belong to the system, in other
words, whose master data is not maintained, is captured
using this function.
S_AHR_61011889 The business event group such as the language course is
set up using this function.
S_AHR_61011888 The business event type is used to capture the delivery
method, cost, capacity, and so on.
PSV2 This function lets you maintain the exact date on which
the event is scheduled to take place. It has the start and
end dates of events.
T-code Description
PSV1
This function lets you enroll attendees for business events
and, at the same time, store the relevant billing and
activity allocation data.
S_PH9_46000434 The internal activity allocation for settling the fees of
external instructors and also of the employees who had
attended an event can be settled using this function.
The Travel Management submodule
The Travel Management submodule offers functionalities such as creating
different travel expense types, processing business trip data, taking care of
approvals, and entering the travel trip data into the system. Let's focus on the
important T-codes related to this submodule, shown in the following table:
T-
code
Description
TRIP This T-code allows you to create a travel request, book rooms, hotel,
and so on.
PR05 The travel expense functionality allows you to track the status,
settlement status, amount, and so on.
PRAP The mass approval of any number of trips is performed via this
function.
T-
code
Description
PREC The expected travel expenses cannot be determined until a trip is
approved. In order to proceed further, the trip needs to be settled, and
this function helps to meet the purpose.
PRFI The posting run is performed using this function. The travel expenses
that need to be settled are collected as transfer documents for posting
to accounting.
PRRW The trip transfer documents are posted to FI/CO using this function.
Standard reports
SAP has delivered many standard reports that meet business needs. For
example, the SAP1 T-code can be used to display all reports module-wise in
SAP. Let's look closely at some of the important reports that can be used by
administrators.
Recruitment
The Recruitment standard reports can be accessed by navigating to SAP
Easy Access | Human Resources | Personnel Management | Recruitment
| Infosystem | Reports | Variable Applicant List.
The Variable Applicant List report, which can be accessed via the
S_AHR_61015508 T-code, is very useful when fetching the flexible list of all
the applicants' data. There are flexible reports that let us choose from a
combination of 20 fields from different infotypes. They also allow us to sort
different fields such as age.
Tip
All of the reports can also be accessed via the SE38 or SA38 T-code,
depending on user authorizations, and can be fetched by navigating to
System | Status | Program.
The statuses of applicants along with their names can be fetched using the
applicants by name report that can be accessed via the S_AHR_61015509 T-
code. The output has the following data:
The number of the applicants
The applicants' names
The text of the status, for example, in process
The beginning date of the applicants' statuses
Tip
The applicant action along with the status of each applicant, name, and so on
can be fetched via the applicant by action report, and it can be accessed via
the S_AHR_61015510 T-code. The output received is the action type such as
initial data entry, overall applicant status, applicant name, or applicant id.
The frequently fed input data such as the company code can be entered in the
input selection screen and saved as a variant for saving time.
Before clicking on Save (or pressing Ctrl + S), we can give the variant a
name and description; however, isn't mandatory. This is shown in the
following screenshot:
The variant can be called and it automatically feeds on the data stored using
the variant. From the standard report, we can call the variant by clicking on
Get Variant (or pressing Shift + F5) and choosing the variant name. We can
do this if we want to get the Test variant for example. We saved this variant
in the previous step. The demonstration is shown in the following screen:
The ad hoc query is a useful tool to pull any data from tables and is accessed
via the S_PH0_48000512 T-code. The standard /SAPQUERY/HR_APP infoset
can be used to set the selection and output. If the standard report doesn't
meet the requirement of the client, this ad hoc query function can be utilized.
From the different fields available, Selection and Output need to be
flagged, and the preview of the output can also be viewed at the bottom of
the screen. This is demonstrated in the following screenshot. Finally, click
on the Save button to access the query when required.
The name and title of the query need to be entered when saving. Click on
Query, select Open (or press F6), and then select the query name to execute
the saved query, as shown in the following screenshot. There is also a date
and time stamp when the query is saved.
As seen in the following screenshot, the selection and the output saved in the
query gets displayed automatically when we open the query.
We can display the output by clicking on the Output button or by pressing
the F8 key.
Tip
Transaction SERP and SARP can be used to display and maintain the standard
report tree. HR00 needs to selected, then click on Display (F5) to start the
report.
Organizational Management
The OM reports can be accessed by navigating to SAP Easy Access |
Human Resources | Organizational Management | Infosystem |
Organization Unit. The backbone of OM is the SPOCK object types, and
there are plenty of standard reports to display them individually. There are
many standard reports provided by SAP to display the object types and their
description. The S_AHR_61016491 function is used to display the
organizational units with their start and end dates, along with their object
IDs and description.
The existing positions can be seen via the S_AHR_61016502 T-code. The
output is similar to what is displayed for an organizational unit. All the
existing jobs, along with their descriptions, are accessed via the
S_AHR_61016497 T-code.
The structure hierarchy is displayed via the RHSTRU00 report. This report
uses the object ID that is entered as the root of a tree structure, and using the
specified evaluation path, it fetches the object and its related object type. The
display depth in the report tells us how far the object and its relationship
need to be displayed in the output.
Tip
The evaluation path gives instructions to the system to look for the object
types and relationships and is maintained in the T778A table or via the OOAW
T-code.
The graphic interface is also supported by SAP; the structure can be
displayed in a graphical format. The S_AHR_61016530 T-code is used to
display the structure in a graphical form. They can be downloaded on to the
system for further analysis.
The reporting infotype is a functionality given to run reports based on
infotypes. Normally, 1000-1999 are OM infotypes, and in this report, we can
give the infotype number and execute the report. The S_AHR_61016532 T-
code is used to execute the report.
The authorization for objects based on a user can be fetched using the
Authorized Objects per User/Profile report and is accessed via the
RE_RHAUTH00 T-code. When the user ID is entered and executed, the system
displays all the authorization objects to which the user has access.
Relationship is a key concept in OM; it's like A and B, where A is bottom up
and B is top down. We can find the missing relationships for object types
using this report. The Display and Create Missing Inverse Relationships
report helps find the missing relationships between object types, and it is
accessed via the RE_RHCHECKV T-code.
The object types and relationships can be exported to different clients using
the Manual Transport Link report, which is accessed via the RE_RHMOVE30
T-code.
Personnel Administration
The most wanted and frequently used report is the one maintaining a record
of the employees who have joined and left the company, and SAP has
provided a standard report that can be accessed via the S_PH9_46000223 T-
code. The output has the first and last names of the employee, start date, and
leaving date, along with the Org unit and its description.
Tip
The layout of reports can be controlled by clicking on Change layout (or
pressing Ctrl + F8). The order of display can be sorted, or the fields can be
unselected so that they are not displayed.
The education and training details of all the employees can be displayed via
the S_PH9_46000224 T-code. It's mandatory that data is maintained in the
respective infotypes in order to be correctly shown in the output. The output
format can be set to SAP list viewer or spreadsheet, based on the
requirement. This is a common functionality of all the reports.
The promotion-related activities surrounding an employee, such as the time
spent in each pay scale group and level, can be fetched using the Time spent
in each pay scale area/type/group/level report. This is accessed via the
S_AHR_61016356 T-code. The output has the pay scale type, area, group, and
level details along with the calculated years and months. This is shown in the
following screenshot:
If we notice, the logic to fetch the year and month is built in report that SAP
uses to display in the output. If the standard report doesn't meet your
requirements, only then is it recommended that you go for a new
development.
The personnel numbers are normally of eight digits, and should the client
wish to capture the numbers maintained in the legacy system, they can do it
using the 0031 infotype. SAP provides a standard report to capture the
numbers maintained for all the employees, which is accessed via the
S_AHR_61016358 T-code.
The list of active employees is one of the most frequently wanted reports,
along with gender details, and SAP has built a standard one that can be
accessed via the S_AHR_61016369 T-code. It displays the first name, last
name, position, and personnel number, along with the entry and leaving
dates.
The flexible report that SAP has provided for a user to select/deselect the
fields according to their business needs is the Flexible Employee Data
report. It is accessed via the S_AHR_61016362 T-code. The advantage of
using the report is that it displays all the available fields from which we can
choose 20 separate fields. It's a very user friendly report that can be tweaked
based on the company's needs.
The employee's nationalities can be displayed using the Nationalities report,
which is accessed via the S_AHR_61016374 T-code.
The organizational changes made to the employee can be captured via the
Headcount changes report, and it is accessed via the S_L9C_94000095 T-
code. The action type and action reason normally adds meaning to the
personnel action performed. For example, the change of position action has
been performed and also the promotion action; the two actions can be listed
using the standard report. The important fields such as enterprise and
personnel structure can be fetched using this report.
The age and gender reports are accessed via the S_PH9_46000218 T-code.
SAP also provides a standard report to display age and gender based on
seniority, in other words, the duration spent in the company. This is accessed
via the S_PH9_46000217 T-code. The personnel who has spent more time in
the company gets prioritized and listed first.
The infotype changes have to be captured, and this is very vital for audit
purposes. Any changes done intentionally or unintentionally need to be
captured, and there is a report for this known as Logged Changes in
Infotype Data provided by SAP for security purposes. This report can be
accessed via the S_AHR_61016380 T-code.
Tip
The HR Documents: Infotypes with Documents (V_T585A), HR
Documents: Field Group Definition (V_T585B), and HR Documents:
Field Group Characteristics (V_T585C) tables must be maintained for the
effective use of this report.
A detailed log of report can be accessed via the S_AHR_61016381 T-code.
The report name along with user details and date and time of access is
displayed when the report is executed. This, however, is only created for a
report maintained via the V_T599R (HR Report Attributes) table and also the
Record at start required online field is flagged.
The ad hoc query report for Personnel Administration submodule with the
standard /SAPQUERY/HR_ADM infoset can be used to build a report with your
own selection and output fields. The only difference is the infoset that is
chosen for the PA submodule. The infoset query is accessed via the
S_PH0_48000510 T-code.
Time Management
The work schedule, absence, and attendance of the employee are closely
monitored by the administrators, and SAP has provided many standard
reports to meet the demands.
The daily work schedule of an employee can be accessed via the PT03 T-
code. The personal work schedule of an employee, which can be for a week
or month, for example, can be displayed via the PT63 T-code. The employee
number, name, and daily work schedule are displayed in the following
screenshot:
The start and end dates, along with the holiday calendar, are also displayed,
making it easy for administration.
The absence and attendance information is vital for administration, and SAP
has provided standard reports to meet business demands. They can be
accessed via the PT64 T-code. This report gives us the output in the form of
working hours anticipated and days.
The graphical format is supported by accessing the PT90 T-code. The
absence is displayed in a different color for easy recognition. Multiple
employees can be chosen based on the organization unit, for example, and
the Attendance/Absence Data: Multiple-Employee View report can be
accessed via the PT91 T-code.
The graphical format of absence/attendance can be displayed via the
Graphical Overview of Attendances/Absences report and can be accessed
via the PT65 T-code. When we double-click on absence or attendance type
mentioned on the screen, it will automatically take us to the master data
screen.
The quota entitlements and balances can be displayed via the display
absence quota information report, and it is accessed via the PT_QTA10 T-
code. The base entitlements in number of days, for example, and the applied
leave along with the available balance or the remaining total is displayed in
the output. This is another one of the most frequently used report in
business. The output of this report is shown in the following screenshot:
The Cumulated Time Evaluation Results: Time Balances/Time Wage
Types report is accessed via the PT_BAL00 T-code. If we use PT60 (Time
evaluation), time wage types / time balances are formed via time evaluation.
These reports will be very useful to display information.
Time evaluation data can be accessed via the PT_EDT_TELU T-code; the time
statement form can also be configured and used in this report. If time-
evaluated data is available in time cluster, it gets displayed as the output. The
standard form TEDT TF00 Time statement form (standard) is used and copied
according to customer needs. This copied time form can be used in the
report. This is very similar to the payslip configuration in the Payroll
submodule.
The working times captured via Cross Application Time Sheet (CATS) can
be accessed via the CATS_DA T-code. An important report of transferring data
to cross modules such as HR is accessed via the CATA T-code.
The data can also be transferred individually module-wise and can be
accessed via the CAT6 T-code for HR, CAT5 for project systems, and CAT7 for
FICO.
Payroll Accounting
The payments and deductions of employees are displayed via the Payments
and Deductions report. It's a flexible report that allows us to display data
based on the wage type if necessary. This is accessed via the
S_AHR_61015608 T-code.
The bank details of employees are displayed via the Bank Details report or
accessed via the S_AHR_61015609 T-code. The data maintained in the
following infotypes and subtypes can be displayed via this report:
Bank Details (0009)
Capital Formation (0010)
External Transfers (0011)
Payslip or remuneration statement is displayed via the program remuneration
statement that can be accessed via the S_AHR_61015606 T-code. The form
name that we use is the copied version of Remuneration statement (SAP
standard) - XF01. It's recommended that you copy the standard, rename it,
and change it accordingly. The remuneration statement can also be printed
using the HR smart forms. They are accessed via the PC00_M99_HRF T-code.
The wage type reporter is a useful report that displays the wage types and the
corresponding amount, along with other related information of the employee
such as company code and personnel area. It's accessed via the
PC00_M99_CWTR T-code. The data is fetched from Cluster tables (Results
table and WPBP). All the payment and deduction wage types can be
displayed using this report.
The payments made on public holidays can be determined using the
Paydays on holidays or weekends report. It's accessed via the
S_AHR_61015614 T-code. The prerequisite is to have the paydays defined in
the T549S table.
The payment date, end date of pay period, and so on are graphically
displayed using the Payday calendar report, and are executed via the
S_AHR_61015615 T-code. The legends used clearly indicate the meaning. For
example, X denotes a payday in the past. This is demonstrated in the
following screenshot:
Talent Management
The display profile matchup report can be accessed via the PEPM T-code. It's
a comparison of the position's requirements with the person's qualifications.
We can also generate a training proposal by flagging the checkbox.
Applicable career paths within an organization structure can be displayed via
the Evaluate Careers report, and are accessed via the S_AHR_61015524 T-
code. The following screenshot shows the Evaluate Careers report:
The career path and its description along with the object type, LB, are
displayed as the output.
The object without qualification or requirement can be accessed via the
S_PH9_46000019 T-code. The object type in selection can be, for example, a
person, and when it is executed, it lists the IDs of people whose
qualifications are not maintained. It basically takes us to the PPCP T-code.
The overview of all the qualifications maintained is accessed via the
Qualification Overview report, and it is accessed via the S_PH9_46000016
T-code.
Training and Event Management
The standard reports help administrators capture the training cost, details
about the business event, attendees, and so on. The reports can be accessed
by navigating to SAP Easy Access | Human Resources | Training and
Event Management | Information Systems | Reports.
All the attendees enrolled for a training program can be displayed via the
S_PH9_46000434 T-code. The report list many fields such as the following:
Attendee's name and abbreviation
Booking date
Attendance fee/price
Business event name
Start and end dates of the event
The comparison of cost incurred against each organization unit is a useful
report for analysis, and it can be accessed via the S_PH9_46000423 T-code.
The business event schedule can be accessed via S_PH9_46000438. If there is
no event that is scheduled, the system throws an error message to indicate its
nonavailability.
The resources to organize an event are captured via a standard resource
equipment report, which is accessed via the S_AHR_61016224 T-code. This
report gives details of the equipments that are available in training rooms.
The graphical format is supported by SAP. The graphical resource
reservation report is a useful one that can be accessed via the
S_PH9_46000441 T-code.
The Training and Event Management submodule also has an ad hoc query
that can be developed using the S_PH0_48000535 T-code.
Travel Management
The Travel Management component supports all processes involved in
handling business trips. Its comprehensive functionality is integrated with
settlement and payment processes.
Travel Management enables you to request, plan, and book trips, create
expense reports, and transfer expense results to other business function
areas.
There are various standard reports that can be accessed by navigating to SAP
Easy Access | Human Resources | Information Systems | Reports | Travel
Management. They broadly cover trip expenses and planning reports.
The General Trip Data/Trip Totals report is very useful to evaluate the trip
totals listed per trip. This report is accessed via the S_AHR_61016401 T-code.
There are many branching options that can be selected from the following
options:
Trip
Trip receipts
Trip cost assignment
Trip block list
The Cost Assignment for Trip report is very vital for a business to evaluate
the cost and assignment to respective general ledger in accounting. This
report is accessed via the S_AHR_61016404 T-code.
The period-wise travel expense report can be displayed using the
S_AHR_61016408 T-code.
Multiple periods or period parameters can be selected so that a report can be
displayed. The period could be from the following options:
Monthly
Bi-weekly
Weekly
This is a very flexible report that allows up to seven periods to be
represented in a single report. The different selection parameters could be
from the following options:
Personnel's number
Cost center (employee master cost center), for example, the employee
cost center maintained in 0001 infotype
Trip expense types (see field documentation)
Trip expense categories (see field documentation)
Per diems/flat rates (for meals, travel costs, and accommodations)
There are plenty of tricks to save time for administrators. We will cover
some of them specifically to access T-codes and reports.
Creating a folder and moving the T-
codes
First, SAP provides an easy functionality to help us access T-codes easily
without the need to remember them. It is done by navigating to SAP Easy
access | Favorites | Insert folder, as shown in the following screenshot:
Users can create folders and insert all the T-code related to them. For
example, payroll can be a folder, and all the T-code related to the payroll
can be moved to that folder.
SAP also has the feature to add the T-codes that are frequently accessed, to
the folder of our choice that we created earlier. It is done by navigating to
SAP Easy access | Favorites | Insert transaction, as shown in the
following screenshot:
All the T-codes are moved to the respective folders, and hence, accessibility
is easier for administrators. SAP has an interesting feature of downloading
T-codes for easy accessibility or to share it with your teammates. It is
accessed by navigating to SAP Easy access | Favorites | Download to PC.
The format can be a text file or a word pad option of your choice.
The technical names of reports can be shown or hidden by changing the
settings by navigating to SAP Easy Access | Extras | Settings | Display
Technical Names.
When the Display Technical Names option is flagged, all the technical
names of the reports and the T-code get displayed automatically.
An overview of SAP standard reports
SAP has developed many standard reports that normally meet business
requirements. We will cover frequently used reports submodule-wise. We
will see the reports along with their T-code and program name for easy
understanding and can use them in a real-time environment.
Recruitment
The following are the important T-codes along with their ABAP program
names:
Report ABAP Program T-code
Variable Applicant List RPAPL012 S_AHR_61015508
Applicants by Name RPAPL001 S_AHR_61015509
Applicants by action RPAPL004 S_AHR_61015510
Ad Hoc Query SAPLAQ_ADHOC S_PH0_48000512
Organization Management
The Organizational Management program names are prefixed with RH and
are shown in the following table along with their technical names:
Report ABAP Program T-code
Existing Organizational Units RHXEXI00 S_AHR_61016491
Existing Positions RHXEXI03 S_AHR_61016502
Existing Jobs RHXEXI02 S_AHR_61016497
Structure Display/Maintenance RHSTRU00 SE38
PD Graphics Interface PDGRAPHX S_AHR_61016530
Infotype Reporting RHINFAW0 S_AHR_61016532
Authorized Objects RHAUTH00 RE_RHAUTH00
Check Relationships RHCHECKV RE_RHCHECKV
Manual Transport Link RHMOVE30 RE_RHMOVE30
Personnel Administration
The Personnel Administration report's program names normally start with
RP. We have listed all the frequently used T-codes and their technical names
in the following table:
Report ABAP Program T-code
EEs Who Entered
And/Or Left
Company
AQZZ/SAPQUERY/H2FLUCTUATIONS== S_PH9_46000223
Education and
Training
AQZZ/SAPQUERY/H2EDUCATION===== S_PH9_46000224
Time spent in pay
scale group/level
RPLTRF00 S_AHR_61016356
Reference
Personnel Numbers
RPLREF00 S_AHR_61016358
Employee List RPLMIT00 S_AHR_61016369
Flexible Employee
Data
RPLICO10 S_AHR_61016362
Nationalities RPSNAT00 S_AHR_61016374
Headcount Changes AQZZ/SAPQUERY/H2STAFF_CHANGES2 S_L9C_94000095
Report ABAP Program T-code
Statistics: Gender
Sorted By Age
AQZZ/SAPQUERY/H2GENDER_PER_AGE S_PH9_46000218
Statistic: Gender by
Service Age
AQZZ/SAPQUERY/H2GEND_P_SENIOR= S_PH9_46000217
Logged Changes in
Infotype Data
RPUAUD00 S_AHR_61016380
Log of Report Starts RPUPROTD S_AHR_61016381
Ad Hoc Query SAPLAQ_ADHOC S_PH0_48000510
Time Management
We will see all the Time Management T-codes and their technical names in
the following table. We can execute the functionalities directly via the T-
code or by executing the ABAP program.
Report ABAP Program T-code
Display Work Schedule SAPMP51S PT03
Personal Work Schedule RPTPSH10 PT63
Attendances/Absences:
Calendar View
RPTABS50 PT90
Attendances/Absences: For
Multiple Employees
RPTABS60 PT91
Graphical Attendances/Abs.
Overview
RPTLEA40 PT65
Absence Quota Information RPTQTA10 PT_QTA10
Cumulated Time Evaluation
Results
RPTBAL00 PT_BAL00
Time Balances Overview RPTEDT00 PT_EDT_TELU
Display Working Times RCATS_DISPLAY_ACTIVITIES CATS_DA
Report ABAP Program T-code
Transfer to Target Components RCATSTAL CATA
Transfer External -> Time
Management
RPTEXTPT CAT6
Data Transfer CATS -> PS RCATSTPS CAT5
CATS: Transfer Data to CO RCATSTCO CAT7
Payroll Accounting
The Payroll T-codes are easy to memorize; they normally start with PC00
followed by country-grouping numbers. We will see the frequently used T-
codes and their technical names in the following table:
Report ABAP Program T-code
Payments and Deductions RPLPAY00 S_AHR_61015608
Bank Details RPLBNK00 S_AHR_61015609
Remuneration Statements RPCEDTX0 S_AHR_61015606
Wage Statement with HR Forms H99_HRFORMS_CALL PC00_M99_HRF
Wage type reporter H99CWTR0 PC00_M99_CWTR
Paydays on Holidays or Weekends RPCHCK00 S_AHR_61015614
Payday Calendar RPCSHS00 S_AHR_61015615
Talent Management
We will cover the frequently used Talent Management T-code in the
following table, which will serve as a quick reference note:
Report ABAP Program T-code
Profile Matchup SAPLRHPP PEPM
Evaluate Careers RHPECPAS S_AHR_61015524
Objects w/o Qualis or
Requirements
RHXPEP20 S_PH9_46000019
Career Planning RHPEPLAC PPCP
Qualifications Overview RHXPE_QUALI_PRO_ORGUNIT S_PH9_46000016
Training and Event Management
The standard T-code and their technical names under the Time and Event
Management report have been covered in the following table:
Report ABAP Program T-code
Attendee List RHXTEILN S_PH9_46000434
Budget Comparison RHXBUDG0 S_PH9_46000423
Business Event Schedule RHABLAUF S_PH9_46000438
Resource Equipment RHXRESA0 S_AHR_61016224
Graphical Resource Reservation RHXRBEL1 S_PH9_46000441
Ad Hoc Query SAPLAQ_ADHOC S_PH0_48000535
Travel Management
We will cover the frequently used Travel Management T-code in the
following table, which will serve as a quick reference note:
Report ABAP Program T-code
General Trip
Data/Trip Totals
RPR_TRIP_HEADER_DATA S_AHR_61016401
Cost Assignment for
Trip
RPR_TRIP_COST_ASSIGNMENT_DATA S_AHR_61016404
Travel Expense
Reporting by Period
RPRSTA01 S_AHR_61016408
Summary
In this chapter, we covered all the transaction codes or simply T-codes and
standard reports that are used submodule-wise. We started off by covering
all the important T-codes that are used on a day-to-day basis for both master
and transactional processing. Next, we covered all the standard reports
along with their program names that can be executed directly instead of the
T-code functionality.
In the next chapter, we will look closely at configuring the Recruitment
submodule and explore the standard functionalities provided by SAP.
Chapter 2. Recruitment Configuration
In this chapter, we will learn how the Recruitment submodule is configured
to map the business requirements in the SAP system. We will also learn how
to configure the recruitment module and also the integration aspects with
other modules such as organization management. Throughout the
recruitment component, data is captured in separate databases such as
PBxxxx, where xxxx is the infotype number and PB denotes the applicants.
Recruitment infotypes are in the range of 4000-4999. Some useful
recruitment-related infotypes are as follows:
4000: This refers to an applicant's action
4001: This refers to the applications
4002: This refers to a vacancy assignment
4003: This refers to an applicant's activities
4004: This refers to the status of an applicant's activity
4005: This refers to an applicant's personnel number
Handling vacancies
Hypothetically, let's say there is an open position that needs to be filled by an
employee.
The open positions are created in an Organization Management submodule,
which you will be learning in the next chapter, Chapter 3, SPOCK – the
Building Block of OM.
We will cover a scenario where the open position (Senior Manager HR)
created in an OM component will be used in the Recruitment submodule.
We will see how an open position is created in OM, although we will cover
it extensively in Chapter 3, SPOCK – the Building Block of OM.
We will enter the PP01 T-code in the command line. We will create an open
position (Senior Manager HR) and flag it as vacant. To create open
positions, we can use the PP01 T-code. This is shown in the following
screenshot:
The vacant position is the one we will attempt to fill using the Recruitment
submodule. Click on Save. We will keep this position vacant as shown in the
following screenshot:
We will flag all the positions as open; they need to be filled. Click on Create
(F5). You get the following screenshot:
We will create the open position in the OM side of the world, and this is
where the integration between recruitment and organization management
comes into play:
Vacancy maintenance steps
We will discuss how the vacant position created in the OM side is processed
in the recruitment side of the world. Click on Execute or press F8. We can
use the PPOCE/PP01/PPOC_OLD T-code to create positions in the OM as
shown in the following screenshot:
A vacancy is maintained via the TCD PBAY or by navigating to SAP easy
access | Human Resources | Personnel Management | Recruitment |
Advertising | Vacancy | PBAY (Maintain).
There is a standard report for listing out all the open positions created in the
OM. When we execute the report, we can not only list all the open positions,
but also assign the officer in charge of the open position. This is depicted in
the following screenshot:
When we click on the icon that looks like a pencil (edit), the Change
vacancy window gets enabled. Using this option, the officer in charge can
be mapped. This is shown in the following screenshot:
The complete administrator name gets populated, and we can choose from
the list. We will see the personnel officer assigned as AMU when we click
on the details button. AMU is the personnel officer in charge of the vacant
position's application, and it can be maintained by navigating to SPRO |
Personnel Management | Personnel administration | Organization data |
define administrators or via the SM30/31 T-code in the T526 table. This is
shown in the following screenshot:
The OM column is crucial, because the indicator P denotes that it's created
in the OM side and cannot be changed.
Advertising vacancies
The different channels that are used to fill the vacant positions are of prime
importance for the stakeholders. The following are the different types of
recruitment instruments that clients make use of:
Recruitment
Instruments
Description
Internal postings These are the ways to look internally for possible
candidates to fill the position
Employee
referral program
This is a cost-effective and efficient mode to track
potential candidates
Classified
advertising
These are jobs posted in newspapers
Employment
agencies and
search firms
These are consultancies that are tied up with companies,
and they specialize in identifying the right candidate for
the job
Job fairs This is like a place where all the interested companies
gather and hire the right talent
Online recruiting
sites
These are free websites that let candidates upload their
profiles, and companies use them as a source to identify
the right candidate
Channels or recruitment instruments
Recruitment instruments or channels are classified according to the different
media used. The media could be job portals, newspapers, television
advertisements, employee references, and so on.
The recruitment instruments are configurable items that can be used by the
end user to map the vacant position.
We will look at the configuration of applicant number ranges first. This can
be accessed by navigating to SPRO | Personnel Management |
Recruitment | Basic settings | Create number ranges for applicant
numbers. The following screenshot demonstrates this:
We will see three options, which are as follows:
Display: This option shows a number range, which is a two-digit code,
the start and end numbers (range), NR status, which has the last number
assigned, and finally, the flag that indicates whether it is internal or
external.
Change: This option allows us to make changes to the two-digit code,
start and end numbers (range), NR status, which has the last number
assigned, and finally, the flag that indicates whether it is internal or
external.
Tip
To delete the number range, we need to set the NR status to 0 or else
the system will throw an error message. Deletion is possible only if the
status is initial.
Change: This option allows us to change the current number assigned
from the current choice to a number of choices. The other fields are
grayed out and cannot be altered when this option is chosen.
Vacant position mapping using recruitment
instruments
We will see how different recruitment instruments, such as job portal, job
fair, and so on, are mapped to the vacant position.
First, the recruitment instruments such as ABC job portal and XYZ job
portal are created, and they are classified as the medium to which they
belong. The recruitment instruments can be accessed by navigating to SPRO
| Personnel Management | Recruitment | Workforce requirements and
advertising | Create recruitment instruments.
We can otherwise use Table Maintenance directly, which is common for all
the configurable tables.
The T-code that can be used is SM30/SM31. This is shown in the following
screenshot:
The first Instrument column has the unique ID, and the second instrument
column has the text maintained.
Recruitment medium
The recruitment medium is configured to group the instruments into one
category. We can access the recruitment medium by navigating to SPRO |
Personnel Management | Recruitment | Workforce requirements and
advertising | Create media. The following screenshot shows this:
We can also maintain the address of the instrument, or the source can also be
maintained by navigating to SPRO | Personnel Management |
Recruitment | Workforce requirements and advertising | Create
addresses for recruitment instruments.
The Recruitment submodule has the provision of creating applicant groups
and ranges. For example, the "Senior Managers" are all grouped under
Manager, the range is technical or nontechnical, and so on.
We will look at how this can be configured by navigating to SPRO |
Personnel Management | Recruitment | Applicant administration |
Applicant Structure | Create applicant groups. This is shown in the
following screenshot:
The applicant group allows us to categorize the applicants according to their
business needs, which are as follows:
Consultants
Managers
Freelancers
The applicant group is mapped to an applicant class. An applicant class is
categorized into two classes, which are as follows:
"P" for internal applicants
"AP" for external applicants
The applicant group not only allows us to bifurcate the applicants based on
their categories, it also has the functionality of mapping them as unsolicited
and lets us see how it is handled in the system. Unsolicited application
groups can be created by navigating to SPRO | Personnel Management |
Recruitment | Applicant administration | Applicant Structure | Create
unsolicited application groups.
The personnel administrators created are also used in the Personnel
Administration submodule, and they serve as an integration point.
In recruitment, this is called Create Personnel Officer, while in personnel
administration, it's called Define Administrator.
They can be accessed directly via the SM30/SM31 T-code and the T526 table.
The administrators are configured in the system by navigating to SPRO |
Personnel Management | Recruitment | Applicant administration |
Create personnel officer.
Tip
The administrators defined are also used in the PA as shown in the 0001
(organization assignment) infotype.
We can use the standard template that can be captured and sent out to
applicants based on their different statuses.
The standard template or text is configurable; however, mailing out to
applicants is a customizable activity that requires a technical consultant's
involvement. The path is SPRO | Personnel Management | Recruitment |
Applicant administration | Short profile | Create standard text. The
template can be mapped as a short profile to the applicant via Feature
SHPRO.
Tip
The repository documentation of features, payroll functions, and operations
can be accessed via the PDSY T-code. This is a useful Tcode to memorize.
Applicant cycle
The different stages of an applicant cycle are captured via applicant actions
such as in process, put on hold, and rejected. The applicant actions are
performed via the PB40 TCD, and it helps capture the details of the applicant,
such as initial data is captured, profile is screened, process applicant, and so
on.
We will see how applicant actions are configured in the system by
navigating to SPRO | Personnel Management | Recruitment | Applicant
selection | Applicant status | Change action texts. This is shown in the
following screenshot:
The standard statuses in SAP are as follows:
In process
To be hired
On hold
Rejected
Contract offered
Offer rejected
Invite
Invite to AC
The different reasons associated with each applicant action can be
configured by navigating to SPRO | Personnel Management | Recruitment
| Applicant selection | Applicant status | Create status reasons.
The following are the reasons why a candidate may be rejected:
Insufficient qualifications
Formal error
Overqualified
New application
No requirement
The standard statuses will normally meet your requirements and needs and
should be changed only in exceptional cases, as shown in the following
screenshot:
SAP also allows us to map the permissible vacancy assignment status to an
overall status, and this is achieved using the STATU feature by navigating to
SPRO | Personnel Management | Recruitment | Applicant Selection |
Applicant Status | Set permissible vac.assign statuses for each overall
status. This is shown in the following screenshot:
The STATU feature lets us define the overall status based on the status and
return value, as shown in the following screenshot:
The HR administrator can process the applicant in the system via
information types or infotypes. The info group is simply a collection of
infotypes populating sequentially to assist the user in completing the
transaction quickly.
The group can be changed by navigating to SPRO | Personnel
Management | Recruitment | Applicant actions | Change info groups.
This is shown in the following screenshot:
Double-click on the Info Groups option and you will get the User Group
Dependency on Menus and Info Groups window.
Here, we define the info group and mention whether it's dependent on user
group (UGR) or not. This is shown in the following screenshot:
The flag controls whether the menu is dependent on the UGR parameter
maintained in the user's profile, as shown in the following screenshot:
The parameter value is set in the UGR parameter, and it is maintained via the
SU3 or SU01 T-code.
If required, every user can be assigned a parameter value against the UGR
parameter ID.
For instance, UGR is a user group parameter and MOL is country grouping.
The output of the SU3 T-code looks like the following screenshot:
The output of the SU01 T-code looks like the following screenshot:
Each applicant action, such as the initial entry of basic applicant data,
prepare to hire, and so on, is mapped to an applicant's status, such as in
process, to be hired, and so on. We will see how the applicant action is
configured by navigating to SPRO | Personnel Management | Recruitment
| Applicant selection | Applicant actions | Change applicant actions. This
is shown in the following screenshot:
All the applicant actions, such as an applicant's initial screening, shortlisting
applicants, and interviewing, are maintained as shown in the following
screenshot:
The applicant actions are performed via the PB40 T-code. This is shown in
the following screenshot:
The applicant data is captured via different infotypes such as 0002, which is
personal data, and 0006, which is the address.
This is possible by configuring the info groups that we covered earlier in this
chapter.
We will see how infotypes sequentially populate one after the other. This is
shown in the following screenshot:
The mandatory fields have to be filled in order to proceed to the next
infotype. This is demonstrated in the following screenshot:
The next infotype is the personal data of the applicant, such as the first
name, last name, date of birth, and so on. This is demonstrated in the
following screenshot:
We will also find the applicant number generated automatically by the
system. This is controlled via a configuration in number ranges; we covered
this earlier in this chapter. This is shown in the following screenshot:
Click on the Save button after feeding data in to each infotype.
The system throws a message that the action for the applicant has been
successfully executed.
We will discuss the integration aspects of the Recruitment submodule and
Personnel Administration submodule in the next chapter.
We will find a seamless integration between the Recruitment and Personnel
Administration submodules. This integration will enable the applicants from
being transferred as employees.
Integration with personnel
administration
There is a seamless integration between the Recruitment and Personnel
Administration submodules, and we will now look at how the configuration
is done to achieve this.
There are two features that can be checked: the first one is PRELI, and the
other one is PRELR. They are checked by navigating to SPRO | Personnel
Management | Recruitment | Basic settings | Set up integration with
other components. The following screenshot demonstrates this:
Click on Execute.
The important features related to the Recruitment submodule are PRELI and
PRELR.
PRELI and PRELR are useful in the recruitment module to check if the
number entered in the recruitment module is to be checked with the
database.
PAPLI is another feature that is useful for the Recruitment submodule.
Integration tools
The procedure for transferring applicant data to Personnel Administration is
listed in the following table:
Steps Tcode Comment
First step PB40 Execute the initial entry of the basic data
applicant action
Second step PB40 Execute the prepare to hire applicant action
Third step PBA7 Direct transfer of the applicant data
Fourth and final
step
PBA8 Complete the activities after the data transfer
We will look at the steps in detail. The integration point between recruitment
and personnel administration is controlled via Data Transfer Tools, and it is
accessed via the PBA7 T-code.
Note
Do not change the action of hiring as it is hardcoded in the program
(RPAPRT09) as 60.
The following screenshot shows the integration point between recruitment
and personnel administration:
To find the name of the program from the T-code, select the T-code, navigate
to System | Status, and double-click on the program. This is shown in the
following screenshot:
We can see the program name of any code as shown in the following
screenshot:
The overall status must be set to 2 (corresponds to hired) for transferring the
applicant to the employee. This is shown in the following screenshot:
Click on Execute.
Finally, to complete the activity, execute the PBA8 T-code as shown in the
following screenshot:
Common error message during data transfer
We normally come across the "Error during activity import" error. We might
have run the initial entry of basic data and then we can execute the applicant'
action. When we try to transfer the applicant data to employee data using the
PBA7 T-code, the system might throw an error. We would need to check the
PB60 T-code and choose transfer data; navigate to Planned | Completed (
F8).
Tips and tricks
Let us take a look at certain features and transport requests in SAP which
will make our work easier.
Features
SAP has certain given features to default the values based on the enterprise
or personnel structure. The feature used to default an applicant number range
is NUMAP (which refers to applicant number ranges). The repository of
features can be maintained via the PE03 T-code. The features normally query
enterprise and personnel structure fields and return the value. The features'
functionality is useful, and it saves time and eradicates error while
processing data. This is shown in the following screenshot:
The applicant number range feature can be maintained via the PE03 T-code
as shown in the preceding screenshot, or by navigating to SPRO | Personnel
Management | Recruitment | Basic Settings | Choose number ranges.
The system determines which number range, such as external or internal,
needs to be assigned to the applicant during the initial entry of the applicant
data. This is in conjunction with the decision tree. The following screenshot
demonstrates this:
Here, we see that the decision tree is built based on the country grouping.
The return value is assigned as 01. The system queries the country grouping
of the applicant, and based on the grouping, it assigns 01, which could be
internal or external.
Tip
SAP offers the check feature to check the consistency of the action. If there
is no error, the system throws a message that the decision tree is error free;
otherwise, there will be an error message.
This feature is activated by clicking on Activate (Ctrl+F3), and it can be
checked for correctness by clicking on Check (Ctrl+F2).
Normally, when a feature is activated, the system triggers a transport request,
or TR. The TR is significant for moving data from one client to another
without making changes separately. This is shown in the following
screenshot:
SAP offers the functionality to hide the free search help for applicants and
persons. This is customized by navigating to SPRO | Personnel
Management | Recruitment | Basic settings | Hide Free Search in Search
Help or via the T77S0 system table. SAP recommends that we have SEARK
and NOAHQ in the T77S0 settings (system table). The blank space in the
value description field will denote that the free search is displayed, and if the
field has an entity "X", then the free search is hidden. This is the control
feature for free search. In the HR system, use the SM30/SM31.Type V_T77S0
T-code in the field table view and click on maintain. We will have to make
sure the following parameters are set.
The following table illustrates the functionalities:
Group
Semantic short
name
Value
abbreviation
Description
SEARK NOAHQ The free search is
displayed
SEARK NOAHQ X The free search is hidden
Transport requests in SAP
The system generates the transport request number when you click on
Activate.
The topic of transport requests must be known although, it is part of the
basis activity.
The transport request allows the changes made in one client to be moved to a
different client without any risk.
The transport request created earlier can be see by navigating to the SE09 T-
code.
We won't dwell any more on the concept of transport requests, as it's a
completely different topic. The output of the SE09 T-code looks like the
following screenshot:
It's very important to understand the request type and request status
functionalities:
The request type has multiple options to flag such as customizing and
workbench options
The request that is created by Functional Consultants (FC) is
collected as a customizing request
The request that is created by technical consultants is collected as a
workbench request
The request status has modifiable and released statuses:
Modifiable means the request is not yet released for transport
Released are the ones that have been released and can be moved to
different clients
Tip
Click on Display. Transport requests need to be released by the functional
consultant, and the porting of TR to different clients is taken care of by the
basis consultant.
We need to click on the Transport bus (F9) to release the request, and there
will be a green flag that denotes that the request is released. When the TR is
released, we will find the message populating it at the bottom of the screen,
as shown in the following screenshot:
The repository of transport requests is maintained via STMS, and normal
access is prohibited to those T-codes.
The following is a screenshot of the SAP Transport Management System
(STMS) T-code:
Summary
In this chapter, we have covered the standard functionalities provided by
SAP to configure the Recruitment submodule. The configurable items such
as recruitment instruments, media, and vacant positions have been covered.
The integration points between recruitment and organization management
have been discussed. The data transfer from Recruitment to Personnel
Administration has been explained.
In the next chapter, we will look closely at configuring the Organizational
Management submodule and explore the standard functionalities provided
by SAP.
Chapter 3. SPOCK – the Building Block of
OM
We will now learn how the Organizational Management (OM) submodule is
configured to map the business requirement in a SAP system. We will see how a
functional structure is mapped into the system. In this chapter, we will cover the
following topics:
The basic concepts of OM
Creating an organizational structure
Integrating OM with Personnel Administration
The concepts of Organization Management
The building blocks of OM are SPOCK. They are described as follows:
S: This stands for Position (for example, HR Manager, Marketing Director, and so
on)
P: This stands for Person
O: This stands for Organizational unit (also known as Org unit; it represents the
department in a company)
C: This stands for Job (for example, manager, director, and so on)
K: This stands for Cost Center
Note
Note that both K and P are external object types. The K object type, Cost Center, is
maintained in the FI/CO module, and the P object type, Person, is maintained in the PA
submodule. When we say external, it is simply not created in the OM submodule.
SAP has delivered multiple interfaces to design an organizational structure, and we will
understand each of them separately.
Elucidating an organizational structure
An organizational structure is a functional structure. It simply represents the
departmental hierarchy in a company. It identifies each Job, Position, its functions, and
where it reports to within the organization. The following table is an example of an
organizational structure:
Company
name
Departments
(suborg units)
Subordinate
departments
Positions Jobs
ABC Paper
Company
(Root
organizational
unit)
Administration
Office
Supervisor
Office Clerk
Receptionist
Director
Manager
Analyst
Administrator
Supervisor
Human
Resources
HR Director
Benefits
Administrator
Hiring
Manager
Hiring
Analyst
Finance
Accounts
Payable
Accounts
Receivable
A/P Manager
A/P Clerk
A/R Manager
A/R Clerk
Manufacturing
Pulp
Paper
Maintenance
Plant
supervisor
Technician
shift 1 - 05
Technician
shift 2 - 05
Maintenance
supervisor
Basic relationships between organizational objects
The relationships in organizational management are mostly similar to a parent-child
structure in two ways. A Position can belong to an organizational unit, and inversely, can
be incorporated by an organizational unit. In the following table, A indicates the bottom-
up approach, while B indicates the top-down approach:
Relationship
type
Related object
type
Relationship name
A002 O-O An organizational unit reports to another
organizational unit
B002 O-O This is the line supervisor of an organizational unit
A003 S-O All the Positions that reports to an organizational
unit
B003 O-S A Position belongs to an organizational unit
A007 C-S A Job describes a Position
B007 S-C A Position is described by a Job
A012 S-O The chief Position manages an organizational unit
B012 O-S An organizational unit is managed by a chief
Position
A011 K This is the Cost Center assignment
A008 P-S This is a Position-to-Person relationship
B008 S-P This is a Person-to-Position relationship
It is important to note that Cost Center is always one sided unlike other object types that
can have both A and B. It can be mapped either to an Org unit or to a Position, depending
on the business requirement.
Tip
Irrespective of the interface we use to create the structure, the object types are stored in
the HRP1000 table, and the relationship between the two object types is stored in
HRP1001.
When we discuss relationships, it is important to know the concept of the evaluation path
in SAP. The evaluation path lets us create a relationship between two object types. An
evaluation path can also have a sequence of object relationships. The evaluation path can
be accessed by navigating to SPRO | Personnel Management | Organizational
Management | Basic Settings | Data Model Enhancement | Maintain Evaluation
Paths or via OOAW. The BOSSONLY T-code, for example, is a standard evaluation path that
can be used in a report that will fetch the Org units that have the B012 relationship and
the holder of the Position.
Building an organizational structure
The different methods of building an organizational structure are as follows:
Organization and Staffing
Simple Maintenance
Expert Mode
Creating an organizational structure
with different interfaces
There are multiple interfaces provided by SAP to build a functional
structure. We will look at each of them in detail.
Organization and Staffing
The Organization and Staffing method of building organizational structure is
delivered by SAP in a scenario where the company does not have an HR
module, but the organizational structure is needed for the purpose of other
modules, for example, workflow requirements. Using this method, the
organization objects can be moved using the drag-and-drop approach. Also,
we can add some extra attributes to the organizational objects.
To work in this module, you have to navigate to SAP Easy Access |
Organizational Management | Organizational Plan | Organization and
Staffing | PPOCE - Create. The following screenshot demonstrates the
navigation path:
When you use the PPOCE - Create T-code, it prompts you to enter the start
date and end date, as seen in the following screenshot. It is recommended
that you have the start date as backdated as possible, say 01011900, for
instance.
The relationship between an Org unit and Position
We can use the PPOME T-code to use this interface via the SAP Easy Access
screen. We can right-click on Organizational unit, select Assign, and click
on Incorporates, as shown in the following screenshot:
You can enter the name of the Position, as shown in the following box, and
click on Enter. You can see that the Asst Manager position belongs to New
organizational unit. Also, notice O and S under ID. As discussed earlier, O
refers to the Org unit and S is for Position.
The relationship between Position and Job
We will use the PPOME T-code again, to use this interface via the SAP Easy
Access screen. Click on Edit and select Create Job. When the Create Job
window opens, enter the required fields, as shown in the following
screenshot. You can create the required jobs and click on Enter. The jobs are
saved, and we can assign them to positions by selecting the jobs that you
have created for the positions.
We will see how a Cost Center is mapped to an Org unit. Click on the
Accounting tab after you execute the PPOME T-code. You can assign the Cost
Center either to the position or the Org unit by entering the required details.
This is demonstrated in the following screenshot:
The Cost Center is an external object and can be mapped to either an Org
unit or a position.
Note
Note that OM is strongly built on the principle of inheritance. When the Cost
Center is mapped to the parent Org unit, all the other Org units or positions
mapped to them will automatically have the Cost Center tagged to them.
The following screenshot is an example that shows how a Master Cost
Center is mapped to the Org unit by clicking on the Accounting tab in the
PPOME T-code:
Simple Maintenance
The Simple Maintenance method, an older method of maintaining an
organizational structure, is used to build an organizational structure and
assign Cost Center in an easy way on one screen itself. This method is
recommended to build an organizational structure manually, in a scenario
where the company has few employees. In this method, you can view the
organizational structure without having to navigate much to different
screens.
This method can be accessed via SAP Easy Access by navigating to SAP
Menu | Human Resources | Organizational Management | Expert Mode |
Simple Maintenance | PPOC_OLD – Create. This is shown in the
following screenshot:
Also, we can directly access this method via the PPOC_OLD T-code, which is
shown in the following screenshot:
Enter the required fields in the Create Organizational Unit window to
create the Org unit. We will be able to enter the Org unit's name, the
abbreviation, as well as the long text. In the Create Organizational Unit
window, the users will have the following two options:
Overall view: In this view, the options and features cater to the users of
SAP Business Workflow
Human Resources view: In this view, the options and features cater to
the users of HR
After this is done, click on the Create button in the top-left corner of the
window, as shown in the following screenshot:
After performing the preceding steps, SAP automatically assigns an 8-digit
identifier that is unique to the object. The letter O identifies the object as an
organizational unit.
The positions are created by clicking on Staff assignments, as shown in the
following screenshot:
After this, click on Positions... and a screen pops up wherein the required
fields and validity periods are entered (it's recommend that you have them
backdated). SAP assigns a unique 8-digit identifier to each Position. The
letter S identifies the object as a Position. The following screenshot shows a
demonstration of the preceding steps:
In the Create Positions window, we will enter the abbreviation and the long
text that identifies the Position, the S object. The following screenshot shows
a demonstration of the preceding steps:
After performing the preceding steps, the jobs are created by clicking on
Create jobs; they are then mapped to positions. We need to enter the
abbreviation and its long text and then click on the Save button. After
clicking on the Create jobs button, the Create Jobs window opens up,
which is shown in the following screenshot:
We can map the Cost Center to the Org units or Positions by navigating to
Goto | Account Assignment and then clicking on the Master cost center…
tab, as shown in the following two screenshots:
After clicking on the Master cost center… tab, choose the appropriate Cost
Center and then click on the Save icon.
When we click on the Account Assignment tab, it will allow us to choose
the relevant Cost Center that needs to be mapped to that Org unit. This is
demonstrated in the following screenshot:
Creating a Cost Center
The Cost Center is an external object; it is created by a Finance (FI)
consultant and serves as an integration point between HCM-FI modules. The
Cost Center is essentially used for expense classification to know the
breakup of costs according to General Ledger (G/L).
Though Cost Center belongs to the FI module, it is useful to know the
navigation path. To access the Cost Center, navigate to SAP Easy Access |
SAP Menu | Accounting | Controlling | Cost center accounting | Master
Data | Cost Center | Individual Processing | KS01 - Create), as shown in
the following screenshot:
The following screenshot shows the Create Cost Center window that
allows you to enter the Cost Center name and the validity period:
Tip
The validity period is important when assigning it to an employee. The start
date of the Cost Distribution infotype 0027 must not be before the start date
of the Cost Center, or else, the system will throw an error.
The Expert Mode
The next interface that we will learn to use is PP01 - General. Using it, we
can create any of the object types such as O, S, C, and K. Using this method,
we can maintain any type of attribute to any of the organizational objects. If
any organizational structure needs to be built using uploaded programs,
especially for large companies, the uploaded programs can use the expert
method of building an organizational structure.
The Expert Mode can be accessed by navigating to SAP Easy Access | SAP
Menu | Organizational Management | Expert Mode | PP01 - General, as
shown in the following screenshot:
Creating an organizational unit object in the
Expert Mode
The object type and its relationships are created using the Expert Mode
interface. This interface is convenient to work with if we are familiar with
the object types and the relationships between them. It is normally used by
functional consultants. The following screenshot shows a demonstration of
the process of object creation:
Select Object and click on the Create infotype button (or press F5). Give an
object abbreviation as well as an object name for the Org unit that we are
creating. This is demonstrated in the following screenshot:
Creating a position object in the Expert Mode
We will now try to understand how a Position object is created. Follow the
steps mentioned in the preceding section about creating an organizational
unit. Instead of selecting Organizational unit as Object Type, select
Position. The demonstration is shown in the following screenshot:
As shown in the following screenshot, enter all the fields just as it was done
when creating an organizational unit:
Creating a Job object in the Expert Mode
You can create a Job object in the same manner in which you created the
Position object. Follow the steps mentioned in the preceding two sections.
Instead of selecting Position as Object Type, select Job. The demonstration
is shown in the following screenshot:
In the Maintain object window, the different statuses that we will find are
as follows:
Active
Planned
Submitted
Approved
Rejected
The statuses are useful if we want an approval-type mechanism of workflow
based on different statuses. In general, all OM objects are created in the
Active status.
When we click on Create object, the Create Object window allows you to
enter the object description and name, as shown in the following screenshot:
Tip
The object abbreviation is, by standard, 12 characters in length, and the
object name is 40 characters in length. We can find the length of each field
by pressing F1 from the field and clicking on the technical information.
Double click on table name in field data.
The concept of Number Ranges
It's important to know where the object IDs are actually generated from.
Each object has a unique number that's associated with it.
To check what number is assigned to the different subgroups, navigate to
SPRO | Personnel Management | Organizational Management | Basic
Settings | Maintain Number Ranges | Maintain Number Ranges. The
following screenshot shows the Change View "Number Assignment":
Overview window:
We can also access the preceding window via the OONR T-code. After
clicking on the Number range maintenance tab in the preceding
screenshot, the Range Maintenance window appears, as shown in the
following screenshot:
When we can click on the Intervals tab (the pencil icon depicts that we can
change intervals), shown in the preceding screenshot, the Interval
Maintenance window opens up, as shown in the following screenshot:
Scenarios where we use external number
assignment
Let's say that the company has object keys (numbers) already defined in an
existing system and would like the same numbers to be brought over to SAP
too.
Consider the number range is $$$$. The first two $$ represent the plan
version and the next two $$ represent the object type. For example, 01O
refers to the number range for organizational units. No changes may be
needed in this table.
We can also access the Number Range Object Maintenance window via
the SNRO T-code. In the following screenshot, RP_PLAN is Number Ranges for
Personnel Planning:
Click on the Ranges button in the following screenshot (or press F7). It
leads to the Range Maintenance window for Personnel Planning:
After performing the preceding step, the subgroup for Personnel Planning is
displayed. In the following screenshot, RP_Plan is the object that we choose
for Organization Management number ranges, 01 is the Plan version, and O
denotes the object type:
The Plan Version
The Plan Version lets us simulate multiple versions in parallel. It allows us to
manage different scenarios in the OM. We can have a number of plan
versions, but only one can be active and current.
Plan versions can be configured by navigating to SPRO | Personnel
Management | Global Settings in Personnel Management | Plan Version
Management | Maintain Plan Version. The following screenshot shows the
Change View "Plan Versions": Overview window:
We have to set the plan version by mapping the plan version ID into the
T77S0 table.
Plan versions can be activated by navigating to SPRO | Personnel
Management | Global Settings in Personnel Management | Plan Version
Management | Set active Plan Version. The following screenshot shows
the Change View "Set Active Plan Version": Overview window:
To activate the plan version, we use the PSO0 – Set Plan Version option,
which can be found by navigating to Organizational Management |
Settings:
We can activate the Plan Version directly via the PCO0 T-code, as shown in
the following screenshot:
After performing the preceding step, a window will open up asking you to
give the Plan Version. After selecting your Plan Version, click on the
Continue button, as shown in the following screenshot:
Let's say we want to maintain the Plan Version. We can do this by accessing
the configurable tables via a particular node or directly via table
maintenance. We have to execute the SM30/SM31 T-code and then enter the
table name, as shown in the following screenshot:
Clicking on the Maintain button will take us to a configurable table, as
shown in the following screenshot:
We can also go directly to the node by clicking on Customizing. This is
shown in the following screenshot:
Once we click on the Customizing button, the following screen appears;
click on Continue w/o Specifying Project:
After clicking on Continue w/o Specifying Project, the IMG activities
overview window appears; click on Global Settings in Personnel
Management:
After clicking on Global Settings in Personnel Management, click on the
Continue button, as shown in the following screenshot:
After clicking on the Continue button, we will see the Maintain Plan
Versions node, as shown in the following screenshot:
After clicking on the Maintain Plan Versions node, the Plan Versions
screen will appear, as shown in the following screenshot:
In the preceding screenshot, you'll find the Print icon; click on it or press
Ctrl + P. The following screenshot appears:
Creating an organizational structure using the
Expert Mode
We will now see how the organizational structure is created via Expert
Mode by navigating to SAP Easy Access | Human Resources |
Organizational Management | Expert Mode | PO10 – Organizational
Unit. The following screenshot shows how this is done:
We can perform the preceding steps directly via the PO10 T-code.
It's known as "Expert Mode" simply because you must have a good
understanding of the object types and relationships to build the structure
using this interface. The following screenshot shows the status of the
structure:
As seen in the preceding screenshot, we will see the status indicating that it
starts the application to build the organizational unit. The following
screenshot shows how an object is created:
To create positions, we navigate to SAP Easy Access | Human Resources |
Organizational Management | Expert Mode | PO13 - Positions. This is
demonstrated in the following screenshot:
We can perform the preceding steps directly via the PO13 T-code. The
following screenshot shows the Maintain Position window that appears
after creating a Position:
To create an object, we can choose the object and click on the Create
infotype (or press F5) and the following window appears. Then, click on the
Save:
To create Jobs, we navigate to SAP Easy Access | Human Resources |
Organizational Management | Expert Mode | PO03 - Jobs, as shown in
the following screenshot:
We can perform the preceding steps directly via the PO03 T-code. The
following window appears after creating an object:
Choose an object, click on the Create infotype button seen in the preceding
screenshot, then enter the required fields in the following Create Object
window, and click on the Save button:
Configuring the table
For the table configuration steps, the Data Browser screen needs to be used.
Then, enter the table name (for example, hrp1000), as seen in the following
screenshot:
Once we enter the table name, the respective table comes up, as seen in the
following screenshot:
The relationship between objects is always two-sided such as A/B, where A
is the bottom-up approach and B is the top-down approach. The relationship
with Cost Center is always one side; it is represented by A011.
The relationship between object types is maintained in the HRP1001 table.
This can be seen in the following screenshot:
The permitted relationships are stored in the T777E table. The OOVK T-code
gives us the completed view of the Relationship between Objects. We can
check using the SM30 or SM31 T-code, as seen in the following screenshot:
Using the SM30 or SM31 T-code, the Allowed Relationships window appears
as shown in the following screenshot:
Integrating Organization Management
with Personnel Administration
The dataflow between the Organizational Management and Personnel
Administration submodules is controlled via a system table.
Integration switches
A system table can be accessed via multiple ways, directly via SPRO, T-
code, or via table maintenance. We will explore all the methods in detail.
First, we will access a system table by navigating to SPRO | Personnel
Management | Organizational Management | Integration | Integration
with Personnel Administration | Set up Integration with Personnel
Administration. The navigation path is shown in the following screenshot:
Secondly, we will access the system table via the SM30/SM31 table
maintenance T-code. The following screenshot appears after executing the
T-code:
Finally, we will access the system table via the OOPS T-code, as shown in the
following screenshot:
After executing the OOPS T-code, the HR Master Data Integration window
in the following screenshot appears:
In the preceding screenshot, X denotes that data transfer from OM and PA
is active. The changes made in the PA side of the world can be transferred
to the OM side using Data Transfer reports that we will see in the following
section.
The PLOGI table actually holds the object types and object IDs that can be
accessed via the SE16 table, which is the Data Browser window:
In the Data Browser window, click on the Table Contents button. We can
give the Plan Version, Object Type, and click on the Execute button as
shown in the following screenshot:
The following screenshot shows the next window that shows the selected
entries:
Data Transfer Tools
There are standard data transfer reports provided by SAP; these reports
facilitate the transfer of objects between the OM and PA submodules. They
help the PA and OM submodules to be in sync after they are executed. The
reports can be accessed via the SE38 or SA38 T-code, which opens the
ABAP Editor window wherein you can enter the Program T-code as
shown in the following screenshot:
RHINTE Reports
The RHINTE00, RHINTE10, RHINTE20, and RHINTE30 tools facilitate data
transfer from OM to PA and vice versa.
Let's explore RHINTE00 with a scenario. Say, we have uploaded Master in
the Personnel Administration side, and we see the Org data in the 0001
infotype. However, we don't find the Position and Person mapping in the
OM side. In this case, we will make use of RHINTE00, which opens the
following window after it is executed.
After selecting the Personnel Number, the Report-Specific Settings
window appears as follows:
We will unflag the Test run and execute RHINTE00. Then, we will execute
the SM37 T-code to check the scheduled Job as shown in the following
screenshot:
Once we process the Job, we will be able to execute the T-code. The Job
will be listed with the name of the Job and the user ID.
The purpose of the OM tool
The RHINTECHECK tool is a very useful tool to use to check
inconsistencies in integration. The missing object type and its relationship,
if any, are highlighted, and it allows the consultant to check the
configuration settings.
All the reports have the standard documentation maintained to explain the
report purpose. We can see them by clicking on the Documentation
checkbox and then on the Display button.
Summary
In this chapter, we have covered all the interfaces provided by SAP to
design and develop the organizational structure. We have learned various T-
codes and table names to configure the OM submodule. We have also
covered the data-transfer tools provided that serve as an integration point
between the OM and PA submodules.
In the next chapter, we will closely look at configuring the Personnel
Administration submodule and explore the standard functionalities provided
by SAP.
Chapter 4. PA Configuration in Less
Than 24 Hours
In this chapter, we will explore how Personnel Administration (PA) is
configured to meet a client's requirements. We will see how different
infotypes are configured to meet the business requirements.
In this chapter, we are going to cover the following topics:
Personnel Administration infotypes
Important infotypes and their configuration
Configuring the submodule
Configuring personnel action
Personnel Administration infotypes
Infotype is a four-digit number, and nnnn is assigned to each infotype. The
number range 9,000 to 9,999 is reserved for customer and not standard SAP.
Personnel administration is everything to do with the master data of an
employee. The details of the employee are captured in infotypes.
The details of an employee such as personal data, bank details, and address
are all captured in infotypes. The employee details such as which associated
department he or she belong to, his or her current position, and his or her
personal details such as date of birth, residential address, pay details, bank
details, and so on, are captured using this submodule.
Standard PA infotypes are in the range of 0000-0999. Each number has a
name associated with it. For instance, 0002 is personal data. We will cover
all the mandatory infotypes in the following chapters. Customer or
customized infotypes are in the range of 9,000-9,999. There are some
country-specific infotypes such as court orders/student loans GB (infotype
0070), which is specific to Great Britain.
Important infotypes that are
mandatory and their configuration
steps
There are some important infotypes that need to be maintained for
processing the payroll and time. They are as follows:
0000 (Actions)
0001 (Organization Assignment)
0002 (Personal Data)
0006 (Address)
0007 (Planned Working Time)
0008 (Basic Pay)
0009 (Bank Details)
Tip
The 0003 infotype (Payroll Status) is created automatically when the hiring
action is performed; we will learn about this infotype in the following
chapters.
Functions of infotypes
Let's quickly cover the functionalities of each infotype in detail.
The 0000 (Actions) infotype
The Actions infotype is an important infotype that captures the activities
surrounding an employee from, say, hiring to separation.
When the employee is hired, the action type is "hire", and when there is
another activity such as promotion or reassignment that needs to be
performed, then again there is a different action type.
Each action has a start and end date to capture the history of the activities.
Let's say the hire action is performed on January 01, 2013 (the start date).
Another action is performed, for example, the employee is promoted on
December 01, 2013. In this scenario, there will be two line items to capture
the history.
The Actions infotype also clearly illustrates the reason for performing a
particular action. For example, hire can be an action type, and the reason for
performing the hiring action could be replacement. These fields are very
useful for reporting and administrative purposes, as demonstrated in the
following screenshot:
Tip
Important activities such as change of address, addition of a family member,
change in bank details, and so on, are not considered as actions but as part of
the master data maintenance.
The Actions infotype also has an important configurable field that shows the
employment status of an employee with the company. They are standard
SAP values, and each one has a meaning. The standard employment statuses
are as follows:
Active
Inactive
Retiree
Withdrawn
Tip
The status is maintained in the T529U table, and it can be accessed via SE16
or V_T529U in the SM30/31 T-code, as demonstrated in the following
screenshot:
Multiple actions can be performed in a single day. However, the status of the
employee cannot be changed from active to inactive on the same day. Virtual
infotype and Additional Actions infotype 0302 are used to take advantage of
the functionality of capturing multiple actions on the same day.
The 0001 (Organization Assignment) infotype
The Organizational Assignment infotype is of prime importance, because it
holds key employee information such as the geographical location, position,
department, and so on. It's one of the key infotypes for both organizational
and administrative purposes. This is an important infotype for the control of
payroll and for authorization purposes. This infotype has employee
integration in the following structures:
Enterprise structure
Personnel structure
Organizational structure
The enterprise structure is the connection between the company and
company code (legal entity or profit and loss) level. The personnel structure
demonstrates the connection between the employee and employer. The
organization structure is the functional connection of the employee or, in
other words, the employee positioned in the company.
The integration point between PA and OM applies in this infotype, as
demonstrated in the following screenshot:
The important payroll-related control feature, payroll area, is captured in
these infotypes. This helps all the employees to be grouped together when
the payroll is processed. The master cost center is default in this infotype.
This infotype also holds the key to an organization; this key can be used for
authorization purposes, if necessary.
The 0002 (Personal Data) infotype
The Personal Data infotype is used to capture an employee's first name, last
name, marital status, and date of birth.
Tip
The start date of Personal Data infotype is the birth date. If we note, in this
case, the date of birth of the employee is September 05, 1960, and the start
date of the employee is September 05, 1960.
The 0006 (Address) infotype
The Address infotype is used to capture the permanent and temporary
addresses of the employee. The address entered is also used in the 0009
(Bank Details) infotype. This is demonstrated in the following screenshot:
The 0007 (Planned Working Time) infotype
The Planned Working Time infotype is used to capture the work schedule of
the employee. Using this infotype, the employee's stipulated working time
can be captured. This is a crucial infotype that is useful for payroll. The
holiday calendar is linked directly/indirectly through this infotype.
The daily/weekly work pattern is captured in this infotype. We can also get
the total amount of work done on a daily, weekly, and monthly basis through
this infotype. This is customized by navigating to IMG | Time
Management | Work Schedule Rule | Work Schedule Rules and Work
Schedules. We will cover this exhaustively in Chapter 5, Time Management
Configuration – Negative Time. The following screenshot demonstrates this
infotype:
The work schedule will give us a detailed planned working time of the
employee. The employment percentage is passed on to the Basic Pay
infotype as capacity utilization level. The data flows from the Time
Management submodule to the Personnel Administration submodule when
the Basic Pay infotype details are maintained in the system, as shown in the
following screenshot:
Tip
The T588M infotype screen control has the feature of hiding or maintaining
the required fields of an infotype. It can also be accessed by navigating to
SPRO | Personnel Management | Personnel Administration |
Customising user interfaces | Change Screen Modifications.
The 0008 (Basic Pay) infotype
The Basic Pay infotype is used to capture the fixed pay components/earnings
drawn by the employee. The employee industry type and physical location-
specific details are captured in the form of payscale type and area.
The components captured in the Basic Pay infotype are referred to as wage
types, and we will cover them exhaustively in Chapter 6, Payroll
Configuration. For example, housing allowance and conveyance allowance
are referred to as wage types, and they have a number and text to identify
them.
The integration point between time and payroll is also evident in this
infotype. We will see the capacity utilization level fed from the value stored
in the 0007 (Planned Working Time) infotype. The following screenshot
shows the Basic Pay infotype:
The basic pay infotype can also be used to see the payslip. The configuration
steps will be covered in the forthcoming chapters. The payroll driver
program needs the Basic Pay (0008) infotype and the 0007 (Planned
Working Time) infotype for calculating the salary gross to net.
The 0009 (Bank Details) infotype
The Bank Details infotype has the payment method of salary for the
employee. The different payment methods that can be maintained are as
follows:
Cash
Check
Bank transfer
The following screenshot gives us a clear picture of the Bank Details
infotype:
The name of the employee is populated from the 0002 (Personal Data)
infotype, and the address populates from the 0006 (Address) infotype. The
standard bank detail types provided by SAP are as follows:
Main bank
Other bank details
Travel expenses
The account number is mandatory if the payment method is bank transfer.
Tip
The payment is configured normally through the FICO module. However, it
can also be done by an HCM consultant in liaison with a FICO consultant.
Configuration steps
The backbone of PA is a design of best practice enterprise and personnel
structure. The design of the enterprise and personnel structure is crucial for
both reporting and administrative purposes. It is also critical for processing
the payroll and time functionalities. Let's look at the configuration steps of
enterprise and personnel structure in detail.
What makes the enterprise structure?
The following components make up an enterprise structure:
Company
Company code
Personnel area
Personnel subarea
The company is the client for whom the implementation is done.
The company code is designed by the FICO component, and it actually
depends on the legal entities of the client, or in other words, it has its own
profit and loss statement. A different line of business can be represented as
company code in SAP. For example, company ABC can have multiple
businesses such as IT services and manufacturing. These two are represented
by a company code.
The personnel area can either be designed based on the geographical
location or functional location. For example, ABC company has its head
office in Chicago, USA, and its plant in New York, USA. We can create two
personnel areas.
The factors that influence the number of personnel areas needed are as
follows:
At least one personnel area is needed for each country
The number of personnel areas needed depends on the reporting
requirements
It may depend on the number of plants, the number of states in which
the company has offices, and so on
It may depend on the authorization needs
It may depend on the business needs in time management, payroll, and
in benefits modules
Tip
Personnel areas and subareas are four-digit alphanumeric code identifiers
with long text.
Personnel subareas are a further bifurcation of personnel areas. The business
characteristics are normally stored at the personnel subarea level. We will
see groupings done in payroll and time management at personnel subareas
and employee subgrouping levels.
What makes the personnel structure?
The following components make up the personnel structure:
Employee group
Employee subgroup
Payroll area
Organization key
The personnel structure can be designed for the purposes of both
administrative and organization perspectives.
The employee group and subgroup define the relationship of the employee
with the company. Say, for example, a full-time employee can be designed
as employee group, and the different grades can be designed as employee
subgroups such as grade A.
The payroll area allows us to group employees for whom the payroll is
processed at the same time and in the same frequency, for example, monthly,
bi-weekly, and so on.
Organization key is useful for authorization purpose, and its is a 14-digit key
that also defines the enterprise and personnel structure.
The Organizational Assignment infotype (0001), as discussed earlier, holds
the enterprise and personnel structure data of an employee, as seen in the
following screenshot:
Now, let's look at the configuration of enterprise and personnel structure in
detail. The company and company code is created by a FICO consultant.
However, we will see the steps for understanding it better.
The company is defined by a four-digit alphanumeric code, which represents
the unit designed according to commercial and labor law. A company can
have "N" number of company code (legal entities) that can be accessed by
navigating to SPRO | Enterprise Structure | Definition | Financial
Accounting | Define company. The following screenshot demonstrates this:
The company is defined by using a six-digit code. The long text is of 30
characters, and it can be alphanumeric.
Tip
The best practice is to copy entries and rename entries (click on copy or
press F6).
The following screenshot shows the list of entries for the company:
The next step is the creation of the company code. It can be accessed by
navigating to SPRO | Enterprise Structure | Definition | Financial
Accounting | Edit, Copy, Delete, Check Company Code.
The company code is below the company, and there can be "N" number of
company codes mapped to a company, as shown in the following screenshot:
When the copy option is chosen, the related tables are automatically filled
with entries, so it is advisable and the best practice in order to prevent a "No
entry in table" error while performing a configuration. This is shown in the
following screenshot:
There will be many associated tables when an object is copied. The frequent
pit falls while configuring could be "Customizing Error" or "No entry in
table" error messages. Now, when we click on copy, it will ask us to enter
the company code, as shown in the following screenshot:
We need to give from the company code say, 1,000, and the company code is
the one FI consultant creates which is, 9,000. The system throws a warning
message; we need to click on Yes to proceed and confirm.
If we wish to allocate the same chart of accounts to the new company that
we are defining, then we can click on Yes, or we can click on No, as shown
in the following screenshot:
All the associated tables get copied when the action is performed. The
objective here is to assign a different currency to the target company code
we copied. Say, the reference company currency is Euro, while the target
company code currency is USD. The system prompts a message that the
copy action has been successfully carried out, as demonstrated in the
following screenshot:
The other details about the company code such as the address, phone
number, and so on can be entered by clicking on address (Shift + F5). The
details that we enter here will be useful for reporting purpose. The following
screenshot shows the various fields that are to be filled:
We have to define the personnel areas, subareas, employee group, and
subgroups to do the assignment.
The design of enterprise and personnel structure is critical for the successful
implementation of the project and mapping the client process in SAP. The
best practice is to try out multiple designs before the blueprint is submitted
to the client for execution.
The personnel area and subareas are defined by navigating to SPRO |
Enterprise Structure | Definition | Human Resource Management |
Personnel Areas. This is shown in the following screenshot:
The personnel area defined can be used for reporting purpose, and they are
organized according to the aspects of payroll, time, and personnel. It can be
specific either to the geographical location or functional location. It is based
on the client-business process and setup.
We can copy the entries from the existing SAP standard delivered personnel
area and rename these entries to your customer-specific entries, as shown in
the following screenshot:
Click on Copy, delete, check personnel area, and give the form to the
personnel area. "From" is basically the SAP standard personnel area, while"
To" is the customer-specific entry. It is a four-digit alphanumeric code with
the text name, as shown in the following screenshot:
The personnel subarea holds the business characteristics. We use it for
payroll and time, hence, it's critical that we get our design of the personnel
area and subareas correct to have a smooth configuration and mapping of the
business process in SAP.
A personnel area can have "N" number of personnel subareas.
The personnel subarea is defined by navigating to SPRO | Enterprise
Structure | Definition | Human Resource Management | Personnel
Subareas. This is shown in the following screenshot:
Tip
The best practice is to prepare a Key Data Structure (KDS) in Excel. Copy
and paste it in a table; it can save a lot of time and effort.
Click on Create Personnel Subarea and choose the personnel area for
which the personnel subareas are mapped. This is demonstrated in the
following screenshot:
When we start defining the employee group and employee subgroups, we are
ready with the personnel structure. The employee group is defined by
navigating to SPRO | Enterprise Structure | Definition | Human
Resources Management | Employee Groups. This is shown in the
following screenshot:
The employee group can also be defined directly via the T501 table. It is a
one-digit alphanumeric code. It can also be a special character, as shown in
the following screenshot:
The employee subgroup is defined by navigating to SPRO | Enterprise
Structure | Definition | Human Resource Management | Employee
Subgroups.
It's a two-digit alphanumeric code and is mapped to employee group created
in the earlier step. It is shown in the following screenshot:
The configuration of enterprise and personnel structure is complete only
when the mapping is done between company code, personnel area, employee
group, and employee subgroups.
The assignment of company code to the company is done by navigating to
SPRO | Enterprise Structure | Assignment | Assign company code to
company. It is demonstrated in the following screenshot:
When the employee is hired, the company and the company code, by default,
are automatically based on the mapping or assignment that is done in this
step. This is shown in the following screenshot:
The personnel area is assigned to the company code. The mapping of the
employee group and subgroup is done in the next step, as shown in the
following screenshot:
This assignment determines the employee company code mapping that
happens through personnel area, as shown in the following screenshot:
The employee group and employee subgroups have an added feature of
maintaining the permissibility-per-country grouping. The standard country
(Molga) grouping numbers in SAP are, for example, USA-10 and Germany-
01. This is shown in the following screenshot:
The allowed flag serves as an input check when the employee grouping is
mapped to the employee. The flag denotes that it's permissible for country
grouping, while unflag means that it's not permitted.
Tips and tricks that will be handy
while configuring the submodule
We will learn the configuration steps for the PA mandatory infotypes. The
first thing that is required is customizing of a number range. It's an eight-
digit numeric code and is created by navigating to SPRO | Personnel
Management | Personnel Administration | Basic Settings or directly via
the PA04 T-code.
Recommendation on number range assignment
We will now see the recommendation on number assignment. The following
key ideas need to be adhered to:
During the hiring process, if the system generates an employee number,
then it is called "internal number assignment". This method is
recommended as part of the SAP implementation when a company
wants to have uniformity of number assignment with more digits.
A company has a number of third-party systems where employee
numbers are maintained and used in lot of interfaced programs. In such
cases, it is important and necessary that we maintain the same employee
numbers in SAP as well. In this case, we use the concept of external
number assignment.
In some cases where a company has multiple office locations, we may
use external number assignment for some locations, and we may use
internal number assignment for other locations.
As a PA consultant, you have to discuss the number range and the
number of digits to be used with the client.
The following screenshot shows the number range assignment:
The OM and PA number range concepts are the same. We flag whether it's
external (manually inputted by the user) or internal (system generated). This
is shown in the following screenshot:
The feature used for default number ranges is NUMKR. The return value is
the two-digit code that is maintained in the NRIV table via the SE16 T-code.
Tip
The number ranges are maintained in the NRIV table and are accessed via the
SE16 T-code. The RP_PREL object name is for PA and RP_PLAN is for OM.
The preceding table has the number range code and number range series
based on which it gets executed when the hiring action is performed for an
employee.
Configuring mandatory infotypes
First, let's look at personal data by navigating to SPRO | Personnel
Management | Personal Data | Personal Data | Create forms of address.
This is shown in the following screenshot:
The address table T522G also has the gender category that is configurable.
The standard possible entries provided are as follows:
Permitted for males only
Permitted for females only
Permitted for males and females
The address table T522G is shown in the following screenshot:
The marital status of the employee can also be configured by navigating to
SPRO | Personnel Management | Personal Data | Personal Data | Create
marital status or via the V_T502_T T-code, as shown in the following
screenshot:
This table is freely configurable according to the client's requirement, as
shown in the following screenshot:
The Addresses infotype is accessed by navigating to SPRO | Personnel
Management | Personal Data | Addresses | Create address types. The
following screenshot demonstrates this:
The 0006 Addresses infotype can be used to capture the temporary and
permanent addresses of the employee.
The subtypes are a further classification of infotype, and in this case, the
different address types are mapped as subtypes in SAP. This concept is
demonstrated in the following screenshot:
The regions and countries are standard SAP-delivered entries, and it is
recommended that you retain the same and not make any changes. This is
demonstrated in the following screenshot:
The country key in Addresses (0006) infotype is maintained by navigating to
SPRO | Basic settings | Create countries /countries of birth/nationalities.
The country global parameters table, V_T005, has the standard entries
maintained. For instance, The United States of America is maintained as US.
Note
Every employee master data must contain the Addresses infotype with
subtypes and the permanent address.
During payroll processing, in the "preprogram DME" step, the system
checks the permanent address of the employee master data. If the permanent
address is not maintained, the preprogram DME will generate error
messages.
The employee mode of payment is captured in the Bank Details infotype
(0009). The countrywise standard SAP entries are as follows:
C check
T bank transfer
Cash
The payment method is normally configured by an FI consultant and is
defaulted using the ZLSCH feature. The payment method gets defaulted in
0009, and the infotype is maintained.
The standard entry is "main bank", and this is configured by navigating to
SPRO | Personnel Administration |Personal Data | Bank Details | Create
bank connection types. The following screenshot demonstrates this:
The Organizational Assignment infotype (0001) is an important infotype that
holds the key characteristics of an employee, such as personnel area,
subarea, employee group, and employee subgroup.
The Organizational Assignment infotype is configured by navigating to
SPRO | Personnel Management | Organizational Data | Define employee
attributes or via the V_503_H T-code.
The employment status, raining status, and activity status are standard
entries, and only if necessary, SAP recommends customizing them. This is
shown in the following screenshot:
The standard entries in SAP are for the status of an activity. They are as
follows:
Active employee
Retiree
Early retiree
Others
Part-time work for retirees
The standard entries in SAP for employment status are as follows:
Industrial worker/hourly paid worker
Salaried employee
Civil servant
Others
The control record and payroll area are critical customizable objects for
payroll and reporting purposes. The payroll is created for mapping an
employee whose payroll is processed in the same frequency and on the same
date, say, monthly or biweekly for that matter.
Every payroll area must have a control record. The control record controls
how the payroll is processed.
They are configured by navigating to SPRO | Personnel Administration |
Organizational Data | Organizational Assignment | Create payroll area
or via the V_T549A T-code. The following screenshot shows this:
We can group the employees together and map them to a payroll area so that
it is easy to process for a group of employees in one shot.
The control record determines the current period for which the payroll is
processed. It also determines the payroll period past date, up to which the
system allows you to make changes to the master and time data and is called
as Retro in SAP.
There are multiple statuses in control record such as "released" for payroll,
which means master and time data is locked, and the correction of master
data is not possible.
The release of correction implies that the system allows us to make
corrections to the master and time data, and exit payroll means that we are
done with processing the current payroll period, and it can be exited.
The incorrect personnel numbers are captured in match code "W". The
system captures incorrectly processed employees during payroll. This needs
to be corrected, and we need to rerun the payroll for the same.
The earliest retro period in control record determines how far back in time
the system can allow us to make corrections to processed payroll periods.
The Basic Pay (0008) infotype is crucial for processing the payroll and is
configured by navigating to SPRO | Personnel Management | Personnel
Administration | Payroll Data | Basic Pay. The following screenshot
demonstrates this:
The employee subgroup grouping for personnel calculation rule (PCR)
and collective agreement provision (CAP) is the cornerstone for processing
payroll PCR. We can group employees based on different rules and
regulations set.
They are maintained by navigating to SPRO | Personnel Management |
Personnel administration | Payroll Data | Basic Pay | Define EE
Subgroup Grouping for PCR and Coll.Agrmt.Prov or directly via the
V_503_B table. This is shown in the following screenshot:
The payscale type, area, groups, and levels are configured by navigating to
SPRO| Personnel Management | Personnel Administration | Payroll
Data | Basic Pay | Check PayScale Type/Area or via the T510G/T510A T-
code.
A payscale type defines the industry in which the client is operating, such as
metal for example, while the pay scale area defines the physical work
location of the client. This is shown in the following screenshot:
The pay components are defined as wage types in SAP. For example,
housing allowance is defined as the "8888" wage type number followed by
text to identify the same. Wage types are created using the tool that SAP has
provided. This tool is accessed via the PU30 or OH11 T-code or by navigating
to SPRO | Personnel Management | Personnel Administration | Payroll
Data | Basic Pay | Wage Types. This is shown in the following screenshot:
Tip
There are many associated table entries that get copied when the tool is used.
We see the associated table entries in the following screenshot:
The wage type texts are normally stored in the T511 and T512 series tables,
while the assignment of wage type grouping, base type valuation, and so on
are stored in T52 series tables. The Planned Working Time (0007) infotype
serves as an integration point between the Time Management and Payroll
submodules.
Planned Working Time has the work schedule of the employee. This is
entangled with public holidays and the working time for a week, month, and
so on.
It is configured via the Time Management submodule that we will be
covering in the next chapter. The work schedule rule that we generate
becomes the default one in the Planned Working Time (0007) infotype.
The Planned Working Time (007) infotype is configured by navigating to
SPRO | Time Management | Work Schedules | Work Schedule Rules and
Work Schedules, and is shown in the following screenshot:
Customizing the infotype menu and
info groups
The infotype menu is the one that the user sees in PA30. There are different
tabs that can be maintained and different infotypes can be defaulted under
each tab. This functionality is provided for simplifying the user maintenance
of master data of the employees.
Infotype menus are configured by navigating to SPRO | Personnel
Management | Personnel Administration | Customizing Procedures |
Infotype Menus | Infotype Menu. This is shown in the following
screenshot:
The menu can be or cannot be maintained based on the user group of the
user.
Tip
The SU3 or SU01 T-code is used to maintain the UGR.
If we would like to have the menus dependent on a particular user group,
SAP has a functionality to meet this requirement. Say, a particular menu is
applicable for only a group of users mapped as UGR 10; in this case we have
to configure the settings by navigating to SPRO | Personnel Management |
Personnel Administration | Customizing Procedures | Infotype Menus |
Infotype Menu | User Group Dependency on Menus and Info Groups.
Should the User-dep. field be flagged, it means the menu is dependent on
UGR parameter that is maintained in the SU3 transaction code for the user.
This is shown in the following screenshot:
The advantage of using this functionality is when there are multiple client
operators in multiple countries. If you would like the users to have enough
control and authorization to specific infotype, for specific country infotype,
this feature comes in very handy.
It is important to know the different menu types provided by SAP. Each
character has a specific meaning associated with it. The different menu types
are as follows:
B: This refers to applicant action menu
G: This refers to info group menu
I: This refers to infotype menu
M: This refers to personnel action menu
S: This refers to infotype menu
"I" denotes that it is the infotype menu or the header tab of the PA30 or PA20
screen. The infotypes are grouped under each infotype menu. For example, a
payroll tab can have the Basic Pay (0008), Recurring Payments and
Deductions (0014), and Additional Payments (0015) infotypes grouped, as
demonstrated in the following screenshot:
The infotype listed under each menu is controlled by navigating to SPRO |
Personnel Management | Personnel Administration | Customizing
Procedures | Infotype Menus | Infotype Menu.
The infotypes such as time-related Planned Working Time time (0007),
Absences (2001), and Absence Quotas (2006), can be grouped under Time
Menu or tab, as shown in the following screenshot:
Infogroups group together infotypes that populate sequentially one after
another. Let's say, in order to perform a hiring action, the infotypes such as
actions (0000), organizational assignment (0001), and basic pay (0008) need
to be filled in by the user. Infogroups can also be based on user grouping
such as info menu. They are configured by navigating to SPRO | Personnel
Management | Personnel Administration | Customizing Procedures |
Actions | Define infogroups. This is shown in the following screenshot:
The menu type of the infogroup that needs to be configured is "G". This
infogroup can also be made dependent on the user by flagging the user-
dependent check box and mentioning the reference user group number
maintained in the SU3/SU01 T-code. It is shown in the following screenshot:
The infogroup 03 can be used to map all the related infotypes that need to be
captured for a hiring action. We will see how the mapping is done in the
table via the info menu. The infotypes are configured by navigating to
SPRO | Personnel Management | Personnel Administration |
Customizing Procedures | Actions | Info Group. This is shown in the
following screenshot:
Here, the user group is the UGR parameter that has to be in congruence with
the parameter that is maintained in the SU3/SU01 T-code. There are standard
operations provided by SAP that can be referenced. They are as follows:
Create (Ins)
Change (Mod)
Delimit (LIS9LIS) LIS9
Lock/Unlock (EDQ)
Configuring personnel actions
The personnel actions are all the activities surrounding the employee life
cycle, such as hiring, promotion, change in pay, and separation. They are
called personnel actions in SAP. Each action will have the infotype
populating sequentially based on the infogroups mapped to the action
infotype.
The personnel actions in SAP are configured by navigating to SPRO |
Personnel Management | Personnel Administration | Customizing
Procedures | Actions | Set up personnel actions | Personnel Action Types.
This is shown in the following screenshot:
Customizing procedures is an important node where infogroups, menus, and
personnel actions all can be customized.The personnel action table looks like
the one shown in the following screenshot:
The action type is a two-digit alphanumeric code with text such as hire,
change of position, and so on associated with it. Each action type will have
the infogroup code mapped to it, and based on the personnel action chosen
by the user, the infotype defaults sequentially. The FC denotes the function
character for the personnel action. For example, for hiring, we can use 01,
which is the first hiring, and for other actions, we can use 0.
SAP-delivered function codes can be used and don't require customizing.
They are as follows:
'1': This refers to first hiring
'7': This refers to first hiring and transfer of data from recruitment
'8': This refers to activation of personnel assignment in the host country
(for global employees)
'9': This refers to activation of personnel assignment in the home
country (for global employees)
'0': This refers to other actions
The SAP standard employment status (STAT2) can be used and will
normally fulfill the requirements. The standard entries are as follows:
0: This refers to an employee not with the company
1: This refers to an employee working with the company, but inactive
2: This refers to an employee working with the company, but as a
retiree
3: This refers to an employee who is active in the company
Based on the personnel action, we can map the status number accordingly.
For example, we can use 3 for hiring personnel action and 0 for resignation
or separation of personnel action.
This is how the PA40 T-code looks when the user executes to maintain the
master data:
SAP also has the functionally of defining the reason for each personnel
action. For instance, the hiring personnel action can be executed based on
multiple reasons such as ramp up, replacement, and so on.
They are configured by navigating to SPRO | Personnel Management |
Personnel Administration | Customizing Procedures | Actions | Create
reasons for personnel actions or directly or via the V_T530 T-code. This is
shown in the following screenshot:
The possible reasons for each personnel action are maintained in the table
and can be used in the PA40 T-code. This will be very useful for reporting
purposes, and is shown in the following screenshot:
The menu created needs to be mapped to the standard menu provided by
SAP.01, which needs to be used. The following screenshot demonstrates
this:
The standard menu can be configured by navigating to SPRO | Personnel
Management | Personnel Administration | Customizing Procedures |
Actions | Change action menu | User Group Dependency on Menus and
Info Groups.
The menu can be made dependent on the user maintained in the SU3/SU01 T-
code. This is shown in the following screenshot:
All the personnel actions are mapped to the standard 01 menu. This is shown
in the following screenshot:
Dynamic actions
These are very useful for the maintenance of infotypes. They are triggered
automatically when a particular change of an infotype is performed. They
are configured by navigating to SPRO | Personnel Management |
Personnel Administration | Customizing Procedures | Dynamic Actions
or directly via T588Z. This is shown in the following screenshot:
Tip
For more information on configuring personnel action, there is an excellent
reference guide, Unleash the Power of Dynamic Actions: Tips and Tricks to
Get the Best Results, by Rehan Zaidi.
The following screenshot demonstrates an overview of the dynamic action:
The infotype and subtype are used to maintain the infotype number for
which we want the dynamic action to be triggered. We can also use a
specific field name if we want dynamic action to trigger on the changes
made to them. There are standard function characters that SAP has
delivered, and we can use them in the table. They are as follows:
00: This is used if it is independent of the current function carried out
02: This is used for change
04: This is used for create
06: This is used for change and create
08: This is used for delete
10: This is used for change and delete
12: This is used for create and delete
The standard function characters, along with the indicator for step, form the
key for dynamic action. The standard SAP-delivered indicators for steps are
as follows:
P: This is used to check conditions
I: This is used to maintain the record of infotypes
W: This is used to set the default values when creating a new record
V: This is used to reference to another step
F: This is used to call routine
M: This is used to send mail
Finally, the variable function has to be maintained.
Summary
In this chapter, we covered how to configure master data for employees. We
have also covered how to customize info groups, menus, and dynamic
actions.
In the next chapter, we will closely look at configuring the Time
Management submodule and explore the standard functionalities provided
by SAP.
Chapter 5. Time Management
Configuration – Negative Time
We will explore how the Time Management submodule is configured to
meet the client's requirements. Time Management deals with recording,
reporting, and evaluating the attendance and absenteeism of an employee.
Evaluation could be the number of hours worked extra by an employee, and
this is determined using the Time Management submodule. The absence and
attendance entitlements or quotas are also captured. The Absence Quotas are
buckets to collect the leave entitlements. We will cover the important
configuration steps, infotypes, and tips to configure the submodule.
In this chapter, we will cover the following topics:
Various nodes for configuring the Work schedule rule
Absence Quotas
Customizing tables for the Work schedule rule
Customizing tables for Absence Quotas
Generating hassle-free Absence Quotas
Nodes for configuring the Work
schedule rule and Absence Quotas
Before we start to cover the important configuration points, let's closely look
at the Time Management infotypes in detail. It's important for us to be
familiar with the functionalities of Time Management infotypes before
starting with the configuration steps.
Time Management infotypes
The important Time Management infotypes are listed in the following table:
Infotypes Infotype text
0007 Planned Working Time
2001 Absences
2002 Attendances
2006 Absence Quotas
2007 Attendance Quotas
2005 Overtime
2010 Employee Remuneration Info
2013 Quota Correction
0416 Time Quota Compensation
The Planned Working Time infotype (0007)
The Planned Working Time infotype has the key details about an
employee's work pattern. The work schedule is tagged to the employee
based on the configuration, and it gives us details about the daily work
schedule, holiday class, and day type. The Time Management Status
(P0007-ZTERF) controls whether an employee participates in time evaluation.
The following screenshot shows the Work schedule rule section:
The following table shows the related text for various indicator values:
Indicator Text
0 No time evaluation
1 Time evaluation (Actual times)
2 Time evaluation (PDC)
7 Time evaluation without integration to Payroll
8 External services
9 Evaluation of planned times
If we are not going to use the Time Evaluation (RPTIME00) program for
accounting time data, we can mention the employee status as 0.
If we are not going to integrate time with payroll, then the status can be set
to 7, or it is advisable to set the status to 9.When the clock in and clock out
time is going to be recorded, the status needs to be set to 1. Plant Data
Collection (PDC) is useful to transfer data from the following application
components to Time Management:
SAP Project Systems (PS)
SAP Plant Maintenance and Customer Service (PM/CS)
SAP Production Planning (PP) and Process Control (PP/PI)
Tip
The TMSTA DEFAULT VALUE FOR TIME MANAGEMENT STATUS feature is
configured to the default Time Management status based on different
parameters. It can be accessed via the PE03 T-code.
The Working time details such as the daily working hours, monthly
working hours, and so on are also captured in the Planned Working Time
infotype. The integration point between time and payroll is the monthly
working hours that flows from the Planned Working Time to Basic Pay
infotype when personnel action is run for the employee. The daily hours,
monthly hours, weekly hours, and weekly work days are configurable items,
and when the Work schedule rule is selected, it gets displayed automatically.
The following table shows us the fields and values used in the 0007 infotype:
Working time Field data
Employment percent 100
Daily working hours 8
Weekly working hours 40
Working time Field data
Monthly working hours 173
Annual working hours 2080
Weekly workdays 5
From the work schedule, we can see the employee's daily, weekly, and
monthly working hours. The Time Management status indicates whether the
time data of an employee is processed in the following categories:
Time evaluation
Processed data passed to Payroll for further processing
The Absences infotype (2001)
The Absences infotype is used to capture the absence type based on the
grouping. It defines the nature of absence such as Sick, Casual, and so on.
The absence type is a four-character code that specifies the absence text. The
following screenshot shows the Change Absences window:
The Attendances infotype (2002)
The Attendances infotype is used to capture the special attendance reasons
such as business trip or training needs, for instance, in addition to the normal
work pattern. There is also a special feature for entry screen such as general
attendance and attendance with quota deduction. This is controlled in
customizing, and we can define the attendance quota from which a specific
attendance type must be deducted.
The payment data other than the normal cost that is associated with the
attendance type maintained for an employee is done in one of the following
two ways:
Using wage type, the amount can be directly entered and queried in
payroll or time evaluation
By navigating to Goto | Different payment, where we can enter the
amount in the Valuation basis field, as seen in the following
screenshot:
The Absence Quotas infotype (2006)
Absence Quotas are entitlements or buckets that contain the number of days
an employee can avail leave. When the absence is recorded in the Absences
infotype (2001), the absence gets reduced from the quota automatically. The
Absence Quotas infotype has different fields, which are shown in the
following screenshot:
The following table contains a description of the various Absence Quotas:
Field Description
Category The absence quota type that includes sick leave, annual leave,
and so on.
Quota
number
The number of days or hours an employee is entitled to take
leave.
Deduction The Deduction field has the number of leaves that has been
availed or used.
Deduction
from
The date from which quota can be deducted when an absence is
recorded.
Deduction
to
The date up to which quota can be deducted when an absence is
recorded.
Neg.
deduction
to
The value going over and beyond the entitlements days can be
mentioned here. Say, the entitlement is 40 days and 50 days
needs to be recorded; then, we can insert 50 here.
The Attendance Quotas infotype (2007)
The special attendance of employees that is approved using the 2002
infotype is stored in the Attendance Quotas infotypes. The following
screenshot shows the Create Attendance Quotas window:
The Overtime infotype (2005)
The Overtime infotype is used to capture the additional number of hours an
employee works in addition to the normal working hours. The hours are
queried in payroll and compensated accordingly. The following screenshot
shows the Change Overtime window:
The Employee Remuneration infotype (2010)
The Employee Remuneration infotype is used to capture the wage type and
amount that gets processed in payroll. The number of hours or the amount
can be specified based on the customized settings for that wage type. The
following screenshot shows the Change Employee Remuneration Info
window:
The Quota Correction infotype (2013)
The decrease or increase of entitlements can be controlled using the Quota
Correction infotype. Let's say we would like to reduce the number of days
generated in the 2006 infotype by 2. We can specify the number of days to be
increased or decreased in the Quota number field. There are multiple
options provided, and we can make use of them accordingly to meet the
requirement.
Let's have a look at these options in the following screenshot:
The following table lists the meanings of the three options available for
accrual entitlements:
Accrual
entitlements
option
Meaning
Increase
generated
entitlement
The number specified in the Quota number field gets
added to the existing quotas in the 2006 infotype.
Reduce
generated
entitlement
The number specified in the Quota number field gets
reduced from the existing quotas in the 2006 infotype.
Accrual
entitlements
option
Meaning
Replace
generated
entitlement
The number specified in the Quota number field gets
replaced with the existing quotas in the 2006 infotype.
The transfer of entitlements can be controlled, and there are multiple options
provided by SAP. The Transfer options are as follows:
Do not change transfer time: The quota correction does not happen
immediately and does not reflect in the 2006 infotype instantly
Transfer collected entitlement immediately: The correction reflects
in the 2006 infotype instantly when the time evaluation is run for the
employee
Only transfer quota correction immediately: The correction is
effective in Absence Quotas (2006) only in the next evaluation run
The Time Quota Compensation infotype (0416)
The unused entitlements can be remunerated using this infotype. The No. to
compensate field is used to enter the absence entitlements that need to be
remunerated, in days or hours. There is also a functionality to control
whether the entitlement needs to be remunerated or not. This is done by
flagging the Do not account checkbox.
There are two specifications provided by SAP that can be used to
compensate the entitlements. They are as follows:
Automatic compensation
Manual compensation
In the Automatic compensation method, we mention the quota type and
quota number to be compensated. In the Manual compensation method, the
quota number that needs to be compensated has to be specified along with
the wage type, amount, and currency.
If we use the Automatic compensation option to remunerate the quota
number, we need to build the PCR and use it in the schema after running the
P0416 function.
The PCR used for running the P0416 function can be used as follows:
ZLEN (PCR name)
3(ESG Grouping for PCR)
1234 (Leave encashment Wage type that holds number)
AMT=6789(Wage type)
AMT/30
MULTI ANA (Multiply Amount and Number, place it in Amount
field)
ADDWT 1234(Wage type)
The following table explains the logic built for the PCR. The business
requirement is that the days used in P0416 need to be multiplied with one
day's basic pay and remunerated for the employee. The following table
shows the PCR operations with their explanations:
PCR
Operation
Explanation
ZLEN This checks whether the PCR is customized to map the
business requirement.
3 This is the value of the Employee subgroup grouping for PCR.
Please use the number used in SPRO | Personnel
Management | Personnel administration | Payroll data |
Basic Pay | Define EE subgroup grouping for PCR and
CAP (V_503_B-ABART).
1234 The wage type number that has the unused quota number to be
remunerated.
PCR
Operation
Explanation
AMT=6789 The amount in the Basic Pay wage type in Input Table (IT) is
assigned for calculation.
AMT/30 The Basic Pay wage type amount is divided by 30.
MULTI
ANA
The derived amount is multiplied with the number and stored
in the amount field.
ADDWT This adds the wage type amount to the subsequent wage type,
and if an asterisk is used, it moves to the output table.
Important nodes and/or customizing
tables for the Work schedule rule
The fixed planned working time of an employee for a particular period of
time is captured in the Planned Working Time infotype (0007), and we will
closely look at the configuration of the Work schedule rule.
Tip
The backbone of Time Management is the Personnel subarea grouping and
Employee subgroup grouping.
The period work schedule has the daily work schedule mapped for 7 days,
and the period work schedule is tagged with the Work schedule rule. The
daily work schedule is a fixed pattern of work such as 9 a.m. to 5 p.m. The
period work schedule is the work pattern followed for the number of days,
say 4 weeks.
The holiday calendar
The holiday calendar must be created by navigating to SPRO | Time
Management | Work Schedule | Define Public Holiday Classes.
Public holidays need to be defined first and then mapped to a holiday
calendar. There are different types of public holidays that can be defined.
They are as follows:
With a fixed date
With a fixed date from a particular date
Distance to Easter
Easter Sunday
Floating public holiday
There are plenty of features that can be used while defining the holidays.
We can mention whether the holiday falls on a particular day such as
Sunday or Not Guaranteed. The Sort Criterion option is very handy when
we try to find the holiday that we defined in order to map in the holiday
calendar. The Public Holiday Class option has a standard meaning defined
and the key for counting absences, the time wage type selection, and the
daily work schedule variants.
The following table will shows us the meaning of the different holiday
classes provided by SAP:
Public Holiday Class Meaning
Blank Normal working day
1 Full day off
2 Half day off
Public Holiday Class Meaning
3-9 Customer specific
The short name and long name define the name of the public holiday. The
short name is 10 characters in length and long name is 30 characters in
length. The following screenshot shows the Create/Change Public
Holidays: Floating Public Holidays window:
After entering the year, month, day, and choosing options in Guaranteed
and Public Holiday Attributes, we need to click on the Insert Date
button. The created public holiday needs to be inserted in the holiday
calendar. We click on the Holiday calendar button and then on Edit. After
performing the necessary actions, click on Create (or press Shift + F4) as
shown in the following screenshot:
Enter the holiday Calendar ID and text, followed by validity, and the From
and To dates. To insert the public holidays created in the previous step, we
need to click on Assign Holiday. The public holidays created get listed so
that we can choose and filter them based on the sort criterion we selected.
This is demonstrated in the following screenshot:
In our case, we have chosen Canada Day as a public holiday. When we
click on Assign publ.holiday, as seen in the preceding screenshot, the
holiday gets assigned to the holiday calendar, and it looks like the following
screenshot:
The daily work schedule
We can say that the personnel subarea grouping field is the key for
generating the work schedule. It's done by navigating to SPRO | Time
Management | Work Schedules | Personnel Subarea Groupings | Group
Personnel Subareas for the Work Schedule. It's a two-digit code that is
mapped to the personnel area (PA) and personnel subarea (PSA). The PA
and PSA that have the same working policies can be grouped together for
easy processing. In the next step, we map the PS grouping with the daily
work schedule (DWS) grouping. Say, if 99 is a personnel subarea PS
grouping, then we will map 99 with the DWS grouping by navigating to
SPRO | Time Management | Work Schedules | Personnel Subarea
Groupings | Group Personnel Subareas for the Daily Work Schedule.
The actual working pattern of the employee on a given day is defined in the
DWS, and it also includes the break schedule. The DWS can be 9 a.m. to 5
p.m. with a 30-minute break as the break schedule, for example. First, we
define the break schedule and then map the break schedule in the DWS. It is
configured by navigating to SPRO | Time Management | Work Schedules
| Daily Work Schedules | Define Break Schedules. We mention the start
and end time and the stipulated time as paid or unpaid. The break schedule
is a four-digit alphanumeric code along with the PS grouping for the daily
work schedule that we defined in the previous table.
The following screenshot shows the Change View "Work Break
Schedule": Overview window:
The unpaid break is the one that is not remunerated, while a paid one is part
of the remuneration.
The DWS is configured by navigating to SPRO | Time Management |
Work Schedules | Daily Work Schedules | Define Daily Work Schedules.
The DWS is a four-digit alphanumeric code along with some text. The
Planned working hours field has the total number of working hours per
day (9 hours, for example) along with the break times. In the Work break
schedule field, the break schedule is mapped. The following screenshot
shows the details of the Daily Work Schedule window:
If the No planned working hrs. checkbox is flagged, it means that it's a
non-working day. The best practice is to copy a DWS and rename it. We
can flag the No planned working hrs checkbox to use it in a non-working
day such as Saturday or Sunday. The system considers it as zero working
hours irrespective of whether the working time, fixed or flexible, is
maintained or not. This is one of the improvements made in SAP time
recording and evaluation. Earlier, the Daily work schedule class was set to
0 to indicate that it was a day off.
The period work schedule
The period work schedule represents the weekly work pattern followed by
the employee. It could be for a week or month depending on the business.
The daily work schedule is mapped to the period work schedule by
navigating to SPRO | Time Management | Work Schedules | Period
Work Schedules.
The period work schedule is a four-digit alphanumeric code, and the week
number represents the number of the week followed by the daily work
schedule.
The day type
The day type has a defined standard meaning and is used for payment
purpose. It can be customized by navigating to SPRO | Time Management
| Work Schedules | Day Types | Define Day Types.
The standard system has 4 day types defined, and only if required, new day
types need to be defined. The standard day types and their text are shown in
the following table:
Day type Text
0 Work paid
1 Time off paid
2 Time off unpaid
3 Special day
4-9 Customer specific
The Work schedule rule
The employee subgroup grouping, holiday calendar grouping, and
personnel subarea grouping form the key when defining the work schedule
rule, and this gets populated automatically in the 0007 infotype based on
this grouping. First, the employee subgroup grouping is done by navigating
to SPRO | Time Management | Work Schedules | Define Work Schedule
Rules and Work Schedule | Define Employee Subgroup Grouping.
Next is the holiday calendar grouping; this is done by navigating to SPRO |
Time Management | Work Schedules | Define Work Schedule Rules and
Work Schedule | Define Groupings for the Public Holiday Calendar.
The key fields for the work schedule rule generation are the ES, PS,
Holiday calendar grouping, and the working time. We define the daily
working hours, monthly working hours, and daily working hours in
configurable tables. In the work schedule generation, we map the period
work schedule. The reference date indicates the date from which we would
like to generate the work schedule, and the start point refers to 001 to 007,
where 001 is Monday and 007 is Sunday here. Say, if we wish to generate
the work schedule from 01-01-2014, which falls on a Wednesday, we will
assign the start point in PWS as 003 (Wednesday).
The work schedule is customized by navigating to SPRO | Time
Management | Work Schedules | Define Work Schedule Rules and
Work Schedule | Set Work Schedule Rules and Work Schedules.
The work schedule can be generated manually or in a batch by navigating to
SPRO | Time Management | Work Schedules | Define Work Schedule
Rules and Work Schedule | Generate Work Schedules Manually/Batch.
SAP has delivered a standard feature called SCHKZ to default the work
schedule rule. The return value based on the different fields based on the
enterprise and personnel structure fields forms the default value for the
work schedule rule. The TMSTA feature is used to default the Time
Management status in the Planned Working Time infotype (0007). The
different statuses and their meanings have been covered earlier in this
chapter.
We will see the customizing tables that can be accessed for table
maintenance using SM30/SM31:
Table Node Text
V_001P_N Group Personnel Subareas for the Work Schedule
T508Z Assignment of PS Grouping for Work Schedules to Daily
WS
V_T550P Work Break Schedule
V_T550A Daily Work Schedule
V_T551A Period Work Schedule
V_T553T Day Types Text
V_503_D Employee Subgroup Grouping for Work Schedule
V_001P_M Assign Personnel Subarea to Public Holiday Calendar
V_T508A Work Schedule Rule
We will ideally be using many Employee subgroups and Personnel subarea
groupings in the following nodes:
Personnel subarea grouping –
V_0001_P_ALL
Employee sub group
grouping – V_503_ALL
Personnel subarea grouping –
V_0001_P_ALL
Employee sub group
grouping – V_503_ALL
Group Personnel Subareas for the Work
Schedule
Define Employee Subgroup
Groupings for work
schedule
Group Personnel Subareas for the Daily
Work Schedule
Group Employee Subgroups
for Time Quotas
Personnel area and personnel subarea
grouping for the public holiday calendar
Primary Wage type
Personnel area and personnel subarea
grouping for absence/attendance
Personnel Calculation Rule
Group Personnel Subareas for Time
Quotas
Personnel area and personnel subarea
grouping for Substitution/Availability
Personnel area and personnel subarea
grouping for Absence/Attendance
counting
MODT is an important PCR that sets the employee subgrouping for PCR.
The "where is used" feature (Ctrl + Shift + F3) will show us where the PCR
is actually used in the schema. The PAYTP operation can be used to re-assign
the value based on the Org assignment that is based on settings in the
employee subgroup grouping for PCR/CAP or employee grouping for the
time evaluation rule. The operation is followed by one of the two variables,
X or Y.
For variable X (the generalized wage type), there are two standard values, G
and V, which are defined as follows:
G: The wage/time type is set to "****"
V: The employee subgroup grouping is set
Variable Y (determines the employee subgroup) takes three values that can
be assigned, that is S, A, and other (represented by n). They are defined as
follows:
S: The employee subgroup grouping from the Time Recording infotype
(0050) is set
A: The employee subgroup grouping from the employee subgroup
grouping table (T503) is set
n: The employee subgroup grouping is set to n irrespective of the
current value assigned
The MODT rule is defined as follows:
MODT (Determine groupings)
*
****
PAYTP A Set ESG for PCR
3
****
MODIF W=01
MODIF T=01
MODIF A=01
MODIF L=01
Thus, based on the ESG grouping for PCR, the rule processes the
conditions further.
Important nodes and/or customizing
tables for Absence Quotas
We have learned, from previous chapters, about absence being recorded in
the 2001 infotype and Absence Quotas being captured in the 2006 infotype.
When the absence is created automatically, it reflects in the entitlements
getting reduced proportionately.
We will cover the important customizing steps for the generation of Absence
Quotas and automatic deduction of absences.
Absences are simply the unavailability of employees to work for various
reasons such as sickness, personal reasons, and so on. First, the catalog for
absences is created by navigating to SPRO | Time Management | Absences
| Absence Catalog | Group Personnel Subareas for Attendances and
Absences.
This is useful in cases where multiple personnel areas and personnel
subareas have the same absences. In the next step, we define the absences
such as sick leave, for example. We do it by navigating to SPRO | Time
Management | Absences | Absence Catalog | Define Absence Types.
There are multiple options provided by SAP for the input checks of
absences; we can choose from these options. The standard values are given
as follows:
First day is day off
Minimum duration
Last day is day off
Maximum duration
Non-working period
Unit
For the First day is an off option, we can choose one of the following
options. For example, if we select W, a warning message populates when an
absence is created in the 2001 infotype:
No message
W: Warning
I: Information
E: Error message
The preceding options are applicable for the absence entered on the last day
and on a non-working day, for instance, on New Year's Eve.
The minimum and maximum duration is the number of days that an
employee can apply in the 2001 infotype. The absence can be recorded in
different units, and they are as follows:
Unit Short description
Blank Calendar Days
K Calendar Days
A Attendance and absence days
R Payroll days
The following screenshot shows the Absence: Input Checks window, which
shows the different nodes that were discussed earlier in this section:
When the Second date required option is flagged, it indicates that the Start
date and End date has to be entered when an absence is recorded for an
employee in the 2001 infotype.
We will cover the important customizing nodes used to count absences. We
do so by navigating to SPRO | Time Management | Time Data Recording
and Administration | Absences | Absence Catalog | Absence Counting |
Define Counting Classes for the Period Work Schedule.
The counting class for the period work schedule is useful in the counting
rule step. For each separate class maintained, we need to create a counting
rule and this is how we can have different sets of counting rules, depending
on the business requirement.
The rules set for the counting class is a very important step for counting the
recorded absences based on the different conditions that get satisfied. First,
we group employees and personnel subgroups for time quotas by navigating
to SPRO | Time Management | Time Data Recording and
Administration | Absences | Absence Catalog | Absence Counting | Rules
for Absence Counting (New) | Group Employee Subgroups for Time
Quotas. Thus, employee groups and subgroups for which the same absence
quota type is applicable are grouped together for easy maintenance.
In the next node, we group personnel areas and subareas for which the same
absence quota type is applicable. We do this by navigating to SPRO | Time
Management | Time Data Recording and Administration | Absences |
Absence Catalog | Absence Counting | Rules for Absence Counting
(New) | Group Personnel Subareas for Time Quotas.
The rounding absence step can be used to round absences that fall in the
upper and lower limit for the purpose of precision, and the rounding rule is
mapped to the counting rule. We create a rounding rule by navigating to
SPRO | Time Management | Time Data Recording and Administration |
Absences | Absence Catalog | Absence Counting | Rules for Absence
Counting (New) | Define Rules for Rounding Counted Absences. Say, for
example, if the absence calculated is in the range of 1.5 to 2.5, then it needs
to be rounded off to 2.
The counting rule is an important table that is used to define the different set
of rules for calculating payroll days and hours for an absence or recorded
absence. It is also useful for quota purpose. We customize this rule by
navigating to SPRO | Time Management | Time data recording and
administration | Absences | Absence Catalog | Absence Counting | Rules
for Absence Counting (New) | Define Counting Rules. Once we do this,
the following window appears:
The applicability of rules works on different conditions set and met. The
counting rule is a three-digit alphanumeric code and sequence number. We
can set different conditions and accordingly assign the sequence number; the
system checks the conditions one after another until a particular condition is
met. The conditions of the current day are checked, for example, if this rule
is applicable on a particular day between Monday to Sunday based on the
day that we flag. We need to flag all the days if we want the rule to be
applicable irrespective of the day in question.
The Holiday class option is checked against the public holidays that are
defined in the SCAL T-code (Holiday calendar). Say, there's an absence
created on January 1, 2014, and we have created a holiday on the same day
and flagged it as Holiday class 1, which is a normal public holiday. Now,
the system compares this with the holiday created and doesn't count it as an
absence. We are actually instructing the system to also check on a public
holiday based on the flag. If all of them are flagged, then the system checks
all the days.
The day type's functionality is specifically for the purpose of payment, and
day type rules are used in work schedule rules. This again can be queried
using different flags set. The following screenshot shows the conditions for
the work schedule:
The Counting class 0 checkbox has been previously used to check planned
non-working days, and we have also seen the improvements made. Hence,
it's redundant now. The recommended practice is to check all the entries and
uncheck the ones that we feel won't be required. This helps in preventing
attendance/absences from not being counted by mistake.
If planned hours such as Sunday need to be counted, then we use the
Planned hours = 0 flag. We have to flag both the entries to satisfy the
condition.
If we want the absences that are lesser than a full day to also be counted,
then we need to flag the < 1 day option; or, both the entries must be flagged.
The rounding rule is used for rounding absences and is mapped in the
counting rule, while the Quota multiplier option is used to satisfy two of
the following conditions:
To determine the payroll hours and days
To count the absences and attendances for quota deduction
Based on the counting rule defined, we map it to the related absence type.
The connection flows from the counting rule to the absence type to the
deduction rule that holds the quotas that are mapped to the counting rule.
Finally, the counting rule is mapped to the absence type by navigating to
SPRO | Time Management | Time Data Recording and Administration |
Absences | Absence Catalog | Absence Counting | Assign Counting Rules
to Absence Types. The following screenshot shows the Absence: Counting
and Quota Deduction window:
If we would like the quota to be deducted when an absence is recorded, we
need to check the Quota deduction flag. The Deduction over interval end
option indicates that the system allows us to deduct absences more than the
entitlement, instead of throwing an error. There are multiple tables that
control quota that can be deducted over and beyond the entitlements.
Absence Quotas generation rule configuration
We will see how the Absence Quotas entitlements and generation rules are
configured in the following steps. There are three important customizing
steps that need to be performed to generate quotas. They are as follows:
Base entitlements that give us the number of days an employee can
avail for a particular period such as a calendar year
Validity and deduction intervals
Generation rules for quotas
We will see them in this chapter as we move along. The prerequisite to
Absence Quotas is the grouping of personnel subarea and employee
subgroup, and it's done by navigating to SPRO | Time Management | Time
Data Recording and Administration | Managing Time Accounts Using
Attendance/Absence Quotas | Setting Groupings for Time Quotas |
Group Employee Subgroups for Time Quotas.
Just as we maintained employee groups and subgroups earlier, similarly, we
group the employee groups and subgroups here.
Similarly, the personnel areas and subareas are grouped together, thus having
the same Absence Quotas. They are customized by navigating to SPRO |
Time Management | Time Data Recording and Administration |
Managing Time Accounts Using Attendance/Absence Quotas | Setting
Groupings for Time Quotas | Group Personnel Subareas for Time
Quotas.
The quota types (entitlements) such as sick leave and annual leave must be
defined first by navigating to SPRO | Time Management | Time Data
Recording and Administration | Managing Time Accounts Using
Attendance/Absence Quotas | Time Quota Types | Define Absence Quota
Types.
The different measures of time that SAP has provided are Hours and Days.
The entitlements over and above this can be defined in the Neg. ded. to
field, as shown in the following screenshot:
The input for the Absence quota type field is a two-digit alphanumeric
code. The Absence Quotas are accrued based on the customization. SAP has
provided multiple ways of accruing quotas, and they are as follows:
When not considering time evaluation, use the RPTQTA00 report
When considering time evaluation, use the time evaluation driver PT60
T-code
In order to generate quota without time evaluation, that is, using the
RPTQTA00 report, we use the No generation radio button to control it. If we
would like to generate quota using the time evaluation driver, we use the
Increase or Replace radio button. We customize it by navigating to SPRO |
Time Management | Time Data Recording and Administration |
Managing Time Accounts Using Attendance/Absence Quotas |
Calculating Absence Entitlements | Automatic Accrual of Absence
Quotas | Permit Generation of Quotas in Time Evaluation. The following
screenshot shows the Absence Quota Type window:
The entitlements over and above this can be defined in the NegDed
(Negative deduction) field. The No generation, Increase, and Replace
fields have a specific functionality associated with it. The No generation
flag indicates that the Absence Quotas are maintained manually or using a
report.
Tip
If we have the Increase or Replace flag checked, the quotas cannot be
generated using the RPTQTA00 report.
The Time Constraint (TC) class has specific meaning associated with it.
The collision checks are controlled via the TC class. Say, for example, an
absence is recorded for an employee on January 1, 2014, and on the same
day, another attendance or substation is recorded. In this case, the system
checks the class and controls the entry.
All the Time Management infotypes (2001 to 2012) can be controlled via the
table views, Time Constraint Reaction (V_554Y_B) and Global Time
Constraint Reaction (V_T554Y).
The reaction indicators determine the way the system reacts when there is an
overlapping of time records in infotypes, and the specifications are as
follows:
Specification Text
A The records get delimited
Specification Text
E The system doesn't allow us to create a new record
W The old record remains unchanged, and the system allows us
to create a new record
N Same as W, and collision checks are not displayed
The important rules that control the generation of quotas are defined later on.
The maximum limits or entitlements are defined by navigating to SPRO |
Time Management | Time Data Recording and Administration |
Managing Time Accounts Using Attendance/Absence Quotas |
Calculating Absence Entitlements | Rules for Generating Absence
Quotas | Set Base Entitlements.
We can define the rules for constant in days or hours for each leave quota
that serves as a prorating absence for the accrual period. It's a three-digit
code that has the quota mapped to it, for example, for sick leave. The
entitlements can be defined as constant, say, 15 days, and related to the
period of absence, we can set whether we want it to be accrued on a prorate
basis or in lump sum advance.
The base entitlement also has the additional feature of defining it based on
two of the following options:
Seniority
Age
Seniority is the duration of stay in the company/client based on which the
quotas get accrued, say, for example, for 1 to 2 years it's 10 days, while for 2
to 3 years it's 20 days.
If we would like the rule to be set based on the Age feature, say 20 to 30
years, a certain amount of leave needs to be accrued. Then, we can make use
of this provision. The following screenshot shows the Base Entitlement for
Absence Quota Generation window:
The base entitlement related to period is as follows:
Calendar year: One full year from 0101XXX to 3112XXXX
Accrual period: The period based on which the accrual must take place
Time evaluation period: The period is specified by navigating to
SPRO | Personnel Time Management | Time Evaluation | General
Settings | Determine Time Evaluation Period and is queried when
this option is flagged
Payroll period: Based on the payroll area, the payroll period that is
valid for the current period is queried
Other period: This is based on period parameters defined in
customizing
Rel. to date type: This is referenced to the 0041 date specification, and
the length can be defined by defining the period of time more
specifically
Tip
The Base entitlement (V_T559E), Determine validity and deduction
intervals (V_T559D), Reduction rules (T559M), and Rounding rules
(V_T559R) can also be defined directly by going to the Selection rule table
(V_T559L).
The validity and deduction periods for Absence Quotas define the "from"
and "to" periods for which the quotas are valid and the period in which the
quotas can be deducted. Say, between 01/Jan/XXXX and 31/12/XXXX, the
quotas can be deducted. The validity intervals are defined more precisely
using the standard options available. The validity and deduction intervals are
configured by navigating to SPRO | Time Management | Time Data
Recording and Administration | Managing Time Accounts Using
Attendance/Absence Quotas | Calculating Absence Entitlements | Rules
for Generating Absence Quotas | Determine Validity and Deduction
Periods. The following screenshot shows the Determine Validity and
Deduction Periods window:
There are a couple of more options to choose from, which are different from
the Base entitlements period that we saw, and they are as follows:
Base period
Transfer Time
The rounding rule is a two-digit alphanumeric code and is used to round off
the generated quota entitlements. We can define the values of Lower limit,
Upper limit, and Target value, for example, if we would like the quotas
between 1.5 and 1.75 to be rounded off to 2. The Rounding rule is
customized by navigating to SPRO | Time Management | Time Data
Recording and Administration | Managing Time Accounts Using
Attendance/Absence Quotas | Calculating Absence Entitlements | Rules
for Generating Absence Quotas | Define Rules for Rounding Quota
Entitlements. The following screenshot shows the Rounding Rule window:
The Roll. field indicates that the rule is applicable for all the intervals
defined in the table. When the Incl. field is flagged, it indicates that the
upper or lower limit is included in the calculation.
Finally, we define the selection rule by navigating to SPRO | Time
Management | Time Data Recording and Administration | Managing
Time Accounts Using Attendance/Absence Quotas | Calculating Absence
Entitlements | Rules for Generating Absence Quotas | Define Generation
Rules for Quota Type Selection. The following screenshot shows the
Generation Rules for Quota Type Selection window:
The prerequisites are the Base Entitlements, Absence Quotas, and validity
and deduction periods that are defined before customizing the selection rule
table.
We will find multiple tabs for customization; they are as follows:
Applicability
Accrual Period
Base Entitlements
Accrual Entitlements
Total Entitlements
The entry date is defined in the Applicability tab. For example, we can give
01011900 to 31129999 as the entry date.
The Accrual Period tab we defined will be used if the entitlements are
prorated on the following basis:
Daily: In this case, the entitlements are divided by 365 days
Month: The base entitlements are divided by 12 calendar months
Calendar year: The entitlements are accrued for the calendar year
Time evaluation period: It's according to the customizing step in SPRO
Payroll period: It's according to the period parameter
Other period: It's according to the period parameter
Rel. to date type: It's according to 0041; the accrual period varies
The Base Entitlements tab is used to map the rule defined earlier, for which
the prerequisites for the selection rule are also the same. The Limit field is
defined using this tab. If we would like to generate the quota based on
seniority or age, the Key Date for Determining Seniority subtab needs to
be customized.
The Accrual Entitlements tab indicates whether the quotas need to be
prorated or nonprorated. There is also the provision to multiply with day or
period balances.
There are many options to choose from in the Transfer time tab:
Upon accrual
Per calendar year
Per time evaluation period
Per payroll period
Other period
Date type
Transfer rule (this is not applicable for all the countries)
Tips to generate Absence Quotas
without any hassles
The key to customizing absence quota configuration is employee subgroup
grouping and personnel subarea grouping. Most of the configuration gets
simplified if we use the correct grouping. We have reiterated this
throughout the chapter.
Frequent error message and workaround
Most of the time, we come across the infamous You have not selected
any generation rules error error. This error occurs when we use both
RPTQTA00 report and the PT60 time evaluation driver T-code. To address this
issue, we need to check the following tables via SM30/SM31 or via SPRO:
Table Text
V_001P_H Personnel subarea grouping for time recording
V_T559E Base entitlement for absence quota generation
V_T559L Selection rules
V_T559D Validity / Deduction intervals for Absence Quotas
V_001P_ALL Personnel area / subarea complete view
V_503_ALL Employee group / subgroup complete view
We come across errors such as Not enough quota for
attendance/absence 1000 on 29.03.2011 for personnel no.
00030010, Message no. HRTIM00REC014.
There is a note released with the correction instruction; it says OSS 601872
- Error message displays incorrect quota type. We also need to
check whether the configuration settings are correct.
We also frequently receive errors such as Time evaluation PT60 error
STOP: No rule under key $ TP20*****2 S ***. This error clearly
suggests that in TP20, the PCR doesn't have the *** absence type added in
the rule. This is shown in the following screenshot:
The best practice is to copy the rule and rename it, for example, to ZP20. As
we can see in the following screenshot, there is a pair type 2 and a process
type S for which a decision tree is built. The error, as discussed earlier, is
trying to query the Absence type with the *** condition, which is missing
in the standard rule, and hence, the system is throwing the error.
Now, when the ZP20 rule is inserted in the schema, the system won't throw
the error message. The system is able to query single, double, and triple
asteriskes that were missing in the standard PCR.
Another error that we bump into is entry no. 83 Error when creating
absence quota General information, Rule: 001 quota type 01
Casual Leave, No payroll period for key 19 20100131 when we run
a time evaluation.
The T549Q tables might not have the start and end date for which the time
evaluation is actually run. To fix this issue, navigate to SPRO | Payroll |
Payroll XX (XX-localized country like USA for example) | Global
Settings | Payroll Organization | Generate Payroll Periods | Generate
Payroll Run Period or simply execute the RPUCTP00 report. The following
window will appear:
The RPUCTP00 report is significant for both Payroll and Time purposes. The
parameters included in this report are as follows:
Period Parameter: This determines the frequency of payroll such as
monthly, weekly, and so on.
Date modifier: We can use the following standard ones provided:
00: Standard modifier
01: Standard modifier
Start Date: This is the period start date, such as 01012014.
Final year: This is the year until which the periods need to be
generated.
Start date of fiscal year: This is based on the country legal settings. It
varies between countries (such as in the Middle East, it's January to
December; in India, its April to March).
Payday rule: This has the following standard meanings:
1: This adds the number of days to the period start date
2: This deducts the number of days from the period end date
3: This adds the number of days to the period end date
4: This is used only for monthly periods and the number of days
is used as the payment day
This field works in conjunction with the Number of days field.
Number of days: This is based on the number assigned in the Payday
rule field. The days are calculated. For example, if we assign 1 in
Payday rule and 1 in Number of days, the system would pick the
period end date, say, December. It will pick 31 and add one day to it.
So, the payday becomes January 1.
Determine period number: This is an indicator to map the period
number based on the standard settings provided by SAP, which are as
follows:
Payment day for period
Start date for period
End date for period
Important Time Management-related tables
We will see the important tables that control the Time Management module
in the following table:
Table Table Name
V_T552V Dynamic Assignment of Daily Work Schedule Assignment
V_T554C Employee Grouping for Absence Valuation
V_T555A Time Types
V_T555E Error Messages
V_T555Z Time Type Determination (TIMTP)
V_T559P Time Balance Rule Group
V_T559L Quotas
V_T559P Limits
V_T510V Processing Types
V_T705A Absence Reasons
V_554S_E Absence, Processing, and Time Type classes
Important functions, operations, and features
Functions are technical code or Advanced Business Application
Programming (ABAP) code, a logical block used to perform a bigger
calculation, and logic is built into it to perform the task. Operations, on the
other hand, are used to perform a little bit of calculation, and they can be
called as PCR's control behavior. Some of the important functions are given
in the following table:
Function Text
QUOTA The Generate Absence Quotas function is used in the RPTQTA00
report and the Time schema (TM04/TM00). Quota function is
called in the 000810 line of the standard TM00 schema and the
000730 line of the TM04 schema. It's based on the T559L settings
function quota that generates Absence Quotas. If time
evaluation is used, the results are stored in the QTACC and
QTTRANS table clusters.
CUMBT This function is used to cumulate the results in the Results table
(RT).
P2001 This function is used to import absence in the internal table TIP
for further processing.
GWT This function generates wage type from time pairs.
P2006 The Process Absence Quotas function is used to query the
values in the ABWKONTI internal table for further processing.
We will explore some important operations that will be very handy to map
the business process in SAP. Operations are very useful to change the data
stored in the input table during processing.
The common types of operations are given as follows:
Decision operations
Operations that initiate one or more actions
Branch operations
Operations to update internal tables
Operations to read internal tables
Operations to manipulate hours
Tip
For additional information, refer to The building blocks of SAP Time
Evaluation, Dirk Liepold.
Some of the important operations are given in the following table:
Operation Text
COLER Transfer to error table
ADDDB Cumulate in day balance table
ADDMB Cumulate in monthly balance table
ADDZL Cumulate in time wage types tables
COLOP Transfer data to internal table TOP
HRS Edit Number of Hours Field
ROUND Round Clock Times or Number of Hours Field
VARST Provide General Fields
Features, as we have seen earlier, are used to query fields and return the
value. We will learn about some important features related to Time
Management; they are as follows:
QUOMO: This feature is used to determine the absence quota selection
based on the organization assignment. This is queried in the V_T559L-
QUOMO selection rule table.
MASEX: This feature is used to determine the infotype admissibility for
employees. The following turn values are the standard ones defined in
SAP:
0: This is allowed for female and male employees
1: This is allowed for female employees only
2: This is allowed for male employees only
Internal tables and cluster tables used in time
evaluation
Internal tables are structured data types in ABAP. They are specified
completely by the table type, key, and line type. Some of the important
tables are given in the following table:
Table Text
ERT Error message table
DZL Generated day types
ZML Overtime wage types
ZL Time wage types
TIP Daily Input
TOP Daily Output
Cluster tables are not manageable directly using database system tools. In
other words, they are data from different tables packed together as a cluster,
and they can be accessed via function modules. The function modules can
be accessed via the SE37 T-code.
Table Text
ZES Daily time balances
Table Text
PT Time Pairs
AB Absences
ZL Time wage types
Tip
RPTERL00 and RPTERR00 are useful reports to check the predefined error
messages, or we can also include our own error messages in T555E (Time
Evaluation Errors). The category of error messages are standard and
provided by SAP as follows:
1: The error set by the COLER operation in time evaluation
2: (No longer used) User-specific message from pair formation
3: A technical error from pair formation
4: A technical error from time evaluation
5: Warnings and notes generated by time evaluation
The different messages generated during time evaluation is processed and
stored in clusters B1 and B2 as follows:
Message Table Cluster
Errors, notes, and information from the last run ERT B1
Information that has not been confirmed ERT B1
Notes and information from previous runs FEHLER B2
Tool to check the configuration settings for quota
generation
SAP has delivered a standard report to check the customizing settings in
SPRO for absence quota generation. The RPTQUOTA_CHECK report is
accessed via SE38/SA38. The document for the report can be found by
navigating to SPRO | Time Management | Time Data Recording and
Administration | Managing Time Accounts Using Attendance/Absence
Quotas | Calculating Absence Entitlements | Rules for Generating
Absence Quotas | Check Customizing Settings for Quota Generation.
The report is very useful as it displays the customizing settings used for
absence quota generation. It displays the list in a tree structure, which helps
to figure out the missing table entries. It doesn't, however, simulate the time
evaluation, but the setting is actually displayed.
There are three options to choose from when selecting quotas:
All the generation methods (with/without time evaluation)
Generation during time evaluation (PT60)
Generation by the RPTQTA00 report
Summary
In this chapter, we covered all the important Time Management infotypes,
from 2001 to 2999. We started off by discussing infotypes. Next, we
covered the important customizing steps used to configure Absence Quotas.
We also covered frequently occurring error messages and ways to address
them. Finally, we learned a few tips to configure the time module.
In the next chapter, we will closely look at configuring the Payroll
submodule and explore the standard functionalities provided by SAP.
Chapter 6. Payroll Configuration
Payroll may not be as complicated as it is assumed to be. This chapter will
attempt to enlighten you and correct your notion. We will explore how the
Payroll submodule is configured to meet the client's requirements. We will
cover the important configuration steps, infotypes, posting payroll results to
finance, and the tips and tricks to configure the submodule in depth.
The following topics will be covered in this chapter:
Infotypes that are mandatory for payroll processing
The control record
Payroll configuration
Writing a Personnel Calculation Rules (PCR)
Integration of payroll processing with the finance module
Infotypes mandatory for payroll
processing
Before we start to cover the important configuration points, let's closely
look at the mandatory infotypes that need to be maintained to process the
payroll for an employee. It's imperative to be familiar with the functionality
of payroll-related infotypes before starting the configuration steps.
Payroll infotypes
The work centre basic pay (WPBP) infotype is a critical one, so let's
closely look at it:
Infotype Infotype text
0000 Actions
0001 Organizational assignment
0003 Payroll status
0007 Planned working time
0008 Basic pay
0027 Cost distribution
We will cover the infotype's functionalities in detail in this chapter.
The 0000 (Actions) infotype
The Action infotype is the first infotype that gets updated when a personnel
action is performed for an employee. Actions that affect payroll could be
promotion, demotion, and so on. There is a standard function, WPBP-
FUWPBP, in the INBD subschema. This function reads the master data and
transfers the data to the internal WPBP table. If there is any change in the
work centre and basic pay data due to splits, they are indicated by split
indicators. The Actions infotype was covered in Chapter 4, PA
Configuration in Less Than 24 Hours.
The 0001 (Organizational Assignment) infotype
The Organizational Assignment infotype holds the key characteristics of the
employee, for example, company code, personnel area, personnel subarea,
employee group, employee subgroup, payroll area, and so on. The
enterprise and personnel structure was covered in Chapter 4, PA
Configuration in Less Than 24 Hours. We will learn the functionality of the
payroll area and control record in detail in this chapter.
Payroll area
The personnel area is grouped together and processed in the payroll area.
The payroll accounting area or simply payroll area is a two-digit
alphanumeric code. The payroll area has the following functionalities:
To determine the specific payroll dates.
To determine the specific periods that the payroll is processed for. For
example, 01.01.2014 is the start period and 31.01.2013 is the end
period.
To define the earliest retro accounting period that is possible.
To define retroactive accounting, that can be recognized.
The payroll area is configured by navigating to SPRO | Personnel
Management | Personnel Administration | Organizational Data |
Organizational Assignment | Create payroll area or via the SM30/31 T-
code in the V_T549A table.
The Payroll area table has the following fields:
Payroll
area
Payroll
area
text
Period
parameter
Period
parameter
text
Run flag Date modifier
XX Monthly
payroll
area
Code of
the
frequency
of the
payroll
such as 01
Text of the
period
parameter,
for
example,
01 is
monthly
Needs to
be
flagged.
Click on
Yes to run
the
payroll.
Standard entries are
0 and 1; we can use
them to differentiate
between the
different payment
dates
Let's look at the functionalities of the fields in the payroll table. The payroll
area table has the period parameter mentioned; this parameter determines
the frequency of the payroll period such as monthly, weekly, and biweekly,
which is defined by navigating to SPRO | Payroll | Basic Settings | Payroll
Organization | Define period parameters or via the SM30/31 T-code in the
V_T549R table. The period parameter table also has the standard time units
defined as follows:
Time unit Description
01 Monthly
02 Semi-monthly
03 Weekly
04 Biweekly
05 Every four weeks
06 Annually
07 Quarterly
08 Half-yearly
The date modifier, on the other hand, has standard entries defined and can
be used to differentiate the payroll run based on different dates. In cases
where the payroll periodicity is the same (for example, monthly) but the pay
dates are different (for example, for one group of personnel, the pay date is
the 15th, and for another group, it's the 20th), then the system will need two
different date modifiers.
Date modifier code Date modifier text
00 Standard modifier
01 Standard modifier 01
The payroll area is defaulted via the ABKRS feature and is configured by
navigating to SPRO | Personnel Management | Personnel
Administration | Organizational Data | Organizational Assignment |
Check default payroll area. The return value is the default payroll area
based on the different fields for the decision operation.
Control record elucidated
The control record controls how a payroll is processed, and every payroll
must have one control record created in the system. The control record is
defined by navigating to SPRO | Personnel Management | Personnel
Administration | Organizational Data | Organizational Assignment |
Create control record or via the PA03 T-code.
The control record performs the following functionalities in the system:
Determines the status of the payroll, for example, if it is in released or
exit state, and determines the current period for which the payroll is
processed
Determines the earliest, retro accounting period
It's important to understand the different statuses and their meaning. We will
learn them from the following table:
Control record
status
Meaning
Released for
payroll
The master data and time data are locked and changes
cannot be performed
Released for
correction
Allows us to make any correction to the master data and
time data
Exit payroll The control record is exited once the payroll is performed
for the particular period
Check payroll
results
Checks whether the payroll has run correctly
There is also a sort field in the control record that is useful to store the
payroll run. Every time the payroll is corrected and rerun, it gets
incremented. The control record is sensitive, and access is normally
restricted to the PA03 T-code. There are also fields to capture the time stamp
that can be helpful for audit purposes. These fields are as follows:
User ID
Date
Time
Status
The control record was also touched upon in Chapter 4, PA Configuration in
Less Than 24 Hours.
The 0003 (Payroll Status) infotype
The Payroll Status infotype is created automatically when an employee is
hired. It's an important infotype that needs to be understood clearly, as it
controls how the payroll is processed if there is any change in the master or
time data. Retro calculation is an important concept that needs to be
understood in payroll. Retro is any change triggered due to the master or
time data changes made to an employee's record when the period payroll is
run. The Payroll Status infotype looks like the following screenshot. PU03 is
the T-code used for changing the payroll status, only if it's required. This is
shown in the following screenshot:
Let's closely look at the fields and their functionalities:
Field Description
Earl pers
RA date
This date is the one up to which the system will allow us to
make changes to employee's master data
Field Description
Accounted
to
The period up to which the payroll has actually run
Run
payroll up
to
The period up to which we want the system to process the
payroll for an employee
Earliest
MD
change
This refers to the master data change period stamp
Do not
account
after
The period after which we would not want the payroll to be
processed for an employee
Payroll
correction
This is the system's automatic correction indicator when the
payroll rejects an employee or changes are made during the
correction
Pers no
locked
Personnel number won't be processed by payroll
Earl pers
rec date
This is related to time evaluation
Tip
Employees who are rejected during the payroll process are captured in the
match code "W" functionality (Shift+F8).
The 0007 (Planned Working Time) infotype
The Planned Working Time data serves as an input for the 0008 (Basic Pay)
infotype. The employment percentage (P0007-EMPCT) and monthly hours
(P0007-MOSTD) serve as an integration point for the time and payroll. The
payroll fields capacity utilization level (P0008-BSGRD) and working hours
per payroll period (P0008-DIVGV) get filled from the Planned Working
Time (0007) infotype. The Planned Working Time infotype was covered
exhaustively in Chapter 5, Time Management Configuration – Negative
Time.
The 0008 (Basic Pay) infotype
The Basic Pay infotype is important for payroll processing. The Basic Pay
infotype holds the key characteristics of an employee with regard to the
payroll. The important fields in the Basic Pay infotype are covered in the
following table:
Important filed in
basic pay
Technical
name
Description
Pay scale type P0008-
TRFAR
The industry in which the client is
operating, such as manufacturing
Pay scale area P0008-
TRFGB
The physical work location of the client,
such as California
Pay scale group P0008-
TRFGR
This is used to determine different
grades for pay scale distinction
Pay scale level P0008-
TRFST
The pay scale levels are a further
bifurcation of the pay scale groups
Annual salary P0008-
ANSAL
This just serves as an input field and is
not taken into consideration when the
payroll is processed by the payroll driver
Short text for EE
subgroup grouping for
personnel calc rules
T546T-
ATEXT
This is grayed, out and it is a control
feature for processing the personnel
calculation rule
Tip
The annual salary is configured by navigating to SPRO | Personnel
Administration | Payroll Data | Basic Pay | Define annual salary |
Relevant wage types for annual salary valuation.
The 0027 (Cost Distribution) infotype
The Cost Distribution infotype is designed for the purpose of distributing
costs to different Cost Centers other than the master Cost Centre of the
employee. The master Cost Centre is normally mapped in Organizational
Assignment infotype (0001), and it's overridden when Cost Distribution
infotype (0027) is maintained for an employee. This infotype has the
provision to mention the breakup percentage between cost centers. However,
the percentage cannot exceed 100. Let's look at the important fields that can
be maintained in the infotype. The infotype can be accessed via the PA30 or
PA20 T-code. The following screenshot demonstrates this:
The following table gives information about the various infotypes and a
description of them:
Field in
infotype
Technical
name
Description
Field in
infotype
Technical
name
Description
Costs to
be
distributed
P0027-
KSTAR
This describes the cost to which the distribution
is actually performed. The standard entries are as
follows:
Wage/salary
Travel expenses
Company
code
RHCD_TAB-
BUKRS
This is defined in FI module, and it's defined as
per the profit and loss statements for different
entities by the client
Cost
Centre
RHCD_TAB-
KOSTL
This uniquely identifies the Cost Centre
Pct RHCD_TAB-
PROZT
This refers to the weighting percentage of
different Cost Centers
Tip
The Cost Distribution infotype is only maintained if there is a requirement of
distributing costs across different cost centers, else its master Cost Centre is
maintained in 0001I. The Cost Centre is created by an FI consultant, which
was explained in Chapter 3, SPOCK – the Building Block of OM.
In addition to mandatory infotypes that need to be maintained for payroll
processing, it is necessary to know a few other infotypes. They are as
follows:
Recurring Payment and Deduction infotype (0014)
Additional Payments (0015)
Additional off-cycle payments (0267)
The 0014 (Recurring Payment and Deduction)
infotype
The Recurring Payment and Deduction infotype is used to maintain the
deductions and payments made to the employee for a particular period of
time.
If you notice, wage types maintained in the Basic Pay (0008) infotype do not
have the provision to delimit the wage type processing for a particular
period, say, just one month.
In cases where payments or deductions are only for a particular period of
time, we can use this infotype. The infotype can be accessed via the PA30 or
PA20 T-code. This is demonstrated in the following screenshot:
The 0015 (Additional Payments) infotype
The Additional Payments infotype is used for one-time payment purposes. It
doesn't have a start date and end date but it does have the date of origin, that
is, the date on which the payment must be processed for an employee. The
infotype can be accessed via the PA30 or PA20 T-code.
The fields that this infotype have are shown in the following table:
Fields
Technical
name
Description
Wage
types
P0015-
LGART
This refers to the components such as basic pay that
are displayed in the paystub
Amount Q0015-
BETRG
This refers to the wage type amount for payment
purposes, such as 50 USD
Date of
origin
P0015-
BEGDA
This refers to the date on which this wage type needs
to be processed
Tip
We can maintain a different Cost Centre using the functionality maintain
cost assignment (Ctrl+F2). This is shown in the following screenshot:
The 0267 (Additional off-cycle payments) infotype
The Additional off-cycle activity is used for payments during irregular
payment periods, for example, in the middle of the payroll period. The off-
cycle payroll workbench is used to process these scenarios, and the wage
type processed using that off-cycle payroll workbench gets stored in the
0267 infotype. The off-cycle configuration steps will be covered in the
forthcoming chapters. The infotype can be accessed via the PA30 or PA20 T-
code, as shown in the following screenshot:
Steps to configure the payroll
We have already covered the important infotypes mandatory for payroll
processing. We will look at the configuration steps involved to perform the gross
and net calculation.
SAP has a payroll solution for country-specific versions and generic versions as
well. There are localized payroll schemas and international schemas for which
localization is not yet released by SAP. Each country has its own payroll driver
program and payroll schema that covers various statutory requirements for each
country.
Wage types
When we talk about payroll in SAP, it's very important to understand the
functionalities of wage types. Wage types are components or allowances that we
see in our paystub, such as basic pay, conveyance allowance, and so on. SAP has
provided a tool to create customer-specific wage types. The best practice is to
copy model wage types delivered by SAP and rename it to customer-specific
wage types. When a new service pack (SP) is released by SAP, it ensures that it
does not affect customer wage types. The wage types are created by navigating to
SPRO | Personnel Management | Personnel Administration | Payroll Data |
Wage Types | Create Wage Type Catalog or using the OH11 or PU30 T-code.
Tip
Model wage types are prefixed with letters, while customer wage types are
prefixed with numbers.
The system prompts us to choose a particular method for maintenance. First, we
can select Copy and click on Continue (Enter). The three methods available are
as follows:
Copy
Delete
Completeness check
The best practice is to choose a model wage type from the original wage type
column and enter a new wage type such as 9000 in the customizing wage type
column, as shown in the following screenshot:
The wage types are grouped in the Basic Pay (0008) infotype by navigating to
SPRO | Personnel Management | Personnel Administration | Payroll Data |
Wage Types | Check wage type group ' Basic Pay' or via the SM30/31 T-code in
the VV_52D7_B_0008_AL0 table. The rationale is that by assigning the wage type in
this group, the administrator will be able to restrict the wage type used for
different infotype groups such as 0008, 0014, 0015 and so on.
The wage type text can be checked and corrected if required by navigating to
SPRO | Personnel Management | Personnel Administration | Payroll Data |
Wage Types | Check wage type catalog | Check wage type text or via the
SM30/31 T-code in the V_512W_T table.
The wage type's applicability for a particular group of employees can be
controlled by navigating to SPRO | Personnel Management | Personnel
Administration | Payroll Data | Wage Types | Check wage type catalog |
Define Wage Type Permissibility for each PS and ESG or via the SM30/31 T-
code in the V_511_B table. This just serves as an input to check which wage type
is permissible for certain groups, as shown in the following screenshot:
There are three standard options that we can assign from, and they are as follows:
Wage type for employee subgroup grouping not permissible
Wage type for employee subgroup grouping permissible
Wage type for EE subgroup grouping permissible with warning
Let's hypothetically say that we assign a blank space for 1 in employee sub group
(ESG) grouping. The personnel subarea (PSA) grouping system will throw us an
error message when the wage type is mapped for this group.
This is performed in conjunction with another two steps: employee subgroups for
the primary wage type and personnel subareas for the primary wage type. Let's
say that we assign a 1 to 9 number range for both EE grouping and personnel
subarea grouping for a wage type. This can be viewed by the following path:
SPRO | Personnel Management | Personnel Administration | Payroll
Data | Wage Types | Employee Subgroups for Primary Wage Type or via
the SM30/31 T-code in the V_503_G table
SPRO | Personnel Management | Personnel Administration | Payroll
Data | Wage Types | Personnel Subareas for Primary Wage Type or via
the SM30/31 T-code in the V_001P_K table.
There is a feature provided by SAP to default the wage types in the Basic Pay
infotype based on the grouping, which is based on LGMST, the Enterprise
structure for a wage type model. The return value used in the feature is
configured by navigating to SPRO | Personnel Management | Personnel
Administration | Payroll Data | Wage Types | Revise Default Wage Types or
via the SM30/31 T-code in the V_T539A table. The following parameters are for
wages:
F: This does not allow the wage types assigned in 0008 to be overwritten
O: This allows the wage types entered in 0008 to be overwritten
The following screenshot shows the Default Wage Types for Basic Pay screen:
The 0008 (Basic Pay) configuration
Let's explore the configuration required to maintain basic pay in employee's
master data. The 0008 (Basic Pay) infotype holds the wage types that are paid
regularly month on month. It includes the wage types that can be evaluated
directly or indirectly, and this gets affected when loss of payment method is
created. It is also useful when making a distinction between employees, based on
the collective agreement provision (CAP).
Tip
The Basic Pay infotype can hold only a maximum of 40 wage types.
First, it's important that we define the groupings for personnel calculation rule
and CAP, which is done by navigating to SPRO | Personnel Management |
Personnel Administration | Payroll Data | Basic Pay | Define EE Subgroup
Grouping for PCR and Coll.Agrmt.Prov or via the SM30/31 T-code in the
V_503_B table. This grouping is very crucial as it serves as a check when a PCR is
created. The groupings refer to the same rule that is applicable for a group of
employees. This is shown in the following screenshot:
The standard values can be used and only changed if necessary, and are
maintained in the T546A table via the SM30/31 T-code. The standard delivered
values are as follows:
1: This refers to the hourly wage earners
2: This refers to periodic payments (for example, monthly wage earners)
3: This refers to salaried employees
The value that we map to employee group and subgroups is default in the 0008
(Basic Pay) infotype and cannot be edited, as shown in the following screenshot:
The collective agreement provision (CAP) also has SAP standard delivered
entries that can be used. They need to be changed only if the entries don't meet
the requirement. The requirements are as follows:
1: This refers to industrial workers/hourly wages
2: This refers to industrial
workers/monthly wages
3: This refers to salaried employees
4: This refers to employees in the non pay scale band
The CAP are defined by navigating to SPRO | Personnel Management |
Personnel Administration | Payroll Data | Basic Pay | Check pay scale type or
via the SM30/31 T-code in the V_T510A table, and SPRO | Personnel
Management | Personnel Administration | Payroll Data | Basic Pay | Check
pay scale area or via the SM30/31 T-code in the V_T510G table respectively.
The defined pay scale type and area can be mapped to the enterprise structure by
navigating to SPRO | Personnel Management | Personnel Administration |
Payroll Data | Basic Pay | Check Assignment of Pay Scale Structure to
Enterprise Structure.
If the monthly period does not apply to an employee, we have to maintain this
step by navigating to SPRO | Personnel Management | Personnel
Administration | Payroll Data | Basic Pay | Set up payroll period for
collective agreement provision or via the SM30/31 T-code in the V_T510W table.
After we set up the CAP and pay scale area, we can also further distinguish
among the employees based on their groups and levels. We define this by
navigating to SPRO | Personnel Management | Personnel Administration |
Payroll Data | Basic Pay | Revise Pay Scale Groups and Levels or via the
SM30/31 T-code in the V_T510 table. The prequisite is that we must maintain the
pay scale type, areas, and wage types.
The 0014 (Recurring Payments and Deductions)
configuration
The wage types that are to be frequently paid or deducted are defined via the
0014 infotype. Let's look at the configuration steps followed for the 0014
infotype. The configuration is very similar to the one followed for basic pay. The
steps involved in this are as follows:
1. The wage type catalog can be accessed via SPRO | Personnel Management
| Personnel Administration | Payroll Data | Recurring payments and
deductions | Wagetypes | Create wage type catalog.
2. The recurring payments and deduction can be accessed via SPRO |
Personnel Management | Personnel Administration | Payroll Data |
Recurring payments and deductions | Wagetypes | Check wage type
group Recurring payments and deductions.
Here, we group the wage types in the 0014, Recurring payments/deducts
category. This is shown in the following screenshot:
3. The wage type text can be checked and amended by navigating to SPRO |
Personnel Management | Personnel Administration | Payroll Data |
Recurring payments and deductions | Wagetypes | Check Wage Type
Catalog | Check wage type text.
4. We can define the wage type permissibility by navigating to SPRO |
Personnel Management | Personnel Administration | Payroll Data |
Recurring payments and deductions | Wage types | Check Wage Type
Catalog | Check entry permissibility per infotype. There is also a
provision to define whether the wage type is going to be used once or
multiple times.
5. We can define the personnel subarea and employee subgroup that the wage
type is accessible for by navigating to SPRO | Personnel Management |
Personnel Administration | Payroll Data | Recurring payments and
deductions | Wagetypes | Check Wage Type Catalog | Define Wage Type
Permissibility for each PS and ESG. We can click on details
(Ctrl+Shift+F2) to choose the wage type and make the necessary changes.
6. We can define the wage type characteristics such as payment or deduction
wage type by navigating to SPRO | Personnel Management | Personnel
Administration | Payroll Data | Recurring payments and deductions |
Wagetypes | Check Wage Type Catalog | Check wage type
characteristics or via the SM30/SM31 T-code in the V_T511 table.
7. The steps work in conjunction with the values defined in the permissibility
of wage types. We define the subgroup wage type for each employee. This is
permissible by navigating to SPRO | Personnel Management | Personnel
Administration | Payroll Data | Recurring payments and deductions |
Wagetypes | Define employee subgroup grouping for primary wage type.
8. We define the wage type for each personnel subarea. This is permissible via
SPRO | Personnel Management | Personnel Administration | Payroll
Data | Recurring payments and deductions | Wagetypes | Define
personnel subarea grouping for primary wage type.
The 0015 (Additional Payments) configuration
One-time payment that needs to be settled are paid via the 0015 infotype to the
employees. Let's look at the configuration steps followed for the 0015 infotype.
The configuration is very similar to one followed for the Basic Pay infotype and
recurring payments/deduction. The steps involved in this are as follows:
1. The wage type catalog can be accessed via SPRO | Personnel Management
| Personnel administration | Payroll data | Additional payments |
Wagetypes | Create wage type catalog.
2. The additional payments option can be accessed via SPRO | Personnel
Management | Personnel administration | Payroll data | Additional
payments | Wagetypes | Check wage type group Additional payments.
Here, we group the wage types in the 0015, Additional payments category, as
shown in the following screenshot:
The following steps define the various wage type characteristics:
1. The wage type text can be checked and amended by navigating to SPRO |
Personnel Management | Personnel Administration | Payroll Data |
Additional payments | Wagetypes | Check Wage Type Catalog | Check
wage type text.
2. We can define the wage type permissibility by navigating to SPRO |
Personnel Management | Personnel Administration | Payroll Data |
Additional payments | Wagetypes | Check Wage Type Catalog | Check
entry permissibility per infotype. There is also a provision to define
whether the wage type is going to be used once or multiple times.
3. We can define the personnel subarea and employee subgroup that the wage
type is accessible for by navigating to SPRO | Personnel Management |
Personnel Administration | Payroll Data | Additional payments |
Wagetypes | Check Wage Type Catalog | Define Wage Type
Permissibility for each PS and ESG. We can choose the wage type and
click on details (Ctrl+Shift+F2) to choose the wage type and make the
necessary changes.
4. We can define the wage type characteristics such as the payment or
deduction wage type by navigating to SPRO | Personnel Management |
Personnel Administration | Payroll Data | Additional payments |
Wagetypes | Check Wage Type Catalog | Check wage type
characteristics.
5. The preceding steps work in conjunction with the values defined with the
permissibility of the wage types. We define the wage type for each employee
subgroup. This is permissible by navigating to SPRO | Personnel
Management | Personnel Administration | Payroll Data | Additional
payments | Wagetypes | Define employee subgroup grouping for
primary wage type.
6. We define for the wage type each personnel subarea. This is permissible by
navigating to SPRO | Personnel Management | Personnel Administration
| Payroll Data | Additional payments | Wagetypes | Define personnel
subarea grouping for primary wage type.
The 0267 (On-demand or Additional Payments)
configuration
The payment made during the middle of the payroll period or simply on a on-
demand basis is maintained in the 0267 infotype. Let's look at the configuration
steps followed for the 0267 infotype. The configuration is very similar to the one
followed for the basic pay infotype. The steps involved are as follows:
1. The wage type catalog is accessed via SPRO | Personnel Management |
Personnel Administration | Payroll Data | Additional payments: Off-
Cycle | Wagetypes | Create wage type catalog.
2. The wage type group is accessed via SPRO | Personnel Management |
Personnel Administration | Payroll Data | Additional payments: Off-
Cycle | Wagetypes | Check wage type group Additional payments.
Here, we group the wage types in the 0267, Additional off-cycle Pymt
category, as shown in the following screenshot:
3. The wage type text can be checked and amended by navigating to SPRO |
Personnel Management | Personnel Administration | Payroll Data |
Additional payments: Off-cycle | Wagetypes | Check Wage Type Catalog
| Check wage type text.
4. We can define the wage type permissibility by navigating to SPRO |
Personnel Management | Personnel Administration | Payroll Data |
Additional payments: Off-cycle | Wagetypes | Check Wage Type Catalog
| Check entry permissibility per infotype. There is also a provision to
define whether the wage type is going to be used once or multiple times.
5. We can define personnel who the subarea and employee subgroup, wage
type is accessible for. It is accessible by navigating to SPRO | Personnel
Management | Personnel Administration | Payroll Data | Additional
payments: Off-cycle | Wagetypes | Check Wage Type Catalog | Define
Wage Type Permissibility for each PS and ESG. We can choose the wage
type and click on details (Ctrl+Shift+F2) to choose the wage type and make
the necessary changes.
6. We can define the wage type characteristics such as the payment or
deduction wage type by navigating to SPRO | Personnel Management |
Personnel Administration | Payroll Data | Additional payments: Off-
cycle | Wagetypes | Check Wage Type Catalog | Check wage type
characteristics.
7. The steps work in conjunction with the values defined in permissibility of
the wage types. We define for each employee subgroup wage type, which is
permissible by navigating to SPRO | Personnel Management | Personnel
Administration | Payroll Data | Additional payments: Off-cycle |
Wagetypes | Define employee subgroup grouping for primary wage type.
8. We define the wage type for the personnel subarea, which is permissible by
navigating to SPRO | Personnel Management | Personnel Administration
| Payroll Data | Additional payments: Off-cycle | Wagetypes | Define
personnel subarea grouping for primary wage type.
The transaction code used to run the on-demand payroll or off-cycle
work bench is PUOC_XX, where XX is country grouping, such as 10 for
USA, 08 for UK. The on-demand payroll is processed via the off-cycle
work bench, and the program's name is SAPLHRPAY99_OC. The off-
cycle work bench is shown in the following screenshot.
Writing a PCR to meet your
customer's requirements
In the previous chapters, we covered the configuration steps required to
maintain the master data of the employee in relevant infotypes such as
0008, 0014, 0015, and 0267. In this chapter, we will cover the functionality
of schema and PCR.
Schematic payroll schema
The schematic payroll schema is a collection of subschemas that can be
logically used for the purpose of calculation. The schemas can be accessed
via the PE01 T-code. They can be accessed via the SE11 or SE16 T-code, and
they are maintained in T52C0. They are displayed as rows in the table. The
schema has the following three subobjects:
Source text
Attributes
Documentation
The source text will have the subschemas, and we will be able to see them
by clicking on the Display button.
The schema can be defined as payroll or time, and it is controlled in the
attributes subobject. The program class has the provision to define itself as
payroll or time schema. The following list defines this:
C: This refers to payroll
T: This refers to time management
The country-grouping attributes allow us to mention the country for which
we are using the payroll, and there are localized country payroll drivers
provided by SAP. If the localized solution is not available, we can use the
99 grouping.
The schema can be executed; for this, the indicator needs to be flagged.
This will generate and run the schema. There is a control mechanism, and if
we would like the schema to be changed only by a particular user, we can
mention the user ID in the Person responsible field and flag Changes only
by person responsible. Any changes made to the schema can also be
captured for audit purpose. The Administrative info tab has the details
about the user and date stamp. The following screenshot demonstrates this
process:
It is always recommended that the standard schema is copied to the
customer name space before being used. The schema can be copied by
clicking on Copy (Shift+F4). We can click on the Where-used list
(Ctrl+Shift+F3). The documentation subobject is there for us to write
details about each object and schema if required.
The standard tool to generate or check schema consistency is the
RPUSCG00 report. It can be executed via the SE38 or SA38 T-code or by
clicking on Generate (F6). The following are two modes that are available:
1: This is chosen to generate the schemas
2: This is chosen for syntax errors or consistencies
There are four options that are available to be flagged. They are as follows:
Test run
Force generation
Display clusters
Print active
Some important functions to know when working on a schema are given in
the following table:
Function Description
COM The meaning of the schema line can be mentioned using this
function. We don't need to use a parameter when working on
this function.
COPY The subschema called in par 1 is called dynamically using the
COPY function. For example, the main schema is X000, and in
that, we can call a subschema, XIN0, using the COPY function.
It's important to understand the design and functionalities that are available
in the schema. The following screenshot shows what the payroll schema
screen parameter looks like:
Let's look at the different functionalities of the fields of the schema editor in
the following table:
Field Description
Field Description
Line We can use this to mention the number, or many commands can be
entered at the end of the number. For instance, I is used for inserting
a new line.
Func Function is code of logic developed to perform a major chunk of
work. For instance, COPY is a function used to call the subschema.
Par1 A more detailed definition of functions can be used by par 1, for
example, what the significance is of the function or whether we can
make entries or not.
Par
2
A more detailed definition of functions can be used by par 2, for
example, what the significance is of the function or whether we can
make entries or not.
Par
3
A more detailed definition of functions can be used by par 3, for
example, what the significance is of the function or whether we can
make entries or not.
Par
4
A more detailed definition of functions can be used by par 4, for
example, what the significance is of the function or whether we can
make entries or not.
D We can use * to have a function deactivated. This determines
whether or not a function is to be included when the subschemas are
executed during a payroll run.
Text This is a free text field to describe the function by adding comments
about the schemas.
The line number field we covered earlier in the chapter has more
functionality. Let's look at it in detail. The possible combination is as
follows:
Commands Description
I This is used to insert a new line
D This deletes the line
R This repeats the same line
Rn Number of lines gets repeated, where n is a number
> Explodes the subschema and is only used in the COPY
function
< The explosion of a schema
The payroll schema has the functions and PCR. The function calls the
function modules, and rule has operations that refer to operation modules.
Tip
Schemas and PCR can be exploded using the RPDASC00 program. This
program refers to the T-codes T52C0 and T52C5 and lists the entries as
maintained in the table.
Personnel calculation rule (PCR)
Personnel calculation rules are maintained via the PE02 T-code. The
important functionality is to determine PCR based on employee subgroup
grouping. Let's see how a sample PCR is written and maintained in the
schema. The following screenshot demonstrates this:
It's recommended that we always select the standard PCR delivered by SAP,
and rename it to a customer-specific PCR. The source text has the ESGrp
grouping and wage type. The ESGrp is what we defined in V_503_B, and the
wage type is defined if the rule is applicable for a particular wage type. We
can also use the * and **** function, which means the function is
applicable for all the wage types; however, it doesn't work for all ESGrp.
We can click on create or edit the PCR. When we click on Create
(Ctrl+F3), it will list three options to insert objects. The three options are as
follows:
same level
Sub-level
Cancel
The following screenshot lists the three options that we discussed in the
preceding bullet list:
We will learn the functionality of the program PCR Z010.
Here, the PCR checks for EE subgroup grouping for PCR, say if it finds the
option 2 2, and it's applicable for all the wage type 2. Next, it uses the
VWTCL operation to check the processing class maintained for the wage
type; in this case, it checks 01, as shown in the following command line:
****
VWTCL 01
1
ADDWT * OT Output table
ELIMI ZEliminate time period ID
Zero= N amtnumrtetime=0
ADDWT /001 OT Output Table
Processing class, cummulation class, and evaluation class are maintained
for wage types in the v_512w_d table.
If the wage type specification is 1 for pclass 01, then it pushes the amount
to the output table. It then eliminates the number and assign it as 0, and
adds the amount to valuation basis wage type 001.
Important payroll functions
The function, in general, is a piece of code developed to perform a major
chunk of tasks. The following is a list of some important payroll functions
that will be very handy:
Function Meaning
COPY If we want to insert the subschema into the main schema, we
can make use of the COPY function.
WPBP The work centre basic pay function (WPBP) is useful to
import master data from 0, 1, 7, 8, and 27 infotypes to the IT
and WPBP internal tables.
PGM The PGM function is used to provide information about the type
of program.
UPD This function can be used to control whether results can be
stored in databases. We can set No in par 1 if we would like to
test a payroll run.
PIT The process input table (PIT)is the function that is used to call
a personnel calculation rule.
PRT This function calls the PCR for different wage types from the
result table.
Important payroll operations
Operations are developed to perform a small piece of a task. The following
is a list of some important payroll operations that will be very handy:
Operation Meaning
VWTCL The set processing class value is a decision operation based
on a specification set in the v_512w_d table.
AMT This evaluates the amt field value. It can also be used as a
decision operation.
NUM This operation evaluates the num field.
RTE The data is entered in the rte field by this operation, and it also
evaluates the rte field.
ADDWT This operation adds the value in the wage type to the
subsequent wage type
Tip
The RPDSYS00 program or the PDSY/PE04 T-code can be used to refer to the
documentation for functions and operations.
Frequent error messages and workaround
During post-implementation support, there can be frequent issues that we
come across. Let's discuss some of them and workarounds to address them.
The infamous posting error that we frequently get is "Posting balance is not
cleared" (period 06/2011 A).
To resolve this issue, we will refer to the following table:
V_T52EK This refers to the symbolic account and its MOMAG field
account assignment
V_T52EZ This includes wage type overview plus/minus sign to post a
positive amount as debit and a negative amount as credit,
respectively
OBYE This T-code is used if the symbolic account has been mapped to
the correct general ledger
The payroll result has already been evaluated in run 0000002259.
The workaround is that the posting run PP 0000002259 has to be deleted
and a simulation has to be run instead of a live run.
Configuring a payslip
The remuneration statement or payslip is customized by navigating to
SPRO | Payroll (XX) | Forms | Remuneration Statement | Set up
Remuneration statement or via the PE51 T-code.
The form class chosen is CEDT, and we copy it and rename it to the customer
name, and make adjustments. The important subobject that needs to be
changed is a single field where we add the fields that need to be included in
the paystub. We choose a single field and click on change. We click on
Create (F5), and on the Insert Single Field screen, we mention the Table
and Table field and click on Transfer (F8). This process is demonstrated in
the following screenshot:
Integration with the finance module
There is a close integration between the payroll and finance modules. Payroll
results are posted directly to the finance module to respective general
ledgers. Symbolic accounts serve as an integration point between the payroll
and finance modules. We will explore the configuration steps required to
post payroll results to the finance module. There are configurations required
for activities in the HR system and finance system.
Activities in the HR system
The determination of accounts while posting to the finance module is broken
down into the following two steps:
On the payroll side, the symbolic account is mapped to the wage type
On the finance side, the symbolic account is mapped with the general
ledger
The grouping of employee for account determination helps to actively group
the employees having the same symbolic accounts but is distributed to
different accounts in finance. It is defined by navigating to SPRO | Payroll
(XX) | Reporting for posting payroll results to accounting | Activities in
HR system | Employee grouping and symbolic accounts | Define
Employee grouping account determination | Employee grouping for
account determination: Define values or via the SM30/31 T-code in the
V_T52EM table.
In the next step, there is a feature called PPMOD. This can be used to
default the employee grouping based on the enterprise or personnel structure
fields. It is defined by navigating to SPRO | Payroll (XX) | Reporting for
posting payroll results to accounting | Activities in HR system |
Employee grouping and symbolic accounts | Define Employee grouping
account determination | Define assignment of EE char. to EE group
account assgmt. This return value can be used when we define the
Symbolic Accounts in the next step by flagging the MOMAG field. If the
MOMAG field, is active or flagged, the employee grouping is taken into
account during account determination. The symbolic accounts are defined by
navigating to SPRO | Payroll (XX) | Reporting for posting payroll results
to accounting | Activities in HR system | Employee grouping and
symbolic account | Define Symbolic Accounts or via the SM30/31 T-code in
the V_T52EK table. This is shown in the following screenshot:
The symbolic account is a four-digit alphanumeric code with account
assignment types. The account determination types determine the type of
account to be posted in finance. The account assignment also determines the
account mapped on the finance side.
Let's look at the different account assignment types and their functionality in
the following table:
Account assignment
type
Meaning
C This refers to posting to an expense account
F This refers to posting to a balance sheet account
K This refers to posting to personal vendor accounts
KF This refers to posting to fixed vendor accounts
FC This refers to posting to a balance sheet account
(NewGL)
The symbolic account defined in the preceding step can be mapped to the
wage types by navigating to SPRO | Payroll (XX) | Reporting for Posting
Payroll Results to Accounting | Activities in the HR system | Maintain
Wage Types | Define Posting Characteristics of Wage Types or via the
SM30/31 T-code in the V_T52EL_NOFM table.
The plus and minus signs are defined along with the symbolic account, and
they have specific meanings, as shown in the following list:
+: The positive amounts from the wage types are posted as debits and
negative amounts are posted as credits
-: The positive amounts are posted as credits and negative amounts are
posted as debits
Activities in an accounting AC system
The symbolic accounts that are defined are mapped to the general ledger on
the accounting side. Based on the account assignment defined for the
symbolic account, we have to choose the accounts as follows:
Assign balance sheet accounts
Assign expense accounts
Assign technical accounts
Assign customer accounts
Assign vendor accounts
Assign customer accounts for specific loan posting
Hypothetically, if we have defined a symbolic account with the account
assignment type as "C", then we have to map that symbolic account to assign
an expense account. If it's "FC", then we have to map it to assign balance
sheet accounts. This is depicted in the following screenshot:
Only, if the MOMAG field is flagged, the employee grouping for account
determination, will be active to be assigned.
Tip
Wage type assignment: The G/L Accounts report RPDKON00 is useful
when customizing settings of wage types, symbolic accounts, and general
ledgers.
Posting payroll results to finance steps
We will look at the steps to be followed to post the payroll results to the
finance steps.
The first step is executing the PC00_M99_CIPE T-code. This is shown in the
following screenshot:
The three different statuses available are as follows:
P: This refers to a live posting run
S: This refers to the creation of simulation documents
T: This refers to a test run; no documents are created
The following screenshot demonstrates this:
Click on Personnel Numbers and a new Posting to Accounting:
Document overview window will open. This is shown in the following
screenshot:
The document needs to be released first before posting. Choose the
document created and click on Release document (F9). This is shown in the
following screenshot:
Click on Yes and note that the Status is changed to Released. This is shown
in the following screenshot:
The posting runs can be displayed via the PCP0 T-code.
Different statuses of a posting run
The finance posting run can have the following statuses:
Fixed value Text
31 This refers to the creation of documents
50 This refers to the posting of documents
61 This refers to the reverse document that is created
Summary
In this chapter, we attempted to clear the notion that payroll is complex.
After reading this chapter, you should be comfortable configuring the
Payroll submodule. We covered important payroll-related infotypes. We
also covered the functionalities of payroll schema and PCR.
In the next chapter, we will closely look at configuring the Talent
Management submodule and explore the standard functionalities provided
by SAP.
Chapter 7. Talent Management and
Development Configuration
The Personnel Development component is an extension of the OM
component. It deals with personnel engagement and development activities.
The personnel development component comprises the following:
Qualifications/requirements
Appraisal systems
Career and succession planning
Development plans
The Personnel Development submodule enables us to plan and implement
training measures to enhance the professional development of the personnel.
The settings made in the following submodules also have an impact on the
Personnel Development submodule:
Organizational Management
Compensation Management
Training and Event Management
Basic settings – Personnel Development
The PD view Infotypes per object type can be controlled by navigating to
SPRO | Personnel Management | Personnel Development | Basic Settings
| Maintaining Infotypes, as shown in the following screenshot, or via the
SM30/31 T-code in the T777I table:
The No Maintenance indicator controls settings if the infotype can be
maintained via basic transaction such as PP01. In the standard system
settings, some infotypes have the No Maintenance checkbox flagged, but if
we would like to maintain them through the PP01 transaction code, then the
No Maintenance (T777I-MAINT) flag needs to be removed.
Customer-specific settings for PD-related infotypes can be maintained by
navigating to SPRO | Personnel Management | Personnel Development |
Basic Settings | Maintaining Infotypes, as shown in the following
screenshot, or via the SM30/31 T-code in the T77CD table.
The customer-specific settings can be defined in the table for PD infotypes.
If we are not going to use the standard screen 2000, an alternate screen
number can be defined. The screen number 2000 is usually the default
screen for infotypes and only has different screen numbers as the default for
certain country-specific infotypes.
If we are not going to use the standard list screen number 3000, an
alternate screen number can be defined
The maintenance of the infotype via the PP01 TCD can be controlled by
checking the No Maintenance flag
In the case of language specific infotypes, the delete blank switch lets
us know how blank lines can be processed. The three options available
are as follows:
E: blank lines are only deleted at the end
A: all blank lines are deleted
Blank lines are retained
We can also sort the infotype in sequence by flagging the Sort Entries flag.
We can sort it based on the following settings:
Sort
sequence
Description
Sort
sequence
Description
In the ascending order by subtype and in the descending order
by "from" date
1 In the descending order by "from" date and in the ascending
order by subtype
2 In the ascending order by subtype and in the ascending order
by "from" date
3 In the ascending order by "from" date and in the ascending
order by subtype
We can specify whether an infotype is maintained only for a particular
country such as the USA, for example, by navigating to SPRO | Personnel
Management | Personnel Development | Basic Settings | Maintaining
Infotypes, as shown in the following screenshot, or via the SM30/31 T-code
in the T77NI table.
The time constraint for each object type can be set by navigating to SPRO |
Personnel Management | Personnel development | Basic Settings |
Maintain Relationships | Define Time Constraint Depending on Target
Object Type, as shown in the following screenshot, or via the SM30/31 T-
code in the T77ZR table:
The standard TC settings are as follows:
TC class Description
0 This may only exist once
1 This exists without gaps
2 This exists with gaps
3 This is available as often as required
The different languages supported in the PD submodule can be displayed by
navigating to SPRO | Personnel Management | Personnel development |
Basic Settings | Specify Sequence of Languages Available or via the
SM30/31 T-code in the T778L table. The standard sequence of languages is
German, English, Spanish, Dutch, French, and Italian, as you can see in
the following screenshot:
This useful tool provided to check the consistency of installation can be
accessed by navigating to SPRO | Personnel Management | Personnel
development | Basic Settings | Tools | Check Consistency of Installation,
as shown in the following screenshot, or via TCD OOCH. They can also be
accessed by navigating to Report | RHCHECK0.
The infotypes that the change documents need to be captured can be defined
by navigating to SPRO | Personnel Management | Personnel development
| Basic Settings | Activate Change Documents, as shown in the following
screenshot, or via the SM30/31 T-code in the T77CDOC_CUST table. In the
standard settings, the table is empty and we can activate the change
document functionality for infotype, subtype, object type, and plan version.
Integration aspects with other
submodules of HCM
There is a tight integration between the following submodules of Human
Capital Management (HCM):
Personnel Administration
Recruitment
The following data flow happens due to the effect of the integration:
Qualifications are transferred from personnel administration.
Qualifications are transferred from recruitment.
Appraisals are transferred from personnel administration. We can use
the OOPD transaction code for setting the control features.
The HR Master Data view is as shown in the following screenshot:
The integration helps in using the qualifications from the PD submodule,
instead of from the 0024 infotype (Qualifications).The appraisal system in
the PD submodule can be used instead of the 0025 (Appraisals) infotype.
This table is maintained by navigating to SPRO | Personnel Management |
Personnel development | Integration | Set up Integration with
Personnel Admin. and Recruitment as shown in the preceding screenshot,
or via TCD OOPD.
Tip
If the integration is active, the qualifications and appraisal maintained in
0024 and 0025 are overridden by the PD component.
To import the qualification and appraisal maintained in the PA submodule
and recruitment component, the following reports are used:
The RHQINTE0 report transfers the personnel data stored in 0024
(PA infotypes) to the same object ID in T574A. The data stored in
PA0024 is then deleted.
The RHQINTE1 report transfers the applicant data stored in 0024 (PA
infotypes) to the same object ID in T574A. The data stored in PA0024
is then deleted.
The RPIT25APP report is a useful report to convert the 0025 infotype
data to the appraisal system of personnel development. We can also
delete the entries in PA0025 using this report after conversion.
These reports can be accessed by navigating to SPRO | Personnel
Management | Personnel development | Integration | Transfer
Qualifications from Personnel Administration.
Master data for the Personnel
Development component
There are four major activities that can be performed. This depends on
whether the modules already implemented are used. The activities are as
follows:
Organizational plan maintenance
Scales
Qualifications catalog
Careers
If we have the OM module implemented, then we need not perform the
organizational plan maintenance step. If the OM component is implemented,
the organizational plan maintenance need not be performed separately.
The active integration of PD components will allow us to define the scales,
qualitative or quantitative. Examples of quality scales can be as follows:
Expert
Beginners
Some recommendations while creating qualitative scales are as follows:
Define less than 20 proficiencies for a scale
At least one proficiency must be created for a scale
Examples of quantity scales can be 100 percentage, where 1 is the lowest
proficiency and 100 is the highest proficiency.
The scales are defined by navigating to SPRO | Personnel Management |
Personnel Development | Master Data | Edit Scales, as shown in the
following screenshot, or via the SM30/31 T-code in the V_T77SK table.
We define, for example, a 5-point scale, and the system prompts us to choose
whether it's qualitative or quantitative, as shown in the following screenshot:
The proficiencies are defined by choosing Quality scale or Quantity scale.
The characteristic values are defined by navigating to SPRO | Personnel
Management | Personnel Development | Master Data | Edit Scales |
Characteristics Values, as shown in the following screenshot, or via the
SM30/31 T-code in the V_T77SP_1 table.
The qualification catalogue
The qualification catalog lets us define the qualification or proficiency in
which the employer is interested. The qualification groups and qualifications
together make a qualification catalog. The qualification catalog can be
defined by navigating to SPRO | Personnel Management | Personnel
Development | Master Data | Edit Qualifications Catalog, as shown in the
following screenshot, or via TCD OOQA.
A qualification catalogue can be edited by selecting Functional/Technical
(qualification) under SAP Skills (qualification group), as shown in the
following screenshot. The proficiency description of the qualification
defined in the appraisal catalogue can be edited in the qualification catalog.
The inherited proficiency descriptions should be displayed for the object and
feature. It is controlled by flagging the Default checkbox under the
Proficiencies tab, as shown in the following screenshot.
In the standard system, the default setting is that this flag is normally
activated. This implies that the proficiency descriptions of the scale (or, in
the case of qualifications, the proficiency descriptions of the corresponding
qualification group) will be displayed.
The Default checkbox shall be deactivated to create or display an individual
description of the proficiencies.
The qualification group (object type QK) is assigned a proficiency scale. It is
also used to structure the qualification catalogue. The qualifications, on the
other hand, cannot be directly inserted into catalogues; they must be mapped
via the qualification group. The validity period and deficiency meter can be
assigned to qualifications. The qualification catalogue can be uploaded using
LSMW (Legacy System Migration Work Bench), along with the
qualification group, qualifications, and proficiencies. The proficiencies
against each position level are normally uploaded via Batch Data
Collection (BDC). The validity or the depreciation meter is maintained by
clicking on the additional data table for each qualification, as shown in the
following screenshot:
The Where-used (Ctrl + Shift + F3) functionality, shown in the following
screenshot, is useful to find the relationships of the qualification group
object type:
Career maintenance
The applicable path within an organization can be defined via careers. One
career can contain up to 9,999 career items. Career items are normally
arranged bottom up. Items high up in the hierarchy come at the top. They are
defined by navigating to SPRO | Personnel Management | Personnel
Development | Master Data | Edit Careers, as shown in the following
screenshot, or via TCD OOQ4. Changing a career is a customizing activity in
SPRO.
Functions in Personnel Development
Personnel Development functions such as profile view, control parameters,
selection criteria, and specifying the vacancy infotype are some features in a
PD component. The profile view lets us define a view for each object type. It
comprises of a number of subprofiles. The profile view can be defined by
navigating to SPRO | Personnel Management | Personnel Development |
Functions | Define Profile View or via the SM30/31 T-code in the
T77PP_VIEW table. The profile view lets us define the views (headers and
subprofiles) such as qualifications, potentials, and dislikes for an object type
P, as shown in the following screenshot:
The control parameter function in V_T77S0 lets us define the features
mentioned in the following list. They are defined by navigating to SPRO |
Personnel Management | Personnel Development | Functions | Set Up
Control Parameters.
Maximum number of entries in the hit list
Handling over qualification
Activating the qualification bundle
The following values are maintained for the standard settings switches:
Group
Sem
abbreviation
Value Description
QUALI MAXEN 20 Maximum number of entries in the hit list
QUALI OVERQ 1 Valuation of over-qualification
QUALI QBUSE Use qualifications bundle
QUALI QPROZ 100 Replacement percentage for alternative
qualification
QUALI SHORT Code in qualifications catalog
The suitability range is a useful function in the PD component, which helps
users identify object suitability at a glance. The suitability ranges are defined
by navigating to SPRO | Personnel Management | Personnel
Development | Functions | Define Suitability Ranges, as shown in the
following screenshot, or via the SM30/31 T-code in the T77CS table. The
column ID is a standard icon that can be used to depict ranges.
The infoset must be created with the AP and P object types and mapped with
the PDVFINE scenario, as shown in the following screenshot:
The standard system settings have the PDVFINE scenario defined for the AP
and P object types maintained in T77OMAHQ_FUNCARS, as shown in the
following screenshot:
This infoset can be seen in the sq02 TCD, as shown in the following
screenshot:
We can specify whether the vacancy infotype needs to be maintained in 1007
or not by navigating to SPRO | Personnel Management | Personnel
Development | Functions | Activate/Deactivate "Vacancy" Infotype. If
the PPVAC PPVAC switch in the T77SO table is set at 0, then integration with
recruitment is inactive, as shown in the following table:
Group
Sem
abbreviation
Value Description
PPVAC PPVAC 0 1007I cannot be maintained
PPVAC PPVAC 1 The vacant position is indicated by 1007I and
is maintained for Personnel Development
Standard tools in the PD component
There are some standard tools provided in PD components to perform the
following functions:
Requirements for positions can be copied to position holder's
qualification subprofile
Mass data maintenance for creating the qualifications subprofile
They can be accessed by navigating to SPRO | Personnel
Management | Personnel development | Tools | Copy Requirements
Profiles to Position Holder(s), or via SPRO | Personnel Management
| Personnel Development | Tools | Qualifications Profile: Mass Data
Maintenance.
Development plans
The individual development plan status is defined to identify the current
progress of the business event planned. The status can be defined by
navigating to SPRO | Personnel Management | Personnel development |
Development Plans | Define Development Plan States, or via the SM30/31
T-code in the T77BZ table. In the standard system, the following settings are
defined:
State State of development plan
1 Planned
2 Current
3 Completed
4 Completed unsuccessfully
5 Completed successfully
6 Not carried out
The development plan catalog contains the development plan group and
development plan, and they can be maintained by navigating to SPRO |
Personnel Management | Personnel Development | Development Plans |
Edit Development Plan Catalog, as shown in the following screenshot:
The development plan contains subactivities, and the following object types
can be included as items in a development plan:
A: This is the work center
BS: This is the appraisal model
C: This is the job
D: This is the course type
DC: This is the curriculum type
F: This is the location
O: This is the organizational unit
S: This is the position
We can also define the following information for the development plan:
Duration in months, days, or years
Notes for items
Specify whether an item is mandatory, as shown in the following
screenshot:
Objective setting and an appraisal's
template configuration
The basic settings need to be set up in a way that determines whether we are
going to use the old appraisal system or the objective settings and appraisal
system component. To replace the new system, we need to set the system
switch, as shown in the following screenshot. The system table settings are
defined by navigating to SPRO | Personnel Management | Personnel
Development | Objective Settings and Appraisal | Edit Appraisal
Catalog or via the OOHAP_SETTINGS_PA TCD, as shown in the following
screenshot:
The possible values that can be defined for the switches are explained in the
following table:
Value
possible
Description
Retain the old appraisal system
X The system replaces the appraisal system with objective settings
and appraisal subcomponents.
Value
possible
Description
T The system replaces the appraisal system with objective settings
and appraisal subcomponents. It also has an impact on the TEM
submodule. For business event processing, the system offers the
function of objective setting and appraisal for users.
A The system replaces the appraisal system with objective settings
and appraisal subcomponents. The settings also have an impact on
the PD and TEM submodules.
Appraisal templates will be created under the category group. The category
group is defined by navigating to SPRO | Personnel Management |
Personnel Development | Objective Settings and Appraisal | Edit
Templates.
The appraisal template includes the following elements:
Category (appraisal) group
Appraisal category
Appraisal template
Criteria group
Criterion
External element
Category groups let us define the object types, status, authorized persons,
and workflow events. They also include appraisal documents for the
objective settings and appraisals' applications.
An appraisal category groups different appraisal processes, for example, the
360-degree appraisal process.
Tip
SAP recommends using separate category groups for each appraisal process.
An appraisal template lets us define specific appraisal documents. It is
always assigned to a category. It is quite simple to create an appraisal
template for an appraisal process. The standard templates delivered by SAP
can be used instead of creating a new one.
A criteria group follows the appraisal template. An individual characteristic
in an appraisal document that needs evaluation is referred to as a criterion.
The standard system delivers the following categories:
360-degree feedback
Standard appraisal
Objective setting
The following are delivered as standard templates:
Objective setting
Performance appraisal
Category group creation
The category groups use the object types such as P that are chosen during the
appraisal form creation. The object types included in Allowed Object Types
control the selection during the appraisal form creation process, as shown in
the following screenshot:
The status that needs to be included in the appraisal template is included in
the Status Flow column. The status that is mentioned at the Category
Group level applies to the category and template as well. The selected flag
controls whether the status can be used or not, as shown in the following
screenshot:
The people authorized to access the appraisal template and the status are
defined in the Person Authorized tab, as shown in the following screenshot:
As an additional function, the workflow templates can also be added in the
appraisal template. The workflow can be triggered based on the events setup,
as shown in the following screenshot:
Category creation
We can create a new category by right-clicking on the category group, as
shown in the following screenshot:
We will have an option to choose from the pop-up screen.
We can define the following columns for the category:
Participants
Columns
Roles
Value Lists
Enhancements
Status Flow
The text and type of participants can be defined in the Participants tab, as
shown in the following screenshot. The text is displayed as a label, and if no
text is maintained, the system displays a validity period.
The list of columns can be defined in the appraisal template level, as shown
in the following screenshot:
The final list of roles can be defined in the appraisal template level, as
shown in the following screenshot, and is mainly for partial appraisal
purposes:
The scales can be defined in the appraisal template level in the Value Lists
tab:
If we are going to use any enhancements in the appraisal, the template level
can be defined in the Enhancements tab, as shown in the following
screenshot. The enhancement is a technical activity and can be performed by
the technical consultants.
The person authorized to access the appraisal template and status flow of
events can be defined in the Status Flow tab, as shown in the following
screenshot:
Steps to create an appraisal template
We need to right-click on the category and choose Create Template, as
shown in the following screenshot:
Here, we will have options to choose from. Choose Create Manually, as
shown in the following screenshot:
Each item that comes under the appraisal template is called an element. The
overall view of the appraisal template looks like the following screenshot:
The description that needs to be shown after the header is defined can be
done under the Description tab. The setup for numbering and appraisal
document headers is controlled in the Layout tab, as shown in the following
screenshot:
The unchecked header details will be displayed in the appraisal document.
The enhancement can also be defined in the template in the further block.
The column owner setup is defined in the Column Access tab. The different
statuses such as display, change, and hide can be set up. The different
statuses that can be used in the appraisal template are set in the Status Flow
tab. The push button can be defined for each process, and the workflow
event can also be defined for the process.
Tip
The OSS note Target function: FAQ - 1549085 is a useful note for reference.
In all the standard reports, the appraisers and appraisees are defaulted. The
appraisees are defaulted not at the person level but at the organization unit
level. To avoid this, VC_T77HAP_CATEGORY can be used to remove the allowed
appraiser type, which is O, and maintain the type P, as shown in the
following screenshot:
Summary
In this chapter, you learned how to configure the Personnel Development
component. You learned how to maintain the important master data required
for the Personnel Development component. We only focused on PD and did
not cover the Talent Management/Development suite for the purpose of
this chapter. We covered the basic settings required for configuration and
learned about the important master data maintained in PD. We also learned
how to create appraisal templates based on corporate goals and corporate or
team values.
Chapter 8. Training and Event
Management Configuration
The Training and Event Management (PE) component offers a variety of
features that help a company plan and administer their employees' training
courses. It also helps companies keep a track by recording the knowledge
and skills acquired by employees that can be used in real-time practice. The
TEM submodule enables us to plan and manage business events; we can
also book, prebook, and cancel events using this component. In this chapter,
we will learn to set up event catalogs and integration aspects with other
modules such as time management and material management. Although
SAP Learning Solution is based on Training and Event Management, we
are limiting our learning only to TEM (PE). To use the SAP Learning
Solution functionality, its add-on must be installed on the system. Learning
Solution (LSO) is a portal-based solution and is activated by installing the
add-on. Success Factor (SF) is making a wave in the Talent Management
space, and we hope to cover it in a separate book.
The following topics will be covered in this chapter:
The basic settings of TEM
Integration aspects of TEM
Configuring Business Event preparation
The basic settings in TEM
The plan version is defined to maintain a different simulation of the plan,
and this has been covered in the previous chapters. The plan version is
defined by navigating to SPRO | Training and Event Management | Basic
Settings | Plan version maintenance | Maintain plan version.
We can set up the number ranges as plan version dependent or independent,
and it is maintained by navigating to SPRO | Training and Event
Management | Basic Settings | Number Range Maintenance | Set Up
Plan Version-Independent Number Assignment. If the NUMRG COMP
switch is set to X, then the number can be assigned across different plan
versions. The internal and external number ranges can be defined by
navigating to SPRO | Training and Event Management | Basic Settings |
Number Range Maintenance | Define Number Ranges for Objects or
via the transaction code, OONR. The new number range object, HRTEM_REFN,
has been introduced in Training and Event Management for number range
reference objects for external operators. These are useful for the following
functions:
Requesting material in the Material Management submodule
Billing and activity allocation of business events in the sales and
distribution (SD) and cost accounting (CO) modules
The factory calendar holidays can be linked to the TEM submodule by
navigating to SPRO | Training and Event Management | Basic Settings |
Control Options for Days Off | Specify Factory Calendar. The SEMIN
ORTCA switch needs to be set with the default factory calendar ID. This
serves as a control feature for holidays that are defined for the enterprise.
Integration aspects in the Training and
Event Management module
TEM modules support integration with many submodules such as the
following ones:
Time management
Material management
Budget management
Billing and activity allocation
Appointment calendar
Mail connection
SAP knowledge provider
Time management integration allows us to define the incompatible absence
or attendance types with a particular business event type function. The PLOGI
TIME switch needs to be activated, and its value needs to be X for the
integration to be active. The different attendance types are defined for
attendees and instructors along with a mandatory minimum percentage of
attendance. We define the settings by navigating to SPRO | Training and
Event Management | Integration | Time Management | Specify
Attendance Types.
Group Semantic abbreviation Description
SEMIN AINST Attendance type for instructor in T554S
SEMIN APART Attendance type for attendance in T554S
SEMIN TIMEP Minimum percentage attendance
If materials required for a particular event are available in the material
management module, they can be integrated to TEM. There is a wizard that
helps us integrate the MM and TEM modules. The control parameters
maintained in T77S0 are activated only after the wizard has successfully
completed. If we want to activate the MM functions, we need to choose Yes
from the wizard options, as shown in the following screenshot:
The wizard then helps us assign the number ranges to the next step, and the
plant location, storage area, and controlling area details can be input in the
wizard. The wizard then allows us to assign the document type and
movement types. Documents are simply purchase requisitions in the MM
module, and hence, the default document type NB is reserved for purchase
requests from the TEM module. The movement of goods is controlled in
MM as movement types, so when a request comes from TEM for issuing
goods, then the movement type goods issue (GI-201) for cost center is
supported. The customizing setting is completed after filling in all the
integration details with MM, and we get a message to click on and complete
the process to save the settings.
Name Value
Plant 6650
Name Value
Storage location 0002
Controlling area 2000
Document type NB
Transaction type 201
The ones shown in the following screenshot are not standard values:
The SEMIN MAT switch must be set as 1 for the activation to be switched on,
and it's defined by navigating to SPRO | Training and Event Management
| Integration | Material Management | Integration Yes or No?. The
integration is usually deactivated by default, and it needs to be activated by
changing the standard settings.
The controlling area, plant, and storage location are defaulted by navigating
to SPRO | Training and Event Management | Integration | Material
Management | Specify Organizational Elements. The default value is
assigned in T77S0 for the following groups and semantic abbreviations:
Group
Semantic
abbreviation
Description
PPINT PPINT Default value for controlling area
SEMIN PLANT Plant for material administration
SEMIN STORE Storage location for material
administration
The document types and movement types are defaulted by navigating to
SPRO | Training and Event Management | Integration | Material
Management | Specify Control Elements.
Group Semantic abbreviation Description
SEMIN DOCTY Purchase requisition (document type)
SEMIN MOVTY Reservation: movement type
The budget allocated versus the measurement of the cost incurred for
training events can be defined if the Organizational Plan component (PA-
OS) is active and if it is defined by navigating to SPRO | Training and
Event Management | Integration | Budget Management | Specify Budget
Currency. The currency is mapped via this node or via the SM30/31 T-code
in the V_T7PM2 table. The budge types and their attributes are defined by
navigating to SPRO | Training and Event Management | Integration |
Budget Management | Define Budget Type and Attributes, as shown in
the following screenshot, or via the SM30/31 T-code in the V_T7PM3_B table:
The default of the budget type group is 03, that is, Training and Event
Management. Some of the other groups are as follows:
01: This is HR Funds and Position Management
02: This is Compensation Management
03: This is Training and Event Management
04: This is Organization Management for Public Services
The budget periods can be defined by navigating to SPRO | Training and
event management | Integration | Budget Management | Specify Budget
Period or via the table V_T7PM9_B. The start date, end date, and key date are
defined in the table.
We can integrate SAP knowledge providers such as document management
service, content management service, text retrieval, and information
extraction. We can do this by navigating to SPRO | Training and event
management | Integration | SAP Knowledge Provider.
Configuring a business event
preparation/event catalog
The configuration of business event preparation will help set up master data
for the Training and Event Management components such as resources. It
also helps in setting up the hierarchical structured business event catalog. We
start setting up the cost items; basically, the cost items represent the costs
incurred by the business events. It is also required for transferring costs to
cost accounting and also for determining price proposal. Cost items are
defined by navigating to SPRO | Training and Event Management |
Business Event Preparation | Define cost items or via the SM30/31 T-code
in the T77KB table. Cost items help us store the costs for resources, resource
types, business events, and business event types. The cost items have a
provision for defining the cost as follows:
Attendee
Time unit
Business event
We can also state whether the cost is relevant for transfer to accounting, and
if yes, we have them mapped to the controlling area and cost element, as
shown in the following screenshot:
Time schedule
We can define the time schedules for each business event, say, the duration
of training sessions such as one full day and with different day segments.
Day segments allow us to define the schedule or break it up into three
different blocks.
Day schedule and time segment are defined by navigating to SPRO |
Training and Event Management | Business Event Preparation | Define
Time Schedule/Day segment, as shown in the following screenshot, or via
the SM30/31 T-code in the T77AM/T770A table:
Physical location
The physical location of the rooms can be maintained by navigating to
SPRO | Training and Event Management | Business Event Preparation |
Create Building Address or via the SM30/31 T-code in the T777A table. The
business event locations can be maintained by navigating to SPRO |
Training and Event Management | Business Event Preparation |
Location | Business Event Location Switch.
The SEMIN ORT switch must be activated for using the business event
locations. When an event is created, locations can be assigned, and they are
defined by navigating to SPRO | Training and Event Management |
Business Event Preparation | Location | Create Location, as shown in the
following screenshot. We can also capture the following details when the
locations are defined:
Site-Dependent Info
Address
Further information
Internal or external organizers conducting the business event can be defined
by navigating to SPRO | Training and Event Management | Business
Event Preparation | Organizers | Specify Organizer Types. The standard
organizer types are company (U object type), organizational unit (O object
type), customer (KU object type), and interested party. The SEMIN VTYP1
switch must be assigned the relevant object type.
External organizers of business events are defined as companies, while
internal organizers are defined as organization units by navigating to SPRO |
Training and Event Management | Business Event Preparation |
Organizers | Create Company, as shown in the following screenshot. We
can set up a company in TEM as follows:
It can set as an organizer of a business event type
It can be set as an organizer of a business event
It can be set as independent external organizers conducting events
It can also be assigned to an external instructor or attendee
The internal organizers of an event are set up by navigating to SPRO |
Training and Event Management | Business Event Preparation |
Organizers | Create Organizational Unit. Internal organizers are of object
type O and need not be defined if they are already defined in OM.
The business event group helps set up the event catalog and is defined by
navigating to SPRO | Training and Event Management | Business Event
Preparation | Create Business Event Group. The business event group has
the following details captured:
General description
Relationship
The business event type serves as a blueprint from which the date of a
particular business event is generated. We can also schedule a business
event type to take place at a particular time and date. We can maintain
the following infotypes for business event type Description:
Time schedule model
Capacity
Prices
Relationships
Validity period
An internal and external price for the event type can be maintained. While
the internal prices are a user's activity allocation purpose, the external is used
for billing purposes.
The following screenshot shows the Relationships tab:
The validity period is used as a depreciation meter. The capacity function
plays a vital role in the following features:
Bookings
Resource selection
Price proposal
It also allows us to define the minimum, optimum, and number of attendees
of a particular business event type permissible. The schedule model is
defined in the time schedule that can be mapped. We can activate or
deactivate integration with time management in the Course Type info tab. It
also controls the availability check for the attendees.
Tip
If the Do Not Display Business Event Type indicator is flagged in the
intranet, then the business event type won't be displayed in the Employee
Self-Service (ESS) or portal view of TEM.
Master data
SAP allows us to define all the master data related to TEM in one step with
the catalog feature. The objects are displayed in the hierarchical form if they
are already set up in individual objects' steps in the Implementation Guide.
This feature can be explored by navigating to SPRO | Training and Event
Management | Business Event Preparation | Maintain Master Data via
Catalog, as shown in the following screenshot:
The relationships between object types can be established by clicking on the
Create Relationship option (Ctrl + F10), as shown in the following
screenshot:
We can create objects and relationships for the following using this catalog:
Location
Company
Organizational unit
Resource type
Room
External instructor
Other resources
Business event group
Business event type
Resource management
Resource management allows us to define the resources such as rooms,
instructors, materials, and they can be defined by navigating to SPRO |
Training and Event Management | Business Event Preparation |
Resource Management | Create Resource Type, as shown in the following
screenshot, or via TCD OORT:
To have direct access to resource reservation tables in TEM, the user exit
needs to be assigned in SEMIN RESOC. It is assigned by navigating to SPRO |
Training and Event Management | Business Event Preparation |
Resource Management | Control Elements. By default, the standard
functional module, RH_ALLOCAT, is assigned in the system table.
The three types of resources that are normally distinguished are as follows:
Room
External instructors
Other resources
The three type of resources are defined by navigating to SPRO | Training
and Event Management | Business Event Preparation | Resource
Management | Resources | Create Room.
The object type ( G ) room is defined, and the following can be mapped when
a room is defined as a resource:
Capacity
Address
Cost
Relationships such as the Belongs to location
The object type ( H ) can be defined and the following relationship can be
mapped when an external person is created:
Address
Mail address
Relationships such as the Belongs to location or Is instructor for
business event type
The other resource (G) can be defined, and the following relationships can be
established:
Costs
Relationship Belongs to location and the Is a specialization of resource
type
The object type (VE) can be used to lock resources in TEM. TEM doesn't
have the feature of creating a relationship between resources and services.
Services are defined by navigating to SPRO | Training and Event
Management | Business Event Preparation | Resource Management |
Resources | Locking Resources | Create Service. The SEMIN ENQVE switch
can have the object ID assigned to it to have the service locked. It is assigned
by navigating to SPRO | Training and Event Management | Business
Event Preparation | Resource Management | Resources | Locking
Resources | Specify Service for Lock Administration.
The control elements for business event execution can be defined by
navigating to SPRO | Training and Event Management | Business Event
Catalog | Control Elements.
Group Semantic abbreviation Text
SEMIN FORCA Business event preview: period in days
SEMIN KAP Standard capacity
SEMIN PFORC Planning period
The standard system, as shown in the preceding table, has the following
values assigned and can be changed if required:
FORCA: 90
KAP: 99
PFORC: 360
The FORCA switch is used to define the business event preview period time
frame. The KAP switch is used to define the attendee's capacity, while the
PFORC switch defines the planning period.
The business event catalog
The list of events is available as a catalog, and the control elements are
defined in the system table with the standard settings, as follows:
Group
Semantic
abbreviation
Value Text
SEMIN FORCA 90 Business event preview: period in
days
SEMIN KAP 90 Standard capacity
SEMIN PFORC 360 Planning period
The value in the SEMIN FORCA switch indicates the period (in number of
days) in which a business event exists. The start date is the system date when
an event is booked via the PV00 TCD, and the end date is determined by the
value set in SEMIN FORCA.
The following screenshot shows Book Attendance:
The value set in SEMIN KAP is the maximum capacity for a event. The value
set in SEMIN PFORC is used for the planning period. This is used when a
business event is created, as shown in the following screenshot, using the
PV10 or PV11 transaction code:
Day-to-day activities
All the booking-related activities such as booking, prebooking, and
cancellation can be controlled in the day-to-day-activities settings.
Group
Semantic
abbreviation
Description
SEMIN HISTO Message type for changes to historical
attendances
SEMIN WKAPM Maximum waiting list capacity
SEMIN WKAPT Message type when the waiting list capacity is
exceeded
The preceding system table helps us control the system's reaction with the
SEMIN HISTO switch when a user attempts to cancel, rebook, or replace a
booked attendance. The following input options can be set:
No entry
E: This is an error message
W: This is a warning
I: This is information
A check is not performed if the input option is set as blank. The system
doesn't allow any changes if the input is set as E. If the input is set as W, a
warning message is the output; however, the system allows us to make
changes. The system informs the user that attendance booking is attempted
to be changed. It allows you to make a change in the system.
The SEMIN WKAPM switch helps control the number of attendees per business
event. The SEMIN WKAPT switch helps set the reaction messages when the
waiting list booking is exceeded. The various input options allowed are as
follows:
No entry
E: This is an error message
W: This is a warning
I: This is information
If we would like to have the system read the business event catalogs while
prebooking attendees, then the SEMIN OFFER switch must be set to 1. The
standard values are as follows:
0: System doesn't read the business event catalog
1: System reads the business event catalog
Booking
The attendee type control option lets us determine the type of attendees that
appear on the screen for prebooking, rebooking, replace, and cancel options.
The system lets us choose a maximum of six attendee types under Sort in the
range of 01 to 06. The sort sequence function, however, doesn't allow us to
hide certain attendee types. There are details that are entered for the attendee
types. They are defined by navigating to SPRO | Training and Event
Management | Day to day activities | Booking | Specify Attendee Type
Control Options, as shown in the following screenshot or via the SM30/31 T-
code in the V_T77R3_1 table:
The following options can be set for the attendance or participant type:
Individual attendee
Relevant for the Internet
Organizational assignment
Function module—organizational assignment
Billing and allocation information
Cost center assignment
Function module—cost center assignment
If the participant doesn't belong to a group, the flag can be set. If the
attendee type is included during maintenance in the Internet application, the
flag needs to be set for relevance for the Internet. The evaluation path can be
mentioned to determine the attendee's organizational assignment. We can
also make use of the function module if the evaluation path is not to be used.
The settlement type can be set for settling the costs for the participant of
attendee's type. If we do not want to mention the cost center, we can specify
the function module for determining the cost center assignment of the
attendees.
The booking and prebooking attendees check can be performed by
navigating to SPRO | Training and Event Management | Day to day
activities | Booking | Attendee Checks, as shown in the following
screenshot, or via the SM30/31 T-code in the V_T77KV_1 table:
System reactions can be defined for some booking and prebooking in the
form of message output.
Some of the checks, such as the following, can be set up:
Check for bookings of the same business event type
Check for prebookings of the same business event type
Check for a prerequisite business event
Check attendee's qualification
Standard output messages that can be set for the preceding fields are as
follows:
No check
E: This is an error message
W: This is a warning
I: This is information
The time conflicts when the attendance booked can be controlled via the
system table (T77S0), or the the switch needs to be set as follows:
Group
Semantic
abbreviation
Description
SEMIN TEREF Message type for attendance/instructor
function conflict
SEMIN TETEI Message type for attendance/attendance
conflict
The settings for fee handling can be controlled by navigating to SPRO |
Training and Event Management | Day to day activities | Booking | Fee
Handling.
Group
Semantic
abbreviation
Description
SEMIN CCDCT Dialog module cost maintenance for
bookings
SEMIN CCOST Switch for special event costs for bookings
Tip
The standard system settings have RH_PRICES as function modules and CCDCT
and CCOST are set as 1.
The priority for booking can be set by navigating to SPRO | Training and
event management | Day to day activities | Booking | Booking Priorities.
Group
Semantic
abbreviation
Description
SEMIN MAXMU Maximum priority for essential booking
SEMIN MINWL Minimum priority for waiting-list booking
SEMIN NPRIO Default priority for normal booking
The parameter that we define for the switch is defined from 00 to 99. The
number set is considered as the priority.
The control options for canceling attendances can be defined by navigating
to SPRO | Training and Event Management | Day to day activities |
Canceling Attendance | Control Options, as shown in the following
screenshot.
This control feature allows us to do the following activities:
We can specify the relationship for the cancellation where applicable
The default value for the cancellation fees can be specified
The move-up procedure for waiting list bookings can be specified
The text for attendance cancellation can be defined by navigating to SPRO |
Training and Event Management | Day to day activities | Reasons for
Attendance Cancellation, as shown in the following screenshot, or via the
SM30/31 T-code in the T77CAR table:
The cancellation percentage fee can be defined, and the indicator for
attendance/cancellation can also be set.
Recurring activities
The activities pertaining to business event dates are defined in the nodes of
recurring activities. We can firmly book or cancel business events via the
SEMIN FIXRV control switch. We can define it by navigating to SPRO |
Training and Event Management | Recurring Activities | Firmly
Booking/Canceling | Control Options.
0 indicates that the attendance or participation cannot be canceled unless it is
rebooked.
1 indicates that attendances can be cancelled and the waiting list can be left
empty.
We can define the different reasons for event cancellation by navigating to
SPRO | Training and Event Management | Recurring Activities | Firmly
Booking/Canceling | Reasons for Event Cancellation, as shown in the
following screenshot, or via SM30/31 in the T77CR table. In the standard
system, the following reasons are maintained, and if required, they can be
changed:
The required minimum number of attendees not reached
The resources flagged as "required" are not available
The training room is not available
The instructor is not available
Follow-up processing
The actions that need to be carried out post the business event for attendee
type is defined by navigating to SPRO | Training and Event Management |
Recurring Activities | Follow-up Processing, as shown in the following
screenshot, or via the SM30/31 in the V_T77KV_2 table. This results in the
deletion of the relationship 025 ("is attended"), and a relationship between
the attendee and business event type (relationship 034 "attended") is created.
We can set the flag to mention that the qualification can be transferred to the
participant or attendee subsequent to the business event.
Tip
Read the online SAP support (OSS) note 538446—data redundancies.
TEM contains plenty of standard reports such as resources and business
events that can be accessed via a dynamic information menu. They can be
accessed by navigating to SPRO | Training and Event Management |
Information Systems | Integrate Customer-Specific Reports, as shown in
the following screenshot, or via the PVDM TCD:
We can choose the keys <, >, or Shift + F5 to display or hide the text. We
can also integrate our own reports by performing the following steps:
1. Choose the service from the menu repository and click on level down
(Ctrl + Shift + F1). The system lets us choose from the following three
options:
New submenu
New function
Existing function
2. Choose Existing function and click on OK. A window will open, as
shown in the following screenshot:
3. In the dialog box that appears, enter the following details such as the
name of the function, and Text for server and Text for function auto
populates, as shown in the following screenshot:
Employee Self-Service (ESS)
The control elements for integration with ESS is set up by navigating to
SPRO | Training and event management | Employee Self-Service (ESS) |
Set Up Control Elements for ESS.
Group
Semantic
abbreviation
Description
SEMIN INPRI Booking priority for Internet
SEMIN REQUE Event generation in web transactions
SEMIN WEBST Cancelation reason for employee in ESS
(PV8I)
The reasons for cancellation are stated in the T77CAR table. This can be used
when the event is cancelled in ESS (PV8I).
Tip
PV8I cannot be called via Easy Access, and if you try to do so, the system
will throw a Transaction PV8I cannot be called in the Easy Access
Menu; see long text message.
Summary
In this chapter, we have learned to configure the Training and Event
Management (PE) submodule. We have only focused on TEM and not
covered LSO for the purpose of this chapter. We have learned about the
important master data maintained in the TEM submodule. We also learned
how to integrate our own reports in the information menu.
In the next chapter, we will explore travel management configuration.
Chapter 9. Travel Management
Configuration
The Travel Management module covers all the activities surrounding travel.
In this chapter, we will cover the important configuration steps for three
areas of Travel Management: raising a travel request, planning travel, and
settling travel expenses. We will also learn to configure the following
important Travel Management functions:
Planning a trip
Booking a trip
Settling expenses incurred for the trip in detail
Travel Management – features and
functions
The standard functionalities of SAP Travel Management are equipped to
plan a travel destination, book travel trips, settle expenses via payroll or
finance, and also transfer the expenditure data to other modules such as
controlling, payroll, and fund management.
The overall process of the Travel Management module is shown in the
following screenshot:
Source:
https://help.sap.com/saphelp_erp60_sp/helpdata/en/6e/6bf037f1d6b302e10
000009b38f889/content.htm
Travel Management has tight integration with other modules such as SAP
ERP Financials and the SAP Human Capital Management module.
Basic settings for number ranges
The number ranges are defined for trip number, posting, and trip transfer
documents. SAP recommends that you use the internal number
assignments. Let's look at the functionality of number ranges as listed in the
following table:
T-
code
Functionality
SNUM The object used to define the number range is RP_REINR. We click on
Ranges (F7) and use the personnel area for which we define the
"from" and "to" intervals.
PR10 This T-code is similar to SNUM. The only difference is that we don't
use the object; instead, we use the personnel area for which we
define the "from" and "to" number ranges.
PR11 Trip transfer document number ranges are defined using this T-code.
PR12 Number ranges for posting runs is defined via this T-code.
The number ranges are defined by navigating to SPRO | Financial
Accounting (New) | Travel Management | Set up trip number ranges.
Tip
Travel Expenses is an important component. The Travel Expense
component can also be used independently of Travel Requests and Travel
Planning.
Master data required for Travel Management
All the three areas of Travel Management use the same master data that is
maintained in the following three areas:
Travel Request
Travel Planning
Travel Expenses
The following infotypes are mandatory for booking Travel Planning:
The 0001 (Organizational Assignment) infotype
The 0002 (Personal Data) infotype
The 0017 (Travel Privileges) infotype
The 0006 (Addresses) infotype
The 0017 (Travel Privileges) infotype
The 0027 (Cost Assignment ) infotype
The 0009 (Bank Details) infotype
We have covered all the infotypes, but the 00017 (Travel Privileges)
infotype is used in the previous chapters. Let's look at the features of the
0017 (Travel Privileges) infotype. This is shown in the following
screenshot:
Let's closely look at the features of the different fields contained in the
following 0017I table:
Fields Description
Reimbursement group for
meals/accommodations:
this is statutory
Grouping of employees for whom the same
statutory or travel provisions are applicable
Fields Description
Reimbursement group for
meals/accommodations:
this is enterprise-specific
Grouping of employees for whom the same trip
provisions are applicable, for example, senior
directors, directors, managers, and so on
Employee grouping for
the Travel Expense type
Grouping of employees for whom the same
Expense type trip is applicable
Employee Grouping for
Travel Management
Grouping of employees for whom Business
Trip Management is fulfilled
Reimbursement Group for
travel costs
Grouping of employees for whom travel cost is
applicable
Vehicle type Classification of vehicles such as car, flight,
and so on
Vehicle class The vehicles can be classified based on their
model, price, and so on
License plate number The license plate numbers of company-owned
cars or private cars can be captured in this field
Company code Profit and loss statements are captured via
different company codes assigned
Business area A separate area of operations is represented via
business area
Fields Description
Cost Center Distribution of costs can be based on physical
location, for instance
Indicator for recorded
trips
When the trip data is recorded or changed, this
is flagged and the RPRFLDEL report can be
used to reset the settings
Company code change If this is flagged, the company code can be
changed when the business area is entered
Important transaction codes
The important transaction codes required to work on the Travel
Management module are as follows:
T-code Description
TRIP Travel Manager is used to request, plan, enter, and settle a
business trip
PR03 Trip advances can be created using this T-code
PR05 The Travel Expenses manager dialog screen creates trip
expenses and settles and approves a business trip
PRAP Trips can be approved using this T-code
PREC Trip data can be settled via this T-code
PRFI Using this T-code, we can create a posting run
PRRW Posting run is managed via this T-code
F.02/F-
53/FBCJ/F110
Payment of expenses to employees (treating employee as
vendors) is managed via this T-code
PRAA Vendor master records from HR are
created/changed/blocked using this T-code
T-code Description
XK03 Using this T-code, we can check whether the vendor has
been created
Travel Request configuration steps
The overall process of Travel Management, which includes requesting a
trip, planning a trip, and settling expenses incurred for the business trip, can
be diagrammatically represented as follows:
Source:
http://help.sap.com/saphelp_erp60_sp/helpdata/en/26/fddaabb7dd11d194c6
00a0c92946ae/content.htm
We will learn to configure the three phases that SAP has provided. Let's
closely look at the Travel Request phase and the configuration steps
required for the same. The possible combinations of the Travel
Management module functioning could be shown in the following table:
Module SAP Combinations
HR (Payroll) and Accounting SAP Travel Management and Payroll
and a tight integration of the Finance
module
HR and the Travel module SAP Travel Management and the HR
module
Working together with
Accounting and having a
separate HR system
SAP Travel Management and Finance
Accounting
Operate without HR and
Accounting
SAP Travel Management
We will see how Travel Request uses services with the help of the Web
Dynpro Advanced Business Application Programming (ABAP) user
interface. Web Dynpro is a proprietary web application user interface
technology developed by SAP AG and exists in Java and the ABAP stack.
The Web Dynpro is a user interface (UI) platform that is used to build the
portal screen. The data is fetched from the backend and displayed in the
frontend portal. The standard field labels and length of the fields are
controlled by the business object that is used to build them. The backend
field label and length remains the same while in the portal side; it can be
changed based on the logic. The functionalities are as follows:
Enhancements made to standard Web Dynpro UI elements
Enhancements for standard methods in different standard components
The Travel Request module can include the following information:
This module refers to date and time of the trip requested
This module refers to reasons for the trip and travel destination
If there are any additional destinations, they can also be specified
This module includes advances for the business trip planned
The additional cost center can also be included
There is a provision that includes comments when the trip request is
created
The different travel request mediums (such as rail, train, flight, and so
on) can be included
The estimated cost of the trip can be captured
The trip can be requested or booked through different sales offices by
grouping the employees via external reservation system.
The employee grouping is defined by navigating to SPRO | Financial
Accounting (New) | Travel Management | Travel Request | Travel
Request ESS | Other travel services | Define Groupings for Access to
External Reservation Systems or via the SM30/31 T-code in the
V_TA20O_FIND table.
The standard services can be defined and used in Travel Request in the Web
Dynpro ABAP UI. They are as follows:
Flight
Hotel
Rental car
Train
Ferry
Helicopter
Airport shuttle
The keys for services other than the standard ones such as flight, hotel, and
so on is defined by navigating to SPRO | Financial Accounting (New) |
Travel Management | Travel Request | Travel Request ESS | Other
travel services | Define Other Travel Services or via the SM30/31 T-code
in the V_TA20C/V_TA23OS table.
Tip
For PNR integration, the checkbox needs to be flagged and the Business
Add-In (BADI), FITP_TRAVEL_PLANNINGFITP_TRAVEL_PLANNING, can be
implemented.
We can assign a sales office, reservation system, and logical system to
certain groupings of employees/users using the TRVOF feature. It's defined
by navigating to SPRO | Financial Accounting (New) | Travel
Management | Travel Request | Travel Request ESS | Other travel
services | Assign Groupings for Access to External Reservation
Systems. The TRVOF feature helps assign the following parameters to the
employees based on the following grouping:
Reservation system
Logical system
Sales office
RFC destination
The prerequisites for setting up this feature are the technical access
groupings we defined in the previous table.
The estimated costs and different mediums of travel are defined by
navigating to SPRO | Financial Accounting (New) | Travel Management
| Travel Request | Travel Request ESS | Define Travel Mediums and
Estimated Costs to Be Approved or via the SM30/31 T-code in the
V_T706_REQ_CAT table. The travel medium defined is a four-digit
alphanumeric code, and it has the following options to choose from:
Type
Category
There are two indicators that can be used and have specific functionalities,
as shown in the following table:
Indicators Functionalities
To be
approved
Travel medium is shown in the Travel Request under
accommodation types and travel mediums.
Indicators Functionalities
Enter
estimated
costs
This flag, if set, will allow the user to define the costs as a
separate field. The functionality is only available in the Web
Dynpro ABAP UI.
If the Enter Estimated Costs field needs to be only used as a display
option, then the Display Only field needs to be flagged. This is shown in
the following screenshot:
BADIs are technical activities performed by technical consultants. There
are some BADIs that can be used for enhancements, and they are listed in
the following table:
BADI name Description
GET_ESTIMATED_COSTS This is used for assigning default values to
estimated costs
CHECK_ESTIMATED_COSTS This is used for the entry of estimated costs
There are many standard forms delivered by SAP for Travel Request and
Travel Planning, and they can be configured via the Adobe builder form of
SFP T-code.
The standard forms are presented in the following bullet list:
FITP_REQUEST_FORM
FITP_PLAN_FORM
PTRV_EES_FORM
PTRV_EXPENSE_FORM
It is recommended that you copy the standard form and rename it "Z", with
the name in customer space provided.
The TRVFR feature is used to execute the request form, and it is defined by
navigating to SPRO | Financial Accounting (New) | Travel Management
| Travel Request | Forms | Set Up Feature TRVFR for Request Form.
Configuring Travel Planning
Travel Planning has tight integration with online booking services and is
hassle-free for employees to plan their trip and book their tickets. It gives its
employees a lot of responsibilities, and its user friendly interface ensures that
even novices can work on the system with ease. The SAP business work
flow functionality that comes with the Travel Planning component adds cost
advantage with standardized approval and process mechanism. There are
many standard features that can be used; they are as follows:
Flights, hotel rooms, and rental cars can be booked online
Queries related to travel policies and bookings can be applied
Customized hotel catalog with preferences can be set up
Agreements made with travel service providers can be viewed and
agreed upon
A traveler's personal preferences can be requested automatically online
Flexible reports for analysis purposes
Tight integration with the Travel Expenses module for settling expenses
incurred during the trip
The Travel Planning module supports integration with global distribution
system (GDS) that helps in providing seamless connectivity with travel
service providers. There are standard service providers that provide access to
hotels, flights, train connections, and rental car offerings. Some of them are
as follows:
Galileo
Amadeus
Deutsche Bahn Corporate Portal
Using a Net Weaver Exchange Infrastructure (XI) connection is
possible with low-cost carriers and hotel reservation system such as
Sabre
HRS
BIBE
There are some prerequisites that have to be fulfilled to use the features of
the Travel Planning functionality. They are as discussed in the following
points:
An agreement must have been signed by the client for using the
reservation system, as we would need an interface to connect with the
system and a unique user ID must have been provided for the system
There has to be a network connection that has to be set up for the
reservation system and SAP to communicate with each other
The code of identification that we discussed earlier has to be provided and
entered in SAP customizable tables by navigating to SPRO | Financial
Accounting (New) | Travel Planning | Master Data | Technical Control
Parameters for Travel Planning | Sales Offices and Queues | Sales
Offices or via the SM30/31 T-code in the TA20SUBSCRPT table. This is shown
in the following screenshot:
The general description of the external reservation system that is going to be
interfaced with SAP is defined by navigating to SPRO | Financial
Accounting (New) | Travel Management | Travel Planning | Master Data
| Technical Control Parameters for Travel Planning | External
Reservation Systems | Define Reservation Systems or via the SM30/31 T-
code in the V_TA21P_R table. This is shown in the following screenshot:
The logical systems for each of the reservation systems are defined by
navigating to SPRO | Financial Accounting (New) | Travel Management |
Travel Planning | Master Data | Technical Control Parameters for
Travel Planning | External Reservation Systems | Define Logical
Systems for Reservation Systems or via the SM30/31 T-code in the
V_TA20LOGGDS table.
The logical systems could be as follows:
A unit testing client
A quality testing client
A production system
The technical table that contains the SAP code is mapped to provide code,
and as a rule, it is advisable to not change the standard settings. The standard
entries containing hotel areas (domain FTPD_HOTEL_AREA) and transportation
options (domain FTPD_HOTEL_TRANSPORT) are included in the standard
system, and it is recommended that you not change them. The codes are
defined by navigating to SPRO | Financial accounting (New) | Travel
Management | Travel Planning | Master Data | Technical Control
Parameters for Travel Planning | External Reservation Systems | Assign
SAP Codes to Specific Codes for Reservation Systems or via the SM30/31
T-code in the TA20GDS_CODES table.
The travel preferences of each personnel between the reservation system and
SAP system is established by navigating to SPRO | Financial Accounting
(New) | Travel Management | Travel Planning | Master Data | Technical
Control Parameters for Travel Planning | External Reservation Systems
| Synchronization of Travel Preferences with External Reservation.
Synchronization, however, is not supported by all the providers. Some of the
providers such as Amadeus and Galileo/Apollo are supported, while Sabre is
not supported currently.
There is a standard BADI provided by SAP to compare travel preferences of
personnel providers with global data service providers. The
FITP_PREFERENCE_DATA BADI enables us to send data to the reservation
system based on your personnel preferences.
Tip
RFTP_SYNCHRO_PREFRFTP_SYNCHRO_PREF is a handy program
used for sending the preferences from HR infotypes to the reservation
system.
In the following steps, we define the sales office and IDs. The IDs are useful
when interfacing with the reservation system.
The sales offices are defined by navigating to SPRO | Financial
Accounting (New) | Travel Management | Travel Planning | Master Data
| Technical Control Parameters for Travel Planning | Sales Offices and
Queues | Sales offices | Define Sales Offices or via the SM30/31 T-code in
the V_TA20OFFICE2 table. If it's a virtual office, then there is a flag that can
be checked; this flag serves as an indicator.
The physical address of the sales office can be accessed by navigating to
SPRO | Financial Accounting (New) | Travel Management | Travel
Planning | Master Data | Technical Control Parameters for Travel
Planning | Sales Offices and Queues | Sales offices | Specify Addresses of
Sales Offices or via the SM30/31 T-code in the V_TA23OFFICE_ADR table.
The sales office that we defined earlier needs to be connected to the
reservation system via a log on ID. The following are the prerequisites for
this step:
We must have defined the reservation systems and logical systems
We must have defined the sales offices
We must have defined the log-on data (identification indicators) for the
reservation systems such as Amadeus, Galilieo, and so on
The functionality of queues allows seamless connection with the sales
offices and SA Travel Planning component. It also allows all the sales
offices to access the booking code PNR centrally with ease. It helps to sort
booking and determine price, and the modification of booking can also be
accomplished. The prerequisites for defining the queues for sales offices are
as follows:
The reservation system must have been defined
The logical system must have been defined
The sales office must have been defined
The queues are defined by navigating to SPRO | Financial Accounting
(New) | Travel Management | Travel Planning | Master Data | Technical
Control Parameters for Travel Planning | Sales Offices and Queues |
Queues | Define Queues of Sales Offices or via the SM30/31 T-code in the
TA20Q table.
In the following customizable table, we can define the activities of sales
offices such as price determination, short-term booking, and so on. We can
assign the queue activities so that we can control the activities that can be
performed by the travel centre.
There is FITP_CUST_QUEUEING BADI, which associates associating
sales office queues with a particular travel plan.
The prerequisites for defining the queue categories are as follows:
The reservation system must have been defined
The logical system must have been defined
The sales office must have been defined
The queues of the sales office must have been defined
The queue categories are defined by navigating to SPRO | Financial
Accounting (New) | Travel Management | Travel Planning | Master Data
| Technical Control Parameters for Travel Planning | Sales Offices and
Queues | Queues | Define Queue Categories or via the SM30/31 T-code in
the TA20Q_CAT table.
The sales office's activities are defined by navigating to SPRO | Financial
Accounting (New) | Travel Management | Travel Planning | Master Data
| Technical Control Parameters for Travel Planning | Sales Offices and
Queues | Queues | Define Sales Office Activities or via the SM30/31 T-code
in the V_TA23OA table.
The standard entries in SAP are as follows:
B: This refers to bookings
E: This refers to urgent bookings
F: This refers to booking price, which is already determined
M: This refers to booking modifications
P: This refers to the determination of price
T: This refers to ticket issues
For the reservation system and SAP Travel Planning component to interface
between each other, there has to be a Remote Function Call (RFC) set up;
this is a technical activity. The RFC serves as a connection between SAP and
the SAP gateway. The SAP gateway acts as a bridge between SAP and GRS.
The landscape of the server is graphically represented, as shown in the
following screenshot:
It's defined by navigating to SPRO | Financial Accounting (New) | Travel
Management | Travel Planning | Master Data | Set up RFC Destinations
for Interfaces to External Systems.
The grouping of external reservation systems and other travel service
categories are covered in the following configuration nodes:
By grouping, we can enable the user to book trips based on the different
sales offices and reservation systems. The grouping is defined by navigating
to SPRO | Financial Accounting (New) | Travel Management | Travel
Planning | Master Data | Technical Control Parameters for Travel
Planning | Access to External Reservation Systems | Define Groupings
for Access to External Reservation Systems or via the the SM30/31 T-code
in the V_TA20O_FIND table.
The enterprise level service categories are defined by navigating to SPRO |
Financial Accounting (New) | Travel Management | Travel Planning |
Master Data | Technical Control Parameters for Travel Planning |
Access to External Reservation Systems | Define Travel Service
Categories. The standard codes provided by SAP are as follows:
F: This refers to flight
C: This refers to car rental
H: This refers to hotel
In addition to defining the standard service categories, SAP also provides
other travel services such as ferry. We define these services by navigating to
SPRO | Financial Accounting (New) | Travel Management | Travel
Planning | Master Data | Technical Control Parameters for Travel
Planning | Other travel services | Define Other Travel Services or via the
SM30/31 T-code in the V_TA23OS table.
The Travel Planning component has the functionality of defining the
enterprise-level geography that is normally covered in trips and
characteristics of travel service providers. We will cover them in detail when
we define the International Air Transport Association (IATA) locations
and service provider's details that form the master data for the employee to
choose from.
The IATA locations are defined by navigating to SPRO | Financial
Accounting (New) | Travel Management | Travel Planning | Master Data
| Geographical Situation | IATA locations | define IATA locations or via
the SM30/31 T-code in the V_TA21L table.
The geographic characteristics are defined by navigating to SPRO |
Financial Accounting (New) | Travel Management | Travel Planning |
Master Data | Geographical Situation | IATA locations | Define
Geographical Facts of IATA Locations or via the SM30/31 T-code in the
V_TA21L_1 table.
The characteristics such as country, region, and so on are very useful when
trip rules are mentioned. SAP standard entries have provided states as
regions for some of the following countries:
Argentina
Australia
Brazil
Canada
U.S.
SAP has the functionality of defining the synonyms for airports, and we can
also assign a single destination to multiple IATA locations. The synonyms
for airports, hotels, and car rentals can be defined by navigating to SPRO |
Financial Accounting (New) | Travel Management | Travel Planning |
Master Data | Geographical Situation | Synonyms for Hotel Locations |
Define Synonyms for Airports or via the SM30/31 T-code in the TA23L_F
table.
When a travel plan is created and when the trip destination is entered, for
example, Sweden is the destination and corresponding IATA locations can be
displayed in the selection screen for the availability of the flight.
The synonyms for hotels are defined by navigating to SPRO | Financial
Accounting (New) | Travel Management | Travel Planning | Master Data
| Geographical Situation | Synonyms for Locations | Define Synonyms
for Hotel Locations or via the SM30/31 in the TA23L_H table. These are very
useful for the travel plan when it is queried for hotel reservation and
availabilities.
The synonyms for car rentals can be defined by navigating to SPRO |
Financial Accounting (New) | Travel Management | Travel Planning |
Master Data | Geographical Situation | Synonyms for Locations | Define
Synonyms for Car Rental Locations or via the SM30/31 T-code in the
TA23L_C table.
We can also define the IATA locations within the countries and cross-
country regions as well. They are freely definable in customizable tables,
and they are defined by navigating to SPRO | Financial Accounting (New)
| Travel Management | Travel Planning | Master Data | Geographical
Situation | Regions | Define Regions Within Countries or via the SM30/31
T-code in the V_TA21R_1 table.
The IATA locations can be mapped to the regions that we defined by
navigating to SPRO | Financial Accounting (New) | Travel Management |
Travel Planning | Master Data | Geographical Situation | Regions |
Define Assignment of IATA Locations to Regions Within Countries. The
prerequisite is that the IATA code must have been defined.
The travel service provider's details and its characteristics are defined in the
following steps. We can store details such as costs for the flights, hotels, car
rentals, and so on. We define it by navigating to SPRO | Financial
Accounting (New) | Travel Management | Travel Planning | Master Data
| Travel Service Providers | Flights | Define airlines or via the SM30/31 T-
code in the V_TA21P_F table. Specific airline programs such as frequent flier
can be defined by navigating to SPRO | Financial Accounting (New) |
Travel Management | Travel Planning | Master Data | Travel Service
Providers | Flights | Define Customer Programs of Airlines or via the
SM30/31 T-code in the V_TA21PF_F table.
We can also define the hotel service providers, their classes, and different
programs they offer by navigating to SPRO | Financial Accounting (New) |
Travel Management | Travel Planning | Master Data | Travel Service
Providers | Hotels | Define Hotel Chains or via the SM30/31 T-code in the
V_TA21P_H table.
There are some standard entries available for room rates via the Amadeus
reservation system. It also depends on the providers; they can store their own
rates according to their company policy. We can see the following standard
entries maintained via the Amadeus reservation system:
CON (conventional rate)
COR (company rate)
FAM (family rate)
GOV (statutory rate)
MIL (military rate)
PKG (package rate)
PRO (promotion rate)
RAC (standard rate)
SRS (senior citizen rate)
STP (stopover rate)
TUR (tourist rate)
TVL (rate for travel industry)
WKD (weekend rate)
The standard entries via the Amadeus reservation system can be accessed by
navigating to SPRO | Financial Accounting (New) | Travel Management |
Travel Planning | Master Data | Travel Service Providers | Hotels |
Define hotel rates or via the SM30/31 T-code in the V_TA21H table. The room
classes are defined via the SM30/31 T-code in the V_TA21HO table or by
navigating to SPRO | Travel Management | Travel Planning | Master
Data | Travel Service Providers | Hotels | Define room classes.
The car rental service provider's details can be maintained by navigating to
SPRO | Financial Accounting (New) | Travel Management | Travel
Planning | Master Data | Travel Service Providers | Car Rentals | Define
car rental companies or via the SM30/31 T-code in the V_TA21P_C table. We
can also define the customer programs and classes similarly how we defined
for rooms and flights via the SM30/31 T-code in the V_TA21PF_C and
V_TA21CA table.
The Travel Planning components also have the functionality of defining the
agreements between travel service providers and customer programs such as
frequent flier. They can be defined by navigating to SPRO | Financial
Accounting (New) | Travel Management | Travel Planning | Master Data
| Travel Service Providers | Define Agreements Between Travel Service
Providers on Customer programs or via the SM30/31 T-code in the
V_TA21PFA table.
Any questions regarding the Travel Planning or Travel Expenses that need to
be addressed by a concerned person can be defined by navigating to SPRO |
Financial Accounting (New) | Travel Management | Travel Planning |
Master Data | Define Contact Persons. We can define all the credit card
providers' details by navigating to SPRO | Financial accounting (New) |
Travel Management | Travel Planning | Master Data | Define Credit
Card Providers for Travel Planning. It's a two-character code followed by
long text. We can keep the entries in the following V_T706_CCOMP table:
ID Name of the credit card company
AX American Express
ID Name of the credit card company
MC MasterCard
Any negotiations we have with the travel service providers can be stored in
SAP. This feature is useful during the reservation of travel services such as
flights, room bookings, and so on. The negotiated rates and discounts for
airlines can be maintained by navigating to SPRO | Financial Accounting
(New) | Travel Management | Travel Planning | Rates and Discounts |
Airline rates and discounts | Define Airfare Rates or via the SM30/31 T-
code in the V_TA20NEGOF_2 table. The mandatory parameters for defining the
airline rates are as follows:
Field Mandatory
Provider Yes
Validity period Yes
Fare type Yes
There are optional fields that might / might not be maintained in the table,
and they are shown as follows:
Field Optional
Price information Yes
Flight direction Yes
Field Optional
Flight cabin class Yes
Start and destination locations Yes
Similarly, we can also maintain the discounted rates of other service
providers such as hotel bookings by navigating to SPRO | Financial
Accounting (New) | Travel Management | Travel Planning | Rates and
Discounts | Define Enterprise-Specific Hotel Rates or via the SM30/31 T-
code in the V_TA20NHC table.
The different parameters based on which the rates are defined, are as
follows:
Geographical area
Location
Hotel chain or chain of hotels
Validity period
The car booking can be maintained by navigating to SPRO | Financial
Accounting (New) | Travel Management | Travel Planning | Rates and
Discounts | Car Rental Rates or via the SM31/31 T-code in the V_TA20NCR_2
table.
SAP also has the provision of maintaining the internal trip policies and
procedures that can be mapped to SAP using the 0470 (Travel Profile)
infotype. This infotype contains the special rules that govern a group of
employees, for example, a board of directors being given a special flight and
room. If the 0470 infotype is not maintained for an employee, the trip rules
are automatically applied via the TRVCP feature, as shown in the following
screenshot:
If the 0470 (Travel Profile) infotype is not maintained, the system will check
the TRVCP feature.
SAP has the functionality of maintaining the trip rules for the following
travel service providers:
Flight
Hotel
Rental car
Rail
Some of the categories based on which the trip rules are defined, are as
follows:
Travel service category providers such as flight bookings, room
bookings, and so on
Travel locations such as IATA locations, regions, and so on
Class of the service (first class, for instance)
The trip rules and travel policies are maintained for flights, hotels, car, and
rails by navigating to SPRO | Financial Accounting (New) | Travel
Management | Travel Planning | Trip rules and profiles | Trip and Class
rules | Trip and Class rules for flight/hotel/car rentals.
The mode of payment for travel plan can be maintained by navigating to
SPRO | Financial Accounting (New) | Travel Management | Travel
Planning | Process control | Payment Method. SAP delivers standard
payment methods that can be supported; these methods are as follows:
C: This refers to payment through a corporate credit card
R: This refers to an invoice
B: This refers to payment by cash
P: This refers to payment through a personal credit card
The payment method can be executed via the TRVCC Assign Groupings for
Payment Method feature. The other control parameters such as details of
building a store in the 0032I table needs to be shown in PNR; only then can
we maintain the address in the TA20BUILDING table or by navigating to
SPRO | Financial accounting (New) | Travel Management | Travel
Planning | Expert View | Assign Building Addresses.
Configuring Travel Expenses
After the trip is completed, the Travel Expenses report is completed by the
employee with the supporting documents. The Travel Expense report is then
sent for approval. This again can be automated with the workflow settings.
The system determines the Travel Expenses results and also determines the
amount to be reimbursed for the travel expenses incurred by the employee.
The expenses are always transferred to the Finance module by posting to
finance module and then to controlling. The settlement of the amount can
happen in any of the following ways:
This can happen via a check
This can happen via payroll accounting
This can happen via financial accounting
Bank transfer to the employee's bank account via Data Medium
Exchange (DME)
The first step in Travel Expense is to define the trip provision variant. It
helps us to determine the specific applicable policies based on validity areas
such as private or public sector using the travel expense accounting method.
The trip provision variant is defined by navigating to SPRO | Financial
Accounting (New) | Travel Management | Travel Expenses | Master Data
| Control Parameters for Travel Expenses | Define/Delete/Restore Trip
Provision Variants or via the SM30/31 T-code in the V_T706N table. This is
shown in the following screenshot:
Two trip provision variants must be defined if there is a requirement for
representing two different valid areas in one system. If different verticals,
industries, or countries have different sets of accounting principles, then we
need to have multiple variants set up. This is shown in the following table:
Country
Tax-free
reimbursement
Trip provision
variant
Description of trip
provision variant
XX Media industry 90 Media industry accounting
principles
XX Manufacturing 91 Manufacturing industry
principles
The TRVCT feature is used to execute the trip provision variant based on the
organizational requirements. It is defined by navigating to SPRO | Financial
Accounting (New) | Travel Management | Travel Expenses | Master Data
| Control Parameters for Travel Expenses | Assign Organizational Areas
to Trip Provision Variants via Feature.
The global settings for each trip provision variant enables us to set the
applicability of the payroll based on country grouping and its wage type
validity. The currencies and input tax applicability can also be controlled in
this customizable table. The different methods for converting the recipient
currencies to trip currencies can also be controlled.
We can set the global settings options by navigating to SPRO | Financial
Accounting (New) | Travel Management | Travel Expenses | Master Data
| Control Parameters for Travel Expenses | Define Global Settings or via
the SM30/31 T-code in the V_706D_B table. This is shown in the following
screenshot:
The valid entry values for control parameters for cost accounting that can be
maintained, employee-wise, in the master data in 0017I (travel privileges) is
set up by navigating to SPRO | Financial Accounting (New) | Travel
Management | Travel Expenses | Master Data | Control Parameters for
Travel Expenses | Control Parameters for Travel Privileges.
The grouping configurations such as reimbursement groups for travel costs,
statutory meals and accommodation reimbursement groups, employee
grouping for Travel Expense types, and employee groupings for Travel
Management are all defined to be maintained in the master data of each
employee in the 0017 infotype. We have seen this infotype in the Master
data required for Travel Management section in this chapter.
The control parameters for trip data is defined by navigating to SPRO |
Financial Accounting (New) | Travel Management | Travel Expenses |
Master Data | Control Parameters for Travel Expenses | Control
Parameters from Trip Data. The prerequisite is that the trip provisions
variant must have been defined. The statutory trip types and trip activities
types are also defined in the control parameters from the trip data nodes.
The Travel Expense type serves as a conduit for capturing travel expenses
for a business trip and settling expenses incurred for travel. The expenses
based on individual receipts or per diem are defined based on the trip
provision variant. The expense types such as breakfast, flight, laundry, and
so on are defined by navigating to SPRO | Financial Accounting (New) |
Travel Management | Travel Expenses | Master Data | Travel Expense
Types | Create Travel Expense Types for Individual Receipts. This is
shown in the following screenshot:
The maximum amount for each expense type, for example, 30 USD for
breakfast, can be defined by navigating to SPRO | Financial Accounting
(New) | Travel Management | Travel Expenses | Define Maximum Rates
and Default Values for Expense Types or via the SM30/31 T-code in the
V_T706B2 table. SAP recommends that you set the end date to 31,129,999. It
also helps to restrict the changing and delimiting of the end date.
We define the Expenses types for per diem or flat rates by navigating to
SPRO | Financial Accounting (New) | Travel Management | Travel
Expenses | Create Travel Expense Types for Per Diems/Flat Rates or via
the SM30/31 T-code in the V_T706B1_A table. This is shown in the following
screenshot:
We can define for each travel provision variant, only if combination from
one of the three options of accounting of both the individual receipts and per
diem/flat rates is available. This is possible by navigating to SPRO |
Financial Accounting (New) | Travel Management | Travel Expenses |
Travel Expense Types | Define Per Diem/Flat Rate or Individual Receipt
Reimbursement or via the SM30/31 T-code in the V_T702N_J table.
The travel position variant is a dialog window and looks as shown in the
following screenshot:
For the purpose of credit card expense settlement, the credit card companies'
details must be maintained. This will enable us to assign credit cards to the
Travel Expense types in SAP. This is defined by navigating to SPRO |
Financial Accounting (New) | Travel Management | Travel Expenses |
Master Data | Credit Card Clearing | Define Credit Card Companies.
Some standard abbreviations that SAP has provided are as follows:
AX: American Express
DC: Diners
MC: MasterCard
TP: Airplus
VI: Visa
The payment of the amount that needs to be reimbursed can happen in the
following ways:
Travel advance
Credit card clearing
By check
Through payroll accounting
By bank transfer to the employee's bank account
The data of travel expenses, and wage types are stored in the ROT cluster
tables, and we have to define the wage types for each expense type for
settlement. These wage types serve as an interface between accounting and
travel. We will define the travel expense wage types for individual receipts
and per diem/flat rates by navigating to SPRO | Financial Accounting
(New) | Travel Management | Travel Expenses | Wage Types for
Interfaces | Assign Wage Types to Travel Expense Types for Individual
Rec or via the SM30/31 T-code in the V_T706B4 table. There will be first wage
type and second wage type that needs to be defined for expense type, where
the tax free share of the expense amount is stored, while the taxable part of
expense amount is stored in wage type two. This is shown in the following
screenshot:
Similarly, wage types are assigned to flat rate or per diems by navigating to
SPRO | Financial Accounting (New) | Travel Management | Travel
Expenses | Wage Types for Interfaces | Assign Wage Types to Travel
Expense Types for Per Diems/Flat or via the SM30/31 T-code in the
V_T706B4_A table.
To transfer the travel accounting results to the finance system, we have to set
up symbolic accounts. A symbolic account serves as an interface between
wage types; this is very important in travel accounting and for accounts in
financial accounting. There are two important steps that need to be
performed; they are as follows:
Assigning wage types to symbolic accounts
Assigning symbolic accounts to expense accounts in financial
accounting
We execute the preceding steps by navigating to SPRO | Financial
Accounting (New) | Travel Management | Travel Expenses | Transfer to
Accounting | Define Assignment of Wage Type to Symbolic Account or
via the SM30/31 T-code in the V_T706K table. This is shown in the following
screenshot:
The sign below the symbolic account has a specific meaning, as shown in
the following table:
Sign Significance
+ A positive amount is posted to debits of the G/L account
- A positive amount is posted to credits of the G/L account
The symbolic accounts are then assigned to the expense account by
navigating to SPRO | Financial Accounting (New) | Travel Management |
Travel Expenses | Transfer to Accounting | Conversion of Symbolic
Account to Expense Account or via the PRT3 T-code. It is very important to
understand the meaning of the following groups:
HRT: This is used to identify travel expense postings: expense
accounts
HRP: This is used to identify travel expense postings:
customers/vendors/clearing account
The following screenshot demonstrates the FI configuration:
When we double-click on the procedure and enter the chart of account, we
will now be able to assign the G/L account number.
If the travel expenses are reimbursed using different vendors, then SAP has
the functionality only if the status icon is included in the travel expense
manager (PR05) and trip manager (TRIP). We define the SAP functionality
by navigating to SPRO | Financial Accounting (New) | Travel
Management | Travel Expenses | Transfer to Accounting | Determine FI
Payment Date.
The accounting results can be transferred as flat file to payment banks via
DME. The house bank needs to be set up, and TRVHB is used to execute the
house bank and the account from which the expenses have to be reimbursed
to the employee. This can be done by navigating to SPRO | Financial
Accounting (New) | Travel Management | Travel Expenses | Transfer to
Data Medium Exchange.
Integration aspects with other
application components
We will learn two important integration aspects; one is the integration of
Travel Planning and Travel Expenses that enable us to transfer data from
Travel Plan to Travel Expense reports, and the other one is transferring
travel accounting results to payroll. There are activation steps required for
using Travel Manager, Travel Planning, and Travel Expenses. For the Travel
Manager, there are three components available that can be flagged, and they
are explored as follows:
Create Travel Requests
Plan a business trip
Create travel expense report
For each trip provision variant, we have to activate the components that are
active in the TRIP T-code, backend, and the Web Dynpro portal interface.
The SAP standard has three components activated for all the trip provision
variants. The activation is checked by navigating to SPRO | Financial
Accounting (New) | Travel Management | Integration of Travel Planning
and Travel Expenses | Settings for travel manager Activate
Request/Plan/Expense Report in Travel Manager or via the SM30/31 T-
code in the V_T702N_O. This is shown in the following screenshot:
The integration aspects of Travel Planning and expenses are controlled by
navigating to SPRO | Financial Accounting (New) | Travel Management |
Integration of Travel Planning and Travel Expenses | Activate
Integration | Travel Planning | Travel Expenses or via the SM30/31 T-code
in the V_706D_C table.
The travel accounting results can be transferred to payroll by performing the
following steps. Travel Management and payroll can be run in the same
logical system or different systems and can interfaced using the Application
Link Enabling (ALE). To have the integration active between payroll and
travel in subschema, GREI must be activated in the payroll schema, for
example, G000 (Great Britain payroll schema). This is shown in the
following screenshot:
For integration between travel and payroll, the GREI subschema needs to be
activated. The subschema has a ASREI function that cumulates all the
expenses incurred for the travel per payroll period in wage types, and the
wage types are maintained in the T706B table. These values held in the wage
types are posted to the finance accounting module.
Tip
PR_CHECK is a useful tool to check the customizing settings for the Travel
Management submodule. We can make use of the tool to check the
customizing settings of the following components in Travel Management:
Travel Planning
Travel Expenses (expense report)
Geocoding
Homepage Framework
Summary
In this chapter, we have learned the steps to configure Travel Management
in detail. We have covered important infotypes pertaining to the Travel
Management submodule.
In the next chapter, Chapter 10, Building a Report Using SAP Query
Viewer, we will closely look at building reports without any ABAP or
technical skills. We will have a lot of things to play around and dabble with
in the next chapter for sure.
Chapter 10. Building a Report Using
SAP Query Viewer
SAP has provided an easy-to-use tool to build a query to meet business
requirements. We don't need to know the Advanced Business Application
Programming (ABAP) programming language to develop reports. The
SAP query viewer will make this task very simple, and we will learn to
transport queries across different clients.
In this chapter, we will cover the following topics:
Building an ad hoc query using the SQ01 transaction code
Executing a report using an ad hoc query
Developing a report using SQVI
Building an ad hoc query using the
SQ01 transaction code
The following steps need to be performed in order to build an ad hoc query:
Create a user group using the SQ03 TCD. The prerequisite for building
a query is the user group.
Second, we create an infoset using the SQ02 TCD.
Finally, we create a query using the SQ01 TCD.
Steps for creating the user group
The user group is a 12-character long code; SAP recommends that you use
any special characters, numeric code, or characters to define the user group.
There are four options available to choose from. They are as follows:
Create
Change
Display
Description
The Create option is used to define the name of the user group, as shown in
the following screenshot. The user group is a twelve-character long code
followed by its description.
We are attempting to create a user group by the name ZPACKT; we can also
change the name created by clicking on Change. When trying to create a
query, the system will prompt us to specify the package name where it
needs to be saved. Packages are technical objects in the ABAP work bench.
They are normally called using the following T-codes:
SE80: We can enter the package name, and we can access it by double-
clicking on it
SM30: This is from the V_TDEVC table/view
We will see the program listed under the $TMP package, as shown in the
following screenshot:
The $TMP package is only a temporary package, and a proper package name
needs to be created and used in the development client. A package is
created using the SE80 T-code. This $TMP package is the one we will be
using when we save the user group. The table view of V_TDEVC looks like
the following screenshot when we access it via SM30/31:
When the user group is created, the system prompts us to enter the
description of the user group, as shown in the following screenshot, where
we are giving it the name Test Query. The date and time stamp are
captured for audit purposes.
We need to click on the Save button. When the Save button is clicked on,
the system prompts us to enter the package name where we would like to
save the object. We will enter $TMP, as shown in the following screenshot.
We will also go to SE80 and see how this is getting captured in the package.
We could either enter $TMP or click on a local object (F7). Both perform the
same task. Then, we can use SE80 to see how this is captured in the
package.
If we would like to change the package, then we can do so by navigating to
User group | Change Package from the menu, as shown in the following
screenshot:
The Change Package option helps us assign a different package if required,
instead of the one already assigned.
SAP also provides options such as copying the user group created by
pressing F9 or renaming the user group by pressing Ctrl + F1.
The next step is to assign the usernames to the user group by clicking on the
Assign users and InfoSets button.
The username is 12 characters in length and is assigned in order to access
the user group, as shown in the following screenshot:
The username can also be deleted if required by clicking on the Delete
option (Shift + F2).
Once the user ID is assigned, there will be a flag next to the username. This
flag indicates that the mapping is active, as shown in the following
screenshot:
Steps for creating the infoset
The infoset is created using the SQ02 TCD by entering the infoset name and
description. There are multiple options we can choose the source of data
from. These options are as follows:
Table join using basis table
Direct read of table
Logical database
Data retrieval by program
The pnpce logical database enables us to choose all the infotypes that we
want to choose the input and output for. We will choose the infotypes that
the data is going to be fetched from, as shown in the following screenshot:
The infoset needs to be generated by clicking on Generate (Shift + F6).
Once it is executed, the system checks the infoset and prompts a message
stating that the infoset is generated at the bottom of the screen, as shown in
the following screenshot:
Once the infoset is created and generated, we can go to the SQ01 TCD, enter
the name of the query, and click on the Create button. The infoset created
earlier will be displayed to be chosen. This infoset has the fields from tables
that are mapped using LDB PNPCE.
Steps for creating a query
The Create Query screen looks like the following screenshot:
There are multiple output formats that can be chosen while creating the
query. They are as follows:
SAP List viewer
ABAP List
Graphic
ABC analysis
Executive Information System EIS
File store
Display as table
Word processing
Spreadsheet
Private file
We need to click on Save (Ctrl + S) and then on test (Ctrl + F8). We can
also execute the query after saving it as a variant by choosing the Execute
only with variant checkbox. We can also lock this query from changes
being made by other users by flagging the Change lock checkbox, as
shown in the following screenshot:
We need to go back and execute the query (F8) or execute it as a variant
(Shift + F5), as shown in the following screenshot:
Executing a report using an ad hoc
query
We will now see how we can execute a report using an ad hoc query. We will
learn to use the user group and infoset that we created using the SQ03/SQ02
TCD. We can execute an ad hoc query by navigating to SAP Easy Access |
SAP Menu | Human Resources | Information systems | Reporting tools |
S_PH0_48000513 or directly via the S_PH0_48000513 TCD.
When we execute the transaction code, the screen looks like the one in the
following screenshot. We will have to change the Work area from
Standard area (client-specific) to Global area (cross-client) in the
Environment window and choose the user group that we created, for
example, ZPACKT.
Tip
User groups get listed only when they are based on the work area assigned
while creating them. We can check or change it by navigating to SQ03 |
Environment | Query Areas.
The query area can be defaulted in the user profile by assigning the AQW
(ABAP Query area) parameter in the user profile, as shown in the
following screenshot:
The query area contains a set of objects (user groups, infosets, queries) that
are created via the SQ01, SQ02, and SQ03 TCDs. The entire gamut of SAP
query functionalities can be explored with the standard and global areas.
They are separate entities, and there is no relationship between the objects
created in each area. We will look at the difference between the queries
created in the standard and global clients now.
Standard area: The queries that we create (infosets, user groups,
queries) are specific to a particular client, and they are not attached to
the work bench organizer. We can still transport the query, but it needs
to be done manually. This query that is created in the standard area is
not available across the system.
Global area: The query objects that we create in the global area are
available across clients, and they are connected to the work bench
organizer.
The query can be assigned to a different area by navigating to SQ03 |
Environment | Query areas, as shown in the following screenshot:
Only when we change the work area from standard to global will we be
allowed to assign the user group that we created in the SQ01 TCD, as shown
in the following screenshot:
Now, the system will allow us to choose the input and output fields based on
the requirement. We can also the save the query for frequent use by clicking
on Save (Ctrl + S). We can enter the name and title of the query, as shown in
the following screenshot:
When we execute the query, the output looks like the one shown in the
following screenshot:
If you noticed, the personnel number is not displayed. In order to have the
personnel number displayed, we need to right-click on the column and
choose the appropriate option, as shown in the following screenshot:
The selection in the ad hoc query allows us to change the default value, for
example, 3 for Active Employment Status. In order to change the selection,
we need to open the ad hoc query and in the main menu, click on Extras in
the menu at the top and then click on Switch off object selection, as shown
in the following screenshot:
When switch off object selection is chosen, we will be able to right-click on
the field and choose one of the three available options. When Only text is
chosen, we see the text-selection indicator next to the field name. We can see
the Employment Status text showing in the output, as shown in the
following screenshot:
The output looks like the following screenshot with the text, as the option
chosen is Only text:
Tip
The Hit list button is unavailable when switch off object selection is
selected and the same has been confirmed by SAP. We need to click on
Output to run the report.
Frequent error messages when building an ad hoc
query
We normally come across this standard error message when we create a
query and click on the Test button:
No lists yet defined for query XX where XX is the query name in
SQ01
Message no. AQ217
Analysis
By performing some analysis, we can clearly see that the XX query doesn't
have the report layout specified. Neither the basic list, nor statistics, nor the
ranked list have been defined for the query report layout.
Workaround
Before executing the query, we need to define the report layout (basic list,
statistics, or ranked list) to fix the error. We need to define the input and
output in the list, select the fields to fix this error, and execute the query, as
shown in the following screenshot:
We have four options to choose from; we can click on Basic List and choose
the list and selection fields, as shown in the following screenshot:
Tip
Standard error messages are stored in the SE91 TCD.
An interesting feature to tag the T-code with the
report
There is an interesting feature provided by SAP to tag the TCD to the report
output. For example, we will have to maintain the employee master by
simply double-clicking on the output. We will learn how this feature can be
achieved by following the steps. Report Assignment is the feature we are
discussing that makes this possible. The Report Assignment feature can be
accessed via the SQ01 TCD and entering the query name (Shafiq Rehman,
2008, SCN) and clicking on Change.
The report assignment allows you to assign the TCD to the report, and can
be accessed by navigating to Goto | Report assignment from the menu, as
shown in the following screenshot:
When we click on the Report assignment, the system populates the Assign
Reports screen. When we click on Insert row (F6), there will be a new
window to add the ABAP/4 query.
The ABAP/4 query window has the following fields for the user to choose
from:
User group
Query
Variant
The Global area checkbox
We need to click on the other report type to enter the transaction code such
as PA30, as shown in the following screenshot:
The other report type has the following report types to choose from. In our
case, we are trying to assign the TCD to the report, so we will be choosing
transaction:
Report type Name
BB Report Portfolio
BW BW Query
QU SAP Query
RE Drilldown Reporting
RT ABAP Report Program
RW Report Writer
TR Transaction
When we choose Transaction, the system prompts us to enter the TCD such
as PA30, and click on the tick symbol, as shown in the following screenshot:
The query will now have the TCD mapped to it, so when we execute the
query and double-click on the output, the system will take us to the Master
Data Maintenance transaction (PA30).Click on Save (Ctrl + S), as shown in
the following screenshot:
When we execute the query and double-click on the output, the system takes
us to the PA30 screen. The system shows the 'Maintain HR Master Data' is
executed message at the bottom of the screen, as shown in the following
screenshot. Interesting feature, isn't it?
The PA30 screen will allow us to maintain the master data for the chosen
personnel instantly.
Transport a query across clients
Transporting queries across clients in the landscape is not achieved directly
like in the configurable tables. We will learn the steps to transport a query.
A query is transported by accessing the report by navigating to
Enviornment | Transports (Ctrl + F3), as shown in the following
screenshot:
The difference between accessing the report directly from SQ02 or via the
SE38/SA38 T-code from the RSAQR3TR table is that we will find the
Transport Action Selection enabled for us to export or import the query
option, as shown in the following screenshot:
We need to choose the Export option and check the following boxes. It will
help us generate a transport request number that can be released and
referenced in the client where we would like the query to be imported.
Overwriting allowed
Transport query variants
Transport of Query Layout Variants
Transport of Report-Report Interfaces of Queries
It is mandatory that you mention the user groups, queries, or infosets from
the following options provided:
Transport user groups
Transport Infosets
Transport Infosets and queries
Transport Queries
After choosing any of the options, click on Execute, and the system
generates a transport request number that we can note down and use in the
client where we would like to import the query, as shown in the following
screenshot:
We need to choose the Import option, and the transport request number
needs to be referenced in the client where we are importing the query, as
shown in the following screenshot:
We need to refer to the transport request number in the Datasets with
imports field.
Develop a report using SAP Query
Viewer (SQVI)
SAP has provided a simple tool to develop reports with minimum
programming knowledge. We will delve into the steps to create the reports
using the SAP query viewer (SQVI) TCD. Although SQVI is simple, it is
only specific to a particular user that is being tagged with it. We will also
learn to convert query views to a SAP query in this section.
The query view is accessed via the TCD SQVI, as shown in the following
screenshot:
As we note from the preceding screenshot, the quick view is tagged only to
the user, Karthik. Unlike the SAP query, multiple users cannot have access
to the same query view.
We will assign a name to the query and click on the Create button. We can
enter the long text in the new window that is autopopulated. There are
multiple options that can be mentioned as a source of data for that query.
They are as follows:
Table
Table join
Logical database
SAP Query InfoSet
We can use Table as the data source and fetch output from the table used.
We need to enter PA0001 in the Table/view field and then click on the Enter
button, as shown in the following screenshot:
When we choose the PA0001 table, for example, all the fields related to this
table are available for selection when we press Enter, as shown in the
screenshot:
We have two options to choose from for the design:
Basis mode
Layout mode
The layout design has provisions to define the header text, footer text, and so
on. The layout design looks like the following screenshot:
We can define the header text by double-clicking on it. We can also delete
fields and move them to the trash by clicking on the Delete button. We can
add lines by clicking on the insert line icon and dragging and positioning it
in the place where we would like to add a line. The basis mode looks slightly
different, and the provision to add a header and footer won't be available.
The available fields are listed under the available fields' box, and we can
choose the ones we would like to have as selection (input) or list fields
(output). We can click on the Insert Field button to choose the input and
output, as shown in the following screenshot:
We will have four tabs in the query design, as follows:
List field selection
Sort sequence
Selection fields
Data Source
The data source gives us information about whether we have used the Table,
Table Join, or Logical database as the source, as shown in the following
screenshot:
The Selection fields tab, as the name sounds, will have the field that will be
available in the input screen of the report. The Sort sequence tab can be
used to arrange the fields in the order of preference. The List field selection
tab consists of the fields that we would like to have in the output. Let's say,
for example, we choose Personnel number and Subtype as the selection
fields, and in the output, we would like to have Personnel number alone.
We can do this as shown in the following screenshot:
When we click on the data selection and output button (F8), the query that
we see will have the input as Personnel number and Subtype and output as
the personnel number, as shown in the following screenshot:
Converting the query view to a SAP query
We discussed earlier that the query view is only available for a particular
user and not for all of them. We will learn how a query view can be
converted to a SAP query so that all the users can run the report using the
same query. We need to go to the SQ01 TCD and navigate to Query |
Convert QuickView. We have to enter the Quick View, Query, and
InfoSet names for the conversion, as shown in the following screenshot:
Tip
The Convert quick view may be disabled from SQ01, and we have to go to
Environment | Query area | Change from Global area to Standard area
(Client specific) to have it enabled.
Summary
In this chapter, you learned to build and develop reports using the SAP
query or quick view tools. You learned some tips and tricks to run the report
with minimum programming skills. We got to know the difference between
SAP query and quick views and how to convert the quick view to a query to
be used by all users. Happy reporting!
We hope the book served as a useful reference guide to configure the SAP
HCM module. The configuration steps of the core modules and a new
dimension module were covered from our experiences of working on
different assignments.
Index
A
0000 (action) infotype
about / The 0000 (Actions) infotype
functions / The 0000 (Actions) infotype
0006 (address) infotype
about / The 0006 (Address) infotype
functions / The 0006 (Address) infotype
ABAP/4 query window
about / An interesting feature to tag the T-code with the report
Absence infotype (2001)
about / The Absences infotype (2001)
absence quotas
Category / The Absence Quotas infotype (2006)
Quota number / The Absence Quotas infotype (2006)
Deduction / The Absence Quotas infotype (2006)
Deduction from / The Absence Quotas infotype (2006)
Deduction to / The Absence Quotas infotype (2006)
Neg. deduction to / The Absence Quotas infotype (2006)
tables, customizing for / Important nodes and/or customizing
tables for Absence Quotas
Absence Quotas
nodes, configuring for / Nodes for configuring the Work schedule
rule and Absence Quotas
Absence Quotas infotype (2006)
about / The Absence Quotas infotype (2006)
generation rule configuration / Absence Quotas generation rule
configuration
tips, for generating / Tips to generate Absence Quotas without
any hassles
accounting AC system
activities / Activities in an accounting AC system
actions infotype (0000)
about / The 0000 (Actions) infotype
action type
about / Configuring personnel actions
activities
in HR system / Activities in the HR system
in accounting AC system / Activities in an accounting AC system
activity status entries, SAP
about / Configuring mandatory infotypes
ADDDB operation / Important functions, operations, and features
additional off-cycle payments infotype (0267)
about / The 0267 (Additional off-cycle payments) infotype
additional payments configuration (0015)
about / The 0015 (Additional Payments) configuration
additional payments infotype (0015)
about / The 0015 (Additional Payments) infotype
fields / The 0015 (Additional Payments) infotype
ADDMB operation / Important functions, operations, and features
ADDWT operation / Important payroll operations
ADDZL operation / Important functions, operations, and features
ad hoc query
building, SQ01 TCD used / Building an ad hoc query using the
SQ01 transaction code
used, for executing report / Executing a report using an ad hoc
query
Advanced Business Application Program (ABAP) / Travel Request
configuration steps
Advanced Business Application Programming (ABAP) / Important
functions, operations, and features
AMT operation / Important payroll operations
APPCREATE T-code, talent management submodule / The Talent
Management submodule
applicant by action report / Recruitment
applicant class
about / Recruitment medium
applicant cycle
overview / Applicant cycle
applicant data, transferring to personnel administration
procedure / Integration tools
integration tools / Integration tools
common errors / Common error message during data transfer
applicant group
about / Recruitment medium
applicant number ranges
display intervals / Channels or recruitment instruments
change interval / Channels or recruitment instruments
changed NR status / Channels or recruitment instruments
applicants by name report / Recruitment
Application Link Enabling (ALE) / Integration aspects with other
application components
appraisal category groups
about / Objective setting and an appraisal's template configuration
appraisals template configuration
about / Objective setting and an appraisal's template configuration
category group, creating / Category group creation
category, creating / Category creation
appraisal template
about / Objective setting and an appraisal's template configuration
creating, steps / Steps to create an appraisal template
APPSEARCH T-code, talent management submodule / The Talent
Management submodule
ASREI function / Integration aspects with other application
components
Attendance/Absence Data
Multiple-Employee View report / Time Management
Attendance infotype (2002) / The Attendances infotype (2002)
Attendance Quotas infotype (2007)
about / The Attendance Quotas infotype (2007)
Authorized Objects per User/Profile report / Organizational
Management
B
0008 (basic pay) infotype
functions / The 0008 (Basic Pay) infotype
about / The 0008 (Basic Pay) infotype
0009 (bank details) infotype
functions / The 0009 (Bank Details) infotype
about / The 0009 (Bank Details) infotype
Bank Details report
about / Payroll Accounting
basic pay configuration (0008)
about / The 0008 (Basic Pay) configuration
basic pay infotype (0008)
about / The 0008 (Basic Pay) infotype
fields / The 0008 (Basic Pay) infotype
basic settings, personnel development component / Basic settings –
Personnel Development
basic settings, TEM / The basic settings in TEM
Batch Data Collection (BDC)
about / The qualification catalogue
Business Add-In (BADI)
about / Travel Request configuration steps
business event preparation
configuring / Configuring a business event preparation/event
catalog
C
CAC1 T-code, time management submodule / The Time Management
submodule
candidate
reasons, for rejection / Applicant cycle
career maintenance
about / Career maintenance
CATA T-code, time management submodule / The Time Management
submodule
channels
about / Channels or recruitment instruments
classified advertising
about / Advertising vacancies
clients
queries, transporting across / Transport a query across clients
COLER operation / Important functions, operations, and features
collective agreement provision (CAP) / Configuring mandatory
infotypes
about / The 0008 (Basic Pay) configuration
COLOP operation / Important functions, operations, and features
COM function
about / Schematic payroll schema
command field
about / Daily transactional codes
company
about / What makes the enterprise structure?
company code
about / What makes the enterprise structure?
concepts, Organization Management
SPOCK / The concepts of Organization Management
configuration, business event preparation
time schedule / Time schedule
physical location / Physical location
master data / Master data
resource management / Resource management
business event catalogue / The business event catalog
day-to-day activities / Day-to-day activities
booking / Booking
recurring activities / Recurring activities
follow-up processing / Follow-up processing
Employee Self-Service (ESS) / Employee Self-Service (ESS)
configuration, node
for Work schedule rule / Nodes for configuring the Work schedule
rule and Absence Quotas
for Absence Quotas / Nodes for configuring the Work schedule
rule and Absence Quotas
configuration, payroll
about / Steps to configure the payroll
wage types / Wage types
configuration, payslip
about / Configuring a payslip
configuration steps, PA infotypes
about / Configuration steps
enterprise structure components / What makes the enterprise
structure?
personnel structure components / What makes the personnel
structure?
executing / What makes the personnel structure?
company code, creating / What makes the personnel structure?
personnel area and subareas, defining / What makes the personnel
structure?
employee group, defining / What makes the personnel structure?
employee subgroup, defining / What makes the personnel
structure?
configuration steps, Travel Expenses module / Configuring Travel
Expenses
configuration steps, Travel Planning module / Configuring Travel
Planning
configuration steps, Travel Request module / Travel Request
configuration steps
control record
about / Configuring mandatory infotypes, Control record
elucidated
functionalities / Control record elucidated
payroll status infotype (0003) / The 0003 (Payroll Status) infotype
planned working time infotype (0007) / The 0007 (Planned
Working Time) infotype
basic pay infotype (0008) / The 0008 (Basic Pay) infotype
cost distribution infotype (0027) / The 0027 (Cost Distribution)
infotype
recurring payment and deduction infotype (0014) / The 0014
(Recurring Payment and Deduction) infotype
additional payments infotype (0015) / The 0015 (Additional
Payments) infotype
additional off-cycle payments infotype (0267) / The 0267
(Additional off-cycle payments) infotype
control record status
released for payroll / Control record elucidated
released for correction / Control record elucidated
exit payroll / Control record elucidated
check payroll results / Control record elucidated
COPY function
about / Schematic payroll schema
/ Important payroll functions
Cost Assignment for Trip report / Travel Management
Cost Centre
about / Creating a Cost Center
creating / Creating a Cost Center
cost distribution infotype (0027)
about / The 0027 (Cost Distribution) infotype
fields / The 0027 (Cost Distribution) infotype
country key
about / Configuring mandatory infotypes
criterion
about / Objective setting and an appraisal's template configuration
Cross Application Time Sheet (CATS)
about / Time Management
CUMBT function / Important functions, operations, and features
Cumulated Time Evaluation Results$ Time Balances/Time Wage
Types report / Time Management
customization, table
for Work schedule rule / Important nodes and/or customizing
tables for the Work schedule rule
for absence quotas / Important nodes and/or customizing tables
for Absence Quotas
D
daily work schedule (DWS) / The daily work schedule
Data Medium Exchange(DME) / Configuring Travel Expenses
Data Transfer Tool
about / Integration tools
Data Transfer Tools
about / Data Transfer Tools
day type / The day type
Define Administrator
about / Recruitment medium
delete blank switch / Basic settings – Personnel Development
development plan catalog
about / Development plans
display absence quota information report
about / Time Management
Display and Create Missing Inverse Relationships report /
Organizational Management
dynamic actions
about / Dynamic actions
configuring / Dynamic actions
E
employee referral program
about / Advertising vacancies
Employee Remuneration infotype (2010)
about / The Employee Remuneration infotype (2010)
Employee Self-Service (ESS)
about / Physical location, Employee Self-Service (ESS)
employee sub group (ESG)
about / Wage types
employment agencies
about / Advertising vacancies
employment status entries, SAP
about / Configuring mandatory infotypes
enterprise structure components
company / What makes the enterprise structure?
company code / What makes the enterprise structure?
personnel area / What makes the enterprise structure?
personnel subareas / What makes the enterprise structure?
error messages, on ad hoc query creation
about / Frequent error messages when building an ad hoc query
analysis / Analysis
work around / Workaround
ersonnel calculation rule (PCR) / Configuring mandatory infotypes
Evaluate Careers report / Talent Management
Expert Mode
used, for building organizational structure / The Expert Mode
organizational unit object, creating in / Creating an organizational
unit object in the Expert Mode
position object, creating in / Creating a position object in the
Expert Mode
job object, creating in / Creating a Job object in the Expert Mode
Expert mode
creating, Expert mode used / Creating an organizational structure
using the Expert Mode
F
F.02/F-53/FBCJ/F110 TCD / Important transaction codes
features, recruitment submodule
PRELI / Integration with personnel administration
PRELR / Integration with personnel administration
PAPLI / Integration with personnel administration
features, SAP / Features
features, Travel Management module / Travel Management – features
and functions
fields, schema editor / Schematic payroll schema
about / Schematic payroll schema
Line / Schematic payroll schema
Func / Schematic payroll schema
Par1 / Schematic payroll schema
Par 2 / Schematic payroll schema
Par 3 / Schematic payroll schema
Par 4 / Schematic payroll schema
D / Schematic payroll schema
Text / Schematic payroll schema
fields, Travel Management module / Master data required for Travel
Management
fields functionalities, payroll area / Payroll area
fields functionalities, payroll status infotype (0003) / The 0003
(Payroll Status) infotype
finance module
payroll processing, integrating with / Integration with the finance
module
finance posting
statuses / Different statuses of a posting run
finance steps
payroll results, posting to / Posting payroll results to finance steps
Flexible Employee Data report / Personnel Administration
folder
creating / Creating a folder and moving the T-codes
Functional Consultants (FC)
about / Transport requests in SAP
functionalities, control record / Control record elucidated
functionalities, payroll area / Payroll area
functionalities, Travel Request module / Travel Request configuration
steps
functions, Personnel Development
about / Functions in Personnel Development
functions, schematic payroll schema
COM / Schematic payroll schema
COPY / Schematic payroll schema
functions, Travel Management module / Travel Management – features
and functions
G
General Trip Data/Trip Totals report / Travel Management
generation rule configuration, Absence Quotas infotype (2006) /
Absence Quotas generation rule configuration
generation tips, Absence Quotas infotype (2006)
about / Tips to generate Absence Quotas without any hassles
frequent error message and workaround / Frequent error message
and workaround
Time Management-related tables / Important Time Management-
related tables
functions / Important functions, operations, and features
operations / Important functions, operations, and features
features / Important functions, operations, and features
internal tables, used in time evaluation / Internal tables and cluster
tables used in time evaluation
cluster tables, used in time evaluation / Internal tables and cluster
tables used in time evaluation
tool, for checking configuration settings for quota generation /
Tool to check the configuration settings for quota generation
global distribution system (GDS)
about / Configuring Travel Planning
Global Time Constraint Reaction (V_T554Y) / Absence Quotas
generation rule configuration
GWT function / Important functions, operations, and features
H
hassle-free absence quotas
generating / Tips to generate Absence Quotas without any hassles,
Frequent error message and workaround, Important functions,
operations, and features, Internal tables and cluster tables used in
time evaluation
HCM
about / Integration aspects with other submodules of HCM
HCM submodules
integration aspects / Integration aspects with other submodules of
HCM
Headcount changes report / Personnel Administration
holiday calendar
about / The holiday calendar
HRS operation / Important functions, operations, and features
HR system
activities / Activities in the HR system
I
IATA
about / Configuring Travel Planning
IATA locations
about / Configuring Travel Planning
Infogroups
about / Customizing the infotype menu and info groups
configuring / Customizing the infotype menu and info groups
menu type / Customizing the infotype menu and info groups
infoset
about / Steps for creating the infoset
creating, SQ02 TCD used / Steps for creating the infoset
infotype menu
about / Customizing the infotype menu and info groups
configuring / Customizing the infotype menu and info groups
infotypes, for payroll processing
about / Infotypes mandatory for payroll processing
payroll infotypes / Payroll infotypes
payroll area / Payroll area
infotypes, mandatory
configuration / Configuring mandatory infotypes
Input Table (IT) / The Time Quota Compensation infotype (0416)
integration aspects, HCM submodules
about / Integration aspects with other submodules of HCM
integration aspects, TEM module
about / Integration aspects in the Training and Event Management
module
integration switches / Integration switches
internal postings
about / Advertising vacancies
J
job fairs
about / Advertising vacancies
job object
creating, in Expert Mode / Creating a Job object in the Expert
Mode
K
Key Data Structure (KDS) / What makes the personnel structure?
L
line number field, schema editor
I command / Schematic payroll schema
D command / Schematic payroll schema
R command / Schematic payroll schema
Rn command / Schematic payroll schema
> command / Schematic payroll schema
< command / Schematic payroll schema
Logged Changes in Infotype Data / Personnel Administration
LSMW (Legacy System Migration Work Bench)
about / The qualification catalogue
M
MASEX feature / Important functions, operations, and features
master data, for Personnel Development component
about / Master data for the Personnel Development component
qualification catalogue / The qualification catalogue
career maintenance / Career maintenance
functions / Functions in Personnel Development
standard tools / Standard tools in the PD component
development plans / Development plans
Master Data Maintenance transaction
about / An interesting feature to tag the T-code with the report
menu types, SAP
about / Customizing the infotype menu and info groups
MODT
about / The Work schedule rule
MOLGA
about / The Payroll Accounting submodule
N
/n+T-code
about / Daily transactional codes
Nationalities report / Personnel Administration
Net Weaver Exchange Infrastructure / Configuring Travel Planning
node
configuring, for Work schedule rule / Nodes for configuring the
Work schedule rule and Absence Quotas
configuring, for Absence Quotas / Nodes for configuring the
Work schedule rule and Absence Quotas
number range assignment
recommendations / Recommendation on number range
assignment
number ranges, Travel Management module
SNUM / Basic settings for number ranges
PR10 / Basic settings for number ranges
PR11 / Basic settings for number ranges
PR12 / Basic settings for number ranges
Number Ranges concept / The concept of Number Ranges
NUMKR
using / Recommendation on number range assignment
NUM operation / Important payroll operations
O
/o+T-code
about / Daily transactional codes
0001 (organization assignment) infotype
about / The 0001 (Organization Assignment) infotype
functions / The 0001 (Organization Assignment) infotype
objective settings
about / Objective setting and an appraisal's template configuration
OH11/PU30 T-code, Payroll Accounting submodule / The Payroll
Accounting submodule
OM reports / Organizational Management
on-demand or additional payments configuration (0267)
about / The 0267 (On-demand or Additional Payments)
configuration
online recruiting sites
about / Advertising vacancies
OOB1 T-code, talent management submodule / The Talent
Management submodule
OOHAP_SETTINGS_PA T-code, talent management submodule / The
Talent Management submodule
OOPS T-code / Integration switches
Organizational Management (OM) submodule / The Recruitment
submodule
about / The Organization Management submodule
T-code / The Organization Management submodule
Organizational Management (OM) submodule, T-code
PO03 / The Organization Management submodule
Organizational Management (OM) submodule, T-code
PPOCE / The Organization Management submodule
PPOC_OLD / The Organization Management submodule
PP01 / The Organization Management submodule
PO10 / The Organization Management submodule
PO13 / The Organization Management submodule
PO03 / The Organization Management submodule
PP03 / The Organization Management submodule
PO14 / The Organization Management submodule
organizational objects
relationships between / Basic relationships between
organizational objects
Organizational Plan component (PA-OS)
about / Integration aspects in the Training and Event Management
module
organizational structure
elucidating / Elucidating an organizational structure
building, methods / Building an organizational structure
creating, multiple interfaces used / Creating an organizational
structure with different interfaces
building, Organization and Staffing method used / Organization
and Staffing
relationship between Org unit, and Position / The relationship
between an Org unit and Position
relationship between Position, and Job / The relationship between
Position and Job
building, Simple Maintenance method used / Simple Maintenance
Cost Centre, creating / Creating a Cost Center
building, Expert Mode used / The Expert Mode
position object, creating in Expert Mode / Creating a position
object in the Expert Mode
job object, creating in Expert Mode / Creating a Job object in the
Expert Mode
concept, of Number Ranges / The concept of Number Ranges
scenarios, of using external number assignment / Scenarios where
we use external number assignment
plan version, activating / The Plan Version
plan version, maintaining / The Plan Version
creating, Expert mode used / Creating an organizational structure
using the Expert Mode
table configuration steps / Configuring the table
organizational unit object
creating, in Expert Mode / Creating an organizational unit object
in the Expert Mode
Organization and Staffing method
used, for building organizational structure / Organization and
Staffing
organization assignment infotype (0001)
about / The 0001 (Organizational Assignment) infotype
Organization Management
concepts / The concepts of Organization Management
integrating, with Personnel Administration / Integrating
Organization Management with Personnel Administration
tools, purpose / The purpose of the OM tool
Organization Management(OM), SAP standard reports / Organization
Management
Organization Management, with Personnel Administration
integration switches / Integration switches
Data Transfer Tools / Data Transfer Tools
RHINTE Reports / RHINTE Reports
OM tool, purpose / The purpose of the OM tool
Overtime infotype (2005)
about / The Overtime infotype (2005)
P
0002 (personal data) infotype
about / The 0002 (Personal Data) infotype
functions / The 0002 (Personal Data) infotype
0007 (planned working time) infotype
functions / The 0007 (Planned Working Time) infotype
about / The 0007 (Planned Working Time) infotype
P2001 function / Important functions, operations, and features
P2006 function / Important functions, operations, and features
PA03 T-code, Payroll Accounting submodule / The Payroll Accounting
submodule
PA20 T-code, personnel administration submodule / The Personnel
Administration submodule
PA30 T-code, personnel administration submodule / The Personnel
Administration submodule
PA40 T-code, personnel administration submodule / The Personnel
Administration submodule
PA42 T-code, personnel administration submodule / The Personnel
Administration submodule
PA61 T-code, time management submodule / The Time Management
submodule
PA70 T-code, personnel administration submodule / The Personnel
Administration submodule
PA71 T-code, time management submodule / The Time Management
submodule
PA infotypes
about / Personnel Administration infotypes
and configuration steps / Important infotypes that are mandatory
and their configuration steps, The 0000 (Actions) infotype, The
0001 (Organization Assignment) infotype, The 0007 (Planned
Working Time) infotype, The 0008 (Basic Pay) infotype, The
0009 (Bank Details) infotype
0000 (action) infotype / The 0000 (Actions) infotype
0001 (organization assignment) infotype / The 0001
(Organization Assignment) infotype
0002 (personal data) infotype / The 0002 (Personal Data) infotype
0006 (address) infotype / The 0006 (Address) infotype
0007 (planned working time) infotype / The 0007 (Planned
Working Time) infotype
0008 (basic pay) infotype / The 0008 (Basic Pay) infotype
0009 (bank details) infotype / The 0009 (Bank Details) infotype
PAPLI
about / Integration with personnel administration
Payday calendar report / Payroll Accounting
Paydays on holidays or weekends report
about / Payroll Accounting
payroll
configuring / Steps to configure the payroll
Payroll Accounting, SAP standard reports / Payroll Accounting
Payroll Accounting report / Payroll Accounting
Payroll Accounting submodule
about / The Payroll Accounting submodule
T-code / The Payroll Accounting submodule
Payroll Accounting submodule, T-code
PU03 / The Payroll Accounting submodule
PA03 / The Payroll Accounting submodule
PC00_MXX_SIMU / The Payroll Accounting submodule
PC00_MXX_CALC / The Payroll Accounting submodule
PC00_MXX_PA03_RELEA / The Payroll Accounting submodule
PC00_MXX_PA03_CORR / The Payroll Accounting submodule
PC00_MXX_PA03_END / The Payroll Accounting submodule
PC00_MXX_CEDT / The Payroll Accounting submodule
PE51 / The Payroll Accounting submodule
PC00_MXX_CDTA / The Payroll Accounting submodule
PUOC_99 / The Payroll Accounting submodule
PC00_M99_CIPE / The Payroll Accounting submodule
PCP0 / The Payroll Accounting submodule
PC00_M99_CIPC / The Payroll Accounting submodule
OH11/PU30 / The Payroll Accounting submodule
PE01 / The Payroll Accounting submodule
PE02 / The Payroll Accounting submodule
PE04 / The Payroll Accounting submodule
PC00_M99_DLGA20 / The Payroll Accounting submodule
PC00_M99_DKON / The Payroll Accounting submodule
PCXX / The Payroll Accounting submodule
PC00 / The Payroll Accounting submodule
PC_Payresult / The Payroll Accounting submodule
payroll area
about / Payroll area
functionalities / Payroll area
fields functionalities / Payroll area
payroll configuration
wage types / Wage types
basic pay configuration (0008) / The 0008 (Basic Pay)
configuration
recurring payments and deductions configuration (0014) / The
0014 (Recurring Payments and Deductions) configuration
additional payments configuration (0015) / The 0015 (Additional
Payments) configuration
on-demand or additional payments configuration (0267) / The
0267 (On-demand or Additional Payments) configuration
payroll functions
COPY / Important payroll functions
WPBP / Important payroll functions
PGM / Important payroll functions
UPD / Important payroll functions
PIT / Important payroll functions
PRT / Important payroll functions
payroll infotypes
about / Payroll infotypes
actions (0000) / The 0000 (Actions) infotype
organization assignment (0001) / The 0001 (Organizational
Assignment) infotype
payroll operations
VWTCL / Important payroll operations
AMT / Important payroll operations
NUM / Important payroll operations
RTE / Important payroll operations
ADDWT / Important payroll operations
payroll processing
integrating, with finance module / Integration with the finance
module
payroll results
posting, to finance steps / Posting payroll results to finance steps
payroll status infotype (0003)
about / The 0003 (Payroll Status) infotype
fields functionalities / The 0003 (Payroll Status) infotype
payscale type
about / Configuring mandatory infotypes
payslip
configuring / Configuring a payslip
PB10 T-code, recruitment submodule / The Recruitment submodule
PB20 T-code, recruitment submodule / The Recruitment submodule
PB30 T-code, recruitment submodule / The Recruitment submodule
PBA1 T-code, recruitment submodule / The Recruitment submodule
PBA2 T-code, recruitment submodule / The Recruitment submodule
PBA7 T-code, recruitment submodule / The Recruitment submodule
PBA8 T-code, recruitment submodule / The Recruitment submodule
PBAA T-code, recruitment submodule / The Recruitment submodule
PBAW T-code, recruitment submodule / The Recruitment submodule
PBAY T-code, recruitment submodule / The Recruitment submodule
PC00 T-code, Payroll Accounting submodule / The Payroll
Accounting submodule
PC00_M99_CIPC T-code, Payroll Accounting submodule / The
Payroll Accounting submodule
PC00_M99_CIPET-code, Payroll Accounting submodule / The Payroll
Accounting submodule
PC00_M99_DKON T-code, Payroll Accounting submodule / The
Payroll Accounting submodule
PC00_M99_DLGA20 T-code, Payroll Accounting submodule / The
Payroll Accounting submodule
PC00_MXX_CALC T-code, Payroll Accounting submodule / The
Payroll Accounting submodule
PC00_MXX_CDTA T-code, Payroll Accounting submodule / The
Payroll Accounting submodule
PC00_MXX_CEDT T-code, Payroll Accounting submodule / The
Payroll Accounting submodule
PC00_MXX_PA03_CORR T-code, Payroll Accounting submodule /
The Payroll Accounting submodule
PC00_MXX_PA03_END T-code, Payroll Accounting submodule /
The Payroll Accounting submodule
PC00_MXX_PA03_RELEA T-code, Payroll Accounting submodule /
The Payroll Accounting submodule
PC00_MXX_SIMU T-code, Payroll Accounting submodule / The
Payroll Accounting submodule
PCP0 T-code, Payroll Accounting submodule / The Payroll
Accounting submodule
PCR Operation
ZLEN / The Time Quota Compensation infotype (0416)
3 / The Time Quota Compensation infotype (0416)
1234 / The Time Quota Compensation infotype (0416)
AMT=6789 / The Time Quota Compensation infotype (0416)
AMT/30 / The Time Quota Compensation infotype (0416)
MULTI ANA / The Time Quota Compensation infotype (0416)
ADDWT / The Time Quota Compensation infotype (0416)
PCXX T-code, Payroll Accounting submodule / The Payroll
Accounting submodule
PC_Payresult T-code, Payroll Accounting submodule / The Payroll
Accounting submodule
PE01 T-code, Payroll Accounting submodule / The Payroll Accounting
submodule
PE02 T-code, Payroll Accounting submodule / The Payroll Accounting
submodule
PE04 T-code, Payroll Accounting submodule / The Payroll Accounting
submodule
PE51 T-code, Payroll Accounting submodule / The Payroll Accounting
submodule
period work schedule / The period work schedule
personnel actions
about / Configuring personnel actions
configuring / Configuring personnel actions
dynamic actions / Dynamic actions
Personnel Administration
Organization Management, integrating with / Integrating
Organization Management with Personnel Administration
personnel administration
recruitment, integrating with / Integration with personnel
administration
Personnel Administration, SAP standard reports / Personnel
Administration
Personnel Administration report / Personnel Administration
personnel administration submodule
T-code / The Personnel Administration submodule
about / The Personnel Administration submodule
personnel administration submodule, T-code
PA20 / The Personnel Administration submodule
PA30 / The Personnel Administration submodule
PA40 / The Personnel Administration submodule
PA42 / The Personnel Administration submodule
PA70 / The Personnel Administration submodule
personnel area
about / What makes the enterprise structure?
factors, influencing / What makes the enterprise structure?
personnel area (PA) / The daily work schedule
personnel calculation rule
about / The Payroll Accounting submodule
Personnel Calculation Rules (PCR)
writing / Writing a PCR to meet your customer's requirements
about / Personnel calculation rule (PCR)
frequent error message / Frequent error messages and workaround
work around / Frequent error messages and workaround
Personnel Development
functions / Functions in Personnel Development
personnel development component
basic settings / Basic settings – Personnel Development
Personnel Development component
master data / Master data for the Personnel Development
component
personnel structure components
employee group / What makes the personnel structure?
employee subgroup / What makes the personnel structure?
payroll area / What makes the personnel structure?
organization key / What makes the personnel structure?
personnel subarea (PSA)
about / Wage types
personnel subareas
about / What makes the enterprise structure?
PGM function / Important payroll functions
PHAP_CATALOG T-code, talent management submodule / The Talent
Management submodule
PHAP_CATALOG_PA T-code, talent management submodule / The
Talent Management submodule
PIT function / Important payroll functions
Planned Working Time infotype (0007)
about / The Planned Working Time infotype (0007)
planned working time infotype (0007)
about / The 0007 (Planned Working Time) infotype
Plant Data Collection (PDC) / The Planned Working Time infotype
(0007)
plan version
about / Scenarios where we use external number assignment, The
Plan Version
activating / The Plan Version
maintaining / The Plan Version
pnpce logical database / Steps for creating the infoset
PO03 T-cold, Organization Management (OM) submodule / The
Organization Management submodule
PO10 T-cold, Organization Management (OM) submodule / The
Organization Management submodule
PO13 T-cold, Organization Management (OM) submodule / The
Organization Management submodule
PO14 T-cold, Organization Management (OM) submodule / The
Organization Management submodule
position object
creating, in Expert Mode / Creating a position object in the Expert
Mode
PP03 T-cold, Organization Management (OM) submodule / The
Organization Management submodule
PP61 T-code, time management submodule / The Time Management
submodule
PPCP T-code, talent management submodule / The Talent
Management submodule
PPEM T-code, talent management submodule / The Talent
Management submodule
PPMOD feature
about / Activities in the HR system
PPO1 T-cold, Organization Management (OM) submodule / The
Organization Management submodule
PPOCE T-code, Organization Management (OM) submodule / The
Organization Management submodule
PPOC_OLD T-code / Simple Maintenance
PPOC_OLD T-cold, Organization Management (OM) submodule /
The Organization Management submodule
PPOME T-code
about / The relationship between an Org unit and Position, The
relationship between Position and Job
PPSP T-code, talent management submodule / The Talent Management
submodule
PR03 TCD / Important transaction codes
PR05 T-code, travel management submodule / The Travel
Management submodule
PR05 TCD / Important transaction codes
PR10 TCD / Basic settings for number ranges
PR11 TCD / Basic settings for number ranges
PR12 TCD / Basic settings for number ranges
PRAA TCD / Important transaction codes
PRAP T-code, travel management submodule / The Travel
Management submodule
PRAP TCD / Important transaction codes
PREC T-code, travel management submodule / The Travel
Management submodule
PREC TCD / Important transaction codes
PRELI
about / Integration with personnel administration
/ Integration with personnel administration
PRELR
about / Integration with personnel administration
/ Integration with personnel administration
PRFI T-code, travel management submodule / The Travel Management
submodule
PRFI TCD / Important transaction codes
PRRW T-code, travel management submodule / The Travel
Management submodule
PRRW TCD / Important transaction codes
PRT function / Important payroll functions
PR_CHECK tool / Integration aspects with other application
components
PSV1 T-code, training and event management submodule / The
Training and Event Management submodule
PSV2 T-code, training and event management submodule / The
Training and Event Management submodule
PSVQ T-code, training and event management submodule / The
Training and Event Management submodule
PT01 T-code, time management submodule / The Time Management
submodule
PT50 T-code, time management submodule / The Time Management
submodule
PT60 T-code, time management submodule / The Time Management
submodule
PT62 T-code, time management submodule / The Time Management
submodule
PTMW T-code, time management submodule / The Time Management
submodule
PT_CLSTB2 T-code, time management submodule / The Time
Management submodule
PT_ERL00 T-code, time management submodule / The Time
Management submodule
PU03 T-code, Payroll Accounting submodule / The Payroll
Accounting submodule
PUOC_99 T-code, Payroll Accounting submodule / The Payroll
Accounting submodule
Q
qualification catalogue
about / The qualification catalogue
Qualification overview report
about / Talent Management
queries
transporting, across clients / Transport a query across clients
queries, in global area / Executing a report using an ad hoc query
queries, in standard area / Executing a report using an ad hoc query
query
creating, SQ01 TCD used / Steps for creating a query
query view
converting, to SAP query / Converting the query view to a SAP
query
QUOMO feature / Important functions, operations, and features
Quota Correction infotype (2013)
about / The Quota Correction infotype (2013)
QUOTA function / Important functions, operations, and features
R
recruitment
integrating, with personnel administration / Integration with
personnel administration
recruitment instruments
about / Advertising vacancies, Channels or recruitment
instruments
internal postings / Advertising vacancies
employee referral program / Advertising vacancies
classified advertising / Advertising vacancies
search firms / Advertising vacancies
employment agencies / Advertising vacancies
job fairs / Advertising vacancies
online recruiting sites / Advertising vacancies
used, for mapping vacant position / Vacant position mapping
using recruitment instruments
recruitment medium
about / Recruitment medium
Recruitment report, SAP standard reports / Recruitment
Recruitment standard reports
about / Recruitment
recruitment submodule
about / The Recruitment submodule
T-code / The Recruitment submodule
recruitment submodule, T-code
PB10 / The Recruitment submodule
PB20 / The Recruitment submodule
PB30 / The Recruitment submodule
PBA1 / The Recruitment submodule
PBA2 / The Recruitment submodule
PBAW / The Recruitment submodule
PBAY / The Recruitment submodule
PBAA / The Recruitment submodule
PBA7 / The Recruitment submodule
PBA8 / The Recruitment submodule
recurring payment and deduction infotype (0014)
about / The 0014 (Recurring Payment and Deduction) infotype
recurring payments and deductions configuration (0014)
about / The 0014 (Recurring Payments and Deductions)
configuration
relationship type, Organization Management
A002 / Basic relationships between organizational objects
B002 / Basic relationships between organizational objects
A003 / Basic relationships between organizational objects
B003 / Basic relationships between organizational objects
A007 / Basic relationships between organizational objects
B007 / Basic relationships between organizational objects
A012 / Basic relationships between organizational objects
B012 / Basic relationships between organizational objects
A011 / Basic relationships between organizational objects
A008 / Basic relationships between organizational objects
B008 / Basic relationships between organizational objects
Remote Function Call (RFC)
about / Configuring Travel Planning
report
executing, ad hoc query used / Executing a report using an ad hoc
query
developing, SQVI used / Develop a report using SAP Query
Viewer (SQVI)
Report Assignment feature
about / An interesting feature to tag the T-code with the report
report output
TCD, tagging to / An interesting feature to tag the T-code with the
report
RFTP_SYNCHRO_PREFRFTP_SYNCHRO_PREF program /
Configuring Travel Planning
RHINTE00 tool
about / RHINTE Reports
RHINTE10 tool / RHINTE Reports
RHINTE20 tool / RHINTE Reports
RHINTE30 tool / RHINTE Reports
RHINTECHECK tool
about / The purpose of the OM tool
RHINTE Reports
about / RHINTE Reports
RHQINTE0 report
about / Integration aspects with other submodules of HCM
RHQINTE1 report
about / Integration aspects with other submodules of HCM
ROUND operation / Important functions, operations, and features
RPIT25APP report
about / Integration aspects with other submodules of HCM
RPTERL00 report / Internal tables and cluster tables used in time
evaluation
RPTERR00 report / Internal tables and cluster tables used in time
evaluation
RPUCTP00 report / Frequent error message and workaround
RTE operation / Important payroll operations
S
Sabre
about / Configuring Travel Planning
SAP
standard statuses / Applicant cycle
about / Applicant cycle
features / Features
transport request / Transport requests in SAP
SAP-delivered function codes
about / Configuring personnel actions
SAP-delivered indicators
about / Dynamic actions
SAP Easy Access window
about / Daily transactional codes
SAP Plant Maintenance and Customer Service (PM/CS) / The Planned
Working Time infotype (0007)
SAP Production Planning (PP) and Process Control (PP/PI) / The
Planned Working Time infotype (0007)
SAP Project Systems (PS) / The Planned Working Time infotype
(0007)
SAP query
query view, converting to / Converting the query view to a SAP
query
SAP standard reports
overview / An overview of SAP standard reports
Recruitment / Recruitment
Organization Management(OM) / Organization Management
Personnel Administration / Personnel Administration
Time Management / Time Management
Payroll Accounting / Payroll Accounting
Talent Management / Talent Management
Training and Event Management / Training and Event
Management
Travel Management / Travel Management
schema editor
fields / Schematic payroll schema
schematic payroll schema
about / Schematic payroll schema
functions / Schematic payroll schema
SE80 TCD / Steps for creating the user group
search firms
about / Advertising vacancies
SEMIN HISTO switch
about / Day-to-day activities
SEMIN ORT switch
about / Physical location
SEMIN WKAPM switch
about / Day-to-day activities
service pack (SP)
about / Wage types
Simple Maintenance
used, for building organizational structure / Simple Maintenance
SM30 TCD / Steps for creating the user group
SNUM TCD / Basic settings for number ranges
SPOCK
about / The concepts of Organization Management
SQ01 TCD
used, for building ad hoc query / Building an ad hoc query using
the SQ01 transaction code
used, for creating query / Steps for creating a query
SQ02 TCD
used, for creating infoset / Steps for creating the infoset
SQ03 TCD
used, for creating user group / Steps for creating the user group
SQVI
used, for developing report / Develop a report using SAP Query
Viewer (SQVI)
standard function characters, SAP
about / Dynamic actions
standard reports
about / Standard reports
Recruitment / Recruitment
Organizational Management / Organizational Management
Personnel Administration / Personnel Administration
Time Management / Time Management
Payroll Accounting / Payroll Accounting
Talent Management / Talent Management
Training and Event Management / Training and Event
Management
Travel Management / Travel Management
standard tools, in Personnel Development / Standard tools in the PD
component
STAT2
about / Configuring personnel actions
STAT2 entries
about / Configuring personnel actions
STATU feature
about / Applicant cycle
STMS
about / Transport requests in SAP
submodule configuration
tips / Tips and tricks that will be handy while configuring the
submodule
submodule configuration tips
number range assignment recommendation / Recommendation on
number range assignment
mandatory infotypes configuration / Configuring mandatory
infotypes
S_AHR_61011841 T-code, training and event management submodule
/ The Training and Event Management submodule
S_AHR_61011843 T-code, training and event management submodule
/ The Training and Event Management submodule
S_AHR_61011845 T-code, training and event management submodule
/ The Training and Event Management submodule
S_AHR_61011888 T-code, training and event management submodule
/ The Training and Event Management submodule
S_AHR_61011889 T-code, training and event management submodule
/ The Training and Event Management submodule
S_AHR_61011893 T-code, training and event management submodule
/ The Training and Event Management submodule
S_PH9_46000434T-code, training and event management submodule /
The Training and Event Management submodule
T
$TMP package / Steps for creating the user group
T-code
about / Daily transactional codes
accessing, via SAP Easy Access / Daily transactional codes
adding, to Favorites / Daily transactional codes
used, for technical screen call / Daily transactional codes
moving, to folder / Creating a folder and moving the T-codes
table configuration steps / Configuring the table
Table Maintenance
about / Vacant position mapping using recruitment instruments
tables
customizing, for Work schedule rule / Important nodes and/or
customizing tables for the Work schedule rule
customizing, for absence quotas / Important nodes and/or
customizing tables for Absence Quotas
Talent Management, SAP standard reports / Talent Management
Talent Management report / Talent Management
talent management submodule
about / The Talent Management submodule
T-code / The Talent Management submodule
talent management submodule, T-code
PHAP_CATALOG / The Talent Management submodule
PPEM / The Talent Management submodule
PPCP / The Talent Management submodule
PPSP / The Talent Management submodule
OOB1 / The Talent Management submodule
APPSEARCH / The Talent Management submodule
PHAP_CATALOG_PA / The Talent Management submodule
OOHAP_SETTINGS_PA / The Talent Management submodule
APPCREATE / The Talent Management submodule
TCD
tagging, to report output / An interesting feature to tag the T-code
with the report
TCD, Travel Management module
TRIP / Important transaction codes
PR03 / Important transaction codes
PR05 / Important transaction codes
PRAP / Important transaction codes
PREC / Important transaction codes
PRFI / Important transaction codes
PRRW / Important transaction codes
F.02/F-53/FBCJ/F110 / Important transaction codes
PRAA / Important transaction codes
XK03 / Important transaction codes
TEM
basic settings / The basic settings in TEM
TEM module
integration aspects / Integration aspects in the Training and Event
Management module
Time Constraint (TC) class / Absence Quotas generation rule
configuration
Time Constraint Reaction (V_554Y_B) / Absence Quotas generation
rule configuration
Time Evaluation (RPTIME00) program / The Planned Working Time
infotype (0007)
Time Management, SAP standard reports / Time Management
Time Management infotypes
about / Time Management infotypes
Planned Working Time infotype (0007) / The Planned Working
Time infotype (0007)
Absence infotype (2001) / The Absences infotype (2001)
Attendance infotype (2002) / The Attendances infotype (2002)
Absence Quotas infotype (2006) / The Absence Quotas infotype
(2006)
Attendance Quotas infotype (2007) / The Attendance Quotas
infotype (2007)
Overtime infotype (2005) / The Overtime infotype (2005)
Employee Remuneration infotype (2010) / The Employee
Remuneration infotype (2010)
Quota Correction infotype (2013) / The Quota Correction
infotype (2013)
Time Quota Compensation infotype (0416) / The Time Quota
Compensation infotype (0416)
Time Management report / Time Management
time management submodule
about / The Time Management submodule
T-code / The Time Management submodule
time management submodule, T-code
PT01 / The Time Management submodule
PTMW / The Time Management submodule
PP61 / The Time Management submodule
PA61 / The Time Management submodule
PA71 / The Time Management submodule
PT50 / The Time Management submodule
PT62 / The Time Management submodule
ERL00 / The Time Management submodule
PT_CLSTB2 / The Time Management submodule
CAC1 / The Time Management submodule
CATA / The Time Management submodule
Time Management T-code / Talent Management
Time Quota Compensation infotype (0416)
about / The Time Quota Compensation infotype (0416)
Time spent in each pay scale area/type/group/level report / Personnel
Administration
TMSTA DEFAULT VALUE FOR TIME MANAGEMENT STATUS
feature / The Planned Working Time infotype (0007)
Training and Event Management, SAP standard reports / Training and
Event Management
Training and Event Management report / Training and Event
Management
about / Training and Event Management
fields / Training and Event Management
training and event management submodule
about / The Training and Event Management submodule
T-code / The Training and Event Management submodule
training and event management submodule, T-code
about / The Training and Event Management submodule
S_AHR_61011845 / The Training and Event Management
submodule
S_AHR_61011843 / The Training and Event Management
submodule
S_AHR_61011841 / The Training and Event Management
submodule
PSVQ / The Training and Event Management submodule
S_AHR_61011893 / The Training and Event Management
submodule
S_AHR_61011889 / The Training and Event Management
submodule
S_AHR_61011888 / The Training and Event Management
submodule
PSV2 / The Training and Event Management submodule
PSV1 / The Training and Event Management submodule
S_PH9_46000434 / The Training and Event Management
submodule
Training and Event Management T-code / Training and Event
Management
transport request, SAP / Transport requests in SAP
Travel Expense component / Basic settings for number ranges
Travel Expenses module
configuration steps / Configuring Travel Expenses
Travel Management, SAP standard reports / Travel Management
Travel Management module
about / Travel Management – features and functions
features / Travel Management – features and functions
functions / Travel Management – features and functions
basic settings, for number ranges / Basic settings for number
ranges
master data / Master data required for Travel Management
infotypes, for booking Travel Planning / Master data required for
Travel Management
fields / Master data required for Travel Management
TCD / Important transaction codes
transaction code / Important transaction codes
integration aspects, with other application components /
Integration aspects with other application components
Travel Management report
about / Travel Management
selection parameters / Travel Management
travel management submodule
about / The Travel Management submodule
T-code / The Travel Management submodule
travel management submodule, T-code
TRIP / The Travel Management submodule
PR05 / The Travel Management submodule
PRAP / The Travel Management submodule
PREC / The Travel Management submodule
PRFI / The Travel Management submodule
PRRW / The Travel Management submodule
Travel Management T-code / Travel Management
Travel Planning module
configuration steps / Configuring Travel Planning
prerequisites, for using features / Configuring Travel Planning
Travel Request module
configuration steps / Travel Request configuration steps
functionalities / Travel Request configuration steps
TRIP T-code, travel management submodule / The Travel
Management submodule
U
UPD function / Important payroll functions
user group
about / Steps for creating the user group
creating, SQ03 TCD used / Steps for creating the user group
user group (UGR)
about / Applicant cycle
V
vacancies
handling / Handling vacancies
advertising / Advertising vacancies
vacancy
maintenance steps / Vacancy maintenance steps
vacant position
mapping, recruitment instruments used / Vacant position mapping
using recruitment instruments
Variable Applicant List report
about / Recruitment
VARST operation / Important functions, operations, and features
VWTCL operation / Important payroll operations
W
wage type assignment
about / Activities in an accounting AC system
wage types
about / Wage types
Web Dynpro
about / Travel Request configuration steps
Where-used functionality
about / The qualification catalogue
work centre basic pay (WPBP) infotype
about / Payroll infotypes
work schedule rule
about / The Work schedule rule
Work schedule rule
nodes, configuring for / Nodes for configuring the Work schedule
rule and Absence Quotas
tables, customizing for / Important nodes and/or customizing
tables for the Work schedule rule
holiday calendar / The holiday calendar
daily work schedule / The daily work schedule
period work schedule / The period work schedule
day type / The day type
WPBP-FUWPBP function / The 0000 (Actions) infotype
WPBP function / Important payroll functions
X
XK03 TCD / Important transaction codes

Ganesh-Karthik-S.-SAP-HCM-A-Complete-Tutorial-_1_.pdf

  • 2.
    SAP HCM –A Complete Tutorial
  • 3.
    Table of Contents SAPHCM – A Complete Tutorial Credits Disclaimer About the Author Acknowledgments About the Reviewers www.PacktPub.com Support files, eBooks, discount offers, and more Why subscribe? Free access for Packt account holders Instant updates on new Packt books Preface What this book covers What you need for this book Who this book is for Conventions Reader feedback Customer support Errata Piracy Questions 1. End User Transactions Daily transactional codes Frequently used T-codes The Recruitment submodule The Organization Management submodule The Personnel Administration submodule The Time Management submodule The Payroll Accounting submodule The Talent Management submodule The Training and Event Management submodule The Travel Management submodule Standard reports Recruitment
  • 4.
    Organizational Management Personnel Administration TimeManagement Payroll Accounting Talent Management Training and Event Management Travel Management Creating a folder and moving the T-codes An overview of SAP standard reports Recruitment Organization Management Personnel Administration Time Management Payroll Accounting Talent Management Training and Event Management Travel Management Summary 2. Recruitment Configuration Handling vacancies Vacancy maintenance steps Advertising vacancies Channels or recruitment instruments Vacant position mapping using recruitment instruments Recruitment medium Applicant cycle Integration with personnel administration Integration tools Common error message during data transfer Tips and tricks Features Transport requests in SAP Summary 3. SPOCK – the Building Block of OM The concepts of Organization Management Elucidating an organizational structure Basic relationships between organizational objects
  • 5.
    Building an organizationalstructure Creating an organizational structure with different interfaces Organization and Staffing The relationship between an Org unit and Position The relationship between Position and Job Simple Maintenance Creating a Cost Center The Expert Mode Creating an organizational unit object in the Expert Mode Creating a position object in the Expert Mode Creating a Job object in the Expert Mode The concept of Number Ranges Scenarios where we use external number assignment The Plan Version Creating an organizational structure using the Expert Mode Configuring the table Integrating Organization Management with Personnel Administration Integration switches Data Transfer Tools RHINTE Reports The purpose of the OM tool Summary 4. PA Configuration in Less Than 24 Hours Personnel Administration infotypes Important infotypes that are mandatory and their configuration steps Functions of infotypes The 0000 (Actions) infotype The 0001 (Organization Assignment) infotype The 0002 (Personal Data) infotype The 0006 (Address) infotype The 0007 (Planned Working Time) infotype The 0008 (Basic Pay) infotype The 0009 (Bank Details) infotype Configuration steps What makes the enterprise structure? What makes the personnel structure? Tips and tricks that will be handy while configuring the submodule
  • 6.
    Recommendation on numberrange assignment Configuring mandatory infotypes Customizing the infotype menu and info groups Configuring personnel actions Dynamic actions Summary 5. Time Management Configuration – Negative Time Nodes for configuring the Work schedule rule and Absence Quotas Time Management infotypes The Planned Working Time infotype (0007) The Absences infotype (2001) The Attendances infotype (2002) The Absence Quotas infotype (2006) The Attendance Quotas infotype (2007) The Overtime infotype (2005) The Employee Remuneration infotype (2010) The Quota Correction infotype (2013) The Time Quota Compensation infotype (0416) Important nodes and/or customizing tables for the Work schedule rule The holiday calendar The daily work schedule The period work schedule The day type The Work schedule rule Important nodes and/or customizing tables for Absence Quotas Absence Quotas generation rule configuration Tips to generate Absence Quotas without any hassles Frequent error message and workaround Important Time Management-related tables Important functions, operations, and features Internal tables and cluster tables used in time evaluation Tool to check the configuration settings for quota generation Summary 6. Payroll Configuration Infotypes mandatory for payroll processing Payroll infotypes The 0000 (Actions) infotype
  • 7.
    The 0001 (OrganizationalAssignment) infotype Payroll area Control record elucidated The 0003 (Payroll Status) infotype The 0007 (Planned Working Time) infotype The 0008 (Basic Pay) infotype The 0027 (Cost Distribution) infotype The 0014 (Recurring Payment and Deduction) infotype The 0015 (Additional Payments) infotype The 0267 (Additional off-cycle payments) infotype Steps to configure the payroll Wage types The 0008 (Basic Pay) configuration The 0014 (Recurring Payments and Deductions) configuration The 0015 (Additional Payments) configuration The 0267 (On-demand or Additional Payments) configuration Writing a PCR to meet your customer's requirements Schematic payroll schema Personnel calculation rule (PCR) Important payroll functions Important payroll operations Frequent error messages and workaround Configuring a payslip Integration with the finance module Activities in the HR system Activities in an accounting AC system Posting payroll results to finance steps Different statuses of a posting run Summary 7. Talent Management and Development Configuration Basic settings – Personnel Development Integration aspects with other submodules of HCM Master data for the Personnel Development component The qualification catalogue Career maintenance Functions in Personnel Development Standard tools in the PD component
  • 8.
    Development plans Objective settingand an appraisal's template configuration Category group creation Category creation Steps to create an appraisal template Summary 8. Training and Event Management Configuration The basic settings in TEM Integration aspects in the Training and Event Management module Configuring a business event preparation/event catalog Time schedule Physical location Master data Resource management The business event catalog Day-to-day activities Booking Recurring activities Follow-up processing Employee Self-Service (ESS) Summary 9. Travel Management Configuration Travel Management – features and functions Basic settings for number ranges Master data required for Travel Management Important transaction codes Travel Request configuration steps Configuring Travel Planning Configuring Travel Expenses Integration aspects with other application components Summary 10. Building a Report Using SAP Query Viewer Building an ad hoc query using the SQ01 transaction code Steps for creating the user group Steps for creating the infoset Steps for creating a query Executing a report using an ad hoc query
  • 9.
    Frequent error messageswhen building an ad hoc query Analysis Workaround An interesting feature to tag the T-code with the report Transport a query across clients Develop a report using SAP Query Viewer (SQVI) Converting the query view to a SAP query Summary Index
  • 10.
    SAP HCM –A Complete Tutorial
  • 11.
    SAP HCM –A Complete Tutorial Copyright © 2014 Packt Publishing All rights reserved. No part of this book may be reproduced, stored in a retrieval system, or transmitted in any form or by any means, without the prior written permission of the publisher, except in the case of brief quotations embedded in critical articles or reviews. Every effort has been made in the preparation of this book to ensure the accuracy of the information presented. However, the information contained in this book is sold without warranty, either express or implied. Neither the author, nor Packt Publishing, and its dealers and distributors will be held liable for any damages caused or alleged to be caused directly or indirectly by this book. Packt Publishing has endeavored to provide trademark information about all of the companies and products mentioned in this book by the appropriate use of capitals. However, Packt Publishing cannot guarantee the accuracy of this information. First published: June 2014 Production reference: 1180614 Published by Packt Publishing Ltd. Livery Place 35 Livery Street Birmingham B3 2PB, UK. ISBN 978-1-78217-220-8 www.packtpub.com Cover image by Asher Wishkerman (<wishkerman@hotmail.com>)
  • 12.
    Credits Author Ganesh Karthik S Reviewers GordonDu Vladimir Mikhaylenko Eric Wildenstein Commissioning Editor Amarabha Banerjee Acquisition Editor Mohammad Rizvi Content Development Editor Shaon Basu Technical Editors Manan Badani Menza Mathew Akash Rajiv Sharma Copy Editor Karuna Narayanan Project Coordinator
  • 13.
    Venitha Cutinho Proofreaders Simran Bhogal AmeeshaGreen Paul Hindle Indexers Mehreen Deshmukh Rekha Nair Tejal Soni Graphics Ronak Dhruv Production Coordinator Arvindkumar Gupta Cover Work Arvindkumar Gupta
  • 14.
    Disclaimer The author wouldlike to advice consultants, end users, and aspirants to do a scrupulous testing of the configuration/customization in the Development client before moving the objects to the Production system. The author will not be held accountable for any damage caused by using or misusing the information, code, or methods suggested in this book, and anyone using them does so at his/her own risk. The evolution of the book is from the author's own interests and book publisher's trust in the author's abilities and not necessarily from the interests of his current and former employers.
  • 15.
    About the Author GaneshKarthik S, who prefers to be called Karthik, is a senior SAP HCM functional consultant with Cognizant (NASDAQ: CTSH), based in Chennai, India. He holds a Master's degree in Human Resource Management from Monash University (Go8 universities), Melbourne, Australia (2005-2006). In December 2010, he earned a certification in SAP Certified Application Associate - Human Capital Management with SAP ERP 6.0 EHP4. He has close to 120 man months of progressive IT experience, which includes working on SAP and Oracle ERP products. He has been associated with multiple end-to-end implementation projects, along with projects on rollouts, upgradation, and production support. He is also determined to share his experiences with SAP aspirants and consultants in the form of a book. He is passionate about SAP and takes joy in sharing knowledge with others. He is an avid blogger and frequently writes on his blog (http://saperphcm.blogspot.in/). He loves sports, and his favorite movie is The Pursuit of Happiness (2006). This book, SAP HCM – A Complete Tutorial, is his first attempt at an endeavor of this kind, and he would like to wholeheartedly thank the entire team at Packt Publishing for this opportunity. He likes to network and can be contacted via his Skype ID, Dreambeckons or via his Google Talk ID, sapenjooy.
  • 16.
    Acknowledgments At the veryoutset, I am thankful to my parents, sister, athimber (ak), nieces (Ananya and Mridini), Sarayu maami, Jayaram mama, Babu mama, Saraswati manni, chittappas, grandpa (ICF) for all their support and wishes. Special thanks to my grandpa and grandma (chrompet), who aren't with me now physically, for their blessings. I would also like to thank my friends Raja, Madhan, Venki, Rajesh, Matheen, Jean, Bean, Anbu (Ramesh), Yogi, Chaks, Machan R, and Mahesh (Alwarpet) for their encouragement. I would like to thank some of my mates in the SAP sphere: Sivabalan, Eswar (Income Tax), Thomas, Arun Vajrakantham, Dinakar, Gopalraj, Arathi, Sankaraman Subramaniam, Santhosh Somasekaran, Rajesh Burra, Kamlesh, Lokesh Sharma, Lokesh, Shankar, Thaneesh, Bala, Guna, Singh, Kamba, Gyan, Prasanna, Charmi, Papri, Suneeta, Eswar (ISU), Kishore, Raju, Govind Rao, Laxmi Rao, Ashok (ABAP), Ganesh (FI), Radhey Shyam, Saravanagopal, and Vijay NR for their continuous support. It's a big list and I apologize if I have inadvertently missed mentioning any of you. I am indebted to the entire team of Packt Publishing for this opportunity and a special mention to Rahul Nair, Mohammad Rizvi, and Shaon Basu for entrusting me with the responsibility, and the technical reviewers, Alexey Tveritinov, Eric Wildenstein, Vladimir Mikhaylenko, and Gordon Du, for their invaluable suggestions and inputs.
  • 17.
    About the Reviewers GordonDu has been working in the Information Technology sector for over 30 years now. He is passionate about helping others whenever he can. Being the top contributor in the SAP Community Network since 2008, he has helped thousands of users to utilize ERP package more efficiently and solve their problems. He has broad knowledge in all aspects of ERP, especially for SAP. Gordon has worked and trained in Canada, China, Singapore, and the USA. In China, he was the first person to successfully implement an international ERP software package in a domestic company. He is the author of Mastering SQL Queries for SAP Business One, Packt Publishing. Vladimir Mikhaylenko is a SAP developer with more than five years of development experience in various SAP modules including, but not limited to, Financials, Material Management, Sales, and Distribution. At present, Vladimir works with SAP Globalization Services in the Russian Federation, and participates in development projects for the localization of SAP Human Capital Management for CIS and Ukraine. Eric Wildenstein is a SAP techno-functional independent consultant, and has been working on ERP implementations for blue chip companies in Western Europe and Northern Africa regions since 1997. He mainly specializes in ABAP object-oriented programming, NetWeaver XI/PI/AIF, and SAP Business Workflow, providing technical expertise across the core business modules of SAP. Prior to becoming self-employed in 2000, he worked as an in-house programmer analyst for PricewaterhouseCoopers, UK, and Andersen Consulting, France, on both SAP R/3 and C/S architectures. Eric has already reviewed several SAP books, including the very informative SAP ABAP Advanced Cookbook, Rehan Zaidi, Packt Publishing. I would like to thank my dear Laurence for her patience and understanding. While I have been away from home working on various projects for the past
  • 18.
    19 years, sheis still very supportive, although I, myself, sometimes don't have much time to share with her.
  • 19.
  • 20.
    Support files, eBooks,discount offers, and more You might want to visit www.PacktPub.com for support files and downloads related to your book. Did you know that Packt offers eBook versions of every book published, with PDF and ePub files available? You can upgrade to the eBook version at www.PacktPub.com and as a print book customer, you are entitled to a discount on the eBook copy. Get in touch with us at <service@packtpub.com> for more details. At www.PacktPub.com, you can also read a collection of free technical articles, sign up for a range of free newsletters and receive exclusive discounts and offers on Packt books and eBooks. http://PacktLib.PacktPub.com Do you need instant solutions to your IT questions? PacktLib is Packt's online digital book library. Here, you can access, read and search across Packt's entire library of books.
  • 21.
    Why subscribe? Fully searchableacross every book published by Packt Copy and paste, print and bookmark content On demand and accessible via web browser
  • 22.
    Free access forPackt account holders If you have an account with Packt at www.PacktPub.com, you can use this to access PacktLib today and view nine entirely free books. Simply use your login credentials for immediate access.
  • 23.
    Instant updates onnew Packt books Get notified! Find out when new books are published by following @PacktEnterprise on Twitter, or the Packt Enterprise Facebook page.
  • 24.
    Preface The HR orHCM function plays the role of strategic partner/business partner in current business scenarios, and the SAP HCM module is a great plugin for SAP. This book attempts to cover most of the modules in HCM such as Payroll, Time, and Travel to mention a few. There are plenty of excellent books written by experts in SAP HCM space, but you will not come across one that covers most of the topics under this module, and that is where I got the inspiration. I hope this book will serve as a one-stop shop to learn SAP HCM module configuration. Many real-time examples are covered along with configuration steps and many snapshots for easy understanding.
  • 25.
    What this bookcovers Chapter 1, End User Transactions, discusses all of the SAP HCM modules' important transaction codes and standard reports that can be used for daily operations. Chapter 2, Recruitment Configuration, shows how to configure the recruitment submodules. Chapter 3, SPOCK – the Building Block of OM, introduces you to important concepts of OM and multiple interfaces that can be used to build an organization structure. Chapter 4, PA Configuration in Less Than 24 Hours, shows how to configure the PA module and understand the standard customizing settings to map the business process. Chapter 5, Time Management Configuration – Negative Time, covers negative time configuration in detail along with how to generate quotas, and error messages that occur frequently and steps to fix the errors. Chapter 6, Payroll Configuration, tells you about the payroll schema and how to customize the PCR. You will also delve into posting the pay results to the FI module, which covers integration with the Finance module. Chapter 7, Talent Management and Development Configuration, shows you how to configure the appraisal template in less time and understand its functionality in detail. Chapter 8, Training and Event Management Configuration, helps you to understand the various features that TEM module covers in detail. Chapter 9, Travel Management Configuration, explores the various standard configuration features that the Travel Management module offers. Chapter 10, Building a Report Using SAP Query Viewer, enlightens you on ways to build bespoke reports without any programming skills.
  • 26.
    What you needfor this book You are expected to have basic knowledge of computers and know-how of Enterprise Resource Planning products and domain experience.
  • 27.
    Who this bookis for This book is for SAP HCM aspirants, end users, and consultants who are keen on learning or fine-tuning their configuration knowledge. This book will attempt to help learn concepts and apply them in real-time projects. There are plenty of screenshots for better understanding. Some of the error messages frequently raised in real-time environment are covered and solutions for the same are also proposed.
  • 28.
    Conventions In this book,you will find a number of styles of text that distinguish between different kinds of information. Here are some examples of these styles and an explanation of their meaning. Code words in text, database table names, folder names, filenames, file extensions, pathnames, dummy URLs, user input, and Twitter handles are shown as follows: "They define the nature of absence such as Sick, Casual, and so on." A block of code is set as follows: ZLEN (PCR name) 3(ESG Grouping for PCR) 1234 (Leave encashment Wage type that holds number) AMT=6789(Wage type) AMT/30 MULTI ANA (Multiply Amount and Number, place it in Amount field) ADDWT 1234(Wage type) New terms and important words are shown in bold. Words that you see on the screen, in menus or dialog boxes for example, appear in the text like this: "The Sort Criterion option is very handy when we try to find the holiday that we defined in order to map it in the holiday calendar." Note Warnings or important notes appear in a box like this. Tip Tips and tricks appear like this.
  • 29.
    Reader feedback Feedback fromour readers is always welcome. Let us know what you think about this book—what you liked or may have disliked. Reader feedback is important for us to develop titles that you really get the most out of. To send us general feedback, simply send an e-mail to <feedback@packtpub.com>, and mention the book title via the subject of your message. If there is a topic that you have expertise in and you are interested in either writing or contributing to a book, see our author guide on www.packtpub.com/authors.
  • 30.
    Customer support Now thatyou are the proud owner of a Packt book, we have a number of things to help you to get the most from your purchase.
  • 31.
    Errata Although we havetaken every care to ensure the accuracy of our content, mistakes do happen. If you find a mistake in one of our books—maybe a mistake in the text or the code—we would be grateful if you would report this to us. By doing so, you can save other readers from frustration and help us improve subsequent versions of this book. If you find any errata, please report them by visiting http://www.packtpub.com/submit-errata, selecting your book, clicking on the errata submission form link, and entering the details of your errata. Once your errata are verified, your submission will be accepted and the errata will be uploaded on our website, or added to any list of existing errata, under the Errata section of that title. Any existing errata can be viewed by selecting your title from http://www.packtpub.com/support.
  • 32.
    Piracy Piracy of copyrightmaterial on the Internet is an ongoing problem across all media. At Packt, we take the protection of our copyright and licenses very seriously. If you come across any illegal copies of our works, in any form, on the Internet, please provide us with the location address or website name immediately so that we can pursue a remedy. Please contact us at <copyright@packtpub.com> with a link to the suspected pirated material. We appreciate your help in protecting our authors, and our ability to bring you valuable content.
  • 33.
    Questions You can contactus at <questions@packtpub.com> if you are having a problem with any aspect of the book, and we will do our best to address it.
  • 34.
    Chapter 1. EndUser Transactions End user transaction code or simply T-code is a functionality provided by SAP that calls a new screen to carry out day-to-day operational activities. A transaction code is a four-character command entered in SAP by the end user to perform routine tasks. It can also be a combination of characters and numbers, for example, FS01. Each module has a different T-code that is uniquely named. For instance, the FICO module's T-code is FI01, while the Project Systems module's T-code will be CJ20. The T-code, as we will call it throughout the chapters, is a technical name that is entered in the command field to initiate a new GUI window. In this chapter, we will cover all the important T-codes that end users or administrators use on a daily basis. Further, you will also learn more about the standard reports that SAP has delivered to ease daily activities.
  • 35.
    Daily transactional codes Ona daily basis, an end user needs to access the T-code to perform daily transactions. All the T-code is entered in a command field. A command field is a space designed by SAP for entering T-codes. There are multiple ways to enter a T-code; we will gradually learn about the different approaches. The first approach is to enter the T-code in the command field, as shown in the following screenshot: Second, the T-codes can be accessed via SAP Easy Access. By double- clicking on a node, the associated application is called and the start of application message is populated at the bottom of the screen. SAP Easy Access is the first screen you see when you log on. The following screenshot shows the SAP Easy Access window:
  • 36.
    Tip We don't haveto remember any T-codes. SAP has given a functionality to store the T-codes by adding it under Favorites. To add a T-code to Favorites, navigate to Favorites | Insert transaction, as shown in the following screenshot, or simply press Ctrl + Shift + F4 and then enter the T-code that we wish to add as favorite:
  • 37.
    There are differentways to call a technical screen using a T-code. They are shown in the following table: Command+T- code Description /n+T-code, for example, /nPA20 If we wish to call the technical screen in the same session, we may use the /n+T-code function. /o+T-code, for example, /oFS01 If we wish to call the screen in a different session, we may use the /n+T-code function.
  • 38.
    Frequently used T-codes Let'slook closely at the important or frequently used T-codes for administration or transactional purposes. The Recruitment submodule The following are the essential T-codes in the Recruitment submodule: T- code Description PB10 This T-code is used for initial data entry. It performs actions similar to the PB40 T-code. The mandatory fields ought to be filled by the user to proceed to the next infotype. PB20 This T-code is used for display purposes only. PB30 This T-code is used to make changes to an applicant's data, for example, changing a wrongly entered date of birth or incorrect address. PBA1 This T-code provides the functionality to bulk process an applicants' data. Multiple applicants can be processed at the same time unlike the PB30 T-code, which processes every applicant's data individually. Applicants' IDs along with their names are fetched using this T-code for easy processing. PBA2 This T-code is useful when listing applicants based on their advertising medium for bulk processing. It helps to filter applicants based on a particular advertising channel such as a portal.
  • 39.
    T- code Description PBAW It's usedto maintain the advertisements used by the client to process an applicants' data. PBAY All the vacant positions can be listed using this T-code. If positions are not flagged as vacant in the Organizational Management (OM) submodule, they can be maintained via this T-code. PBAA A recruitment medium, such as job portal sites, that is linked with an advertisement medium is evaluated using this T-code. PBA7 This is an important T-code to transfer an applicant to employee. Applicant gets converted to an employee using this T-code. The integration between Recruitment and Personnel Administration submodules come into picture. PBA8 To confirm whether an applicant has been transferred to employee, PBA8 needs to be executed. The system throws a message that processing has been carried out successfully for the applicants. After PBA8 T-code is executed, we will see a message similar to the one shown in the following screenshot:
  • 40.
    The Organization Managementsubmodule We will cover some of the important T-codes used to design and develop the organization structure in the following table: T-code Description PPOCE This T-code is used to create an organizational structure. It is a graphically supported interface with icons to easily differentiate between object types such as org unit and position. PPOC_OLD SAP provides multiple interfaces to create a structure. This T- code is one such interface that is pretty simple and easy to use. PP01 This is also referred to as the Expert Mode, because one needs to know the object types like SPOCK, where S represents position, O represents organization unit, and relationships A/B, where A is the bottom-up approach and B is the top-down approach, in depth to work in this interface.
  • 41.
    T-code Description PO10 ThisT-code is used to build structures using object types individually based on SPOCK. This is used to create an Org unit; this T-code creates the object type O, organization unit. PO13 This is used to create the position object type. PO03 This T-code is used to create the job object type. PP03 This is an action-based T-code that helps infotypes get populated one after another. All of the infotypes such as 1000-object, 1001- relationships, and 1002-description can be created using this interface. PO14 Tasks, which are the day-to-day activities performed by the personnel, can be maintained using this T-code. The Personnel Administration submodule The Personnel Administration submodule deals with everything related to the master data of employees. Some of the frequently used T-codes are listed as follows: T- code Description PA20 The master data of an employee is displayed using this T-code. PA30 The master data is maintained via this T-code. Employee details such as address and date of birth can be edited using this T-code.
  • 42.
    T- code Description PA40 Personnel actions areperformed using this T-code. Personnel actions such as hiring and promotions, known as the action type, are executed for employees. PA42 This T-code, known as the fast entry for action solution, helps a company maintain large amount of data. The information captured using this solution is highly accurate. PA70 This T-code, known as the fast entry functionality, allows the maintenance of master data for multiple employees at the same time. For example, the recurring payments and deduction (0014) infotype can be maintained for multiple employees. The usage of the PA70 T-code is shown in the following screenshot. Multiple employees can be entered, and the corresponding wage type, amount, currency, and so on can be provided for these employees. Using this functionality saves the administrator's time.
  • 43.
    The Time Managementsubmodule The Time Management submodule is used to capture the time an employee has spent at their work place or make a note of their absenteeism. The important T-codes that maintain time data are covered in the following table: T-code Description PT01 The work schedule of the employee is created using this T- code. The work schedule is simply the duration of work, say, for instance, 9 a.m. to 6 p.m. PTMW The time manager's workplace action allows us to have multiple views such as one-day view and multiday view. It is used to administer and manage time. PP61 This T-code is used to change a shift plan for the employee. PA61 This T-code, known as maintain time data, is used to maintain time data for the employees. Only time-related infotypes such as Absences, Attendances, and Overtime are maintained via this T-code. PA71 This T-code, known as the fast entry time data action, is used to capture multiple employees' time-related data. PT50 This T-code, known as quota overview, is used to display the quota entitlements and leave balances of an employee. PT62 The attendance check T-code is used to create a list of employees who are absent, along with their reasons and the attendance time.
  • 44.
    T-code Description PT60 This T-codeis used for time evaluation. It is a program that evaluates the time data of employee. Also, the wage types are processed using this program. PT_ERL00 Time evaluation messages are displayed using this T-code. PT_CLSTB2 Time evaluation results can be accessed via this T-code. CAC1 Using this T-code, data entry profile is created. Data entry profiles are maintained for employees to capture their daily working hours, absence, and so on. CATA This T-code is used to transfer data to target components such as PS, HR, and CO. The Payroll Accounting submodule The gross and net calculations of wages are performed using this submodule. We will cover all the important T-codes that are used on a daily basis in the following table: T-code Description
  • 45.
    T-code Description PU03 ThisT-code can be used to change the payroll status of an employee if necessary. It lets us change the master data that already exists, for example, locking a personnel's number. One must exercise caution when working on this T- code. It's a sensitive T-code because it is related to an employee's pay. Also, time data for the employees is controlled using this T-code. PA03 The control record is accessed via this T-code. The control record has key characteristics of how a payroll is processed. This T-code is normally not authorized by administrators. PC00_MXX_SIMU This is the T-code used for the simulation run of a payroll. The test is automatically flagged when this T-code is executed. PC00_MXX_CALC A live payroll run can be performed using this T- code. The test flag is still available to be used if required. PC00_MXX_PA03_RELEA This T-code is used normally by end users to release the control record. Master data and time data is normally locked when this T-code is executed. Changes cannot be made when this T- code is executed.
  • 46.
    T-code Description PC00_MXX_PA03_CORR ThisT-code is used to make any changes to the master data or time data. The status has to be reverted to "release" to run a payroll for the payroll period. PC00_MXX_PA03_END Once all the activities are performed for the payroll period, the control record must be exited in order to proceed for the subsequent periods. PC00_MXX_CEDT The remuneration statement or payslip can be displayed using this T-code. PE51 The payslip is designed using this T-code. The payments, deductions, and net can be designed using this T-code. PC00_MXX_CDTA The data medium exchange for banks can be achieved using this tool. PUOC_99 The off-cycle payroll or on-demand payroll, as it's called in SAP, is used to make payments or deductions in a nonregular pay period such as in the middle of the payroll period. PC00_M99_CIPE The payroll results are posted to the finance department using this T-code.
  • 47.
    T-code Description PCP0 Thepayroll posting runs are displayed using this T- code. The release of posting documents is controlled using this T-code. PC00_M99_CIPC The completeness check is performed using this T- code. We can find the pay results that are not posted using this T-code. OH11/PU30 The wage type maintenance tool is useful when creating wage type or pay components such as housing, dearness allowance. PE01 The schema, which is the warehouse of logic, is accessed and/or maintained via this T-code. PE02 The Personnel Calculation Rule is accessed via this T-code. The PCR is used to perform small calculations. PE04 The function and operations used can be accessed via this T-code. The documentation of most of these functions and operations can also be accessed via this T-code. PC00_M99_DLGA20 This shows the wage types used and their process class and cummulation class assignment. The wage type used in a payroll is analyzed using this T-code.
  • 48.
    T-code Description PC00_M99_DKON Thewage type mapped to general ledgers for FICO integration can be analyzed using this T-code PCXX Country-specific payroll can be accessed via this T- code. PC00 Payroll of all the countries, such as Europe, Americas, and so on, can be accessed via this T- code. PC_Payresult The payroll results of the employee can be analyzed via this T-code. The following screenshot shows how the payroll results are shown when the T-code is executed. Tip The "XX" part in PCXX denotes the country grouping. For example, its 10 for USA, 01 for Germany, and so on. SAP has localized country-specific payroll solution, and hence, each country has a specific number. The country-specific settings are enabled using MOLGA, which is a technical name for the country, and it needs to be activated. It is the foundation of the SAP HCM solution. It's always 99 for Offcyle run for any country grouping. It's the same for posting as well. The following screenshot shows the output of the PC_Payresult T-code:
  • 49.
    The Talent Managementsubmodule The Talent Management module deals with assessing the performance of the employees, such as feedback from supervisors, peers, and so on. We will explore all the T-codes used in this submodule. They are described in the following table: T-code Description PHAP_CATALOG This is used to create an appraisal template that can be filled by the respective persons, based on the Key Result Areas (KRA) such as attendance, certification, and performance. PPEM Career and succession planning for an entire org unit can be performed via this T-code. PPCP Career planning for a person can be performed via this T-code. The qualifications and preferences can be checked, based on which suitable persons can be shortlisted.
  • 50.
    T-code Description PPSP Successionplanning can be performed via this T-code. The successor for a particular position can be determined using this T-code. Different object types such as position and job can be used to plan the successor. OOB1 The form of appraisals is accessed via this T-code. The possible combination of appraiser and appraisee is determined based on the evaluation path. APPSEARCH This T-code is used to evaluate the appraisal template based on different statuses such as "in preparation" and "completed". PHAP_CATALOG_PA This is used to create an appraisal template that can be filled in by the respective persons based on the KRAs such as attendance, certification, and performance. The appraisers and appraisee allowed can be defined. OOHAP_SETTINGS_PA The integration check-related switches can be accessed via this T-code. APPCREATE Once the created appraisal template is released, we would be able to find the template in this T-code. The Training and Event Management submodule The Training and Event Management submodule caters to the company's need of bridging the gap between supply and demand. This submodule caters to identifying the right skill that needs to be provided to carry out the task
  • 51.
    successfully. Let's takea look at the important T-codes and their functionalities in the following table: T-code Description S_AHR_61011845 The necessary master data needs to be set up before using the Training and Event Management submodule. The cost item T-code is used to determine and represent the cost incurred for a business event. S_AHR_61011843 The address or physical location is maintained using this T-code. S_AHR_61011841 The business event location is set up using this T-code, for example, Training Center, Atlanta. PSVQ This function lets you change/display external organizers such as your company. S_AHR_61011893 The instructor who doesn't belong to the system, in other words, whose master data is not maintained, is captured using this function. S_AHR_61011889 The business event group such as the language course is set up using this function. S_AHR_61011888 The business event type is used to capture the delivery method, cost, capacity, and so on. PSV2 This function lets you maintain the exact date on which the event is scheduled to take place. It has the start and end dates of events.
  • 52.
    T-code Description PSV1 This functionlets you enroll attendees for business events and, at the same time, store the relevant billing and activity allocation data. S_PH9_46000434 The internal activity allocation for settling the fees of external instructors and also of the employees who had attended an event can be settled using this function. The Travel Management submodule The Travel Management submodule offers functionalities such as creating different travel expense types, processing business trip data, taking care of approvals, and entering the travel trip data into the system. Let's focus on the important T-codes related to this submodule, shown in the following table: T- code Description TRIP This T-code allows you to create a travel request, book rooms, hotel, and so on. PR05 The travel expense functionality allows you to track the status, settlement status, amount, and so on. PRAP The mass approval of any number of trips is performed via this function.
  • 53.
    T- code Description PREC The expectedtravel expenses cannot be determined until a trip is approved. In order to proceed further, the trip needs to be settled, and this function helps to meet the purpose. PRFI The posting run is performed using this function. The travel expenses that need to be settled are collected as transfer documents for posting to accounting. PRRW The trip transfer documents are posted to FI/CO using this function.
  • 54.
    Standard reports SAP hasdelivered many standard reports that meet business needs. For example, the SAP1 T-code can be used to display all reports module-wise in SAP. Let's look closely at some of the important reports that can be used by administrators.
  • 55.
    Recruitment The Recruitment standardreports can be accessed by navigating to SAP Easy Access | Human Resources | Personnel Management | Recruitment | Infosystem | Reports | Variable Applicant List. The Variable Applicant List report, which can be accessed via the S_AHR_61015508 T-code, is very useful when fetching the flexible list of all the applicants' data. There are flexible reports that let us choose from a combination of 20 fields from different infotypes. They also allow us to sort different fields such as age. Tip All of the reports can also be accessed via the SE38 or SA38 T-code, depending on user authorizations, and can be fetched by navigating to System | Status | Program. The statuses of applicants along with their names can be fetched using the applicants by name report that can be accessed via the S_AHR_61015509 T- code. The output has the following data: The number of the applicants The applicants' names The text of the status, for example, in process The beginning date of the applicants' statuses Tip The applicant action along with the status of each applicant, name, and so on can be fetched via the applicant by action report, and it can be accessed via the S_AHR_61015510 T-code. The output received is the action type such as initial data entry, overall applicant status, applicant name, or applicant id. The frequently fed input data such as the company code can be entered in the input selection screen and saved as a variant for saving time. Before clicking on Save (or pressing Ctrl + S), we can give the variant a name and description; however, isn't mandatory. This is shown in the following screenshot:
  • 56.
    The variant canbe called and it automatically feeds on the data stored using the variant. From the standard report, we can call the variant by clicking on Get Variant (or pressing Shift + F5) and choosing the variant name. We can do this if we want to get the Test variant for example. We saved this variant in the previous step. The demonstration is shown in the following screen: The ad hoc query is a useful tool to pull any data from tables and is accessed via the S_PH0_48000512 T-code. The standard /SAPQUERY/HR_APP infoset can be used to set the selection and output. If the standard report doesn't meet the requirement of the client, this ad hoc query function can be utilized.
  • 57.
    From the differentfields available, Selection and Output need to be flagged, and the preview of the output can also be viewed at the bottom of the screen. This is demonstrated in the following screenshot. Finally, click on the Save button to access the query when required. The name and title of the query need to be entered when saving. Click on Query, select Open (or press F6), and then select the query name to execute the saved query, as shown in the following screenshot. There is also a date and time stamp when the query is saved.
  • 58.
    As seen inthe following screenshot, the selection and the output saved in the query gets displayed automatically when we open the query. We can display the output by clicking on the Output button or by pressing the F8 key. Tip Transaction SERP and SARP can be used to display and maintain the standard report tree. HR00 needs to selected, then click on Display (F5) to start the report.
  • 59.
    Organizational Management The OMreports can be accessed by navigating to SAP Easy Access | Human Resources | Organizational Management | Infosystem | Organization Unit. The backbone of OM is the SPOCK object types, and there are plenty of standard reports to display them individually. There are many standard reports provided by SAP to display the object types and their description. The S_AHR_61016491 function is used to display the organizational units with their start and end dates, along with their object IDs and description. The existing positions can be seen via the S_AHR_61016502 T-code. The output is similar to what is displayed for an organizational unit. All the existing jobs, along with their descriptions, are accessed via the S_AHR_61016497 T-code. The structure hierarchy is displayed via the RHSTRU00 report. This report uses the object ID that is entered as the root of a tree structure, and using the specified evaluation path, it fetches the object and its related object type. The display depth in the report tells us how far the object and its relationship need to be displayed in the output. Tip The evaluation path gives instructions to the system to look for the object types and relationships and is maintained in the T778A table or via the OOAW T-code. The graphic interface is also supported by SAP; the structure can be displayed in a graphical format. The S_AHR_61016530 T-code is used to display the structure in a graphical form. They can be downloaded on to the system for further analysis. The reporting infotype is a functionality given to run reports based on infotypes. Normally, 1000-1999 are OM infotypes, and in this report, we can give the infotype number and execute the report. The S_AHR_61016532 T- code is used to execute the report.
  • 60.
    The authorization forobjects based on a user can be fetched using the Authorized Objects per User/Profile report and is accessed via the RE_RHAUTH00 T-code. When the user ID is entered and executed, the system displays all the authorization objects to which the user has access. Relationship is a key concept in OM; it's like A and B, where A is bottom up and B is top down. We can find the missing relationships for object types using this report. The Display and Create Missing Inverse Relationships report helps find the missing relationships between object types, and it is accessed via the RE_RHCHECKV T-code. The object types and relationships can be exported to different clients using the Manual Transport Link report, which is accessed via the RE_RHMOVE30 T-code.
  • 61.
    Personnel Administration The mostwanted and frequently used report is the one maintaining a record of the employees who have joined and left the company, and SAP has provided a standard report that can be accessed via the S_PH9_46000223 T- code. The output has the first and last names of the employee, start date, and leaving date, along with the Org unit and its description. Tip The layout of reports can be controlled by clicking on Change layout (or pressing Ctrl + F8). The order of display can be sorted, or the fields can be unselected so that they are not displayed. The education and training details of all the employees can be displayed via the S_PH9_46000224 T-code. It's mandatory that data is maintained in the respective infotypes in order to be correctly shown in the output. The output format can be set to SAP list viewer or spreadsheet, based on the requirement. This is a common functionality of all the reports. The promotion-related activities surrounding an employee, such as the time spent in each pay scale group and level, can be fetched using the Time spent in each pay scale area/type/group/level report. This is accessed via the S_AHR_61016356 T-code. The output has the pay scale type, area, group, and level details along with the calculated years and months. This is shown in the following screenshot:
  • 62.
    If we notice,the logic to fetch the year and month is built in report that SAP uses to display in the output. If the standard report doesn't meet your requirements, only then is it recommended that you go for a new development. The personnel numbers are normally of eight digits, and should the client wish to capture the numbers maintained in the legacy system, they can do it using the 0031 infotype. SAP provides a standard report to capture the numbers maintained for all the employees, which is accessed via the S_AHR_61016358 T-code. The list of active employees is one of the most frequently wanted reports, along with gender details, and SAP has built a standard one that can be accessed via the S_AHR_61016369 T-code. It displays the first name, last name, position, and personnel number, along with the entry and leaving dates. The flexible report that SAP has provided for a user to select/deselect the fields according to their business needs is the Flexible Employee Data report. It is accessed via the S_AHR_61016362 T-code. The advantage of using the report is that it displays all the available fields from which we can choose 20 separate fields. It's a very user friendly report that can be tweaked based on the company's needs. The employee's nationalities can be displayed using the Nationalities report, which is accessed via the S_AHR_61016374 T-code. The organizational changes made to the employee can be captured via the Headcount changes report, and it is accessed via the S_L9C_94000095 T- code. The action type and action reason normally adds meaning to the personnel action performed. For example, the change of position action has been performed and also the promotion action; the two actions can be listed using the standard report. The important fields such as enterprise and personnel structure can be fetched using this report. The age and gender reports are accessed via the S_PH9_46000218 T-code. SAP also provides a standard report to display age and gender based on
  • 63.
    seniority, in otherwords, the duration spent in the company. This is accessed via the S_PH9_46000217 T-code. The personnel who has spent more time in the company gets prioritized and listed first. The infotype changes have to be captured, and this is very vital for audit purposes. Any changes done intentionally or unintentionally need to be captured, and there is a report for this known as Logged Changes in Infotype Data provided by SAP for security purposes. This report can be accessed via the S_AHR_61016380 T-code. Tip The HR Documents: Infotypes with Documents (V_T585A), HR Documents: Field Group Definition (V_T585B), and HR Documents: Field Group Characteristics (V_T585C) tables must be maintained for the effective use of this report. A detailed log of report can be accessed via the S_AHR_61016381 T-code. The report name along with user details and date and time of access is displayed when the report is executed. This, however, is only created for a report maintained via the V_T599R (HR Report Attributes) table and also the Record at start required online field is flagged. The ad hoc query report for Personnel Administration submodule with the standard /SAPQUERY/HR_ADM infoset can be used to build a report with your own selection and output fields. The only difference is the infoset that is chosen for the PA submodule. The infoset query is accessed via the S_PH0_48000510 T-code.
  • 64.
    Time Management The workschedule, absence, and attendance of the employee are closely monitored by the administrators, and SAP has provided many standard reports to meet the demands. The daily work schedule of an employee can be accessed via the PT03 T- code. The personal work schedule of an employee, which can be for a week or month, for example, can be displayed via the PT63 T-code. The employee number, name, and daily work schedule are displayed in the following screenshot: The start and end dates, along with the holiday calendar, are also displayed, making it easy for administration. The absence and attendance information is vital for administration, and SAP has provided standard reports to meet business demands. They can be accessed via the PT64 T-code. This report gives us the output in the form of working hours anticipated and days. The graphical format is supported by accessing the PT90 T-code. The absence is displayed in a different color for easy recognition. Multiple employees can be chosen based on the organization unit, for example, and the Attendance/Absence Data: Multiple-Employee View report can be accessed via the PT91 T-code. The graphical format of absence/attendance can be displayed via the Graphical Overview of Attendances/Absences report and can be accessed via the PT65 T-code. When we double-click on absence or attendance type
  • 65.
    mentioned on thescreen, it will automatically take us to the master data screen. The quota entitlements and balances can be displayed via the display absence quota information report, and it is accessed via the PT_QTA10 T- code. The base entitlements in number of days, for example, and the applied leave along with the available balance or the remaining total is displayed in the output. This is another one of the most frequently used report in business. The output of this report is shown in the following screenshot: The Cumulated Time Evaluation Results: Time Balances/Time Wage Types report is accessed via the PT_BAL00 T-code. If we use PT60 (Time evaluation), time wage types / time balances are formed via time evaluation. These reports will be very useful to display information. Time evaluation data can be accessed via the PT_EDT_TELU T-code; the time statement form can also be configured and used in this report. If time- evaluated data is available in time cluster, it gets displayed as the output. The standard form TEDT TF00 Time statement form (standard) is used and copied according to customer needs. This copied time form can be used in the report. This is very similar to the payslip configuration in the Payroll submodule. The working times captured via Cross Application Time Sheet (CATS) can be accessed via the CATS_DA T-code. An important report of transferring data to cross modules such as HR is accessed via the CATA T-code. The data can also be transferred individually module-wise and can be accessed via the CAT6 T-code for HR, CAT5 for project systems, and CAT7 for FICO.
  • 66.
    Payroll Accounting The paymentsand deductions of employees are displayed via the Payments and Deductions report. It's a flexible report that allows us to display data based on the wage type if necessary. This is accessed via the S_AHR_61015608 T-code. The bank details of employees are displayed via the Bank Details report or accessed via the S_AHR_61015609 T-code. The data maintained in the following infotypes and subtypes can be displayed via this report: Bank Details (0009) Capital Formation (0010) External Transfers (0011) Payslip or remuneration statement is displayed via the program remuneration statement that can be accessed via the S_AHR_61015606 T-code. The form name that we use is the copied version of Remuneration statement (SAP standard) - XF01. It's recommended that you copy the standard, rename it, and change it accordingly. The remuneration statement can also be printed using the HR smart forms. They are accessed via the PC00_M99_HRF T-code. The wage type reporter is a useful report that displays the wage types and the corresponding amount, along with other related information of the employee such as company code and personnel area. It's accessed via the PC00_M99_CWTR T-code. The data is fetched from Cluster tables (Results table and WPBP). All the payment and deduction wage types can be displayed using this report. The payments made on public holidays can be determined using the Paydays on holidays or weekends report. It's accessed via the S_AHR_61015614 T-code. The prerequisite is to have the paydays defined in the T549S table. The payment date, end date of pay period, and so on are graphically displayed using the Payday calendar report, and are executed via the S_AHR_61015615 T-code. The legends used clearly indicate the meaning. For
  • 67.
    example, X denotesa payday in the past. This is demonstrated in the following screenshot:
  • 68.
    Talent Management The displayprofile matchup report can be accessed via the PEPM T-code. It's a comparison of the position's requirements with the person's qualifications. We can also generate a training proposal by flagging the checkbox. Applicable career paths within an organization structure can be displayed via the Evaluate Careers report, and are accessed via the S_AHR_61015524 T- code. The following screenshot shows the Evaluate Careers report: The career path and its description along with the object type, LB, are displayed as the output. The object without qualification or requirement can be accessed via the S_PH9_46000019 T-code. The object type in selection can be, for example, a person, and when it is executed, it lists the IDs of people whose qualifications are not maintained. It basically takes us to the PPCP T-code. The overview of all the qualifications maintained is accessed via the Qualification Overview report, and it is accessed via the S_PH9_46000016 T-code.
  • 69.
    Training and EventManagement The standard reports help administrators capture the training cost, details about the business event, attendees, and so on. The reports can be accessed by navigating to SAP Easy Access | Human Resources | Training and Event Management | Information Systems | Reports. All the attendees enrolled for a training program can be displayed via the S_PH9_46000434 T-code. The report list many fields such as the following: Attendee's name and abbreviation Booking date Attendance fee/price Business event name Start and end dates of the event The comparison of cost incurred against each organization unit is a useful report for analysis, and it can be accessed via the S_PH9_46000423 T-code. The business event schedule can be accessed via S_PH9_46000438. If there is no event that is scheduled, the system throws an error message to indicate its nonavailability. The resources to organize an event are captured via a standard resource equipment report, which is accessed via the S_AHR_61016224 T-code. This report gives details of the equipments that are available in training rooms. The graphical format is supported by SAP. The graphical resource reservation report is a useful one that can be accessed via the S_PH9_46000441 T-code. The Training and Event Management submodule also has an ad hoc query that can be developed using the S_PH0_48000535 T-code.
  • 70.
    Travel Management The TravelManagement component supports all processes involved in handling business trips. Its comprehensive functionality is integrated with settlement and payment processes. Travel Management enables you to request, plan, and book trips, create expense reports, and transfer expense results to other business function areas. There are various standard reports that can be accessed by navigating to SAP Easy Access | Human Resources | Information Systems | Reports | Travel Management. They broadly cover trip expenses and planning reports. The General Trip Data/Trip Totals report is very useful to evaluate the trip totals listed per trip. This report is accessed via the S_AHR_61016401 T-code. There are many branching options that can be selected from the following options: Trip Trip receipts Trip cost assignment Trip block list The Cost Assignment for Trip report is very vital for a business to evaluate the cost and assignment to respective general ledger in accounting. This report is accessed via the S_AHR_61016404 T-code. The period-wise travel expense report can be displayed using the S_AHR_61016408 T-code. Multiple periods or period parameters can be selected so that a report can be displayed. The period could be from the following options: Monthly Bi-weekly Weekly
  • 71.
    This is avery flexible report that allows up to seven periods to be represented in a single report. The different selection parameters could be from the following options: Personnel's number Cost center (employee master cost center), for example, the employee cost center maintained in 0001 infotype Trip expense types (see field documentation) Trip expense categories (see field documentation) Per diems/flat rates (for meals, travel costs, and accommodations) There are plenty of tricks to save time for administrators. We will cover some of them specifically to access T-codes and reports.
  • 72.
    Creating a folderand moving the T- codes First, SAP provides an easy functionality to help us access T-codes easily without the need to remember them. It is done by navigating to SAP Easy access | Favorites | Insert folder, as shown in the following screenshot: Users can create folders and insert all the T-code related to them. For example, payroll can be a folder, and all the T-code related to the payroll can be moved to that folder. SAP also has the feature to add the T-codes that are frequently accessed, to the folder of our choice that we created earlier. It is done by navigating to SAP Easy access | Favorites | Insert transaction, as shown in the following screenshot:
  • 73.
    All the T-codesare moved to the respective folders, and hence, accessibility is easier for administrators. SAP has an interesting feature of downloading T-codes for easy accessibility or to share it with your teammates. It is accessed by navigating to SAP Easy access | Favorites | Download to PC. The format can be a text file or a word pad option of your choice. The technical names of reports can be shown or hidden by changing the settings by navigating to SAP Easy Access | Extras | Settings | Display Technical Names. When the Display Technical Names option is flagged, all the technical names of the reports and the T-code get displayed automatically.
  • 74.
    An overview ofSAP standard reports SAP has developed many standard reports that normally meet business requirements. We will cover frequently used reports submodule-wise. We will see the reports along with their T-code and program name for easy understanding and can use them in a real-time environment.
  • 75.
    Recruitment The following arethe important T-codes along with their ABAP program names: Report ABAP Program T-code Variable Applicant List RPAPL012 S_AHR_61015508 Applicants by Name RPAPL001 S_AHR_61015509 Applicants by action RPAPL004 S_AHR_61015510 Ad Hoc Query SAPLAQ_ADHOC S_PH0_48000512
  • 76.
    Organization Management The OrganizationalManagement program names are prefixed with RH and are shown in the following table along with their technical names: Report ABAP Program T-code Existing Organizational Units RHXEXI00 S_AHR_61016491 Existing Positions RHXEXI03 S_AHR_61016502 Existing Jobs RHXEXI02 S_AHR_61016497 Structure Display/Maintenance RHSTRU00 SE38 PD Graphics Interface PDGRAPHX S_AHR_61016530 Infotype Reporting RHINFAW0 S_AHR_61016532 Authorized Objects RHAUTH00 RE_RHAUTH00 Check Relationships RHCHECKV RE_RHCHECKV Manual Transport Link RHMOVE30 RE_RHMOVE30
  • 77.
    Personnel Administration The PersonnelAdministration report's program names normally start with RP. We have listed all the frequently used T-codes and their technical names in the following table: Report ABAP Program T-code EEs Who Entered And/Or Left Company AQZZ/SAPQUERY/H2FLUCTUATIONS== S_PH9_46000223 Education and Training AQZZ/SAPQUERY/H2EDUCATION===== S_PH9_46000224 Time spent in pay scale group/level RPLTRF00 S_AHR_61016356 Reference Personnel Numbers RPLREF00 S_AHR_61016358 Employee List RPLMIT00 S_AHR_61016369 Flexible Employee Data RPLICO10 S_AHR_61016362 Nationalities RPSNAT00 S_AHR_61016374 Headcount Changes AQZZ/SAPQUERY/H2STAFF_CHANGES2 S_L9C_94000095
  • 78.
    Report ABAP ProgramT-code Statistics: Gender Sorted By Age AQZZ/SAPQUERY/H2GENDER_PER_AGE S_PH9_46000218 Statistic: Gender by Service Age AQZZ/SAPQUERY/H2GEND_P_SENIOR= S_PH9_46000217 Logged Changes in Infotype Data RPUAUD00 S_AHR_61016380 Log of Report Starts RPUPROTD S_AHR_61016381 Ad Hoc Query SAPLAQ_ADHOC S_PH0_48000510
  • 79.
    Time Management We willsee all the Time Management T-codes and their technical names in the following table. We can execute the functionalities directly via the T- code or by executing the ABAP program. Report ABAP Program T-code Display Work Schedule SAPMP51S PT03 Personal Work Schedule RPTPSH10 PT63 Attendances/Absences: Calendar View RPTABS50 PT90 Attendances/Absences: For Multiple Employees RPTABS60 PT91 Graphical Attendances/Abs. Overview RPTLEA40 PT65 Absence Quota Information RPTQTA10 PT_QTA10 Cumulated Time Evaluation Results RPTBAL00 PT_BAL00 Time Balances Overview RPTEDT00 PT_EDT_TELU Display Working Times RCATS_DISPLAY_ACTIVITIES CATS_DA
  • 80.
    Report ABAP ProgramT-code Transfer to Target Components RCATSTAL CATA Transfer External -> Time Management RPTEXTPT CAT6 Data Transfer CATS -> PS RCATSTPS CAT5 CATS: Transfer Data to CO RCATSTCO CAT7
  • 81.
    Payroll Accounting The PayrollT-codes are easy to memorize; they normally start with PC00 followed by country-grouping numbers. We will see the frequently used T- codes and their technical names in the following table: Report ABAP Program T-code Payments and Deductions RPLPAY00 S_AHR_61015608 Bank Details RPLBNK00 S_AHR_61015609 Remuneration Statements RPCEDTX0 S_AHR_61015606 Wage Statement with HR Forms H99_HRFORMS_CALL PC00_M99_HRF Wage type reporter H99CWTR0 PC00_M99_CWTR Paydays on Holidays or Weekends RPCHCK00 S_AHR_61015614 Payday Calendar RPCSHS00 S_AHR_61015615
  • 82.
    Talent Management We willcover the frequently used Talent Management T-code in the following table, which will serve as a quick reference note: Report ABAP Program T-code Profile Matchup SAPLRHPP PEPM Evaluate Careers RHPECPAS S_AHR_61015524 Objects w/o Qualis or Requirements RHXPEP20 S_PH9_46000019 Career Planning RHPEPLAC PPCP Qualifications Overview RHXPE_QUALI_PRO_ORGUNIT S_PH9_46000016
  • 83.
    Training and EventManagement The standard T-code and their technical names under the Time and Event Management report have been covered in the following table: Report ABAP Program T-code Attendee List RHXTEILN S_PH9_46000434 Budget Comparison RHXBUDG0 S_PH9_46000423 Business Event Schedule RHABLAUF S_PH9_46000438 Resource Equipment RHXRESA0 S_AHR_61016224 Graphical Resource Reservation RHXRBEL1 S_PH9_46000441 Ad Hoc Query SAPLAQ_ADHOC S_PH0_48000535
  • 84.
    Travel Management We willcover the frequently used Travel Management T-code in the following table, which will serve as a quick reference note: Report ABAP Program T-code General Trip Data/Trip Totals RPR_TRIP_HEADER_DATA S_AHR_61016401 Cost Assignment for Trip RPR_TRIP_COST_ASSIGNMENT_DATA S_AHR_61016404 Travel Expense Reporting by Period RPRSTA01 S_AHR_61016408
  • 85.
    Summary In this chapter,we covered all the transaction codes or simply T-codes and standard reports that are used submodule-wise. We started off by covering all the important T-codes that are used on a day-to-day basis for both master and transactional processing. Next, we covered all the standard reports along with their program names that can be executed directly instead of the T-code functionality. In the next chapter, we will look closely at configuring the Recruitment submodule and explore the standard functionalities provided by SAP.
  • 86.
    Chapter 2. RecruitmentConfiguration In this chapter, we will learn how the Recruitment submodule is configured to map the business requirements in the SAP system. We will also learn how to configure the recruitment module and also the integration aspects with other modules such as organization management. Throughout the recruitment component, data is captured in separate databases such as PBxxxx, where xxxx is the infotype number and PB denotes the applicants. Recruitment infotypes are in the range of 4000-4999. Some useful recruitment-related infotypes are as follows: 4000: This refers to an applicant's action 4001: This refers to the applications 4002: This refers to a vacancy assignment 4003: This refers to an applicant's activities 4004: This refers to the status of an applicant's activity 4005: This refers to an applicant's personnel number
  • 87.
    Handling vacancies Hypothetically, let'ssay there is an open position that needs to be filled by an employee. The open positions are created in an Organization Management submodule, which you will be learning in the next chapter, Chapter 3, SPOCK – the Building Block of OM. We will cover a scenario where the open position (Senior Manager HR) created in an OM component will be used in the Recruitment submodule. We will see how an open position is created in OM, although we will cover it extensively in Chapter 3, SPOCK – the Building Block of OM. We will enter the PP01 T-code in the command line. We will create an open position (Senior Manager HR) and flag it as vacant. To create open positions, we can use the PP01 T-code. This is shown in the following screenshot: The vacant position is the one we will attempt to fill using the Recruitment submodule. Click on Save. We will keep this position vacant as shown in the following screenshot:
  • 88.
    We will flagall the positions as open; they need to be filled. Click on Create (F5). You get the following screenshot: We will create the open position in the OM side of the world, and this is where the integration between recruitment and organization management comes into play:
  • 90.
    Vacancy maintenance steps Wewill discuss how the vacant position created in the OM side is processed in the recruitment side of the world. Click on Execute or press F8. We can use the PPOCE/PP01/PPOC_OLD T-code to create positions in the OM as shown in the following screenshot: A vacancy is maintained via the TCD PBAY or by navigating to SAP easy access | Human Resources | Personnel Management | Recruitment | Advertising | Vacancy | PBAY (Maintain). There is a standard report for listing out all the open positions created in the OM. When we execute the report, we can not only list all the open positions, but also assign the officer in charge of the open position. This is depicted in the following screenshot:
  • 91.
    When we clickon the icon that looks like a pencil (edit), the Change vacancy window gets enabled. Using this option, the officer in charge can be mapped. This is shown in the following screenshot: The complete administrator name gets populated, and we can choose from the list. We will see the personnel officer assigned as AMU when we click on the details button. AMU is the personnel officer in charge of the vacant position's application, and it can be maintained by navigating to SPRO | Personnel Management | Personnel administration | Organization data |
  • 92.
    define administrators orvia the SM30/31 T-code in the T526 table. This is shown in the following screenshot: The OM column is crucial, because the indicator P denotes that it's created in the OM side and cannot be changed.
  • 93.
    Advertising vacancies The differentchannels that are used to fill the vacant positions are of prime importance for the stakeholders. The following are the different types of recruitment instruments that clients make use of: Recruitment Instruments Description Internal postings These are the ways to look internally for possible candidates to fill the position Employee referral program This is a cost-effective and efficient mode to track potential candidates Classified advertising These are jobs posted in newspapers Employment agencies and search firms These are consultancies that are tied up with companies, and they specialize in identifying the right candidate for the job Job fairs This is like a place where all the interested companies gather and hire the right talent Online recruiting sites These are free websites that let candidates upload their profiles, and companies use them as a source to identify the right candidate
  • 94.
    Channels or recruitmentinstruments Recruitment instruments or channels are classified according to the different media used. The media could be job portals, newspapers, television advertisements, employee references, and so on. The recruitment instruments are configurable items that can be used by the end user to map the vacant position. We will look at the configuration of applicant number ranges first. This can be accessed by navigating to SPRO | Personnel Management | Recruitment | Basic settings | Create number ranges for applicant numbers. The following screenshot demonstrates this: We will see three options, which are as follows: Display: This option shows a number range, which is a two-digit code, the start and end numbers (range), NR status, which has the last number assigned, and finally, the flag that indicates whether it is internal or external. Change: This option allows us to make changes to the two-digit code, start and end numbers (range), NR status, which has the last number assigned, and finally, the flag that indicates whether it is internal or external. Tip To delete the number range, we need to set the NR status to 0 or else the system will throw an error message. Deletion is possible only if the
  • 95.
    status is initial. Change:This option allows us to change the current number assigned from the current choice to a number of choices. The other fields are grayed out and cannot be altered when this option is chosen.
  • 96.
    Vacant position mappingusing recruitment instruments We will see how different recruitment instruments, such as job portal, job fair, and so on, are mapped to the vacant position. First, the recruitment instruments such as ABC job portal and XYZ job portal are created, and they are classified as the medium to which they belong. The recruitment instruments can be accessed by navigating to SPRO | Personnel Management | Recruitment | Workforce requirements and advertising | Create recruitment instruments. We can otherwise use Table Maintenance directly, which is common for all the configurable tables. The T-code that can be used is SM30/SM31. This is shown in the following screenshot: The first Instrument column has the unique ID, and the second instrument column has the text maintained.
  • 97.
    Recruitment medium The recruitmentmedium is configured to group the instruments into one category. We can access the recruitment medium by navigating to SPRO | Personnel Management | Recruitment | Workforce requirements and advertising | Create media. The following screenshot shows this: We can also maintain the address of the instrument, or the source can also be maintained by navigating to SPRO | Personnel Management | Recruitment | Workforce requirements and advertising | Create addresses for recruitment instruments. The Recruitment submodule has the provision of creating applicant groups and ranges. For example, the "Senior Managers" are all grouped under Manager, the range is technical or nontechnical, and so on. We will look at how this can be configured by navigating to SPRO | Personnel Management | Recruitment | Applicant administration | Applicant Structure | Create applicant groups. This is shown in the following screenshot:
  • 98.
    The applicant groupallows us to categorize the applicants according to their business needs, which are as follows: Consultants Managers Freelancers The applicant group is mapped to an applicant class. An applicant class is categorized into two classes, which are as follows: "P" for internal applicants "AP" for external applicants The applicant group not only allows us to bifurcate the applicants based on their categories, it also has the functionality of mapping them as unsolicited and lets us see how it is handled in the system. Unsolicited application groups can be created by navigating to SPRO | Personnel Management | Recruitment | Applicant administration | Applicant Structure | Create unsolicited application groups. The personnel administrators created are also used in the Personnel Administration submodule, and they serve as an integration point. In recruitment, this is called Create Personnel Officer, while in personnel administration, it's called Define Administrator. They can be accessed directly via the SM30/SM31 T-code and the T526 table. The administrators are configured in the system by navigating to SPRO | Personnel Management | Recruitment | Applicant administration | Create personnel officer. Tip The administrators defined are also used in the PA as shown in the 0001 (organization assignment) infotype. We can use the standard template that can be captured and sent out to applicants based on their different statuses.
  • 99.
    The standard templateor text is configurable; however, mailing out to applicants is a customizable activity that requires a technical consultant's involvement. The path is SPRO | Personnel Management | Recruitment | Applicant administration | Short profile | Create standard text. The template can be mapped as a short profile to the applicant via Feature SHPRO. Tip The repository documentation of features, payroll functions, and operations can be accessed via the PDSY T-code. This is a useful Tcode to memorize.
  • 100.
    Applicant cycle The differentstages of an applicant cycle are captured via applicant actions such as in process, put on hold, and rejected. The applicant actions are performed via the PB40 TCD, and it helps capture the details of the applicant, such as initial data is captured, profile is screened, process applicant, and so on. We will see how applicant actions are configured in the system by navigating to SPRO | Personnel Management | Recruitment | Applicant selection | Applicant status | Change action texts. This is shown in the following screenshot: The standard statuses in SAP are as follows: In process To be hired On hold Rejected Contract offered Offer rejected Invite Invite to AC The different reasons associated with each applicant action can be configured by navigating to SPRO | Personnel Management | Recruitment | Applicant selection | Applicant status | Create status reasons. The following are the reasons why a candidate may be rejected:
  • 101.
    Insufficient qualifications Formal error Overqualified Newapplication No requirement The standard statuses will normally meet your requirements and needs and should be changed only in exceptional cases, as shown in the following screenshot: SAP also allows us to map the permissible vacancy assignment status to an overall status, and this is achieved using the STATU feature by navigating to SPRO | Personnel Management | Recruitment | Applicant Selection | Applicant Status | Set permissible vac.assign statuses for each overall status. This is shown in the following screenshot: The STATU feature lets us define the overall status based on the status and return value, as shown in the following screenshot:
  • 102.
    The HR administratorcan process the applicant in the system via information types or infotypes. The info group is simply a collection of infotypes populating sequentially to assist the user in completing the transaction quickly. The group can be changed by navigating to SPRO | Personnel Management | Recruitment | Applicant actions | Change info groups. This is shown in the following screenshot: Double-click on the Info Groups option and you will get the User Group Dependency on Menus and Info Groups window. Here, we define the info group and mention whether it's dependent on user group (UGR) or not. This is shown in the following screenshot:
  • 103.
    The flag controlswhether the menu is dependent on the UGR parameter maintained in the user's profile, as shown in the following screenshot: The parameter value is set in the UGR parameter, and it is maintained via the SU3 or SU01 T-code. If required, every user can be assigned a parameter value against the UGR parameter ID. For instance, UGR is a user group parameter and MOL is country grouping.
  • 104.
    The output ofthe SU3 T-code looks like the following screenshot: The output of the SU01 T-code looks like the following screenshot: Each applicant action, such as the initial entry of basic applicant data, prepare to hire, and so on, is mapped to an applicant's status, such as in process, to be hired, and so on. We will see how the applicant action is configured by navigating to SPRO | Personnel Management | Recruitment | Applicant selection | Applicant actions | Change applicant actions. This is shown in the following screenshot:
  • 105.
    All the applicantactions, such as an applicant's initial screening, shortlisting applicants, and interviewing, are maintained as shown in the following screenshot: The applicant actions are performed via the PB40 T-code. This is shown in the following screenshot:
  • 106.
    The applicant datais captured via different infotypes such as 0002, which is personal data, and 0006, which is the address. This is possible by configuring the info groups that we covered earlier in this chapter. We will see how infotypes sequentially populate one after the other. This is shown in the following screenshot:
  • 107.
    The mandatory fieldshave to be filled in order to proceed to the next infotype. This is demonstrated in the following screenshot:
  • 108.
    The next infotypeis the personal data of the applicant, such as the first name, last name, date of birth, and so on. This is demonstrated in the following screenshot:
  • 109.
    We will alsofind the applicant number generated automatically by the system. This is controlled via a configuration in number ranges; we covered this earlier in this chapter. This is shown in the following screenshot:
  • 110.
    Click on theSave button after feeding data in to each infotype. The system throws a message that the action for the applicant has been successfully executed. We will discuss the integration aspects of the Recruitment submodule and Personnel Administration submodule in the next chapter. We will find a seamless integration between the Recruitment and Personnel Administration submodules. This integration will enable the applicants from being transferred as employees.
  • 111.
    Integration with personnel administration Thereis a seamless integration between the Recruitment and Personnel Administration submodules, and we will now look at how the configuration is done to achieve this. There are two features that can be checked: the first one is PRELI, and the other one is PRELR. They are checked by navigating to SPRO | Personnel Management | Recruitment | Basic settings | Set up integration with other components. The following screenshot demonstrates this: Click on Execute. The important features related to the Recruitment submodule are PRELI and PRELR.
  • 112.
    PRELI and PRELRare useful in the recruitment module to check if the number entered in the recruitment module is to be checked with the database. PAPLI is another feature that is useful for the Recruitment submodule.
  • 113.
    Integration tools The procedurefor transferring applicant data to Personnel Administration is listed in the following table: Steps Tcode Comment First step PB40 Execute the initial entry of the basic data applicant action Second step PB40 Execute the prepare to hire applicant action Third step PBA7 Direct transfer of the applicant data Fourth and final step PBA8 Complete the activities after the data transfer We will look at the steps in detail. The integration point between recruitment and personnel administration is controlled via Data Transfer Tools, and it is accessed via the PBA7 T-code. Note Do not change the action of hiring as it is hardcoded in the program (RPAPRT09) as 60. The following screenshot shows the integration point between recruitment and personnel administration:
  • 114.
    To find thename of the program from the T-code, select the T-code, navigate to System | Status, and double-click on the program. This is shown in the following screenshot: We can see the program name of any code as shown in the following screenshot:
  • 115.
    The overall statusmust be set to 2 (corresponds to hired) for transferring the applicant to the employee. This is shown in the following screenshot: Click on Execute. Finally, to complete the activity, execute the PBA8 T-code as shown in the following screenshot:
  • 117.
    Common error messageduring data transfer We normally come across the "Error during activity import" error. We might have run the initial entry of basic data and then we can execute the applicant' action. When we try to transfer the applicant data to employee data using the PBA7 T-code, the system might throw an error. We would need to check the PB60 T-code and choose transfer data; navigate to Planned | Completed ( F8).
  • 118.
    Tips and tricks Letus take a look at certain features and transport requests in SAP which will make our work easier. Features SAP has certain given features to default the values based on the enterprise or personnel structure. The feature used to default an applicant number range is NUMAP (which refers to applicant number ranges). The repository of features can be maintained via the PE03 T-code. The features normally query enterprise and personnel structure fields and return the value. The features' functionality is useful, and it saves time and eradicates error while processing data. This is shown in the following screenshot: The applicant number range feature can be maintained via the PE03 T-code as shown in the preceding screenshot, or by navigating to SPRO | Personnel Management | Recruitment | Basic Settings | Choose number ranges. The system determines which number range, such as external or internal, needs to be assigned to the applicant during the initial entry of the applicant
  • 119.
    data. This isin conjunction with the decision tree. The following screenshot demonstrates this: Here, we see that the decision tree is built based on the country grouping. The return value is assigned as 01. The system queries the country grouping of the applicant, and based on the grouping, it assigns 01, which could be internal or external. Tip SAP offers the check feature to check the consistency of the action. If there is no error, the system throws a message that the decision tree is error free; otherwise, there will be an error message. This feature is activated by clicking on Activate (Ctrl+F3), and it can be checked for correctness by clicking on Check (Ctrl+F2).
  • 120.
    Normally, when afeature is activated, the system triggers a transport request, or TR. The TR is significant for moving data from one client to another without making changes separately. This is shown in the following screenshot: SAP offers the functionality to hide the free search help for applicants and persons. This is customized by navigating to SPRO | Personnel Management | Recruitment | Basic settings | Hide Free Search in Search Help or via the T77S0 system table. SAP recommends that we have SEARK and NOAHQ in the T77S0 settings (system table). The blank space in the value description field will denote that the free search is displayed, and if the field has an entity "X", then the free search is hidden. This is the control feature for free search. In the HR system, use the SM30/SM31.Type V_T77S0 T-code in the field table view and click on maintain. We will have to make sure the following parameters are set. The following table illustrates the functionalities: Group Semantic short name Value abbreviation Description SEARK NOAHQ The free search is displayed SEARK NOAHQ X The free search is hidden
  • 121.
    Transport requests inSAP The system generates the transport request number when you click on Activate. The topic of transport requests must be known although, it is part of the basis activity. The transport request allows the changes made in one client to be moved to a different client without any risk. The transport request created earlier can be see by navigating to the SE09 T- code. We won't dwell any more on the concept of transport requests, as it's a completely different topic. The output of the SE09 T-code looks like the following screenshot:
  • 122.
    It's very importantto understand the request type and request status functionalities: The request type has multiple options to flag such as customizing and workbench options The request that is created by Functional Consultants (FC) is collected as a customizing request The request that is created by technical consultants is collected as a workbench request The request status has modifiable and released statuses: Modifiable means the request is not yet released for transport Released are the ones that have been released and can be moved to different clients Tip Click on Display. Transport requests need to be released by the functional consultant, and the porting of TR to different clients is taken care of by the basis consultant. We need to click on the Transport bus (F9) to release the request, and there will be a green flag that denotes that the request is released. When the TR is released, we will find the message populating it at the bottom of the screen, as shown in the following screenshot: The repository of transport requests is maintained via STMS, and normal access is prohibited to those T-codes. The following is a screenshot of the SAP Transport Management System (STMS) T-code:
  • 124.
    Summary In this chapter,we have covered the standard functionalities provided by SAP to configure the Recruitment submodule. The configurable items such as recruitment instruments, media, and vacant positions have been covered. The integration points between recruitment and organization management have been discussed. The data transfer from Recruitment to Personnel Administration has been explained. In the next chapter, we will look closely at configuring the Organizational Management submodule and explore the standard functionalities provided by SAP.
  • 125.
    Chapter 3. SPOCK– the Building Block of OM We will now learn how the Organizational Management (OM) submodule is configured to map the business requirement in a SAP system. We will see how a functional structure is mapped into the system. In this chapter, we will cover the following topics: The basic concepts of OM Creating an organizational structure Integrating OM with Personnel Administration
  • 126.
    The concepts ofOrganization Management The building blocks of OM are SPOCK. They are described as follows: S: This stands for Position (for example, HR Manager, Marketing Director, and so on) P: This stands for Person O: This stands for Organizational unit (also known as Org unit; it represents the department in a company) C: This stands for Job (for example, manager, director, and so on) K: This stands for Cost Center Note Note that both K and P are external object types. The K object type, Cost Center, is maintained in the FI/CO module, and the P object type, Person, is maintained in the PA submodule. When we say external, it is simply not created in the OM submodule. SAP has delivered multiple interfaces to design an organizational structure, and we will understand each of them separately.
  • 127.
    Elucidating an organizationalstructure An organizational structure is a functional structure. It simply represents the departmental hierarchy in a company. It identifies each Job, Position, its functions, and where it reports to within the organization. The following table is an example of an organizational structure: Company name Departments (suborg units) Subordinate departments Positions Jobs ABC Paper Company (Root organizational unit) Administration Office Supervisor Office Clerk Receptionist Director Manager Analyst Administrator Supervisor Human Resources HR Director Benefits Administrator Hiring Manager Hiring Analyst Finance Accounts Payable Accounts Receivable A/P Manager A/P Clerk A/R Manager A/R Clerk Manufacturing Pulp Paper Maintenance Plant supervisor Technician shift 1 - 05 Technician shift 2 - 05 Maintenance supervisor
  • 128.
    Basic relationships betweenorganizational objects The relationships in organizational management are mostly similar to a parent-child structure in two ways. A Position can belong to an organizational unit, and inversely, can be incorporated by an organizational unit. In the following table, A indicates the bottom- up approach, while B indicates the top-down approach: Relationship type Related object type Relationship name A002 O-O An organizational unit reports to another organizational unit B002 O-O This is the line supervisor of an organizational unit A003 S-O All the Positions that reports to an organizational unit B003 O-S A Position belongs to an organizational unit A007 C-S A Job describes a Position B007 S-C A Position is described by a Job A012 S-O The chief Position manages an organizational unit B012 O-S An organizational unit is managed by a chief Position A011 K This is the Cost Center assignment A008 P-S This is a Position-to-Person relationship B008 S-P This is a Person-to-Position relationship
  • 129.
    It is importantto note that Cost Center is always one sided unlike other object types that can have both A and B. It can be mapped either to an Org unit or to a Position, depending on the business requirement. Tip Irrespective of the interface we use to create the structure, the object types are stored in the HRP1000 table, and the relationship between the two object types is stored in HRP1001. When we discuss relationships, it is important to know the concept of the evaluation path in SAP. The evaluation path lets us create a relationship between two object types. An evaluation path can also have a sequence of object relationships. The evaluation path can be accessed by navigating to SPRO | Personnel Management | Organizational Management | Basic Settings | Data Model Enhancement | Maintain Evaluation Paths or via OOAW. The BOSSONLY T-code, for example, is a standard evaluation path that can be used in a report that will fetch the Org units that have the B012 relationship and the holder of the Position.
  • 130.
    Building an organizationalstructure The different methods of building an organizational structure are as follows: Organization and Staffing Simple Maintenance Expert Mode
  • 131.
    Creating an organizationalstructure with different interfaces There are multiple interfaces provided by SAP to build a functional structure. We will look at each of them in detail.
  • 132.
    Organization and Staffing TheOrganization and Staffing method of building organizational structure is delivered by SAP in a scenario where the company does not have an HR module, but the organizational structure is needed for the purpose of other modules, for example, workflow requirements. Using this method, the organization objects can be moved using the drag-and-drop approach. Also, we can add some extra attributes to the organizational objects. To work in this module, you have to navigate to SAP Easy Access | Organizational Management | Organizational Plan | Organization and Staffing | PPOCE - Create. The following screenshot demonstrates the navigation path: When you use the PPOCE - Create T-code, it prompts you to enter the start date and end date, as seen in the following screenshot. It is recommended that you have the start date as backdated as possible, say 01011900, for instance.
  • 134.
    The relationship betweenan Org unit and Position We can use the PPOME T-code to use this interface via the SAP Easy Access screen. We can right-click on Organizational unit, select Assign, and click on Incorporates, as shown in the following screenshot: You can enter the name of the Position, as shown in the following box, and click on Enter. You can see that the Asst Manager position belongs to New organizational unit. Also, notice O and S under ID. As discussed earlier, O refers to the Org unit and S is for Position.
  • 136.
    The relationship betweenPosition and Job We will use the PPOME T-code again, to use this interface via the SAP Easy Access screen. Click on Edit and select Create Job. When the Create Job window opens, enter the required fields, as shown in the following screenshot. You can create the required jobs and click on Enter. The jobs are saved, and we can assign them to positions by selecting the jobs that you have created for the positions. We will see how a Cost Center is mapped to an Org unit. Click on the Accounting tab after you execute the PPOME T-code. You can assign the Cost Center either to the position or the Org unit by entering the required details. This is demonstrated in the following screenshot:
  • 137.
    The Cost Centeris an external object and can be mapped to either an Org unit or a position. Note Note that OM is strongly built on the principle of inheritance. When the Cost Center is mapped to the parent Org unit, all the other Org units or positions mapped to them will automatically have the Cost Center tagged to them. The following screenshot is an example that shows how a Master Cost Center is mapped to the Org unit by clicking on the Accounting tab in the PPOME T-code:
  • 139.
    Simple Maintenance The SimpleMaintenance method, an older method of maintaining an organizational structure, is used to build an organizational structure and assign Cost Center in an easy way on one screen itself. This method is recommended to build an organizational structure manually, in a scenario where the company has few employees. In this method, you can view the organizational structure without having to navigate much to different screens. This method can be accessed via SAP Easy Access by navigating to SAP Menu | Human Resources | Organizational Management | Expert Mode | Simple Maintenance | PPOC_OLD – Create. This is shown in the following screenshot: Also, we can directly access this method via the PPOC_OLD T-code, which is shown in the following screenshot:
  • 140.
    Enter the requiredfields in the Create Organizational Unit window to create the Org unit. We will be able to enter the Org unit's name, the abbreviation, as well as the long text. In the Create Organizational Unit window, the users will have the following two options: Overall view: In this view, the options and features cater to the users of SAP Business Workflow Human Resources view: In this view, the options and features cater to the users of HR After this is done, click on the Create button in the top-left corner of the window, as shown in the following screenshot: After performing the preceding steps, SAP automatically assigns an 8-digit identifier that is unique to the object. The letter O identifies the object as an organizational unit.
  • 141.
    The positions arecreated by clicking on Staff assignments, as shown in the following screenshot: After this, click on Positions... and a screen pops up wherein the required fields and validity periods are entered (it's recommend that you have them backdated). SAP assigns a unique 8-digit identifier to each Position. The letter S identifies the object as a Position. The following screenshot shows a demonstration of the preceding steps: In the Create Positions window, we will enter the abbreviation and the long text that identifies the Position, the S object. The following screenshot shows
  • 142.
    a demonstration ofthe preceding steps: After performing the preceding steps, the jobs are created by clicking on Create jobs; they are then mapped to positions. We need to enter the abbreviation and its long text and then click on the Save button. After clicking on the Create jobs button, the Create Jobs window opens up, which is shown in the following screenshot:
  • 143.
    We can mapthe Cost Center to the Org units or Positions by navigating to Goto | Account Assignment and then clicking on the Master cost center… tab, as shown in the following two screenshots: After clicking on the Master cost center… tab, choose the appropriate Cost Center and then click on the Save icon. When we click on the Account Assignment tab, it will allow us to choose the relevant Cost Center that needs to be mapped to that Org unit. This is demonstrated in the following screenshot:
  • 145.
    Creating a CostCenter The Cost Center is an external object; it is created by a Finance (FI) consultant and serves as an integration point between HCM-FI modules. The Cost Center is essentially used for expense classification to know the breakup of costs according to General Ledger (G/L). Though Cost Center belongs to the FI module, it is useful to know the navigation path. To access the Cost Center, navigate to SAP Easy Access | SAP Menu | Accounting | Controlling | Cost center accounting | Master Data | Cost Center | Individual Processing | KS01 - Create), as shown in the following screenshot: The following screenshot shows the Create Cost Center window that allows you to enter the Cost Center name and the validity period:
  • 146.
    Tip The validity periodis important when assigning it to an employee. The start date of the Cost Distribution infotype 0027 must not be before the start date of the Cost Center, or else, the system will throw an error.
  • 147.
    The Expert Mode Thenext interface that we will learn to use is PP01 - General. Using it, we can create any of the object types such as O, S, C, and K. Using this method, we can maintain any type of attribute to any of the organizational objects. If any organizational structure needs to be built using uploaded programs, especially for large companies, the uploaded programs can use the expert method of building an organizational structure. The Expert Mode can be accessed by navigating to SAP Easy Access | SAP Menu | Organizational Management | Expert Mode | PP01 - General, as shown in the following screenshot:
  • 148.
    Creating an organizationalunit object in the Expert Mode The object type and its relationships are created using the Expert Mode interface. This interface is convenient to work with if we are familiar with the object types and the relationships between them. It is normally used by functional consultants. The following screenshot shows a demonstration of the process of object creation: Select Object and click on the Create infotype button (or press F5). Give an object abbreviation as well as an object name for the Org unit that we are creating. This is demonstrated in the following screenshot:
  • 150.
    Creating a positionobject in the Expert Mode We will now try to understand how a Position object is created. Follow the steps mentioned in the preceding section about creating an organizational unit. Instead of selecting Organizational unit as Object Type, select Position. The demonstration is shown in the following screenshot: As shown in the following screenshot, enter all the fields just as it was done when creating an organizational unit:
  • 152.
    Creating a Jobobject in the Expert Mode You can create a Job object in the same manner in which you created the Position object. Follow the steps mentioned in the preceding two sections. Instead of selecting Position as Object Type, select Job. The demonstration is shown in the following screenshot: In the Maintain object window, the different statuses that we will find are as follows: Active Planned Submitted Approved Rejected The statuses are useful if we want an approval-type mechanism of workflow based on different statuses. In general, all OM objects are created in the Active status.
  • 153.
    When we clickon Create object, the Create Object window allows you to enter the object description and name, as shown in the following screenshot: Tip The object abbreviation is, by standard, 12 characters in length, and the object name is 40 characters in length. We can find the length of each field by pressing F1 from the field and clicking on the technical information. Double click on table name in field data.
  • 154.
    The concept ofNumber Ranges It's important to know where the object IDs are actually generated from. Each object has a unique number that's associated with it. To check what number is assigned to the different subgroups, navigate to SPRO | Personnel Management | Organizational Management | Basic Settings | Maintain Number Ranges | Maintain Number Ranges. The following screenshot shows the Change View "Number Assignment": Overview window: We can also access the preceding window via the OONR T-code. After clicking on the Number range maintenance tab in the preceding
  • 155.
    screenshot, the RangeMaintenance window appears, as shown in the following screenshot: When we can click on the Intervals tab (the pencil icon depicts that we can change intervals), shown in the preceding screenshot, the Interval Maintenance window opens up, as shown in the following screenshot:
  • 156.
    Scenarios where weuse external number assignment Let's say that the company has object keys (numbers) already defined in an existing system and would like the same numbers to be brought over to SAP too. Consider the number range is $$$$. The first two $$ represent the plan version and the next two $$ represent the object type. For example, 01O refers to the number range for organizational units. No changes may be needed in this table. We can also access the Number Range Object Maintenance window via the SNRO T-code. In the following screenshot, RP_PLAN is Number Ranges for Personnel Planning: Click on the Ranges button in the following screenshot (or press F7). It leads to the Range Maintenance window for Personnel Planning:
  • 157.
    After performing thepreceding step, the subgroup for Personnel Planning is displayed. In the following screenshot, RP_Plan is the object that we choose for Organization Management number ranges, 01 is the Plan version, and O denotes the object type:
  • 158.
    The Plan Version ThePlan Version lets us simulate multiple versions in parallel. It allows us to manage different scenarios in the OM. We can have a number of plan versions, but only one can be active and current. Plan versions can be configured by navigating to SPRO | Personnel Management | Global Settings in Personnel Management | Plan Version Management | Maintain Plan Version. The following screenshot shows the Change View "Plan Versions": Overview window: We have to set the plan version by mapping the plan version ID into the T77S0 table. Plan versions can be activated by navigating to SPRO | Personnel Management | Global Settings in Personnel Management | Plan Version Management | Set active Plan Version. The following screenshot shows the Change View "Set Active Plan Version": Overview window:
  • 159.
    To activate theplan version, we use the PSO0 – Set Plan Version option, which can be found by navigating to Organizational Management | Settings: We can activate the Plan Version directly via the PCO0 T-code, as shown in the following screenshot: After performing the preceding step, a window will open up asking you to give the Plan Version. After selecting your Plan Version, click on the Continue button, as shown in the following screenshot: Let's say we want to maintain the Plan Version. We can do this by accessing the configurable tables via a particular node or directly via table maintenance. We have to execute the SM30/SM31 T-code and then enter the table name, as shown in the following screenshot:
  • 160.
    Clicking on theMaintain button will take us to a configurable table, as shown in the following screenshot: We can also go directly to the node by clicking on Customizing. This is shown in the following screenshot:
  • 161.
    Once we clickon the Customizing button, the following screen appears; click on Continue w/o Specifying Project: After clicking on Continue w/o Specifying Project, the IMG activities overview window appears; click on Global Settings in Personnel Management:
  • 162.
    After clicking onGlobal Settings in Personnel Management, click on the Continue button, as shown in the following screenshot: After clicking on the Continue button, we will see the Maintain Plan Versions node, as shown in the following screenshot: After clicking on the Maintain Plan Versions node, the Plan Versions screen will appear, as shown in the following screenshot:
  • 163.
    In the precedingscreenshot, you'll find the Print icon; click on it or press Ctrl + P. The following screenshot appears:
  • 164.
    Creating an organizationalstructure using the Expert Mode We will now see how the organizational structure is created via Expert Mode by navigating to SAP Easy Access | Human Resources | Organizational Management | Expert Mode | PO10 – Organizational Unit. The following screenshot shows how this is done: We can perform the preceding steps directly via the PO10 T-code.
  • 165.
    It's known as"Expert Mode" simply because you must have a good understanding of the object types and relationships to build the structure using this interface. The following screenshot shows the status of the structure: As seen in the preceding screenshot, we will see the status indicating that it starts the application to build the organizational unit. The following screenshot shows how an object is created: To create positions, we navigate to SAP Easy Access | Human Resources | Organizational Management | Expert Mode | PO13 - Positions. This is demonstrated in the following screenshot:
  • 166.
    We can performthe preceding steps directly via the PO13 T-code. The following screenshot shows the Maintain Position window that appears after creating a Position:
  • 167.
    To create anobject, we can choose the object and click on the Create infotype (or press F5) and the following window appears. Then, click on the Save: To create Jobs, we navigate to SAP Easy Access | Human Resources | Organizational Management | Expert Mode | PO03 - Jobs, as shown in the following screenshot:
  • 168.
    We can performthe preceding steps directly via the PO03 T-code. The following window appears after creating an object:
  • 169.
    Choose an object,click on the Create infotype button seen in the preceding screenshot, then enter the required fields in the following Create Object window, and click on the Save button:
  • 170.
    Configuring the table Forthe table configuration steps, the Data Browser screen needs to be used. Then, enter the table name (for example, hrp1000), as seen in the following screenshot: Once we enter the table name, the respective table comes up, as seen in the following screenshot: The relationship between objects is always two-sided such as A/B, where A is the bottom-up approach and B is the top-down approach. The relationship with Cost Center is always one side; it is represented by A011. The relationship between object types is maintained in the HRP1001 table. This can be seen in the following screenshot:
  • 171.
    The permitted relationshipsare stored in the T777E table. The OOVK T-code gives us the completed view of the Relationship between Objects. We can check using the SM30 or SM31 T-code, as seen in the following screenshot: Using the SM30 or SM31 T-code, the Allowed Relationships window appears as shown in the following screenshot:
  • 173.
    Integrating Organization Management withPersonnel Administration The dataflow between the Organizational Management and Personnel Administration submodules is controlled via a system table.
  • 174.
    Integration switches A systemtable can be accessed via multiple ways, directly via SPRO, T- code, or via table maintenance. We will explore all the methods in detail. First, we will access a system table by navigating to SPRO | Personnel Management | Organizational Management | Integration | Integration with Personnel Administration | Set up Integration with Personnel Administration. The navigation path is shown in the following screenshot: Secondly, we will access the system table via the SM30/SM31 table maintenance T-code. The following screenshot appears after executing the T-code:
  • 175.
    Finally, we willaccess the system table via the OOPS T-code, as shown in the following screenshot: After executing the OOPS T-code, the HR Master Data Integration window in the following screenshot appears:
  • 176.
    In the precedingscreenshot, X denotes that data transfer from OM and PA is active. The changes made in the PA side of the world can be transferred to the OM side using Data Transfer reports that we will see in the following section. The PLOGI table actually holds the object types and object IDs that can be accessed via the SE16 table, which is the Data Browser window:
  • 177.
    In the DataBrowser window, click on the Table Contents button. We can give the Plan Version, Object Type, and click on the Execute button as shown in the following screenshot: The following screenshot shows the next window that shows the selected entries:
  • 178.
    Data Transfer Tools Thereare standard data transfer reports provided by SAP; these reports facilitate the transfer of objects between the OM and PA submodules. They help the PA and OM submodules to be in sync after they are executed. The reports can be accessed via the SE38 or SA38 T-code, which opens the ABAP Editor window wherein you can enter the Program T-code as shown in the following screenshot:
  • 179.
    RHINTE Reports The RHINTE00,RHINTE10, RHINTE20, and RHINTE30 tools facilitate data transfer from OM to PA and vice versa. Let's explore RHINTE00 with a scenario. Say, we have uploaded Master in the Personnel Administration side, and we see the Org data in the 0001 infotype. However, we don't find the Position and Person mapping in the OM side. In this case, we will make use of RHINTE00, which opens the following window after it is executed. After selecting the Personnel Number, the Report-Specific Settings window appears as follows:
  • 180.
    We will unflagthe Test run and execute RHINTE00. Then, we will execute the SM37 T-code to check the scheduled Job as shown in the following screenshot: Once we process the Job, we will be able to execute the T-code. The Job will be listed with the name of the Job and the user ID.
  • 181.
    The purpose ofthe OM tool The RHINTECHECK tool is a very useful tool to use to check inconsistencies in integration. The missing object type and its relationship, if any, are highlighted, and it allows the consultant to check the configuration settings. All the reports have the standard documentation maintained to explain the report purpose. We can see them by clicking on the Documentation checkbox and then on the Display button.
  • 183.
    Summary In this chapter,we have covered all the interfaces provided by SAP to design and develop the organizational structure. We have learned various T- codes and table names to configure the OM submodule. We have also covered the data-transfer tools provided that serve as an integration point between the OM and PA submodules. In the next chapter, we will closely look at configuring the Personnel Administration submodule and explore the standard functionalities provided by SAP.
  • 184.
    Chapter 4. PAConfiguration in Less Than 24 Hours In this chapter, we will explore how Personnel Administration (PA) is configured to meet a client's requirements. We will see how different infotypes are configured to meet the business requirements. In this chapter, we are going to cover the following topics: Personnel Administration infotypes Important infotypes and their configuration Configuring the submodule Configuring personnel action
  • 185.
    Personnel Administration infotypes Infotypeis a four-digit number, and nnnn is assigned to each infotype. The number range 9,000 to 9,999 is reserved for customer and not standard SAP. Personnel administration is everything to do with the master data of an employee. The details of the employee are captured in infotypes. The details of an employee such as personal data, bank details, and address are all captured in infotypes. The employee details such as which associated department he or she belong to, his or her current position, and his or her personal details such as date of birth, residential address, pay details, bank details, and so on, are captured using this submodule. Standard PA infotypes are in the range of 0000-0999. Each number has a name associated with it. For instance, 0002 is personal data. We will cover all the mandatory infotypes in the following chapters. Customer or customized infotypes are in the range of 9,000-9,999. There are some country-specific infotypes such as court orders/student loans GB (infotype 0070), which is specific to Great Britain.
  • 186.
    Important infotypes thatare mandatory and their configuration steps There are some important infotypes that need to be maintained for processing the payroll and time. They are as follows: 0000 (Actions) 0001 (Organization Assignment) 0002 (Personal Data) 0006 (Address) 0007 (Planned Working Time) 0008 (Basic Pay) 0009 (Bank Details) Tip The 0003 infotype (Payroll Status) is created automatically when the hiring action is performed; we will learn about this infotype in the following chapters.
  • 187.
    Functions of infotypes Let'squickly cover the functionalities of each infotype in detail. The 0000 (Actions) infotype The Actions infotype is an important infotype that captures the activities surrounding an employee from, say, hiring to separation. When the employee is hired, the action type is "hire", and when there is another activity such as promotion or reassignment that needs to be performed, then again there is a different action type. Each action has a start and end date to capture the history of the activities. Let's say the hire action is performed on January 01, 2013 (the start date). Another action is performed, for example, the employee is promoted on December 01, 2013. In this scenario, there will be two line items to capture the history. The Actions infotype also clearly illustrates the reason for performing a particular action. For example, hire can be an action type, and the reason for performing the hiring action could be replacement. These fields are very useful for reporting and administrative purposes, as demonstrated in the following screenshot:
  • 188.
    Tip Important activities suchas change of address, addition of a family member, change in bank details, and so on, are not considered as actions but as part of the master data maintenance. The Actions infotype also has an important configurable field that shows the employment status of an employee with the company. They are standard SAP values, and each one has a meaning. The standard employment statuses are as follows: Active Inactive Retiree Withdrawn Tip The status is maintained in the T529U table, and it can be accessed via SE16 or V_T529U in the SM30/31 T-code, as demonstrated in the following screenshot: Multiple actions can be performed in a single day. However, the status of the employee cannot be changed from active to inactive on the same day. Virtual infotype and Additional Actions infotype 0302 are used to take advantage of the functionality of capturing multiple actions on the same day. The 0001 (Organization Assignment) infotype
  • 189.
    The Organizational Assignmentinfotype is of prime importance, because it holds key employee information such as the geographical location, position, department, and so on. It's one of the key infotypes for both organizational and administrative purposes. This is an important infotype for the control of payroll and for authorization purposes. This infotype has employee integration in the following structures: Enterprise structure Personnel structure Organizational structure The enterprise structure is the connection between the company and company code (legal entity or profit and loss) level. The personnel structure demonstrates the connection between the employee and employer. The organization structure is the functional connection of the employee or, in other words, the employee positioned in the company. The integration point between PA and OM applies in this infotype, as demonstrated in the following screenshot:
  • 190.
    The important payroll-relatedcontrol feature, payroll area, is captured in these infotypes. This helps all the employees to be grouped together when the payroll is processed. The master cost center is default in this infotype. This infotype also holds the key to an organization; this key can be used for authorization purposes, if necessary. The 0002 (Personal Data) infotype The Personal Data infotype is used to capture an employee's first name, last name, marital status, and date of birth. Tip The start date of Personal Data infotype is the birth date. If we note, in this case, the date of birth of the employee is September 05, 1960, and the start date of the employee is September 05, 1960. The 0006 (Address) infotype The Address infotype is used to capture the permanent and temporary addresses of the employee. The address entered is also used in the 0009 (Bank Details) infotype. This is demonstrated in the following screenshot:
  • 191.
    The 0007 (PlannedWorking Time) infotype The Planned Working Time infotype is used to capture the work schedule of the employee. Using this infotype, the employee's stipulated working time can be captured. This is a crucial infotype that is useful for payroll. The holiday calendar is linked directly/indirectly through this infotype. The daily/weekly work pattern is captured in this infotype. We can also get the total amount of work done on a daily, weekly, and monthly basis through this infotype. This is customized by navigating to IMG | Time Management | Work Schedule Rule | Work Schedule Rules and Work Schedules. We will cover this exhaustively in Chapter 5, Time Management Configuration – Negative Time. The following screenshot demonstrates this infotype:
  • 192.
    The work schedulewill give us a detailed planned working time of the employee. The employment percentage is passed on to the Basic Pay infotype as capacity utilization level. The data flows from the Time Management submodule to the Personnel Administration submodule when the Basic Pay infotype details are maintained in the system, as shown in the following screenshot:
  • 193.
    Tip The T588M infotypescreen control has the feature of hiding or maintaining the required fields of an infotype. It can also be accessed by navigating to SPRO | Personnel Management | Personnel Administration | Customising user interfaces | Change Screen Modifications. The 0008 (Basic Pay) infotype The Basic Pay infotype is used to capture the fixed pay components/earnings drawn by the employee. The employee industry type and physical location- specific details are captured in the form of payscale type and area. The components captured in the Basic Pay infotype are referred to as wage types, and we will cover them exhaustively in Chapter 6, Payroll
  • 194.
    Configuration. For example,housing allowance and conveyance allowance are referred to as wage types, and they have a number and text to identify them. The integration point between time and payroll is also evident in this infotype. We will see the capacity utilization level fed from the value stored in the 0007 (Planned Working Time) infotype. The following screenshot shows the Basic Pay infotype: The basic pay infotype can also be used to see the payslip. The configuration steps will be covered in the forthcoming chapters. The payroll driver program needs the Basic Pay (0008) infotype and the 0007 (Planned Working Time) infotype for calculating the salary gross to net. The 0009 (Bank Details) infotype The Bank Details infotype has the payment method of salary for the employee. The different payment methods that can be maintained are as follows: Cash Check
  • 195.
    Bank transfer The followingscreenshot gives us a clear picture of the Bank Details infotype: The name of the employee is populated from the 0002 (Personal Data) infotype, and the address populates from the 0006 (Address) infotype. The standard bank detail types provided by SAP are as follows: Main bank Other bank details Travel expenses The account number is mandatory if the payment method is bank transfer. Tip The payment is configured normally through the FICO module. However, it can also be done by an HCM consultant in liaison with a FICO consultant. Configuration steps
  • 196.
    The backbone ofPA is a design of best practice enterprise and personnel structure. The design of the enterprise and personnel structure is crucial for both reporting and administrative purposes. It is also critical for processing the payroll and time functionalities. Let's look at the configuration steps of enterprise and personnel structure in detail. What makes the enterprise structure? The following components make up an enterprise structure: Company Company code Personnel area Personnel subarea The company is the client for whom the implementation is done. The company code is designed by the FICO component, and it actually depends on the legal entities of the client, or in other words, it has its own profit and loss statement. A different line of business can be represented as company code in SAP. For example, company ABC can have multiple businesses such as IT services and manufacturing. These two are represented by a company code. The personnel area can either be designed based on the geographical location or functional location. For example, ABC company has its head office in Chicago, USA, and its plant in New York, USA. We can create two personnel areas. The factors that influence the number of personnel areas needed are as follows: At least one personnel area is needed for each country The number of personnel areas needed depends on the reporting requirements It may depend on the number of plants, the number of states in which the company has offices, and so on It may depend on the authorization needs It may depend on the business needs in time management, payroll, and in benefits modules
  • 197.
    Tip Personnel areas andsubareas are four-digit alphanumeric code identifiers with long text. Personnel subareas are a further bifurcation of personnel areas. The business characteristics are normally stored at the personnel subarea level. We will see groupings done in payroll and time management at personnel subareas and employee subgrouping levels.
  • 198.
    What makes thepersonnel structure? The following components make up the personnel structure: Employee group Employee subgroup Payroll area Organization key The personnel structure can be designed for the purposes of both administrative and organization perspectives. The employee group and subgroup define the relationship of the employee with the company. Say, for example, a full-time employee can be designed as employee group, and the different grades can be designed as employee subgroups such as grade A. The payroll area allows us to group employees for whom the payroll is processed at the same time and in the same frequency, for example, monthly, bi-weekly, and so on. Organization key is useful for authorization purpose, and its is a 14-digit key that also defines the enterprise and personnel structure. The Organizational Assignment infotype (0001), as discussed earlier, holds the enterprise and personnel structure data of an employee, as seen in the following screenshot:
  • 199.
    Now, let's lookat the configuration of enterprise and personnel structure in detail. The company and company code is created by a FICO consultant. However, we will see the steps for understanding it better. The company is defined by a four-digit alphanumeric code, which represents the unit designed according to commercial and labor law. A company can have "N" number of company code (legal entities) that can be accessed by navigating to SPRO | Enterprise Structure | Definition | Financial Accounting | Define company. The following screenshot demonstrates this: The company is defined by using a six-digit code. The long text is of 30 characters, and it can be alphanumeric. Tip The best practice is to copy entries and rename entries (click on copy or press F6). The following screenshot shows the list of entries for the company:
  • 200.
    The next stepis the creation of the company code. It can be accessed by navigating to SPRO | Enterprise Structure | Definition | Financial Accounting | Edit, Copy, Delete, Check Company Code. The company code is below the company, and there can be "N" number of company codes mapped to a company, as shown in the following screenshot: When the copy option is chosen, the related tables are automatically filled with entries, so it is advisable and the best practice in order to prevent a "No
  • 201.
    entry in table"error while performing a configuration. This is shown in the following screenshot: There will be many associated tables when an object is copied. The frequent pit falls while configuring could be "Customizing Error" or "No entry in table" error messages. Now, when we click on copy, it will ask us to enter the company code, as shown in the following screenshot: We need to give from the company code say, 1,000, and the company code is the one FI consultant creates which is, 9,000. The system throws a warning message; we need to click on Yes to proceed and confirm.
  • 202.
    If we wishto allocate the same chart of accounts to the new company that we are defining, then we can click on Yes, or we can click on No, as shown in the following screenshot: All the associated tables get copied when the action is performed. The objective here is to assign a different currency to the target company code we copied. Say, the reference company currency is Euro, while the target company code currency is USD. The system prompts a message that the copy action has been successfully carried out, as demonstrated in the following screenshot: The other details about the company code such as the address, phone number, and so on can be entered by clicking on address (Shift + F5). The details that we enter here will be useful for reporting purpose. The following screenshot shows the various fields that are to be filled:
  • 203.
    We have todefine the personnel areas, subareas, employee group, and subgroups to do the assignment. The design of enterprise and personnel structure is critical for the successful implementation of the project and mapping the client process in SAP. The best practice is to try out multiple designs before the blueprint is submitted to the client for execution. The personnel area and subareas are defined by navigating to SPRO | Enterprise Structure | Definition | Human Resource Management | Personnel Areas. This is shown in the following screenshot:
  • 204.
    The personnel areadefined can be used for reporting purpose, and they are organized according to the aspects of payroll, time, and personnel. It can be specific either to the geographical location or functional location. It is based on the client-business process and setup. We can copy the entries from the existing SAP standard delivered personnel area and rename these entries to your customer-specific entries, as shown in the following screenshot: Click on Copy, delete, check personnel area, and give the form to the personnel area. "From" is basically the SAP standard personnel area, while" To" is the customer-specific entry. It is a four-digit alphanumeric code with the text name, as shown in the following screenshot:
  • 205.
    The personnel subareaholds the business characteristics. We use it for payroll and time, hence, it's critical that we get our design of the personnel area and subareas correct to have a smooth configuration and mapping of the business process in SAP. A personnel area can have "N" number of personnel subareas. The personnel subarea is defined by navigating to SPRO | Enterprise Structure | Definition | Human Resource Management | Personnel Subareas. This is shown in the following screenshot: Tip The best practice is to prepare a Key Data Structure (KDS) in Excel. Copy and paste it in a table; it can save a lot of time and effort. Click on Create Personnel Subarea and choose the personnel area for which the personnel subareas are mapped. This is demonstrated in the following screenshot:
  • 206.
    When we startdefining the employee group and employee subgroups, we are ready with the personnel structure. The employee group is defined by navigating to SPRO | Enterprise Structure | Definition | Human Resources Management | Employee Groups. This is shown in the following screenshot: The employee group can also be defined directly via the T501 table. It is a one-digit alphanumeric code. It can also be a special character, as shown in the following screenshot:
  • 207.
    The employee subgroupis defined by navigating to SPRO | Enterprise Structure | Definition | Human Resource Management | Employee Subgroups. It's a two-digit alphanumeric code and is mapped to employee group created in the earlier step. It is shown in the following screenshot: The configuration of enterprise and personnel structure is complete only when the mapping is done between company code, personnel area, employee group, and employee subgroups. The assignment of company code to the company is done by navigating to SPRO | Enterprise Structure | Assignment | Assign company code to company. It is demonstrated in the following screenshot: When the employee is hired, the company and the company code, by default, are automatically based on the mapping or assignment that is done in this step. This is shown in the following screenshot:
  • 208.
    The personnel areais assigned to the company code. The mapping of the employee group and subgroup is done in the next step, as shown in the following screenshot: This assignment determines the employee company code mapping that happens through personnel area, as shown in the following screenshot: The employee group and employee subgroups have an added feature of maintaining the permissibility-per-country grouping. The standard country (Molga) grouping numbers in SAP are, for example, USA-10 and Germany- 01. This is shown in the following screenshot:
  • 209.
    The allowed flagserves as an input check when the employee grouping is mapped to the employee. The flag denotes that it's permissible for country grouping, while unflag means that it's not permitted.
  • 210.
    Tips and tricksthat will be handy while configuring the submodule We will learn the configuration steps for the PA mandatory infotypes. The first thing that is required is customizing of a number range. It's an eight- digit numeric code and is created by navigating to SPRO | Personnel Management | Personnel Administration | Basic Settings or directly via the PA04 T-code.
  • 211.
    Recommendation on numberrange assignment We will now see the recommendation on number assignment. The following key ideas need to be adhered to: During the hiring process, if the system generates an employee number, then it is called "internal number assignment". This method is recommended as part of the SAP implementation when a company wants to have uniformity of number assignment with more digits. A company has a number of third-party systems where employee numbers are maintained and used in lot of interfaced programs. In such cases, it is important and necessary that we maintain the same employee numbers in SAP as well. In this case, we use the concept of external number assignment. In some cases where a company has multiple office locations, we may use external number assignment for some locations, and we may use internal number assignment for other locations. As a PA consultant, you have to discuss the number range and the number of digits to be used with the client. The following screenshot shows the number range assignment: The OM and PA number range concepts are the same. We flag whether it's external (manually inputted by the user) or internal (system generated). This is shown in the following screenshot:
  • 212.
    The feature usedfor default number ranges is NUMKR. The return value is the two-digit code that is maintained in the NRIV table via the SE16 T-code. Tip The number ranges are maintained in the NRIV table and are accessed via the SE16 T-code. The RP_PREL object name is for PA and RP_PLAN is for OM. The preceding table has the number range code and number range series based on which it gets executed when the hiring action is performed for an employee.
  • 213.
    Configuring mandatory infotypes First,let's look at personal data by navigating to SPRO | Personnel Management | Personal Data | Personal Data | Create forms of address. This is shown in the following screenshot: The address table T522G also has the gender category that is configurable. The standard possible entries provided are as follows: Permitted for males only Permitted for females only Permitted for males and females The address table T522G is shown in the following screenshot: The marital status of the employee can also be configured by navigating to SPRO | Personnel Management | Personal Data | Personal Data | Create marital status or via the V_T502_T T-code, as shown in the following screenshot:
  • 214.
    This table isfreely configurable according to the client's requirement, as shown in the following screenshot: The Addresses infotype is accessed by navigating to SPRO | Personnel Management | Personal Data | Addresses | Create address types. The following screenshot demonstrates this: The 0006 Addresses infotype can be used to capture the temporary and permanent addresses of the employee. The subtypes are a further classification of infotype, and in this case, the different address types are mapped as subtypes in SAP. This concept is demonstrated in the following screenshot:
  • 215.
    The regions andcountries are standard SAP-delivered entries, and it is recommended that you retain the same and not make any changes. This is demonstrated in the following screenshot: The country key in Addresses (0006) infotype is maintained by navigating to SPRO | Basic settings | Create countries /countries of birth/nationalities. The country global parameters table, V_T005, has the standard entries maintained. For instance, The United States of America is maintained as US.
  • 216.
    Note Every employee masterdata must contain the Addresses infotype with subtypes and the permanent address. During payroll processing, in the "preprogram DME" step, the system checks the permanent address of the employee master data. If the permanent address is not maintained, the preprogram DME will generate error messages. The employee mode of payment is captured in the Bank Details infotype (0009). The countrywise standard SAP entries are as follows: C check T bank transfer Cash
  • 217.
    The payment methodis normally configured by an FI consultant and is defaulted using the ZLSCH feature. The payment method gets defaulted in 0009, and the infotype is maintained. The standard entry is "main bank", and this is configured by navigating to SPRO | Personnel Administration |Personal Data | Bank Details | Create bank connection types. The following screenshot demonstrates this: The Organizational Assignment infotype (0001) is an important infotype that holds the key characteristics of an employee, such as personnel area, subarea, employee group, and employee subgroup. The Organizational Assignment infotype is configured by navigating to SPRO | Personnel Management | Organizational Data | Define employee attributes or via the V_503_H T-code. The employment status, raining status, and activity status are standard entries, and only if necessary, SAP recommends customizing them. This is shown in the following screenshot:
  • 218.
    The standard entriesin SAP are for the status of an activity. They are as follows: Active employee Retiree Early retiree Others Part-time work for retirees The standard entries in SAP for employment status are as follows: Industrial worker/hourly paid worker Salaried employee Civil servant Others The control record and payroll area are critical customizable objects for payroll and reporting purposes. The payroll is created for mapping an employee whose payroll is processed in the same frequency and on the same date, say, monthly or biweekly for that matter. Every payroll area must have a control record. The control record controls how the payroll is processed. They are configured by navigating to SPRO | Personnel Administration | Organizational Data | Organizational Assignment | Create payroll area or via the V_T549A T-code. The following screenshot shows this:
  • 219.
    We can groupthe employees together and map them to a payroll area so that it is easy to process for a group of employees in one shot. The control record determines the current period for which the payroll is processed. It also determines the payroll period past date, up to which the system allows you to make changes to the master and time data and is called as Retro in SAP. There are multiple statuses in control record such as "released" for payroll, which means master and time data is locked, and the correction of master data is not possible. The release of correction implies that the system allows us to make corrections to the master and time data, and exit payroll means that we are done with processing the current payroll period, and it can be exited. The incorrect personnel numbers are captured in match code "W". The system captures incorrectly processed employees during payroll. This needs
  • 220.
    to be corrected,and we need to rerun the payroll for the same. The earliest retro period in control record determines how far back in time the system can allow us to make corrections to processed payroll periods. The Basic Pay (0008) infotype is crucial for processing the payroll and is configured by navigating to SPRO | Personnel Management | Personnel Administration | Payroll Data | Basic Pay. The following screenshot demonstrates this: The employee subgroup grouping for personnel calculation rule (PCR) and collective agreement provision (CAP) is the cornerstone for processing payroll PCR. We can group employees based on different rules and regulations set. They are maintained by navigating to SPRO | Personnel Management | Personnel administration | Payroll Data | Basic Pay | Define EE Subgroup Grouping for PCR and Coll.Agrmt.Prov or directly via the V_503_B table. This is shown in the following screenshot:
  • 221.
    The payscale type,area, groups, and levels are configured by navigating to SPRO| Personnel Management | Personnel Administration | Payroll Data | Basic Pay | Check PayScale Type/Area or via the T510G/T510A T- code. A payscale type defines the industry in which the client is operating, such as metal for example, while the pay scale area defines the physical work location of the client. This is shown in the following screenshot: The pay components are defined as wage types in SAP. For example, housing allowance is defined as the "8888" wage type number followed by text to identify the same. Wage types are created using the tool that SAP has provided. This tool is accessed via the PU30 or OH11 T-code or by navigating to SPRO | Personnel Management | Personnel Administration | Payroll Data | Basic Pay | Wage Types. This is shown in the following screenshot:
  • 222.
    Tip There are manyassociated table entries that get copied when the tool is used. We see the associated table entries in the following screenshot:
  • 223.
    The wage typetexts are normally stored in the T511 and T512 series tables, while the assignment of wage type grouping, base type valuation, and so on are stored in T52 series tables. The Planned Working Time (0007) infotype serves as an integration point between the Time Management and Payroll submodules. Planned Working Time has the work schedule of the employee. This is entangled with public holidays and the working time for a week, month, and so on. It is configured via the Time Management submodule that we will be covering in the next chapter. The work schedule rule that we generate becomes the default one in the Planned Working Time (0007) infotype. The Planned Working Time (007) infotype is configured by navigating to SPRO | Time Management | Work Schedules | Work Schedule Rules and Work Schedules, and is shown in the following screenshot:
  • 224.
    Customizing the infotypemenu and info groups The infotype menu is the one that the user sees in PA30. There are different tabs that can be maintained and different infotypes can be defaulted under each tab. This functionality is provided for simplifying the user maintenance of master data of the employees. Infotype menus are configured by navigating to SPRO | Personnel Management | Personnel Administration | Customizing Procedures | Infotype Menus | Infotype Menu. This is shown in the following screenshot: The menu can be or cannot be maintained based on the user group of the user. Tip The SU3 or SU01 T-code is used to maintain the UGR. If we would like to have the menus dependent on a particular user group, SAP has a functionality to meet this requirement. Say, a particular menu is applicable for only a group of users mapped as UGR 10; in this case we have to configure the settings by navigating to SPRO | Personnel Management | Personnel Administration | Customizing Procedures | Infotype Menus | Infotype Menu | User Group Dependency on Menus and Info Groups. Should the User-dep. field be flagged, it means the menu is dependent on UGR parameter that is maintained in the SU3 transaction code for the user. This is shown in the following screenshot:
  • 225.
    The advantage ofusing this functionality is when there are multiple client operators in multiple countries. If you would like the users to have enough control and authorization to specific infotype, for specific country infotype, this feature comes in very handy. It is important to know the different menu types provided by SAP. Each character has a specific meaning associated with it. The different menu types are as follows: B: This refers to applicant action menu G: This refers to info group menu I: This refers to infotype menu M: This refers to personnel action menu S: This refers to infotype menu "I" denotes that it is the infotype menu or the header tab of the PA30 or PA20 screen. The infotypes are grouped under each infotype menu. For example, a payroll tab can have the Basic Pay (0008), Recurring Payments and Deductions (0014), and Additional Payments (0015) infotypes grouped, as demonstrated in the following screenshot:
  • 226.
    The infotype listedunder each menu is controlled by navigating to SPRO | Personnel Management | Personnel Administration | Customizing Procedures | Infotype Menus | Infotype Menu. The infotypes such as time-related Planned Working Time time (0007), Absences (2001), and Absence Quotas (2006), can be grouped under Time Menu or tab, as shown in the following screenshot: Infogroups group together infotypes that populate sequentially one after another. Let's say, in order to perform a hiring action, the infotypes such as actions (0000), organizational assignment (0001), and basic pay (0008) need to be filled in by the user. Infogroups can also be based on user grouping such as info menu. They are configured by navigating to SPRO | Personnel Management | Personnel Administration | Customizing Procedures | Actions | Define infogroups. This is shown in the following screenshot:
  • 227.
    The menu typeof the infogroup that needs to be configured is "G". This infogroup can also be made dependent on the user by flagging the user- dependent check box and mentioning the reference user group number maintained in the SU3/SU01 T-code. It is shown in the following screenshot: The infogroup 03 can be used to map all the related infotypes that need to be captured for a hiring action. We will see how the mapping is done in the table via the info menu. The infotypes are configured by navigating to SPRO | Personnel Management | Personnel Administration | Customizing Procedures | Actions | Info Group. This is shown in the following screenshot:
  • 228.
    Here, the usergroup is the UGR parameter that has to be in congruence with the parameter that is maintained in the SU3/SU01 T-code. There are standard operations provided by SAP that can be referenced. They are as follows: Create (Ins) Change (Mod) Delimit (LIS9LIS) LIS9 Lock/Unlock (EDQ)
  • 229.
    Configuring personnel actions Thepersonnel actions are all the activities surrounding the employee life cycle, such as hiring, promotion, change in pay, and separation. They are called personnel actions in SAP. Each action will have the infotype populating sequentially based on the infogroups mapped to the action infotype. The personnel actions in SAP are configured by navigating to SPRO | Personnel Management | Personnel Administration | Customizing Procedures | Actions | Set up personnel actions | Personnel Action Types. This is shown in the following screenshot: Customizing procedures is an important node where infogroups, menus, and personnel actions all can be customized.The personnel action table looks like the one shown in the following screenshot:
  • 230.
    The action typeis a two-digit alphanumeric code with text such as hire, change of position, and so on associated with it. Each action type will have the infogroup code mapped to it, and based on the personnel action chosen by the user, the infotype defaults sequentially. The FC denotes the function character for the personnel action. For example, for hiring, we can use 01, which is the first hiring, and for other actions, we can use 0. SAP-delivered function codes can be used and don't require customizing. They are as follows: '1': This refers to first hiring '7': This refers to first hiring and transfer of data from recruitment '8': This refers to activation of personnel assignment in the host country (for global employees) '9': This refers to activation of personnel assignment in the home country (for global employees) '0': This refers to other actions The SAP standard employment status (STAT2) can be used and will normally fulfill the requirements. The standard entries are as follows: 0: This refers to an employee not with the company 1: This refers to an employee working with the company, but inactive 2: This refers to an employee working with the company, but as a retiree 3: This refers to an employee who is active in the company Based on the personnel action, we can map the status number accordingly. For example, we can use 3 for hiring personnel action and 0 for resignation or separation of personnel action. This is how the PA40 T-code looks when the user executes to maintain the master data:
  • 231.
    SAP also hasthe functionally of defining the reason for each personnel action. For instance, the hiring personnel action can be executed based on multiple reasons such as ramp up, replacement, and so on. They are configured by navigating to SPRO | Personnel Management | Personnel Administration | Customizing Procedures | Actions | Create reasons for personnel actions or directly or via the V_T530 T-code. This is shown in the following screenshot: The possible reasons for each personnel action are maintained in the table and can be used in the PA40 T-code. This will be very useful for reporting purposes, and is shown in the following screenshot:
  • 232.
    The menu createdneeds to be mapped to the standard menu provided by SAP.01, which needs to be used. The following screenshot demonstrates this: The standard menu can be configured by navigating to SPRO | Personnel Management | Personnel Administration | Customizing Procedures | Actions | Change action menu | User Group Dependency on Menus and Info Groups. The menu can be made dependent on the user maintained in the SU3/SU01 T- code. This is shown in the following screenshot:
  • 233.
    All the personnelactions are mapped to the standard 01 menu. This is shown in the following screenshot:
  • 234.
    Dynamic actions These arevery useful for the maintenance of infotypes. They are triggered automatically when a particular change of an infotype is performed. They are configured by navigating to SPRO | Personnel Management | Personnel Administration | Customizing Procedures | Dynamic Actions or directly via T588Z. This is shown in the following screenshot: Tip For more information on configuring personnel action, there is an excellent reference guide, Unleash the Power of Dynamic Actions: Tips and Tricks to Get the Best Results, by Rehan Zaidi. The following screenshot demonstrates an overview of the dynamic action: The infotype and subtype are used to maintain the infotype number for which we want the dynamic action to be triggered. We can also use a specific field name if we want dynamic action to trigger on the changes made to them. There are standard function characters that SAP has delivered, and we can use them in the table. They are as follows: 00: This is used if it is independent of the current function carried out
  • 235.
    02: This isused for change 04: This is used for create 06: This is used for change and create 08: This is used for delete 10: This is used for change and delete 12: This is used for create and delete The standard function characters, along with the indicator for step, form the key for dynamic action. The standard SAP-delivered indicators for steps are as follows: P: This is used to check conditions I: This is used to maintain the record of infotypes W: This is used to set the default values when creating a new record V: This is used to reference to another step F: This is used to call routine M: This is used to send mail Finally, the variable function has to be maintained.
  • 236.
    Summary In this chapter,we covered how to configure master data for employees. We have also covered how to customize info groups, menus, and dynamic actions. In the next chapter, we will closely look at configuring the Time Management submodule and explore the standard functionalities provided by SAP.
  • 237.
    Chapter 5. TimeManagement Configuration – Negative Time We will explore how the Time Management submodule is configured to meet the client's requirements. Time Management deals with recording, reporting, and evaluating the attendance and absenteeism of an employee. Evaluation could be the number of hours worked extra by an employee, and this is determined using the Time Management submodule. The absence and attendance entitlements or quotas are also captured. The Absence Quotas are buckets to collect the leave entitlements. We will cover the important configuration steps, infotypes, and tips to configure the submodule. In this chapter, we will cover the following topics: Various nodes for configuring the Work schedule rule Absence Quotas Customizing tables for the Work schedule rule Customizing tables for Absence Quotas Generating hassle-free Absence Quotas
  • 238.
    Nodes for configuringthe Work schedule rule and Absence Quotas Before we start to cover the important configuration points, let's closely look at the Time Management infotypes in detail. It's important for us to be familiar with the functionalities of Time Management infotypes before starting with the configuration steps.
  • 239.
    Time Management infotypes Theimportant Time Management infotypes are listed in the following table: Infotypes Infotype text 0007 Planned Working Time 2001 Absences 2002 Attendances 2006 Absence Quotas 2007 Attendance Quotas 2005 Overtime 2010 Employee Remuneration Info 2013 Quota Correction 0416 Time Quota Compensation The Planned Working Time infotype (0007) The Planned Working Time infotype has the key details about an employee's work pattern. The work schedule is tagged to the employee based on the configuration, and it gives us details about the daily work schedule, holiday class, and day type. The Time Management Status
  • 240.
    (P0007-ZTERF) controls whetheran employee participates in time evaluation. The following screenshot shows the Work schedule rule section: The following table shows the related text for various indicator values: Indicator Text 0 No time evaluation 1 Time evaluation (Actual times) 2 Time evaluation (PDC) 7 Time evaluation without integration to Payroll 8 External services 9 Evaluation of planned times
  • 241.
    If we arenot going to use the Time Evaluation (RPTIME00) program for accounting time data, we can mention the employee status as 0. If we are not going to integrate time with payroll, then the status can be set to 7, or it is advisable to set the status to 9.When the clock in and clock out time is going to be recorded, the status needs to be set to 1. Plant Data Collection (PDC) is useful to transfer data from the following application components to Time Management: SAP Project Systems (PS) SAP Plant Maintenance and Customer Service (PM/CS) SAP Production Planning (PP) and Process Control (PP/PI) Tip The TMSTA DEFAULT VALUE FOR TIME MANAGEMENT STATUS feature is configured to the default Time Management status based on different parameters. It can be accessed via the PE03 T-code. The Working time details such as the daily working hours, monthly working hours, and so on are also captured in the Planned Working Time infotype. The integration point between time and payroll is the monthly working hours that flows from the Planned Working Time to Basic Pay infotype when personnel action is run for the employee. The daily hours, monthly hours, weekly hours, and weekly work days are configurable items, and when the Work schedule rule is selected, it gets displayed automatically. The following table shows us the fields and values used in the 0007 infotype: Working time Field data Employment percent 100 Daily working hours 8 Weekly working hours 40
  • 242.
    Working time Fielddata Monthly working hours 173 Annual working hours 2080 Weekly workdays 5 From the work schedule, we can see the employee's daily, weekly, and monthly working hours. The Time Management status indicates whether the time data of an employee is processed in the following categories: Time evaluation Processed data passed to Payroll for further processing The Absences infotype (2001) The Absences infotype is used to capture the absence type based on the grouping. It defines the nature of absence such as Sick, Casual, and so on. The absence type is a four-character code that specifies the absence text. The following screenshot shows the Change Absences window:
  • 243.
    The Attendances infotype(2002) The Attendances infotype is used to capture the special attendance reasons such as business trip or training needs, for instance, in addition to the normal work pattern. There is also a special feature for entry screen such as general attendance and attendance with quota deduction. This is controlled in customizing, and we can define the attendance quota from which a specific attendance type must be deducted. The payment data other than the normal cost that is associated with the attendance type maintained for an employee is done in one of the following two ways: Using wage type, the amount can be directly entered and queried in payroll or time evaluation By navigating to Goto | Different payment, where we can enter the amount in the Valuation basis field, as seen in the following screenshot:
  • 244.
    The Absence Quotasinfotype (2006) Absence Quotas are entitlements or buckets that contain the number of days an employee can avail leave. When the absence is recorded in the Absences infotype (2001), the absence gets reduced from the quota automatically. The Absence Quotas infotype has different fields, which are shown in the following screenshot:
  • 245.
    The following tablecontains a description of the various Absence Quotas: Field Description Category The absence quota type that includes sick leave, annual leave, and so on. Quota number The number of days or hours an employee is entitled to take leave. Deduction The Deduction field has the number of leaves that has been availed or used. Deduction from The date from which quota can be deducted when an absence is recorded. Deduction to The date up to which quota can be deducted when an absence is recorded. Neg. deduction to The value going over and beyond the entitlements days can be mentioned here. Say, the entitlement is 40 days and 50 days needs to be recorded; then, we can insert 50 here. The Attendance Quotas infotype (2007) The special attendance of employees that is approved using the 2002 infotype is stored in the Attendance Quotas infotypes. The following screenshot shows the Create Attendance Quotas window:
  • 246.
    The Overtime infotype(2005) The Overtime infotype is used to capture the additional number of hours an employee works in addition to the normal working hours. The hours are queried in payroll and compensated accordingly. The following screenshot shows the Change Overtime window:
  • 247.
    The Employee Remunerationinfotype (2010) The Employee Remuneration infotype is used to capture the wage type and amount that gets processed in payroll. The number of hours or the amount can be specified based on the customized settings for that wage type. The following screenshot shows the Change Employee Remuneration Info window: The Quota Correction infotype (2013) The decrease or increase of entitlements can be controlled using the Quota Correction infotype. Let's say we would like to reduce the number of days generated in the 2006 infotype by 2. We can specify the number of days to be increased or decreased in the Quota number field. There are multiple options provided, and we can make use of them accordingly to meet the requirement.
  • 248.
    Let's have alook at these options in the following screenshot: The following table lists the meanings of the three options available for accrual entitlements: Accrual entitlements option Meaning Increase generated entitlement The number specified in the Quota number field gets added to the existing quotas in the 2006 infotype. Reduce generated entitlement The number specified in the Quota number field gets reduced from the existing quotas in the 2006 infotype.
  • 249.
    Accrual entitlements option Meaning Replace generated entitlement The number specifiedin the Quota number field gets replaced with the existing quotas in the 2006 infotype. The transfer of entitlements can be controlled, and there are multiple options provided by SAP. The Transfer options are as follows: Do not change transfer time: The quota correction does not happen immediately and does not reflect in the 2006 infotype instantly Transfer collected entitlement immediately: The correction reflects in the 2006 infotype instantly when the time evaluation is run for the employee Only transfer quota correction immediately: The correction is effective in Absence Quotas (2006) only in the next evaluation run The Time Quota Compensation infotype (0416) The unused entitlements can be remunerated using this infotype. The No. to compensate field is used to enter the absence entitlements that need to be remunerated, in days or hours. There is also a functionality to control whether the entitlement needs to be remunerated or not. This is done by flagging the Do not account checkbox. There are two specifications provided by SAP that can be used to compensate the entitlements. They are as follows: Automatic compensation Manual compensation In the Automatic compensation method, we mention the quota type and quota number to be compensated. In the Manual compensation method, the quota number that needs to be compensated has to be specified along with the wage type, amount, and currency.
  • 250.
    If we usethe Automatic compensation option to remunerate the quota number, we need to build the PCR and use it in the schema after running the P0416 function. The PCR used for running the P0416 function can be used as follows: ZLEN (PCR name) 3(ESG Grouping for PCR) 1234 (Leave encashment Wage type that holds number) AMT=6789(Wage type) AMT/30 MULTI ANA (Multiply Amount and Number, place it in Amount field) ADDWT 1234(Wage type) The following table explains the logic built for the PCR. The business requirement is that the days used in P0416 need to be multiplied with one day's basic pay and remunerated for the employee. The following table shows the PCR operations with their explanations: PCR Operation Explanation ZLEN This checks whether the PCR is customized to map the business requirement. 3 This is the value of the Employee subgroup grouping for PCR. Please use the number used in SPRO | Personnel Management | Personnel administration | Payroll data | Basic Pay | Define EE subgroup grouping for PCR and CAP (V_503_B-ABART). 1234 The wage type number that has the unused quota number to be remunerated.
  • 251.
    PCR Operation Explanation AMT=6789 The amountin the Basic Pay wage type in Input Table (IT) is assigned for calculation. AMT/30 The Basic Pay wage type amount is divided by 30. MULTI ANA The derived amount is multiplied with the number and stored in the amount field. ADDWT This adds the wage type amount to the subsequent wage type, and if an asterisk is used, it moves to the output table.
  • 252.
    Important nodes and/orcustomizing tables for the Work schedule rule The fixed planned working time of an employee for a particular period of time is captured in the Planned Working Time infotype (0007), and we will closely look at the configuration of the Work schedule rule. Tip The backbone of Time Management is the Personnel subarea grouping and Employee subgroup grouping. The period work schedule has the daily work schedule mapped for 7 days, and the period work schedule is tagged with the Work schedule rule. The daily work schedule is a fixed pattern of work such as 9 a.m. to 5 p.m. The period work schedule is the work pattern followed for the number of days, say 4 weeks.
  • 253.
    The holiday calendar Theholiday calendar must be created by navigating to SPRO | Time Management | Work Schedule | Define Public Holiday Classes. Public holidays need to be defined first and then mapped to a holiday calendar. There are different types of public holidays that can be defined. They are as follows: With a fixed date With a fixed date from a particular date Distance to Easter Easter Sunday Floating public holiday There are plenty of features that can be used while defining the holidays. We can mention whether the holiday falls on a particular day such as Sunday or Not Guaranteed. The Sort Criterion option is very handy when we try to find the holiday that we defined in order to map in the holiday calendar. The Public Holiday Class option has a standard meaning defined and the key for counting absences, the time wage type selection, and the daily work schedule variants. The following table will shows us the meaning of the different holiday classes provided by SAP: Public Holiday Class Meaning Blank Normal working day 1 Full day off 2 Half day off
  • 254.
    Public Holiday ClassMeaning 3-9 Customer specific The short name and long name define the name of the public holiday. The short name is 10 characters in length and long name is 30 characters in length. The following screenshot shows the Create/Change Public Holidays: Floating Public Holidays window: After entering the year, month, day, and choosing options in Guaranteed and Public Holiday Attributes, we need to click on the Insert Date
  • 255.
    button. The createdpublic holiday needs to be inserted in the holiday calendar. We click on the Holiday calendar button and then on Edit. After performing the necessary actions, click on Create (or press Shift + F4) as shown in the following screenshot: Enter the holiday Calendar ID and text, followed by validity, and the From and To dates. To insert the public holidays created in the previous step, we need to click on Assign Holiday. The public holidays created get listed so that we can choose and filter them based on the sort criterion we selected. This is demonstrated in the following screenshot:
  • 256.
    In our case,we have chosen Canada Day as a public holiday. When we click on Assign publ.holiday, as seen in the preceding screenshot, the holiday gets assigned to the holiday calendar, and it looks like the following screenshot:
  • 258.
    The daily workschedule We can say that the personnel subarea grouping field is the key for generating the work schedule. It's done by navigating to SPRO | Time Management | Work Schedules | Personnel Subarea Groupings | Group Personnel Subareas for the Work Schedule. It's a two-digit code that is mapped to the personnel area (PA) and personnel subarea (PSA). The PA and PSA that have the same working policies can be grouped together for easy processing. In the next step, we map the PS grouping with the daily work schedule (DWS) grouping. Say, if 99 is a personnel subarea PS grouping, then we will map 99 with the DWS grouping by navigating to SPRO | Time Management | Work Schedules | Personnel Subarea Groupings | Group Personnel Subareas for the Daily Work Schedule. The actual working pattern of the employee on a given day is defined in the DWS, and it also includes the break schedule. The DWS can be 9 a.m. to 5 p.m. with a 30-minute break as the break schedule, for example. First, we define the break schedule and then map the break schedule in the DWS. It is configured by navigating to SPRO | Time Management | Work Schedules | Daily Work Schedules | Define Break Schedules. We mention the start and end time and the stipulated time as paid or unpaid. The break schedule is a four-digit alphanumeric code along with the PS grouping for the daily work schedule that we defined in the previous table. The following screenshot shows the Change View "Work Break Schedule": Overview window: The unpaid break is the one that is not remunerated, while a paid one is part of the remuneration.
  • 259.
    The DWS isconfigured by navigating to SPRO | Time Management | Work Schedules | Daily Work Schedules | Define Daily Work Schedules. The DWS is a four-digit alphanumeric code along with some text. The Planned working hours field has the total number of working hours per day (9 hours, for example) along with the break times. In the Work break schedule field, the break schedule is mapped. The following screenshot shows the details of the Daily Work Schedule window: If the No planned working hrs. checkbox is flagged, it means that it's a non-working day. The best practice is to copy a DWS and rename it. We
  • 260.
    can flag theNo planned working hrs checkbox to use it in a non-working day such as Saturday or Sunday. The system considers it as zero working hours irrespective of whether the working time, fixed or flexible, is maintained or not. This is one of the improvements made in SAP time recording and evaluation. Earlier, the Daily work schedule class was set to 0 to indicate that it was a day off.
  • 261.
    The period workschedule The period work schedule represents the weekly work pattern followed by the employee. It could be for a week or month depending on the business. The daily work schedule is mapped to the period work schedule by navigating to SPRO | Time Management | Work Schedules | Period Work Schedules. The period work schedule is a four-digit alphanumeric code, and the week number represents the number of the week followed by the daily work schedule.
  • 262.
    The day type Theday type has a defined standard meaning and is used for payment purpose. It can be customized by navigating to SPRO | Time Management | Work Schedules | Day Types | Define Day Types. The standard system has 4 day types defined, and only if required, new day types need to be defined. The standard day types and their text are shown in the following table: Day type Text 0 Work paid 1 Time off paid 2 Time off unpaid 3 Special day 4-9 Customer specific
  • 263.
    The Work schedulerule The employee subgroup grouping, holiday calendar grouping, and personnel subarea grouping form the key when defining the work schedule rule, and this gets populated automatically in the 0007 infotype based on this grouping. First, the employee subgroup grouping is done by navigating to SPRO | Time Management | Work Schedules | Define Work Schedule Rules and Work Schedule | Define Employee Subgroup Grouping. Next is the holiday calendar grouping; this is done by navigating to SPRO | Time Management | Work Schedules | Define Work Schedule Rules and Work Schedule | Define Groupings for the Public Holiday Calendar. The key fields for the work schedule rule generation are the ES, PS, Holiday calendar grouping, and the working time. We define the daily working hours, monthly working hours, and daily working hours in configurable tables. In the work schedule generation, we map the period work schedule. The reference date indicates the date from which we would like to generate the work schedule, and the start point refers to 001 to 007, where 001 is Monday and 007 is Sunday here. Say, if we wish to generate the work schedule from 01-01-2014, which falls on a Wednesday, we will assign the start point in PWS as 003 (Wednesday). The work schedule is customized by navigating to SPRO | Time Management | Work Schedules | Define Work Schedule Rules and Work Schedule | Set Work Schedule Rules and Work Schedules. The work schedule can be generated manually or in a batch by navigating to SPRO | Time Management | Work Schedules | Define Work Schedule Rules and Work Schedule | Generate Work Schedules Manually/Batch. SAP has delivered a standard feature called SCHKZ to default the work schedule rule. The return value based on the different fields based on the enterprise and personnel structure fields forms the default value for the work schedule rule. The TMSTA feature is used to default the Time Management status in the Planned Working Time infotype (0007). The
  • 264.
    different statuses andtheir meanings have been covered earlier in this chapter. We will see the customizing tables that can be accessed for table maintenance using SM30/SM31: Table Node Text V_001P_N Group Personnel Subareas for the Work Schedule T508Z Assignment of PS Grouping for Work Schedules to Daily WS V_T550P Work Break Schedule V_T550A Daily Work Schedule V_T551A Period Work Schedule V_T553T Day Types Text V_503_D Employee Subgroup Grouping for Work Schedule V_001P_M Assign Personnel Subarea to Public Holiday Calendar V_T508A Work Schedule Rule We will ideally be using many Employee subgroups and Personnel subarea groupings in the following nodes:
  • 265.
    Personnel subarea grouping– V_0001_P_ALL Employee sub group grouping – V_503_ALL Personnel subarea grouping – V_0001_P_ALL Employee sub group grouping – V_503_ALL Group Personnel Subareas for the Work Schedule Define Employee Subgroup Groupings for work schedule Group Personnel Subareas for the Daily Work Schedule Group Employee Subgroups for Time Quotas Personnel area and personnel subarea grouping for the public holiday calendar Primary Wage type Personnel area and personnel subarea grouping for absence/attendance Personnel Calculation Rule Group Personnel Subareas for Time Quotas Personnel area and personnel subarea grouping for Substitution/Availability Personnel area and personnel subarea grouping for Absence/Attendance counting MODT is an important PCR that sets the employee subgrouping for PCR. The "where is used" feature (Ctrl + Shift + F3) will show us where the PCR is actually used in the schema. The PAYTP operation can be used to re-assign the value based on the Org assignment that is based on settings in the employee subgroup grouping for PCR/CAP or employee grouping for the
  • 266.
    time evaluation rule.The operation is followed by one of the two variables, X or Y. For variable X (the generalized wage type), there are two standard values, G and V, which are defined as follows: G: The wage/time type is set to "****" V: The employee subgroup grouping is set Variable Y (determines the employee subgroup) takes three values that can be assigned, that is S, A, and other (represented by n). They are defined as follows: S: The employee subgroup grouping from the Time Recording infotype (0050) is set A: The employee subgroup grouping from the employee subgroup grouping table (T503) is set n: The employee subgroup grouping is set to n irrespective of the current value assigned The MODT rule is defined as follows: MODT (Determine groupings) * **** PAYTP A Set ESG for PCR 3 **** MODIF W=01 MODIF T=01 MODIF A=01 MODIF L=01 Thus, based on the ESG grouping for PCR, the rule processes the conditions further.
  • 267.
    Important nodes and/orcustomizing tables for Absence Quotas We have learned, from previous chapters, about absence being recorded in the 2001 infotype and Absence Quotas being captured in the 2006 infotype. When the absence is created automatically, it reflects in the entitlements getting reduced proportionately. We will cover the important customizing steps for the generation of Absence Quotas and automatic deduction of absences. Absences are simply the unavailability of employees to work for various reasons such as sickness, personal reasons, and so on. First, the catalog for absences is created by navigating to SPRO | Time Management | Absences | Absence Catalog | Group Personnel Subareas for Attendances and Absences. This is useful in cases where multiple personnel areas and personnel subareas have the same absences. In the next step, we define the absences such as sick leave, for example. We do it by navigating to SPRO | Time Management | Absences | Absence Catalog | Define Absence Types. There are multiple options provided by SAP for the input checks of absences; we can choose from these options. The standard values are given as follows: First day is day off Minimum duration Last day is day off Maximum duration Non-working period Unit For the First day is an off option, we can choose one of the following options. For example, if we select W, a warning message populates when an absence is created in the 2001 infotype: No message
  • 268.
    W: Warning I: Information E:Error message The preceding options are applicable for the absence entered on the last day and on a non-working day, for instance, on New Year's Eve. The minimum and maximum duration is the number of days that an employee can apply in the 2001 infotype. The absence can be recorded in different units, and they are as follows: Unit Short description Blank Calendar Days K Calendar Days A Attendance and absence days R Payroll days The following screenshot shows the Absence: Input Checks window, which shows the different nodes that were discussed earlier in this section:
  • 269.
    When the Seconddate required option is flagged, it indicates that the Start date and End date has to be entered when an absence is recorded for an employee in the 2001 infotype. We will cover the important customizing nodes used to count absences. We do so by navigating to SPRO | Time Management | Time Data Recording and Administration | Absences | Absence Catalog | Absence Counting | Define Counting Classes for the Period Work Schedule. The counting class for the period work schedule is useful in the counting rule step. For each separate class maintained, we need to create a counting rule and this is how we can have different sets of counting rules, depending on the business requirement. The rules set for the counting class is a very important step for counting the recorded absences based on the different conditions that get satisfied. First, we group employees and personnel subgroups for time quotas by navigating to SPRO | Time Management | Time Data Recording and Administration | Absences | Absence Catalog | Absence Counting | Rules
  • 270.
    for Absence Counting(New) | Group Employee Subgroups for Time Quotas. Thus, employee groups and subgroups for which the same absence quota type is applicable are grouped together for easy maintenance. In the next node, we group personnel areas and subareas for which the same absence quota type is applicable. We do this by navigating to SPRO | Time Management | Time Data Recording and Administration | Absences | Absence Catalog | Absence Counting | Rules for Absence Counting (New) | Group Personnel Subareas for Time Quotas. The rounding absence step can be used to round absences that fall in the upper and lower limit for the purpose of precision, and the rounding rule is mapped to the counting rule. We create a rounding rule by navigating to SPRO | Time Management | Time Data Recording and Administration | Absences | Absence Catalog | Absence Counting | Rules for Absence Counting (New) | Define Rules for Rounding Counted Absences. Say, for example, if the absence calculated is in the range of 1.5 to 2.5, then it needs to be rounded off to 2. The counting rule is an important table that is used to define the different set of rules for calculating payroll days and hours for an absence or recorded absence. It is also useful for quota purpose. We customize this rule by navigating to SPRO | Time Management | Time data recording and administration | Absences | Absence Catalog | Absence Counting | Rules for Absence Counting (New) | Define Counting Rules. Once we do this, the following window appears:
  • 271.
    The applicability ofrules works on different conditions set and met. The counting rule is a three-digit alphanumeric code and sequence number. We can set different conditions and accordingly assign the sequence number; the system checks the conditions one after another until a particular condition is met. The conditions of the current day are checked, for example, if this rule is applicable on a particular day between Monday to Sunday based on the day that we flag. We need to flag all the days if we want the rule to be applicable irrespective of the day in question. The Holiday class option is checked against the public holidays that are defined in the SCAL T-code (Holiday calendar). Say, there's an absence created on January 1, 2014, and we have created a holiday on the same day and flagged it as Holiday class 1, which is a normal public holiday. Now, the system compares this with the holiday created and doesn't count it as an
  • 272.
    absence. We areactually instructing the system to also check on a public holiday based on the flag. If all of them are flagged, then the system checks all the days. The day type's functionality is specifically for the purpose of payment, and day type rules are used in work schedule rules. This again can be queried using different flags set. The following screenshot shows the conditions for the work schedule: The Counting class 0 checkbox has been previously used to check planned non-working days, and we have also seen the improvements made. Hence, it's redundant now. The recommended practice is to check all the entries and
  • 273.
    uncheck the onesthat we feel won't be required. This helps in preventing attendance/absences from not being counted by mistake. If planned hours such as Sunday need to be counted, then we use the Planned hours = 0 flag. We have to flag both the entries to satisfy the condition. If we want the absences that are lesser than a full day to also be counted, then we need to flag the < 1 day option; or, both the entries must be flagged. The rounding rule is used for rounding absences and is mapped in the counting rule, while the Quota multiplier option is used to satisfy two of the following conditions: To determine the payroll hours and days To count the absences and attendances for quota deduction Based on the counting rule defined, we map it to the related absence type. The connection flows from the counting rule to the absence type to the deduction rule that holds the quotas that are mapped to the counting rule. Finally, the counting rule is mapped to the absence type by navigating to SPRO | Time Management | Time Data Recording and Administration | Absences | Absence Catalog | Absence Counting | Assign Counting Rules to Absence Types. The following screenshot shows the Absence: Counting and Quota Deduction window:
  • 274.
    If we wouldlike the quota to be deducted when an absence is recorded, we need to check the Quota deduction flag. The Deduction over interval end option indicates that the system allows us to deduct absences more than the entitlement, instead of throwing an error. There are multiple tables that control quota that can be deducted over and beyond the entitlements.
  • 275.
    Absence Quotas generationrule configuration We will see how the Absence Quotas entitlements and generation rules are configured in the following steps. There are three important customizing steps that need to be performed to generate quotas. They are as follows: Base entitlements that give us the number of days an employee can avail for a particular period such as a calendar year Validity and deduction intervals Generation rules for quotas We will see them in this chapter as we move along. The prerequisite to Absence Quotas is the grouping of personnel subarea and employee subgroup, and it's done by navigating to SPRO | Time Management | Time Data Recording and Administration | Managing Time Accounts Using Attendance/Absence Quotas | Setting Groupings for Time Quotas | Group Employee Subgroups for Time Quotas. Just as we maintained employee groups and subgroups earlier, similarly, we group the employee groups and subgroups here. Similarly, the personnel areas and subareas are grouped together, thus having the same Absence Quotas. They are customized by navigating to SPRO | Time Management | Time Data Recording and Administration | Managing Time Accounts Using Attendance/Absence Quotas | Setting Groupings for Time Quotas | Group Personnel Subareas for Time Quotas. The quota types (entitlements) such as sick leave and annual leave must be defined first by navigating to SPRO | Time Management | Time Data Recording and Administration | Managing Time Accounts Using Attendance/Absence Quotas | Time Quota Types | Define Absence Quota Types. The different measures of time that SAP has provided are Hours and Days. The entitlements over and above this can be defined in the Neg. ded. to field, as shown in the following screenshot:
  • 276.
    The input forthe Absence quota type field is a two-digit alphanumeric code. The Absence Quotas are accrued based on the customization. SAP has provided multiple ways of accruing quotas, and they are as follows: When not considering time evaluation, use the RPTQTA00 report When considering time evaluation, use the time evaluation driver PT60 T-code In order to generate quota without time evaluation, that is, using the RPTQTA00 report, we use the No generation radio button to control it. If we would like to generate quota using the time evaluation driver, we use the Increase or Replace radio button. We customize it by navigating to SPRO | Time Management | Time Data Recording and Administration | Managing Time Accounts Using Attendance/Absence Quotas | Calculating Absence Entitlements | Automatic Accrual of Absence Quotas | Permit Generation of Quotas in Time Evaluation. The following screenshot shows the Absence Quota Type window:
  • 277.
    The entitlements overand above this can be defined in the NegDed (Negative deduction) field. The No generation, Increase, and Replace fields have a specific functionality associated with it. The No generation flag indicates that the Absence Quotas are maintained manually or using a report. Tip If we have the Increase or Replace flag checked, the quotas cannot be generated using the RPTQTA00 report. The Time Constraint (TC) class has specific meaning associated with it. The collision checks are controlled via the TC class. Say, for example, an absence is recorded for an employee on January 1, 2014, and on the same day, another attendance or substation is recorded. In this case, the system checks the class and controls the entry. All the Time Management infotypes (2001 to 2012) can be controlled via the table views, Time Constraint Reaction (V_554Y_B) and Global Time Constraint Reaction (V_T554Y). The reaction indicators determine the way the system reacts when there is an overlapping of time records in infotypes, and the specifications are as follows: Specification Text A The records get delimited
  • 278.
    Specification Text E Thesystem doesn't allow us to create a new record W The old record remains unchanged, and the system allows us to create a new record N Same as W, and collision checks are not displayed The important rules that control the generation of quotas are defined later on. The maximum limits or entitlements are defined by navigating to SPRO | Time Management | Time Data Recording and Administration | Managing Time Accounts Using Attendance/Absence Quotas | Calculating Absence Entitlements | Rules for Generating Absence Quotas | Set Base Entitlements. We can define the rules for constant in days or hours for each leave quota that serves as a prorating absence for the accrual period. It's a three-digit code that has the quota mapped to it, for example, for sick leave. The entitlements can be defined as constant, say, 15 days, and related to the period of absence, we can set whether we want it to be accrued on a prorate basis or in lump sum advance. The base entitlement also has the additional feature of defining it based on two of the following options: Seniority Age Seniority is the duration of stay in the company/client based on which the quotas get accrued, say, for example, for 1 to 2 years it's 10 days, while for 2 to 3 years it's 20 days. If we would like the rule to be set based on the Age feature, say 20 to 30 years, a certain amount of leave needs to be accrued. Then, we can make use
  • 279.
    of this provision.The following screenshot shows the Base Entitlement for Absence Quota Generation window: The base entitlement related to period is as follows: Calendar year: One full year from 0101XXX to 3112XXXX Accrual period: The period based on which the accrual must take place Time evaluation period: The period is specified by navigating to SPRO | Personnel Time Management | Time Evaluation | General Settings | Determine Time Evaluation Period and is queried when this option is flagged Payroll period: Based on the payroll area, the payroll period that is valid for the current period is queried
  • 280.
    Other period: Thisis based on period parameters defined in customizing Rel. to date type: This is referenced to the 0041 date specification, and the length can be defined by defining the period of time more specifically Tip The Base entitlement (V_T559E), Determine validity and deduction intervals (V_T559D), Reduction rules (T559M), and Rounding rules (V_T559R) can also be defined directly by going to the Selection rule table (V_T559L). The validity and deduction periods for Absence Quotas define the "from" and "to" periods for which the quotas are valid and the period in which the quotas can be deducted. Say, between 01/Jan/XXXX and 31/12/XXXX, the quotas can be deducted. The validity intervals are defined more precisely using the standard options available. The validity and deduction intervals are configured by navigating to SPRO | Time Management | Time Data Recording and Administration | Managing Time Accounts Using Attendance/Absence Quotas | Calculating Absence Entitlements | Rules for Generating Absence Quotas | Determine Validity and Deduction Periods. The following screenshot shows the Determine Validity and Deduction Periods window:
  • 281.
    There are acouple of more options to choose from, which are different from the Base entitlements period that we saw, and they are as follows: Base period Transfer Time The rounding rule is a two-digit alphanumeric code and is used to round off the generated quota entitlements. We can define the values of Lower limit, Upper limit, and Target value, for example, if we would like the quotas between 1.5 and 1.75 to be rounded off to 2. The Rounding rule is customized by navigating to SPRO | Time Management | Time Data Recording and Administration | Managing Time Accounts Using Attendance/Absence Quotas | Calculating Absence Entitlements | Rules
  • 282.
    for Generating AbsenceQuotas | Define Rules for Rounding Quota Entitlements. The following screenshot shows the Rounding Rule window: The Roll. field indicates that the rule is applicable for all the intervals defined in the table. When the Incl. field is flagged, it indicates that the upper or lower limit is included in the calculation. Finally, we define the selection rule by navigating to SPRO | Time Management | Time Data Recording and Administration | Managing Time Accounts Using Attendance/Absence Quotas | Calculating Absence Entitlements | Rules for Generating Absence Quotas | Define Generation Rules for Quota Type Selection. The following screenshot shows the Generation Rules for Quota Type Selection window:
  • 283.
    The prerequisites arethe Base Entitlements, Absence Quotas, and validity and deduction periods that are defined before customizing the selection rule table. We will find multiple tabs for customization; they are as follows: Applicability Accrual Period Base Entitlements Accrual Entitlements Total Entitlements
  • 284.
    The entry dateis defined in the Applicability tab. For example, we can give 01011900 to 31129999 as the entry date. The Accrual Period tab we defined will be used if the entitlements are prorated on the following basis: Daily: In this case, the entitlements are divided by 365 days Month: The base entitlements are divided by 12 calendar months Calendar year: The entitlements are accrued for the calendar year Time evaluation period: It's according to the customizing step in SPRO Payroll period: It's according to the period parameter Other period: It's according to the period parameter Rel. to date type: It's according to 0041; the accrual period varies The Base Entitlements tab is used to map the rule defined earlier, for which the prerequisites for the selection rule are also the same. The Limit field is defined using this tab. If we would like to generate the quota based on seniority or age, the Key Date for Determining Seniority subtab needs to be customized. The Accrual Entitlements tab indicates whether the quotas need to be prorated or nonprorated. There is also the provision to multiply with day or period balances. There are many options to choose from in the Transfer time tab: Upon accrual Per calendar year Per time evaluation period Per payroll period Other period Date type Transfer rule (this is not applicable for all the countries)
  • 285.
    Tips to generateAbsence Quotas without any hassles The key to customizing absence quota configuration is employee subgroup grouping and personnel subarea grouping. Most of the configuration gets simplified if we use the correct grouping. We have reiterated this throughout the chapter.
  • 286.
    Frequent error messageand workaround Most of the time, we come across the infamous You have not selected any generation rules error error. This error occurs when we use both RPTQTA00 report and the PT60 time evaluation driver T-code. To address this issue, we need to check the following tables via SM30/SM31 or via SPRO: Table Text V_001P_H Personnel subarea grouping for time recording V_T559E Base entitlement for absence quota generation V_T559L Selection rules V_T559D Validity / Deduction intervals for Absence Quotas V_001P_ALL Personnel area / subarea complete view V_503_ALL Employee group / subgroup complete view We come across errors such as Not enough quota for attendance/absence 1000 on 29.03.2011 for personnel no. 00030010, Message no. HRTIM00REC014. There is a note released with the correction instruction; it says OSS 601872 - Error message displays incorrect quota type. We also need to check whether the configuration settings are correct. We also frequently receive errors such as Time evaluation PT60 error STOP: No rule under key $ TP20*****2 S ***. This error clearly suggests that in TP20, the PCR doesn't have the *** absence type added in the rule. This is shown in the following screenshot:
  • 287.
    The best practiceis to copy the rule and rename it, for example, to ZP20. As we can see in the following screenshot, there is a pair type 2 and a process type S for which a decision tree is built. The error, as discussed earlier, is trying to query the Absence type with the *** condition, which is missing in the standard rule, and hence, the system is throwing the error.
  • 288.
    Now, when theZP20 rule is inserted in the schema, the system won't throw the error message. The system is able to query single, double, and triple asteriskes that were missing in the standard PCR. Another error that we bump into is entry no. 83 Error when creating absence quota General information, Rule: 001 quota type 01 Casual Leave, No payroll period for key 19 20100131 when we run a time evaluation. The T549Q tables might not have the start and end date for which the time evaluation is actually run. To fix this issue, navigate to SPRO | Payroll | Payroll XX (XX-localized country like USA for example) | Global Settings | Payroll Organization | Generate Payroll Periods | Generate Payroll Run Period or simply execute the RPUCTP00 report. The following window will appear:
  • 289.
    The RPUCTP00 reportis significant for both Payroll and Time purposes. The parameters included in this report are as follows: Period Parameter: This determines the frequency of payroll such as monthly, weekly, and so on. Date modifier: We can use the following standard ones provided: 00: Standard modifier 01: Standard modifier Start Date: This is the period start date, such as 01012014. Final year: This is the year until which the periods need to be generated. Start date of fiscal year: This is based on the country legal settings. It varies between countries (such as in the Middle East, it's January to December; in India, its April to March). Payday rule: This has the following standard meanings: 1: This adds the number of days to the period start date 2: This deducts the number of days from the period end date 3: This adds the number of days to the period end date
  • 290.
    4: This isused only for monthly periods and the number of days is used as the payment day This field works in conjunction with the Number of days field. Number of days: This is based on the number assigned in the Payday rule field. The days are calculated. For example, if we assign 1 in Payday rule and 1 in Number of days, the system would pick the period end date, say, December. It will pick 31 and add one day to it. So, the payday becomes January 1. Determine period number: This is an indicator to map the period number based on the standard settings provided by SAP, which are as follows: Payment day for period Start date for period End date for period
  • 291.
    Important Time Management-relatedtables We will see the important tables that control the Time Management module in the following table: Table Table Name V_T552V Dynamic Assignment of Daily Work Schedule Assignment V_T554C Employee Grouping for Absence Valuation V_T555A Time Types V_T555E Error Messages V_T555Z Time Type Determination (TIMTP) V_T559P Time Balance Rule Group V_T559L Quotas V_T559P Limits V_T510V Processing Types V_T705A Absence Reasons V_554S_E Absence, Processing, and Time Type classes
  • 292.
    Important functions, operations,and features Functions are technical code or Advanced Business Application Programming (ABAP) code, a logical block used to perform a bigger calculation, and logic is built into it to perform the task. Operations, on the other hand, are used to perform a little bit of calculation, and they can be called as PCR's control behavior. Some of the important functions are given in the following table: Function Text QUOTA The Generate Absence Quotas function is used in the RPTQTA00 report and the Time schema (TM04/TM00). Quota function is called in the 000810 line of the standard TM00 schema and the 000730 line of the TM04 schema. It's based on the T559L settings function quota that generates Absence Quotas. If time evaluation is used, the results are stored in the QTACC and QTTRANS table clusters. CUMBT This function is used to cumulate the results in the Results table (RT). P2001 This function is used to import absence in the internal table TIP for further processing. GWT This function generates wage type from time pairs. P2006 The Process Absence Quotas function is used to query the values in the ABWKONTI internal table for further processing. We will explore some important operations that will be very handy to map the business process in SAP. Operations are very useful to change the data stored in the input table during processing.
  • 293.
    The common typesof operations are given as follows: Decision operations Operations that initiate one or more actions Branch operations Operations to update internal tables Operations to read internal tables Operations to manipulate hours Tip For additional information, refer to The building blocks of SAP Time Evaluation, Dirk Liepold. Some of the important operations are given in the following table: Operation Text COLER Transfer to error table ADDDB Cumulate in day balance table ADDMB Cumulate in monthly balance table ADDZL Cumulate in time wage types tables COLOP Transfer data to internal table TOP HRS Edit Number of Hours Field ROUND Round Clock Times or Number of Hours Field VARST Provide General Fields
  • 294.
    Features, as wehave seen earlier, are used to query fields and return the value. We will learn about some important features related to Time Management; they are as follows: QUOMO: This feature is used to determine the absence quota selection based on the organization assignment. This is queried in the V_T559L- QUOMO selection rule table. MASEX: This feature is used to determine the infotype admissibility for employees. The following turn values are the standard ones defined in SAP: 0: This is allowed for female and male employees 1: This is allowed for female employees only 2: This is allowed for male employees only
  • 295.
    Internal tables andcluster tables used in time evaluation Internal tables are structured data types in ABAP. They are specified completely by the table type, key, and line type. Some of the important tables are given in the following table: Table Text ERT Error message table DZL Generated day types ZML Overtime wage types ZL Time wage types TIP Daily Input TOP Daily Output Cluster tables are not manageable directly using database system tools. In other words, they are data from different tables packed together as a cluster, and they can be accessed via function modules. The function modules can be accessed via the SE37 T-code. Table Text ZES Daily time balances
  • 296.
    Table Text PT TimePairs AB Absences ZL Time wage types Tip RPTERL00 and RPTERR00 are useful reports to check the predefined error messages, or we can also include our own error messages in T555E (Time Evaluation Errors). The category of error messages are standard and provided by SAP as follows: 1: The error set by the COLER operation in time evaluation 2: (No longer used) User-specific message from pair formation 3: A technical error from pair formation 4: A technical error from time evaluation 5: Warnings and notes generated by time evaluation The different messages generated during time evaluation is processed and stored in clusters B1 and B2 as follows: Message Table Cluster Errors, notes, and information from the last run ERT B1 Information that has not been confirmed ERT B1 Notes and information from previous runs FEHLER B2
  • 297.
    Tool to checkthe configuration settings for quota generation SAP has delivered a standard report to check the customizing settings in SPRO for absence quota generation. The RPTQUOTA_CHECK report is accessed via SE38/SA38. The document for the report can be found by navigating to SPRO | Time Management | Time Data Recording and Administration | Managing Time Accounts Using Attendance/Absence Quotas | Calculating Absence Entitlements | Rules for Generating Absence Quotas | Check Customizing Settings for Quota Generation. The report is very useful as it displays the customizing settings used for absence quota generation. It displays the list in a tree structure, which helps to figure out the missing table entries. It doesn't, however, simulate the time evaluation, but the setting is actually displayed. There are three options to choose from when selecting quotas: All the generation methods (with/without time evaluation) Generation during time evaluation (PT60) Generation by the RPTQTA00 report
  • 298.
    Summary In this chapter,we covered all the important Time Management infotypes, from 2001 to 2999. We started off by discussing infotypes. Next, we covered the important customizing steps used to configure Absence Quotas. We also covered frequently occurring error messages and ways to address them. Finally, we learned a few tips to configure the time module. In the next chapter, we will closely look at configuring the Payroll submodule and explore the standard functionalities provided by SAP.
  • 299.
    Chapter 6. PayrollConfiguration Payroll may not be as complicated as it is assumed to be. This chapter will attempt to enlighten you and correct your notion. We will explore how the Payroll submodule is configured to meet the client's requirements. We will cover the important configuration steps, infotypes, posting payroll results to finance, and the tips and tricks to configure the submodule in depth. The following topics will be covered in this chapter: Infotypes that are mandatory for payroll processing The control record Payroll configuration Writing a Personnel Calculation Rules (PCR) Integration of payroll processing with the finance module
  • 300.
    Infotypes mandatory forpayroll processing Before we start to cover the important configuration points, let's closely look at the mandatory infotypes that need to be maintained to process the payroll for an employee. It's imperative to be familiar with the functionality of payroll-related infotypes before starting the configuration steps.
  • 301.
    Payroll infotypes The workcentre basic pay (WPBP) infotype is a critical one, so let's closely look at it: Infotype Infotype text 0000 Actions 0001 Organizational assignment 0003 Payroll status 0007 Planned working time 0008 Basic pay 0027 Cost distribution We will cover the infotype's functionalities in detail in this chapter. The 0000 (Actions) infotype The Action infotype is the first infotype that gets updated when a personnel action is performed for an employee. Actions that affect payroll could be promotion, demotion, and so on. There is a standard function, WPBP- FUWPBP, in the INBD subschema. This function reads the master data and transfers the data to the internal WPBP table. If there is any change in the work centre and basic pay data due to splits, they are indicated by split indicators. The Actions infotype was covered in Chapter 4, PA Configuration in Less Than 24 Hours. The 0001 (Organizational Assignment) infotype
  • 302.
    The Organizational Assignmentinfotype holds the key characteristics of the employee, for example, company code, personnel area, personnel subarea, employee group, employee subgroup, payroll area, and so on. The enterprise and personnel structure was covered in Chapter 4, PA Configuration in Less Than 24 Hours. We will learn the functionality of the payroll area and control record in detail in this chapter.
  • 303.
    Payroll area The personnelarea is grouped together and processed in the payroll area. The payroll accounting area or simply payroll area is a two-digit alphanumeric code. The payroll area has the following functionalities: To determine the specific payroll dates. To determine the specific periods that the payroll is processed for. For example, 01.01.2014 is the start period and 31.01.2013 is the end period. To define the earliest retro accounting period that is possible. To define retroactive accounting, that can be recognized. The payroll area is configured by navigating to SPRO | Personnel Management | Personnel Administration | Organizational Data | Organizational Assignment | Create payroll area or via the SM30/31 T- code in the V_T549A table. The Payroll area table has the following fields: Payroll area Payroll area text Period parameter Period parameter text Run flag Date modifier XX Monthly payroll area Code of the frequency of the payroll such as 01 Text of the period parameter, for example, 01 is monthly Needs to be flagged. Click on Yes to run the payroll. Standard entries are 0 and 1; we can use them to differentiate between the different payment dates Let's look at the functionalities of the fields in the payroll table. The payroll area table has the period parameter mentioned; this parameter determines the frequency of the payroll period such as monthly, weekly, and biweekly, which is defined by navigating to SPRO | Payroll | Basic Settings | Payroll
  • 304.
    Organization | Defineperiod parameters or via the SM30/31 T-code in the V_T549R table. The period parameter table also has the standard time units defined as follows: Time unit Description 01 Monthly 02 Semi-monthly 03 Weekly 04 Biweekly 05 Every four weeks 06 Annually 07 Quarterly 08 Half-yearly The date modifier, on the other hand, has standard entries defined and can be used to differentiate the payroll run based on different dates. In cases where the payroll periodicity is the same (for example, monthly) but the pay dates are different (for example, for one group of personnel, the pay date is the 15th, and for another group, it's the 20th), then the system will need two different date modifiers. Date modifier code Date modifier text
  • 305.
    Date modifier codeDate modifier text 00 Standard modifier 01 Standard modifier 01 The payroll area is defaulted via the ABKRS feature and is configured by navigating to SPRO | Personnel Management | Personnel Administration | Organizational Data | Organizational Assignment | Check default payroll area. The return value is the default payroll area based on the different fields for the decision operation.
  • 306.
    Control record elucidated Thecontrol record controls how a payroll is processed, and every payroll must have one control record created in the system. The control record is defined by navigating to SPRO | Personnel Management | Personnel Administration | Organizational Data | Organizational Assignment | Create control record or via the PA03 T-code. The control record performs the following functionalities in the system: Determines the status of the payroll, for example, if it is in released or exit state, and determines the current period for which the payroll is processed Determines the earliest, retro accounting period It's important to understand the different statuses and their meaning. We will learn them from the following table: Control record status Meaning Released for payroll The master data and time data are locked and changes cannot be performed Released for correction Allows us to make any correction to the master data and time data Exit payroll The control record is exited once the payroll is performed for the particular period Check payroll results Checks whether the payroll has run correctly
  • 307.
    There is alsoa sort field in the control record that is useful to store the payroll run. Every time the payroll is corrected and rerun, it gets incremented. The control record is sensitive, and access is normally restricted to the PA03 T-code. There are also fields to capture the time stamp that can be helpful for audit purposes. These fields are as follows: User ID Date Time Status The control record was also touched upon in Chapter 4, PA Configuration in Less Than 24 Hours.
  • 308.
    The 0003 (PayrollStatus) infotype The Payroll Status infotype is created automatically when an employee is hired. It's an important infotype that needs to be understood clearly, as it controls how the payroll is processed if there is any change in the master or time data. Retro calculation is an important concept that needs to be understood in payroll. Retro is any change triggered due to the master or time data changes made to an employee's record when the period payroll is run. The Payroll Status infotype looks like the following screenshot. PU03 is the T-code used for changing the payroll status, only if it's required. This is shown in the following screenshot: Let's closely look at the fields and their functionalities: Field Description Earl pers RA date This date is the one up to which the system will allow us to make changes to employee's master data
  • 309.
    Field Description Accounted to The periodup to which the payroll has actually run Run payroll up to The period up to which we want the system to process the payroll for an employee Earliest MD change This refers to the master data change period stamp Do not account after The period after which we would not want the payroll to be processed for an employee Payroll correction This is the system's automatic correction indicator when the payroll rejects an employee or changes are made during the correction Pers no locked Personnel number won't be processed by payroll Earl pers rec date This is related to time evaluation Tip Employees who are rejected during the payroll process are captured in the match code "W" functionality (Shift+F8).
  • 310.
    The 0007 (PlannedWorking Time) infotype The Planned Working Time data serves as an input for the 0008 (Basic Pay) infotype. The employment percentage (P0007-EMPCT) and monthly hours (P0007-MOSTD) serve as an integration point for the time and payroll. The payroll fields capacity utilization level (P0008-BSGRD) and working hours per payroll period (P0008-DIVGV) get filled from the Planned Working Time (0007) infotype. The Planned Working Time infotype was covered exhaustively in Chapter 5, Time Management Configuration – Negative Time.
  • 311.
    The 0008 (BasicPay) infotype The Basic Pay infotype is important for payroll processing. The Basic Pay infotype holds the key characteristics of an employee with regard to the payroll. The important fields in the Basic Pay infotype are covered in the following table: Important filed in basic pay Technical name Description Pay scale type P0008- TRFAR The industry in which the client is operating, such as manufacturing Pay scale area P0008- TRFGB The physical work location of the client, such as California Pay scale group P0008- TRFGR This is used to determine different grades for pay scale distinction Pay scale level P0008- TRFST The pay scale levels are a further bifurcation of the pay scale groups Annual salary P0008- ANSAL This just serves as an input field and is not taken into consideration when the payroll is processed by the payroll driver Short text for EE subgroup grouping for personnel calc rules T546T- ATEXT This is grayed, out and it is a control feature for processing the personnel calculation rule Tip
  • 312.
    The annual salaryis configured by navigating to SPRO | Personnel Administration | Payroll Data | Basic Pay | Define annual salary | Relevant wage types for annual salary valuation.
  • 313.
    The 0027 (CostDistribution) infotype The Cost Distribution infotype is designed for the purpose of distributing costs to different Cost Centers other than the master Cost Centre of the employee. The master Cost Centre is normally mapped in Organizational Assignment infotype (0001), and it's overridden when Cost Distribution infotype (0027) is maintained for an employee. This infotype has the provision to mention the breakup percentage between cost centers. However, the percentage cannot exceed 100. Let's look at the important fields that can be maintained in the infotype. The infotype can be accessed via the PA30 or PA20 T-code. The following screenshot demonstrates this: The following table gives information about the various infotypes and a description of them: Field in infotype Technical name Description
  • 314.
    Field in infotype Technical name Description Costs to be distributed P0027- KSTAR Thisdescribes the cost to which the distribution is actually performed. The standard entries are as follows: Wage/salary Travel expenses Company code RHCD_TAB- BUKRS This is defined in FI module, and it's defined as per the profit and loss statements for different entities by the client Cost Centre RHCD_TAB- KOSTL This uniquely identifies the Cost Centre Pct RHCD_TAB- PROZT This refers to the weighting percentage of different Cost Centers Tip The Cost Distribution infotype is only maintained if there is a requirement of distributing costs across different cost centers, else its master Cost Centre is maintained in 0001I. The Cost Centre is created by an FI consultant, which was explained in Chapter 3, SPOCK – the Building Block of OM. In addition to mandatory infotypes that need to be maintained for payroll processing, it is necessary to know a few other infotypes. They are as follows: Recurring Payment and Deduction infotype (0014) Additional Payments (0015) Additional off-cycle payments (0267)
  • 315.
    The 0014 (RecurringPayment and Deduction) infotype The Recurring Payment and Deduction infotype is used to maintain the deductions and payments made to the employee for a particular period of time. If you notice, wage types maintained in the Basic Pay (0008) infotype do not have the provision to delimit the wage type processing for a particular period, say, just one month. In cases where payments or deductions are only for a particular period of time, we can use this infotype. The infotype can be accessed via the PA30 or PA20 T-code. This is demonstrated in the following screenshot:
  • 316.
    The 0015 (AdditionalPayments) infotype The Additional Payments infotype is used for one-time payment purposes. It doesn't have a start date and end date but it does have the date of origin, that is, the date on which the payment must be processed for an employee. The infotype can be accessed via the PA30 or PA20 T-code. The fields that this infotype have are shown in the following table: Fields Technical name Description Wage types P0015- LGART This refers to the components such as basic pay that are displayed in the paystub Amount Q0015- BETRG This refers to the wage type amount for payment purposes, such as 50 USD Date of origin P0015- BEGDA This refers to the date on which this wage type needs to be processed Tip We can maintain a different Cost Centre using the functionality maintain cost assignment (Ctrl+F2). This is shown in the following screenshot:
  • 318.
    The 0267 (Additionaloff-cycle payments) infotype The Additional off-cycle activity is used for payments during irregular payment periods, for example, in the middle of the payroll period. The off- cycle payroll workbench is used to process these scenarios, and the wage type processed using that off-cycle payroll workbench gets stored in the 0267 infotype. The off-cycle configuration steps will be covered in the forthcoming chapters. The infotype can be accessed via the PA30 or PA20 T- code, as shown in the following screenshot:
  • 319.
    Steps to configurethe payroll We have already covered the important infotypes mandatory for payroll processing. We will look at the configuration steps involved to perform the gross and net calculation. SAP has a payroll solution for country-specific versions and generic versions as well. There are localized payroll schemas and international schemas for which localization is not yet released by SAP. Each country has its own payroll driver program and payroll schema that covers various statutory requirements for each country.
  • 320.
    Wage types When wetalk about payroll in SAP, it's very important to understand the functionalities of wage types. Wage types are components or allowances that we see in our paystub, such as basic pay, conveyance allowance, and so on. SAP has provided a tool to create customer-specific wage types. The best practice is to copy model wage types delivered by SAP and rename it to customer-specific wage types. When a new service pack (SP) is released by SAP, it ensures that it does not affect customer wage types. The wage types are created by navigating to SPRO | Personnel Management | Personnel Administration | Payroll Data | Wage Types | Create Wage Type Catalog or using the OH11 or PU30 T-code. Tip Model wage types are prefixed with letters, while customer wage types are prefixed with numbers. The system prompts us to choose a particular method for maintenance. First, we can select Copy and click on Continue (Enter). The three methods available are as follows: Copy Delete Completeness check The best practice is to choose a model wage type from the original wage type column and enter a new wage type such as 9000 in the customizing wage type column, as shown in the following screenshot: The wage types are grouped in the Basic Pay (0008) infotype by navigating to SPRO | Personnel Management | Personnel Administration | Payroll Data | Wage Types | Check wage type group ' Basic Pay' or via the SM30/31 T-code in the VV_52D7_B_0008_AL0 table. The rationale is that by assigning the wage type in this group, the administrator will be able to restrict the wage type used for different infotype groups such as 0008, 0014, 0015 and so on.
  • 321.
    The wage typetext can be checked and corrected if required by navigating to SPRO | Personnel Management | Personnel Administration | Payroll Data | Wage Types | Check wage type catalog | Check wage type text or via the SM30/31 T-code in the V_512W_T table. The wage type's applicability for a particular group of employees can be controlled by navigating to SPRO | Personnel Management | Personnel Administration | Payroll Data | Wage Types | Check wage type catalog | Define Wage Type Permissibility for each PS and ESG or via the SM30/31 T- code in the V_511_B table. This just serves as an input to check which wage type is permissible for certain groups, as shown in the following screenshot: There are three standard options that we can assign from, and they are as follows: Wage type for employee subgroup grouping not permissible Wage type for employee subgroup grouping permissible Wage type for EE subgroup grouping permissible with warning Let's hypothetically say that we assign a blank space for 1 in employee sub group (ESG) grouping. The personnel subarea (PSA) grouping system will throw us an error message when the wage type is mapped for this group. This is performed in conjunction with another two steps: employee subgroups for the primary wage type and personnel subareas for the primary wage type. Let's
  • 322.
    say that weassign a 1 to 9 number range for both EE grouping and personnel subarea grouping for a wage type. This can be viewed by the following path: SPRO | Personnel Management | Personnel Administration | Payroll Data | Wage Types | Employee Subgroups for Primary Wage Type or via the SM30/31 T-code in the V_503_G table SPRO | Personnel Management | Personnel Administration | Payroll Data | Wage Types | Personnel Subareas for Primary Wage Type or via the SM30/31 T-code in the V_001P_K table. There is a feature provided by SAP to default the wage types in the Basic Pay infotype based on the grouping, which is based on LGMST, the Enterprise structure for a wage type model. The return value used in the feature is configured by navigating to SPRO | Personnel Management | Personnel Administration | Payroll Data | Wage Types | Revise Default Wage Types or via the SM30/31 T-code in the V_T539A table. The following parameters are for wages: F: This does not allow the wage types assigned in 0008 to be overwritten O: This allows the wage types entered in 0008 to be overwritten The following screenshot shows the Default Wage Types for Basic Pay screen:
  • 323.
    The 0008 (BasicPay) configuration Let's explore the configuration required to maintain basic pay in employee's master data. The 0008 (Basic Pay) infotype holds the wage types that are paid regularly month on month. It includes the wage types that can be evaluated directly or indirectly, and this gets affected when loss of payment method is created. It is also useful when making a distinction between employees, based on the collective agreement provision (CAP). Tip The Basic Pay infotype can hold only a maximum of 40 wage types. First, it's important that we define the groupings for personnel calculation rule and CAP, which is done by navigating to SPRO | Personnel Management | Personnel Administration | Payroll Data | Basic Pay | Define EE Subgroup Grouping for PCR and Coll.Agrmt.Prov or via the SM30/31 T-code in the V_503_B table. This grouping is very crucial as it serves as a check when a PCR is created. The groupings refer to the same rule that is applicable for a group of employees. This is shown in the following screenshot: The standard values can be used and only changed if necessary, and are maintained in the T546A table via the SM30/31 T-code. The standard delivered values are as follows: 1: This refers to the hourly wage earners 2: This refers to periodic payments (for example, monthly wage earners) 3: This refers to salaried employees The value that we map to employee group and subgroups is default in the 0008 (Basic Pay) infotype and cannot be edited, as shown in the following screenshot:
  • 324.
    The collective agreementprovision (CAP) also has SAP standard delivered entries that can be used. They need to be changed only if the entries don't meet the requirement. The requirements are as follows: 1: This refers to industrial workers/hourly wages
2: This refers to industrial workers/monthly wages 3: This refers to salaried employees 4: This refers to employees in the non pay scale band The CAP are defined by navigating to SPRO | Personnel Management | Personnel Administration | Payroll Data | Basic Pay | Check pay scale type or via the SM30/31 T-code in the V_T510A table, and SPRO | Personnel Management | Personnel Administration | Payroll Data | Basic Pay | Check pay scale area or via the SM30/31 T-code in the V_T510G table respectively. The defined pay scale type and area can be mapped to the enterprise structure by navigating to SPRO | Personnel Management | Personnel Administration | Payroll Data | Basic Pay | Check Assignment of Pay Scale Structure to Enterprise Structure. If the monthly period does not apply to an employee, we have to maintain this step by navigating to SPRO | Personnel Management | Personnel Administration | Payroll Data | Basic Pay | Set up payroll period for collective agreement provision or via the SM30/31 T-code in the V_T510W table. After we set up the CAP and pay scale area, we can also further distinguish among the employees based on their groups and levels. We define this by navigating to SPRO | Personnel Management | Personnel Administration | Payroll Data | Basic Pay | Revise Pay Scale Groups and Levels or via the SM30/31 T-code in the V_T510 table. The prequisite is that we must maintain the pay scale type, areas, and wage types.
  • 325.
    The 0014 (RecurringPayments and Deductions) configuration The wage types that are to be frequently paid or deducted are defined via the 0014 infotype. Let's look at the configuration steps followed for the 0014 infotype. The configuration is very similar to the one followed for basic pay. The steps involved in this are as follows: 1. The wage type catalog can be accessed via SPRO | Personnel Management | Personnel Administration | Payroll Data | Recurring payments and deductions | Wagetypes | Create wage type catalog. 2. The recurring payments and deduction can be accessed via SPRO | Personnel Management | Personnel Administration | Payroll Data | Recurring payments and deductions | Wagetypes | Check wage type group Recurring payments and deductions. Here, we group the wage types in the 0014, Recurring payments/deducts category. This is shown in the following screenshot: 3. The wage type text can be checked and amended by navigating to SPRO | Personnel Management | Personnel Administration | Payroll Data | Recurring payments and deductions | Wagetypes | Check Wage Type Catalog | Check wage type text. 4. We can define the wage type permissibility by navigating to SPRO | Personnel Management | Personnel Administration | Payroll Data | Recurring payments and deductions | Wage types | Check Wage Type Catalog | Check entry permissibility per infotype. There is also a provision to define whether the wage type is going to be used once or multiple times.
  • 326.
    5. We candefine the personnel subarea and employee subgroup that the wage type is accessible for by navigating to SPRO | Personnel Management | Personnel Administration | Payroll Data | Recurring payments and deductions | Wagetypes | Check Wage Type Catalog | Define Wage Type Permissibility for each PS and ESG. We can click on details (Ctrl+Shift+F2) to choose the wage type and make the necessary changes. 6. We can define the wage type characteristics such as payment or deduction wage type by navigating to SPRO | Personnel Management | Personnel Administration | Payroll Data | Recurring payments and deductions | Wagetypes | Check Wage Type Catalog | Check wage type characteristics or via the SM30/SM31 T-code in the V_T511 table. 7. The steps work in conjunction with the values defined in the permissibility of wage types. We define the subgroup wage type for each employee. This is permissible by navigating to SPRO | Personnel Management | Personnel Administration | Payroll Data | Recurring payments and deductions | Wagetypes | Define employee subgroup grouping for primary wage type. 8. We define the wage type for each personnel subarea. This is permissible via SPRO | Personnel Management | Personnel Administration | Payroll Data | Recurring payments and deductions | Wagetypes | Define personnel subarea grouping for primary wage type.
  • 327.
    The 0015 (AdditionalPayments) configuration One-time payment that needs to be settled are paid via the 0015 infotype to the employees. Let's look at the configuration steps followed for the 0015 infotype. The configuration is very similar to one followed for the Basic Pay infotype and recurring payments/deduction. The steps involved in this are as follows: 1. The wage type catalog can be accessed via SPRO | Personnel Management | Personnel administration | Payroll data | Additional payments | Wagetypes | Create wage type catalog. 2. The additional payments option can be accessed via SPRO | Personnel Management | Personnel administration | Payroll data | Additional payments | Wagetypes | Check wage type group Additional payments. Here, we group the wage types in the 0015, Additional payments category, as shown in the following screenshot: The following steps define the various wage type characteristics: 1. The wage type text can be checked and amended by navigating to SPRO | Personnel Management | Personnel Administration | Payroll Data | Additional payments | Wagetypes | Check Wage Type Catalog | Check wage type text. 2. We can define the wage type permissibility by navigating to SPRO | Personnel Management | Personnel Administration | Payroll Data | Additional payments | Wagetypes | Check Wage Type Catalog | Check entry permissibility per infotype. There is also a provision to define whether the wage type is going to be used once or multiple times.
  • 328.
    3. We candefine the personnel subarea and employee subgroup that the wage type is accessible for by navigating to SPRO | Personnel Management | Personnel Administration | Payroll Data | Additional payments | Wagetypes | Check Wage Type Catalog | Define Wage Type Permissibility for each PS and ESG. We can choose the wage type and click on details (Ctrl+Shift+F2) to choose the wage type and make the necessary changes. 4. We can define the wage type characteristics such as the payment or deduction wage type by navigating to SPRO | Personnel Management | Personnel Administration | Payroll Data | Additional payments | Wagetypes | Check Wage Type Catalog | Check wage type characteristics. 5. The preceding steps work in conjunction with the values defined with the permissibility of the wage types. We define the wage type for each employee subgroup. This is permissible by navigating to SPRO | Personnel Management | Personnel Administration | Payroll Data | Additional payments | Wagetypes | Define employee subgroup grouping for primary wage type. 6. We define for the wage type each personnel subarea. This is permissible by navigating to SPRO | Personnel Management | Personnel Administration | Payroll Data | Additional payments | Wagetypes | Define personnel subarea grouping for primary wage type.
  • 329.
    The 0267 (On-demandor Additional Payments) configuration The payment made during the middle of the payroll period or simply on a on- demand basis is maintained in the 0267 infotype. Let's look at the configuration steps followed for the 0267 infotype. The configuration is very similar to the one followed for the basic pay infotype. The steps involved are as follows: 1. The wage type catalog is accessed via SPRO | Personnel Management | Personnel Administration | Payroll Data | Additional payments: Off- Cycle | Wagetypes | Create wage type catalog. 2. The wage type group is accessed via SPRO | Personnel Management | Personnel Administration | Payroll Data | Additional payments: Off- Cycle | Wagetypes | Check wage type group Additional payments. Here, we group the wage types in the 0267, Additional off-cycle Pymt category, as shown in the following screenshot: 3. The wage type text can be checked and amended by navigating to SPRO | Personnel Management | Personnel Administration | Payroll Data | Additional payments: Off-cycle | Wagetypes | Check Wage Type Catalog | Check wage type text. 4. We can define the wage type permissibility by navigating to SPRO | Personnel Management | Personnel Administration | Payroll Data | Additional payments: Off-cycle | Wagetypes | Check Wage Type Catalog | Check entry permissibility per infotype. There is also a provision to define whether the wage type is going to be used once or multiple times. 5. We can define personnel who the subarea and employee subgroup, wage type is accessible for. It is accessible by navigating to SPRO | Personnel Management | Personnel Administration | Payroll Data | Additional payments: Off-cycle | Wagetypes | Check Wage Type Catalog | Define
  • 330.
    Wage Type Permissibilityfor each PS and ESG. We can choose the wage type and click on details (Ctrl+Shift+F2) to choose the wage type and make the necessary changes. 6. We can define the wage type characteristics such as the payment or deduction wage type by navigating to SPRO | Personnel Management | Personnel Administration | Payroll Data | Additional payments: Off- cycle | Wagetypes | Check Wage Type Catalog | Check wage type characteristics. 7. The steps work in conjunction with the values defined in permissibility of the wage types. We define for each employee subgroup wage type, which is permissible by navigating to SPRO | Personnel Management | Personnel Administration | Payroll Data | Additional payments: Off-cycle | Wagetypes | Define employee subgroup grouping for primary wage type. 8. We define the wage type for the personnel subarea, which is permissible by navigating to SPRO | Personnel Management | Personnel Administration | Payroll Data | Additional payments: Off-cycle | Wagetypes | Define personnel subarea grouping for primary wage type. The transaction code used to run the on-demand payroll or off-cycle work bench is PUOC_XX, where XX is country grouping, such as 10 for USA, 08 for UK. The on-demand payroll is processed via the off-cycle work bench, and the program's name is SAPLHRPAY99_OC. The off- cycle work bench is shown in the following screenshot.
  • 331.
    Writing a PCRto meet your customer's requirements In the previous chapters, we covered the configuration steps required to maintain the master data of the employee in relevant infotypes such as 0008, 0014, 0015, and 0267. In this chapter, we will cover the functionality of schema and PCR.
  • 332.
    Schematic payroll schema Theschematic payroll schema is a collection of subschemas that can be logically used for the purpose of calculation. The schemas can be accessed via the PE01 T-code. They can be accessed via the SE11 or SE16 T-code, and they are maintained in T52C0. They are displayed as rows in the table. The schema has the following three subobjects: Source text Attributes Documentation The source text will have the subschemas, and we will be able to see them by clicking on the Display button. The schema can be defined as payroll or time, and it is controlled in the attributes subobject. The program class has the provision to define itself as payroll or time schema. The following list defines this: C: This refers to payroll T: This refers to time management The country-grouping attributes allow us to mention the country for which we are using the payroll, and there are localized country payroll drivers provided by SAP. If the localized solution is not available, we can use the 99 grouping. The schema can be executed; for this, the indicator needs to be flagged. This will generate and run the schema. There is a control mechanism, and if we would like the schema to be changed only by a particular user, we can mention the user ID in the Person responsible field and flag Changes only by person responsible. Any changes made to the schema can also be captured for audit purpose. The Administrative info tab has the details about the user and date stamp. The following screenshot demonstrates this process:
  • 333.
    It is alwaysrecommended that the standard schema is copied to the customer name space before being used. The schema can be copied by clicking on Copy (Shift+F4). We can click on the Where-used list (Ctrl+Shift+F3). The documentation subobject is there for us to write details about each object and schema if required. The standard tool to generate or check schema consistency is the RPUSCG00 report. It can be executed via the SE38 or SA38 T-code or by clicking on Generate (F6). The following are two modes that are available: 1: This is chosen to generate the schemas 2: This is chosen for syntax errors or consistencies There are four options that are available to be flagged. They are as follows: Test run Force generation
  • 334.
    Display clusters Print active Someimportant functions to know when working on a schema are given in the following table: Function Description COM The meaning of the schema line can be mentioned using this function. We don't need to use a parameter when working on this function. COPY The subschema called in par 1 is called dynamically using the COPY function. For example, the main schema is X000, and in that, we can call a subschema, XIN0, using the COPY function. It's important to understand the design and functionalities that are available in the schema. The following screenshot shows what the payroll schema screen parameter looks like: Let's look at the different functionalities of the fields of the schema editor in the following table: Field Description
  • 335.
    Field Description Line Wecan use this to mention the number, or many commands can be entered at the end of the number. For instance, I is used for inserting a new line. Func Function is code of logic developed to perform a major chunk of work. For instance, COPY is a function used to call the subschema. Par1 A more detailed definition of functions can be used by par 1, for example, what the significance is of the function or whether we can make entries or not. Par 2 A more detailed definition of functions can be used by par 2, for example, what the significance is of the function or whether we can make entries or not. Par 3 A more detailed definition of functions can be used by par 3, for example, what the significance is of the function or whether we can make entries or not. Par 4 A more detailed definition of functions can be used by par 4, for example, what the significance is of the function or whether we can make entries or not. D We can use * to have a function deactivated. This determines whether or not a function is to be included when the subschemas are executed during a payroll run. Text This is a free text field to describe the function by adding comments about the schemas.
  • 336.
    The line numberfield we covered earlier in the chapter has more functionality. Let's look at it in detail. The possible combination is as follows: Commands Description I This is used to insert a new line D This deletes the line R This repeats the same line Rn Number of lines gets repeated, where n is a number > Explodes the subschema and is only used in the COPY function < The explosion of a schema The payroll schema has the functions and PCR. The function calls the function modules, and rule has operations that refer to operation modules. Tip Schemas and PCR can be exploded using the RPDASC00 program. This program refers to the T-codes T52C0 and T52C5 and lists the entries as maintained in the table.
  • 337.
    Personnel calculation rule(PCR) Personnel calculation rules are maintained via the PE02 T-code. The important functionality is to determine PCR based on employee subgroup grouping. Let's see how a sample PCR is written and maintained in the schema. The following screenshot demonstrates this: It's recommended that we always select the standard PCR delivered by SAP, and rename it to a customer-specific PCR. The source text has the ESGrp grouping and wage type. The ESGrp is what we defined in V_503_B, and the wage type is defined if the rule is applicable for a particular wage type. We can also use the * and **** function, which means the function is applicable for all the wage types; however, it doesn't work for all ESGrp. We can click on create or edit the PCR. When we click on Create (Ctrl+F3), it will list three options to insert objects. The three options are as
  • 338.
    follows: same level Sub-level Cancel The followingscreenshot lists the three options that we discussed in the preceding bullet list: We will learn the functionality of the program PCR Z010. Here, the PCR checks for EE subgroup grouping for PCR, say if it finds the option 2 2, and it's applicable for all the wage type 2. Next, it uses the VWTCL operation to check the processing class maintained for the wage type; in this case, it checks 01, as shown in the following command line: **** VWTCL 01 1 ADDWT * OT Output table ELIMI ZEliminate time period ID Zero= N amtnumrtetime=0 ADDWT /001 OT Output Table Processing class, cummulation class, and evaluation class are maintained for wage types in the v_512w_d table. If the wage type specification is 1 for pclass 01, then it pushes the amount to the output table. It then eliminates the number and assign it as 0, and adds the amount to valuation basis wage type 001.
  • 339.
    Important payroll functions Thefunction, in general, is a piece of code developed to perform a major chunk of tasks. The following is a list of some important payroll functions that will be very handy: Function Meaning COPY If we want to insert the subschema into the main schema, we can make use of the COPY function. WPBP The work centre basic pay function (WPBP) is useful to import master data from 0, 1, 7, 8, and 27 infotypes to the IT and WPBP internal tables. PGM The PGM function is used to provide information about the type of program. UPD This function can be used to control whether results can be stored in databases. We can set No in par 1 if we would like to test a payroll run. PIT The process input table (PIT)is the function that is used to call a personnel calculation rule. PRT This function calls the PCR for different wage types from the result table.
  • 340.
    Important payroll operations Operationsare developed to perform a small piece of a task. The following is a list of some important payroll operations that will be very handy: Operation Meaning VWTCL The set processing class value is a decision operation based on a specification set in the v_512w_d table. AMT This evaluates the amt field value. It can also be used as a decision operation. NUM This operation evaluates the num field. RTE The data is entered in the rte field by this operation, and it also evaluates the rte field. ADDWT This operation adds the value in the wage type to the subsequent wage type Tip The RPDSYS00 program or the PDSY/PE04 T-code can be used to refer to the documentation for functions and operations.
  • 341.
    Frequent error messagesand workaround During post-implementation support, there can be frequent issues that we come across. Let's discuss some of them and workarounds to address them. The infamous posting error that we frequently get is "Posting balance is not cleared" (period 06/2011 A). To resolve this issue, we will refer to the following table: V_T52EK This refers to the symbolic account and its MOMAG field account assignment V_T52EZ This includes wage type overview plus/minus sign to post a positive amount as debit and a negative amount as credit, respectively OBYE This T-code is used if the symbolic account has been mapped to the correct general ledger The payroll result has already been evaluated in run 0000002259. The workaround is that the posting run PP 0000002259 has to be deleted and a simulation has to be run instead of a live run.
  • 342.
    Configuring a payslip Theremuneration statement or payslip is customized by navigating to SPRO | Payroll (XX) | Forms | Remuneration Statement | Set up Remuneration statement or via the PE51 T-code. The form class chosen is CEDT, and we copy it and rename it to the customer name, and make adjustments. The important subobject that needs to be changed is a single field where we add the fields that need to be included in the paystub. We choose a single field and click on change. We click on Create (F5), and on the Insert Single Field screen, we mention the Table and Table field and click on Transfer (F8). This process is demonstrated in the following screenshot:
  • 344.
    Integration with thefinance module There is a close integration between the payroll and finance modules. Payroll results are posted directly to the finance module to respective general ledgers. Symbolic accounts serve as an integration point between the payroll and finance modules. We will explore the configuration steps required to post payroll results to the finance module. There are configurations required for activities in the HR system and finance system.
  • 345.
    Activities in theHR system The determination of accounts while posting to the finance module is broken down into the following two steps: On the payroll side, the symbolic account is mapped to the wage type On the finance side, the symbolic account is mapped with the general ledger The grouping of employee for account determination helps to actively group the employees having the same symbolic accounts but is distributed to different accounts in finance. It is defined by navigating to SPRO | Payroll (XX) | Reporting for posting payroll results to accounting | Activities in HR system | Employee grouping and symbolic accounts | Define Employee grouping account determination | Employee grouping for account determination: Define values or via the SM30/31 T-code in the V_T52EM table. In the next step, there is a feature called PPMOD. This can be used to default the employee grouping based on the enterprise or personnel structure fields. It is defined by navigating to SPRO | Payroll (XX) | Reporting for posting payroll results to accounting | Activities in HR system | Employee grouping and symbolic accounts | Define Employee grouping account determination | Define assignment of EE char. to EE group account assgmt. This return value can be used when we define the Symbolic Accounts in the next step by flagging the MOMAG field. If the MOMAG field, is active or flagged, the employee grouping is taken into account during account determination. The symbolic accounts are defined by navigating to SPRO | Payroll (XX) | Reporting for posting payroll results to accounting | Activities in HR system | Employee grouping and symbolic account | Define Symbolic Accounts or via the SM30/31 T-code in the V_T52EK table. This is shown in the following screenshot:
  • 346.
    The symbolic accountis a four-digit alphanumeric code with account assignment types. The account determination types determine the type of account to be posted in finance. The account assignment also determines the account mapped on the finance side. Let's look at the different account assignment types and their functionality in the following table: Account assignment type Meaning C This refers to posting to an expense account F This refers to posting to a balance sheet account K This refers to posting to personal vendor accounts KF This refers to posting to fixed vendor accounts FC This refers to posting to a balance sheet account (NewGL) The symbolic account defined in the preceding step can be mapped to the wage types by navigating to SPRO | Payroll (XX) | Reporting for Posting Payroll Results to Accounting | Activities in the HR system | Maintain Wage Types | Define Posting Characteristics of Wage Types or via the SM30/31 T-code in the V_T52EL_NOFM table. The plus and minus signs are defined along with the symbolic account, and they have specific meanings, as shown in the following list: +: The positive amounts from the wage types are posted as debits and negative amounts are posted as credits
  • 347.
    -: The positiveamounts are posted as credits and negative amounts are posted as debits
  • 348.
    Activities in anaccounting AC system The symbolic accounts that are defined are mapped to the general ledger on the accounting side. Based on the account assignment defined for the symbolic account, we have to choose the accounts as follows: Assign balance sheet accounts Assign expense accounts Assign technical accounts Assign customer accounts Assign vendor accounts Assign customer accounts for specific loan posting Hypothetically, if we have defined a symbolic account with the account assignment type as "C", then we have to map that symbolic account to assign an expense account. If it's "FC", then we have to map it to assign balance sheet accounts. This is depicted in the following screenshot: Only, if the MOMAG field is flagged, the employee grouping for account determination, will be active to be assigned. Tip Wage type assignment: The G/L Accounts report RPDKON00 is useful when customizing settings of wage types, symbolic accounts, and general ledgers.
  • 349.
    Posting payroll resultsto finance steps We will look at the steps to be followed to post the payroll results to the finance steps. The first step is executing the PC00_M99_CIPE T-code. This is shown in the following screenshot: The three different statuses available are as follows: P: This refers to a live posting run S: This refers to the creation of simulation documents T: This refers to a test run; no documents are created The following screenshot demonstrates this:
  • 350.
    Click on PersonnelNumbers and a new Posting to Accounting: Document overview window will open. This is shown in the following screenshot: The document needs to be released first before posting. Choose the document created and click on Release document (F9). This is shown in the following screenshot:
  • 351.
    Click on Yesand note that the Status is changed to Released. This is shown in the following screenshot: The posting runs can be displayed via the PCP0 T-code.
  • 352.
    Different statuses ofa posting run The finance posting run can have the following statuses: Fixed value Text 31 This refers to the creation of documents 50 This refers to the posting of documents 61 This refers to the reverse document that is created
  • 353.
    Summary In this chapter,we attempted to clear the notion that payroll is complex. After reading this chapter, you should be comfortable configuring the Payroll submodule. We covered important payroll-related infotypes. We also covered the functionalities of payroll schema and PCR. In the next chapter, we will closely look at configuring the Talent Management submodule and explore the standard functionalities provided by SAP.
  • 354.
    Chapter 7. TalentManagement and Development Configuration The Personnel Development component is an extension of the OM component. It deals with personnel engagement and development activities. The personnel development component comprises the following: Qualifications/requirements Appraisal systems Career and succession planning Development plans The Personnel Development submodule enables us to plan and implement training measures to enhance the professional development of the personnel. The settings made in the following submodules also have an impact on the Personnel Development submodule: Organizational Management Compensation Management Training and Event Management
  • 355.
    Basic settings –Personnel Development The PD view Infotypes per object type can be controlled by navigating to SPRO | Personnel Management | Personnel Development | Basic Settings | Maintaining Infotypes, as shown in the following screenshot, or via the SM30/31 T-code in the T777I table: The No Maintenance indicator controls settings if the infotype can be maintained via basic transaction such as PP01. In the standard system settings, some infotypes have the No Maintenance checkbox flagged, but if we would like to maintain them through the PP01 transaction code, then the No Maintenance (T777I-MAINT) flag needs to be removed. Customer-specific settings for PD-related infotypes can be maintained by navigating to SPRO | Personnel Management | Personnel Development | Basic Settings | Maintaining Infotypes, as shown in the following screenshot, or via the SM30/31 T-code in the T77CD table.
  • 356.
    The customer-specific settingscan be defined in the table for PD infotypes. If we are not going to use the standard screen 2000, an alternate screen number can be defined. The screen number 2000 is usually the default screen for infotypes and only has different screen numbers as the default for certain country-specific infotypes. If we are not going to use the standard list screen number 3000, an alternate screen number can be defined The maintenance of the infotype via the PP01 TCD can be controlled by checking the No Maintenance flag In the case of language specific infotypes, the delete blank switch lets us know how blank lines can be processed. The three options available are as follows: E: blank lines are only deleted at the end A: all blank lines are deleted Blank lines are retained We can also sort the infotype in sequence by flagging the Sort Entries flag. We can sort it based on the following settings: Sort sequence Description
  • 357.
    Sort sequence Description In the ascendingorder by subtype and in the descending order by "from" date 1 In the descending order by "from" date and in the ascending order by subtype 2 In the ascending order by subtype and in the ascending order by "from" date 3 In the ascending order by "from" date and in the ascending order by subtype We can specify whether an infotype is maintained only for a particular country such as the USA, for example, by navigating to SPRO | Personnel Management | Personnel Development | Basic Settings | Maintaining Infotypes, as shown in the following screenshot, or via the SM30/31 T-code in the T77NI table. The time constraint for each object type can be set by navigating to SPRO | Personnel Management | Personnel development | Basic Settings |
  • 358.
    Maintain Relationships |Define Time Constraint Depending on Target Object Type, as shown in the following screenshot, or via the SM30/31 T- code in the T77ZR table: The standard TC settings are as follows: TC class Description 0 This may only exist once 1 This exists without gaps 2 This exists with gaps 3 This is available as often as required The different languages supported in the PD submodule can be displayed by navigating to SPRO | Personnel Management | Personnel development | Basic Settings | Specify Sequence of Languages Available or via the SM30/31 T-code in the T778L table. The standard sequence of languages is German, English, Spanish, Dutch, French, and Italian, as you can see in the following screenshot:
  • 359.
    This useful toolprovided to check the consistency of installation can be accessed by navigating to SPRO | Personnel Management | Personnel development | Basic Settings | Tools | Check Consistency of Installation, as shown in the following screenshot, or via TCD OOCH. They can also be accessed by navigating to Report | RHCHECK0.
  • 360.
    The infotypes thatthe change documents need to be captured can be defined by navigating to SPRO | Personnel Management | Personnel development | Basic Settings | Activate Change Documents, as shown in the following screenshot, or via the SM30/31 T-code in the T77CDOC_CUST table. In the standard settings, the table is empty and we can activate the change document functionality for infotype, subtype, object type, and plan version.
  • 362.
    Integration aspects withother submodules of HCM There is a tight integration between the following submodules of Human Capital Management (HCM): Personnel Administration Recruitment The following data flow happens due to the effect of the integration: Qualifications are transferred from personnel administration. Qualifications are transferred from recruitment. Appraisals are transferred from personnel administration. We can use the OOPD transaction code for setting the control features. The HR Master Data view is as shown in the following screenshot: The integration helps in using the qualifications from the PD submodule, instead of from the 0024 infotype (Qualifications).The appraisal system in the PD submodule can be used instead of the 0025 (Appraisals) infotype. This table is maintained by navigating to SPRO | Personnel Management | Personnel development | Integration | Set up Integration with Personnel Admin. and Recruitment as shown in the preceding screenshot, or via TCD OOPD.
  • 363.
    Tip If the integrationis active, the qualifications and appraisal maintained in 0024 and 0025 are overridden by the PD component. To import the qualification and appraisal maintained in the PA submodule and recruitment component, the following reports are used: The RHQINTE0 report transfers the personnel data stored in 0024 (PA infotypes) to the same object ID in T574A. The data stored in PA0024 is then deleted. The RHQINTE1 report transfers the applicant data stored in 0024 (PA infotypes) to the same object ID in T574A. The data stored in PA0024 is then deleted. The RPIT25APP report is a useful report to convert the 0025 infotype data to the appraisal system of personnel development. We can also delete the entries in PA0025 using this report after conversion. These reports can be accessed by navigating to SPRO | Personnel Management | Personnel development | Integration | Transfer Qualifications from Personnel Administration.
  • 364.
    Master data forthe Personnel Development component There are four major activities that can be performed. This depends on whether the modules already implemented are used. The activities are as follows: Organizational plan maintenance Scales Qualifications catalog Careers If we have the OM module implemented, then we need not perform the organizational plan maintenance step. If the OM component is implemented, the organizational plan maintenance need not be performed separately. The active integration of PD components will allow us to define the scales, qualitative or quantitative. Examples of quality scales can be as follows: Expert Beginners Some recommendations while creating qualitative scales are as follows: Define less than 20 proficiencies for a scale At least one proficiency must be created for a scale Examples of quantity scales can be 100 percentage, where 1 is the lowest proficiency and 100 is the highest proficiency. The scales are defined by navigating to SPRO | Personnel Management | Personnel Development | Master Data | Edit Scales, as shown in the following screenshot, or via the SM30/31 T-code in the V_T77SK table.
  • 365.
    We define, forexample, a 5-point scale, and the system prompts us to choose whether it's qualitative or quantitative, as shown in the following screenshot: The proficiencies are defined by choosing Quality scale or Quantity scale.
  • 366.
    The characteristic valuesare defined by navigating to SPRO | Personnel Management | Personnel Development | Master Data | Edit Scales | Characteristics Values, as shown in the following screenshot, or via the SM30/31 T-code in the V_T77SP_1 table.
  • 367.
    The qualification catalogue Thequalification catalog lets us define the qualification or proficiency in which the employer is interested. The qualification groups and qualifications together make a qualification catalog. The qualification catalog can be defined by navigating to SPRO | Personnel Management | Personnel Development | Master Data | Edit Qualifications Catalog, as shown in the following screenshot, or via TCD OOQA. A qualification catalogue can be edited by selecting Functional/Technical (qualification) under SAP Skills (qualification group), as shown in the following screenshot. The proficiency description of the qualification defined in the appraisal catalogue can be edited in the qualification catalog. The inherited proficiency descriptions should be displayed for the object and feature. It is controlled by flagging the Default checkbox under the Proficiencies tab, as shown in the following screenshot. In the standard system, the default setting is that this flag is normally activated. This implies that the proficiency descriptions of the scale (or, in the case of qualifications, the proficiency descriptions of the corresponding qualification group) will be displayed. The Default checkbox shall be deactivated to create or display an individual description of the proficiencies.
  • 368.
    The qualification group(object type QK) is assigned a proficiency scale. It is also used to structure the qualification catalogue. The qualifications, on the other hand, cannot be directly inserted into catalogues; they must be mapped via the qualification group. The validity period and deficiency meter can be assigned to qualifications. The qualification catalogue can be uploaded using LSMW (Legacy System Migration Work Bench), along with the qualification group, qualifications, and proficiencies. The proficiencies against each position level are normally uploaded via Batch Data Collection (BDC). The validity or the depreciation meter is maintained by clicking on the additional data table for each qualification, as shown in the following screenshot:
  • 369.
    The Where-used (Ctrl+ Shift + F3) functionality, shown in the following screenshot, is useful to find the relationships of the qualification group object type:
  • 371.
    Career maintenance The applicablepath within an organization can be defined via careers. One career can contain up to 9,999 career items. Career items are normally arranged bottom up. Items high up in the hierarchy come at the top. They are defined by navigating to SPRO | Personnel Management | Personnel Development | Master Data | Edit Careers, as shown in the following screenshot, or via TCD OOQ4. Changing a career is a customizing activity in SPRO.
  • 372.
    Functions in PersonnelDevelopment Personnel Development functions such as profile view, control parameters, selection criteria, and specifying the vacancy infotype are some features in a PD component. The profile view lets us define a view for each object type. It comprises of a number of subprofiles. The profile view can be defined by navigating to SPRO | Personnel Management | Personnel Development | Functions | Define Profile View or via the SM30/31 T-code in the T77PP_VIEW table. The profile view lets us define the views (headers and subprofiles) such as qualifications, potentials, and dislikes for an object type P, as shown in the following screenshot: The control parameter function in V_T77S0 lets us define the features mentioned in the following list. They are defined by navigating to SPRO | Personnel Management | Personnel Development | Functions | Set Up Control Parameters.
  • 373.
    Maximum number ofentries in the hit list Handling over qualification Activating the qualification bundle The following values are maintained for the standard settings switches: Group Sem abbreviation Value Description QUALI MAXEN 20 Maximum number of entries in the hit list QUALI OVERQ 1 Valuation of over-qualification QUALI QBUSE Use qualifications bundle QUALI QPROZ 100 Replacement percentage for alternative qualification QUALI SHORT Code in qualifications catalog The suitability range is a useful function in the PD component, which helps users identify object suitability at a glance. The suitability ranges are defined by navigating to SPRO | Personnel Management | Personnel Development | Functions | Define Suitability Ranges, as shown in the following screenshot, or via the SM30/31 T-code in the T77CS table. The column ID is a standard icon that can be used to depict ranges.
  • 374.
    The infoset mustbe created with the AP and P object types and mapped with the PDVFINE scenario, as shown in the following screenshot: The standard system settings have the PDVFINE scenario defined for the AP and P object types maintained in T77OMAHQ_FUNCARS, as shown in the following screenshot:
  • 375.
    This infoset canbe seen in the sq02 TCD, as shown in the following screenshot: We can specify whether the vacancy infotype needs to be maintained in 1007 or not by navigating to SPRO | Personnel Management | Personnel Development | Functions | Activate/Deactivate "Vacancy" Infotype. If the PPVAC PPVAC switch in the T77SO table is set at 0, then integration with recruitment is inactive, as shown in the following table: Group Sem abbreviation Value Description PPVAC PPVAC 0 1007I cannot be maintained PPVAC PPVAC 1 The vacant position is indicated by 1007I and is maintained for Personnel Development
  • 376.
    Standard tools inthe PD component There are some standard tools provided in PD components to perform the following functions: Requirements for positions can be copied to position holder's qualification subprofile Mass data maintenance for creating the qualifications subprofile They can be accessed by navigating to SPRO | Personnel Management | Personnel development | Tools | Copy Requirements Profiles to Position Holder(s), or via SPRO | Personnel Management | Personnel Development | Tools | Qualifications Profile: Mass Data Maintenance.
  • 377.
    Development plans The individualdevelopment plan status is defined to identify the current progress of the business event planned. The status can be defined by navigating to SPRO | Personnel Management | Personnel development | Development Plans | Define Development Plan States, or via the SM30/31 T-code in the T77BZ table. In the standard system, the following settings are defined: State State of development plan 1 Planned 2 Current 3 Completed 4 Completed unsuccessfully 5 Completed successfully 6 Not carried out The development plan catalog contains the development plan group and development plan, and they can be maintained by navigating to SPRO | Personnel Management | Personnel Development | Development Plans | Edit Development Plan Catalog, as shown in the following screenshot:
  • 378.
    The development plancontains subactivities, and the following object types can be included as items in a development plan: A: This is the work center BS: This is the appraisal model C: This is the job D: This is the course type DC: This is the curriculum type F: This is the location O: This is the organizational unit S: This is the position We can also define the following information for the development plan: Duration in months, days, or years Notes for items Specify whether an item is mandatory, as shown in the following screenshot:
  • 380.
    Objective setting andan appraisal's template configuration The basic settings need to be set up in a way that determines whether we are going to use the old appraisal system or the objective settings and appraisal system component. To replace the new system, we need to set the system switch, as shown in the following screenshot. The system table settings are defined by navigating to SPRO | Personnel Management | Personnel Development | Objective Settings and Appraisal | Edit Appraisal Catalog or via the OOHAP_SETTINGS_PA TCD, as shown in the following screenshot: The possible values that can be defined for the switches are explained in the following table: Value possible Description Retain the old appraisal system X The system replaces the appraisal system with objective settings and appraisal subcomponents.
  • 381.
    Value possible Description T The systemreplaces the appraisal system with objective settings and appraisal subcomponents. It also has an impact on the TEM submodule. For business event processing, the system offers the function of objective setting and appraisal for users. A The system replaces the appraisal system with objective settings and appraisal subcomponents. The settings also have an impact on the PD and TEM submodules. Appraisal templates will be created under the category group. The category group is defined by navigating to SPRO | Personnel Management | Personnel Development | Objective Settings and Appraisal | Edit Templates. The appraisal template includes the following elements: Category (appraisal) group Appraisal category Appraisal template Criteria group Criterion External element Category groups let us define the object types, status, authorized persons, and workflow events. They also include appraisal documents for the objective settings and appraisals' applications. An appraisal category groups different appraisal processes, for example, the 360-degree appraisal process. Tip SAP recommends using separate category groups for each appraisal process.
  • 382.
    An appraisal templatelets us define specific appraisal documents. It is always assigned to a category. It is quite simple to create an appraisal template for an appraisal process. The standard templates delivered by SAP can be used instead of creating a new one. A criteria group follows the appraisal template. An individual characteristic in an appraisal document that needs evaluation is referred to as a criterion. The standard system delivers the following categories: 360-degree feedback Standard appraisal Objective setting The following are delivered as standard templates: Objective setting Performance appraisal
  • 383.
    Category group creation Thecategory groups use the object types such as P that are chosen during the appraisal form creation. The object types included in Allowed Object Types control the selection during the appraisal form creation process, as shown in the following screenshot: The status that needs to be included in the appraisal template is included in the Status Flow column. The status that is mentioned at the Category Group level applies to the category and template as well. The selected flag controls whether the status can be used or not, as shown in the following screenshot:
  • 384.
    The people authorizedto access the appraisal template and the status are defined in the Person Authorized tab, as shown in the following screenshot:
  • 385.
    As an additionalfunction, the workflow templates can also be added in the appraisal template. The workflow can be triggered based on the events setup, as shown in the following screenshot:
  • 386.
    Category creation We cancreate a new category by right-clicking on the category group, as shown in the following screenshot: We will have an option to choose from the pop-up screen. We can define the following columns for the category: Participants Columns
  • 387.
    Roles Value Lists Enhancements Status Flow Thetext and type of participants can be defined in the Participants tab, as shown in the following screenshot. The text is displayed as a label, and if no text is maintained, the system displays a validity period. The list of columns can be defined in the appraisal template level, as shown in the following screenshot:
  • 388.
    The final listof roles can be defined in the appraisal template level, as shown in the following screenshot, and is mainly for partial appraisal purposes:
  • 389.
    The scales canbe defined in the appraisal template level in the Value Lists tab: If we are going to use any enhancements in the appraisal, the template level can be defined in the Enhancements tab, as shown in the following screenshot. The enhancement is a technical activity and can be performed by the technical consultants.
  • 390.
    The person authorizedto access the appraisal template and status flow of events can be defined in the Status Flow tab, as shown in the following screenshot:
  • 391.
    Steps to createan appraisal template We need to right-click on the category and choose Create Template, as shown in the following screenshot: Here, we will have options to choose from. Choose Create Manually, as shown in the following screenshot: Each item that comes under the appraisal template is called an element. The overall view of the appraisal template looks like the following screenshot:
  • 392.
    The description thatneeds to be shown after the header is defined can be done under the Description tab. The setup for numbering and appraisal document headers is controlled in the Layout tab, as shown in the following screenshot:
  • 393.
    The unchecked headerdetails will be displayed in the appraisal document. The enhancement can also be defined in the template in the further block. The column owner setup is defined in the Column Access tab. The different statuses such as display, change, and hide can be set up. The different statuses that can be used in the appraisal template are set in the Status Flow tab. The push button can be defined for each process, and the workflow event can also be defined for the process. Tip The OSS note Target function: FAQ - 1549085 is a useful note for reference. In all the standard reports, the appraisers and appraisees are defaulted. The appraisees are defaulted not at the person level but at the organization unit level. To avoid this, VC_T77HAP_CATEGORY can be used to remove the allowed appraiser type, which is O, and maintain the type P, as shown in the following screenshot:
  • 394.
    Summary In this chapter,you learned how to configure the Personnel Development component. You learned how to maintain the important master data required for the Personnel Development component. We only focused on PD and did not cover the Talent Management/Development suite for the purpose of this chapter. We covered the basic settings required for configuration and learned about the important master data maintained in PD. We also learned how to create appraisal templates based on corporate goals and corporate or team values.
  • 395.
    Chapter 8. Trainingand Event Management Configuration The Training and Event Management (PE) component offers a variety of features that help a company plan and administer their employees' training courses. It also helps companies keep a track by recording the knowledge and skills acquired by employees that can be used in real-time practice. The TEM submodule enables us to plan and manage business events; we can also book, prebook, and cancel events using this component. In this chapter, we will learn to set up event catalogs and integration aspects with other modules such as time management and material management. Although SAP Learning Solution is based on Training and Event Management, we are limiting our learning only to TEM (PE). To use the SAP Learning Solution functionality, its add-on must be installed on the system. Learning Solution (LSO) is a portal-based solution and is activated by installing the add-on. Success Factor (SF) is making a wave in the Talent Management space, and we hope to cover it in a separate book. The following topics will be covered in this chapter: The basic settings of TEM Integration aspects of TEM Configuring Business Event preparation
  • 396.
    The basic settingsin TEM The plan version is defined to maintain a different simulation of the plan, and this has been covered in the previous chapters. The plan version is defined by navigating to SPRO | Training and Event Management | Basic Settings | Plan version maintenance | Maintain plan version. We can set up the number ranges as plan version dependent or independent, and it is maintained by navigating to SPRO | Training and Event Management | Basic Settings | Number Range Maintenance | Set Up Plan Version-Independent Number Assignment. If the NUMRG COMP switch is set to X, then the number can be assigned across different plan versions. The internal and external number ranges can be defined by navigating to SPRO | Training and Event Management | Basic Settings | Number Range Maintenance | Define Number Ranges for Objects or via the transaction code, OONR. The new number range object, HRTEM_REFN, has been introduced in Training and Event Management for number range reference objects for external operators. These are useful for the following functions: Requesting material in the Material Management submodule Billing and activity allocation of business events in the sales and distribution (SD) and cost accounting (CO) modules The factory calendar holidays can be linked to the TEM submodule by navigating to SPRO | Training and Event Management | Basic Settings | Control Options for Days Off | Specify Factory Calendar. The SEMIN ORTCA switch needs to be set with the default factory calendar ID. This serves as a control feature for holidays that are defined for the enterprise.
  • 397.
    Integration aspects inthe Training and Event Management module TEM modules support integration with many submodules such as the following ones: Time management Material management Budget management Billing and activity allocation Appointment calendar Mail connection SAP knowledge provider Time management integration allows us to define the incompatible absence or attendance types with a particular business event type function. The PLOGI TIME switch needs to be activated, and its value needs to be X for the integration to be active. The different attendance types are defined for attendees and instructors along with a mandatory minimum percentage of attendance. We define the settings by navigating to SPRO | Training and Event Management | Integration | Time Management | Specify Attendance Types. Group Semantic abbreviation Description SEMIN AINST Attendance type for instructor in T554S SEMIN APART Attendance type for attendance in T554S SEMIN TIMEP Minimum percentage attendance If materials required for a particular event are available in the material management module, they can be integrated to TEM. There is a wizard that helps us integrate the MM and TEM modules. The control parameters
  • 398.
    maintained in T77S0are activated only after the wizard has successfully completed. If we want to activate the MM functions, we need to choose Yes from the wizard options, as shown in the following screenshot: The wizard then helps us assign the number ranges to the next step, and the plant location, storage area, and controlling area details can be input in the wizard. The wizard then allows us to assign the document type and movement types. Documents are simply purchase requisitions in the MM module, and hence, the default document type NB is reserved for purchase requests from the TEM module. The movement of goods is controlled in MM as movement types, so when a request comes from TEM for issuing goods, then the movement type goods issue (GI-201) for cost center is supported. The customizing setting is completed after filling in all the integration details with MM, and we get a message to click on and complete the process to save the settings. Name Value Plant 6650
  • 399.
    Name Value Storage location0002 Controlling area 2000 Document type NB Transaction type 201 The ones shown in the following screenshot are not standard values:
  • 400.
    The SEMIN MATswitch must be set as 1 for the activation to be switched on, and it's defined by navigating to SPRO | Training and Event Management | Integration | Material Management | Integration Yes or No?. The integration is usually deactivated by default, and it needs to be activated by changing the standard settings. The controlling area, plant, and storage location are defaulted by navigating to SPRO | Training and Event Management | Integration | Material Management | Specify Organizational Elements. The default value is assigned in T77S0 for the following groups and semantic abbreviations: Group Semantic abbreviation Description PPINT PPINT Default value for controlling area SEMIN PLANT Plant for material administration SEMIN STORE Storage location for material administration The document types and movement types are defaulted by navigating to SPRO | Training and Event Management | Integration | Material Management | Specify Control Elements. Group Semantic abbreviation Description SEMIN DOCTY Purchase requisition (document type) SEMIN MOVTY Reservation: movement type
  • 401.
    The budget allocatedversus the measurement of the cost incurred for training events can be defined if the Organizational Plan component (PA- OS) is active and if it is defined by navigating to SPRO | Training and Event Management | Integration | Budget Management | Specify Budget Currency. The currency is mapped via this node or via the SM30/31 T-code in the V_T7PM2 table. The budge types and their attributes are defined by navigating to SPRO | Training and Event Management | Integration | Budget Management | Define Budget Type and Attributes, as shown in the following screenshot, or via the SM30/31 T-code in the V_T7PM3_B table: The default of the budget type group is 03, that is, Training and Event Management. Some of the other groups are as follows: 01: This is HR Funds and Position Management 02: This is Compensation Management 03: This is Training and Event Management 04: This is Organization Management for Public Services The budget periods can be defined by navigating to SPRO | Training and event management | Integration | Budget Management | Specify Budget Period or via the table V_T7PM9_B. The start date, end date, and key date are defined in the table. We can integrate SAP knowledge providers such as document management service, content management service, text retrieval, and information
  • 402.
    extraction. We cando this by navigating to SPRO | Training and event management | Integration | SAP Knowledge Provider.
  • 403.
    Configuring a businessevent preparation/event catalog The configuration of business event preparation will help set up master data for the Training and Event Management components such as resources. It also helps in setting up the hierarchical structured business event catalog. We start setting up the cost items; basically, the cost items represent the costs incurred by the business events. It is also required for transferring costs to cost accounting and also for determining price proposal. Cost items are defined by navigating to SPRO | Training and Event Management | Business Event Preparation | Define cost items or via the SM30/31 T-code in the T77KB table. Cost items help us store the costs for resources, resource types, business events, and business event types. The cost items have a provision for defining the cost as follows: Attendee Time unit Business event We can also state whether the cost is relevant for transfer to accounting, and if yes, we have them mapped to the controlling area and cost element, as shown in the following screenshot:
  • 405.
    Time schedule We candefine the time schedules for each business event, say, the duration of training sessions such as one full day and with different day segments. Day segments allow us to define the schedule or break it up into three different blocks. Day schedule and time segment are defined by navigating to SPRO | Training and Event Management | Business Event Preparation | Define Time Schedule/Day segment, as shown in the following screenshot, or via the SM30/31 T-code in the T77AM/T770A table:
  • 406.
    Physical location The physicallocation of the rooms can be maintained by navigating to SPRO | Training and Event Management | Business Event Preparation | Create Building Address or via the SM30/31 T-code in the T777A table. The business event locations can be maintained by navigating to SPRO | Training and Event Management | Business Event Preparation | Location | Business Event Location Switch. The SEMIN ORT switch must be activated for using the business event locations. When an event is created, locations can be assigned, and they are defined by navigating to SPRO | Training and Event Management | Business Event Preparation | Location | Create Location, as shown in the following screenshot. We can also capture the following details when the locations are defined: Site-Dependent Info Address Further information Internal or external organizers conducting the business event can be defined by navigating to SPRO | Training and Event Management | Business Event Preparation | Organizers | Specify Organizer Types. The standard
  • 407.
    organizer types arecompany (U object type), organizational unit (O object type), customer (KU object type), and interested party. The SEMIN VTYP1 switch must be assigned the relevant object type. External organizers of business events are defined as companies, while internal organizers are defined as organization units by navigating to SPRO | Training and Event Management | Business Event Preparation | Organizers | Create Company, as shown in the following screenshot. We can set up a company in TEM as follows: It can set as an organizer of a business event type It can be set as an organizer of a business event It can be set as independent external organizers conducting events It can also be assigned to an external instructor or attendee The internal organizers of an event are set up by navigating to SPRO | Training and Event Management | Business Event Preparation | Organizers | Create Organizational Unit. Internal organizers are of object type O and need not be defined if they are already defined in OM.
  • 408.
    The business eventgroup helps set up the event catalog and is defined by navigating to SPRO | Training and Event Management | Business Event Preparation | Create Business Event Group. The business event group has the following details captured: General description Relationship The business event type serves as a blueprint from which the date of a particular business event is generated. We can also schedule a business event type to take place at a particular time and date. We can maintain the following infotypes for business event type Description: Time schedule model Capacity Prices Relationships Validity period An internal and external price for the event type can be maintained. While the internal prices are a user's activity allocation purpose, the external is used for billing purposes. The following screenshot shows the Relationships tab:
  • 409.
    The validity periodis used as a depreciation meter. The capacity function plays a vital role in the following features: Bookings Resource selection Price proposal It also allows us to define the minimum, optimum, and number of attendees of a particular business event type permissible. The schedule model is defined in the time schedule that can be mapped. We can activate or deactivate integration with time management in the Course Type info tab. It also controls the availability check for the attendees. Tip If the Do Not Display Business Event Type indicator is flagged in the intranet, then the business event type won't be displayed in the Employee Self-Service (ESS) or portal view of TEM.
  • 410.
    Master data SAP allowsus to define all the master data related to TEM in one step with the catalog feature. The objects are displayed in the hierarchical form if they are already set up in individual objects' steps in the Implementation Guide. This feature can be explored by navigating to SPRO | Training and Event Management | Business Event Preparation | Maintain Master Data via Catalog, as shown in the following screenshot: The relationships between object types can be established by clicking on the Create Relationship option (Ctrl + F10), as shown in the following screenshot:
  • 411.
    We can createobjects and relationships for the following using this catalog: Location Company Organizational unit Resource type Room External instructor Other resources Business event group Business event type
  • 412.
    Resource management Resource managementallows us to define the resources such as rooms, instructors, materials, and they can be defined by navigating to SPRO | Training and Event Management | Business Event Preparation | Resource Management | Create Resource Type, as shown in the following screenshot, or via TCD OORT: To have direct access to resource reservation tables in TEM, the user exit needs to be assigned in SEMIN RESOC. It is assigned by navigating to SPRO | Training and Event Management | Business Event Preparation | Resource Management | Control Elements. By default, the standard functional module, RH_ALLOCAT, is assigned in the system table. The three types of resources that are normally distinguished are as follows: Room External instructors
  • 413.
    Other resources The threetype of resources are defined by navigating to SPRO | Training and Event Management | Business Event Preparation | Resource Management | Resources | Create Room. The object type ( G ) room is defined, and the following can be mapped when a room is defined as a resource: Capacity Address Cost Relationships such as the Belongs to location The object type ( H ) can be defined and the following relationship can be mapped when an external person is created: Address Mail address Relationships such as the Belongs to location or Is instructor for business event type
  • 414.
    The other resource(G) can be defined, and the following relationships can be established: Costs Relationship Belongs to location and the Is a specialization of resource type The object type (VE) can be used to lock resources in TEM. TEM doesn't have the feature of creating a relationship between resources and services. Services are defined by navigating to SPRO | Training and Event Management | Business Event Preparation | Resource Management | Resources | Locking Resources | Create Service. The SEMIN ENQVE switch
  • 415.
    can have theobject ID assigned to it to have the service locked. It is assigned by navigating to SPRO | Training and Event Management | Business Event Preparation | Resource Management | Resources | Locking Resources | Specify Service for Lock Administration. The control elements for business event execution can be defined by navigating to SPRO | Training and Event Management | Business Event Catalog | Control Elements. Group Semantic abbreviation Text SEMIN FORCA Business event preview: period in days SEMIN KAP Standard capacity SEMIN PFORC Planning period The standard system, as shown in the preceding table, has the following values assigned and can be changed if required: FORCA: 90 KAP: 99 PFORC: 360 The FORCA switch is used to define the business event preview period time frame. The KAP switch is used to define the attendee's capacity, while the PFORC switch defines the planning period.
  • 416.
    The business eventcatalog The list of events is available as a catalog, and the control elements are defined in the system table with the standard settings, as follows: Group Semantic abbreviation Value Text SEMIN FORCA 90 Business event preview: period in days SEMIN KAP 90 Standard capacity SEMIN PFORC 360 Planning period The value in the SEMIN FORCA switch indicates the period (in number of days) in which a business event exists. The start date is the system date when an event is booked via the PV00 TCD, and the end date is determined by the value set in SEMIN FORCA. The following screenshot shows Book Attendance:
  • 417.
    The value setin SEMIN KAP is the maximum capacity for a event. The value set in SEMIN PFORC is used for the planning period. This is used when a business event is created, as shown in the following screenshot, using the PV10 or PV11 transaction code:
  • 419.
    Day-to-day activities All thebooking-related activities such as booking, prebooking, and cancellation can be controlled in the day-to-day-activities settings. Group Semantic abbreviation Description SEMIN HISTO Message type for changes to historical attendances SEMIN WKAPM Maximum waiting list capacity SEMIN WKAPT Message type when the waiting list capacity is exceeded The preceding system table helps us control the system's reaction with the SEMIN HISTO switch when a user attempts to cancel, rebook, or replace a booked attendance. The following input options can be set: No entry E: This is an error message W: This is a warning I: This is information A check is not performed if the input option is set as blank. The system doesn't allow any changes if the input is set as E. If the input is set as W, a warning message is the output; however, the system allows us to make changes. The system informs the user that attendance booking is attempted to be changed. It allows you to make a change in the system. The SEMIN WKAPM switch helps control the number of attendees per business event. The SEMIN WKAPT switch helps set the reaction messages when the waiting list booking is exceeded. The various input options allowed are as follows:
  • 420.
    No entry E: Thisis an error message W: This is a warning I: This is information If we would like to have the system read the business event catalogs while prebooking attendees, then the SEMIN OFFER switch must be set to 1. The standard values are as follows: 0: System doesn't read the business event catalog 1: System reads the business event catalog
  • 421.
    Booking The attendee typecontrol option lets us determine the type of attendees that appear on the screen for prebooking, rebooking, replace, and cancel options. The system lets us choose a maximum of six attendee types under Sort in the range of 01 to 06. The sort sequence function, however, doesn't allow us to hide certain attendee types. There are details that are entered for the attendee types. They are defined by navigating to SPRO | Training and Event Management | Day to day activities | Booking | Specify Attendee Type Control Options, as shown in the following screenshot or via the SM30/31 T- code in the V_T77R3_1 table: The following options can be set for the attendance or participant type: Individual attendee Relevant for the Internet Organizational assignment Function module—organizational assignment Billing and allocation information Cost center assignment Function module—cost center assignment
  • 422.
    If the participantdoesn't belong to a group, the flag can be set. If the attendee type is included during maintenance in the Internet application, the flag needs to be set for relevance for the Internet. The evaluation path can be mentioned to determine the attendee's organizational assignment. We can also make use of the function module if the evaluation path is not to be used. The settlement type can be set for settling the costs for the participant of attendee's type. If we do not want to mention the cost center, we can specify the function module for determining the cost center assignment of the attendees. The booking and prebooking attendees check can be performed by navigating to SPRO | Training and Event Management | Day to day activities | Booking | Attendee Checks, as shown in the following screenshot, or via the SM30/31 T-code in the V_T77KV_1 table: System reactions can be defined for some booking and prebooking in the form of message output. Some of the checks, such as the following, can be set up: Check for bookings of the same business event type Check for prebookings of the same business event type Check for a prerequisite business event Check attendee's qualification
  • 423.
    Standard output messagesthat can be set for the preceding fields are as follows: No check E: This is an error message W: This is a warning I: This is information The time conflicts when the attendance booked can be controlled via the system table (T77S0), or the the switch needs to be set as follows: Group Semantic abbreviation Description SEMIN TEREF Message type for attendance/instructor function conflict SEMIN TETEI Message type for attendance/attendance conflict The settings for fee handling can be controlled by navigating to SPRO | Training and Event Management | Day to day activities | Booking | Fee Handling. Group Semantic abbreviation Description SEMIN CCDCT Dialog module cost maintenance for bookings SEMIN CCOST Switch for special event costs for bookings Tip
  • 424.
    The standard systemsettings have RH_PRICES as function modules and CCDCT and CCOST are set as 1. The priority for booking can be set by navigating to SPRO | Training and event management | Day to day activities | Booking | Booking Priorities. Group Semantic abbreviation Description SEMIN MAXMU Maximum priority for essential booking SEMIN MINWL Minimum priority for waiting-list booking SEMIN NPRIO Default priority for normal booking The parameter that we define for the switch is defined from 00 to 99. The number set is considered as the priority. The control options for canceling attendances can be defined by navigating to SPRO | Training and Event Management | Day to day activities | Canceling Attendance | Control Options, as shown in the following screenshot. This control feature allows us to do the following activities: We can specify the relationship for the cancellation where applicable The default value for the cancellation fees can be specified The move-up procedure for waiting list bookings can be specified
  • 425.
    The text forattendance cancellation can be defined by navigating to SPRO | Training and Event Management | Day to day activities | Reasons for Attendance Cancellation, as shown in the following screenshot, or via the SM30/31 T-code in the T77CAR table: The cancellation percentage fee can be defined, and the indicator for attendance/cancellation can also be set.
  • 426.
    Recurring activities The activitiespertaining to business event dates are defined in the nodes of recurring activities. We can firmly book or cancel business events via the SEMIN FIXRV control switch. We can define it by navigating to SPRO | Training and Event Management | Recurring Activities | Firmly Booking/Canceling | Control Options. 0 indicates that the attendance or participation cannot be canceled unless it is rebooked. 1 indicates that attendances can be cancelled and the waiting list can be left empty. We can define the different reasons for event cancellation by navigating to SPRO | Training and Event Management | Recurring Activities | Firmly Booking/Canceling | Reasons for Event Cancellation, as shown in the following screenshot, or via SM30/31 in the T77CR table. In the standard system, the following reasons are maintained, and if required, they can be changed: The required minimum number of attendees not reached The resources flagged as "required" are not available The training room is not available The instructor is not available
  • 427.
    Follow-up processing The actionsthat need to be carried out post the business event for attendee type is defined by navigating to SPRO | Training and Event Management | Recurring Activities | Follow-up Processing, as shown in the following screenshot, or via the SM30/31 in the V_T77KV_2 table. This results in the deletion of the relationship 025 ("is attended"), and a relationship between the attendee and business event type (relationship 034 "attended") is created. We can set the flag to mention that the qualification can be transferred to the participant or attendee subsequent to the business event. Tip Read the online SAP support (OSS) note 538446—data redundancies. TEM contains plenty of standard reports such as resources and business events that can be accessed via a dynamic information menu. They can be accessed by navigating to SPRO | Training and Event Management | Information Systems | Integrate Customer-Specific Reports, as shown in the following screenshot, or via the PVDM TCD:
  • 428.
    We can choosethe keys <, >, or Shift + F5 to display or hide the text. We can also integrate our own reports by performing the following steps: 1. Choose the service from the menu repository and click on level down (Ctrl + Shift + F1). The system lets us choose from the following three options: New submenu New function Existing function
  • 429.
    2. Choose Existingfunction and click on OK. A window will open, as shown in the following screenshot: 3. In the dialog box that appears, enter the following details such as the name of the function, and Text for server and Text for function auto populates, as shown in the following screenshot:
  • 431.
    Employee Self-Service (ESS) Thecontrol elements for integration with ESS is set up by navigating to SPRO | Training and event management | Employee Self-Service (ESS) | Set Up Control Elements for ESS. Group Semantic abbreviation Description SEMIN INPRI Booking priority for Internet SEMIN REQUE Event generation in web transactions SEMIN WEBST Cancelation reason for employee in ESS (PV8I) The reasons for cancellation are stated in the T77CAR table. This can be used when the event is cancelled in ESS (PV8I). Tip PV8I cannot be called via Easy Access, and if you try to do so, the system will throw a Transaction PV8I cannot be called in the Easy Access Menu; see long text message.
  • 432.
    Summary In this chapter,we have learned to configure the Training and Event Management (PE) submodule. We have only focused on TEM and not covered LSO for the purpose of this chapter. We have learned about the important master data maintained in the TEM submodule. We also learned how to integrate our own reports in the information menu. In the next chapter, we will explore travel management configuration.
  • 433.
    Chapter 9. TravelManagement Configuration The Travel Management module covers all the activities surrounding travel. In this chapter, we will cover the important configuration steps for three areas of Travel Management: raising a travel request, planning travel, and settling travel expenses. We will also learn to configure the following important Travel Management functions: Planning a trip Booking a trip Settling expenses incurred for the trip in detail
  • 434.
    Travel Management –features and functions The standard functionalities of SAP Travel Management are equipped to plan a travel destination, book travel trips, settle expenses via payroll or finance, and also transfer the expenditure data to other modules such as controlling, payroll, and fund management. The overall process of the Travel Management module is shown in the following screenshot: Source: https://help.sap.com/saphelp_erp60_sp/helpdata/en/6e/6bf037f1d6b302e10 000009b38f889/content.htm
  • 435.
    Travel Management hastight integration with other modules such as SAP ERP Financials and the SAP Human Capital Management module.
  • 436.
    Basic settings fornumber ranges The number ranges are defined for trip number, posting, and trip transfer documents. SAP recommends that you use the internal number assignments. Let's look at the functionality of number ranges as listed in the following table: T- code Functionality SNUM The object used to define the number range is RP_REINR. We click on Ranges (F7) and use the personnel area for which we define the "from" and "to" intervals. PR10 This T-code is similar to SNUM. The only difference is that we don't use the object; instead, we use the personnel area for which we define the "from" and "to" number ranges. PR11 Trip transfer document number ranges are defined using this T-code. PR12 Number ranges for posting runs is defined via this T-code. The number ranges are defined by navigating to SPRO | Financial Accounting (New) | Travel Management | Set up trip number ranges. Tip Travel Expenses is an important component. The Travel Expense component can also be used independently of Travel Requests and Travel Planning.
  • 437.
    Master data requiredfor Travel Management All the three areas of Travel Management use the same master data that is maintained in the following three areas: Travel Request Travel Planning Travel Expenses The following infotypes are mandatory for booking Travel Planning: The 0001 (Organizational Assignment) infotype The 0002 (Personal Data) infotype The 0017 (Travel Privileges) infotype The 0006 (Addresses) infotype The 0017 (Travel Privileges) infotype The 0027 (Cost Assignment ) infotype The 0009 (Bank Details) infotype We have covered all the infotypes, but the 00017 (Travel Privileges) infotype is used in the previous chapters. Let's look at the features of the 0017 (Travel Privileges) infotype. This is shown in the following screenshot:
  • 438.
    Let's closely lookat the features of the different fields contained in the following 0017I table: Fields Description Reimbursement group for meals/accommodations: this is statutory Grouping of employees for whom the same statutory or travel provisions are applicable
  • 439.
    Fields Description Reimbursement groupfor meals/accommodations: this is enterprise-specific Grouping of employees for whom the same trip provisions are applicable, for example, senior directors, directors, managers, and so on Employee grouping for the Travel Expense type Grouping of employees for whom the same Expense type trip is applicable Employee Grouping for Travel Management Grouping of employees for whom Business Trip Management is fulfilled Reimbursement Group for travel costs Grouping of employees for whom travel cost is applicable Vehicle type Classification of vehicles such as car, flight, and so on Vehicle class The vehicles can be classified based on their model, price, and so on License plate number The license plate numbers of company-owned cars or private cars can be captured in this field Company code Profit and loss statements are captured via different company codes assigned Business area A separate area of operations is represented via business area
  • 440.
    Fields Description Cost CenterDistribution of costs can be based on physical location, for instance Indicator for recorded trips When the trip data is recorded or changed, this is flagged and the RPRFLDEL report can be used to reset the settings Company code change If this is flagged, the company code can be changed when the business area is entered
  • 441.
    Important transaction codes Theimportant transaction codes required to work on the Travel Management module are as follows: T-code Description TRIP Travel Manager is used to request, plan, enter, and settle a business trip PR03 Trip advances can be created using this T-code PR05 The Travel Expenses manager dialog screen creates trip expenses and settles and approves a business trip PRAP Trips can be approved using this T-code PREC Trip data can be settled via this T-code PRFI Using this T-code, we can create a posting run PRRW Posting run is managed via this T-code F.02/F- 53/FBCJ/F110 Payment of expenses to employees (treating employee as vendors) is managed via this T-code PRAA Vendor master records from HR are created/changed/blocked using this T-code
  • 442.
    T-code Description XK03 Usingthis T-code, we can check whether the vendor has been created
  • 443.
    Travel Request configurationsteps The overall process of Travel Management, which includes requesting a trip, planning a trip, and settling expenses incurred for the business trip, can be diagrammatically represented as follows: Source: http://help.sap.com/saphelp_erp60_sp/helpdata/en/26/fddaabb7dd11d194c6 00a0c92946ae/content.htm We will learn to configure the three phases that SAP has provided. Let's closely look at the Travel Request phase and the configuration steps required for the same. The possible combinations of the Travel Management module functioning could be shown in the following table:
  • 444.
    Module SAP Combinations ModuleSAP Combinations HR (Payroll) and Accounting SAP Travel Management and Payroll and a tight integration of the Finance module HR and the Travel module SAP Travel Management and the HR module Working together with Accounting and having a separate HR system SAP Travel Management and Finance Accounting Operate without HR and Accounting SAP Travel Management We will see how Travel Request uses services with the help of the Web Dynpro Advanced Business Application Programming (ABAP) user interface. Web Dynpro is a proprietary web application user interface technology developed by SAP AG and exists in Java and the ABAP stack. The Web Dynpro is a user interface (UI) platform that is used to build the portal screen. The data is fetched from the backend and displayed in the frontend portal. The standard field labels and length of the fields are controlled by the business object that is used to build them. The backend field label and length remains the same while in the portal side; it can be changed based on the logic. The functionalities are as follows: Enhancements made to standard Web Dynpro UI elements Enhancements for standard methods in different standard components The Travel Request module can include the following information: This module refers to date and time of the trip requested This module refers to reasons for the trip and travel destination If there are any additional destinations, they can also be specified
  • 445.
    This module includesadvances for the business trip planned The additional cost center can also be included There is a provision that includes comments when the trip request is created The different travel request mediums (such as rail, train, flight, and so on) can be included The estimated cost of the trip can be captured The trip can be requested or booked through different sales offices by grouping the employees via external reservation system. The employee grouping is defined by navigating to SPRO | Financial Accounting (New) | Travel Management | Travel Request | Travel Request ESS | Other travel services | Define Groupings for Access to External Reservation Systems or via the SM30/31 T-code in the V_TA20O_FIND table. The standard services can be defined and used in Travel Request in the Web Dynpro ABAP UI. They are as follows: Flight Hotel Rental car Train Ferry Helicopter Airport shuttle The keys for services other than the standard ones such as flight, hotel, and so on is defined by navigating to SPRO | Financial Accounting (New) | Travel Management | Travel Request | Travel Request ESS | Other travel services | Define Other Travel Services or via the SM30/31 T-code in the V_TA20C/V_TA23OS table. Tip For PNR integration, the checkbox needs to be flagged and the Business Add-In (BADI), FITP_TRAVEL_PLANNINGFITP_TRAVEL_PLANNING, can be implemented.
  • 446.
    We can assigna sales office, reservation system, and logical system to certain groupings of employees/users using the TRVOF feature. It's defined by navigating to SPRO | Financial Accounting (New) | Travel Management | Travel Request | Travel Request ESS | Other travel services | Assign Groupings for Access to External Reservation Systems. The TRVOF feature helps assign the following parameters to the employees based on the following grouping: Reservation system Logical system Sales office RFC destination The prerequisites for setting up this feature are the technical access groupings we defined in the previous table. The estimated costs and different mediums of travel are defined by navigating to SPRO | Financial Accounting (New) | Travel Management | Travel Request | Travel Request ESS | Define Travel Mediums and Estimated Costs to Be Approved or via the SM30/31 T-code in the V_T706_REQ_CAT table. The travel medium defined is a four-digit alphanumeric code, and it has the following options to choose from: Type Category There are two indicators that can be used and have specific functionalities, as shown in the following table: Indicators Functionalities To be approved Travel medium is shown in the Travel Request under accommodation types and travel mediums.
  • 447.
    Indicators Functionalities Enter estimated costs This flag,if set, will allow the user to define the costs as a separate field. The functionality is only available in the Web Dynpro ABAP UI. If the Enter Estimated Costs field needs to be only used as a display option, then the Display Only field needs to be flagged. This is shown in the following screenshot: BADIs are technical activities performed by technical consultants. There are some BADIs that can be used for enhancements, and they are listed in the following table: BADI name Description
  • 448.
    BADI name Description GET_ESTIMATED_COSTSThis is used for assigning default values to estimated costs CHECK_ESTIMATED_COSTS This is used for the entry of estimated costs There are many standard forms delivered by SAP for Travel Request and Travel Planning, and they can be configured via the Adobe builder form of SFP T-code. The standard forms are presented in the following bullet list: FITP_REQUEST_FORM FITP_PLAN_FORM PTRV_EES_FORM PTRV_EXPENSE_FORM It is recommended that you copy the standard form and rename it "Z", with the name in customer space provided. The TRVFR feature is used to execute the request form, and it is defined by navigating to SPRO | Financial Accounting (New) | Travel Management | Travel Request | Forms | Set Up Feature TRVFR for Request Form.
  • 449.
    Configuring Travel Planning TravelPlanning has tight integration with online booking services and is hassle-free for employees to plan their trip and book their tickets. It gives its employees a lot of responsibilities, and its user friendly interface ensures that even novices can work on the system with ease. The SAP business work flow functionality that comes with the Travel Planning component adds cost advantage with standardized approval and process mechanism. There are many standard features that can be used; they are as follows: Flights, hotel rooms, and rental cars can be booked online Queries related to travel policies and bookings can be applied Customized hotel catalog with preferences can be set up Agreements made with travel service providers can be viewed and agreed upon A traveler's personal preferences can be requested automatically online Flexible reports for analysis purposes Tight integration with the Travel Expenses module for settling expenses incurred during the trip The Travel Planning module supports integration with global distribution system (GDS) that helps in providing seamless connectivity with travel service providers. There are standard service providers that provide access to hotels, flights, train connections, and rental car offerings. Some of them are as follows: Galileo Amadeus Deutsche Bahn Corporate Portal Using a Net Weaver Exchange Infrastructure (XI) connection is possible with low-cost carriers and hotel reservation system such as Sabre HRS BIBE There are some prerequisites that have to be fulfilled to use the features of the Travel Planning functionality. They are as discussed in the following points:
  • 450.
    An agreement musthave been signed by the client for using the reservation system, as we would need an interface to connect with the system and a unique user ID must have been provided for the system There has to be a network connection that has to be set up for the reservation system and SAP to communicate with each other The code of identification that we discussed earlier has to be provided and entered in SAP customizable tables by navigating to SPRO | Financial Accounting (New) | Travel Planning | Master Data | Technical Control Parameters for Travel Planning | Sales Offices and Queues | Sales Offices or via the SM30/31 T-code in the TA20SUBSCRPT table. This is shown in the following screenshot: The general description of the external reservation system that is going to be interfaced with SAP is defined by navigating to SPRO | Financial Accounting (New) | Travel Management | Travel Planning | Master Data | Technical Control Parameters for Travel Planning | External Reservation Systems | Define Reservation Systems or via the SM30/31 T- code in the V_TA21P_R table. This is shown in the following screenshot:
  • 451.
    The logical systemsfor each of the reservation systems are defined by navigating to SPRO | Financial Accounting (New) | Travel Management | Travel Planning | Master Data | Technical Control Parameters for Travel Planning | External Reservation Systems | Define Logical Systems for Reservation Systems or via the SM30/31 T-code in the V_TA20LOGGDS table. The logical systems could be as follows: A unit testing client A quality testing client A production system The technical table that contains the SAP code is mapped to provide code, and as a rule, it is advisable to not change the standard settings. The standard entries containing hotel areas (domain FTPD_HOTEL_AREA) and transportation options (domain FTPD_HOTEL_TRANSPORT) are included in the standard system, and it is recommended that you not change them. The codes are defined by navigating to SPRO | Financial accounting (New) | Travel Management | Travel Planning | Master Data | Technical Control Parameters for Travel Planning | External Reservation Systems | Assign
  • 452.
    SAP Codes toSpecific Codes for Reservation Systems or via the SM30/31 T-code in the TA20GDS_CODES table. The travel preferences of each personnel between the reservation system and SAP system is established by navigating to SPRO | Financial Accounting (New) | Travel Management | Travel Planning | Master Data | Technical Control Parameters for Travel Planning | External Reservation Systems | Synchronization of Travel Preferences with External Reservation. Synchronization, however, is not supported by all the providers. Some of the providers such as Amadeus and Galileo/Apollo are supported, while Sabre is not supported currently. There is a standard BADI provided by SAP to compare travel preferences of personnel providers with global data service providers. The FITP_PREFERENCE_DATA BADI enables us to send data to the reservation system based on your personnel preferences. Tip RFTP_SYNCHRO_PREFRFTP_SYNCHRO_PREF is a handy program used for sending the preferences from HR infotypes to the reservation system. In the following steps, we define the sales office and IDs. The IDs are useful when interfacing with the reservation system. The sales offices are defined by navigating to SPRO | Financial Accounting (New) | Travel Management | Travel Planning | Master Data | Technical Control Parameters for Travel Planning | Sales Offices and Queues | Sales offices | Define Sales Offices or via the SM30/31 T-code in the V_TA20OFFICE2 table. If it's a virtual office, then there is a flag that can be checked; this flag serves as an indicator. The physical address of the sales office can be accessed by navigating to SPRO | Financial Accounting (New) | Travel Management | Travel Planning | Master Data | Technical Control Parameters for Travel Planning | Sales Offices and Queues | Sales offices | Specify Addresses of Sales Offices or via the SM30/31 T-code in the V_TA23OFFICE_ADR table.
  • 453.
    The sales officethat we defined earlier needs to be connected to the reservation system via a log on ID. The following are the prerequisites for this step: We must have defined the reservation systems and logical systems We must have defined the sales offices We must have defined the log-on data (identification indicators) for the reservation systems such as Amadeus, Galilieo, and so on The functionality of queues allows seamless connection with the sales offices and SA Travel Planning component. It also allows all the sales offices to access the booking code PNR centrally with ease. It helps to sort booking and determine price, and the modification of booking can also be accomplished. The prerequisites for defining the queues for sales offices are as follows: The reservation system must have been defined The logical system must have been defined The sales office must have been defined The queues are defined by navigating to SPRO | Financial Accounting (New) | Travel Management | Travel Planning | Master Data | Technical Control Parameters for Travel Planning | Sales Offices and Queues | Queues | Define Queues of Sales Offices or via the SM30/31 T-code in the TA20Q table. In the following customizable table, we can define the activities of sales offices such as price determination, short-term booking, and so on. We can assign the queue activities so that we can control the activities that can be performed by the travel centre. There is FITP_CUST_QUEUEING BADI, which associates associating sales office queues with a particular travel plan. The prerequisites for defining the queue categories are as follows: The reservation system must have been defined The logical system must have been defined The sales office must have been defined The queues of the sales office must have been defined
  • 454.
    The queue categoriesare defined by navigating to SPRO | Financial Accounting (New) | Travel Management | Travel Planning | Master Data | Technical Control Parameters for Travel Planning | Sales Offices and Queues | Queues | Define Queue Categories or via the SM30/31 T-code in the TA20Q_CAT table. The sales office's activities are defined by navigating to SPRO | Financial Accounting (New) | Travel Management | Travel Planning | Master Data | Technical Control Parameters for Travel Planning | Sales Offices and Queues | Queues | Define Sales Office Activities or via the SM30/31 T-code in the V_TA23OA table. The standard entries in SAP are as follows: B: This refers to bookings E: This refers to urgent bookings F: This refers to booking price, which is already determined M: This refers to booking modifications P: This refers to the determination of price T: This refers to ticket issues For the reservation system and SAP Travel Planning component to interface between each other, there has to be a Remote Function Call (RFC) set up; this is a technical activity. The RFC serves as a connection between SAP and the SAP gateway. The SAP gateway acts as a bridge between SAP and GRS. The landscape of the server is graphically represented, as shown in the following screenshot:
  • 455.
    It's defined bynavigating to SPRO | Financial Accounting (New) | Travel Management | Travel Planning | Master Data | Set up RFC Destinations for Interfaces to External Systems. The grouping of external reservation systems and other travel service categories are covered in the following configuration nodes: By grouping, we can enable the user to book trips based on the different sales offices and reservation systems. The grouping is defined by navigating to SPRO | Financial Accounting (New) | Travel Management | Travel Planning | Master Data | Technical Control Parameters for Travel Planning | Access to External Reservation Systems | Define Groupings for Access to External Reservation Systems or via the the SM30/31 T-code in the V_TA20O_FIND table. The enterprise level service categories are defined by navigating to SPRO | Financial Accounting (New) | Travel Management | Travel Planning | Master Data | Technical Control Parameters for Travel Planning |
  • 456.
    Access to ExternalReservation Systems | Define Travel Service Categories. The standard codes provided by SAP are as follows: F: This refers to flight C: This refers to car rental H: This refers to hotel In addition to defining the standard service categories, SAP also provides other travel services such as ferry. We define these services by navigating to SPRO | Financial Accounting (New) | Travel Management | Travel Planning | Master Data | Technical Control Parameters for Travel Planning | Other travel services | Define Other Travel Services or via the SM30/31 T-code in the V_TA23OS table. The Travel Planning component has the functionality of defining the enterprise-level geography that is normally covered in trips and characteristics of travel service providers. We will cover them in detail when we define the International Air Transport Association (IATA) locations and service provider's details that form the master data for the employee to choose from. The IATA locations are defined by navigating to SPRO | Financial Accounting (New) | Travel Management | Travel Planning | Master Data | Geographical Situation | IATA locations | define IATA locations or via the SM30/31 T-code in the V_TA21L table. The geographic characteristics are defined by navigating to SPRO | Financial Accounting (New) | Travel Management | Travel Planning | Master Data | Geographical Situation | IATA locations | Define Geographical Facts of IATA Locations or via the SM30/31 T-code in the V_TA21L_1 table. The characteristics such as country, region, and so on are very useful when trip rules are mentioned. SAP standard entries have provided states as regions for some of the following countries: Argentina Australia Brazil
  • 457.
    Canada U.S. SAP has thefunctionality of defining the synonyms for airports, and we can also assign a single destination to multiple IATA locations. The synonyms for airports, hotels, and car rentals can be defined by navigating to SPRO | Financial Accounting (New) | Travel Management | Travel Planning | Master Data | Geographical Situation | Synonyms for Hotel Locations | Define Synonyms for Airports or via the SM30/31 T-code in the TA23L_F table. When a travel plan is created and when the trip destination is entered, for example, Sweden is the destination and corresponding IATA locations can be displayed in the selection screen for the availability of the flight. The synonyms for hotels are defined by navigating to SPRO | Financial Accounting (New) | Travel Management | Travel Planning | Master Data | Geographical Situation | Synonyms for Locations | Define Synonyms for Hotel Locations or via the SM30/31 in the TA23L_H table. These are very useful for the travel plan when it is queried for hotel reservation and availabilities. The synonyms for car rentals can be defined by navigating to SPRO | Financial Accounting (New) | Travel Management | Travel Planning | Master Data | Geographical Situation | Synonyms for Locations | Define Synonyms for Car Rental Locations or via the SM30/31 T-code in the TA23L_C table. We can also define the IATA locations within the countries and cross- country regions as well. They are freely definable in customizable tables, and they are defined by navigating to SPRO | Financial Accounting (New) | Travel Management | Travel Planning | Master Data | Geographical Situation | Regions | Define Regions Within Countries or via the SM30/31 T-code in the V_TA21R_1 table. The IATA locations can be mapped to the regions that we defined by navigating to SPRO | Financial Accounting (New) | Travel Management | Travel Planning | Master Data | Geographical Situation | Regions |
  • 458.
    Define Assignment ofIATA Locations to Regions Within Countries. The prerequisite is that the IATA code must have been defined. The travel service provider's details and its characteristics are defined in the following steps. We can store details such as costs for the flights, hotels, car rentals, and so on. We define it by navigating to SPRO | Financial Accounting (New) | Travel Management | Travel Planning | Master Data | Travel Service Providers | Flights | Define airlines or via the SM30/31 T- code in the V_TA21P_F table. Specific airline programs such as frequent flier can be defined by navigating to SPRO | Financial Accounting (New) | Travel Management | Travel Planning | Master Data | Travel Service Providers | Flights | Define Customer Programs of Airlines or via the SM30/31 T-code in the V_TA21PF_F table. We can also define the hotel service providers, their classes, and different programs they offer by navigating to SPRO | Financial Accounting (New) | Travel Management | Travel Planning | Master Data | Travel Service Providers | Hotels | Define Hotel Chains or via the SM30/31 T-code in the V_TA21P_H table. There are some standard entries available for room rates via the Amadeus reservation system. It also depends on the providers; they can store their own rates according to their company policy. We can see the following standard entries maintained via the Amadeus reservation system: CON (conventional rate) COR (company rate) FAM (family rate) GOV (statutory rate) MIL (military rate) PKG (package rate) PRO (promotion rate) RAC (standard rate) SRS (senior citizen rate) STP (stopover rate) TUR (tourist rate) TVL (rate for travel industry) WKD (weekend rate)
  • 459.
    The standard entriesvia the Amadeus reservation system can be accessed by navigating to SPRO | Financial Accounting (New) | Travel Management | Travel Planning | Master Data | Travel Service Providers | Hotels | Define hotel rates or via the SM30/31 T-code in the V_TA21H table. The room classes are defined via the SM30/31 T-code in the V_TA21HO table or by navigating to SPRO | Travel Management | Travel Planning | Master Data | Travel Service Providers | Hotels | Define room classes. The car rental service provider's details can be maintained by navigating to SPRO | Financial Accounting (New) | Travel Management | Travel Planning | Master Data | Travel Service Providers | Car Rentals | Define car rental companies or via the SM30/31 T-code in the V_TA21P_C table. We can also define the customer programs and classes similarly how we defined for rooms and flights via the SM30/31 T-code in the V_TA21PF_C and V_TA21CA table. The Travel Planning components also have the functionality of defining the agreements between travel service providers and customer programs such as frequent flier. They can be defined by navigating to SPRO | Financial Accounting (New) | Travel Management | Travel Planning | Master Data | Travel Service Providers | Define Agreements Between Travel Service Providers on Customer programs or via the SM30/31 T-code in the V_TA21PFA table. Any questions regarding the Travel Planning or Travel Expenses that need to be addressed by a concerned person can be defined by navigating to SPRO | Financial Accounting (New) | Travel Management | Travel Planning | Master Data | Define Contact Persons. We can define all the credit card providers' details by navigating to SPRO | Financial accounting (New) | Travel Management | Travel Planning | Master Data | Define Credit Card Providers for Travel Planning. It's a two-character code followed by long text. We can keep the entries in the following V_T706_CCOMP table: ID Name of the credit card company AX American Express
  • 460.
    ID Name ofthe credit card company MC MasterCard Any negotiations we have with the travel service providers can be stored in SAP. This feature is useful during the reservation of travel services such as flights, room bookings, and so on. The negotiated rates and discounts for airlines can be maintained by navigating to SPRO | Financial Accounting (New) | Travel Management | Travel Planning | Rates and Discounts | Airline rates and discounts | Define Airfare Rates or via the SM30/31 T- code in the V_TA20NEGOF_2 table. The mandatory parameters for defining the airline rates are as follows: Field Mandatory Provider Yes Validity period Yes Fare type Yes There are optional fields that might / might not be maintained in the table, and they are shown as follows: Field Optional Price information Yes Flight direction Yes
  • 461.
    Field Optional Flight cabinclass Yes Start and destination locations Yes Similarly, we can also maintain the discounted rates of other service providers such as hotel bookings by navigating to SPRO | Financial Accounting (New) | Travel Management | Travel Planning | Rates and Discounts | Define Enterprise-Specific Hotel Rates or via the SM30/31 T- code in the V_TA20NHC table. The different parameters based on which the rates are defined, are as follows: Geographical area Location Hotel chain or chain of hotels Validity period The car booking can be maintained by navigating to SPRO | Financial Accounting (New) | Travel Management | Travel Planning | Rates and Discounts | Car Rental Rates or via the SM31/31 T-code in the V_TA20NCR_2 table. SAP also has the provision of maintaining the internal trip policies and procedures that can be mapped to SAP using the 0470 (Travel Profile) infotype. This infotype contains the special rules that govern a group of employees, for example, a board of directors being given a special flight and room. If the 0470 infotype is not maintained for an employee, the trip rules are automatically applied via the TRVCP feature, as shown in the following screenshot:
  • 462.
    If the 0470(Travel Profile) infotype is not maintained, the system will check the TRVCP feature. SAP has the functionality of maintaining the trip rules for the following travel service providers: Flight Hotel Rental car Rail Some of the categories based on which the trip rules are defined, are as follows: Travel service category providers such as flight bookings, room bookings, and so on Travel locations such as IATA locations, regions, and so on Class of the service (first class, for instance) The trip rules and travel policies are maintained for flights, hotels, car, and rails by navigating to SPRO | Financial Accounting (New) | Travel Management | Travel Planning | Trip rules and profiles | Trip and Class rules | Trip and Class rules for flight/hotel/car rentals. The mode of payment for travel plan can be maintained by navigating to SPRO | Financial Accounting (New) | Travel Management | Travel Planning | Process control | Payment Method. SAP delivers standard payment methods that can be supported; these methods are as follows:
  • 463.
    C: This refersto payment through a corporate credit card R: This refers to an invoice B: This refers to payment by cash P: This refers to payment through a personal credit card The payment method can be executed via the TRVCC Assign Groupings for Payment Method feature. The other control parameters such as details of building a store in the 0032I table needs to be shown in PNR; only then can we maintain the address in the TA20BUILDING table or by navigating to SPRO | Financial accounting (New) | Travel Management | Travel Planning | Expert View | Assign Building Addresses.
  • 464.
    Configuring Travel Expenses Afterthe trip is completed, the Travel Expenses report is completed by the employee with the supporting documents. The Travel Expense report is then sent for approval. This again can be automated with the workflow settings. The system determines the Travel Expenses results and also determines the amount to be reimbursed for the travel expenses incurred by the employee. The expenses are always transferred to the Finance module by posting to finance module and then to controlling. The settlement of the amount can happen in any of the following ways: This can happen via a check This can happen via payroll accounting This can happen via financial accounting Bank transfer to the employee's bank account via Data Medium Exchange (DME) The first step in Travel Expense is to define the trip provision variant. It helps us to determine the specific applicable policies based on validity areas such as private or public sector using the travel expense accounting method. The trip provision variant is defined by navigating to SPRO | Financial Accounting (New) | Travel Management | Travel Expenses | Master Data | Control Parameters for Travel Expenses | Define/Delete/Restore Trip Provision Variants or via the SM30/31 T-code in the V_T706N table. This is shown in the following screenshot:
  • 465.
    Two trip provisionvariants must be defined if there is a requirement for representing two different valid areas in one system. If different verticals, industries, or countries have different sets of accounting principles, then we need to have multiple variants set up. This is shown in the following table: Country Tax-free reimbursement Trip provision variant Description of trip provision variant XX Media industry 90 Media industry accounting principles XX Manufacturing 91 Manufacturing industry principles The TRVCT feature is used to execute the trip provision variant based on the organizational requirements. It is defined by navigating to SPRO | Financial Accounting (New) | Travel Management | Travel Expenses | Master Data | Control Parameters for Travel Expenses | Assign Organizational Areas to Trip Provision Variants via Feature. The global settings for each trip provision variant enables us to set the applicability of the payroll based on country grouping and its wage type validity. The currencies and input tax applicability can also be controlled in this customizable table. The different methods for converting the recipient currencies to trip currencies can also be controlled. We can set the global settings options by navigating to SPRO | Financial Accounting (New) | Travel Management | Travel Expenses | Master Data | Control Parameters for Travel Expenses | Define Global Settings or via the SM30/31 T-code in the V_706D_B table. This is shown in the following screenshot:
  • 466.
    The valid entryvalues for control parameters for cost accounting that can be maintained, employee-wise, in the master data in 0017I (travel privileges) is set up by navigating to SPRO | Financial Accounting (New) | Travel Management | Travel Expenses | Master Data | Control Parameters for Travel Expenses | Control Parameters for Travel Privileges.
  • 467.
    The grouping configurationssuch as reimbursement groups for travel costs, statutory meals and accommodation reimbursement groups, employee grouping for Travel Expense types, and employee groupings for Travel Management are all defined to be maintained in the master data of each employee in the 0017 infotype. We have seen this infotype in the Master data required for Travel Management section in this chapter. The control parameters for trip data is defined by navigating to SPRO | Financial Accounting (New) | Travel Management | Travel Expenses | Master Data | Control Parameters for Travel Expenses | Control Parameters from Trip Data. The prerequisite is that the trip provisions variant must have been defined. The statutory trip types and trip activities types are also defined in the control parameters from the trip data nodes. The Travel Expense type serves as a conduit for capturing travel expenses for a business trip and settling expenses incurred for travel. The expenses based on individual receipts or per diem are defined based on the trip provision variant. The expense types such as breakfast, flight, laundry, and so on are defined by navigating to SPRO | Financial Accounting (New) | Travel Management | Travel Expenses | Master Data | Travel Expense Types | Create Travel Expense Types for Individual Receipts. This is shown in the following screenshot:
  • 468.
    The maximum amountfor each expense type, for example, 30 USD for breakfast, can be defined by navigating to SPRO | Financial Accounting (New) | Travel Management | Travel Expenses | Define Maximum Rates and Default Values for Expense Types or via the SM30/31 T-code in the V_T706B2 table. SAP recommends that you set the end date to 31,129,999. It also helps to restrict the changing and delimiting of the end date. We define the Expenses types for per diem or flat rates by navigating to SPRO | Financial Accounting (New) | Travel Management | Travel Expenses | Create Travel Expense Types for Per Diems/Flat Rates or via the SM30/31 T-code in the V_T706B1_A table. This is shown in the following screenshot:
  • 469.
    We can definefor each travel provision variant, only if combination from one of the three options of accounting of both the individual receipts and per diem/flat rates is available. This is possible by navigating to SPRO | Financial Accounting (New) | Travel Management | Travel Expenses | Travel Expense Types | Define Per Diem/Flat Rate or Individual Receipt Reimbursement or via the SM30/31 T-code in the V_T702N_J table. The travel position variant is a dialog window and looks as shown in the following screenshot:
  • 470.
    For the purposeof credit card expense settlement, the credit card companies' details must be maintained. This will enable us to assign credit cards to the Travel Expense types in SAP. This is defined by navigating to SPRO | Financial Accounting (New) | Travel Management | Travel Expenses | Master Data | Credit Card Clearing | Define Credit Card Companies. Some standard abbreviations that SAP has provided are as follows: AX: American Express DC: Diners MC: MasterCard TP: Airplus VI: Visa The payment of the amount that needs to be reimbursed can happen in the following ways: Travel advance Credit card clearing By check
  • 471.
    Through payroll accounting Bybank transfer to the employee's bank account The data of travel expenses, and wage types are stored in the ROT cluster tables, and we have to define the wage types for each expense type for settlement. These wage types serve as an interface between accounting and travel. We will define the travel expense wage types for individual receipts and per diem/flat rates by navigating to SPRO | Financial Accounting (New) | Travel Management | Travel Expenses | Wage Types for Interfaces | Assign Wage Types to Travel Expense Types for Individual Rec or via the SM30/31 T-code in the V_T706B4 table. There will be first wage type and second wage type that needs to be defined for expense type, where the tax free share of the expense amount is stored, while the taxable part of expense amount is stored in wage type two. This is shown in the following screenshot: Similarly, wage types are assigned to flat rate or per diems by navigating to SPRO | Financial Accounting (New) | Travel Management | Travel Expenses | Wage Types for Interfaces | Assign Wage Types to Travel
  • 472.
    Expense Types forPer Diems/Flat or via the SM30/31 T-code in the V_T706B4_A table. To transfer the travel accounting results to the finance system, we have to set up symbolic accounts. A symbolic account serves as an interface between wage types; this is very important in travel accounting and for accounts in financial accounting. There are two important steps that need to be performed; they are as follows: Assigning wage types to symbolic accounts Assigning symbolic accounts to expense accounts in financial accounting We execute the preceding steps by navigating to SPRO | Financial Accounting (New) | Travel Management | Travel Expenses | Transfer to Accounting | Define Assignment of Wage Type to Symbolic Account or via the SM30/31 T-code in the V_T706K table. This is shown in the following screenshot: The sign below the symbolic account has a specific meaning, as shown in the following table: Sign Significance + A positive amount is posted to debits of the G/L account - A positive amount is posted to credits of the G/L account
  • 473.
    The symbolic accountsare then assigned to the expense account by navigating to SPRO | Financial Accounting (New) | Travel Management | Travel Expenses | Transfer to Accounting | Conversion of Symbolic Account to Expense Account or via the PRT3 T-code. It is very important to understand the meaning of the following groups: HRT: This is used to identify travel expense postings: expense accounts HRP: This is used to identify travel expense postings: customers/vendors/clearing account The following screenshot demonstrates the FI configuration: When we double-click on the procedure and enter the chart of account, we will now be able to assign the G/L account number. If the travel expenses are reimbursed using different vendors, then SAP has the functionality only if the status icon is included in the travel expense manager (PR05) and trip manager (TRIP). We define the SAP functionality by navigating to SPRO | Financial Accounting (New) | Travel Management | Travel Expenses | Transfer to Accounting | Determine FI Payment Date. The accounting results can be transferred as flat file to payment banks via DME. The house bank needs to be set up, and TRVHB is used to execute the house bank and the account from which the expenses have to be reimbursed
  • 474.
    to the employee.This can be done by navigating to SPRO | Financial Accounting (New) | Travel Management | Travel Expenses | Transfer to Data Medium Exchange.
  • 475.
    Integration aspects withother application components We will learn two important integration aspects; one is the integration of Travel Planning and Travel Expenses that enable us to transfer data from Travel Plan to Travel Expense reports, and the other one is transferring travel accounting results to payroll. There are activation steps required for using Travel Manager, Travel Planning, and Travel Expenses. For the Travel Manager, there are three components available that can be flagged, and they are explored as follows: Create Travel Requests Plan a business trip Create travel expense report For each trip provision variant, we have to activate the components that are active in the TRIP T-code, backend, and the Web Dynpro portal interface. The SAP standard has three components activated for all the trip provision variants. The activation is checked by navigating to SPRO | Financial Accounting (New) | Travel Management | Integration of Travel Planning and Travel Expenses | Settings for travel manager Activate Request/Plan/Expense Report in Travel Manager or via the SM30/31 T- code in the V_T702N_O. This is shown in the following screenshot: The integration aspects of Travel Planning and expenses are controlled by navigating to SPRO | Financial Accounting (New) | Travel Management |
  • 476.
    Integration of TravelPlanning and Travel Expenses | Activate Integration | Travel Planning | Travel Expenses or via the SM30/31 T-code in the V_706D_C table. The travel accounting results can be transferred to payroll by performing the following steps. Travel Management and payroll can be run in the same logical system or different systems and can interfaced using the Application Link Enabling (ALE). To have the integration active between payroll and travel in subschema, GREI must be activated in the payroll schema, for example, G000 (Great Britain payroll schema). This is shown in the following screenshot: For integration between travel and payroll, the GREI subschema needs to be activated. The subschema has a ASREI function that cumulates all the expenses incurred for the travel per payroll period in wage types, and the wage types are maintained in the T706B table. These values held in the wage types are posted to the finance accounting module. Tip PR_CHECK is a useful tool to check the customizing settings for the Travel Management submodule. We can make use of the tool to check the customizing settings of the following components in Travel Management: Travel Planning Travel Expenses (expense report) Geocoding Homepage Framework
  • 477.
    Summary In this chapter,we have learned the steps to configure Travel Management in detail. We have covered important infotypes pertaining to the Travel Management submodule. In the next chapter, Chapter 10, Building a Report Using SAP Query Viewer, we will closely look at building reports without any ABAP or technical skills. We will have a lot of things to play around and dabble with in the next chapter for sure.
  • 478.
    Chapter 10. Buildinga Report Using SAP Query Viewer SAP has provided an easy-to-use tool to build a query to meet business requirements. We don't need to know the Advanced Business Application Programming (ABAP) programming language to develop reports. The SAP query viewer will make this task very simple, and we will learn to transport queries across different clients. In this chapter, we will cover the following topics: Building an ad hoc query using the SQ01 transaction code Executing a report using an ad hoc query Developing a report using SQVI
  • 479.
    Building an adhoc query using the SQ01 transaction code The following steps need to be performed in order to build an ad hoc query: Create a user group using the SQ03 TCD. The prerequisite for building a query is the user group. Second, we create an infoset using the SQ02 TCD. Finally, we create a query using the SQ01 TCD.
  • 480.
    Steps for creatingthe user group The user group is a 12-character long code; SAP recommends that you use any special characters, numeric code, or characters to define the user group. There are four options available to choose from. They are as follows: Create Change Display Description The Create option is used to define the name of the user group, as shown in the following screenshot. The user group is a twelve-character long code followed by its description. We are attempting to create a user group by the name ZPACKT; we can also change the name created by clicking on Change. When trying to create a
  • 481.
    query, the systemwill prompt us to specify the package name where it needs to be saved. Packages are technical objects in the ABAP work bench. They are normally called using the following T-codes: SE80: We can enter the package name, and we can access it by double- clicking on it SM30: This is from the V_TDEVC table/view We will see the program listed under the $TMP package, as shown in the following screenshot: The $TMP package is only a temporary package, and a proper package name needs to be created and used in the development client. A package is created using the SE80 T-code. This $TMP package is the one we will be using when we save the user group. The table view of V_TDEVC looks like the following screenshot when we access it via SM30/31:
  • 482.
    When the usergroup is created, the system prompts us to enter the description of the user group, as shown in the following screenshot, where we are giving it the name Test Query. The date and time stamp are captured for audit purposes.
  • 483.
    We need toclick on the Save button. When the Save button is clicked on, the system prompts us to enter the package name where we would like to save the object. We will enter $TMP, as shown in the following screenshot. We will also go to SE80 and see how this is getting captured in the package. We could either enter $TMP or click on a local object (F7). Both perform the same task. Then, we can use SE80 to see how this is captured in the package.
  • 484.
    If we wouldlike to change the package, then we can do so by navigating to User group | Change Package from the menu, as shown in the following screenshot: The Change Package option helps us assign a different package if required, instead of the one already assigned. SAP also provides options such as copying the user group created by pressing F9 or renaming the user group by pressing Ctrl + F1. The next step is to assign the usernames to the user group by clicking on the Assign users and InfoSets button. The username is 12 characters in length and is assigned in order to access the user group, as shown in the following screenshot:
  • 485.
    The username canalso be deleted if required by clicking on the Delete option (Shift + F2). Once the user ID is assigned, there will be a flag next to the username. This flag indicates that the mapping is active, as shown in the following screenshot:
  • 486.
    Steps for creatingthe infoset The infoset is created using the SQ02 TCD by entering the infoset name and description. There are multiple options we can choose the source of data from. These options are as follows: Table join using basis table Direct read of table Logical database Data retrieval by program The pnpce logical database enables us to choose all the infotypes that we want to choose the input and output for. We will choose the infotypes that the data is going to be fetched from, as shown in the following screenshot:
  • 487.
    The infoset needsto be generated by clicking on Generate (Shift + F6). Once it is executed, the system checks the infoset and prompts a message stating that the infoset is generated at the bottom of the screen, as shown in the following screenshot:
  • 488.
    Once the infosetis created and generated, we can go to the SQ01 TCD, enter the name of the query, and click on the Create button. The infoset created earlier will be displayed to be chosen. This infoset has the fields from tables that are mapped using LDB PNPCE.
  • 489.
    Steps for creatinga query The Create Query screen looks like the following screenshot: There are multiple output formats that can be chosen while creating the query. They are as follows: SAP List viewer ABAP List Graphic
  • 490.
    ABC analysis Executive InformationSystem EIS File store Display as table Word processing Spreadsheet Private file We need to click on Save (Ctrl + S) and then on test (Ctrl + F8). We can also execute the query after saving it as a variant by choosing the Execute only with variant checkbox. We can also lock this query from changes being made by other users by flagging the Change lock checkbox, as shown in the following screenshot: We need to go back and execute the query (F8) or execute it as a variant (Shift + F5), as shown in the following screenshot:
  • 492.
    Executing a reportusing an ad hoc query We will now see how we can execute a report using an ad hoc query. We will learn to use the user group and infoset that we created using the SQ03/SQ02 TCD. We can execute an ad hoc query by navigating to SAP Easy Access | SAP Menu | Human Resources | Information systems | Reporting tools | S_PH0_48000513 or directly via the S_PH0_48000513 TCD. When we execute the transaction code, the screen looks like the one in the following screenshot. We will have to change the Work area from Standard area (client-specific) to Global area (cross-client) in the Environment window and choose the user group that we created, for example, ZPACKT. Tip User groups get listed only when they are based on the work area assigned while creating them. We can check or change it by navigating to SQ03 | Environment | Query Areas. The query area can be defaulted in the user profile by assigning the AQW (ABAP Query area) parameter in the user profile, as shown in the following screenshot:
  • 493.
    The query areacontains a set of objects (user groups, infosets, queries) that are created via the SQ01, SQ02, and SQ03 TCDs. The entire gamut of SAP query functionalities can be explored with the standard and global areas. They are separate entities, and there is no relationship between the objects created in each area. We will look at the difference between the queries created in the standard and global clients now. Standard area: The queries that we create (infosets, user groups, queries) are specific to a particular client, and they are not attached to the work bench organizer. We can still transport the query, but it needs to be done manually. This query that is created in the standard area is not available across the system. Global area: The query objects that we create in the global area are available across clients, and they are connected to the work bench organizer. The query can be assigned to a different area by navigating to SQ03 | Environment | Query areas, as shown in the following screenshot: Only when we change the work area from standard to global will we be allowed to assign the user group that we created in the SQ01 TCD, as shown in the following screenshot:
  • 494.
    Now, the systemwill allow us to choose the input and output fields based on the requirement. We can also the save the query for frequent use by clicking on Save (Ctrl + S). We can enter the name and title of the query, as shown in the following screenshot:
  • 495.
    When we executethe query, the output looks like the one shown in the following screenshot:
  • 496.
    If you noticed,the personnel number is not displayed. In order to have the personnel number displayed, we need to right-click on the column and choose the appropriate option, as shown in the following screenshot: The selection in the ad hoc query allows us to change the default value, for example, 3 for Active Employment Status. In order to change the selection, we need to open the ad hoc query and in the main menu, click on Extras in the menu at the top and then click on Switch off object selection, as shown in the following screenshot:
  • 497.
    When switch offobject selection is chosen, we will be able to right-click on the field and choose one of the three available options. When Only text is chosen, we see the text-selection indicator next to the field name. We can see the Employment Status text showing in the output, as shown in the following screenshot: The output looks like the following screenshot with the text, as the option chosen is Only text:
  • 498.
    Tip The Hit listbutton is unavailable when switch off object selection is selected and the same has been confirmed by SAP. We need to click on Output to run the report.
  • 499.
    Frequent error messageswhen building an ad hoc query We normally come across this standard error message when we create a query and click on the Test button: No lists yet defined for query XX where XX is the query name in SQ01 Message no. AQ217 Analysis By performing some analysis, we can clearly see that the XX query doesn't have the report layout specified. Neither the basic list, nor statistics, nor the ranked list have been defined for the query report layout. Workaround Before executing the query, we need to define the report layout (basic list, statistics, or ranked list) to fix the error. We need to define the input and output in the list, select the fields to fix this error, and execute the query, as shown in the following screenshot:
  • 500.
    We have fouroptions to choose from; we can click on Basic List and choose the list and selection fields, as shown in the following screenshot: Tip Standard error messages are stored in the SE91 TCD.
  • 501.
    An interesting featureto tag the T-code with the report There is an interesting feature provided by SAP to tag the TCD to the report output. For example, we will have to maintain the employee master by simply double-clicking on the output. We will learn how this feature can be achieved by following the steps. Report Assignment is the feature we are discussing that makes this possible. The Report Assignment feature can be accessed via the SQ01 TCD and entering the query name (Shafiq Rehman, 2008, SCN) and clicking on Change. The report assignment allows you to assign the TCD to the report, and can be accessed by navigating to Goto | Report assignment from the menu, as shown in the following screenshot:
  • 502.
    When we clickon the Report assignment, the system populates the Assign Reports screen. When we click on Insert row (F6), there will be a new window to add the ABAP/4 query. The ABAP/4 query window has the following fields for the user to choose from: User group Query Variant The Global area checkbox We need to click on the other report type to enter the transaction code such as PA30, as shown in the following screenshot:
  • 503.
    The other reporttype has the following report types to choose from. In our case, we are trying to assign the TCD to the report, so we will be choosing transaction: Report type Name BB Report Portfolio BW BW Query QU SAP Query RE Drilldown Reporting RT ABAP Report Program RW Report Writer TR Transaction
  • 504.
    When we chooseTransaction, the system prompts us to enter the TCD such as PA30, and click on the tick symbol, as shown in the following screenshot: The query will now have the TCD mapped to it, so when we execute the query and double-click on the output, the system will take us to the Master Data Maintenance transaction (PA30).Click on Save (Ctrl + S), as shown in the following screenshot: When we execute the query and double-click on the output, the system takes us to the PA30 screen. The system shows the 'Maintain HR Master Data' is executed message at the bottom of the screen, as shown in the following screenshot. Interesting feature, isn't it?
  • 505.
    The PA30 screenwill allow us to maintain the master data for the chosen personnel instantly.
  • 506.
    Transport a queryacross clients Transporting queries across clients in the landscape is not achieved directly like in the configurable tables. We will learn the steps to transport a query. A query is transported by accessing the report by navigating to Enviornment | Transports (Ctrl + F3), as shown in the following screenshot: The difference between accessing the report directly from SQ02 or via the SE38/SA38 T-code from the RSAQR3TR table is that we will find the Transport Action Selection enabled for us to export or import the query option, as shown in the following screenshot:
  • 507.
    We need tochoose the Export option and check the following boxes. It will help us generate a transport request number that can be released and referenced in the client where we would like the query to be imported. Overwriting allowed Transport query variants Transport of Query Layout Variants Transport of Report-Report Interfaces of Queries It is mandatory that you mention the user groups, queries, or infosets from the following options provided: Transport user groups Transport Infosets Transport Infosets and queries Transport Queries After choosing any of the options, click on Execute, and the system generates a transport request number that we can note down and use in the
  • 508.
    client where wewould like to import the query, as shown in the following screenshot: We need to choose the Import option, and the transport request number needs to be referenced in the client where we are importing the query, as shown in the following screenshot: We need to refer to the transport request number in the Datasets with imports field.
  • 509.
    Develop a reportusing SAP Query Viewer (SQVI) SAP has provided a simple tool to develop reports with minimum programming knowledge. We will delve into the steps to create the reports using the SAP query viewer (SQVI) TCD. Although SQVI is simple, it is only specific to a particular user that is being tagged with it. We will also learn to convert query views to a SAP query in this section. The query view is accessed via the TCD SQVI, as shown in the following screenshot: As we note from the preceding screenshot, the quick view is tagged only to the user, Karthik. Unlike the SAP query, multiple users cannot have access to the same query view. We will assign a name to the query and click on the Create button. We can enter the long text in the new window that is autopopulated. There are multiple options that can be mentioned as a source of data for that query. They are as follows: Table Table join Logical database
  • 510.
    SAP Query InfoSet Wecan use Table as the data source and fetch output from the table used. We need to enter PA0001 in the Table/view field and then click on the Enter button, as shown in the following screenshot:
  • 511.
    When we choosethe PA0001 table, for example, all the fields related to this table are available for selection when we press Enter, as shown in the screenshot: We have two options to choose from for the design: Basis mode Layout mode The layout design has provisions to define the header text, footer text, and so on. The layout design looks like the following screenshot:
  • 512.
    We can definethe header text by double-clicking on it. We can also delete fields and move them to the trash by clicking on the Delete button. We can add lines by clicking on the insert line icon and dragging and positioning it in the place where we would like to add a line. The basis mode looks slightly different, and the provision to add a header and footer won't be available. The available fields are listed under the available fields' box, and we can choose the ones we would like to have as selection (input) or list fields (output). We can click on the Insert Field button to choose the input and output, as shown in the following screenshot:
  • 513.
    We will havefour tabs in the query design, as follows: List field selection Sort sequence Selection fields Data Source The data source gives us information about whether we have used the Table, Table Join, or Logical database as the source, as shown in the following screenshot: The Selection fields tab, as the name sounds, will have the field that will be available in the input screen of the report. The Sort sequence tab can be used to arrange the fields in the order of preference. The List field selection tab consists of the fields that we would like to have in the output. Let's say, for example, we choose Personnel number and Subtype as the selection fields, and in the output, we would like to have Personnel number alone. We can do this as shown in the following screenshot:
  • 514.
    When we clickon the data selection and output button (F8), the query that we see will have the input as Personnel number and Subtype and output as the personnel number, as shown in the following screenshot:
  • 515.
    Converting the queryview to a SAP query We discussed earlier that the query view is only available for a particular user and not for all of them. We will learn how a query view can be converted to a SAP query so that all the users can run the report using the same query. We need to go to the SQ01 TCD and navigate to Query | Convert QuickView. We have to enter the Quick View, Query, and InfoSet names for the conversion, as shown in the following screenshot: Tip The Convert quick view may be disabled from SQ01, and we have to go to Environment | Query area | Change from Global area to Standard area (Client specific) to have it enabled.
  • 516.
    Summary In this chapter,you learned to build and develop reports using the SAP query or quick view tools. You learned some tips and tricks to run the report with minimum programming skills. We got to know the difference between SAP query and quick views and how to convert the quick view to a query to be used by all users. Happy reporting! We hope the book served as a useful reference guide to configure the SAP HCM module. The configuration steps of the core modules and a new dimension module were covered from our experiences of working on different assignments.
  • 517.
    Index A 0000 (action) infotype about/ The 0000 (Actions) infotype functions / The 0000 (Actions) infotype 0006 (address) infotype about / The 0006 (Address) infotype functions / The 0006 (Address) infotype ABAP/4 query window about / An interesting feature to tag the T-code with the report Absence infotype (2001) about / The Absences infotype (2001) absence quotas Category / The Absence Quotas infotype (2006) Quota number / The Absence Quotas infotype (2006) Deduction / The Absence Quotas infotype (2006) Deduction from / The Absence Quotas infotype (2006) Deduction to / The Absence Quotas infotype (2006) Neg. deduction to / The Absence Quotas infotype (2006) tables, customizing for / Important nodes and/or customizing tables for Absence Quotas Absence Quotas nodes, configuring for / Nodes for configuring the Work schedule rule and Absence Quotas Absence Quotas infotype (2006) about / The Absence Quotas infotype (2006) generation rule configuration / Absence Quotas generation rule configuration tips, for generating / Tips to generate Absence Quotas without any hassles accounting AC system activities / Activities in an accounting AC system actions infotype (0000) about / The 0000 (Actions) infotype action type
  • 518.
    about / Configuringpersonnel actions activities in HR system / Activities in the HR system in accounting AC system / Activities in an accounting AC system activity status entries, SAP about / Configuring mandatory infotypes ADDDB operation / Important functions, operations, and features additional off-cycle payments infotype (0267) about / The 0267 (Additional off-cycle payments) infotype additional payments configuration (0015) about / The 0015 (Additional Payments) configuration additional payments infotype (0015) about / The 0015 (Additional Payments) infotype fields / The 0015 (Additional Payments) infotype ADDMB operation / Important functions, operations, and features ADDWT operation / Important payroll operations ADDZL operation / Important functions, operations, and features ad hoc query building, SQ01 TCD used / Building an ad hoc query using the SQ01 transaction code used, for executing report / Executing a report using an ad hoc query Advanced Business Application Program (ABAP) / Travel Request configuration steps Advanced Business Application Programming (ABAP) / Important functions, operations, and features AMT operation / Important payroll operations APPCREATE T-code, talent management submodule / The Talent Management submodule applicant by action report / Recruitment applicant class about / Recruitment medium applicant cycle overview / Applicant cycle applicant data, transferring to personnel administration procedure / Integration tools integration tools / Integration tools
  • 519.
    common errors /Common error message during data transfer applicant group about / Recruitment medium applicant number ranges display intervals / Channels or recruitment instruments change interval / Channels or recruitment instruments changed NR status / Channels or recruitment instruments applicants by name report / Recruitment Application Link Enabling (ALE) / Integration aspects with other application components appraisal category groups about / Objective setting and an appraisal's template configuration appraisals template configuration about / Objective setting and an appraisal's template configuration category group, creating / Category group creation category, creating / Category creation appraisal template about / Objective setting and an appraisal's template configuration creating, steps / Steps to create an appraisal template APPSEARCH T-code, talent management submodule / The Talent Management submodule ASREI function / Integration aspects with other application components Attendance/Absence Data Multiple-Employee View report / Time Management Attendance infotype (2002) / The Attendances infotype (2002) Attendance Quotas infotype (2007) about / The Attendance Quotas infotype (2007) Authorized Objects per User/Profile report / Organizational Management
  • 520.
    B 0008 (basic pay)infotype functions / The 0008 (Basic Pay) infotype about / The 0008 (Basic Pay) infotype 0009 (bank details) infotype functions / The 0009 (Bank Details) infotype about / The 0009 (Bank Details) infotype Bank Details report about / Payroll Accounting basic pay configuration (0008) about / The 0008 (Basic Pay) configuration basic pay infotype (0008) about / The 0008 (Basic Pay) infotype fields / The 0008 (Basic Pay) infotype basic settings, personnel development component / Basic settings – Personnel Development basic settings, TEM / The basic settings in TEM Batch Data Collection (BDC) about / The qualification catalogue Business Add-In (BADI) about / Travel Request configuration steps business event preparation configuring / Configuring a business event preparation/event catalog
  • 521.
    C CAC1 T-code, timemanagement submodule / The Time Management submodule candidate reasons, for rejection / Applicant cycle career maintenance about / Career maintenance CATA T-code, time management submodule / The Time Management submodule channels about / Channels or recruitment instruments classified advertising about / Advertising vacancies clients queries, transporting across / Transport a query across clients COLER operation / Important functions, operations, and features collective agreement provision (CAP) / Configuring mandatory infotypes about / The 0008 (Basic Pay) configuration COLOP operation / Important functions, operations, and features COM function about / Schematic payroll schema command field about / Daily transactional codes company about / What makes the enterprise structure? company code about / What makes the enterprise structure? concepts, Organization Management SPOCK / The concepts of Organization Management configuration, business event preparation time schedule / Time schedule physical location / Physical location master data / Master data resource management / Resource management business event catalogue / The business event catalog
  • 522.
    day-to-day activities /Day-to-day activities booking / Booking recurring activities / Recurring activities follow-up processing / Follow-up processing Employee Self-Service (ESS) / Employee Self-Service (ESS) configuration, node for Work schedule rule / Nodes for configuring the Work schedule rule and Absence Quotas for Absence Quotas / Nodes for configuring the Work schedule rule and Absence Quotas configuration, payroll about / Steps to configure the payroll wage types / Wage types configuration, payslip about / Configuring a payslip configuration steps, PA infotypes about / Configuration steps enterprise structure components / What makes the enterprise structure? personnel structure components / What makes the personnel structure? executing / What makes the personnel structure? company code, creating / What makes the personnel structure? personnel area and subareas, defining / What makes the personnel structure? employee group, defining / What makes the personnel structure? employee subgroup, defining / What makes the personnel structure? configuration steps, Travel Expenses module / Configuring Travel Expenses configuration steps, Travel Planning module / Configuring Travel Planning configuration steps, Travel Request module / Travel Request configuration steps control record about / Configuring mandatory infotypes, Control record elucidated
  • 523.
    functionalities / Controlrecord elucidated payroll status infotype (0003) / The 0003 (Payroll Status) infotype planned working time infotype (0007) / The 0007 (Planned Working Time) infotype basic pay infotype (0008) / The 0008 (Basic Pay) infotype cost distribution infotype (0027) / The 0027 (Cost Distribution) infotype recurring payment and deduction infotype (0014) / The 0014 (Recurring Payment and Deduction) infotype additional payments infotype (0015) / The 0015 (Additional Payments) infotype additional off-cycle payments infotype (0267) / The 0267 (Additional off-cycle payments) infotype control record status released for payroll / Control record elucidated released for correction / Control record elucidated exit payroll / Control record elucidated check payroll results / Control record elucidated COPY function about / Schematic payroll schema / Important payroll functions Cost Assignment for Trip report / Travel Management Cost Centre about / Creating a Cost Center creating / Creating a Cost Center cost distribution infotype (0027) about / The 0027 (Cost Distribution) infotype fields / The 0027 (Cost Distribution) infotype country key about / Configuring mandatory infotypes criterion about / Objective setting and an appraisal's template configuration Cross Application Time Sheet (CATS) about / Time Management CUMBT function / Important functions, operations, and features Cumulated Time Evaluation Results$ Time Balances/Time Wage Types report / Time Management
  • 524.
    customization, table for Workschedule rule / Important nodes and/or customizing tables for the Work schedule rule for absence quotas / Important nodes and/or customizing tables for Absence Quotas
  • 525.
    D daily work schedule(DWS) / The daily work schedule Data Medium Exchange(DME) / Configuring Travel Expenses Data Transfer Tool about / Integration tools Data Transfer Tools about / Data Transfer Tools day type / The day type Define Administrator about / Recruitment medium delete blank switch / Basic settings – Personnel Development development plan catalog about / Development plans display absence quota information report about / Time Management Display and Create Missing Inverse Relationships report / Organizational Management dynamic actions about / Dynamic actions configuring / Dynamic actions
  • 526.
    E employee referral program about/ Advertising vacancies Employee Remuneration infotype (2010) about / The Employee Remuneration infotype (2010) Employee Self-Service (ESS) about / Physical location, Employee Self-Service (ESS) employee sub group (ESG) about / Wage types employment agencies about / Advertising vacancies employment status entries, SAP about / Configuring mandatory infotypes enterprise structure components company / What makes the enterprise structure? company code / What makes the enterprise structure? personnel area / What makes the enterprise structure? personnel subareas / What makes the enterprise structure? error messages, on ad hoc query creation about / Frequent error messages when building an ad hoc query analysis / Analysis work around / Workaround ersonnel calculation rule (PCR) / Configuring mandatory infotypes Evaluate Careers report / Talent Management Expert Mode used, for building organizational structure / The Expert Mode organizational unit object, creating in / Creating an organizational unit object in the Expert Mode position object, creating in / Creating a position object in the Expert Mode job object, creating in / Creating a Job object in the Expert Mode Expert mode creating, Expert mode used / Creating an organizational structure using the Expert Mode
  • 527.
    F F.02/F-53/FBCJ/F110 TCD /Important transaction codes features, recruitment submodule PRELI / Integration with personnel administration PRELR / Integration with personnel administration PAPLI / Integration with personnel administration features, SAP / Features features, Travel Management module / Travel Management – features and functions fields, schema editor / Schematic payroll schema about / Schematic payroll schema Line / Schematic payroll schema Func / Schematic payroll schema Par1 / Schematic payroll schema Par 2 / Schematic payroll schema Par 3 / Schematic payroll schema Par 4 / Schematic payroll schema D / Schematic payroll schema Text / Schematic payroll schema fields, Travel Management module / Master data required for Travel Management fields functionalities, payroll area / Payroll area fields functionalities, payroll status infotype (0003) / The 0003 (Payroll Status) infotype finance module payroll processing, integrating with / Integration with the finance module finance posting statuses / Different statuses of a posting run finance steps payroll results, posting to / Posting payroll results to finance steps Flexible Employee Data report / Personnel Administration folder creating / Creating a folder and moving the T-codes Functional Consultants (FC) about / Transport requests in SAP
  • 528.
    functionalities, control record/ Control record elucidated functionalities, payroll area / Payroll area functionalities, Travel Request module / Travel Request configuration steps functions, Personnel Development about / Functions in Personnel Development functions, schematic payroll schema COM / Schematic payroll schema COPY / Schematic payroll schema functions, Travel Management module / Travel Management – features and functions
  • 529.
    G General Trip Data/TripTotals report / Travel Management generation rule configuration, Absence Quotas infotype (2006) / Absence Quotas generation rule configuration generation tips, Absence Quotas infotype (2006) about / Tips to generate Absence Quotas without any hassles frequent error message and workaround / Frequent error message and workaround Time Management-related tables / Important Time Management- related tables functions / Important functions, operations, and features operations / Important functions, operations, and features features / Important functions, operations, and features internal tables, used in time evaluation / Internal tables and cluster tables used in time evaluation cluster tables, used in time evaluation / Internal tables and cluster tables used in time evaluation tool, for checking configuration settings for quota generation / Tool to check the configuration settings for quota generation global distribution system (GDS) about / Configuring Travel Planning Global Time Constraint Reaction (V_T554Y) / Absence Quotas generation rule configuration GWT function / Important functions, operations, and features
  • 530.
    H hassle-free absence quotas generating/ Tips to generate Absence Quotas without any hassles, Frequent error message and workaround, Important functions, operations, and features, Internal tables and cluster tables used in time evaluation HCM about / Integration aspects with other submodules of HCM HCM submodules integration aspects / Integration aspects with other submodules of HCM Headcount changes report / Personnel Administration holiday calendar about / The holiday calendar HRS operation / Important functions, operations, and features HR system activities / Activities in the HR system
  • 531.
    I IATA about / ConfiguringTravel Planning IATA locations about / Configuring Travel Planning Infogroups about / Customizing the infotype menu and info groups configuring / Customizing the infotype menu and info groups menu type / Customizing the infotype menu and info groups infoset about / Steps for creating the infoset creating, SQ02 TCD used / Steps for creating the infoset infotype menu about / Customizing the infotype menu and info groups configuring / Customizing the infotype menu and info groups infotypes, for payroll processing about / Infotypes mandatory for payroll processing payroll infotypes / Payroll infotypes payroll area / Payroll area infotypes, mandatory configuration / Configuring mandatory infotypes Input Table (IT) / The Time Quota Compensation infotype (0416) integration aspects, HCM submodules about / Integration aspects with other submodules of HCM integration aspects, TEM module about / Integration aspects in the Training and Event Management module integration switches / Integration switches internal postings about / Advertising vacancies
  • 532.
    J job fairs about /Advertising vacancies job object creating, in Expert Mode / Creating a Job object in the Expert Mode
  • 533.
    K Key Data Structure(KDS) / What makes the personnel structure?
  • 534.
    L line number field,schema editor I command / Schematic payroll schema D command / Schematic payroll schema R command / Schematic payroll schema Rn command / Schematic payroll schema > command / Schematic payroll schema < command / Schematic payroll schema Logged Changes in Infotype Data / Personnel Administration LSMW (Legacy System Migration Work Bench) about / The qualification catalogue
  • 535.
    M MASEX feature /Important functions, operations, and features master data, for Personnel Development component about / Master data for the Personnel Development component qualification catalogue / The qualification catalogue career maintenance / Career maintenance functions / Functions in Personnel Development standard tools / Standard tools in the PD component development plans / Development plans Master Data Maintenance transaction about / An interesting feature to tag the T-code with the report menu types, SAP about / Customizing the infotype menu and info groups MODT about / The Work schedule rule MOLGA about / The Payroll Accounting submodule
  • 536.
    N /n+T-code about / Dailytransactional codes Nationalities report / Personnel Administration Net Weaver Exchange Infrastructure / Configuring Travel Planning node configuring, for Work schedule rule / Nodes for configuring the Work schedule rule and Absence Quotas configuring, for Absence Quotas / Nodes for configuring the Work schedule rule and Absence Quotas number range assignment recommendations / Recommendation on number range assignment number ranges, Travel Management module SNUM / Basic settings for number ranges PR10 / Basic settings for number ranges PR11 / Basic settings for number ranges PR12 / Basic settings for number ranges Number Ranges concept / The concept of Number Ranges NUMKR using / Recommendation on number range assignment NUM operation / Important payroll operations
  • 537.
    O /o+T-code about / Dailytransactional codes 0001 (organization assignment) infotype about / The 0001 (Organization Assignment) infotype functions / The 0001 (Organization Assignment) infotype objective settings about / Objective setting and an appraisal's template configuration OH11/PU30 T-code, Payroll Accounting submodule / The Payroll Accounting submodule OM reports / Organizational Management on-demand or additional payments configuration (0267) about / The 0267 (On-demand or Additional Payments) configuration online recruiting sites about / Advertising vacancies OOB1 T-code, talent management submodule / The Talent Management submodule OOHAP_SETTINGS_PA T-code, talent management submodule / The Talent Management submodule OOPS T-code / Integration switches Organizational Management (OM) submodule / The Recruitment submodule about / The Organization Management submodule T-code / The Organization Management submodule Organizational Management (OM) submodule, T-code PO03 / The Organization Management submodule Organizational Management (OM) submodule, T-code PPOCE / The Organization Management submodule PPOC_OLD / The Organization Management submodule PP01 / The Organization Management submodule PO10 / The Organization Management submodule PO13 / The Organization Management submodule PO03 / The Organization Management submodule PP03 / The Organization Management submodule PO14 / The Organization Management submodule
  • 538.
    organizational objects relationships between/ Basic relationships between organizational objects Organizational Plan component (PA-OS) about / Integration aspects in the Training and Event Management module organizational structure elucidating / Elucidating an organizational structure building, methods / Building an organizational structure creating, multiple interfaces used / Creating an organizational structure with different interfaces building, Organization and Staffing method used / Organization and Staffing relationship between Org unit, and Position / The relationship between an Org unit and Position relationship between Position, and Job / The relationship between Position and Job building, Simple Maintenance method used / Simple Maintenance Cost Centre, creating / Creating a Cost Center building, Expert Mode used / The Expert Mode position object, creating in Expert Mode / Creating a position object in the Expert Mode job object, creating in Expert Mode / Creating a Job object in the Expert Mode concept, of Number Ranges / The concept of Number Ranges scenarios, of using external number assignment / Scenarios where we use external number assignment plan version, activating / The Plan Version plan version, maintaining / The Plan Version creating, Expert mode used / Creating an organizational structure using the Expert Mode table configuration steps / Configuring the table organizational unit object creating, in Expert Mode / Creating an organizational unit object in the Expert Mode Organization and Staffing method
  • 539.
    used, for buildingorganizational structure / Organization and Staffing organization assignment infotype (0001) about / The 0001 (Organizational Assignment) infotype Organization Management concepts / The concepts of Organization Management integrating, with Personnel Administration / Integrating Organization Management with Personnel Administration tools, purpose / The purpose of the OM tool Organization Management(OM), SAP standard reports / Organization Management Organization Management, with Personnel Administration integration switches / Integration switches Data Transfer Tools / Data Transfer Tools RHINTE Reports / RHINTE Reports OM tool, purpose / The purpose of the OM tool Overtime infotype (2005) about / The Overtime infotype (2005)
  • 540.
    P 0002 (personal data)infotype about / The 0002 (Personal Data) infotype functions / The 0002 (Personal Data) infotype 0007 (planned working time) infotype functions / The 0007 (Planned Working Time) infotype about / The 0007 (Planned Working Time) infotype P2001 function / Important functions, operations, and features P2006 function / Important functions, operations, and features PA03 T-code, Payroll Accounting submodule / The Payroll Accounting submodule PA20 T-code, personnel administration submodule / The Personnel Administration submodule PA30 T-code, personnel administration submodule / The Personnel Administration submodule PA40 T-code, personnel administration submodule / The Personnel Administration submodule PA42 T-code, personnel administration submodule / The Personnel Administration submodule PA61 T-code, time management submodule / The Time Management submodule PA70 T-code, personnel administration submodule / The Personnel Administration submodule PA71 T-code, time management submodule / The Time Management submodule PA infotypes about / Personnel Administration infotypes and configuration steps / Important infotypes that are mandatory and their configuration steps, The 0000 (Actions) infotype, The 0001 (Organization Assignment) infotype, The 0007 (Planned Working Time) infotype, The 0008 (Basic Pay) infotype, The 0009 (Bank Details) infotype 0000 (action) infotype / The 0000 (Actions) infotype 0001 (organization assignment) infotype / The 0001 (Organization Assignment) infotype 0002 (personal data) infotype / The 0002 (Personal Data) infotype
  • 541.
    0006 (address) infotype/ The 0006 (Address) infotype 0007 (planned working time) infotype / The 0007 (Planned Working Time) infotype 0008 (basic pay) infotype / The 0008 (Basic Pay) infotype 0009 (bank details) infotype / The 0009 (Bank Details) infotype PAPLI about / Integration with personnel administration Payday calendar report / Payroll Accounting Paydays on holidays or weekends report about / Payroll Accounting payroll configuring / Steps to configure the payroll Payroll Accounting, SAP standard reports / Payroll Accounting Payroll Accounting report / Payroll Accounting Payroll Accounting submodule about / The Payroll Accounting submodule T-code / The Payroll Accounting submodule Payroll Accounting submodule, T-code PU03 / The Payroll Accounting submodule PA03 / The Payroll Accounting submodule PC00_MXX_SIMU / The Payroll Accounting submodule PC00_MXX_CALC / The Payroll Accounting submodule PC00_MXX_PA03_RELEA / The Payroll Accounting submodule PC00_MXX_PA03_CORR / The Payroll Accounting submodule PC00_MXX_PA03_END / The Payroll Accounting submodule PC00_MXX_CEDT / The Payroll Accounting submodule PE51 / The Payroll Accounting submodule PC00_MXX_CDTA / The Payroll Accounting submodule PUOC_99 / The Payroll Accounting submodule PC00_M99_CIPE / The Payroll Accounting submodule PCP0 / The Payroll Accounting submodule PC00_M99_CIPC / The Payroll Accounting submodule OH11/PU30 / The Payroll Accounting submodule PE01 / The Payroll Accounting submodule PE02 / The Payroll Accounting submodule PE04 / The Payroll Accounting submodule PC00_M99_DLGA20 / The Payroll Accounting submodule
  • 542.
    PC00_M99_DKON / ThePayroll Accounting submodule PCXX / The Payroll Accounting submodule PC00 / The Payroll Accounting submodule PC_Payresult / The Payroll Accounting submodule payroll area about / Payroll area functionalities / Payroll area fields functionalities / Payroll area payroll configuration wage types / Wage types basic pay configuration (0008) / The 0008 (Basic Pay) configuration recurring payments and deductions configuration (0014) / The 0014 (Recurring Payments and Deductions) configuration additional payments configuration (0015) / The 0015 (Additional Payments) configuration on-demand or additional payments configuration (0267) / The 0267 (On-demand or Additional Payments) configuration payroll functions COPY / Important payroll functions WPBP / Important payroll functions PGM / Important payroll functions UPD / Important payroll functions PIT / Important payroll functions PRT / Important payroll functions payroll infotypes about / Payroll infotypes actions (0000) / The 0000 (Actions) infotype organization assignment (0001) / The 0001 (Organizational Assignment) infotype payroll operations VWTCL / Important payroll operations AMT / Important payroll operations NUM / Important payroll operations RTE / Important payroll operations ADDWT / Important payroll operations payroll processing
  • 543.
    integrating, with financemodule / Integration with the finance module payroll results posting, to finance steps / Posting payroll results to finance steps payroll status infotype (0003) about / The 0003 (Payroll Status) infotype fields functionalities / The 0003 (Payroll Status) infotype payscale type about / Configuring mandatory infotypes payslip configuring / Configuring a payslip PB10 T-code, recruitment submodule / The Recruitment submodule PB20 T-code, recruitment submodule / The Recruitment submodule PB30 T-code, recruitment submodule / The Recruitment submodule PBA1 T-code, recruitment submodule / The Recruitment submodule PBA2 T-code, recruitment submodule / The Recruitment submodule PBA7 T-code, recruitment submodule / The Recruitment submodule PBA8 T-code, recruitment submodule / The Recruitment submodule PBAA T-code, recruitment submodule / The Recruitment submodule PBAW T-code, recruitment submodule / The Recruitment submodule PBAY T-code, recruitment submodule / The Recruitment submodule PC00 T-code, Payroll Accounting submodule / The Payroll Accounting submodule PC00_M99_CIPC T-code, Payroll Accounting submodule / The Payroll Accounting submodule PC00_M99_CIPET-code, Payroll Accounting submodule / The Payroll Accounting submodule PC00_M99_DKON T-code, Payroll Accounting submodule / The Payroll Accounting submodule PC00_M99_DLGA20 T-code, Payroll Accounting submodule / The Payroll Accounting submodule PC00_MXX_CALC T-code, Payroll Accounting submodule / The Payroll Accounting submodule PC00_MXX_CDTA T-code, Payroll Accounting submodule / The Payroll Accounting submodule PC00_MXX_CEDT T-code, Payroll Accounting submodule / The Payroll Accounting submodule
  • 544.
    PC00_MXX_PA03_CORR T-code, PayrollAccounting submodule / The Payroll Accounting submodule PC00_MXX_PA03_END T-code, Payroll Accounting submodule / The Payroll Accounting submodule PC00_MXX_PA03_RELEA T-code, Payroll Accounting submodule / The Payroll Accounting submodule PC00_MXX_SIMU T-code, Payroll Accounting submodule / The Payroll Accounting submodule PCP0 T-code, Payroll Accounting submodule / The Payroll Accounting submodule PCR Operation ZLEN / The Time Quota Compensation infotype (0416) 3 / The Time Quota Compensation infotype (0416) 1234 / The Time Quota Compensation infotype (0416) AMT=6789 / The Time Quota Compensation infotype (0416) AMT/30 / The Time Quota Compensation infotype (0416) MULTI ANA / The Time Quota Compensation infotype (0416) ADDWT / The Time Quota Compensation infotype (0416) PCXX T-code, Payroll Accounting submodule / The Payroll Accounting submodule PC_Payresult T-code, Payroll Accounting submodule / The Payroll Accounting submodule PE01 T-code, Payroll Accounting submodule / The Payroll Accounting submodule PE02 T-code, Payroll Accounting submodule / The Payroll Accounting submodule PE04 T-code, Payroll Accounting submodule / The Payroll Accounting submodule PE51 T-code, Payroll Accounting submodule / The Payroll Accounting submodule period work schedule / The period work schedule personnel actions about / Configuring personnel actions configuring / Configuring personnel actions dynamic actions / Dynamic actions Personnel Administration
  • 545.
    Organization Management, integratingwith / Integrating Organization Management with Personnel Administration personnel administration recruitment, integrating with / Integration with personnel administration Personnel Administration, SAP standard reports / Personnel Administration Personnel Administration report / Personnel Administration personnel administration submodule T-code / The Personnel Administration submodule about / The Personnel Administration submodule personnel administration submodule, T-code PA20 / The Personnel Administration submodule PA30 / The Personnel Administration submodule PA40 / The Personnel Administration submodule PA42 / The Personnel Administration submodule PA70 / The Personnel Administration submodule personnel area about / What makes the enterprise structure? factors, influencing / What makes the enterprise structure? personnel area (PA) / The daily work schedule personnel calculation rule about / The Payroll Accounting submodule Personnel Calculation Rules (PCR) writing / Writing a PCR to meet your customer's requirements about / Personnel calculation rule (PCR) frequent error message / Frequent error messages and workaround work around / Frequent error messages and workaround Personnel Development functions / Functions in Personnel Development personnel development component basic settings / Basic settings – Personnel Development Personnel Development component master data / Master data for the Personnel Development component personnel structure components employee group / What makes the personnel structure?
  • 546.
    employee subgroup /What makes the personnel structure? payroll area / What makes the personnel structure? organization key / What makes the personnel structure? personnel subarea (PSA) about / Wage types personnel subareas about / What makes the enterprise structure? PGM function / Important payroll functions PHAP_CATALOG T-code, talent management submodule / The Talent Management submodule PHAP_CATALOG_PA T-code, talent management submodule / The Talent Management submodule PIT function / Important payroll functions Planned Working Time infotype (0007) about / The Planned Working Time infotype (0007) planned working time infotype (0007) about / The 0007 (Planned Working Time) infotype Plant Data Collection (PDC) / The Planned Working Time infotype (0007) plan version about / Scenarios where we use external number assignment, The Plan Version activating / The Plan Version maintaining / The Plan Version pnpce logical database / Steps for creating the infoset PO03 T-cold, Organization Management (OM) submodule / The Organization Management submodule PO10 T-cold, Organization Management (OM) submodule / The Organization Management submodule PO13 T-cold, Organization Management (OM) submodule / The Organization Management submodule PO14 T-cold, Organization Management (OM) submodule / The Organization Management submodule position object creating, in Expert Mode / Creating a position object in the Expert Mode
  • 547.
    PP03 T-cold, OrganizationManagement (OM) submodule / The Organization Management submodule PP61 T-code, time management submodule / The Time Management submodule PPCP T-code, talent management submodule / The Talent Management submodule PPEM T-code, talent management submodule / The Talent Management submodule PPMOD feature about / Activities in the HR system PPO1 T-cold, Organization Management (OM) submodule / The Organization Management submodule PPOCE T-code, Organization Management (OM) submodule / The Organization Management submodule PPOC_OLD T-code / Simple Maintenance PPOC_OLD T-cold, Organization Management (OM) submodule / The Organization Management submodule PPOME T-code about / The relationship between an Org unit and Position, The relationship between Position and Job PPSP T-code, talent management submodule / The Talent Management submodule PR03 TCD / Important transaction codes PR05 T-code, travel management submodule / The Travel Management submodule PR05 TCD / Important transaction codes PR10 TCD / Basic settings for number ranges PR11 TCD / Basic settings for number ranges PR12 TCD / Basic settings for number ranges PRAA TCD / Important transaction codes PRAP T-code, travel management submodule / The Travel Management submodule PRAP TCD / Important transaction codes PREC T-code, travel management submodule / The Travel Management submodule PREC TCD / Important transaction codes PRELI
  • 548.
    about / Integrationwith personnel administration / Integration with personnel administration PRELR about / Integration with personnel administration / Integration with personnel administration PRFI T-code, travel management submodule / The Travel Management submodule PRFI TCD / Important transaction codes PRRW T-code, travel management submodule / The Travel Management submodule PRRW TCD / Important transaction codes PRT function / Important payroll functions PR_CHECK tool / Integration aspects with other application components PSV1 T-code, training and event management submodule / The Training and Event Management submodule PSV2 T-code, training and event management submodule / The Training and Event Management submodule PSVQ T-code, training and event management submodule / The Training and Event Management submodule PT01 T-code, time management submodule / The Time Management submodule PT50 T-code, time management submodule / The Time Management submodule PT60 T-code, time management submodule / The Time Management submodule PT62 T-code, time management submodule / The Time Management submodule PTMW T-code, time management submodule / The Time Management submodule PT_CLSTB2 T-code, time management submodule / The Time Management submodule PT_ERL00 T-code, time management submodule / The Time Management submodule PU03 T-code, Payroll Accounting submodule / The Payroll Accounting submodule
  • 549.
    PUOC_99 T-code, PayrollAccounting submodule / The Payroll Accounting submodule
  • 550.
    Q qualification catalogue about /The qualification catalogue Qualification overview report about / Talent Management queries transporting, across clients / Transport a query across clients queries, in global area / Executing a report using an ad hoc query queries, in standard area / Executing a report using an ad hoc query query creating, SQ01 TCD used / Steps for creating a query query view converting, to SAP query / Converting the query view to a SAP query QUOMO feature / Important functions, operations, and features Quota Correction infotype (2013) about / The Quota Correction infotype (2013) QUOTA function / Important functions, operations, and features
  • 551.
    R recruitment integrating, with personneladministration / Integration with personnel administration recruitment instruments about / Advertising vacancies, Channels or recruitment instruments internal postings / Advertising vacancies employee referral program / Advertising vacancies classified advertising / Advertising vacancies search firms / Advertising vacancies employment agencies / Advertising vacancies job fairs / Advertising vacancies online recruiting sites / Advertising vacancies used, for mapping vacant position / Vacant position mapping using recruitment instruments recruitment medium about / Recruitment medium Recruitment report, SAP standard reports / Recruitment Recruitment standard reports about / Recruitment recruitment submodule about / The Recruitment submodule T-code / The Recruitment submodule recruitment submodule, T-code PB10 / The Recruitment submodule PB20 / The Recruitment submodule PB30 / The Recruitment submodule PBA1 / The Recruitment submodule PBA2 / The Recruitment submodule PBAW / The Recruitment submodule PBAY / The Recruitment submodule PBAA / The Recruitment submodule PBA7 / The Recruitment submodule PBA8 / The Recruitment submodule recurring payment and deduction infotype (0014)
  • 552.
    about / The0014 (Recurring Payment and Deduction) infotype recurring payments and deductions configuration (0014) about / The 0014 (Recurring Payments and Deductions) configuration relationship type, Organization Management A002 / Basic relationships between organizational objects B002 / Basic relationships between organizational objects A003 / Basic relationships between organizational objects B003 / Basic relationships between organizational objects A007 / Basic relationships between organizational objects B007 / Basic relationships between organizational objects A012 / Basic relationships between organizational objects B012 / Basic relationships between organizational objects A011 / Basic relationships between organizational objects A008 / Basic relationships between organizational objects B008 / Basic relationships between organizational objects Remote Function Call (RFC) about / Configuring Travel Planning report executing, ad hoc query used / Executing a report using an ad hoc query developing, SQVI used / Develop a report using SAP Query Viewer (SQVI) Report Assignment feature about / An interesting feature to tag the T-code with the report report output TCD, tagging to / An interesting feature to tag the T-code with the report RFTP_SYNCHRO_PREFRFTP_SYNCHRO_PREF program / Configuring Travel Planning RHINTE00 tool about / RHINTE Reports RHINTE10 tool / RHINTE Reports RHINTE20 tool / RHINTE Reports RHINTE30 tool / RHINTE Reports RHINTECHECK tool about / The purpose of the OM tool
  • 553.
    RHINTE Reports about /RHINTE Reports RHQINTE0 report about / Integration aspects with other submodules of HCM RHQINTE1 report about / Integration aspects with other submodules of HCM ROUND operation / Important functions, operations, and features RPIT25APP report about / Integration aspects with other submodules of HCM RPTERL00 report / Internal tables and cluster tables used in time evaluation RPTERR00 report / Internal tables and cluster tables used in time evaluation RPUCTP00 report / Frequent error message and workaround RTE operation / Important payroll operations
  • 554.
    S Sabre about / ConfiguringTravel Planning SAP standard statuses / Applicant cycle about / Applicant cycle features / Features transport request / Transport requests in SAP SAP-delivered function codes about / Configuring personnel actions SAP-delivered indicators about / Dynamic actions SAP Easy Access window about / Daily transactional codes SAP Plant Maintenance and Customer Service (PM/CS) / The Planned Working Time infotype (0007) SAP Production Planning (PP) and Process Control (PP/PI) / The Planned Working Time infotype (0007) SAP Project Systems (PS) / The Planned Working Time infotype (0007) SAP query query view, converting to / Converting the query view to a SAP query SAP standard reports overview / An overview of SAP standard reports Recruitment / Recruitment Organization Management(OM) / Organization Management Personnel Administration / Personnel Administration Time Management / Time Management Payroll Accounting / Payroll Accounting Talent Management / Talent Management Training and Event Management / Training and Event Management Travel Management / Travel Management schema editor fields / Schematic payroll schema
  • 555.
    schematic payroll schema about/ Schematic payroll schema functions / Schematic payroll schema SE80 TCD / Steps for creating the user group search firms about / Advertising vacancies SEMIN HISTO switch about / Day-to-day activities SEMIN ORT switch about / Physical location SEMIN WKAPM switch about / Day-to-day activities service pack (SP) about / Wage types Simple Maintenance used, for building organizational structure / Simple Maintenance SM30 TCD / Steps for creating the user group SNUM TCD / Basic settings for number ranges SPOCK about / The concepts of Organization Management SQ01 TCD used, for building ad hoc query / Building an ad hoc query using the SQ01 transaction code used, for creating query / Steps for creating a query SQ02 TCD used, for creating infoset / Steps for creating the infoset SQ03 TCD used, for creating user group / Steps for creating the user group SQVI used, for developing report / Develop a report using SAP Query Viewer (SQVI) standard function characters, SAP about / Dynamic actions standard reports about / Standard reports Recruitment / Recruitment Organizational Management / Organizational Management
  • 556.
    Personnel Administration /Personnel Administration Time Management / Time Management Payroll Accounting / Payroll Accounting Talent Management / Talent Management Training and Event Management / Training and Event Management Travel Management / Travel Management standard tools, in Personnel Development / Standard tools in the PD component STAT2 about / Configuring personnel actions STAT2 entries about / Configuring personnel actions STATU feature about / Applicant cycle STMS about / Transport requests in SAP submodule configuration tips / Tips and tricks that will be handy while configuring the submodule submodule configuration tips number range assignment recommendation / Recommendation on number range assignment mandatory infotypes configuration / Configuring mandatory infotypes S_AHR_61011841 T-code, training and event management submodule / The Training and Event Management submodule S_AHR_61011843 T-code, training and event management submodule / The Training and Event Management submodule S_AHR_61011845 T-code, training and event management submodule / The Training and Event Management submodule S_AHR_61011888 T-code, training and event management submodule / The Training and Event Management submodule S_AHR_61011889 T-code, training and event management submodule / The Training and Event Management submodule S_AHR_61011893 T-code, training and event management submodule / The Training and Event Management submodule
  • 557.
    S_PH9_46000434T-code, training andevent management submodule / The Training and Event Management submodule
  • 558.
    T $TMP package /Steps for creating the user group T-code about / Daily transactional codes accessing, via SAP Easy Access / Daily transactional codes adding, to Favorites / Daily transactional codes used, for technical screen call / Daily transactional codes moving, to folder / Creating a folder and moving the T-codes table configuration steps / Configuring the table Table Maintenance about / Vacant position mapping using recruitment instruments tables customizing, for Work schedule rule / Important nodes and/or customizing tables for the Work schedule rule customizing, for absence quotas / Important nodes and/or customizing tables for Absence Quotas Talent Management, SAP standard reports / Talent Management Talent Management report / Talent Management talent management submodule about / The Talent Management submodule T-code / The Talent Management submodule talent management submodule, T-code PHAP_CATALOG / The Talent Management submodule PPEM / The Talent Management submodule PPCP / The Talent Management submodule PPSP / The Talent Management submodule OOB1 / The Talent Management submodule APPSEARCH / The Talent Management submodule PHAP_CATALOG_PA / The Talent Management submodule OOHAP_SETTINGS_PA / The Talent Management submodule APPCREATE / The Talent Management submodule TCD tagging, to report output / An interesting feature to tag the T-code with the report TCD, Travel Management module TRIP / Important transaction codes
  • 559.
    PR03 / Importanttransaction codes PR05 / Important transaction codes PRAP / Important transaction codes PREC / Important transaction codes PRFI / Important transaction codes PRRW / Important transaction codes F.02/F-53/FBCJ/F110 / Important transaction codes PRAA / Important transaction codes XK03 / Important transaction codes TEM basic settings / The basic settings in TEM TEM module integration aspects / Integration aspects in the Training and Event Management module Time Constraint (TC) class / Absence Quotas generation rule configuration Time Constraint Reaction (V_554Y_B) / Absence Quotas generation rule configuration Time Evaluation (RPTIME00) program / The Planned Working Time infotype (0007) Time Management, SAP standard reports / Time Management Time Management infotypes about / Time Management infotypes Planned Working Time infotype (0007) / The Planned Working Time infotype (0007) Absence infotype (2001) / The Absences infotype (2001) Attendance infotype (2002) / The Attendances infotype (2002) Absence Quotas infotype (2006) / The Absence Quotas infotype (2006) Attendance Quotas infotype (2007) / The Attendance Quotas infotype (2007) Overtime infotype (2005) / The Overtime infotype (2005) Employee Remuneration infotype (2010) / The Employee Remuneration infotype (2010) Quota Correction infotype (2013) / The Quota Correction infotype (2013)
  • 560.
    Time Quota Compensationinfotype (0416) / The Time Quota Compensation infotype (0416) Time Management report / Time Management time management submodule about / The Time Management submodule T-code / The Time Management submodule time management submodule, T-code PT01 / The Time Management submodule PTMW / The Time Management submodule PP61 / The Time Management submodule PA61 / The Time Management submodule PA71 / The Time Management submodule PT50 / The Time Management submodule PT62 / The Time Management submodule ERL00 / The Time Management submodule PT_CLSTB2 / The Time Management submodule CAC1 / The Time Management submodule CATA / The Time Management submodule Time Management T-code / Talent Management Time Quota Compensation infotype (0416) about / The Time Quota Compensation infotype (0416) Time spent in each pay scale area/type/group/level report / Personnel Administration TMSTA DEFAULT VALUE FOR TIME MANAGEMENT STATUS feature / The Planned Working Time infotype (0007) Training and Event Management, SAP standard reports / Training and Event Management Training and Event Management report / Training and Event Management about / Training and Event Management fields / Training and Event Management training and event management submodule about / The Training and Event Management submodule T-code / The Training and Event Management submodule training and event management submodule, T-code about / The Training and Event Management submodule
  • 561.
    S_AHR_61011845 / TheTraining and Event Management submodule S_AHR_61011843 / The Training and Event Management submodule S_AHR_61011841 / The Training and Event Management submodule PSVQ / The Training and Event Management submodule S_AHR_61011893 / The Training and Event Management submodule S_AHR_61011889 / The Training and Event Management submodule S_AHR_61011888 / The Training and Event Management submodule PSV2 / The Training and Event Management submodule PSV1 / The Training and Event Management submodule S_PH9_46000434 / The Training and Event Management submodule Training and Event Management T-code / Training and Event Management transport request, SAP / Transport requests in SAP Travel Expense component / Basic settings for number ranges Travel Expenses module configuration steps / Configuring Travel Expenses Travel Management, SAP standard reports / Travel Management Travel Management module about / Travel Management – features and functions features / Travel Management – features and functions functions / Travel Management – features and functions basic settings, for number ranges / Basic settings for number ranges master data / Master data required for Travel Management infotypes, for booking Travel Planning / Master data required for Travel Management fields / Master data required for Travel Management TCD / Important transaction codes transaction code / Important transaction codes
  • 562.
    integration aspects, withother application components / Integration aspects with other application components Travel Management report about / Travel Management selection parameters / Travel Management travel management submodule about / The Travel Management submodule T-code / The Travel Management submodule travel management submodule, T-code TRIP / The Travel Management submodule PR05 / The Travel Management submodule PRAP / The Travel Management submodule PREC / The Travel Management submodule PRFI / The Travel Management submodule PRRW / The Travel Management submodule Travel Management T-code / Travel Management Travel Planning module configuration steps / Configuring Travel Planning prerequisites, for using features / Configuring Travel Planning Travel Request module configuration steps / Travel Request configuration steps functionalities / Travel Request configuration steps TRIP T-code, travel management submodule / The Travel Management submodule
  • 563.
    U UPD function /Important payroll functions user group about / Steps for creating the user group creating, SQ03 TCD used / Steps for creating the user group user group (UGR) about / Applicant cycle
  • 564.
    V vacancies handling / Handlingvacancies advertising / Advertising vacancies vacancy maintenance steps / Vacancy maintenance steps vacant position mapping, recruitment instruments used / Vacant position mapping using recruitment instruments Variable Applicant List report about / Recruitment VARST operation / Important functions, operations, and features VWTCL operation / Important payroll operations
  • 565.
    W wage type assignment about/ Activities in an accounting AC system wage types about / Wage types Web Dynpro about / Travel Request configuration steps Where-used functionality about / The qualification catalogue work centre basic pay (WPBP) infotype about / Payroll infotypes work schedule rule about / The Work schedule rule Work schedule rule nodes, configuring for / Nodes for configuring the Work schedule rule and Absence Quotas tables, customizing for / Important nodes and/or customizing tables for the Work schedule rule holiday calendar / The holiday calendar daily work schedule / The daily work schedule period work schedule / The period work schedule day type / The day type WPBP-FUWPBP function / The 0000 (Actions) infotype WPBP function / Important payroll functions
  • 566.
    X XK03 TCD /Important transaction codes