Download to read offline

![Total Site to Sites Linux Based Open VPN Solution with DDNS Page 2
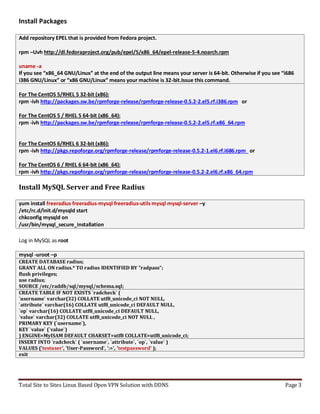
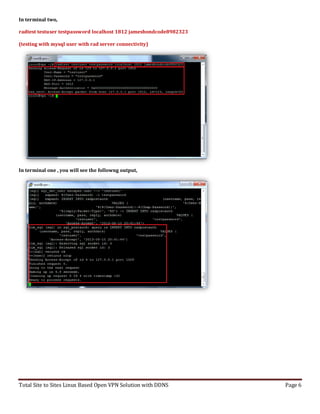
Now onto the easy step-by-step installation of no-ip client. Run the following 6 commands from the
terminal:
mkdir noip && cd noip
wget http://www.no-ip.com/client/linux/noip-duc-linux.tar.gz
tar zvxf noip-duc-linux.tar.gz
cd noip-2.1.9-1
make
make install
Please enter the login/email string for no-ip.com (email account that you used to set-up no-ip account)
Please enter the password for user(password that you used to login to no-ip)
Please enter an update interval: [30] 30
(Increments in minutes that you want no-ip client to check if your router’s external dynamic IP address has changed
and updates it accordingly.)
Do you wish to run something at successful update? [N] (y/N) N(Just enter “N” here.)
/usr/local/bin/noip2(To start/run noip client)
echo ‘/usr/local/bin/noip2′ >> /etc/rc.local(To start/run noip client after each system reboot
More useful no-ip commands
/usr/local/bin/noip2 -C to configure noip client
/usr/local/bin/noip2 -S to display info about running noip client
/usr/local/bin/noip2 -U to set update intervals (in minutes)
Most Important Settings on Free Radius Server (192.168.2.205) and Open VPN Server
(192.168.2.204)
Please set the correct Time & date in your VPN Access server and Free Radius Server:
Date:
date -s "9 AUG 2013 11:32:08"
Time:
date +%T -s "11:32:08"
After that you must be correctly Setup that yours VPN server's CA.cert Time Zone and Server Key Time
Settings as well.
Please make sure to use same version of VPN Clent Software aslo with the server verions as well.](https://image.slidesharecdn.com/freeradiusbillingserverwithpracticalvpnexmaple-200213033942/85/Free-radius-billing-server-with-practical-vpn-exmaple-2-320.jpg)


![Total Site to Sites Linux Based Open VPN Solution with DDNS Page 17
BgkqhkiG9w0BAQEFAAOBjQAwgYkCgYEAuMcVrtq8Y/en+R6scsKl4EHMSU1e9xzQ
nHsbG8U93YHGQL8iJThdCaw/FS85ekTQmyQLS5qdFPOWEYPGbiR/ROH9yjD/VWzC
2OHSdmE+6w909tKjLWQSNpiBQaq5InSd/UrJ98Usw2hHz6yk/gkeTwkNip75UHGG
XREC6FUa6zUCAwEAAaOB/zCB/DAdBgNVHQ4EFgQUzli9ONAdxV7S73RTOpfaXP99
HDIwgcwGA1UdIwSBxDCBwYAUzli9ONAdxV7S73RTOpfaXP99HDKhgZ2kgZowgZcx
CzAJBgNVBAYTAlVLMQswCQYDVQQIEwJOUjEVMBMGA1UEBxMMQXR0bGVib3JvdWdo
MRkwFwYDVQQKFBBIaWRlIE15IEFzcyEgUHJvMQwwCgYDVQQLEwNWUE4xGjAYBgNV
BAMTEXZwbi5oaWRlbXlhc3MuY29tMR8wHQYJKoZIhvcNAQkBFhBjYUBoaWRlbXlh
c3MuY29tggkAjPJMDBldWigwDAYDVR0TBAUwAwEB/zANBgkqhkiG9w0BAQUFAAOB
gQCqNwcaCyebKsSQt6IqnCMB+WaSjrxnRgD1hqgReho/fD2D5+mHYAfs22Y5R0GQ
uLwmH+88OfIgsK9Wy0cKknGVML2E5fV+AUVWpPkAx8nZVNUuhj9N6nN+891pTIQc
jRdJbgqyUwlmc+/eyiLB8/s7GmqOoDK5UrSEyBoi8XhRBQ==
-----END CERTIFICATE-----
</ca>
cipher AES-256-CBC
comp-lzo
verb 3
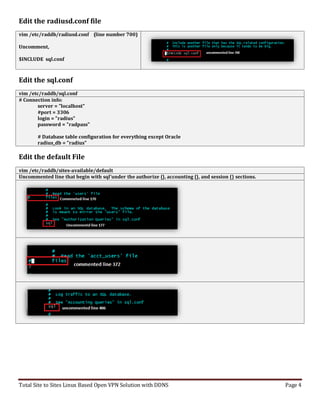
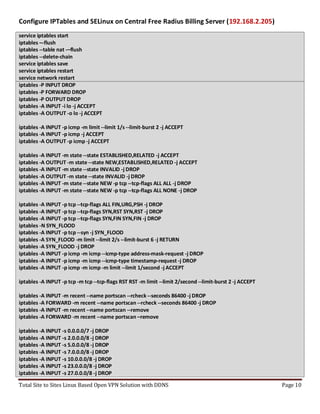
Troubleshooting
Testing:
tail -f /var/log/openvpn.log
tail -f /var/log/openvpn-status.log
iptables -L -t nat –n
ip route
route –n
radiusd –X
radtest lasantha 1234 192.168.2.205 1812 jamesbondcode8982323 (Username = lasantha,
Password 1234, Radius Svr = 192.168.2.205, Secret of Radius Server = jamesbondcode8982323)
tcpdump
tracert 192.168.2.204
Backup Free Radius Server’s MySQL Database
{mysqldump -u root -p[root_password] [database_name] > dumpfilename.sql}
Ex:-
mysqldump -u root -pz80cpu radius > radius.sql
Restore a database:-
{mysql -u root -p[root_password] [database_name] < dumpfilename.sql}
Ex:-
mysql -u root -pz80cpu radius < /tmp/radius.sql
Just use WinSCP Free Software Tool for Transfering MySQL Backup Database file into you Laptop](https://image.slidesharecdn.com/freeradiusbillingserverwithpracticalvpnexmaple-200213033942/85/Free-radius-billing-server-with-practical-vpn-exmaple-17-320.jpg)

This document provides instructions for setting up a total site-to-site Linux-based OpenVPN solution with dynamic DNS (DDNS) in 3 pages. It includes steps to install and configure a DDNS client, FreeRADIUS server, MySQL database, OpenVPN server, firewall rules, and a web interface for managing the FreeRADIUS server. The full document contains technical details for installing packages, editing configuration files, testing the setup, and securing the system.