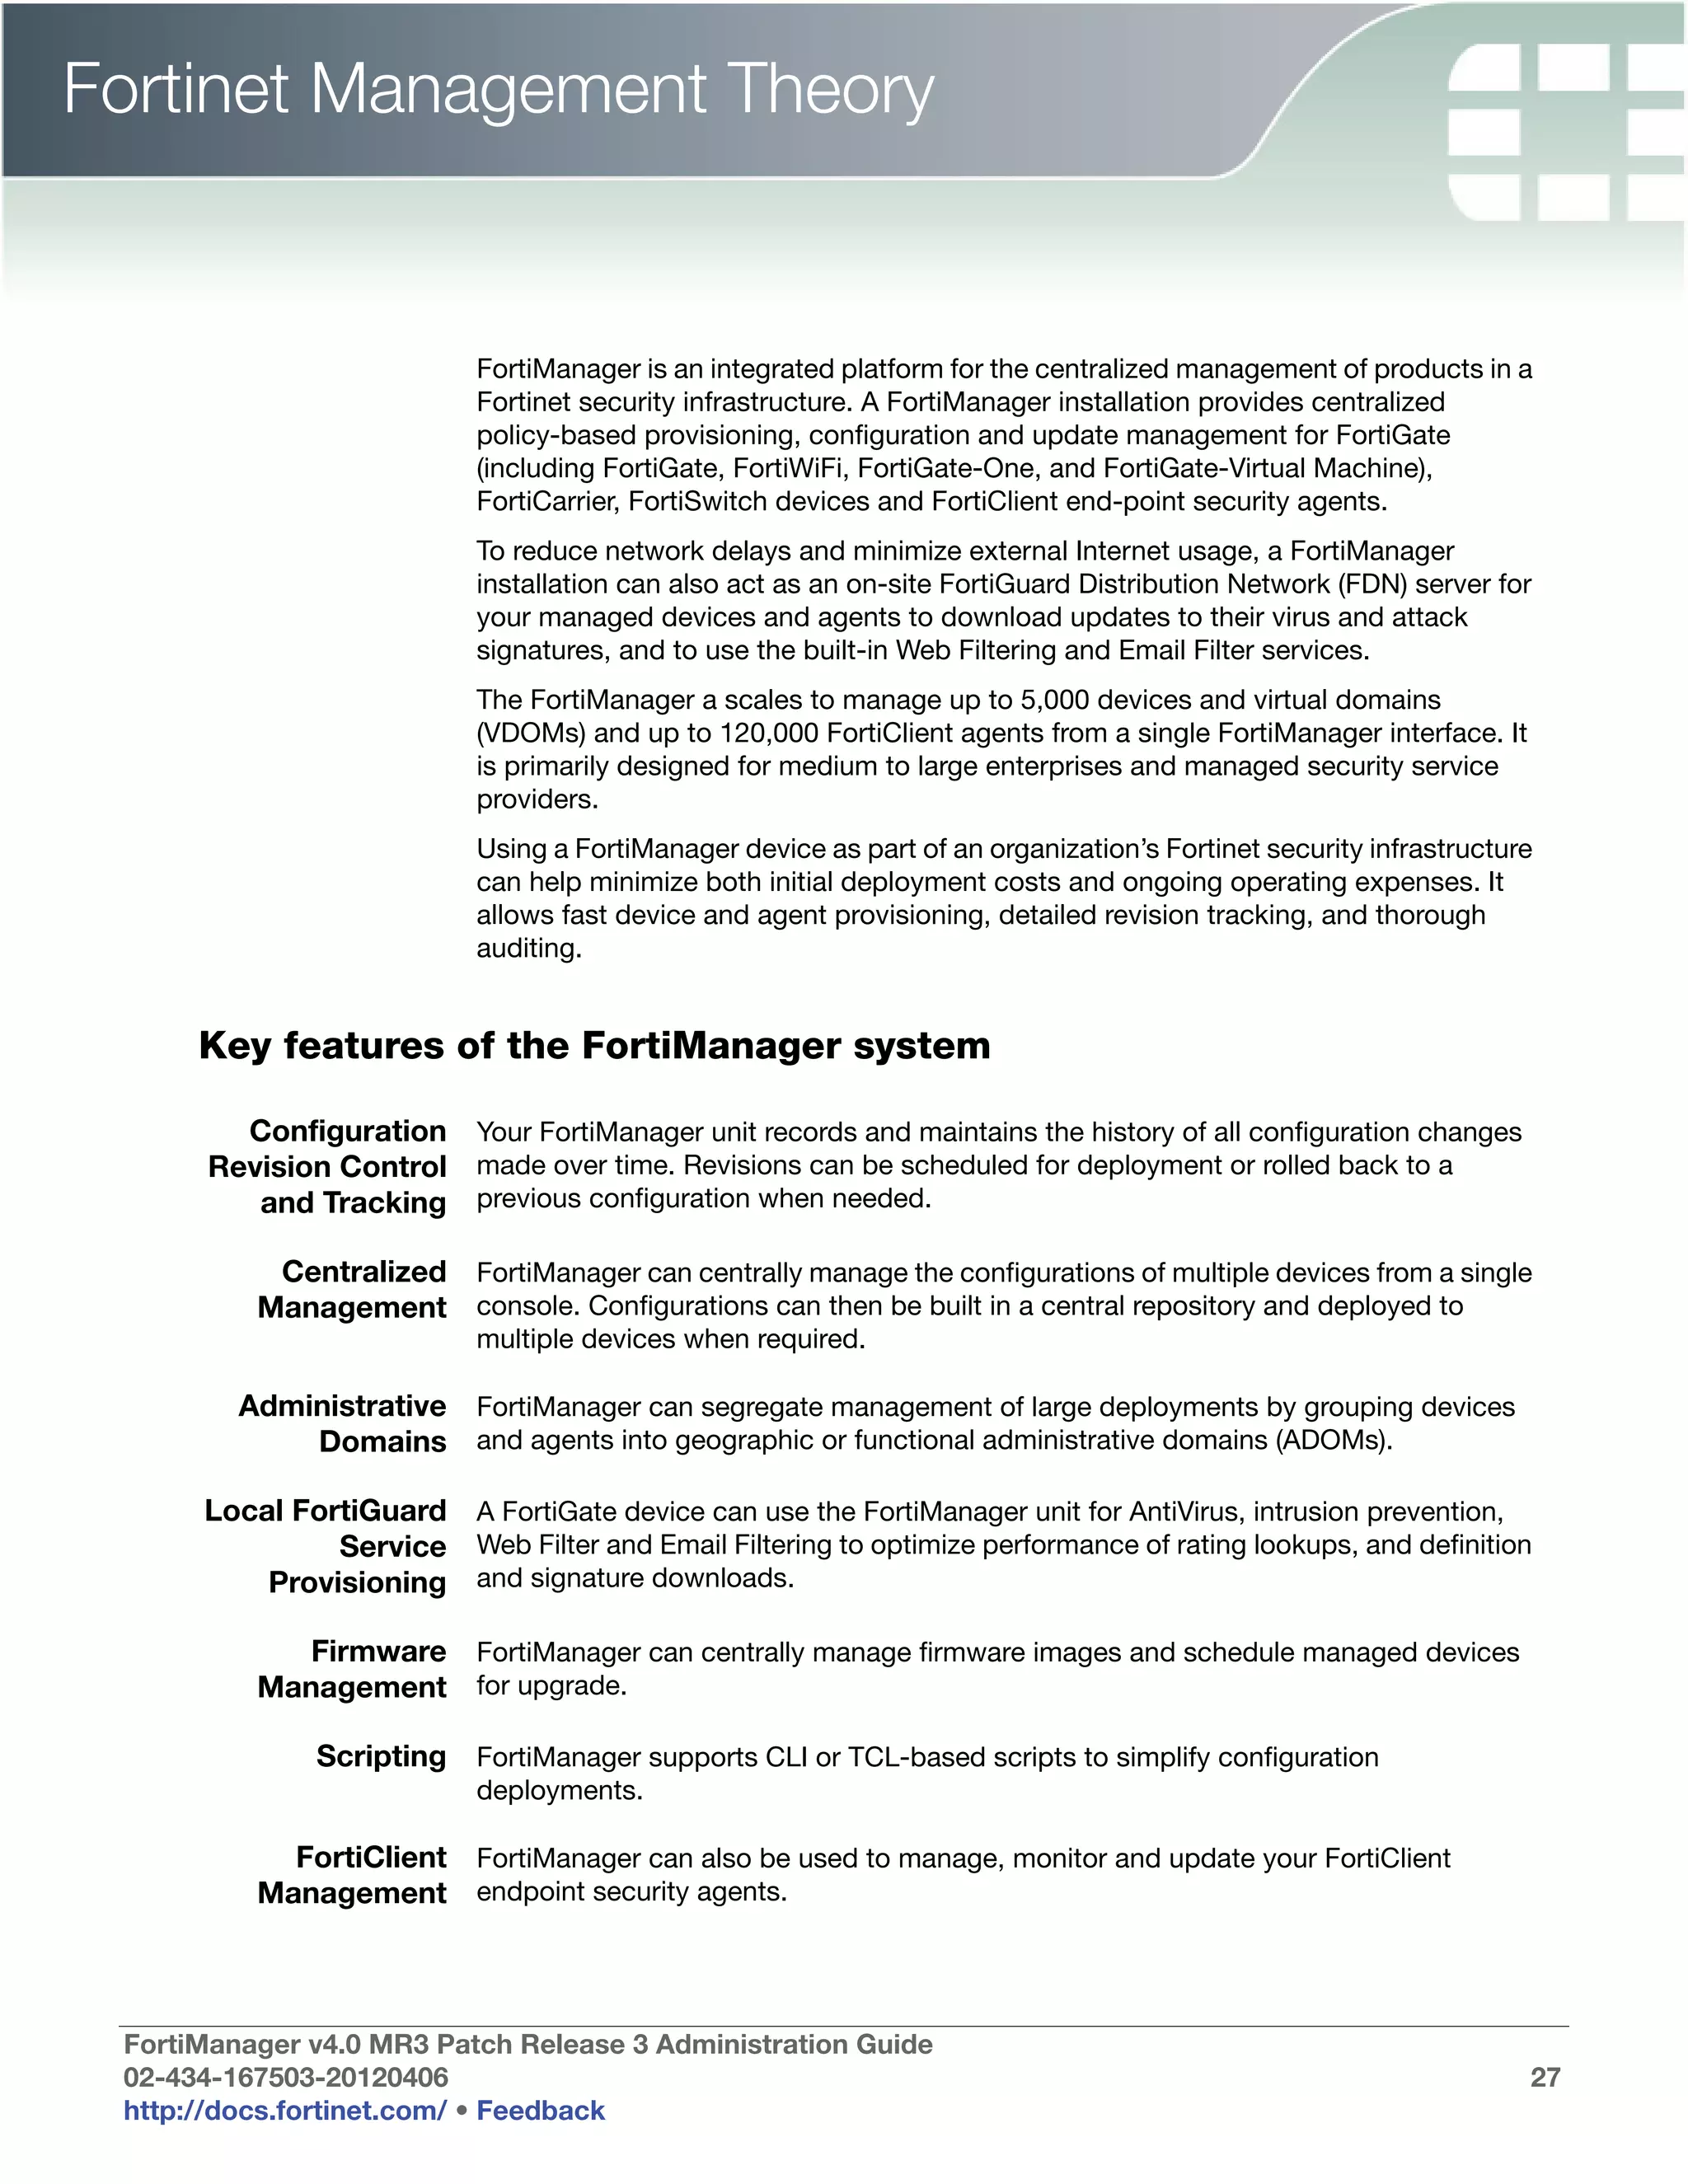
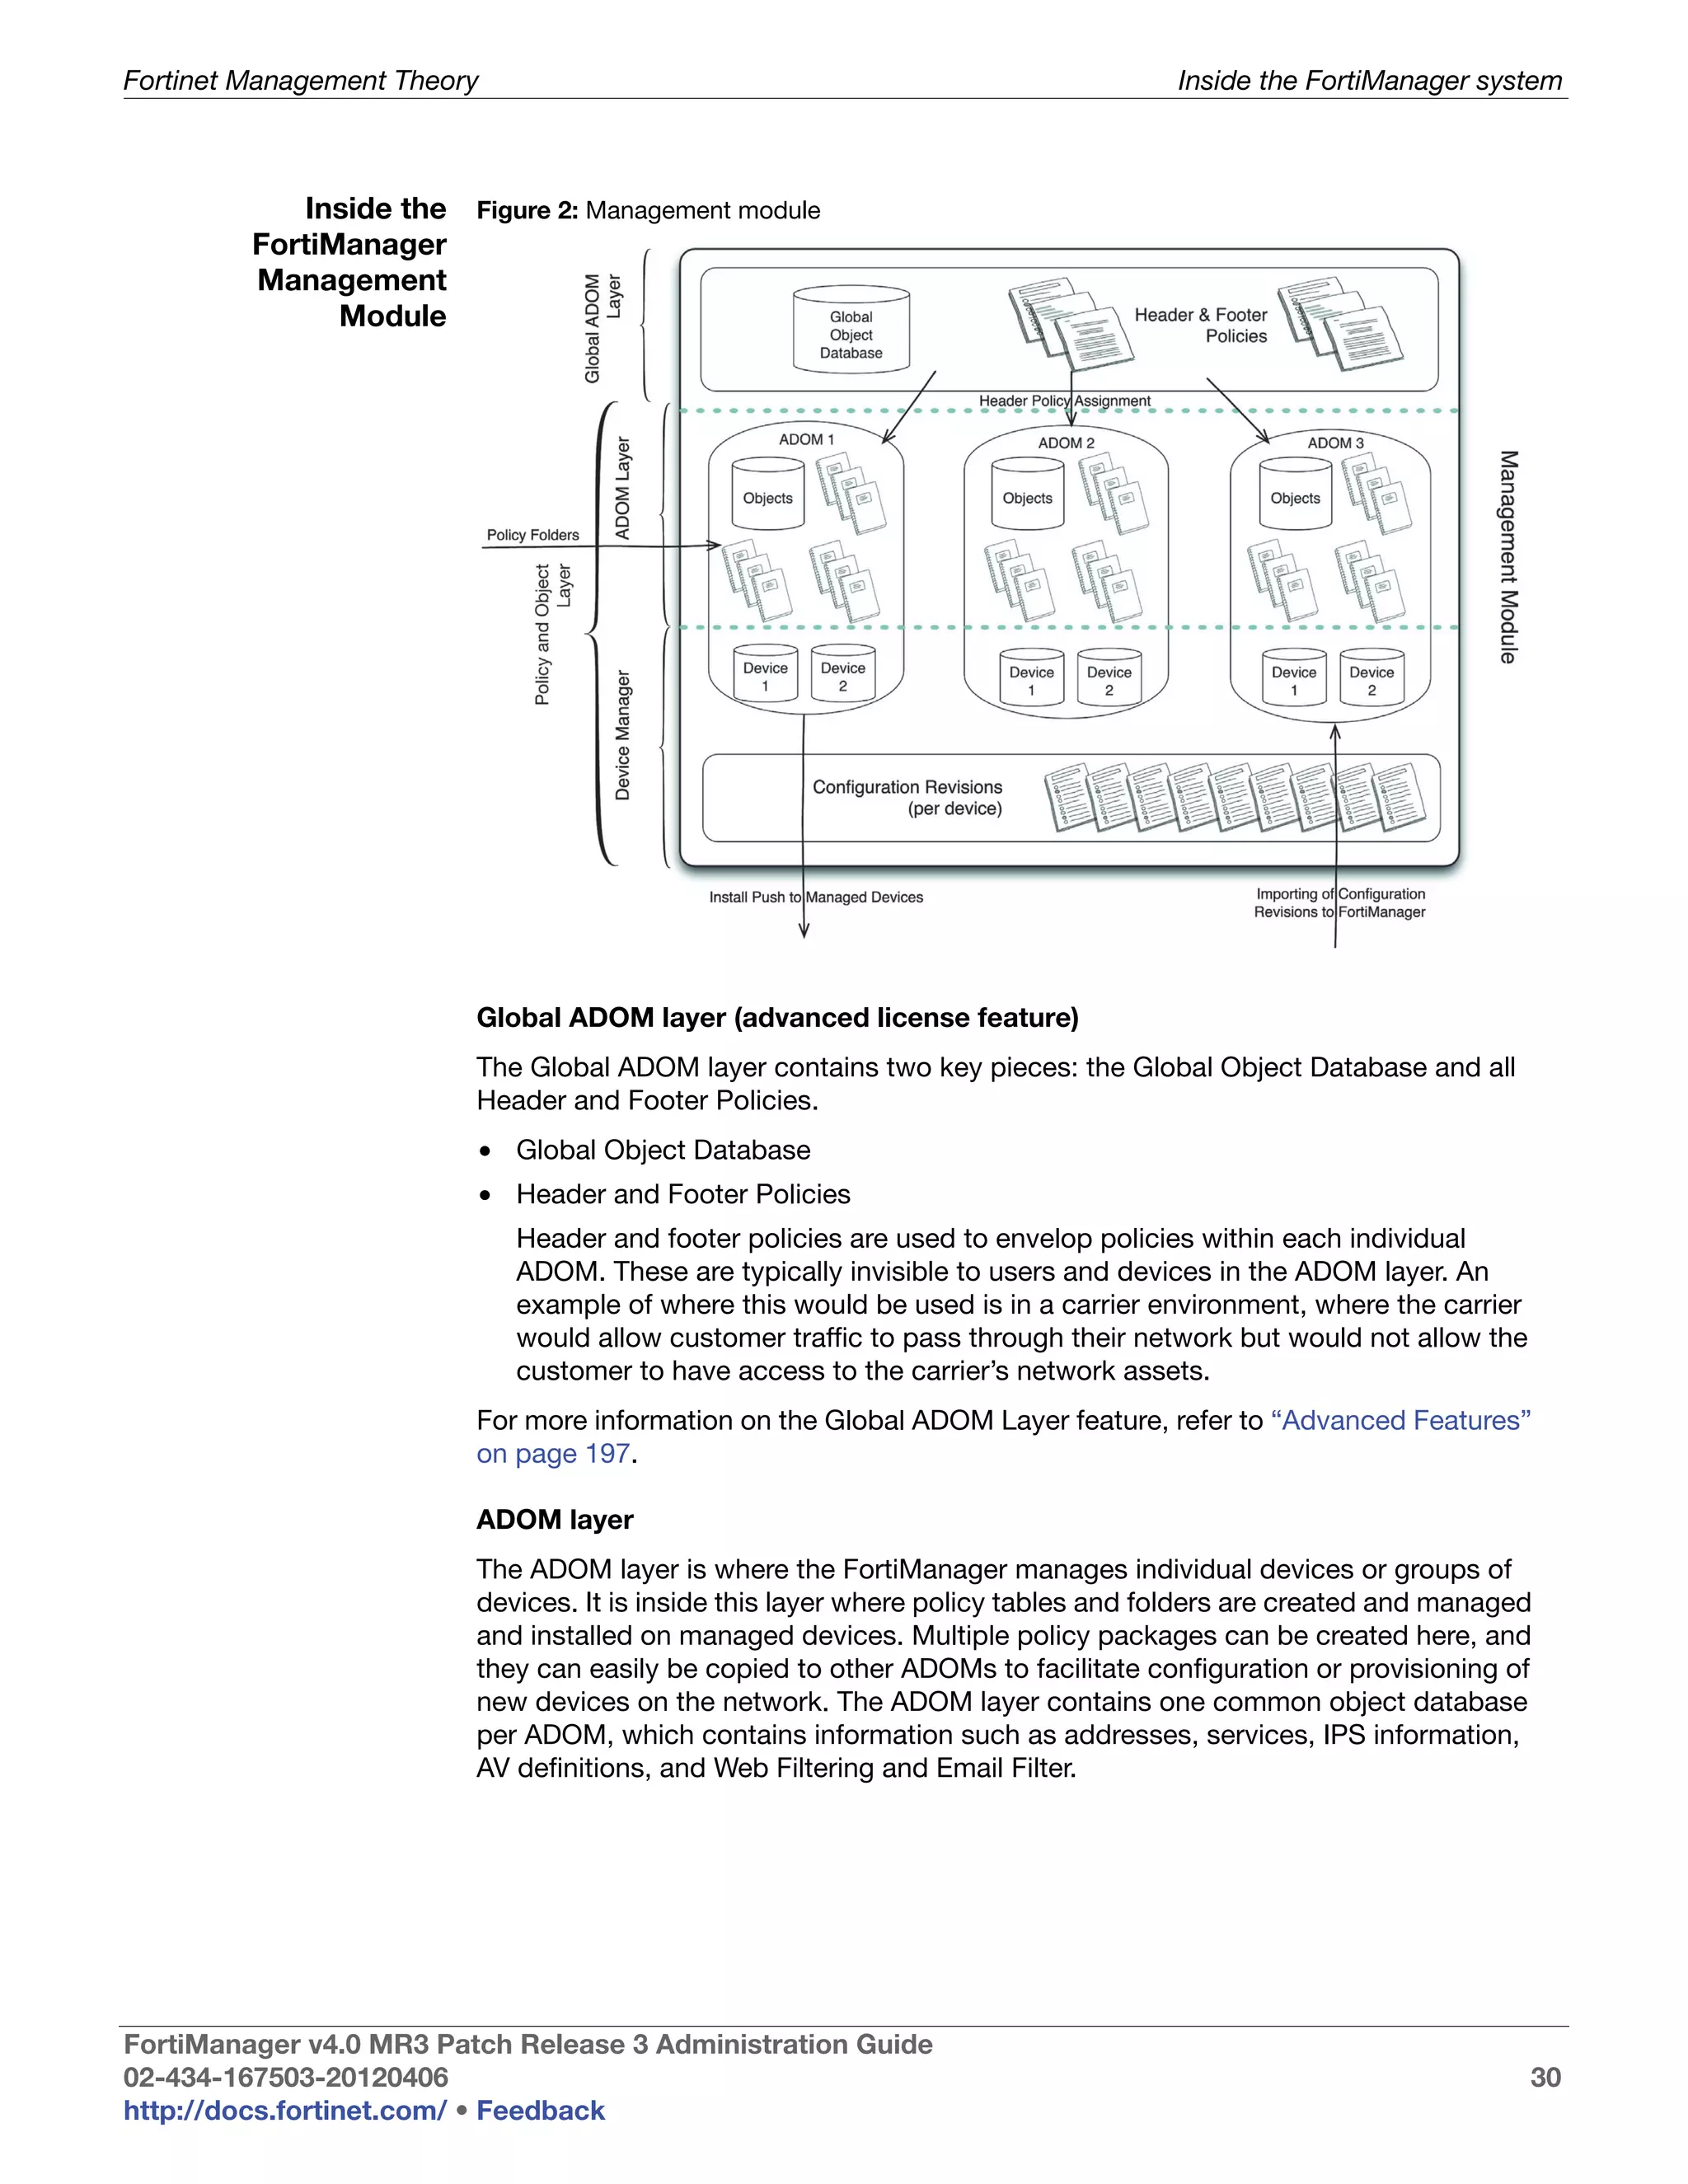
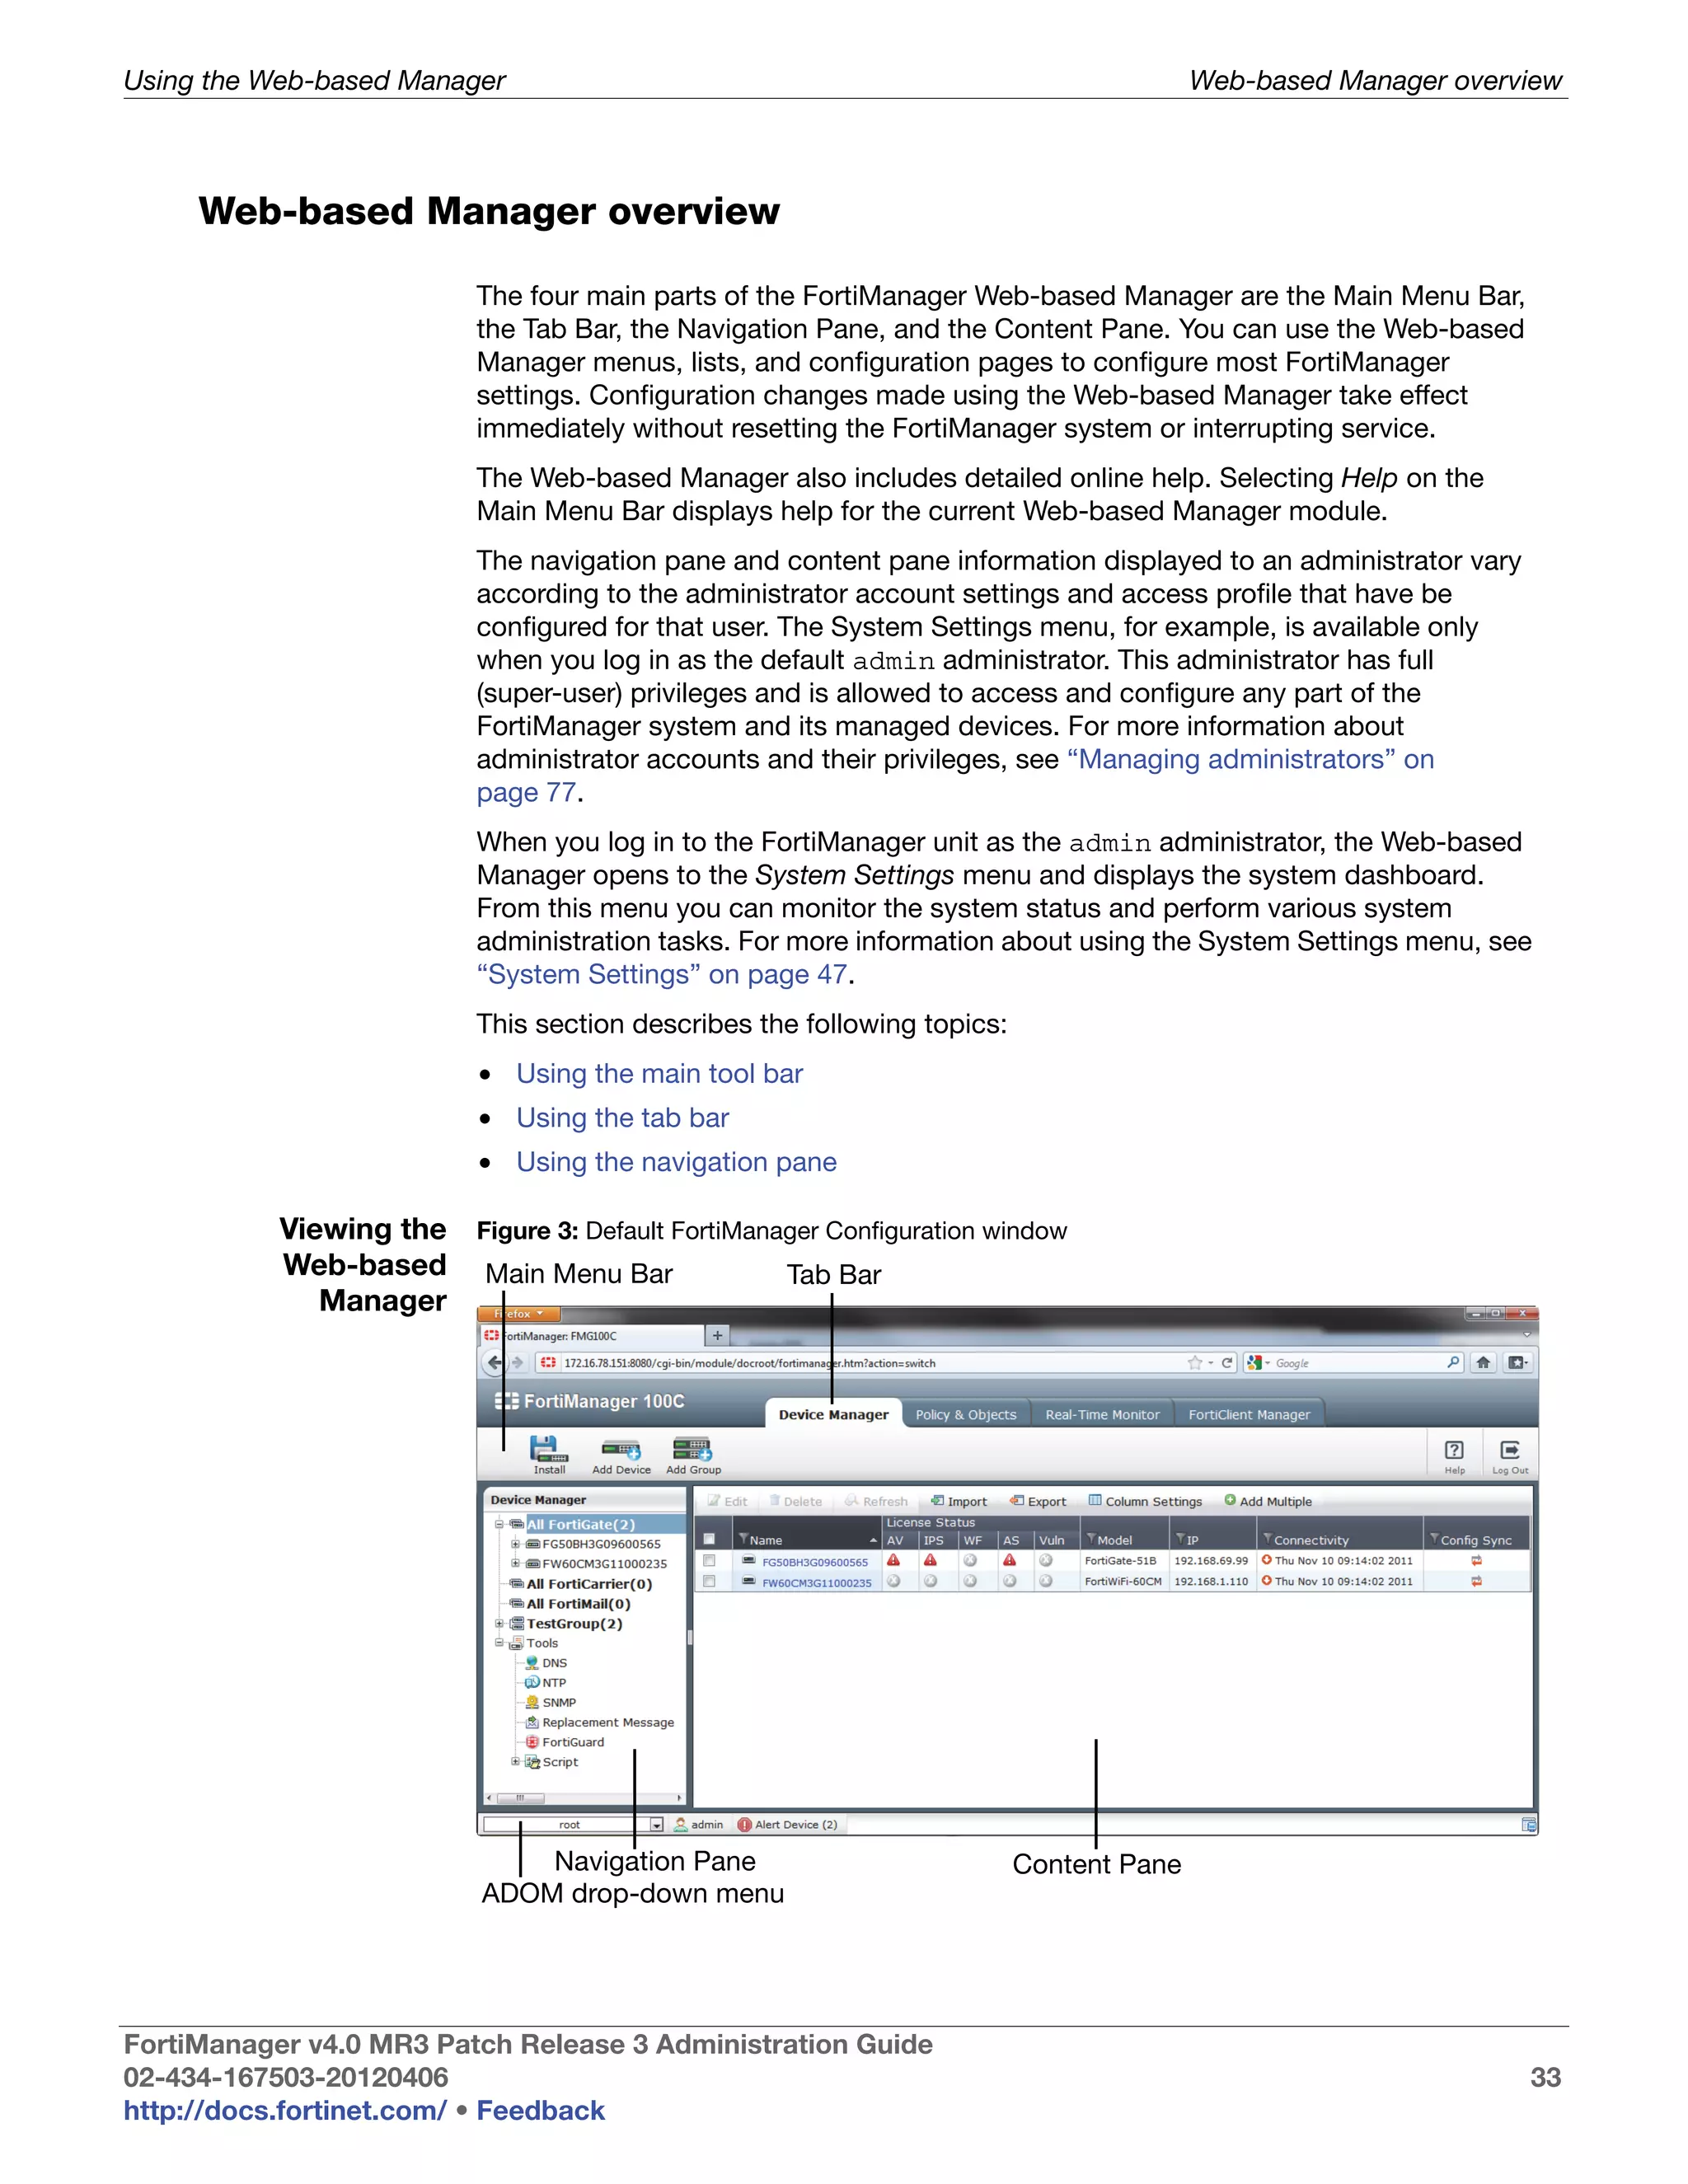
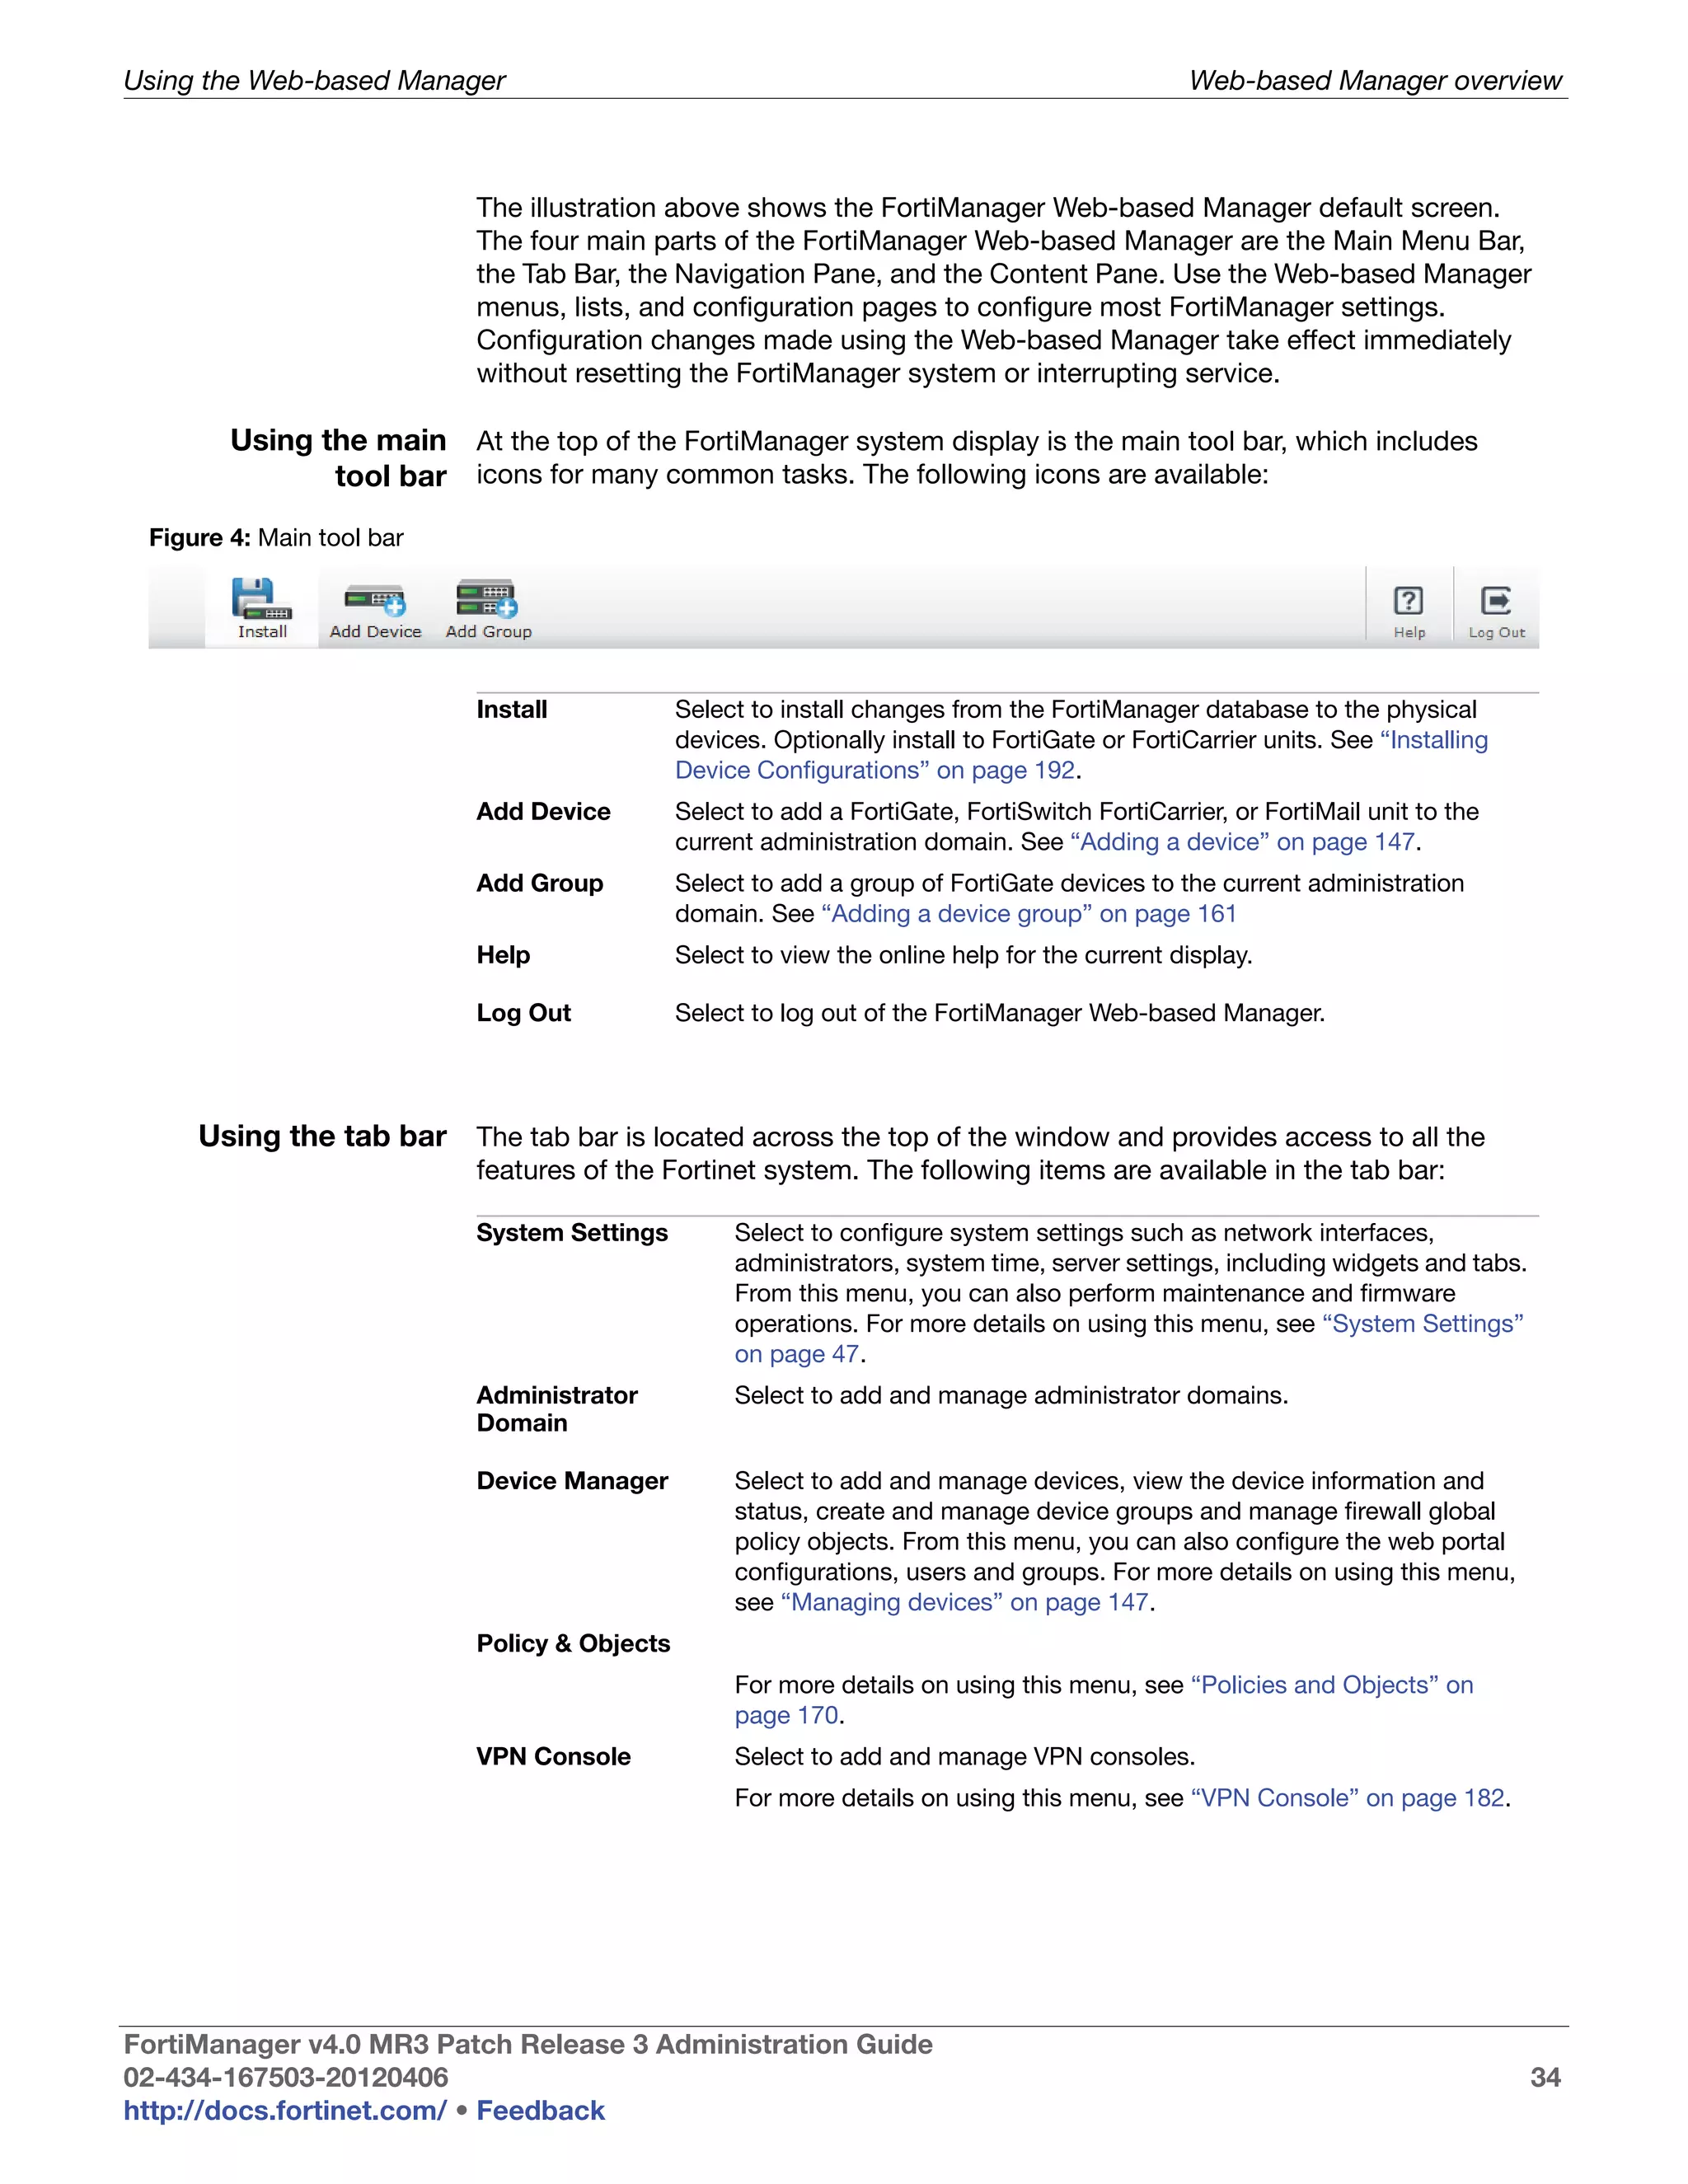
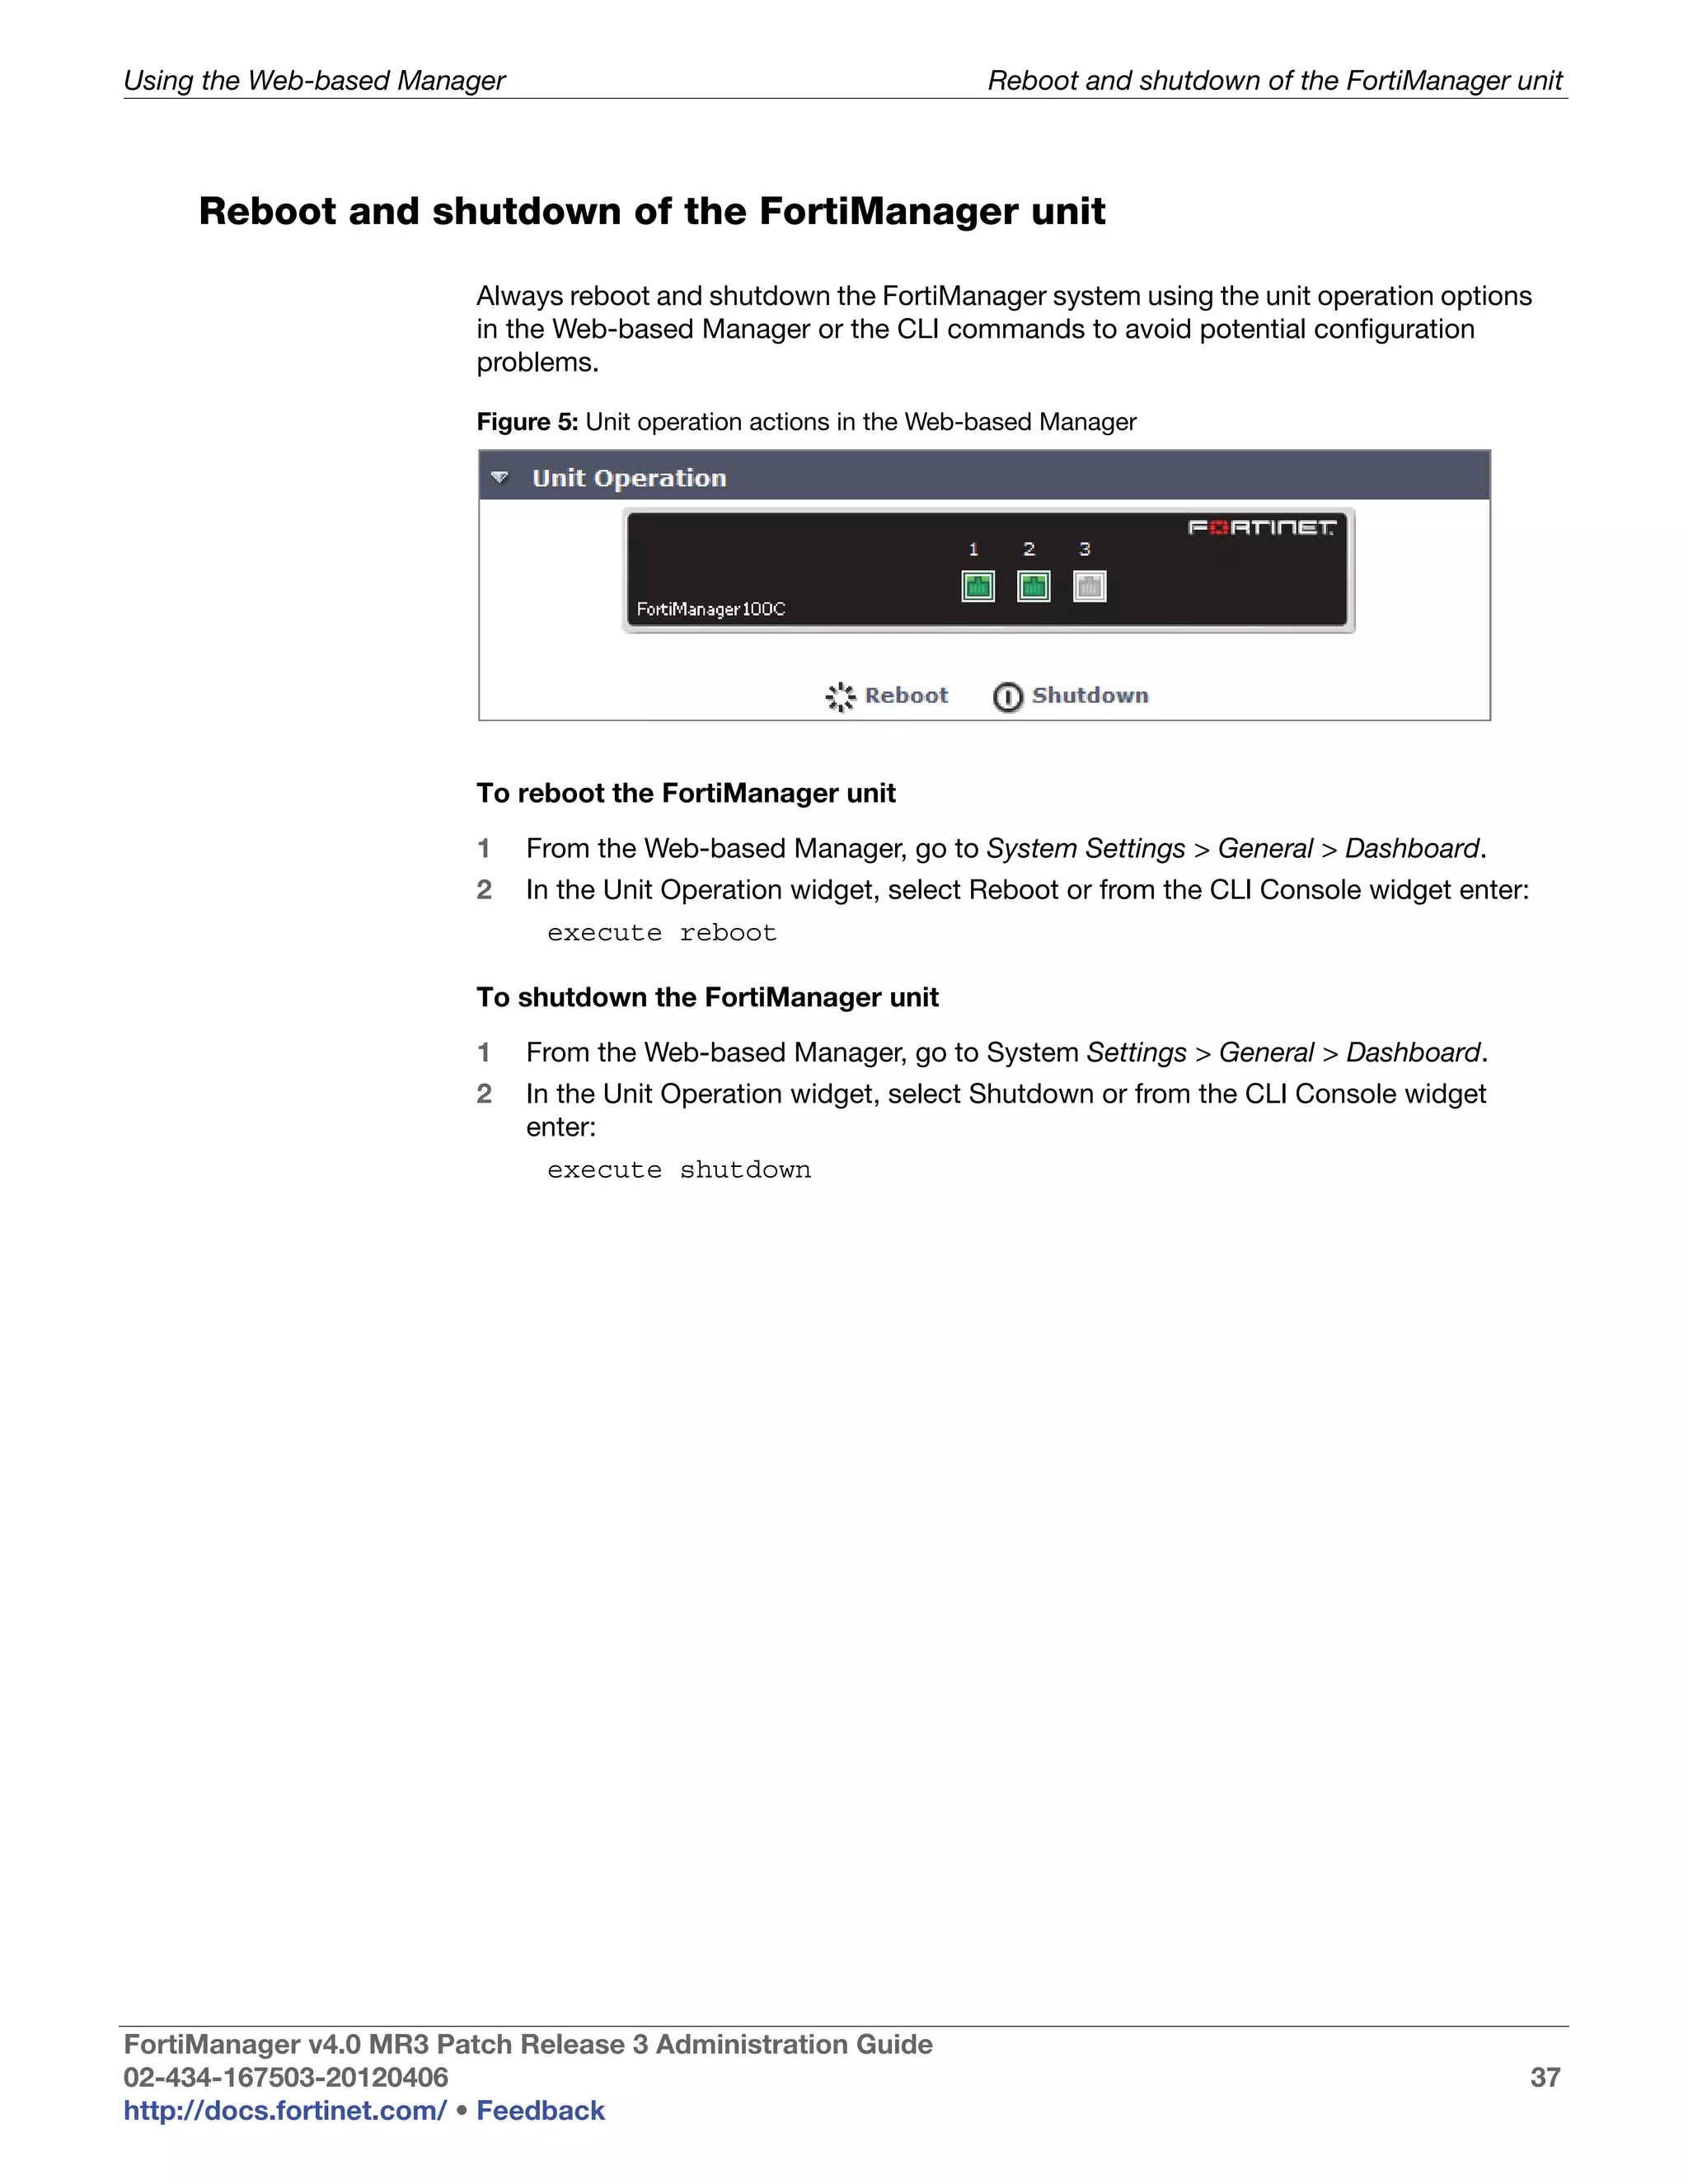
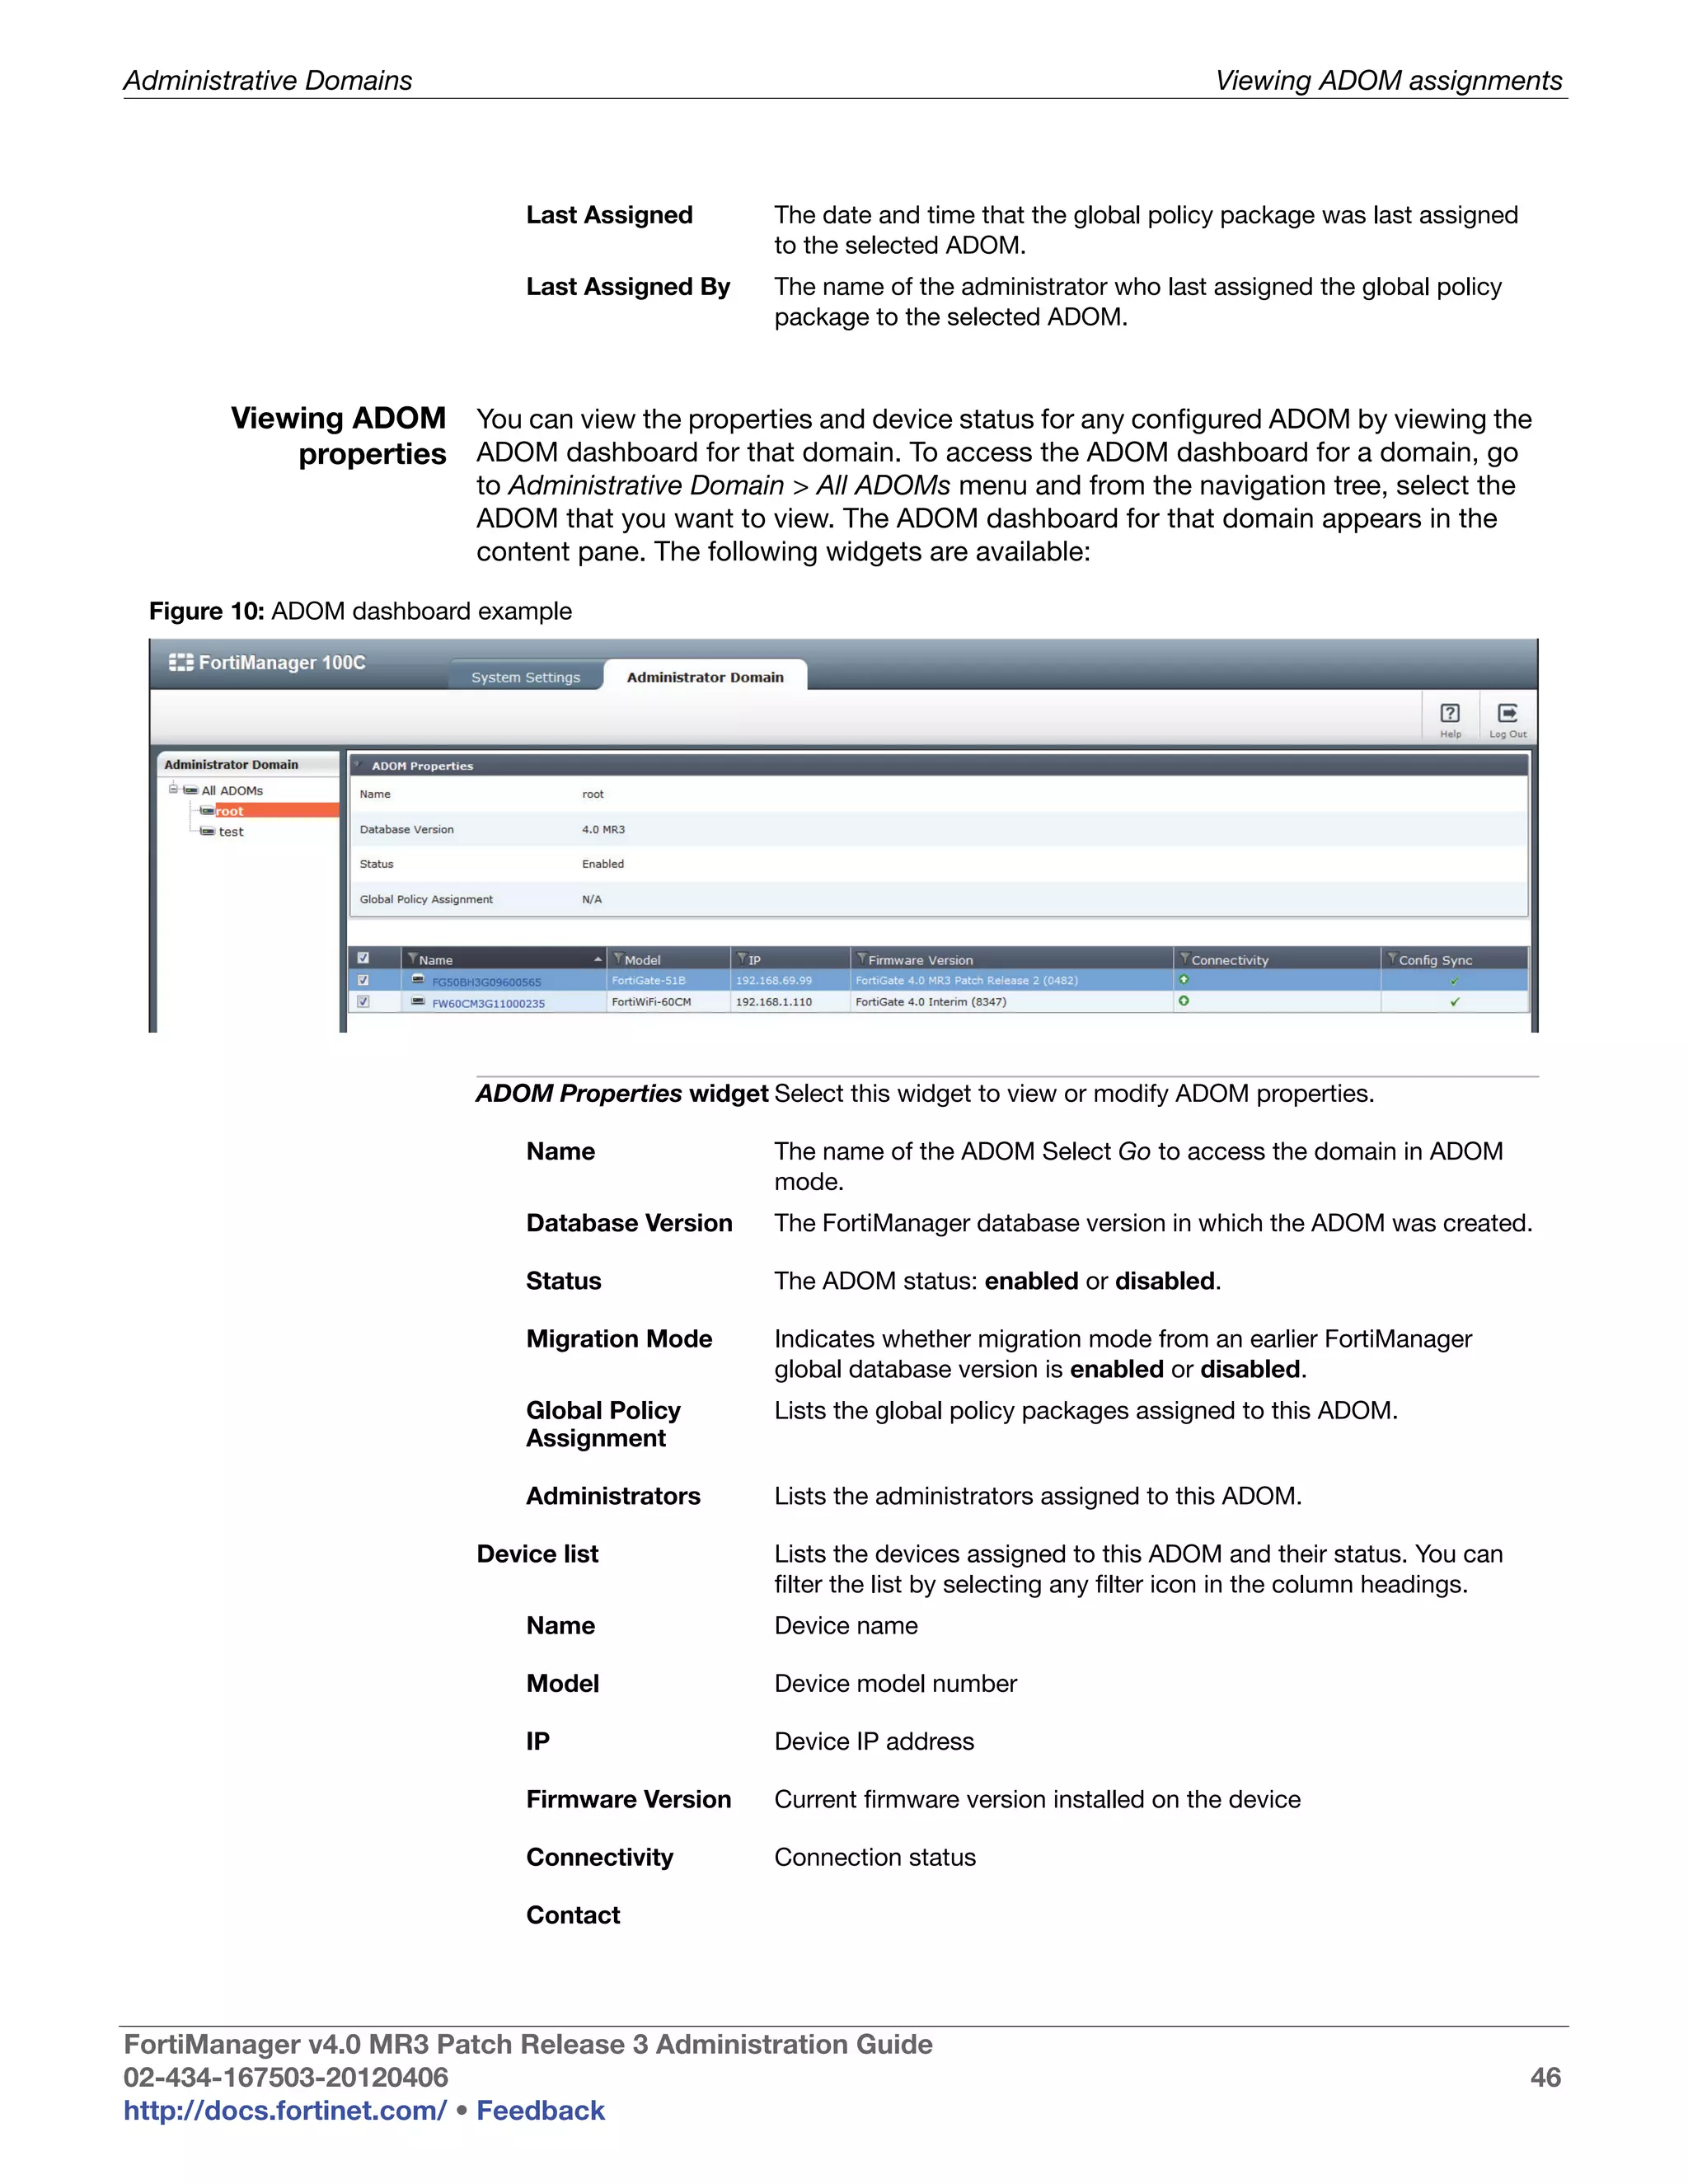
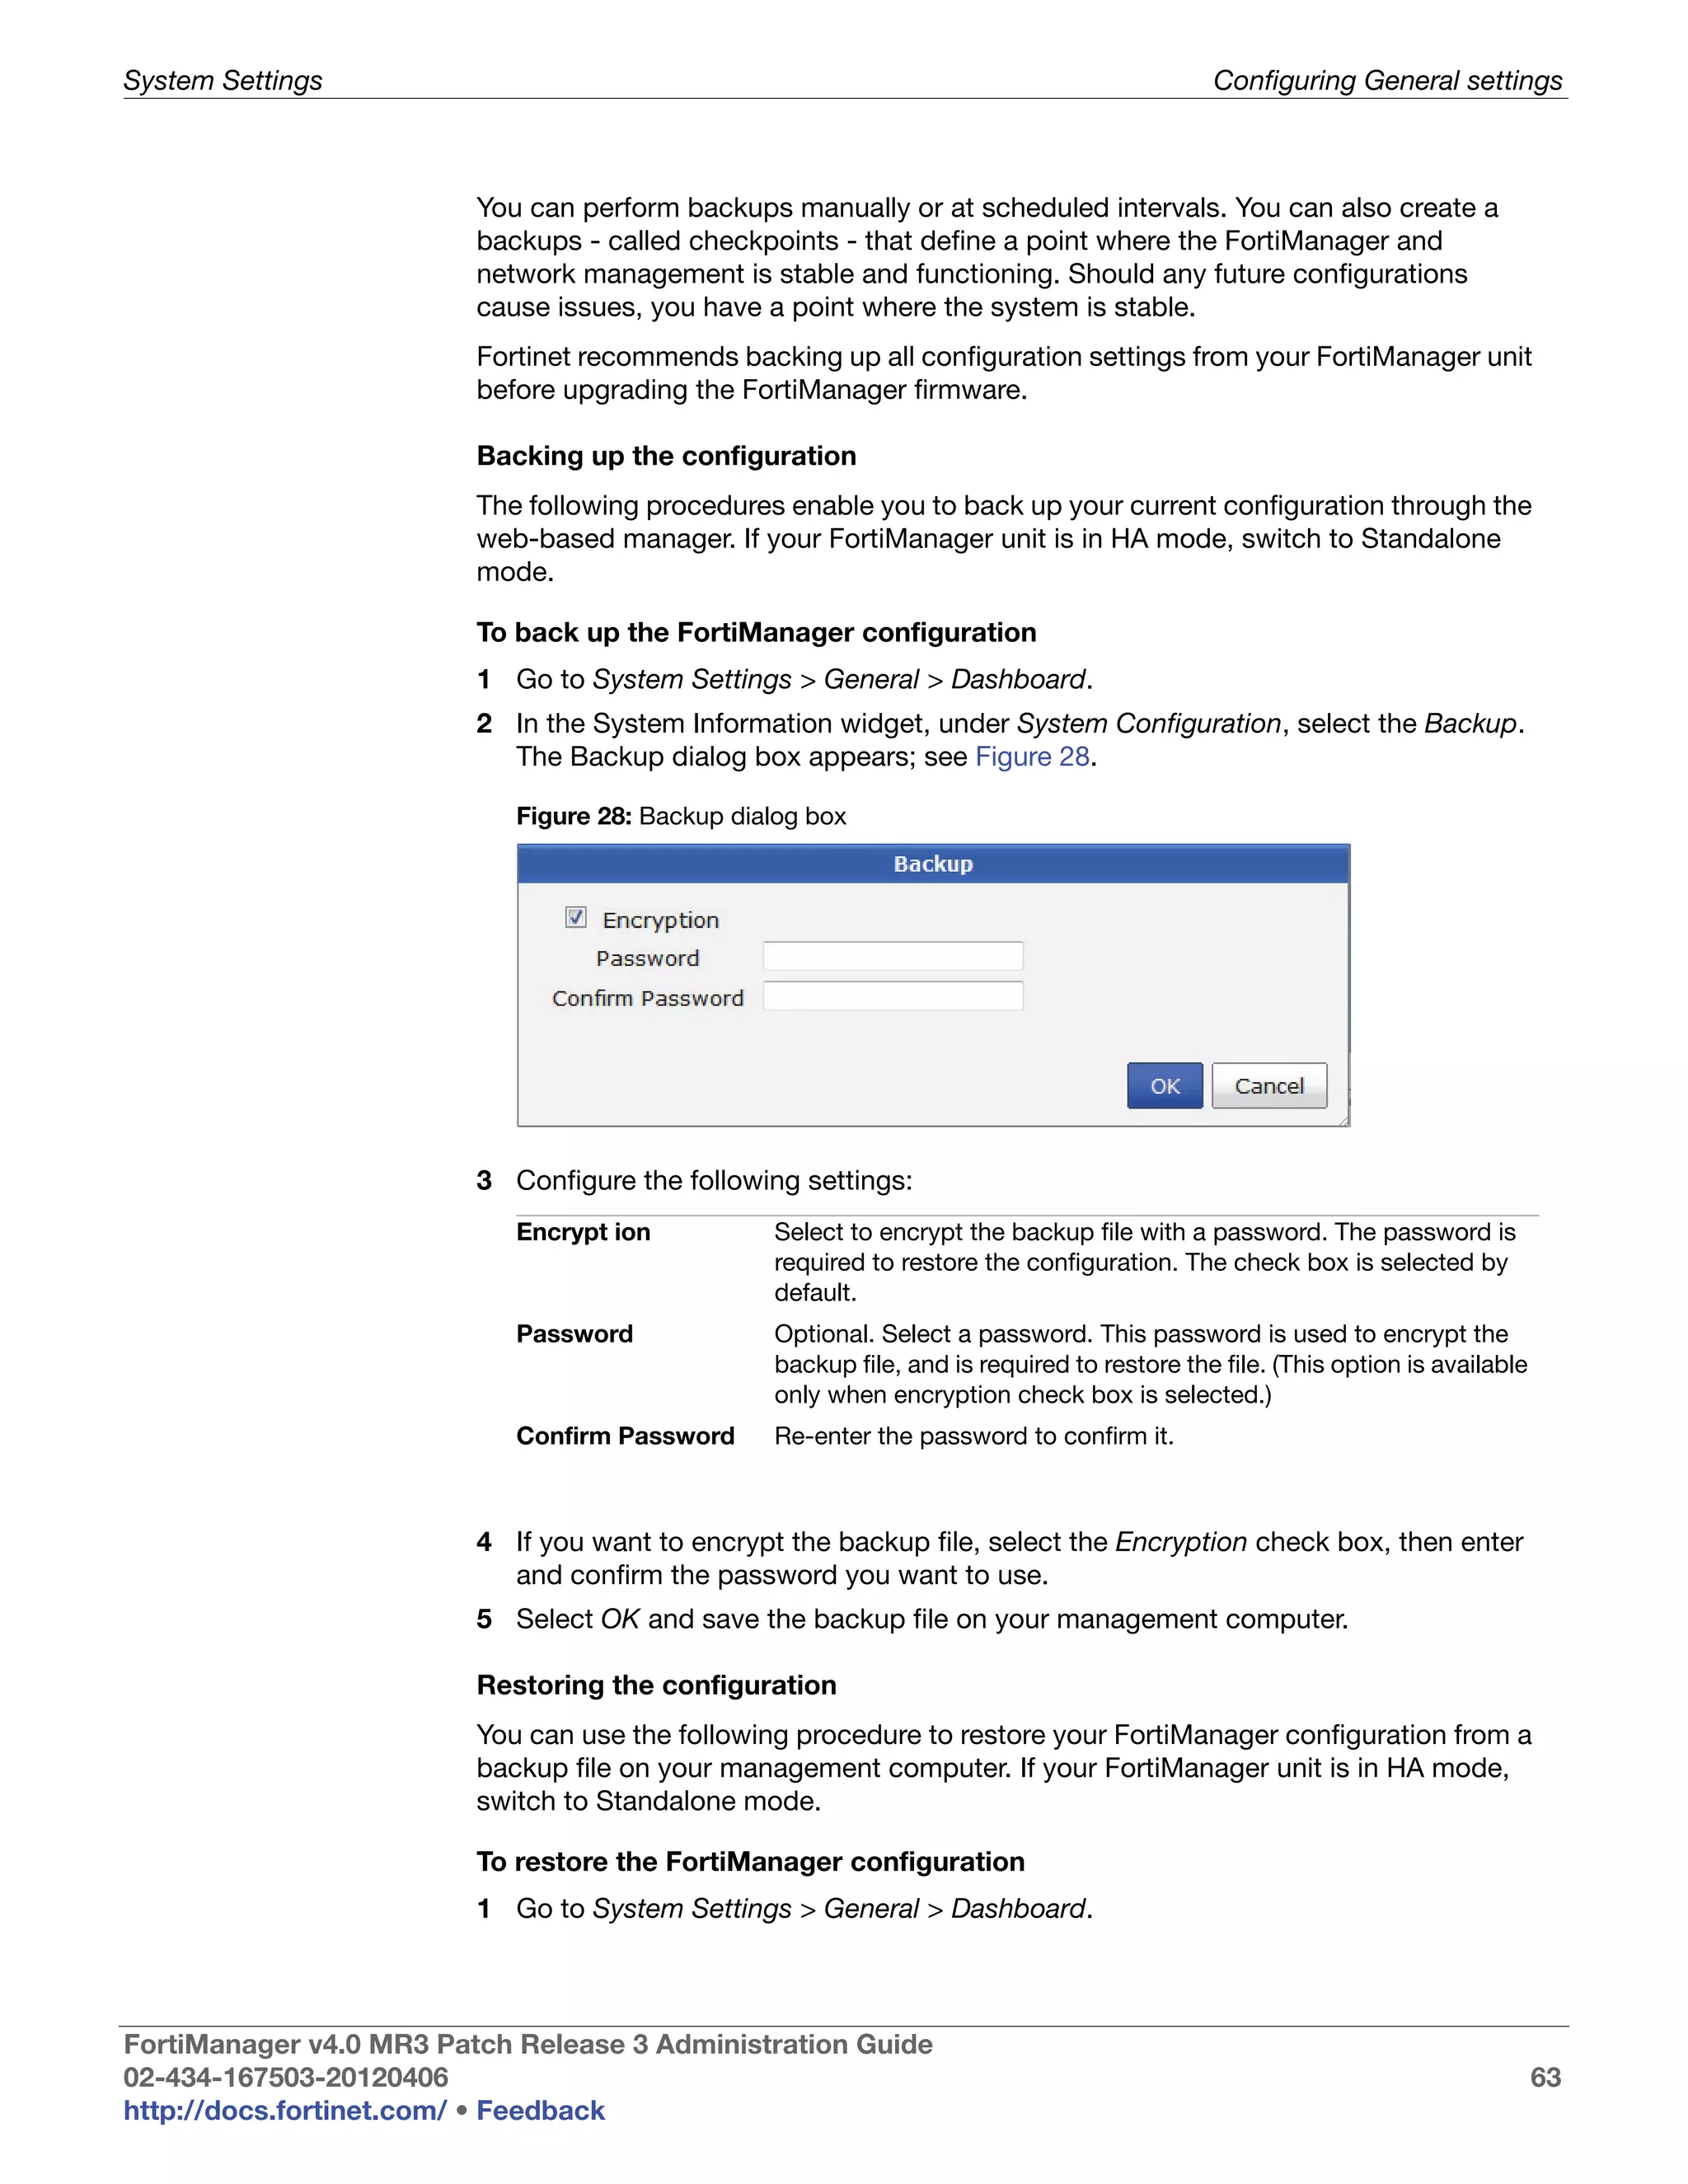
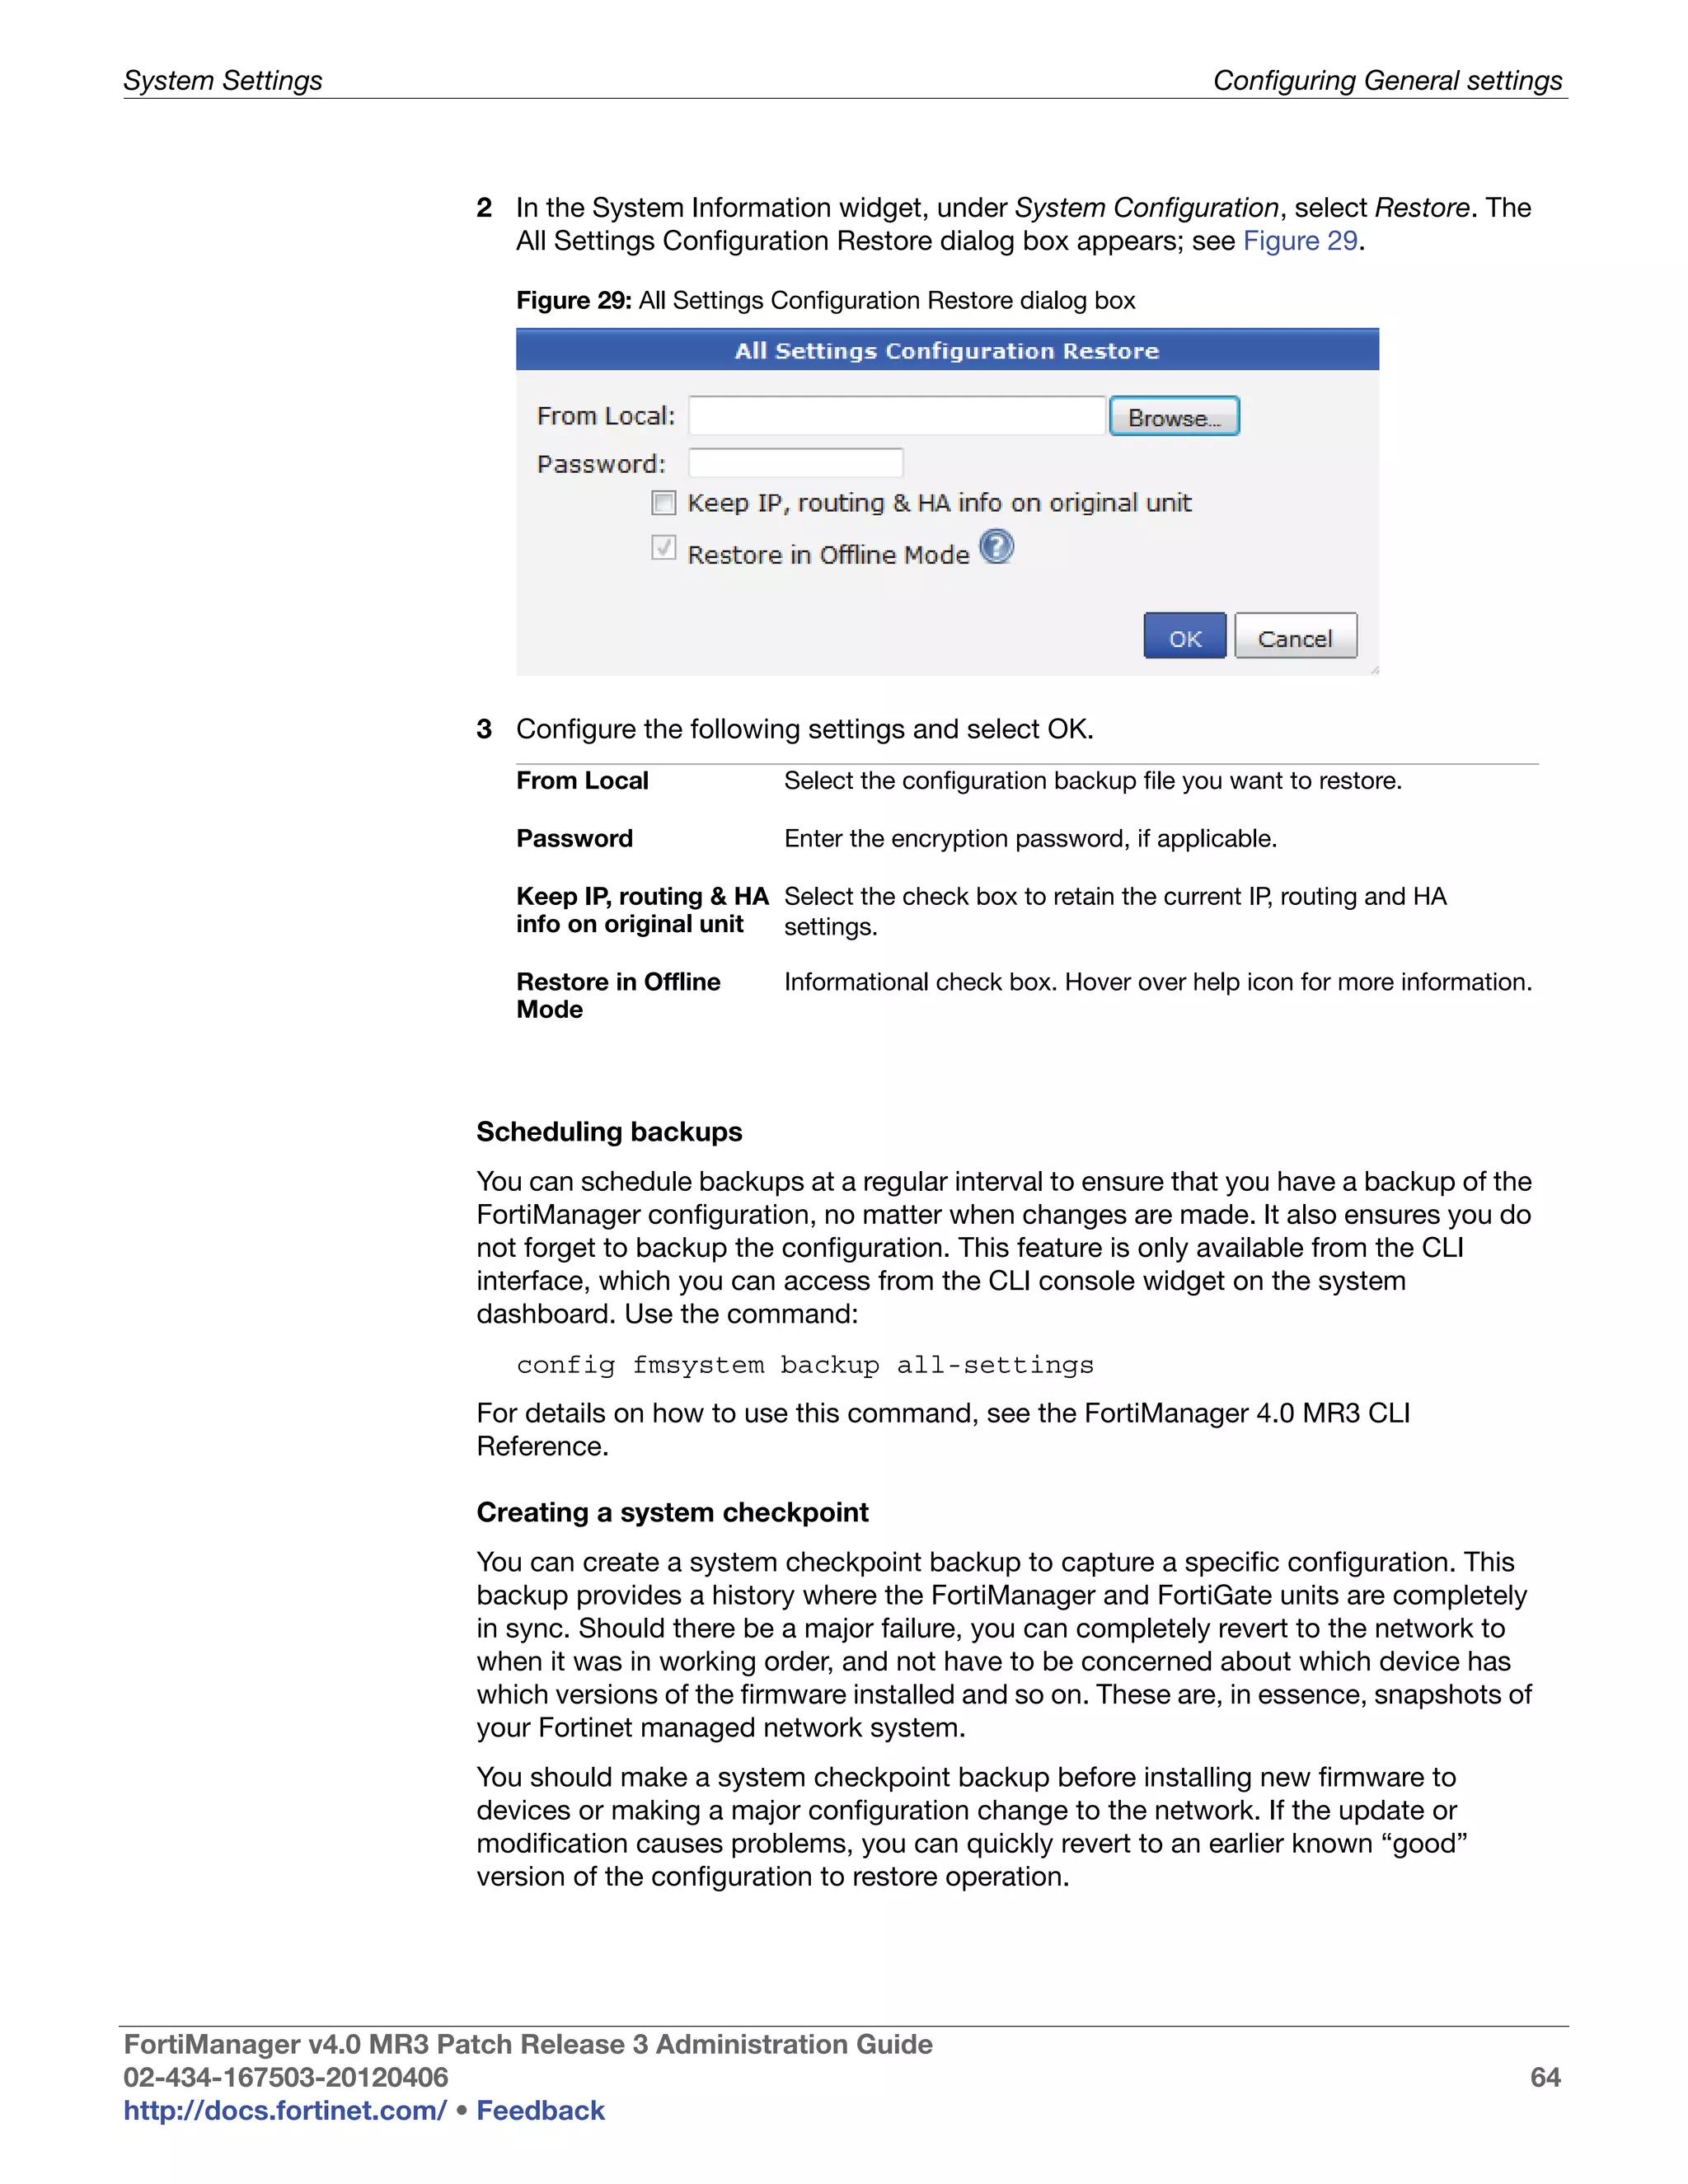
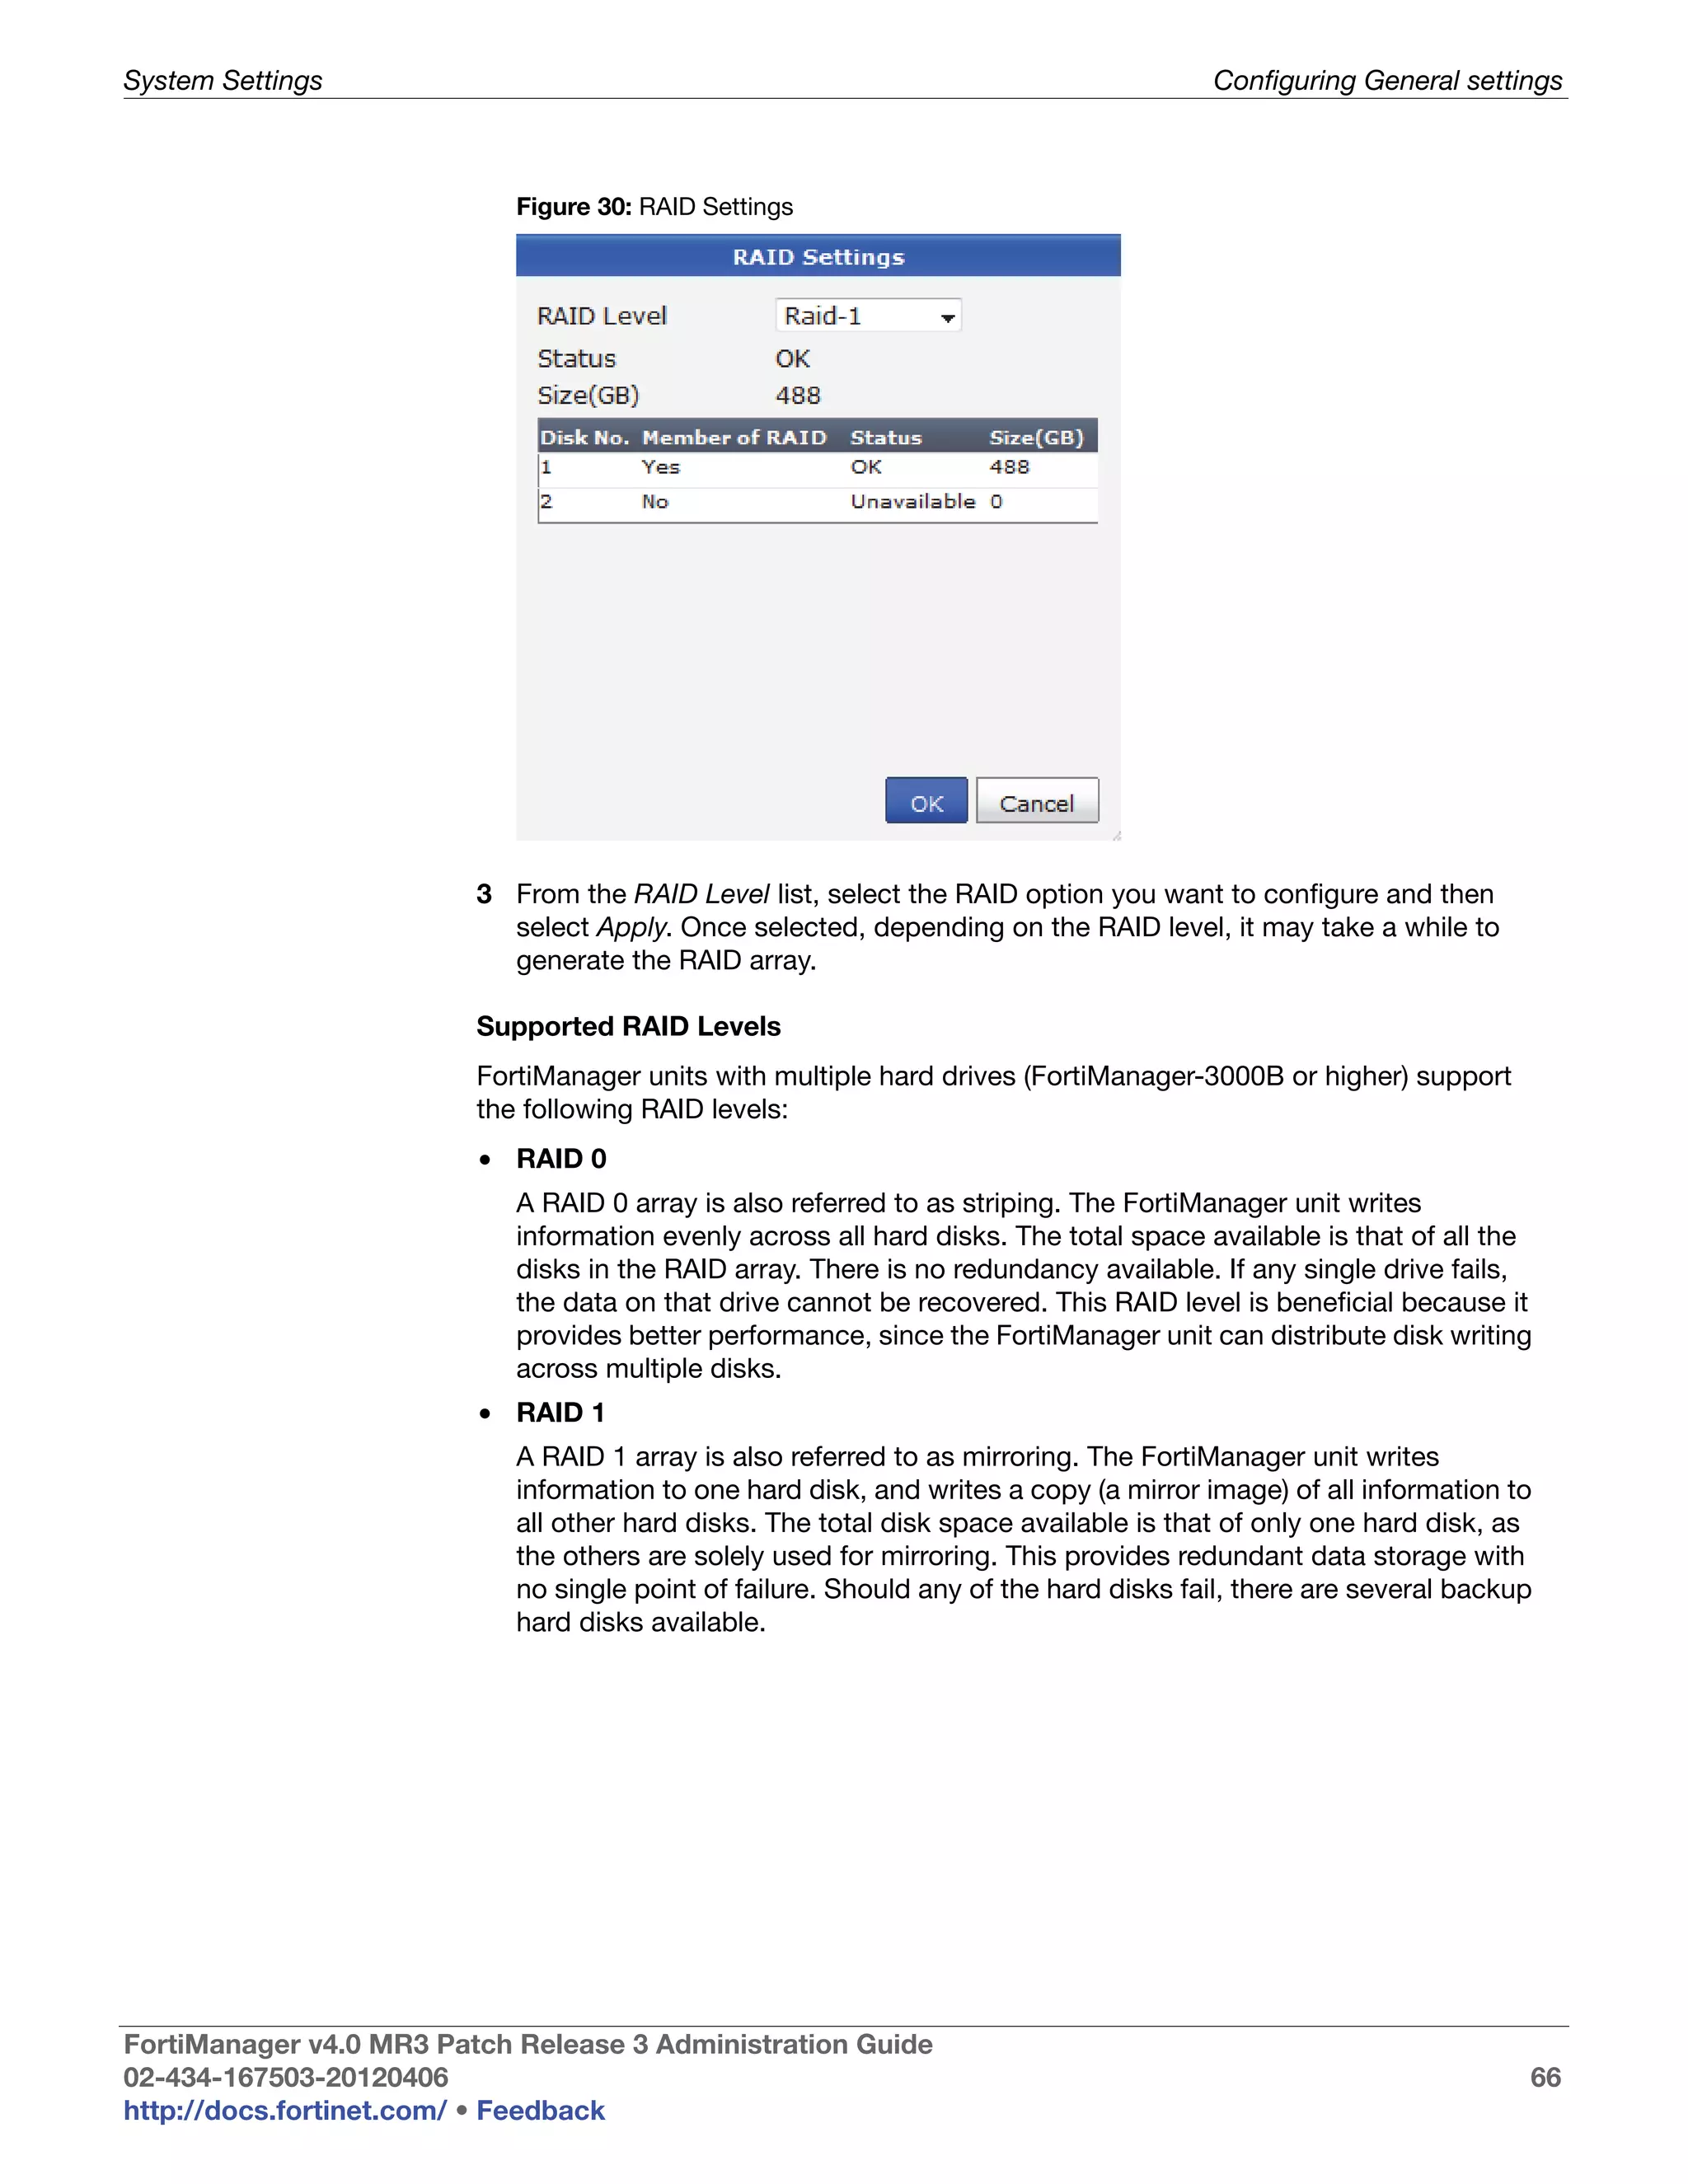
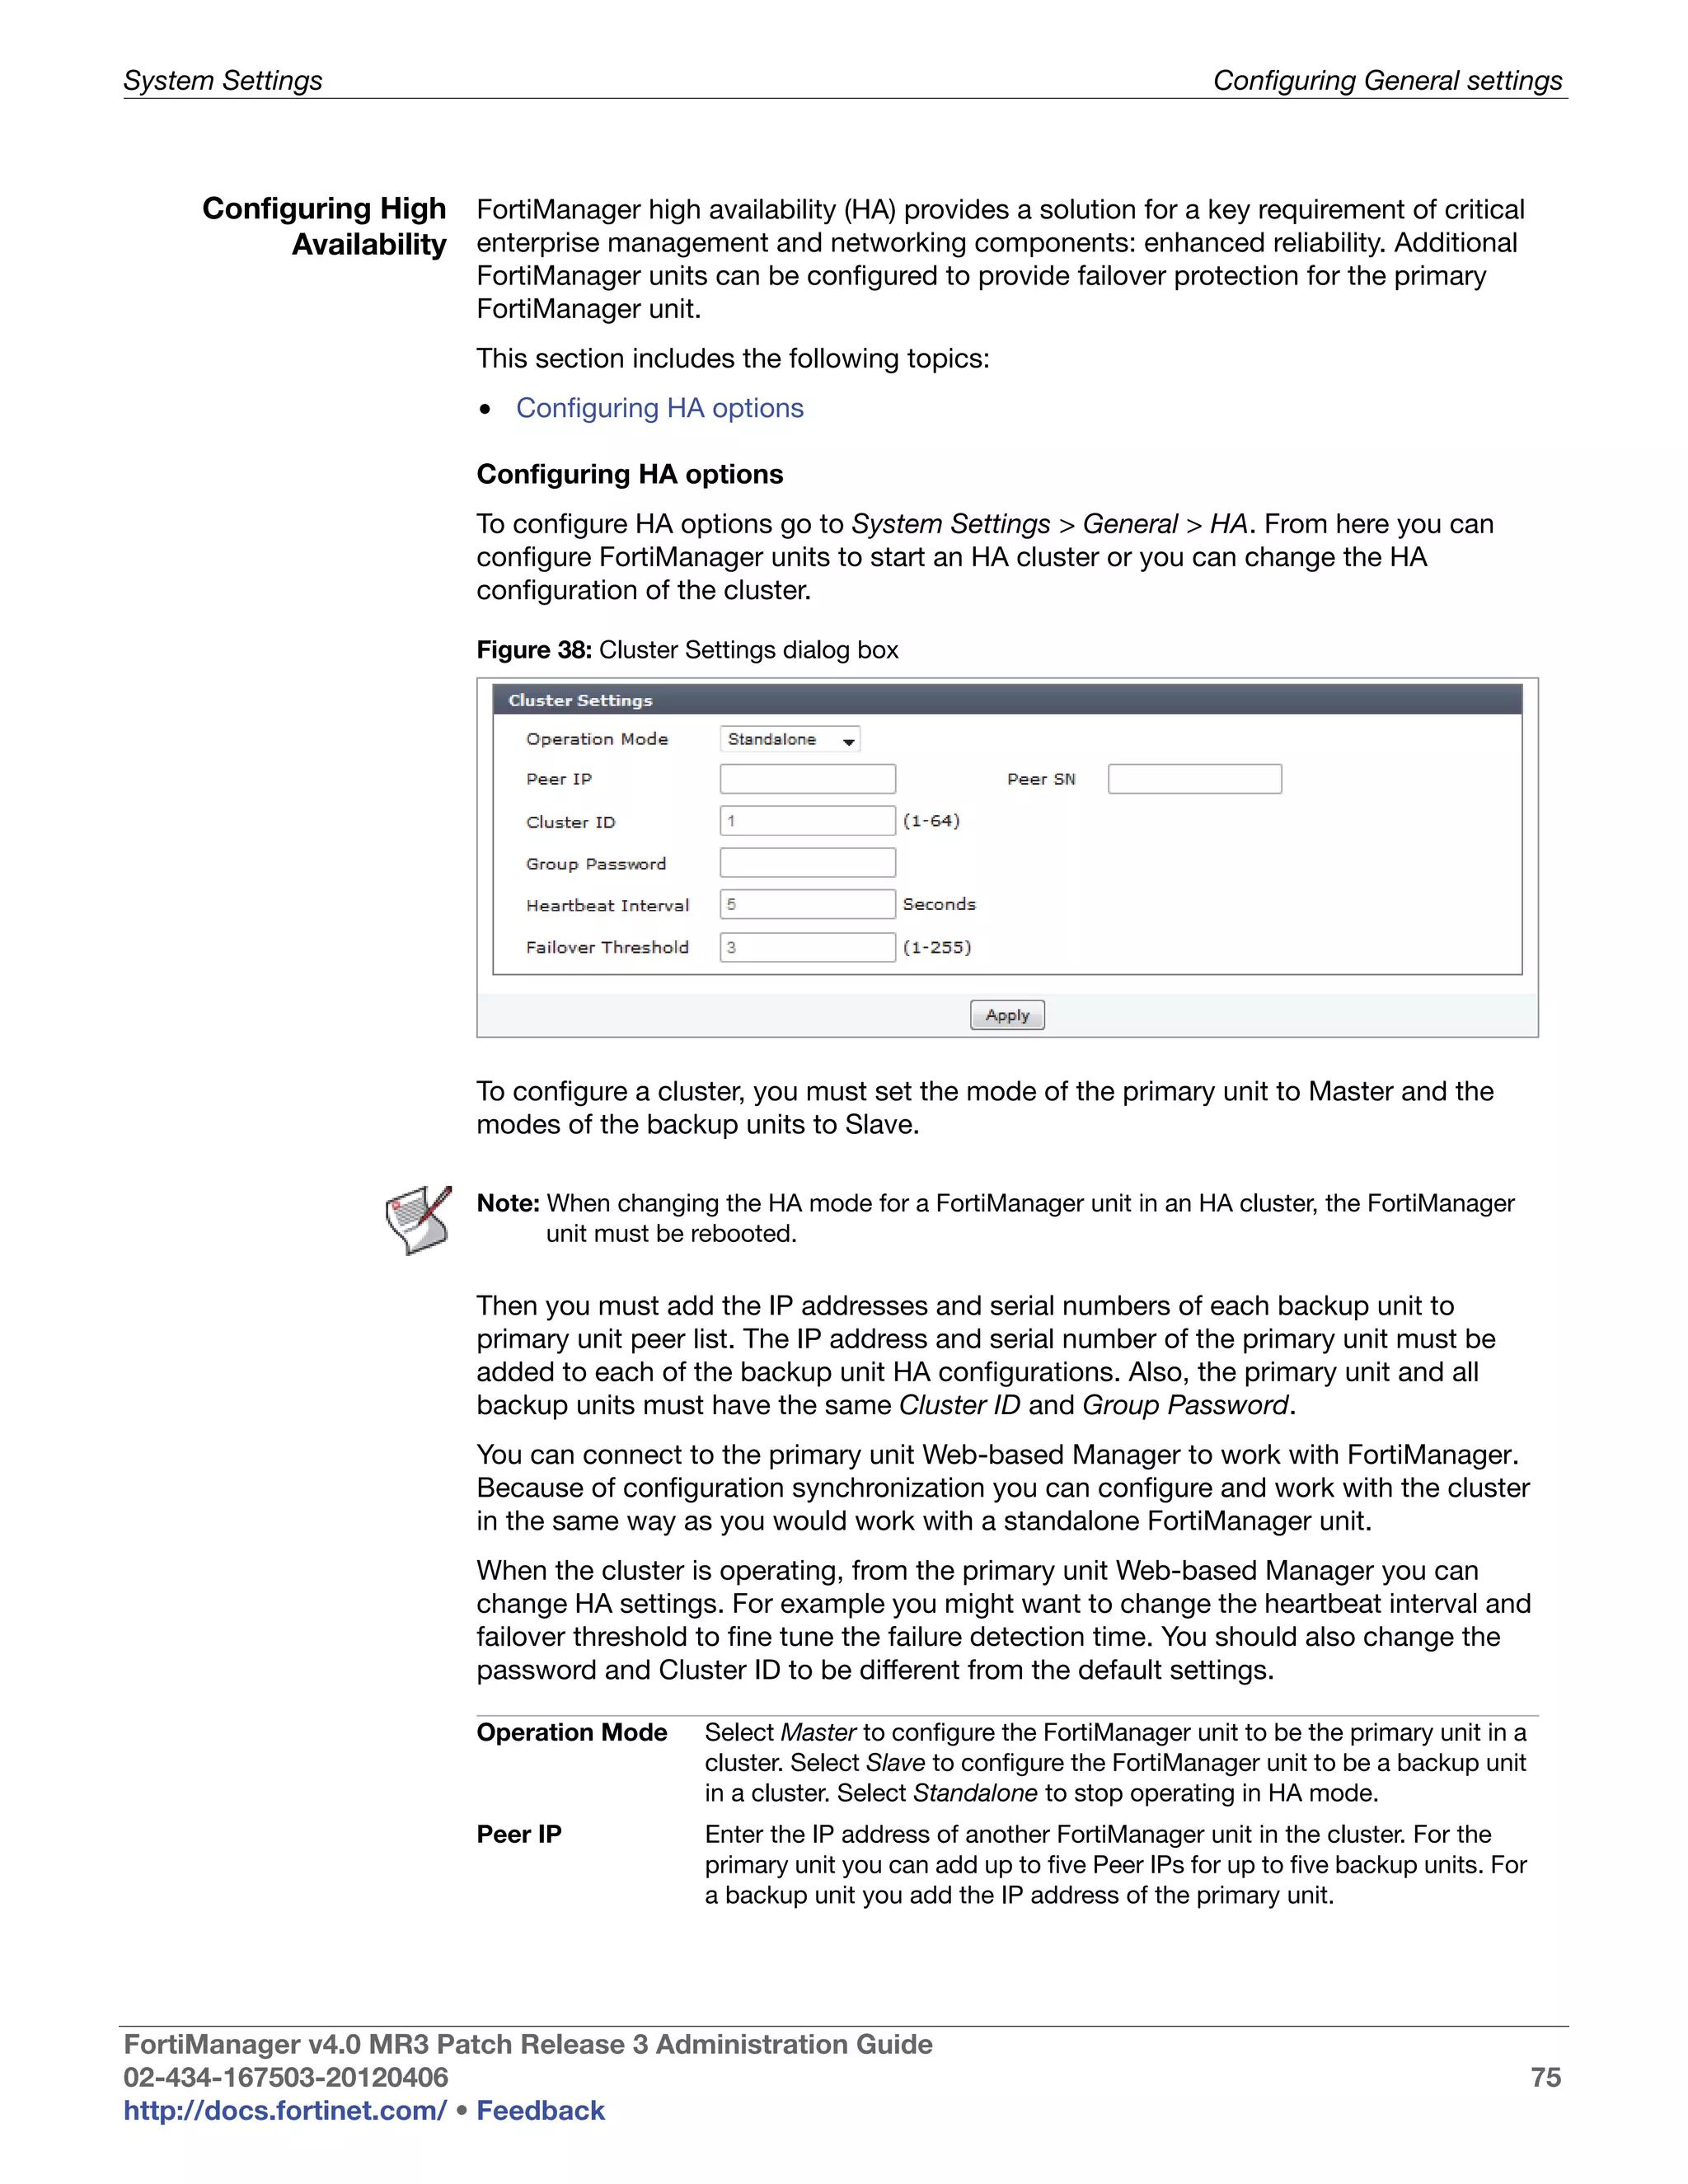
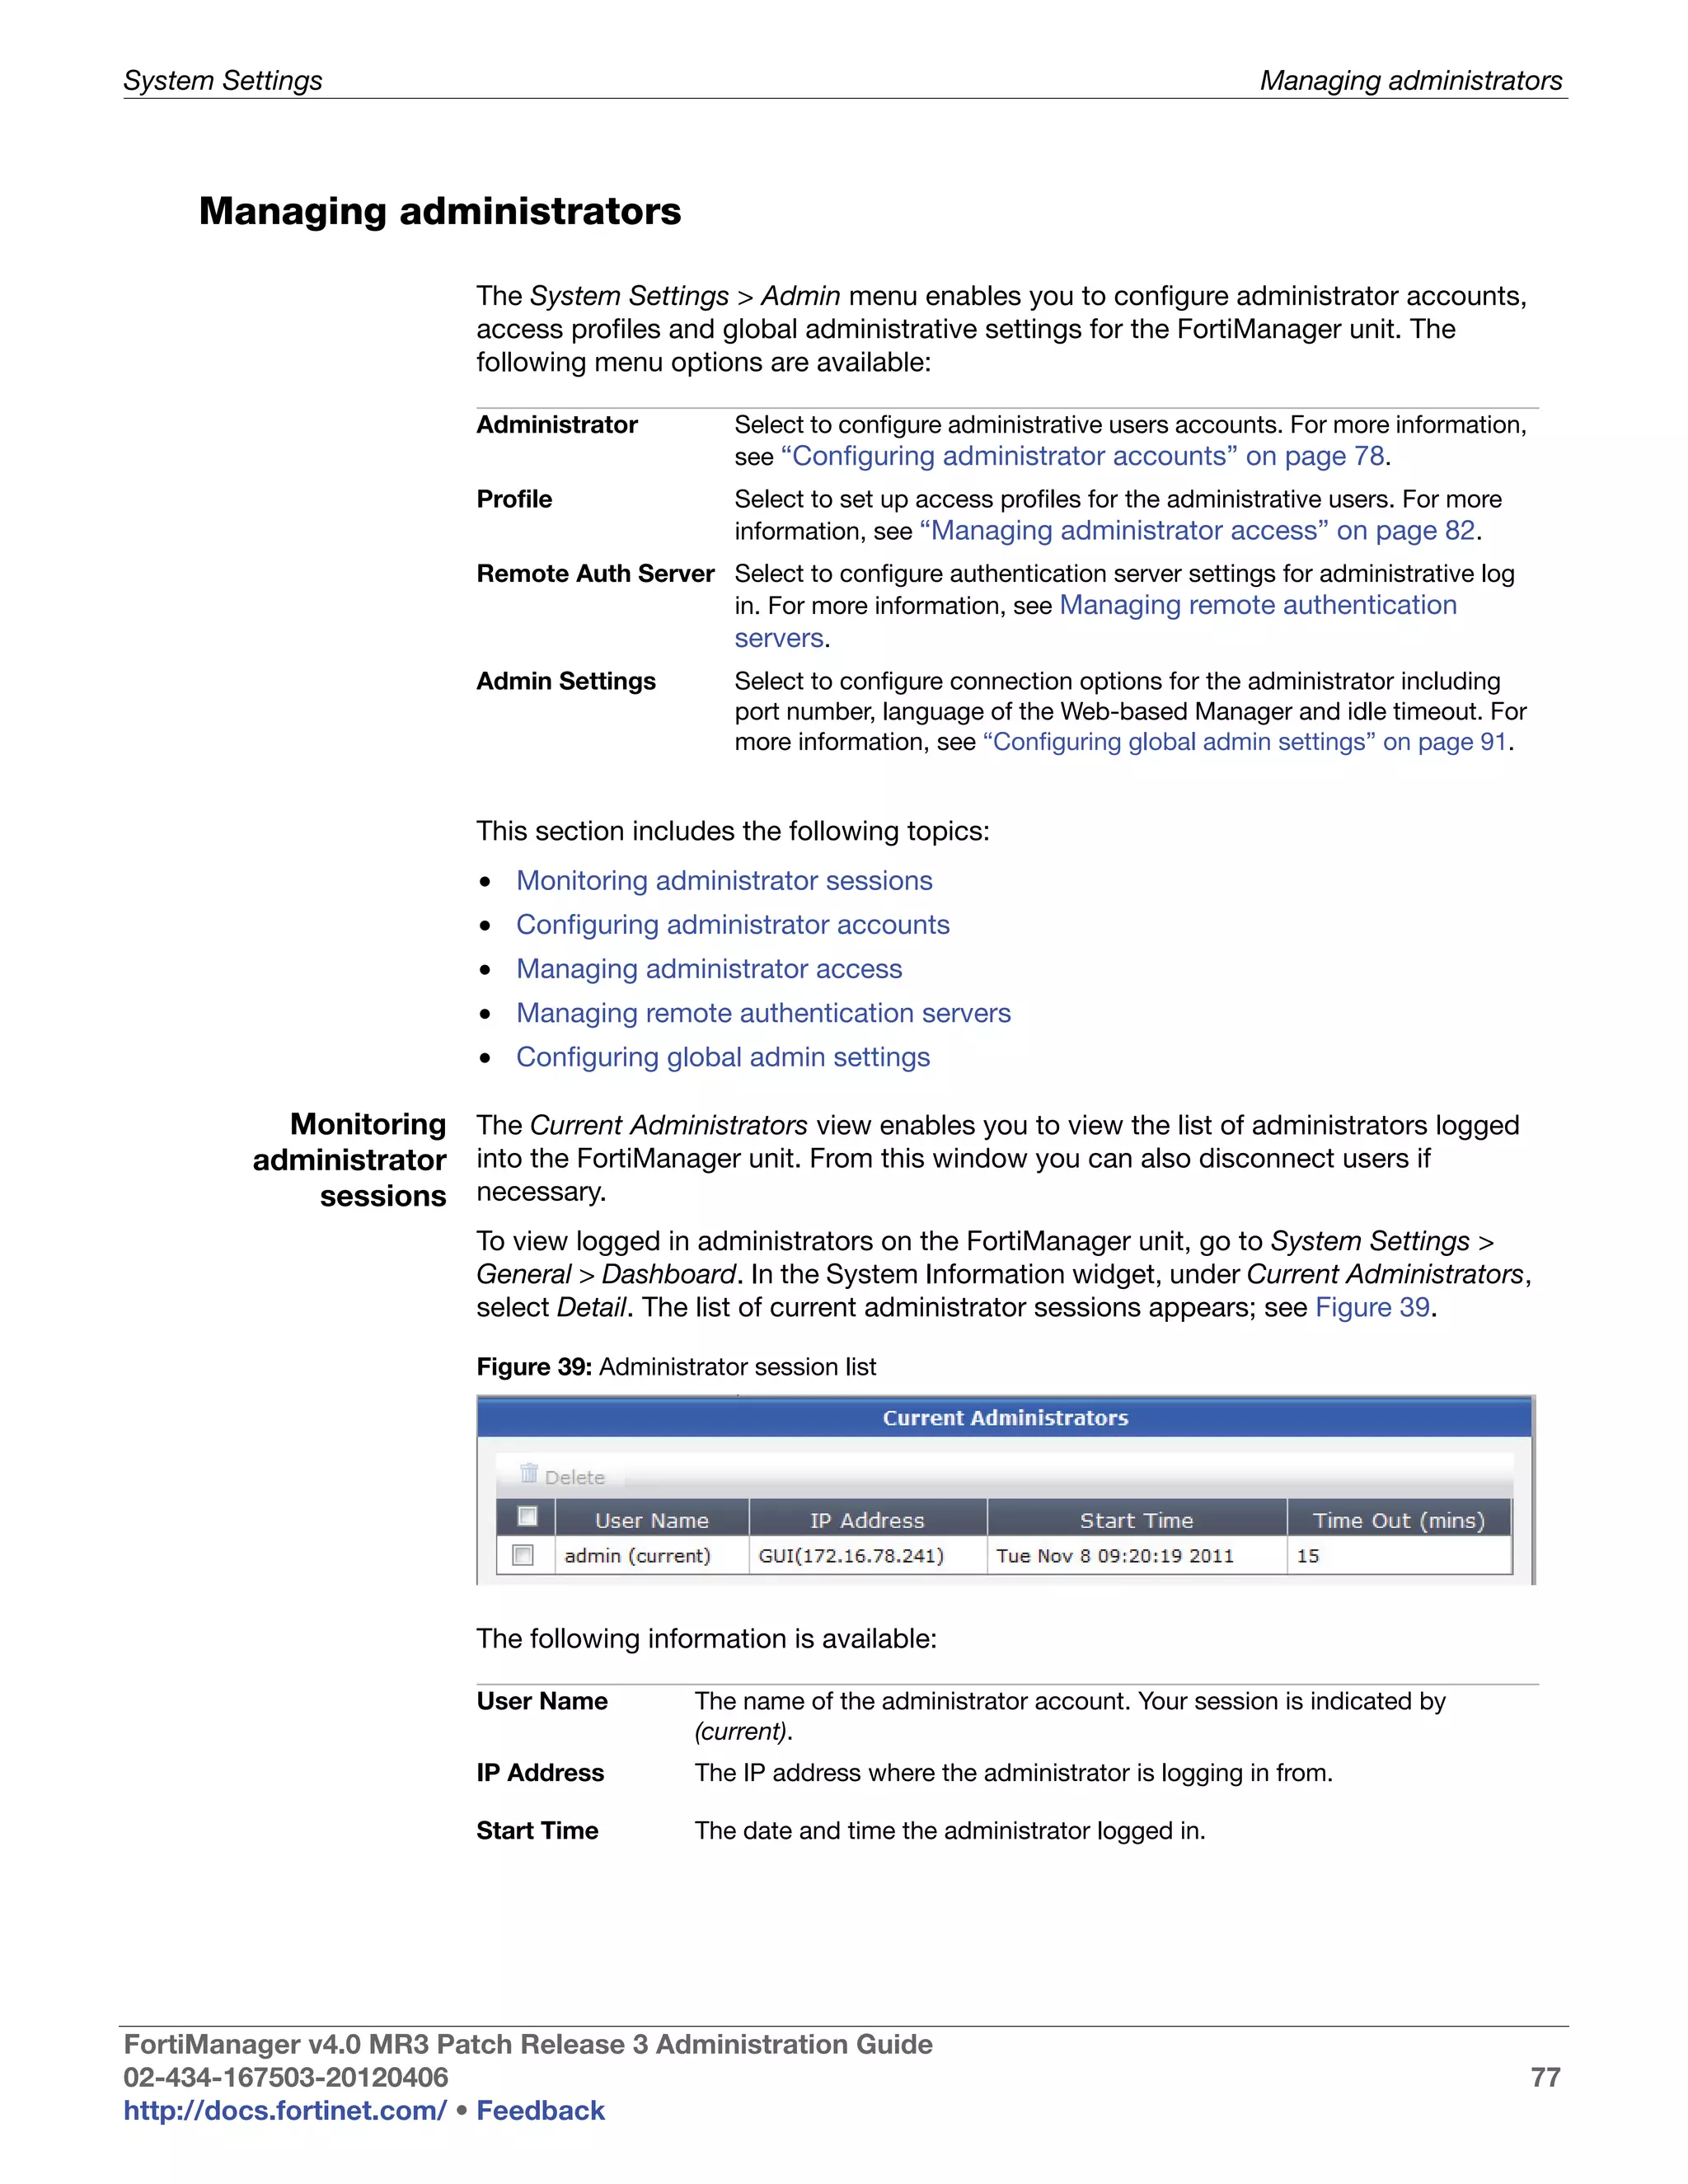
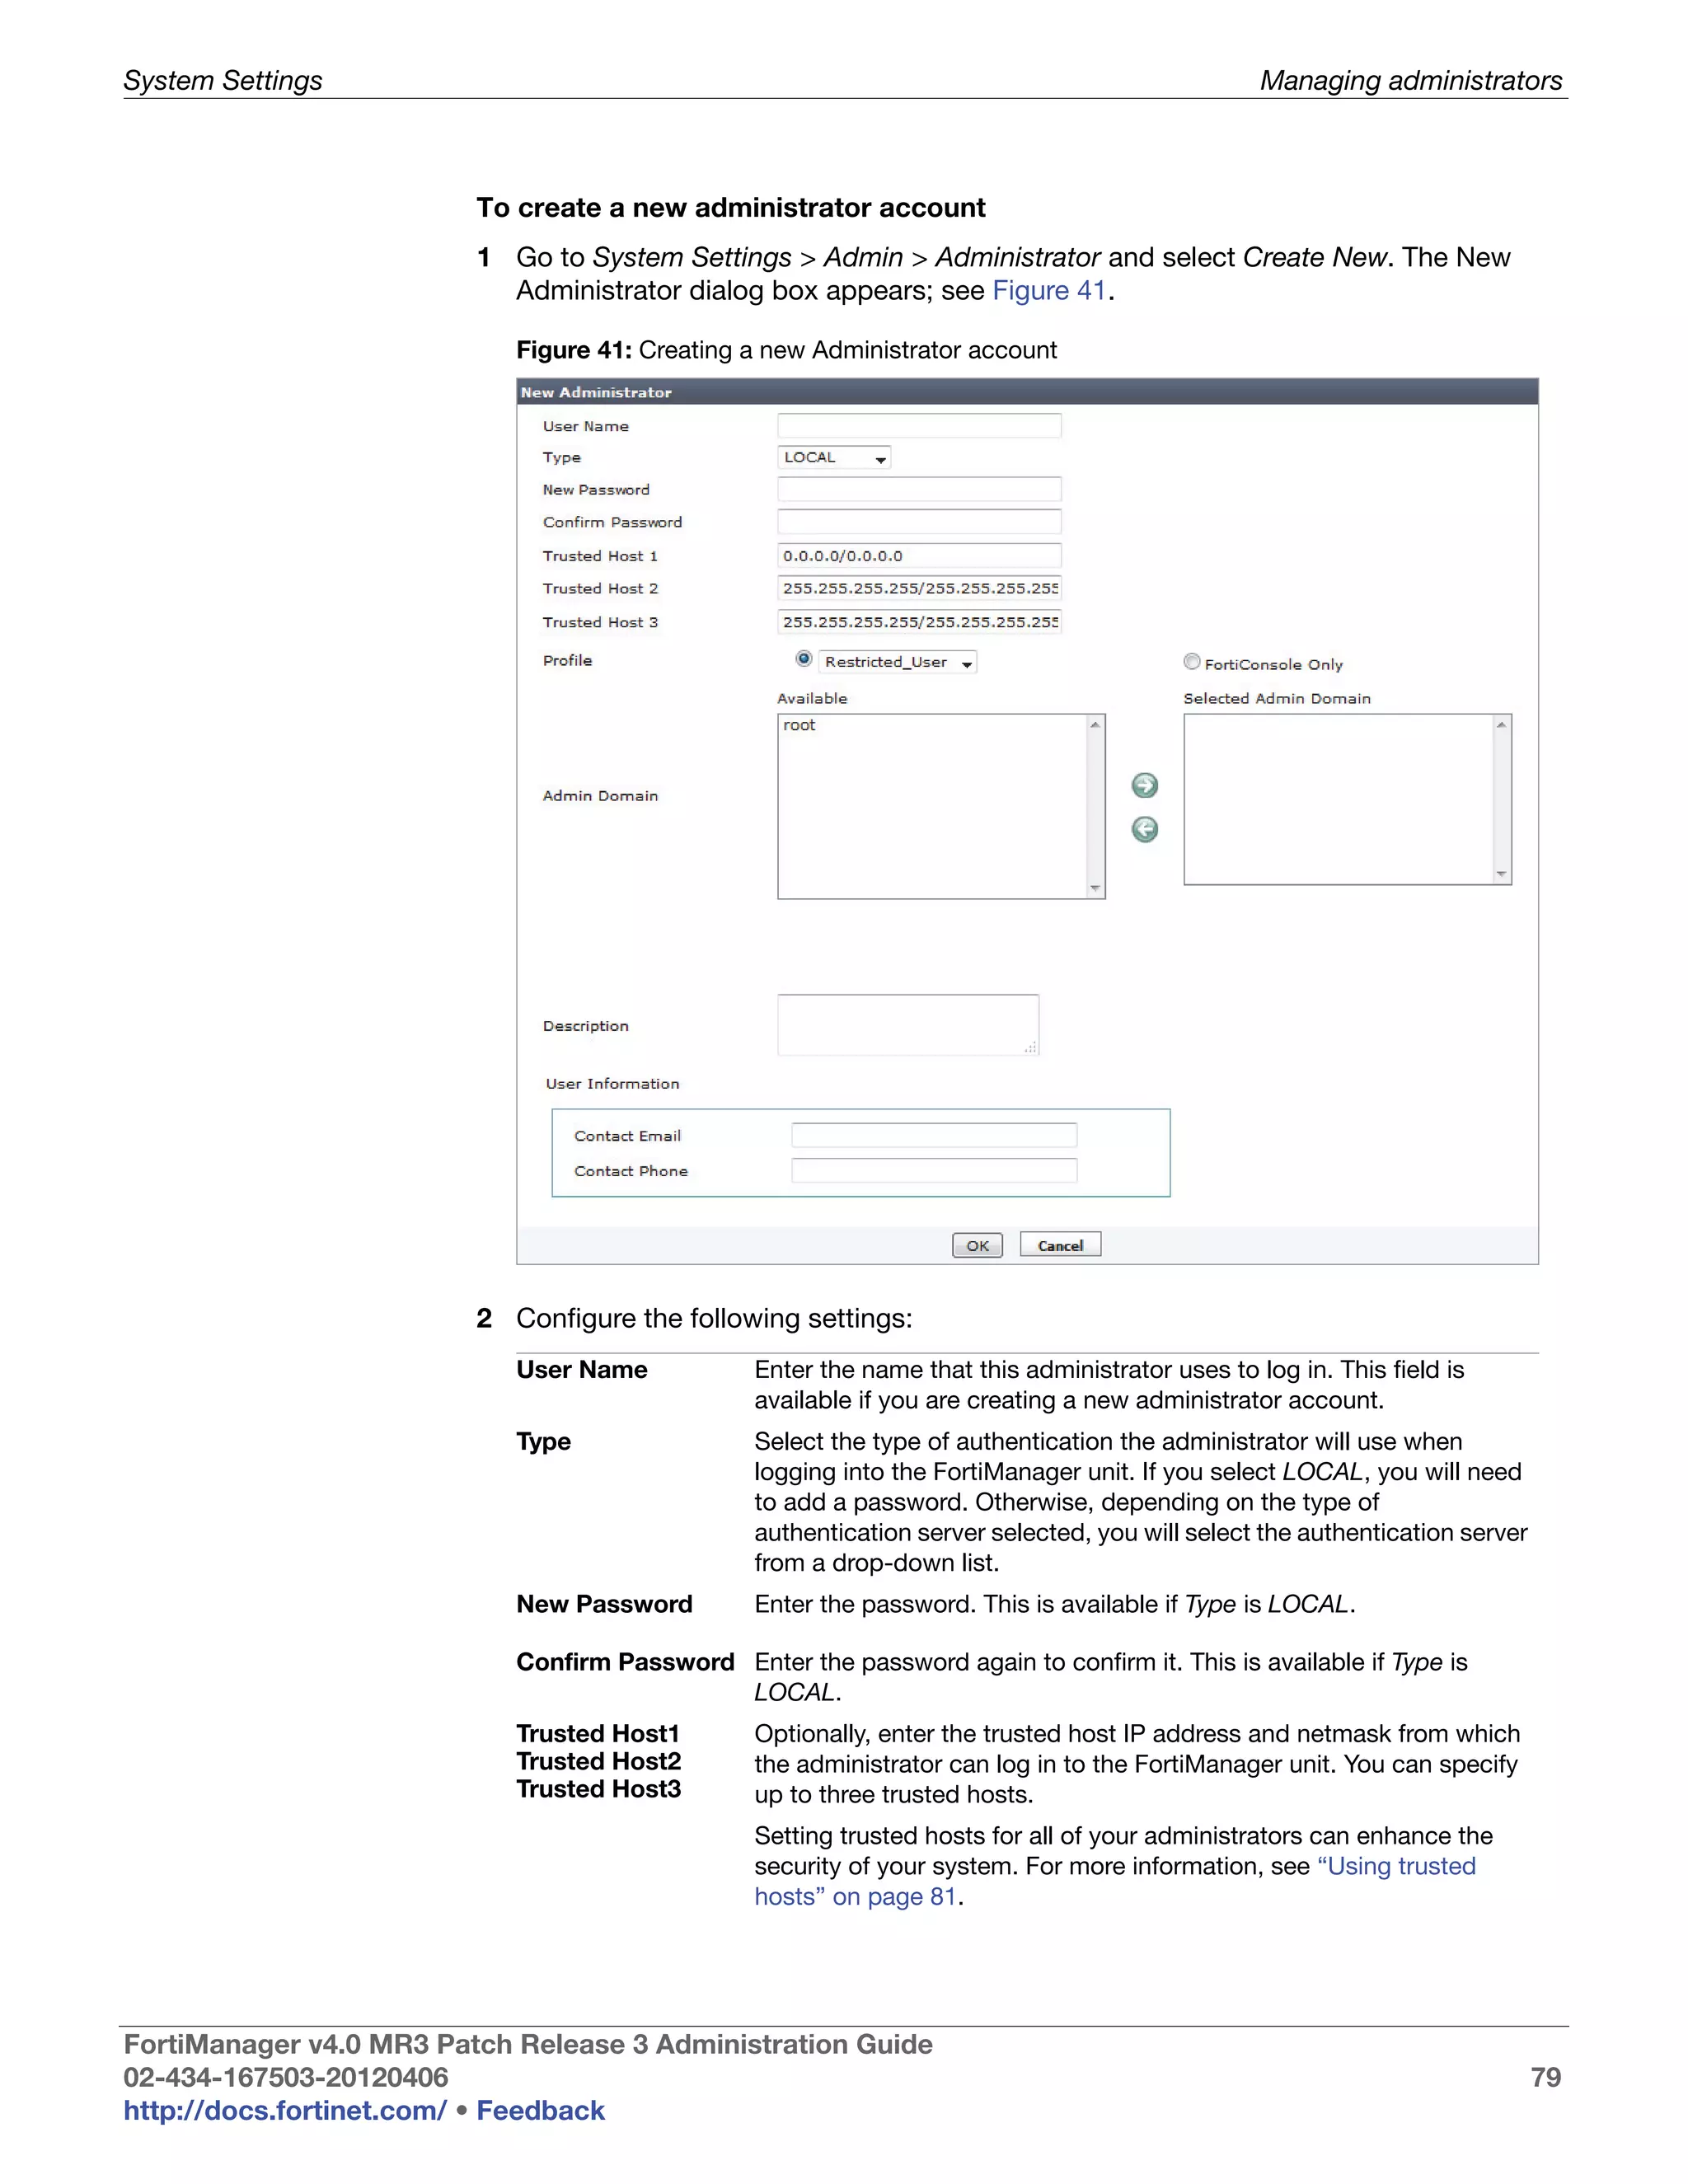
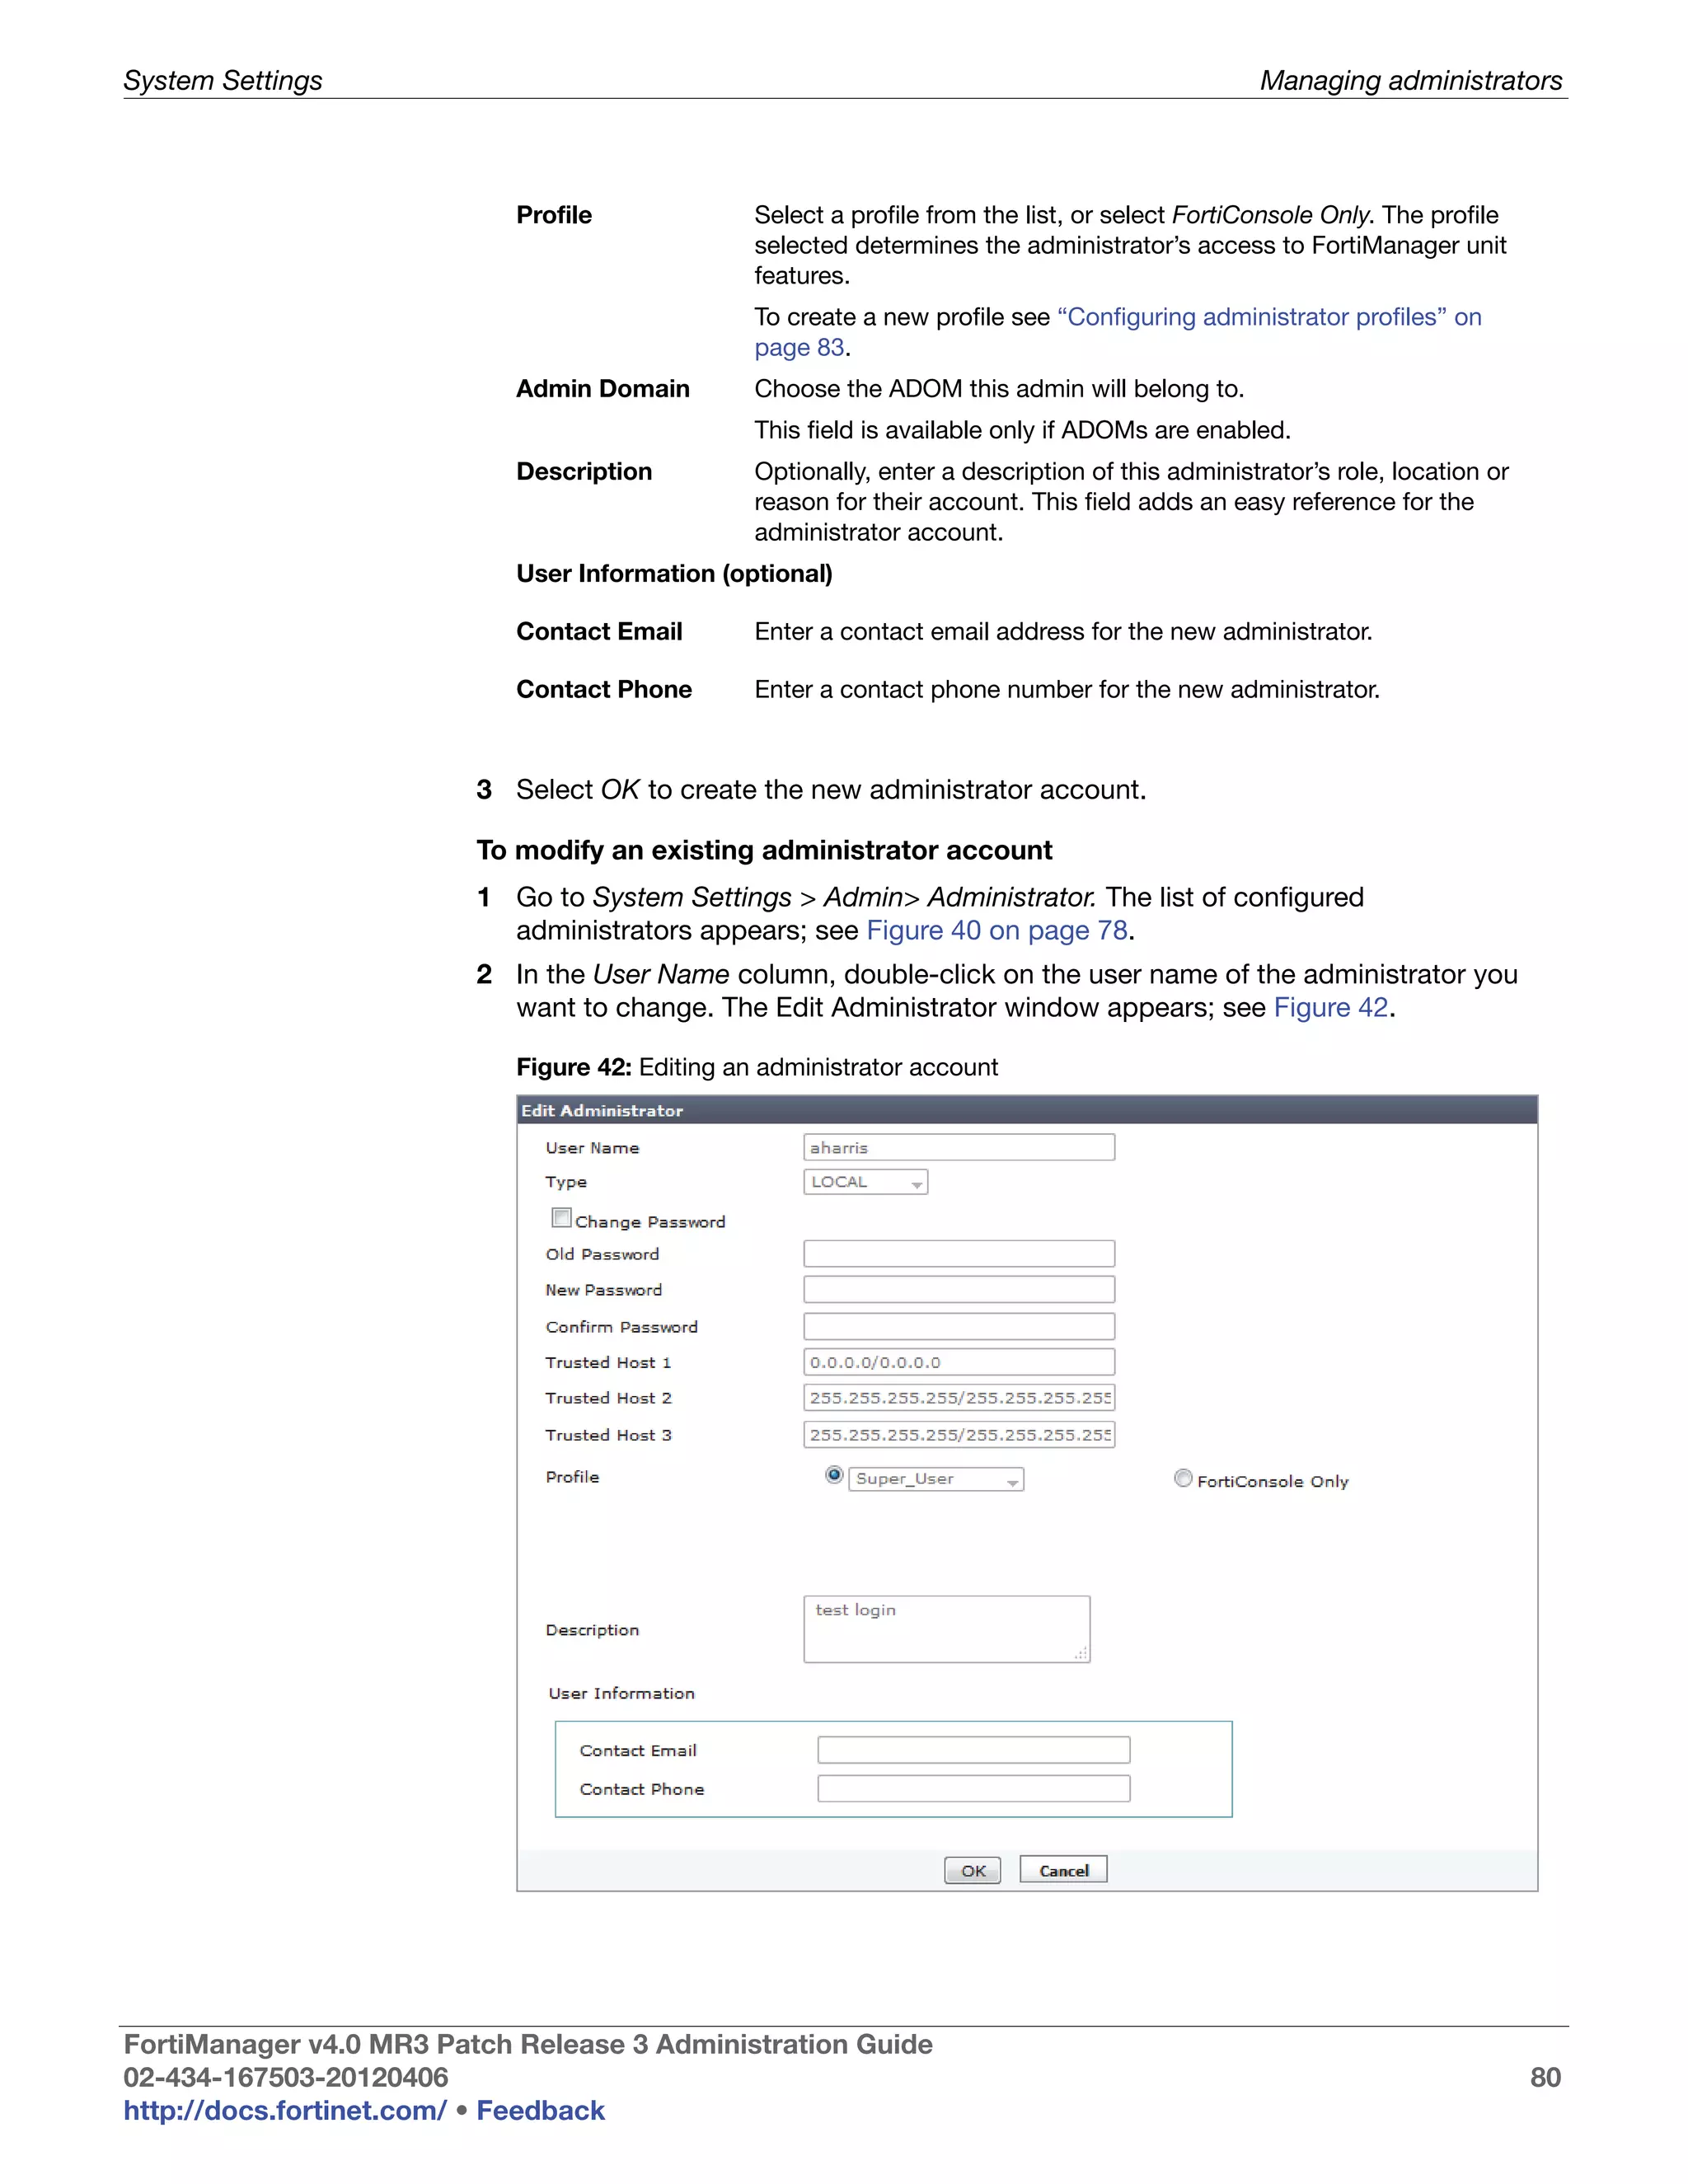
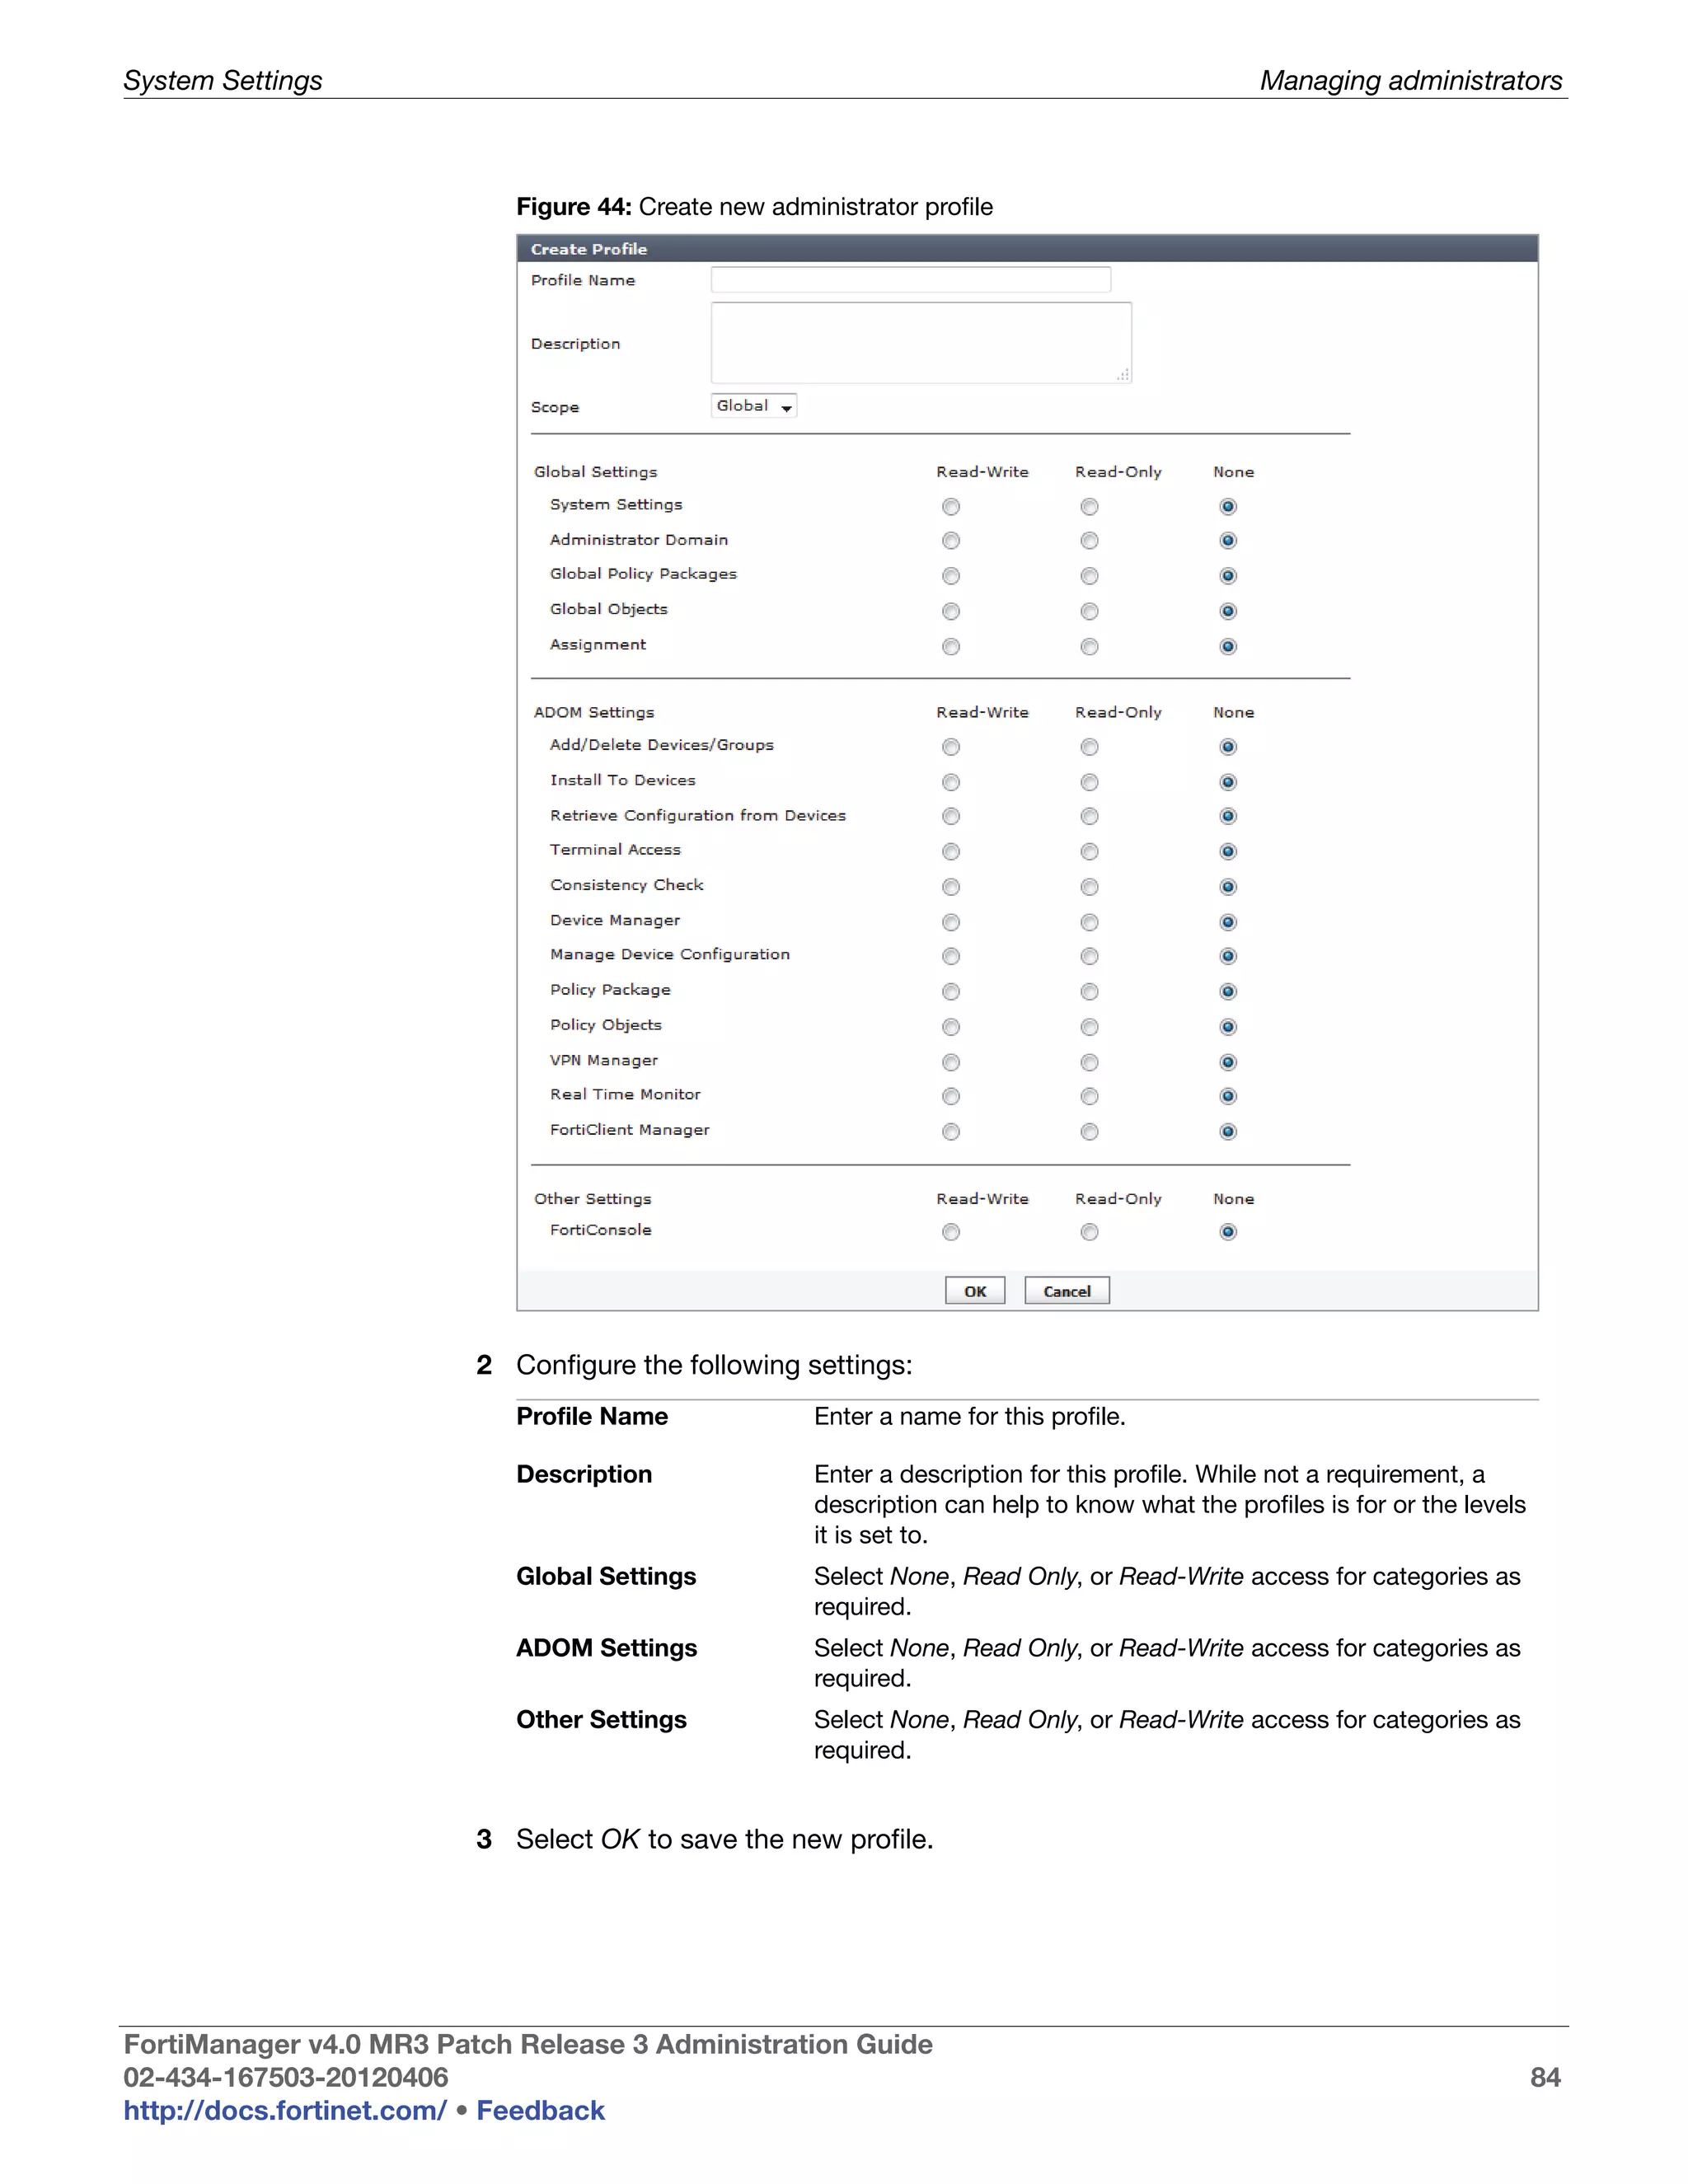
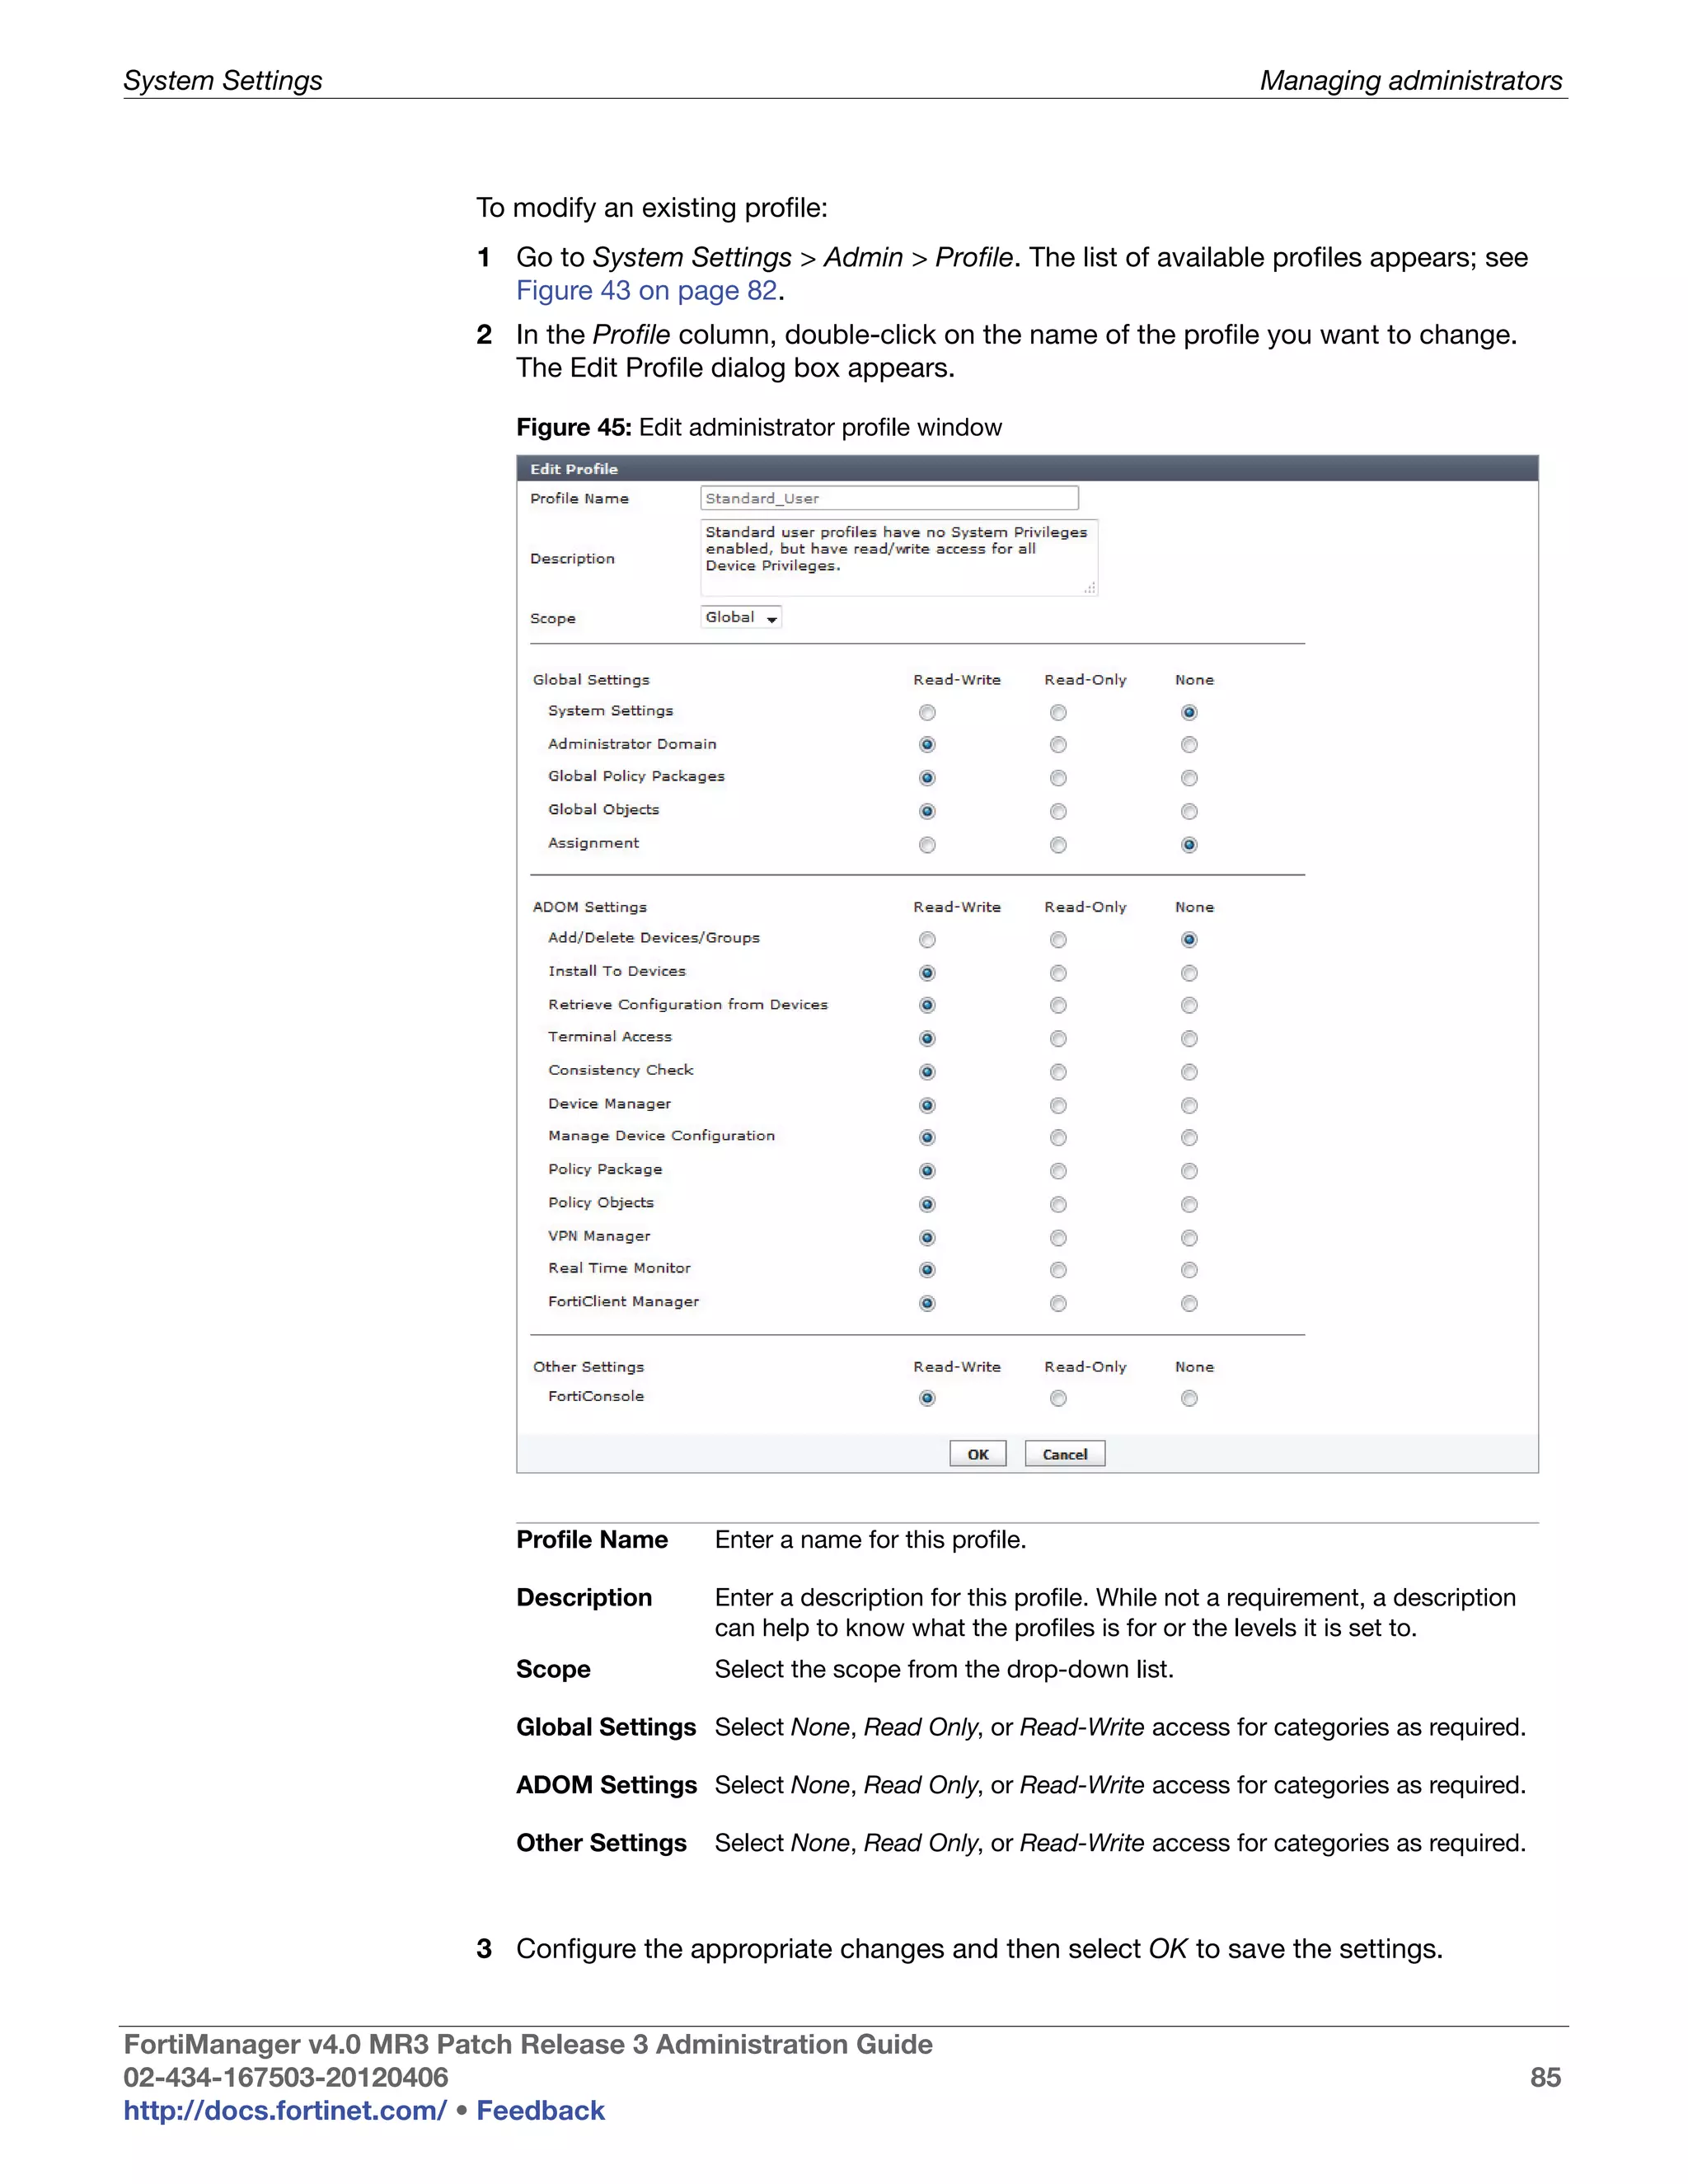
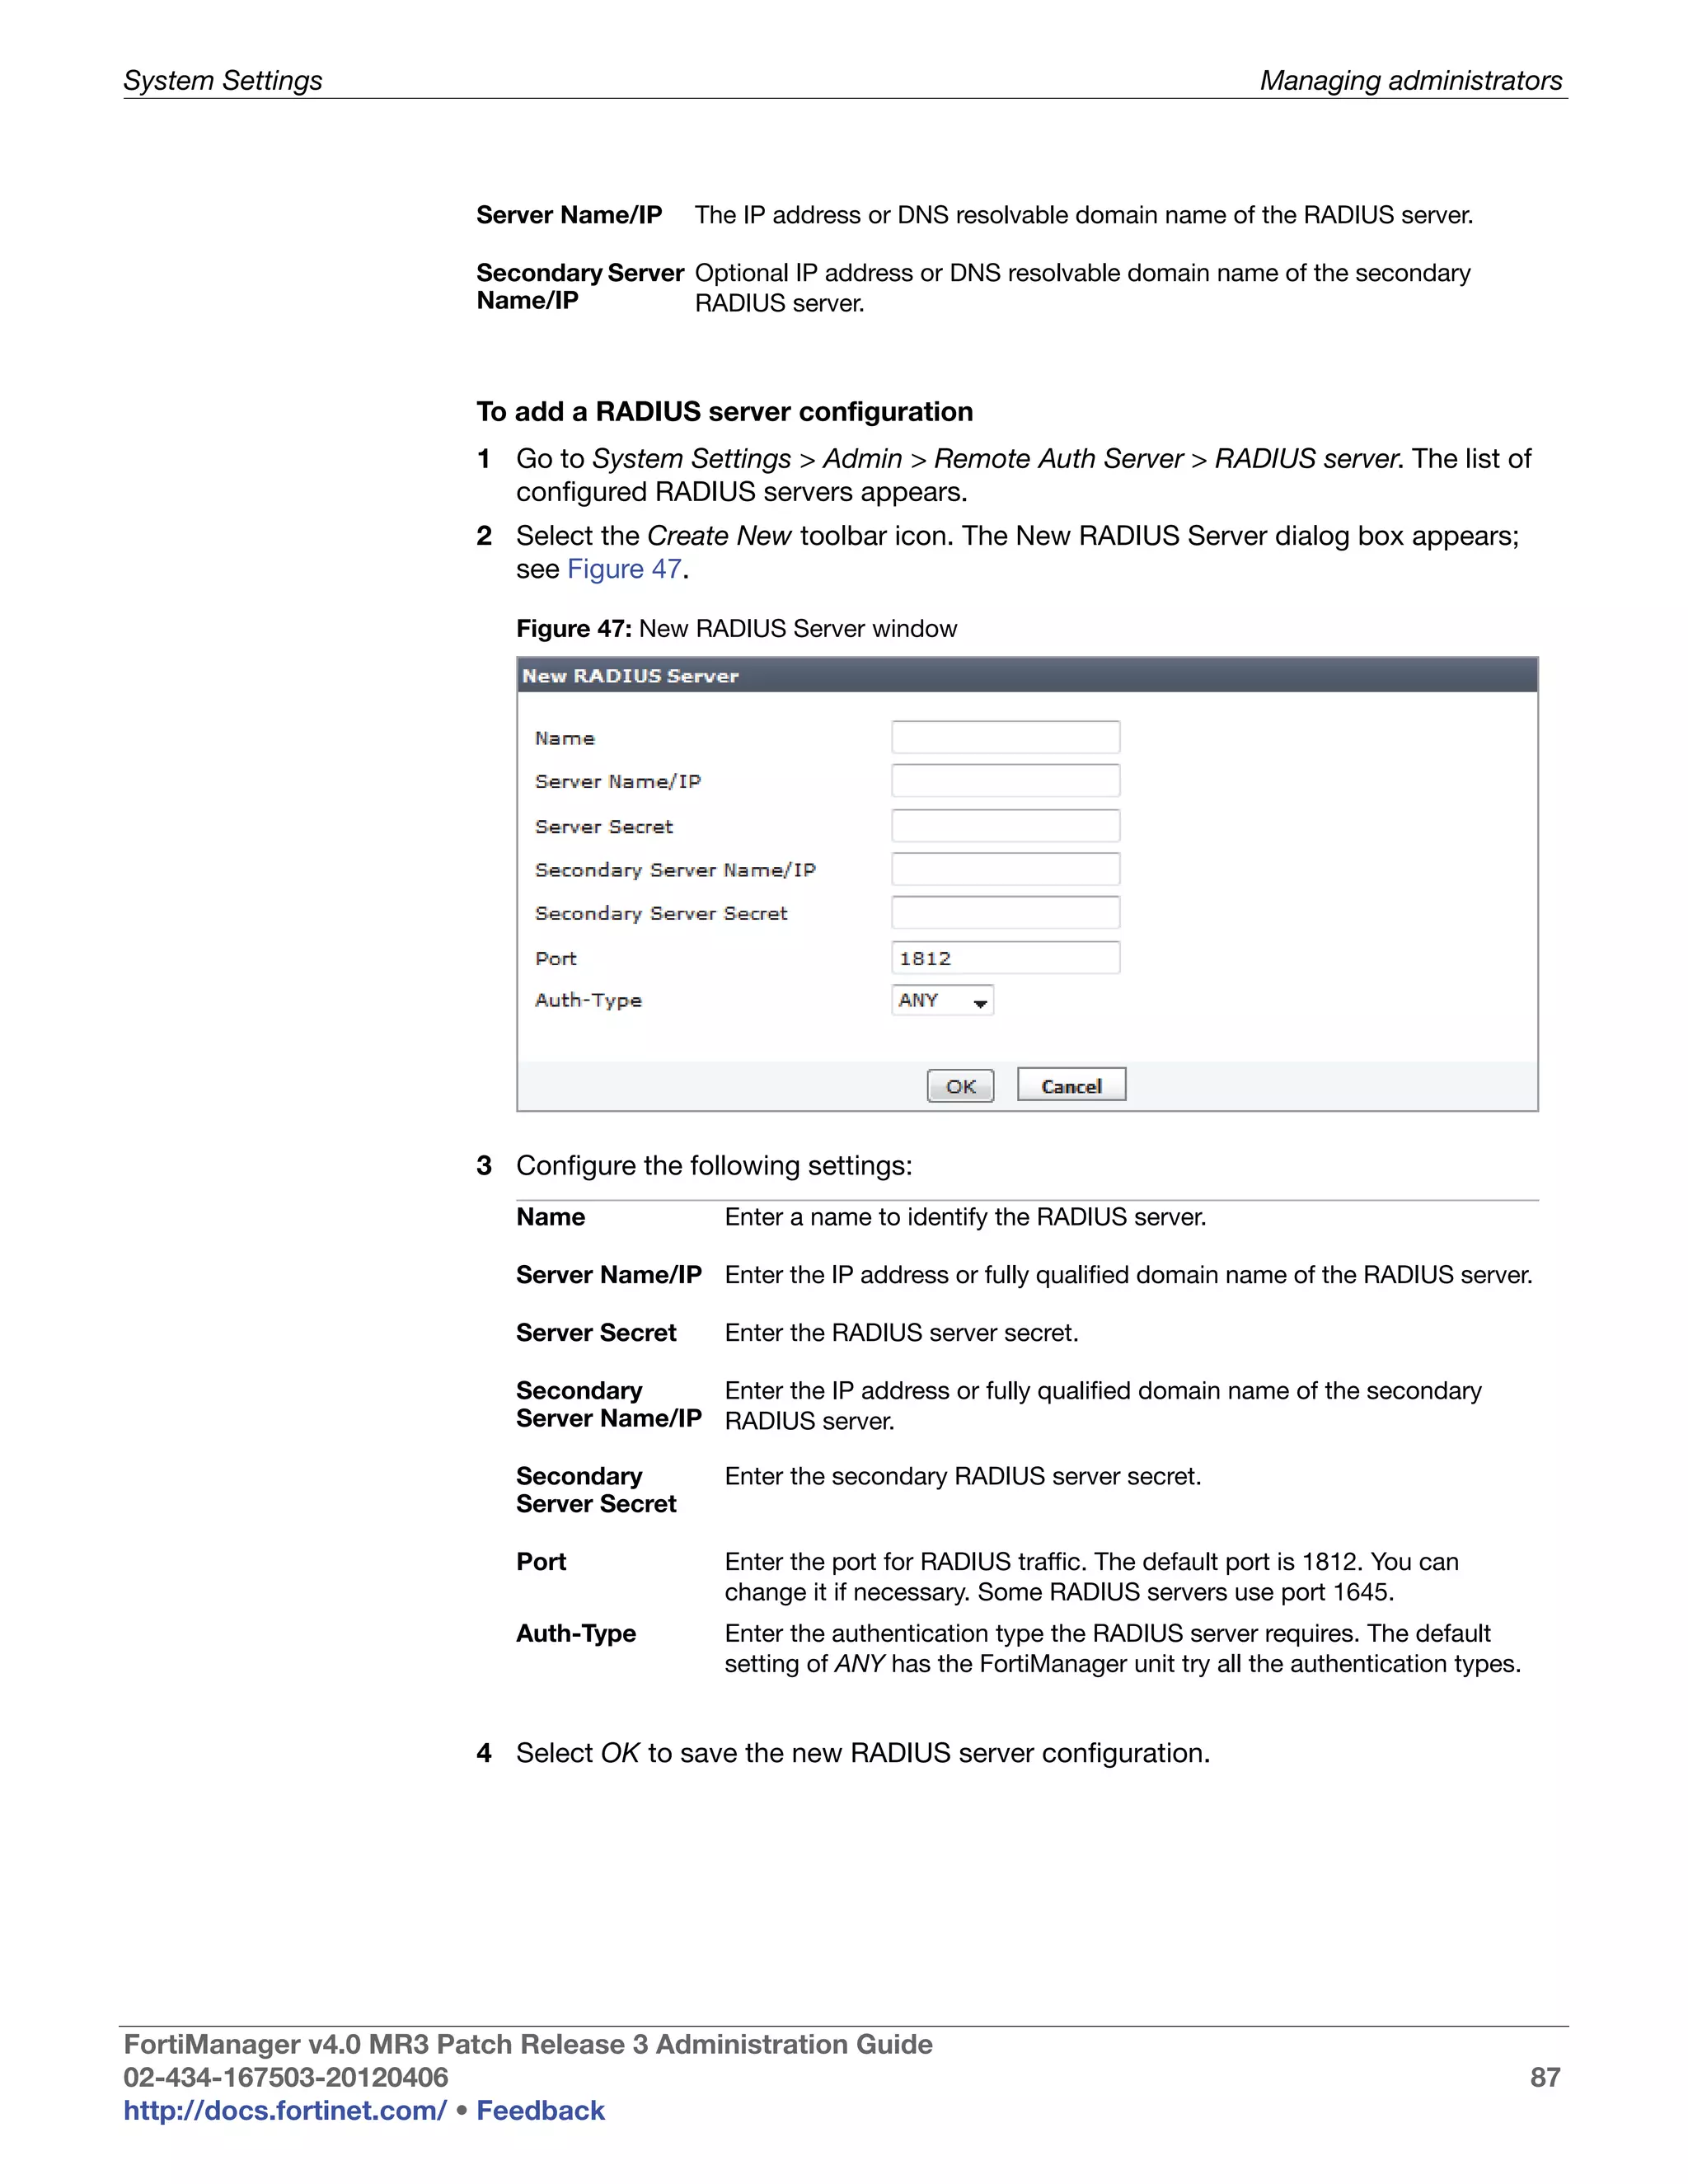
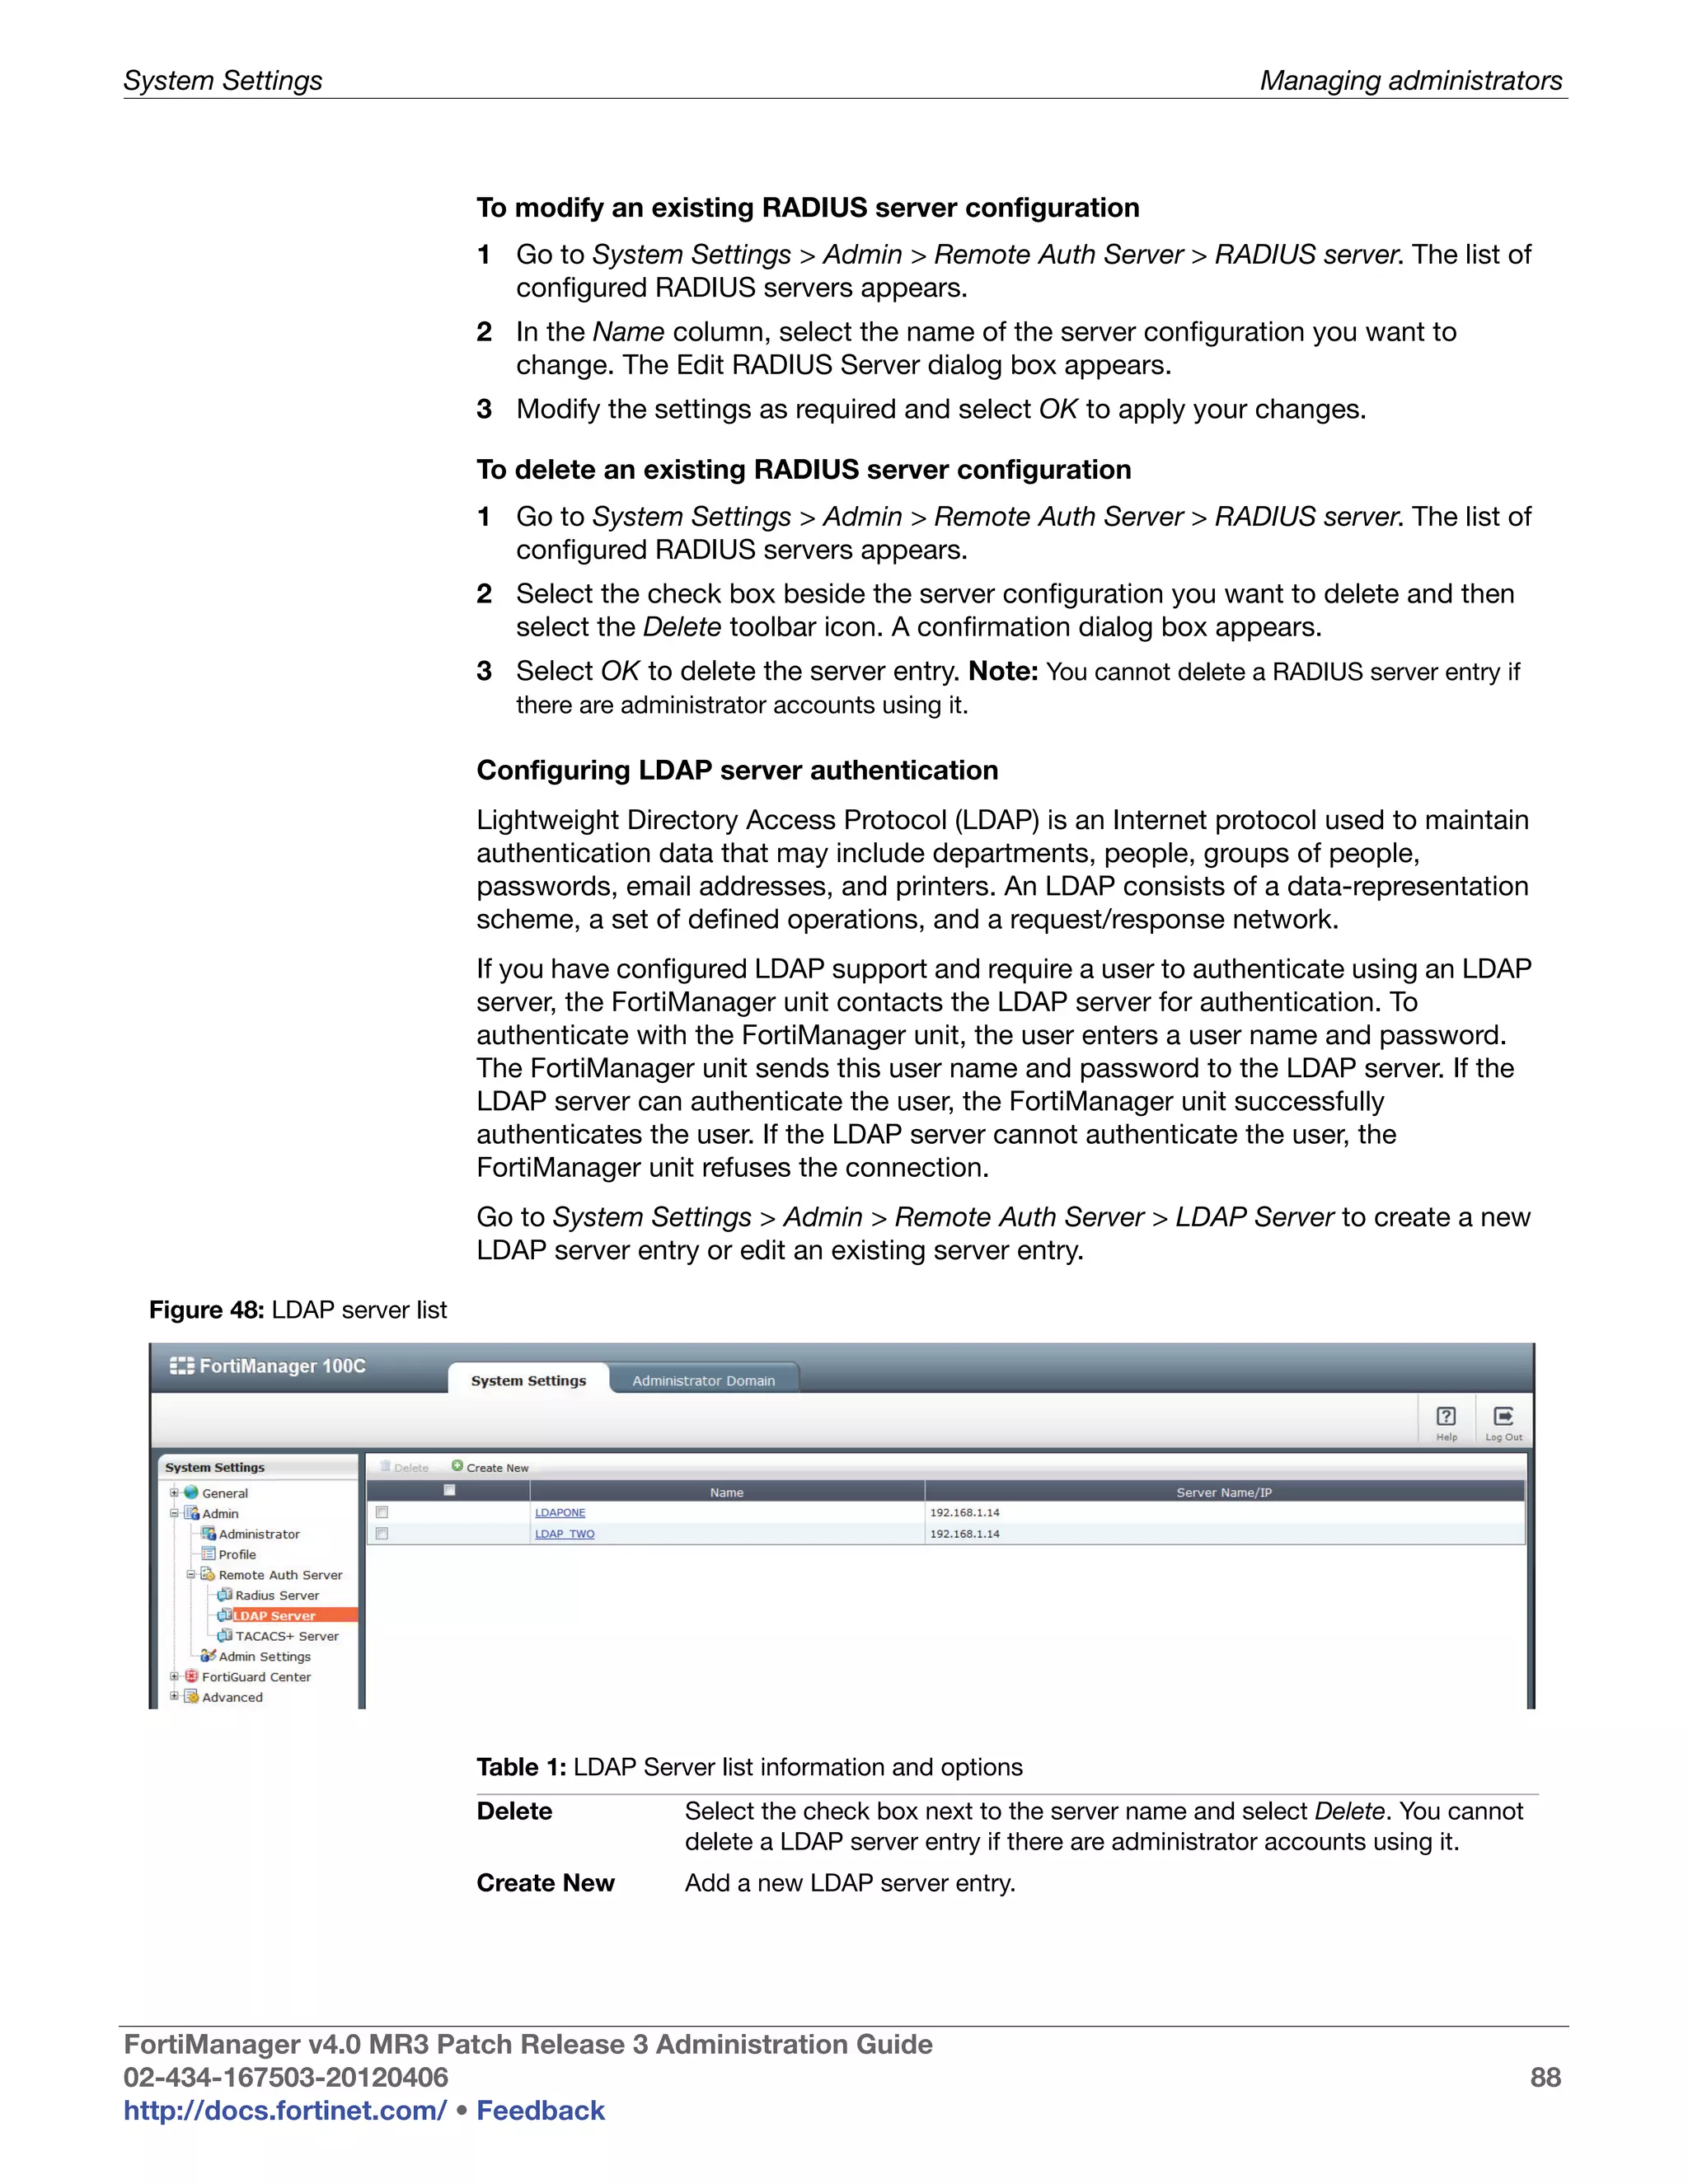
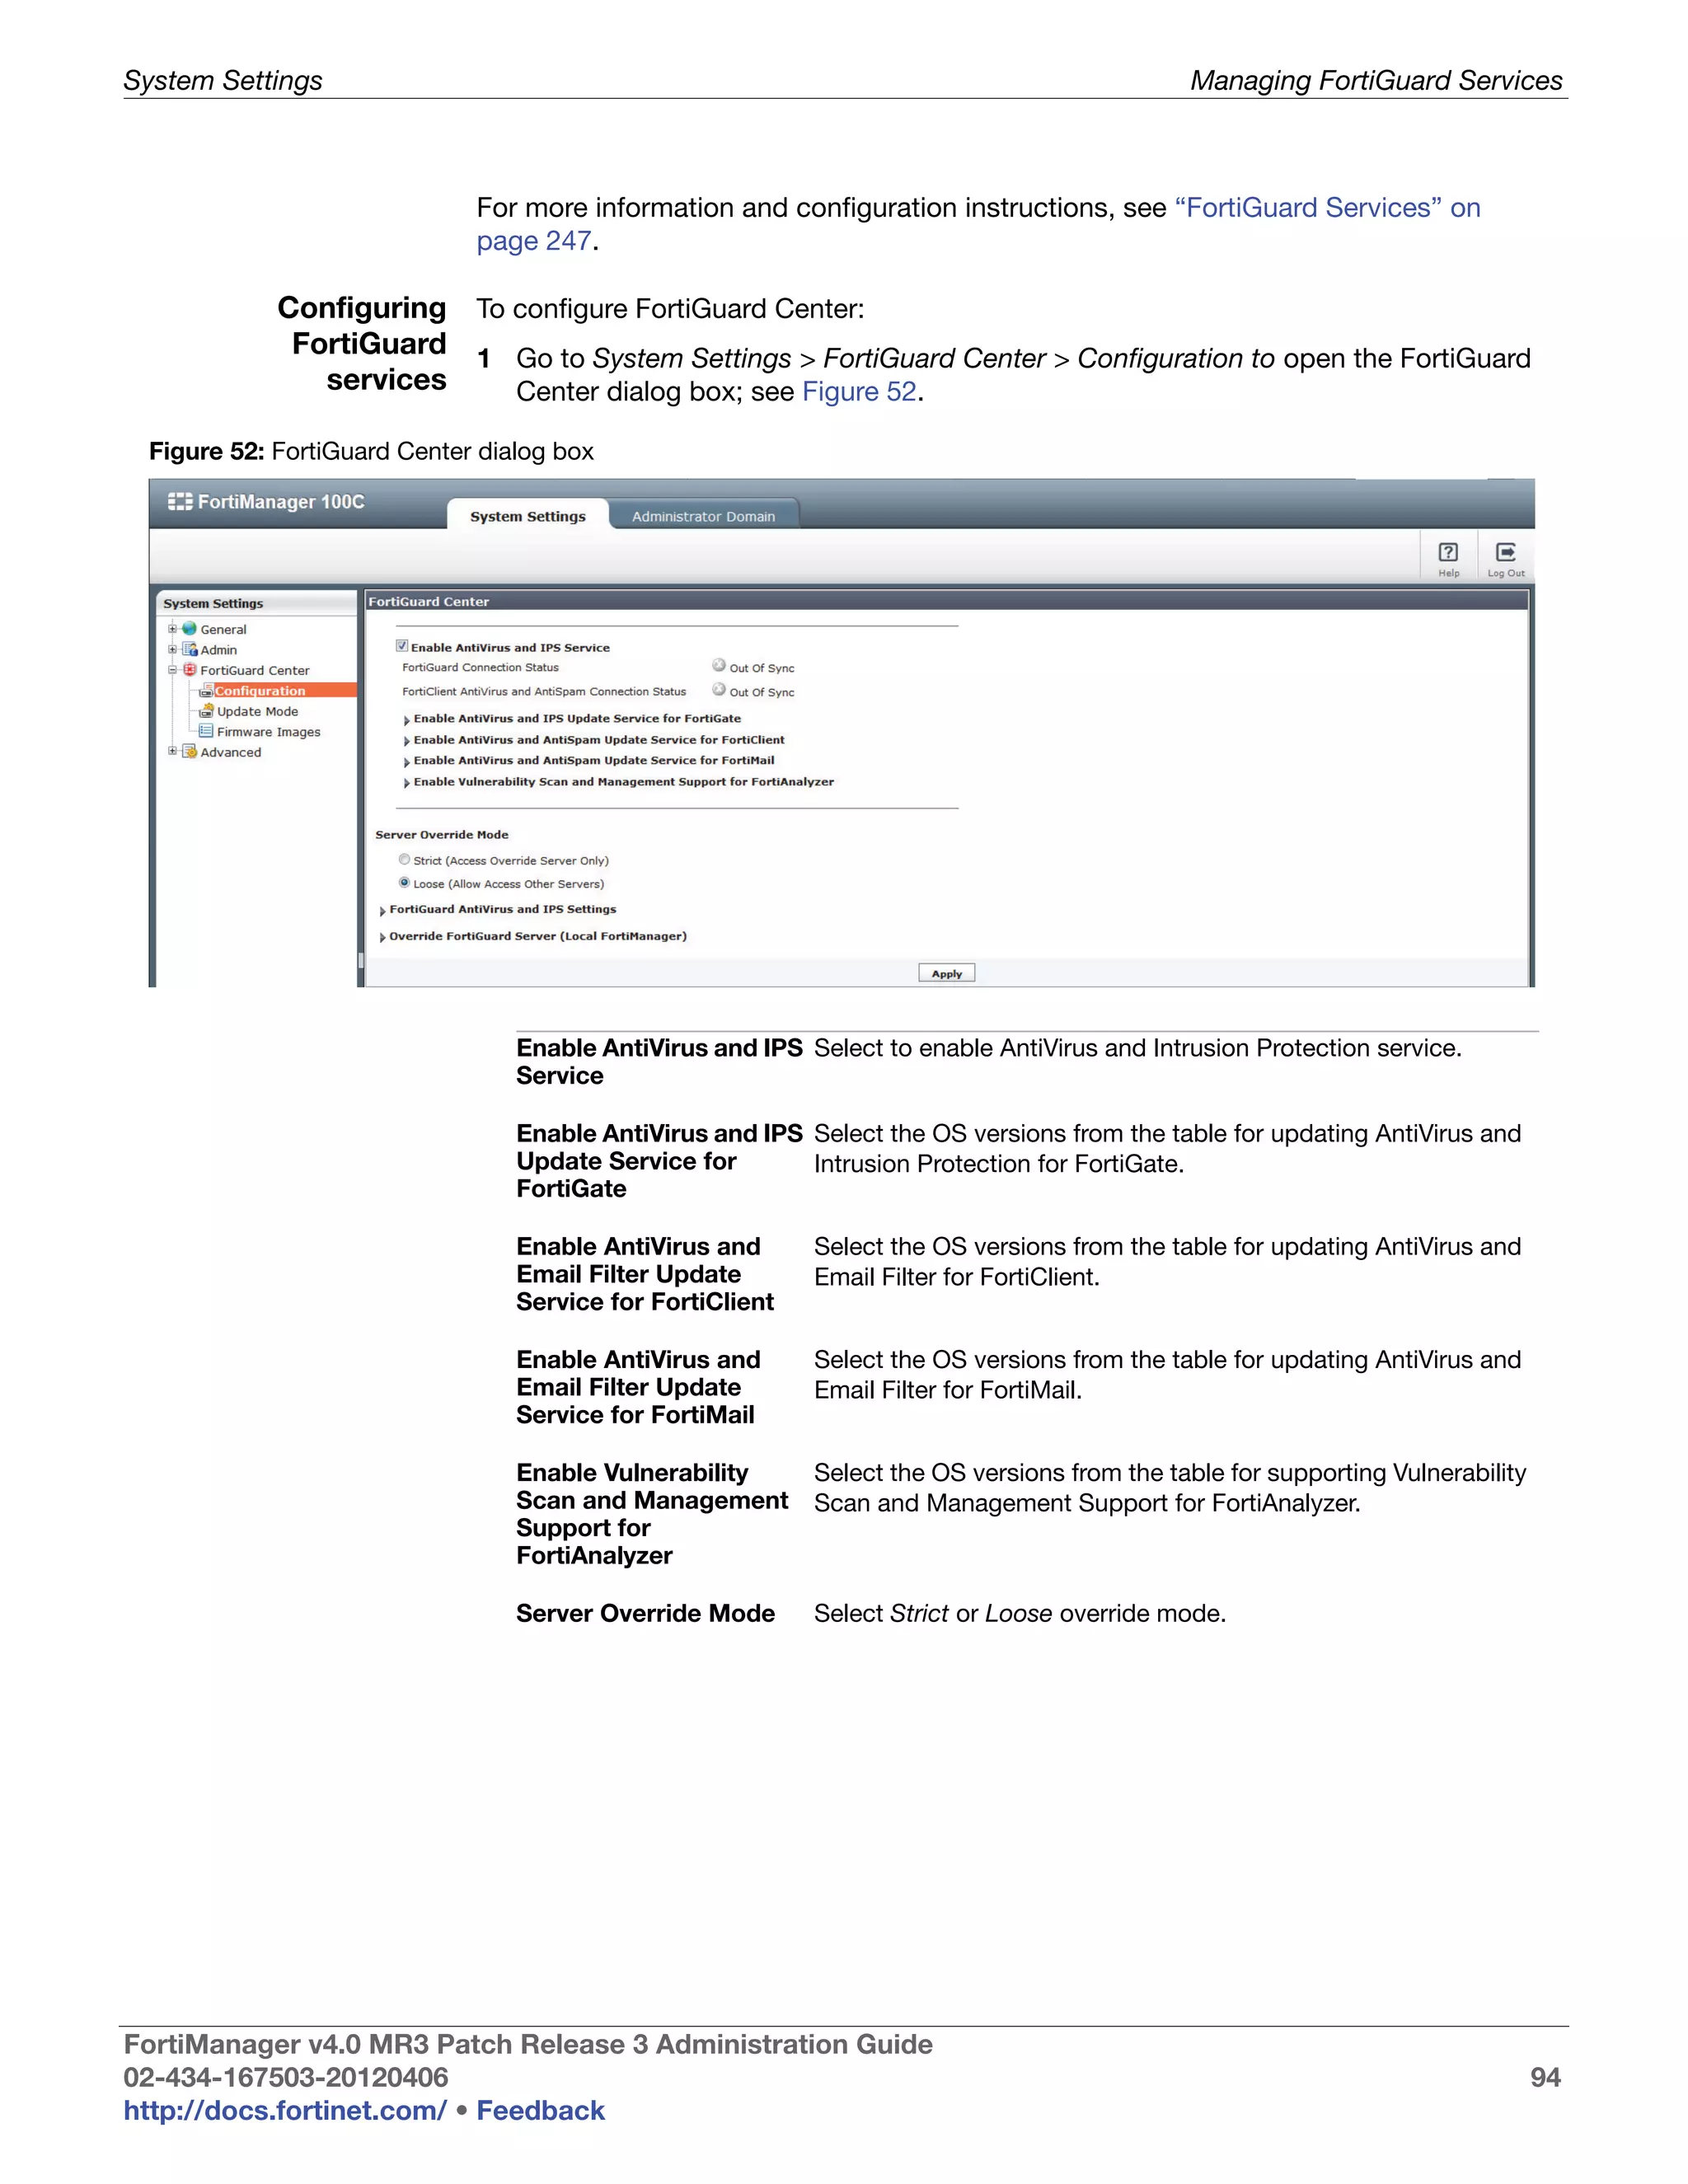
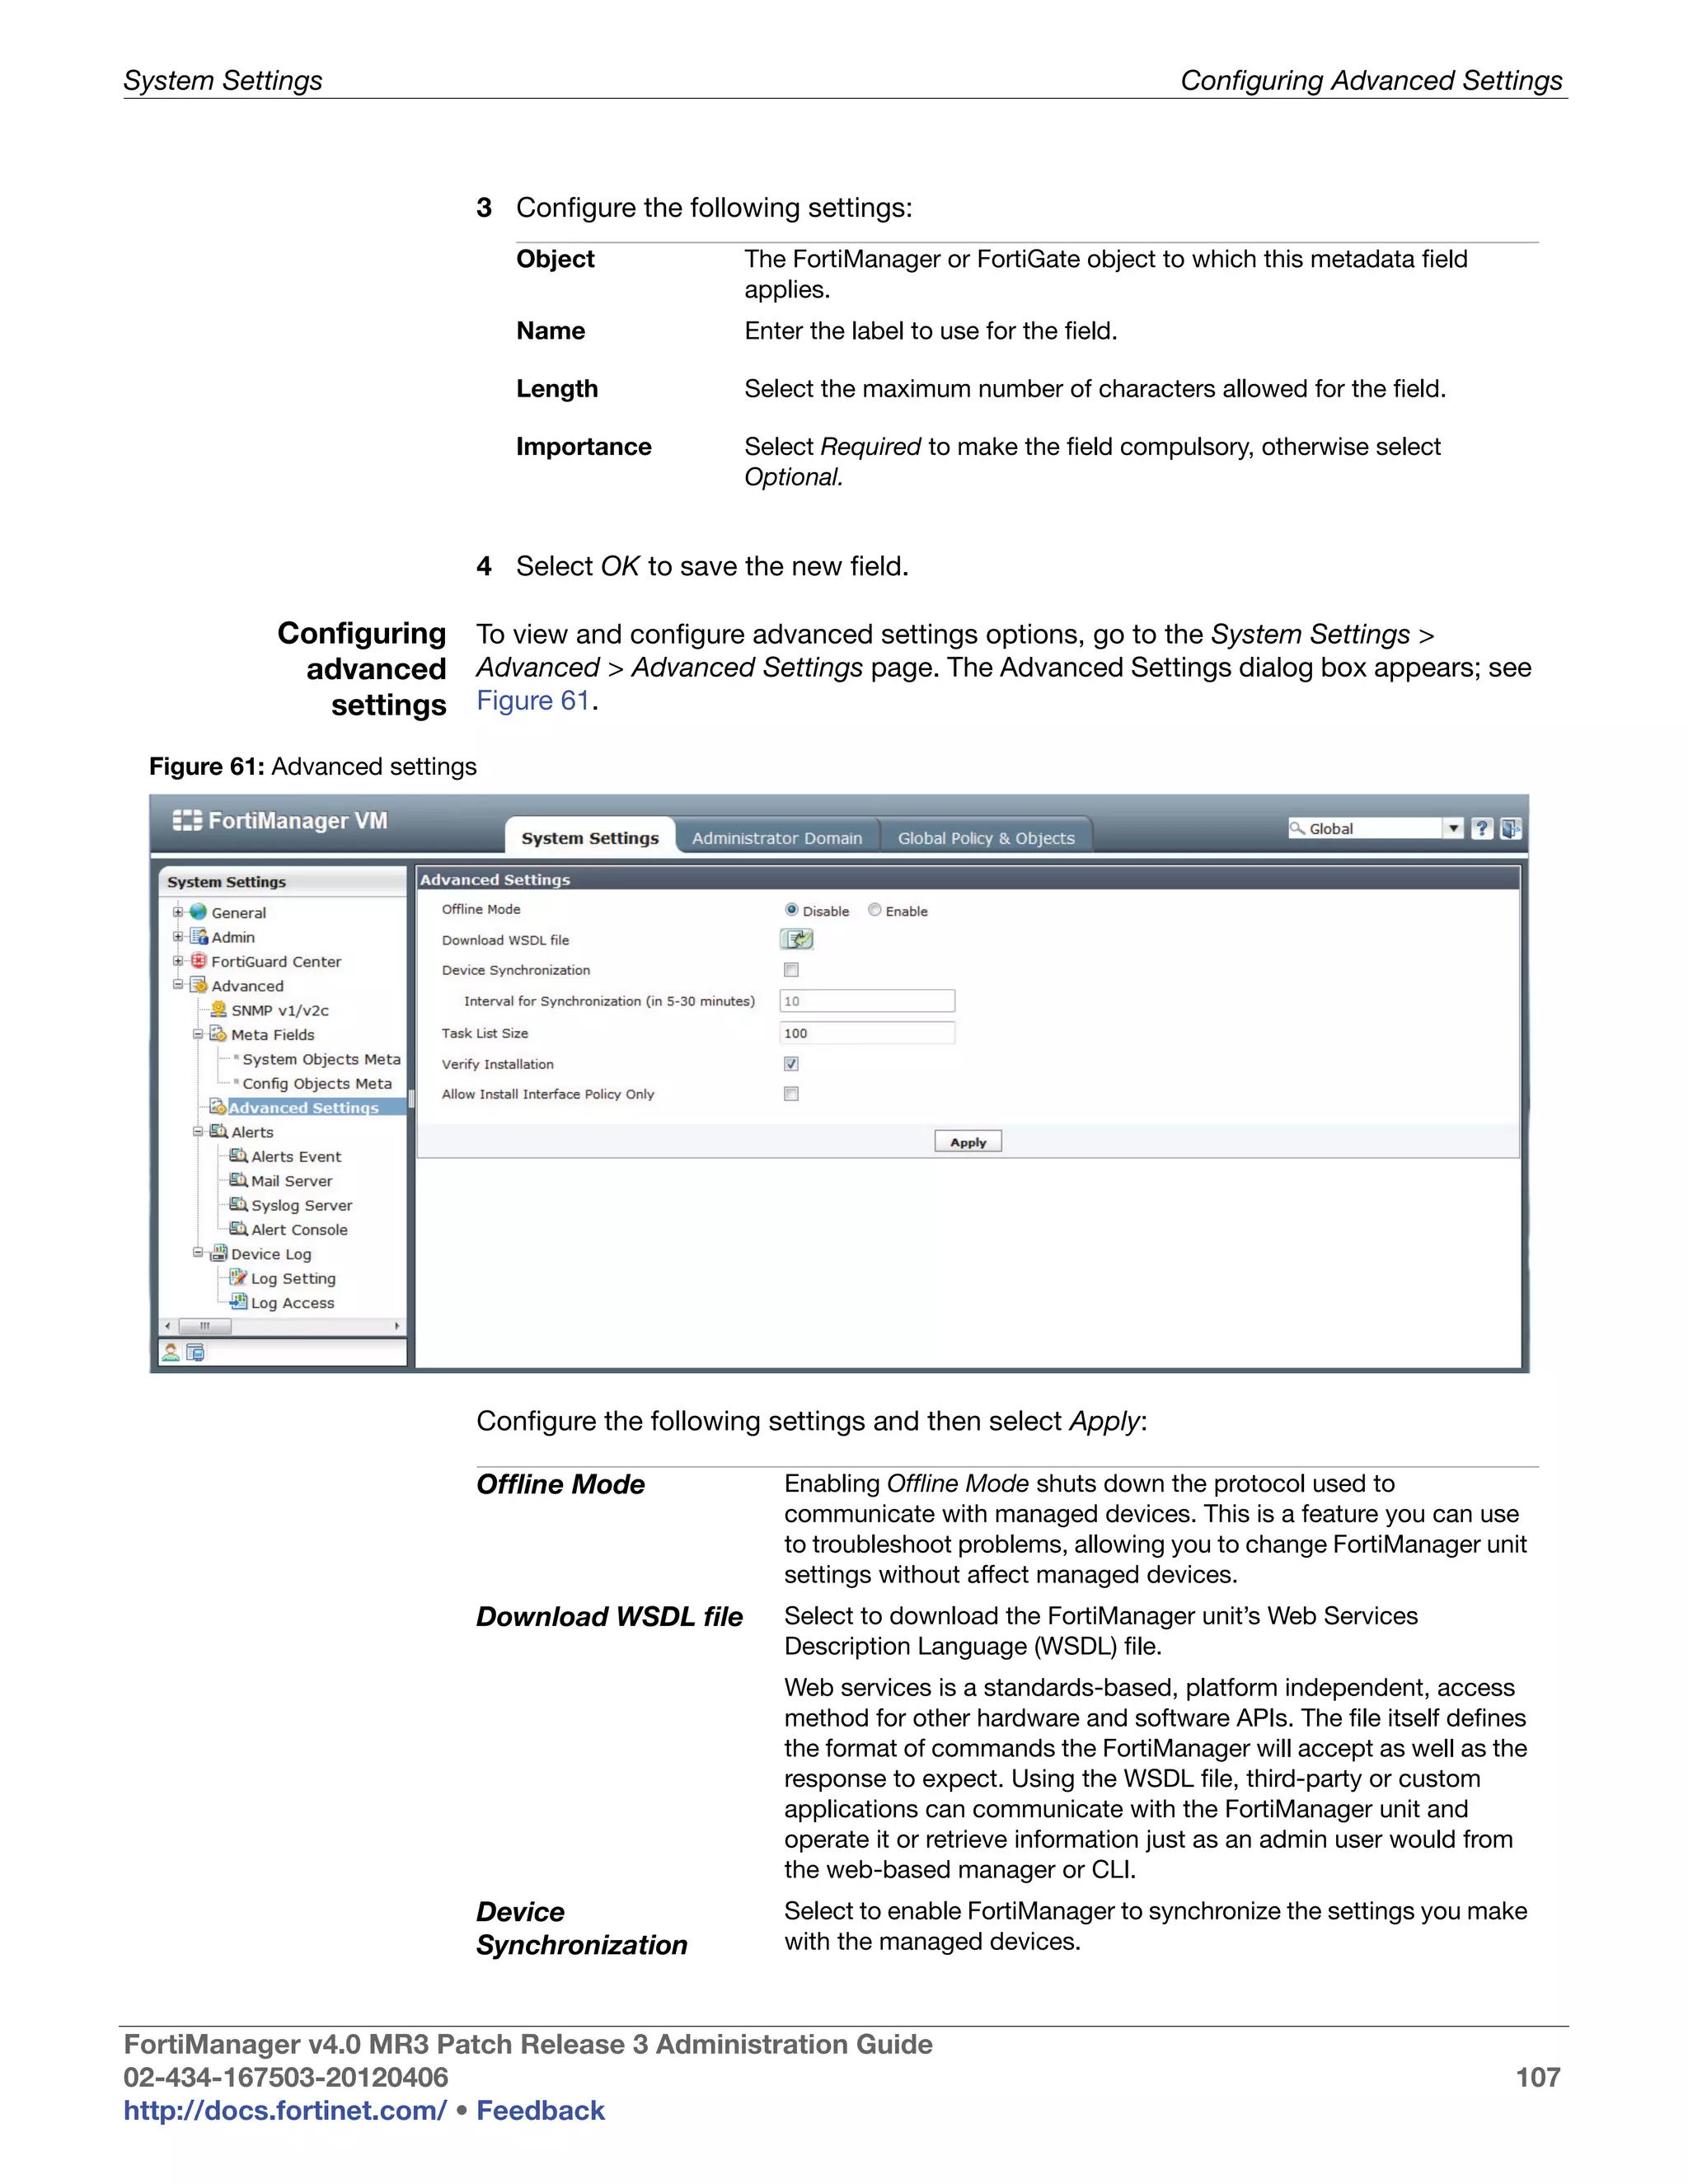
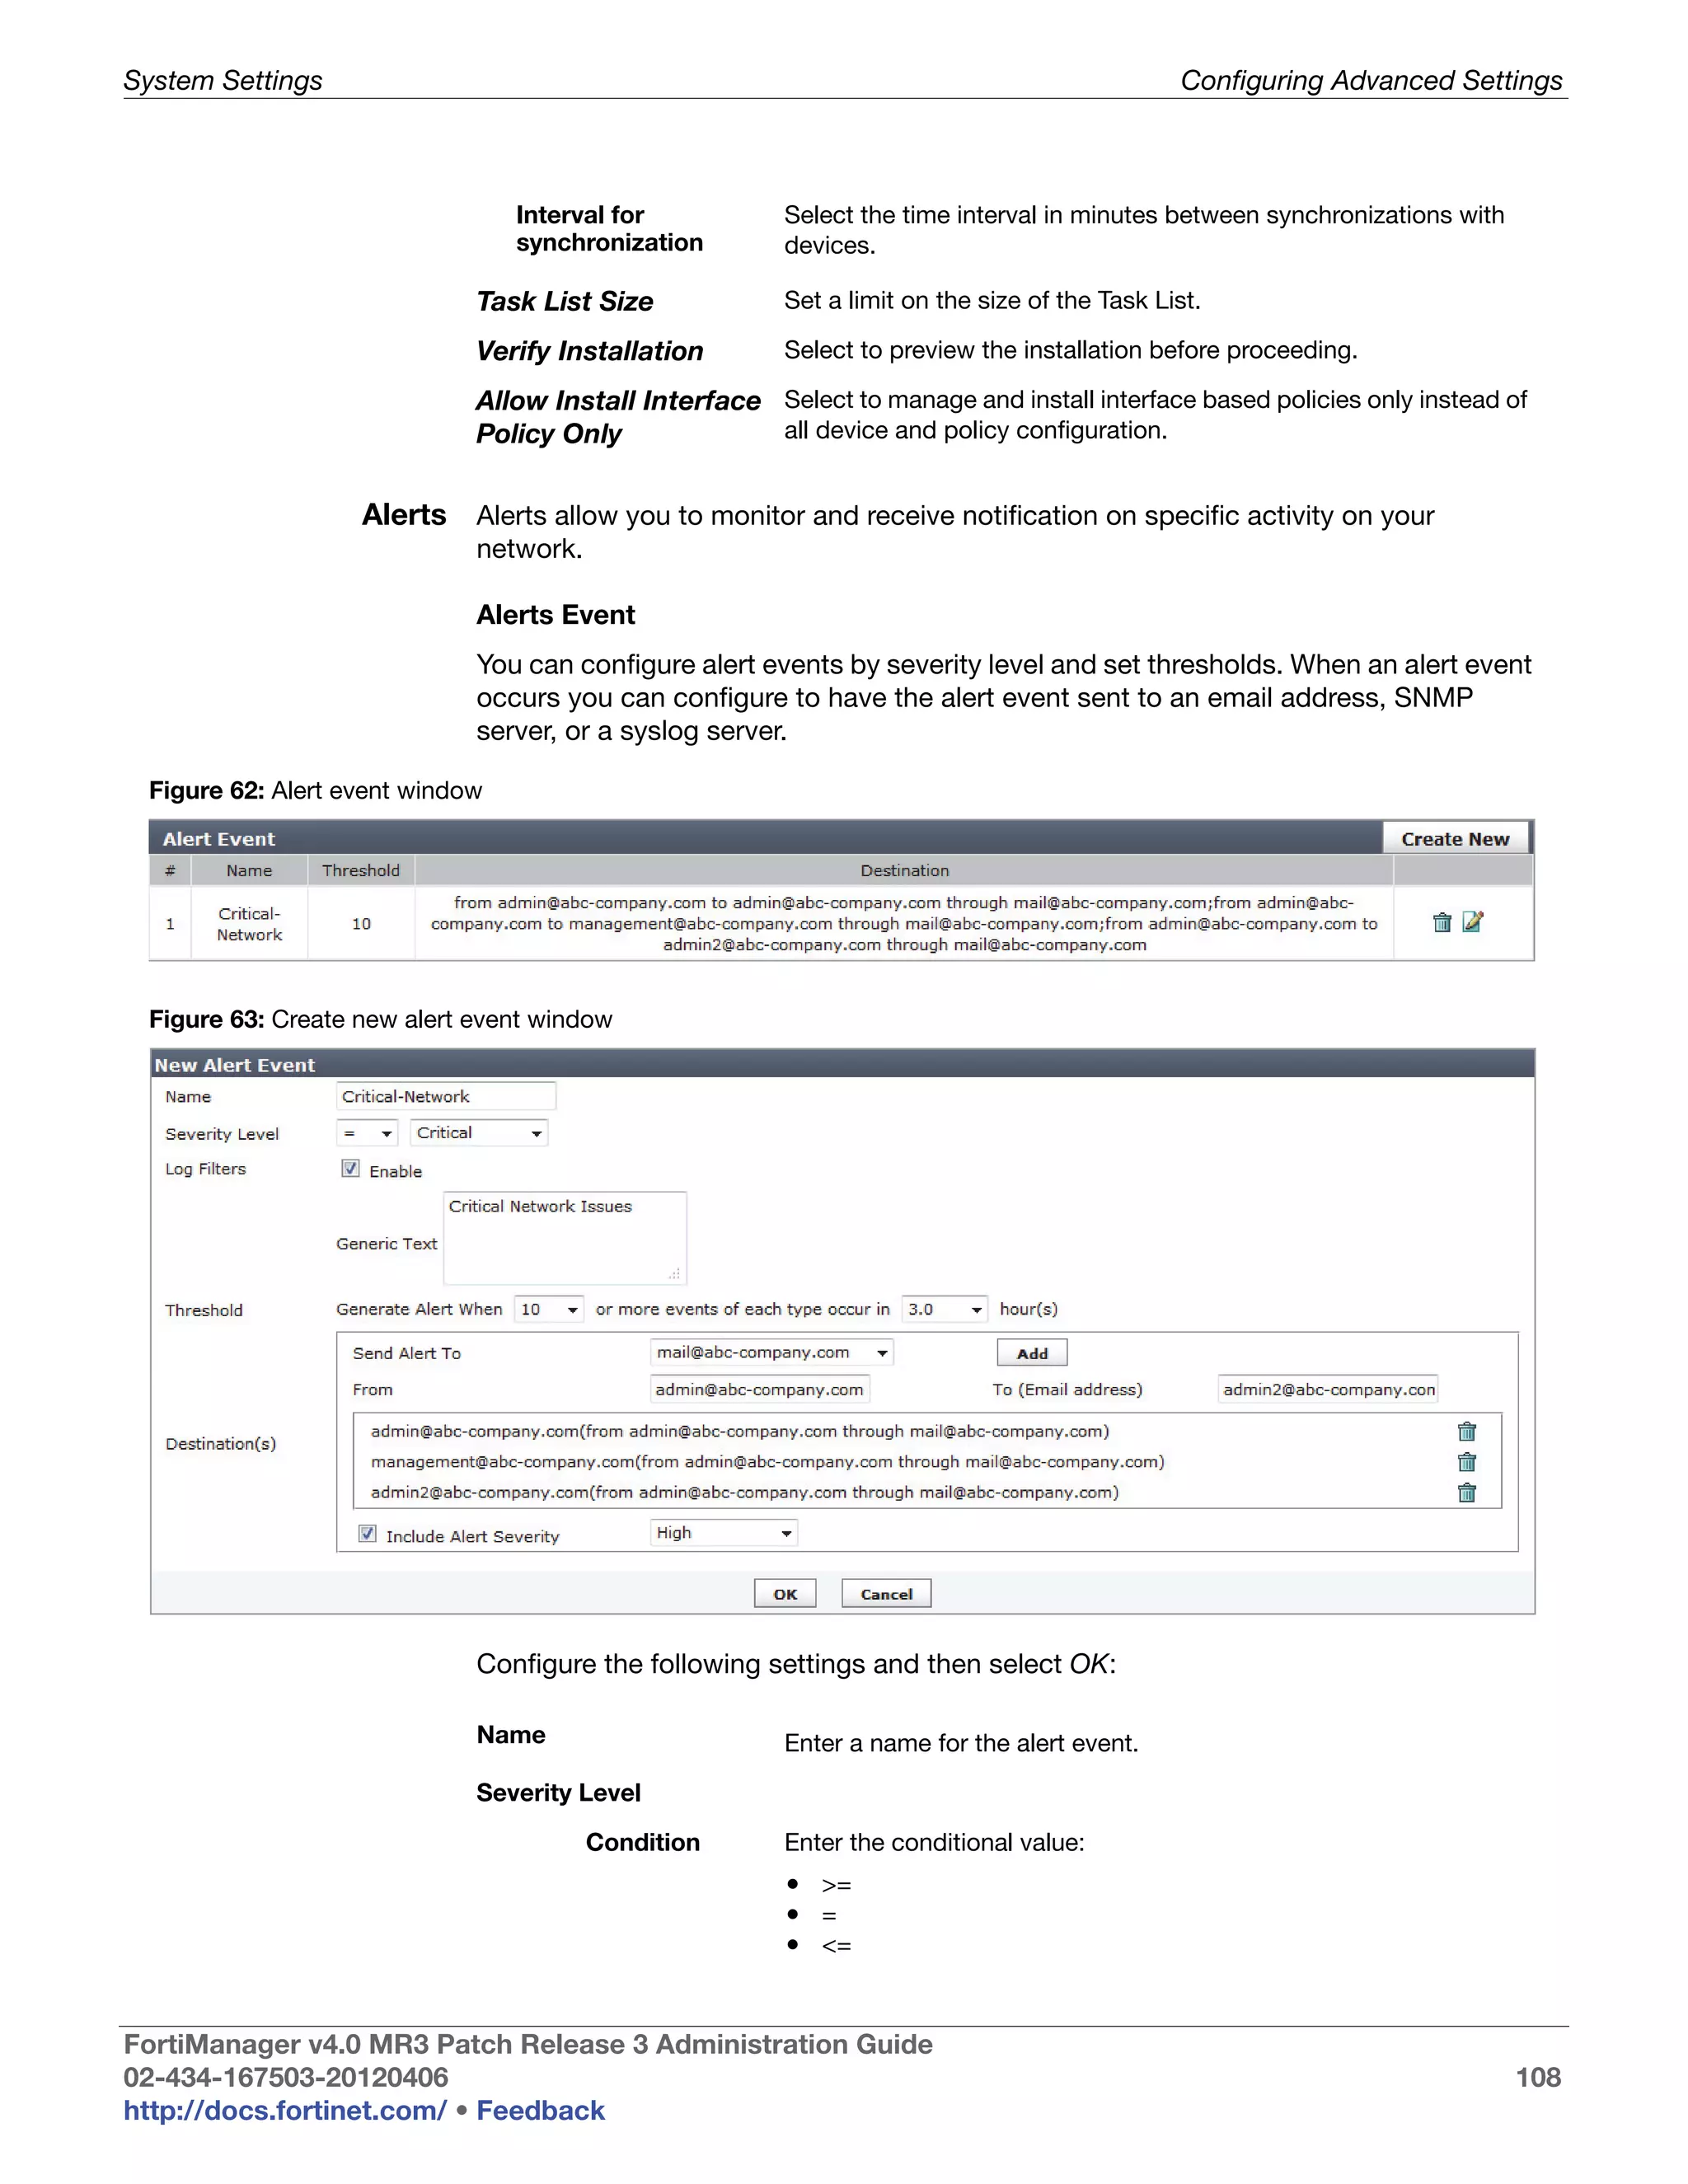
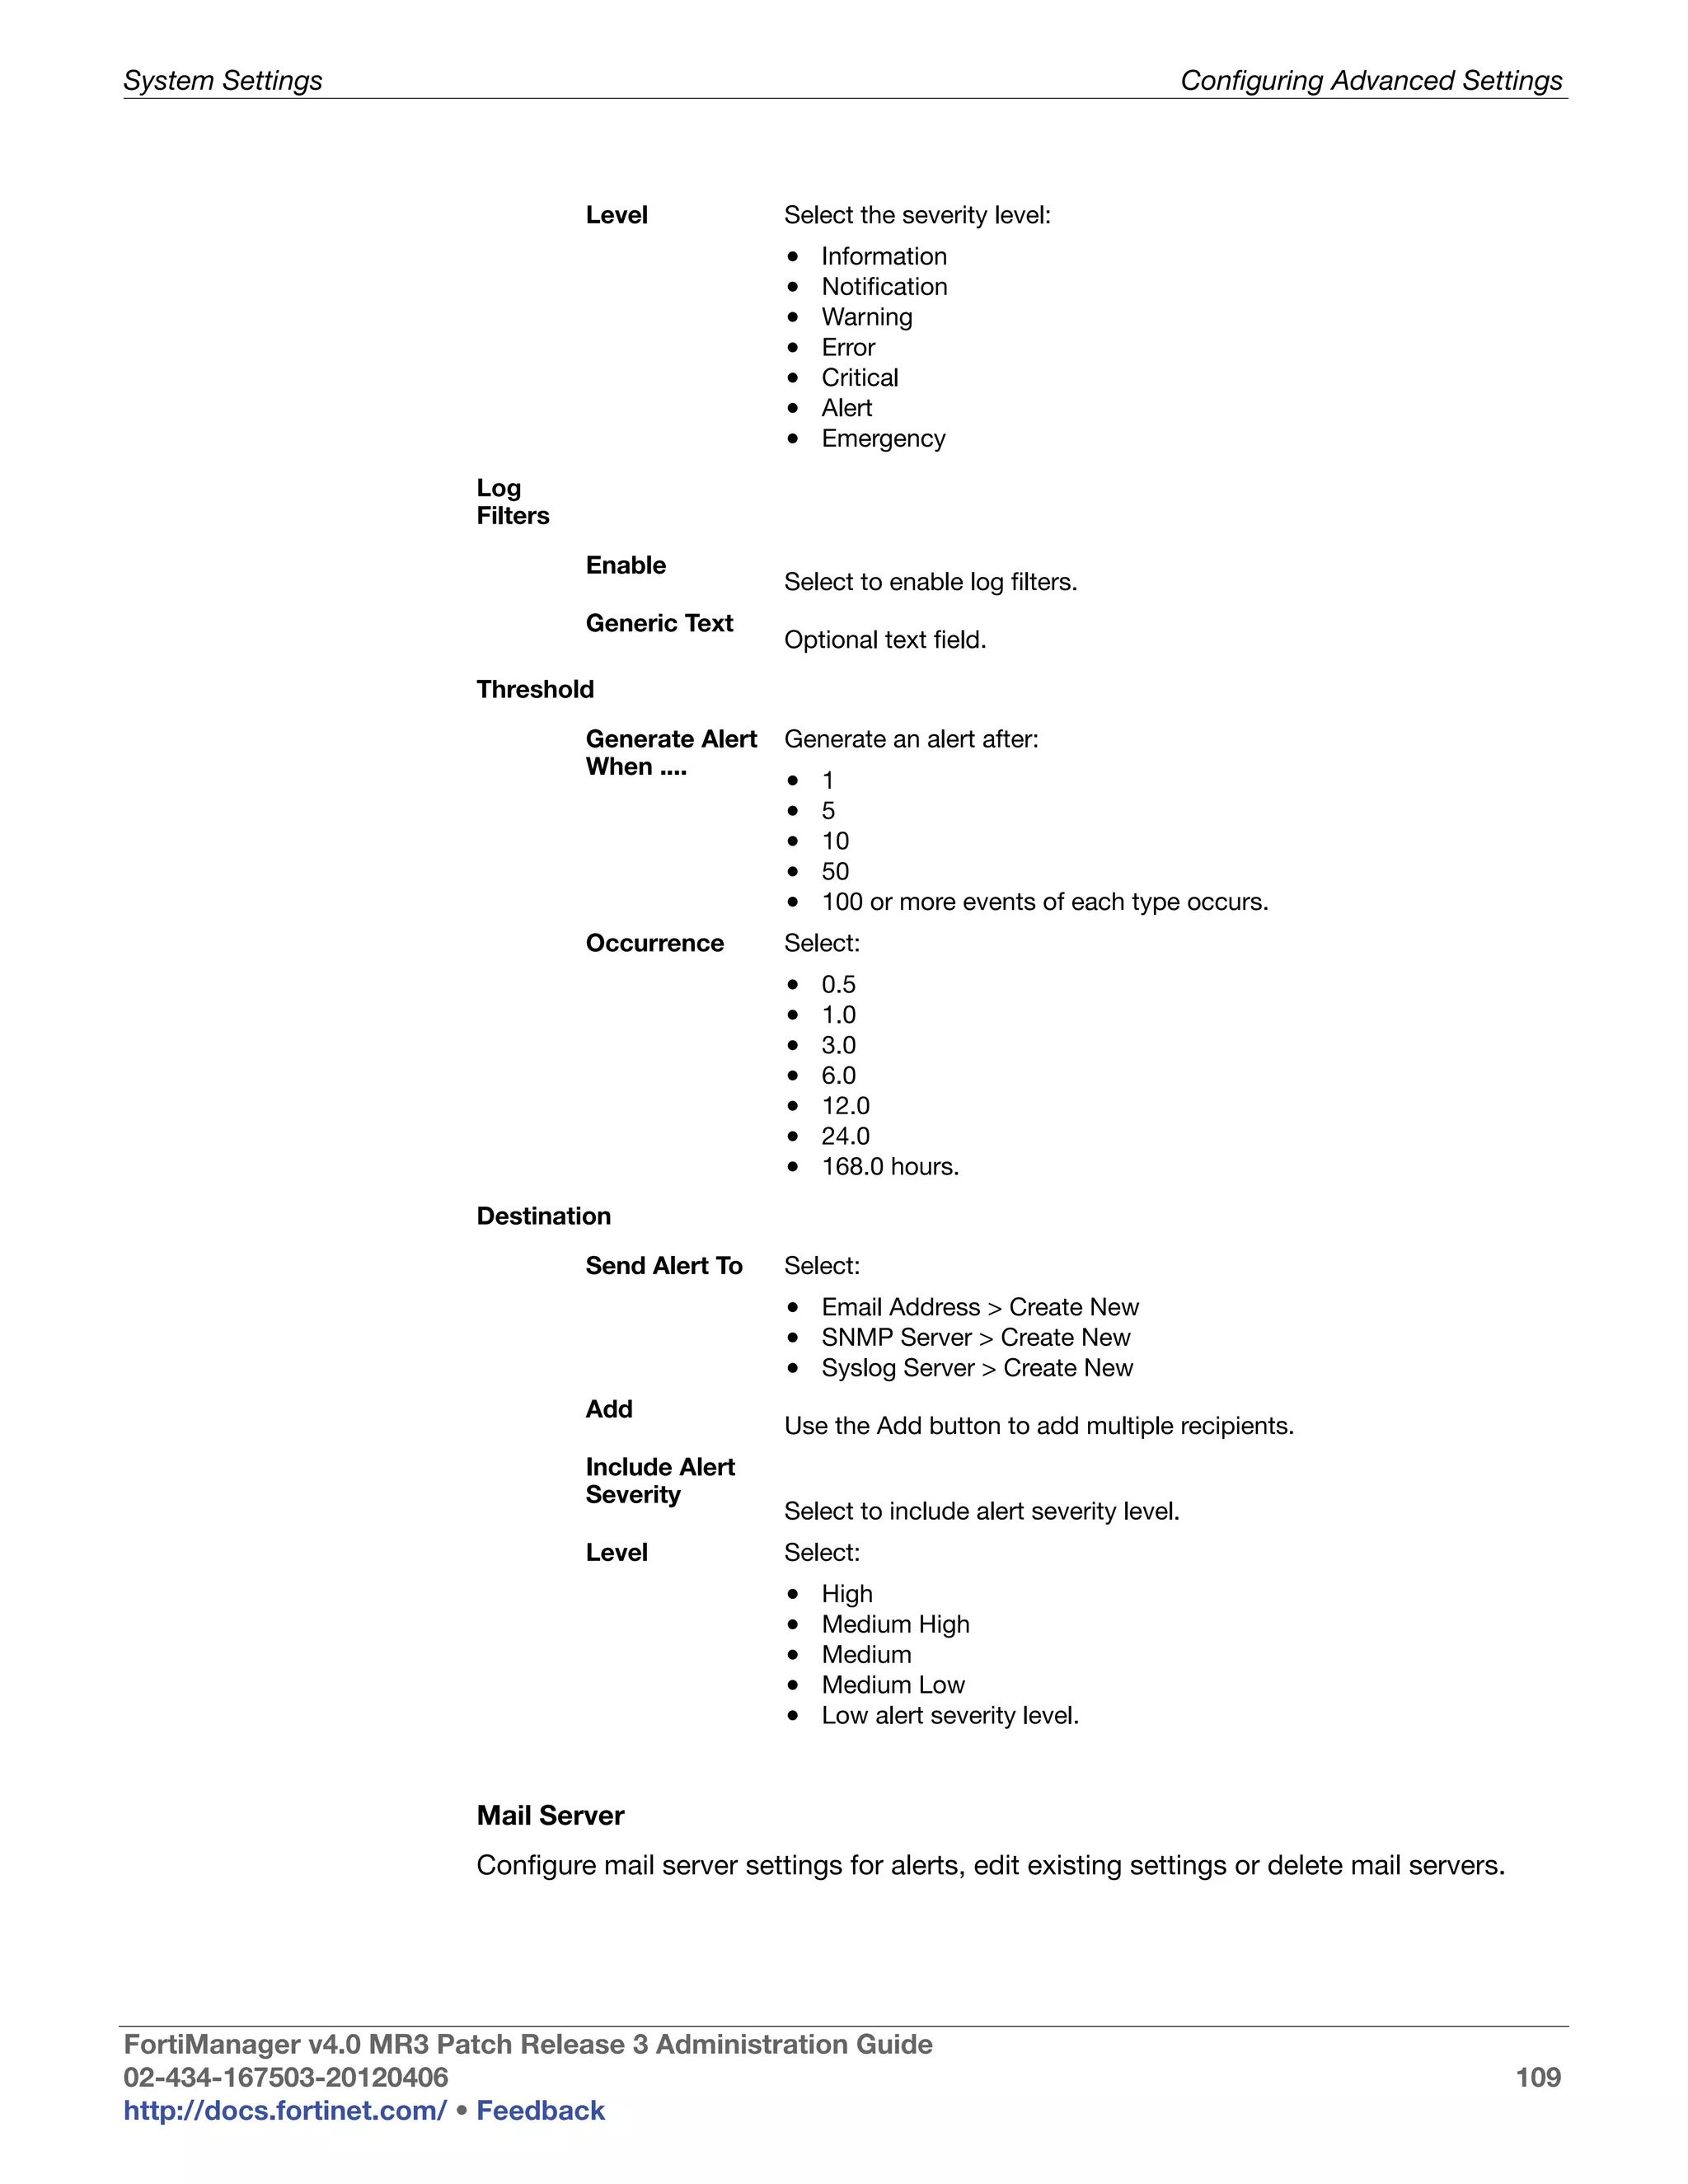
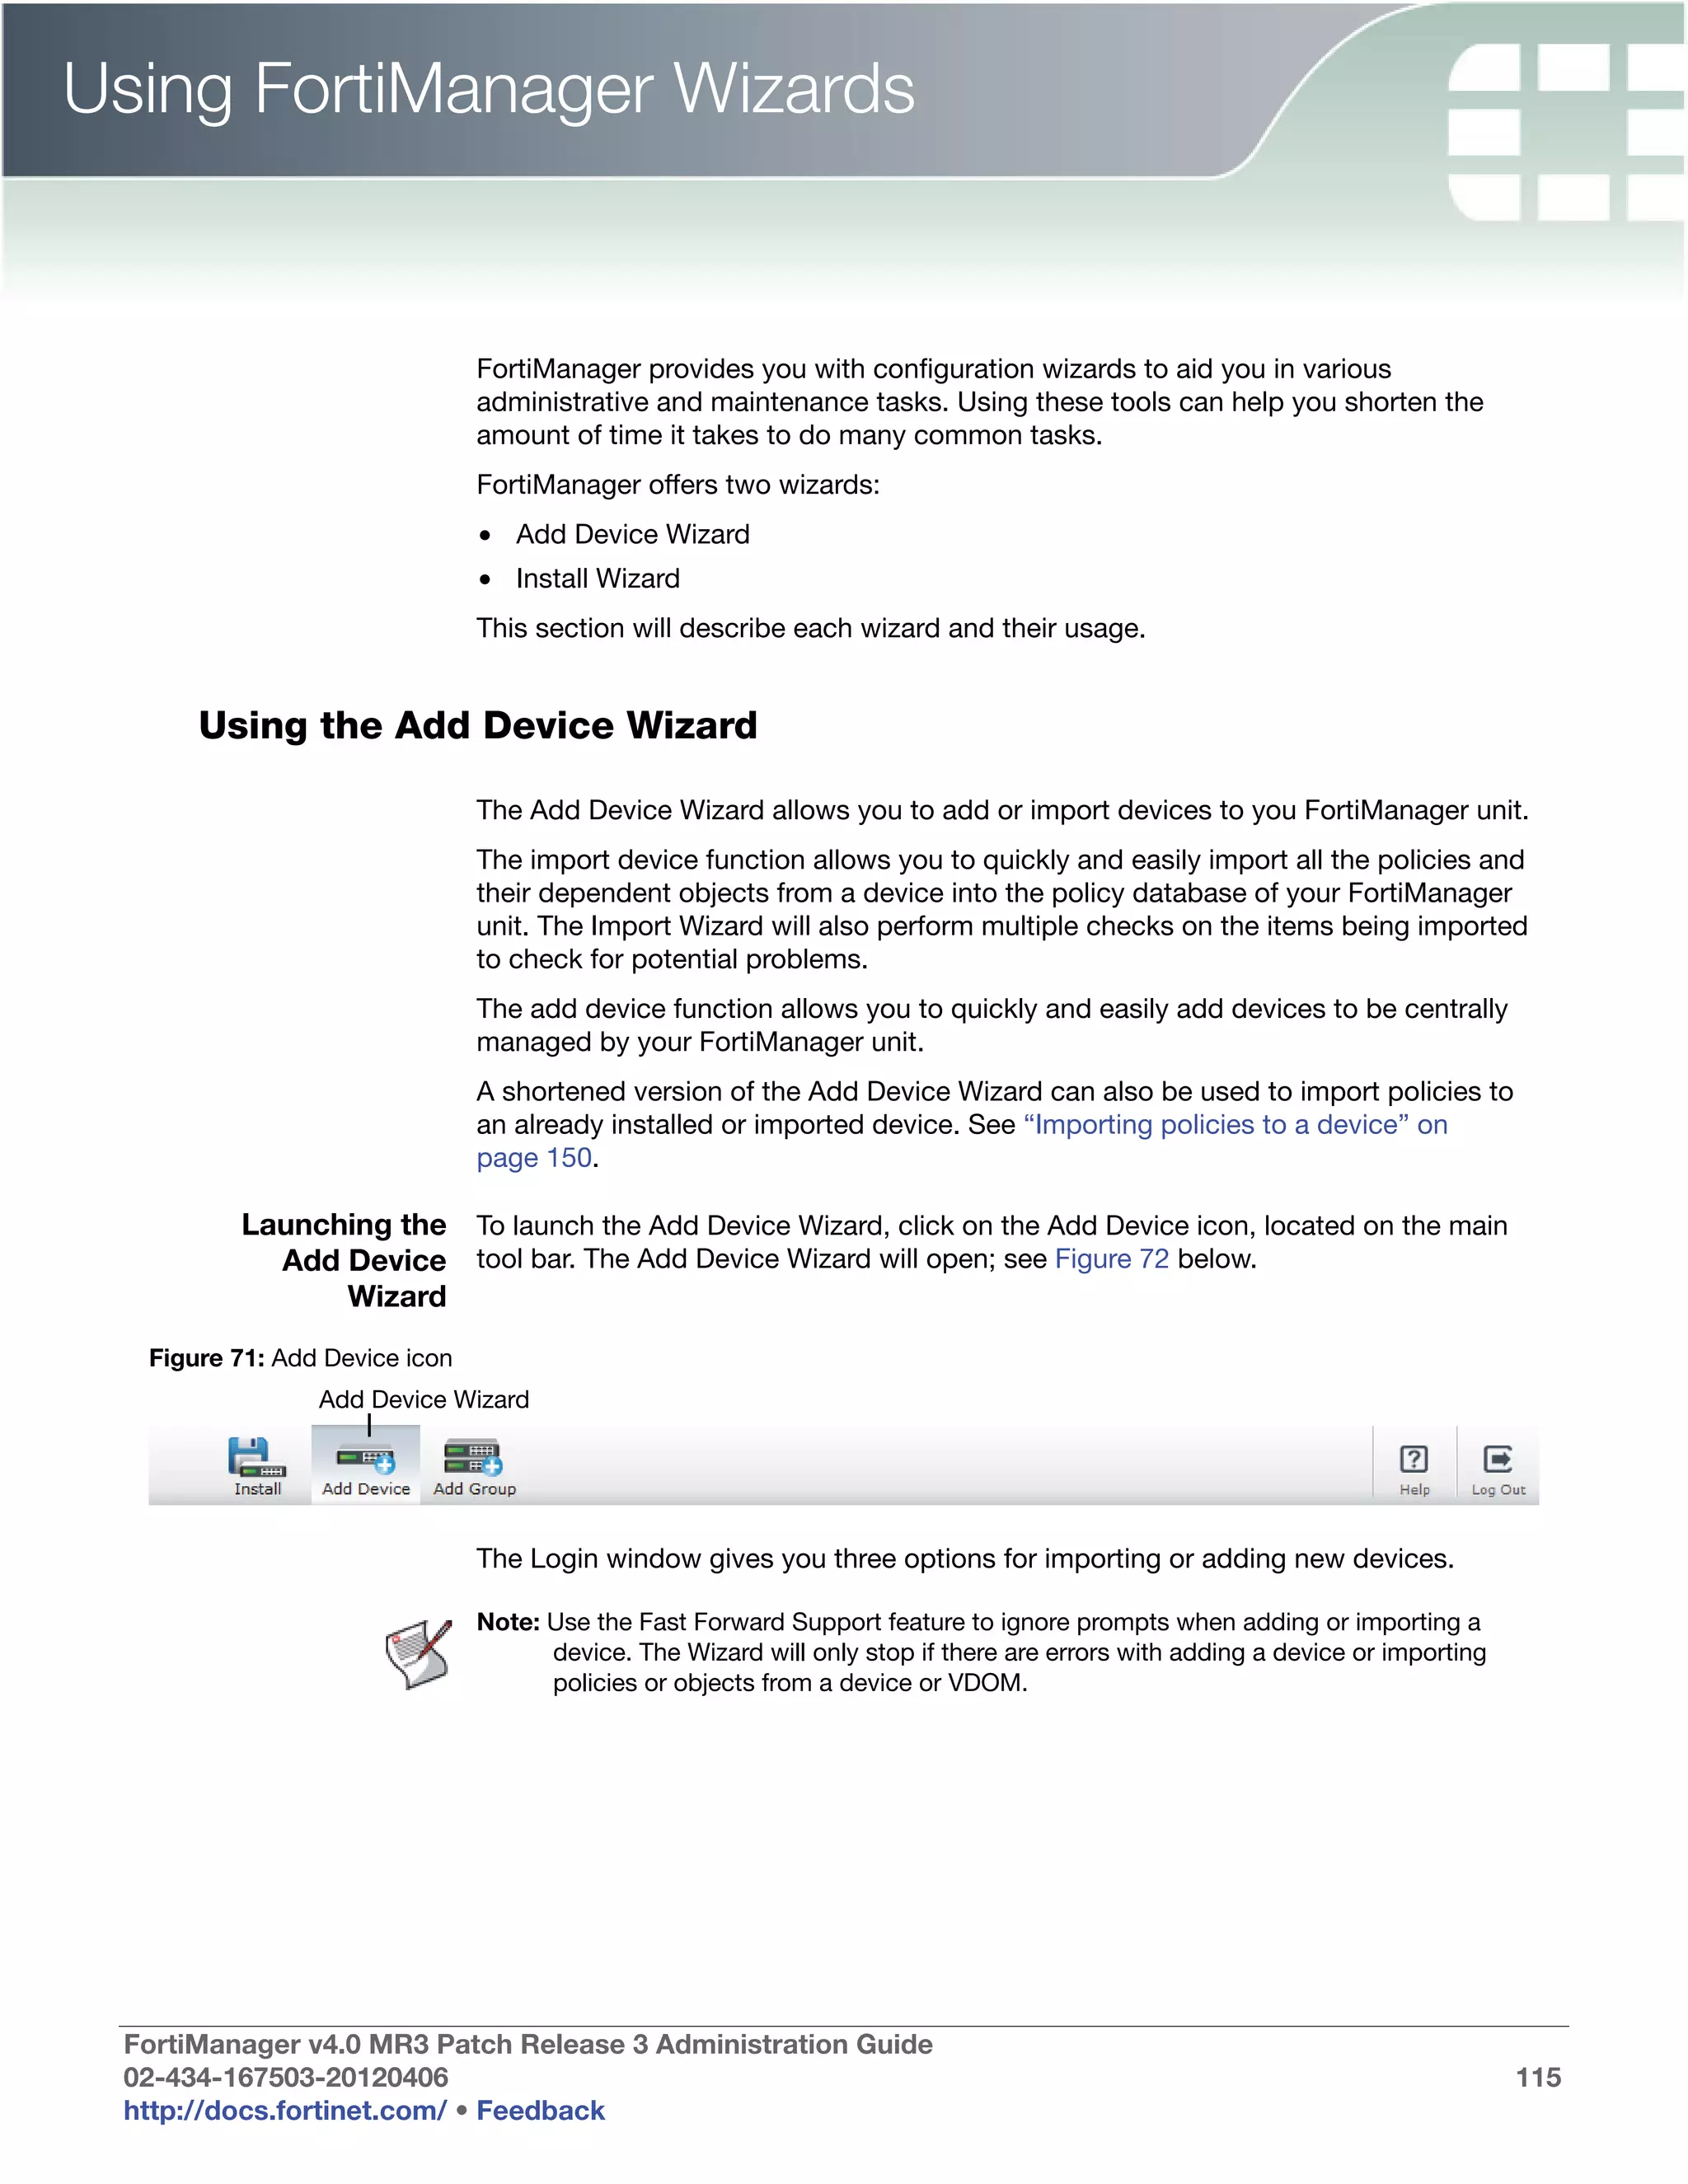
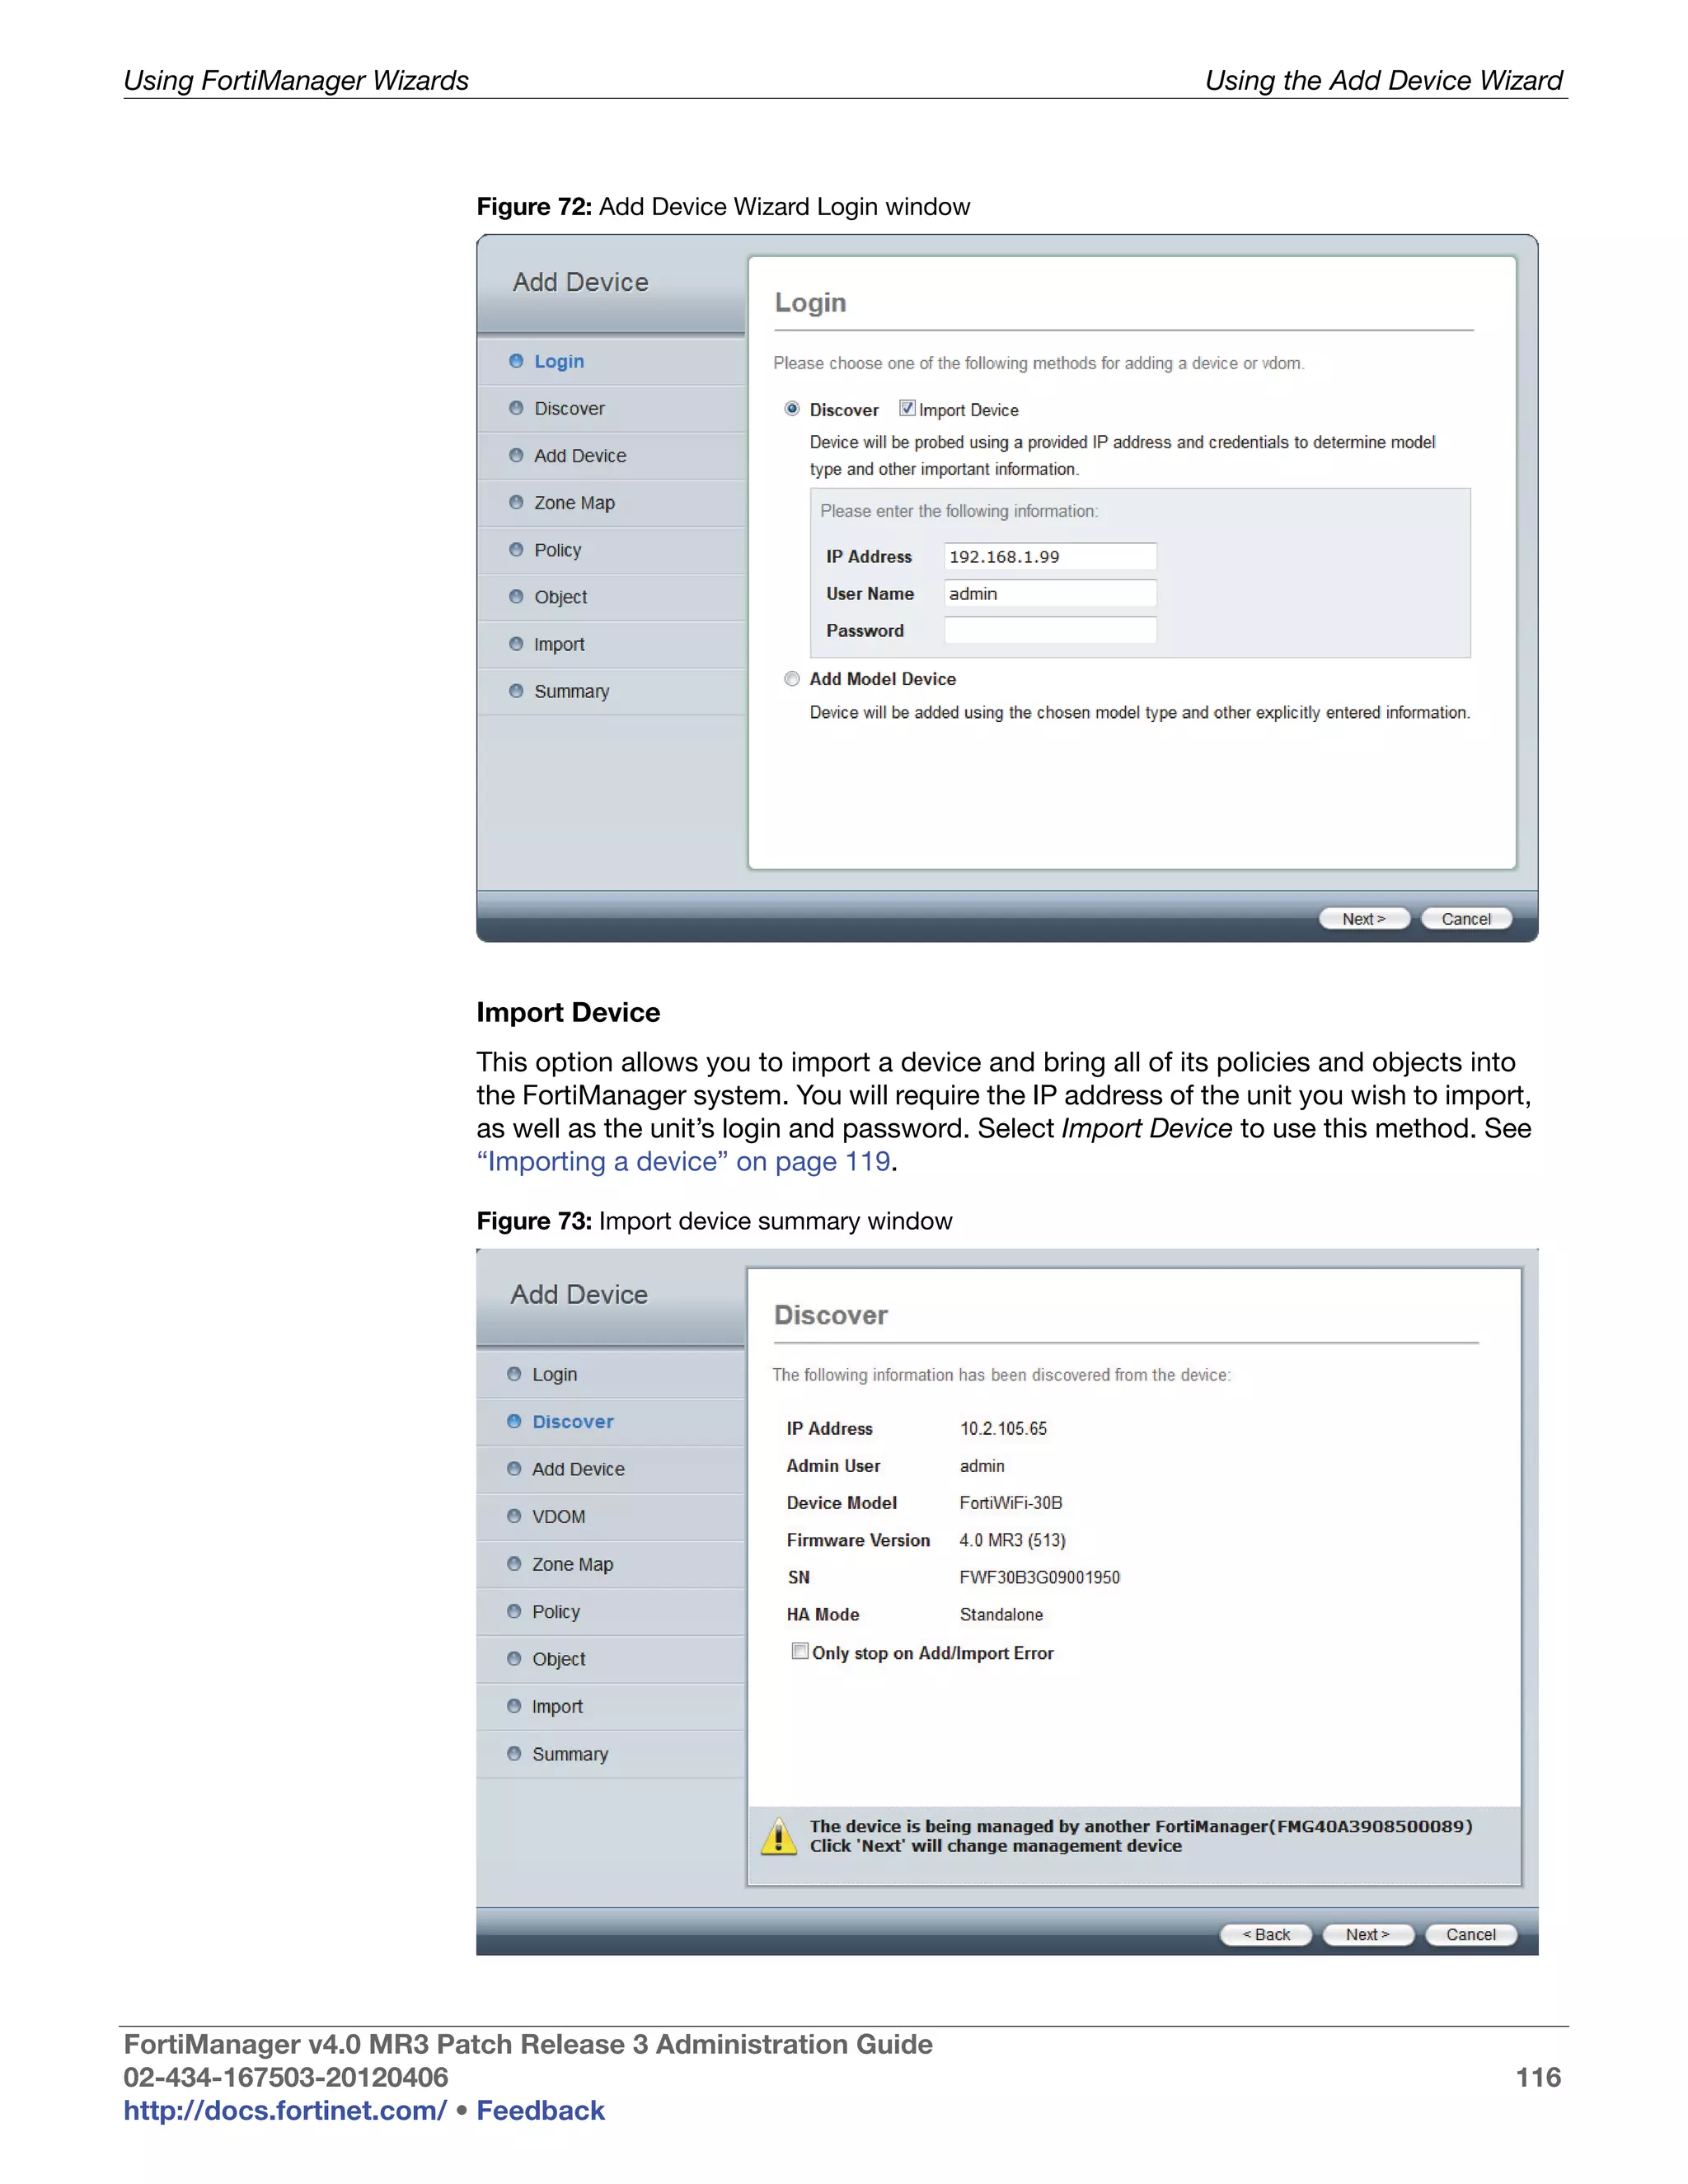
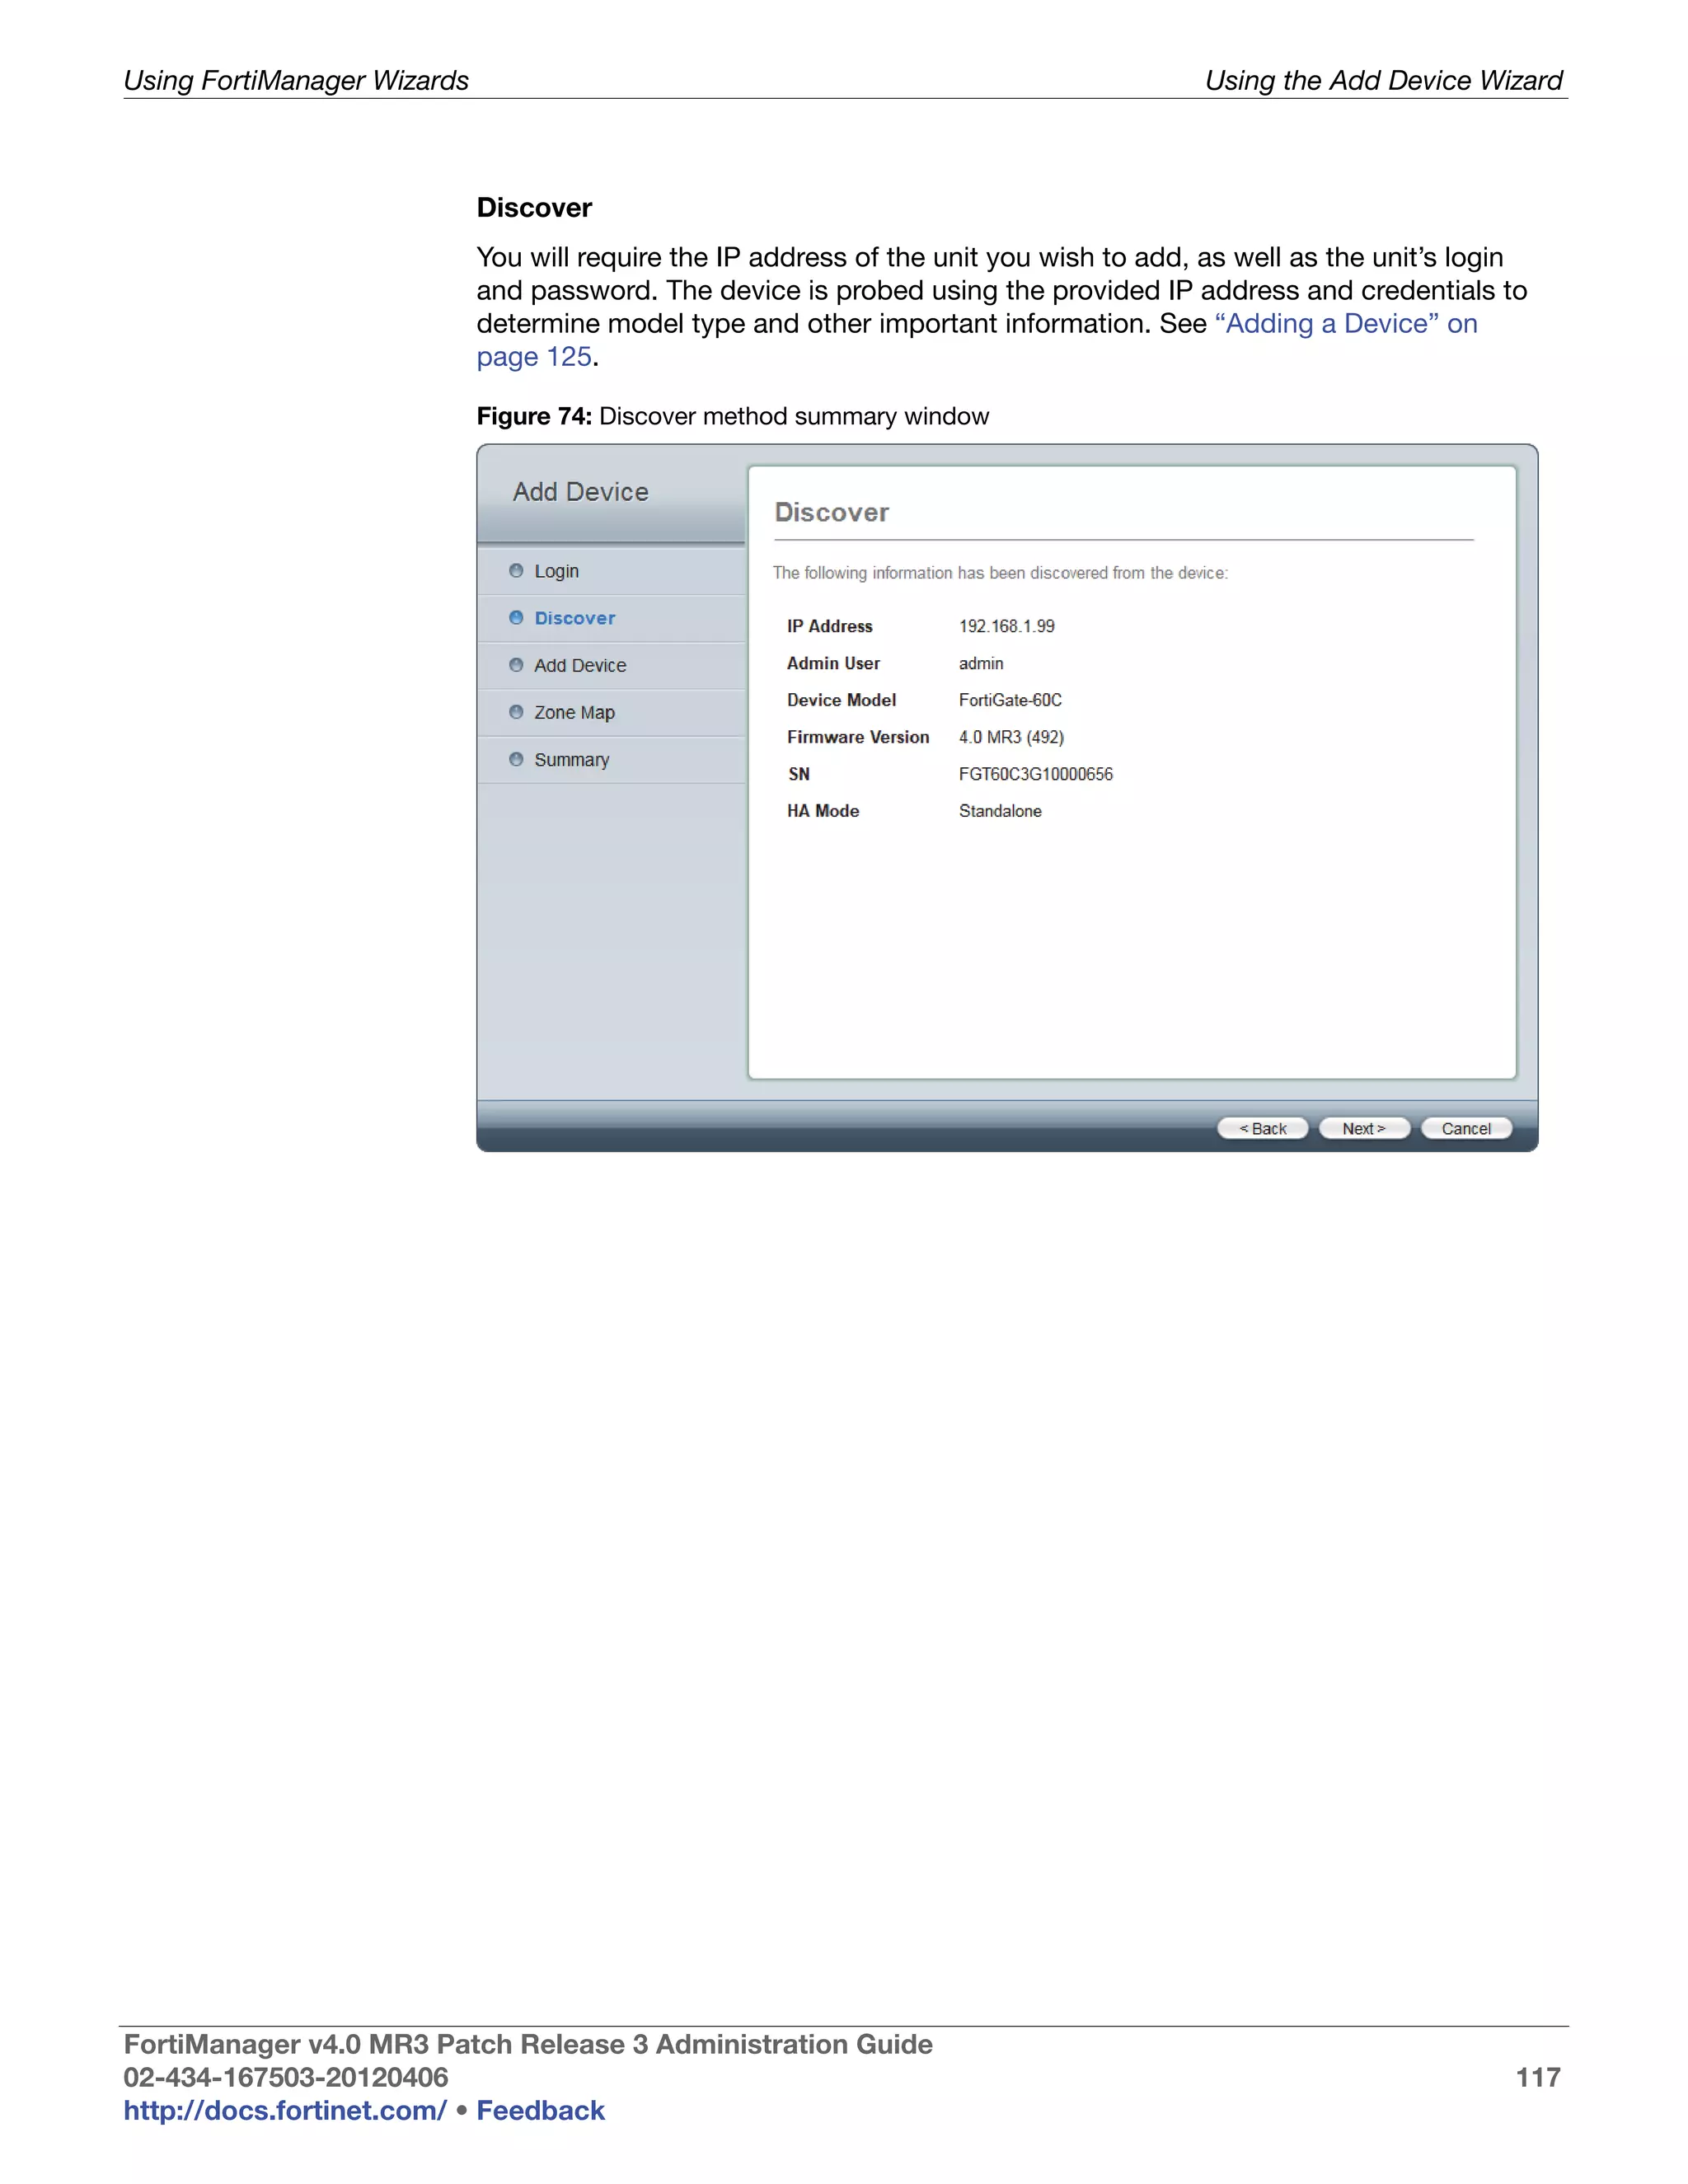
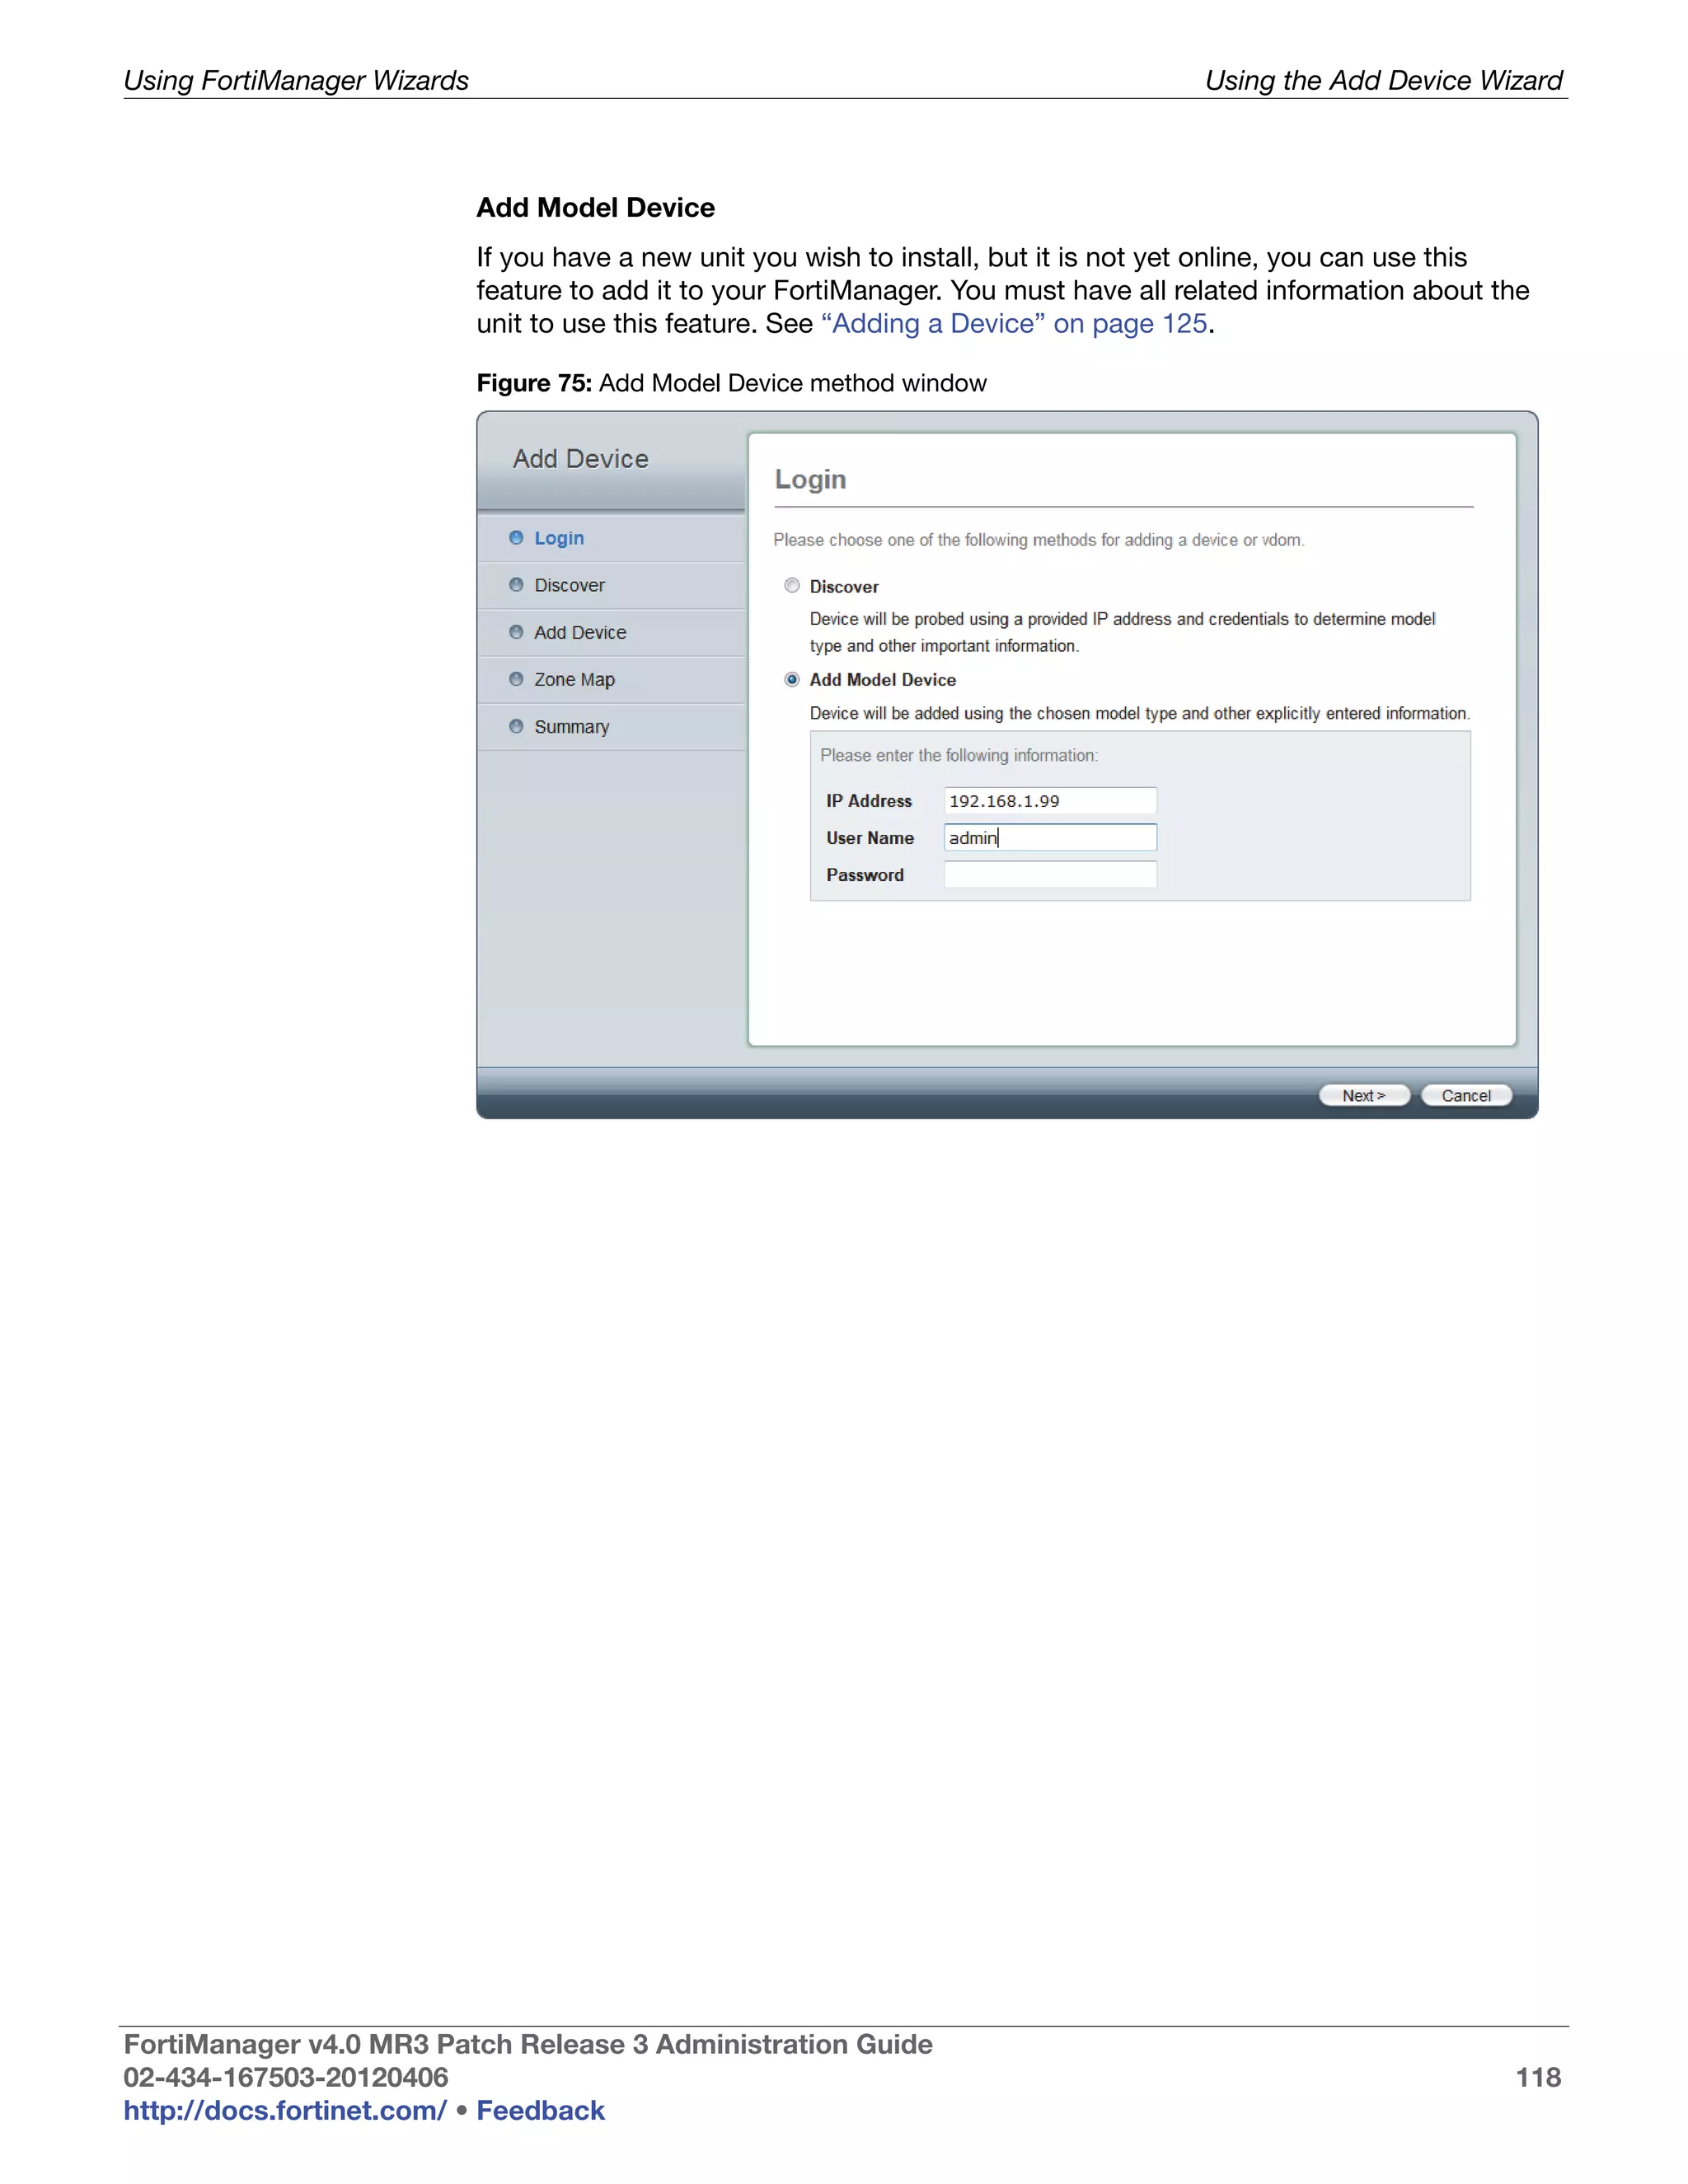
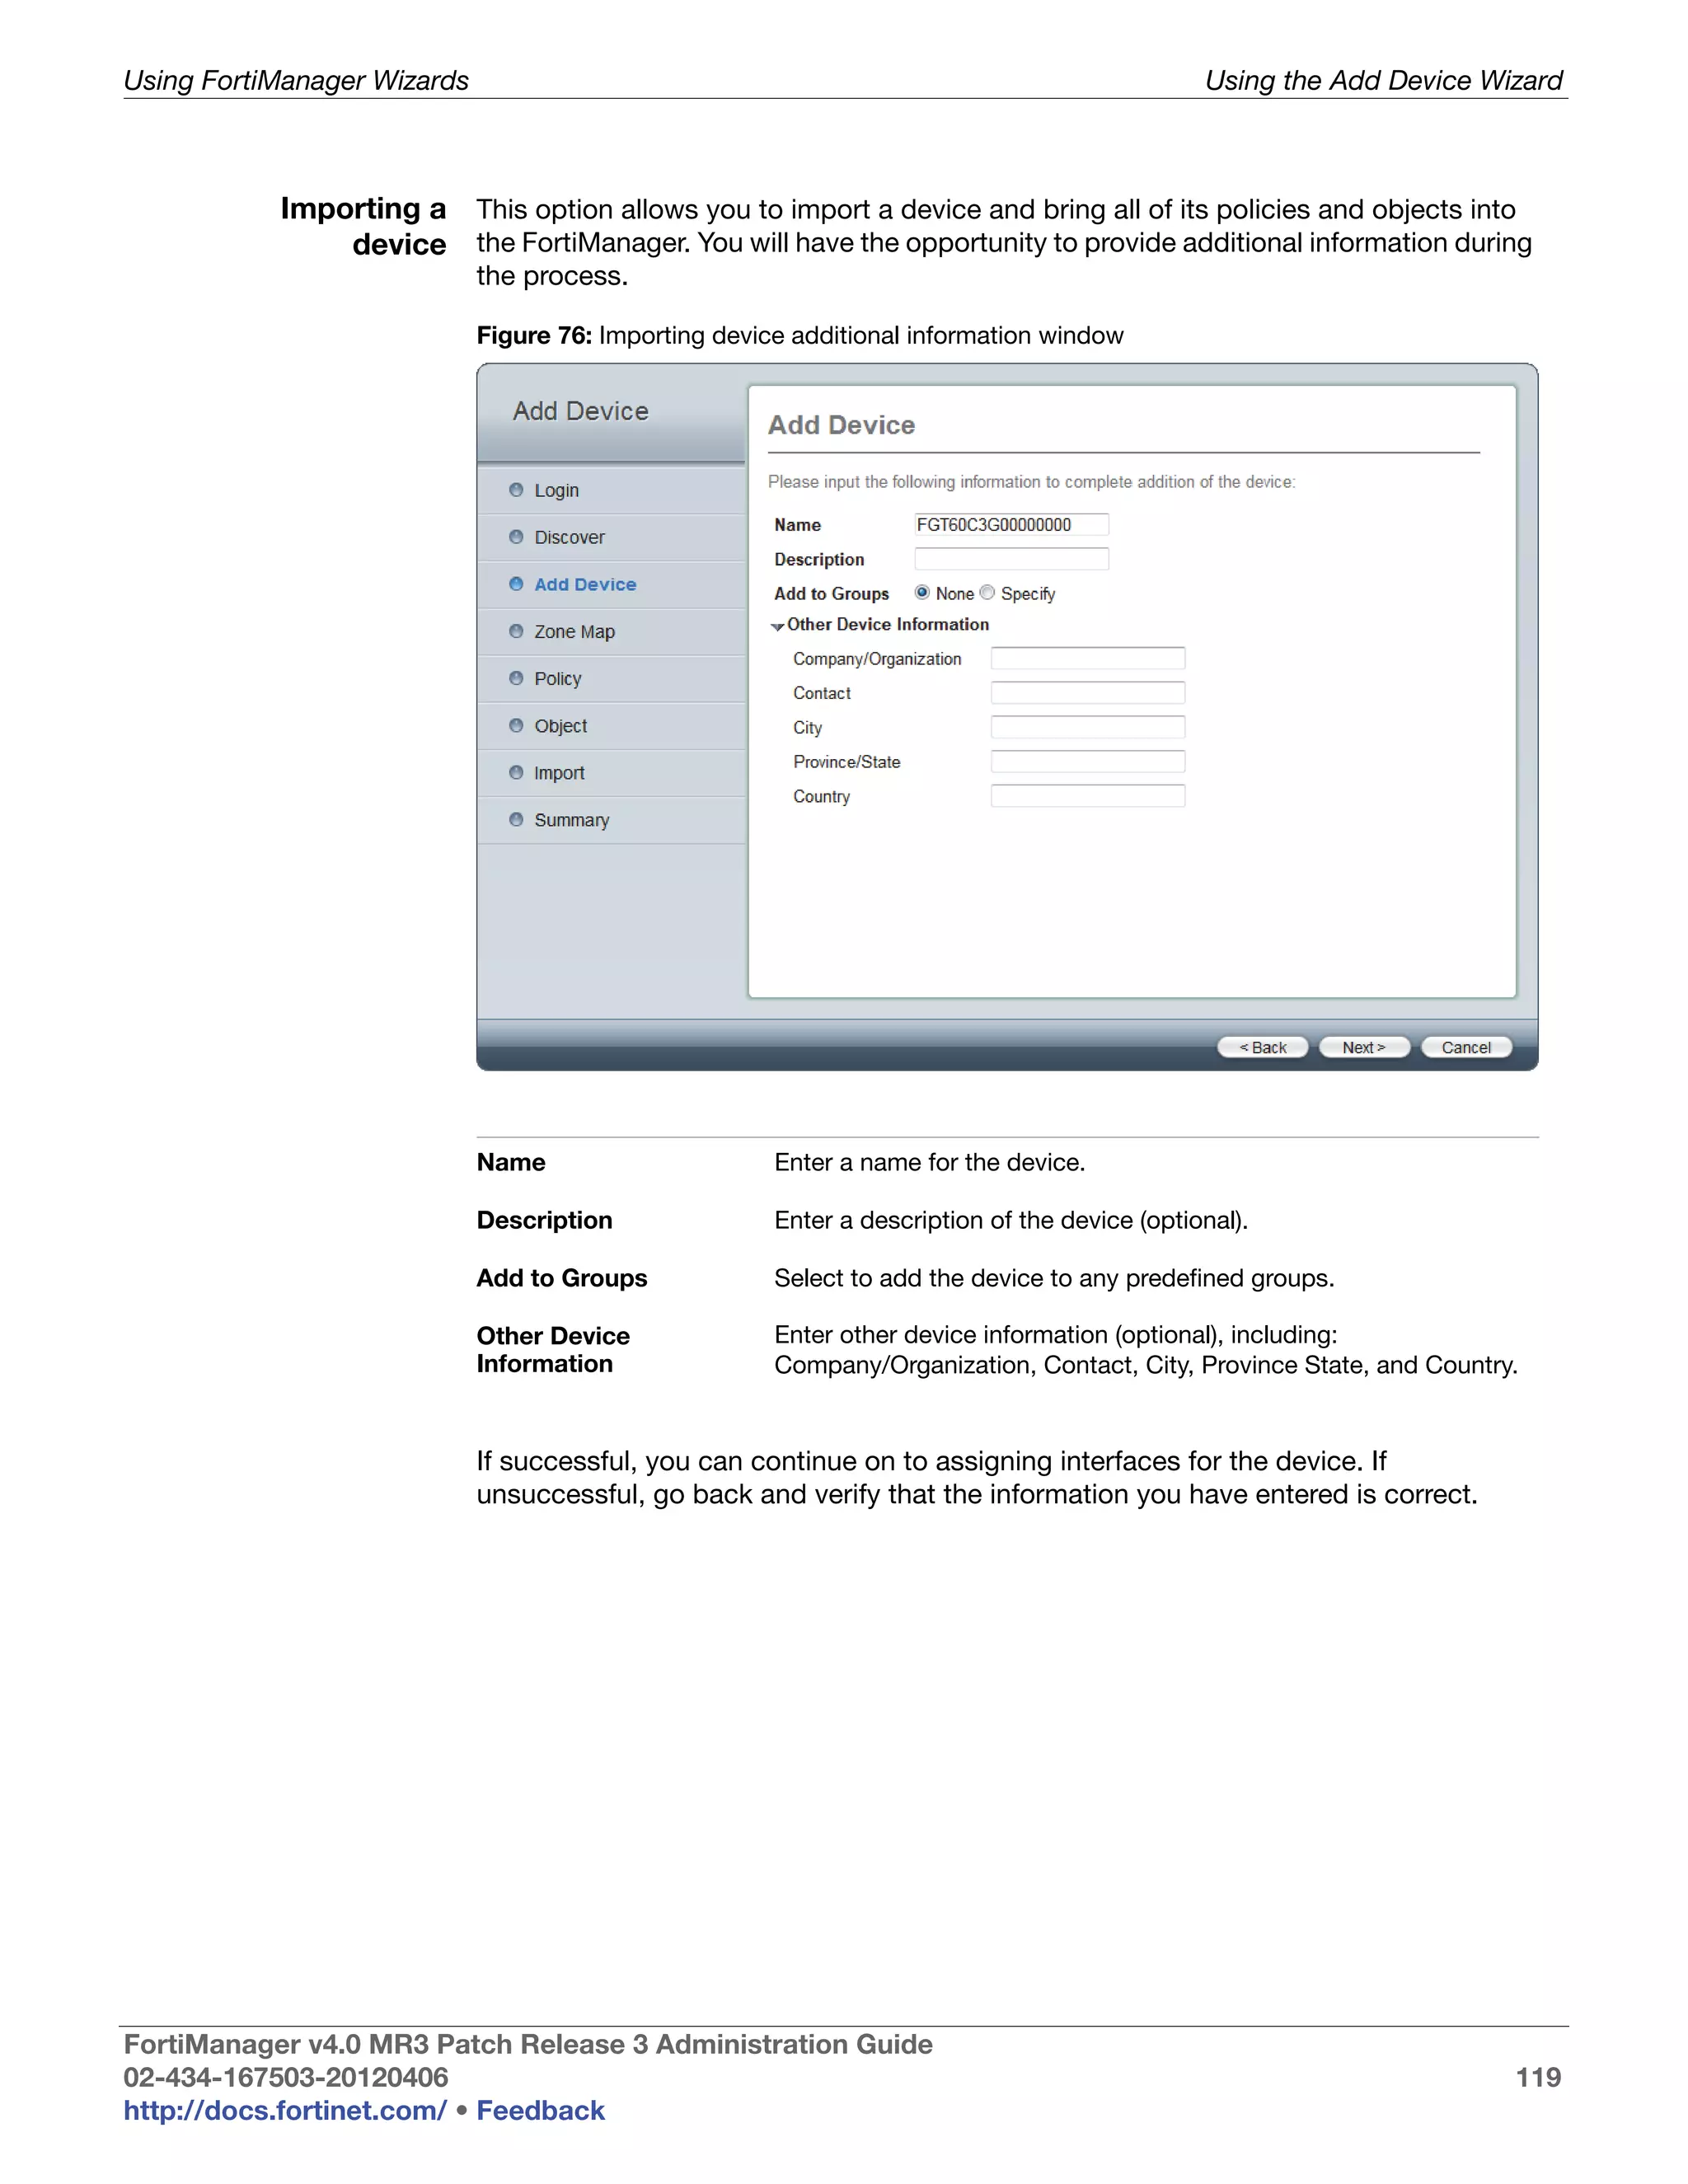
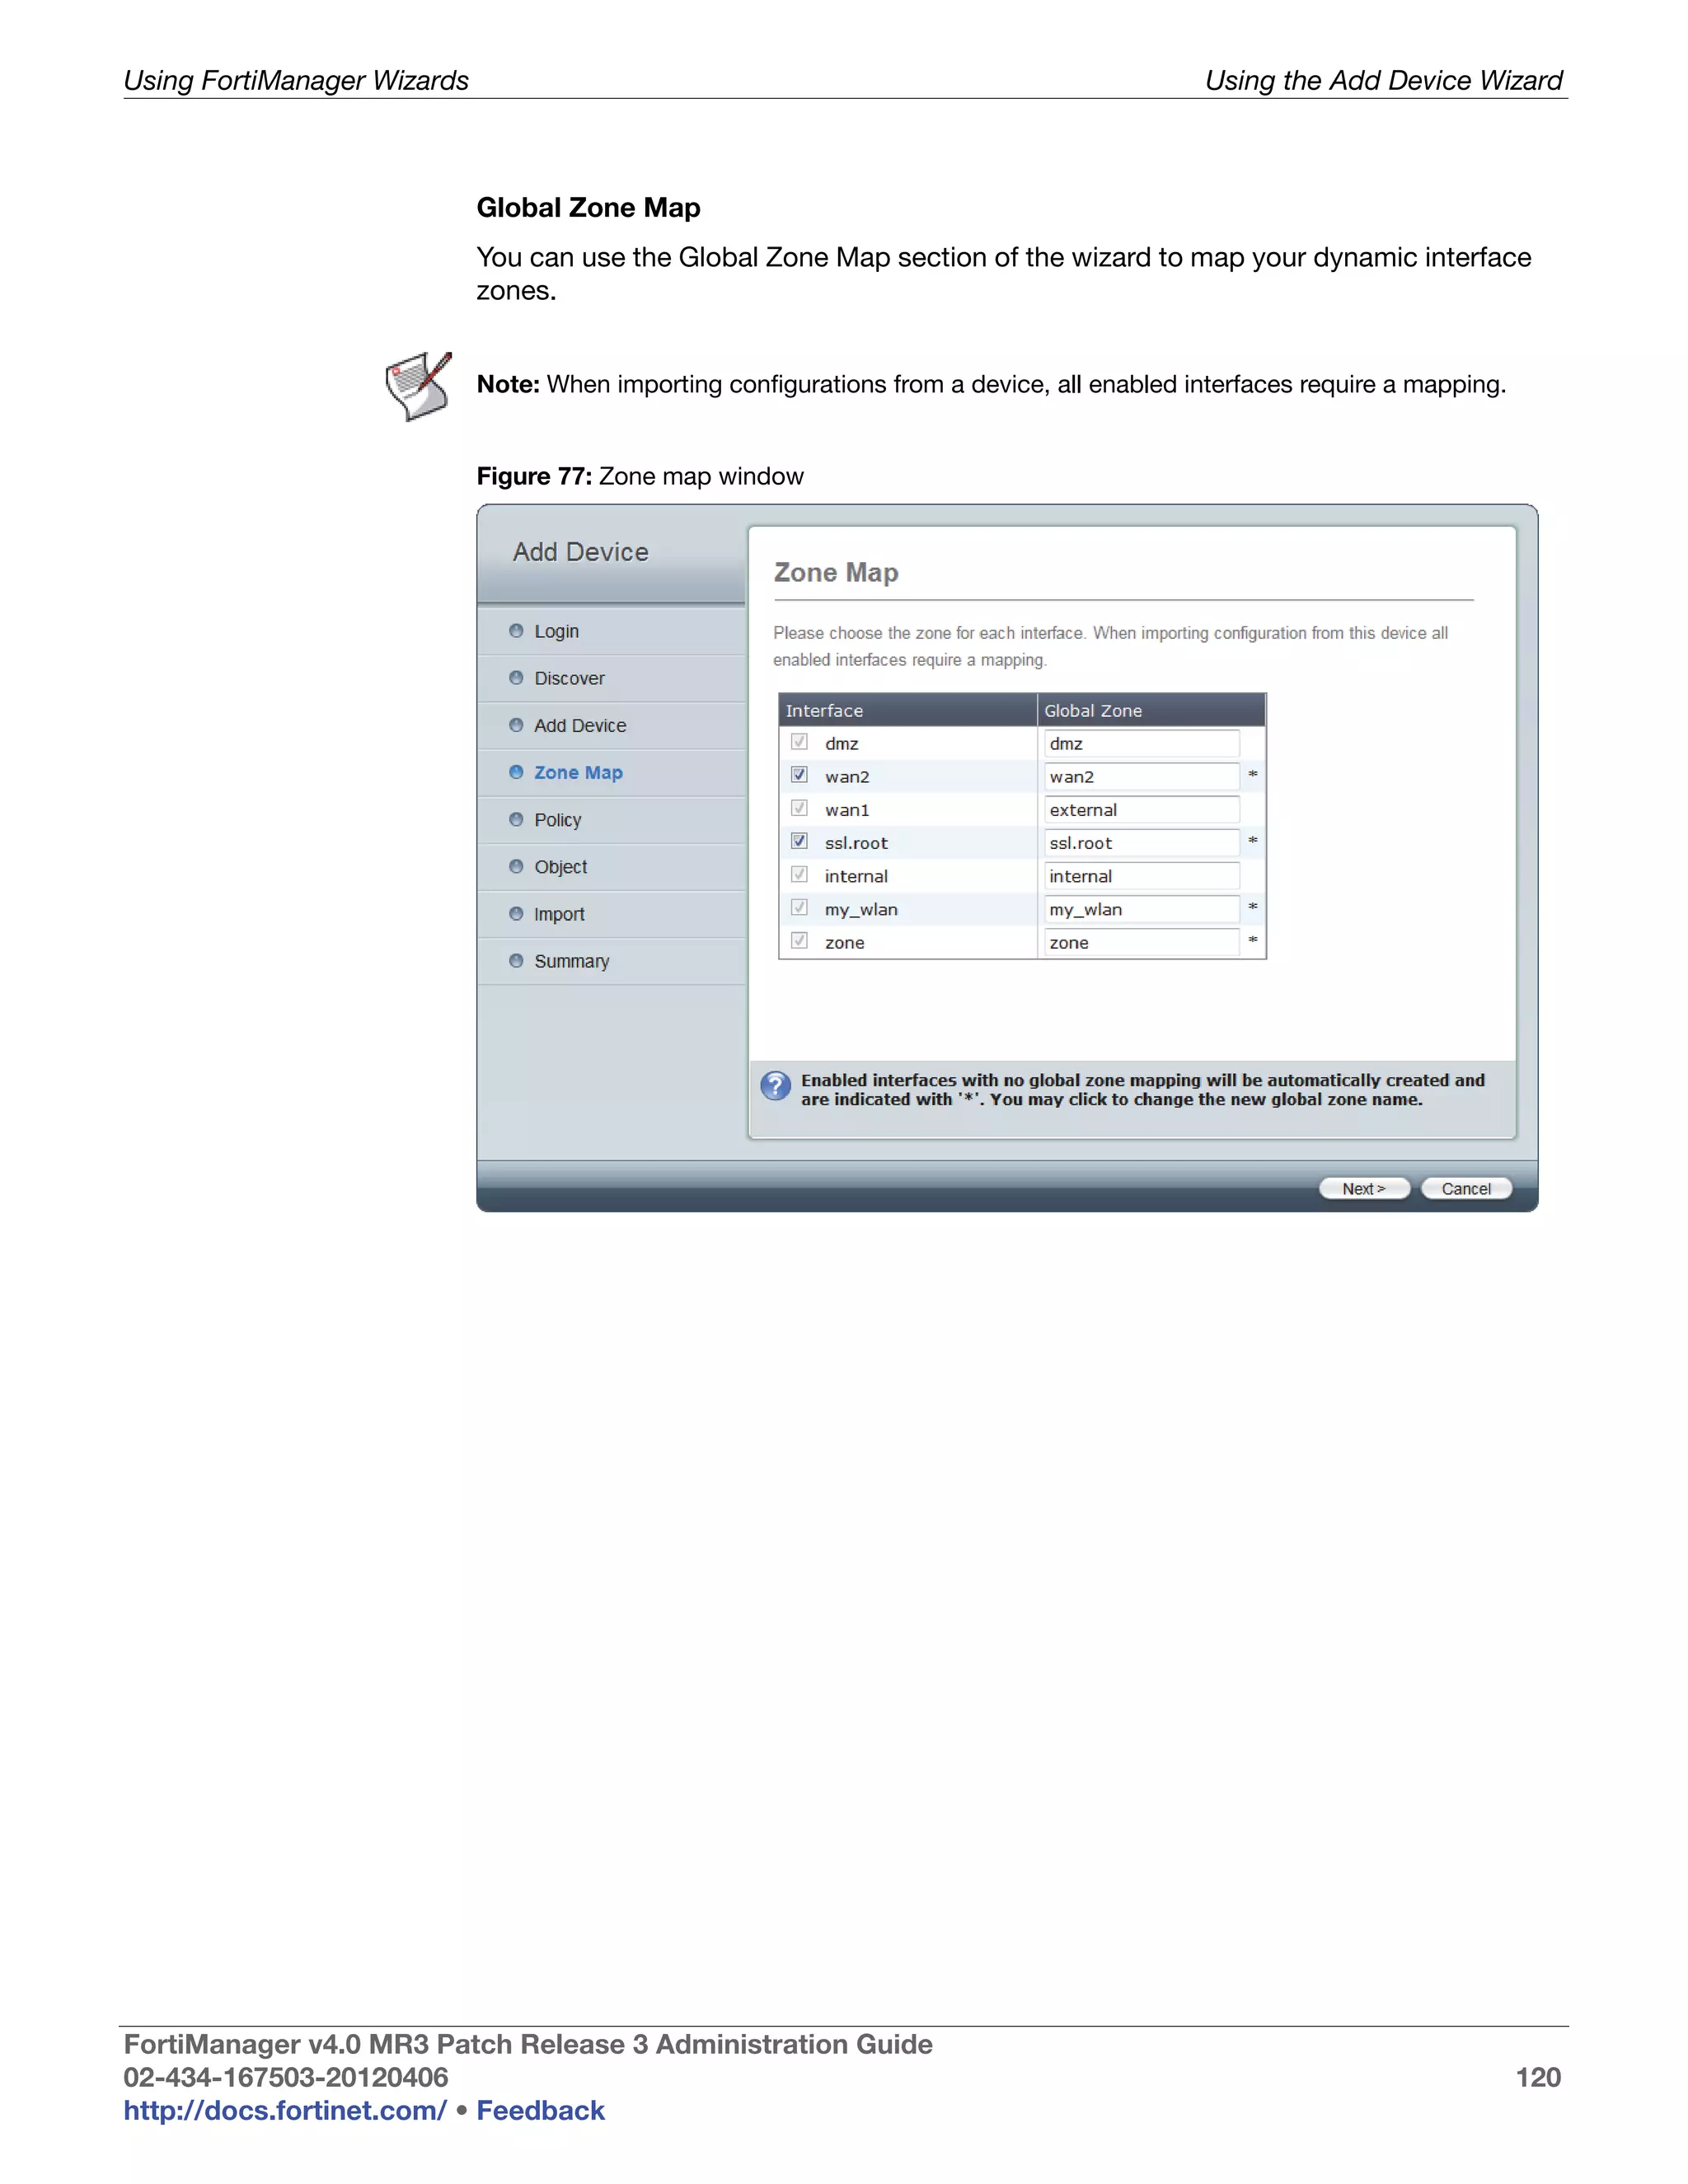
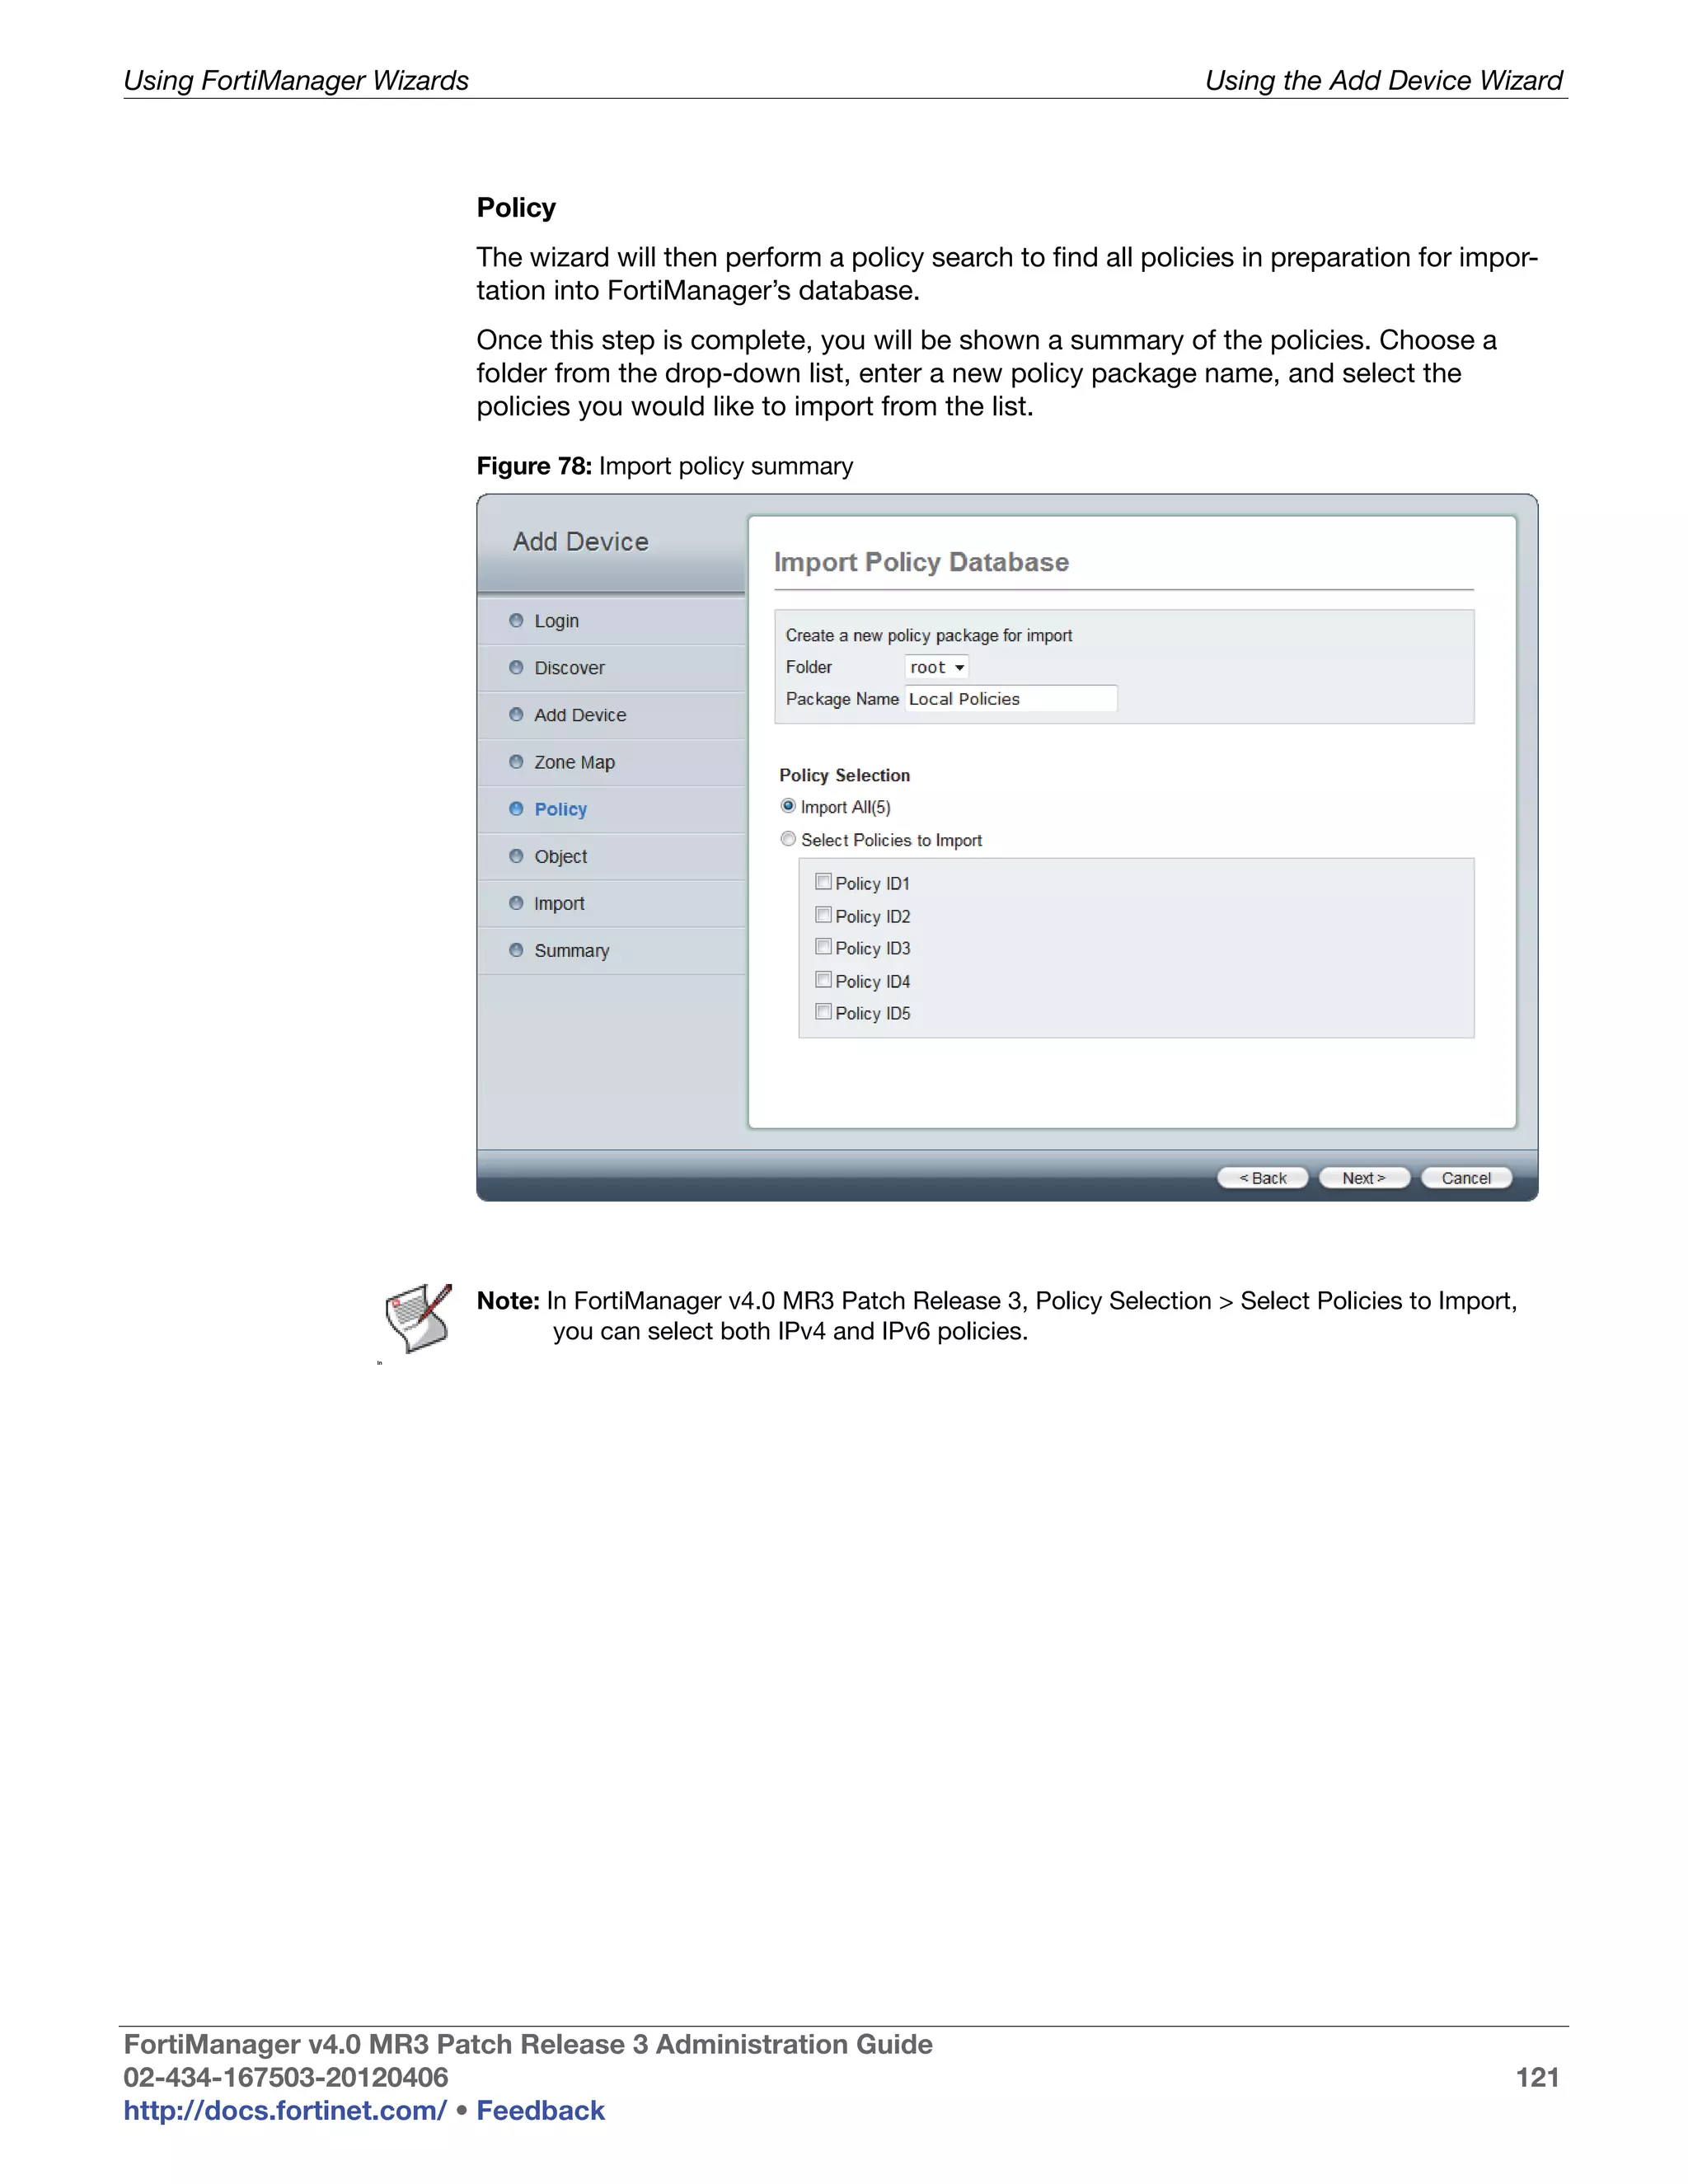
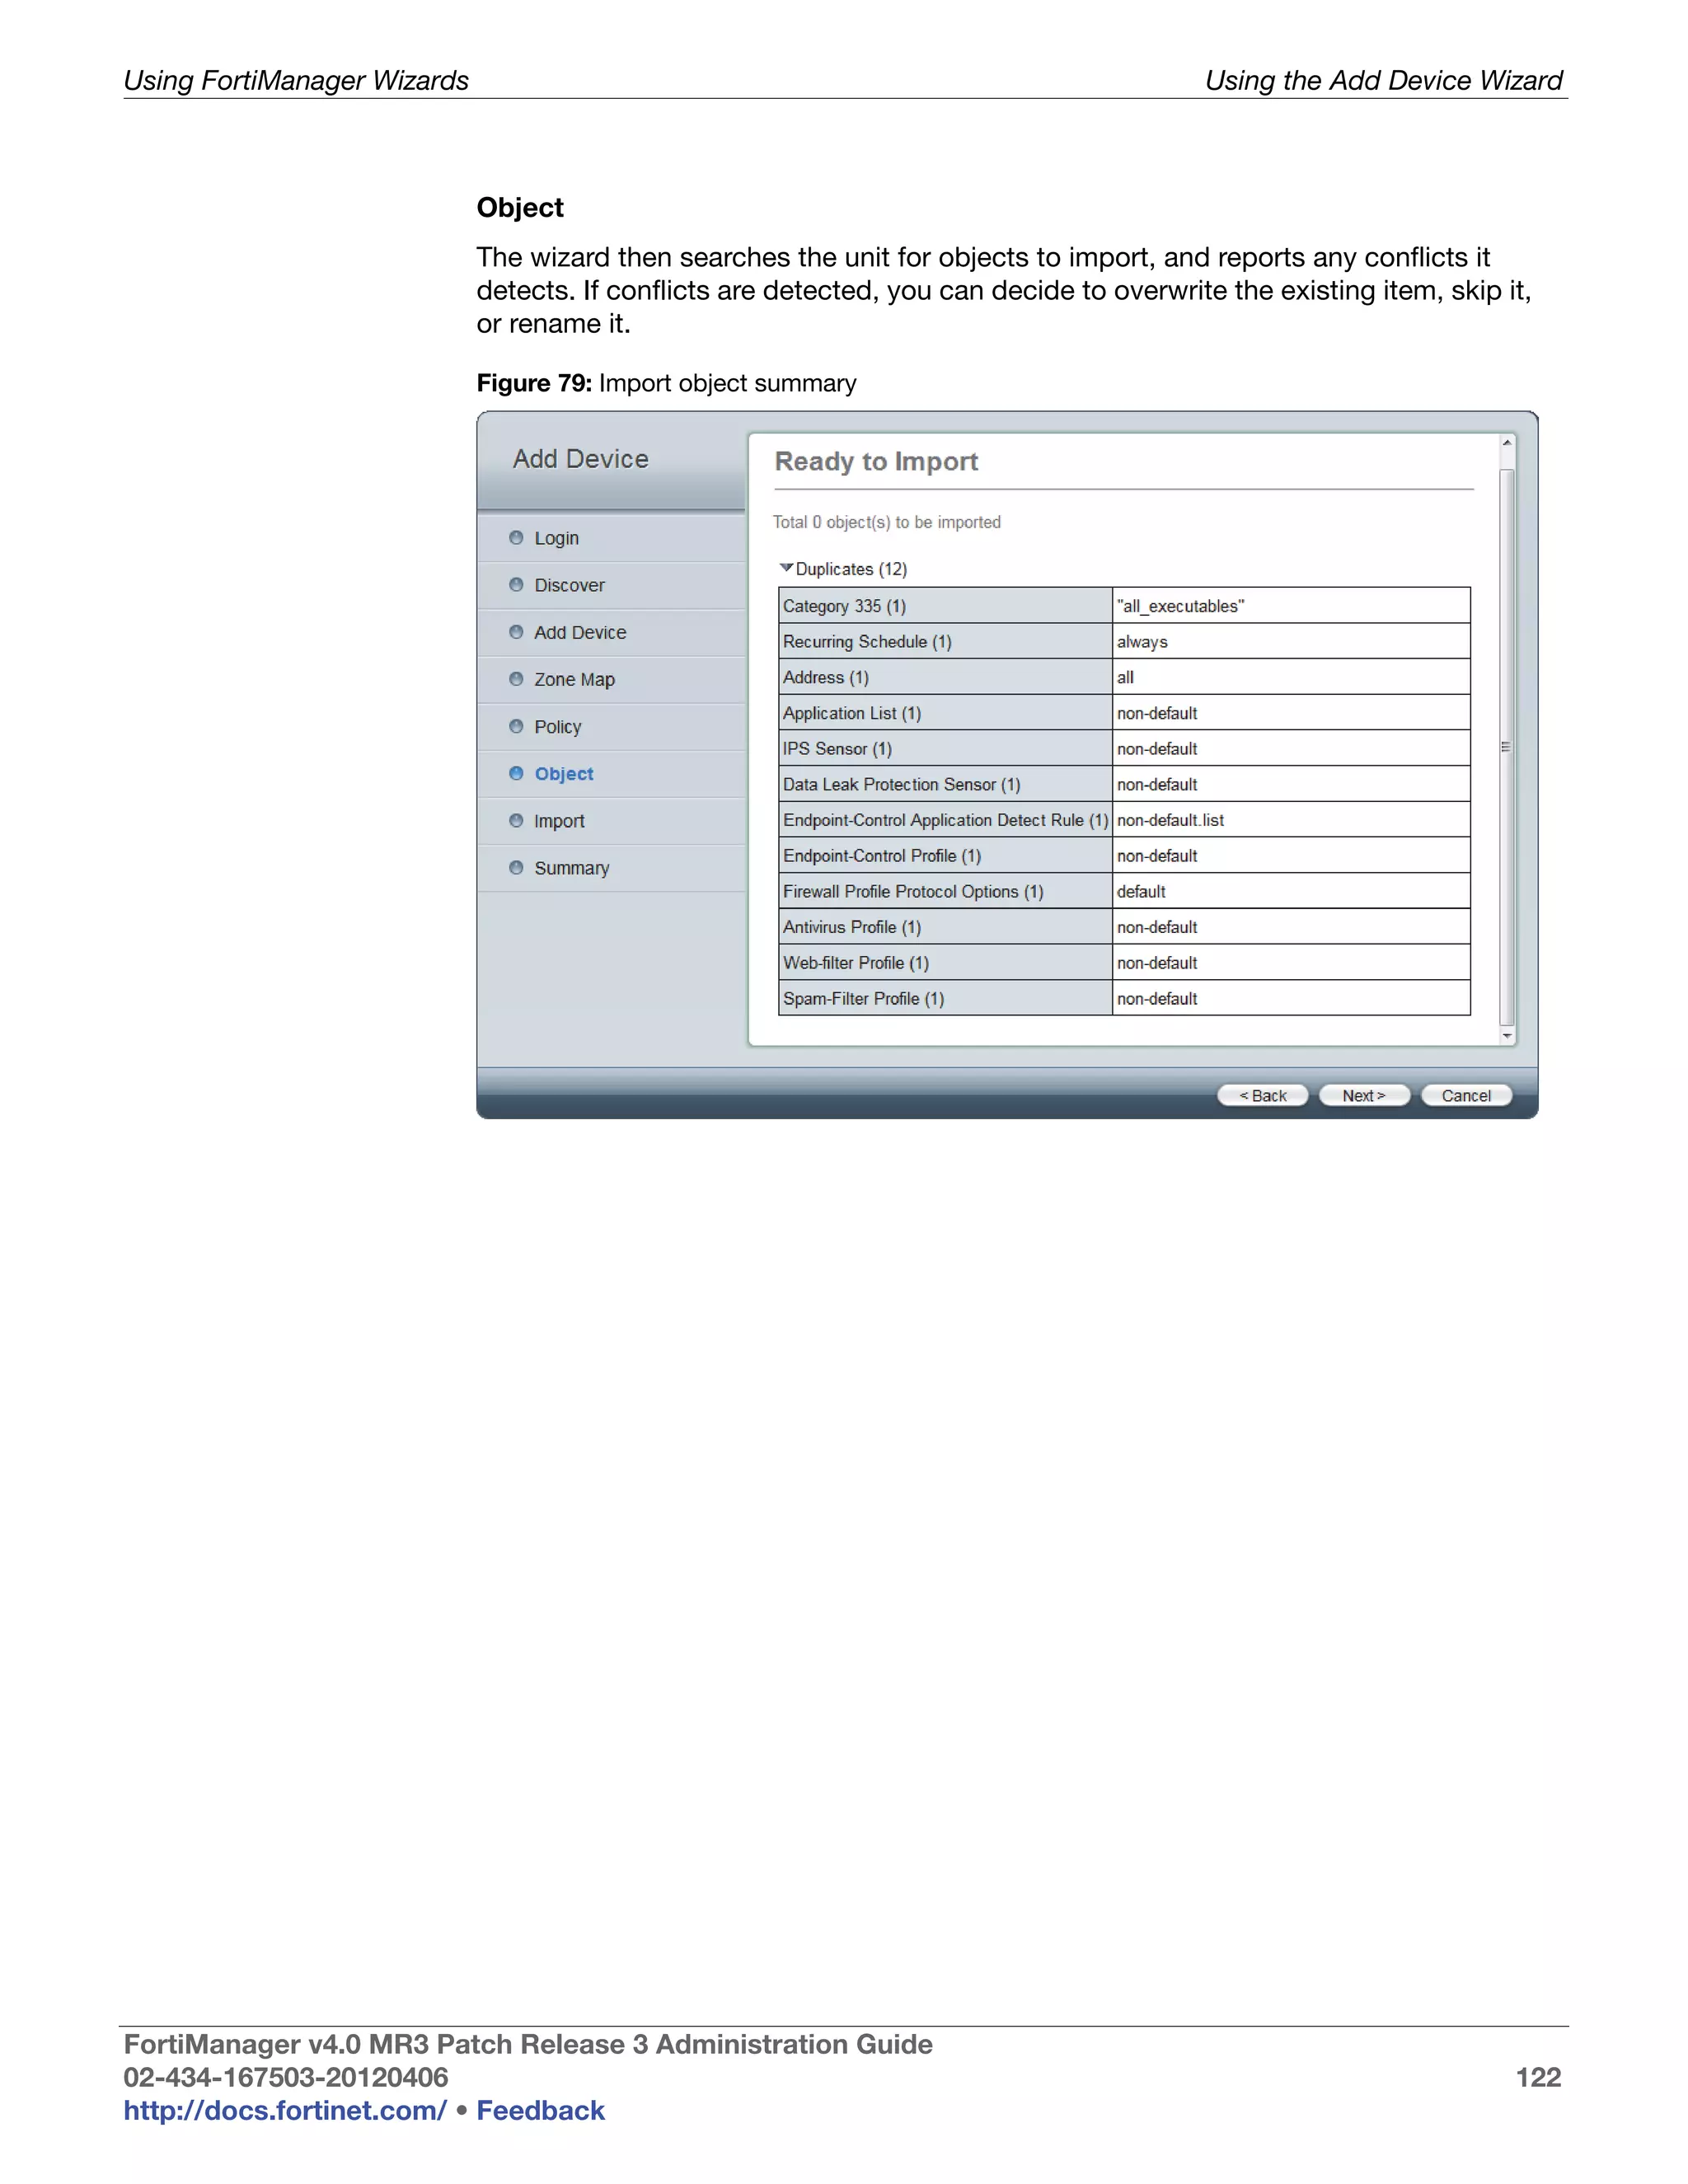
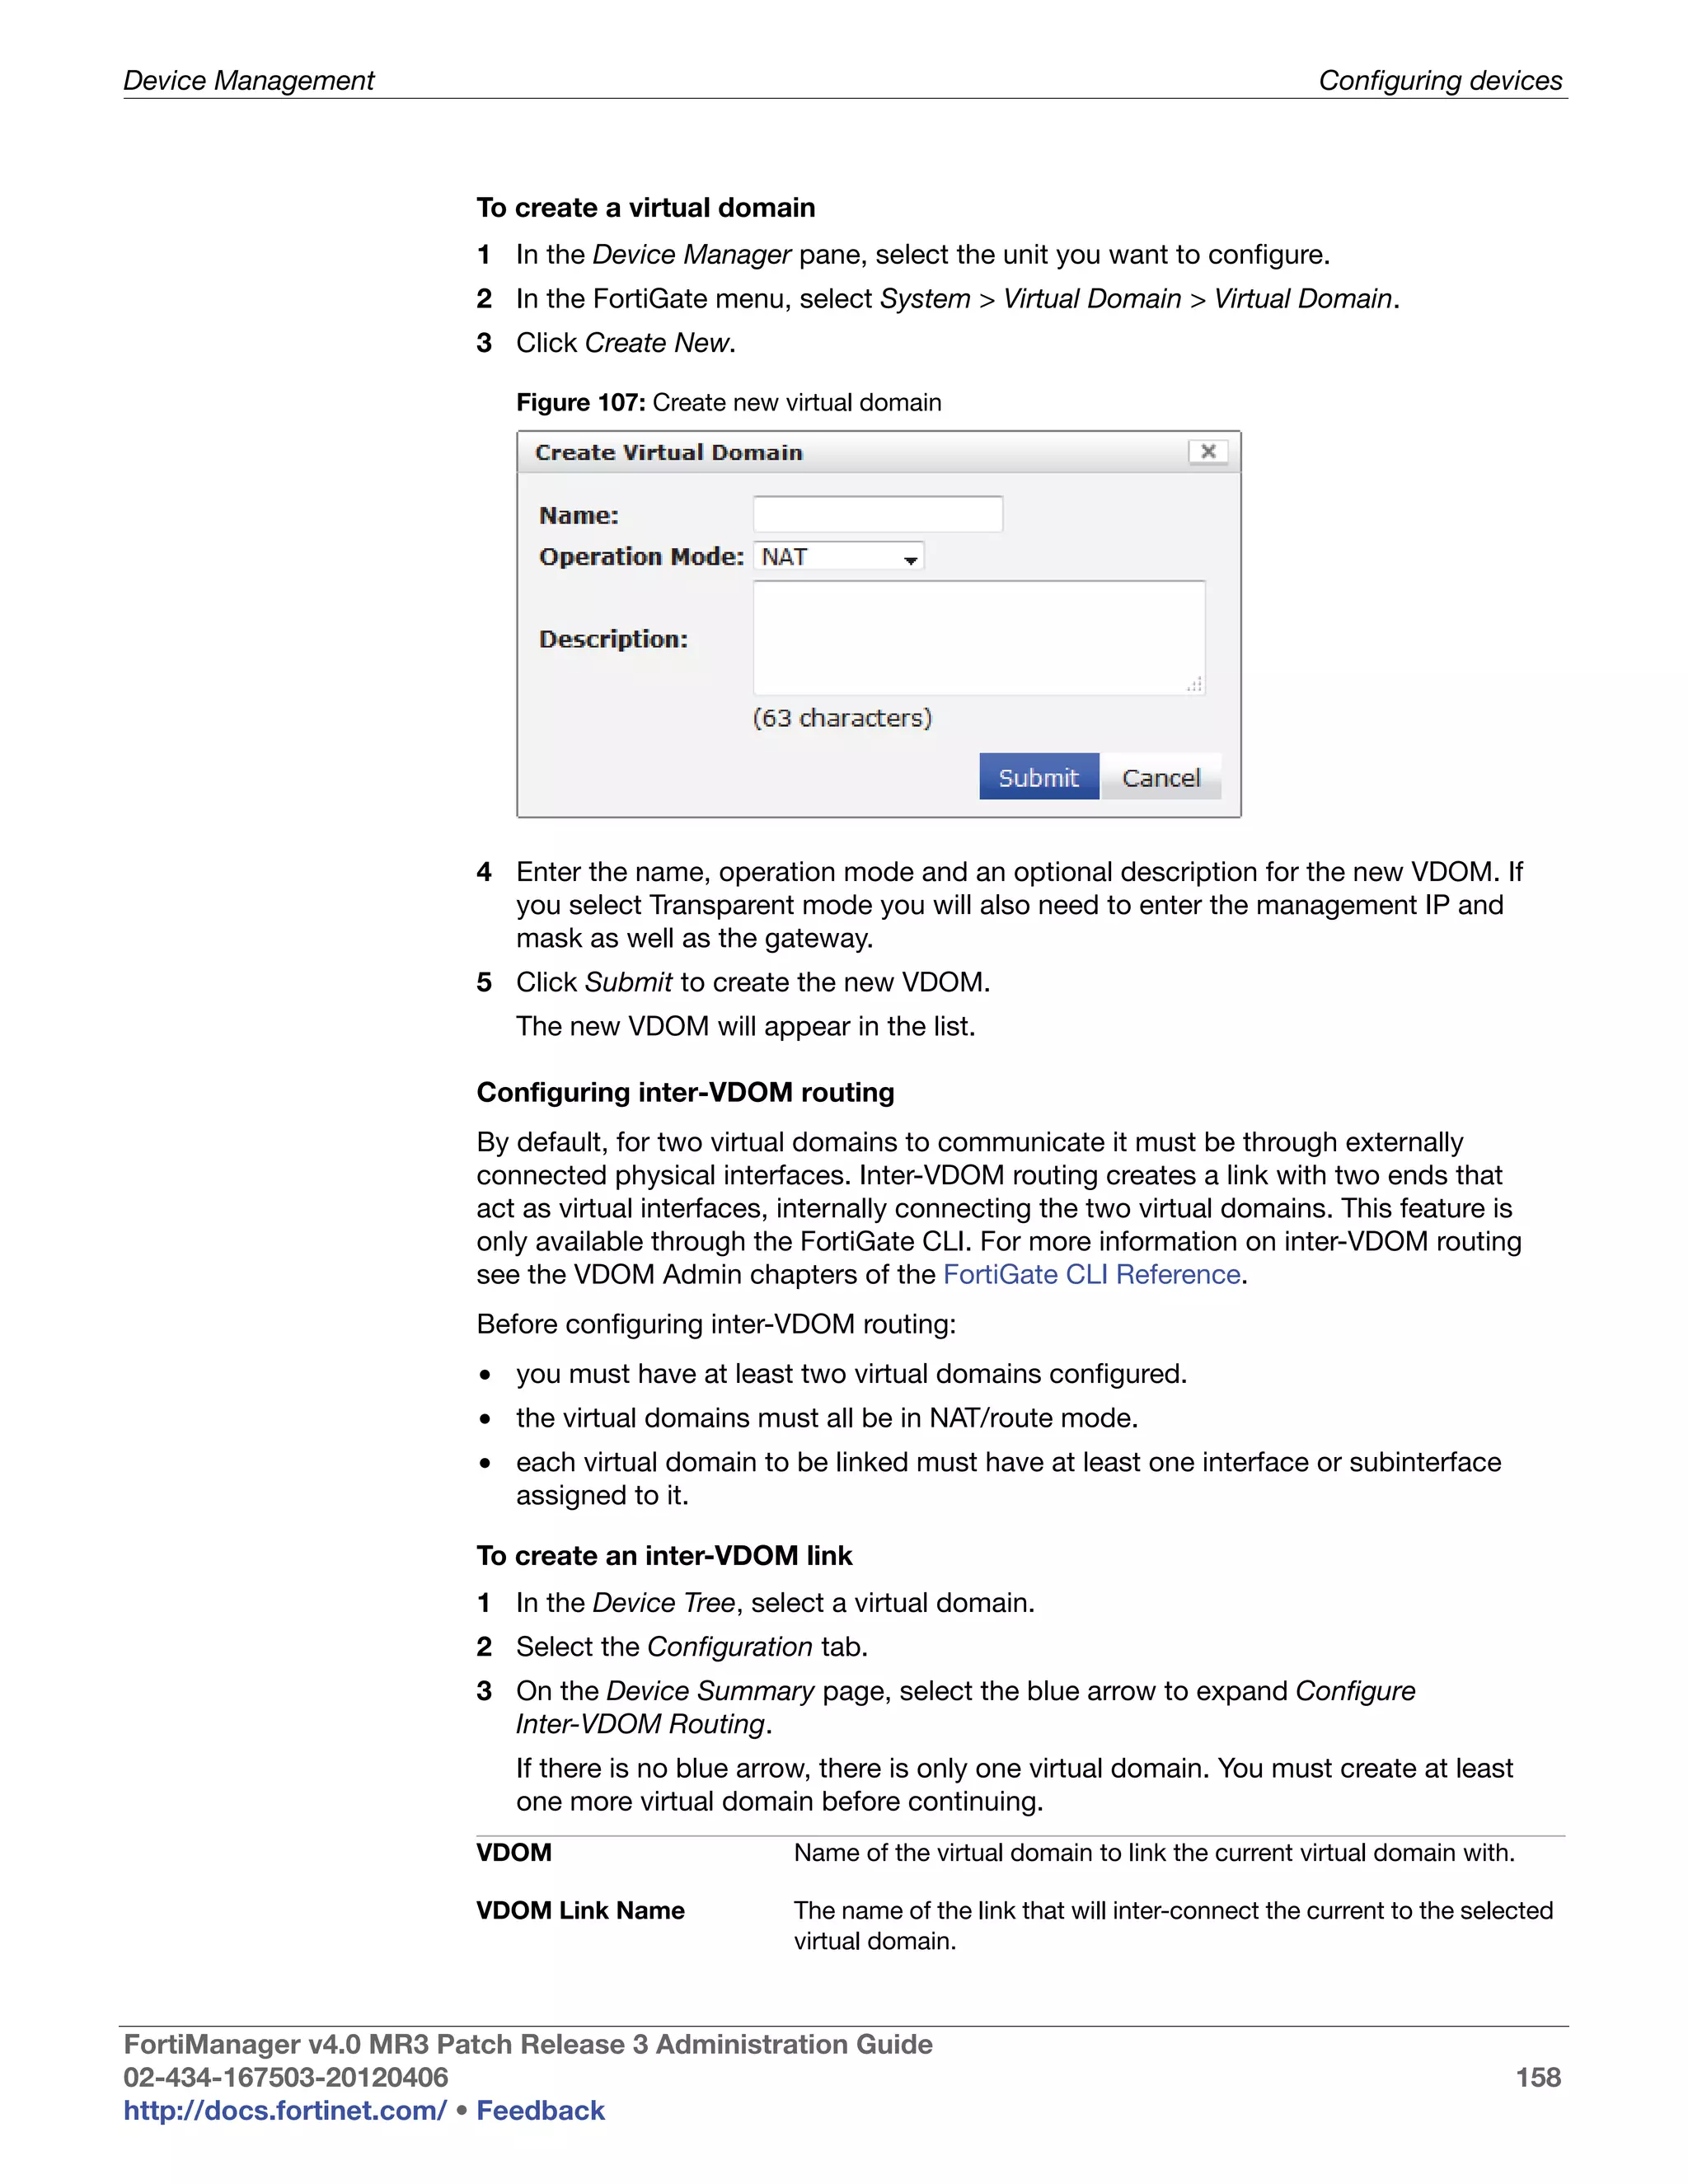
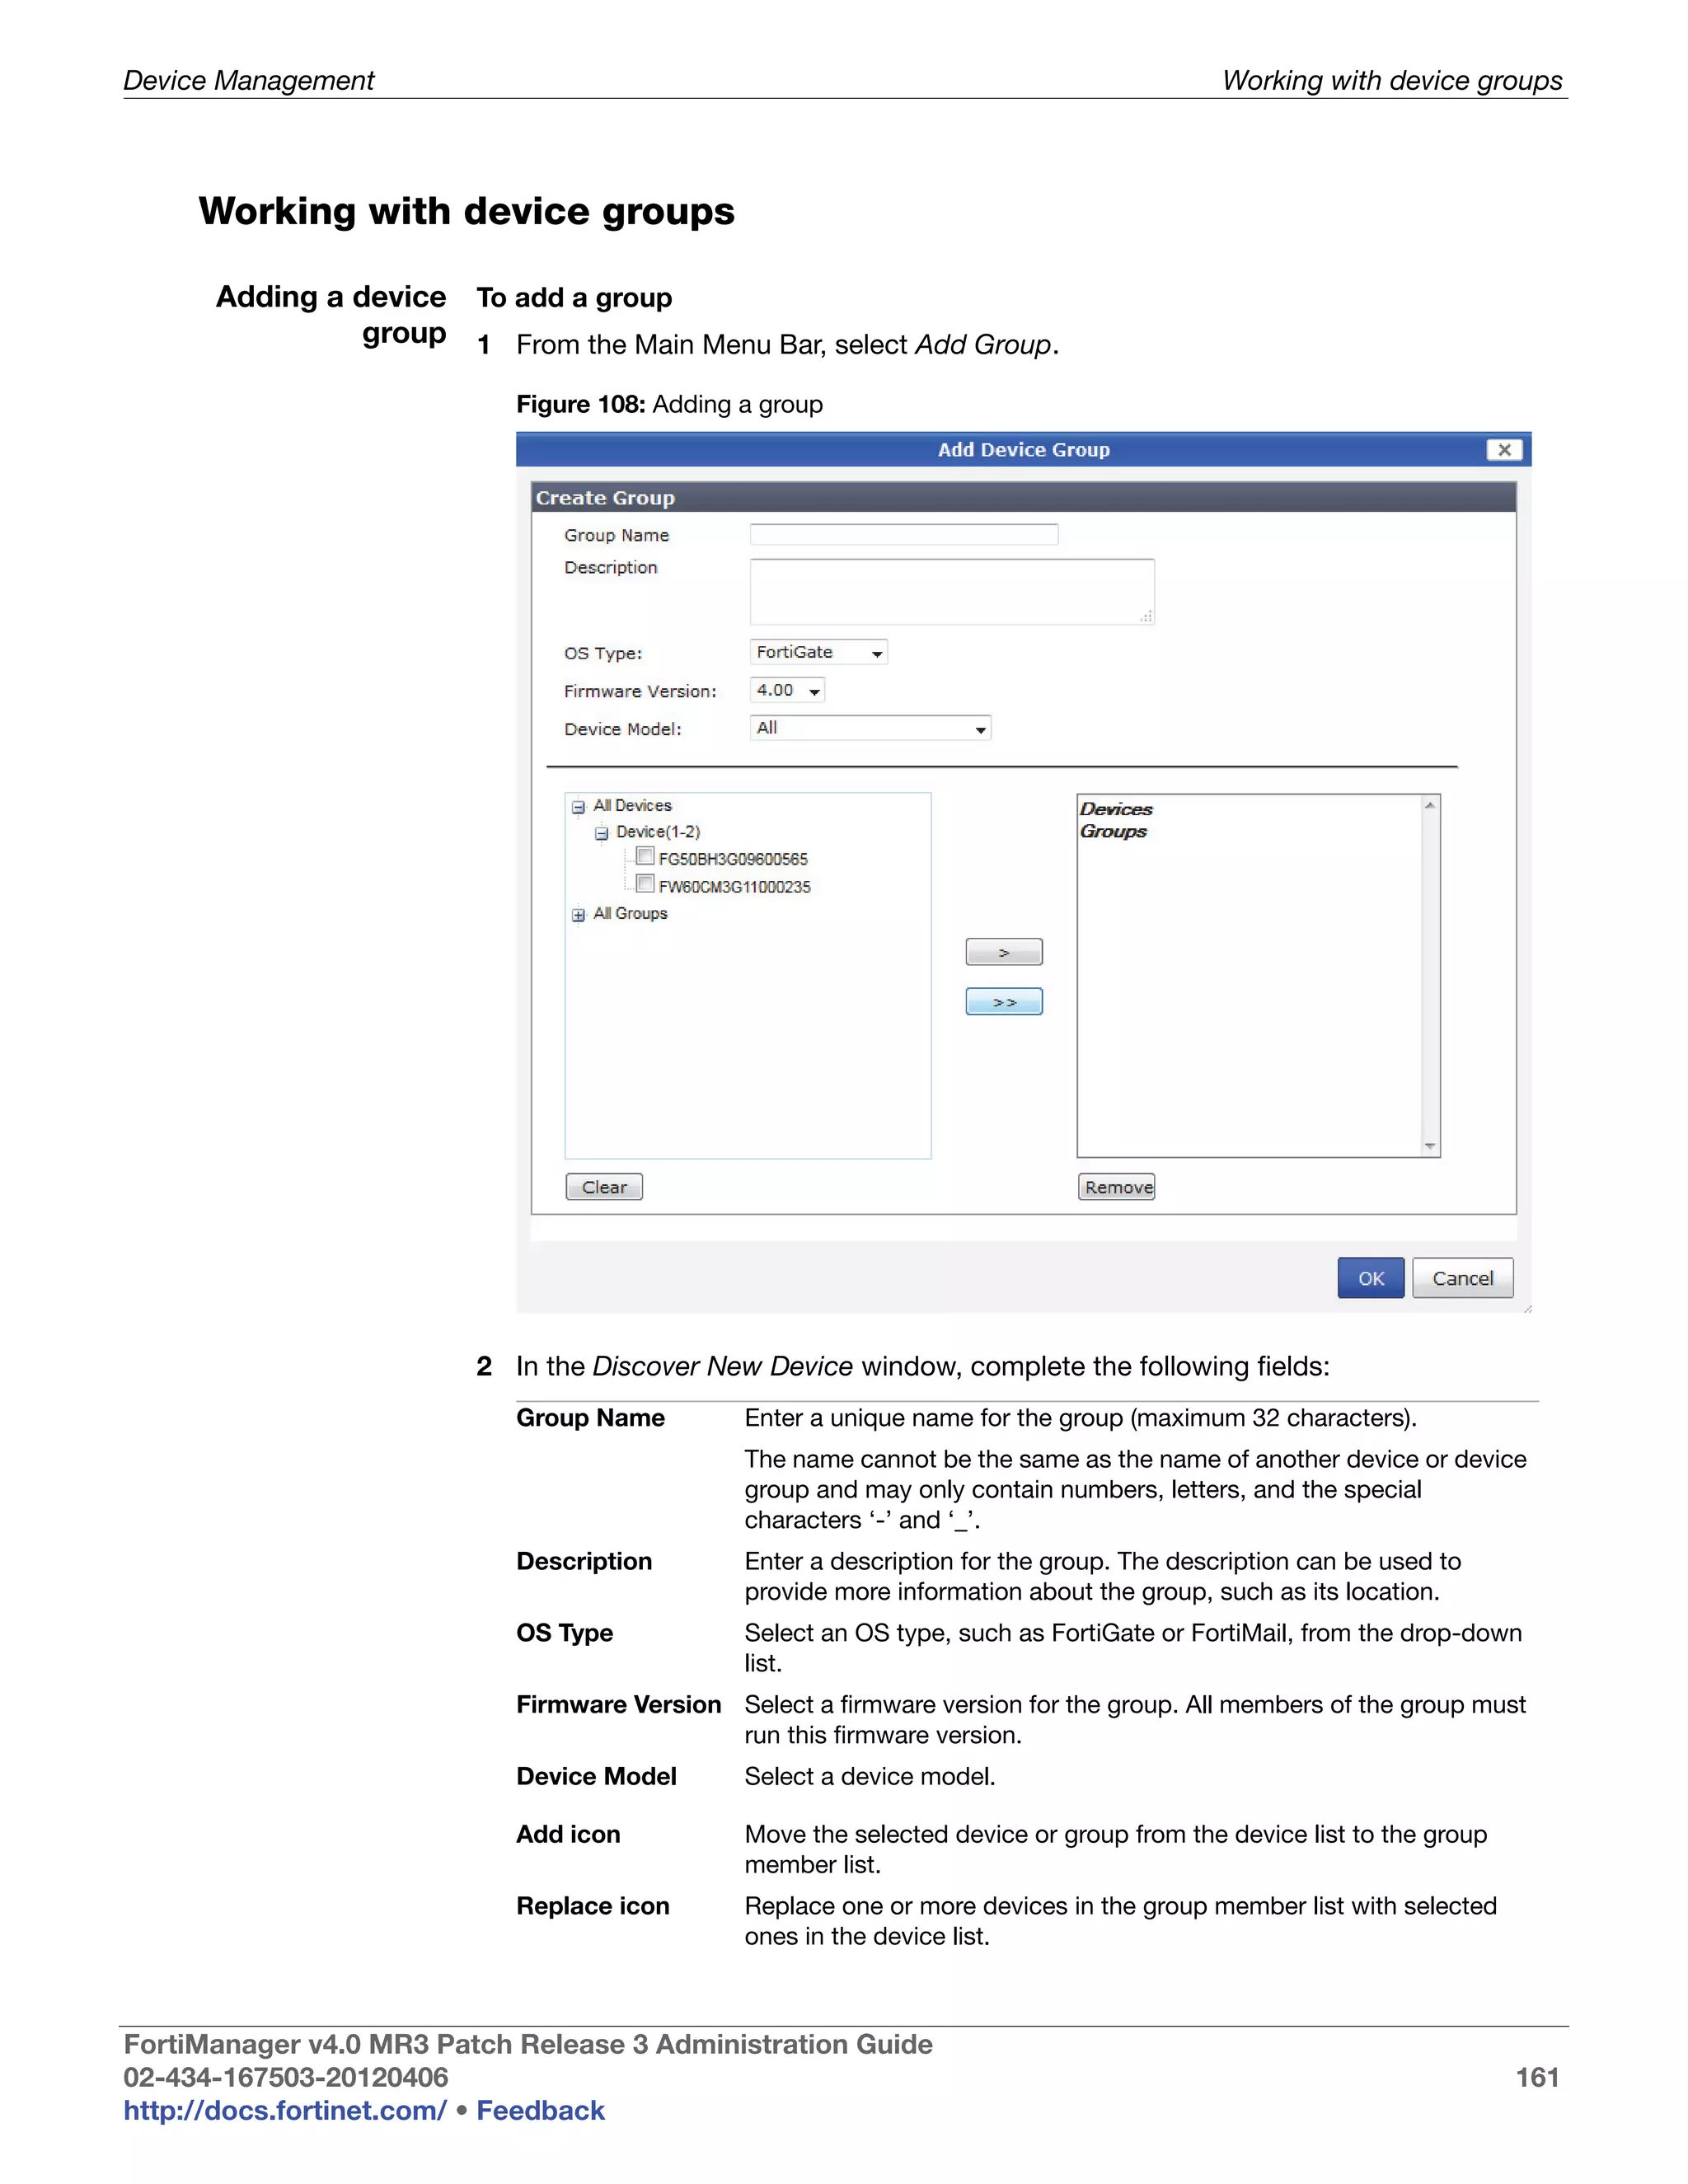
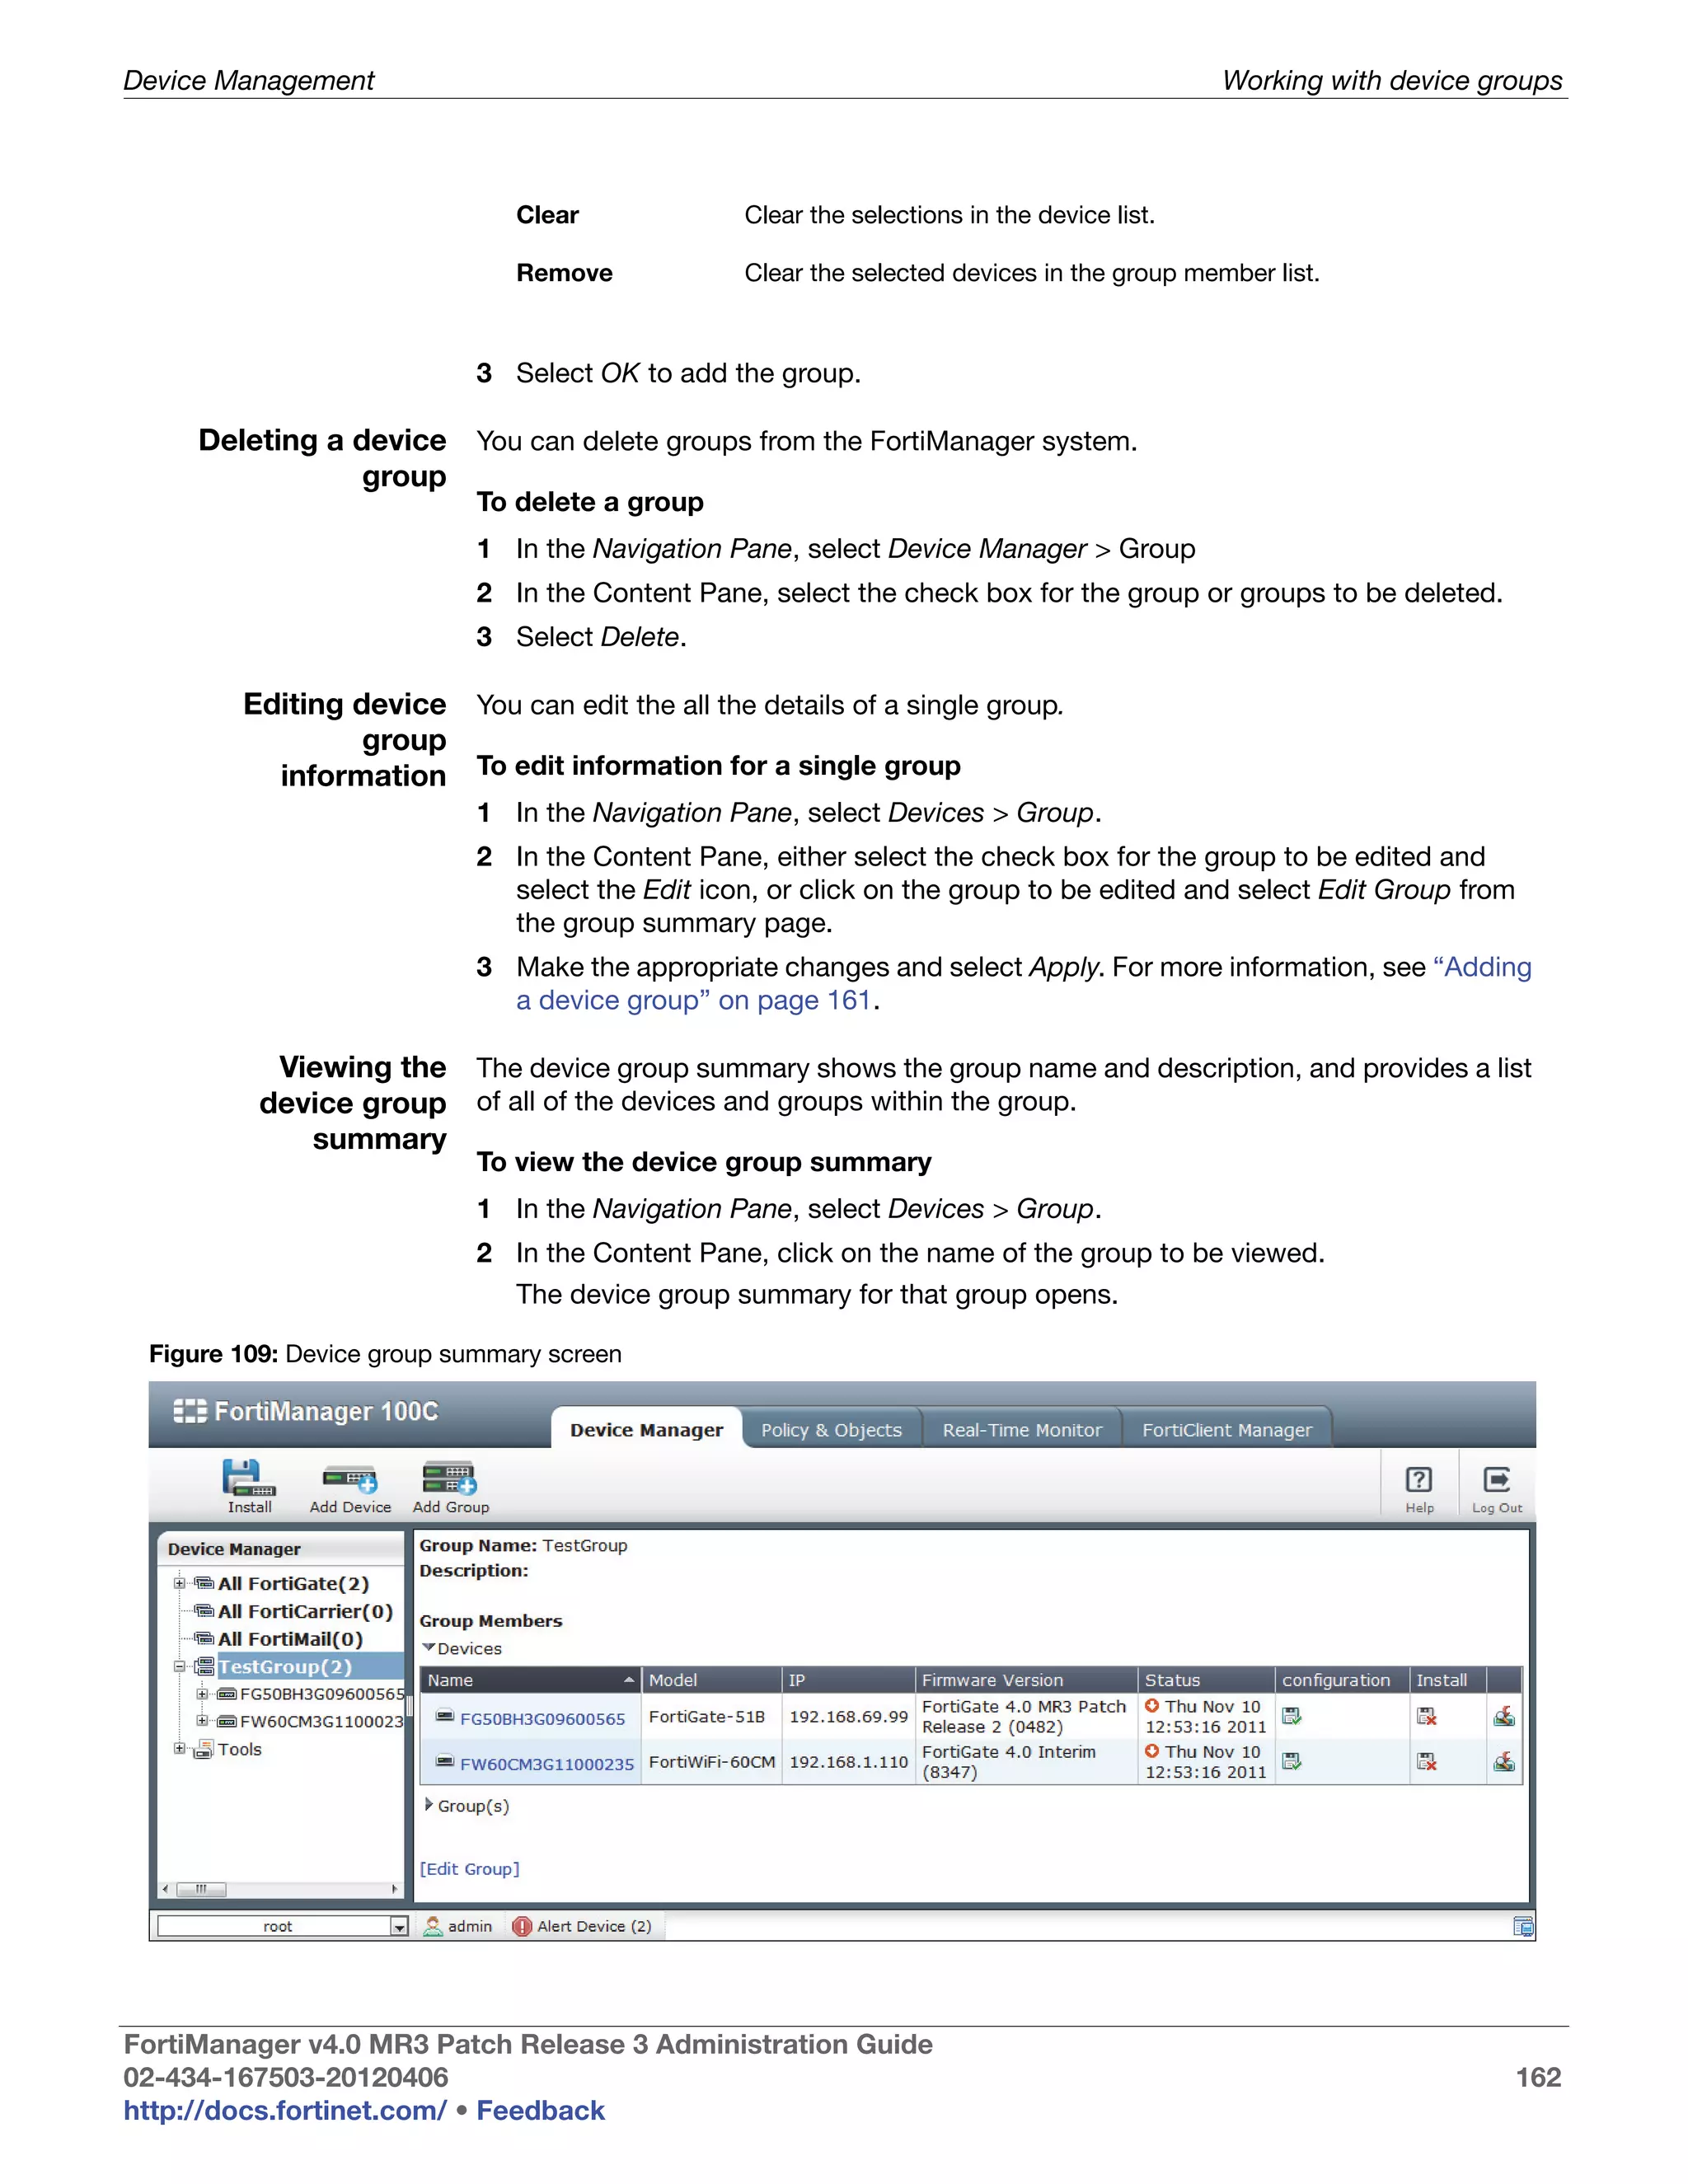
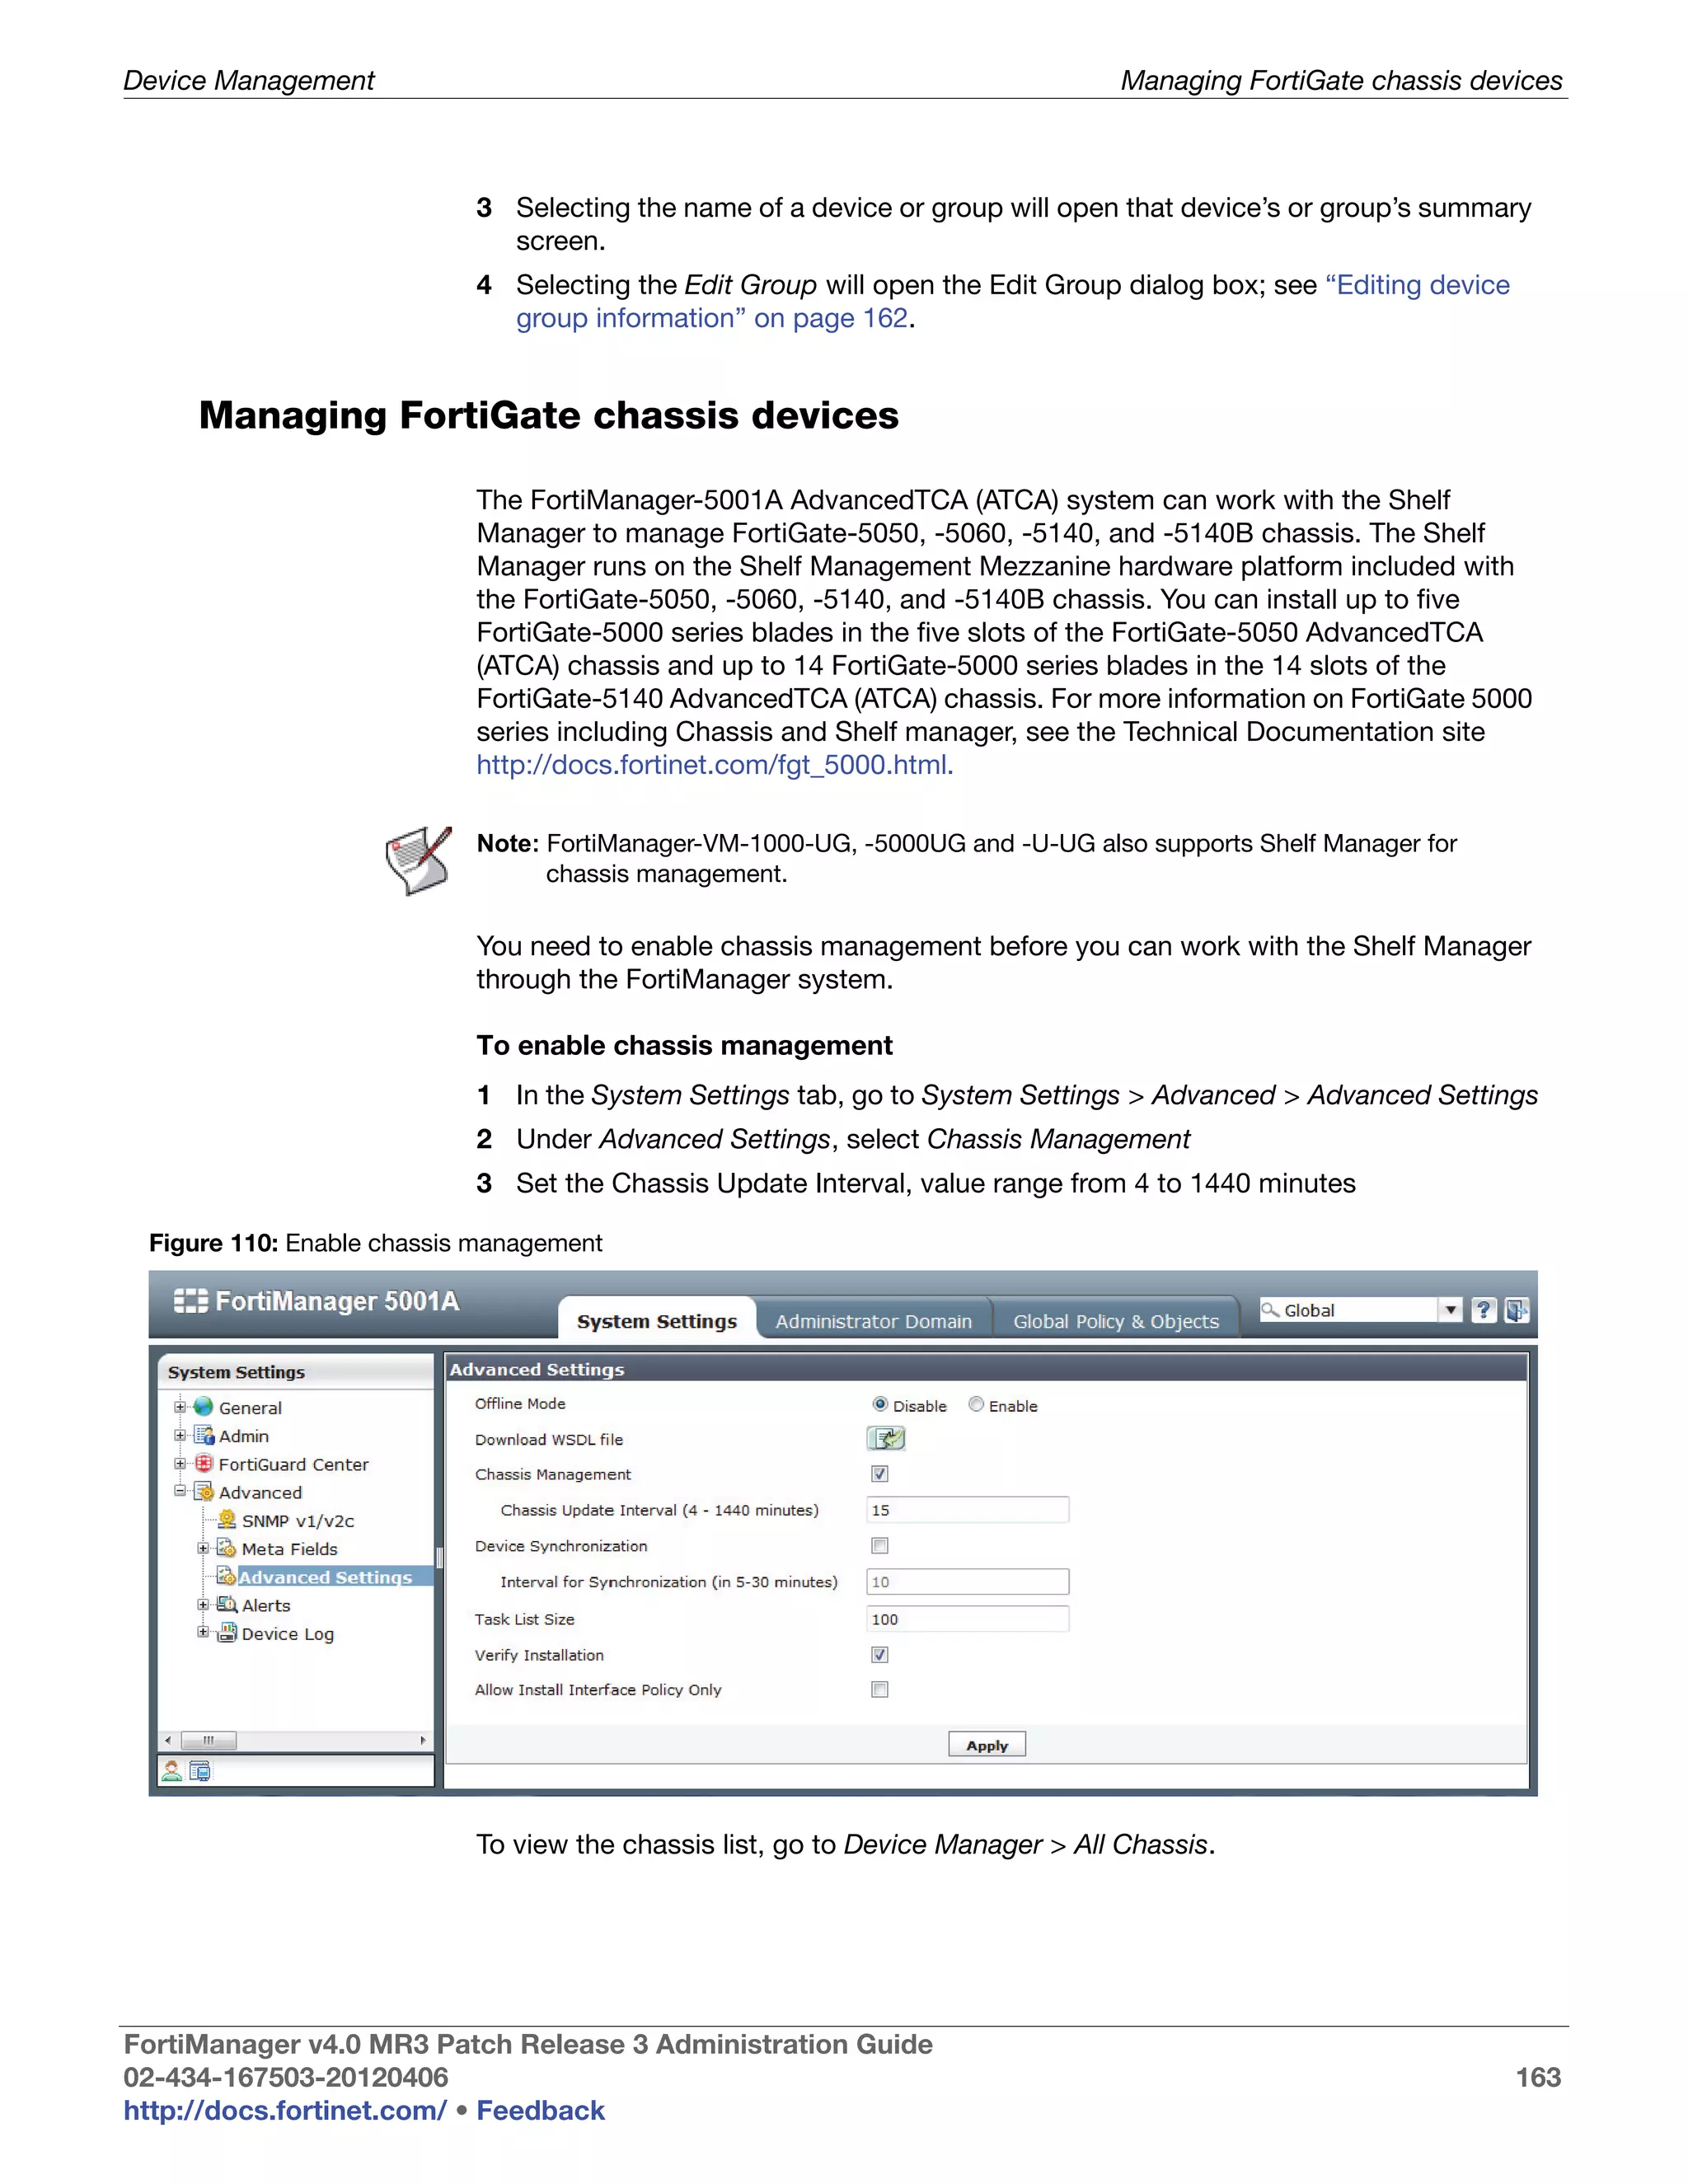
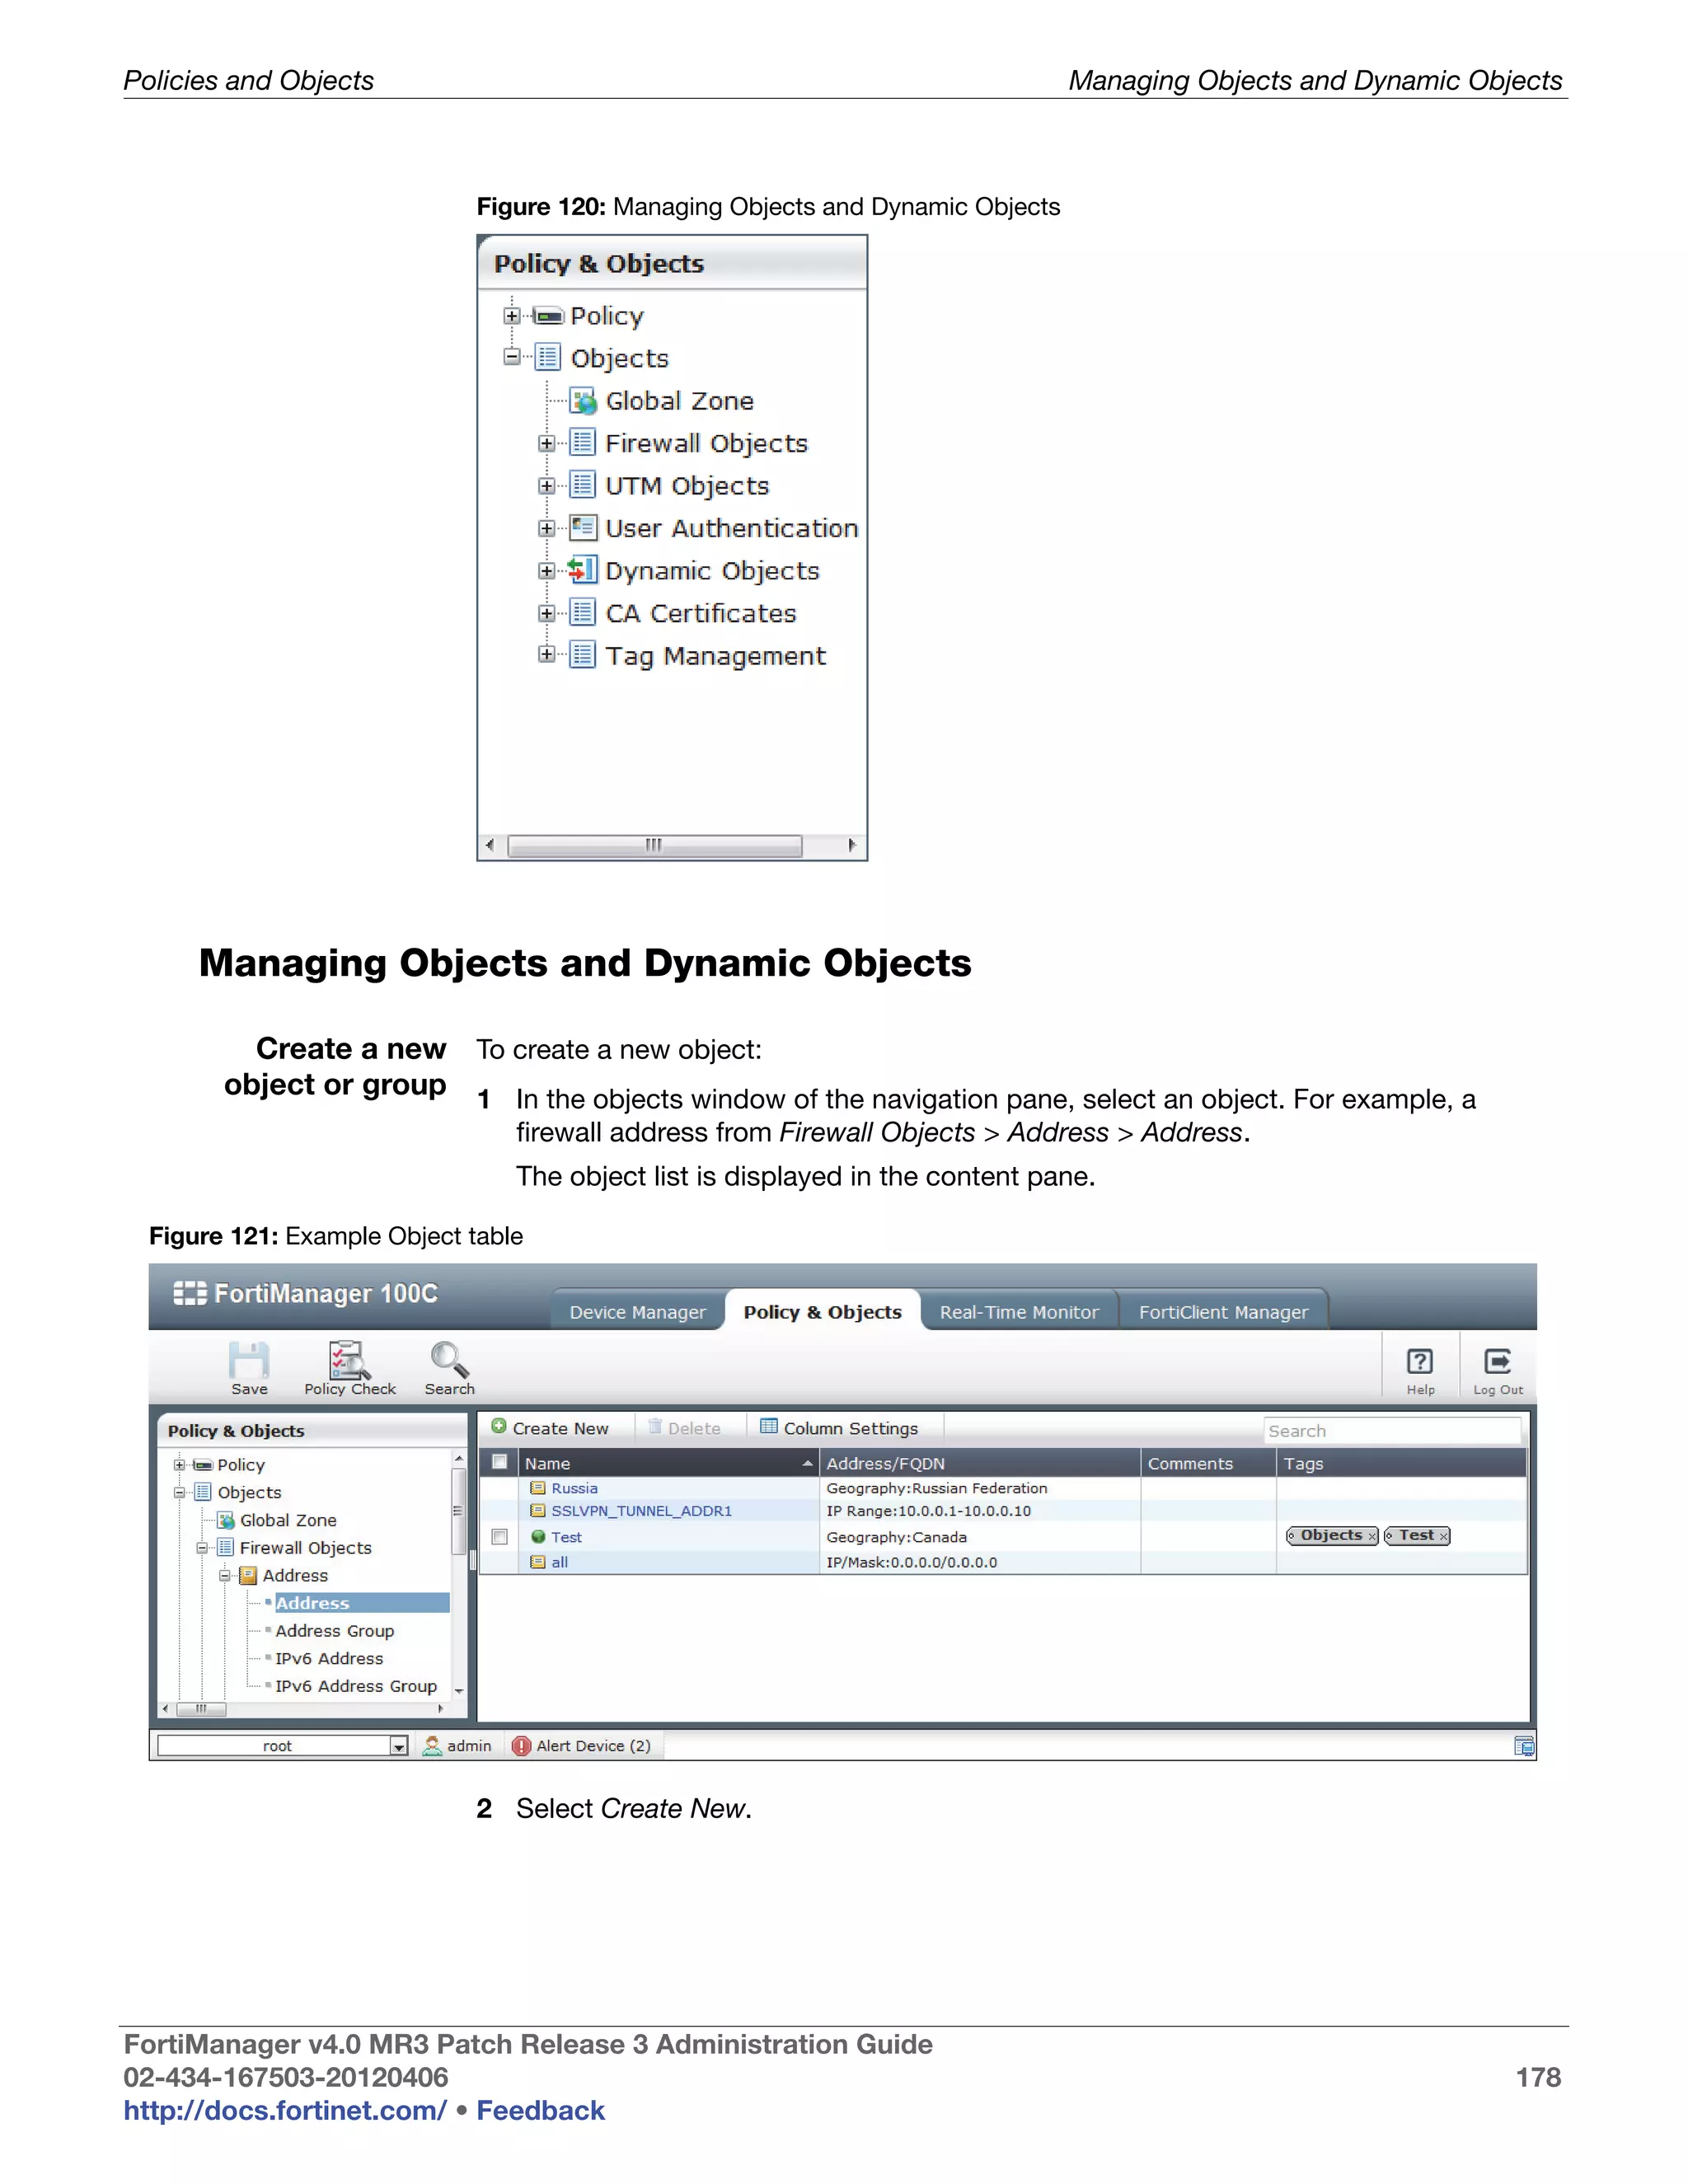
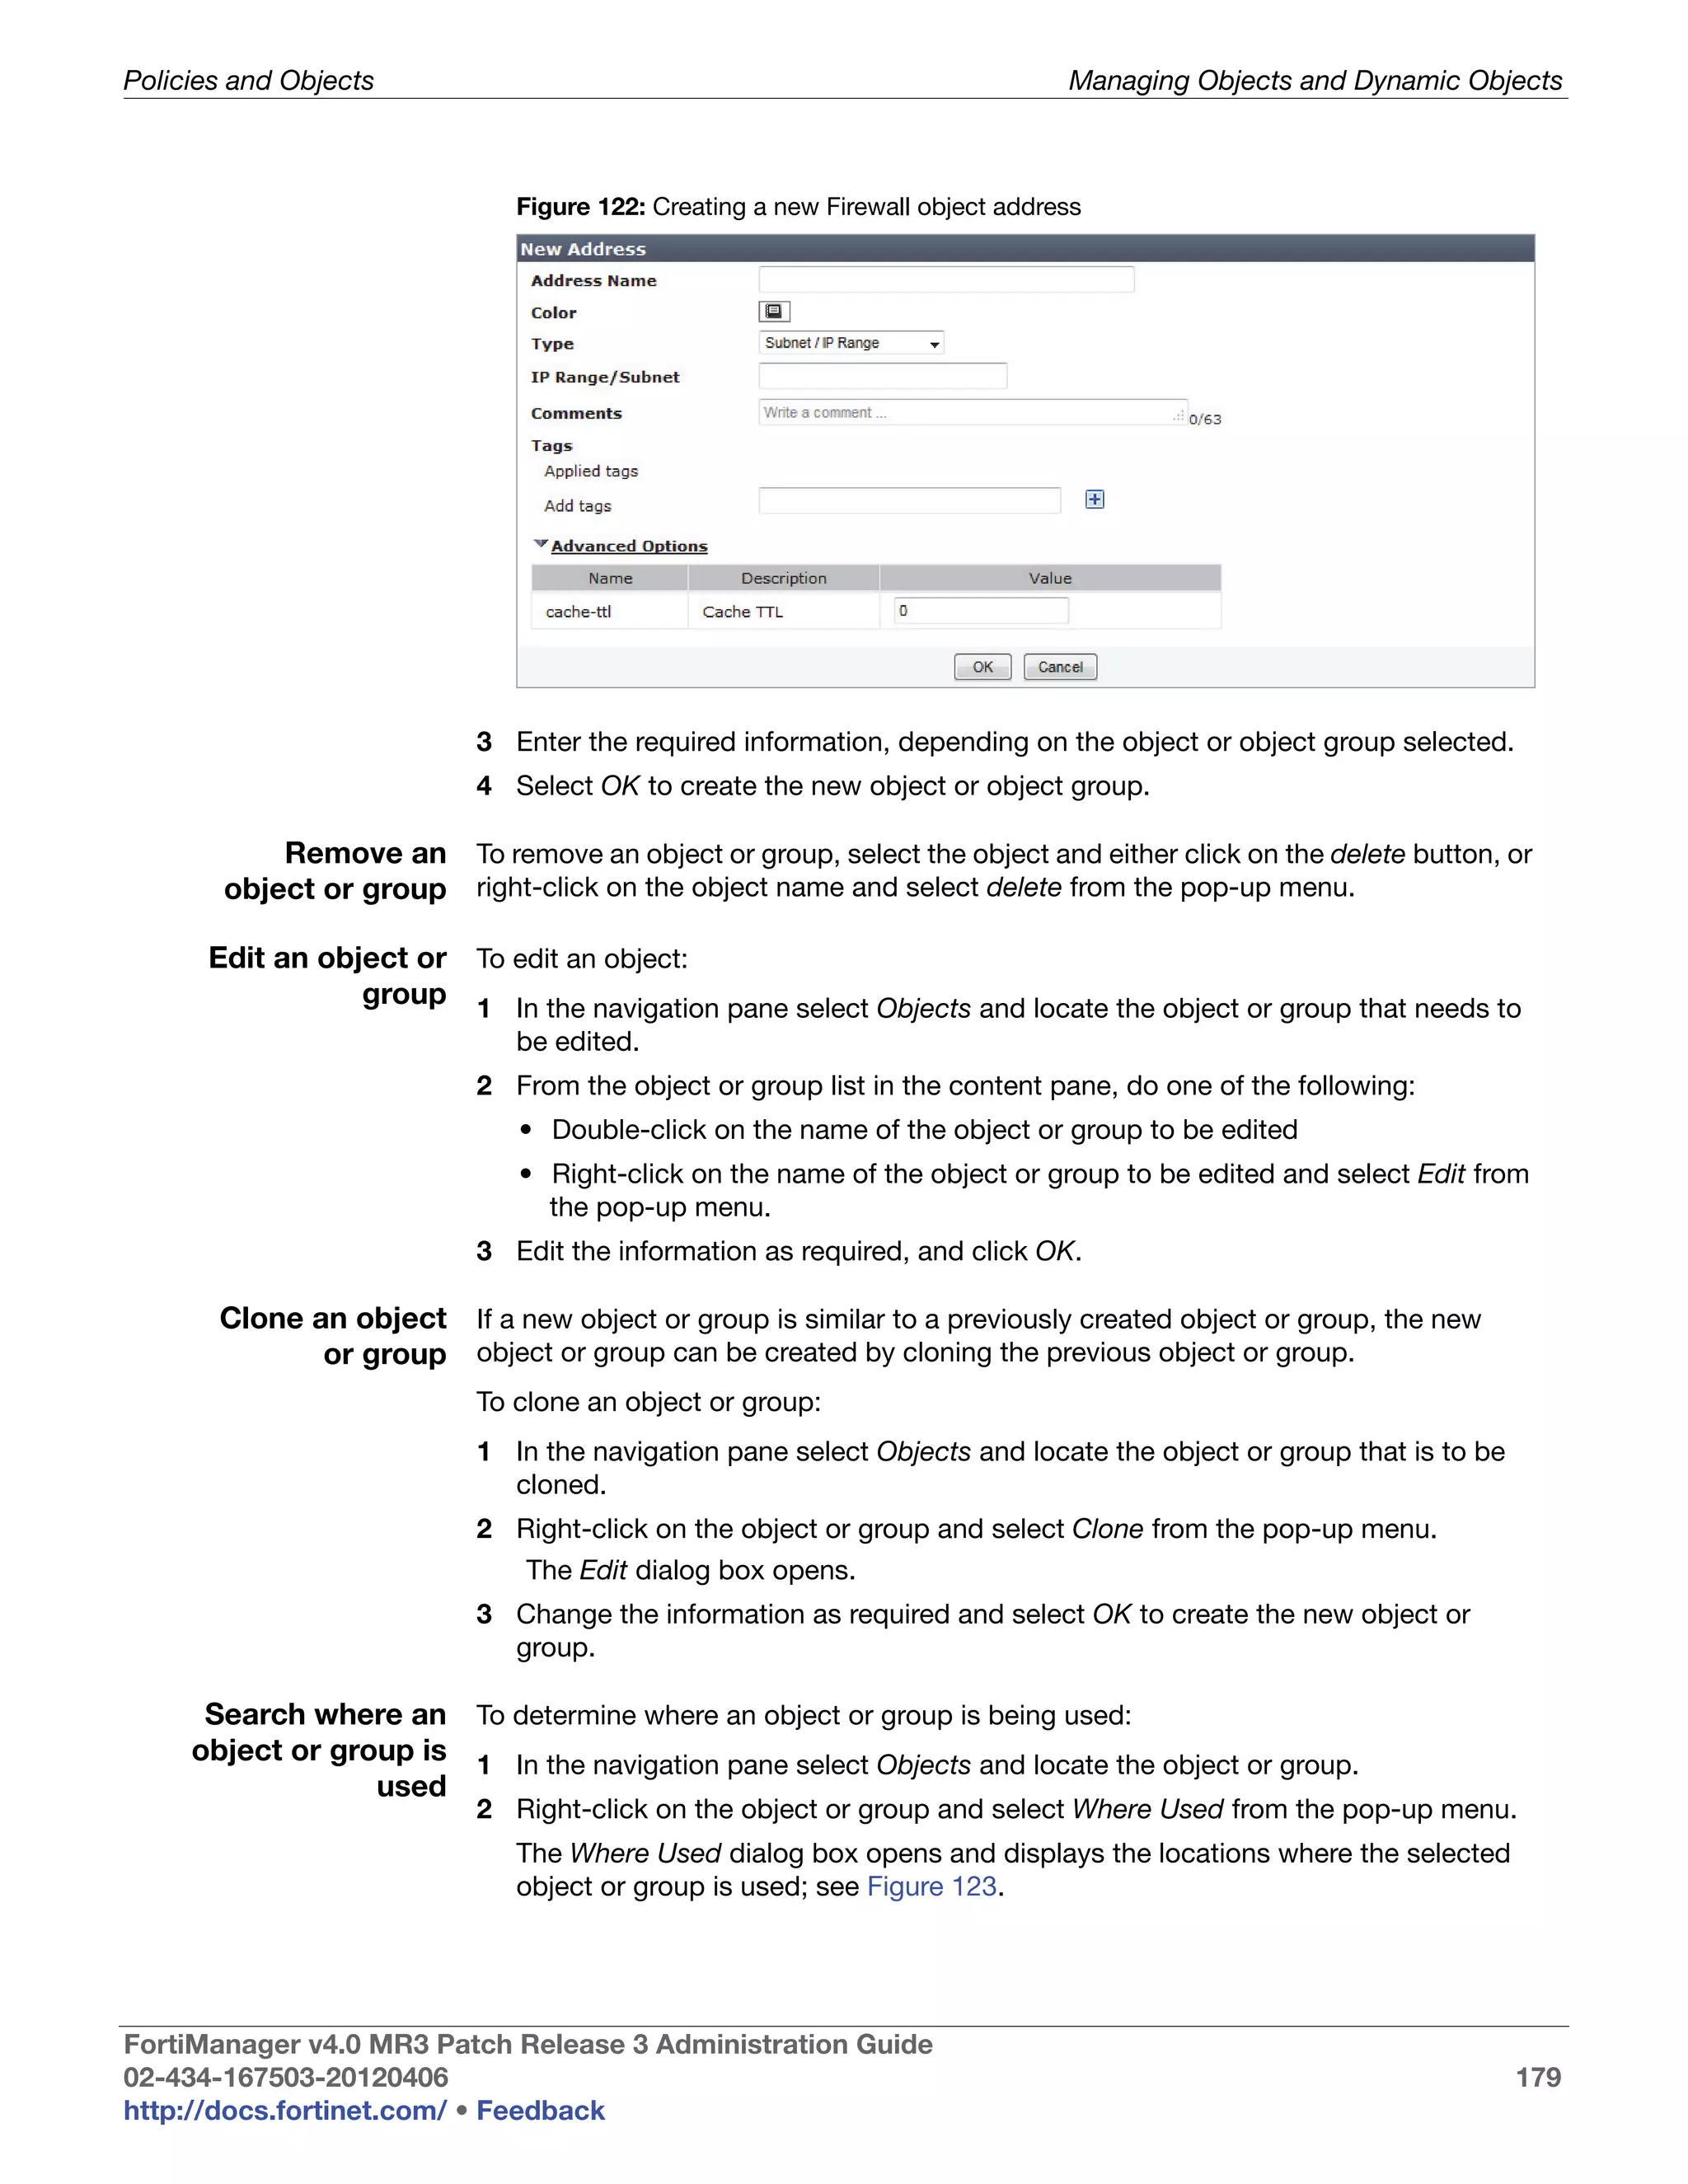
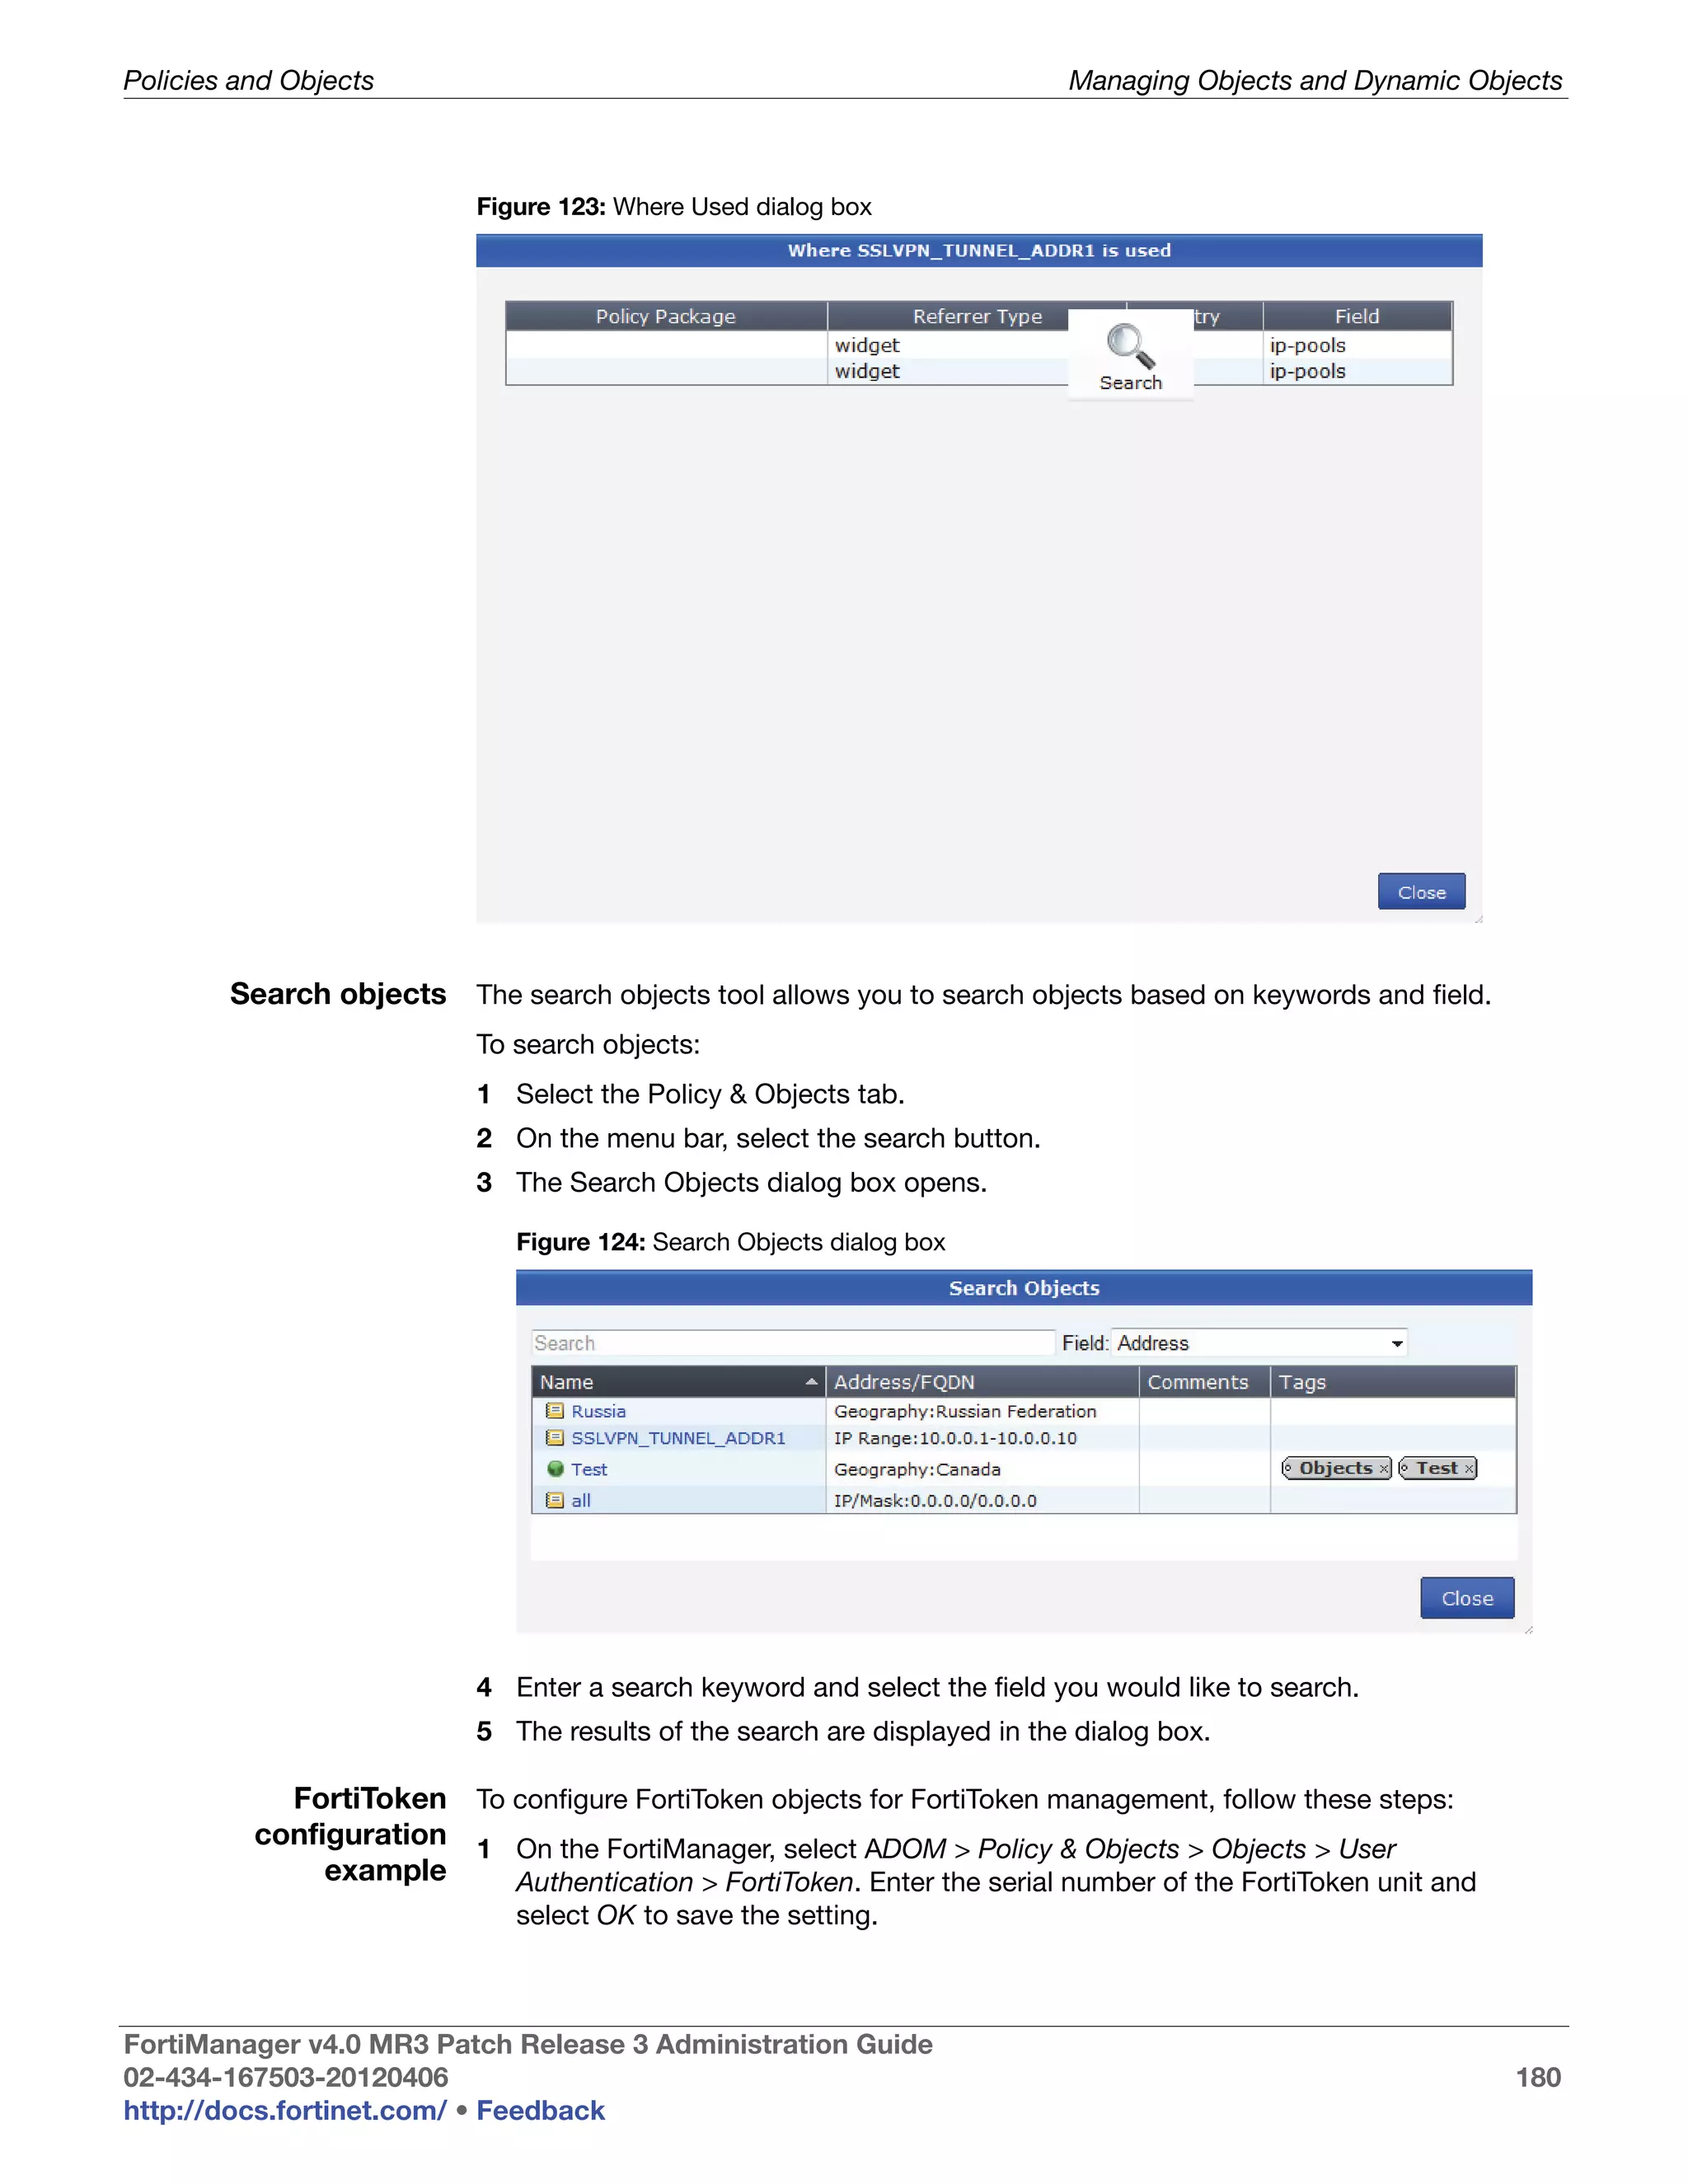
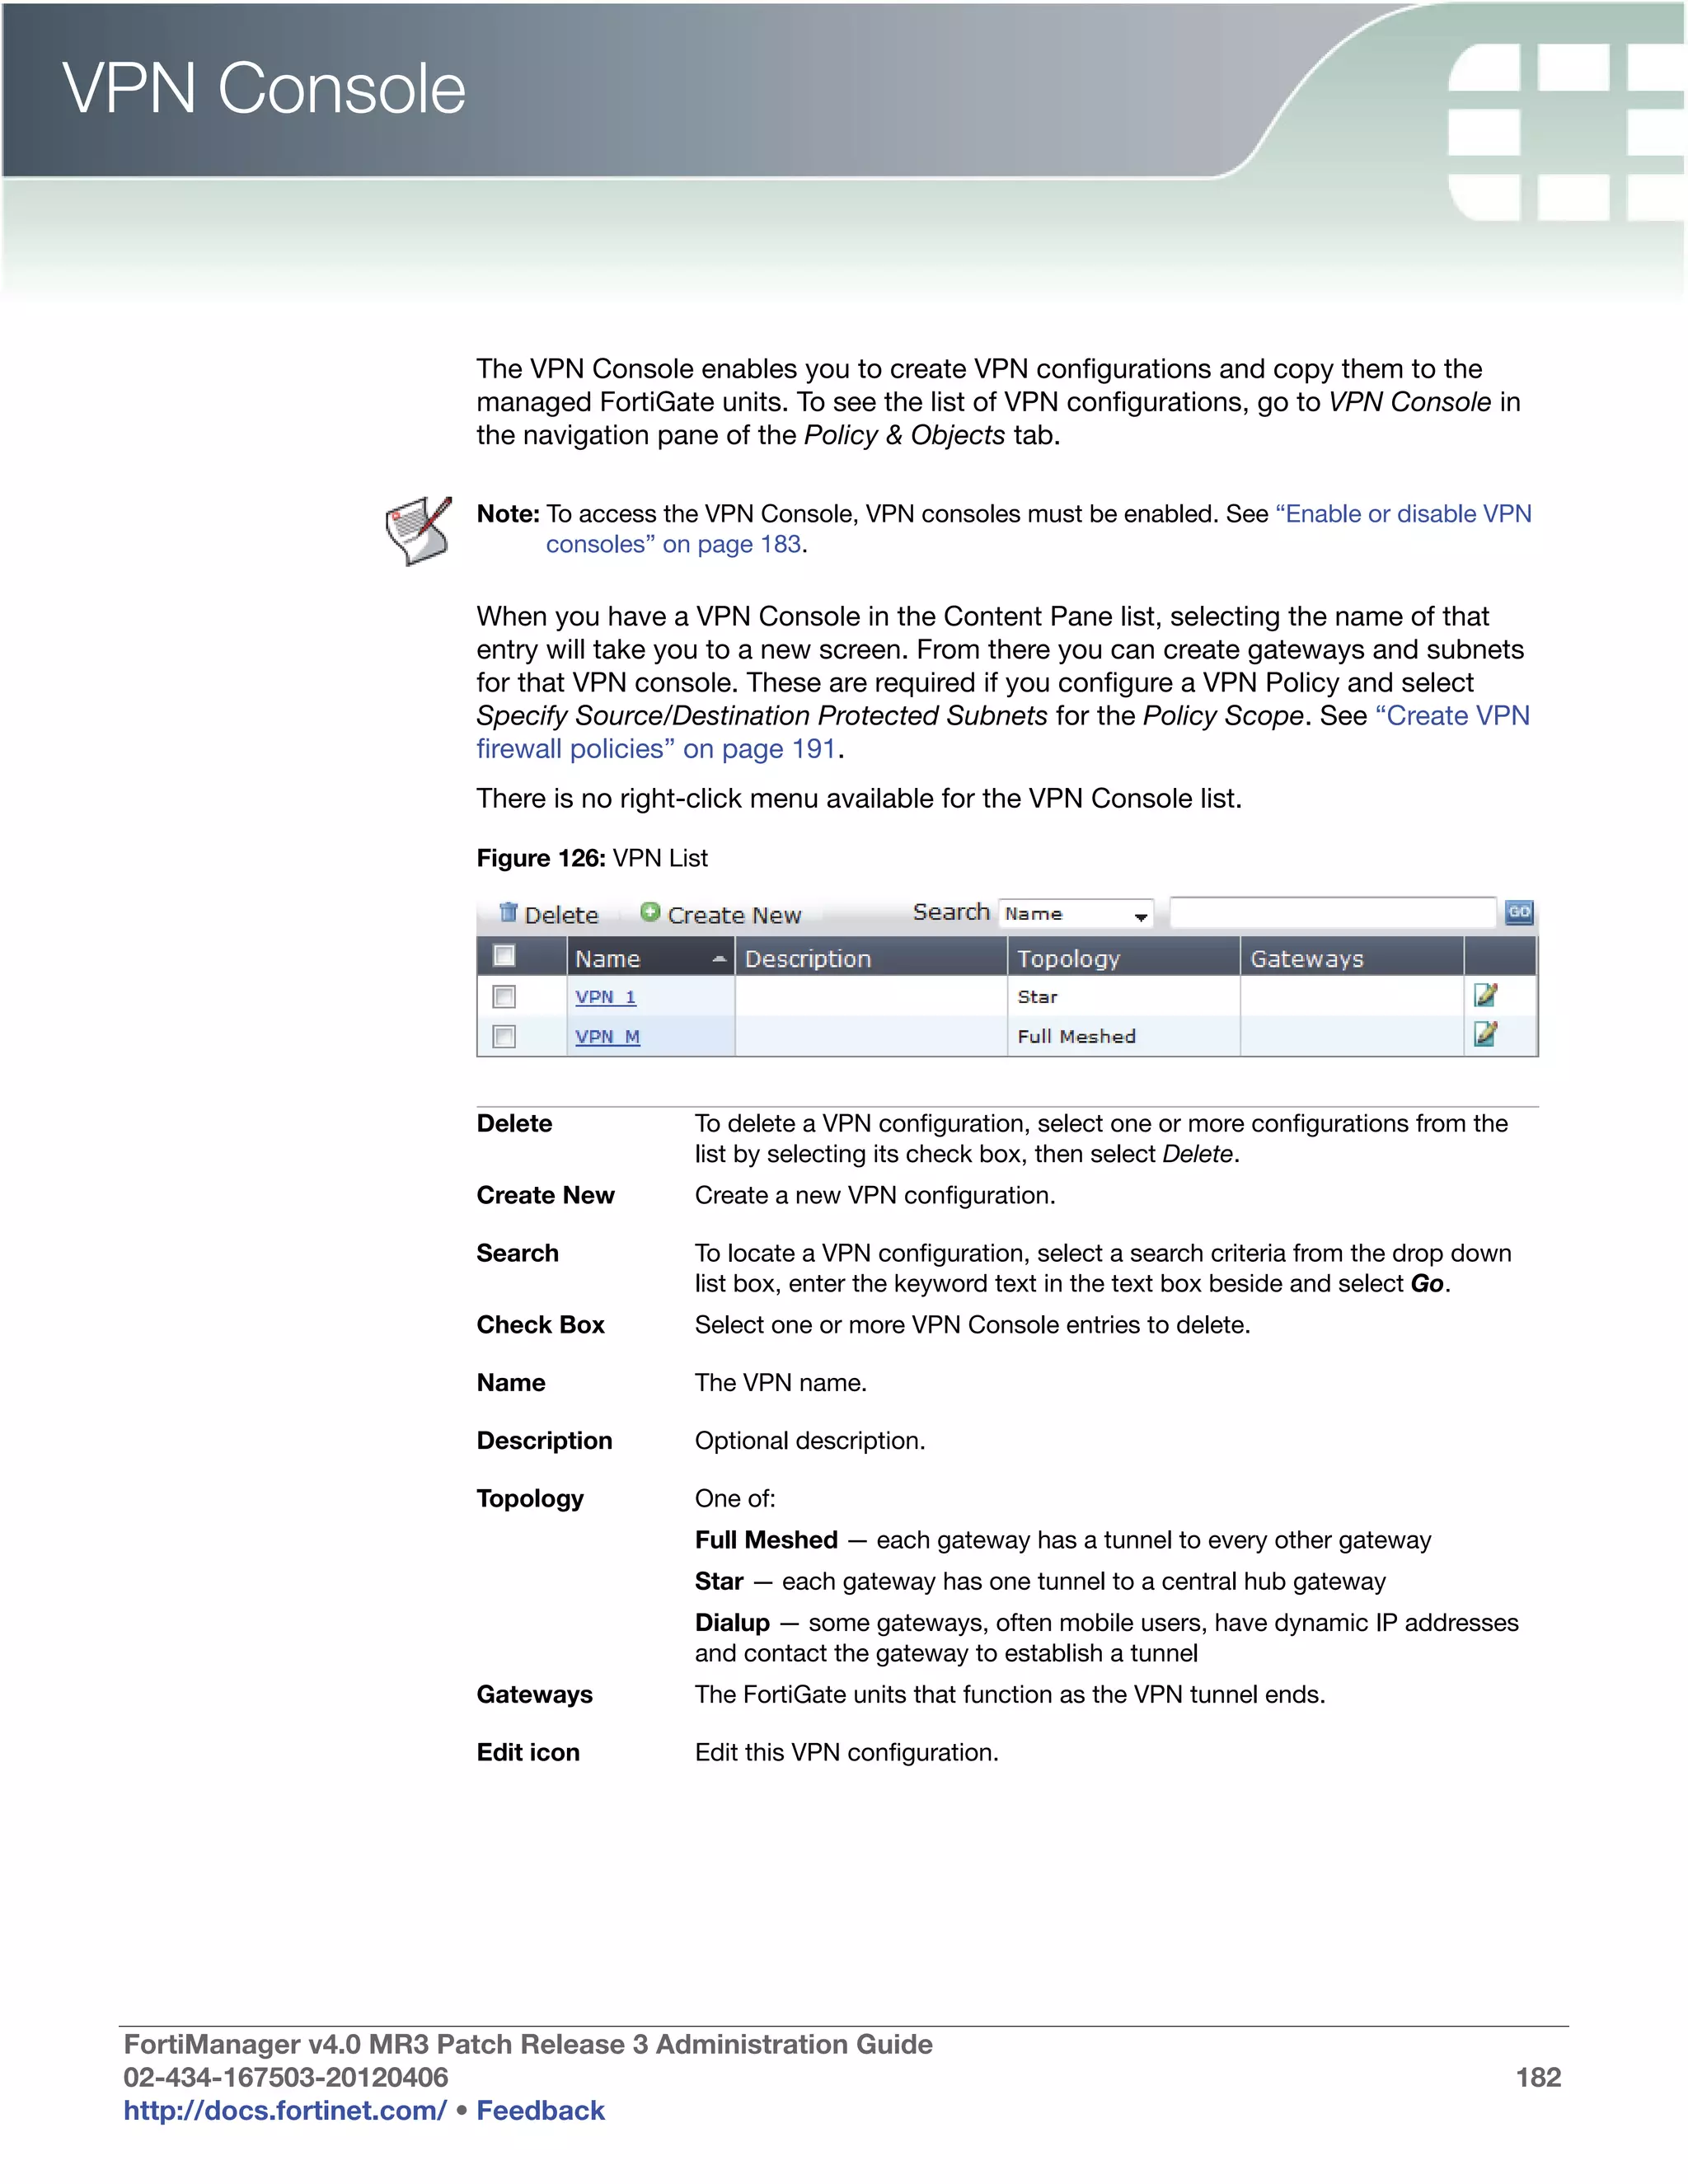
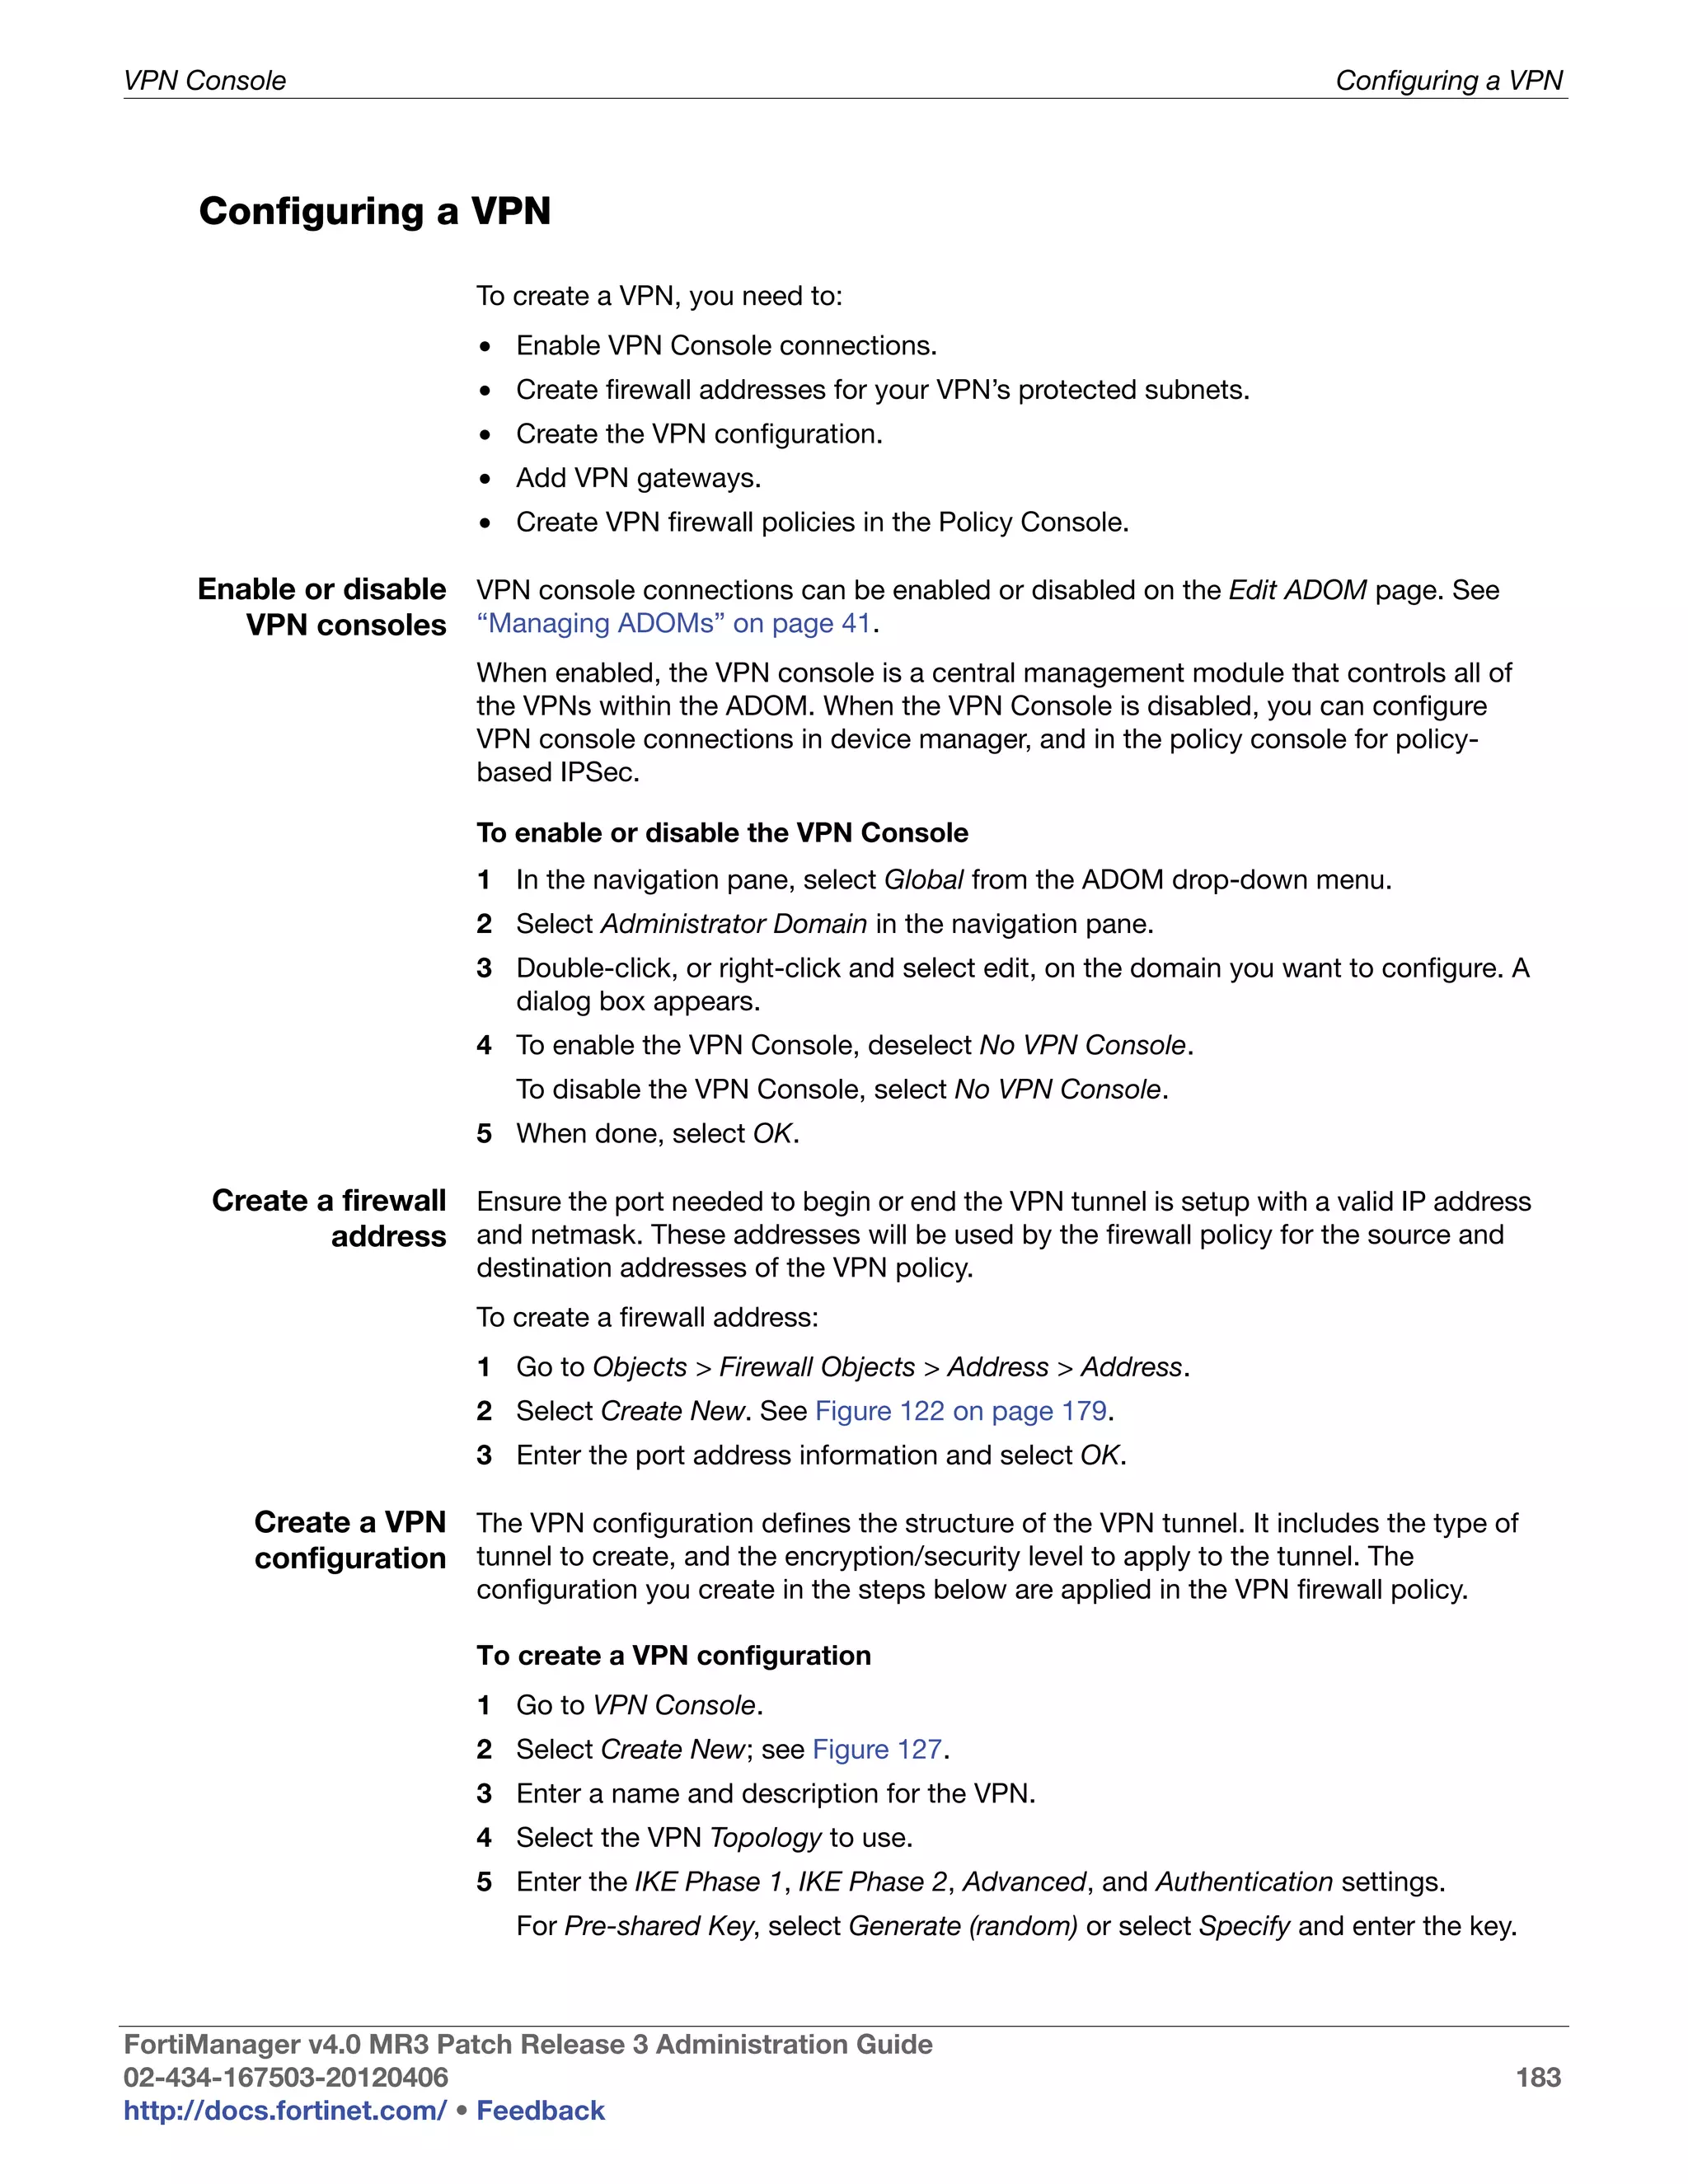
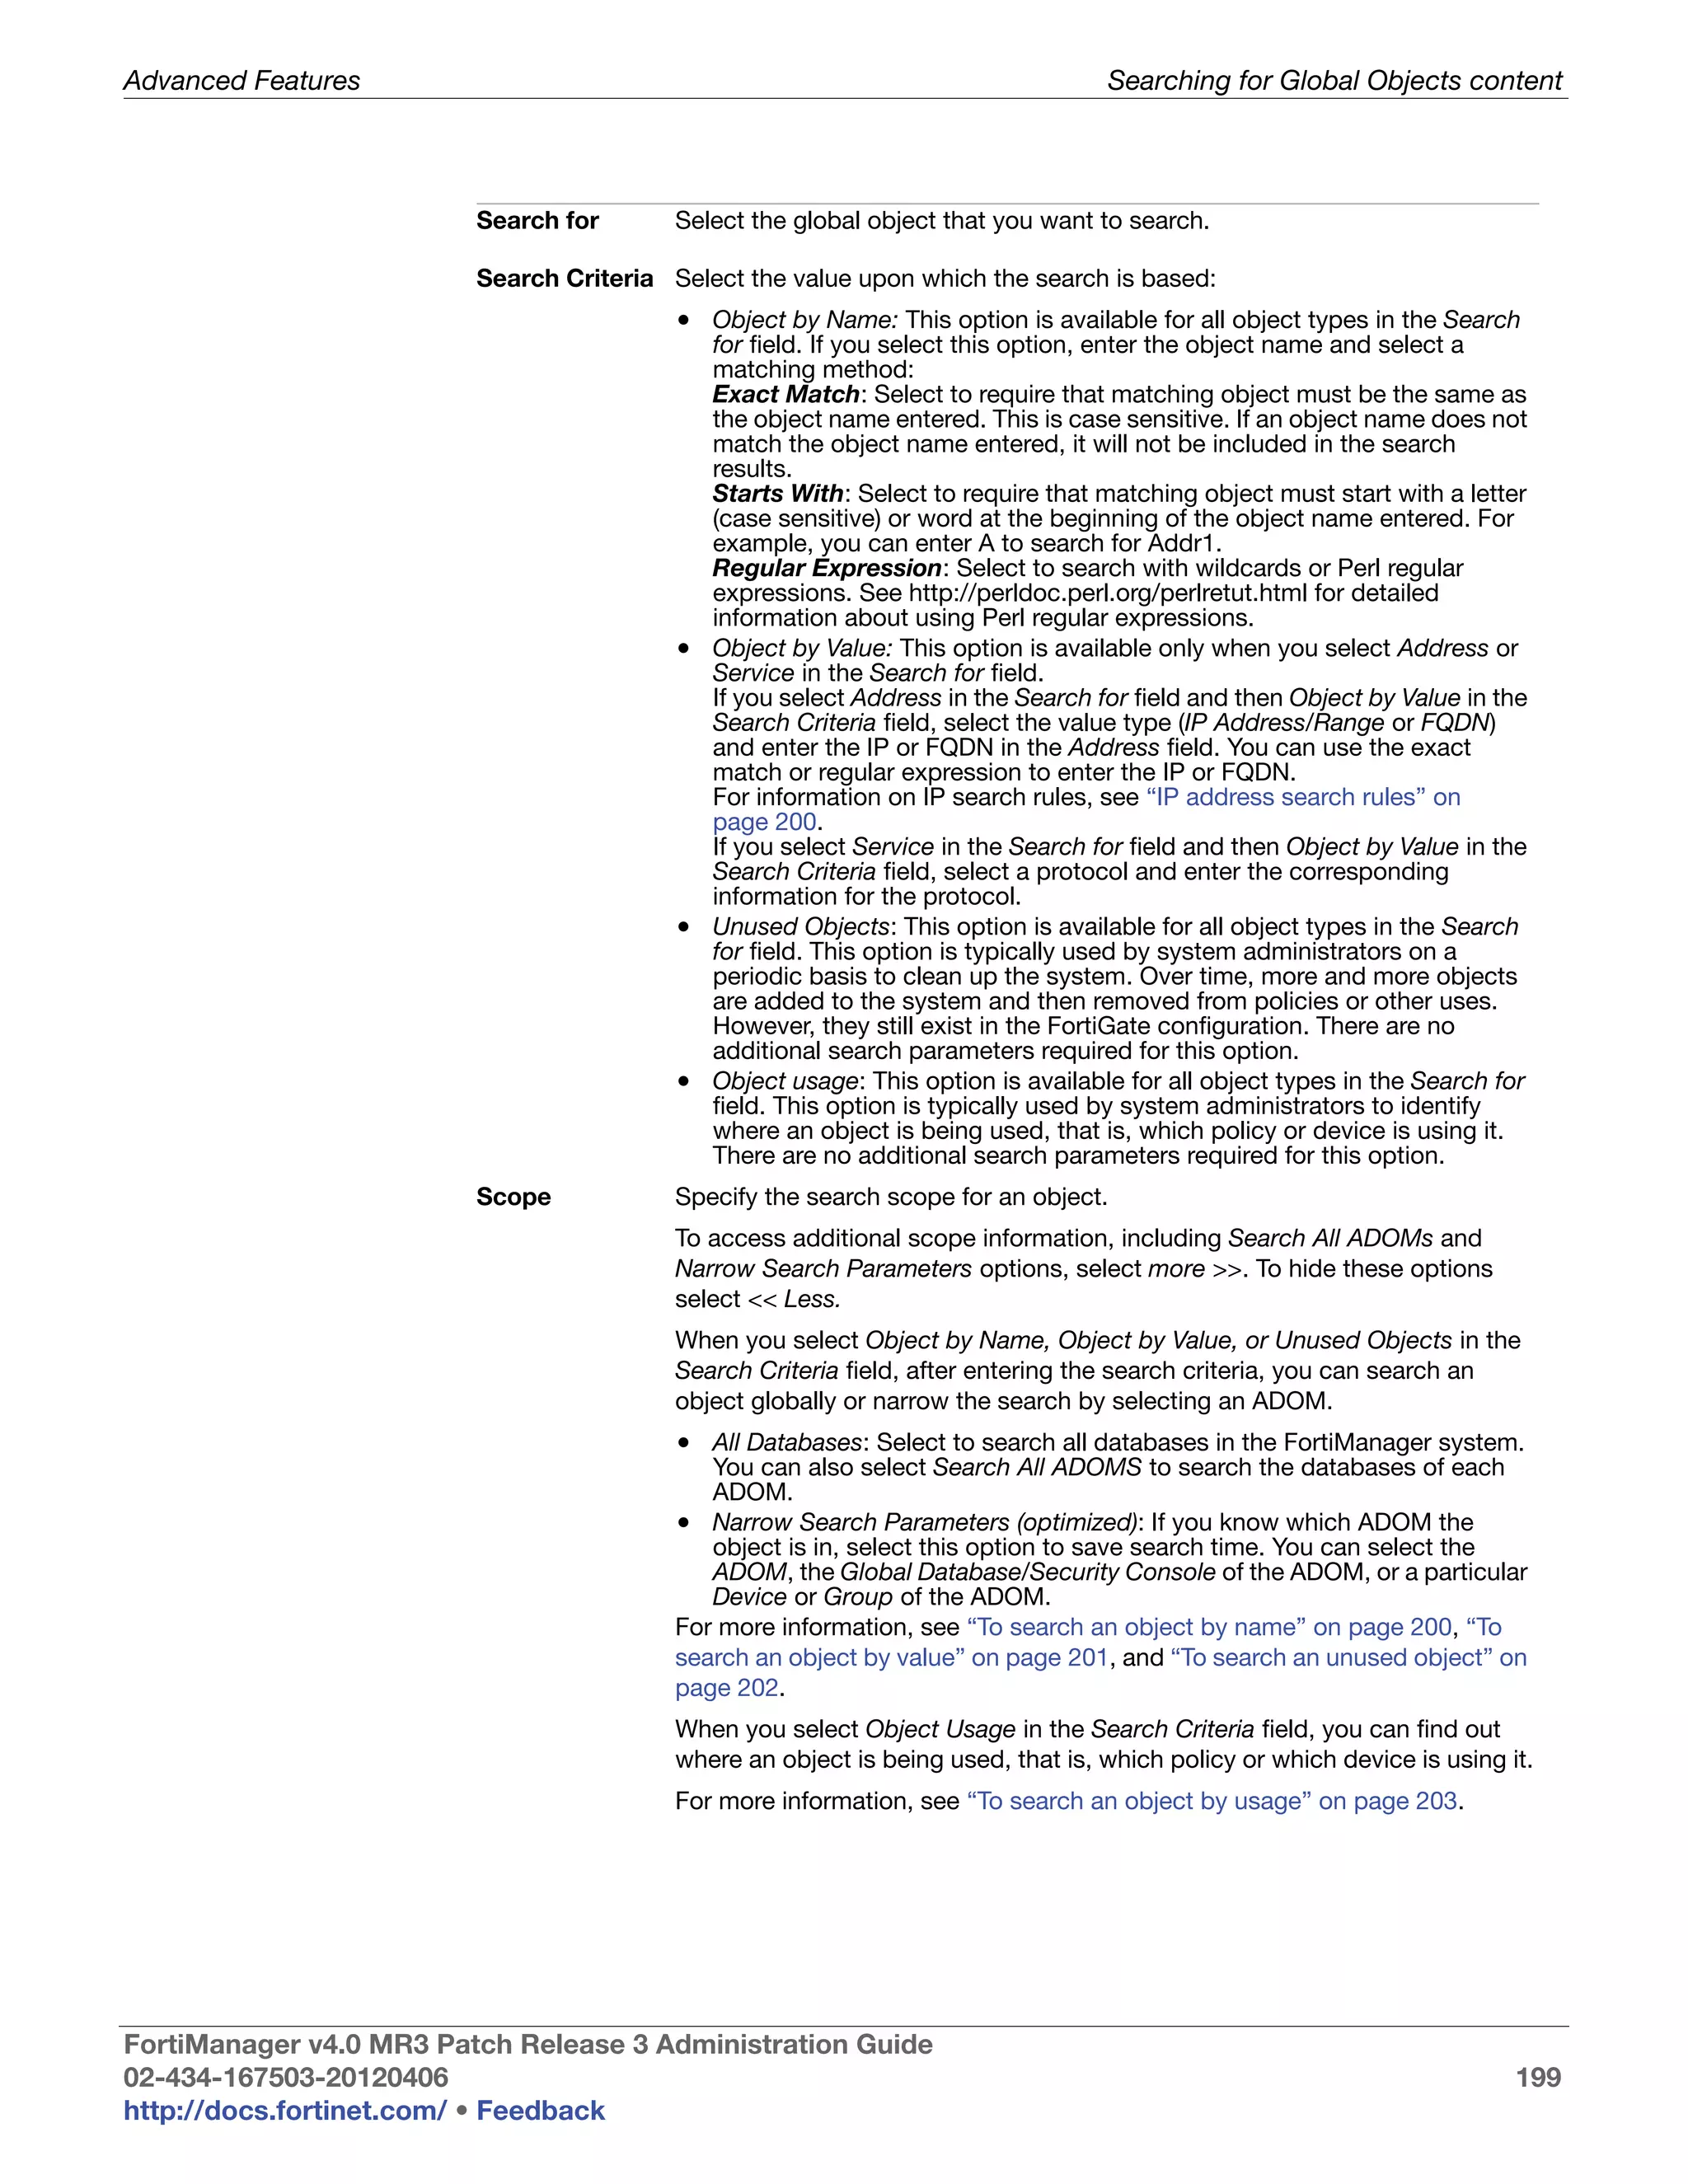
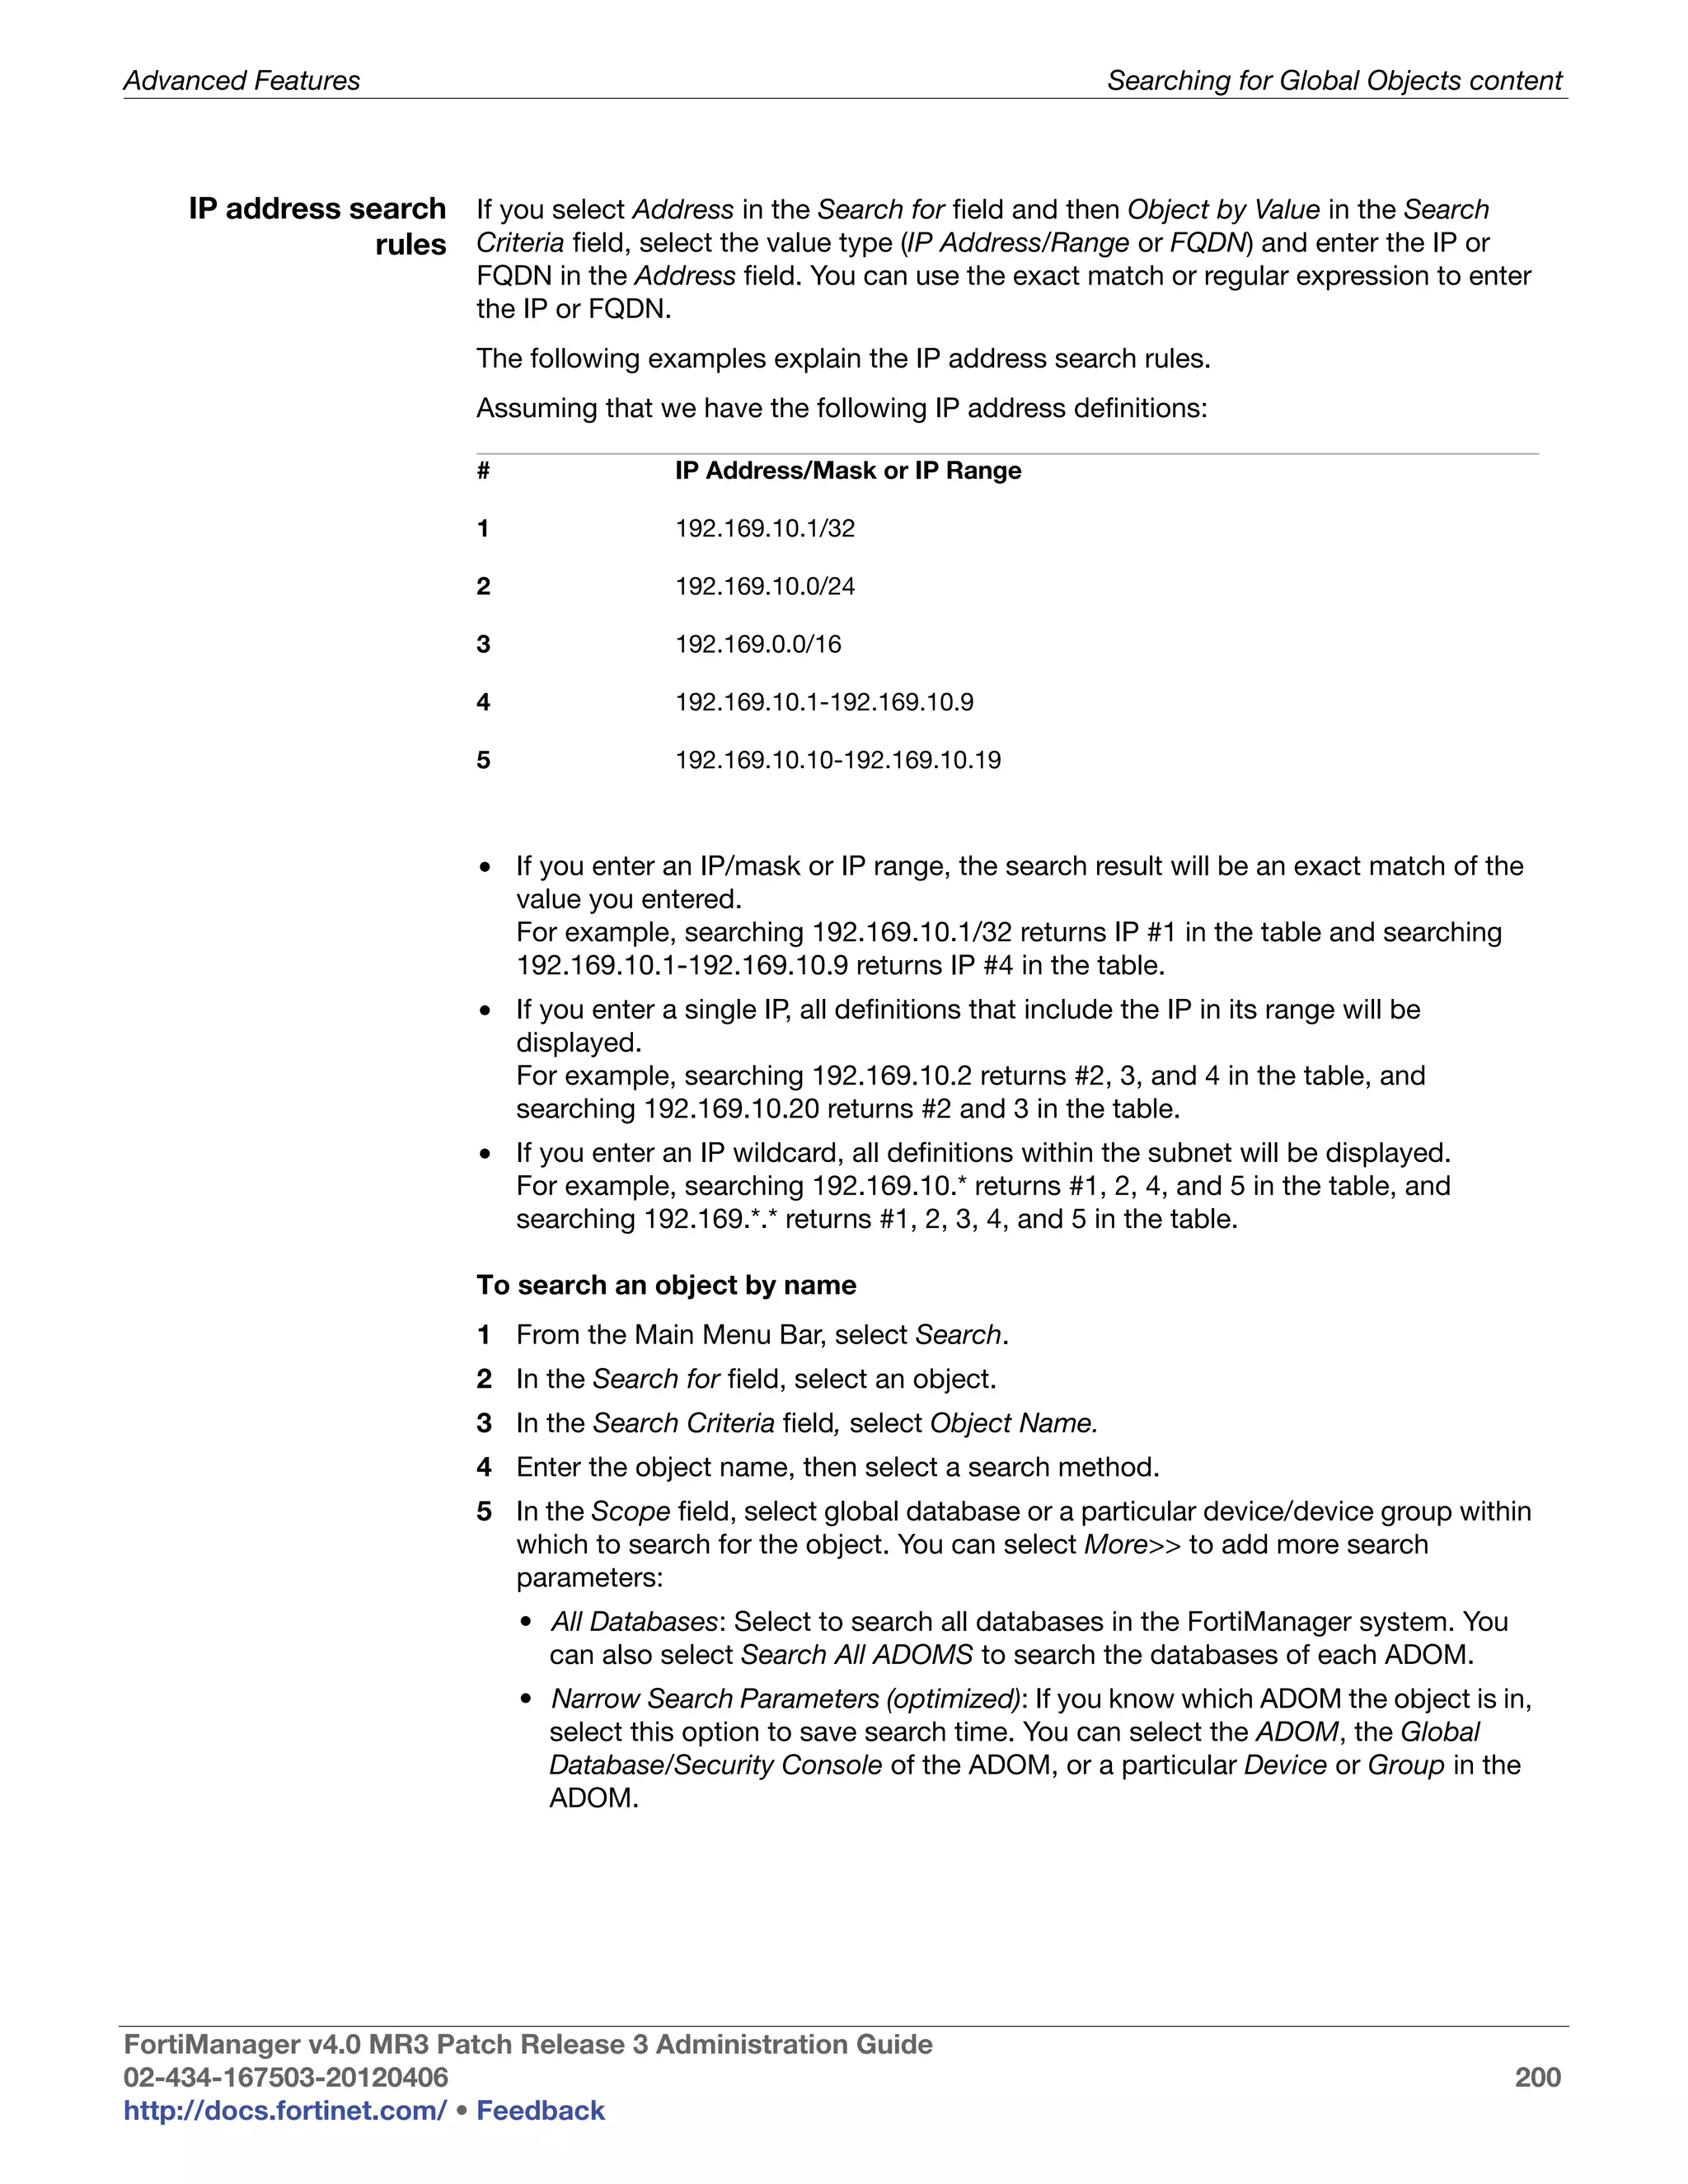
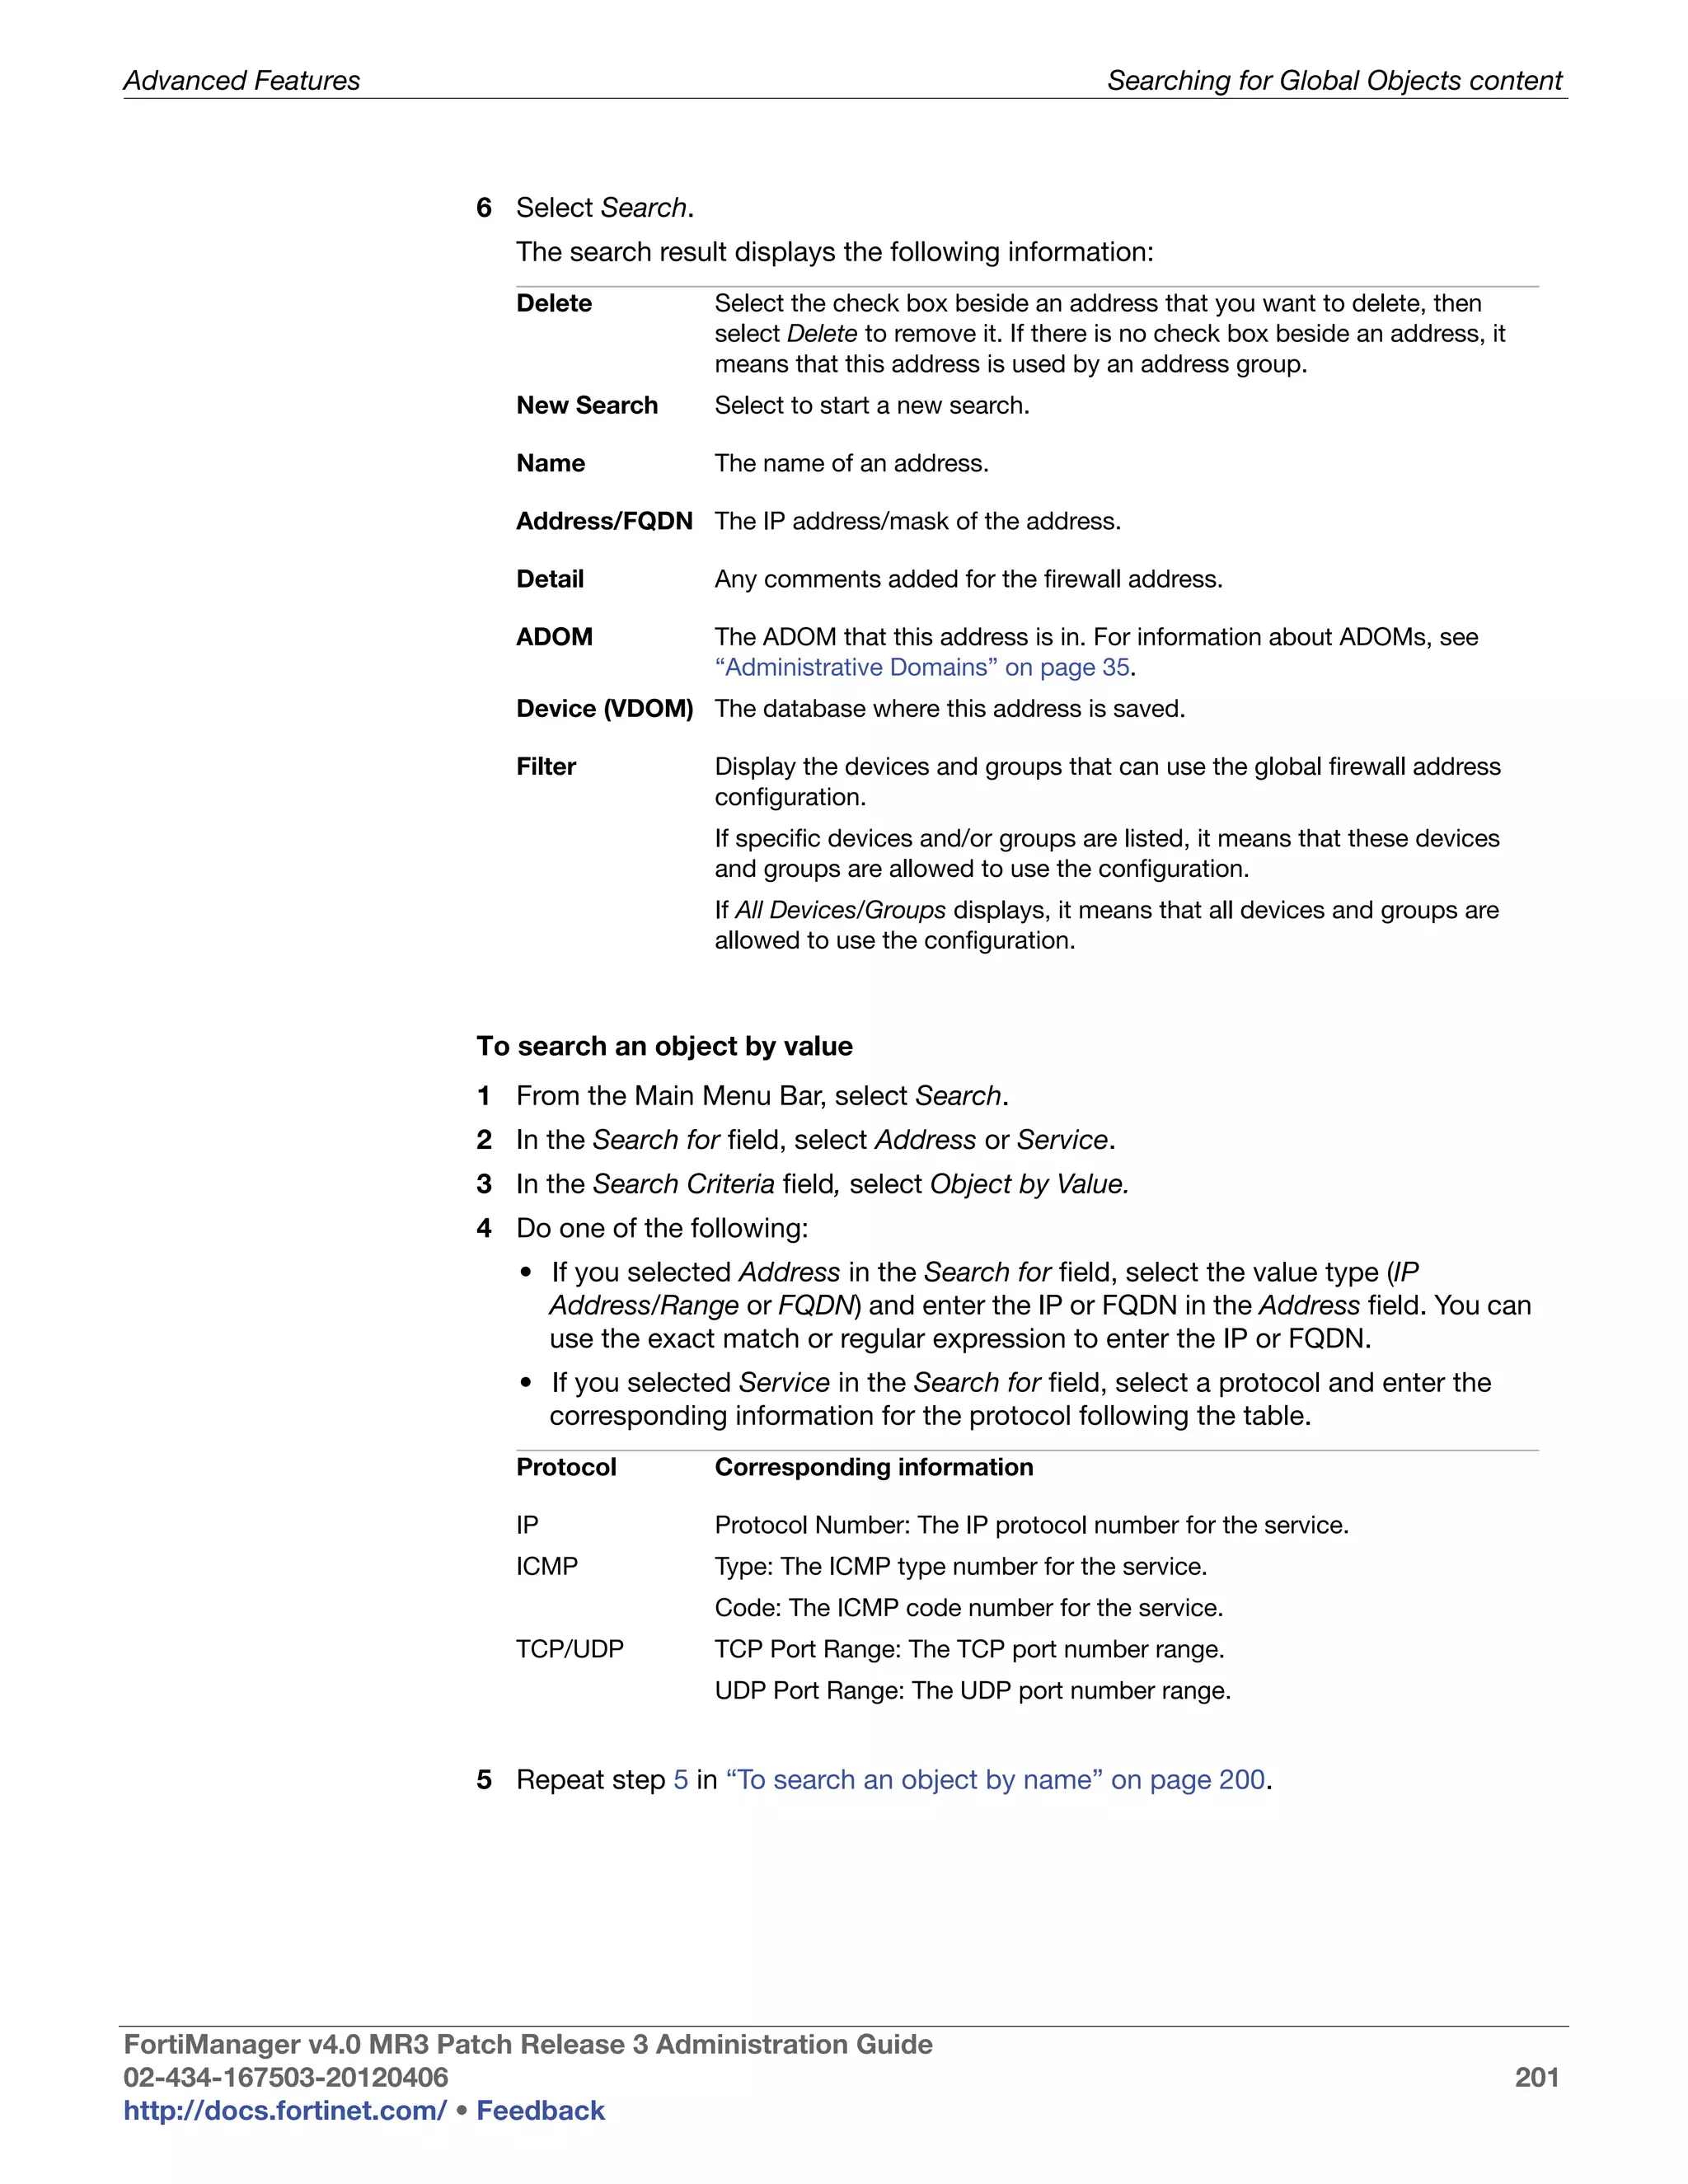
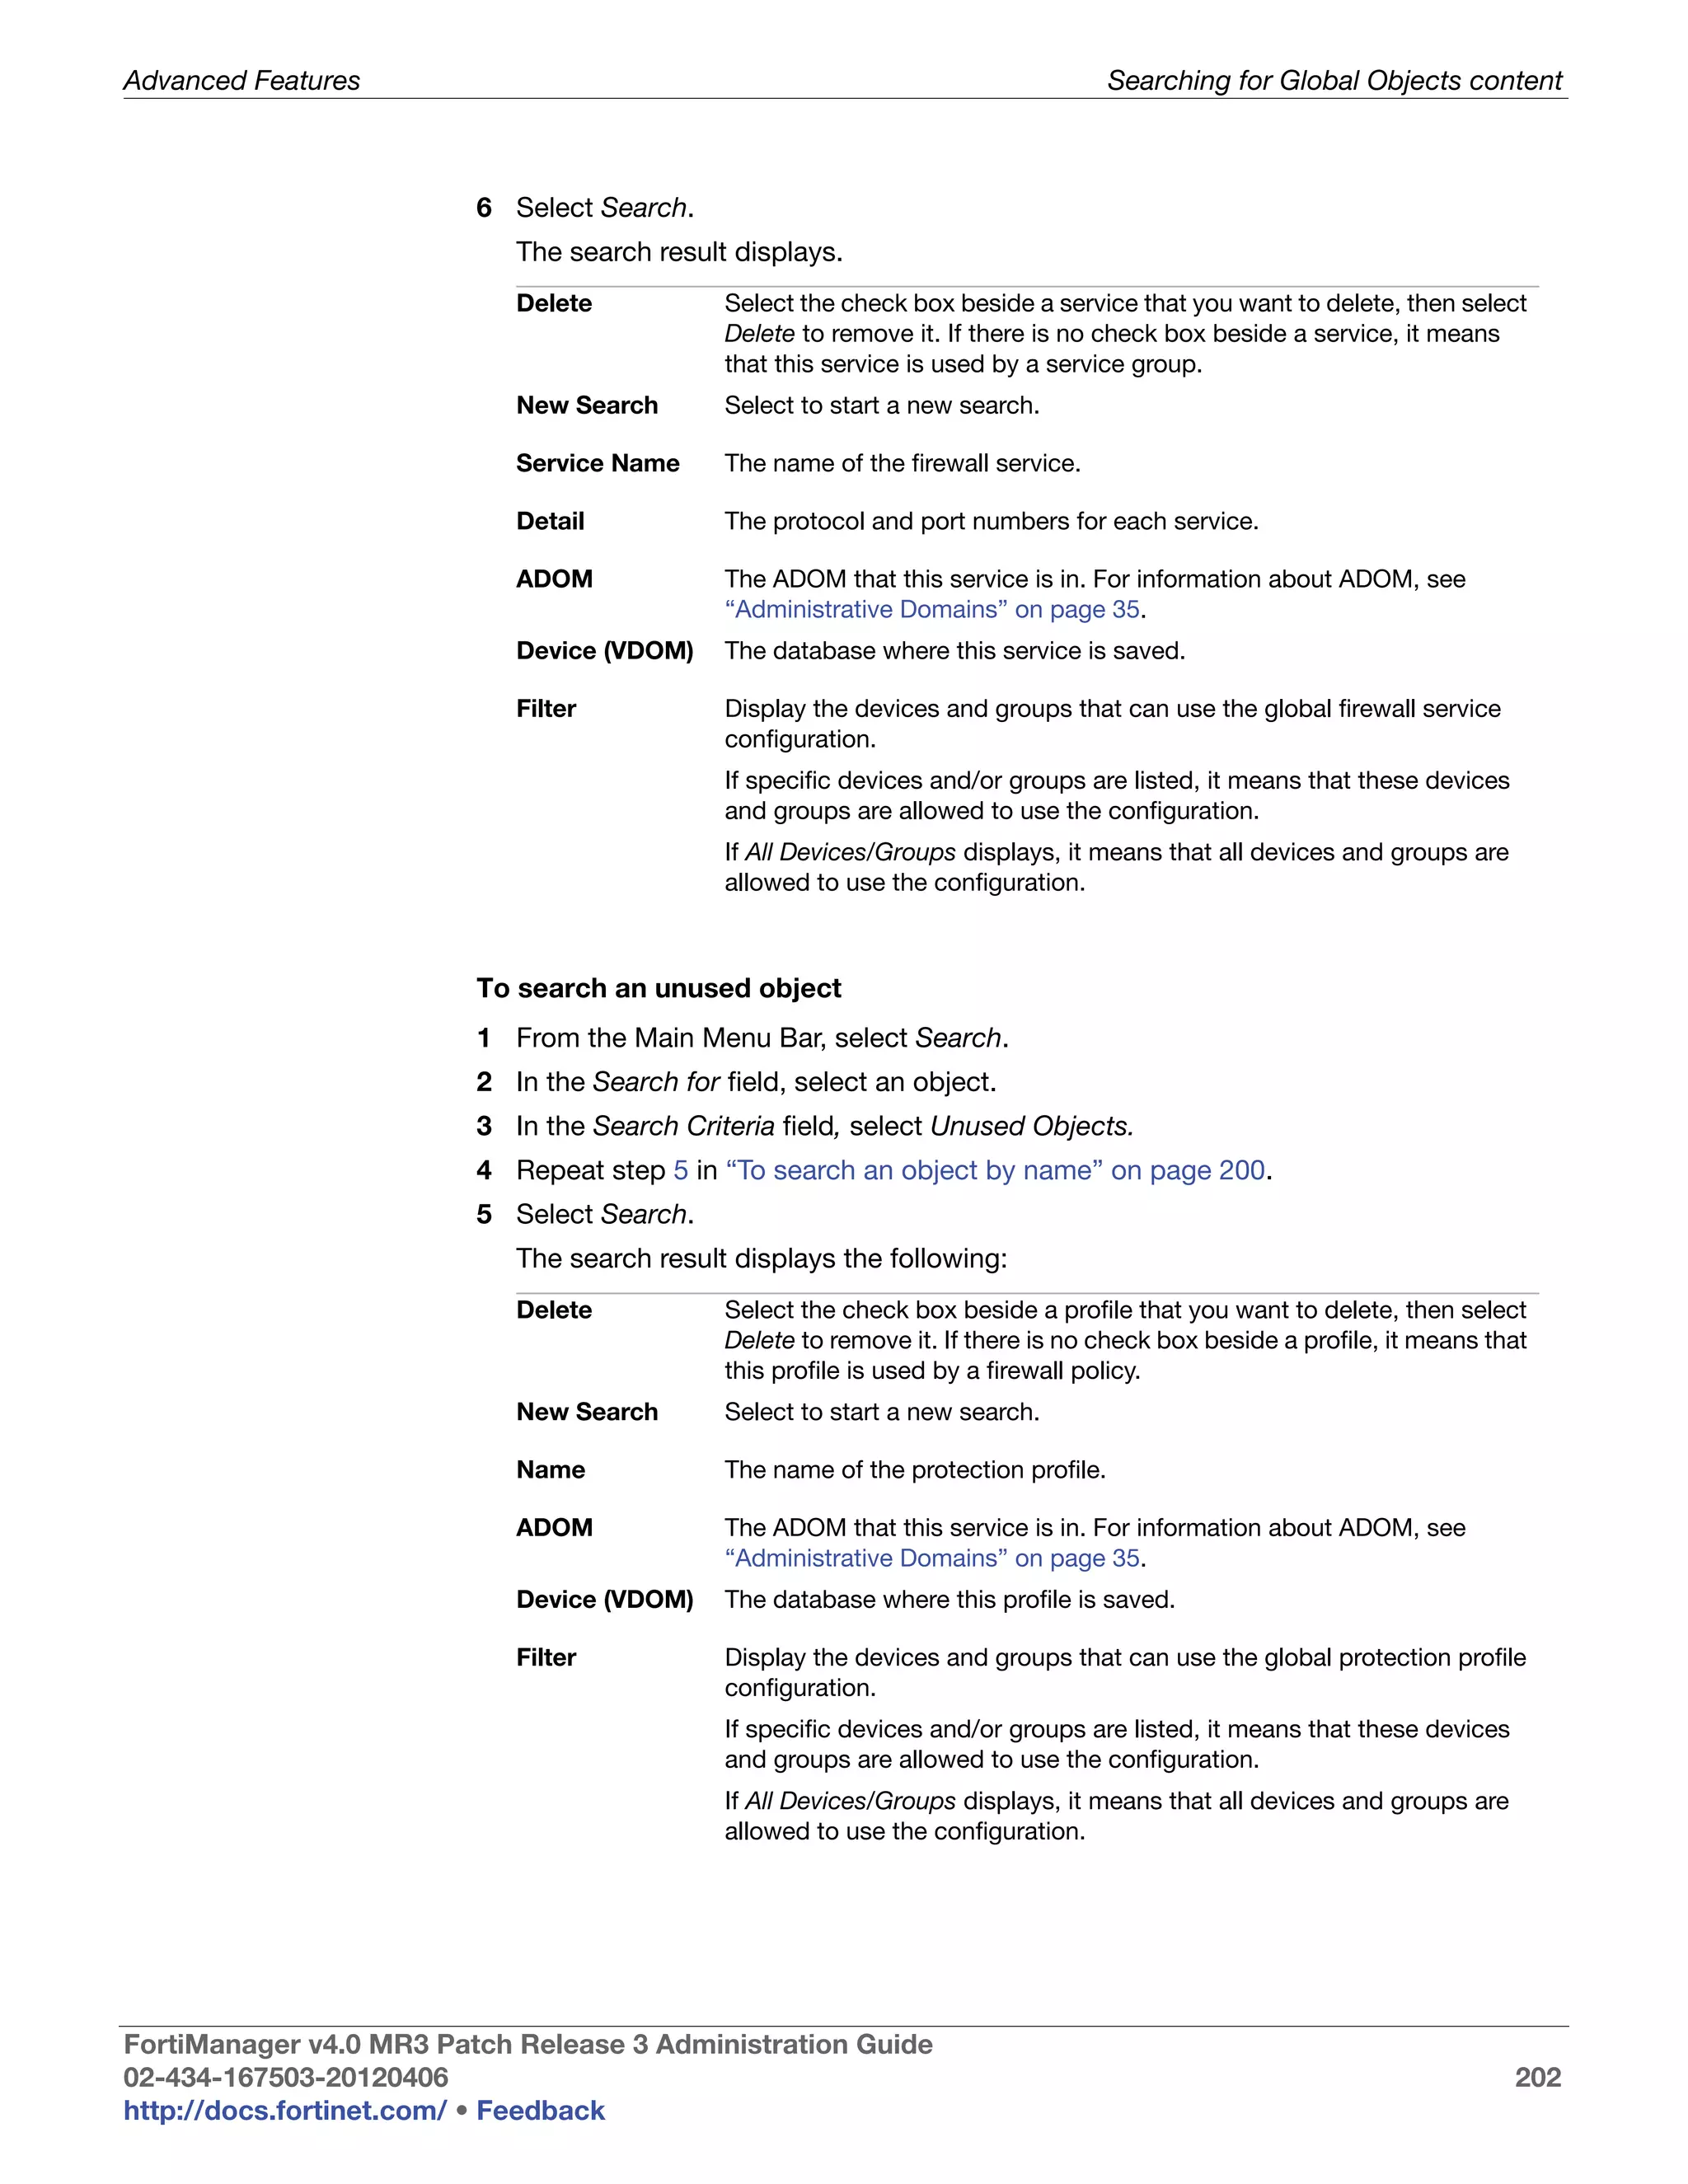
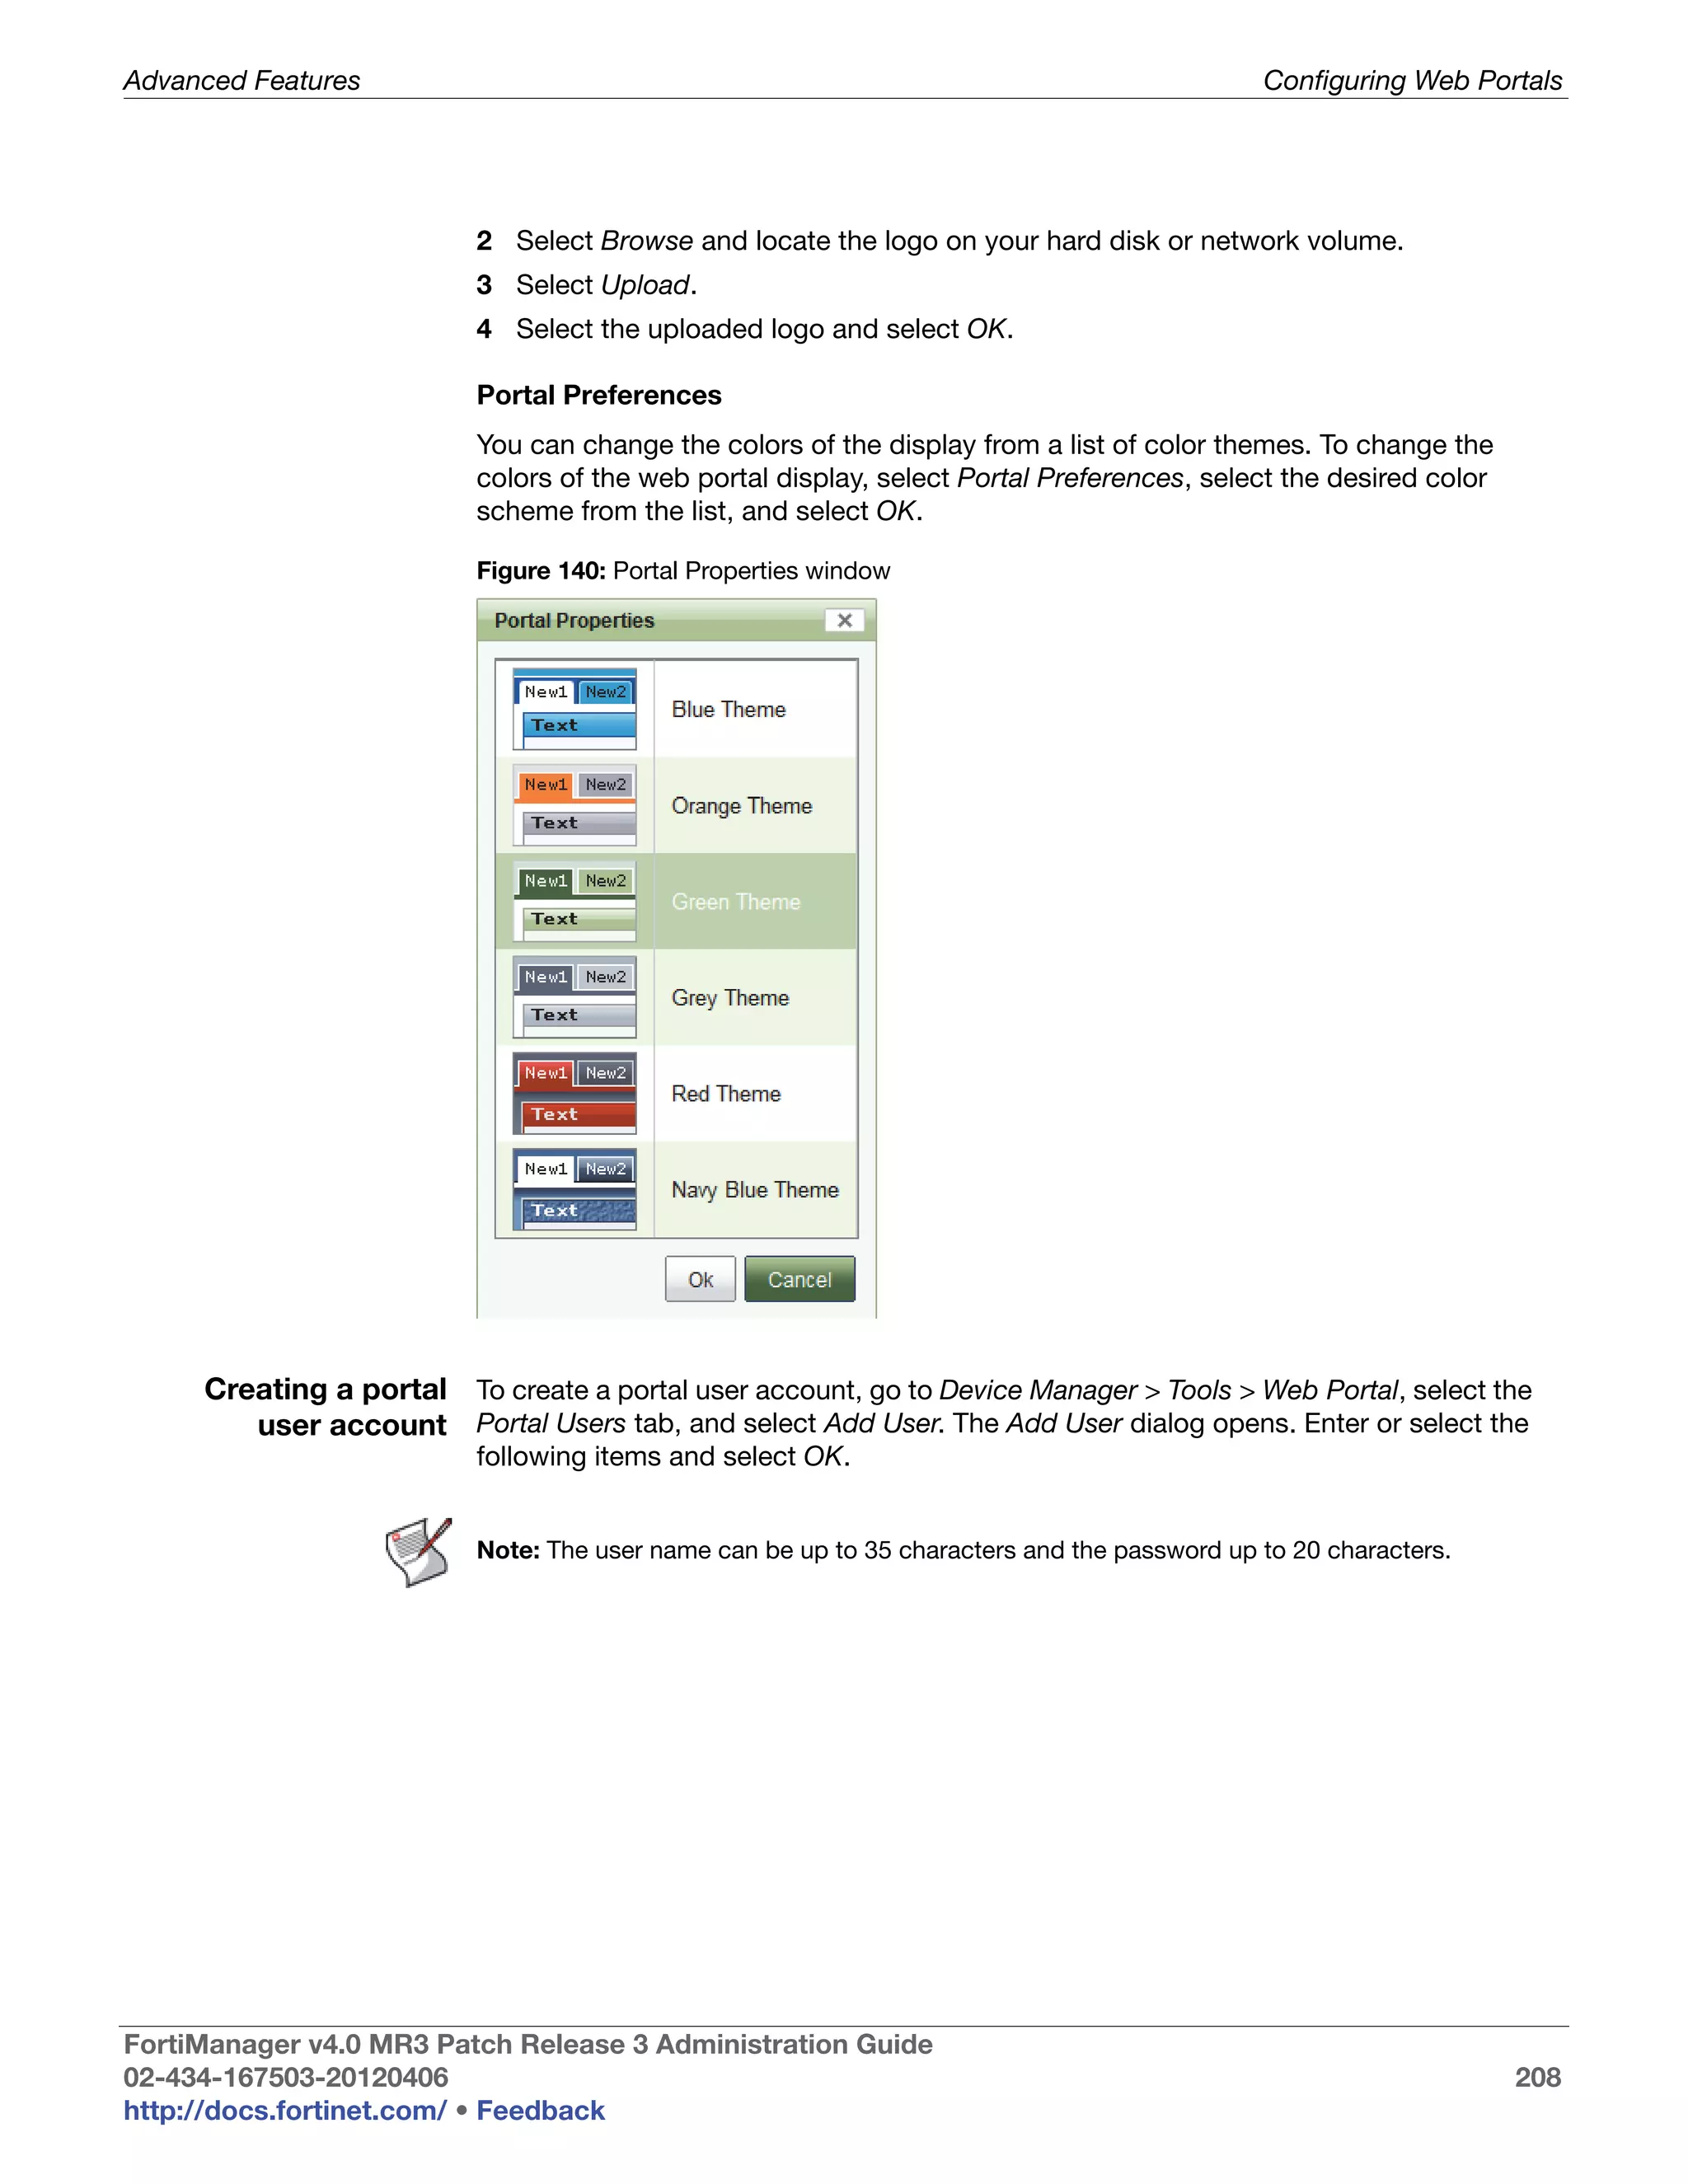
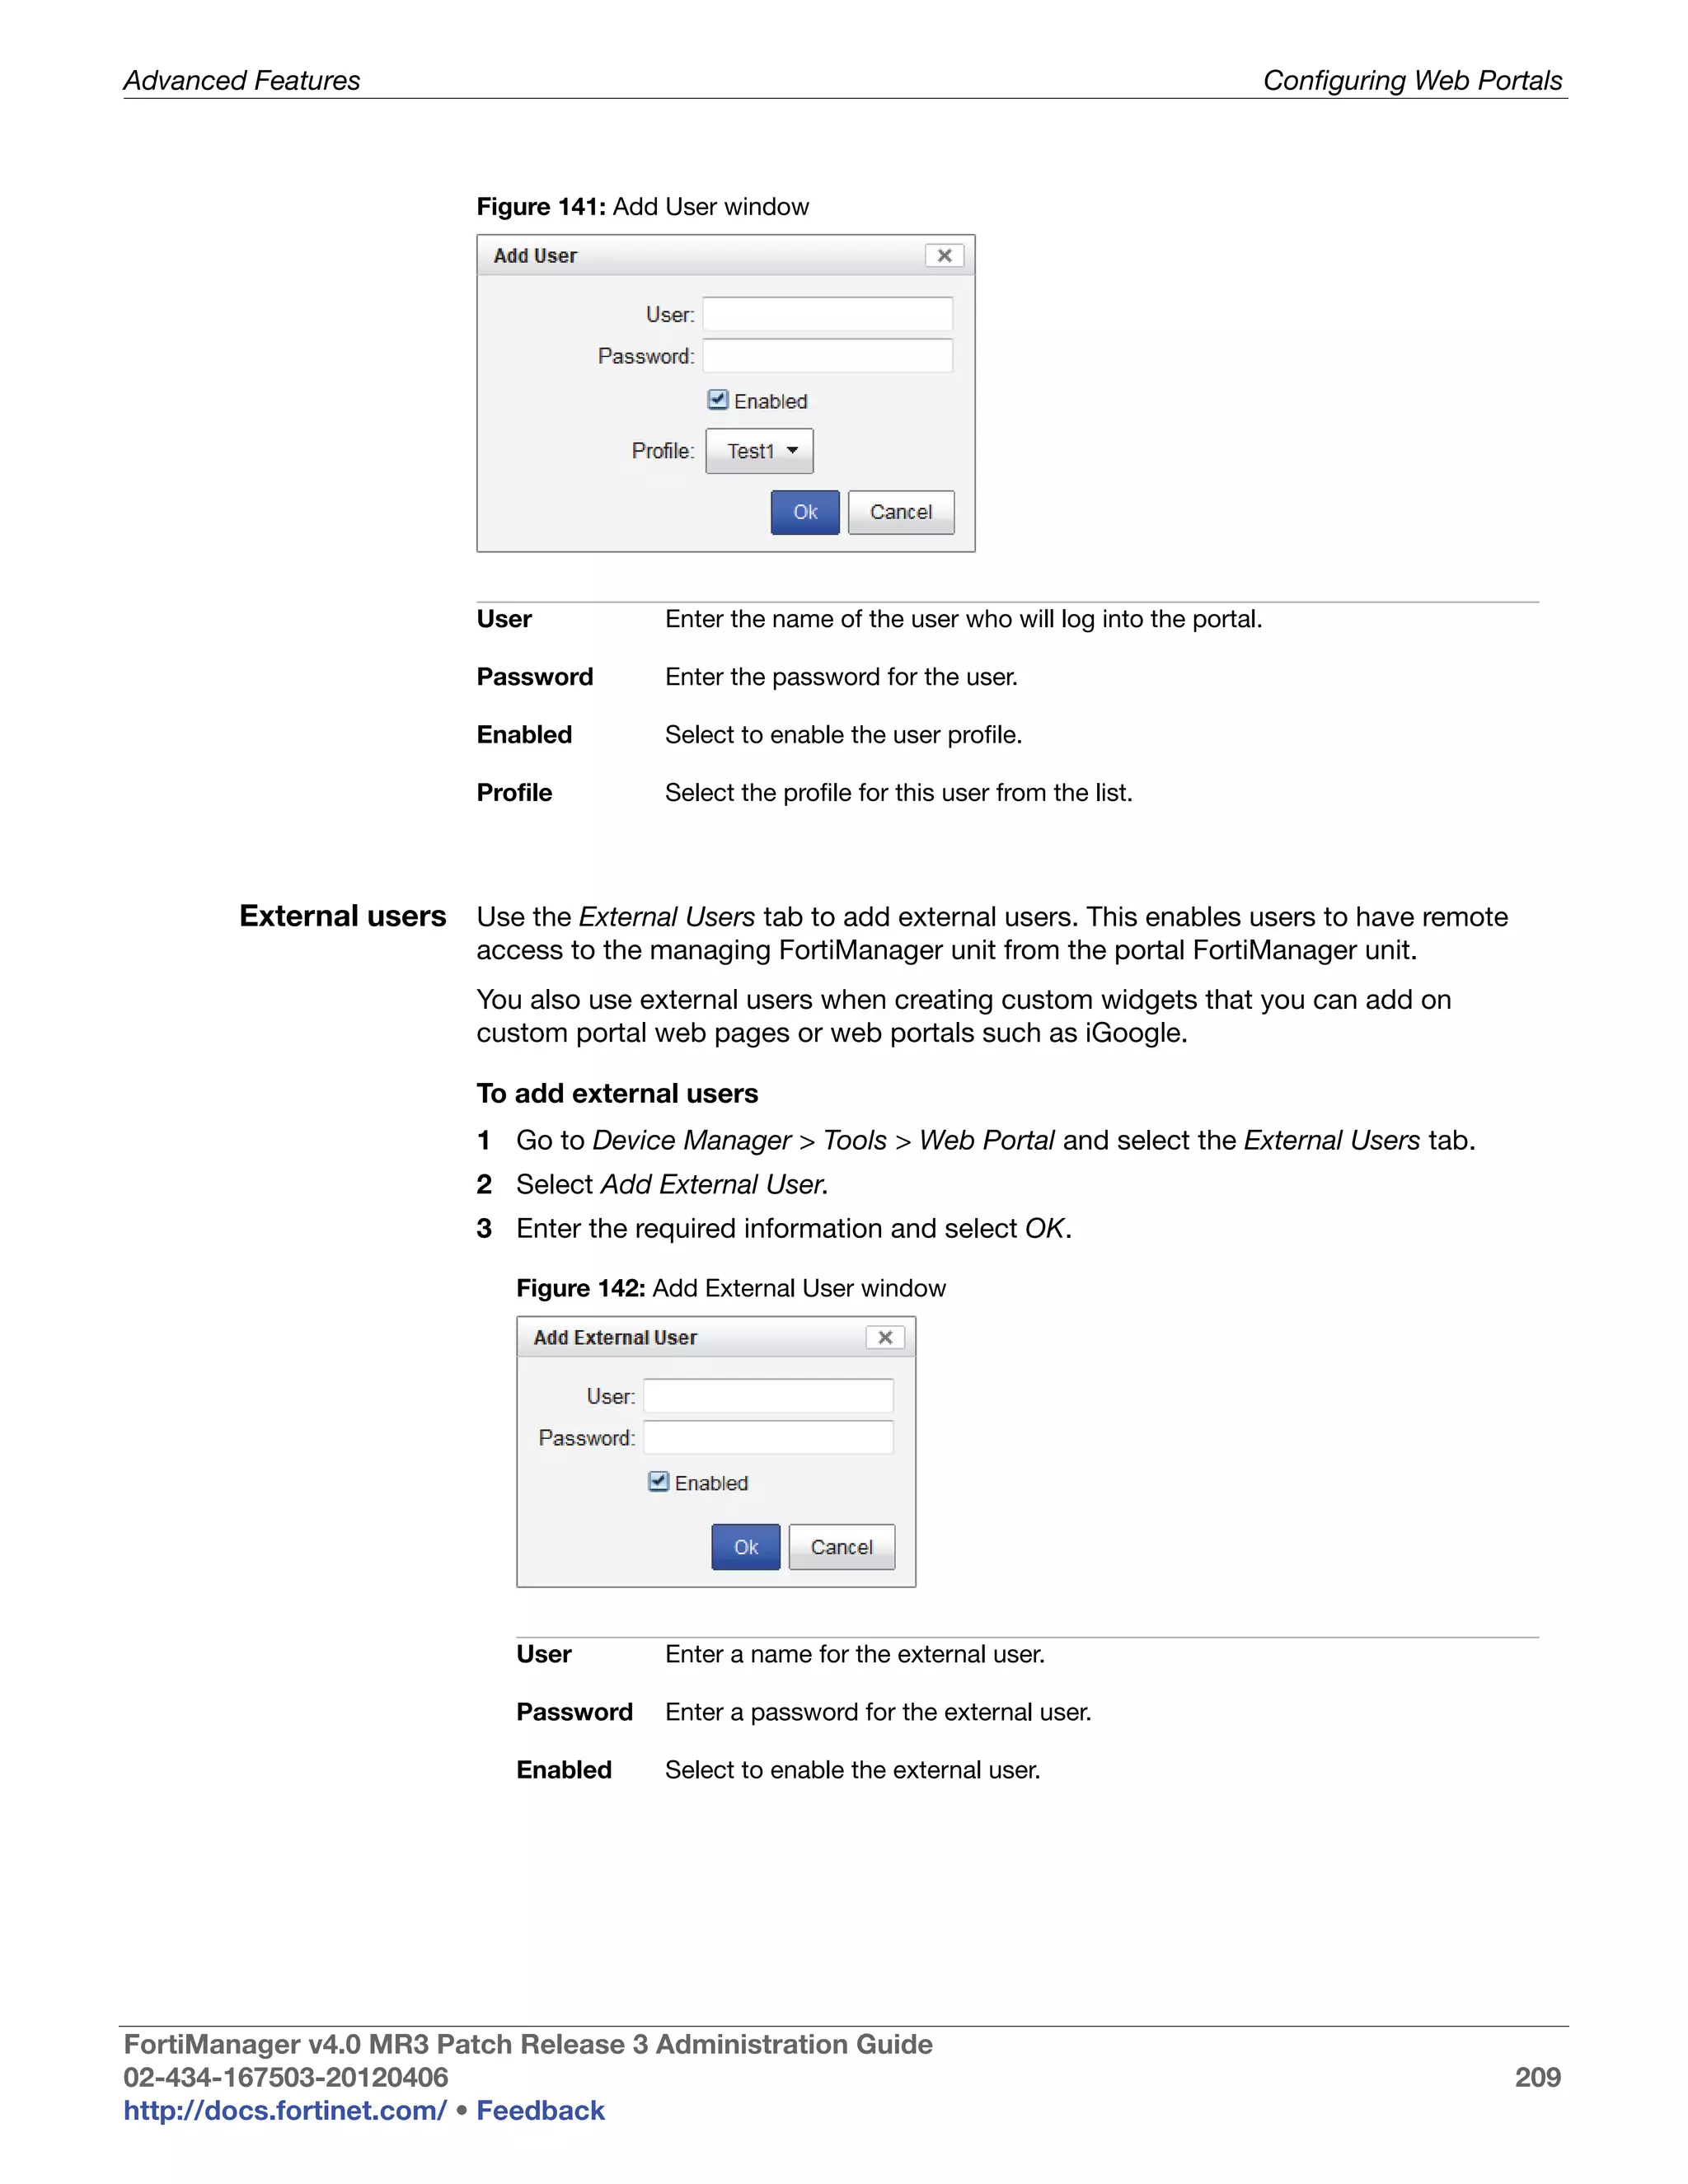
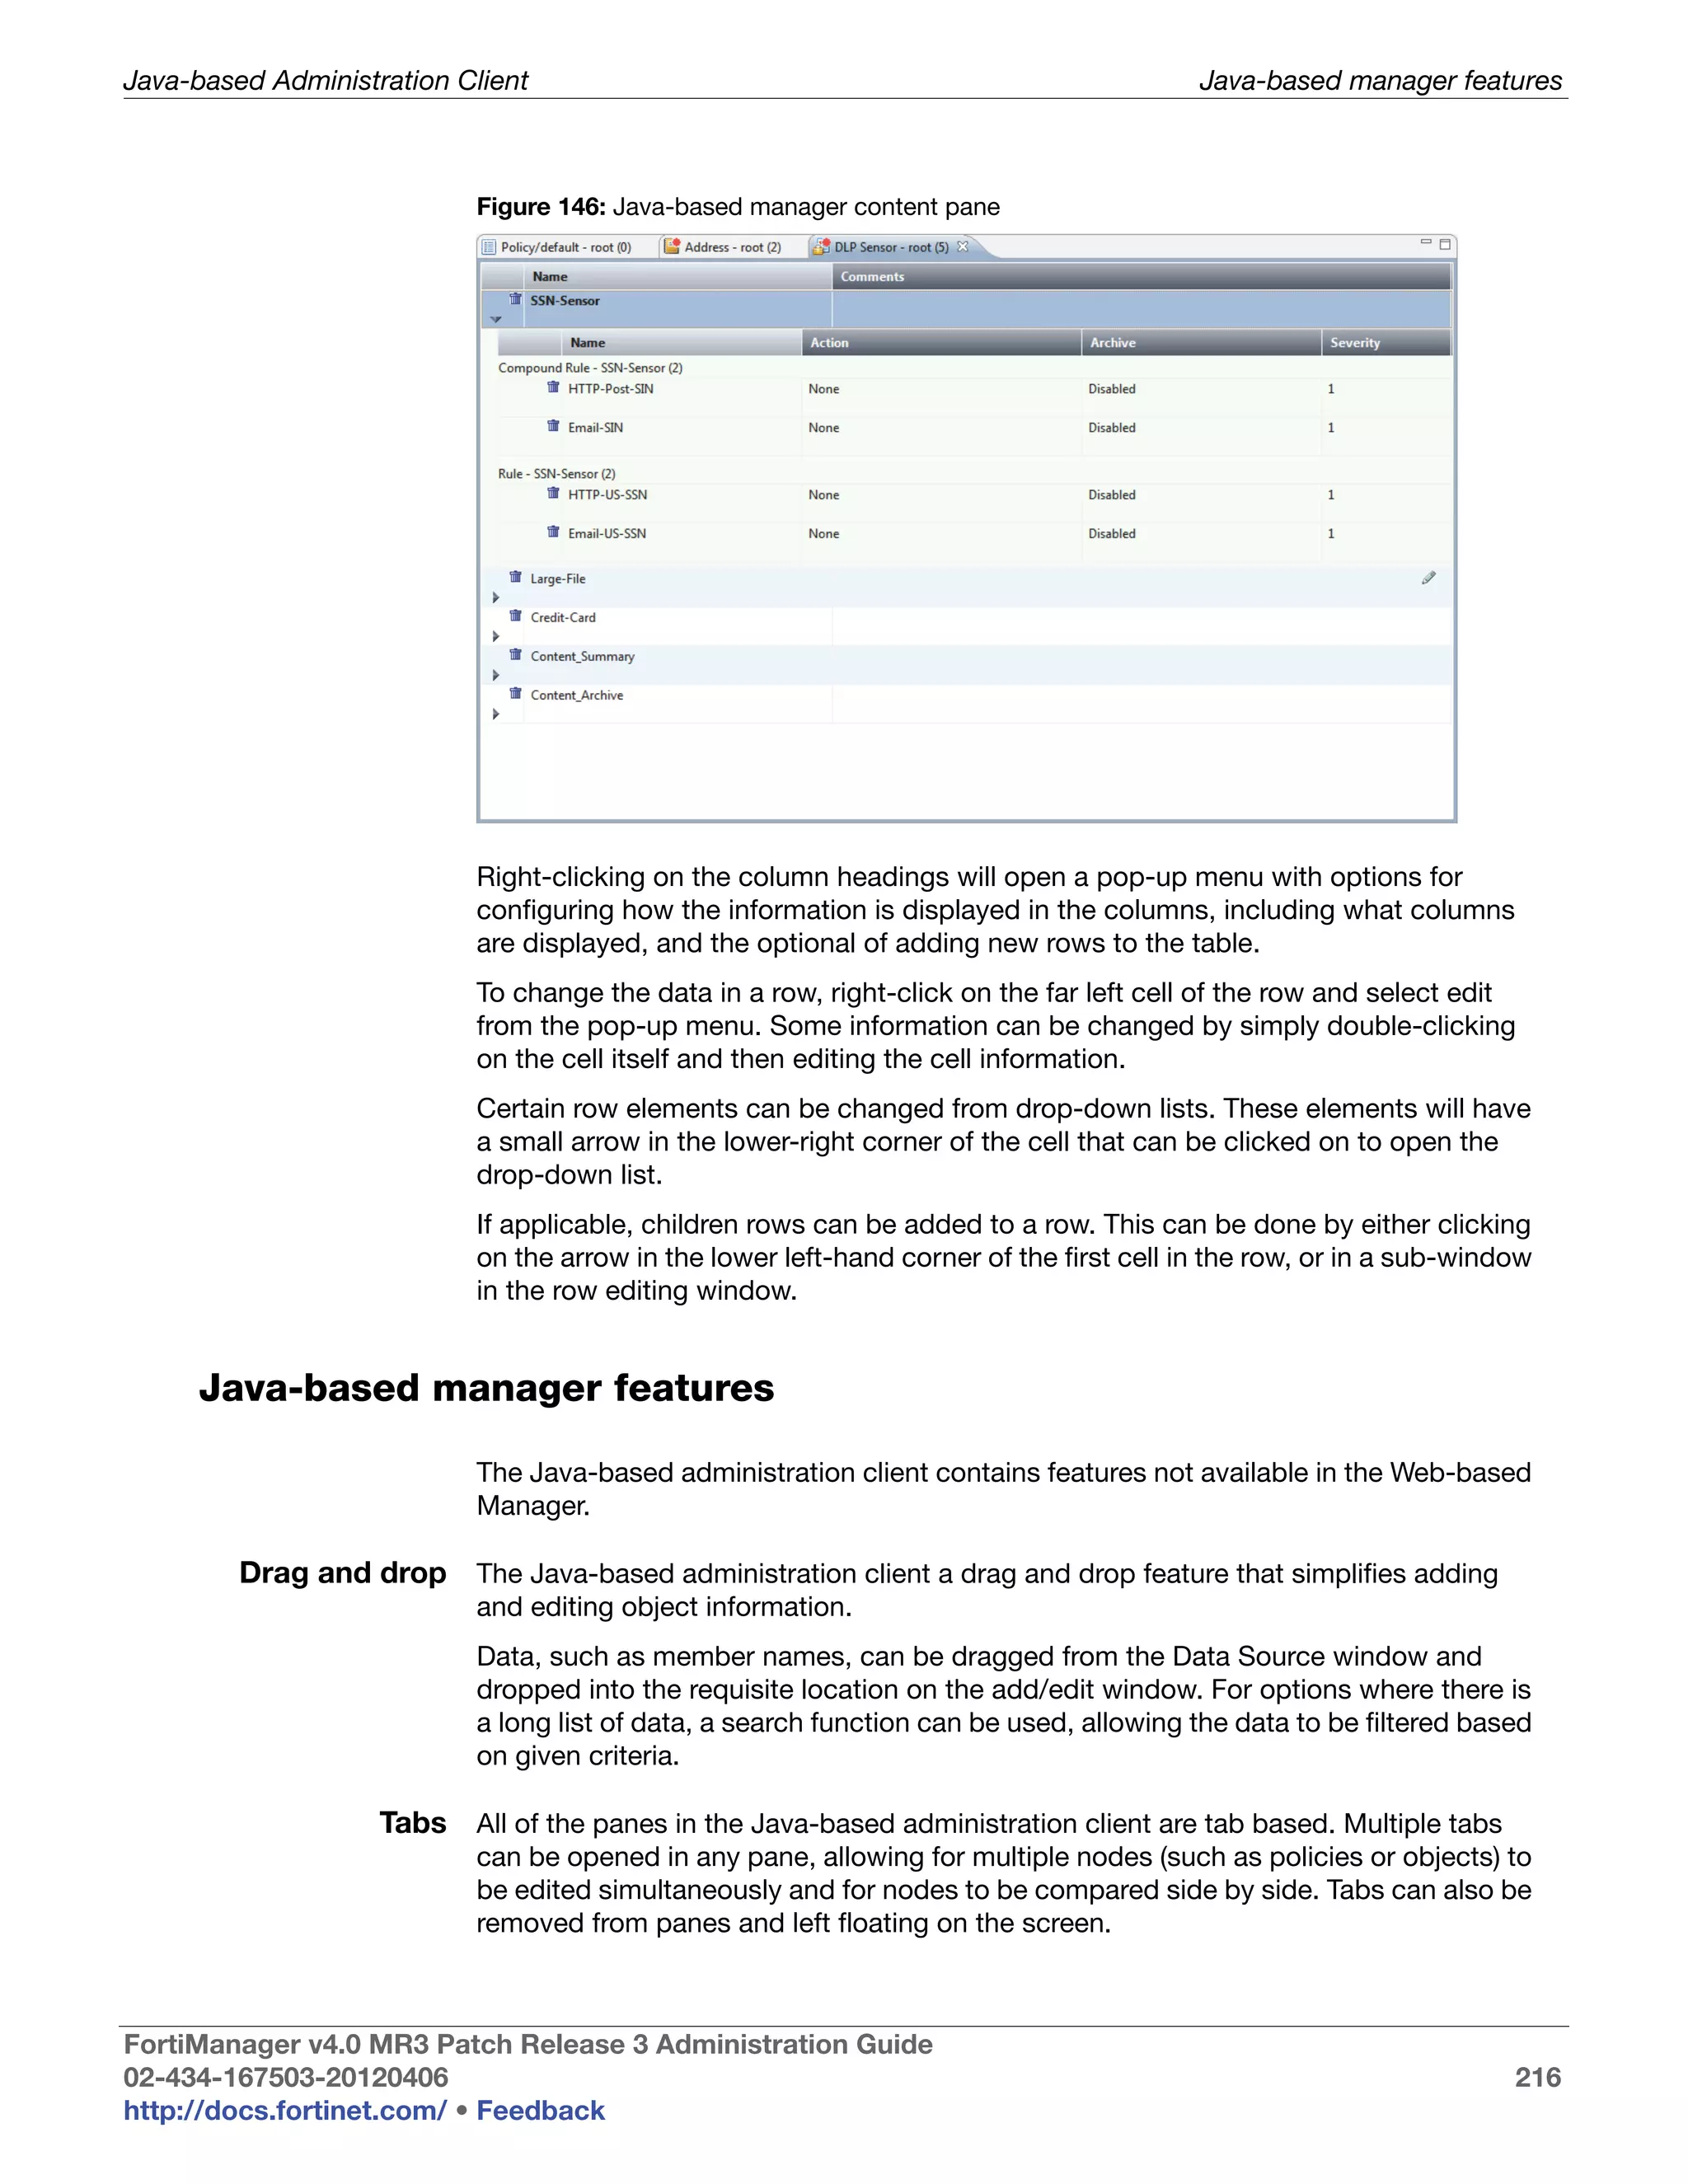
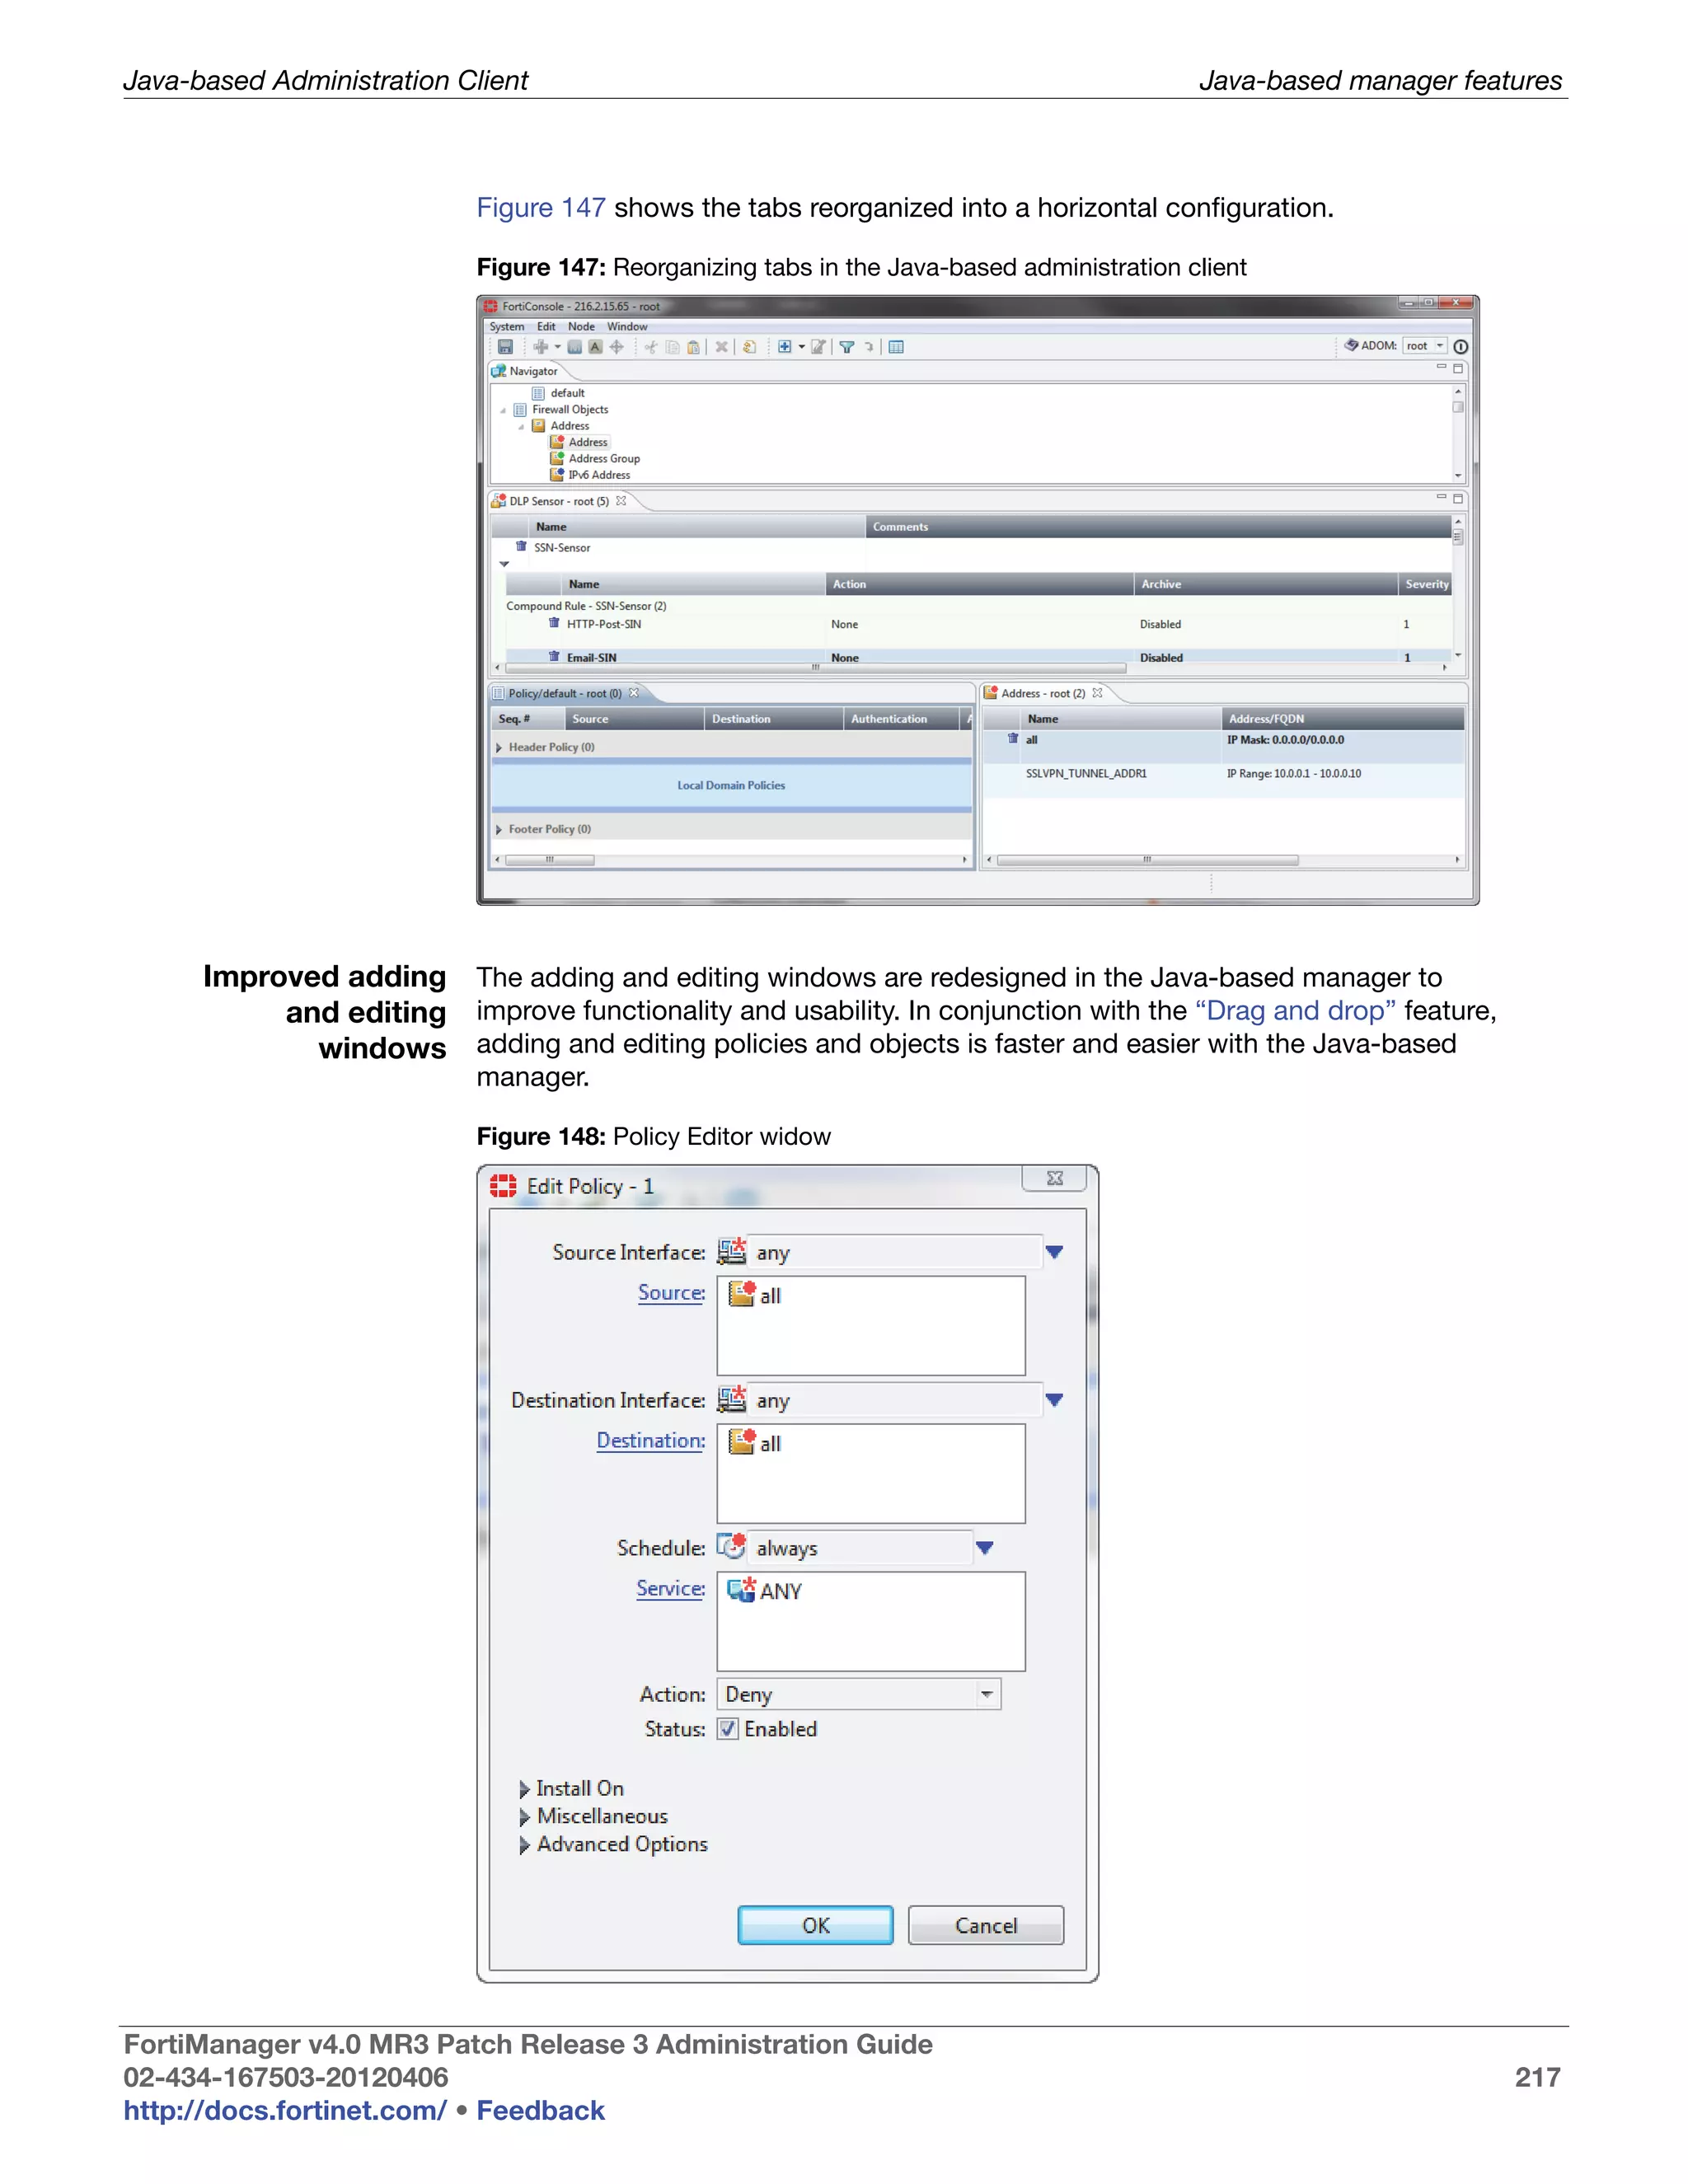
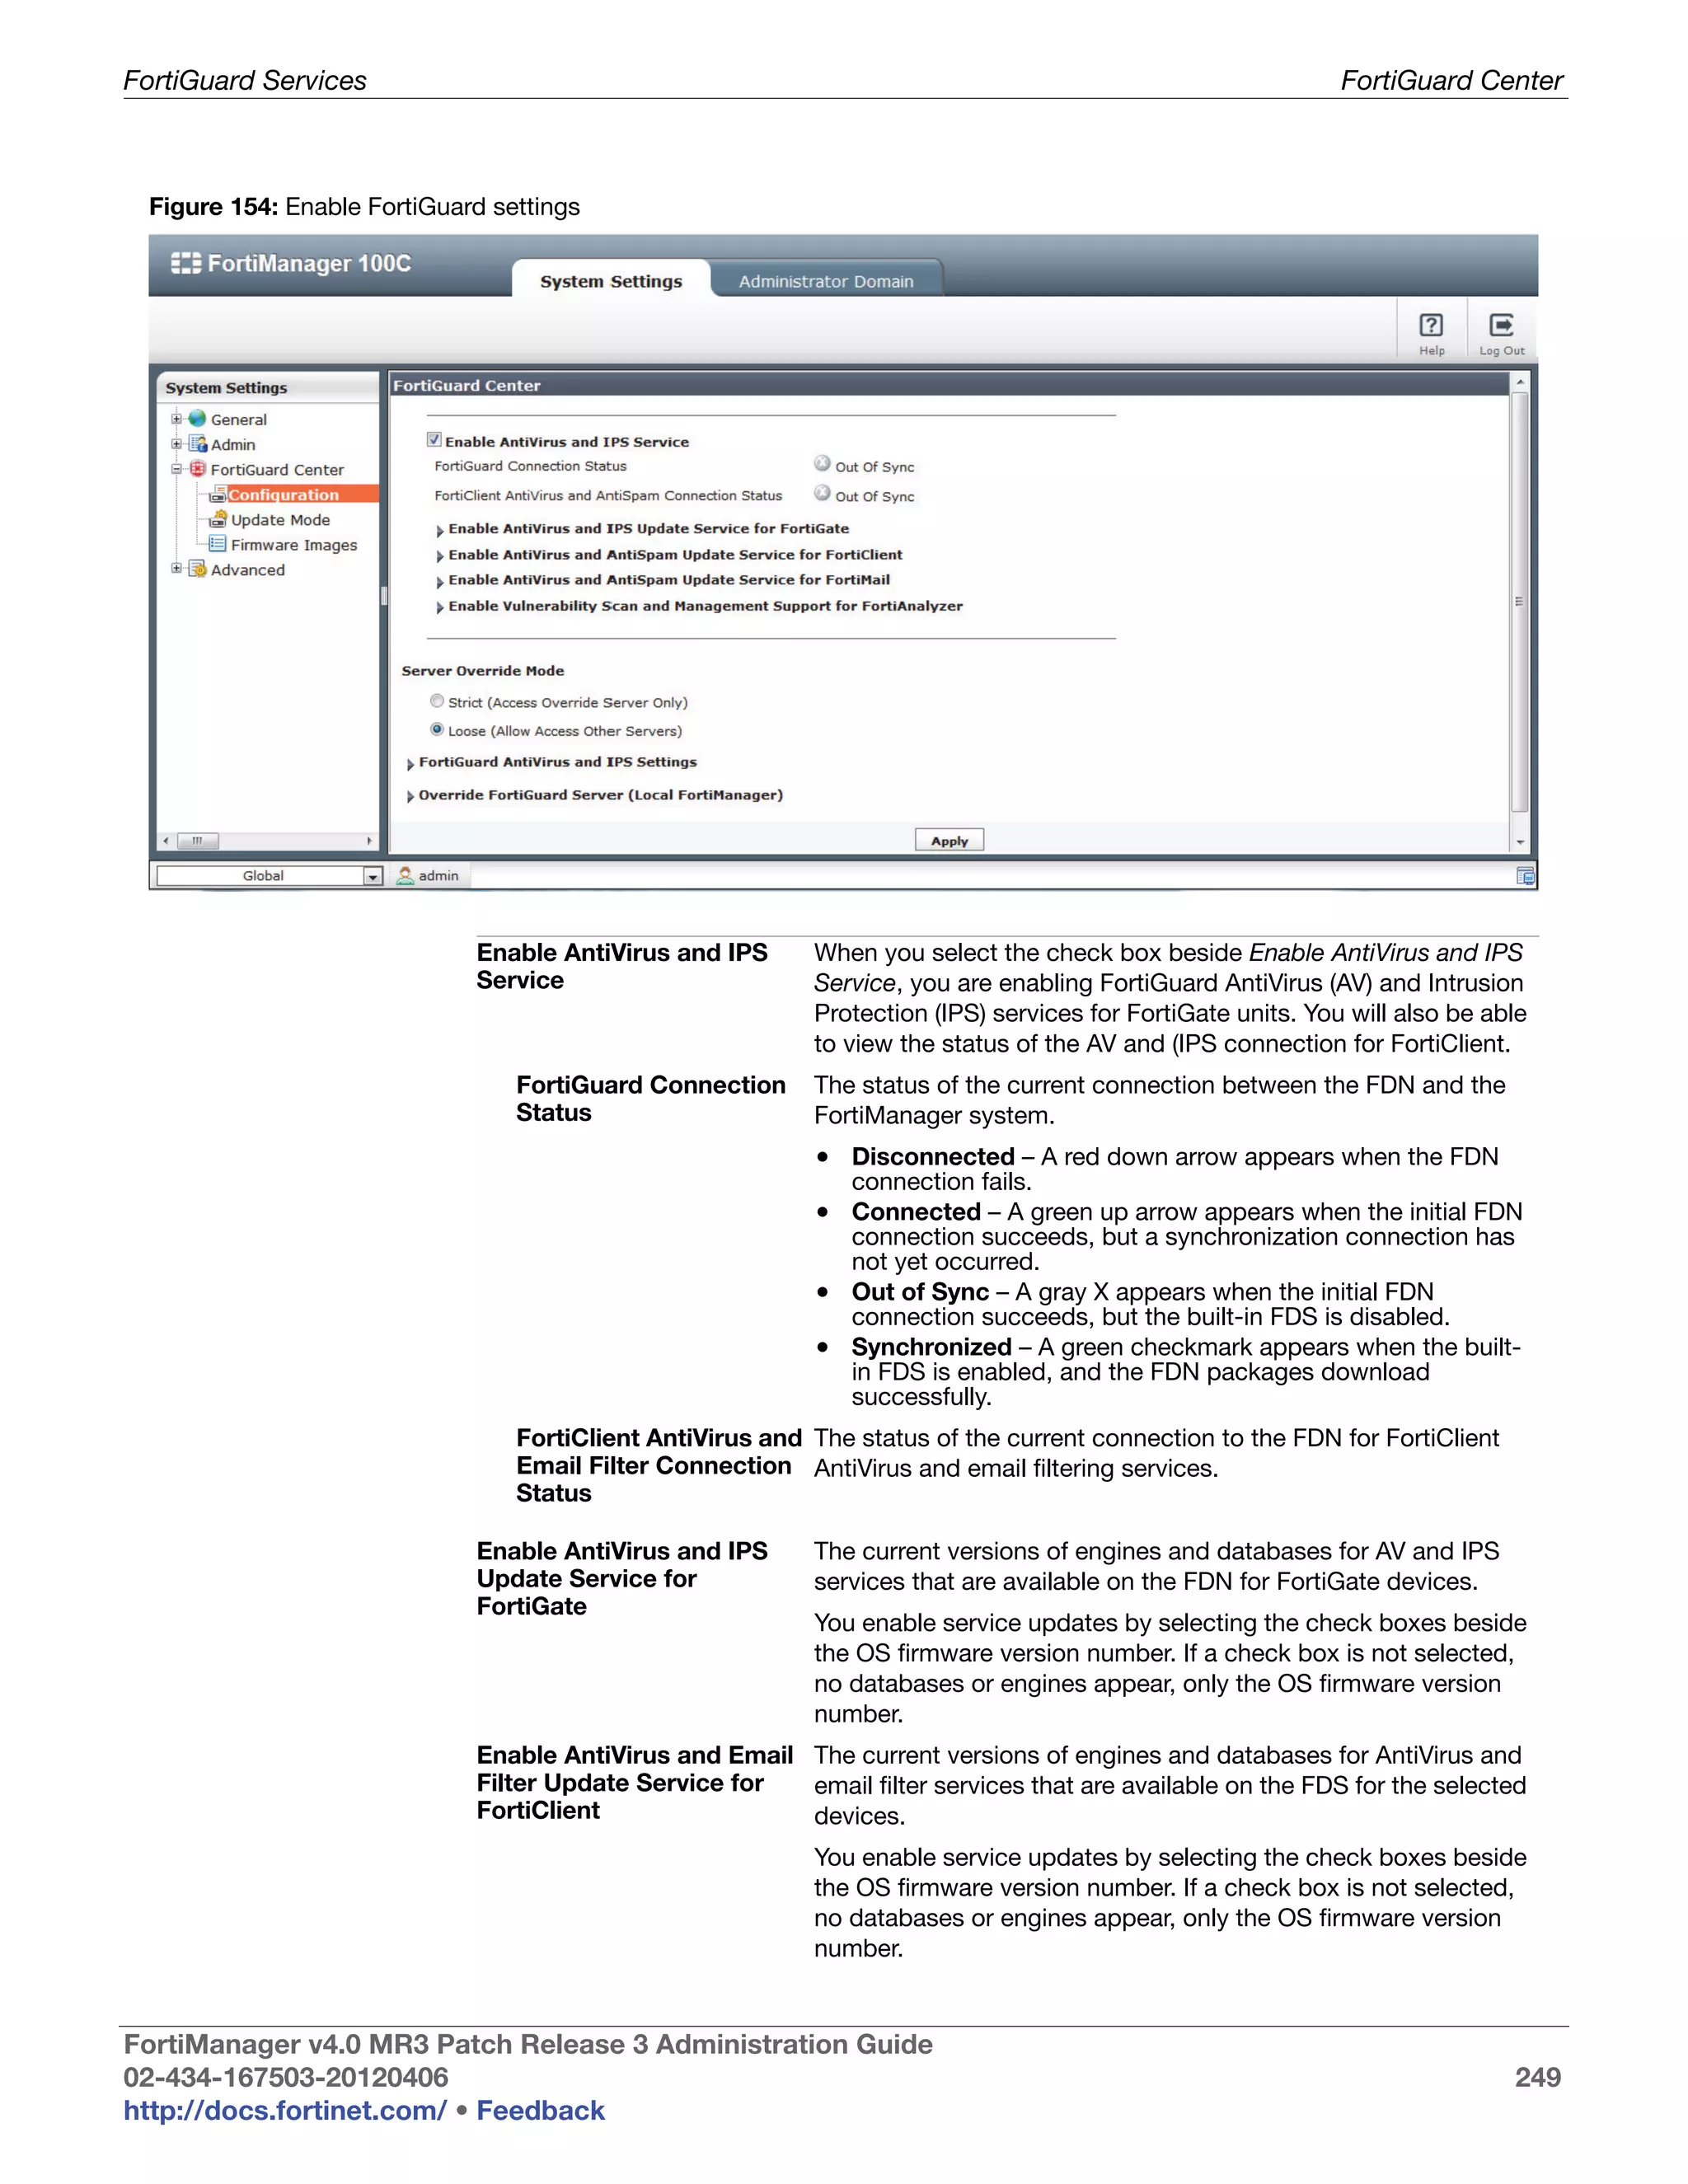
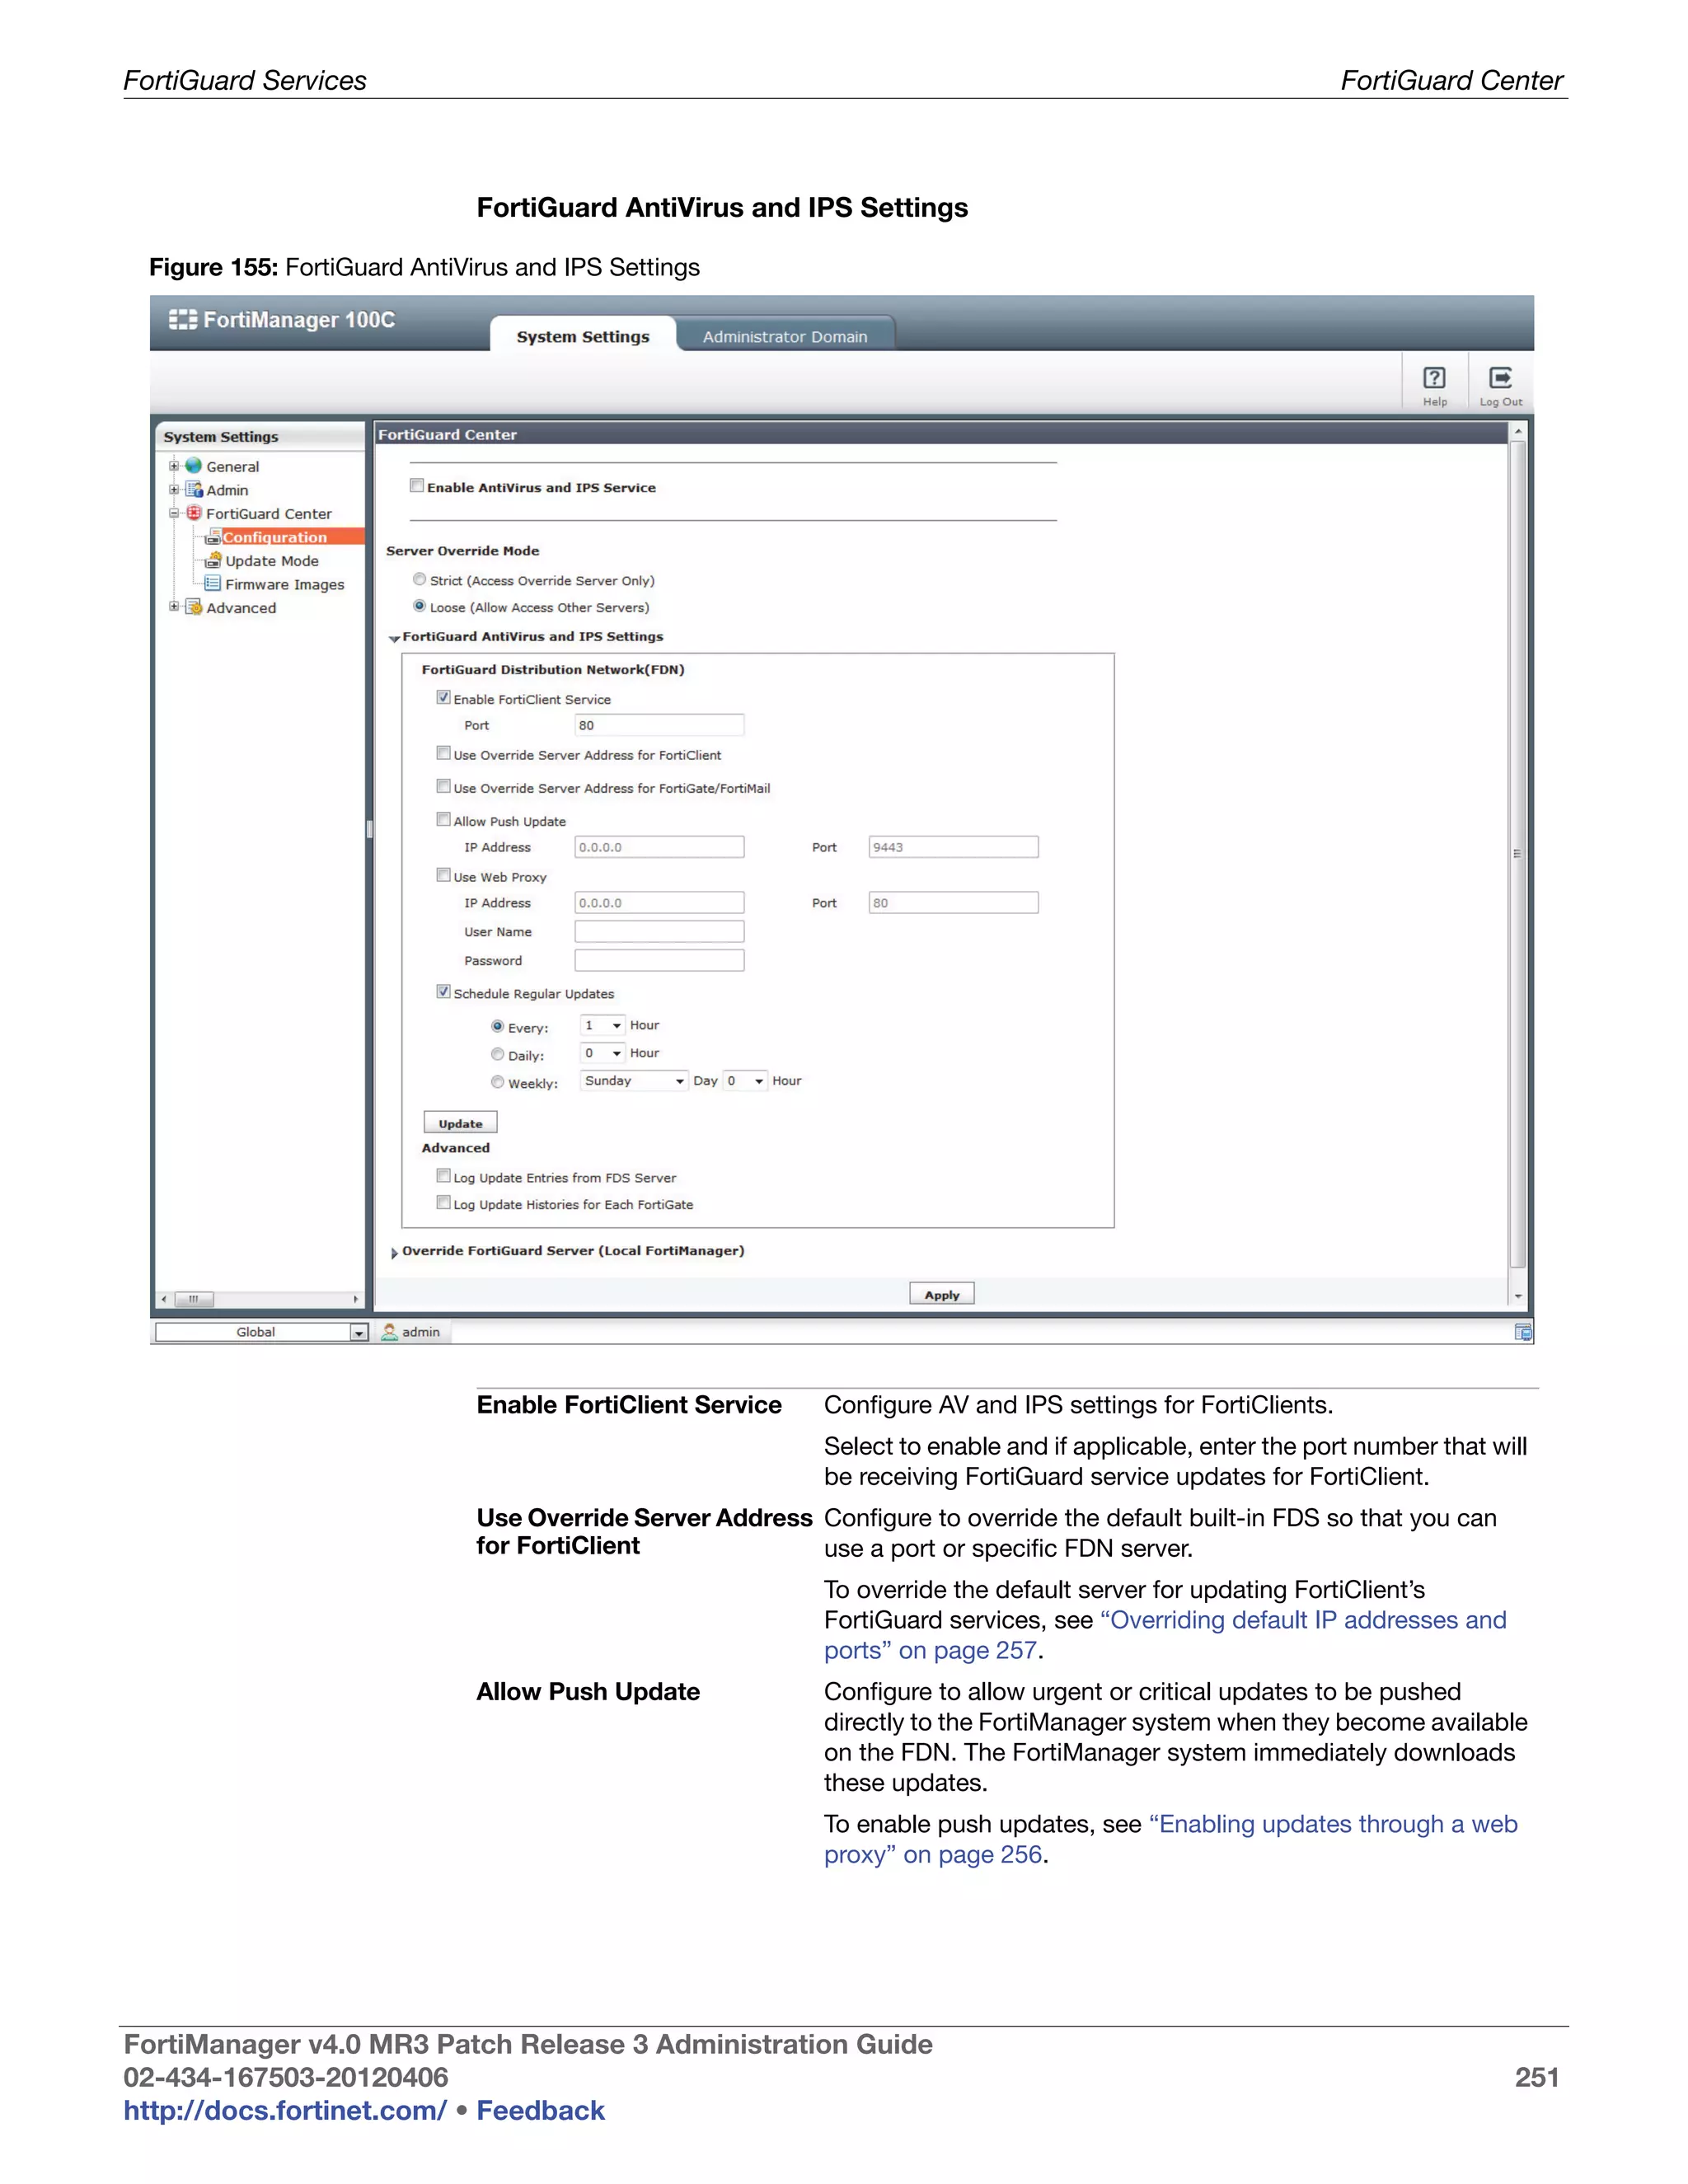
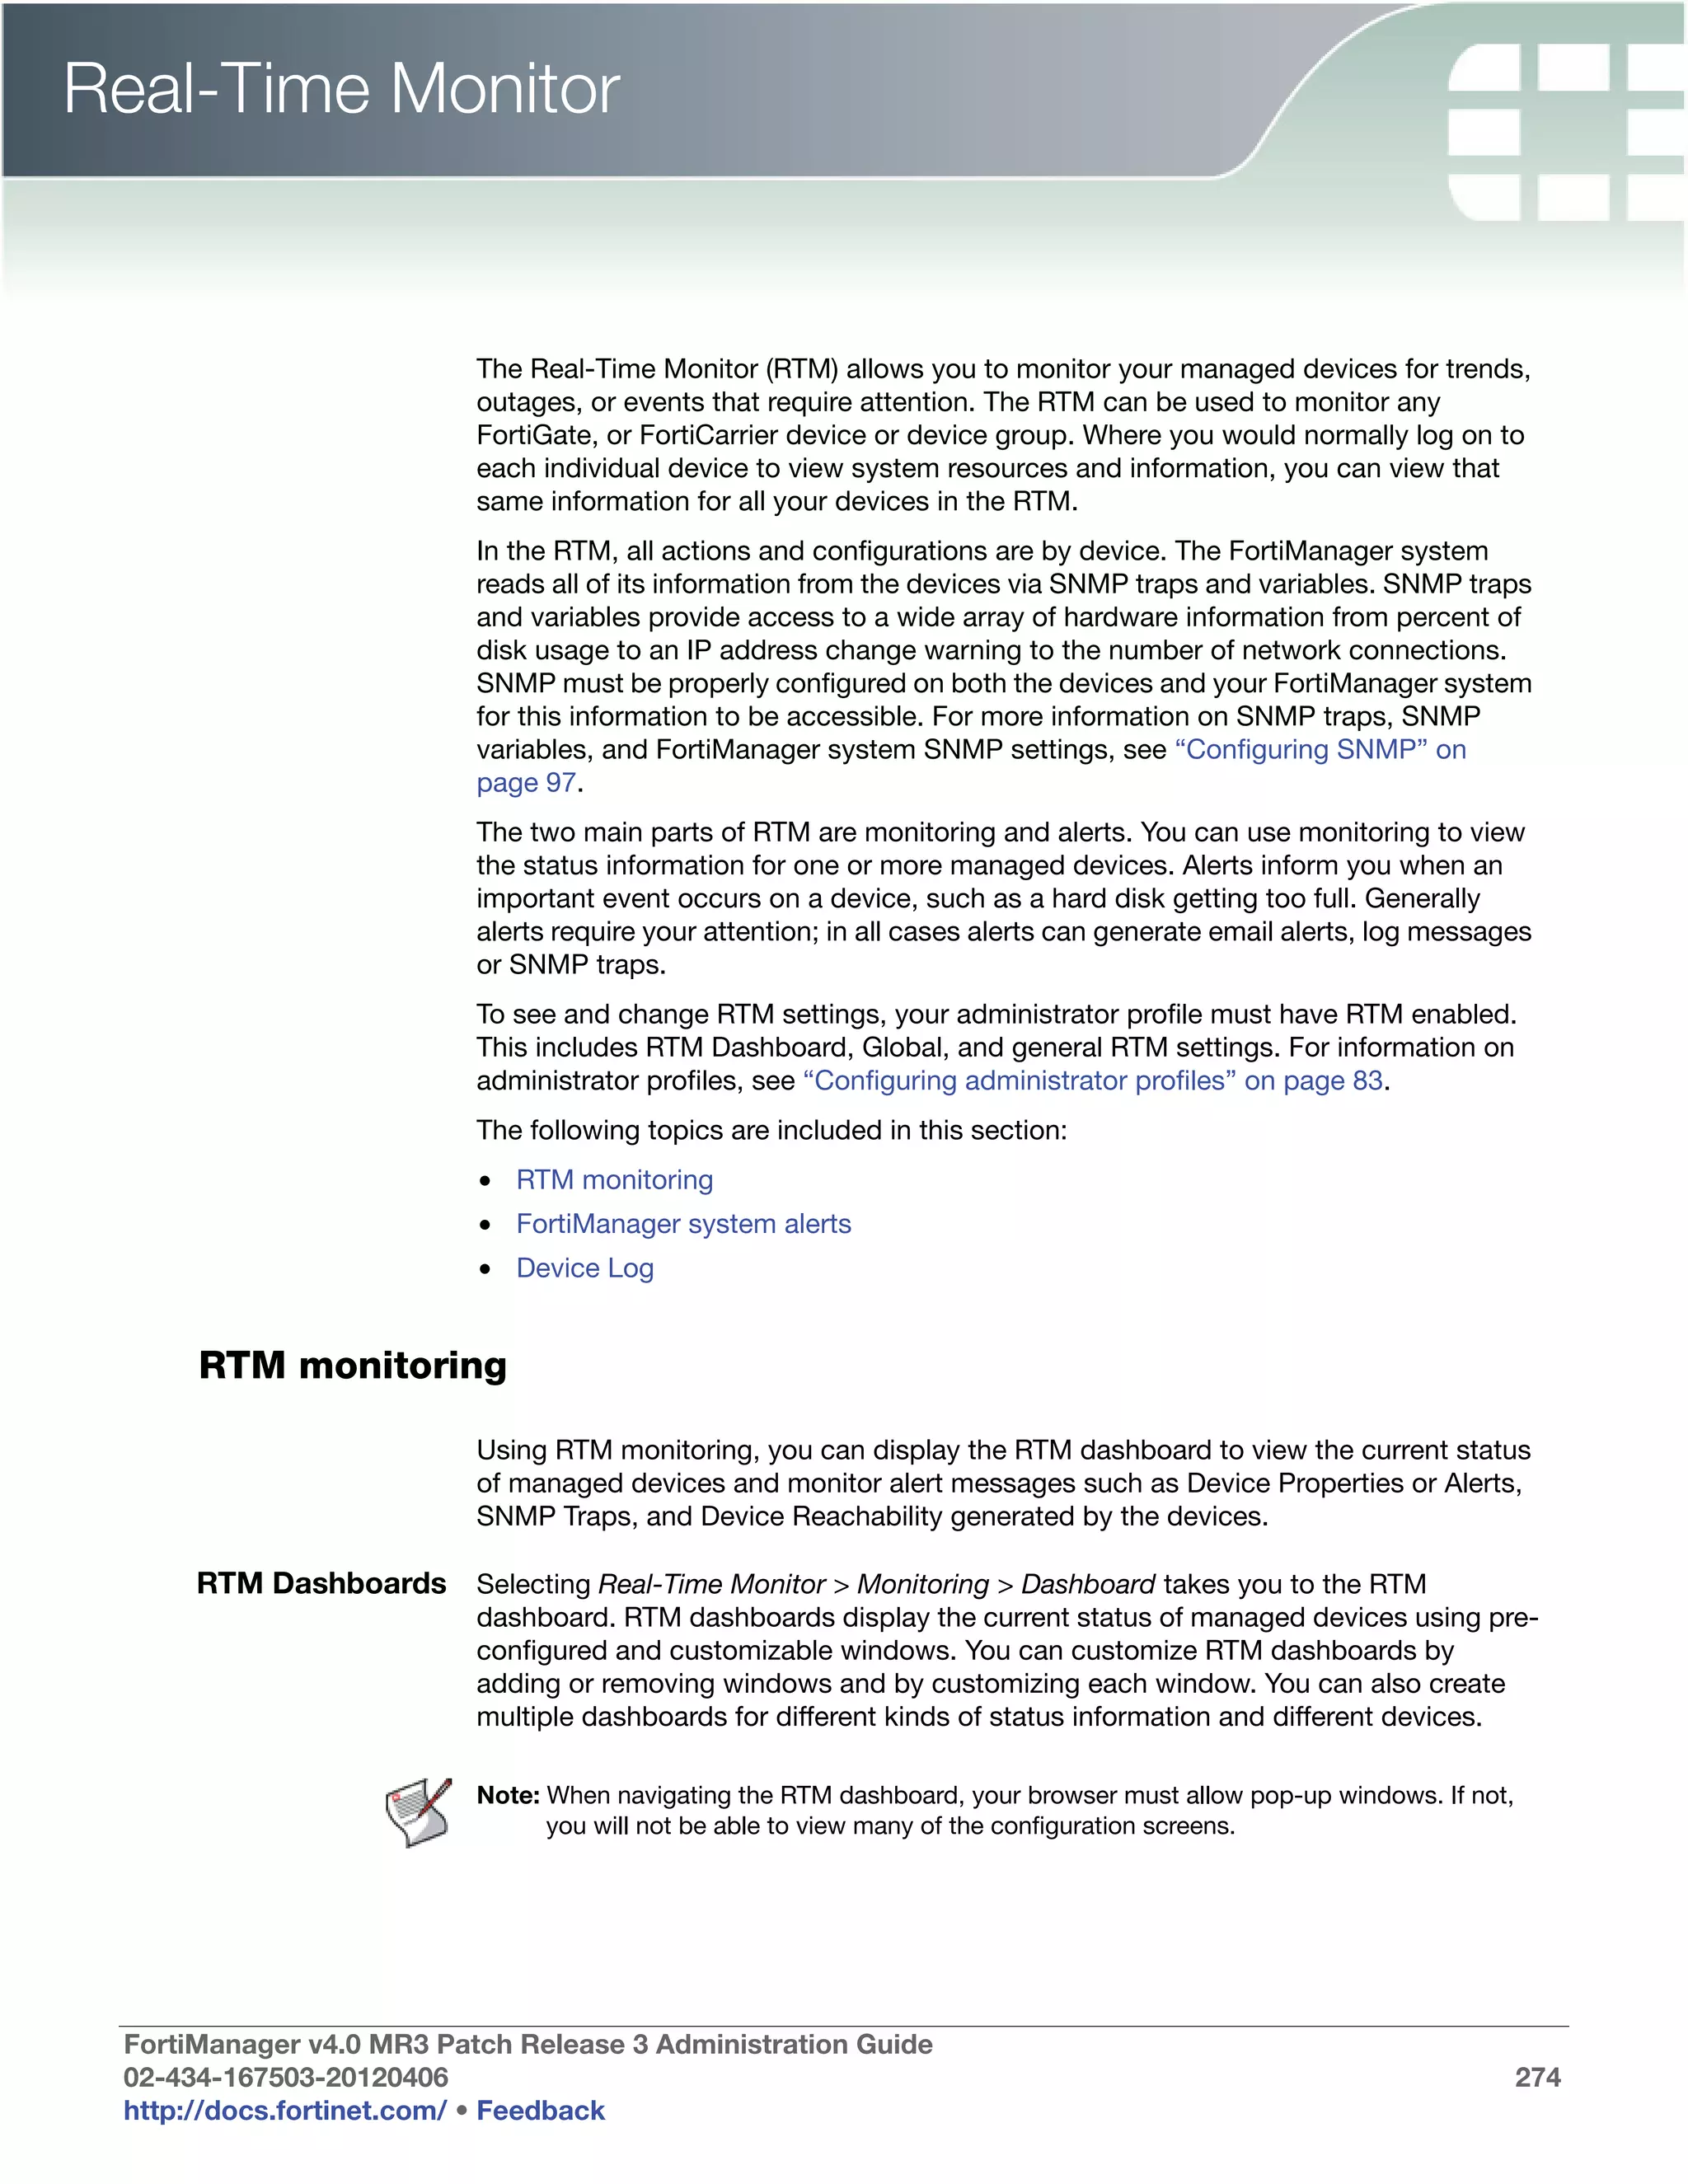
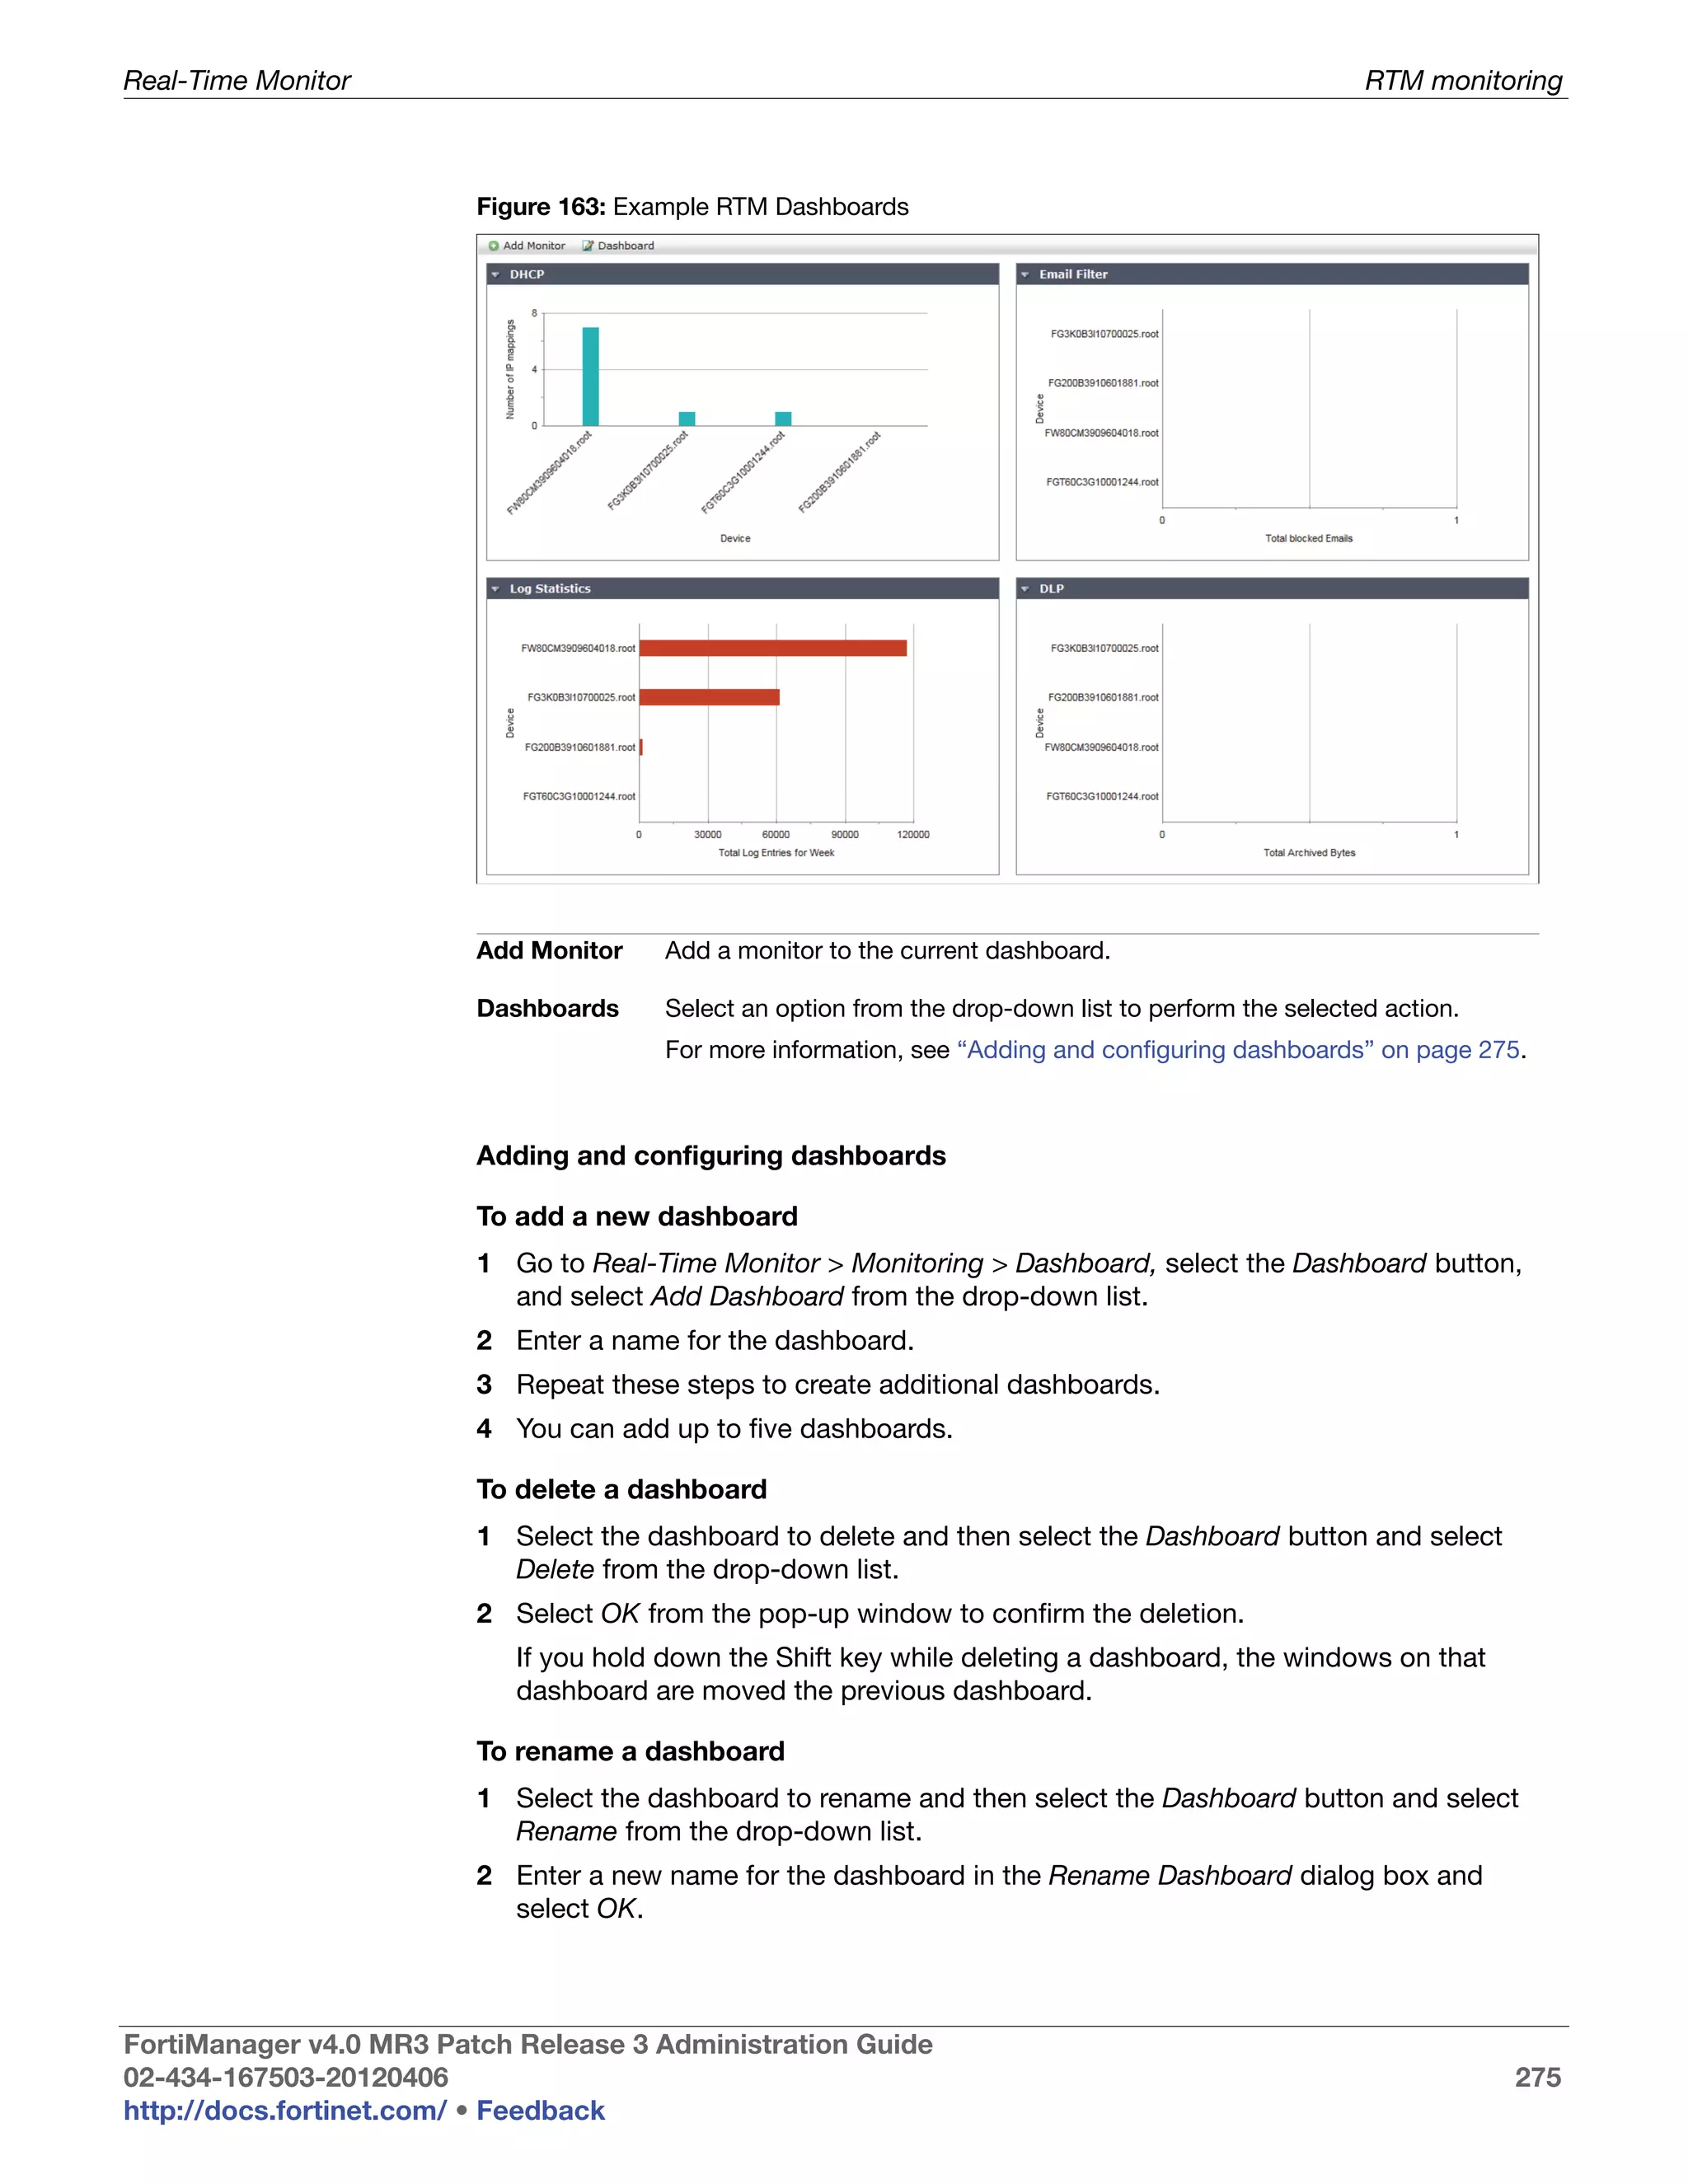
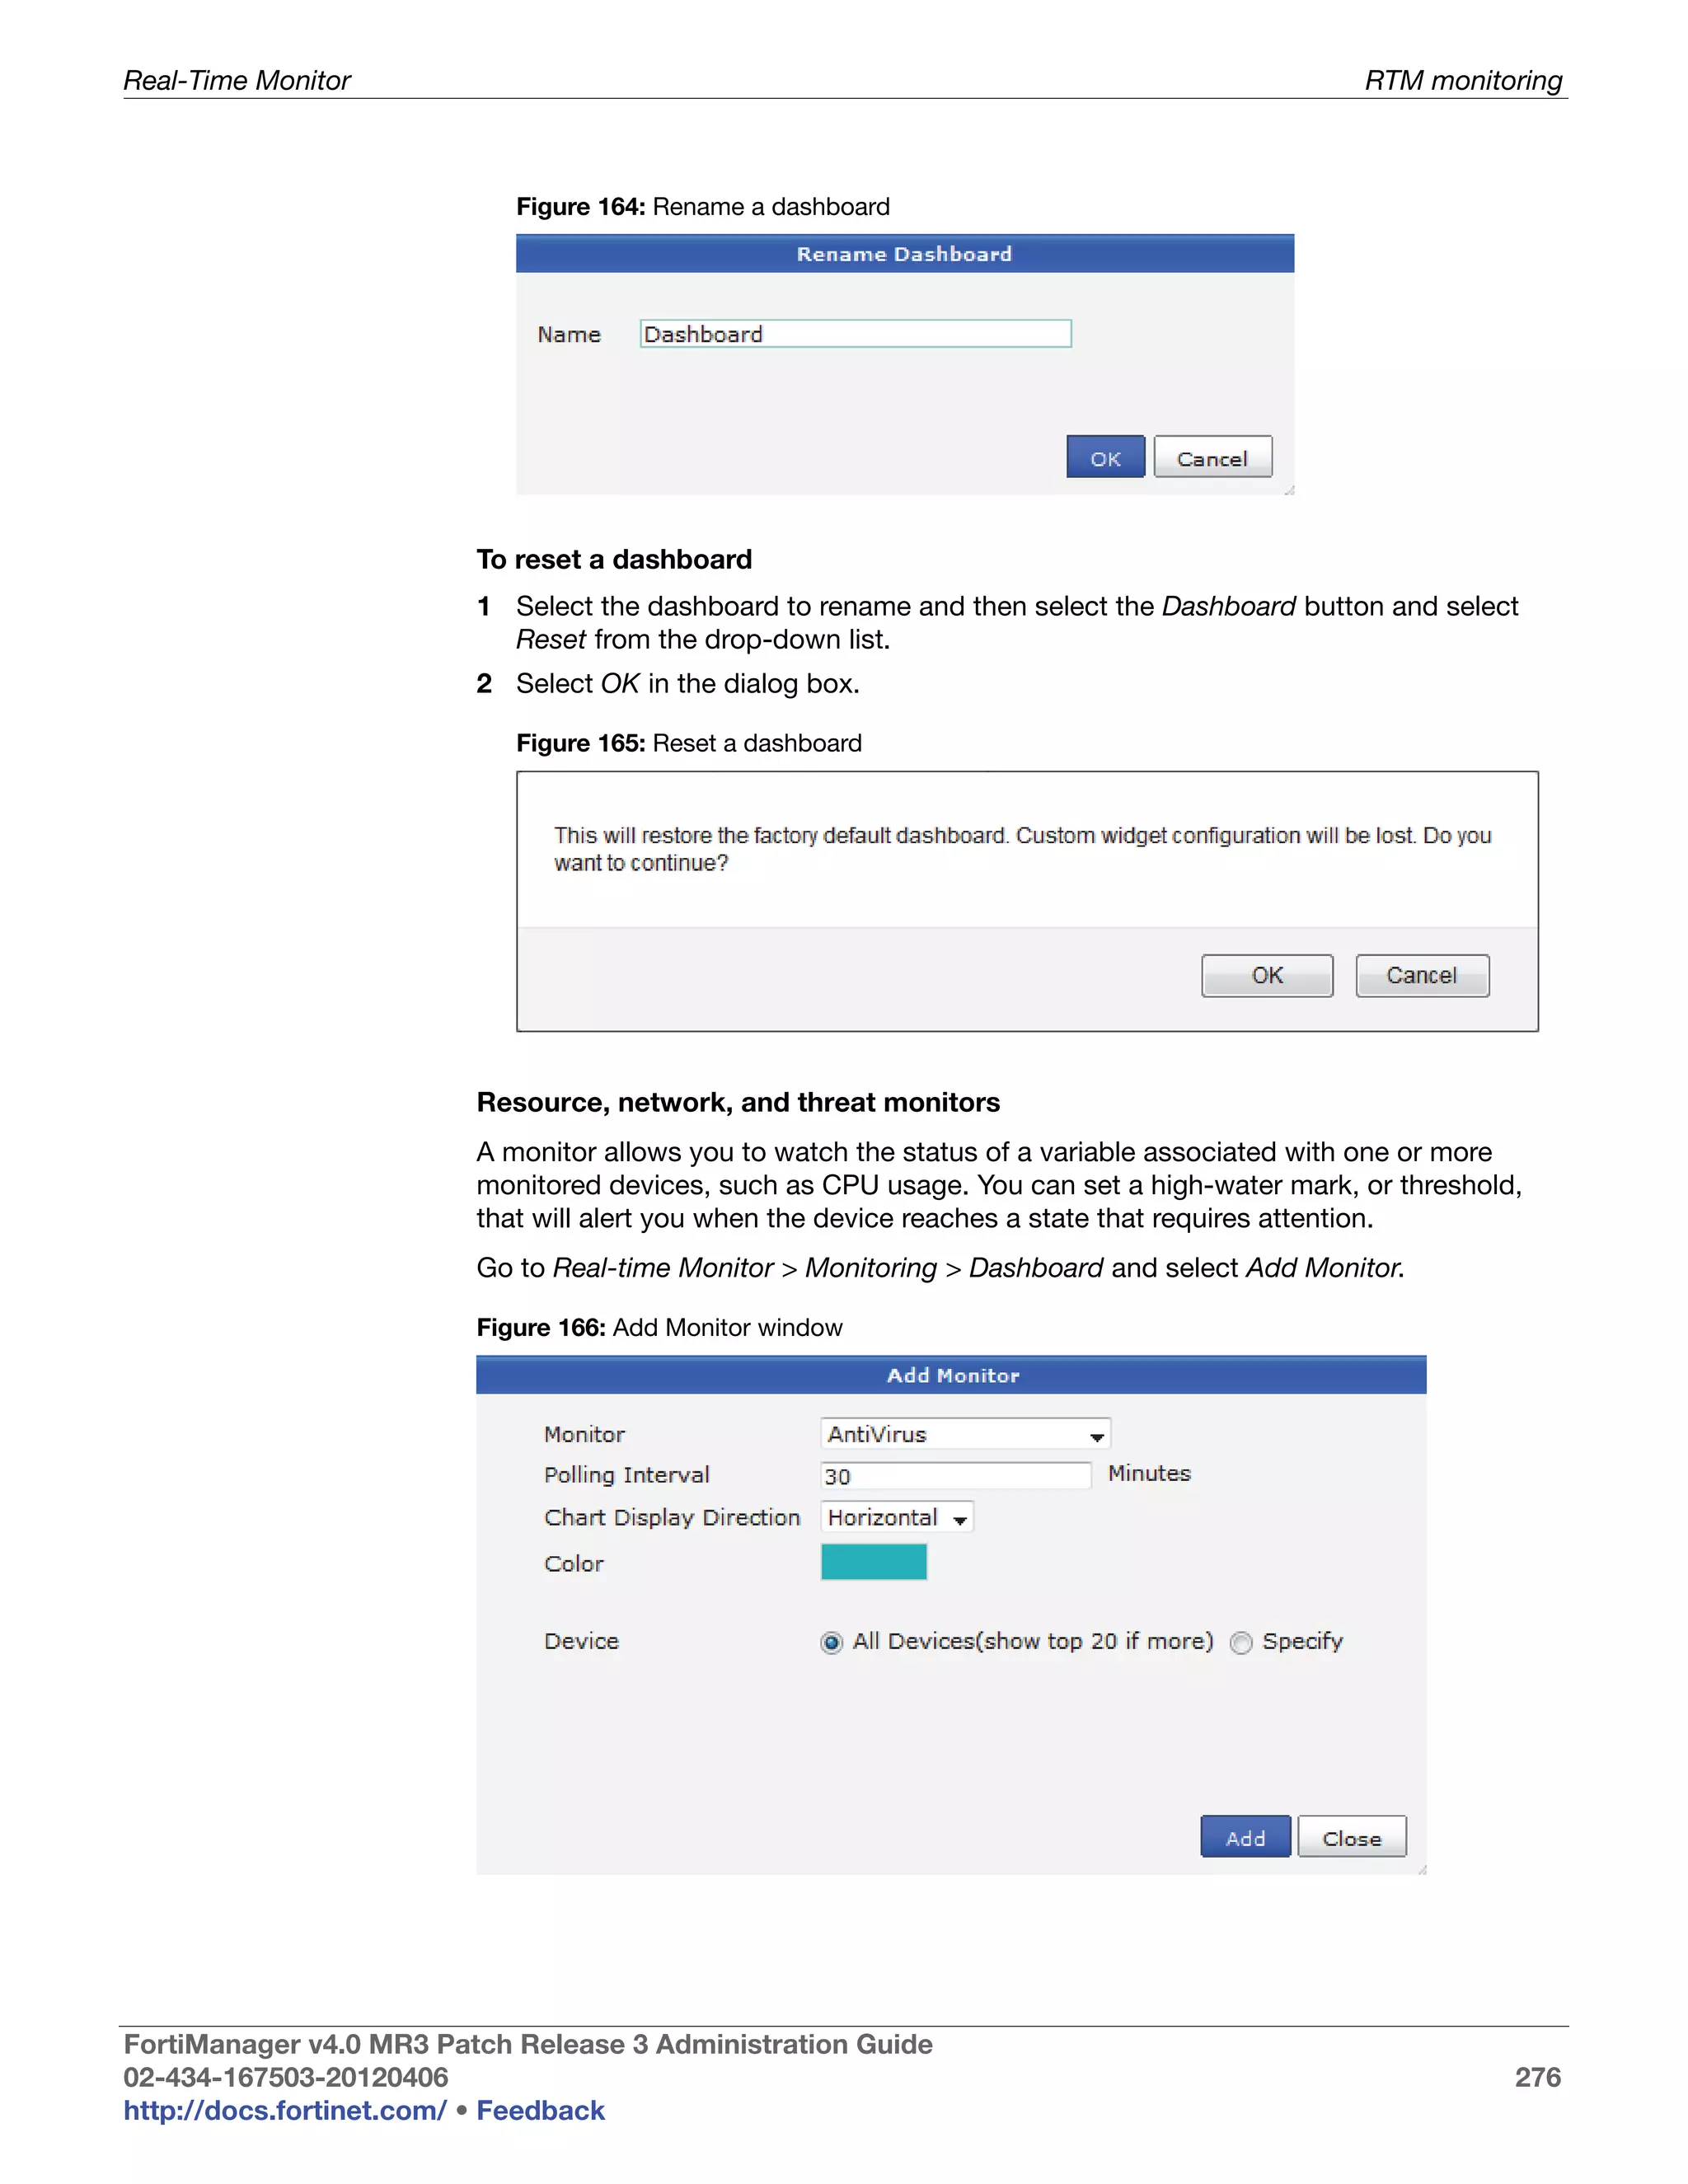
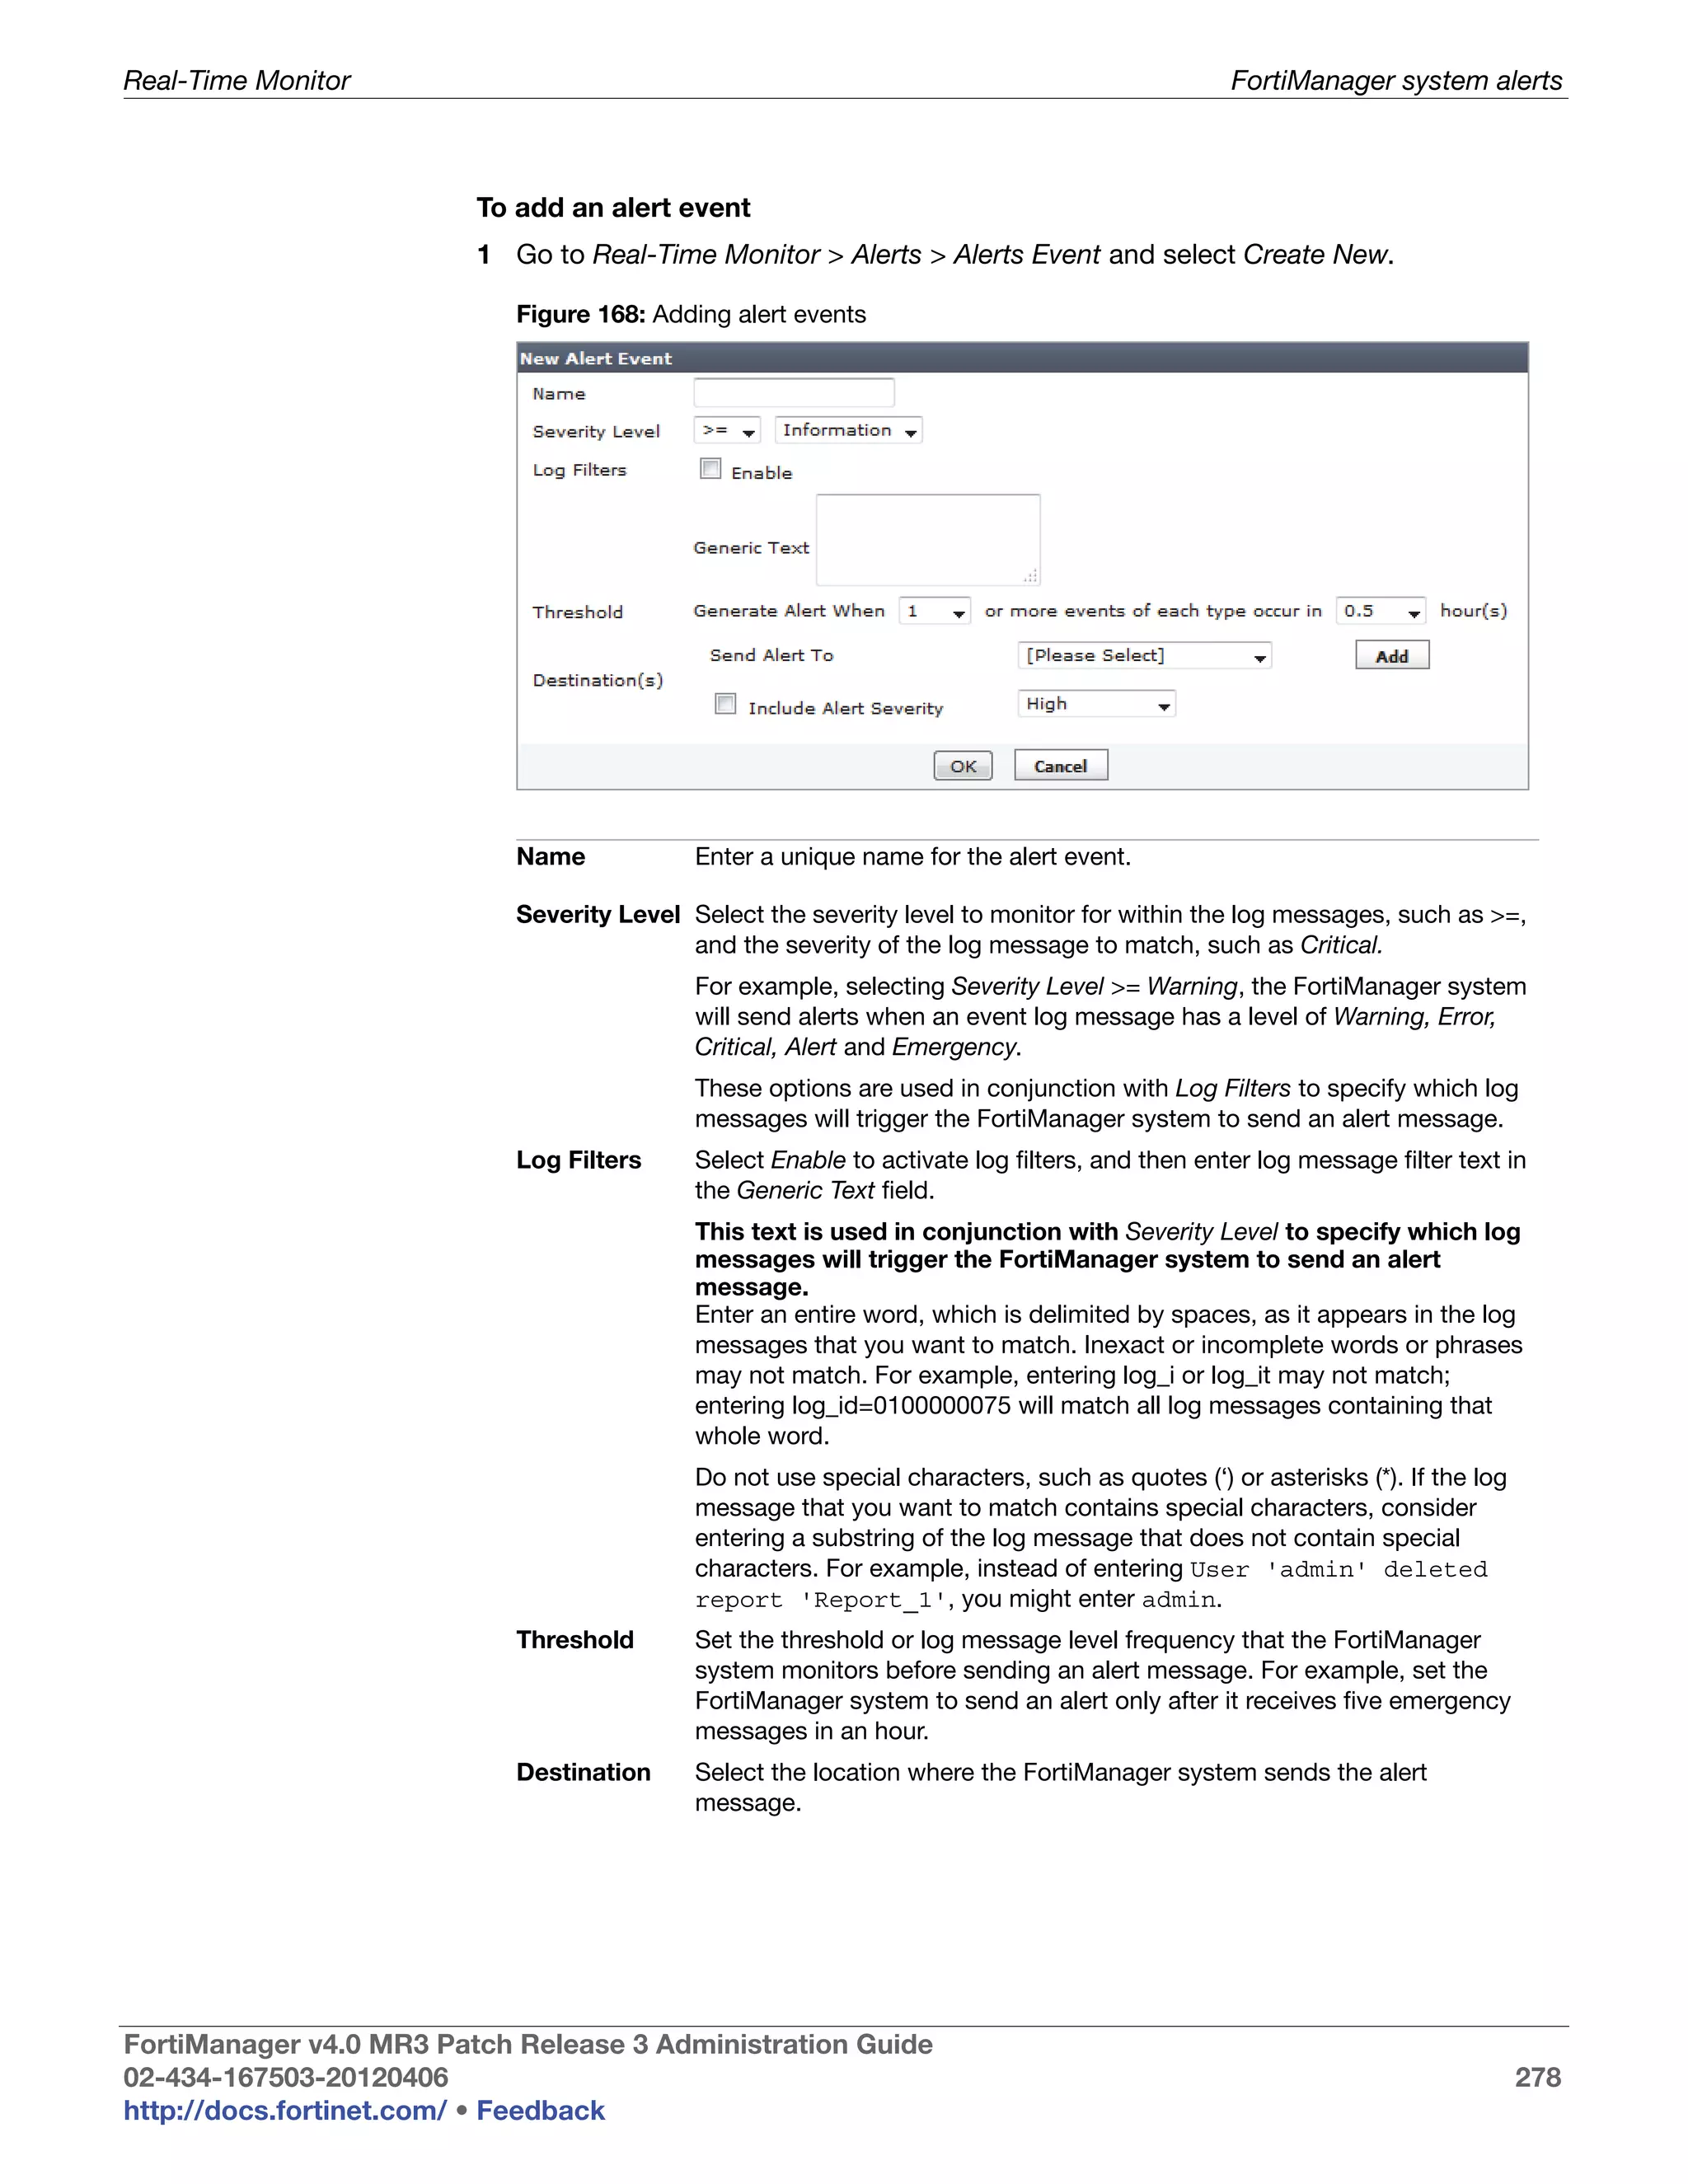
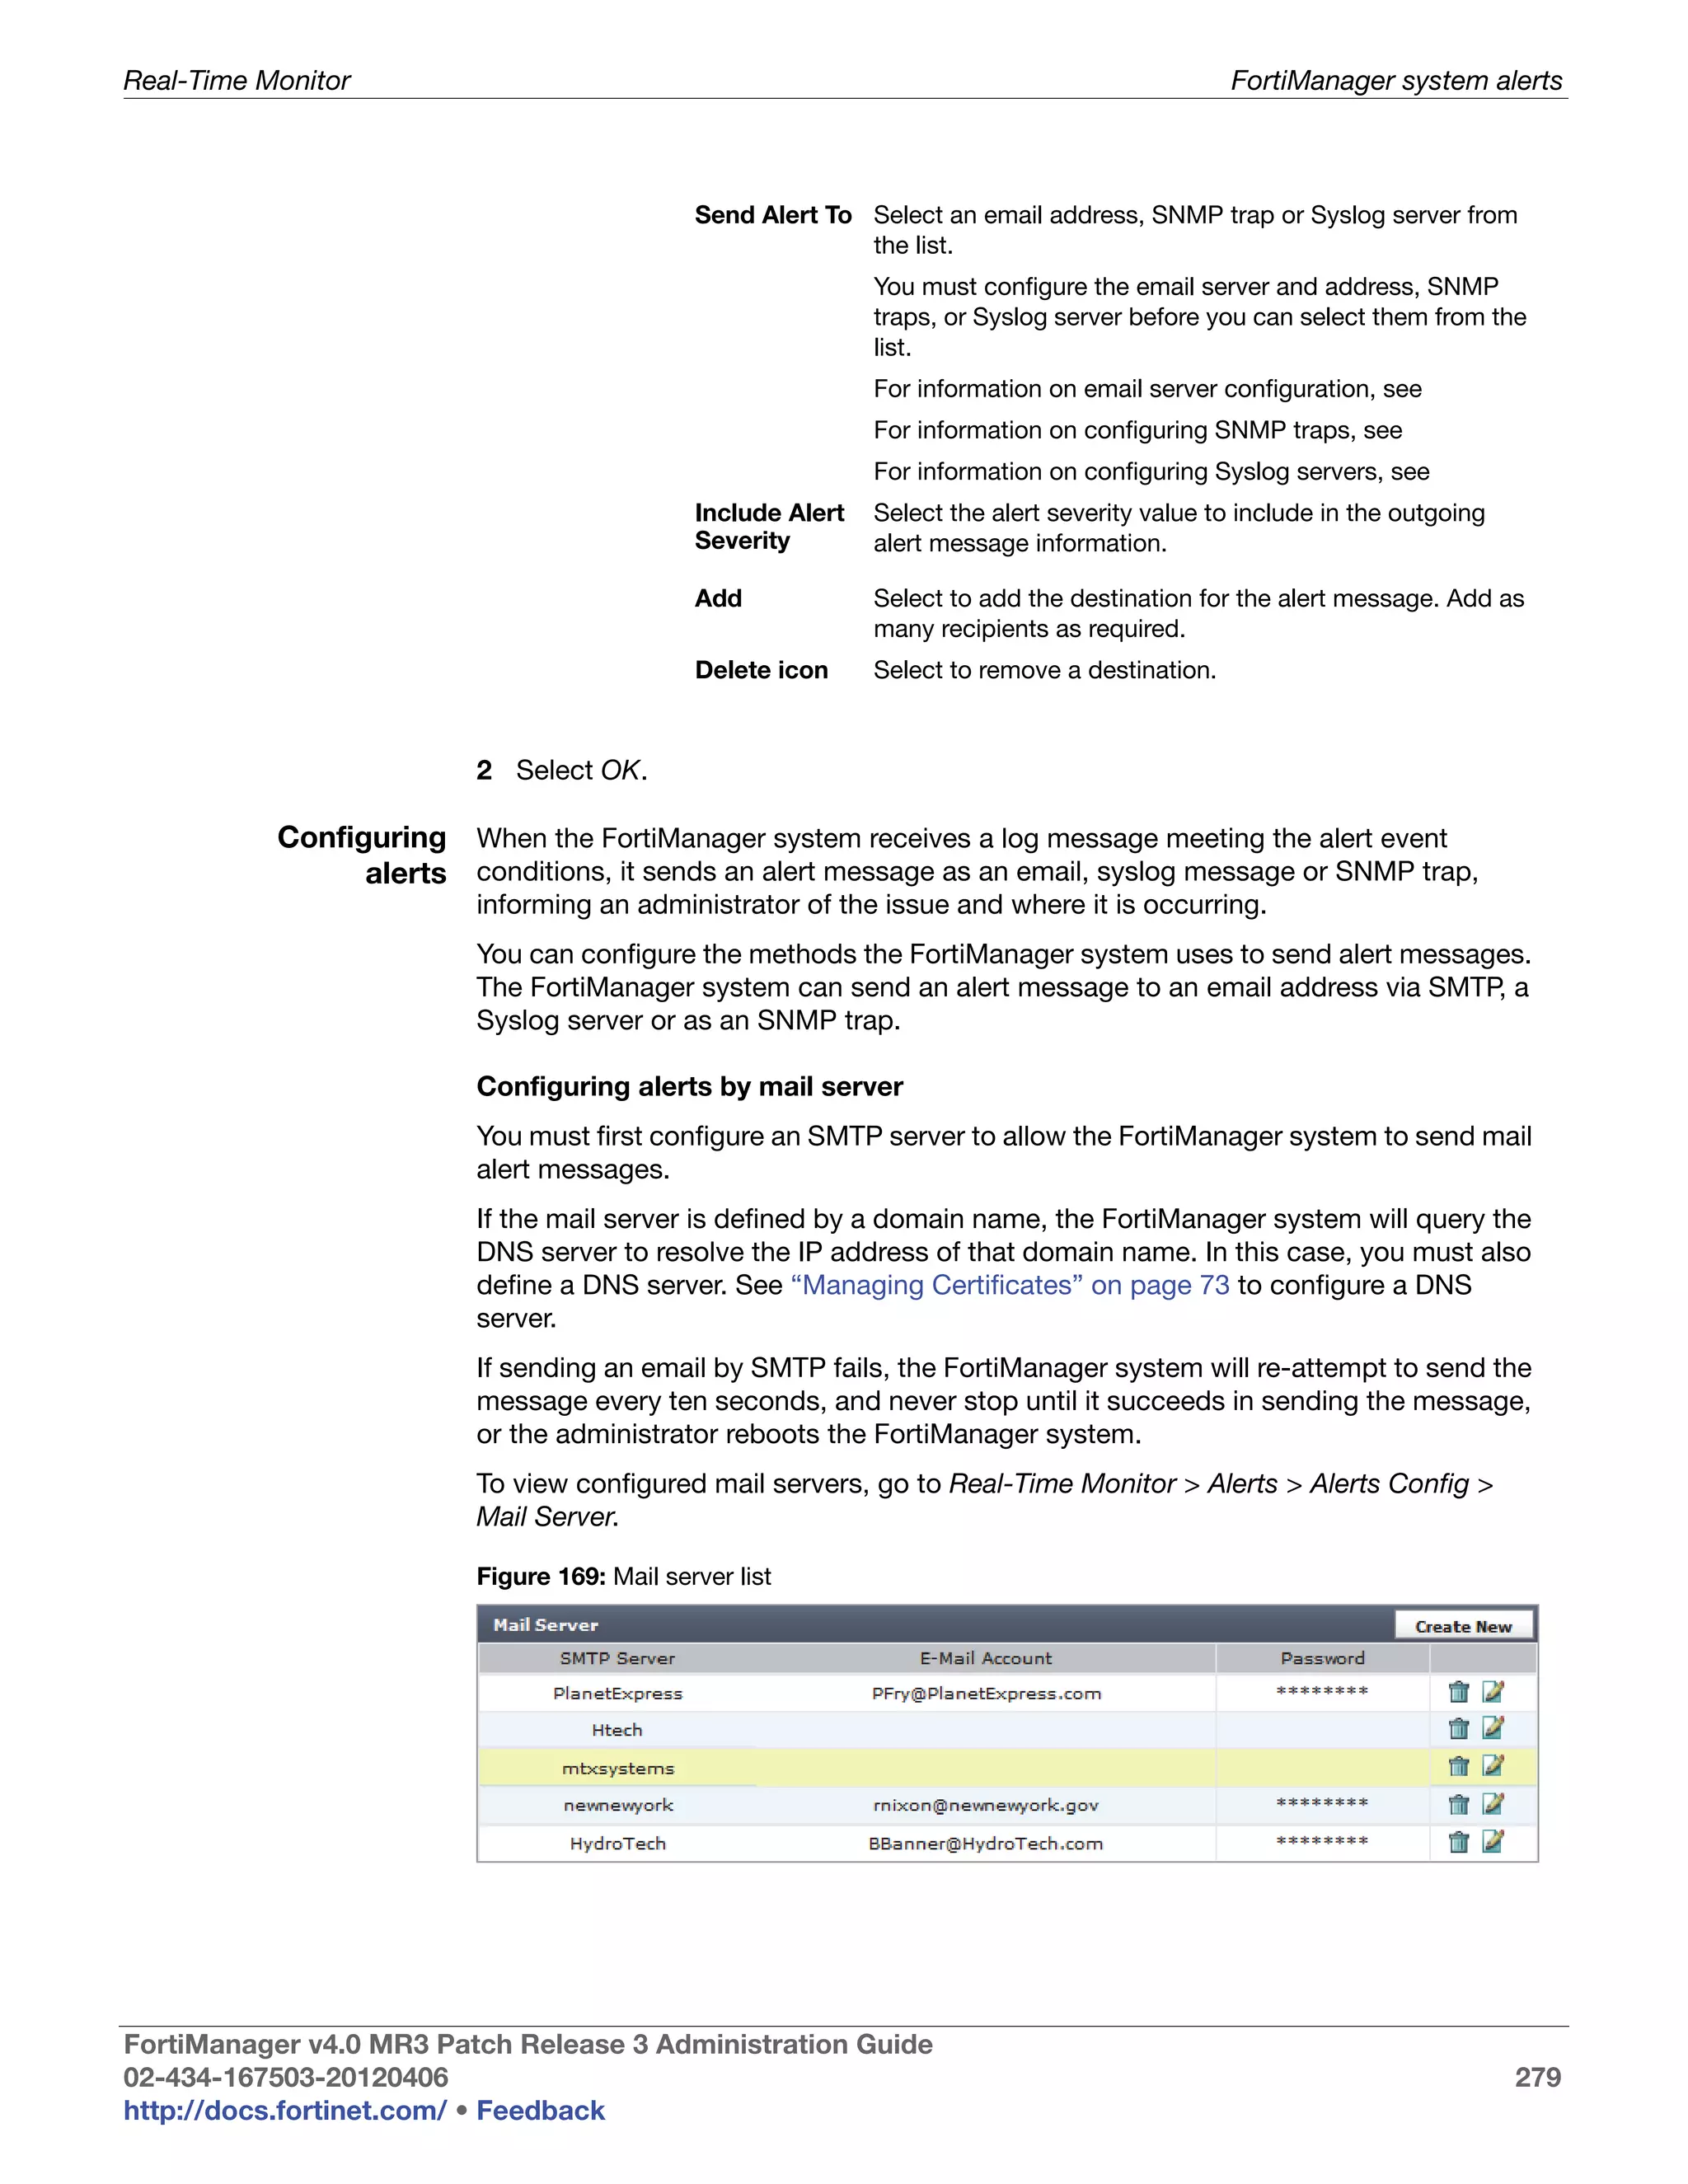
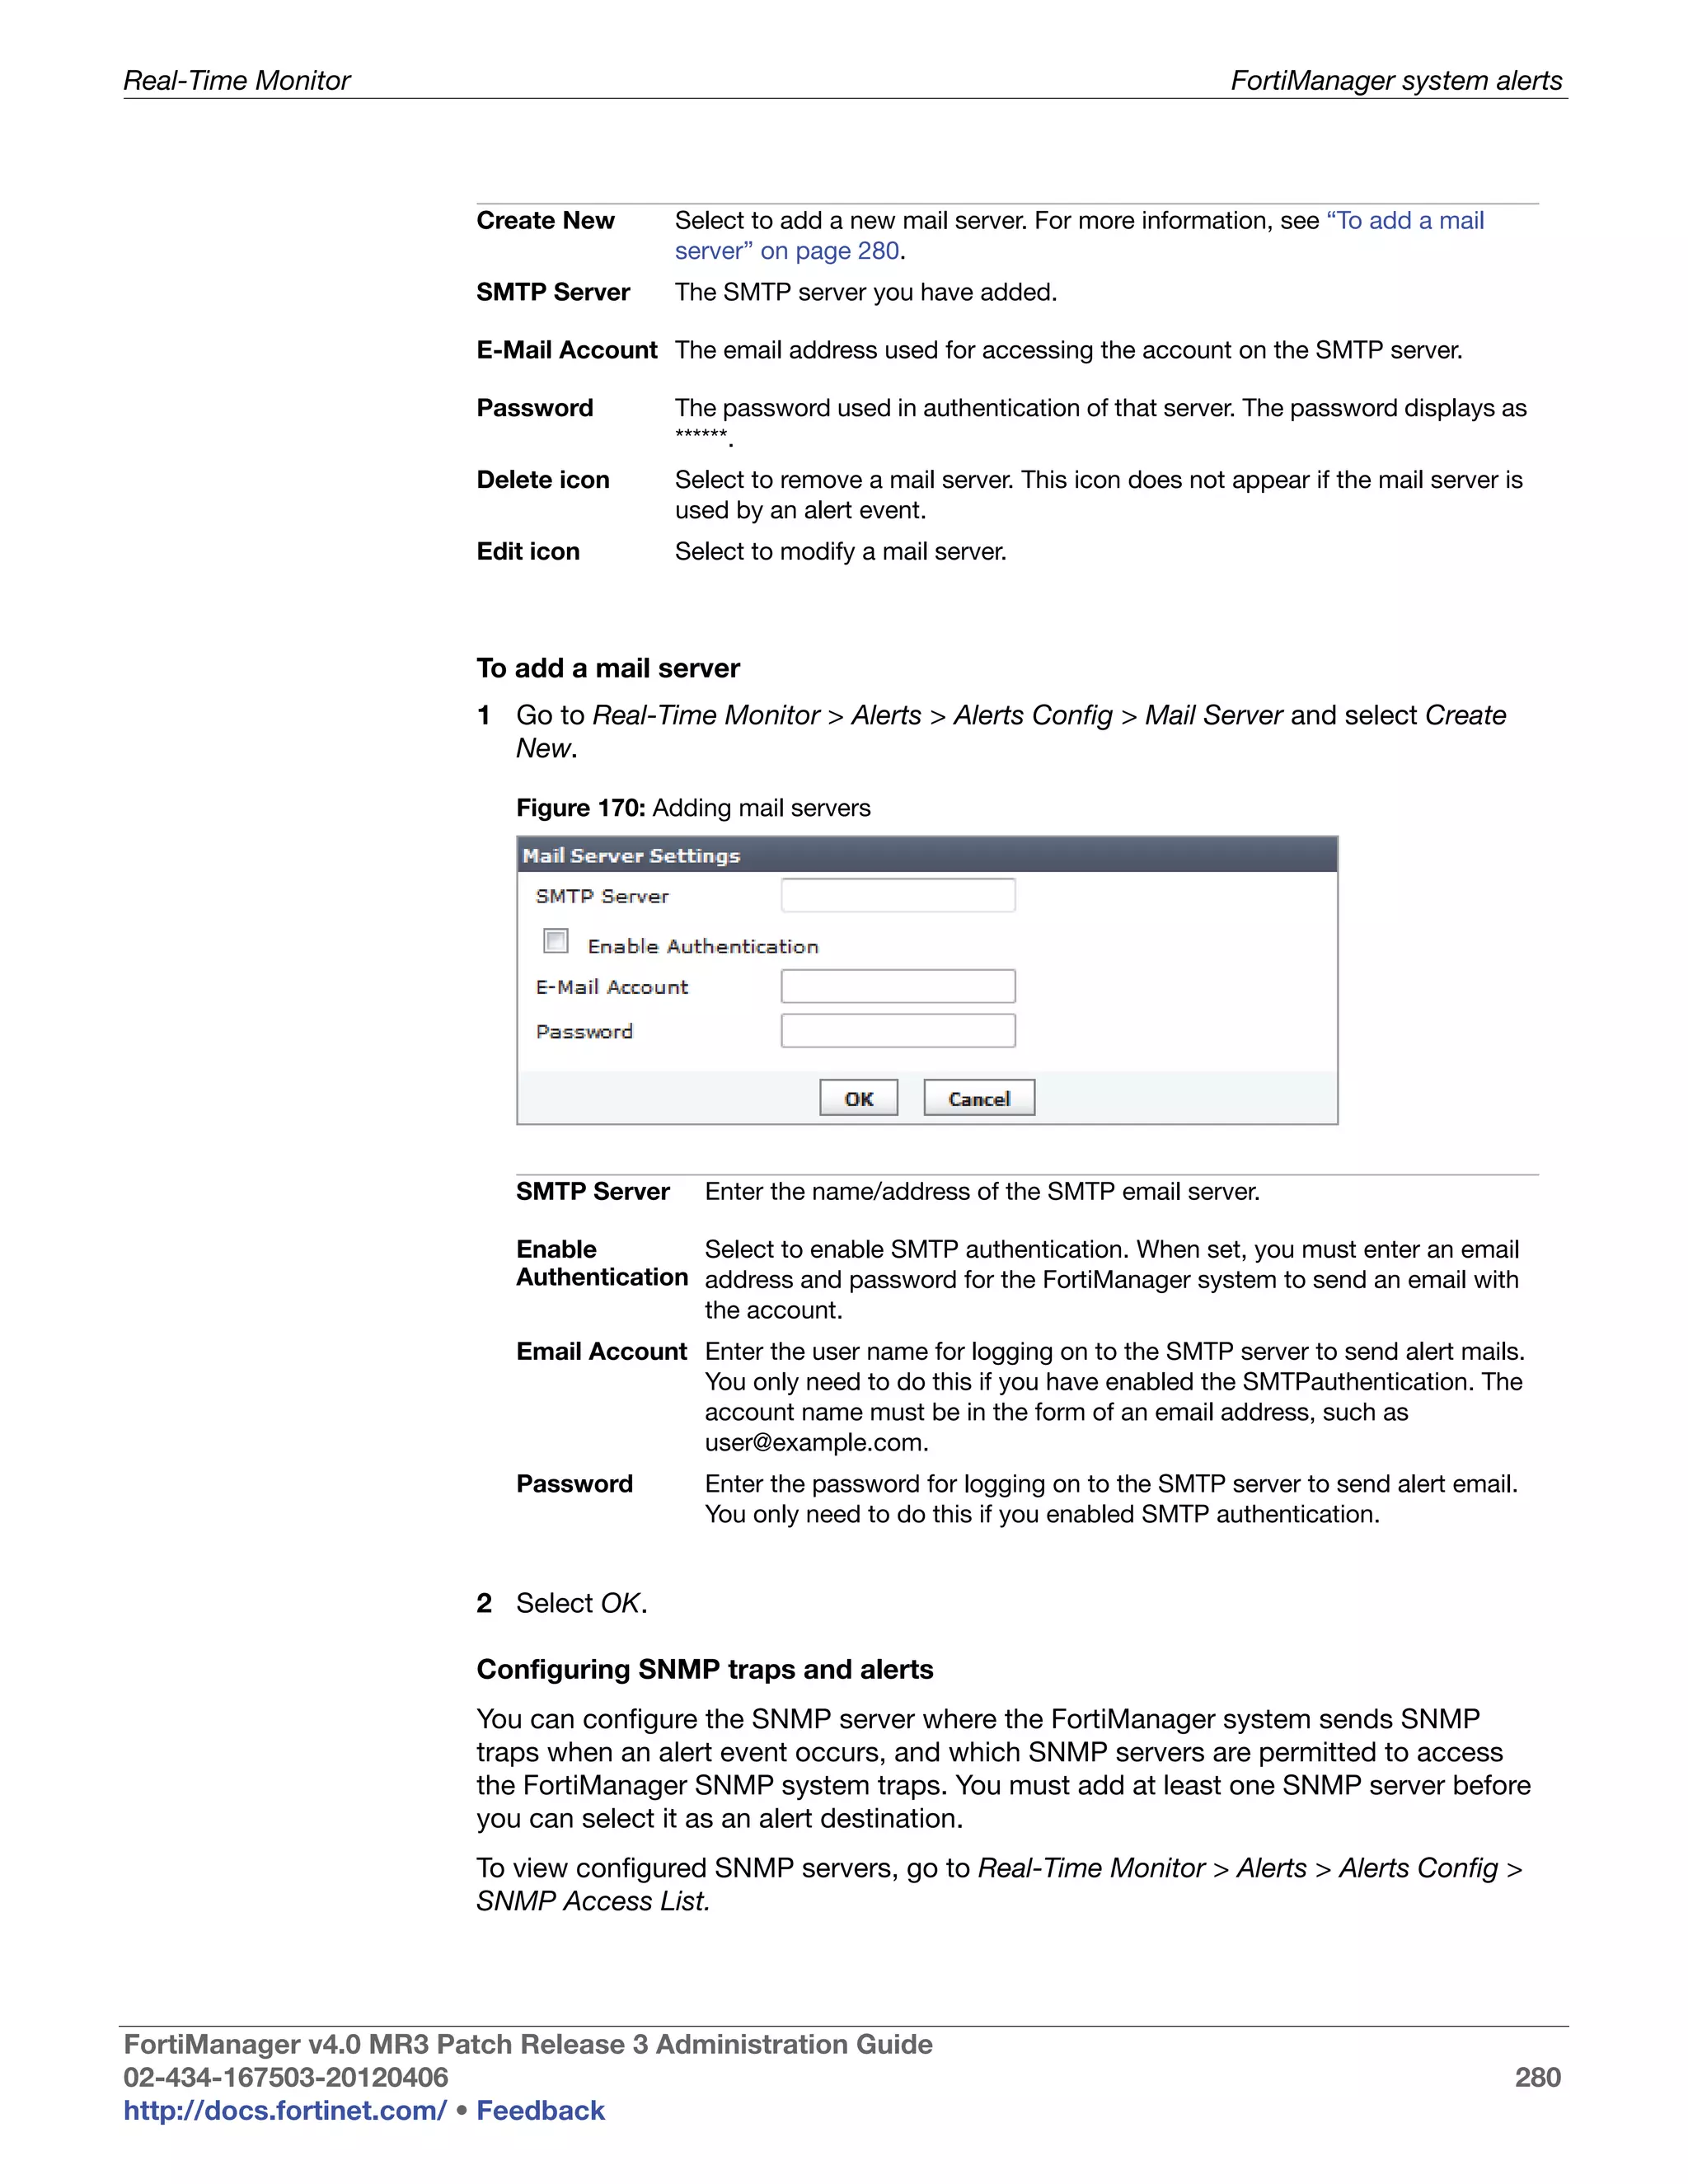
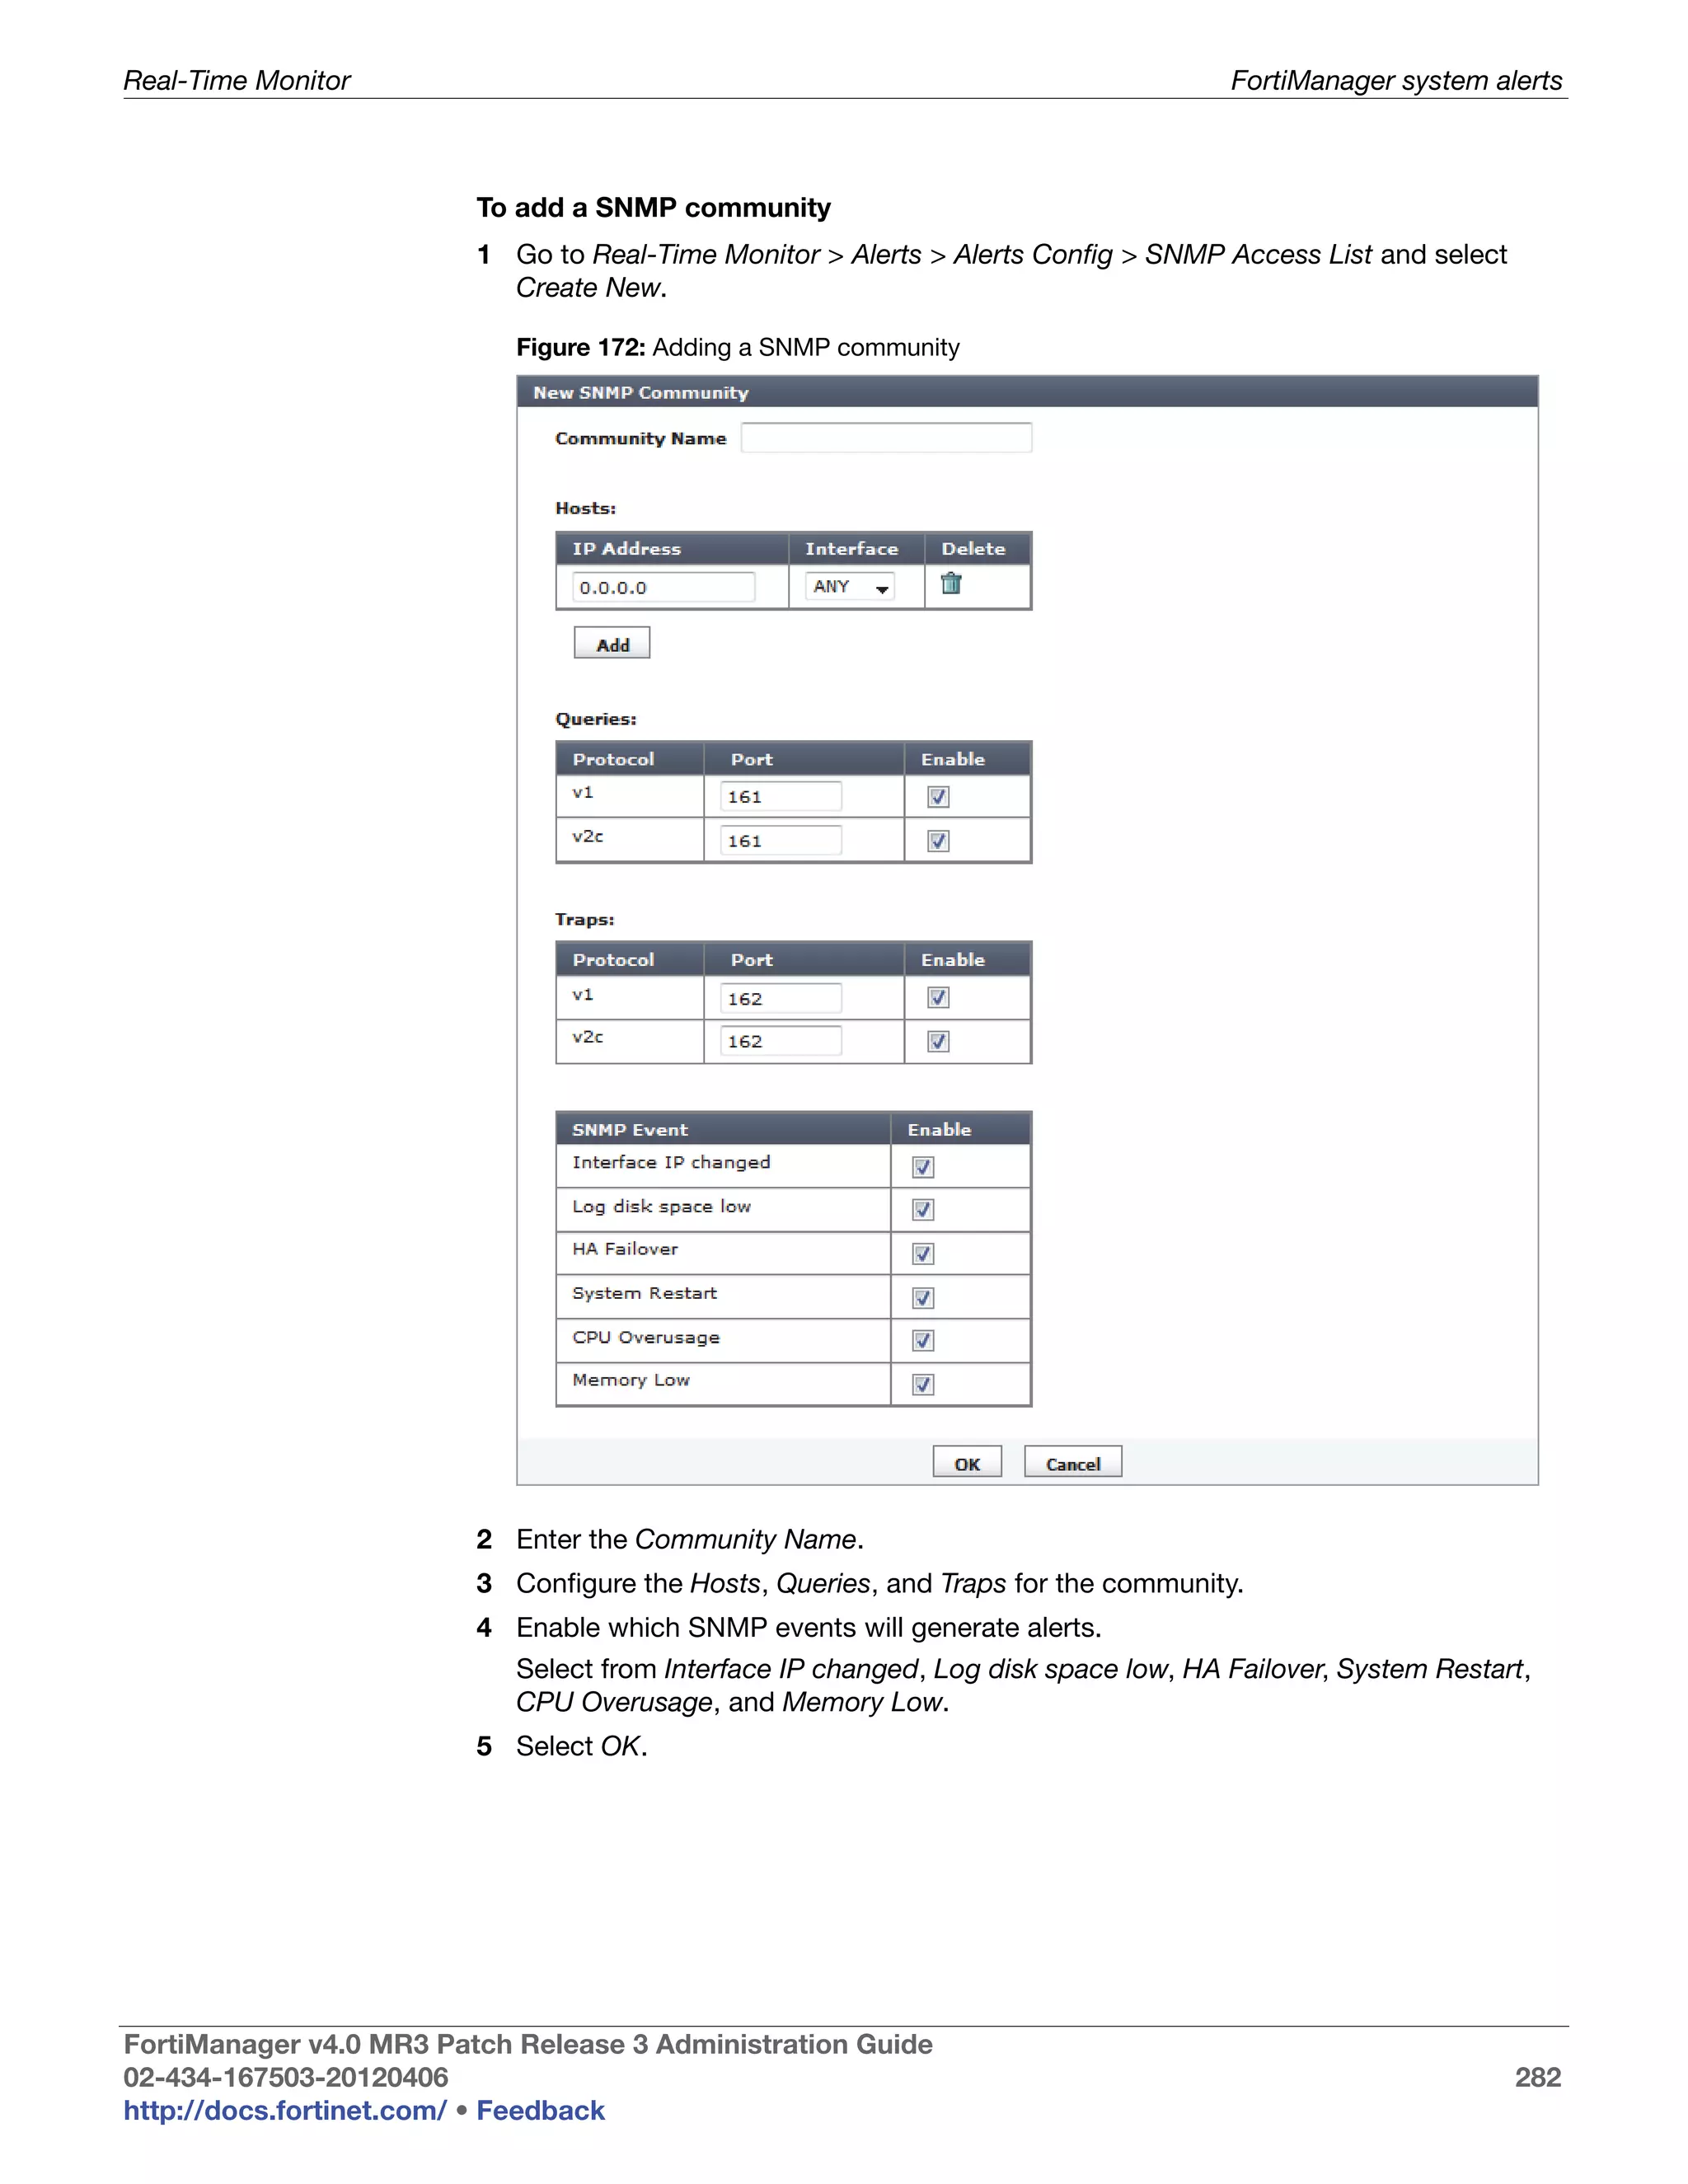
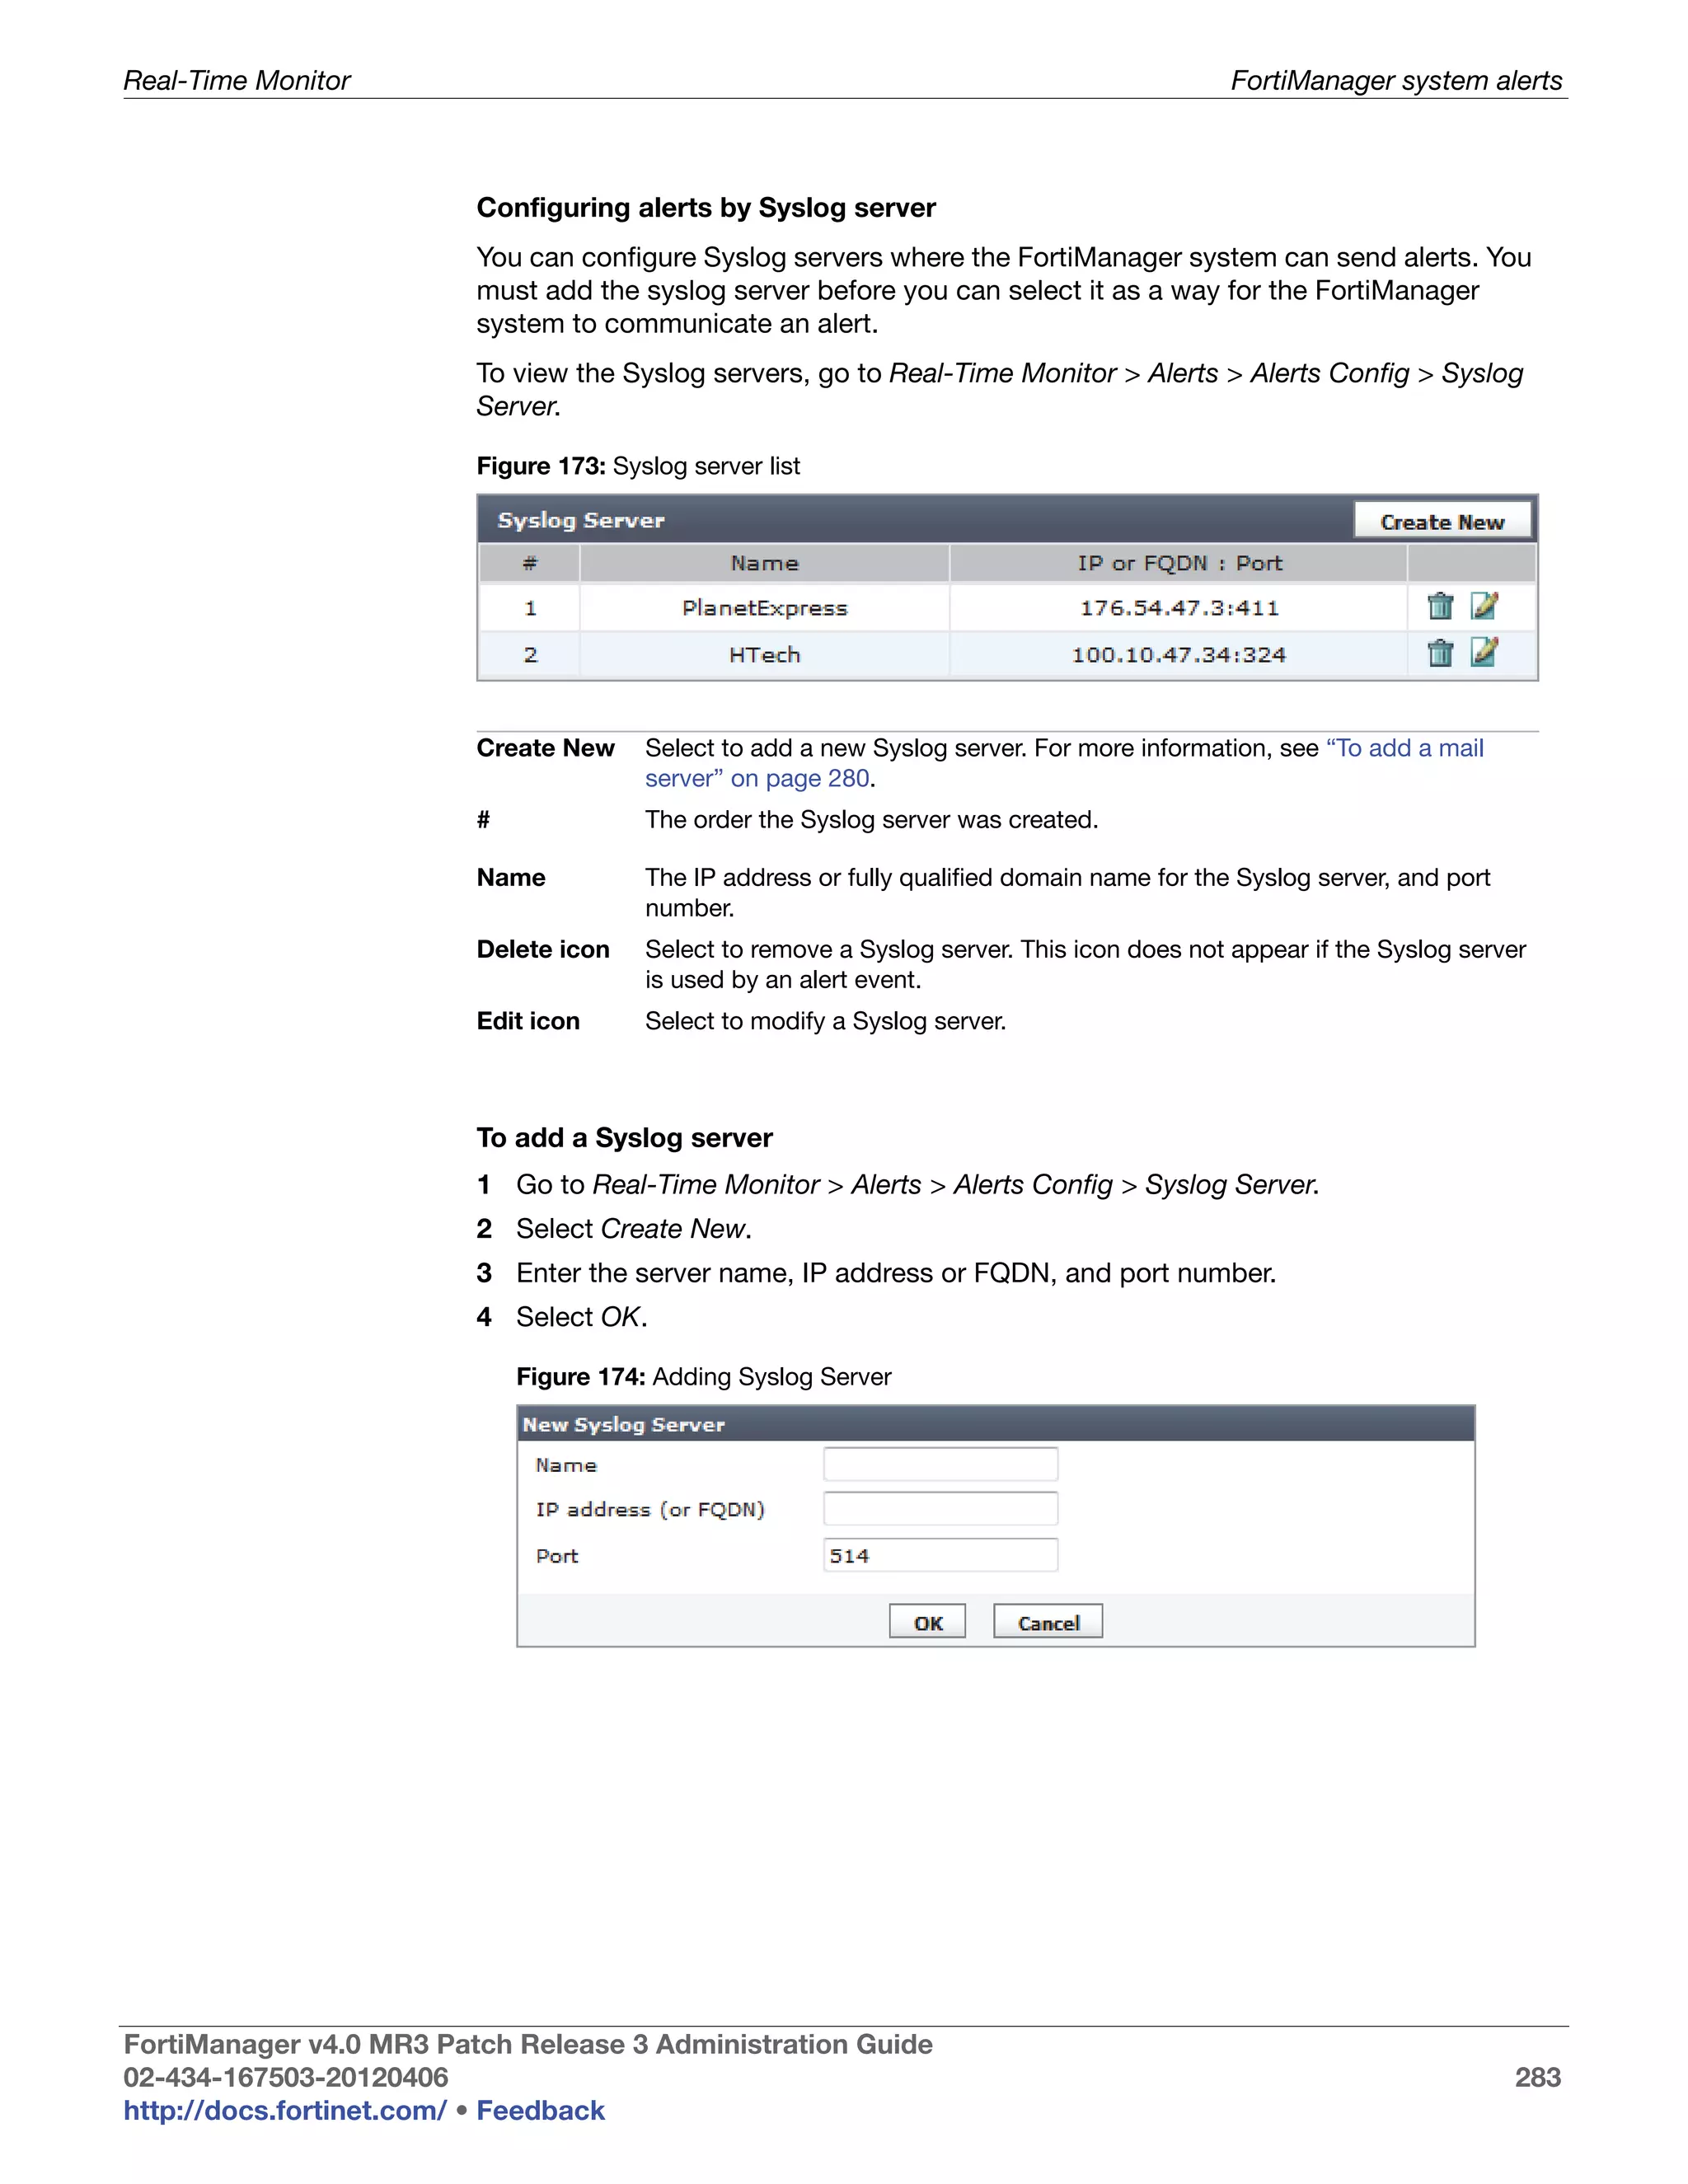
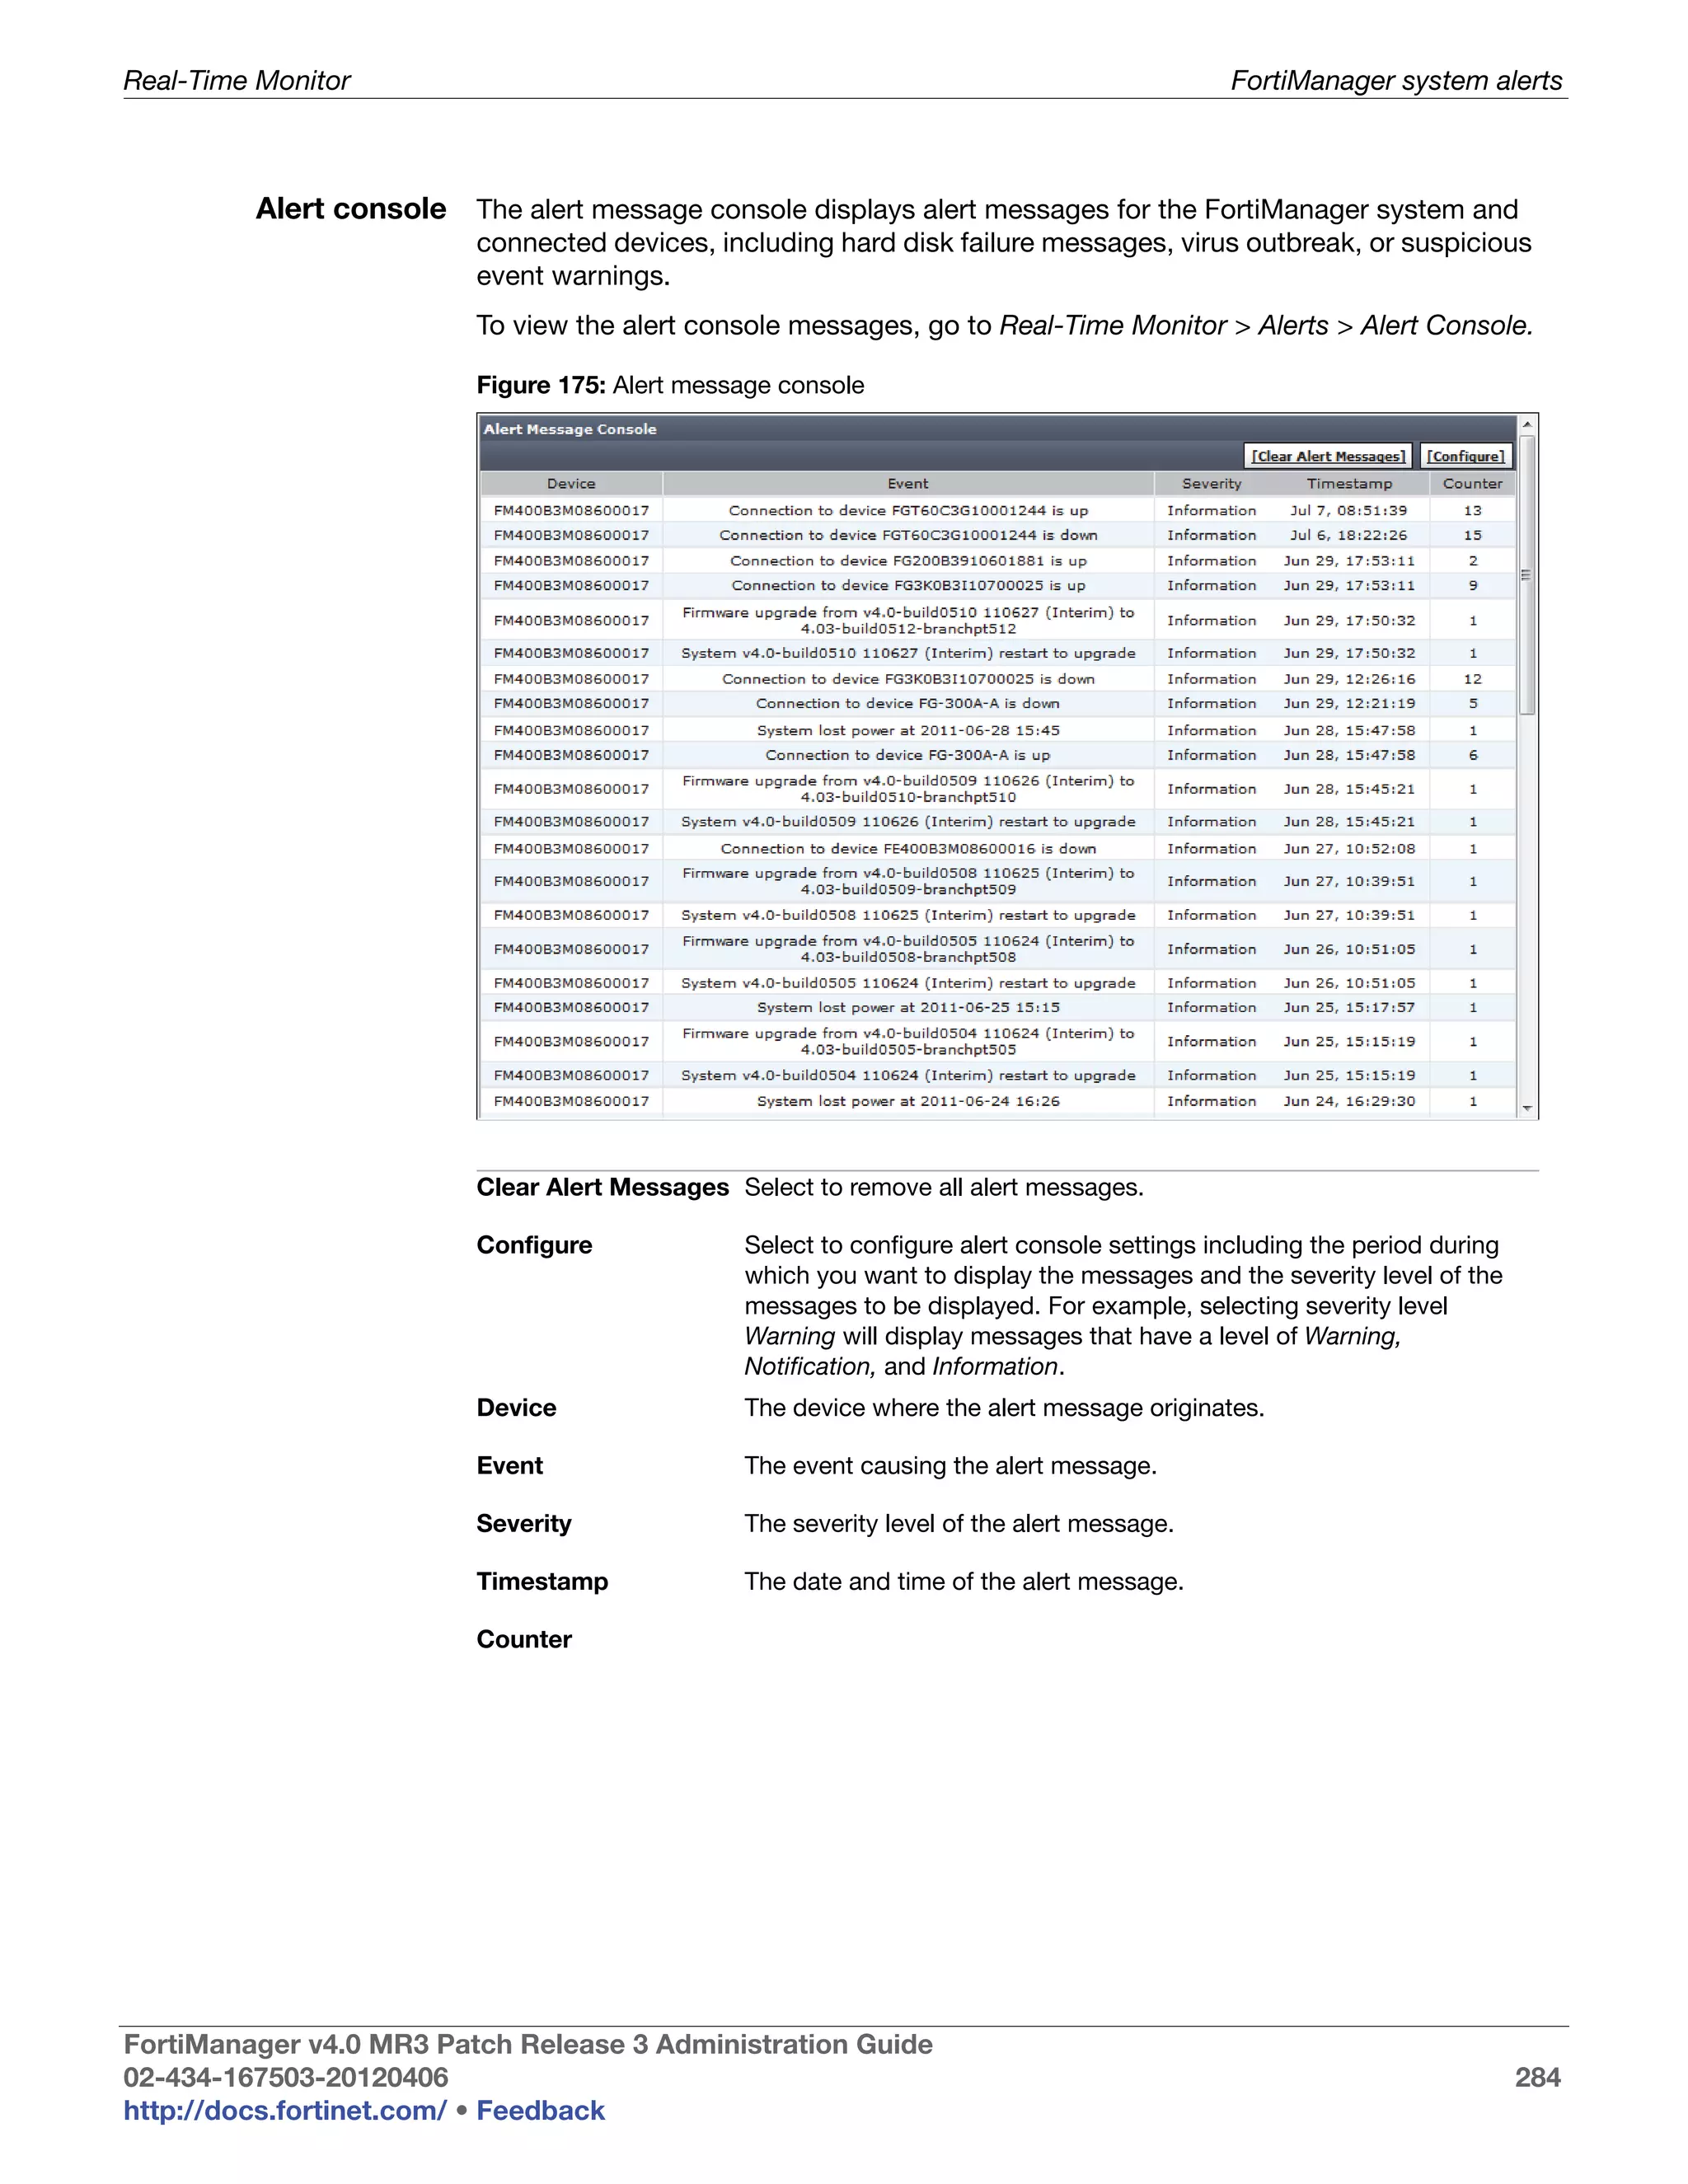
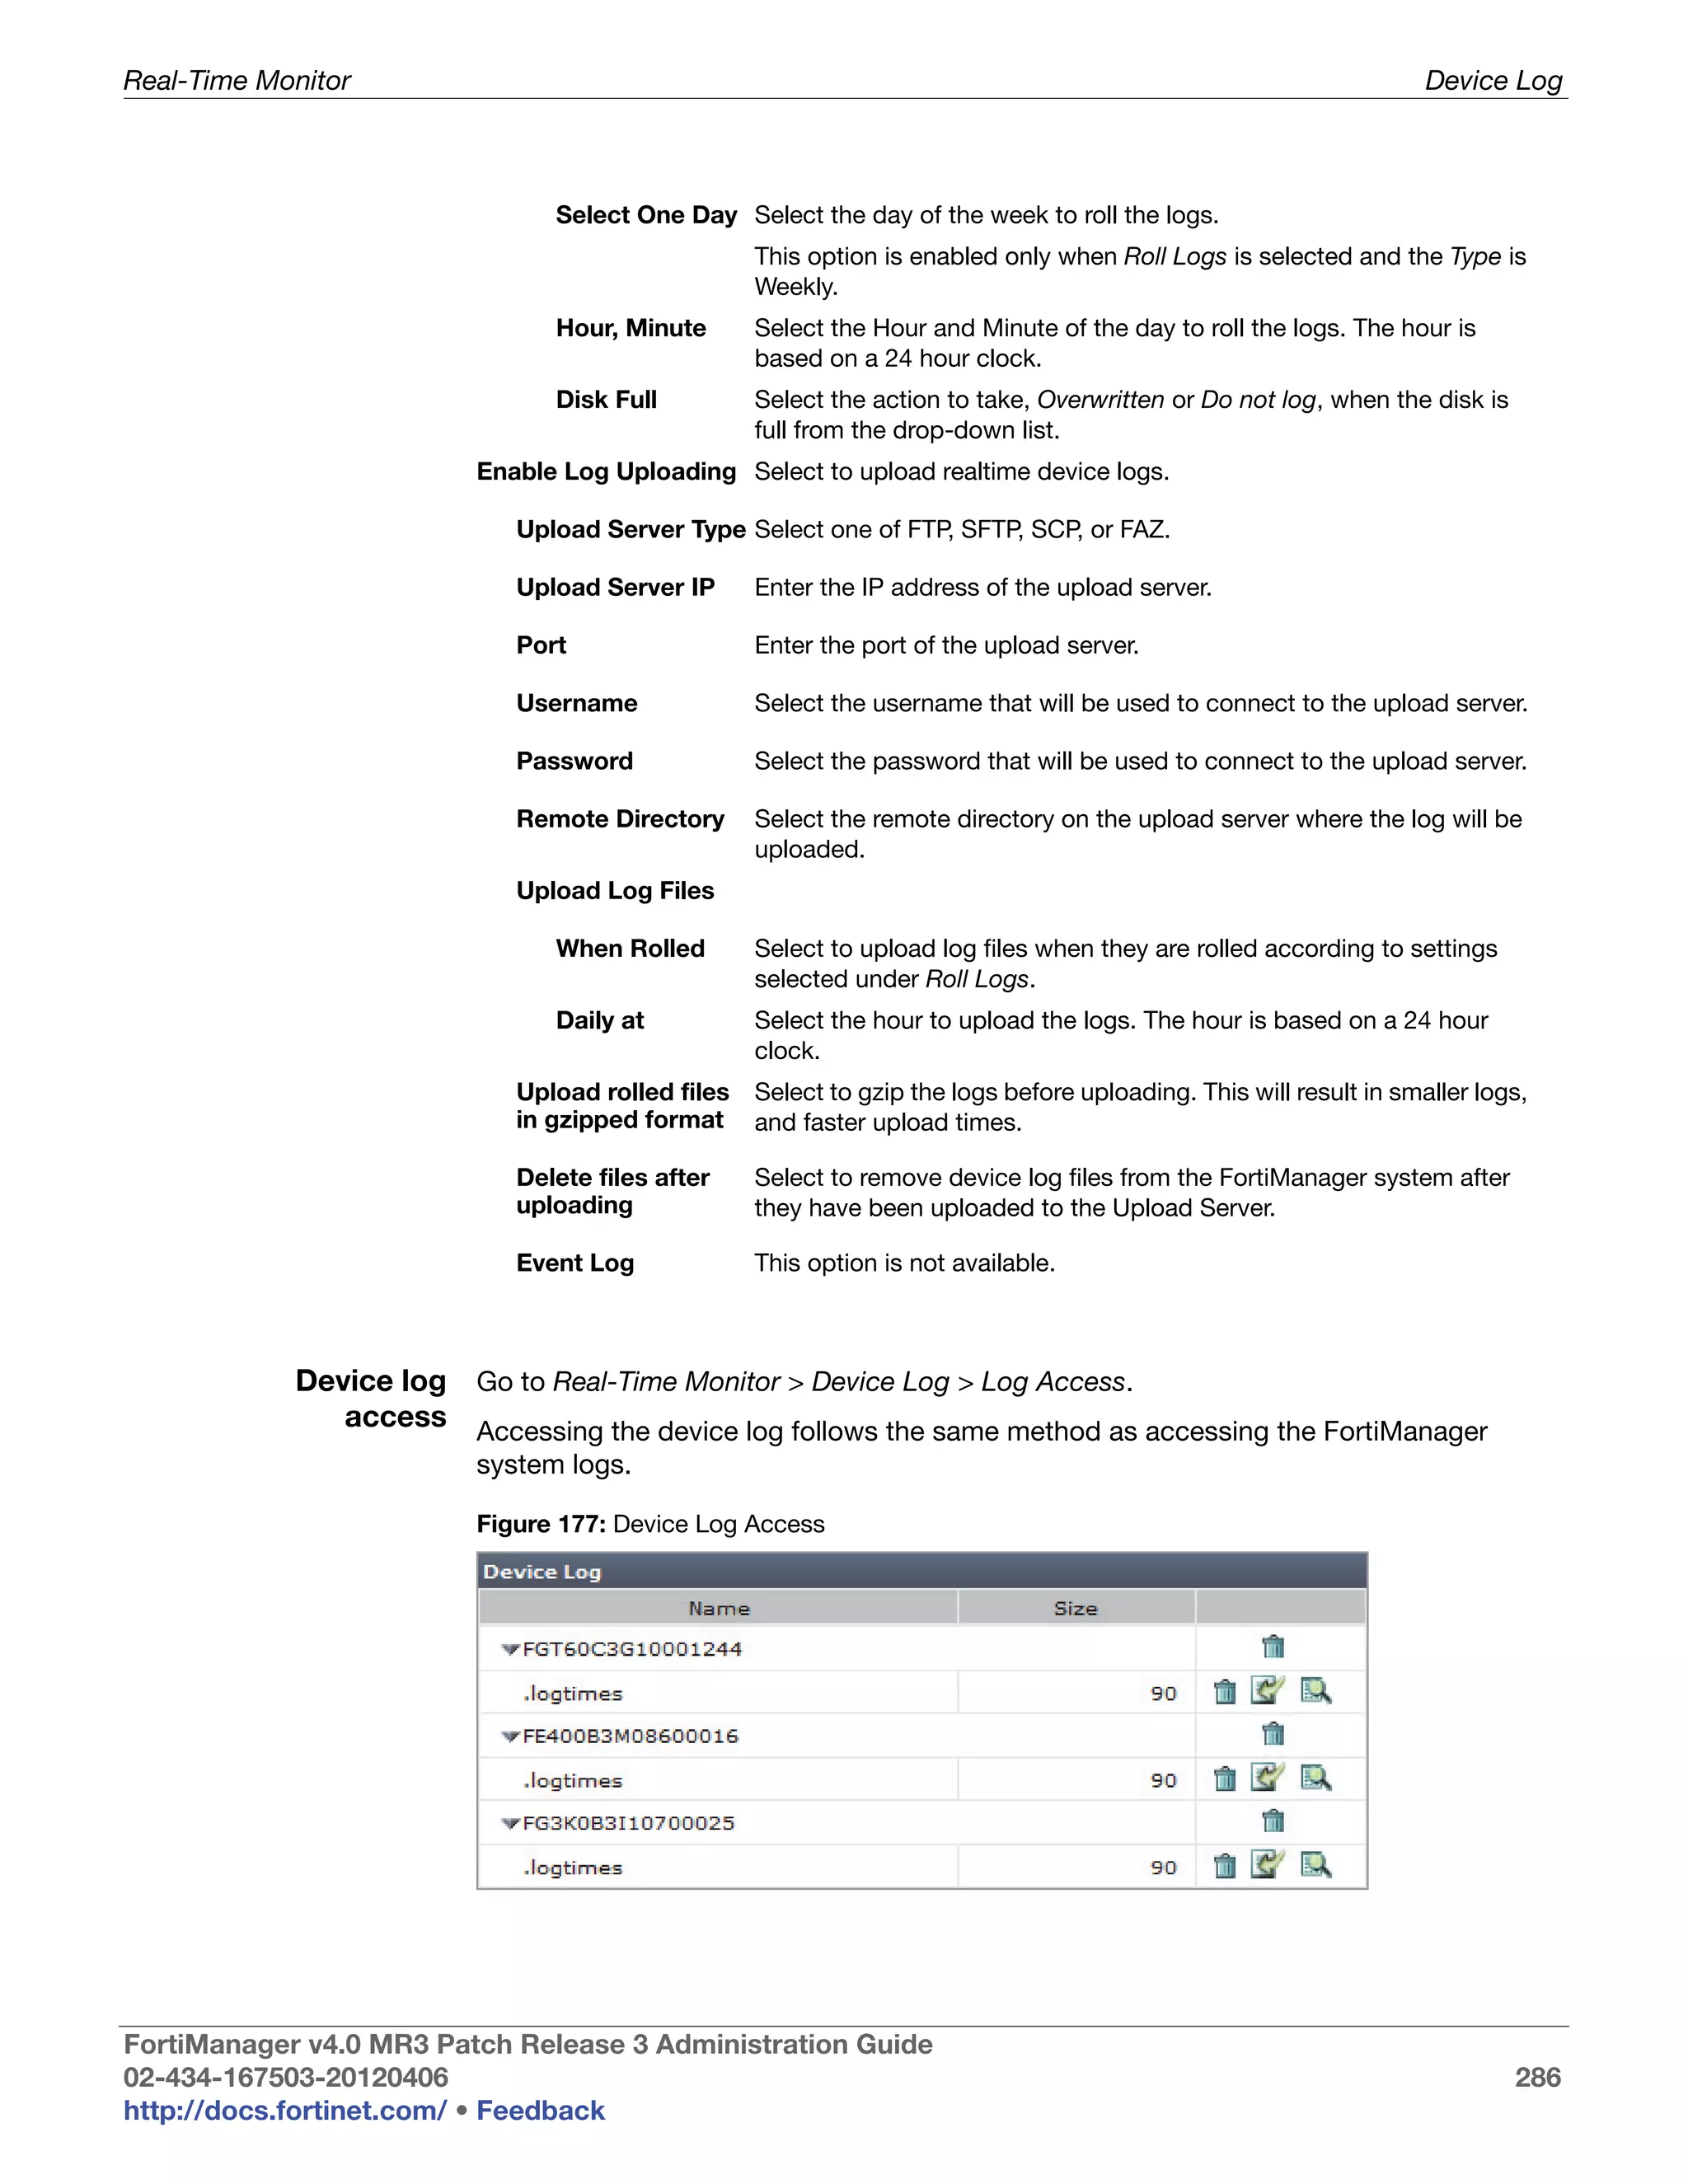
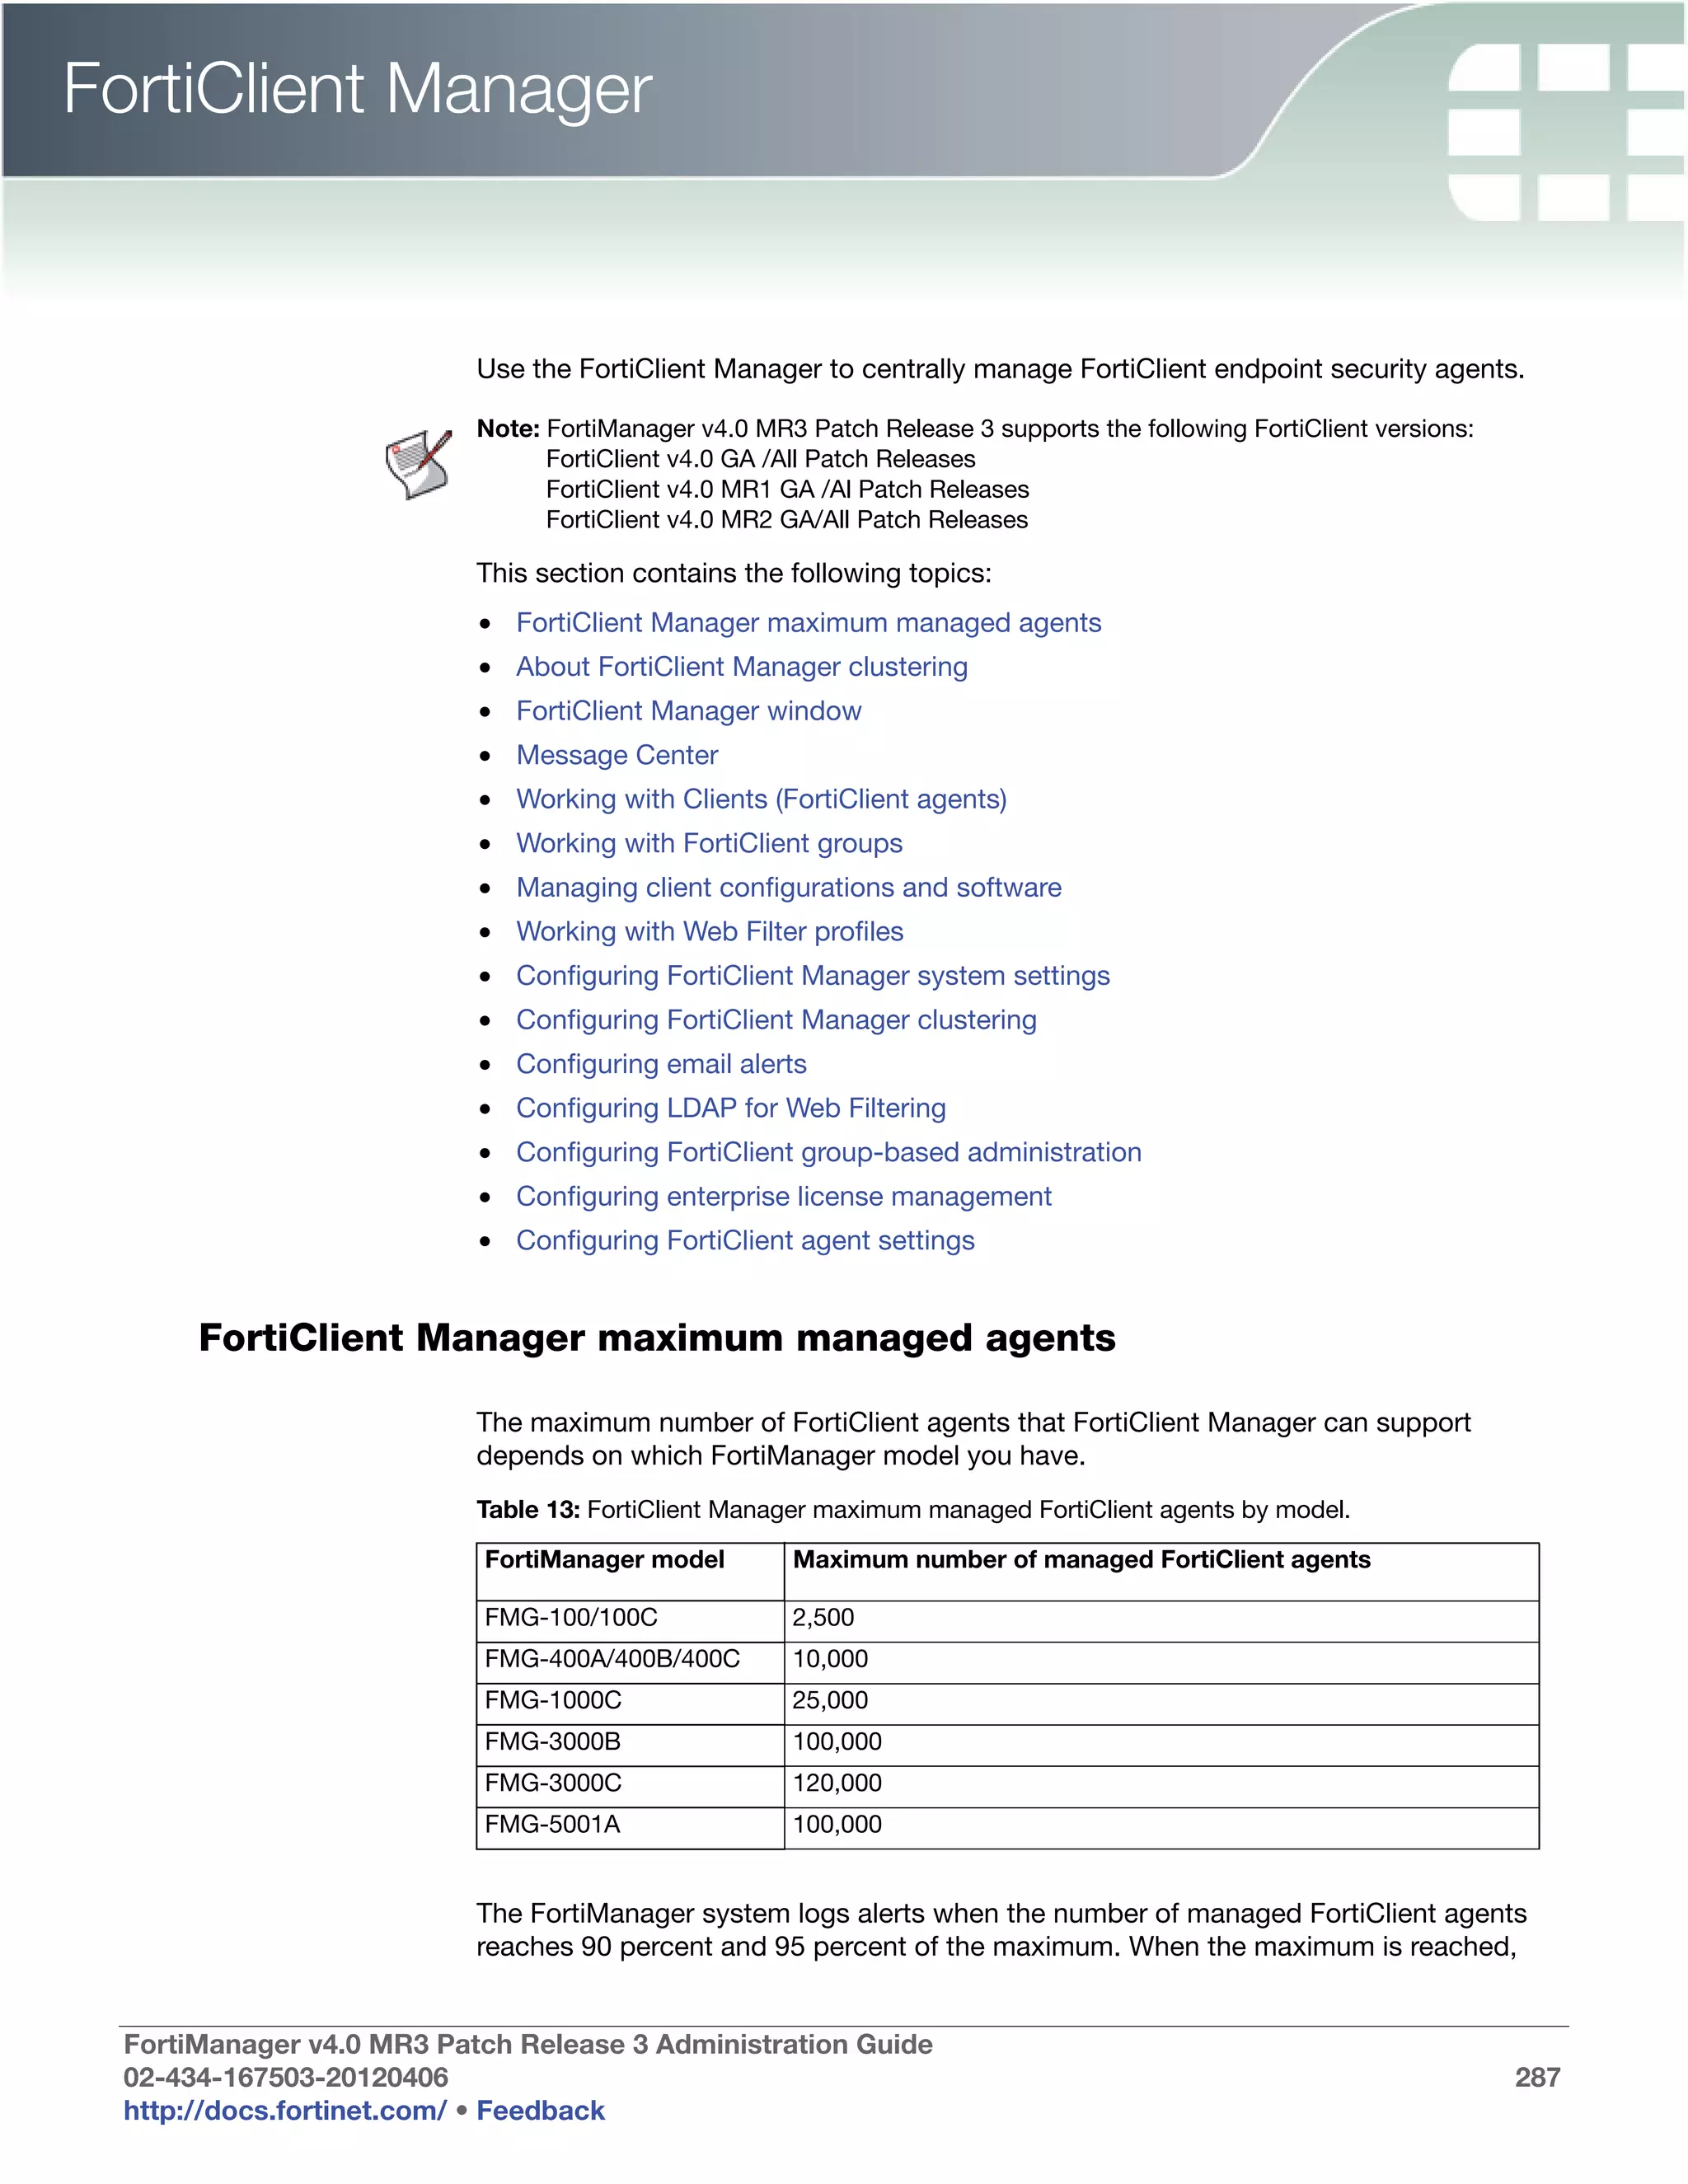
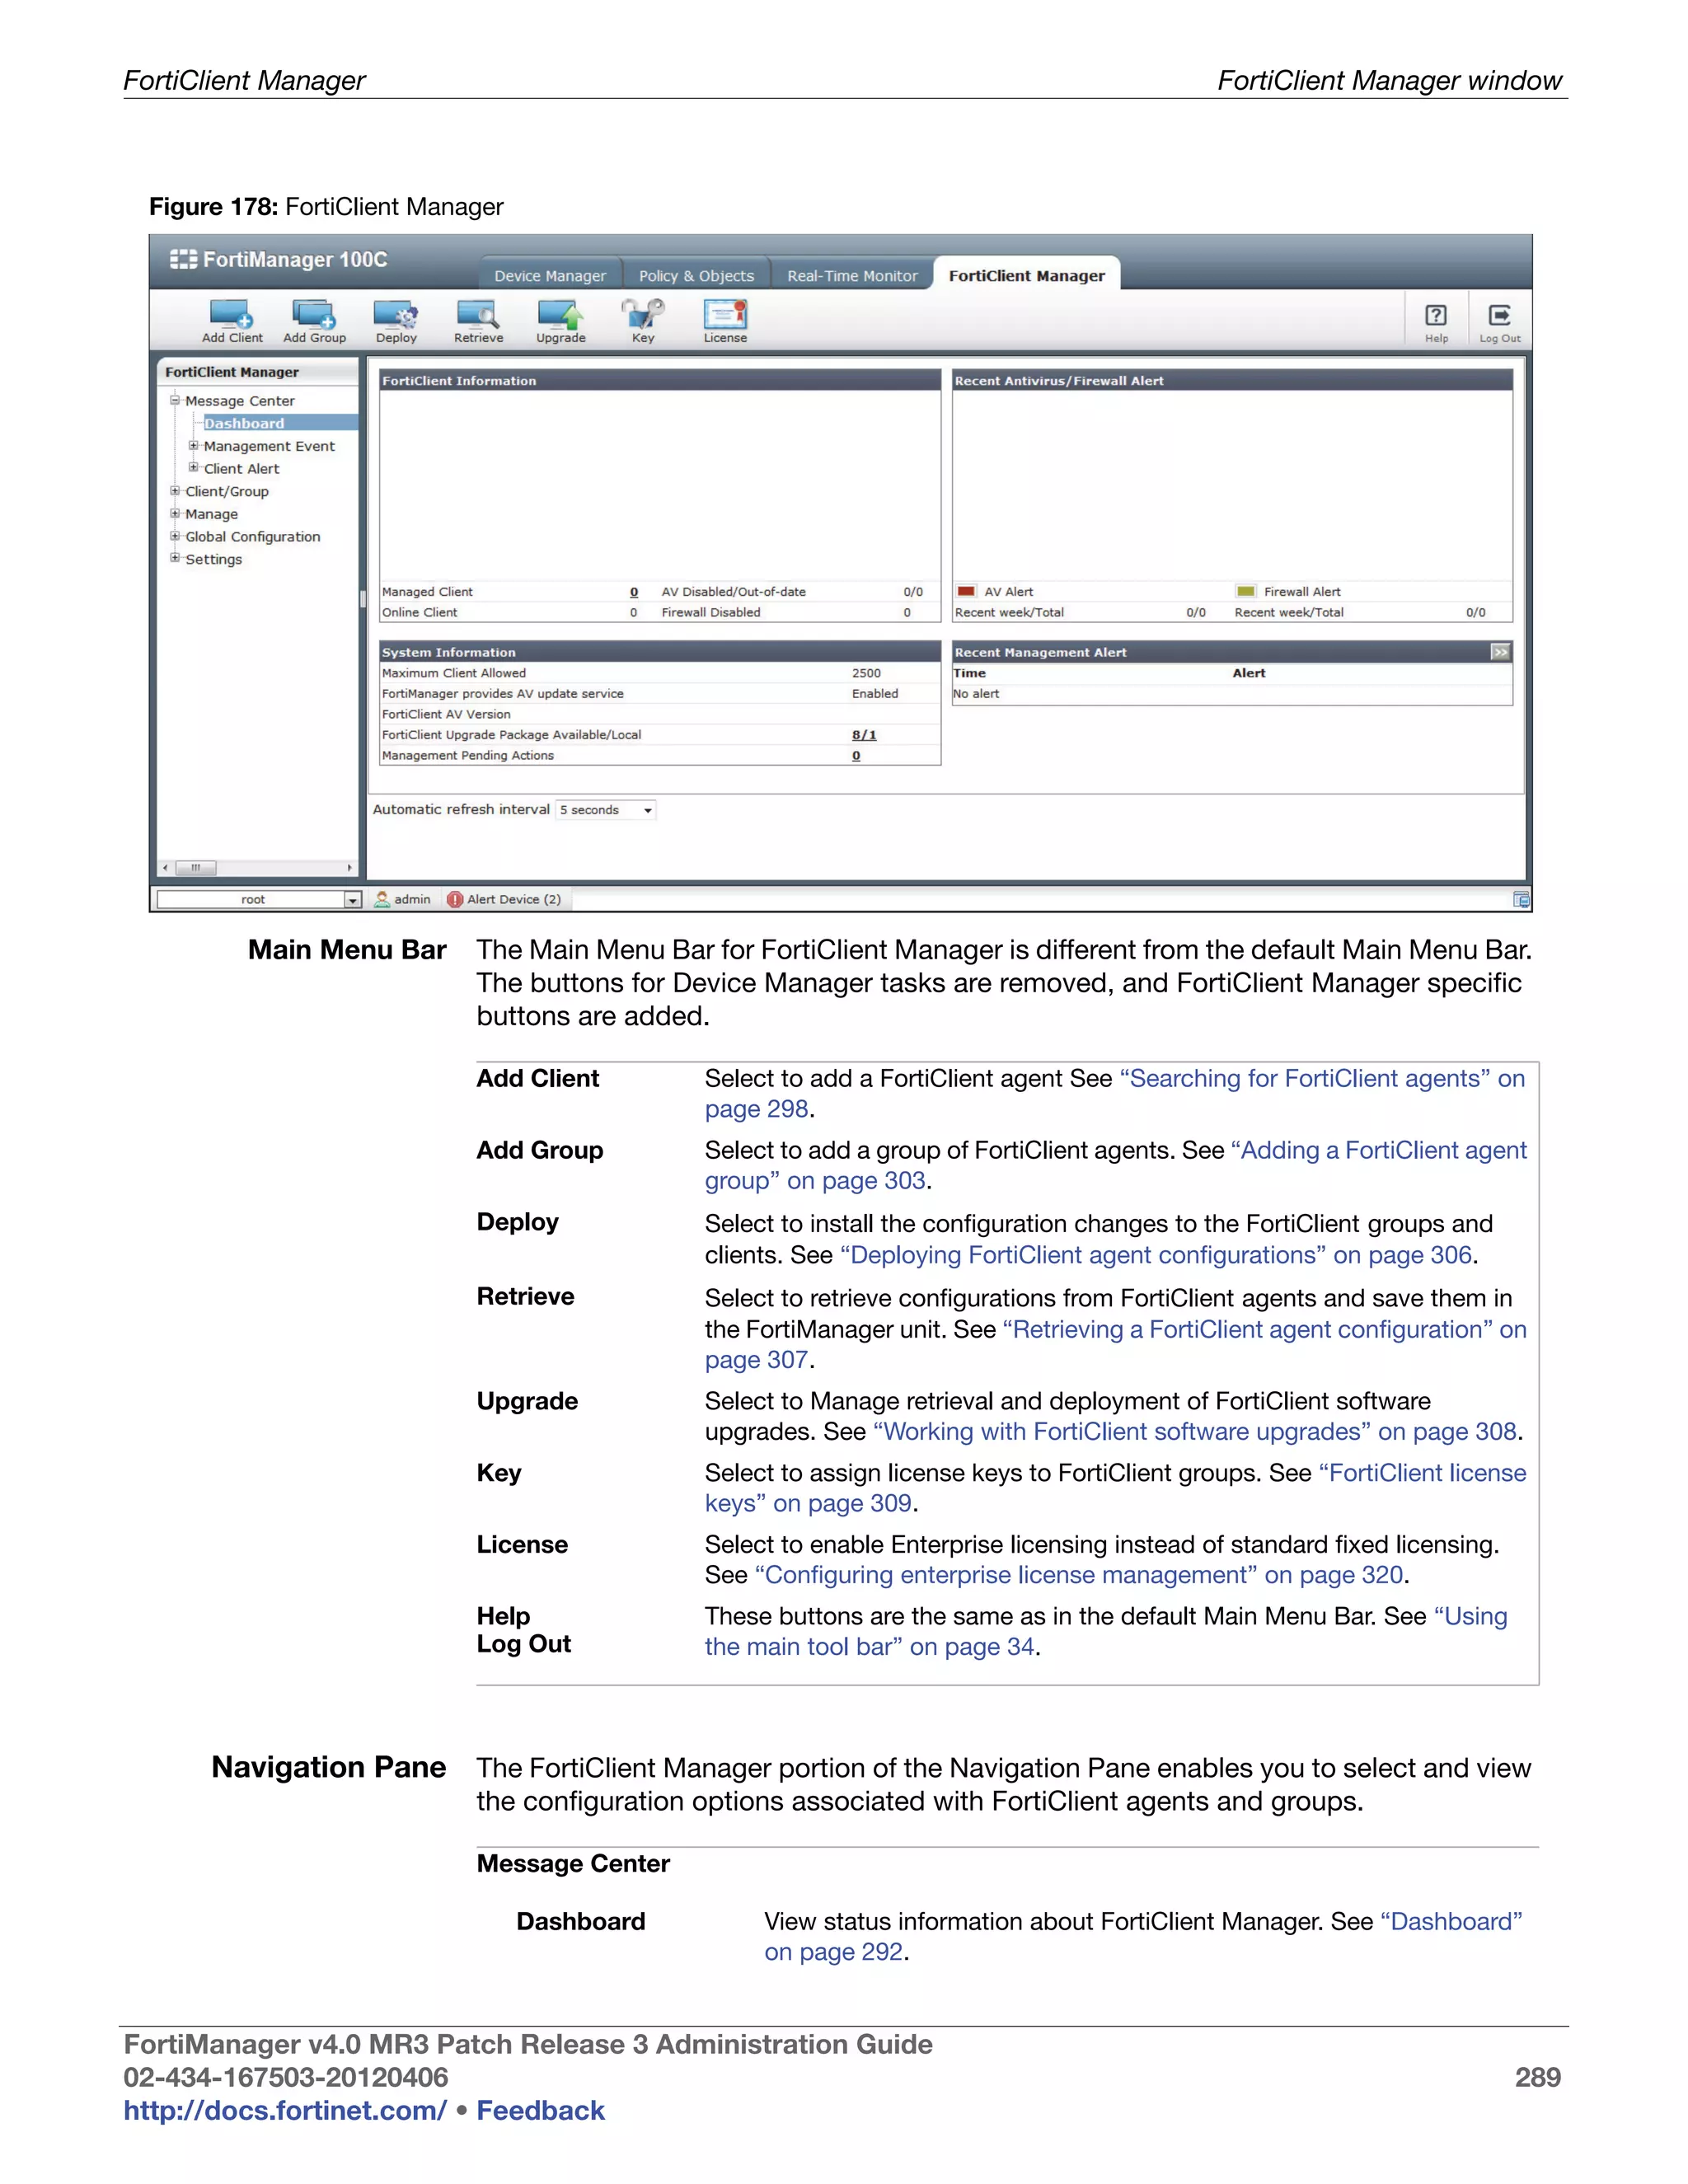
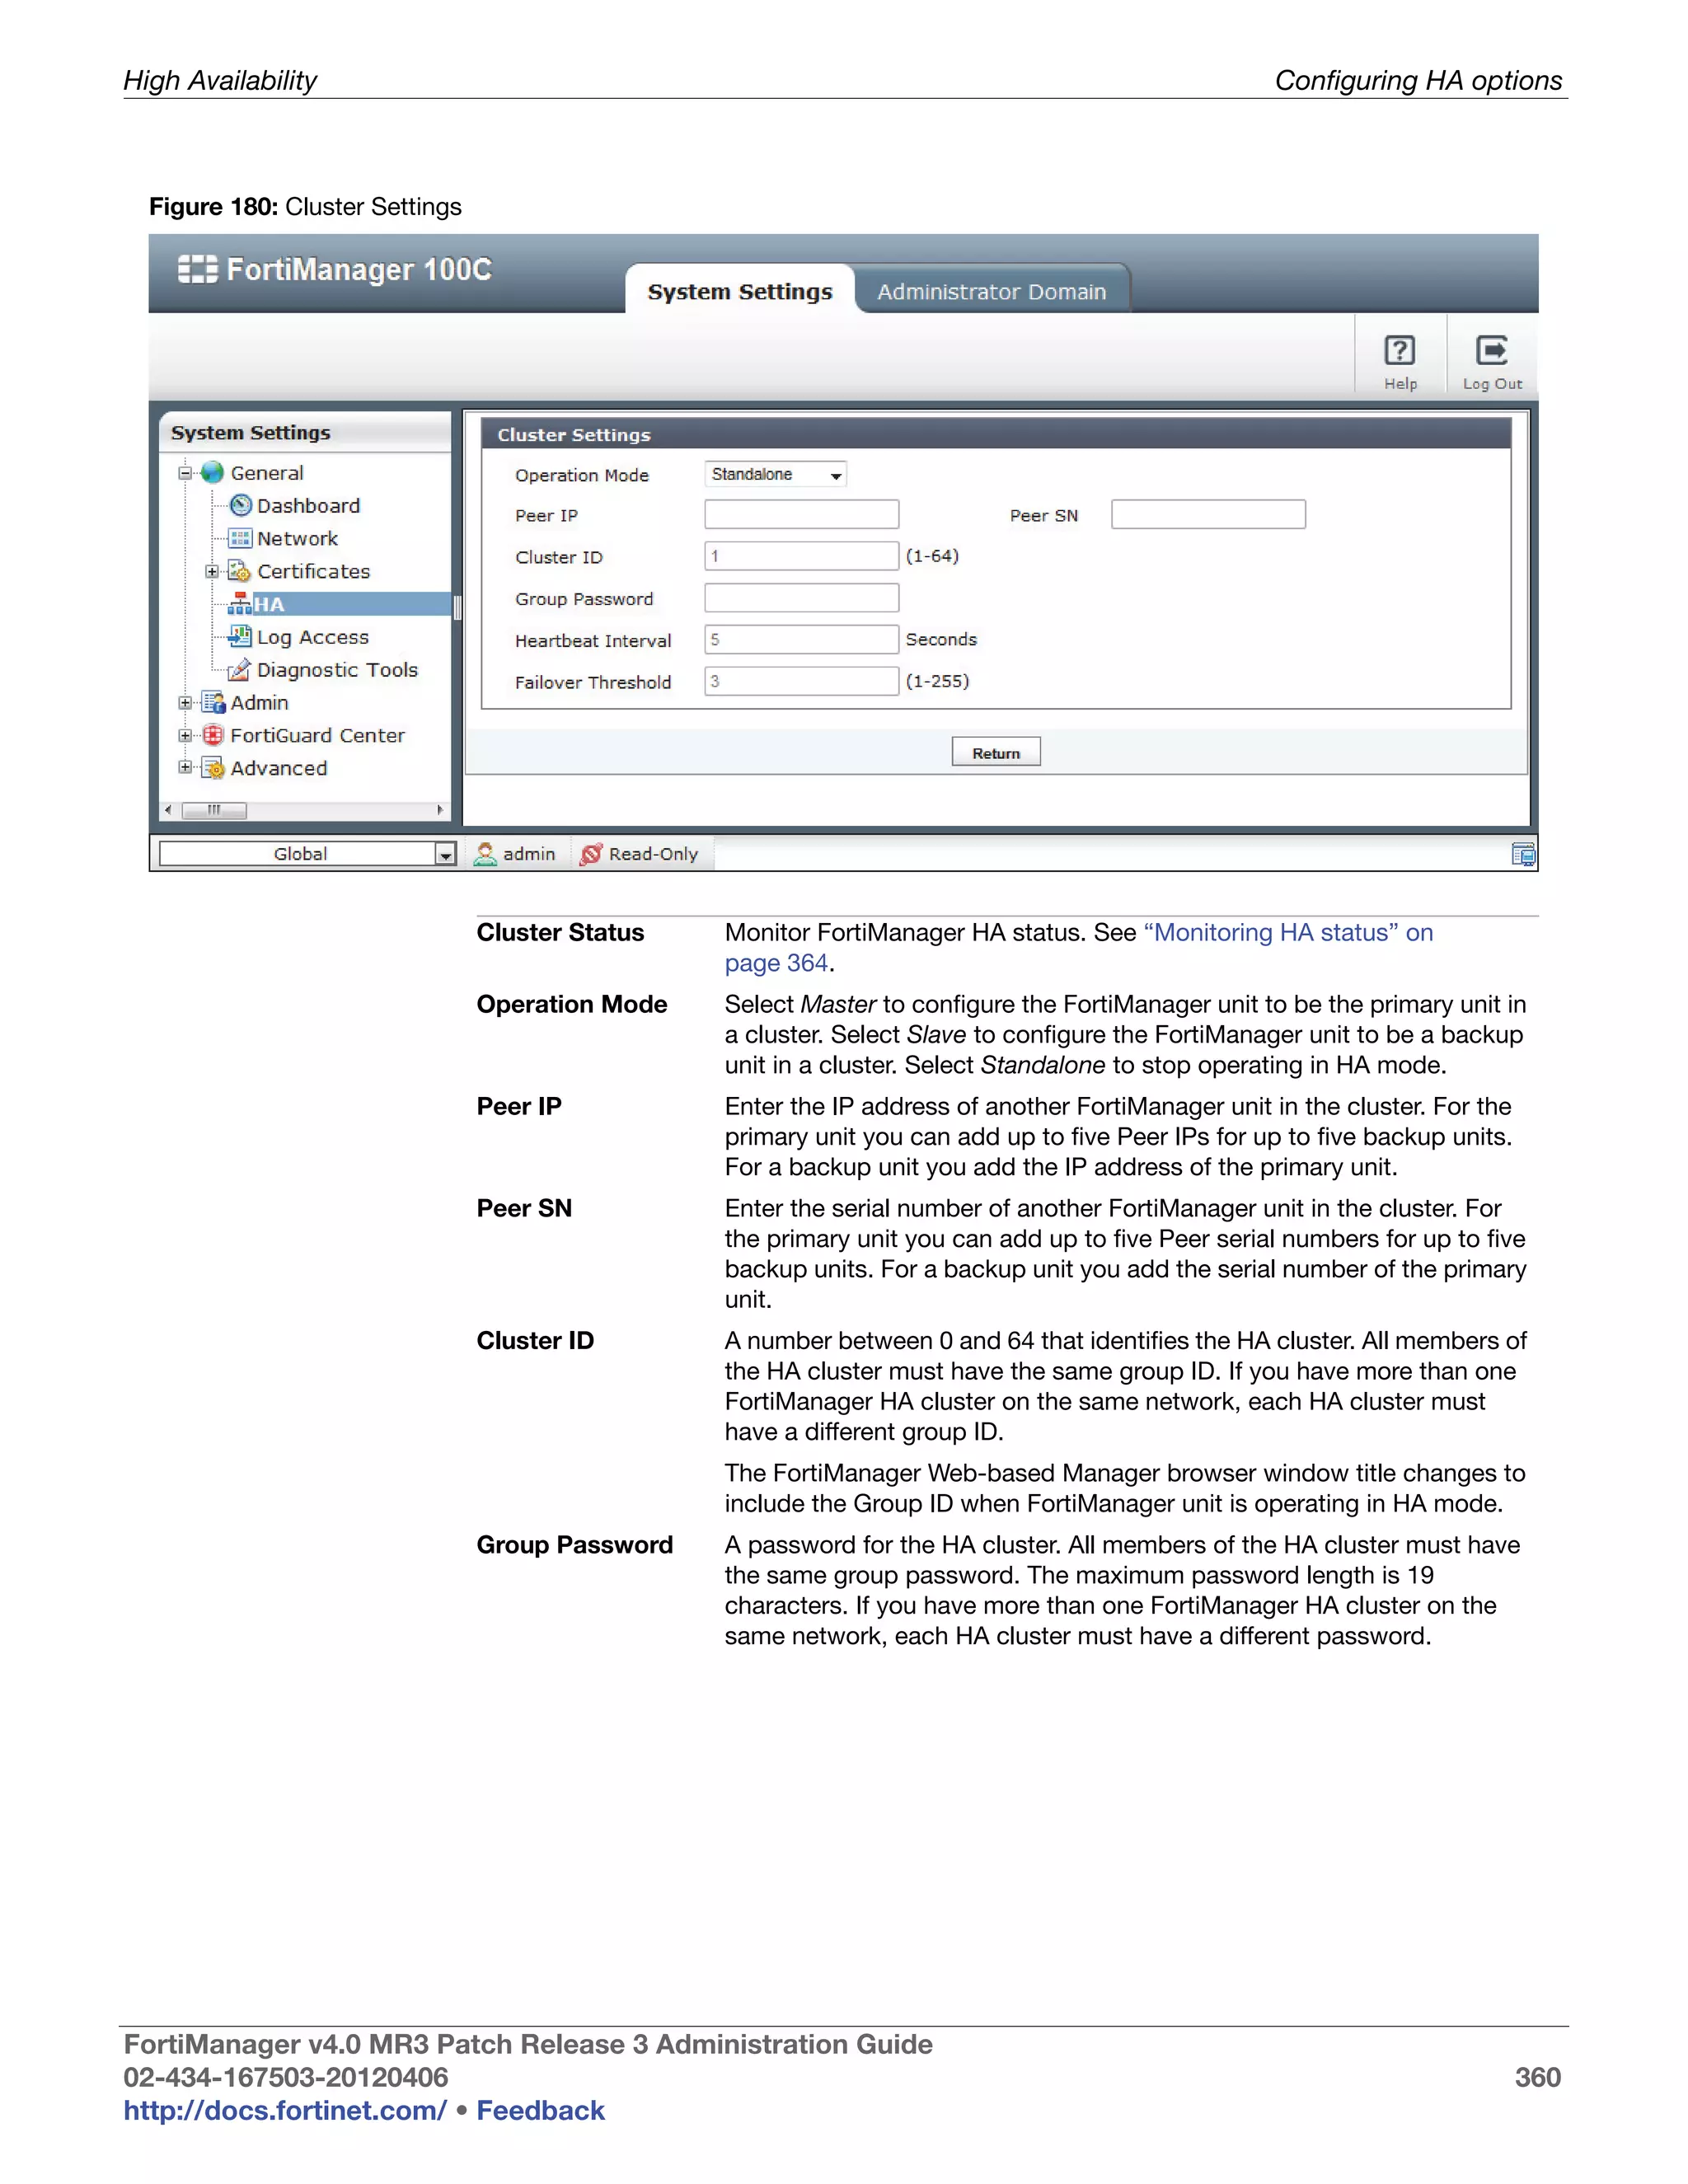
This document provides an overview of the FortiManager system including key features, documentation resources, and basic configuration instructions. It summarizes the new features introduced in version 4.0 MR3 including improvements to global policies, administrative domains, installation wizards, policy usability, FortiToken support, management models, licensing, and the web-based manager. It also describes the FortiManager management module and its role in centrally managing FortiGate devices and their configurations.


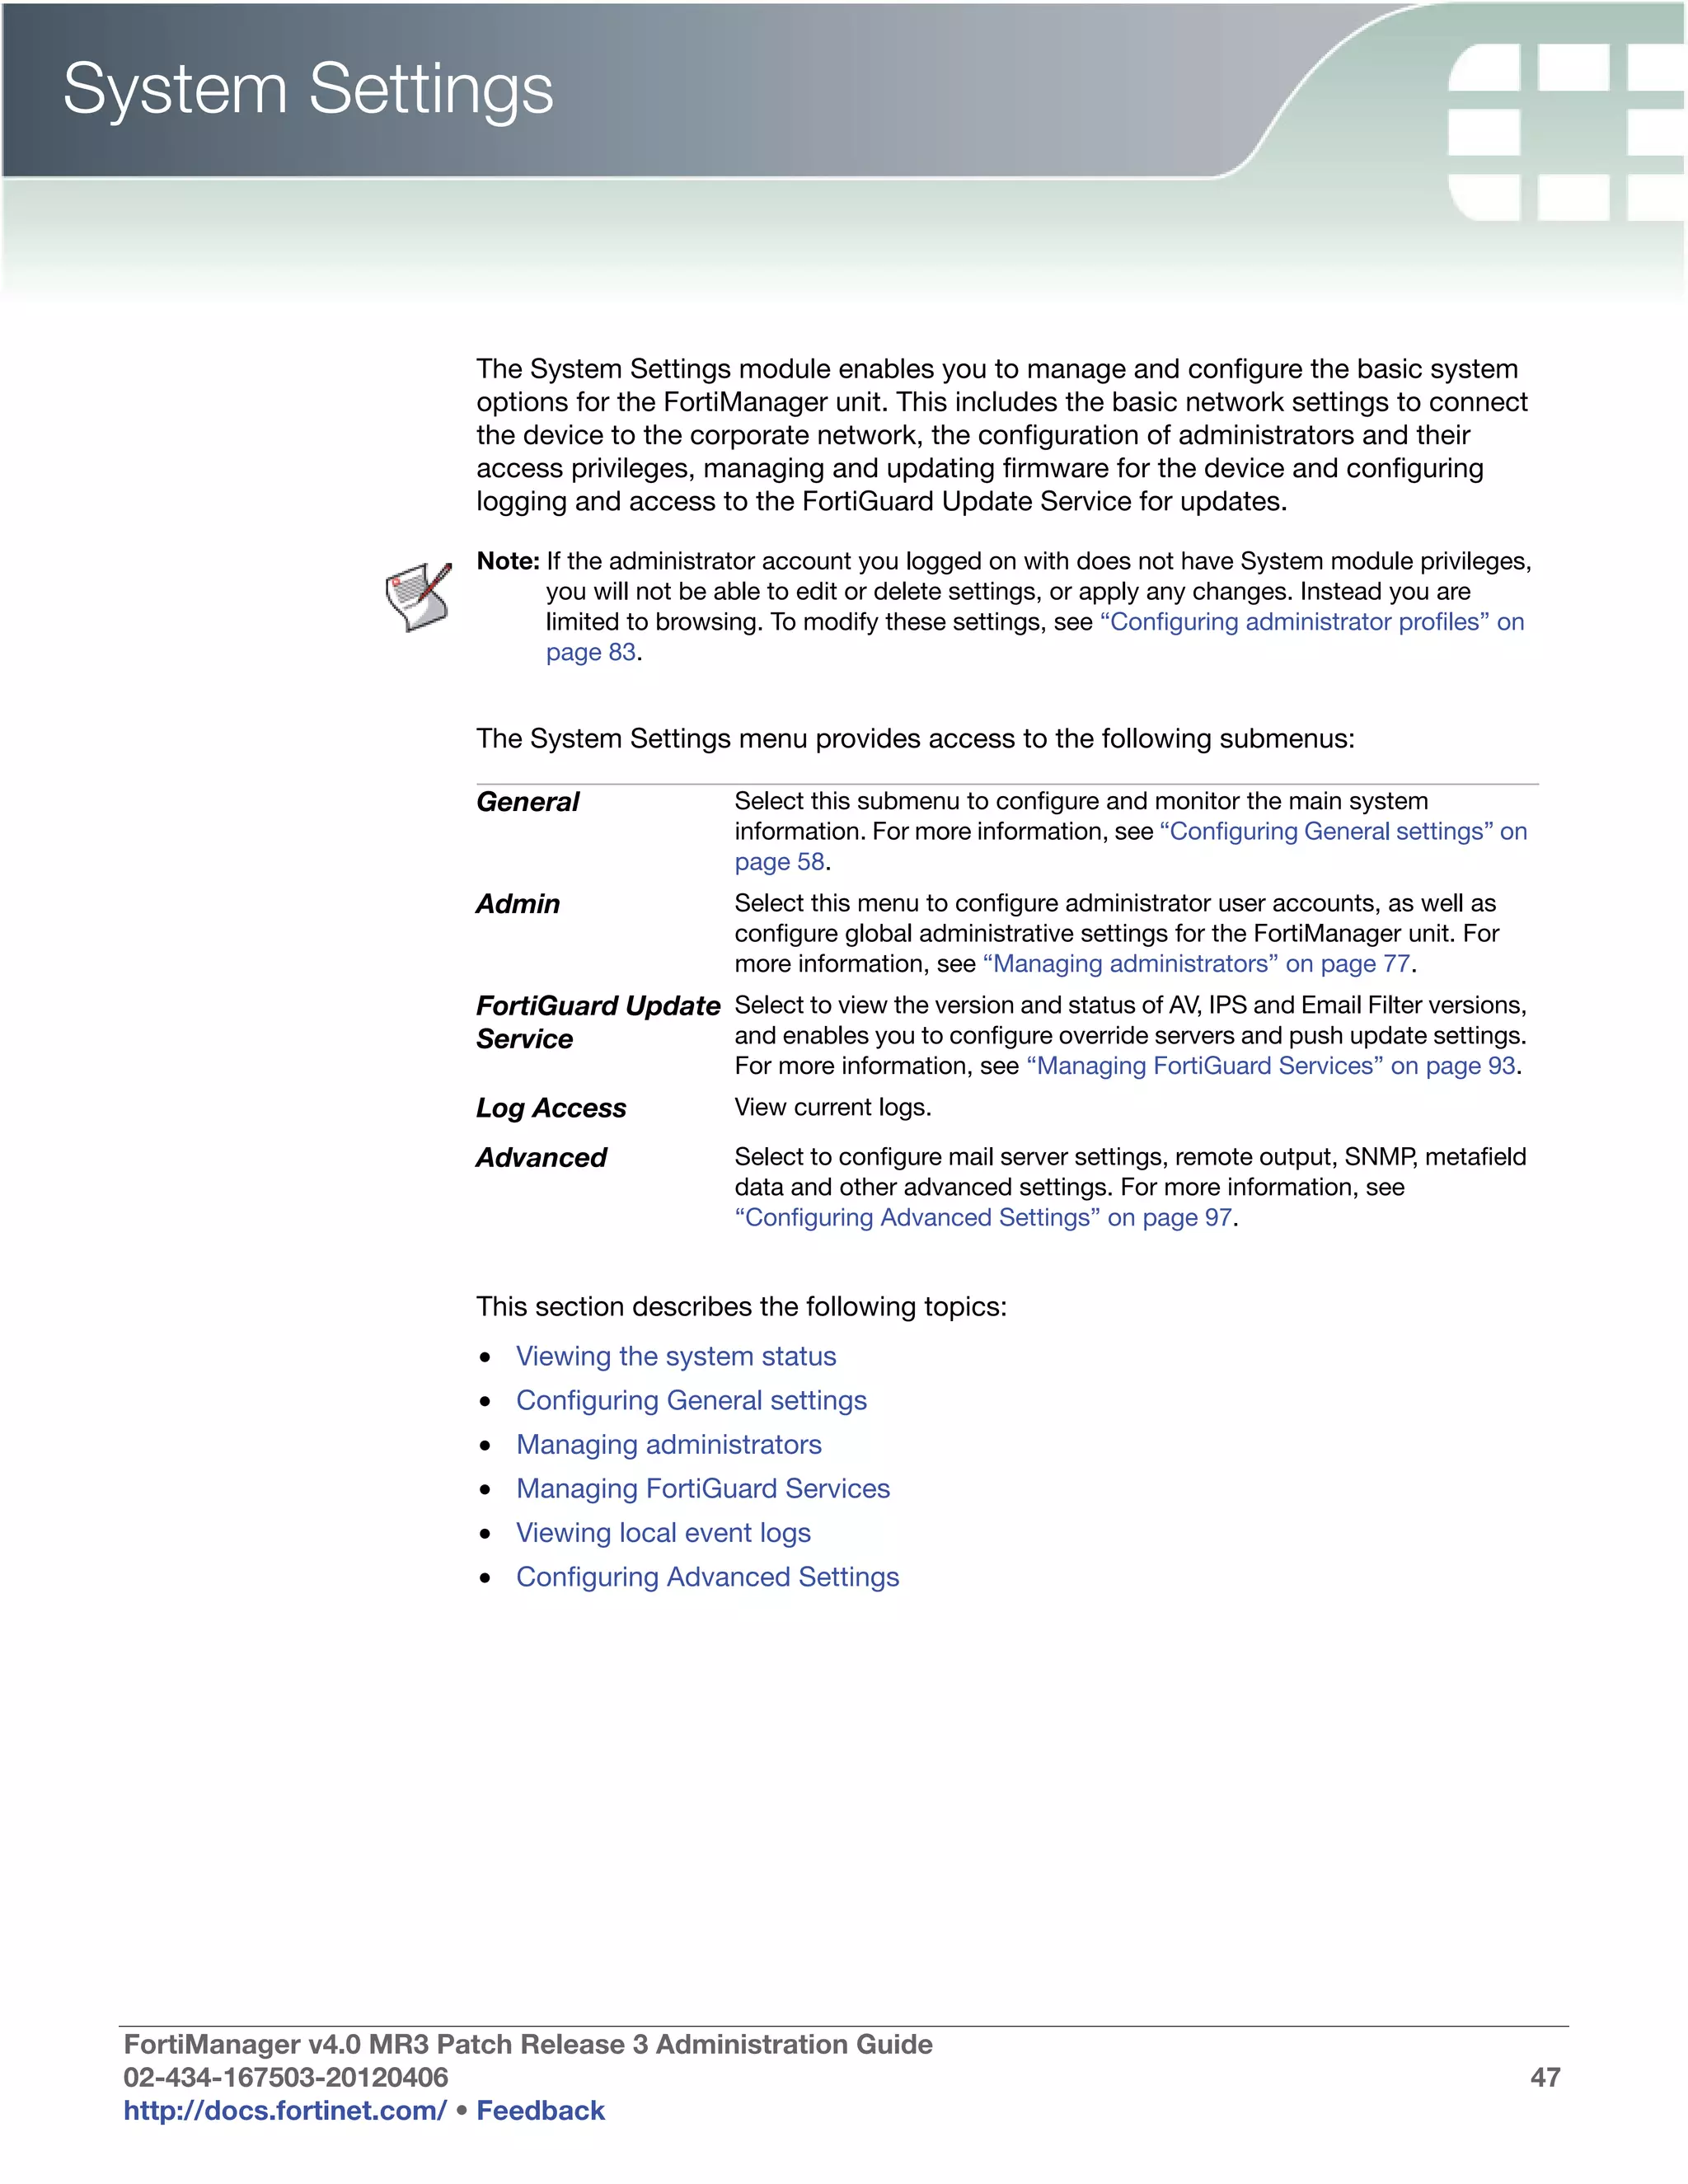
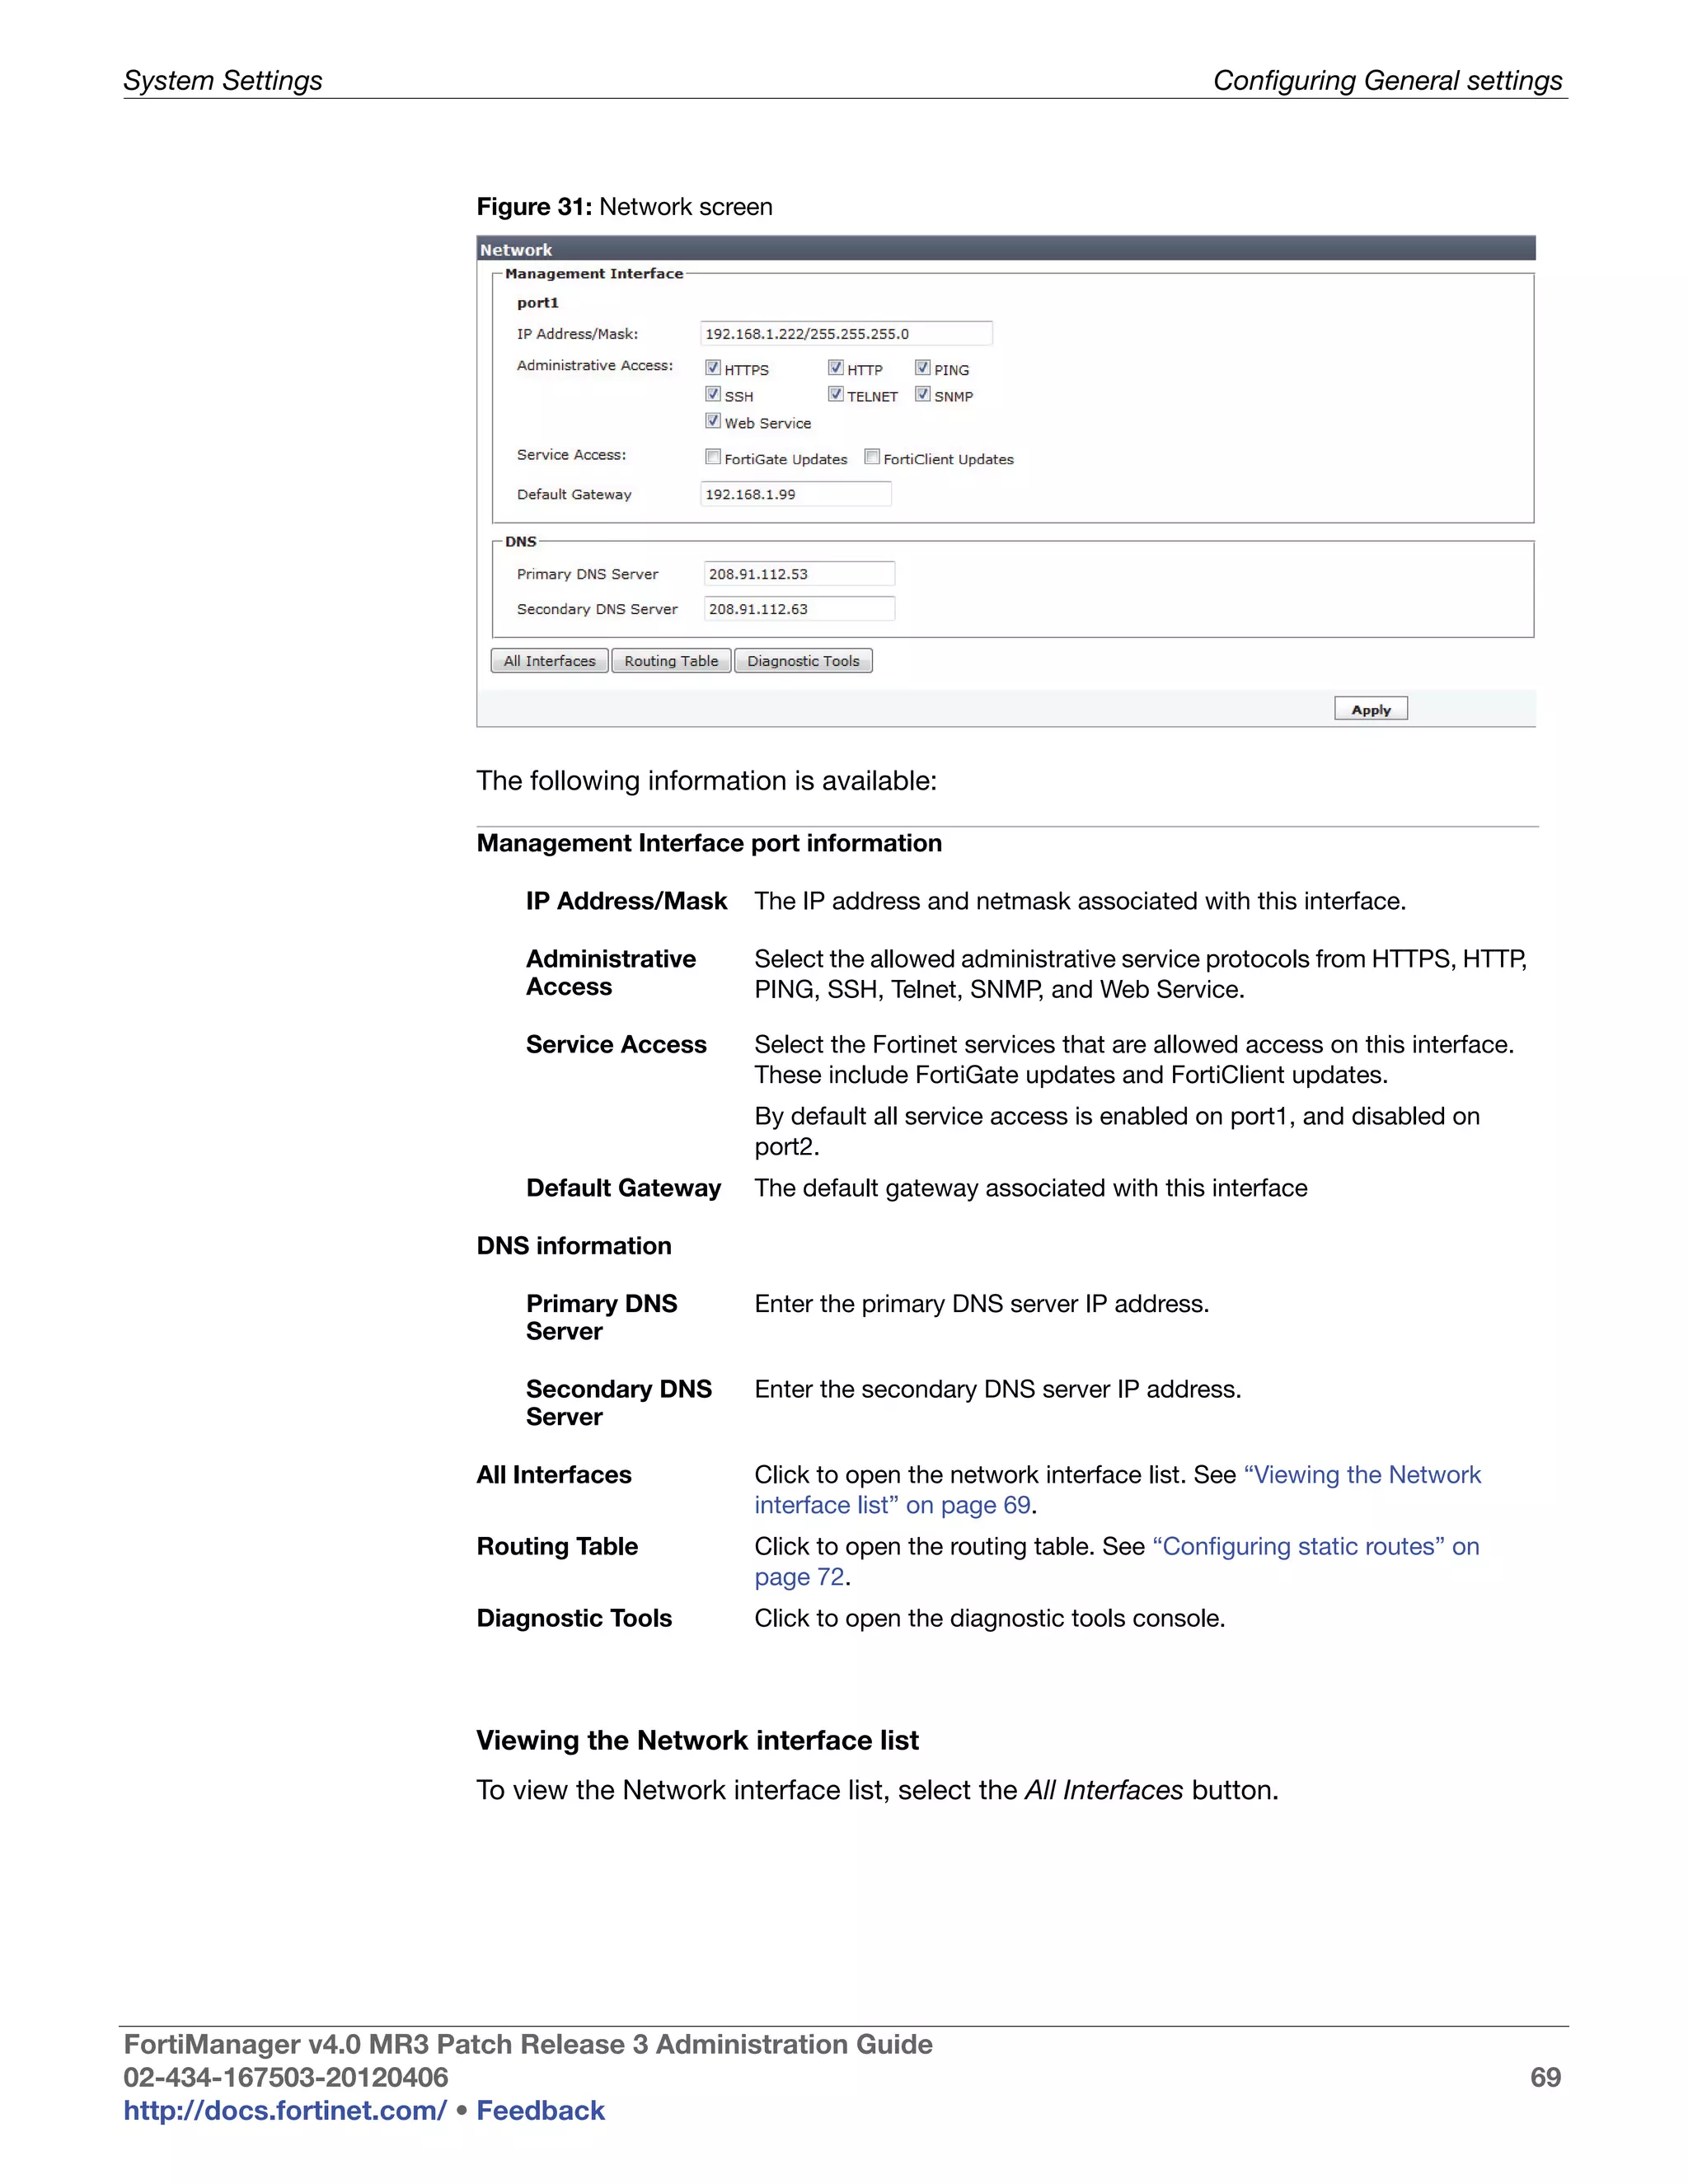
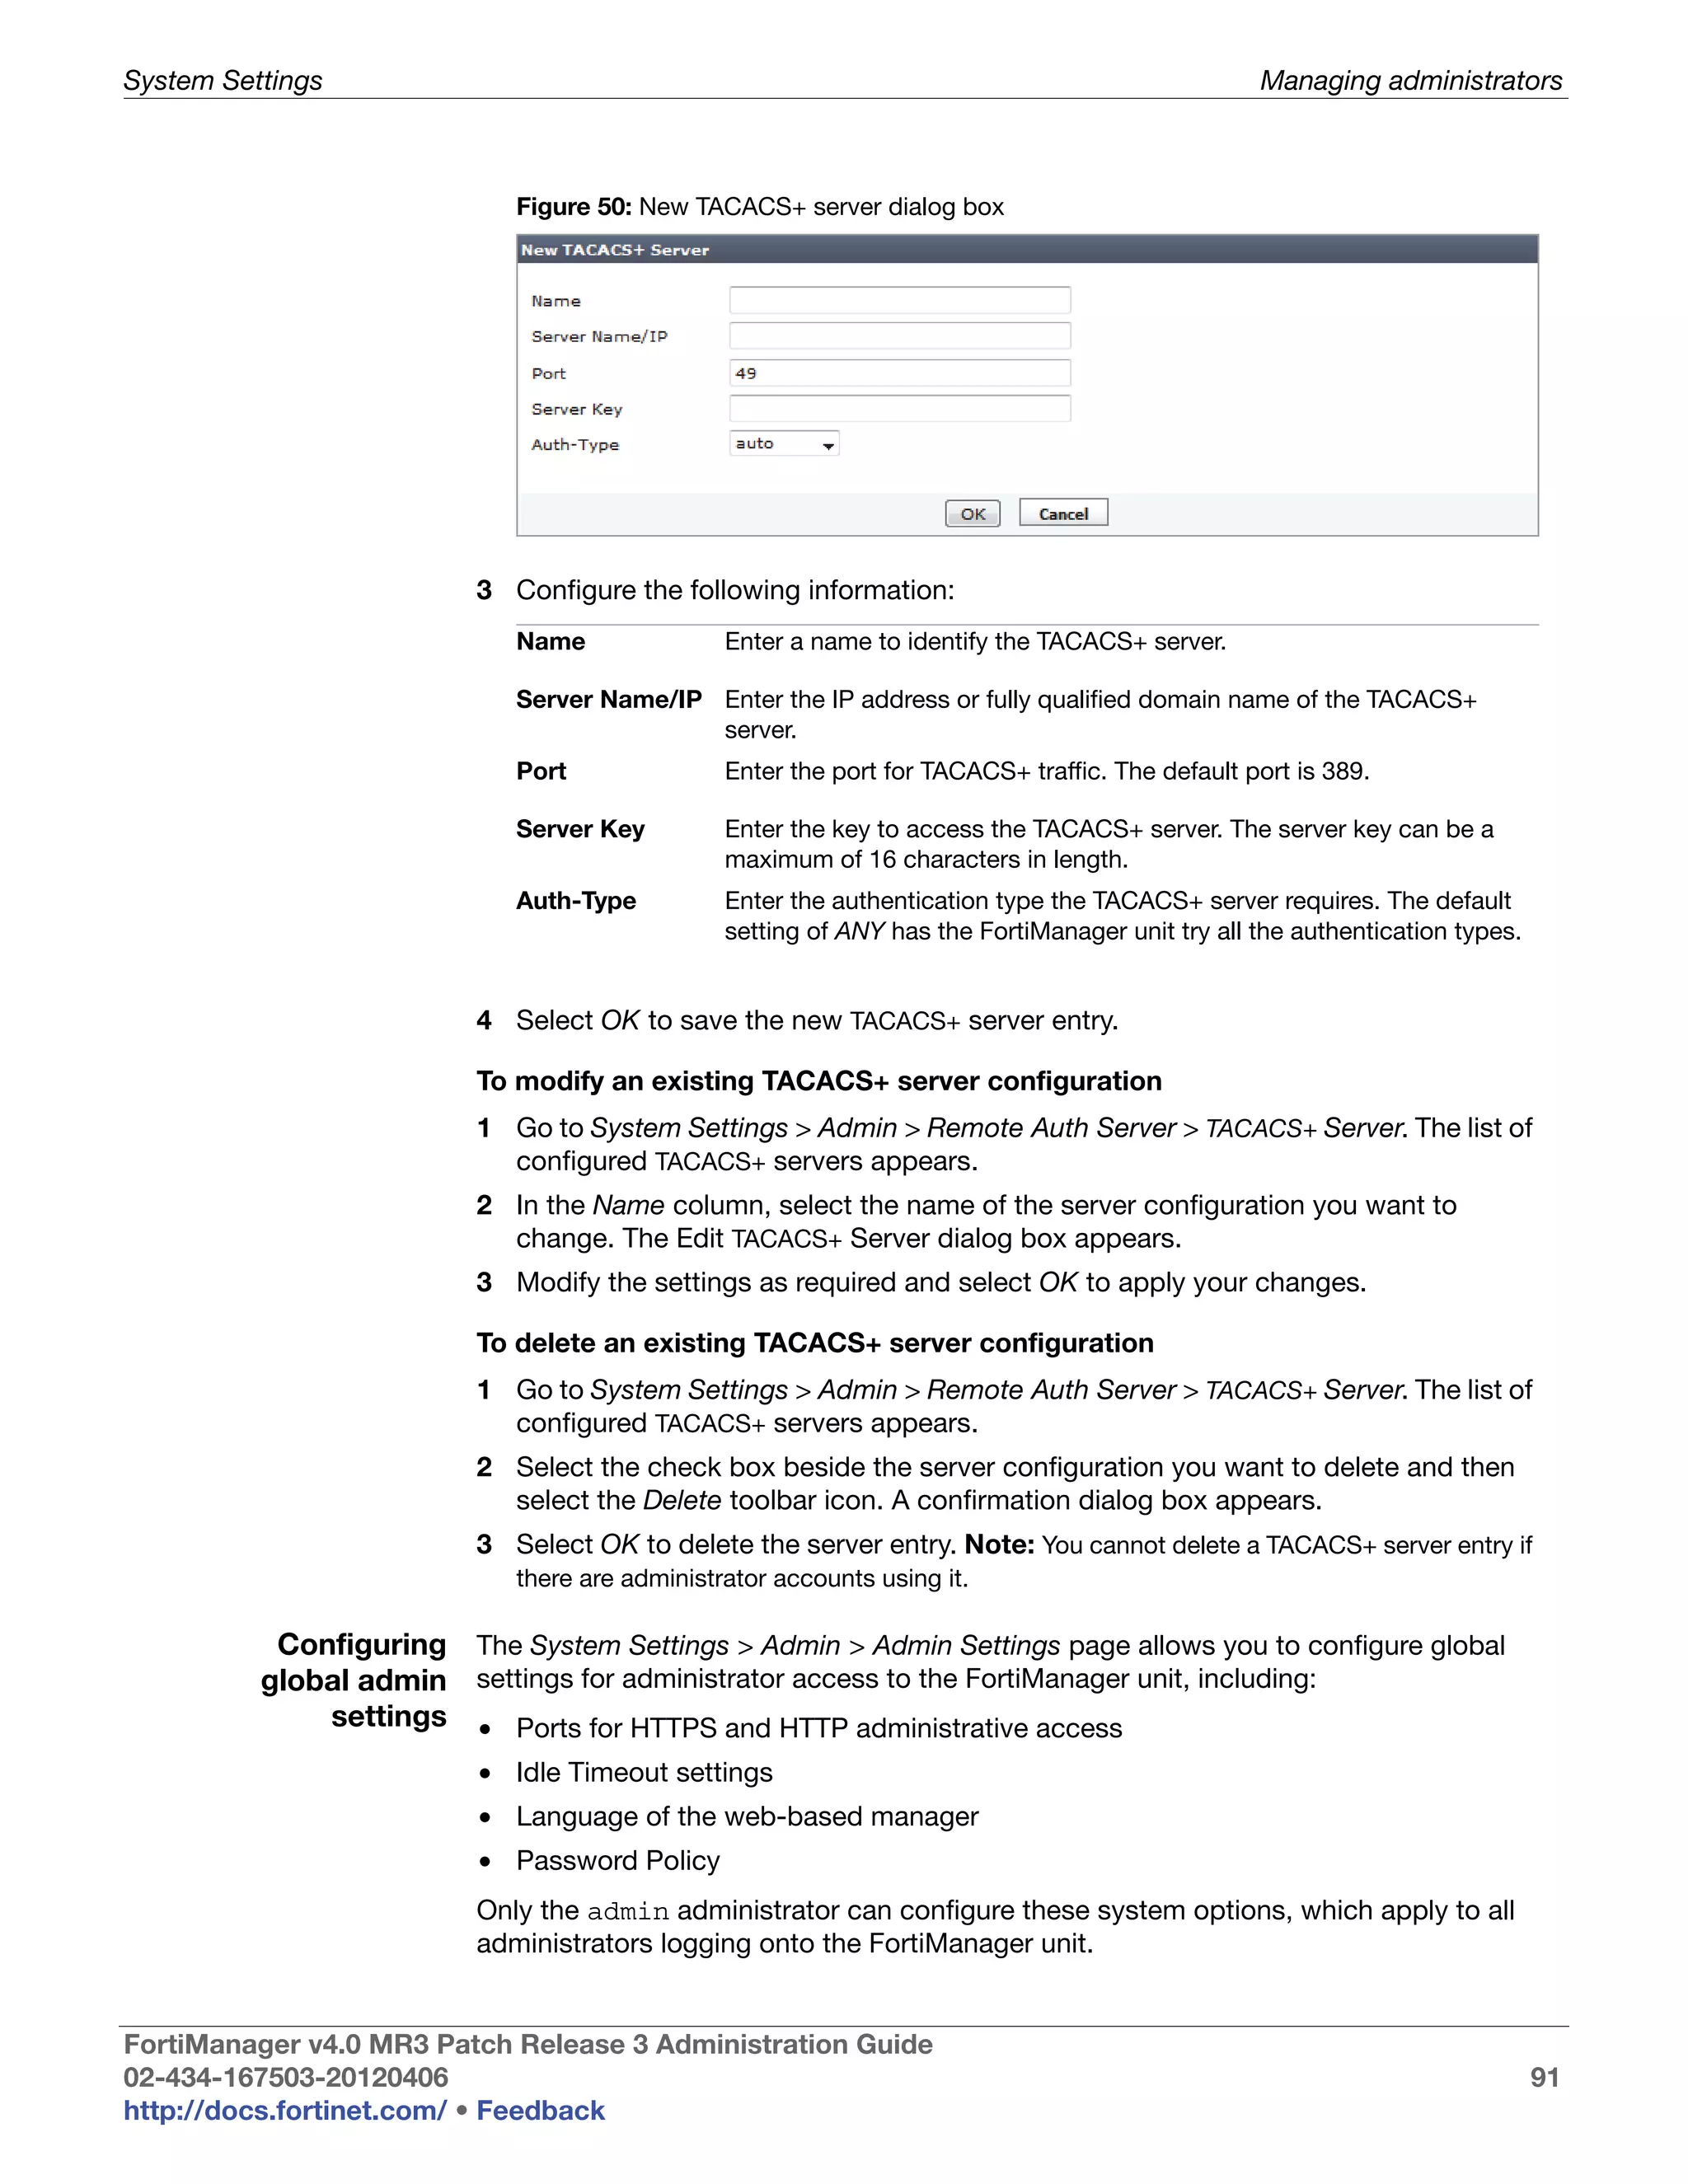
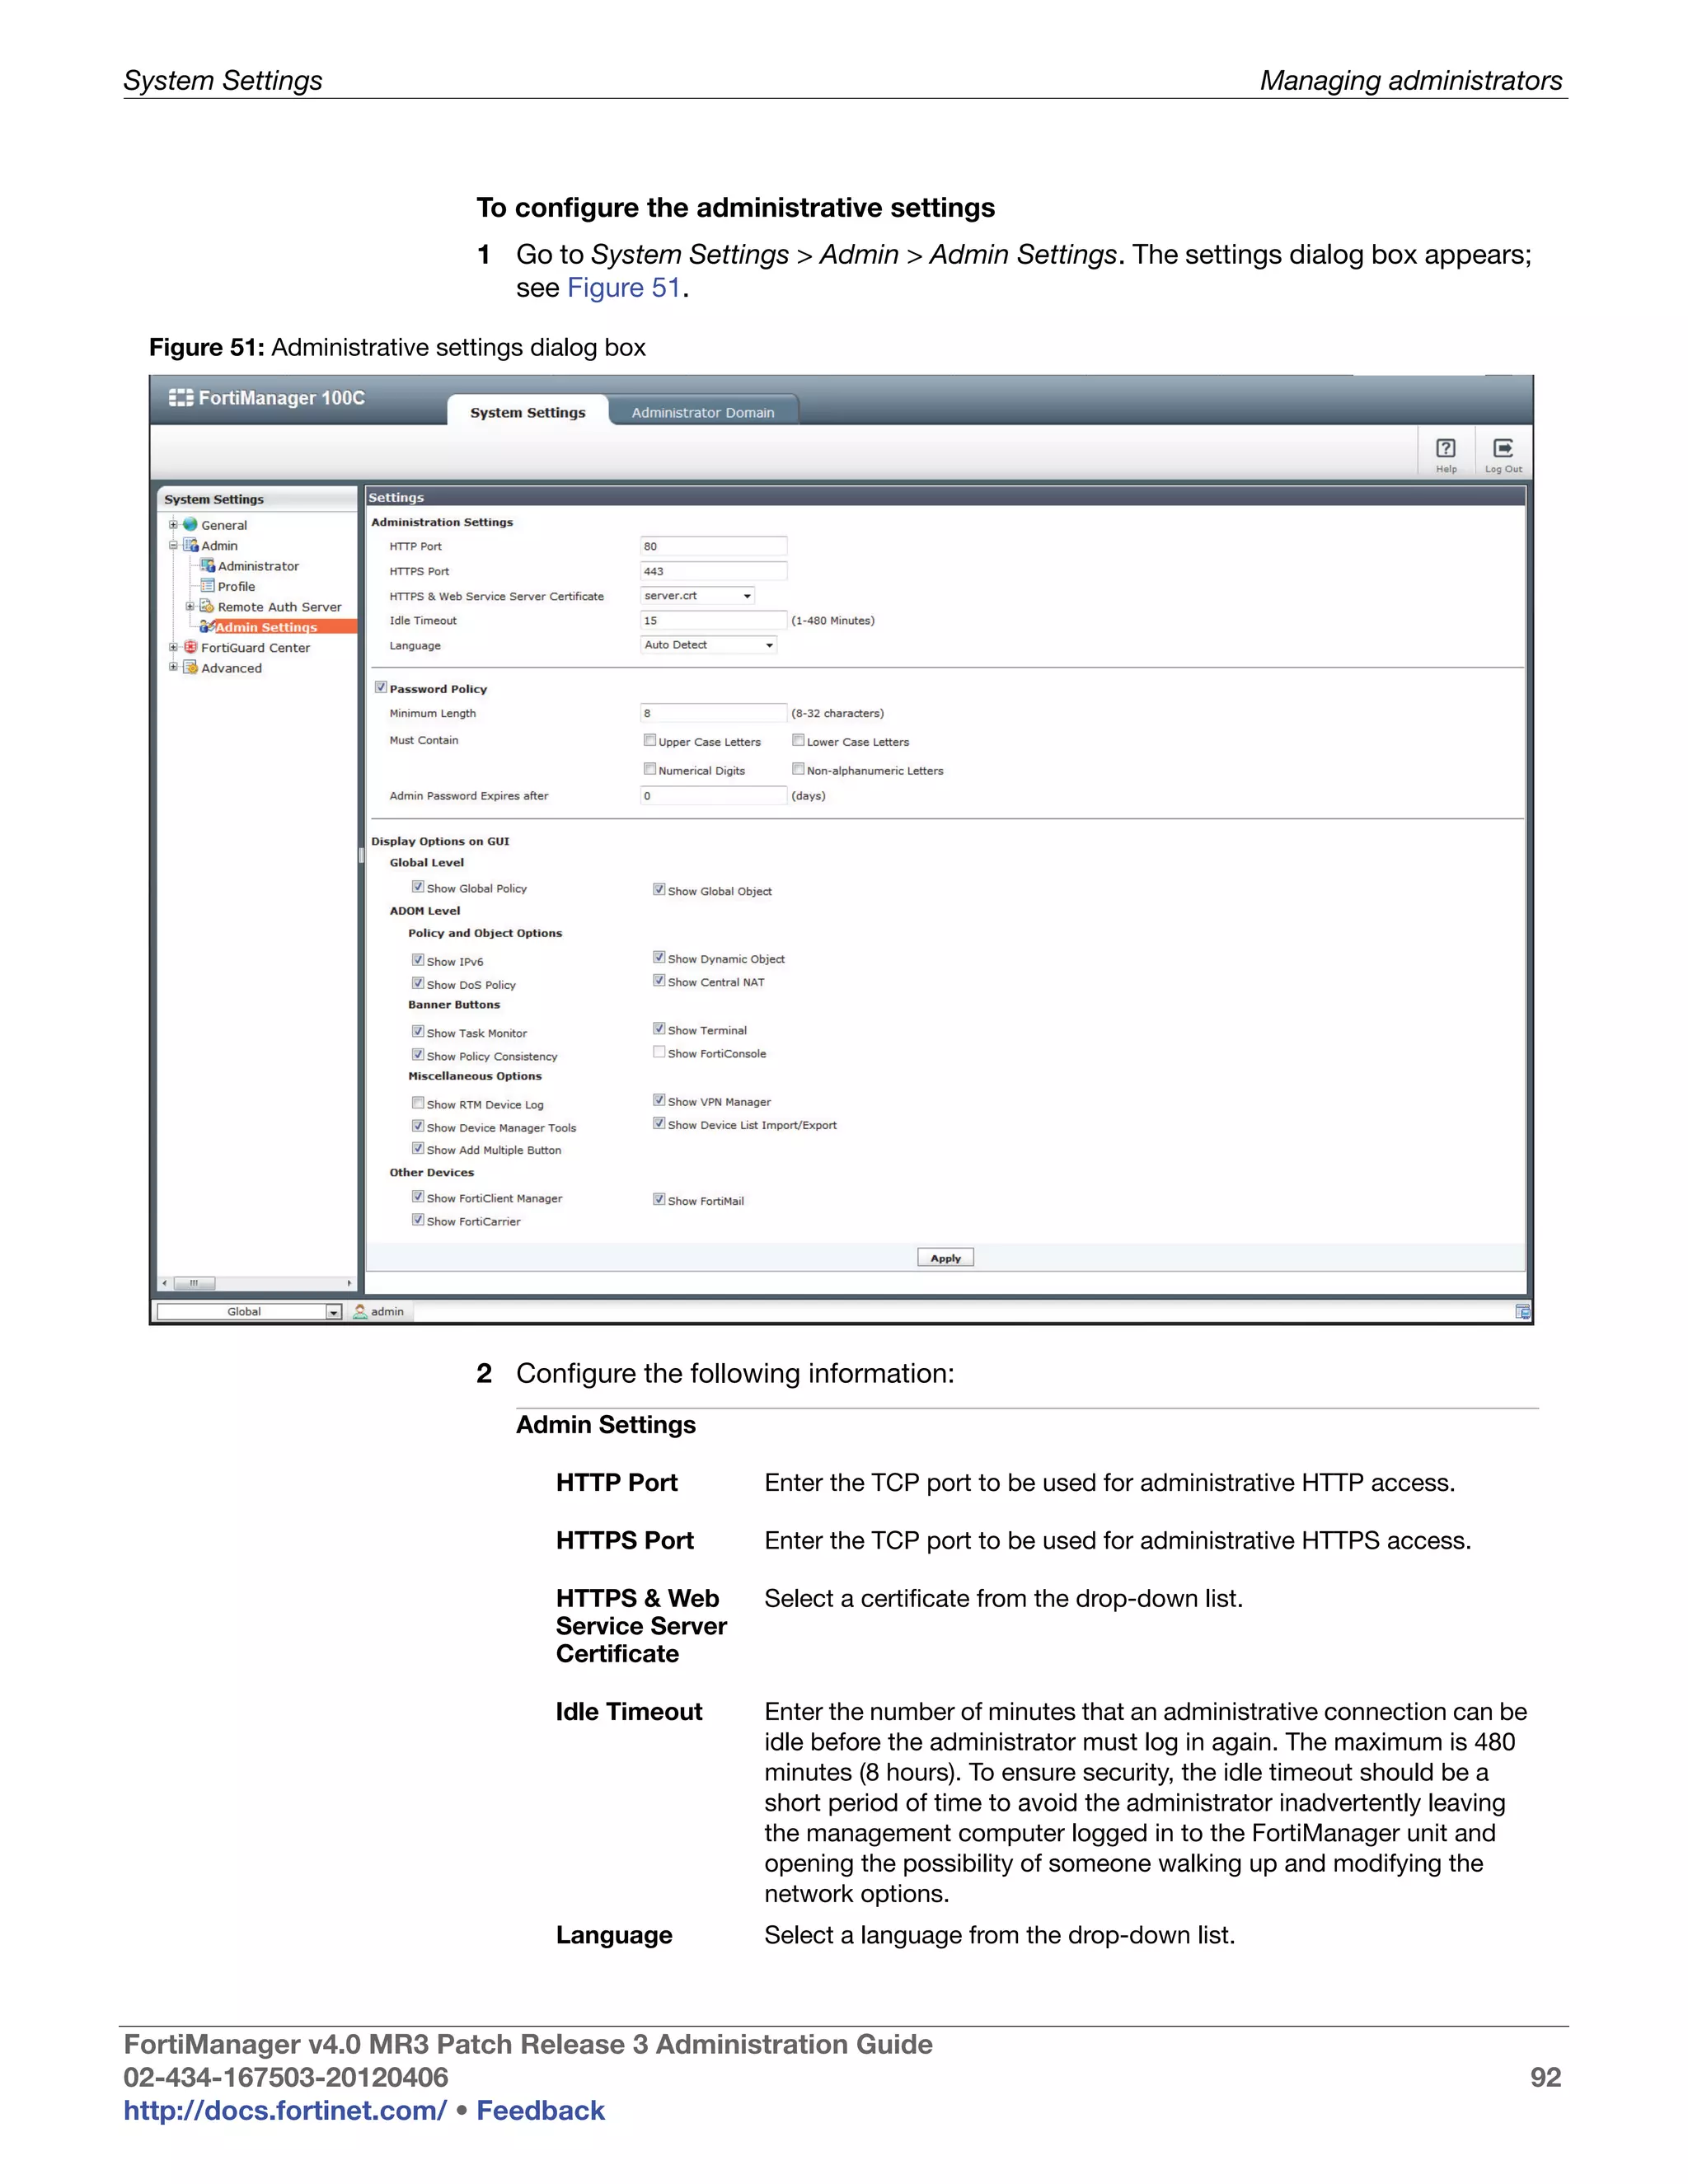
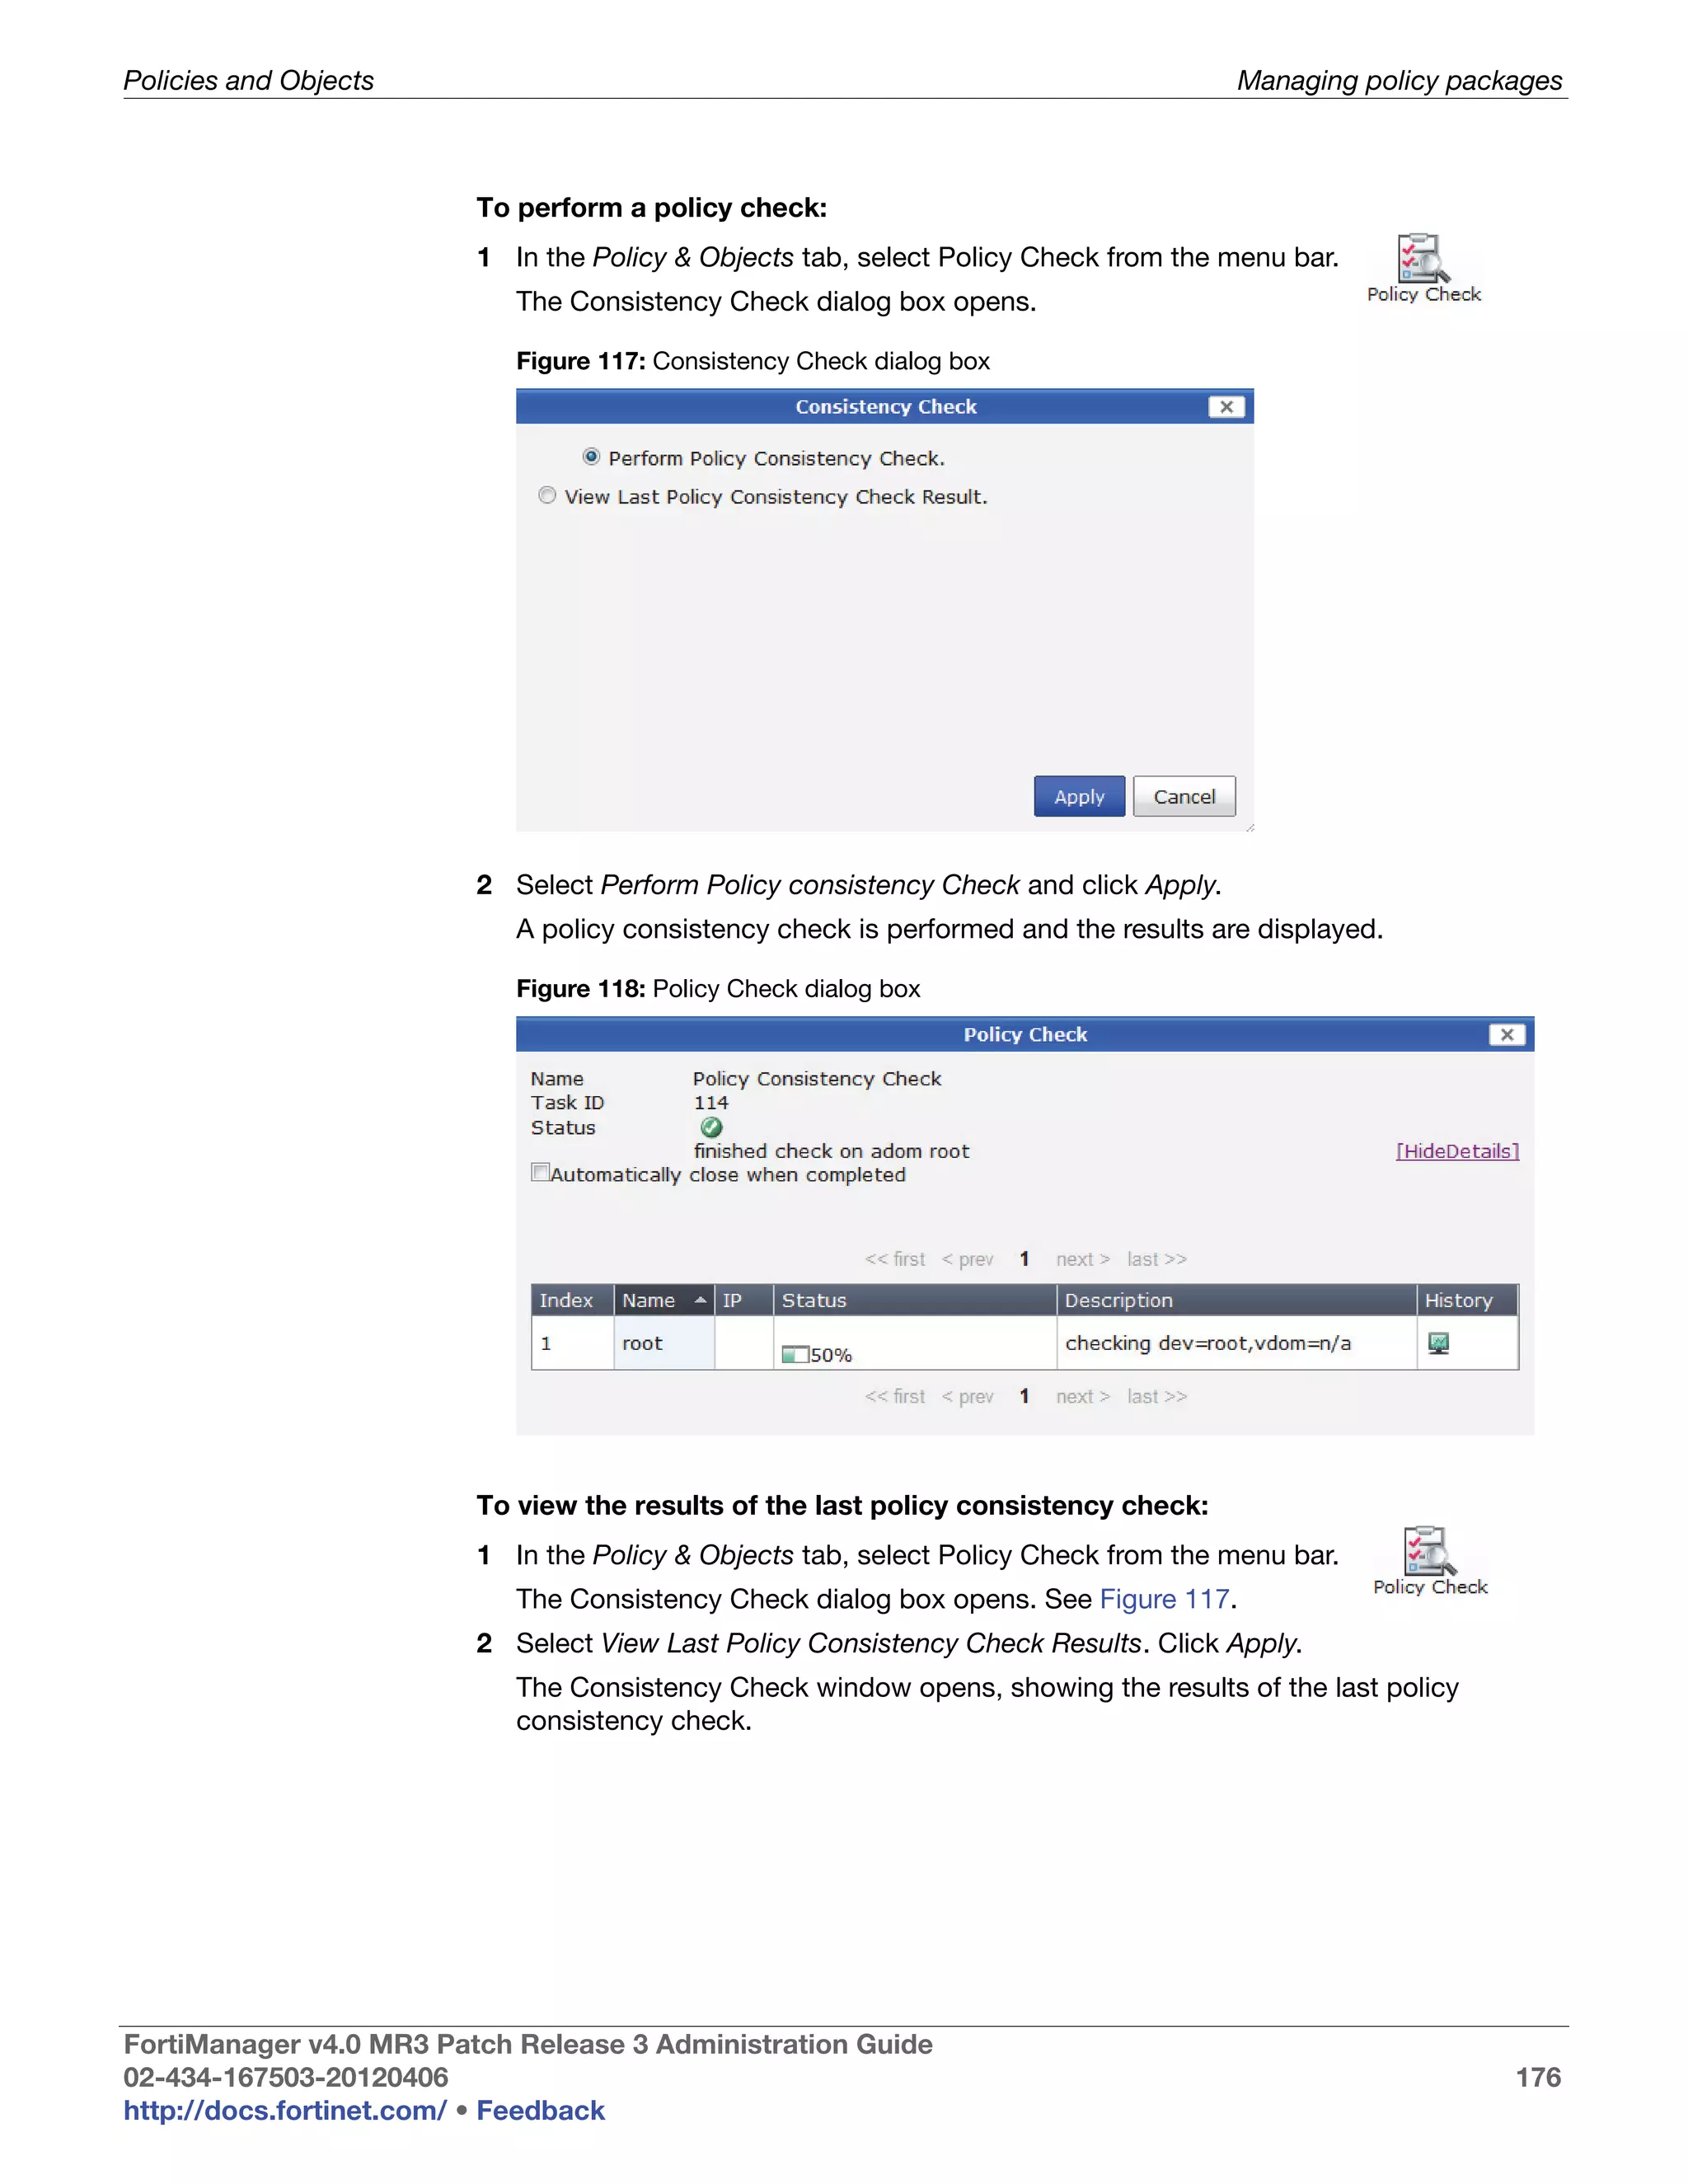
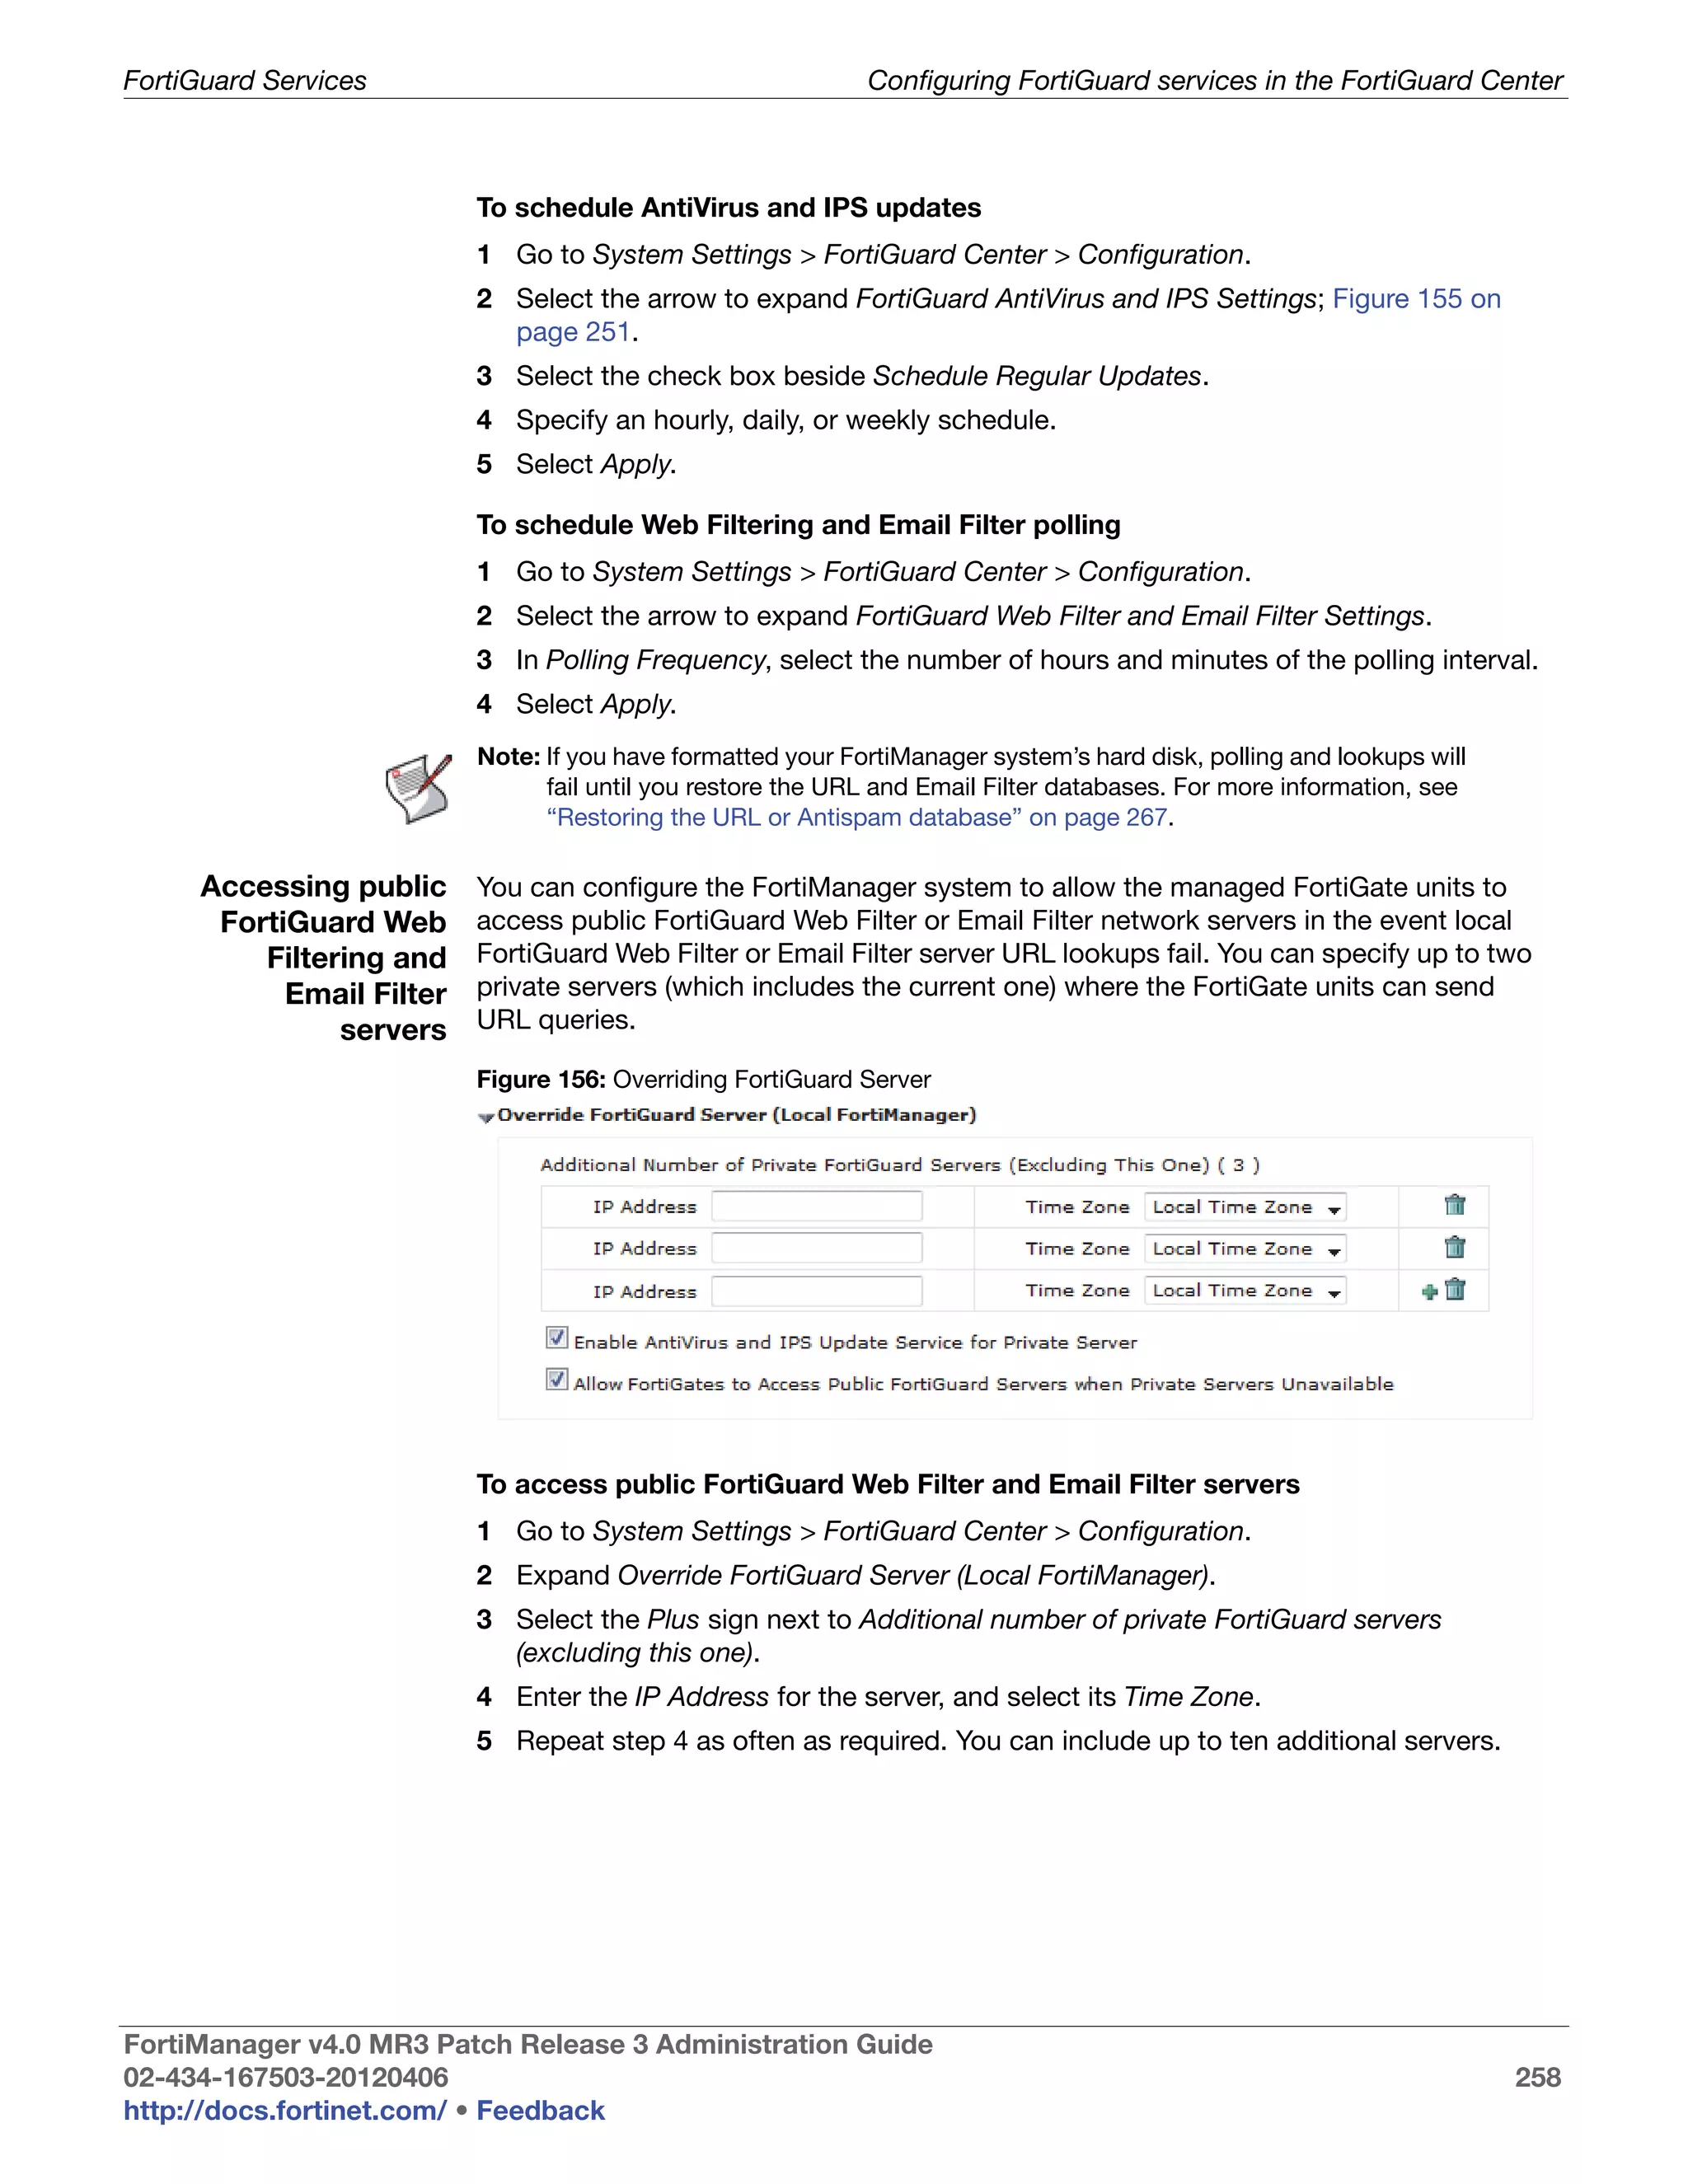
![System Settings Viewing the system status
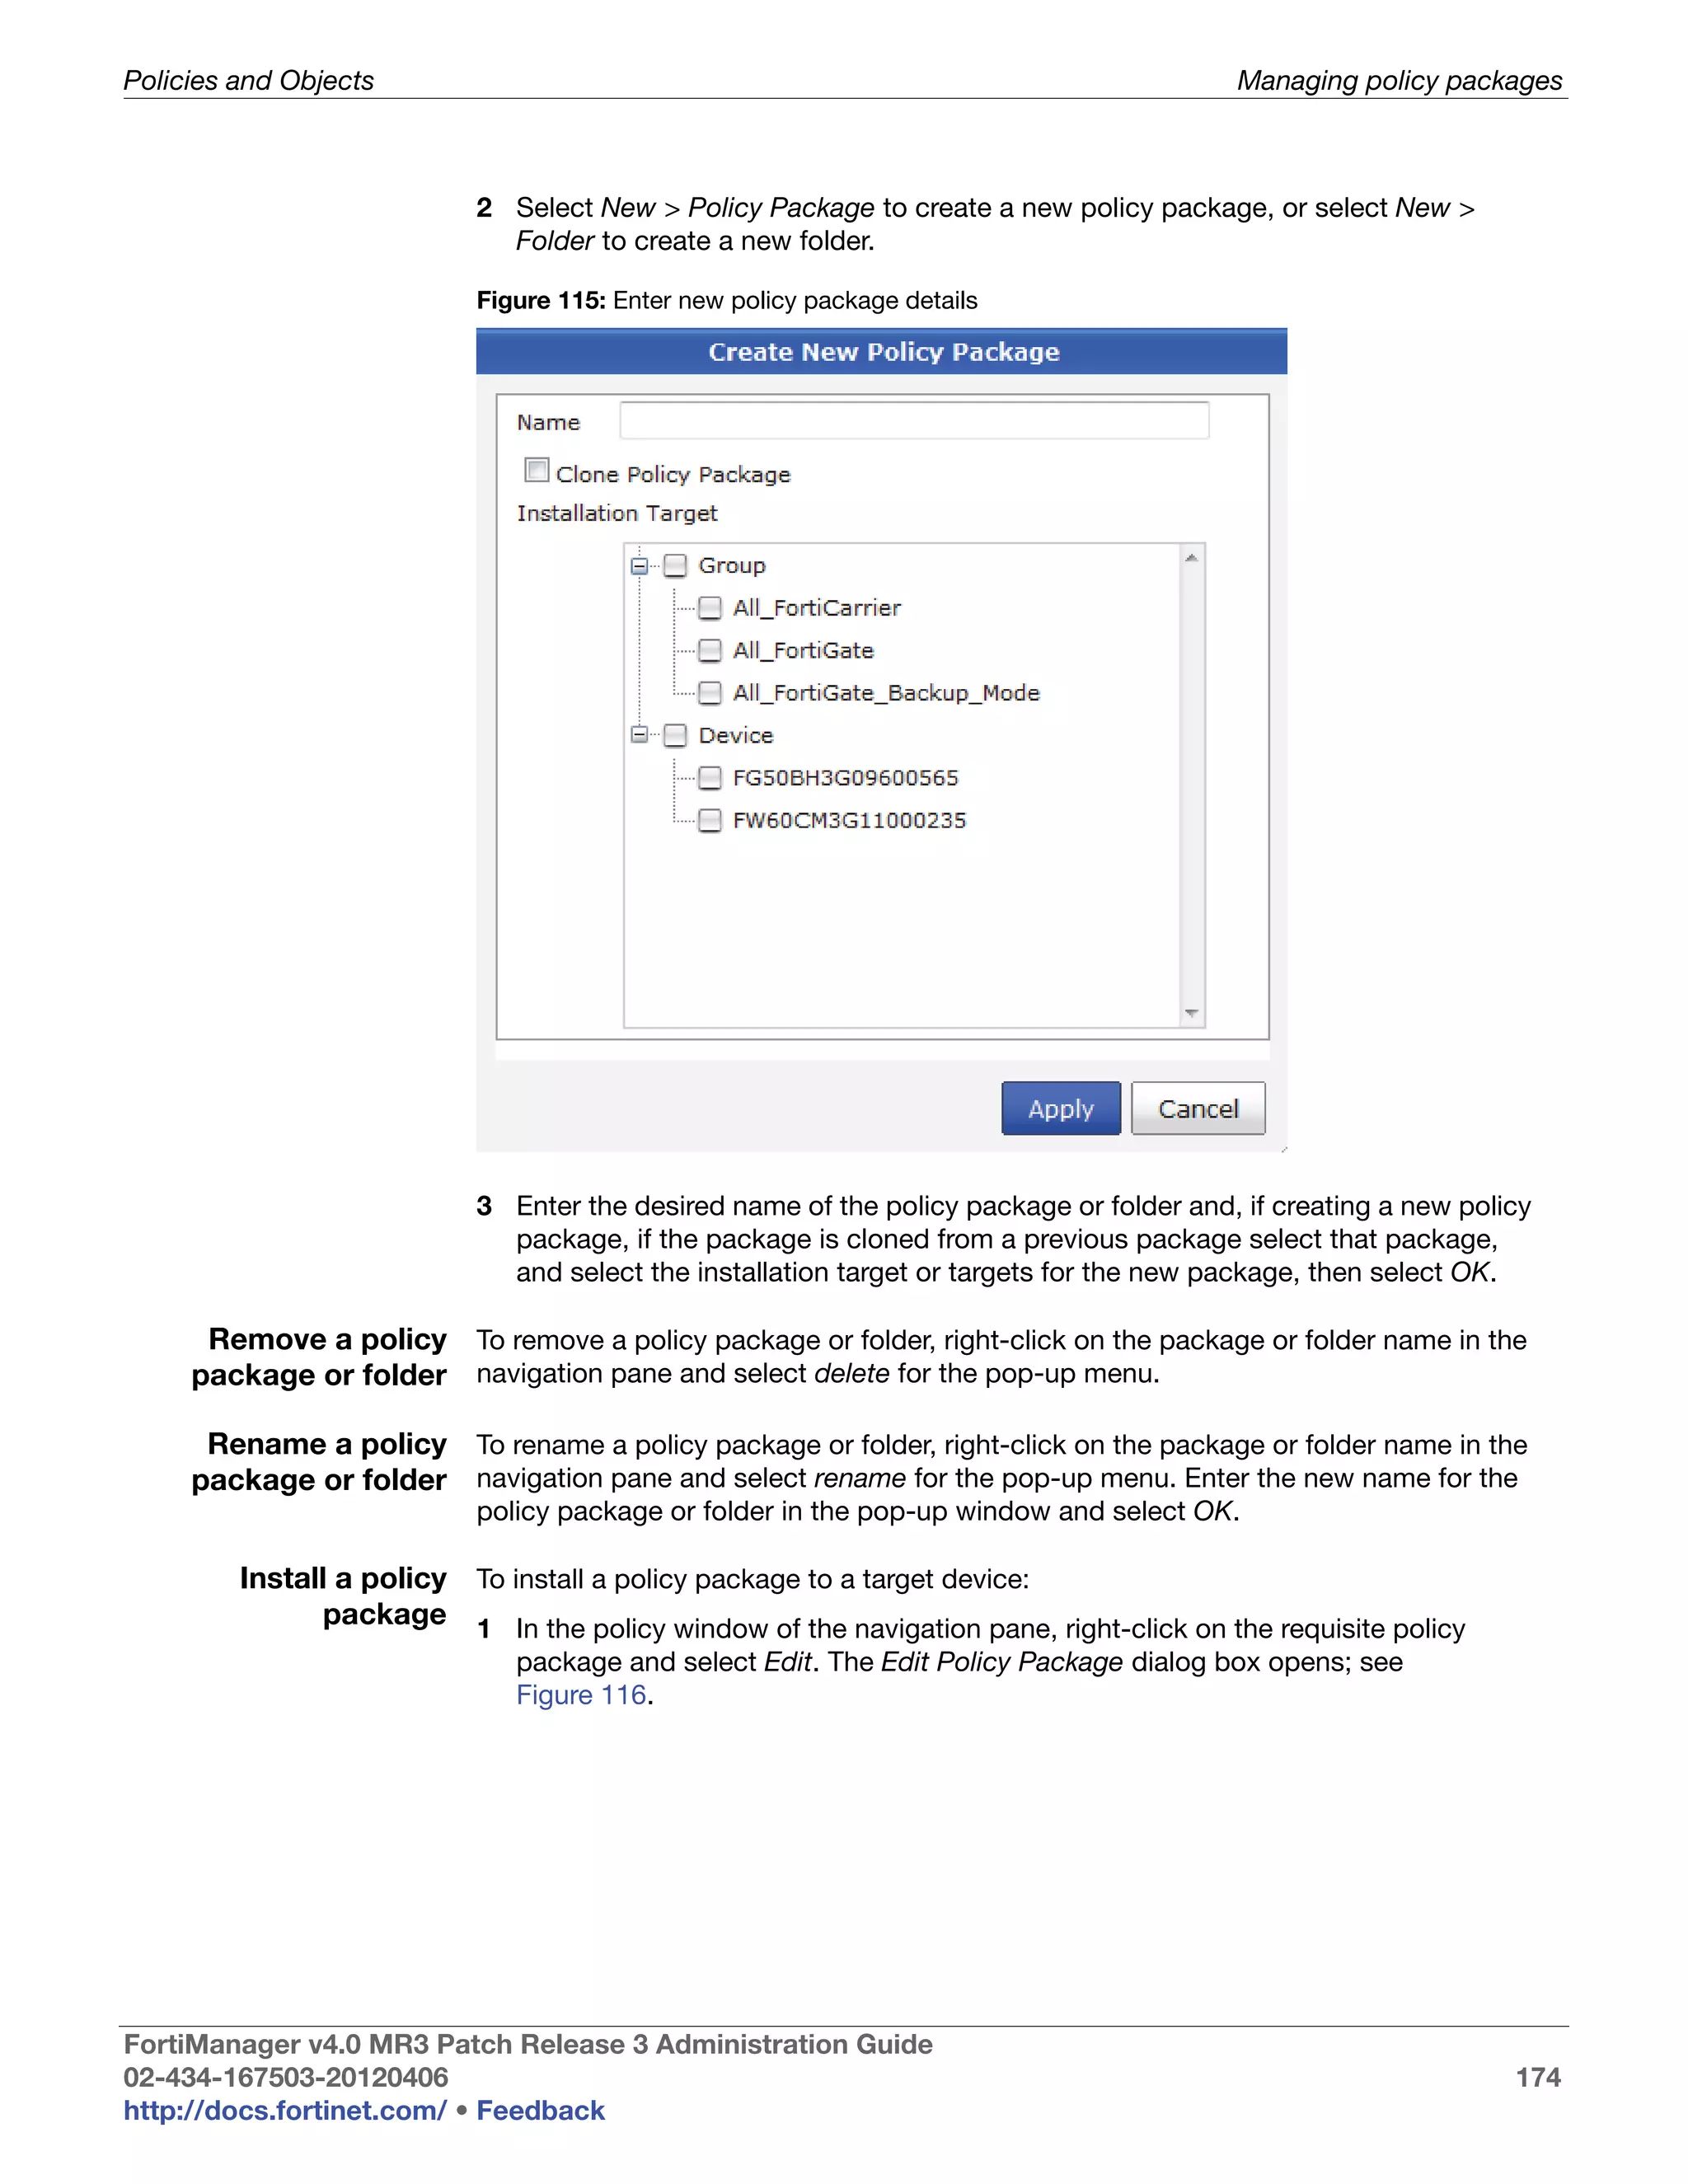
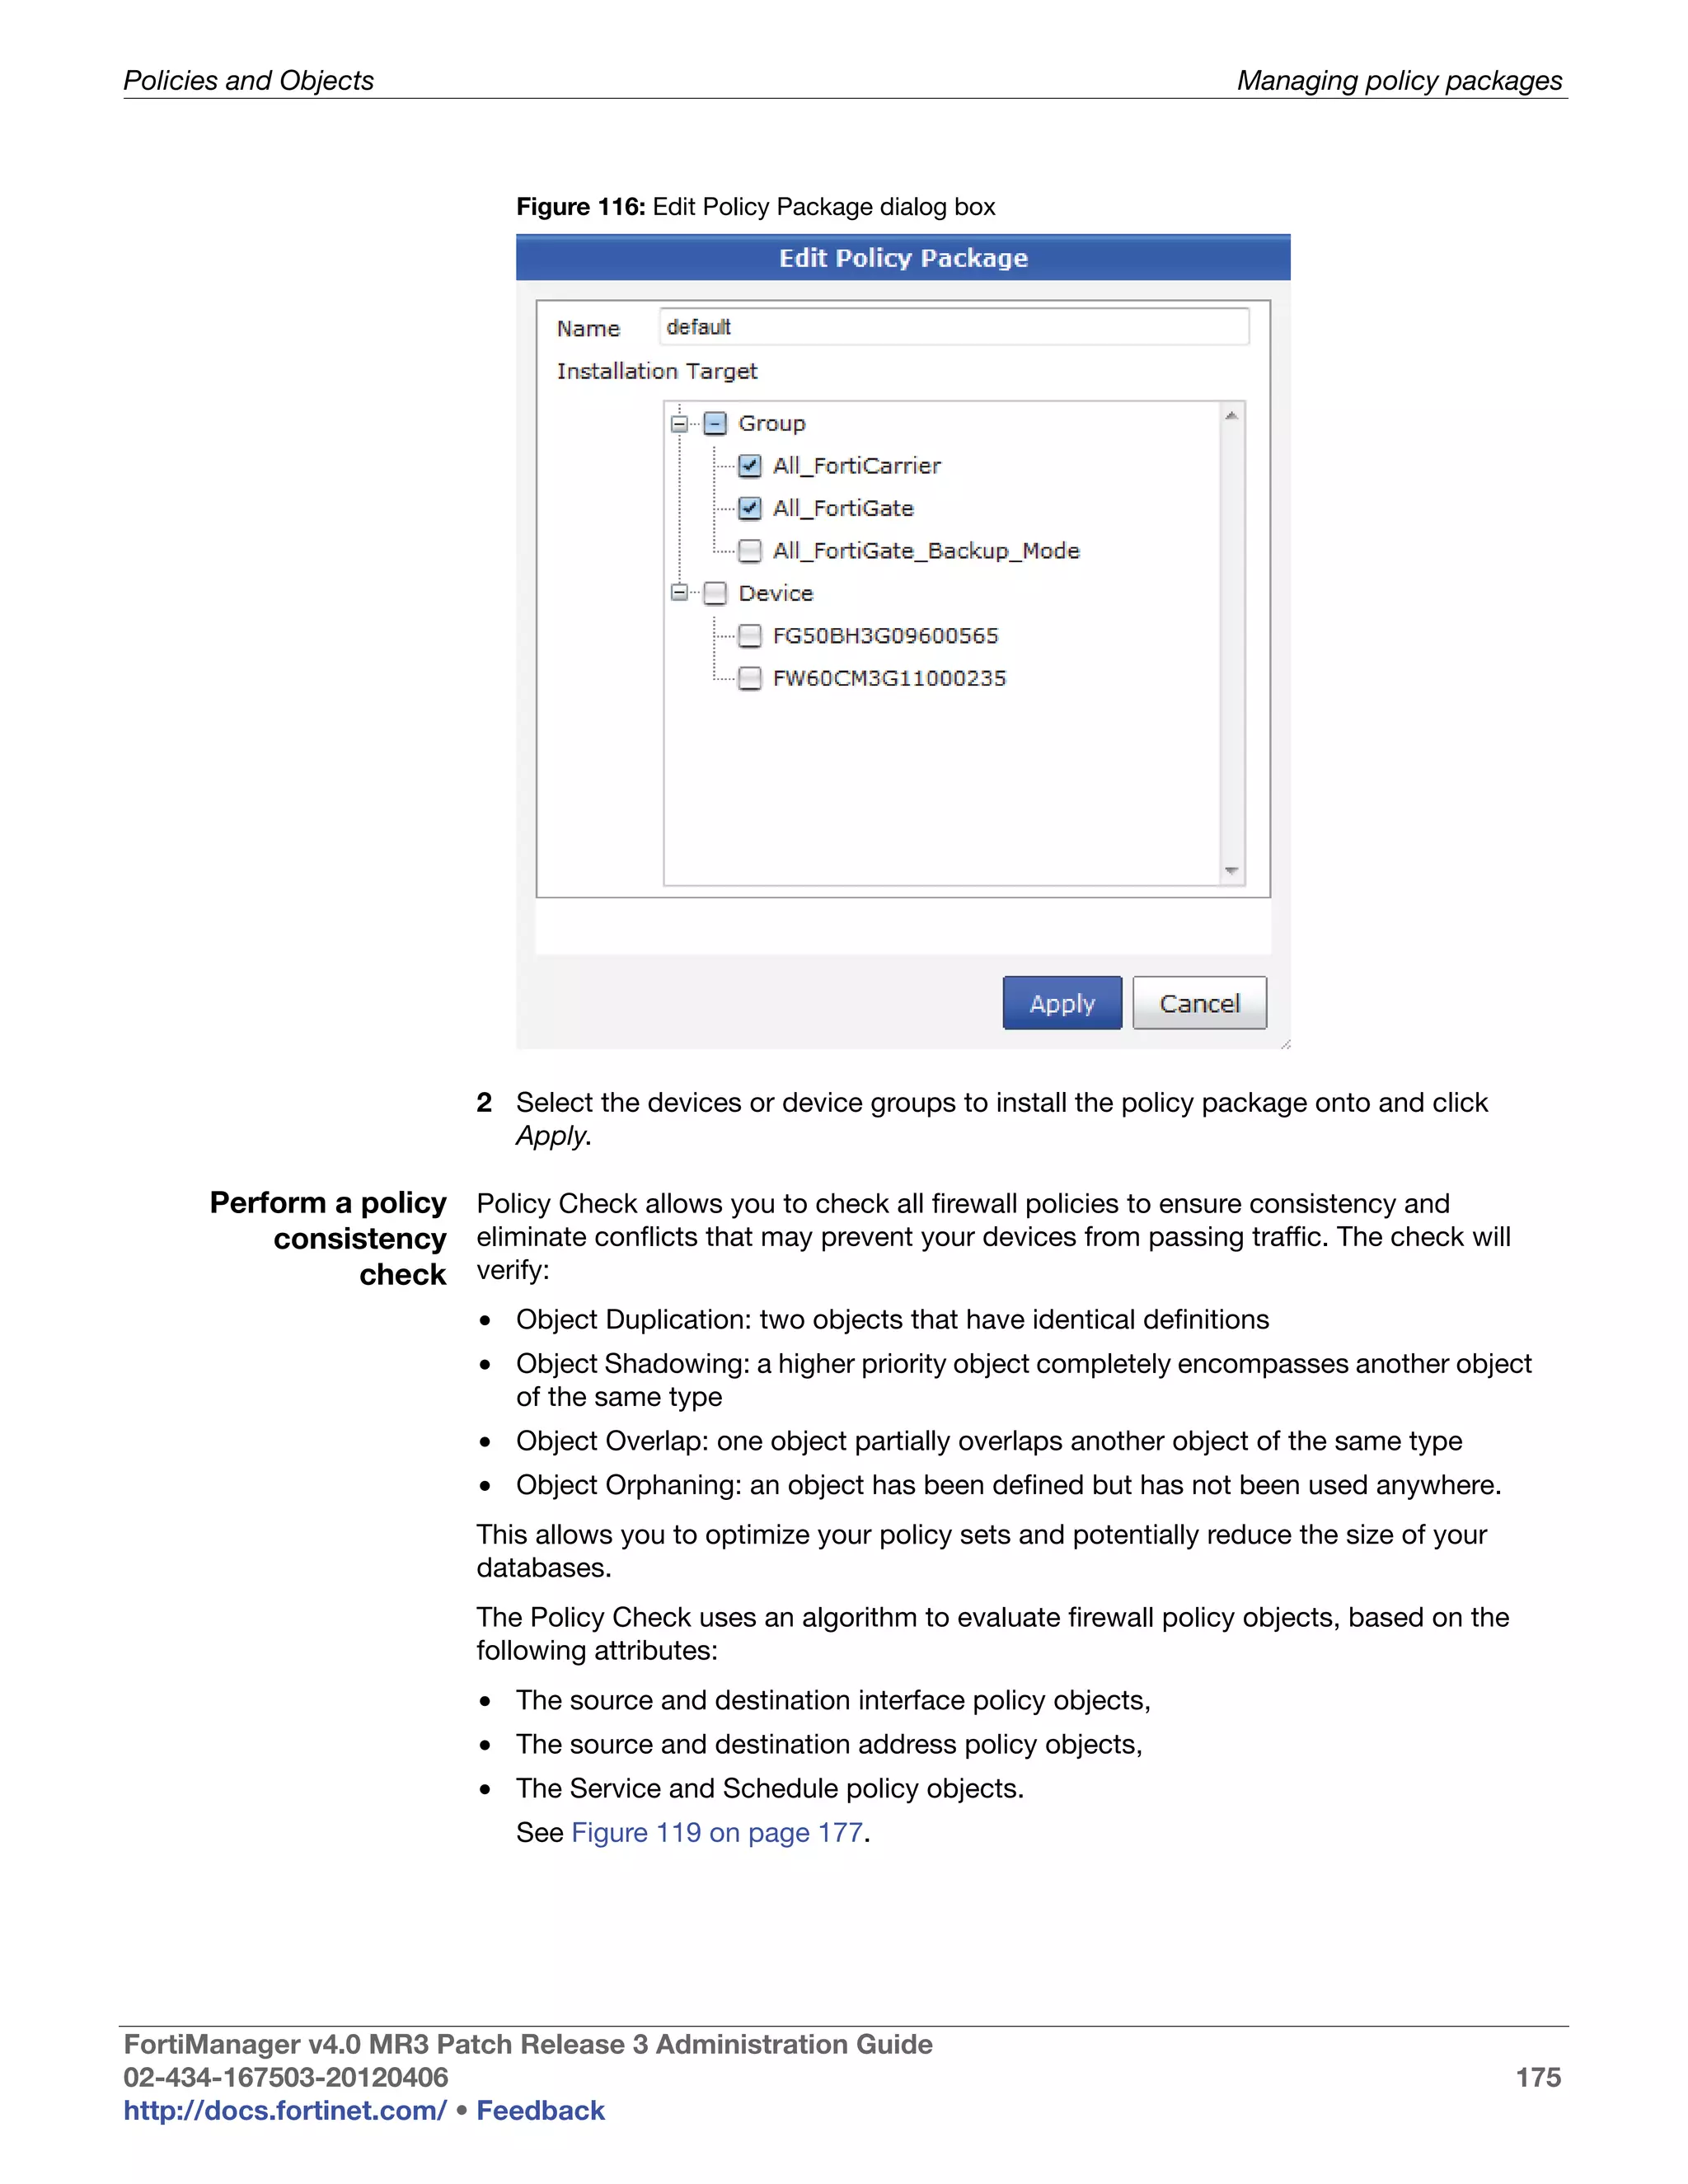
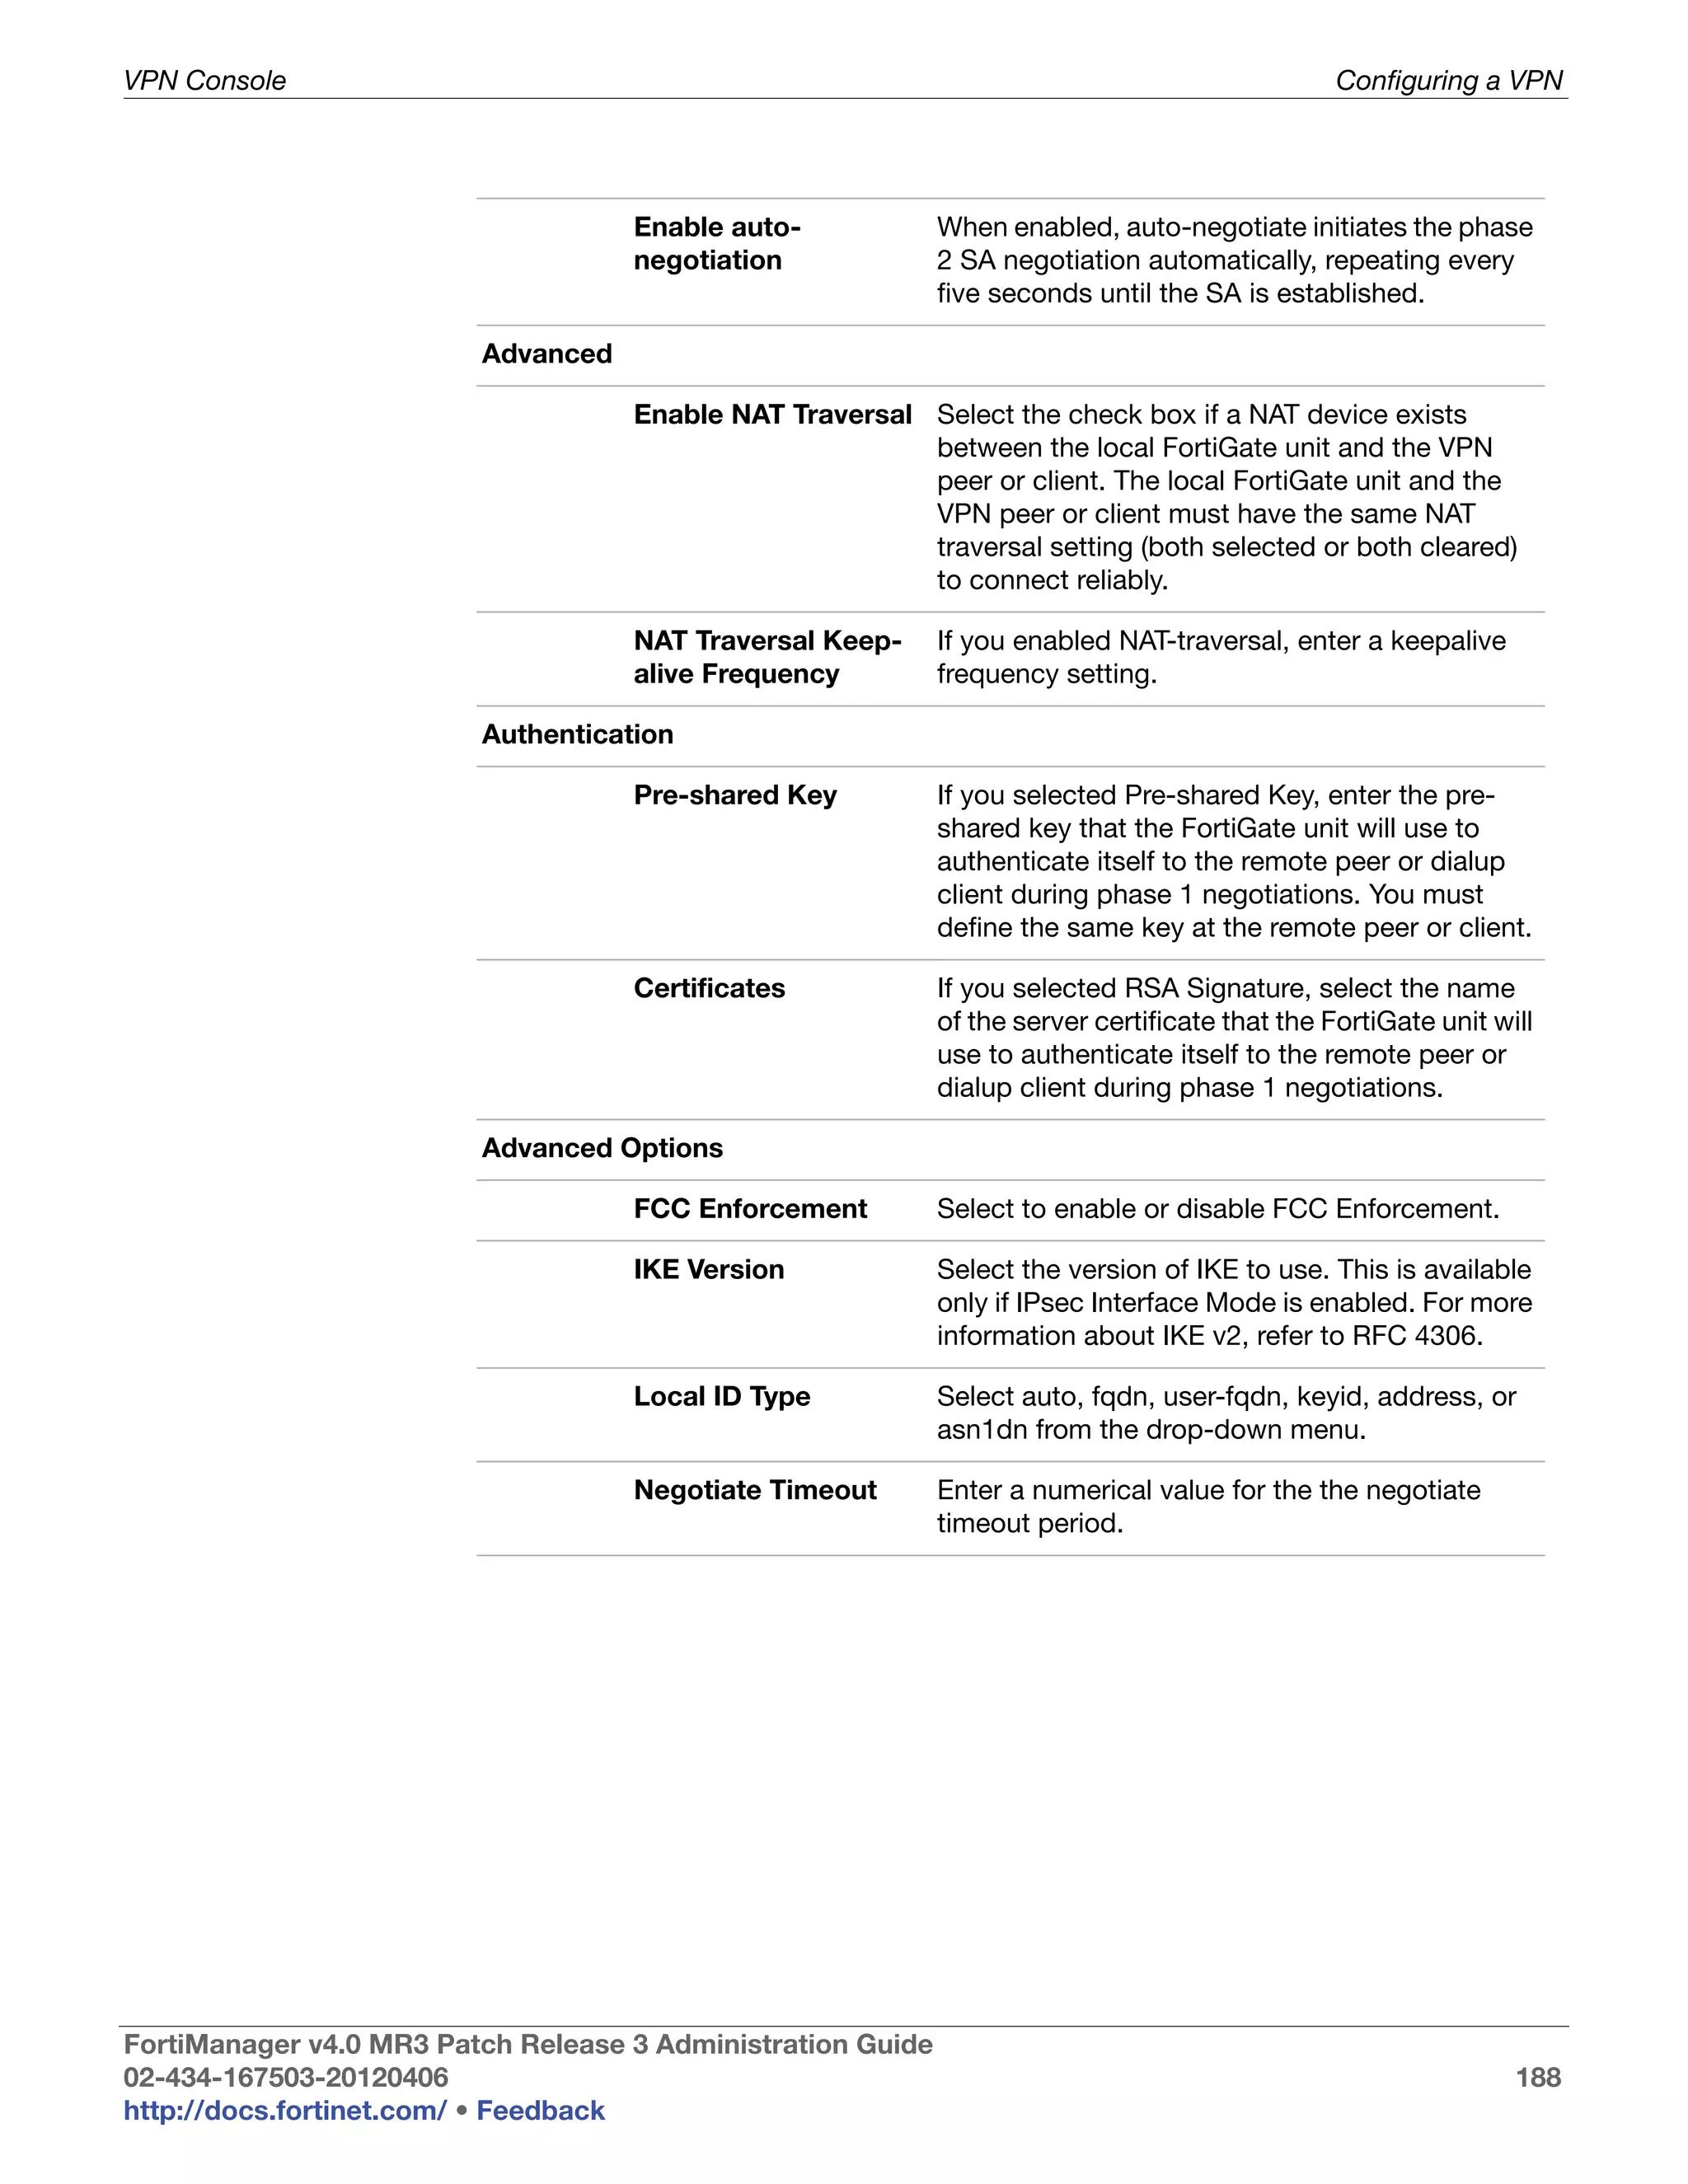
Array Status Icons and text indicating the RAID level and one of the following RAID disk
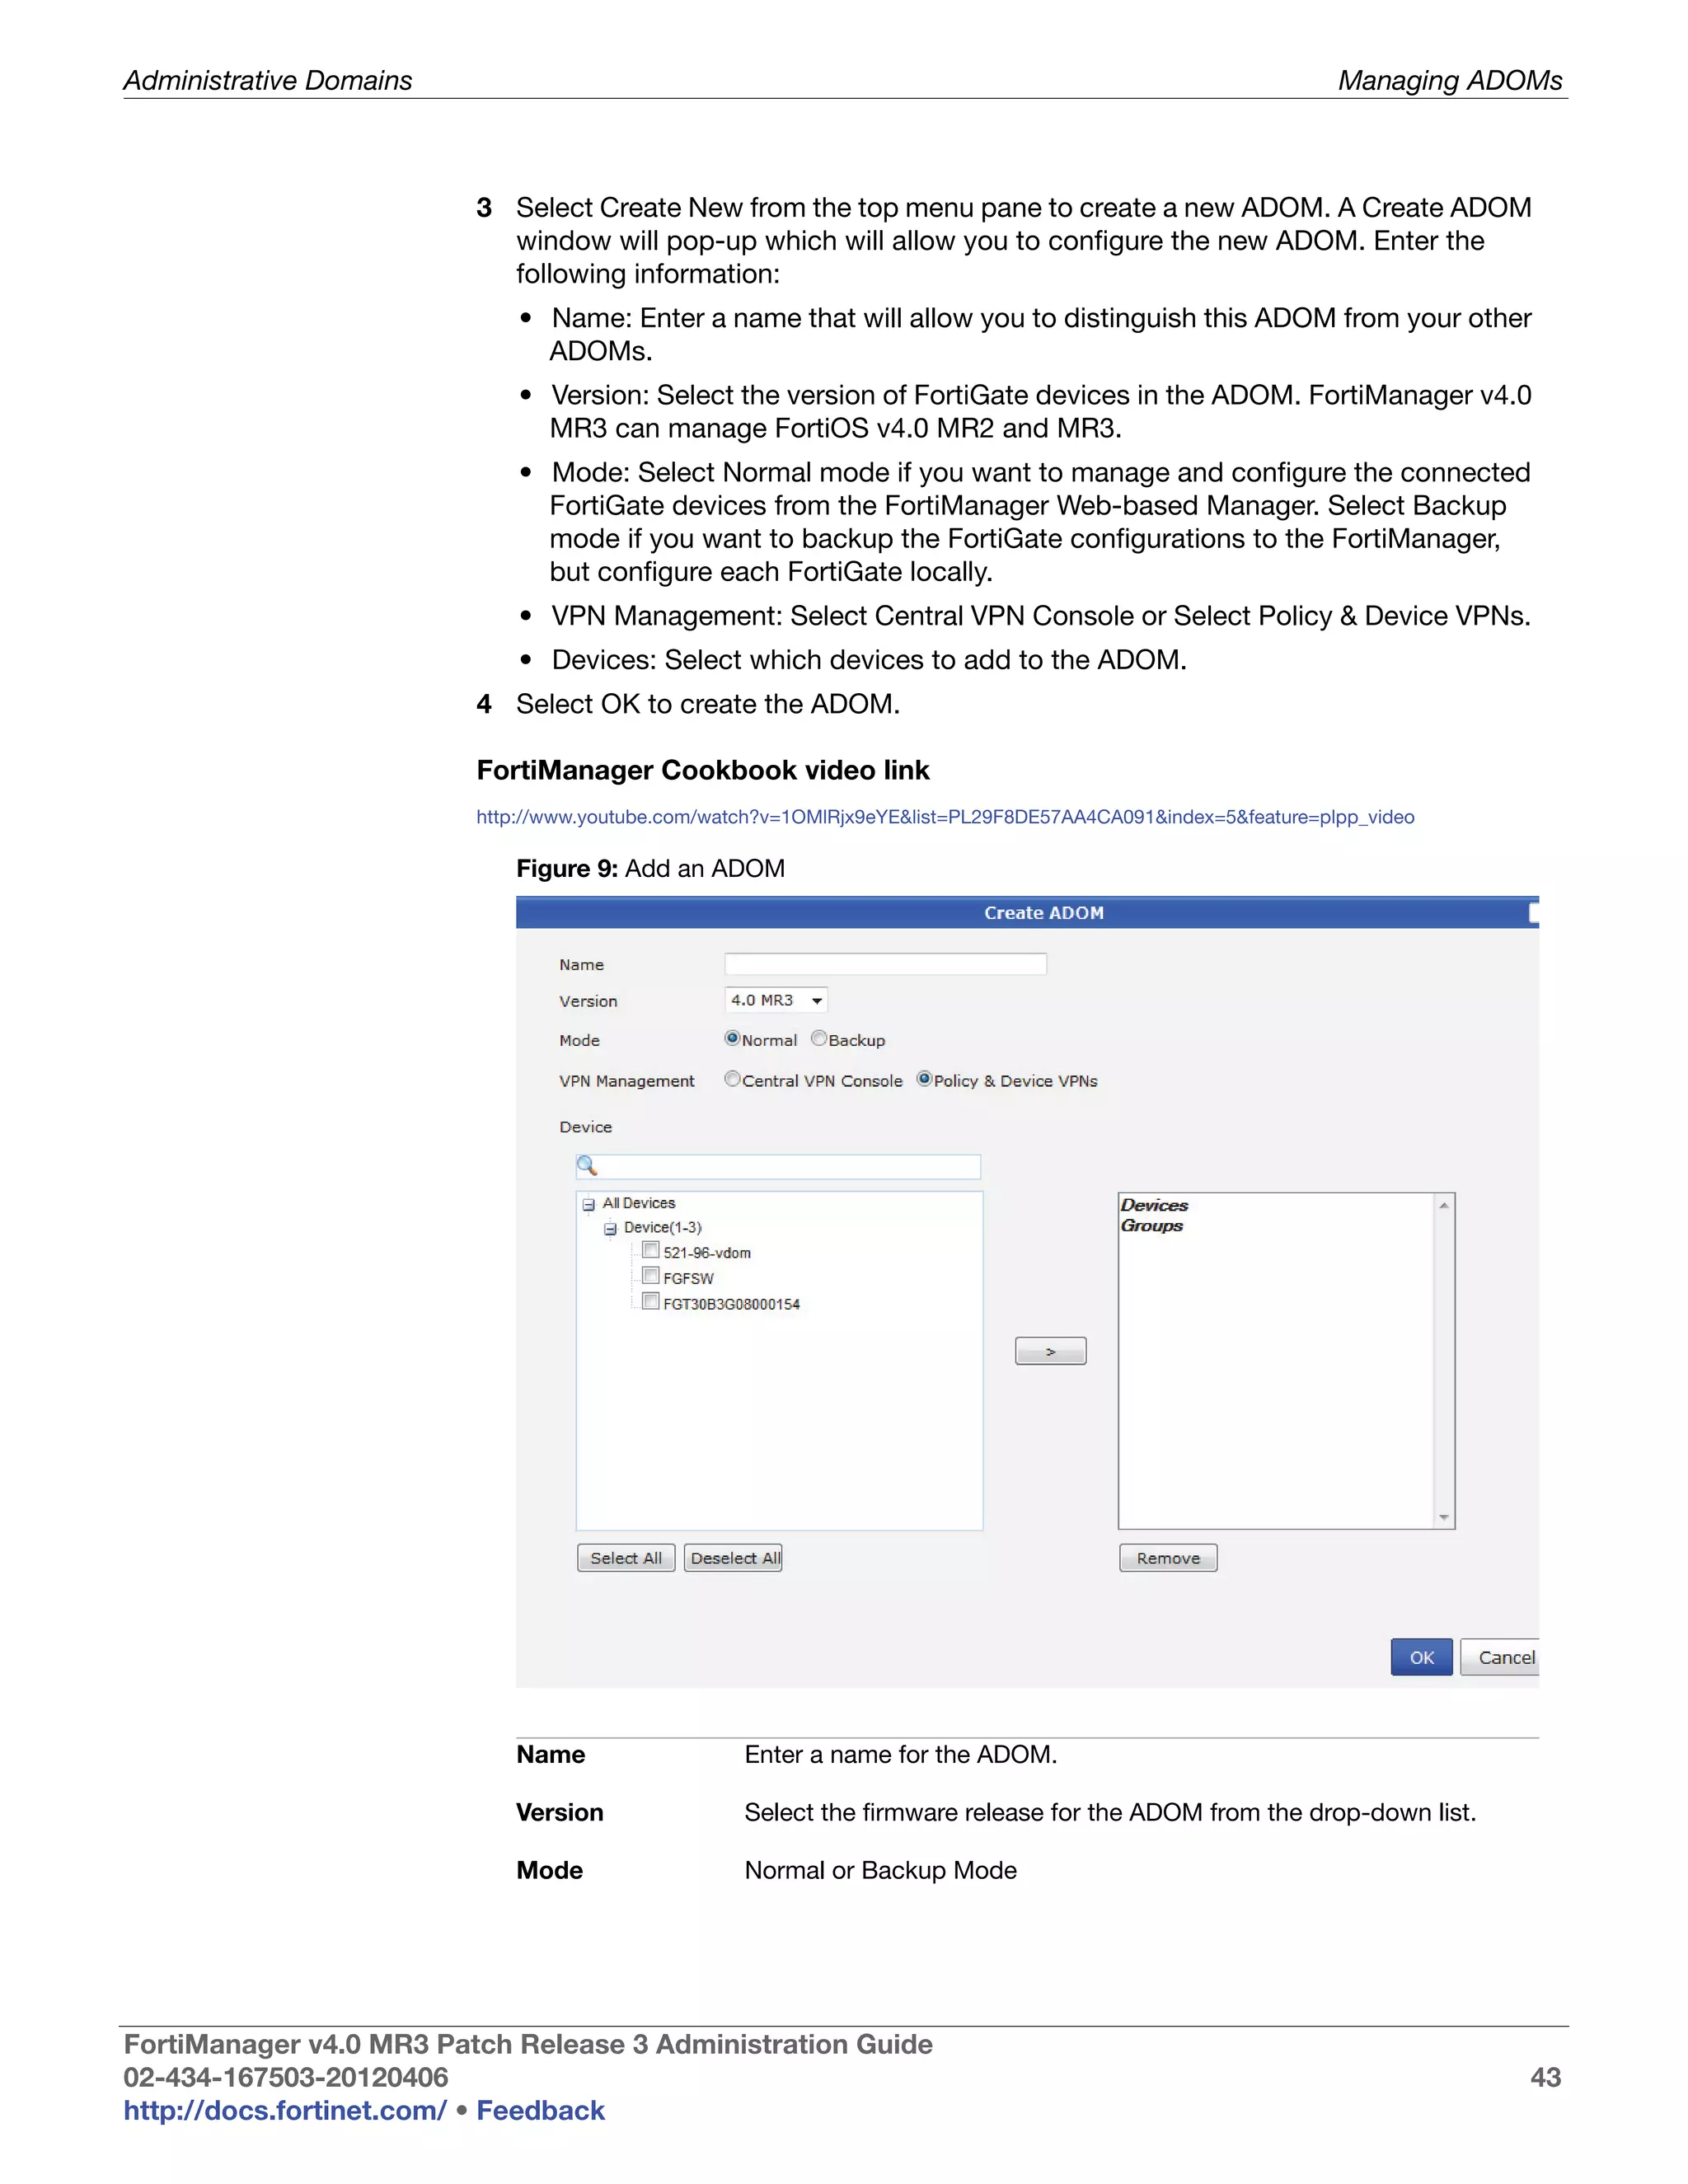
statuses:
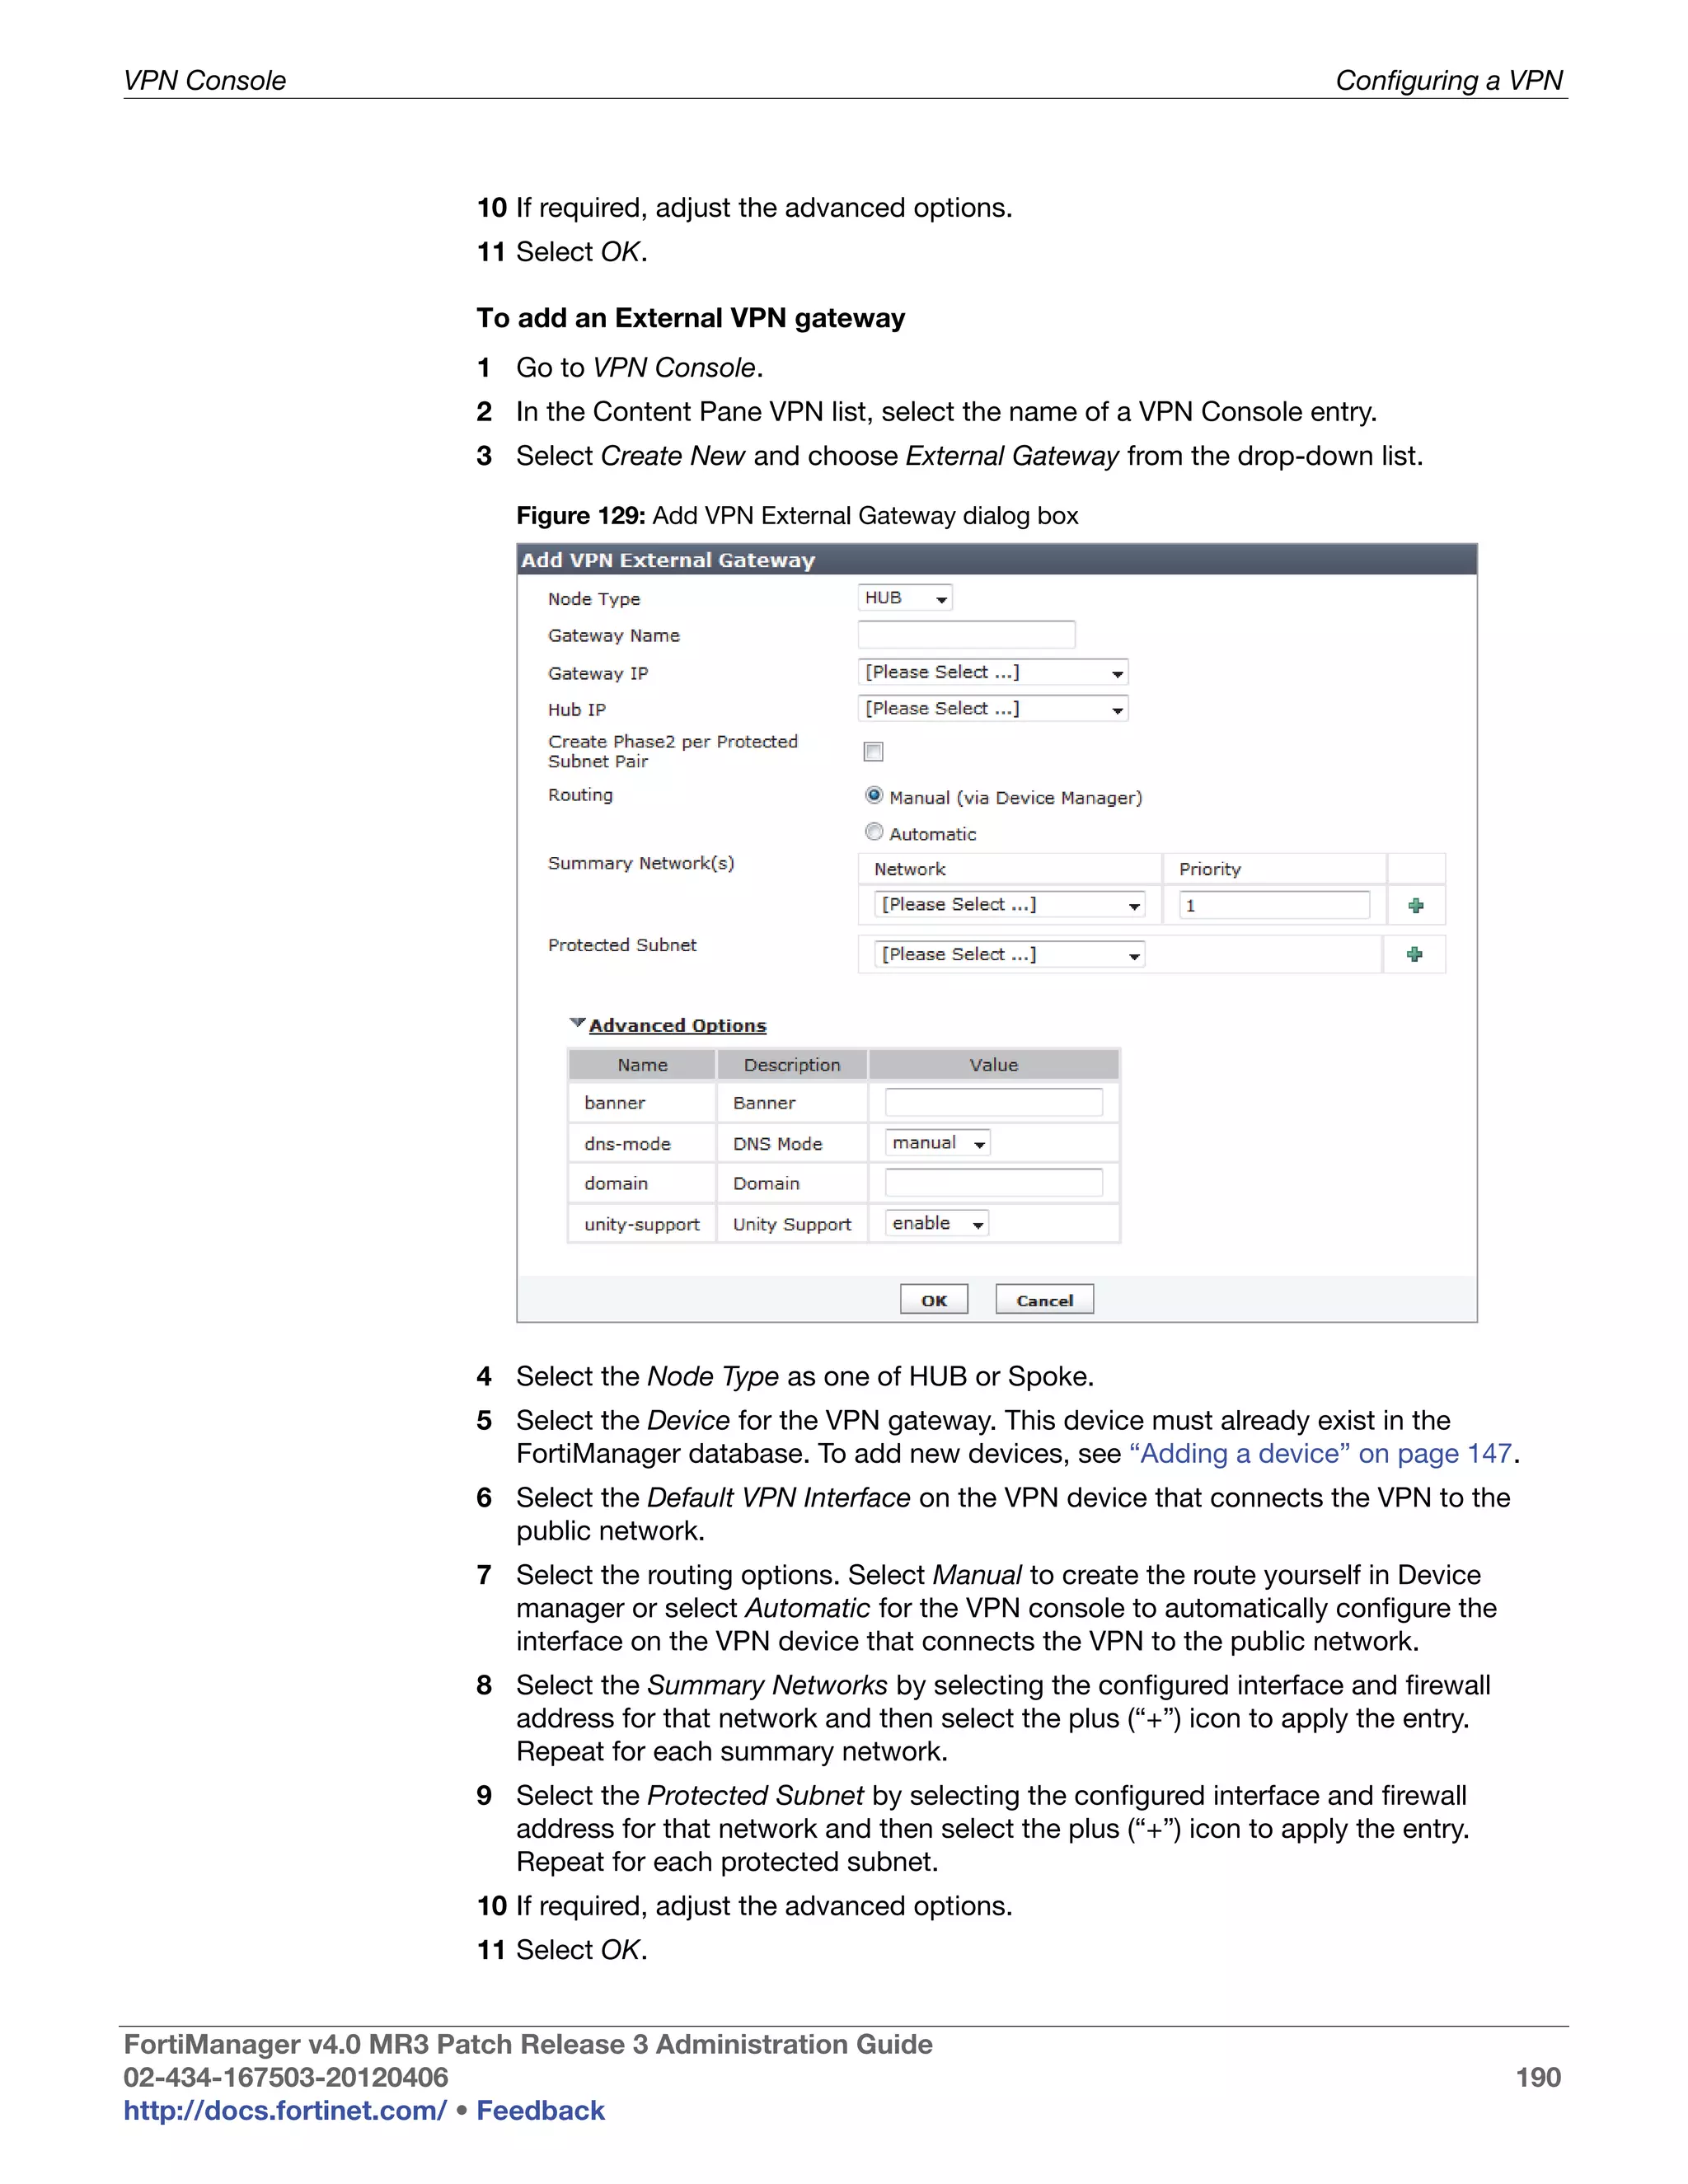
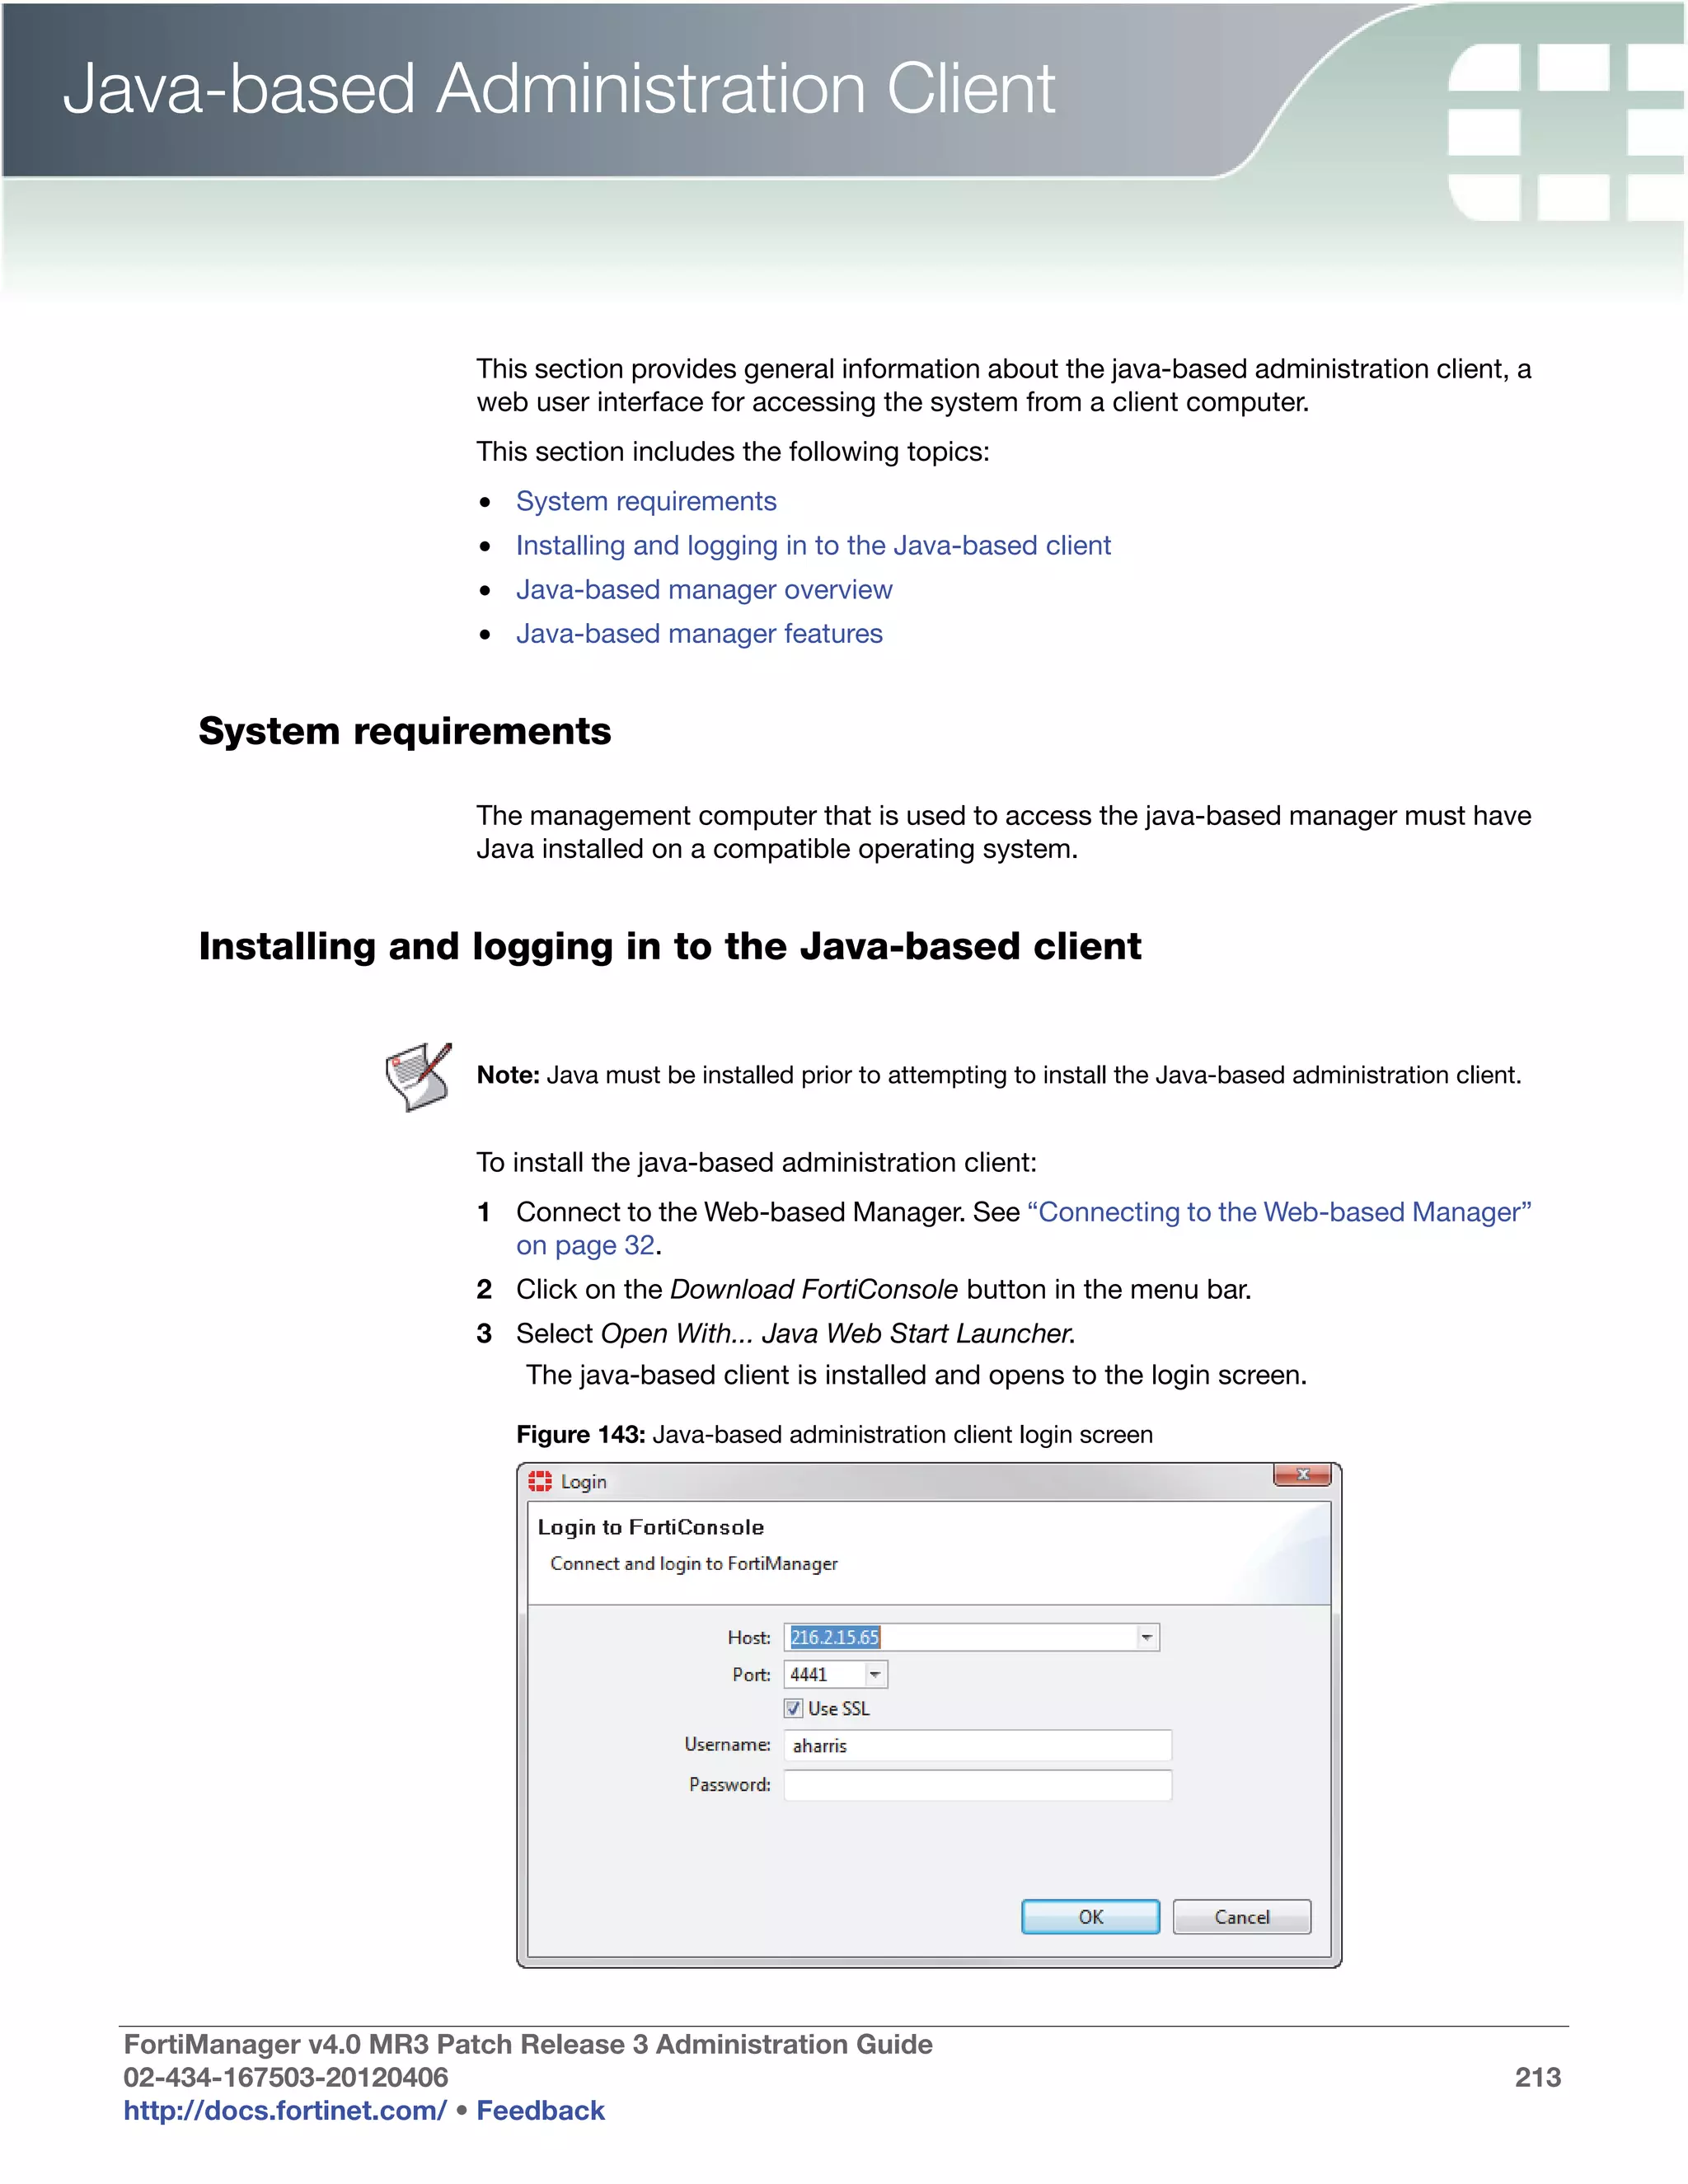
• green checkmark (OK): Indicates that the RAID disk has no problems
• warning symbol (Warning): Indicates that there is a problem with the
RAID disk, such as a failure, and needs replacing. The RAID disk is also
in reduced reliability mode when this status is indicated in the widget.
• wrench symbol (Rebuilding): Indicates that a drive has been replaced
and the RAID array is being rebuilt; it is also in reduced reliability mode.
• exclamation mark (Failure): Indicates that one or more drives have
failed, the RAID array is corrupted, and the drive must be re-initialized.
This is displayed by both a warning symbol and text. The text appears
when you hover your mouse over the warning symbol; the text also
indicates the amount of space in GB.
Rebuild Status A percentage bar indicating the progress of the rebuilding of a RAID array.
The bar displays only when a RAID array is being rebuilt.
Estimated rebuild The time remaining to rebuild the RAID array, and the date and time the
time rebuild is expected to end. This time period displays only when an array is
[start and end time] being rebuilt.
This time period will not display in hardware RAID, such as
FortiManager-2000/2000A/2000B, and FortiManager-4000/4000A/4000B.
Rebuild Warning Text reminding you the system has no redundancy protection until the
rebuilding process is complete. This text displays only when an array is
being rebuilt.
Disk space usage The amount of disk used, displayed as a percentage and a percentage pie
chart, and listing the number of GB used, free, and in total.
Note that the FortiManager unit reserves some disk space for
compression files, upload files, and temporary reports files.
The total reserved space is:
• 25% of total disk space if total < 500G, with MAX at 100G
• 20% of total disk space if 500G< total <1000G, with MAX at 150G
• 15% of total disk space if 1000G < total < 3000G, with MAX at 300G
• 10% of total disk space if total > 3000G
This is therefore to be deducted from the total capacity.
Fortinet units allocate most of their total disk space for both the Fortinet unit’s own
logs as well as logs and quarantined files from connecting devices. Disk space quota is
assigned to each device and the Fortinet unit itself. If the quota is consumed, the
Fortinet unit will either overwrite the oldest files saved or stop collecting new logs,
depending on your preference.
Remaining disk space is reserved for devices, FortiAnalyzer reports, and any
temporary files, such as configuration backups and log files that are currently queued
for upload to a server. The size of the reserved space varies by the total RAID/hard disk
capacity. For more information, see “Disk space usage” on page 56.
For more information about RAID, see “Configuring RAID” on page 65.
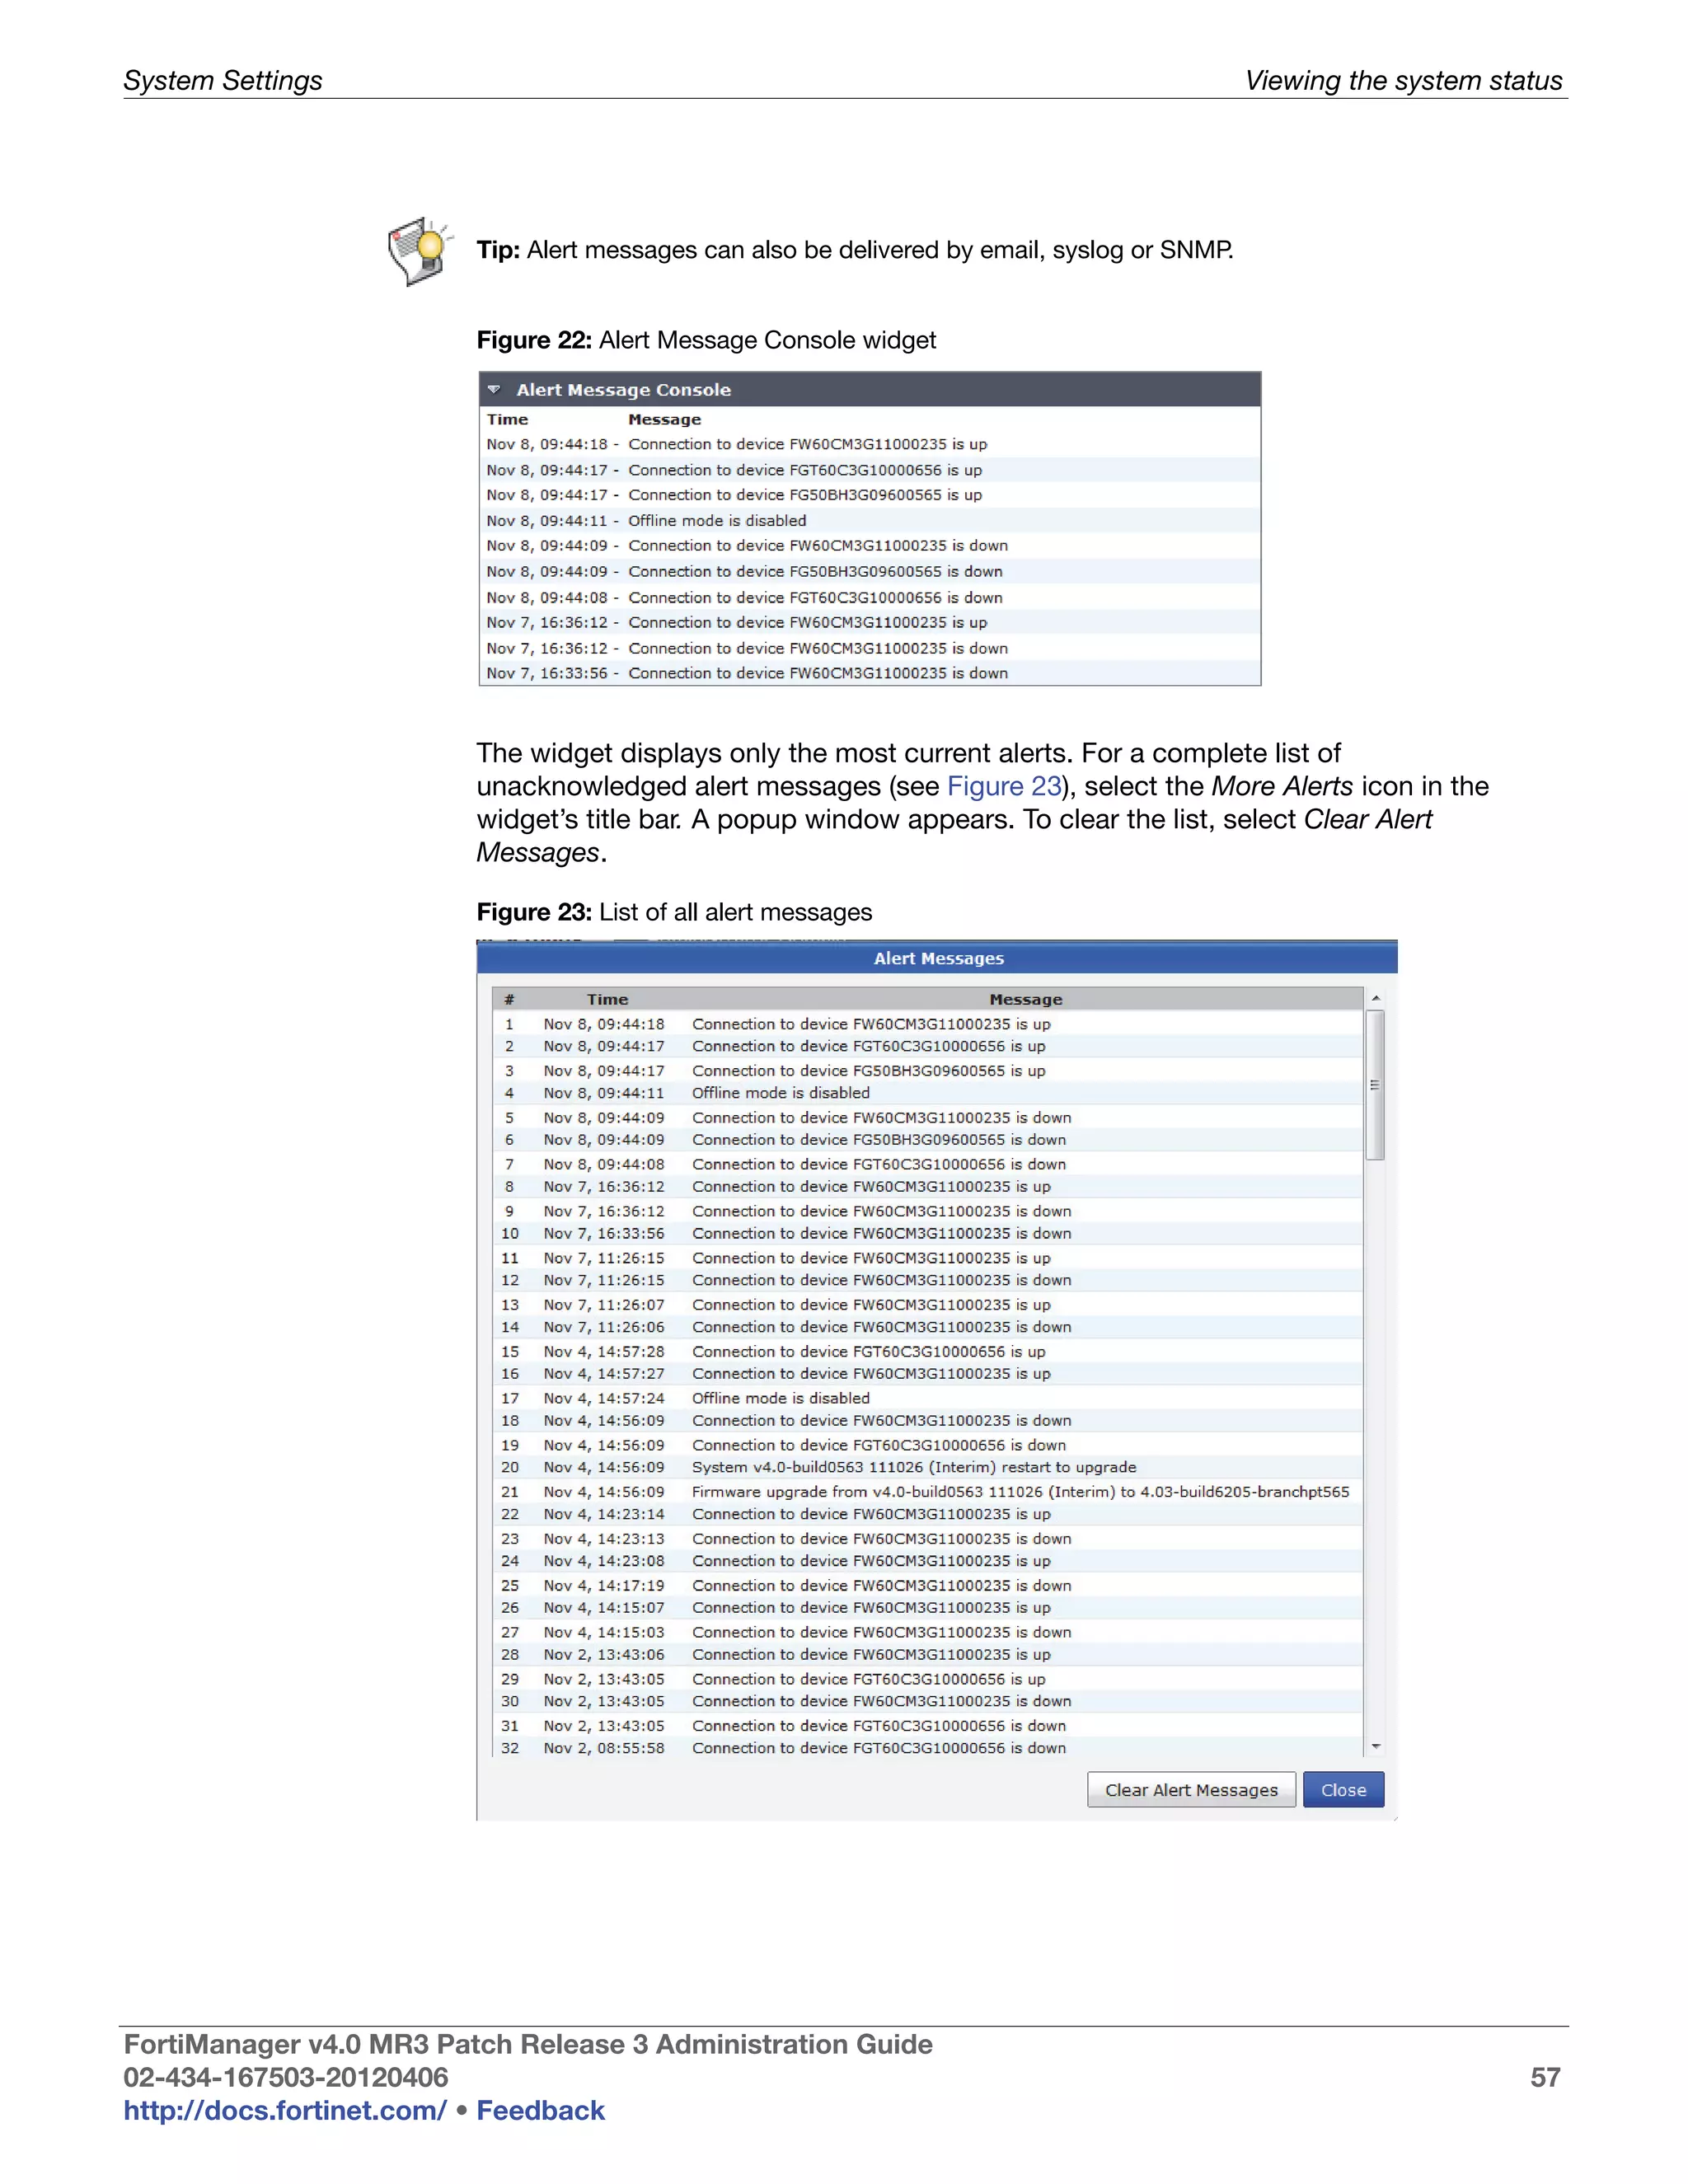
Viewing Alert The Alert Message Console widget displays log-based alert messages for both the
Messages Fortinet unit itself and connected devices.
Alert messages help you track system events on your Fortinet unit such as firmware
changes, and network events such as detected attacks. Each message shows the
date and time that the event occurred.
FortiManager v4.0 MR3 Patch Release 3 Administration Guide
02-434-167503-20120406 56
http://docs.fortinet.com/ • Feedback](https://image.slidesharecdn.com/fortimanager-admin-40-mr3-130103035726-phpapp02/75/Fortimanager-admin-40-mr3-56-2048.jpg)


![Working with Scripts Script Samples
To save system status information in an array
Script 1 #!
2 proc get_sys_status aname {
3 upvar $aname a
4 set input [exec "get system statusn" "# "]
5 set linelist [split $input n]
6 foreach line $linelist {
7 if {![regexp {([^:]+):(.*)} $line dummy key value]}
continue
8 switch -regexp -- $key {
9 Version {
10 regexp {Fortigate-([^ ]+)
([^,]+),build([d]+),.*} $value dummy a(platform)
a(version) a(build)
11 }
12 Serial-Number {
set a(serial-number) [string trim $value]
}
13 Hostname {
14 set a(hostname) [string trim $value]
} }
}
}
15 get_sys_status status
16 puts "This machine is a $status(platform) platform."
17 puts "It is running version $status(version) of FortiOS."
18 puts "The firmware is build# $status(build)."
19 puts "S/N: $status(serial-number)"
20 puts "This machine is called $status(hostname)"
21
22
Output Starting script execution
This machine is a 100A platform.
It is running version 4.0 of FortiOS.
The firmware is build# 482.
S/N: FGT100A220120181
This machine is called techdocs-100A.
Variations Once the information is in the variable array, you can use it as part of
commands you send to the FortiGate device or to make decisions based on
the information. For example:
if {$status(version) == 4.0} {
# follow the version 4.0 commands
} elseif {$status(version) == 4.0} {
# follow the version 4.0 commands
}
FortiManager v4.0 MR3 Patch Release 3 Administration Guide
02-434-167503-20120406 231
http://docs.fortinet.com/ • Feedback](https://image.slidesharecdn.com/fortimanager-admin-40-mr3-130103035726-phpapp02/75/Fortimanager-admin-40-mr3-231-2048.jpg)
![Working with Scripts Script Samples
This script introduces the concept of executing CLI commands within Tcl scripts using
the following method:
set input [exec "get system statusn" "# "]
This command executes the CLI command “get system status” and passes the
result into the variable called input. Without the “n” at the end of the CLI command,
the CLI command will not execute to provide output.
In analyzing this script:
• line 1 is the required #! to indicate this is a Tcl script
• lines 2-3 open the procedure declaration
• lines 4-5 puts the output from the CLI command into a Tcl variable as a string, and
breaks it up at each return character into an array of smaller strings
• line 6 starts a loop to go through the array of strings
• line 7 loops if the array element is punctuation or continues if its text
• line 8 takes the output of line 7’s regexp command and based on a match, performs
one of the actions listed in lines 9 through 17
• lines 9-11 if regexp matches ‘Version’ then parse the text and store values for the
platform, version, and build number in the named array elements
• line 12-14 if regexp matches ‘Serial-Number’ then store the value in an array
element named that after trimming the string down to text only
• lines 15-17 is similar to line 12 except the regexp is matched against ‘Hostname’
• line 17-19 close the switch decision statement, the foreach loop, and the procedure
• line 20 calls the procedure with an array name of status
• lines 21-25 output the information stored in the status array
FortiManager v4.0 MR3 Patch Release 3 Administration Guide
02-434-167503-20120406 232
http://docs.fortinet.com/ • Feedback](https://image.slidesharecdn.com/fortimanager-admin-40-mr3-130103035726-phpapp02/75/Fortimanager-admin-40-mr3-232-2048.jpg)
![Working with Scripts Script Samples
Tcl loops
Even though the last script used a loop, that script’s main purpose was storing
information in the array. The next script uses a loop to create a preset number of users
on the FortiGate device, in this case 10 users. The output is only shown for the first two
users due to space considerations.
To create 10 users from usr0001 to usr0010
Script 1 #!
2 proc do_cmd {cmd} {
3 puts [exec "$cmdn" "# " 15]
4 }
5 set num_users 10
6 do_cmd "config user local"
7 for {set i 1} {$i <= $num_users} {incr i} {
8 set name [format "usr%04d" $i]
9 puts "Adding user: $name"
10 do_cmd "edit $name"
11 do_cmd "set status enable"
12 do_cmd "set type password"
13 do_cmd "next"
14 }
15 do_cmd "end"
16 do_cmd "show user local"
17
FortiManager v4.0 MR3 Patch Release 3 Administration Guide
02-434-167503-20120406 233
http://docs.fortinet.com/ • Feedback](https://image.slidesharecdn.com/fortimanager-admin-40-mr3-130103035726-phpapp02/75/Fortimanager-admin-40-mr3-233-2048.jpg)
![Working with Scripts Script Samples
• lines 10-13 create and configure the user, leaving the CLI ready for the next user to
be added
• line 14 ends the for loop
• line 15 ends the adding of users in the CLI
• line 16 executes a CLI command to prove the users were added properly
Tcl decisions
Tcl has a number of decision structures that allow you to execute different CLI
commands based on what information you discover.
This script is more complex than the previous scripts as it uses two procedures that
read FortiGate information, make a decision based on that information, and then
executes one of the CLI sub-scripts based on that information.
To add information to existing firewall policies
Script 1 #!
2 # need to define procedure do_cmd
3 # the second parameter of exec should be "# "
4 # If split one command to multiple lines use "" to
continue
5 proc do_cmd {cmd} {
6 puts [exec "$cmdn" "# "]
}
7 foreach line [split [exec "show firewall policyn" "# "]
n] {
8 if {[regexp {edit[ ]+([0-9]+)} $line match policyid]} {
continue
9 } elseif {[regexp {set[ ]+(w+)[ ]+(.*)r} $line match
10 key value]} {
11 lappend fw_policy($policyid) "$key $value"
12 }
}
do_cmd "config firewall policy"
13 foreach policyid [array names fw_policy] {
14 if {[lsearch $fw_policy($policyid){diffservcode_forward
15 000011}] == -1} {
do_cmd "edit $policyid"
do_cmd "set diffserv-forward enable"
16 do_cmd "set diffservcode-forward 000011"
17 do_cmd "next"
18 }
19 }
do_cmd "end"
20
21
FortiManager v4.0 MR3 Patch Release 3 Administration Guide
02-434-167503-20120406 235
http://docs.fortinet.com/ • Feedback](https://image.slidesharecdn.com/fortimanager-admin-40-mr3-130103035726-phpapp02/75/Fortimanager-admin-40-mr3-235-2048.jpg)

![Working with Scripts Script Samples
Additional Tcl Scripts
To get and display state information about the FortiGate device
Script 1 #!
2
3 #Run on FortiOS v4.00
4 #This script will display FortiGate's CPU states,
5 #Memory states, and Up time
6
7 set input [exec "get system statusn" "# "]
8 regexp {Version: *([^ ]+) ([^,]+),build([0-9]+),[0
9 -9]+} $input dummy status(Platform) status(Version)
10 status(Build)
11
12 if {$status(Version) eq "4.00"} {
13 puts -nonewline [exec "get system performance
14 statusn" "# " 30]
15 } else {
16 puts -nonewline [exec "get system performancen" "#
17 " 30]
18 }
19
Output Starting script execution
get system performance
CPU states: 92% used, 8% idle
Memory states: 55% used
Up: 9 days, 5 hours, 1 minutes.
Fortigate-50B #
Variations none.
Versions 4.0
FortiManager v4.0 MR3 Patch Release 3 Administration Guide
02-434-167503-20120406 237
http://docs.fortinet.com/ • Feedback](https://image.slidesharecdn.com/fortimanager-admin-40-mr3-130103035726-phpapp02/75/Fortimanager-admin-40-mr3-237-2048.jpg)
![Working with Scripts Script Samples
To configure common global settings
Script 1 #!
2
3 #Run on FortiOS v4.00
4 #This script will configure common global settings
5 #if you do not want to set a parameter, comment the
6 #corresponding set command
7 #if you want to reset a parameter to it's default
8 #value, set it an empty string
9
10 set sys_global(ntpserver) "2.2.2.2"
11 set sys_global(admintimeout) ""
12 set sys_global(authtimeout) 20
13 set sys_global(ntpsync) "enable"
14
15 #procedure to execute FortiGate command
16 proc fgt_cmd cmd {
17 puts -nonewline [exec "$cmdn" "# " 30]
18 }
19
20 #config system global---begin
21
22 fgt_cmd "config system global"
23 foreach key [array names sys_global] {
24 if {$sys_global($key) ne ""} {
25 fgt_cmd "set $key $sys_global($key)"
26 } else {
27 fgt_cmd "unset $key"
28 }
29 }
30 fgt_cmd "end"
31
32 #config system global---end
33
34
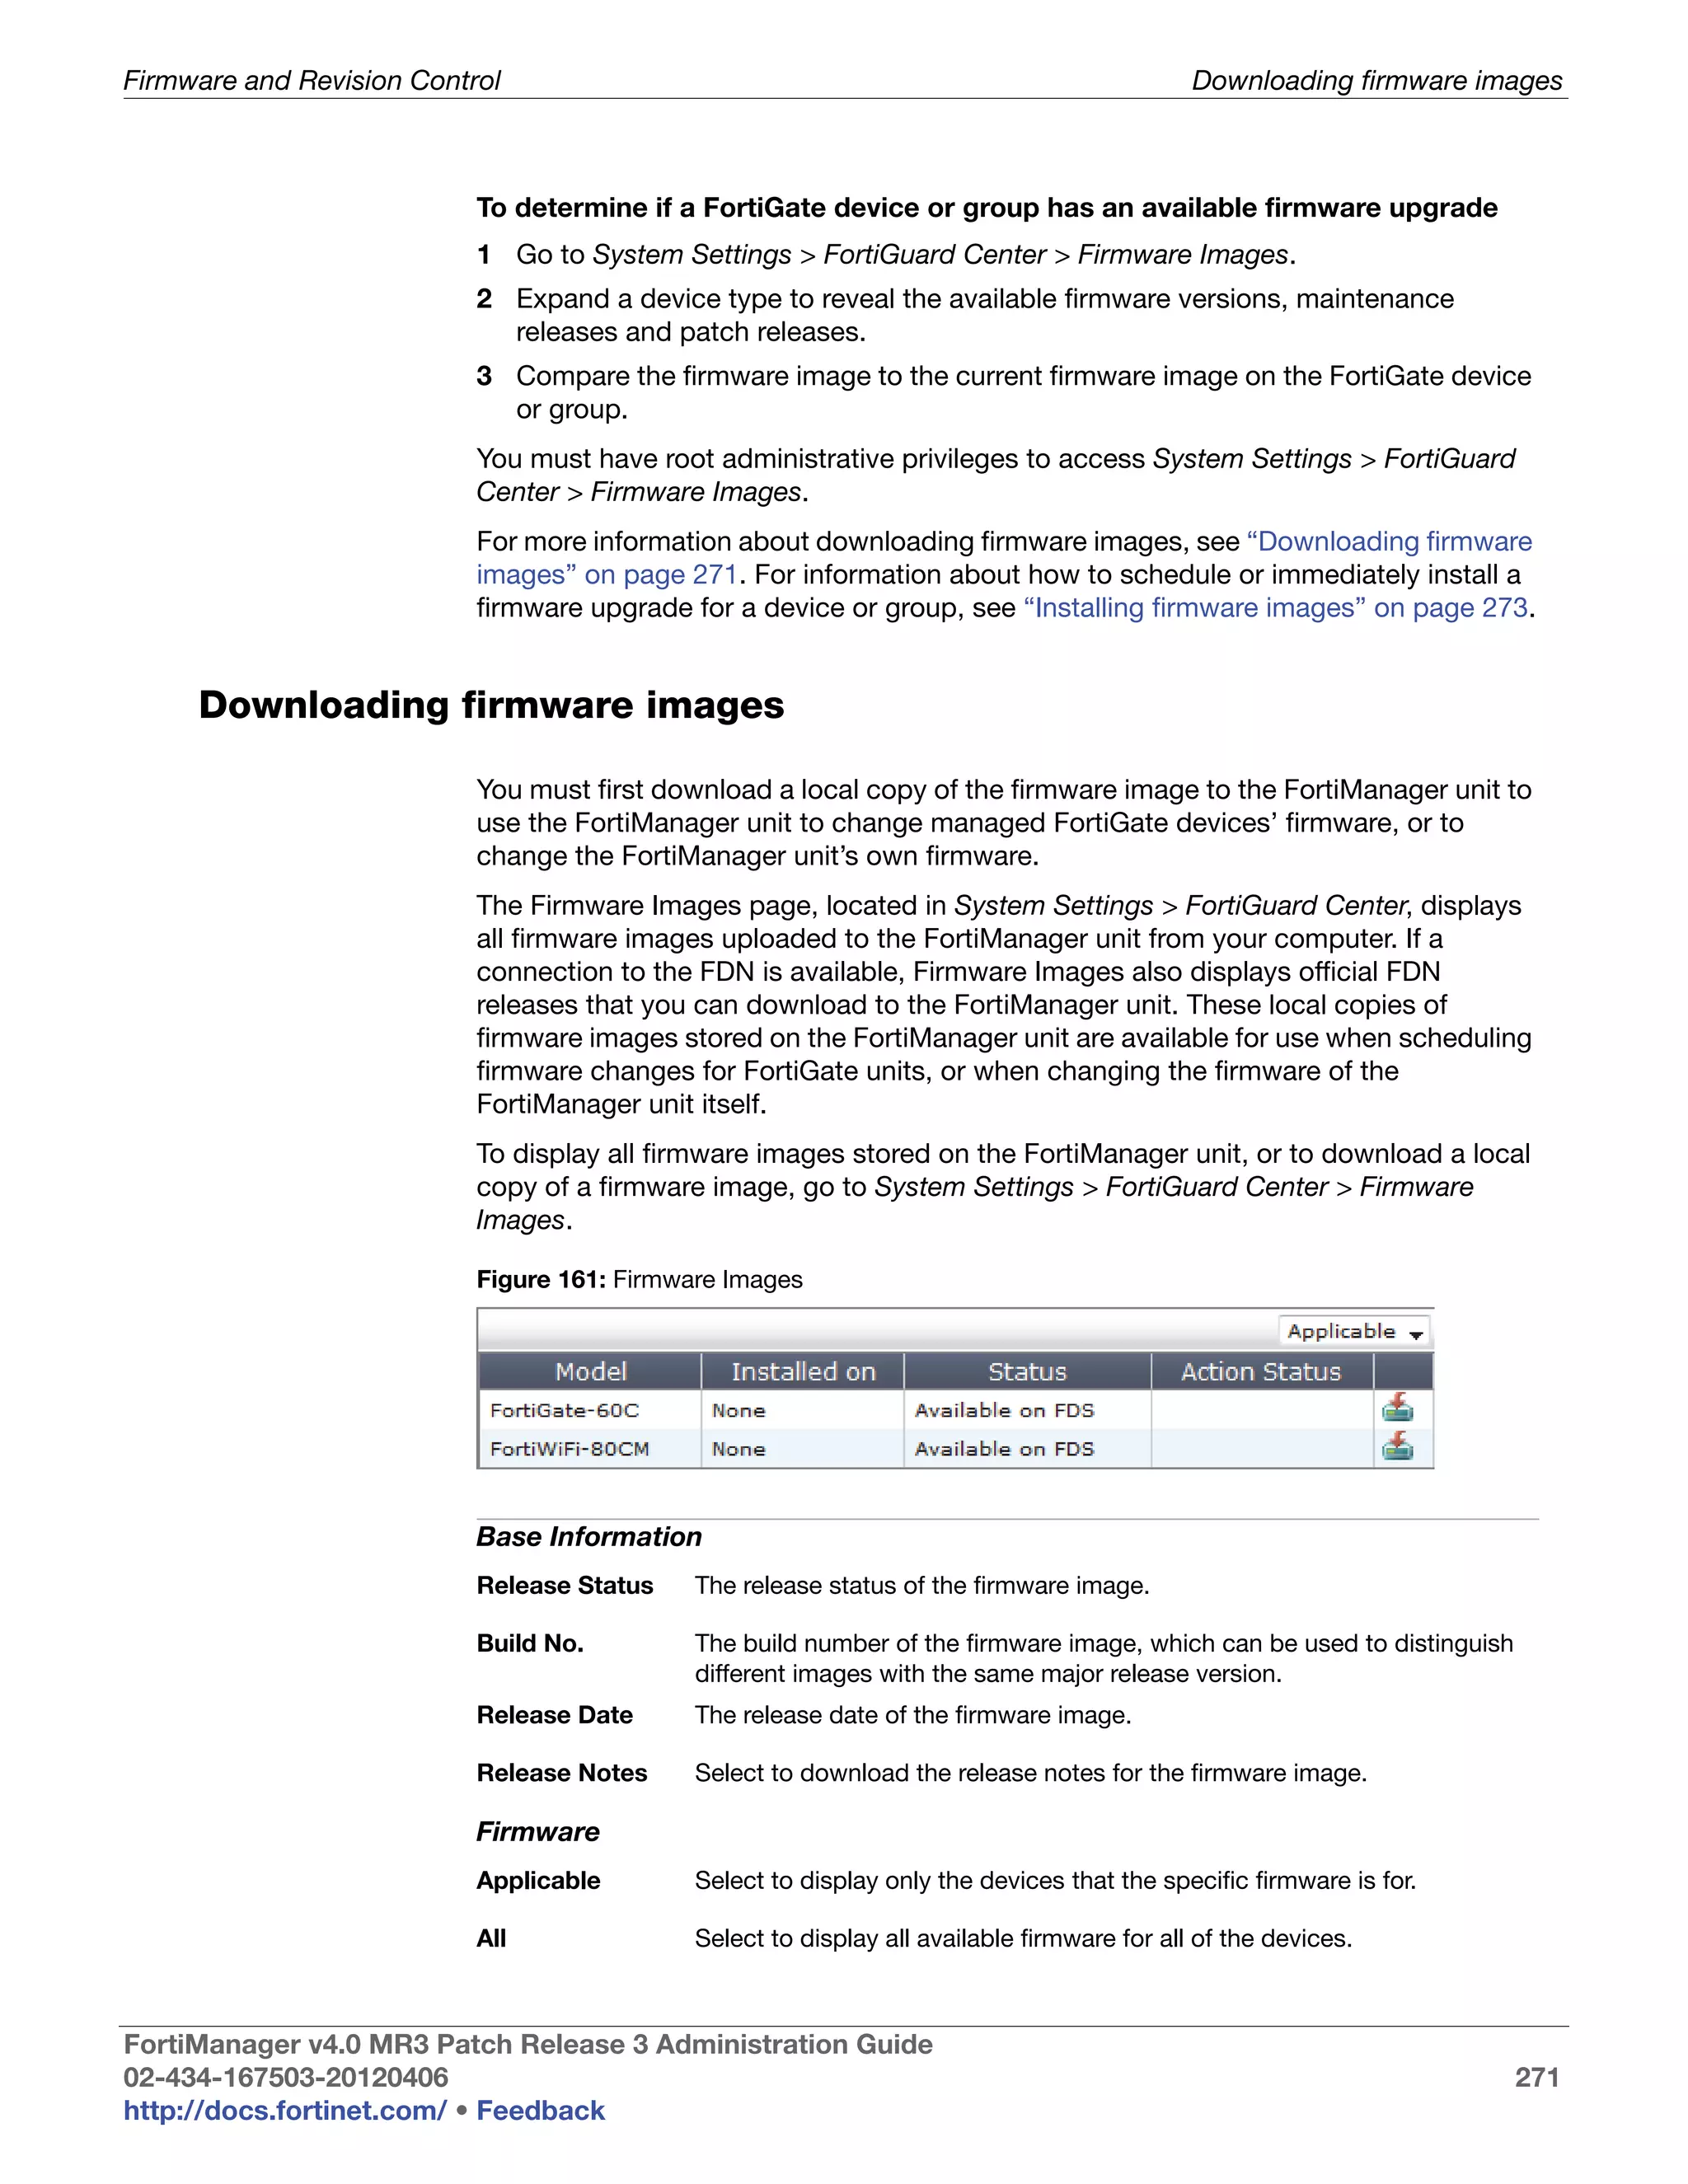
Output Starting script execution
Variations none
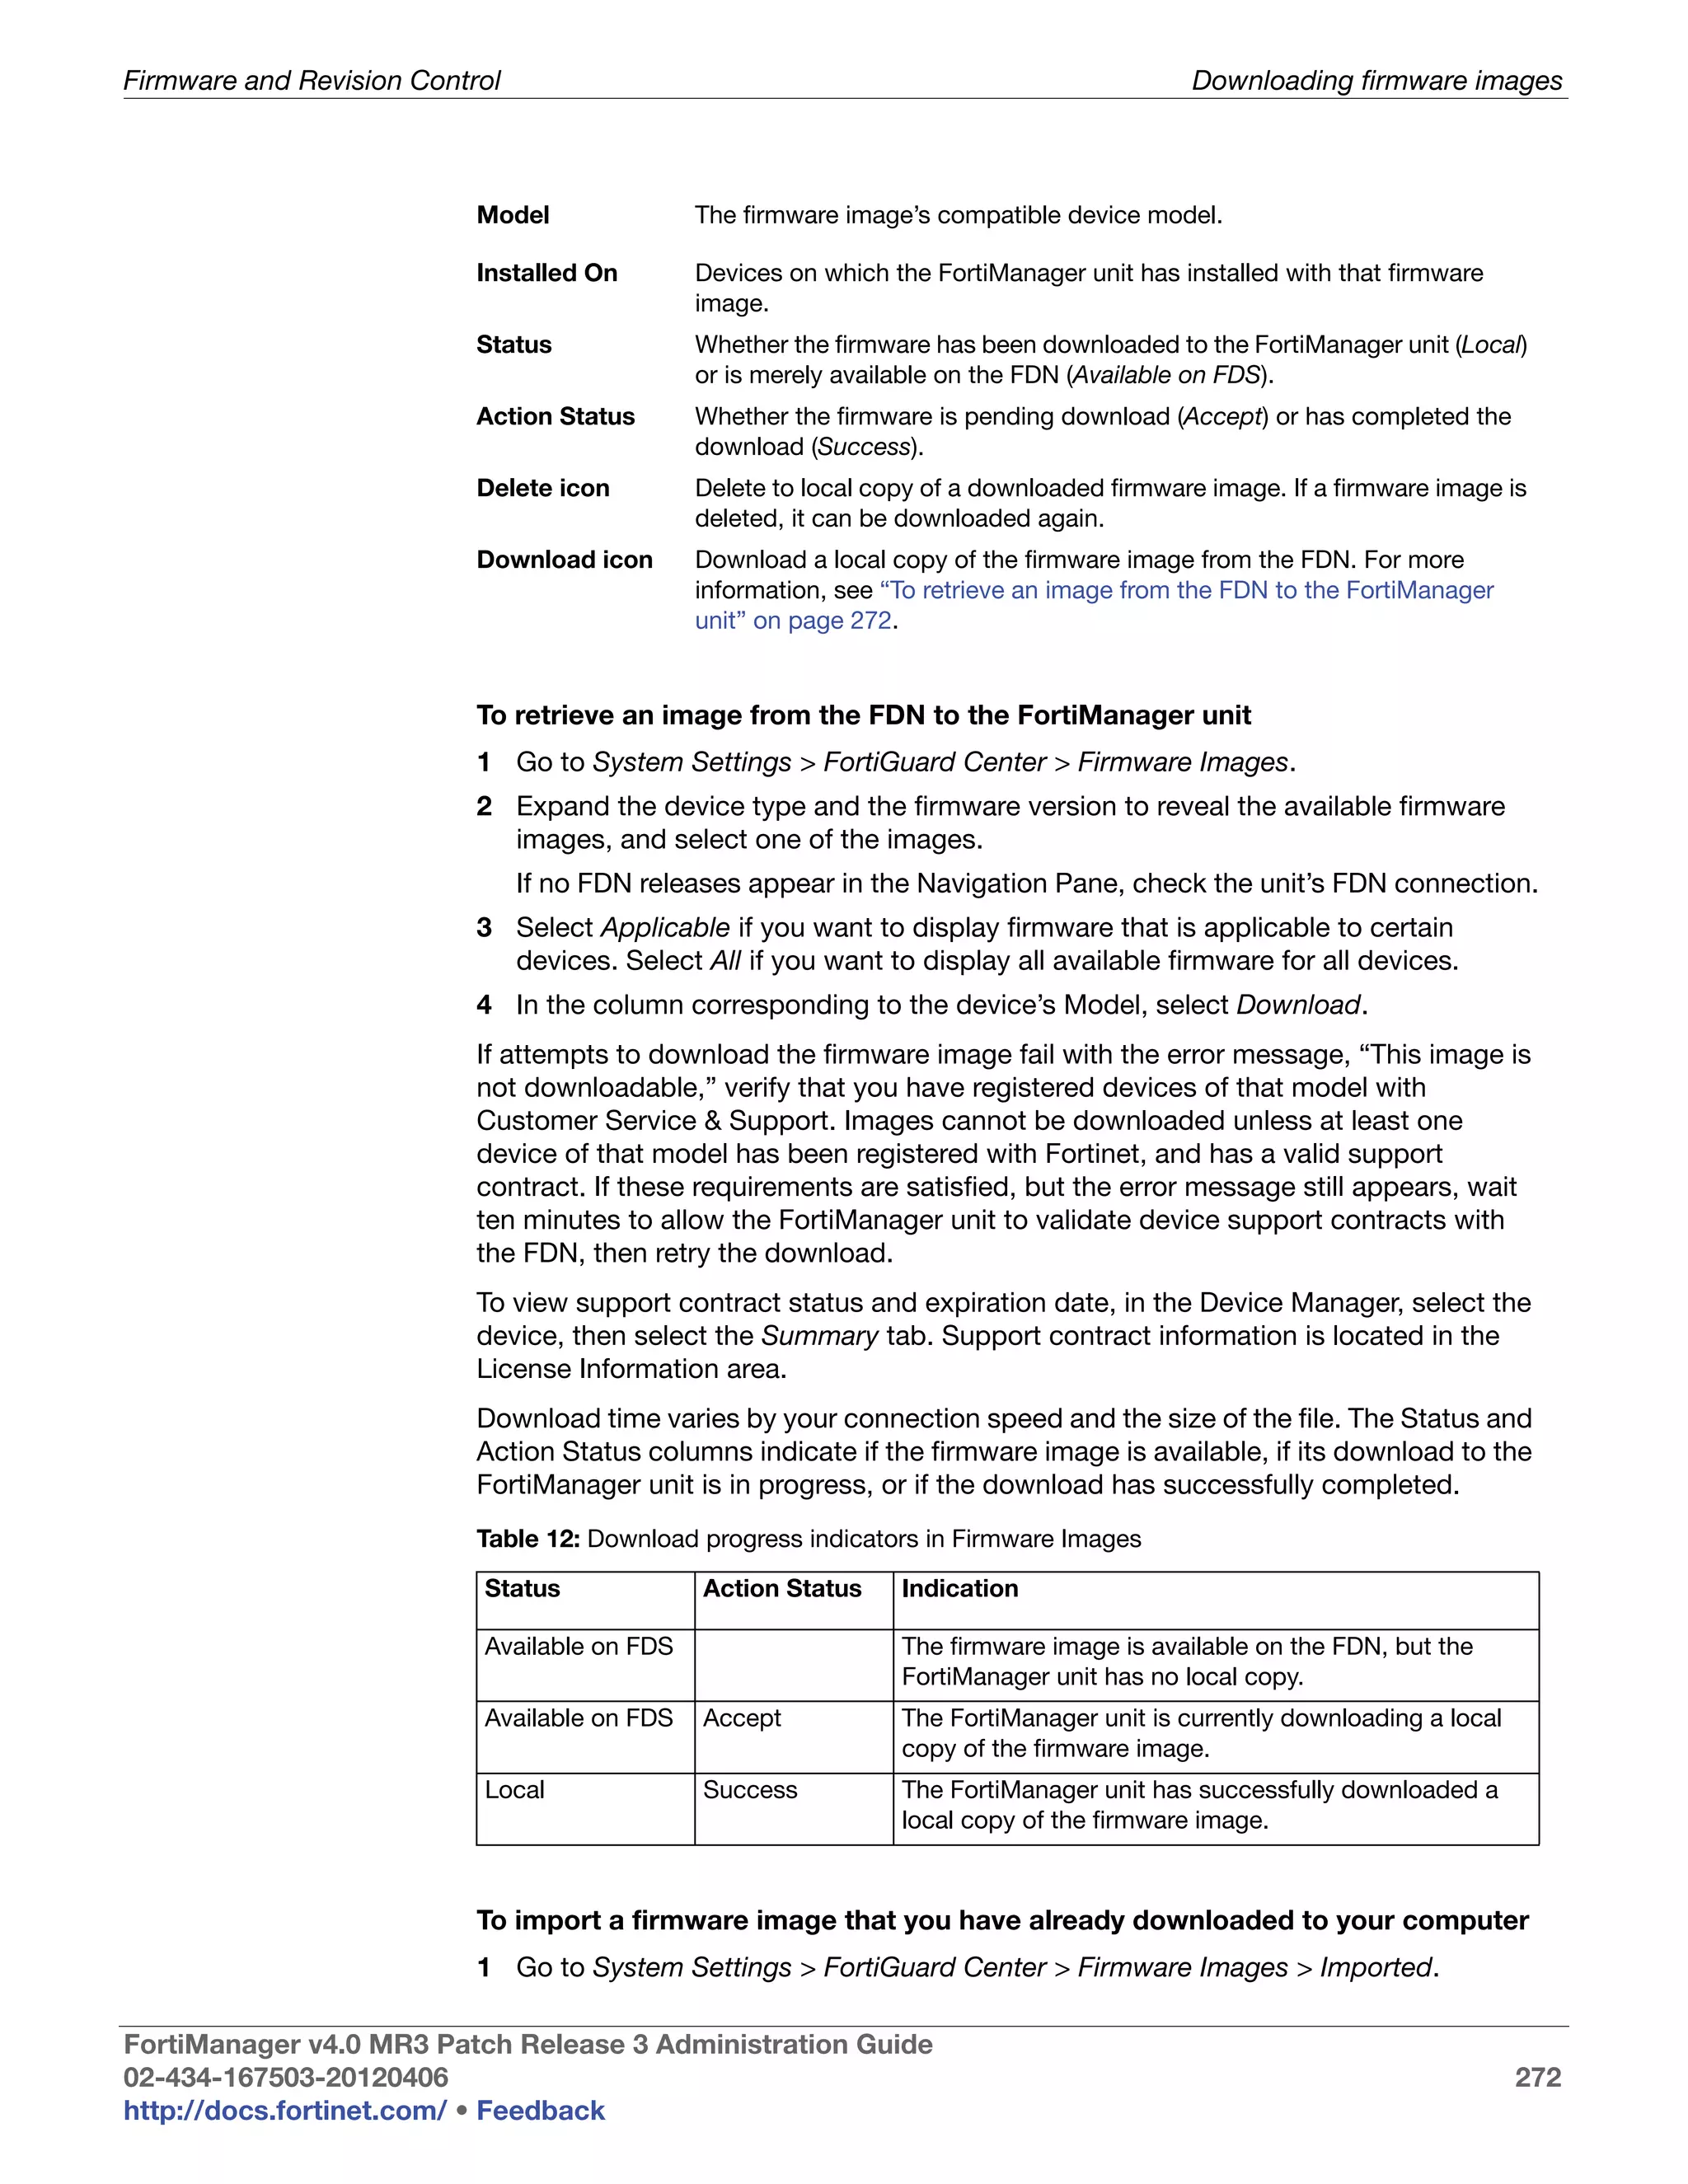
FortiManager v4.0 MR3 Patch Release 3 Administration Guide
02-434-167503-20120406 238
http://docs.fortinet.com/ • Feedback](https://image.slidesharecdn.com/fortimanager-admin-40-mr3-130103035726-phpapp02/75/Fortimanager-admin-40-mr3-238-2048.jpg)
![Working with Scripts Script Samples
To configure syslogd settings and filters
Script 1 #!
2
3 #Run on FortiOS v4.00
4 #This script will configure log syslogd setting and
5 #filter
6
7 #key-value pairs for 'config log syslogd setting', no
8 #value means default value.
9 set setting_list {{status enable} {csv enable}
10 {facility alert} {port} {server 1.1.1.2}}
11
12 #key-value pairs for 'config log syslogd filter', no
13 #value means default value.
14 set filter_list {{attack enable} {email enable} {im
15 enable} {severity} {traffic enable} {virus disable}
16 {web enable}}
17
18 #set the number of syslogd server, "", "2" or "3"
19 set syslogd_no "2"
20
21 #procedure to execute FortiGate CLI command
22 proc fgt_cmd cmd {
23 puts -nonewline [exec "$cmdn" "# "]
24 }
25
26 #procedure to set a series of key-value pairs
27 proc set_kv kv_list {
28 foreach kv $kv_list {
29 set len [llength $kv]
30 if {$len == 0} {
31 continue
32 } elseif {$len == 1} {
33 fgt_cmd "unset [lindex $kv 0]"
34 } else {
35 fgt_cmd "set [lindex $kv 0] [lindex $kv 1]"
36 }
37 }
38 }
39
40 #configure log syslogd setting---begin
41
42 fgt_cmd "config log syslogd$syslogd_no setting"
43 set_kv $setting_list
44 fgt_cmd "end"
45
46 #configure log syslogd setting---end
47 #configure log syslogd filter---begin
48 fgt_cmd "config log syslogd$syslogd_no filter"
49 set_kv $filter_list
50 fgt_cmd "end"
51 #configure log syslogd filter---end
52
FortiManager v4.0 MR3 Patch Release 3 Administration Guide
02-434-167503-20120406 239
http://docs.fortinet.com/ • Feedback](https://image.slidesharecdn.com/fortimanager-admin-40-mr3-130103035726-phpapp02/75/Fortimanager-admin-40-mr3-239-2048.jpg)
![Working with Scripts Script Samples
To configure the FortiGate device to communicate with a FortiAnalyzer unit
Script 1 #!
2 #This script will configure the FortiGate device to
3 #communicate with a FortiAnalyzer unit
4
5 #Enter the following key-value pairs for 'config
6 #system fortianalyzer'
7
8 set status enable
9 set address-mode static
10 set encrypt enable
11 #localid will be set as the hostname automatically
12 #later
13 set psksecret "123456"
14 set server 1.1.1.1
15 set ver-1 disable
16
17 #for fortianalyzer, fortianalyzer2 or
18 #fortianalyzer3, enter the corresponding value "",
19 #"2", "3"
20 set faz_no ""
21
22 #keys used for 'config system fortianalyzer', if you
23 #do not want to change the value of a key, do not put
24 #it in the list
25 set key_list {status address-mode encrypt localid
26 psksecret server ver-1}
27
28 #procedure to get system status from a FortiGate
29 proc get_sys_status aname {
30 upvar $aname a
31 set input [split [exec "get system statusn" "# "]
32 n]
33 foreach line $input {
34 if {![regexp {([^:]+):(.*)} $line dummy key
35 value]} continue
36 set a([string trim $key]) [string trim $value]
37 }
38 }#procedure to execute FortiGate command
39 proc fgt_cmd cmd {
40 puts -nonewline [exec "$cmdn" "# "]
41 }#set the localid as the FortiGate's hostname
42 get_sys_status sys_status
43 set localid $sys_status(Hostname)
44
45 #config system fortianalyzer---begin
46 fgt_cmd "config system fortianalyzer$faz_no"
47
48 foreach key $key_list {
49 if [info exists $key] {
50 fgt_cmd "set $key [set $key]"
51 } else {
52 fgt_cmd "unset $key"
53 } }
54 fgt_cmd "end"
55 #config system fortianalyzer---end
56
FortiManager v4.0 MR3 Patch Release 3 Administration Guide
02-434-167503-20120406 241
http://docs.fortinet.com/ • Feedback](https://image.slidesharecdn.com/fortimanager-admin-40-mr3-130103035726-phpapp02/75/Fortimanager-admin-40-mr3-241-2048.jpg)
![Working with Scripts Script Samples
To create custom IPS signatures and add them to a custom group
Script 1 #!
2
3 #Run on FortiOS v4.00
4 #This script will create custom ips signatures and
5 #add them to a custom signature group
6
7 #Enter custom ips signatures, signature names are the
8 #names of array elements
9 set custom_sig(c1) {"F-SBID(--protocol icmp;
10 --icmp_type 10; )"}
11 set custom_sig(c2) {"F-SBID(--protocol icmp;
12 --icmp_type 0; )"}
13
14 #Enter custom ips group settings
15 set custom_rule(c1) {{status enable} {action drop}
16 {log enable} {log-packet} {severity high}}
17
18 set custom_rule(c2) {{status enable} {action reset}
19 {log} {log-packet disable} {severity low}}
20
21 #procedure to execute FortiGate command
22 proc fgt_cmd cmd {
23 puts -nonewline [exec "$cmdn" "# "]
24 }
25
26 #procedure to set a series of key-value pairs
27 proc set_kv kv_list {
28 foreach kv $kv_list {
29 set len [llength $kv]
30 if {$len == 0} {
31 continue
32 } elseif {$len == 1} {
33 fgt_cmd "unset [lindex $kv 0]"
34 } else {
35 fgt_cmd "set [lindex $kv 0] [lindex $kv 1]"
36 }
37 } }
38 #config ips custom---begin
39 fgt_cmd "config ips custom"
40 foreach sig_name [array names custom_sig] {
41 fgt_cmd "edit $sig_name"
42 fgt_cmd "set signature $custom_sig($sig_name)"
43 fgt_cmd "next"
44 }
45 fgt_cmd "end"
46 #config ips group custom---begin
47 fgt_cmd "config ips group custom"
48 foreach rule_name [array names custom_rule] {
49 fgt_cmd "config rule $rule_name"
50 set_kv $custom_rule($rule_name)
51 fgt_cmd "end"
52 }
53 fgt_cmd "end"
54 #config ips group custom---end
55
FortiManager v4.0 MR3 Patch Release 3 Administration Guide
02-434-167503-20120406 243
http://docs.fortinet.com/ • Feedback](https://image.slidesharecdn.com/fortimanager-admin-40-mr3-130103035726-phpapp02/75/Fortimanager-admin-40-mr3-243-2048.jpg)
![Working with Scripts Script Samples
To write to a file
Script 1 #!
2
3 set somefile {open “tcl_test” “w”}
4 puts $somefile "Hello, world!"
5 close $somefile
6
Output
Variations
Versions 4.0
To read from a file
Script 1 #!
2
3 set otherfile {open “tcl_test” “r”}
4 while {[gets $otherfile line] >= 0} {
5 puts [string length $line]
}
7 close $otherfile
8
Output Hello, world!
Variations
These two short scripts write a file called tcl_test and then read it back.
Line 3 in both scripts opens the file either for reading (r) or writing (w) and assigns it to
a filehandle (somefile or otherfile). Later in the script when you see these filehandles, its
input or output passing to the open file.
When reading from the file, lines 4 and 5 loop through the file line by line until it reaches
the end of the file. Each line that is read is put to the screen.
Both scripts close the file before they exit.
FortiManager v4.0 MR3 Patch Release 3 Administration Guide
02-434-167503-20120406 245
http://docs.fortinet.com/ • Feedback](https://image.slidesharecdn.com/fortimanager-admin-40-mr3-130103035726-phpapp02/75/Fortimanager-admin-40-mr3-245-2048.jpg)
![Working with Scripts Script Samples
Troubleshooting Tips
This section includes suggestions to help you find and fix problems you may be having
with your scripts.
• Make sure the commands you are trying to execute are valid for the version of
FortiOS running on your target FortiGate device.
• You should always use braces when evaluating code that may contain user input, to
avoid possible security breaches. To illustrate the danger, consider this interactive
session:
% set userinput {[puts DANGER!]}
[puts DANGER!]
% expr $userinput == 1
DANGER!
0
% expr {$userinput == 1}
0
In the first example, the code contained in the user-supplied input is evaluated,
whereas in the second the braces prevent this potential danger. As a general rule,
always surround expressions with braces, whether using expr directly or some
other command that takes an expression.
• A number that includes a leading zero or zeros, such as 0500 or 0011, is interpreted
as an octal number, not a decimal number. So 0500 is actually 320 in decimal, and
0011 is 9 in decimal.
• There is a limit to the number of scripts allowed on the FortiManager unit. Try
removing an old script before trying to save your current one.
• Using the Tcl command “catch” you can add custom error messages in your script
to alert you to problems during the script execution. When catch encounters an
error it will return 1, but if there is no error it will return 0. For example:
if { [catch {open $someFile w} fid] } {
puts stderr "Could not open $someFile for writingn$fid"
exit 1 ;# error opening the file!
} else {
# put the rest of your script here
}
FortiManager v4.0 MR3 Patch Release 3 Administration Guide
02-434-167503-20120406 246
http://docs.fortinet.com/ • Feedback](https://image.slidesharecdn.com/fortimanager-admin-40-mr3-130103035726-phpapp02/75/Fortimanager-admin-40-mr3-246-2048.jpg)


![FortiClient Manager Configuring FortiClient agent settings
Configuring Add, edit, and delete firewall addresses as required. Firewall policies specify firewall
firewall addresses to match the source or destination IP addresses of packets that the
addresses on a FortiClient agent receives.
FortiClient agent
Create New Select to create a firewall address for the managed FortiClient agent.
Override The FortiClient agent’s configuration includes those inherited from the group
to which the computer belongs.
Selecting override allows you to modify the inherited firewall address
configuration on this FortiClient agent. Deselecting override means that you
want to use the firewall address configuration inherited from the group to
which the computer belongs.
Even with inherited firewall address configurations, you can still create new
firewall addresses for a FortiClient agent.
See “Adding a FortiClient agent group” on page 303 and “Configuring
settings for client groups” on page 305.
Name The name of the firewall address.
Type Select one of Single Address, IP Range, Subnet, or FQDN.
Single Address This name and format of this field depends on the Type setting.
IP Range
Examples:
Subnet
FQDN • Single Address: 10.10.1.2
• IP Range: 10.10.1.[12-20] or 10.10.1.12-10.10.1.20
• Subnet: 10.10.10.0/255.255.0.0
• FQDN: mysite.example.com
Comments Comments on the firewall address.
Action Delete — Remove the selected firewall address.
Edit — Modify the firewall address.
Copy to group — If the FortiClient agent belongs to a client group, add this
address to the group configuration.
To add a firewall address
1 In the FortiClient Manager, select Client/Group > Client > Managed Client in the
Navigation Pane.
2 In the All Managed Clients list, select the FortiClient agent you want from the
Host Name column.
3 From the FortiClient menu, select Firewall > IP Address > IP Address.
4 Select Create New, enter the information as described above and then select OK.
FortiManager v4.0 MR3 Patch Release 3 Administration Guide
02-434-167503-20120406 343
http://docs.fortinet.com/ • Feedback](https://image.slidesharecdn.com/fortimanager-admin-40-mr3-130103035726-phpapp02/75/Fortimanager-admin-40-mr3-343-2048.jpg)


![Vibe Coding vs. Spec-Driven Development [Free Meetup]](https://cdn.slidesharecdn.com/ss_thumbnails/vibecodingvsspecdrivendevelopment-251209105622-43f455e7-thumbnail.jpg?width=640&height=640&fit=bounds)


