Downloaded 129 times


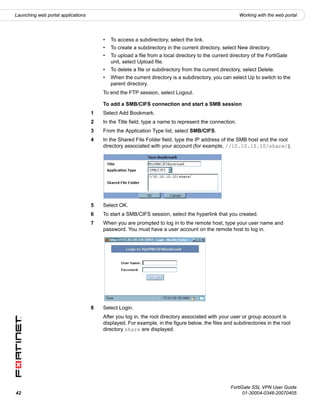
![Configuring firewall policies Configuring a FortiGate SSL VPN
Tunnel mode:
• The source address corresponds to the range of IP addresses that can be
connected to the FortiGate unit. This address is used to restrict who can
access the FortiGate unit.
• The destination address corresponds to the IP address or addresses that
remote clients need to access. The destination address may correspond to
an entire private network (behind the FortiGate unit), a range of private IP
addresses, or the private IP address of a server or host.
Configuring Web-only firewall policies
To specify the destination IP address
1 Go to Firewall > Address and select Create New.
2 In the Address Name field, type a name that represents the local network,
server(s), or host(s) to which IP packets may be delivered (for example,
Subnet_1).
3 From the Type list, select Subnet/IP Range.
4 In the Subnet/IP Range field, type the corresponding IP address and subnet mask
(for example, 172.16.10.0/24).
Note: To provide access to a single host or server, you would type an IP address like
172.16.10.2/32. To provide access to two servers having contiguous IP addresses, you
would type an IP address range like 172.16.10.[4-5].
5 Select OK.
To define the firewall policy for web-only mode connections
1 Go to Firewall > Policy and select Create New.
2 Enter these settings in particular:
Source Interface/Zone
Select the FortiGate interface that accepts connections from remote
users.
Address Name
Select all.
Destination Interface/Zone
Select the FortiGate interface to the local private network (for example,
dmz).
Address Name
Select the IP destination address that you defined previously (for
example, Subnet_1).
Service Select ANY.
Action Select SSL-VPN.
SSL Client Allow traffic generated by holders of a (shared) group certificate. The
Certificate holders of the group certificate must be members of an SSL VPN user
Restrictive group, and the name of that user group must be present in the Allowed
list.
Cipher Strength Select one of the following options to determine the level of SSL
encryption to use. The web browser on the remote client must be
capable of matching the level that you select:
• To use any cipher suite, select Any.
• To use a 164-bit or greater cipher suite, select High >= 164.
• To use a 128-bit or greater cipher suite, select Medium >= 128.
FortiGate SSL VPN User Guide
28 01-30004-0348-20070405](https://image.slidesharecdn.com/fortigatesslvpnuserguide01-30004-0348-20070405-100922201504-phpapp01/85/Forti-gate-ssl_vpn_user_guide_01-30004-0348-20070405-28-320.jpg)
![Configuring firewall policies Configuring a FortiGate SSL VPN
Configuring the firewall policy involves:
• specifying the source and destination IP addresses:
• The source address corresponds to the range of IP addresses that can be
connected to the FortiGate unit.
• The destination address corresponds to the IP address or addresses that
remote clients need to access. The destination address may correspond to
an entire private network, a range of private IP addresses, or the private IP
address of a server or host.
• specifying the level of SSL encryption to use and the authentication method
• binding the user group to the firewall policy
Note: If your destination address, SSL encryption, and user group are the same as
for your web-only mode connection, you do not need to create a firewall policy for
tunnel mode. The FortiGate unit uses the web-only mode policy settings except
for the source address range, which it obtains from the tunnel IP range settings.
To specify the source IP address
1 Go to Firewall > Address and select Create New.
2 In the Address Name field, type a name that represents the IP addresses
permitted to set up SSL VPN connection (for example, SSL_Tunnel_Host).
3 From the Type list, select Subnet/IP Range.
4 In the Subnet/IP Range field, type the corresponding IP address and subnet mask
(for example, 172.16.10.0/24). Enter 0.0.0.0/0.0.0.0 to indicate ‘all’.
Note: To provide access to a single host or server, you would type an IP address like
172.16.10.2/32. To provide access to two servers having contiguous IP addresses, you
would type an IP address range like 172.16.10.[4-5].
5 In the Interface field, select the interface to the internal (private) network.
6 Select OK.
To specify the destination IP address
1 Go to Firewall > Address and select Create New.
2 In the Address Name field, type a name that represents the local network,
server(s), or host(s) to which IP packets may be delivered (for example,
Subnet_2).
3 In the Subnet/IP Range field, type the corresponding IP address (for example,
192.168.22.0/24 for a subnet, or 192.168.22.2/32 for a server or host), or
IP address range (192.168.22.[10-25]).
4 In the Interface field, select the interface to the external (public) network.
5 Select OK.
FortiGate SSL VPN User Guide
30 01-30004-0348-20070405](https://image.slidesharecdn.com/fortigatesslvpnuserguide01-30004-0348-20070405-100922201504-phpapp01/85/Forti-gate-ssl_vpn_user_guide_01-30004-0348-20070405-30-320.jpg)


This document provides a 3 sentence summary of the FortiGate SSL VPN User Guide: The guide explains how to configure SSL VPN operation on FortiGate units in both web-only and tunnel modes, providing procedures for configuring SSL VPN settings, user accounts, firewall policies, and event logging. It also describes how to connect to and use the features of the SSL VPN web portal, including installing the ActiveX plugin for tunnel mode connections. The document provides an introduction to FortiGate SSL VPN technology and supplementary Fortinet documentation.


