This is a handout from a Flash workshop I recently conducted at the National University of Singapore. It contains step by step instructions covering Flash basics, ActionScript and also Flash-PHP communication. Feel free to contact me if you find any bugs! :)
Graphics Experts Ltd is the right solution for all of your graphic design needs. We offer affordable, professional services that encompass everything from image masking, shadow creation, web image optimization, and clipping path to image manipulation, image retouching, color adjustments, photo editing, vehicle enhancement, and even illustration.
Adobe Illustrator CS5 Part 1 : Introduction to Illustratorcsula its training
Adobe Illustrator CS5 is used to create graphics and type in vector format. Vector graphics are made up of points, lines, and curves that are defined by mathematical equations. Vector graphics are resolution independent, which means that they can be resized to any size without losing quality. This handout provides an overview of the Illustrator CS5 user interface and vector graphics, and covers how to create different shapes using the Pen tool.
If you would like to see more videos on Adobe Illustrator, please visit http://www.youtube.com/mycsula for more online training.
There you can find FREE tutorials on Illustrator, Photoshop, Microsoft Office, HTML5, and many more!
Putting together a slide show.
Using slide animation effects.
Controlling a slide show using the Presenter Console.
Quick printing.
Emailing a presentation.
Learning Illustrator CS6 with 100 practical exercisesMCB Press
Illustrator CS6, vector drawing application from Adobe, is an excellent tool for computer-aided design. Thanks to its amazing and powerful features, you can create original artwork using drawings and images for it. Do not hesitate to make the 100 exercises in this book to discover the thousand and one possibilities hidden in this great program, as advocated by professionals.
With this book:
Meet the new applications of pattern creation tool enhanced.
Discover also improved image tracing tool that now provides clean lines and perfect fit.
Apply gradients on strokes to get interesting and striking results.
Leverage the revamped interface with optimized panels and other new features that make it more intuitive, efficient and flexible.
Enjoy improvements to some effects, such as Gaussian blur, glare and shadows, which are applied much faster now.
PowerPointLabs (http://www.comp.nus.edu.sg/~pptlabs/) is an add-in for PowerPoint to help less-experience user to make professional-look presentation slides. This presentation is a brief tutorial about the PowerPointLabs.
I. PurposeThe purpose of this assignment is to demonstrate your fideladallimore
I. Purpose
The purpose of this assignment is to demonstrate your ability to use the various features and
functions in Adobe Animate to create a commercial for your fictional company/organization.
This assignment is an opportunity to utilize the animation authoring skills that you have learned
to develop a creative and original 10-second non-looping animation to deliver a message about
your company/organization.
II. Steps
1. You must use Adobe Animate to create your commercial. Your animation must meet the
following requirements:
Document Setting:
Dimension: CAN NOT exceed 800 pixel width and 600 pixel height
Frames per second MUST be set to 12
Platform/Playback Type:
HTML5 Canvas (preferred) or ActionScript 3.0
Accessibility Setting (ActionScript 3.0):
The Accessibility Panel (Window > Properties > Accessibility) must be
activated
For the movie:
o Select the “Make Movie Accessible” option
o Provide an alternative equivalent in the “Name” and “Description” fields
For each object (e.g., button)
o Select the “Make Object Accessible” option
o Provide an alternative equivalent in the “Name” and “Description” fields
Ensure that no component of the content flashes more than three times in
any 1-second period
Requirements (The animation should play in the following order):
Preloader:
Select a background color; Create a text box, aligned at the horizontal
center of the stage and type in 'Loading' in the text box; Create 5 small
white squares and align them as shown.
Create a preloader animation so that the squares sequentially turn to
black squares for 0.5 second each, moving from left to right.
Motion Tween (all of the following):
Resulting in a color change of any object
Resulting in a position change of any object (movement)
Resulting in a transformation change of any object (scale, rotation)
2
Shape Tween:
Resulting in a shape change (morphing)
Button:
Insert a square and convert it into a button symbol
Set the following states for the button:
o Up State: Create a text box on top of the square, with the text
‘End’ and align the square and text to look good.
o Over State: Change the color of the text ‘End’.
o Down State: Change the color of the text ‘End’.
Ending (JavaScript or ActionScript 3.0):
Create a new key frame after the frame on which the button is created.
Delete the button from this frame. Import the Image.gif file to your
library and drag an instance of it to this layer.
Set the Actions to the button/frame so that the animation stops when the
button appears, and the animation continues to play the imported
Image.gif animation when the user clicks on the button.
The imported Image.gif animation must run at least once completely
without looping.
File Type:
FLA (.fla)
Time Length:
At least 10 seconds (non-looping)
2. Submit your FLA file via Blackboard using the Assignments Tool (“Course Tools”
“Assignments” ...
This is a short tutorial for my students at USC, teaching them how to use Adobe's Edge Animate application to create an animated infographic. I go through some simple steps, using the Rectangle, Text and Clipping tools to show how to create a simple bar graph, and then using the Timeline, to make the bars bounce up into view.
How to Make a Field invisible in Odoo 17Celine George
It is possible to hide or invisible some fields in odoo. Commonly using “invisible” attribute in the field definition to invisible the fields. This slide will show how to make a field invisible in odoo 17.
2024.06.01 Introducing a competency framework for languag learning materials ...Sandy Millin
http://sandymillin.wordpress.com/iateflwebinar2024
Published classroom materials form the basis of syllabuses, drive teacher professional development, and have a potentially huge influence on learners, teachers and education systems. All teachers also create their own materials, whether a few sentences on a blackboard, a highly-structured fully-realised online course, or anything in between. Despite this, the knowledge and skills needed to create effective language learning materials are rarely part of teacher training, and are mostly learnt by trial and error.
Knowledge and skills frameworks, generally called competency frameworks, for ELT teachers, trainers and managers have existed for a few years now. However, until I created one for my MA dissertation, there wasn’t one drawing together what we need to know and do to be able to effectively produce language learning materials.
This webinar will introduce you to my framework, highlighting the key competencies I identified from my research. It will also show how anybody involved in language teaching (any language, not just English!), teacher training, managing schools or developing language learning materials can benefit from using the framework.
Macroeconomics- Movie Location
This will be used as part of your Personal Professional Portfolio once graded.
Objective:
Prepare a presentation or a paper using research, basic comparative analysis, data organization and application of economic information. You will make an informed assessment of an economic climate outside of the United States to accomplish an entertainment industry objective.
Operation “Blue Star” is the only event in the history of Independent India where the state went into war with its own people. Even after about 40 years it is not clear if it was culmination of states anger over people of the region, a political game of power or start of dictatorial chapter in the democratic setup.
The people of Punjab felt alienated from main stream due to denial of their just demands during a long democratic struggle since independence. As it happen all over the word, it led to militant struggle with great loss of lives of military, police and civilian personnel. Killing of Indira Gandhi and massacre of innocent Sikhs in Delhi and other India cities was also associated with this movement.
Embracing GenAI - A Strategic ImperativePeter Windle
Artificial Intelligence (AI) technologies such as Generative AI, Image Generators and Large Language Models have had a dramatic impact on teaching, learning and assessment over the past 18 months. The most immediate threat AI posed was to Academic Integrity with Higher Education Institutes (HEIs) focusing their efforts on combating the use of GenAI in assessment. Guidelines were developed for staff and students, policies put in place too. Innovative educators have forged paths in the use of Generative AI for teaching, learning and assessments leading to pockets of transformation springing up across HEIs, often with little or no top-down guidance, support or direction.
This Gasta posits a strategic approach to integrating AI into HEIs to prepare staff, students and the curriculum for an evolving world and workplace. We will highlight the advantages of working with these technologies beyond the realm of teaching, learning and assessment by considering prompt engineering skills, industry impact, curriculum changes, and the need for staff upskilling. In contrast, not engaging strategically with Generative AI poses risks, including falling behind peers, missed opportunities and failing to ensure our graduates remain employable. The rapid evolution of AI technologies necessitates a proactive and strategic approach if we are to remain relevant.
Biological screening of herbal drugs: Introduction and Need for
Phyto-Pharmacological Screening, New Strategies for evaluating
Natural Products, In vitro evaluation techniques for Antioxidants, Antimicrobial and Anticancer drugs. In vivo evaluation techniques
for Anti-inflammatory, Antiulcer, Anticancer, Wound healing, Antidiabetic, Hepatoprotective, Cardio protective, Diuretics and
Antifertility, Toxicity studies as per OECD guidelines
June 3, 2024 Anti-Semitism Letter Sent to MIT President Kornbluth and MIT Cor...Levi Shapiro
Letter from the Congress of the United States regarding Anti-Semitism sent June 3rd to MIT President Sally Kornbluth, MIT Corp Chair, Mark Gorenberg
Dear Dr. Kornbluth and Mr. Gorenberg,
The US House of Representatives is deeply concerned by ongoing and pervasive acts of antisemitic
harassment and intimidation at the Massachusetts Institute of Technology (MIT). Failing to act decisively to ensure a safe learning environment for all students would be a grave dereliction of your responsibilities as President of MIT and Chair of the MIT Corporation.
This Congress will not stand idly by and allow an environment hostile to Jewish students to persist. The House believes that your institution is in violation of Title VI of the Civil Rights Act, and the inability or
unwillingness to rectify this violation through action requires accountability.
Postsecondary education is a unique opportunity for students to learn and have their ideas and beliefs challenged. However, universities receiving hundreds of millions of federal funds annually have denied
students that opportunity and have been hijacked to become venues for the promotion of terrorism, antisemitic harassment and intimidation, unlawful encampments, and in some cases, assaults and riots.
The House of Representatives will not countenance the use of federal funds to indoctrinate students into hateful, antisemitic, anti-American supporters of terrorism. Investigations into campus antisemitism by the Committee on Education and the Workforce and the Committee on Ways and Means have been expanded into a Congress-wide probe across all relevant jurisdictions to address this national crisis. The undersigned Committees will conduct oversight into the use of federal funds at MIT and its learning environment under authorities granted to each Committee.
• The Committee on Education and the Workforce has been investigating your institution since December 7, 2023. The Committee has broad jurisdiction over postsecondary education, including its compliance with Title VI of the Civil Rights Act, campus safety concerns over disruptions to the learning environment, and the awarding of federal student aid under the Higher Education Act.
• The Committee on Oversight and Accountability is investigating the sources of funding and other support flowing to groups espousing pro-Hamas propaganda and engaged in antisemitic harassment and intimidation of students. The Committee on Oversight and Accountability is the principal oversight committee of the US House of Representatives and has broad authority to investigate “any matter” at “any time” under House Rule X.
• The Committee on Ways and Means has been investigating several universities since November 15, 2023, when the Committee held a hearing entitled From Ivory Towers to Dark Corners: Investigating the Nexus Between Antisemitism, Tax-Exempt Universities, and Terror Financing. The Committee followed the hearing with letters to those institutions on January 10, 202
The Roman Empire A Historical Colossus.pdfkaushalkr1407
The Roman Empire, a vast and enduring power, stands as one of history's most remarkable civilizations, leaving an indelible imprint on the world. It emerged from the Roman Republic, transitioning into an imperial powerhouse under the leadership of Augustus Caesar in 27 BCE. This transformation marked the beginning of an era defined by unprecedented territorial expansion, architectural marvels, and profound cultural influence.
The empire's roots lie in the city of Rome, founded, according to legend, by Romulus in 753 BCE. Over centuries, Rome evolved from a small settlement to a formidable republic, characterized by a complex political system with elected officials and checks on power. However, internal strife, class conflicts, and military ambitions paved the way for the end of the Republic. Julius Caesar’s dictatorship and subsequent assassination in 44 BCE created a power vacuum, leading to a civil war. Octavian, later Augustus, emerged victorious, heralding the Roman Empire’s birth.
Under Augustus, the empire experienced the Pax Romana, a 200-year period of relative peace and stability. Augustus reformed the military, established efficient administrative systems, and initiated grand construction projects. The empire's borders expanded, encompassing territories from Britain to Egypt and from Spain to the Euphrates. Roman legions, renowned for their discipline and engineering prowess, secured and maintained these vast territories, building roads, fortifications, and cities that facilitated control and integration.
The Roman Empire’s society was hierarchical, with a rigid class system. At the top were the patricians, wealthy elites who held significant political power. Below them were the plebeians, free citizens with limited political influence, and the vast numbers of slaves who formed the backbone of the economy. The family unit was central, governed by the paterfamilias, the male head who held absolute authority.
Culturally, the Romans were eclectic, absorbing and adapting elements from the civilizations they encountered, particularly the Greeks. Roman art, literature, and philosophy reflected this synthesis, creating a rich cultural tapestry. Latin, the Roman language, became the lingua franca of the Western world, influencing numerous modern languages.
Roman architecture and engineering achievements were monumental. They perfected the arch, vault, and dome, constructing enduring structures like the Colosseum, Pantheon, and aqueducts. These engineering marvels not only showcased Roman ingenuity but also served practical purposes, from public entertainment to water supply.
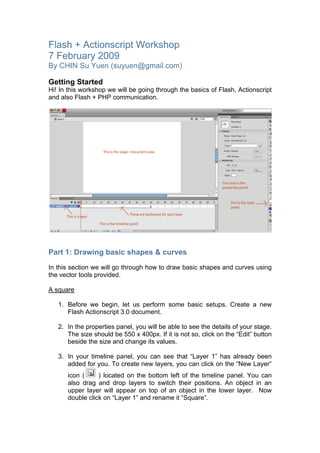
1. Flash + Actionscript Workshop
7 February 2009
By CHIN Su Yuen (suyuen@gmail.com)
Getting Started
Hi! In this workshop we will be going through the basics of Flash, Actionscript
and also Flash + PHP communication.
Part 1: Drawing basic shapes & curves
In this section we will go through how to draw basic shapes and curves using
the vector tools provided.
A square
1. Before we begin, let us perform some basic setups. Create a new
Flash Actionscript 3.0 document.
2. In the properties panel, you will be able to see the details of your stage.
The size should be 550 x 400px. If it is not so, click on the “Edit” button
beside the size and change its values.
3. In your timeline panel, you can see that “Layer 1” has already been
added for you. To create new layers, you can click on the “New Layer”
icon ( ) located on the bottom left of the timeline panel. You can
also drag and drop layers to switch their positions. An object in an
upper layer will appear on top of an object in the lower layer. Now
double click on “Layer 1” and rename it “Square”.
2. 4. Select the “Rectangle Tool” icon ( ) from the tools panel. Note that
if you click on the “Rectangle Tool” again, you will see a list of other
possible shapes like ovals and circles. After you’ve selected the
“Rectangle Tool”, the properties panel will change to show the
properties of the rectangle you are about to draw.
5. Under “Fill And Stroke”, you should be able to see this:
The left, white-coloured box represents the outline colour (also known
as stroke colour) of the rectangle. The box on the right represents the
fill colour of the rectangle. Double click on the stroke colour box and
change it to black.
6. Click and drag the cursor on the stage to draw your box. You should be
able to see a rectangle of the colours you picked. Notice that the
stroke/outline of the rectangle is a bit thin. Lets make it thicker.
7. Select the “Selection Tool” icon ( ) from the Tools panel. Bring
your cursor close to the rectangle until you see a curved line close to
your cursor. Click on the line. You will see that only one side of the
rectangle’s outline has been selected. (Note that you can use the
“Selection Tool” to remove / move parts of the rectangle away from the
main shape).
Double click on the line and all 4 lines of the rectangle will be selected.
In the properties panel, you can move the “Stroke” slider to alter the
thickness of the outline. Lets bring it to 2.
Curves
1. Ok, now let us move to something more fun (hopefully)…. Drawing
curves using the pen tool. Clear your stage by deleting the rectangle.
Click on the “Pen tool” icon ( ) from your tools panel.
2. Draw one dot anywhere on the stage. For your second dot, click
anywhere but this time, hold down the left mouse button and drag your
3. cursor. You should be able to see a curve forming according to the
tangent line as below.
Continue doing this for the 3rd, 4th and XXXXth dots to create as many
curves as you want.
3. What if you don’t like a curve you have created? No worries. It is
adjustable. Select the Subselection Tool ( ) from the tools panel
and click on the curve. You will be able to see small hollow squares
representing the points you drew. Click on any one point and the
tangent like before will appear at the selected point. Click and drag any
of the ends of the tangent point and you will see the curve change.
There you have it, the basics of shape and curve drawings in Flash!
Part 2: Animations
Now we are going to learn how animations work in Flash by creating a simple
animation.
1. Assuming we are all lazy people and have images we already want to
use, let us import the images we will be using into our Flash library. To
do this, click File > Import > Import To Library.
Note: If you import a file to a library, in the future when you want to use
multiple instances of the file, all you have to do is drag and drop from
the library onto the stage. This saves a lot of memory usage as Flash
will only load the object once from the library instead of multiple times.
4. 2. After importing, click on the Library Panel tab (located beside the
Properties panel tab). You should be able to see your imported image
there. Click and drag it onto the stage. You should know see your
image on the stage.
3. Right click on your image and select “Convert to Symbol”. Name your
symbol anything you want. In this case, I picked “Image1” and for Type,
select “Graphic”. You should be able to see your newly created symbol
in the Library panel as well.
4. In the timeline, right click on the first keyframe of the layer where your
symbol is placed. (There should be only one layer unless you created
new layers). Select “Create Motion Tween” and you should see the
timeline filled with blue frames.
5. Left click on Frame 10. Move your image onto any other location of
your choice. Left click on Frame 25. Move the image to another
location. If you move the red slider in the timeline back and forth, you
will be able to see your image playing. To see the actual .swf playing,
click Control > Test Movie.
6. Feel that your animation is playing too fast? Move close to the end of
the last keyframe and you should see your cursor convert into a double
arrow. Drag it to Frame 50. Try playing the animation now.
7. If you notice, it is repeating non-stop. Lets make it stop at the last
keyframe. Create a new layer and name it “Actions”. This will be the
layer where we will put all our keyframe actions. Right click on Frame
50 and select “Insert Keyframe”. We are inserting a keyframe here
because we want it to stop at only frame 50.
8. Right click on the keyframe you’ve just added and select “Actions”. You
should see an “Actions” box pop up. Type in “stop()” which is the action
script for stopping a movie.
9. Once you’re done, save your file and try playing the animation again.
Your animation should now stop at the end
10. Now lets try creating an animation that will jump to another frame and
play from there. In the “Actions” layer, insert a keyframe into frame
number 40. Right click on it and select “Actions”. In the “Actions” box
pop up, type in “gotoAndPlay(20)”. Now retry your animation. Notice
that everytime it reaches frame 20 it will jump to frame 20 and play
from there.
There you have it, your simple animation in Flash! Now let us try toying
around with some other effects.
5. In-class Exercise
1. Create an animation containing an object fading in and fading out.
(Hint: Try fiddling with the alpha value of an object)
Part 3: ActionScript Basics
ActionScript is an Object Oriented Programming language (I assume all of
you know what OOP is). Here we will go through some very simple basics of
ActionScript and its syntaxes.
1. Create a new Flash ActionScript 3.0 document. This is the Flash file
where we will be seeing the output of our work. Save it as any name
you want.
2. On the Stage, draw a blue square. Once you’ve drawn the blue square,
right click on it and select “Convert to Symbol”. Enter “blueSquare” as
the name of the symbol (very important for ActionScript file later).
Under Type, select “MovieClip”.
Why did I select “MovieClip”? The answer will be revealed later.
Ok now before you go ahead and click “OK”, click on the “Advanced”
button located towards the lower right corner of the window.
More options should appear. Under the “Linkage” section, check
“Export for ActionScript” and the Class and Base Class text fields
should have automatically been filled for you. If it isn’t, enter the
following:
Class: blueSquare
Base class: flash.display.MovieClip
Ok! Now you can press “OK”.
Note: If a message box pops up saying “A definition for this class could
not be found in the classpath” just press OK. (Don’t worry, it will not
cause us any harm in the future).
3. Double click on the blueSquare. You should see the following image on
the upper left part of the Stage.
6. This shows that you are in the “blueSquare Movie Clip” editing mode.
Any animations you create here will not show up in the original stage
(Scene 1) timeline. In other words, it means that the blueSquare
animation will run independent of what happens in Scene 1.
4. Ok now create a simple animation of the blue square going left and
right. (By now you should be able to do it on your own right?). Once
your’e done, click “Scene 1” on the top left corner of the stage and
5. Test the movie. You should see the blue square animation playing.
6. Ok! Now we shall start with some “actionscripting”. First we shall create
a new actionscript file. Select File > New. In the pop up box, select
“ActionScript File”.
7. You will see a blank document. This is like your typical text editor
where you will be typing in codes for your classes. Save it as
“blueSquare.as” in the same location as your earlier .fla file. Note: See
why we named the symbol “blueSquares” earlier now?
8. Copy and paste the following code into “blueSquare.as”.
package
{
import flash.events.*;
import flash.display.*;
public class blueSquare extends MovieClip
{
public function blueSquare()
{
this.addEventListener(MouseEvent.CLICK,onClickEvent);
}
function onClickEvent(event:Event)
{
this.width = this.width / 2;
this.height = this.height / 2;
}
}
}
9. Test the movie and try clicking on the square. You should see it
decreasing in size everytime you click on it. v
Explanation of code:
Now we will go through the code line by line while explaining some basic
syntaxes of ActionScript.
7. As you can see, we started the code with the word “package”. This is the
package of your object that contains the class definition and functions.
import flash.events.*;
import flash.display.*;
The 2 lines above are importing libraries from Flash to be used in your
ActionScript file. Here we are importing the display and events library.
public class blueSquare extends MovieClip
This is the class definition. You might be wondering where MovieClip is
coming from. As earlier we’ve imported the flash.display library, we used a .*
at the end. This means that we have imported all the components in that
library and hence can use it without typing the full flash.display.MovieClip.
public function blueSquare()
This is the constructor of your class.
this.addEventListener(MouseEvent.CLICK,onClickEvent);
This adds an event listener to your blueSquare object. In thise case, it is a
mouse click event. The syntax is this.addEventListener(eventType,
functionToCall). In this case, I named my function that will be called when a
mouse is clicked on the box “onClickEvent”.
function onClickEvent(event:Event)
{
this.width = this.width / 2;
this.height = this.height / 2;
}
To define a function in ActionScript, you start with the word “function”. The
syntaxes are: function nameofFunction(typeOfInput). In this case, as it is a
mouse event, it is of the Event type. Hence, the event:Event. The “this” in the
function refers to the blueSquare object. Here, I am halving the blueSquare’s
size by half everytime it is clicked on.
In-Class Exercise
1. Create an object which users can drag around the stage.
(Hint: Use the startDrag() and stopDrag() functions)
2. Create an object and remove it from the stage when it is clicked.
(Hint: Use the removeChild() function. Note that you have to call
the parent to remove the child)
Note that there are many types of events predefined in ActionScript and also
mouseEvents which you can experiment with.
8. Refer to http://labs.adobe.com/wiki/index.php/ActionScript_3 which contains
an official documentation of AS3 from Adobe.
Ok, what about defining variables and setting their values?
Now lets create something simple to understand how variables work in
ActionScript.
1. Create a new Flash file and name it anything you want. Save it.
2. Create a new ActionScript File and name it ObjectName. Copy and
paste the following code into it:
package
{
private var ObjectName2;
public function setName(tempName:String):void
{
ObjectName2 = tempName;
}
public function getName():String
{
return ObjectName2;
}
}
The code above declares a variable ObjectName. Notice that the first word
“private” is the accessor. “var” tells Actionscript that we are defining a
variable.
Notice that in the SetName function definition we have some new syntaxes.
“tempName:String” says that the function takes in a variable of type String. In
this case, we named the variable “tempName”. The “:void” says that the
function does not return any value.
In the getName function definition, we put “:String” as the function returns a
value of type String.
Ok so we have defined these in the ActionScript file. What next? We have to
call these functions or else we will not be able to see them in action. Lets use
the Flash file we created earlier.
3. In the Flash file you’ve created earlier, right click on the first keyframe
and select “Actions”. Enter the following code:
var name1:ObjectName = new ObjectName();
name1.setName(“Facebook”);
trace(name1.getName());
9. In the first line, we declared creating a variable. The syntax is:
var variableName:typeName. In this case, the variable name is “name1” and
the type is “ObjectName” which we defined earlier. We then used the
constructor in “new ObjectName()” to create a new object.
In the second line, we are setting the object’s name to “Facebook” using the
setName() function we defined earlier.
Lastly, we use a “trace” command which in Flash, will return you results in the
“Output” panel shown below. You can use this method from time to time to
trace values being passed around in between your functions when testing
movies :D
4. Run the program. You should see an “Output” panel where the
“Timeline” panel used to be. In there, you should see the text
“Facebook”.
Playing around with textboxes
Now we will play around with the idea of creating a textbox that users can
input values into and have the value displayed in the output. In this tutorial, we
will be showing you how to add actionscript to Flash files instead of an
external ActionScript file.
1. Create a new Flash document. Click on the Text icon ( ) from the
Tools panel.
2. In the “Properties” panel, select “Input Text” from the drop down menu
in the upper section of the panel.
10. 3. Draw a textbox on the stage.
4. Look at the “Properties” panel now. You should see a new field appear
at the upper section of the panel with the values “<Instance Name>” in
it.
5. You can name the text box anything you want. This will be the name
you will use to refer to the textbox in your action script code later. For
ease of memory, lets name it “textBox”.
6. Test the movie. If you notice, the textbox can’t be seen in your movie
as it does not have a border. Create a new layer and draw the
rectangle in the textbox area so that users can see where they are
supposed to enter text. (Note: Make sure that this new layer is below
the textBox layer so that it does not overlap the textBox.)
7. Test the movie again. Now you will be able to see the textbox and type
things into it.
8. Ok! Now let us play around with some actionscript. In the layer
containing the textBox, right click on the first keyframe containing the
timeline and select Actions. Enter this code:
textBox.text = "Enter your name here and press OK";
This code will set the default values that will appear in the box.
9. We need a trigger for users to click on that will display the values
entered in the Output. To do this, create a box. Right click on the box
and convert it into a button symbol and give it the name okButton.
10. Look in the “Properties” panel and type in the instance name
“okButton”. This is the name we will be using to refer to this button in
the actions panel.
11. Open the actions panel where your textBox actions was and Add an
event listener to it and the trigger function with the following code:
okButton.addEventListener(MouseEvent.MOUSE_DOWN, trace_name);
I believe that this code needs no explanation.
11. Test your movie now and you should see the name typed in by the user
appear in the output everytime the button is clicked.
In-class Exercise
1. Try manipulating the value obtained from the textbox (E.g:
Adding words to the back of it). Hint: Make use of
variables.
function trace_name(event:Event)
{
trace(textBox.value);
Flash talking to PHP
}
Now we will learn to how to make Flash communicate with PHP.
1. Lets start by creating a PHP file. Copy and paste the following code
into it and upload it onto your server. Name it test.php.
<?php
$x = "Testing PHP communication!";
print "$x";
?>
The code above will return the value of variable $x to our Flash file. In
this case, it contains a string with the value “Testing PHP
communication!”.
2. Create a new flash file and create a text box on the stage. Make sure
that it is a dynamic text box. Give it the Instance Name “textBox”.
Remember, this is the name you will need to call when you want to
change the value of the textbox later.
3. Convert it to a “MovieClip” symbol and give it any name you want.
4. Double click on it to enter the symbol’s editing mode. In the first
keyframe, right click and select “Actions”. Paste the following code:
var myLoader:URLLoader = new URLLoader();
myLoader.load(new
URLRequest("http://cs3216.comp.nus.edu.sg/suyuen/test.php"));
myLoader.addEventListener(Event.COMPLETE, onLoad);
function onLoad(ev:Event)
{
this.textBox.text = myLoader.data;
}
12. Note: Change the website address in the code above to the location of
your “test.php” file.
5. Test the movie and you should see the text “Testing PHP
Communication!” in your text box. :D
Explanation of code:
var myLoader:URLLoader = new URLLoader();
URLLoader is a variable type required to perform URLRequest functions.
Here, we are declaring the variable “myLoader” as the type URLLoader.
myLoader.load(new
URLRequest("http://cs3216.comp.nus.edu.sg/suyuen/test.php"));
Here, we are loading the values returned by the “test.php” file into the
myLoader variable.
myLoader.addEventListener(Event.COMPLETE, onLoad);
We only want to show data in the textbox after all the data from the “test.php”
file has been loaded into the myLoader variable. Hence, we add an event
listener to only trigger the function when the process is complete.
function onLoad(event:Event)
{
this.textBox.text = myLoader.data;
stop();
}
The function triggered to display text in the textbox.
So now we have seen how to obtain a value from a PHP file. What about
sending a value over? In the current Flash file, open up the Actions panel and
replace the code with the following.
var myRequest:URLRequest = new
URLRequest("http://cs3216.comp.nus.edu.sg/suyuen/test2.php");
var myLoader:URLLoader = new URLLoader();
var myVariables:URLVariables = new URLVariables();
myVariables.name1 = "Su Yuen";
myRequest.method = URLRequestMethod.GET;
myRequest.data = myVariables;
function onLoaded(event:Event):void {
this.textBox.text = myLoader.data;
}
myLoader.addEventListener(Event.COMPLETE, onLoaded);
myLoader.load(myRequest);
13. Next, create a new PHP file called “test2.php” and copy and paste this code
into it.
<?php
$first_name = $_GET['name1'];
echo $first_name." is happy!";
?>
Explanation of code:
var myVariables:URLVariables = new URLVariables();
URLVariables is a class type that is needed for variables that will be sending
values to a URL. This is because it will ensure that the values are URL
Encoded before they are sent to your PHP file.
myVariables.name1 = "Su Yuen";
Here we are defining a property (name1) of myVariables and assigning a
value to it. Note that this is required as URLVariables abstracts the
name/value pairs you want to send to the server.
myRequest.method = URLRequestMethod.GET;
myRequest.data = myVariables;
Here we set the request method to GET and assign the value of the variable
to myRequest’s data property.
Ok! So now you know how Flash can communicate with PHP. What about
Facebook? It is the exact same principle. However, in your PHP file when
embedding the SWF, take note to add this line of code to it:
<fb:swf swfsrc='http://cs3216.comp.nus.edu.sg/flash/test.swf'
width='600' height='600' >
The web address is the location of your .swf file. Take note that this URL
MUST be the absolute URL else it will not work.
Get your PHP file to echo any values you retrieve and it will appear in the
Flash file just as shown above.
In-class Exercise
1. Now that you have learnt the basics of sending and requesting
data between Flash and PHP, try loading an image into Flash
based on a website address of the online image location
returned by PHP. (Hint: GOOGLE has tutorials)
AND WE ARE DONE!
14. References you might want to check out!
1. Kirupa Flash & Actionscript Tutorials
http://www.kirupa.com/developer/flash/index.htm
2. Detailed explanation about Flash + PHP Communication functions
http://www.peterelst.com/blog/2007/11/28/actionscript-30-wheres-my-
loadvars/
3. Alternativa Platform (Open source, 3D flash engine)
http://alternativaplatform.com/en/
4. Swift 3D (Program for 3D Flash Object modeling)
http://www.erain.com/
5. Integrating your Flash game into Facebook
http://www.emanueleferonato.com/2008/05/30/integrate-your-flash-
game-on-facebook/
6. Actionscript 3 Overview by Adobe
http://labs.adobe.com/wiki/index.php/ActionScript_3
7. Lots of tutorials on how to do cool Flash CS4 stuff
http://www.flashandmath.com/