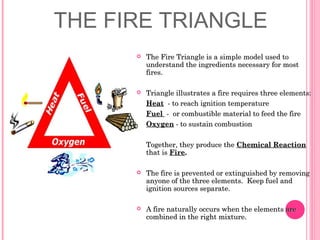
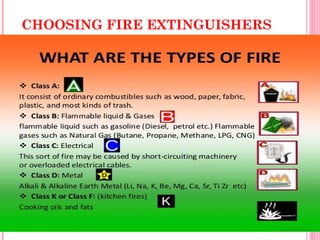
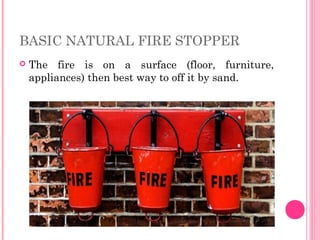
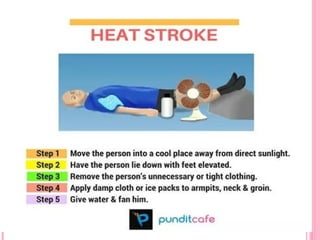
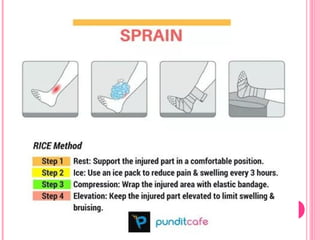
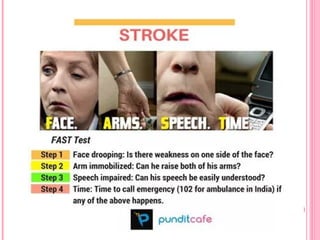
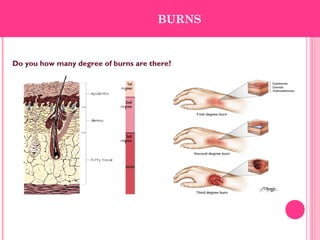
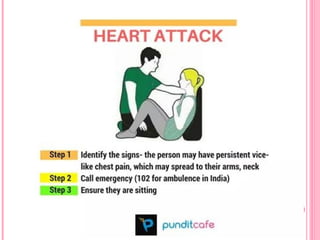
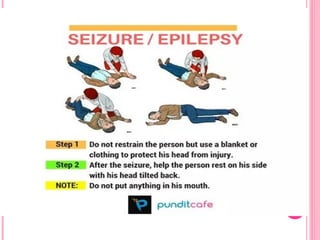
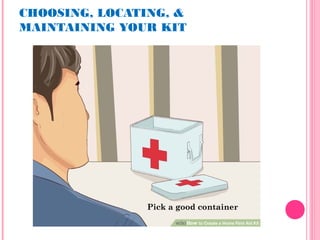
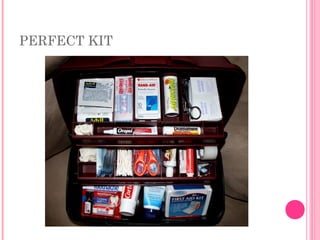
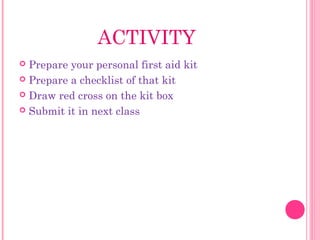
SAFETY
DRILL
BY
R. Blessina Preethi M.E.,
Assistant Professor.
TOPICS
FIRE ACCIDENT
CRASHES
THE FIRE TRIANGLE
 The Fire Triangle is a simple model used toThe Fire Triangle is a simple model used to
understand the ingredients necessary for mostunderstand the ingredients necessary for most
fires.fires.
 Triangle illustrates a fire requires three elements:Triangle illustrates a fire requires three elements:
HeatHeat - to reach ignition temperature- to reach ignition temperature
FuelFuel - or combustible material to feed the fire- or combustible material to feed the fire
OxygenOxygen - to sustain combustion- to sustain combustion
Together, they produce theTogether, they produce the Chemical ReactionChemical Reaction
that isthat is FireFire..
 The fire is prevented or extinguished by removingThe fire is prevented or extinguished by removing
anyone of the three elements. Keep fuel andanyone of the three elements. Keep fuel and
ignition sources separate.ignition sources separate.
 A fire naturally occurs when the elements areA fire naturally occurs when the elements are
combined in the right mixture.combined in the right mixture.
CHOOSING FIRE EXTINGUISHERS
BASIC NATURAL FIRE STOPPER
 The fire is on a surface (floor, furniture,
appliances) then best way to off it by sand.
TYPES OF FIRE
EXTINGUISHERS
PRESSURIZED WATERPRESSURIZED WATER
A Trash Wood Paper
B Liquids Grease
C Electrical Equipment
A Trash Wood Paper
B Liquids Grease
C Electrical Equipment
• Class “A” fires only.
• 2.5 gal. water (up to 1 minute
discharge time).
• Has pressure gauge to allow visual
capacity check.
• 30-40 ft. maximum effective range.
A Trash Wood Paper
B Liquids Grease
C Electrical Equipment
A Trash Wood Paper
B Liquids Grease
C Electrical Equipment
CARBON DIOXIDE (COCARBON DIOXIDE (CO22))
• Class “B” or “C” fires.
• (8-30 seconds discharge
time).
MULITPURPOSE DRY CHEMICALMULITPURPOSE DRY CHEMICAL
A Trash Wood Paper
B Liquids Grease
C Electrical Equipment
A Trash Wood Paper
B Liquids Grease
C Electrical Equipment
• Class “A”, “B”, or “C” fires. On
campus mostly Class ABC.
• Dry chemical (ammonium
phosphate) pressurized by
nitrogen gas
• 8-25 seconds discharge time
WET CHEMICALWET CHEMICAL
K Cooking
Media • Class “K” fires.
• 1.5 gal. of stored pressure wet
chemical extinguishing agent
• 40 sec. discharge time
• 10-12 ft. maximum effective
range.
FIRE EXTINGUISHER PARTS
DATA PLATE
PRESSURE GAUGE
(not found on CO2
extinguishers)
BODY
DISCHARGE LEVER
DISCHARGE LOCKING PIN
AND SEAL
DISCHARGE HOSE
DISCHARGE NOZZLE
DISCHARGE ORIFICE
CARRYING
HANDLE
HOW TO USE A FIRE
EXTINGUISHER
Remember this easy acronym when using
an extinguisher - P.A.S.S.
Pull the pin.
Aim the nozzle.
Squeeze the handle.
Sweep side to side at the base of the fire.
HOW TO USE A FIRE
EXTINGUISHER
 Pull thePull the PinPin……
 This will allow you toThis will allow you to
discharge the firedischarge the fire
extinguisher. The pinextinguisher. The pin
prevents the fireprevents the fire
extinguisher from beingextinguisher from being
accidentally dischargedaccidentally discharged
by squeezing theby squeezing the
handle.handle.
HOW TO USE A FIRE
EXTINGUISHER
 AimAim at the base of theat the base of the
fire.fire.
 Hit the fuel. If you aimHit the fuel. If you aim
at the flames theat the flames the
extinguishing agent willextinguishing agent will
fly right throughfly right through
without stopping thewithout stopping the
fire.fire.
HOW TO USE A FIRE
EXTINGUISHER
 SqueezeSqueeze the top handle.the top handle.
 Squeezing the handleSqueezing the handle
opens a valve thatopens a valve that
releases the pressurizedreleases the pressurized
extinguishing agentextinguishing agent
from the firefrom the fire
extinguisher.extinguisher.
HOW TO USE A FIRE
EXTINGUISHER
 SweepSweep from side to side.from side to side.
(until the fire is completely(until the fire is completely
out)out)
 Start using the fireStart using the fire
extinguisher from a safeextinguisher from a safe
distance (6-8 feet) thendistance (6-8 feet) then
slowly move forward ifslowly move forward if
possible.possible.
 Once the fire is out, keep anOnce the fire is out, keep an
eye on the area in case iteye on the area in case it
reignites.reignites.
GUIDELINES FOR FIGHTING
FIRES
 The final rule is to always position yourself with an exitThe final rule is to always position yourself with an exit
or means of escape at your back before you attempt toor means of escape at your back before you attempt to
use a fire extinguisher to put out a fire.use a fire extinguisher to put out a fire.
 In case the extinguisher malfunctions, or something
unexpected happens, you need to be able to get out
quickly. You don’t want to become trapped.
1. HOW TO
RESCUE A
PERSON
FROM FIRE
1. HOW TO RESCUE A PERSON FROM
FIRE
 Covering a Clothes Fire
 Wrap someone whose clothes are burning in
the fire blanket
HAVE THE PERSON STOP, DROP,
AND ROLL
 Instruct the person in danger to stop, drop, and roll.
This is a classic safety technique used to diminish fire.
A person stop moving, drops to the ground, and rolls
until the fire suffocates
SEEK MEDICAL ASSISTANCE
 Burns caused by fire should be evaluated by a medical
professional as soon as possible. Even if you think the
burns look minor, any injury caused by fire should be
evaluated by a medical professional. Take the person
whose clothes were on fire to the ER immediately
HOW TO RESCUE SO
BURNING CAR
CRASH
2
. HOW TO RESCUE SOMEONE FROM A BURNIN
CRASH
Rescuing someone yourself is
something you shouldn't do unless the
car is on fire, or smoking and leaking
gasoline.
You should always
call the Emergency Services first.
However in emergencies you have to
act, even against some common rules.
DIVERT TRAFFIC AWAY FROM THE
CRASHED & BURNING VEHICLE
 Use your car and park it behind the wrecked car, at
least 100 feet (30.5 m) away, and turn on your hazard
lights.
 Deploy traffic cones and other traffic control devices if
you have them.
 Generally other vehicles are far more dangerous for you
than the risk of an explosion.
KNOW THAT A CAR WILL NOT
EXPLODE UNTIL THE GAS TANK IS
EMPTY OF GASOLINE.
 Liquids are not explosive, vapor from a
flammable substance is. So a leaking gas tank
raises the risk of an explosion.
CALL THE EMERGENCY SERVICES
.
ESTIMATE THE DANGER.
ATTEMPT TO EXTINGUISH THE
FIRE, IF YOU HAVE A FIRE
EXTINGUISHER
 Get the spurt directly in the flames. Use your
little capacity as efficiently and as quickly as
possible
TRY TO COMMUNICATE WITH THE
PASSENGERS
 Rush to the driver's window and check how many
passengers there are. If they are conscious tell
them to unbuckle themselves and try to get out
GET IN SAFELY
 If the doors are smashed in, try to take them out
through the windows.
 If the windows are not completely smashed out, take
your shirt off and wrap your fist in it. Punch through
the glass and rip large shards off, so the person can get
out.
 Don't take a lot of time doing this, cuts are not as life
threatening as an explosion
UNBUCKLE THEIR SEATBELTS
 the buckling mechanism is damaged the belt will
need to be cut.
PULL THE OCCUPANTS OUT OF
THE CAR
 Carry the victims away.
FIRST
AID
By
R. Blessina Preethi.M.E.,
Assistant Professor
Introductory to First Aid
The Aim of First Aid?
Learn these 3 ‘P’s:
Preserve life
Prevent further injury
Promote recovery
NOSE BLEED
Diagnosis
Nosebleed • Do not lean back.
• Learning back can be harmful as
the blood could get into the
windpipe, blocking the airway.
• Sit in a comfortable upright position and
lean forward slightly.
• Then pinch your nose just below the
bony bridge and above the fleshy lobes of
the nostrils until the bleeding is stemmed.
Aftercare: Once the bleeding is
controlled, do not blow your nose as this
might dislodge the clot and make you
bleed again.
The Do’s & Don’ts for First Aid Treatments
Do you how many degree of burns are there?
BURNS
Guess what degree of burn has the person suffered?
BURNS
• Never put ice on the burn, as it’ll delay healing or
cause extra damage (think frostbite).
• Also, leave the butter in the kitchen, unless you
want to make it worse.
• Do not break blisters and attempt to remove the
skin, as it can cause infection
1st
Degree burn
• . Put the burned part in cold water.
2nd
Degree Burn
● Put the burned part in cold water.
●Put cold, wet dressing on burn. Cover the burn
with a loose bandage (or clean washed cotton
sheet for a larger area) and go to the doctor.
3rd
Degree Burn
●Leave burned clothes on the skin
●If face is burned, keep victim sitting up
●Keep airway open, tilt head back
●Evaluate burned arms, legs, hands. Keep burn
higher than heart.
●Call for an ambulance
The Do’s & Don’ts for First Aid Treatments
Diagnosis
Burns Chemical Burn
● Remove the chemical causing burn by washing the skin under cool
running water for at least 20 minutes.
● Remove all clothing or jewellery that may be contaminated by the
chemical.
●After washing, apply a cool, wet cloth on the burn to relieve pain
● Over this, loosely wrap a dry sterile dressing or clean cloth.
Electrical Burn
●Call for an ambulance immediately
●Look out if there is any contact with the electrical source
●Turn off the electrical source or try to move it by using a non –
conducting object
●Prevent shock by lying the child down and raising the legs with an
object, eg: Pillow
The Do’s & Don’ts for First Aid Treatments
HOW TO CREATE
YOUR PERSONAL
FIRST AID KIT
CHOOSING, LOCATING, &
MAINTAINING YOUR KIT
Pick a good container
CREATE A CHECKLIST TO
INCLUDE WITH THE KIT
STOCKING YOUR KIT
 25 adhesive bandages of various sizes
 Five 3” x 3” and five 4” x 4” gauze pads
 A roll of cloth adhesive tape
 Two 5” x 9” sterile dressings
 One 3” wide and one 4” wide roller bandage (ace bandage)
 Two triangular bandages
 Pain relievers (aspirin, ibuprofen, and acetaminophen)
 Cough / cold medicine
 Small, sharp scissors
 Tissue papers
 Two pairs of non-latex gloves
 Non-mercury oral thermometer
 Cotton balls and swabs
 Breathing mask
 First aid instruction booklet
 Hand sanitizer
 Cleansing wipes (for external cleaning only)
PERFECT KIT
ACTIVITY
 Prepare your personal first aid kit
 Prepare a checklist of that kit
 Draw red cross on the kit box
 Submit it in next class
THANK YOU

Fire accident, rescue and first aid

  • 1.
    SAFETY DRILL BY R. Blessina PreethiM.E., Assistant Professor.
  • 2.
  • 3.
    THE FIRE TRIANGLE The Fire Triangle is a simple model used toThe Fire Triangle is a simple model used to understand the ingredients necessary for mostunderstand the ingredients necessary for most fires.fires.  Triangle illustrates a fire requires three elements:Triangle illustrates a fire requires three elements: HeatHeat - to reach ignition temperature- to reach ignition temperature FuelFuel - or combustible material to feed the fire- or combustible material to feed the fire OxygenOxygen - to sustain combustion- to sustain combustion Together, they produce theTogether, they produce the Chemical ReactionChemical Reaction that isthat is FireFire..  The fire is prevented or extinguished by removingThe fire is prevented or extinguished by removing anyone of the three elements. Keep fuel andanyone of the three elements. Keep fuel and ignition sources separate.ignition sources separate.  A fire naturally occurs when the elements areA fire naturally occurs when the elements are combined in the right mixture.combined in the right mixture.
  • 4.
  • 5.
    BASIC NATURAL FIRESTOPPER  The fire is on a surface (floor, furniture, appliances) then best way to off it by sand.
  • 6.
    TYPES OF FIRE EXTINGUISHERS PRESSURIZEDWATERPRESSURIZED WATER A Trash Wood Paper B Liquids Grease C Electrical Equipment A Trash Wood Paper B Liquids Grease C Electrical Equipment • Class “A” fires only. • 2.5 gal. water (up to 1 minute discharge time). • Has pressure gauge to allow visual capacity check. • 30-40 ft. maximum effective range.
  • 7.
    A Trash WoodPaper B Liquids Grease C Electrical Equipment A Trash Wood Paper B Liquids Grease C Electrical Equipment CARBON DIOXIDE (COCARBON DIOXIDE (CO22)) • Class “B” or “C” fires. • (8-30 seconds discharge time).
  • 8.
    MULITPURPOSE DRY CHEMICALMULITPURPOSEDRY CHEMICAL A Trash Wood Paper B Liquids Grease C Electrical Equipment A Trash Wood Paper B Liquids Grease C Electrical Equipment • Class “A”, “B”, or “C” fires. On campus mostly Class ABC. • Dry chemical (ammonium phosphate) pressurized by nitrogen gas • 8-25 seconds discharge time
  • 9.
    WET CHEMICALWET CHEMICAL KCooking Media • Class “K” fires. • 1.5 gal. of stored pressure wet chemical extinguishing agent • 40 sec. discharge time • 10-12 ft. maximum effective range.
  • 10.
    FIRE EXTINGUISHER PARTS DATAPLATE PRESSURE GAUGE (not found on CO2 extinguishers) BODY DISCHARGE LEVER DISCHARGE LOCKING PIN AND SEAL DISCHARGE HOSE DISCHARGE NOZZLE DISCHARGE ORIFICE CARRYING HANDLE
  • 11.
    HOW TO USEA FIRE EXTINGUISHER Remember this easy acronym when using an extinguisher - P.A.S.S. Pull the pin. Aim the nozzle. Squeeze the handle. Sweep side to side at the base of the fire.
  • 12.
    HOW TO USEA FIRE EXTINGUISHER  Pull thePull the PinPin……  This will allow you toThis will allow you to discharge the firedischarge the fire extinguisher. The pinextinguisher. The pin prevents the fireprevents the fire extinguisher from beingextinguisher from being accidentally dischargedaccidentally discharged by squeezing theby squeezing the handle.handle.
  • 13.
    HOW TO USEA FIRE EXTINGUISHER  AimAim at the base of theat the base of the fire.fire.  Hit the fuel. If you aimHit the fuel. If you aim at the flames theat the flames the extinguishing agent willextinguishing agent will fly right throughfly right through without stopping thewithout stopping the fire.fire.
  • 14.
    HOW TO USEA FIRE EXTINGUISHER  SqueezeSqueeze the top handle.the top handle.  Squeezing the handleSqueezing the handle opens a valve thatopens a valve that releases the pressurizedreleases the pressurized extinguishing agentextinguishing agent from the firefrom the fire extinguisher.extinguisher.
  • 15.
    HOW TO USEA FIRE EXTINGUISHER  SweepSweep from side to side.from side to side. (until the fire is completely(until the fire is completely out)out)  Start using the fireStart using the fire extinguisher from a safeextinguisher from a safe distance (6-8 feet) thendistance (6-8 feet) then slowly move forward ifslowly move forward if possible.possible.  Once the fire is out, keep anOnce the fire is out, keep an eye on the area in case iteye on the area in case it reignites.reignites.
  • 16.
    GUIDELINES FOR FIGHTING FIRES The final rule is to always position yourself with an exitThe final rule is to always position yourself with an exit or means of escape at your back before you attempt toor means of escape at your back before you attempt to use a fire extinguisher to put out a fire.use a fire extinguisher to put out a fire.  In case the extinguisher malfunctions, or something unexpected happens, you need to be able to get out quickly. You don’t want to become trapped.
  • 17.
    1. HOW TO RESCUEA PERSON FROM FIRE
  • 18.
    1. HOW TORESCUE A PERSON FROM FIRE  Covering a Clothes Fire  Wrap someone whose clothes are burning in the fire blanket
  • 19.
    HAVE THE PERSONSTOP, DROP, AND ROLL  Instruct the person in danger to stop, drop, and roll. This is a classic safety technique used to diminish fire. A person stop moving, drops to the ground, and rolls until the fire suffocates
  • 20.
    SEEK MEDICAL ASSISTANCE Burns caused by fire should be evaluated by a medical professional as soon as possible. Even if you think the burns look minor, any injury caused by fire should be evaluated by a medical professional. Take the person whose clothes were on fire to the ER immediately
  • 21.
    HOW TO RESCUESO BURNING CAR CRASH
  • 22.
    2 . HOW TORESCUE SOMEONE FROM A BURNIN CRASH Rescuing someone yourself is something you shouldn't do unless the car is on fire, or smoking and leaking gasoline. You should always call the Emergency Services first. However in emergencies you have to act, even against some common rules.
  • 23.
    DIVERT TRAFFIC AWAYFROM THE CRASHED & BURNING VEHICLE  Use your car and park it behind the wrecked car, at least 100 feet (30.5 m) away, and turn on your hazard lights.  Deploy traffic cones and other traffic control devices if you have them.  Generally other vehicles are far more dangerous for you than the risk of an explosion.
  • 24.
    KNOW THAT ACAR WILL NOT EXPLODE UNTIL THE GAS TANK IS EMPTY OF GASOLINE.  Liquids are not explosive, vapor from a flammable substance is. So a leaking gas tank raises the risk of an explosion.
  • 25.
  • 26.
  • 27.
    ATTEMPT TO EXTINGUISHTHE FIRE, IF YOU HAVE A FIRE EXTINGUISHER  Get the spurt directly in the flames. Use your little capacity as efficiently and as quickly as possible
  • 28.
    TRY TO COMMUNICATEWITH THE PASSENGERS  Rush to the driver's window and check how many passengers there are. If they are conscious tell them to unbuckle themselves and try to get out
  • 29.
    GET IN SAFELY If the doors are smashed in, try to take them out through the windows.  If the windows are not completely smashed out, take your shirt off and wrap your fist in it. Punch through the glass and rip large shards off, so the person can get out.  Don't take a lot of time doing this, cuts are not as life threatening as an explosion
  • 30.
    UNBUCKLE THEIR SEATBELTS the buckling mechanism is damaged the belt will need to be cut.
  • 31.
    PULL THE OCCUPANTSOUT OF THE CAR  Carry the victims away.
  • 32.
  • 34.
    Introductory to FirstAid The Aim of First Aid? Learn these 3 ‘P’s: Preserve life Prevent further injury Promote recovery
  • 35.
  • 36.
    Diagnosis Nosebleed • Donot lean back. • Learning back can be harmful as the blood could get into the windpipe, blocking the airway. • Sit in a comfortable upright position and lean forward slightly. • Then pinch your nose just below the bony bridge and above the fleshy lobes of the nostrils until the bleeding is stemmed. Aftercare: Once the bleeding is controlled, do not blow your nose as this might dislodge the clot and make you bleed again. The Do’s & Don’ts for First Aid Treatments
  • 44.
    Do you howmany degree of burns are there? BURNS
  • 45.
    Guess what degreeof burn has the person suffered? BURNS
  • 46.
    • Never putice on the burn, as it’ll delay healing or cause extra damage (think frostbite). • Also, leave the butter in the kitchen, unless you want to make it worse. • Do not break blisters and attempt to remove the skin, as it can cause infection 1st Degree burn • . Put the burned part in cold water. 2nd Degree Burn ● Put the burned part in cold water. ●Put cold, wet dressing on burn. Cover the burn with a loose bandage (or clean washed cotton sheet for a larger area) and go to the doctor. 3rd Degree Burn ●Leave burned clothes on the skin ●If face is burned, keep victim sitting up ●Keep airway open, tilt head back ●Evaluate burned arms, legs, hands. Keep burn higher than heart. ●Call for an ambulance The Do’s & Don’ts for First Aid Treatments
  • 48.
    Diagnosis Burns Chemical Burn ●Remove the chemical causing burn by washing the skin under cool running water for at least 20 minutes. ● Remove all clothing or jewellery that may be contaminated by the chemical. ●After washing, apply a cool, wet cloth on the burn to relieve pain ● Over this, loosely wrap a dry sterile dressing or clean cloth. Electrical Burn ●Call for an ambulance immediately ●Look out if there is any contact with the electrical source ●Turn off the electrical source or try to move it by using a non – conducting object ●Prevent shock by lying the child down and raising the legs with an object, eg: Pillow The Do’s & Don’ts for First Aid Treatments
  • 51.
    HOW TO CREATE YOURPERSONAL FIRST AID KIT
  • 52.
    CHOOSING, LOCATING, & MAINTAININGYOUR KIT Pick a good container
  • 53.
    CREATE A CHECKLISTTO INCLUDE WITH THE KIT
  • 54.
  • 55.
     25 adhesivebandages of various sizes  Five 3” x 3” and five 4” x 4” gauze pads  A roll of cloth adhesive tape  Two 5” x 9” sterile dressings  One 3” wide and one 4” wide roller bandage (ace bandage)  Two triangular bandages  Pain relievers (aspirin, ibuprofen, and acetaminophen)  Cough / cold medicine
  • 56.
     Small, sharpscissors  Tissue papers  Two pairs of non-latex gloves  Non-mercury oral thermometer  Cotton balls and swabs  Breathing mask  First aid instruction booklet  Hand sanitizer  Cleansing wipes (for external cleaning only)
  • 57.
  • 58.
    ACTIVITY  Prepare yourpersonal first aid kit  Prepare a checklist of that kit  Draw red cross on the kit box  Submit it in next class
  • 59.