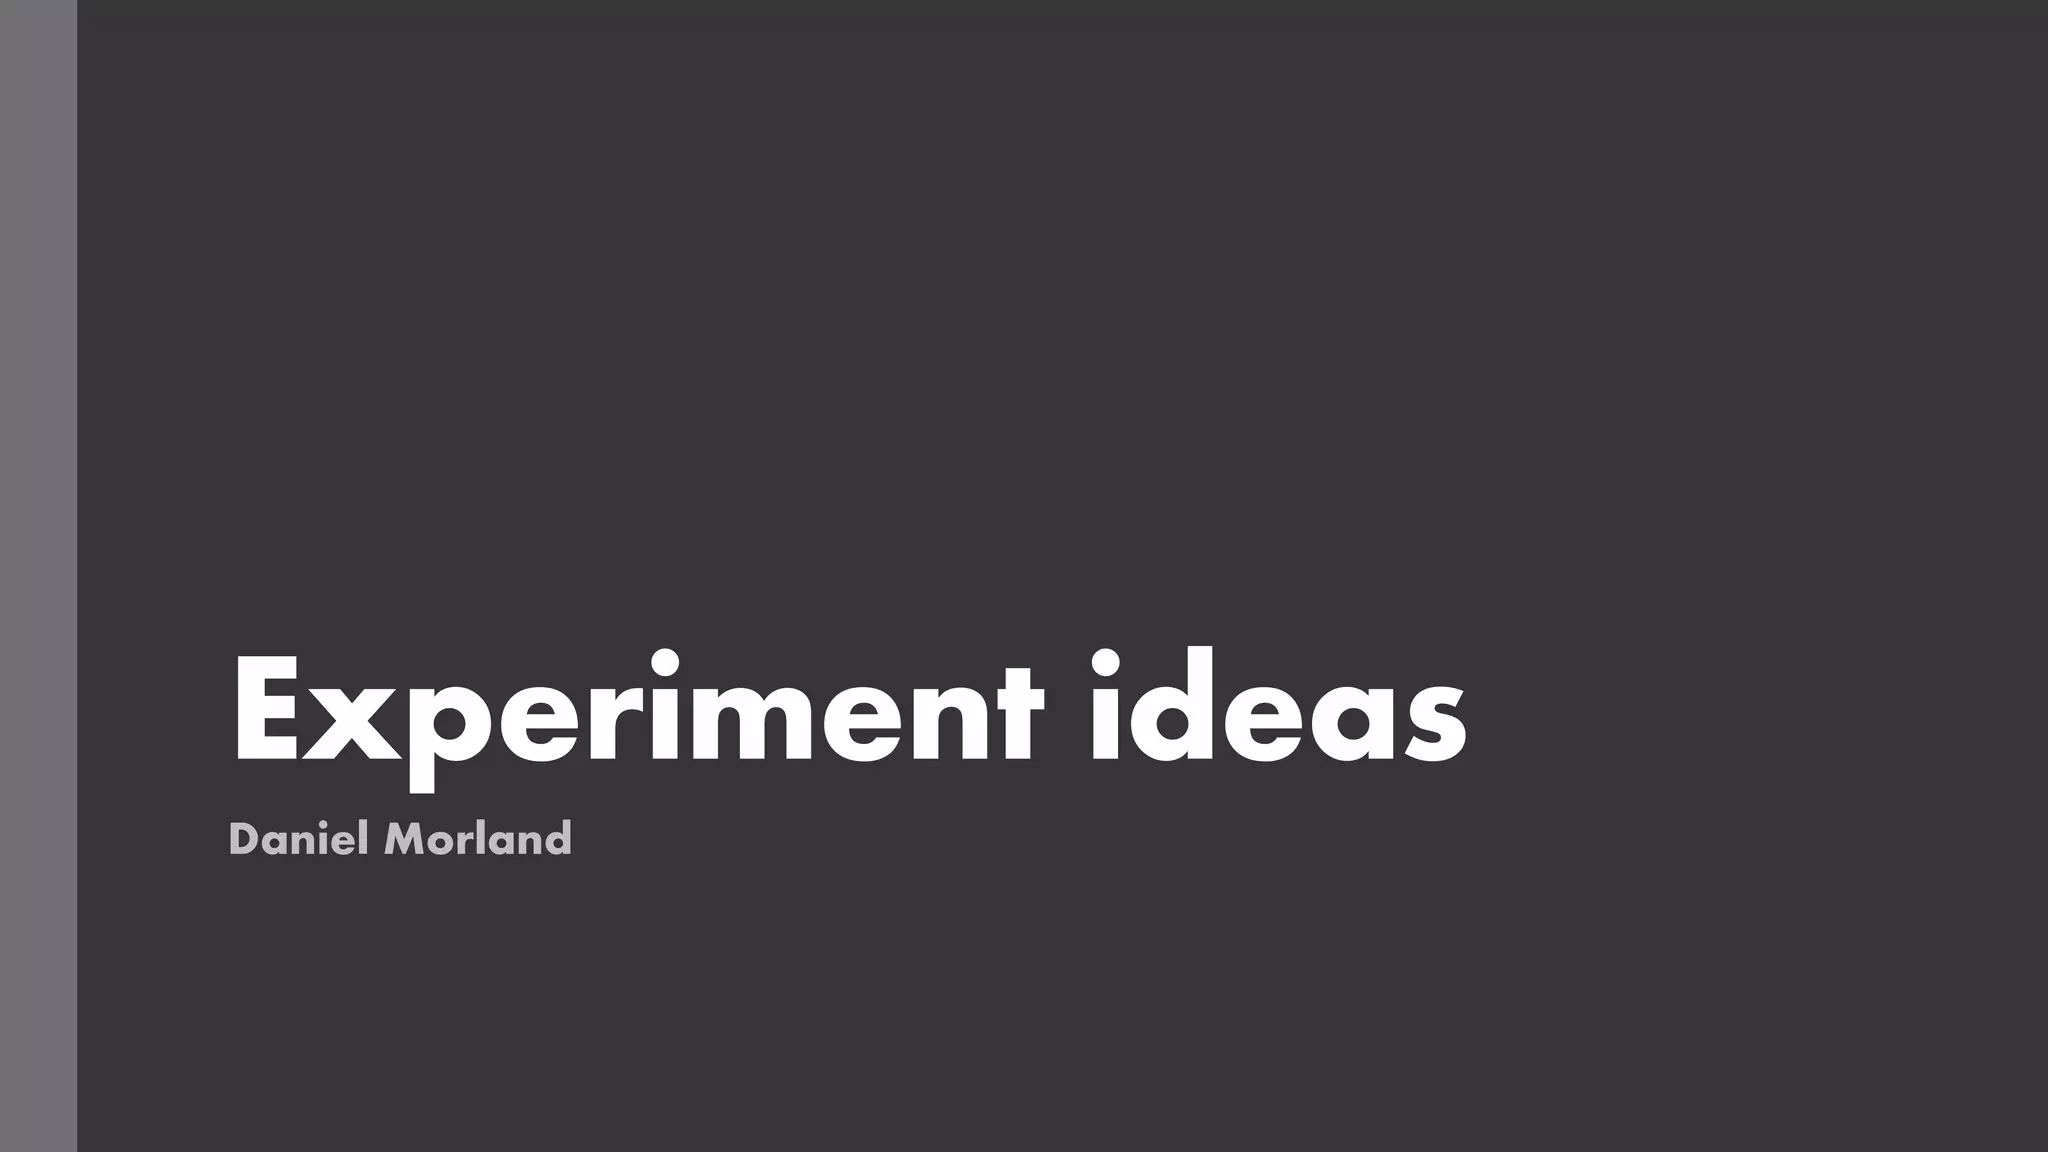
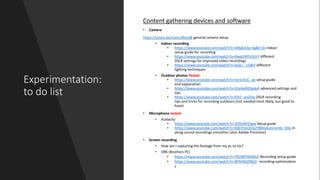
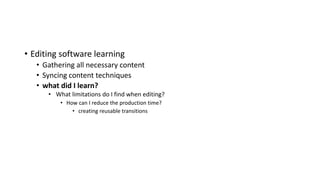
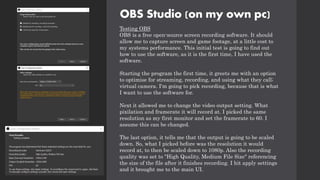
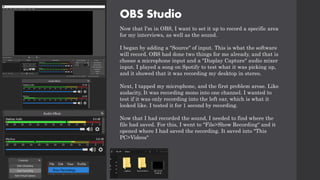
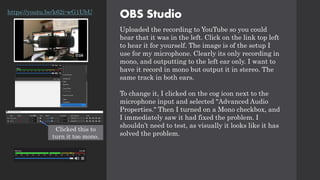
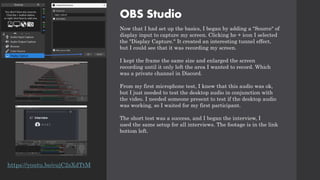
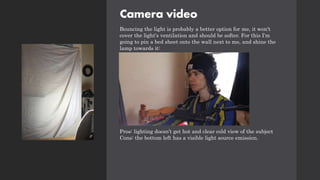
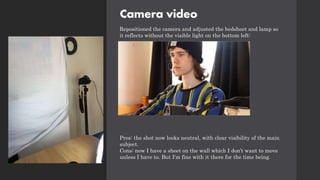
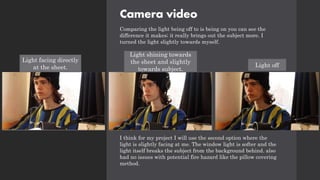
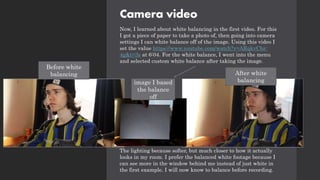
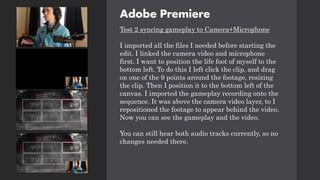
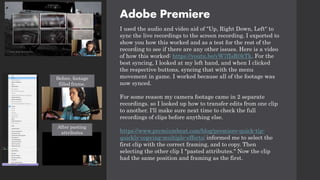
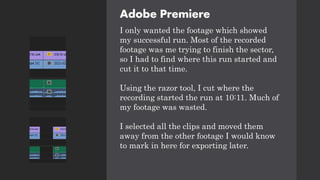
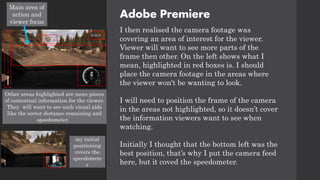
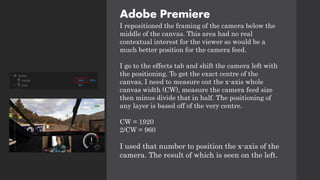
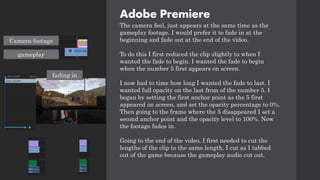
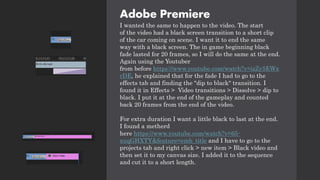
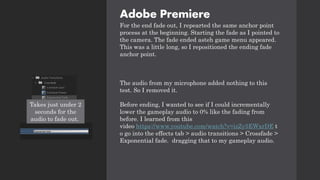
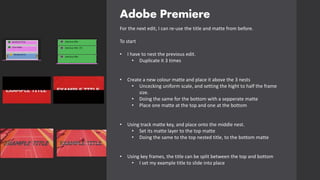
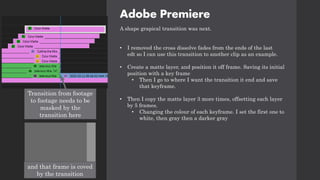
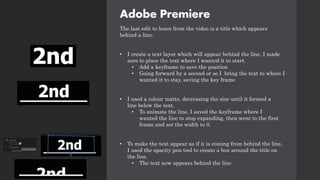
Experiment ideas
Daniel Morland
Experimentation:
to do list
Content gathering devices and software
• Camera
https://youtu.be/zvenc4Rsok8 general camera setup
• Indoor recording
• https://www.youtube.com/watch?v=ARqkvCbz-4g&t=3s indoor
setup guide for recording
• https://www.youtube.com/watch?v=0wqUWYx3UrY different
DSLR settings for improved video recordings
• https://www.youtube.com/watch?v=wGLi-_c5dkY different
lighting techniques
• Outdoor photos Tested
• https://www.youtube.com/watch?v=5IrvU5zC_Jw setup guide
and explanation
• https://www.youtube.com/watch?v=S2eAeMOpdeA advanced settings and
tips
• https://www.youtube.com/watch?v=IOtT_evlJOw DSLR recording
tips and tricks for recording outdoors (not needed most likely, but good to
have)
• Microphone tested
• Audacity
• https://www.youtube.com/watch?v=JE9hiiM1Sgw Setup guide
• https://www.youtube.com/watch?v=fqb7moQUq2Y&feature=emb_title m
aking sound recordings smoother (also Adobe Premiere)
• Screen recording
• How am I capturing the footage from my pc to his?
• OBS (Brothers PC)
• https://www.youtube.com/watch?v=YRZWPHA40vE Recording setup guide
• https://www.youtube.com/watch?v=8FNH6QY8x5I recording optimisation
s
• Editing software learning
• Gathering all necessary content
• Syncing content techniques
• what did I learn?
• What limitations do I find when editing?
• How can I reduce the production time?
• creating reusable transitions
Experimentation:
to do list
Editing Software
• Adobe Premiere
• https://www.youtube.com/watch?v=4VRarJaRIbs graphical basics
• https://www.youtube.com/watch?v=bQCpfN_xovs graphical motion
• https://www.youtube.com/watch?v=rzvLA48Ocos Clipping mask edits
• Transitions/graphical effects
• Syncing audio/video and recordings
• Adobe Photoshop
• Find graphical edit videos
• Ability to create moving gifs tests
Test results
• Editing software learning
• Gathering all necessary content
• Syncing content techniques
• what did I learn?
• What limitations do I find when editing?
• How can I reduce the production time?
• creating reusable transitions
Experimentation:
to do list
Internet activity and uploads
• YouTube
• Compression limitation tests
• Website tested
• Finding what service to use
• https://www.websitetooltester.com/en/best-website-builder/
• Limitation tests
• Social media
• What social medias to use
• Differences between social medias
• Website features to test
• Interactive features
• Buttons Chaning colour
• Images zooming in when hovering over
• Interactive titles
• Ability to change images on zoom
Experimentation:
to do list
Styles and fonts
• Fonts
• Find font which represents brand
• Beauty of racing.
• Luxury to be in the sport
• fast
• style
• how can I reflect speed, and agility with my style of videos?
• Personal
• Complex edits?
• Indepth interpretations
Experiments
Experimenting and Testing
Im going to use the tests and experiemnts
for my own purposes so I can come back to
the document if I have any toruble. Im
going to test everything so I don’t ever get
lost. If there is something I didn’t test but
used in production, it's because I thought
of it later. I will document if I should have
thought about it in hindsight and tested it
before production.
Camera photo
Test 1
This is the first time I have properly experimented with a DSLR
camera. I want to learn everything, from general setup to each setting
and their uses. It will help me in the coming future in content
gathering.
I'm going to watch this video https://youtu.be/zvenc4Rsok8 as it is a
general guide on the basics of a Canon 800D (the camera I'm using).
I'm watching the video fully to understand all the settings. I set up my
camera and placed it onto a stand like how I instructed in my problem-
solving document. I could also plug it straight into my pc using a USB
cable.
I'm going to re-watch the video and test out the camera myself. The
video suggested to use the manual mode so that’s what I'm going to use
for now. I set the file to the suggested RAW large, which outputs a
.Jpeg file. The respective settings for my first photo:
Shutter speed – 1/125
Aperture – F16
ISO – 1600
Autofocus – One shot
When importing the image into my pc, I could immediately change
settings in photoshop. This is the result after quickly messing with a
few settings. The size of the image came out to 35MB, so I can take
600+ images before I run out of storage.
Camera photo
I'm going to change the settings I set for the last image to see
the difference. Keeping everything the same except ISO.
Shutter speed – 1/125
ISO – 6400
Aperture - F16
Autofocus – One shot
Clearly it was way too high because the result was way too
bright. But I could fix this in photoshop by lowing exposure and
changing some settings.
Camera photo
To educate myself further on the different settings I'm going to
watch these videos from Benjamin Jaworskyj's YouTube channel.
He has an entire playlist about the different settings and their
effects so I can always come back to these videos if I have
questions. This will improve my experience when taking photos
in different environments/scenes.
Aperture – https://www.youtube.com/watch?v=RhIBlg1ld2g
Shutter speed –
https://www.youtube.com/watch?v=1wHtRelnbRk&list=PLgDzN
1G8Hp9ANGFUEb1y6Qr1FaoNVHcdT&index=8
ISO – https://www.youtube.com/watch?v=PWTfarG9-
E8&list=PLgDzN1G8Hp9ANGFUEb1y6Qr1FaoNVHcdT&index
=6
White balance –
https://www.youtube.com/watch?v=W3xZD0jQIhc&list=PLgDzN
1G8Hp9ANGFUEb1y6Qr1FaoNVHcdT&index=9
Focus settings –
https://www.youtube.com/watch?v=ZQU7WvP7WuI
Sports photography –
https://www.youtube.com/watch?v=m88xFI0s4JY&list=PLgDzN
1G8Hp9ANGFUEb1y6Qr1FaoNVHcdT&index=4
Camera photo
At night
After watching the videos, I waited till night-time to try out
changing the camera settings to suit the scene. i wanted to
experiment with the shutter speed.
Aperture – F10
ISO – 1600
What I gathered from this, is changing the shutter speed with
increase the amount of light (from what I learned).
From my images, I saw the difference in the brightness of the
sky primarily. To note, is I must keep my camera very still if my
shutter is open for long periods of time. As you can see, even
what my camera was mounted, I still had some shake and
therefor it blurred the image (5 seconds) I can reduce the
blurriness by having a lower time its open, but then it absorbs
less light, and you can't see anything at all.
Shutter
speed
open for
5
seconds
1/8
second
Camera photo
This time I reduced the aperture and changed the ISO settings.
Leaving the same.
With this test I was trying to find aa way to get a lighter
background, seeing the houses, without the blurry effect.
The first image still had no background sky, so I upped the iso
and prolonged the shutter. The result was better in the second
image, and I repeated the process. The last image there
was little to no blur, but I began to see the drawbacks of iso as I
got the grainy effect. But overall, it did get brighter.
If I want to shoot with a longer shutter length, then I will need
to get a stand either from college or I will have to purchase one.
This will reduce the blur that comes with camera shake the
shutter is open for so long.
settings
Shutter speed – 1/50
Aperture – F4
ISO - 6400
Shutter speed – 1/25
Aperture – F4
ISO - 12000
Shutter speed – 1/15
Aperture – F4
ISO - 25600
Camera photo
Out and about
When I take photos, I will be out and about so I need to test what it's like.
So I took a stroll to my local crematory for an on the move photoshoot,
simulating what it would be like outdoors.
Things to note:
• Cloudy
• Light snow
• I didn’t have a stand with me at the time
• I used automatic settings for ISO and focusing to see the
effectiveness.
The conditions worried me, the light snow could have got into my camera
and damaged the parts. The snow limited the amount of time I could take
photos as I had no umbrella over me to cover against the water damage. I
didn’t check the weather prior to going out, so next time I will so I can
prepare for the weather.
When coming back into the house, I looked up how to protect against
snow, and this link https://www.popphoto.com/how-to-properly-protect-
your-camera-gear-when-shooting-photos-in-
snow/#:~:text=Use%20a%20lens%20hood,it%20can't%20be%20helped sug
gested that I clean off all the snow while in the cold conditions before
entering a warm environment. This will stop the chance of snow thawing
into the camera. In the future, for an outdoor photoshoot like this, I could
have created a contingency plan to prepare for some foreseen issues, like
the snow.
Camera photo
When looking at the images, I could have reduced the ISO
because of the large amounts of white colours in frame. The
image to the left here is a good example. It's hard to look due to
the brightness.
If I had a stand, I could have lined up this shot further. It has a
slight tilt to the right. I could have also used the built in
electronic leveller as explained in canon's advertisement video at
6:55 https://www.youtube.com/watch?v=Ydz4OgweAfU. In the
moment I didn’t think about it, but this will help me stabilise a
shot more precisely.
Overall, I was very happy with my on the move images. the
camera was transportable as I only had the one lens with me.
OBS Studio (on my own pc)
Testing OBS
OBS is a free open-source screen recording software. It should
allow me to capture screen and game footage, at a little cost to
my systems performance. This initial test is going to find out
how to use the software, as it is the first time, I have used the
software.
Starting the program the first time, it greets me with an option
to optimise for streaming, recording, and using what they call;
virtual camera. I'm going to pick recording, because that is what
I want to use the software for.
Next it allowed me to change the video output setting. What
pixilation and framerate it will record at. I picked the same
resolution as my first monitor and set the framerate to 60. I
assume this can be changed.
The last option, it tells me that the output is going to be scaled
down. So, what I picked before was the resolution it would
record at, to then be scaled down to 1080p. Also the recording
quality was set to "High Quality, Medium File Size" referencing
the size of the file after it finishes recording. I hit apply settings
and it brought me to the main UI.
OBS Studio
Now that I'm in OBS, I want to set it up to record a specific area
for my interviews, as well as the sound.
I began by adding a "Source" of input. This is what the software
will record. OBS had done two things for me already, and that is
choose a microphone input and a "Display Capture" audio mixer
input. I played a song on Spotify to test what it was picking up,
and it showed that it was recording my desktop in stereo.
Next, I tapped my microphone, and the first problem arose. Like
audacity, It was recording mono into one channel. I wanted to
test if it was only recording into the left ear, which is what it
looked like. I tested it for 1 second by recording.
Now that I had recorded the sound, I needed to find where the
file had saved. For this, I went to "File>Show Recording" and it
opened where I had saved the recording. It saved into "This
PC>Videos"
OBS Studio
Uploaded the recording to YouTube so you could
hear that it was in the left. Click on the link top left
to hear it for yourself. The image is of the setup I
use for my microphone. Clearly its only recording in
mono, and outputting to the left ear only. I want to
have it record in mono but output it in stereo. The
same track in both ears.
To change it, I clicked on the cog icon next to the
microphone input and selected "Advanced Audio
Properties." Then I turned on a Mono checkbox, and
I immediately saw it had fixed the problem. I
shouldn’t need to test, as visually it looks like it has
solved the problem.
https://youtu.be/k62i-wG1UbU
Clicked this to
turn it too mono.
OBS Studio
Now that I had set up the basics, I began by adding a "Source" of
display input to capture my screen. Clicking he + icon I selected
the "Display Capture." It created an interesting tunnel effect,
but I could see that it was recording my screen.
I kept the frame the same size and enlarged the screen
recording until it only left the area I wanted to record. Which
was a private channel in Discord.
From my first microphone test, I knew that this audio was ok,
but I just needed to test the desktop audio in conjunction with
the video. I needed someone present to test if the desktop audio
was working, so I waited for my first participant.
The short test was a success, and I began the interview, I
used the same setup for all interviews. The footage is in the link
bottom left.
https://youtu.be/cujC2sXdTtM
Microphone test in Audacity
Setting up the microphone, and launching audacity, I got to the
main screen. I selected my microphone and tested the audio. It
only played mono into the left ear. To fix this issue I selected the
recording channel which was in stereo and put it into mono. This
fixed the issue.
Next the audio was echoing slightly, so I lowered the gain on
my audio interface, and again this seems to have done the trick.
I exported my recordings as MP3 files and uploaded the result
to YouTube. You can hear in the video, as I change the settings
what differences it made. I'm going to continue using the
settings I have here for the future.
Playing
in 1
track
only
https://youtu.be/W3IR90en0ts
Camera video
Test 2
For my video tests, I'm going to watch the first
(https://www.youtube.com/watch?v=ARqkvCbz-4g&t=3s) I posted
and find a solution which fits my setup best.
Test 1 (after watching the first video)
I'm settings up my camera to be pointing directly at me. I
quickly tweaked my video settings from what the video
suggested. The camera isn't recording audio because I have a
separate microphone for that.
I'm able to plug in my camera to my pc, so I can press the record
button while sitting at my pc. This will reduce the size of the
video clip, as I will spend less time getting up and sitting down
after each time I want to re-record something.
Now, I knew that I would be uploading the result with a
microphone test as well. So I need to be able to sync the audio.
As a marker, I'm going to clap. I recorded the audio and video
and began the test.
I downloaded the files to edit the results for my first test in
Adobe Premiere.
First test
camera
settings
Camera video
Notes I took while watching and the position of my camera.
Camera video
Prior to recording the video, I hammered the issues with some
settings like when I set the framerate to 60fps, I needed a
shutter speed which was closest to 120 for smooth video: initially
I set it to 125 and the video had a glitching jittery effect because
of the light coming from my monitors. I lowered it to 100 and
this seemed to resolve the issue.
Overall, the positives were:
• The settings were correct (ISO, shutter speed, aperture etc)
so I had no negative effects like the shutter speed I just
mentioned.
• The angle had primary focus on subject
• Colours looked correct for the lighting
But the changes I want for the next tests are:
• More focus on the main subject
• A more interesting shot, maybe incorporating the window
behind me
• Lighting for effect
https://youtu.be/gEbwq6rT3KI
Adobe Premiere
Prior to anything, I needed a layout of folders so I can easily
find any recordings. In my (D:) drive I set up an FMP folder
which expands out into all the areas I need. Having an
organised system will allow me to not lose any clips from all
the sources I'm gathering from. I can also add more folders
in the future needed. Setting the groundwork early on will
keep an organised system, so I don’t have any issues finding
what I need in the future. Because of the system in place, I
could easily find where I had saved and exported the
separate recordings.
Earlier I explained how I needed to sync the audio to video
because the two recordings were from separate recording
devices. That marker was my clap at the beginning. Within
premiere I found where I clapped in the video and in the
audio. Without this system the 2 tracks would be out of time
and unusable.
I got the frame where my hand connected along with the
first spike in volume in the audio. Because the sound was so
immediate, I found it incredibly easy to sync the audio to the
video using the frame marker.
Adobe Premiere
The recordings didn’t match in length. I must
remember to have a pause at the beginning and
end, so I can trim the recordings to the same
length. But in this test it didn’t matter because I
didn’t anyway. So I could trim the video to match
the lengths.
After this I rendered in and out, uploading the
result for you to see.
Adobe Premiere
https://youtu.be/flVd_p_qTtg video 1
After uploading the video, I immediately saw my
first problem.
The video on YouTube was 480p and had large
black bars around the sides. I had to now
troubleshoot the reason why this was happening:
I reuploaded the video to see if it was a setting
within the upload that I had picked, and it looks
like I had the problem was when I exported it. I
exported it for a second time and found that it was
still outputting at 480p. I looked up a guide on how
to change this and I found out that my sequence
was in 480p not my exporting file. To change this, I
had to press "Control + N" to bring up a new
sequence. I was suggested to pick the
"DVCPROHD" pre-set, and I found the resolution
and framerate I was working at.
Adobe Premiere
I repeated the process of my last edit and while
exporting the video, I still saw that it was exporting
at 480p. So again, I looked up why this was
happening. My video was exporting as a .avi file.
Changing this to H.264 and selecting the custom
preset, I was able to change the resolution and
framerate. For later edits, I saved the preset I'm
using here because this will be the settings for
export that I will use for all of my videos.
I exported the video and uploaded it to YouTube. It
was in 1080p and 60fps but this time however, the
audio in the video 2 was incredibly quiet. Now I had
to solve this issue.
https://youtu.be/-HWbYYp5Fvg video 2
Adobe Premiere
I deleted the current audio track and put in the
audio source. I checked the video before uploading it
and that seemed to fix the issue. The result (video 3)
as you will hear is a lot louder.
Re watching the video, I saw it had some areas
where the video cut out for a single frame. I'm pretty
sure this is down to the difference between the
Camera video file which is 59.94 fps and the
exported video which plays at 60 fps.
So this time I exported in 59.94 fps, and the result
was fine. The video didn’t chop at all and the
recording was smooth.
Throughout this process I learned a lot, and I can
continue what I learned in my next experiments and
through into my produced content.
https://youtu.be/5Jr9G526SxI video 3
https://youtu.be/XB
RcnZ7sR_Q video 4
(final result)
Camera video
Test 3
I watched the rest of the videos for indoor recording and
repositioned my camera:
https://www.youtube.com/watch?v=0wqUWYx3UrY differ
ent DSLR settings for improved video recordings
https://www.youtube.com/watch?v=wGLi-
_c5dkY different lighting techniques
I wrote some notes on a piece of paper, things that I
should take away from the videos.
So with this second test I want to:
• More focus on the main subject
• A more interesting shot, maybe incorporating the
window behind me
• White balance the shot using a piece of paper
• Lighting, using my sun lamp
Camera video
Set up the camera here, and put the zoom close to the max. Kept
the same settings as the last test and it looked like this:
The shot has more focus on the subject. I prefer this angle
currently to the one I used in the first test.
Camera video
Next, I need to set up the other changes I want to make:
• Lighting
• White balance
I'm going to set up the lighting first. For this I'm going to set up
my sun lamp. I positioned it behind my monitor pointing at me.
The lamp really lit up my face as but it was rather harsh. I
needed some was of softening the light. I learned 2 ways to do
that in the videos:
• Coving the lamp with a sheet
• Bouncing the light off of a surface
Position of lamp
for lighting.
With the light
on.
Without the
light
Camera video
Coving the light with a pillow over provides this look on the
camera:
Pros: the light is warm and soft
Cons: the light's ventilation shouldn’t be covered for long periods
of time. Otherwise, it could become a fire hazard if it gets too
hot.
After the test I took the pillow cover off, and I could already feel
that it was warm, even after 5 minuets. Most likely I cant use
this technique.
Camera video
Bouncing the light is probably a better option for me, it won't
cover the light's ventilation and should be softer. For this I'm
going to pin a bed sheet onto the wall next to me, and shine the
lamp towards it:
Pros: lighting doesn’t get hot and clear cold view of the subject
Cons: the bottom left has a visible light source emission.
Camera video
Repositioned the camera and adjusted the bedsheet and lamp so
it reflects without the visible light on the bottom left:
Pros: the shot now looks neutral, with clear visibility of the main
subject.
Cons: now I have a sheet on the wall which I don’t want to move
unless I have to. But I'm fine with it there for the time being.
Camera video
Comparing the light being off to is being on you can see the
difference it makes; it really brings out the subject more. I
turned the light slightly towards myself.
I think for my project I will use the second option where the
light is slightly facing at me. The window light is softer and the
light itself breaks the subject from the background behind. also
had no issues with potential fire hazard like the pillow covering
method.
Light facing directly
at the sheet.
Light shining towards
the sheet and slightly
towards subject.
Light off
Camera video
Now, I learned about white balancing in the first video. For this
I got a piece of paper to take a photo of, then going into camera
settings I can white balance off of the image. Using this video I
set the value https://www.youtube.com/watch?v=ARqkvCbz-
4g&t=3s at 6:04. For the white balance, I went into the menu
and selected custom white balance after taking the image.
The lighting because softer, but much closer to how it actually
looks in my room. I prefer the balanced white footage because I
can see more in the window behind me instead of just white in
the first example. I will now know to balance before recording.
Before white
balancing
image I based
the balance
off
After white
balancing
Camera video
I recorded my video and microphone, uploaded the video to
YouTube like I did before. illustrates what my testing provided
and compared to the first video which was I think is a huge
improvement. Also, when editing the video, I cut the audio on
the point of the clap, this made it easier to position with the
frame guide.
• There is a lot more focus on the subject from the light and
positioning.
• I incorporated a more interesting shot with the window
behind me instead of just having my bed and that large crack
as you can see.
• The focusing is a lot more enticing as you can clearly see the
subject, but the background is still blurred.
Admittedly, because I'm talking to the audience; I should have
looked at the camera more often. It doesn’t matter in a test video
like this, but in the future when I'm recording for production
videos where the audience is directly being talked to, then I
should be talking to them, not to my side monitor.
https://www.youtube.com/watc
h?v=XBRcnZ7sR_Q
Test 1
https://youtu.be/1WwDRWt8F_I
Test 2
Camera video
The frame cut off the top of my head. I have two ideas to combat
this. One being to position the camera to be slightly higher, and
the second idea is to zoom out slightly. This should reveal more
of my head in shot. It looks good, just I think it could be
improved.
The video came out darker than I intended. My hat blended with
the curtains behind. There isn't much I can do about this item,
other than take it off and ware nothing.
And re-watching the video, the light from my lamp was very
harsh. It really lit up may face, a bit too much then I intended.
So, I turned it away fully to reduce the amount of light directed
at me.
https://youtu.be/1WwDRWt8F_I
Camera video
Test 3
My 3rd test will be at night-time. I currently intend to shoot all
my videos during the day, but I still want to test the settings and
possibility of night filming.
Because there isn't any sun, the window won't emit light. I have
to take that into consideration when setting up my lighting and
white balance.
I repositioned the camera like I suggested from the last test
also. This video will include live gameplay, so I need to adjust
the frame to incorporate the action from my wheel.
Because the light was so harsh, I put tinfoil around it and placed
it below my desk on a box. This bounced the light harder off of
my wall.
Camera video
I set up OBS, Audacity and my Camera to record all 3 in conjunction.
I'm already pretty sure that my computer cannot handle this amount
of CPU and GPU usage because it has 3 recordings and 1 gameplay
screen to deal with. Dirt Rally is an older game from 2015, so it
might be able to handle this usage. But anything more demanding
then this, I will most likely see performance loss.
Putting just the camera and microphone together and uploading
that, the ISO stood out to me straight away. Because of the dark
background and no lighting from the window I recorded footage
which was slightly grainy from a too high ISO setting. Personally, I
want footage which hasn’t got any grain, so this shows me that i
shouldn’t film at night.
I did like the night atmosphere, but it doesn’t really have an effect in
a genre like racing. You could see lit windows from the buildings
across from me.
I didn’t like the positioning of the camera. It could see all of the
action coming from my arms and face, but I think it would have
looked better if I had either slightly moved the camera back, or
zoomed it out and moved it up.
There was no frame loss throughout the video. So my camera and
microphone were not withheld by the high PC demand.
https://youtu.be/b5iz3YnVJik
I would like to see the
camera I little higher than
this. Maybe 1 or 2 inches.
OBS Studio
Test 2
For this test I'm going to record gameplay of dirt rally. I only
want OBS to capture video and audio from that application, and
not my desktop.
First, I click "add source" under the video section. And it already
has a game capture. I select this and prepare the audio from the
game.
The next menu is simple. I made it so it specifically captured the
application I wanted. I checked the box where it limited the
framerate, so I can limit it to 59.94. The same speed as my
camera. This will hopefully help me out when I export the video.
Now I needed to see if the game was being captured at 1080p
any higher and my PC's performance won't be able to keep up
with recording and playing the game. Initially the canvas was
set to 2k (1440p), I lowered it and rescaled the output.
OBS Studio
The last thing I have to do before recording is capture the audio.
I again go to "sources" and select audio output capture. It only
allows me to choose between output devices and I specifically
want it to record the application. So I back out of this and choose
a different option.
I found this forum which showed me how I might want to
download the free software "VoiceMeeter" so I can separate the
audio tracks like Sportify and the game. For now I will have to
resort to display capturing my game, but I will keep this in
mind.
The desktop audio is picking up my sound anyway. So I'll use it
for this test.
I quickly recorded a 5 second clip to test if the framerate and
resolution were correct, and it revealed that the output was in a
location I didn’t want it to be. So, I re-set the outputting file to
my hard drive folder.
One con with recording dirt, is that every time I tab out of the
game; it exits Fullscreen mode. A way around was suggested by
downloading "borderless gaming" an application which prevents
this from happening. Ive used it in the past.
Initial path
Current path
OBS Studio
Now that I have everything set up, I record a 5 second tester clip. I
saw nothing wrong with it in the recording, so I quickly uploaded it
to YouTube to see if there were any hidden issues. Nothing abnormal
was included. You can see at the beginning of the video though, the process
I need to take to get the game into Fullscreen.
For the test, I need to sync the video, screen recording and microphone so
that I can bring all the clips together. Im using the same clap method. But
to sync the screen recording, I will say "Up, Down, Left, Right" and press
the respective buttons on the D-pad. The menu movement will show me
when I pressed the button.
While I was in the settings, I changed the framerate at which the recording
was taken from 60fps to 59.94fps to match the recording speed of my
camera. Even though I didn’t get to test the framerate was an issue, I
theorise that because the 2 recordings (camera and screen) would have been
out of sync, this might have caused slight frame loss of the gameplay. the
was because of the exporting framerate of 59.94fps.
Unfortunately, my recording was the wrong file type for Premiere, meaning
I couldn't test the syncing system or edit the footage together.
To change this I went to OBS settings and changed the file type from
.mkv to .mp4.
The recording should now be transferrable to Premiere, and I waited till the
morning to re-record.
https://youtu.be/CLIecegKfuw
Exporting framerate.
Camera video
Morning
Now that it was day, I didn't have to film at a high ISO and
I repositioned the camera slightly as I suggested and
re-filmed the gameplay.
I re-record some gameplay in the morning, making sure to
sync all recordings like before.
The footage looks a lot better during the day as you can see on
the left. No graining at all.
https://youtu.be/5SnelW8cXvs
Adobe Premiere
Test 2 syncing gameplay to Camera+Microphone
I imported all the files I needed before starting the
edit. I linked the camera video and microphone
first. I want to position the life foot of myself to the
bottom left. To do this I left click the clip, and drag
on one of the 9 points around the footage, resizing
the clip. Then I position it to the bottom left of the
canvas. I imported the gameplay recording onto the
sequence. It was above the camera video layer, to I
repositioned the footage to appear behind the video.
Now you can see the gameplay and the video.
You can still hear both audio tracks currently, so no
changes needed there.
Adobe Premiere
I used the audio and video aid of "Up, Right Down, Left" to
sync the live recordings to the screen recording. I exported to
show you how this worked and as a test for the rest of the
recording to see if there are any other issues. Here is a video
of how this worked: https://youtu.be/yW7fIsR0kTk. For the
best syncing, I looked at my left hand, and when I clicked
the respective buttons, syncing that with the menu
movement in game. I worked because all of the footage was
now synced.
For some reason my camera footage came in 2 separate
recordings. so I looked up how to transfer edits from one clip
to another. I'll make sure next time to check the full
recordings of clips before anything else.
https://www.premiumbeat.com/blog/premiere-quick-tip-
quickly-copying-multiple-effects/ informed me to select the
first clip with the correct framing, and to copy. Then
selecting the other clip I "pasted attributes." Now the clip
had the same position and framing as the first.
Before, footage
filled frame.
After pasting
attributes
Adobe Premiere
I only wanted the footage which showed
my successful run. Most of the recorded
footage was me trying to finish the sector,
so I had to find where this run started and
cut it to that time.
Using the razor tool, I cut where the
recording started the run at 10:11. Much of
my footage was wasted.
I selected all the clips and moved them
away from the other footage I would know
to mark in here for exporting later.
Adobe Premiere
I then realised the camera footage was
covering an area of interest for the viewer.
Viewer will want to see more parts of the
frame then other. On the left shows what I
mean, highlighted in red boxes is. I should
place the camera footage in the areas where
the viewer won't be wanting to look.
I will need to position the frame of the camera
in the areas not highlighted, so it doesn’t cover
the information viewers want to see when
watching.
Initially I thought that the bottom left was the
best position, that’s why I put the camera feed
here, but it coved the speedometer.
Main area of
action and
viewer focus
Other areas highlighted are more pieces
of contextual information for the viewer.
They will want to see such visual aids
like the sector distance remaining and
speedometer.
my initial
positioning
covers the
speedomete
r
Adobe Premiere
I repositioned the framing of the camera below the
middle of the canvas. This area had no real
contextual interest for the viewer so would be a
much better position for the camera feed.
I go to the effects tab and shift the camera left with
the positioning. To get the exact centre of the
canvas, I need to measure out the x-axis whole
canvas width (CW), measure the camera feed size
then minus divide that in half. The positioning of
any layer is based off of the very centre.
CW = 1920
2/CW = 960
I used that number to position the x-axis of the
camera. The result of which is seen on the left.
Adobe Premiere
The camera feel, just appears at the same time as the
gameplay footage. I would prefer it to fade in at the
beginning and fade out at the end of the video.
To do this I first reduced the clip slightly to when I
wanted the fade to begin. I wanted the fade to begin
when the number 5 first appears on screen.
I now had to time how long I wanted the fade to last. I
wanted full opacity on the last from of the number 5. I
began by setting the first anchor point as the 5 first
appeared on screen, and set the opacity percentage to 0%.
Then going to the frame where the 5 disappeared I set a
second anchor point and the opacity level to 100%. Now
the footage fades in.
Going to the end of the video, I first needed to cut the
lengths of the clip to the same length. I cut as I tabbed
out of the game because the gameplay audio cut out.
Camera footage
gameplay
fading in
Adobe Premiere
I wanted the same to happen to the video. The start
of the video had a black screen transition to a short clip
of the car coming on scene. I want it to end the same
way with a black screen. The in game beginning black
fade lasted for 20 frames, so I will do the same at the end.
Again using the Youtuber
from before https://www.youtube.com/watch?v=izZy5EWx
rDE, he explained that for the fade I had to go to the
effects tab and finding the "dip to black" transition. I
found it in Effects > Video transitions > Dissolve > dip to
black. I put it at the end of the gameplay and counted
back 20 frames from the end of the video.
For extra duration I want a little black to last at the end.
I found a metherd
here https://www.youtube.com/watch?v=65-
xuqGHXTY&feature=emb_title and I have to go to the
projects tab and right click > new item > Black video and
then set it to my canvas size. I added it to the sequence
and cut it to a short length.
Adobe Premiere
For the end fade out, I repearted the same anchor point
process at the beginning. Starting the fade as I pointed to
the camera. The fade ended asteh game menu appeared.
This was a little long, so I repositioned the ending fade
anchor point.
The audio from my microphone added nothing to this
test. So I removed it.
Before ending, I wanted to see if I could incrementally
lower the gameplay audio to 0% like the fading from
before. I learned from this
video https://www.youtube.com/watch?v=izZy5EWxrDE t
o go into the effects tab > audio transitions > Crossfade >
Exponential fade. dragging that to my gameplay audio.
Takes just under 2
seconds for the
audio to fade out.
Adobe Premiere
I finished the editing and exported the video.
The video came out as intended. I would say that this
test was successful.
The syncing was effective. Look in the video when I gear
shift, the same shifting happens on point.
I found plenty of effects and techniques which I can carry
forward. Its also a refresh or premiere for myself.
For footage like this, I don’t need to include my
microphone.
No frame drops in the camera feed or gameplay which is
a positive.
Finished video
https://youtu.be/n1pQD-OljOE
Camera
Test 5 recording Assetto Corsa Competizione (ACC) racing camera video
For my production I'm going to focus on ACC recordings. For this test, I
want to find a simple syncing technique between camera video and the
OBS recording.
For this I'm going to press the gear up paddle and gear down paddle in
a set pattern when driving the car in game. I will look into the camera
while performing this action, at the end of the recording session. This is
because I'm forward thinking about online races. An online race starts
immediately so I cannot gear up and down before a race. It will be
easier to understand when I record actual online events, but for this
test recording an offline race.
If I sync at the right time, my wheel in game should turn at the same
time I turn the racing wheel on camera. If the clips are out of time, it
won't look live. The point of syncing is to provide the effect of looking
like I recorded this in the moment, which I'm not.
The camera angle and settings from the last test can be bring forward
to this one. I have found the angle I want to use.
Gear up
paddle
Gear
down paddle
Camera
This is the pattern of gear shifts that I recorded. The shifts are
abnormal, but still recorded in the session. I can sync this easily in
premiere.
I'm not using the microphone this time. Because I'm not audibly
interacting with the audience or anyone else.
OBS Studio (on my brothers PC)
Now that I had the settings down, I wanted to test out the recordings on
my brother's computer, which is more powerful than my own. He has
allowed me to use it for this purpose. Because it has more performance, I
can run more demanding games at higher quality which still maintaining
a framerate of 59.95fps. My pc cannot handle the same tasks. Because of
the high quality, it should be more interesting to watch then a low render
of a game.
This time the game will be Assetto Corsa Competizione will be the main
game I record.
To record on his pc I have to go through a process:
1. Save a copy of a race I want to record onto my PC
2. Transfer another copy to my external hard drive
3. Using the external hard drive, save another copy to my brothers pc
4. Open ACC and OBS to record the gameplay
5. Transfer the recording back to my hard drive
6. Save a separate copy of the recording to my pc
Finish
I could send the footage back and forth over email, but I think this route
is more appropriate, because I don't always have access to my computer. I
will sometimes visit my dad and will have to use my brother's laptop to
edit. The external hard dive can come with me instead of my entire pc
setup.
OBS Studio (on my brothers PC)
After driving a few laps, I found out that you cannot save replays in single
player. Usually, you would go to the replay section and watch the session
you recorded. Ill hop into a multiplayer and save that session instead.
I saved the replay and located it in my hard drive. The path to finding the
save file was on: C: > Users > Dan > Documents > Assetto Corsa
Competizione > Replay > Saved. In saved were all the saved races. I only
had 2 currently.
I moved the replay files from my current location to
my external hard drive. Now I had a copy on each
drive, I can go to my brothers pc, and put the files
into the same location as mine. Just on his setup. I
set up OBS like I had for dirt. I made sure that the
outputting file would be onto my external drive.
Here is the race recording. It was smooth and
looked fine: https://youtu.be/a4260ODGGDo
OBS Studio (on my brothers PC)
Moving the files to the
external drive
Moving the files to my
brothers pc
Adobe Premiere
I now have to sync the audio. Here is the method I
used in game, along with the input. Unfortunately,
I didn’t look at the camera the whole time, but I can
still sync the game to my gear
shifts: https://youtu.be/IDnahOaO_7A
The syncing worked, and my movement in
game was replicated on the camera footage.
I sent my dirt video out to a few people and they
suggested that I move it away from the side of the
canvas a little bit, off of the x and y axis by 15
pixels.
I thought about flipping the footage so I could place
it on the top left, but the gear shifts on my camera
would look strange, because my paddle shifts would
be flipped. This would be confusing to watch. I
uploaded the result of the recording to YouTube.
OBS Studio (on my brothers PC)
It took quite a bit of time to get access to my brothers PC, so I'm
going to try recording on my setup. Here is a reading of my
computers performance while recording at the required settings of
1080p 59.94fps. Much of my components were pushed, but I had a
consistent framerate of 70fps. My V Ram which is the ram in my
GPU was very close to being used fully. But it didn’t lose any
frames. From now on I could just record on my setup at this frame
rate.
Recording: https://youtu.be/rEzLsTEowCA
I can also record trackside clips by pressing F7 for freecam which
follows the car selected and pressing Control + F7 again will allow
for a freecam which doenst follow vehicals. Here is some footage I
gathered from the same race with those
views: https://youtu.be/_APROP6QAZk
The footage was slightly choppy, but I can try again with a lower
graphical setting ingame. This should reduce this.
The recordings was unusable but I did try out motion blur in the
last part. It helped with reducing the obvious number of sharp
frames. Here is the result: https://youtu.be/rwNHTj4Kn3A
My computer cannot handle the freecam aswell as the cockpit
camera. I might want to outsource that footage on my brothers PC.
OBS Studio (on my brothers PC)
One problem with recording on my brothers pc, is that he uses it
most of the time. He needs to allow me to use it, and he won't if
hes using it himself. I will need to record as much footage as I
can to only record what I need on his setup.
This test outlined how im going to gather footage for ACC. The
bulk majorty of cockpit footage on my setup. And then
Freecamera angles on my brother's setup.
Website
Test 6
Before I test any site builder, I want to find a service
which suits the graphical route I want to go. I found
this https://www.websitetooltester.com/en/best-
website-builder/ quick link I found, and it shows the
positives and negatives of website builders.
I'm going to choose Wix.com for my website. This is
because the free service that it has, falls close
enough to what I want to do. I also have a little past
experience with it, so I'm not completely
uneducated. But I'm going to use tools which I
haven't before. My other website is completely basic
with few animated parts. So I need to find out if
there is anything out of reach for this service.
it's not guaranteed that I'm going to use Wix, I want
to find its limitations. It says that one of the con is
that "templated cannot be changed easily" and that’s
already a worrying sign for me.
Website
Unfortunately, Wix only has templates to
choose from. But I can still edit these templates
later.
Removing most of the features currently on the
template so I can just test the features.
The first aspect I want to change is the
background. I added this image as a funky
background. I set this image to "parallax" scroll
so that it mimics the scrolling speed of the
person viewing. I'm quickly going to mess with
the background image as I do have the option
to change a lot about it. I could do this in
photoshop prior, but this allows me to do it
Onsight.
Website
Next, I wanted to look at the shape
options. I could choose from the shale
library and I can also upload shapes I
create myself. Currently, this site is
suiting my needs.
I used shapes to limit the sides of the
image. Using a separate shape in the
middle to line up the 2 sides. Each side
of the measuring rectangle there was a
single space of pixels between the
shapes. So I nudged them into position
so that the both were nested into
position.
Website
If I want to remove the headers and
footers, a simple button does the trick.
Replacing the header with one of my
own images, I can animate it onto the
page. The image I have chosen here
isn't rotated to 0 degrees. To fix this I
opened photoshop and re-lined up the
image using rulers so that it was flat. I
then changed the perspective of the
image to be more top down then it
currently was. Finishing it by exporting
the image as a .PNG up and importing
it back to the website.
Website
The image didn’t fully fit the top banner. So I
retook a wider screenshot by going into the
game I got it from. Using the same technique
as before in Photoshop I resized the image and
perspective. Quickly adjusting the image to
look more enthusiastic and this was the result.
I copied the image to span across the page, like
a header of my own.
In the future, I would plan for an image like
this. Currently it looks quite obvious to me that
the image is copied over on each end. To combat
this, my image would have ended.
I grouped the 2 top images. So that they would
act as 1 shape.
Where the
copied image
connected
Where I should
have cropped the
image. Not in the
middle of a square
like it did.
Website
With all 3 shapes selected, I could put an
animation on top, so they fly in when the page
is opened.
For an interesting homepage, I want
animations as a visual interactive. So I put 2
shapes to see what it would look like. They
both glided in from the left and right. At the
same speed (1.2 seconds_ at the top start/finish
line.
The animation just faded in, so I resized the
shapes, and they both glided in like the line, I
delayed the rectangles from the left and right
so the finish line came in first.
Website
A added a bunch of shapes to leave little background,
they all animated from areas on the left and right. Each
shape could have custom images with plenty of individual
customisations.
I'm happy with the animations. I have a good understand
of how they work now.
Website
I wanted to try out the customisation of the buttons. Buttons
should be Interactve so as to suggest clicking on them.
I need to find what limitations I have with buttons. I want it to
be an image which when hovered over, the image will zoom out.
Clicking on design, Wix allows me to change the state the button
is in when hovered over and when not. I added my own image
and when the button is not hovered over the scaled fit is 200%.
Hoving over, it transitions to 100% fill. I previewed the button,
and there was no animation between the two states. It went
directly from one fill to the other. To change this, I removed all
other layers and previewed the button. Now what it does is a
smooth transition from 200% to 160% when hovering. I can also
change the positioning of the image, so it could slide from and
direction.
I didn't experiment with the text, but I can also change how that
interacts while hovered and not hovered.
The button, like the shapes can also be animated onto the page
using the same animation tools from before.
Website
Overall, I'm sure that Wix's tools I didn’t experiment with would
still be adequate for my project. It did everything I asked for,
first time of asking. After this experiment, I can conclude that
this will be the tool I use to build my own site.
One negative aspect about the website, is that it keeps shifting
my layers whenever I save. Saving pushes the S/F line behind
the two rectangles to the left and right. I have tried fixing this,
but for some reason it won't let me kepp the S/F line above. The
image certainly extends out. A limitation I'll keep a note of.
https://daniel-morland.wixsite.com/my-site
https://daniel-
morland.wixsite.com/my-site
Adobe Premiere
Test 7
I want to incorporate graphical art transitions and effects into
my videos and website. I have never done anything around
moving graphical edits in any form. This will be a learning
session of technequies and my ability.
Starting off, I have a few videos already lined up surrounding
graphical technequies. Im writing down what I want to take
away from each video.
Video 1 https://www.youtube.com/watch?v=4VRarJaRIbs graphical basic
Adobe Premiere
Slide in animations seem basic but fundimentle. What I did to achive this
example is:
• Creating a shape to slide in
• I coloured mine red and placed it in the area I want to end in.
• In the effects control, I save the position by setting a key frame, so it
will arrive in that position in 10 frames.
• Going back to the first frame of the animation I set a second key
frame.
• The position of this key frame is off the screen.
• It moved a little too fast, so I prolonged the animation by 10
frames.
• It ended by going off screen. Using the same key frame metherd.
To animatte from a differnet angle, I have to create new shape and re-
position the key frame's x and y axis
Starts here Finishs here
Moving on
screen
Moving off
screen
Adobe Premiere
For the pop in animation:
• Created a new shape
• The first key frame has the shape start at 80% of its size.
• 3 frames later the shape is 100% size
• 2 frames after that the shape finishes at 90% size.
• To end I just made the shape fade out.
These animations are pretty easy, but now that I have learned them, I can
begin to move onto harder technequies.
80 > 100 > 90
Adobe Premiere
Video 2 https://www.youtube.com/watch?v=bQCpfN_xovs graphical motion
Here are the notes I took from the video:
Adobe Premiere
For the next edit, I need some footage. So I added one of the clips of ACC.
To creat the effect I:
• Added a text layer, resized it and positioned it in the centre of the frame.
• Create a colour matte, placing the title above the matte.
• Apply the "track matte key" effect to the colour matte
• Reverse the effect
• Change the blend mode of the matte (I used colour dodge)
• Lower the opacity of the matte
• In his video the footage zooms in slowly. Ill add my own slight zoom.
• I cross dissolve faded the clips in and out
Adobe Premiere
For the next edit, I can re-use the title and matte from before.
To start
• I have to nest the previous edit.
• Duplicate it 3 times
• Create a new colour matte and place it above the 3 nests
• Uncecking uniform scale, and setting the hight to half the frame
size.
• Doing the same for the bottom with a sepperate matte
• Place one matte at the top and one at the bottom
• Using track matte key, and place onto the middle nest.
• Set its matte layer to the top matte
• Doing the same to the top nested title, to the bottom matte
• Using key frames, the title can be split between the top and bottom
• I set my example title to slide into place
Adobe Premiere
A shape grapical transition was next.
• I removed the cross dissolve fades from the ends of the last
edt so I can use this transition to another clip as an example.
• Create a matte layer, and position it off frame. Saving its initial
position with a key frame
• Then I go to where I want the transition it end and save
that keyframe.
• Then I copy the matte layer 3 more times, offsetting each layer
by 5 frames.
• Changing the colour of each keyframe. I set the first one to
white, then gray then a darker gray
Transition from footage
to footage needs to be
masked by the
transition here
and that frame is coved
by the transition
Adobe Premiere
The last edit to learn from the video is a title which appears
behind a line.
• I create a text layer which will appear behind the line, I made
sure to place the text where I wanted it to start.
• Add a keyframe to save the position
• Going forward by a second or so I bring the text to where I
wanted it to stay, saving the key frame
• I used a colour matte, decreasing the size until it formed a
line below the text.
• To animate the line, I saved the keyframe where I
wanted the line to stop expanding, then went to the first
frame and set the width to 0.
• To make the text appear as if it is coming from behind the line,
I used the opacity pen tool to create a box around the title on
the line.
• The text now appears behind the line
Adobe Premiere
The videos lesson looked challenging, but
now that I know how to do these effects, I
can think of ways to use them. After
watching the videos I'm going to animate
some footage using what I learned over the
course of this test.
Adobe Premiere
Video 3 https://www.youtube.com/watch?v=rzvLA48Ocos Clipping mask edits
Here are the notes I made of the 3rd video:
Adobe Premiere
The effect is clipping a video into a shape and having a second video play behind it.
• I'm going to start by animating a shape popping into the centre of the
frame.
• Placing the effect Track matte key onto the a second video clip, which
is from the dirt test. I set the track matte of the video to the track
which the rectangle was on, which is video 4.
• Last I wanted the shape to expand out. So I saved the keyframe of its
size and then increased the rectangle scale until it filled the frame.
Adobe Premiere
https://youtu.be/-5BODd9PJxs here is the video of all the tests so
far.
These experiments were pretty easy, but as I said it's all a part of the
process of building my Premiere knowledge and experience.
Video 4 https://www.youtube.com/watch?v=InrN097tg_E smoother
object movements
Here are the notes I made of the 4th video:
Adobe Premiere
I also wanted to see the importing of shape files from photoshop. So in
Premiere I went to File > new > Photoshop file. This allowed me to create
a shape with the same canvas size as my premiere working space. I
threw together some shapes with the custom shape tool to edit around
and imported the file back to Premiere.
Importing the file back to Premiere, I have a few options. If I had a more
complex image from photoshop such as a thumbnail I could import the
file and select "individual layers" or "sequence" I experimented with this
by importing one of the pages from my last project and selected
"sequence" to see the result. As I suspected, the photoshop file is
imported with all layers separated into different sections, which I could
then pick and choose to use in the timeline.
I placed the shape I made onto the timeline.
Adobe Premiere
Like I learned before, I want this shape to be a transition from left to
right, but this time it will move with more fluidity, not just a linier line.
I made an example of the transition using the normal keyframes and
also using Bezier keyframes. To select Bezier keyframes, I have to
highlight the keyframes I want to change, right click > Temporal
interpolation Bezier and the keyframes will change.
By clicking the position dropdown arrow, I can edit the motion of the
transition. The movement can be edited so it spikes near the middle,
giving the shape more movement the higher the spike.
Normal Bezier
Constant speed, Bezier allows
the speed to be less linier
Adobe Premiere
Now, by layering 3 shapes with the same Bezier motion, I can create the
same frame transition from the last test, but it looks a lot better. They all
move at independent set speeds.
One frame covers the entire canvas, this is necessary for the transition.
I want to test enhancing the text which appears behind the line.
The movement can be made cleaner with these keyframes. So I
create an example like before, but I edit the keyframes to be
Bezier.
Keyframes
of text
movement
Keyframes
of shape
width
Adobe Premiere
I am experiencing some performance issues with Premiere, so I'm going
to optimize the program with the optimization video in my problem
solving document.
I allocated more ram, and accelerated my GPU. Also rendering the work
I had finished. All to give the program less to do.
Going back to the text and shape, I copied and pasted the width key
points and reversed their placements. I did the same to the texts
movement. So now the line expands out, the text comes up, pauses there
and then returns with the line disappearing. The time when the line
should have remained static, it was slightly changing the width. To
combat this, I added 2 linier keyframes, one frame after the first
transition and one frame before the ending transition. This kept the line
at a constant width.
Width changes
Adobe Premiere
Here is the result of the past
tests: https://youtu.be/UkCnIGiihnA
Bezier is a much more sefisicated movement techneque. Most of
my animations up until this test looks ridged and linier, bezier
does the job of making animations slide smoothly and therefor
easier on the eye of the viewer.
Self experiment test (no tutorial)
Finding the ability of importing photoshop files will also be
helpful her is a short clip of my last projects work, I animated
the chevrons around a textbox to see how it would look: so I
quickly made a new Photoshop document, and imported it to
Premiere in sequence.
Adobe Premiere
• I changed the y axis so the chevrons would go down the screen. Pages
6 and 7 which the chevrons were from has a transparent centre for a
textbox. So I created a crated a rectangle and placed track matte key
onto the chevrons, but the key moved with the chevrons. So I exported
the movement of the chevrons and imported it back to the sequence:
this is what that looks like https://youtu.be/II3Z76WR6Gs
• I used the track matte key again, but only on the exported clip. It did
this:
• I needed to copy the initial background layer to hide the transparent
area. The chevrons were now going around the set box.
it was now doing what I wanted it to, I uploaded the result for you to
see: https://youtu.be/VsAya9erP2I
I didn’t follow any tutorial for this experiment, I just used what I have
learned previously. There was a small hick-up with the track mask, but
the end result is as I had imagined.
From my last project
Adobe Premiere
Video 5 https://www.youtube.com/watch?v=lEHHQ_Rhnkk Creating a
3D Screen animation
I plan to use this for track layouts in my production, for now
im going to test it out on some of my gameplay footage from
dirt.
Here are the notes I made of the video:
Adobe Premiere
To animate in 3D space I need to:
• Create a sequence at the pixelation and framerate
im working at: so 1080p 59.94 fps.
• Then create a second sequence which is double the
size: 2160p
• Import a video to the 2nd sequence (Screen holder)
• Then drag and drop the 2nd sequence to the
main sequence
This is the
perspective
This is the
image/video
Adobe Premiere
Add "basic 3D" effect to the video/image
• This allows for:
• Tilt shifts
• Swivel
• Distence to image
• Orbital perspective tools
No orbial changes
Tilt
Distence
swivel
example
• Tilt forward
• Swivel to the left
• distence to image increased
Adobe Premiere
Changing motion "rotation" will affect the layers rotation
keeping the perspective in static:
By adding distort > "Transform" you can change the
perspective, keeping the layer in place:
Adobe Premiere
Now that I have the tools ill create an example. To do this I
first set the position I want the animation to start:
• I begin by setting the keyframes of all the perspectives
and layer rotations I applied.
• Saving each time where the perspective will end with
keyframes.
Here are the keyframes:
This is the exported result: https://youtu.be/iZUKzU6XK-w
Adobe Premiere
I had 3 problems with this test: the first being the strange
obeject on the which appeared at the very beginning of the
video. I went back to check the perspective I had; and it
was because I was too close to the image. I must remember
to keep a bit of a distence away from what im working with
in 3D space.
Next was the awful controls, it took a while to get the
perspective I wanted, because premire didn’t reflect the
actual angle in the preview version. So I had to rewatch to
rewatch the preview to make changes. Unintuitive but I
can work around it.
At the end of the video, you could see where the layer
ended. If I were to create a map, I would increase the area
surrounding it so that the outside could not come into
perspective like it did in my this experiement.
Video had some other techneqies which im going to try to
encahnce another 3D animation with.
Cut off the layer
This is an example of the
increase area around the
working space:
Adobe Premiere
this time im using a map of York as the image. I imported
it like before and appled the previous techneqies I learned
in the example before.
Other technequies im using in this example:
Perspective orentation is changed by moving the position of
the layer:
Adobe Premiere
i used bezier key points instead of the linier movements.
The animation was in 3 stages.
Falling down
Rotating the angle
Spinning around a centre point.
I would have like to have had less agresive movements, but
it all comes down to learning. I had no real aim with what I
wanted this animation to look like, so it is a bit sporadic.
But the perspective is shifted in 3D space.
Here is the video: https://youtu.be/kU85zLRyKGw
Adobe Premiere
https://www.youtube.com/watch?v=f6r6UX5gWsw

Experiments and tests

  • 1.
  • 2.
    Experimentation: to do list Contentgathering devices and software • Camera https://youtu.be/zvenc4Rsok8 general camera setup • Indoor recording • https://www.youtube.com/watch?v=ARqkvCbz-4g&t=3s indoor setup guide for recording • https://www.youtube.com/watch?v=0wqUWYx3UrY different DSLR settings for improved video recordings • https://www.youtube.com/watch?v=wGLi-_c5dkY different lighting techniques • Outdoor photos Tested • https://www.youtube.com/watch?v=5IrvU5zC_Jw setup guide and explanation • https://www.youtube.com/watch?v=S2eAeMOpdeA advanced settings and tips • https://www.youtube.com/watch?v=IOtT_evlJOw DSLR recording tips and tricks for recording outdoors (not needed most likely, but good to have) • Microphone tested • Audacity • https://www.youtube.com/watch?v=JE9hiiM1Sgw Setup guide • https://www.youtube.com/watch?v=fqb7moQUq2Y&feature=emb_title m aking sound recordings smoother (also Adobe Premiere) • Screen recording • How am I capturing the footage from my pc to his? • OBS (Brothers PC) • https://www.youtube.com/watch?v=YRZWPHA40vE Recording setup guide • https://www.youtube.com/watch?v=8FNH6QY8x5I recording optimisation s
  • 3.
    • Editing softwarelearning • Gathering all necessary content • Syncing content techniques • what did I learn? • What limitations do I find when editing? • How can I reduce the production time? • creating reusable transitions
  • 4.
    Experimentation: to do list EditingSoftware • Adobe Premiere • https://www.youtube.com/watch?v=4VRarJaRIbs graphical basics • https://www.youtube.com/watch?v=bQCpfN_xovs graphical motion • https://www.youtube.com/watch?v=rzvLA48Ocos Clipping mask edits • Transitions/graphical effects • Syncing audio/video and recordings • Adobe Photoshop • Find graphical edit videos • Ability to create moving gifs tests
  • 5.
    Test results • Editingsoftware learning • Gathering all necessary content • Syncing content techniques • what did I learn? • What limitations do I find when editing? • How can I reduce the production time? • creating reusable transitions
  • 6.
    Experimentation: to do list Internetactivity and uploads • YouTube • Compression limitation tests • Website tested • Finding what service to use • https://www.websitetooltester.com/en/best-website-builder/ • Limitation tests • Social media • What social medias to use • Differences between social medias
  • 7.
    • Website featuresto test • Interactive features • Buttons Chaning colour • Images zooming in when hovering over • Interactive titles • Ability to change images on zoom
  • 8.
    Experimentation: to do list Stylesand fonts • Fonts • Find font which represents brand • Beauty of racing. • Luxury to be in the sport • fast • style • how can I reflect speed, and agility with my style of videos? • Personal • Complex edits? • Indepth interpretations
  • 9.
  • 10.
    Experimenting and Testing Imgoing to use the tests and experiemnts for my own purposes so I can come back to the document if I have any toruble. Im going to test everything so I don’t ever get lost. If there is something I didn’t test but used in production, it's because I thought of it later. I will document if I should have thought about it in hindsight and tested it before production.
  • 11.
    Camera photo Test 1 Thisis the first time I have properly experimented with a DSLR camera. I want to learn everything, from general setup to each setting and their uses. It will help me in the coming future in content gathering. I'm going to watch this video https://youtu.be/zvenc4Rsok8 as it is a general guide on the basics of a Canon 800D (the camera I'm using). I'm watching the video fully to understand all the settings. I set up my camera and placed it onto a stand like how I instructed in my problem- solving document. I could also plug it straight into my pc using a USB cable. I'm going to re-watch the video and test out the camera myself. The video suggested to use the manual mode so that’s what I'm going to use for now. I set the file to the suggested RAW large, which outputs a .Jpeg file. The respective settings for my first photo: Shutter speed – 1/125 Aperture – F16 ISO – 1600 Autofocus – One shot When importing the image into my pc, I could immediately change settings in photoshop. This is the result after quickly messing with a few settings. The size of the image came out to 35MB, so I can take 600+ images before I run out of storage.
  • 12.
    Camera photo I'm goingto change the settings I set for the last image to see the difference. Keeping everything the same except ISO. Shutter speed – 1/125 ISO – 6400 Aperture - F16 Autofocus – One shot Clearly it was way too high because the result was way too bright. But I could fix this in photoshop by lowing exposure and changing some settings.
  • 13.
    Camera photo To educatemyself further on the different settings I'm going to watch these videos from Benjamin Jaworskyj's YouTube channel. He has an entire playlist about the different settings and their effects so I can always come back to these videos if I have questions. This will improve my experience when taking photos in different environments/scenes. Aperture – https://www.youtube.com/watch?v=RhIBlg1ld2g Shutter speed – https://www.youtube.com/watch?v=1wHtRelnbRk&list=PLgDzN 1G8Hp9ANGFUEb1y6Qr1FaoNVHcdT&index=8 ISO – https://www.youtube.com/watch?v=PWTfarG9- E8&list=PLgDzN1G8Hp9ANGFUEb1y6Qr1FaoNVHcdT&index =6 White balance – https://www.youtube.com/watch?v=W3xZD0jQIhc&list=PLgDzN 1G8Hp9ANGFUEb1y6Qr1FaoNVHcdT&index=9 Focus settings – https://www.youtube.com/watch?v=ZQU7WvP7WuI Sports photography – https://www.youtube.com/watch?v=m88xFI0s4JY&list=PLgDzN 1G8Hp9ANGFUEb1y6Qr1FaoNVHcdT&index=4
  • 14.
    Camera photo At night Afterwatching the videos, I waited till night-time to try out changing the camera settings to suit the scene. i wanted to experiment with the shutter speed. Aperture – F10 ISO – 1600 What I gathered from this, is changing the shutter speed with increase the amount of light (from what I learned). From my images, I saw the difference in the brightness of the sky primarily. To note, is I must keep my camera very still if my shutter is open for long periods of time. As you can see, even what my camera was mounted, I still had some shake and therefor it blurred the image (5 seconds) I can reduce the blurriness by having a lower time its open, but then it absorbs less light, and you can't see anything at all. Shutter speed open for 5 seconds 1/8 second
  • 15.
    Camera photo This timeI reduced the aperture and changed the ISO settings. Leaving the same. With this test I was trying to find aa way to get a lighter background, seeing the houses, without the blurry effect. The first image still had no background sky, so I upped the iso and prolonged the shutter. The result was better in the second image, and I repeated the process. The last image there was little to no blur, but I began to see the drawbacks of iso as I got the grainy effect. But overall, it did get brighter. If I want to shoot with a longer shutter length, then I will need to get a stand either from college or I will have to purchase one. This will reduce the blur that comes with camera shake the shutter is open for so long. settings Shutter speed – 1/50 Aperture – F4 ISO - 6400 Shutter speed – 1/25 Aperture – F4 ISO - 12000 Shutter speed – 1/15 Aperture – F4 ISO - 25600
  • 16.
    Camera photo Out andabout When I take photos, I will be out and about so I need to test what it's like. So I took a stroll to my local crematory for an on the move photoshoot, simulating what it would be like outdoors. Things to note: • Cloudy • Light snow • I didn’t have a stand with me at the time • I used automatic settings for ISO and focusing to see the effectiveness. The conditions worried me, the light snow could have got into my camera and damaged the parts. The snow limited the amount of time I could take photos as I had no umbrella over me to cover against the water damage. I didn’t check the weather prior to going out, so next time I will so I can prepare for the weather. When coming back into the house, I looked up how to protect against snow, and this link https://www.popphoto.com/how-to-properly-protect- your-camera-gear-when-shooting-photos-in- snow/#:~:text=Use%20a%20lens%20hood,it%20can't%20be%20helped sug gested that I clean off all the snow while in the cold conditions before entering a warm environment. This will stop the chance of snow thawing into the camera. In the future, for an outdoor photoshoot like this, I could have created a contingency plan to prepare for some foreseen issues, like the snow.
  • 17.
    Camera photo When lookingat the images, I could have reduced the ISO because of the large amounts of white colours in frame. The image to the left here is a good example. It's hard to look due to the brightness. If I had a stand, I could have lined up this shot further. It has a slight tilt to the right. I could have also used the built in electronic leveller as explained in canon's advertisement video at 6:55 https://www.youtube.com/watch?v=Ydz4OgweAfU. In the moment I didn’t think about it, but this will help me stabilise a shot more precisely. Overall, I was very happy with my on the move images. the camera was transportable as I only had the one lens with me.
  • 19.
    OBS Studio (onmy own pc) Testing OBS OBS is a free open-source screen recording software. It should allow me to capture screen and game footage, at a little cost to my systems performance. This initial test is going to find out how to use the software, as it is the first time, I have used the software. Starting the program the first time, it greets me with an option to optimise for streaming, recording, and using what they call; virtual camera. I'm going to pick recording, because that is what I want to use the software for. Next it allowed me to change the video output setting. What pixilation and framerate it will record at. I picked the same resolution as my first monitor and set the framerate to 60. I assume this can be changed. The last option, it tells me that the output is going to be scaled down. So, what I picked before was the resolution it would record at, to then be scaled down to 1080p. Also the recording quality was set to "High Quality, Medium File Size" referencing the size of the file after it finishes recording. I hit apply settings and it brought me to the main UI.
  • 20.
    OBS Studio Now thatI'm in OBS, I want to set it up to record a specific area for my interviews, as well as the sound. I began by adding a "Source" of input. This is what the software will record. OBS had done two things for me already, and that is choose a microphone input and a "Display Capture" audio mixer input. I played a song on Spotify to test what it was picking up, and it showed that it was recording my desktop in stereo. Next, I tapped my microphone, and the first problem arose. Like audacity, It was recording mono into one channel. I wanted to test if it was only recording into the left ear, which is what it looked like. I tested it for 1 second by recording. Now that I had recorded the sound, I needed to find where the file had saved. For this, I went to "File>Show Recording" and it opened where I had saved the recording. It saved into "This PC>Videos"
  • 21.
    OBS Studio Uploaded therecording to YouTube so you could hear that it was in the left. Click on the link top left to hear it for yourself. The image is of the setup I use for my microphone. Clearly its only recording in mono, and outputting to the left ear only. I want to have it record in mono but output it in stereo. The same track in both ears. To change it, I clicked on the cog icon next to the microphone input and selected "Advanced Audio Properties." Then I turned on a Mono checkbox, and I immediately saw it had fixed the problem. I shouldn’t need to test, as visually it looks like it has solved the problem. https://youtu.be/k62i-wG1UbU Clicked this to turn it too mono.
  • 22.
    OBS Studio Now thatI had set up the basics, I began by adding a "Source" of display input to capture my screen. Clicking he + icon I selected the "Display Capture." It created an interesting tunnel effect, but I could see that it was recording my screen. I kept the frame the same size and enlarged the screen recording until it only left the area I wanted to record. Which was a private channel in Discord. From my first microphone test, I knew that this audio was ok, but I just needed to test the desktop audio in conjunction with the video. I needed someone present to test if the desktop audio was working, so I waited for my first participant. The short test was a success, and I began the interview, I used the same setup for all interviews. The footage is in the link bottom left. https://youtu.be/cujC2sXdTtM
  • 23.
    Microphone test inAudacity Setting up the microphone, and launching audacity, I got to the main screen. I selected my microphone and tested the audio. It only played mono into the left ear. To fix this issue I selected the recording channel which was in stereo and put it into mono. This fixed the issue. Next the audio was echoing slightly, so I lowered the gain on my audio interface, and again this seems to have done the trick. I exported my recordings as MP3 files and uploaded the result to YouTube. You can hear in the video, as I change the settings what differences it made. I'm going to continue using the settings I have here for the future. Playing in 1 track only https://youtu.be/W3IR90en0ts
  • 25.
    Camera video Test 2 Formy video tests, I'm going to watch the first (https://www.youtube.com/watch?v=ARqkvCbz-4g&t=3s) I posted and find a solution which fits my setup best. Test 1 (after watching the first video) I'm settings up my camera to be pointing directly at me. I quickly tweaked my video settings from what the video suggested. The camera isn't recording audio because I have a separate microphone for that. I'm able to plug in my camera to my pc, so I can press the record button while sitting at my pc. This will reduce the size of the video clip, as I will spend less time getting up and sitting down after each time I want to re-record something. Now, I knew that I would be uploading the result with a microphone test as well. So I need to be able to sync the audio. As a marker, I'm going to clap. I recorded the audio and video and began the test. I downloaded the files to edit the results for my first test in Adobe Premiere. First test camera settings
  • 26.
    Camera video Notes Itook while watching and the position of my camera.
  • 27.
    Camera video Prior torecording the video, I hammered the issues with some settings like when I set the framerate to 60fps, I needed a shutter speed which was closest to 120 for smooth video: initially I set it to 125 and the video had a glitching jittery effect because of the light coming from my monitors. I lowered it to 100 and this seemed to resolve the issue. Overall, the positives were: • The settings were correct (ISO, shutter speed, aperture etc) so I had no negative effects like the shutter speed I just mentioned. • The angle had primary focus on subject • Colours looked correct for the lighting But the changes I want for the next tests are: • More focus on the main subject • A more interesting shot, maybe incorporating the window behind me • Lighting for effect https://youtu.be/gEbwq6rT3KI
  • 28.
    Adobe Premiere Prior toanything, I needed a layout of folders so I can easily find any recordings. In my (D:) drive I set up an FMP folder which expands out into all the areas I need. Having an organised system will allow me to not lose any clips from all the sources I'm gathering from. I can also add more folders in the future needed. Setting the groundwork early on will keep an organised system, so I don’t have any issues finding what I need in the future. Because of the system in place, I could easily find where I had saved and exported the separate recordings. Earlier I explained how I needed to sync the audio to video because the two recordings were from separate recording devices. That marker was my clap at the beginning. Within premiere I found where I clapped in the video and in the audio. Without this system the 2 tracks would be out of time and unusable. I got the frame where my hand connected along with the first spike in volume in the audio. Because the sound was so immediate, I found it incredibly easy to sync the audio to the video using the frame marker.
  • 29.
    Adobe Premiere The recordingsdidn’t match in length. I must remember to have a pause at the beginning and end, so I can trim the recordings to the same length. But in this test it didn’t matter because I didn’t anyway. So I could trim the video to match the lengths. After this I rendered in and out, uploading the result for you to see.
  • 30.
    Adobe Premiere https://youtu.be/flVd_p_qTtg video1 After uploading the video, I immediately saw my first problem. The video on YouTube was 480p and had large black bars around the sides. I had to now troubleshoot the reason why this was happening: I reuploaded the video to see if it was a setting within the upload that I had picked, and it looks like I had the problem was when I exported it. I exported it for a second time and found that it was still outputting at 480p. I looked up a guide on how to change this and I found out that my sequence was in 480p not my exporting file. To change this, I had to press "Control + N" to bring up a new sequence. I was suggested to pick the "DVCPROHD" pre-set, and I found the resolution and framerate I was working at.
  • 31.
    Adobe Premiere I repeatedthe process of my last edit and while exporting the video, I still saw that it was exporting at 480p. So again, I looked up why this was happening. My video was exporting as a .avi file. Changing this to H.264 and selecting the custom preset, I was able to change the resolution and framerate. For later edits, I saved the preset I'm using here because this will be the settings for export that I will use for all of my videos. I exported the video and uploaded it to YouTube. It was in 1080p and 60fps but this time however, the audio in the video 2 was incredibly quiet. Now I had to solve this issue. https://youtu.be/-HWbYYp5Fvg video 2
  • 32.
    Adobe Premiere I deletedthe current audio track and put in the audio source. I checked the video before uploading it and that seemed to fix the issue. The result (video 3) as you will hear is a lot louder. Re watching the video, I saw it had some areas where the video cut out for a single frame. I'm pretty sure this is down to the difference between the Camera video file which is 59.94 fps and the exported video which plays at 60 fps. So this time I exported in 59.94 fps, and the result was fine. The video didn’t chop at all and the recording was smooth. Throughout this process I learned a lot, and I can continue what I learned in my next experiments and through into my produced content. https://youtu.be/5Jr9G526SxI video 3 https://youtu.be/XB RcnZ7sR_Q video 4 (final result)
  • 34.
    Camera video Test 3 Iwatched the rest of the videos for indoor recording and repositioned my camera: https://www.youtube.com/watch?v=0wqUWYx3UrY differ ent DSLR settings for improved video recordings https://www.youtube.com/watch?v=wGLi- _c5dkY different lighting techniques I wrote some notes on a piece of paper, things that I should take away from the videos. So with this second test I want to: • More focus on the main subject • A more interesting shot, maybe incorporating the window behind me • White balance the shot using a piece of paper • Lighting, using my sun lamp
  • 35.
    Camera video Set upthe camera here, and put the zoom close to the max. Kept the same settings as the last test and it looked like this: The shot has more focus on the subject. I prefer this angle currently to the one I used in the first test.
  • 36.
    Camera video Next, Ineed to set up the other changes I want to make: • Lighting • White balance I'm going to set up the lighting first. For this I'm going to set up my sun lamp. I positioned it behind my monitor pointing at me. The lamp really lit up my face as but it was rather harsh. I needed some was of softening the light. I learned 2 ways to do that in the videos: • Coving the lamp with a sheet • Bouncing the light off of a surface Position of lamp for lighting. With the light on. Without the light
  • 37.
    Camera video Coving thelight with a pillow over provides this look on the camera: Pros: the light is warm and soft Cons: the light's ventilation shouldn’t be covered for long periods of time. Otherwise, it could become a fire hazard if it gets too hot. After the test I took the pillow cover off, and I could already feel that it was warm, even after 5 minuets. Most likely I cant use this technique.
  • 38.
    Camera video Bouncing thelight is probably a better option for me, it won't cover the light's ventilation and should be softer. For this I'm going to pin a bed sheet onto the wall next to me, and shine the lamp towards it: Pros: lighting doesn’t get hot and clear cold view of the subject Cons: the bottom left has a visible light source emission.
  • 39.
    Camera video Repositioned thecamera and adjusted the bedsheet and lamp so it reflects without the visible light on the bottom left: Pros: the shot now looks neutral, with clear visibility of the main subject. Cons: now I have a sheet on the wall which I don’t want to move unless I have to. But I'm fine with it there for the time being.
  • 40.
    Camera video Comparing thelight being off to is being on you can see the difference it makes; it really brings out the subject more. I turned the light slightly towards myself. I think for my project I will use the second option where the light is slightly facing at me. The window light is softer and the light itself breaks the subject from the background behind. also had no issues with potential fire hazard like the pillow covering method. Light facing directly at the sheet. Light shining towards the sheet and slightly towards subject. Light off
  • 41.
    Camera video Now, Ilearned about white balancing in the first video. For this I got a piece of paper to take a photo of, then going into camera settings I can white balance off of the image. Using this video I set the value https://www.youtube.com/watch?v=ARqkvCbz- 4g&t=3s at 6:04. For the white balance, I went into the menu and selected custom white balance after taking the image. The lighting because softer, but much closer to how it actually looks in my room. I prefer the balanced white footage because I can see more in the window behind me instead of just white in the first example. I will now know to balance before recording. Before white balancing image I based the balance off After white balancing
  • 42.
    Camera video I recordedmy video and microphone, uploaded the video to YouTube like I did before. illustrates what my testing provided and compared to the first video which was I think is a huge improvement. Also, when editing the video, I cut the audio on the point of the clap, this made it easier to position with the frame guide. • There is a lot more focus on the subject from the light and positioning. • I incorporated a more interesting shot with the window behind me instead of just having my bed and that large crack as you can see. • The focusing is a lot more enticing as you can clearly see the subject, but the background is still blurred. Admittedly, because I'm talking to the audience; I should have looked at the camera more often. It doesn’t matter in a test video like this, but in the future when I'm recording for production videos where the audience is directly being talked to, then I should be talking to them, not to my side monitor. https://www.youtube.com/watc h?v=XBRcnZ7sR_Q Test 1 https://youtu.be/1WwDRWt8F_I Test 2
  • 43.
    Camera video The framecut off the top of my head. I have two ideas to combat this. One being to position the camera to be slightly higher, and the second idea is to zoom out slightly. This should reveal more of my head in shot. It looks good, just I think it could be improved. The video came out darker than I intended. My hat blended with the curtains behind. There isn't much I can do about this item, other than take it off and ware nothing. And re-watching the video, the light from my lamp was very harsh. It really lit up may face, a bit too much then I intended. So, I turned it away fully to reduce the amount of light directed at me. https://youtu.be/1WwDRWt8F_I
  • 45.
    Camera video Test 3 My3rd test will be at night-time. I currently intend to shoot all my videos during the day, but I still want to test the settings and possibility of night filming. Because there isn't any sun, the window won't emit light. I have to take that into consideration when setting up my lighting and white balance. I repositioned the camera like I suggested from the last test also. This video will include live gameplay, so I need to adjust the frame to incorporate the action from my wheel. Because the light was so harsh, I put tinfoil around it and placed it below my desk on a box. This bounced the light harder off of my wall.
  • 46.
    Camera video I setup OBS, Audacity and my Camera to record all 3 in conjunction. I'm already pretty sure that my computer cannot handle this amount of CPU and GPU usage because it has 3 recordings and 1 gameplay screen to deal with. Dirt Rally is an older game from 2015, so it might be able to handle this usage. But anything more demanding then this, I will most likely see performance loss. Putting just the camera and microphone together and uploading that, the ISO stood out to me straight away. Because of the dark background and no lighting from the window I recorded footage which was slightly grainy from a too high ISO setting. Personally, I want footage which hasn’t got any grain, so this shows me that i shouldn’t film at night. I did like the night atmosphere, but it doesn’t really have an effect in a genre like racing. You could see lit windows from the buildings across from me. I didn’t like the positioning of the camera. It could see all of the action coming from my arms and face, but I think it would have looked better if I had either slightly moved the camera back, or zoomed it out and moved it up. There was no frame loss throughout the video. So my camera and microphone were not withheld by the high PC demand. https://youtu.be/b5iz3YnVJik I would like to see the camera I little higher than this. Maybe 1 or 2 inches.
  • 47.
    OBS Studio Test 2 Forthis test I'm going to record gameplay of dirt rally. I only want OBS to capture video and audio from that application, and not my desktop. First, I click "add source" under the video section. And it already has a game capture. I select this and prepare the audio from the game. The next menu is simple. I made it so it specifically captured the application I wanted. I checked the box where it limited the framerate, so I can limit it to 59.94. The same speed as my camera. This will hopefully help me out when I export the video. Now I needed to see if the game was being captured at 1080p any higher and my PC's performance won't be able to keep up with recording and playing the game. Initially the canvas was set to 2k (1440p), I lowered it and rescaled the output.
  • 48.
    OBS Studio The lastthing I have to do before recording is capture the audio. I again go to "sources" and select audio output capture. It only allows me to choose between output devices and I specifically want it to record the application. So I back out of this and choose a different option. I found this forum which showed me how I might want to download the free software "VoiceMeeter" so I can separate the audio tracks like Sportify and the game. For now I will have to resort to display capturing my game, but I will keep this in mind. The desktop audio is picking up my sound anyway. So I'll use it for this test. I quickly recorded a 5 second clip to test if the framerate and resolution were correct, and it revealed that the output was in a location I didn’t want it to be. So, I re-set the outputting file to my hard drive folder. One con with recording dirt, is that every time I tab out of the game; it exits Fullscreen mode. A way around was suggested by downloading "borderless gaming" an application which prevents this from happening. Ive used it in the past. Initial path Current path
  • 49.
    OBS Studio Now thatI have everything set up, I record a 5 second tester clip. I saw nothing wrong with it in the recording, so I quickly uploaded it to YouTube to see if there were any hidden issues. Nothing abnormal was included. You can see at the beginning of the video though, the process I need to take to get the game into Fullscreen. For the test, I need to sync the video, screen recording and microphone so that I can bring all the clips together. Im using the same clap method. But to sync the screen recording, I will say "Up, Down, Left, Right" and press the respective buttons on the D-pad. The menu movement will show me when I pressed the button. While I was in the settings, I changed the framerate at which the recording was taken from 60fps to 59.94fps to match the recording speed of my camera. Even though I didn’t get to test the framerate was an issue, I theorise that because the 2 recordings (camera and screen) would have been out of sync, this might have caused slight frame loss of the gameplay. the was because of the exporting framerate of 59.94fps. Unfortunately, my recording was the wrong file type for Premiere, meaning I couldn't test the syncing system or edit the footage together. To change this I went to OBS settings and changed the file type from .mkv to .mp4. The recording should now be transferrable to Premiere, and I waited till the morning to re-record. https://youtu.be/CLIecegKfuw Exporting framerate.
  • 50.
    Camera video Morning Now thatit was day, I didn't have to film at a high ISO and I repositioned the camera slightly as I suggested and re-filmed the gameplay. I re-record some gameplay in the morning, making sure to sync all recordings like before. The footage looks a lot better during the day as you can see on the left. No graining at all. https://youtu.be/5SnelW8cXvs
  • 51.
    Adobe Premiere Test 2syncing gameplay to Camera+Microphone I imported all the files I needed before starting the edit. I linked the camera video and microphone first. I want to position the life foot of myself to the bottom left. To do this I left click the clip, and drag on one of the 9 points around the footage, resizing the clip. Then I position it to the bottom left of the canvas. I imported the gameplay recording onto the sequence. It was above the camera video layer, to I repositioned the footage to appear behind the video. Now you can see the gameplay and the video. You can still hear both audio tracks currently, so no changes needed there.
  • 52.
    Adobe Premiere I usedthe audio and video aid of "Up, Right Down, Left" to sync the live recordings to the screen recording. I exported to show you how this worked and as a test for the rest of the recording to see if there are any other issues. Here is a video of how this worked: https://youtu.be/yW7fIsR0kTk. For the best syncing, I looked at my left hand, and when I clicked the respective buttons, syncing that with the menu movement in game. I worked because all of the footage was now synced. For some reason my camera footage came in 2 separate recordings. so I looked up how to transfer edits from one clip to another. I'll make sure next time to check the full recordings of clips before anything else. https://www.premiumbeat.com/blog/premiere-quick-tip- quickly-copying-multiple-effects/ informed me to select the first clip with the correct framing, and to copy. Then selecting the other clip I "pasted attributes." Now the clip had the same position and framing as the first. Before, footage filled frame. After pasting attributes
  • 53.
    Adobe Premiere I onlywanted the footage which showed my successful run. Most of the recorded footage was me trying to finish the sector, so I had to find where this run started and cut it to that time. Using the razor tool, I cut where the recording started the run at 10:11. Much of my footage was wasted. I selected all the clips and moved them away from the other footage I would know to mark in here for exporting later.
  • 54.
    Adobe Premiere I thenrealised the camera footage was covering an area of interest for the viewer. Viewer will want to see more parts of the frame then other. On the left shows what I mean, highlighted in red boxes is. I should place the camera footage in the areas where the viewer won't be wanting to look. I will need to position the frame of the camera in the areas not highlighted, so it doesn’t cover the information viewers want to see when watching. Initially I thought that the bottom left was the best position, that’s why I put the camera feed here, but it coved the speedometer. Main area of action and viewer focus Other areas highlighted are more pieces of contextual information for the viewer. They will want to see such visual aids like the sector distance remaining and speedometer. my initial positioning covers the speedomete r
  • 55.
    Adobe Premiere I repositionedthe framing of the camera below the middle of the canvas. This area had no real contextual interest for the viewer so would be a much better position for the camera feed. I go to the effects tab and shift the camera left with the positioning. To get the exact centre of the canvas, I need to measure out the x-axis whole canvas width (CW), measure the camera feed size then minus divide that in half. The positioning of any layer is based off of the very centre. CW = 1920 2/CW = 960 I used that number to position the x-axis of the camera. The result of which is seen on the left.
  • 56.
    Adobe Premiere The camerafeel, just appears at the same time as the gameplay footage. I would prefer it to fade in at the beginning and fade out at the end of the video. To do this I first reduced the clip slightly to when I wanted the fade to begin. I wanted the fade to begin when the number 5 first appears on screen. I now had to time how long I wanted the fade to last. I wanted full opacity on the last from of the number 5. I began by setting the first anchor point as the 5 first appeared on screen, and set the opacity percentage to 0%. Then going to the frame where the 5 disappeared I set a second anchor point and the opacity level to 100%. Now the footage fades in. Going to the end of the video, I first needed to cut the lengths of the clip to the same length. I cut as I tabbed out of the game because the gameplay audio cut out. Camera footage gameplay fading in
  • 57.
    Adobe Premiere I wantedthe same to happen to the video. The start of the video had a black screen transition to a short clip of the car coming on scene. I want it to end the same way with a black screen. The in game beginning black fade lasted for 20 frames, so I will do the same at the end. Again using the Youtuber from before https://www.youtube.com/watch?v=izZy5EWx rDE, he explained that for the fade I had to go to the effects tab and finding the "dip to black" transition. I found it in Effects > Video transitions > Dissolve > dip to black. I put it at the end of the gameplay and counted back 20 frames from the end of the video. For extra duration I want a little black to last at the end. I found a metherd here https://www.youtube.com/watch?v=65- xuqGHXTY&feature=emb_title and I have to go to the projects tab and right click > new item > Black video and then set it to my canvas size. I added it to the sequence and cut it to a short length.
  • 58.
    Adobe Premiere For theend fade out, I repearted the same anchor point process at the beginning. Starting the fade as I pointed to the camera. The fade ended asteh game menu appeared. This was a little long, so I repositioned the ending fade anchor point. The audio from my microphone added nothing to this test. So I removed it. Before ending, I wanted to see if I could incrementally lower the gameplay audio to 0% like the fading from before. I learned from this video https://www.youtube.com/watch?v=izZy5EWxrDE t o go into the effects tab > audio transitions > Crossfade > Exponential fade. dragging that to my gameplay audio. Takes just under 2 seconds for the audio to fade out.
  • 59.
    Adobe Premiere I finishedthe editing and exported the video. The video came out as intended. I would say that this test was successful. The syncing was effective. Look in the video when I gear shift, the same shifting happens on point. I found plenty of effects and techniques which I can carry forward. Its also a refresh or premiere for myself. For footage like this, I don’t need to include my microphone. No frame drops in the camera feed or gameplay which is a positive. Finished video https://youtu.be/n1pQD-OljOE
  • 61.
    Camera Test 5 recordingAssetto Corsa Competizione (ACC) racing camera video For my production I'm going to focus on ACC recordings. For this test, I want to find a simple syncing technique between camera video and the OBS recording. For this I'm going to press the gear up paddle and gear down paddle in a set pattern when driving the car in game. I will look into the camera while performing this action, at the end of the recording session. This is because I'm forward thinking about online races. An online race starts immediately so I cannot gear up and down before a race. It will be easier to understand when I record actual online events, but for this test recording an offline race. If I sync at the right time, my wheel in game should turn at the same time I turn the racing wheel on camera. If the clips are out of time, it won't look live. The point of syncing is to provide the effect of looking like I recorded this in the moment, which I'm not. The camera angle and settings from the last test can be bring forward to this one. I have found the angle I want to use. Gear up paddle Gear down paddle
  • 62.
    Camera This is thepattern of gear shifts that I recorded. The shifts are abnormal, but still recorded in the session. I can sync this easily in premiere. I'm not using the microphone this time. Because I'm not audibly interacting with the audience or anyone else.
  • 63.
    OBS Studio (onmy brothers PC) Now that I had the settings down, I wanted to test out the recordings on my brother's computer, which is more powerful than my own. He has allowed me to use it for this purpose. Because it has more performance, I can run more demanding games at higher quality which still maintaining a framerate of 59.95fps. My pc cannot handle the same tasks. Because of the high quality, it should be more interesting to watch then a low render of a game. This time the game will be Assetto Corsa Competizione will be the main game I record. To record on his pc I have to go through a process: 1. Save a copy of a race I want to record onto my PC 2. Transfer another copy to my external hard drive 3. Using the external hard drive, save another copy to my brothers pc 4. Open ACC and OBS to record the gameplay 5. Transfer the recording back to my hard drive 6. Save a separate copy of the recording to my pc Finish I could send the footage back and forth over email, but I think this route is more appropriate, because I don't always have access to my computer. I will sometimes visit my dad and will have to use my brother's laptop to edit. The external hard dive can come with me instead of my entire pc setup.
  • 64.
    OBS Studio (onmy brothers PC) After driving a few laps, I found out that you cannot save replays in single player. Usually, you would go to the replay section and watch the session you recorded. Ill hop into a multiplayer and save that session instead. I saved the replay and located it in my hard drive. The path to finding the save file was on: C: > Users > Dan > Documents > Assetto Corsa Competizione > Replay > Saved. In saved were all the saved races. I only had 2 currently.
  • 65.
    I moved thereplay files from my current location to my external hard drive. Now I had a copy on each drive, I can go to my brothers pc, and put the files into the same location as mine. Just on his setup. I set up OBS like I had for dirt. I made sure that the outputting file would be onto my external drive. Here is the race recording. It was smooth and looked fine: https://youtu.be/a4260ODGGDo OBS Studio (on my brothers PC) Moving the files to the external drive Moving the files to my brothers pc
  • 66.
    Adobe Premiere I nowhave to sync the audio. Here is the method I used in game, along with the input. Unfortunately, I didn’t look at the camera the whole time, but I can still sync the game to my gear shifts: https://youtu.be/IDnahOaO_7A The syncing worked, and my movement in game was replicated on the camera footage. I sent my dirt video out to a few people and they suggested that I move it away from the side of the canvas a little bit, off of the x and y axis by 15 pixels. I thought about flipping the footage so I could place it on the top left, but the gear shifts on my camera would look strange, because my paddle shifts would be flipped. This would be confusing to watch. I uploaded the result of the recording to YouTube.
  • 67.
    OBS Studio (onmy brothers PC) It took quite a bit of time to get access to my brothers PC, so I'm going to try recording on my setup. Here is a reading of my computers performance while recording at the required settings of 1080p 59.94fps. Much of my components were pushed, but I had a consistent framerate of 70fps. My V Ram which is the ram in my GPU was very close to being used fully. But it didn’t lose any frames. From now on I could just record on my setup at this frame rate. Recording: https://youtu.be/rEzLsTEowCA I can also record trackside clips by pressing F7 for freecam which follows the car selected and pressing Control + F7 again will allow for a freecam which doenst follow vehicals. Here is some footage I gathered from the same race with those views: https://youtu.be/_APROP6QAZk The footage was slightly choppy, but I can try again with a lower graphical setting ingame. This should reduce this. The recordings was unusable but I did try out motion blur in the last part. It helped with reducing the obvious number of sharp frames. Here is the result: https://youtu.be/rwNHTj4Kn3A My computer cannot handle the freecam aswell as the cockpit camera. I might want to outsource that footage on my brothers PC.
  • 68.
    OBS Studio (onmy brothers PC) One problem with recording on my brothers pc, is that he uses it most of the time. He needs to allow me to use it, and he won't if hes using it himself. I will need to record as much footage as I can to only record what I need on his setup. This test outlined how im going to gather footage for ACC. The bulk majorty of cockpit footage on my setup. And then Freecamera angles on my brother's setup.
  • 70.
    Website Test 6 Before Itest any site builder, I want to find a service which suits the graphical route I want to go. I found this https://www.websitetooltester.com/en/best- website-builder/ quick link I found, and it shows the positives and negatives of website builders. I'm going to choose Wix.com for my website. This is because the free service that it has, falls close enough to what I want to do. I also have a little past experience with it, so I'm not completely uneducated. But I'm going to use tools which I haven't before. My other website is completely basic with few animated parts. So I need to find out if there is anything out of reach for this service. it's not guaranteed that I'm going to use Wix, I want to find its limitations. It says that one of the con is that "templated cannot be changed easily" and that’s already a worrying sign for me.
  • 71.
    Website Unfortunately, Wix onlyhas templates to choose from. But I can still edit these templates later. Removing most of the features currently on the template so I can just test the features. The first aspect I want to change is the background. I added this image as a funky background. I set this image to "parallax" scroll so that it mimics the scrolling speed of the person viewing. I'm quickly going to mess with the background image as I do have the option to change a lot about it. I could do this in photoshop prior, but this allows me to do it Onsight.
  • 72.
    Website Next, I wantedto look at the shape options. I could choose from the shale library and I can also upload shapes I create myself. Currently, this site is suiting my needs. I used shapes to limit the sides of the image. Using a separate shape in the middle to line up the 2 sides. Each side of the measuring rectangle there was a single space of pixels between the shapes. So I nudged them into position so that the both were nested into position.
  • 73.
    Website If I wantto remove the headers and footers, a simple button does the trick. Replacing the header with one of my own images, I can animate it onto the page. The image I have chosen here isn't rotated to 0 degrees. To fix this I opened photoshop and re-lined up the image using rulers so that it was flat. I then changed the perspective of the image to be more top down then it currently was. Finishing it by exporting the image as a .PNG up and importing it back to the website.
  • 74.
    Website The image didn’tfully fit the top banner. So I retook a wider screenshot by going into the game I got it from. Using the same technique as before in Photoshop I resized the image and perspective. Quickly adjusting the image to look more enthusiastic and this was the result. I copied the image to span across the page, like a header of my own. In the future, I would plan for an image like this. Currently it looks quite obvious to me that the image is copied over on each end. To combat this, my image would have ended. I grouped the 2 top images. So that they would act as 1 shape. Where the copied image connected Where I should have cropped the image. Not in the middle of a square like it did.
  • 75.
    Website With all 3shapes selected, I could put an animation on top, so they fly in when the page is opened. For an interesting homepage, I want animations as a visual interactive. So I put 2 shapes to see what it would look like. They both glided in from the left and right. At the same speed (1.2 seconds_ at the top start/finish line. The animation just faded in, so I resized the shapes, and they both glided in like the line, I delayed the rectangles from the left and right so the finish line came in first.
  • 76.
    Website A added abunch of shapes to leave little background, they all animated from areas on the left and right. Each shape could have custom images with plenty of individual customisations. I'm happy with the animations. I have a good understand of how they work now.
  • 77.
    Website I wanted totry out the customisation of the buttons. Buttons should be Interactve so as to suggest clicking on them. I need to find what limitations I have with buttons. I want it to be an image which when hovered over, the image will zoom out. Clicking on design, Wix allows me to change the state the button is in when hovered over and when not. I added my own image and when the button is not hovered over the scaled fit is 200%. Hoving over, it transitions to 100% fill. I previewed the button, and there was no animation between the two states. It went directly from one fill to the other. To change this, I removed all other layers and previewed the button. Now what it does is a smooth transition from 200% to 160% when hovering. I can also change the positioning of the image, so it could slide from and direction. I didn't experiment with the text, but I can also change how that interacts while hovered and not hovered. The button, like the shapes can also be animated onto the page using the same animation tools from before.
  • 78.
    Website Overall, I'm surethat Wix's tools I didn’t experiment with would still be adequate for my project. It did everything I asked for, first time of asking. After this experiment, I can conclude that this will be the tool I use to build my own site. One negative aspect about the website, is that it keeps shifting my layers whenever I save. Saving pushes the S/F line behind the two rectangles to the left and right. I have tried fixing this, but for some reason it won't let me kepp the S/F line above. The image certainly extends out. A limitation I'll keep a note of. https://daniel-morland.wixsite.com/my-site https://daniel- morland.wixsite.com/my-site
  • 80.
    Adobe Premiere Test 7 Iwant to incorporate graphical art transitions and effects into my videos and website. I have never done anything around moving graphical edits in any form. This will be a learning session of technequies and my ability. Starting off, I have a few videos already lined up surrounding graphical technequies. Im writing down what I want to take away from each video. Video 1 https://www.youtube.com/watch?v=4VRarJaRIbs graphical basic
  • 81.
    Adobe Premiere Slide inanimations seem basic but fundimentle. What I did to achive this example is: • Creating a shape to slide in • I coloured mine red and placed it in the area I want to end in. • In the effects control, I save the position by setting a key frame, so it will arrive in that position in 10 frames. • Going back to the first frame of the animation I set a second key frame. • The position of this key frame is off the screen. • It moved a little too fast, so I prolonged the animation by 10 frames. • It ended by going off screen. Using the same key frame metherd. To animatte from a differnet angle, I have to create new shape and re- position the key frame's x and y axis Starts here Finishs here Moving on screen Moving off screen
  • 82.
    Adobe Premiere For thepop in animation: • Created a new shape • The first key frame has the shape start at 80% of its size. • 3 frames later the shape is 100% size • 2 frames after that the shape finishes at 90% size. • To end I just made the shape fade out. These animations are pretty easy, but now that I have learned them, I can begin to move onto harder technequies. 80 > 100 > 90
  • 83.
    Adobe Premiere Video 2https://www.youtube.com/watch?v=bQCpfN_xovs graphical motion Here are the notes I took from the video:
  • 84.
    Adobe Premiere For thenext edit, I need some footage. So I added one of the clips of ACC. To creat the effect I: • Added a text layer, resized it and positioned it in the centre of the frame. • Create a colour matte, placing the title above the matte. • Apply the "track matte key" effect to the colour matte • Reverse the effect • Change the blend mode of the matte (I used colour dodge) • Lower the opacity of the matte • In his video the footage zooms in slowly. Ill add my own slight zoom. • I cross dissolve faded the clips in and out
  • 85.
    Adobe Premiere For thenext edit, I can re-use the title and matte from before. To start • I have to nest the previous edit. • Duplicate it 3 times • Create a new colour matte and place it above the 3 nests • Uncecking uniform scale, and setting the hight to half the frame size. • Doing the same for the bottom with a sepperate matte • Place one matte at the top and one at the bottom • Using track matte key, and place onto the middle nest. • Set its matte layer to the top matte • Doing the same to the top nested title, to the bottom matte • Using key frames, the title can be split between the top and bottom • I set my example title to slide into place
  • 86.
    Adobe Premiere A shapegrapical transition was next. • I removed the cross dissolve fades from the ends of the last edt so I can use this transition to another clip as an example. • Create a matte layer, and position it off frame. Saving its initial position with a key frame • Then I go to where I want the transition it end and save that keyframe. • Then I copy the matte layer 3 more times, offsetting each layer by 5 frames. • Changing the colour of each keyframe. I set the first one to white, then gray then a darker gray Transition from footage to footage needs to be masked by the transition here and that frame is coved by the transition
  • 87.
    Adobe Premiere The lastedit to learn from the video is a title which appears behind a line. • I create a text layer which will appear behind the line, I made sure to place the text where I wanted it to start. • Add a keyframe to save the position • Going forward by a second or so I bring the text to where I wanted it to stay, saving the key frame • I used a colour matte, decreasing the size until it formed a line below the text. • To animate the line, I saved the keyframe where I wanted the line to stop expanding, then went to the first frame and set the width to 0. • To make the text appear as if it is coming from behind the line, I used the opacity pen tool to create a box around the title on the line. • The text now appears behind the line
  • 88.
    Adobe Premiere The videoslesson looked challenging, but now that I know how to do these effects, I can think of ways to use them. After watching the videos I'm going to animate some footage using what I learned over the course of this test.
  • 89.
    Adobe Premiere Video 3https://www.youtube.com/watch?v=rzvLA48Ocos Clipping mask edits Here are the notes I made of the 3rd video:
  • 90.
    Adobe Premiere The effectis clipping a video into a shape and having a second video play behind it. • I'm going to start by animating a shape popping into the centre of the frame. • Placing the effect Track matte key onto the a second video clip, which is from the dirt test. I set the track matte of the video to the track which the rectangle was on, which is video 4. • Last I wanted the shape to expand out. So I saved the keyframe of its size and then increased the rectangle scale until it filled the frame.
  • 91.
    Adobe Premiere https://youtu.be/-5BODd9PJxs hereis the video of all the tests so far. These experiments were pretty easy, but as I said it's all a part of the process of building my Premiere knowledge and experience. Video 4 https://www.youtube.com/watch?v=InrN097tg_E smoother object movements Here are the notes I made of the 4th video:
  • 92.
    Adobe Premiere I alsowanted to see the importing of shape files from photoshop. So in Premiere I went to File > new > Photoshop file. This allowed me to create a shape with the same canvas size as my premiere working space. I threw together some shapes with the custom shape tool to edit around and imported the file back to Premiere. Importing the file back to Premiere, I have a few options. If I had a more complex image from photoshop such as a thumbnail I could import the file and select "individual layers" or "sequence" I experimented with this by importing one of the pages from my last project and selected "sequence" to see the result. As I suspected, the photoshop file is imported with all layers separated into different sections, which I could then pick and choose to use in the timeline. I placed the shape I made onto the timeline.
  • 93.
    Adobe Premiere Like Ilearned before, I want this shape to be a transition from left to right, but this time it will move with more fluidity, not just a linier line. I made an example of the transition using the normal keyframes and also using Bezier keyframes. To select Bezier keyframes, I have to highlight the keyframes I want to change, right click > Temporal interpolation Bezier and the keyframes will change. By clicking the position dropdown arrow, I can edit the motion of the transition. The movement can be edited so it spikes near the middle, giving the shape more movement the higher the spike. Normal Bezier Constant speed, Bezier allows the speed to be less linier
  • 94.
    Adobe Premiere Now, bylayering 3 shapes with the same Bezier motion, I can create the same frame transition from the last test, but it looks a lot better. They all move at independent set speeds. One frame covers the entire canvas, this is necessary for the transition. I want to test enhancing the text which appears behind the line. The movement can be made cleaner with these keyframes. So I create an example like before, but I edit the keyframes to be Bezier. Keyframes of text movement Keyframes of shape width
  • 95.
    Adobe Premiere I amexperiencing some performance issues with Premiere, so I'm going to optimize the program with the optimization video in my problem solving document. I allocated more ram, and accelerated my GPU. Also rendering the work I had finished. All to give the program less to do. Going back to the text and shape, I copied and pasted the width key points and reversed their placements. I did the same to the texts movement. So now the line expands out, the text comes up, pauses there and then returns with the line disappearing. The time when the line should have remained static, it was slightly changing the width. To combat this, I added 2 linier keyframes, one frame after the first transition and one frame before the ending transition. This kept the line at a constant width. Width changes
  • 96.
    Adobe Premiere Here isthe result of the past tests: https://youtu.be/UkCnIGiihnA Bezier is a much more sefisicated movement techneque. Most of my animations up until this test looks ridged and linier, bezier does the job of making animations slide smoothly and therefor easier on the eye of the viewer. Self experiment test (no tutorial) Finding the ability of importing photoshop files will also be helpful her is a short clip of my last projects work, I animated the chevrons around a textbox to see how it would look: so I quickly made a new Photoshop document, and imported it to Premiere in sequence.
  • 97.
    Adobe Premiere • Ichanged the y axis so the chevrons would go down the screen. Pages 6 and 7 which the chevrons were from has a transparent centre for a textbox. So I created a crated a rectangle and placed track matte key onto the chevrons, but the key moved with the chevrons. So I exported the movement of the chevrons and imported it back to the sequence: this is what that looks like https://youtu.be/II3Z76WR6Gs • I used the track matte key again, but only on the exported clip. It did this: • I needed to copy the initial background layer to hide the transparent area. The chevrons were now going around the set box. it was now doing what I wanted it to, I uploaded the result for you to see: https://youtu.be/VsAya9erP2I I didn’t follow any tutorial for this experiment, I just used what I have learned previously. There was a small hick-up with the track mask, but the end result is as I had imagined. From my last project
  • 98.
    Adobe Premiere Video 5https://www.youtube.com/watch?v=lEHHQ_Rhnkk Creating a 3D Screen animation I plan to use this for track layouts in my production, for now im going to test it out on some of my gameplay footage from dirt. Here are the notes I made of the video:
  • 99.
    Adobe Premiere To animatein 3D space I need to: • Create a sequence at the pixelation and framerate im working at: so 1080p 59.94 fps. • Then create a second sequence which is double the size: 2160p • Import a video to the 2nd sequence (Screen holder) • Then drag and drop the 2nd sequence to the main sequence This is the perspective This is the image/video
  • 100.
    Adobe Premiere Add "basic3D" effect to the video/image • This allows for: • Tilt shifts • Swivel • Distence to image • Orbital perspective tools No orbial changes Tilt Distence swivel example • Tilt forward • Swivel to the left • distence to image increased
  • 101.
    Adobe Premiere Changing motion"rotation" will affect the layers rotation keeping the perspective in static: By adding distort > "Transform" you can change the perspective, keeping the layer in place:
  • 102.
    Adobe Premiere Now thatI have the tools ill create an example. To do this I first set the position I want the animation to start: • I begin by setting the keyframes of all the perspectives and layer rotations I applied. • Saving each time where the perspective will end with keyframes. Here are the keyframes: This is the exported result: https://youtu.be/iZUKzU6XK-w
  • 103.
    Adobe Premiere I had3 problems with this test: the first being the strange obeject on the which appeared at the very beginning of the video. I went back to check the perspective I had; and it was because I was too close to the image. I must remember to keep a bit of a distence away from what im working with in 3D space. Next was the awful controls, it took a while to get the perspective I wanted, because premire didn’t reflect the actual angle in the preview version. So I had to rewatch to rewatch the preview to make changes. Unintuitive but I can work around it. At the end of the video, you could see where the layer ended. If I were to create a map, I would increase the area surrounding it so that the outside could not come into perspective like it did in my this experiement. Video had some other techneqies which im going to try to encahnce another 3D animation with. Cut off the layer This is an example of the increase area around the working space:
  • 104.
    Adobe Premiere this timeim using a map of York as the image. I imported it like before and appled the previous techneqies I learned in the example before. Other technequies im using in this example: Perspective orentation is changed by moving the position of the layer:
  • 105.
    Adobe Premiere i usedbezier key points instead of the linier movements. The animation was in 3 stages. Falling down Rotating the angle Spinning around a centre point. I would have like to have had less agresive movements, but it all comes down to learning. I had no real aim with what I wanted this animation to look like, so it is a bit sporadic. But the perspective is shifted in 3D space. Here is the video: https://youtu.be/kU85zLRyKGw
  • 106.