This document provides instructions for installing and configuring HP ArcSight's ESM High Availability Module software. The module allows a backup ESM system to take over automatically if the primary fails or experiences issues. It requires two identical servers connected by crossover cables that mirror the primary's disk partitions and configurations. The document covers hardware sizing, software installation steps for new or existing ESM setups, and maintenance tasks like monitoring, failover testing, and troubleshooting. It also includes an example implementation for setting up the necessary network, operating systems and disk configurations on the two servers.


![./arcsight firstBootWizard [--console]
If you specify --console, the First Boot Wizard runs in console mode, if not it runs in GUI mode,
which is the mode described in this topic. If you run it in console mode, it requires the same inputs
described for the GUI mode.
Unless otherwise noted, fields are required and omitting them will result in an error message.
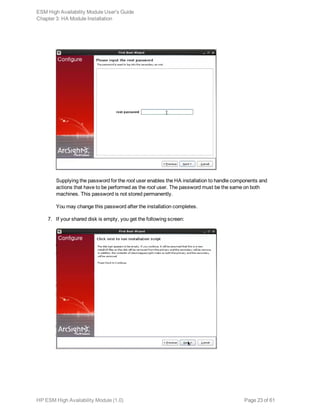
The Welcome to the First Boot Wizard dialog appears.
2. At the Welcome to the First Boot Wizard dialog click Next.
3. On the License File dialog, click the browse button (...) and navigate to the directory to which you
downloaded the license file for the HA Module and select it. Click Next to continue.
ESM High Availability Module User's Guide
Chapter 3: HA Module Installation
HP ESM High Availability Module (1.0) Page 19 of 61](https://image.slidesharecdn.com/esmhausersguide1-170530092706/85/ESM-High-Availability-Module-User-s-Guide-19-320.jpg)


![Chapter 4: Maintenance and Monitoring
This section covers tasks related to maintaining the HA Module’s primary/secondary cluster. and
guidelines for monitoring it’s health.
arcsight_cluster Script 31
Log Output 40
Changing Hostname, IP Address, or Service IP 41
Replacing a Server 45
Changing Mount Options 45
arcsight_cluster Script
The arcsight_cluster script supports maintenance functions such as retrieving status, and taking
servers in and out of service. In this way it is analogous to the arcsight_services script that controls
services in ESM, as described in the Administrator’s Guide.
This script is installed at /usr/lib/arcsight/highavail/bin/arcsight_cluster on both the
primary and the secondary. Except for specific actions noted below, and unlike ESM commands,
arcsight_cluster can be run from either the primary or the secondary. To run it you must be logged in as
user root. The help provides a description of its usage, and the functions it performs.
Command Syntax
The arcsight_cluster command syntax and options are described below. The actions (except help)
have more detailed explanations in the topics that follow.
Description A tool for managing the HA Module. Run this as user root.
Applies to HA Module on either the primary or secondary machine.
Syntax /usr/lib/arcsight/highavail/bin/arcsight_cluster <action> [options]
HP ESM High Availability Module (1.0) Page 31 of 61](https://image.slidesharecdn.com/esmhausersguide1-170530092706/85/ESM-High-Availability-Module-User-s-Guide-31-320.jpg)
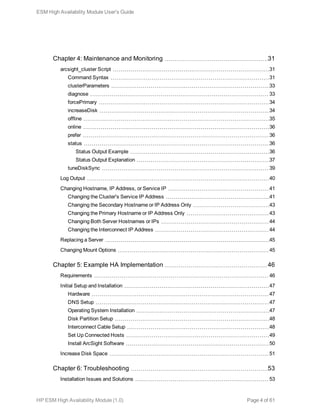
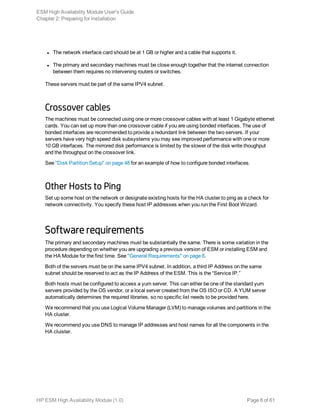
![Actions clusterParameters [--console] Update the cluster parameters using the
Cluster Parameters Wizard. Only run this
on the primary. The --console option
displays in console mode. GUI mode is the
default.
diagnose Checks the system health. If any problems
are found it corrects them or suggests how
the user can correct them. After correcting
a problem, run it again to see if there are
any other problems.
help (or -h) Provides command usage and HA version.
forcePrimary Forces the server where you run this
command to become the primary. Typically
only used in emergency situations,
because it may result in loss of data
collected on the other server, but not yet
mirrored to this one.
increaseDisk Increase the size of the shared partition to
fill the volume that backs it. Only run this
on the primary. There is no option; it
increases the size to the maximum
possible size.
offline [hostname] Makes hostname ineligible to be the
primary. If hostname is not specified, the
secondary is taken offline. Once off line, a
server stays in that state, even if it is or
becomes operational, until the online action
is issued.
online [hostname] This action makes the server [hostname] a
candidate to be the primary.
If there is already a primary, the other
server is brought online as the secondary
and specifying [hostname] is optional.
If both servers are offline (but ready to be
brought on line) you must specify the
server to bring online.
If online is not successful, it will suggest
how the user may bring the server online.
ESM High Availability Module User's Guide
Chapter 4: Maintenance and Monitoring
HP ESM High Availability Module (1.0) Page 32 of 61](https://image.slidesharecdn.com/esmhausersguide1-170530092706/85/ESM-High-Availability-Module-User-s-Guide-32-320.jpg)
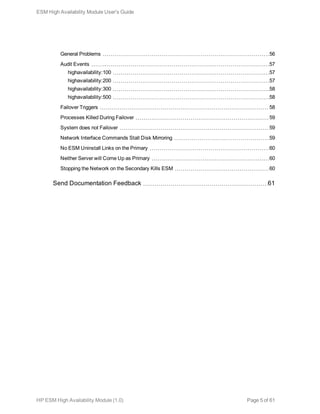
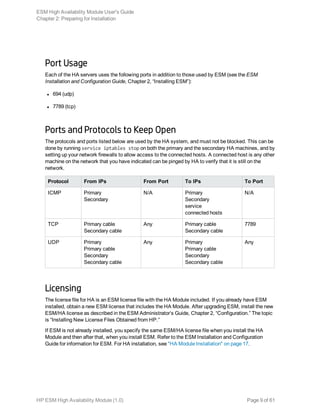
![prefer [hostname] System uses this server as the primary if
both are eligible. If left blank the system
only switches primary if the other server
becomes ineligible (reduces fail-overs).
status Print the status of the cluster.
tuneDiskSync Update the configuration to improve disk
sync speed. Do this whenever the speed of
the interconnect cable is changed.
Examples ./arcsight_cluster status
./arcsight_cluster online myfirstesm.mydomain.com
./arcsight_cluster prefer p12-345-678-q90
clusterParameters
This command option starts the Cluster Parameters Wizard. Whether you run it in console or GUI
mode, it asks you to provide the following parameters:
l preferred primary l ping timeout
l connected hosts l ping attempts
l connectivity down timeout
diagnose
The command arcsight_cluster diagnose runs a set of tests on your cluster, finds problems, and
recommends actions to clear them. The diagnose action deals with the following problems:
l Checks for communication problems between the nodes.
l Suggests ways to bring nodes that are offline to online mode.
a. Detects if arcsight_cluster offline has been used to take a node offline, and if so,
recommends using arcsight_cluster online.
b. Suggests that you run service heartbeat start, if appropriate.
c. Recovers from ifdown/ifup.
l If the disk state is Diskless, it recommends ways to get out of that state.
l Any failures associated with resources are cleared.
ESM High Availability Module User's Guide
Chapter 4: Maintenance and Monitoring
HP ESM High Availability Module (1.0) Page 33 of 61](https://image.slidesharecdn.com/esmhausersguide1-170530092706/85/ESM-High-Availability-Module-User-s-Guide-33-320.jpg)
![online
The online command brings the specified server back online, if it is in the offline state. If that server is
already online, no action is taken. Changing a server state to online does not make it the primary; it is
merely eligible to be the primary.
If there is already a primary server online, then [hostname] is optional; the action brings the server that
is not the primary online as the secondary. If both servers are off line, you must specify [hostname].
If you specify online [hostname] for an offline server that is not fully operational, the server’s state is
changed to online. In that state, it automatically becomes the secondary when it becomes fully
operational.
Sometimes the HA Module hesitates to start a resource that has recently and frequently failed. You can
clear memory of all failures with the diagnose action. This may help to start resources.
prefer
The prefer action allows you to specify on which server to run ESM, if both are eligible. By default there
is no preference; the first available server is used. You can use the prefer action to change the server
running ESM. If there is a preferred primary, when it goes down the other server takes over. When it
comes back up, it resumes being primary by taking over again. The second failover would not happen if
there was no preferred primary set.
If there is currently a preferred server, and you run this action with no hostname, it changes the system
to having no preference.
status
The status action provides you with the current status of the cluster
Status Output Example
Tue Sep 30 14:39:34 PDT 2014 FAIL Disk: UpToDate/Inconsistent, 0 Nodes offline, 0
Resources Stopped
p12-345-678-q90.test.hp.com: online
p12-345-678-q33.test.hp.com: online Primary Preferred
Disk: SyncSource UpToDate/Inconsistent
[=======>...........] sync'ed: 38.1% (319920/512200)K
finish: 0:00:08 speed: 38,456 (38,456) K/sec
OK Network-p12-345-678-q90.test.hp.com
OK Network-p12-345-678-q33.test.hp.com
Started ESM
Started Failover-Check-p12-345-678-q90.test.hp.com
Started Failover-Check-p12-345-678-q33.test.hp.com
ESM High Availability Module User's Guide
Chapter 4: Maintenance and Monitoring
HP ESM High Availability Module (1.0) Page 36 of 61](https://image.slidesharecdn.com/esmhausersguide1-170530092706/85/ESM-High-Availability-Module-User-s-Guide-36-320.jpg)
![If the secondary was offline or it’s heartbeat function stopped, and there was no preferred primary,
these lines would look like this:
p12-345-678-q90.test.hp.com: offline
p12-345-678-q33.test.hp.com: online Primary
Disk Status
There is only one line if the synchronization is up to date. If the disks are inconsistent, the next line
shows a simple progress bar with the percent synchronized and the bytes synchronized out of the total.
Disk: SyncSource UpToDate/Inconsistent
[======>.............] sync'ed: 38.1% (319920/512200)K
finish: 0:00:08 speed: 38,456 (38,456) K/sec
The first line shows the disk connection state, followed by the disk state of /opt on this server
followed by the disk state of /opt on the other server. The next two lines appear if the disk state is
SyncSource or SyncTarget. The first means sync is underway from this machine to the other. The
second means it is underway from the other machine to this one. These lines contain information about
how much space requires sync, how much remains, an estimate of how long the sync will take, and
how fast the sync is running.
If the secondary was offline or its heartbeat function stopped, these lines would be like:
Disk: WFConnection UpToDate/Outdated
The first word after Disk: indicates the Communication state. The shared disk may have one of the
following communication states:
Connection
State Description
Connected Data is being mirrored normally.
StandAlone There is no network connection.
SyncSource Disk synchronization is underway from the local machine to the other machine.
That is, this machine is the primary
SyncTarget Disk synchronization is underway from the other machine to this machine. That is,
this machine is the secondary.
WFConnection This machine is waiting for the other machine to connect to it.
The second word gives the disk state of this server, followed by a /, followed by the disk state of the
other server. The table below shows common disk states.:
Disk State Description
UpToDate The data on the disk is current and correct.
Outdated The data on the disk is out of date. No sync is currently going on.
Inconsistent The data on the disk is out of date, and a sync is going on to correct this.
ESM High Availability Module User's Guide
Chapter 4: Maintenance and Monitoring
HP ESM High Availability Module (1.0) Page 38 of 61](https://image.slidesharecdn.com/esmhausersguide1-170530092706/85/ESM-High-Availability-Module-User-s-Guide-38-320.jpg)


![Chapter 6: Troubleshooting
The following information may help solve problems that occur while operating the HA system. In some
cases, the solution can be found here or in specific ArcSight documentation. This chapter includes the
following topics:
Installation Issues and Solutions 53
General Problems 56
Audit Events 57
Failover Triggers 58
Processes Killed During Failover 59
System does not Failover 59
Network Interface Commands Stall Disk Mirroring 59
No ESM Uninstall Links on the Primary 60
Neither Server will Come Up as Primary 60
Stopping the Network on the Secondary Kills ESM 60
Installation Issues and Solutions
Each of the following messages would be prefixed with the following:
[Primary|Secondary]: [Timestamp] ERROR – <message>
The following table lists the possible installation error messages, what they mean, and what to do if you
get that message. Angle brackets (< > ) enclose values such as names or IP addresses that are unique
to your message.
Installation Message Description
User and Access Issues
Fatal error on <hostname>. See
<log file>.
An unexpected error caused SSH to fail to <hostname> check
the specified log file for suggestions.
Timeout on SSH to
<hostname>. SSH access to
<hostname> failed to connect
quickly.
Fix the SSH communication problem.
HP ESM High Availability Module (1.0) Page 53 of 61](https://image.slidesharecdn.com/esmhausersguide1-170530092706/85/ESM-High-Availability-Module-User-s-Guide-53-320.jpg)