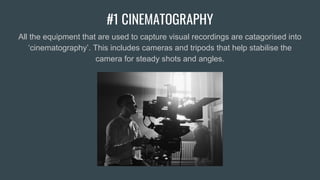
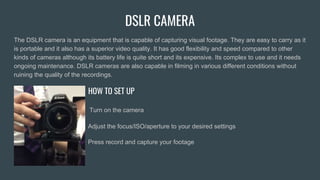
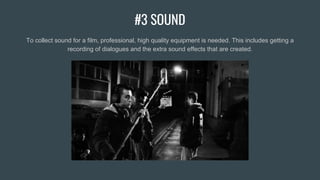
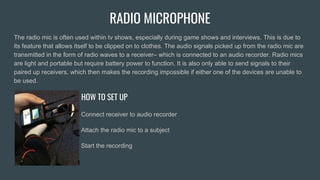
EQUIPMENT WORKSHOP
AYUSHA ROY
#1 CINEMATOGRAPHY
All the equipment that are used to capture visual recordings are catagorised into
‘cinematography’. This includes cameras and tripods that help stabilise the
camera for steady shots and angles.
DSLR CAMERA
The DSLR camera is an equipment that is capable of capturing visual footage. They are easy to carry as it
is portable and it also has a superior video quality. It has good flexibility and speed compared to other
kinds of cameras although its battery life is quite short and its expensive. Its complex to use and it needs
ongoing maintenance. DSLR cameras are also capable in filming in various different conditions without
ruining the quality of the recordings.
HOW TO SET UP
Turn on the camera
Adjust the focus/ISO/aperture to your desired settings
Press record and capture your footage
TRIPOD
Tripods are used to stabilise the camera movement during filming or photographing. Although mainly used
for stabilising cameras, it can also be attached to lighting equipment. Tripods do not require any battery
power and therefore reduces the amount of technical difficulties. It can also be extremely good for long
exposure/HDR pictures or footage. However there are downsides, such as the fact that tripods can be
clumsy and can slow you down. It also restricts the freedom of movement since it only allows the person
to shoot from a fixed spot at a certain time.
HOW TO SET UP
Unfold the legs by unlocking the clasps
Adjust the height by locking the clasps
Remove the camera plate from the tripod
Screw on the camera and clamp it on to the tripod
GIMBAL
Gimbals are electronic devices that help stabilise the camera– just like a tripod. Although tripods are
meant to stick to a place while shooting, gimbals have the advantage of being moved around as it is a
handheld device that has the feature of being able to rotate. This is why gimbals are good for scenes in
which the camera is needed to move along with the actors. Although, gimbals have a short battery life,
making it unsuitable for long sessions of filming. Users of this device also need to refrain from doing any
rapid, jerky movements as this might damage the equipment.
HOW TO SET UP
Connect the camera to the gimbal
Make sure that you balance the weight out carefully as the camera should be .
. able to balance facing forwards and not fall downwards.
Turn on the gimbal and start recording
#2 LIGHTING
Lighting is divided into three main lighting points– key light, fill light and the back light. These three lighting
points are the most crucial in filmmaking as they help set a mood, tone and meaning for the audience to
react to. Equipment that helps control these lights and their intensities, will be listed under this category.
LED LIGHTS
LED lights are used to enhance the lighting of a particular set or scene. These lights can be controlled in
its strength and warmth (3200dpi for warm light and 5500dpi for cold light). Depending on the model,
LED lights can even be attached to the tripod or camera, allowing itself to be more portable. They are
good for adding depth through shadows and harsh lights. It also gives out a cinematic feel, even to the
most amateur set designs. These lights run by battery power and so aren’t suitable for long sessions of
filming.
HOW TO SET UP
Attach to camera/tripod
Add in diffuser if required
Control the light settings to your preferred setting
Turn on the lights and start filming
REFLECTOR
Reflectors are available in various colours. Gold reflectors are used to reflect off warm light while silver
reflectors are used to give off cool lighting. White reflectors do not enhance the temperature of the lighting
in any way but they simply reflect off any light shone towards its direction. Black reflectors are used to
block the sunlight and absorb the light given off, giving a dim look to the scene. Reflectors are easy to
use, extremely light and can be easily portable since it can fold into a much smaller size.
In addition, the silver side of the reflector is used to increase
highlights and is great for video plus black and white
photography. The gold side is used to produce a natural,
golden warm fill that is good for sunsets or indoor portraits.
White is used to produce an even, neutral-coloured bounce
light and black is used to block light or subtract it. The
translucent fabric is used to diffuse the light, producing a
broad light source and a soft effect.
#3 SOUND
To collect sound for a film, professional, high quality equipment is needed. This includes getting a
recording of dialogues and the extra sound effects that are created.
BOOM MICROPHONE
The boom mic is a combination of two seperate devices– the boom pole and the shotgun mic. The boom
pole can be adjusted, enabling the user to set it at a preferred height. The shotgun mic requires battery
power and can only record sounds once connected to an audio recorder.
HOW TO SET UP
Assemble the shotgun mic
Adjust the length of the boom pole
Connect the shotgun mic to the boom pole
AUDIO RECORDER (ZOOM H6)
The model we used to record sounds is the Zoom H6. This model can record sounds of up to five different
microphones at the same time, with each sound source having its recording volume set separately. Audio
recorders require battery power, making them unsuitable for long hours of filming and recording.
HOW TO SET UP
Turn the device on
Connect the recording devices to the right stations
Press the buttons for stations that require recording
Proceed on to adjusting the volume
Press record
RADIO MICROPHONE
The radio mic is often used within tv shows, especially during game shows and interviews. This is due to
its feature that allows itself to be clipped on to clothes. The audio signals picked up from the radio mic are
transmitted in the form of radio waves to a receiver– which is connected to an audio recorder. Radio mics
are light and portable but require battery power to function. It is also only able to send signals to their
paired up receivers, which then makes the recording impossible if either one of the devices are unable to
be used.
HOW TO SET UP
Connect receiver to audio recorder
Attach the radio mic to a subject
Start the recording

EQUIPMENT WORKSHOP

  • 1.
  • 2.
    #1 CINEMATOGRAPHY All theequipment that are used to capture visual recordings are catagorised into ‘cinematography’. This includes cameras and tripods that help stabilise the camera for steady shots and angles.
  • 3.
    DSLR CAMERA The DSLRcamera is an equipment that is capable of capturing visual footage. They are easy to carry as it is portable and it also has a superior video quality. It has good flexibility and speed compared to other kinds of cameras although its battery life is quite short and its expensive. Its complex to use and it needs ongoing maintenance. DSLR cameras are also capable in filming in various different conditions without ruining the quality of the recordings. HOW TO SET UP Turn on the camera Adjust the focus/ISO/aperture to your desired settings Press record and capture your footage
  • 4.
    TRIPOD Tripods are usedto stabilise the camera movement during filming or photographing. Although mainly used for stabilising cameras, it can also be attached to lighting equipment. Tripods do not require any battery power and therefore reduces the amount of technical difficulties. It can also be extremely good for long exposure/HDR pictures or footage. However there are downsides, such as the fact that tripods can be clumsy and can slow you down. It also restricts the freedom of movement since it only allows the person to shoot from a fixed spot at a certain time. HOW TO SET UP Unfold the legs by unlocking the clasps Adjust the height by locking the clasps Remove the camera plate from the tripod Screw on the camera and clamp it on to the tripod
  • 5.
    GIMBAL Gimbals are electronicdevices that help stabilise the camera– just like a tripod. Although tripods are meant to stick to a place while shooting, gimbals have the advantage of being moved around as it is a handheld device that has the feature of being able to rotate. This is why gimbals are good for scenes in which the camera is needed to move along with the actors. Although, gimbals have a short battery life, making it unsuitable for long sessions of filming. Users of this device also need to refrain from doing any rapid, jerky movements as this might damage the equipment. HOW TO SET UP Connect the camera to the gimbal Make sure that you balance the weight out carefully as the camera should be . . able to balance facing forwards and not fall downwards. Turn on the gimbal and start recording
  • 6.
    #2 LIGHTING Lighting isdivided into three main lighting points– key light, fill light and the back light. These three lighting points are the most crucial in filmmaking as they help set a mood, tone and meaning for the audience to react to. Equipment that helps control these lights and their intensities, will be listed under this category.
  • 7.
    LED LIGHTS LED lightsare used to enhance the lighting of a particular set or scene. These lights can be controlled in its strength and warmth (3200dpi for warm light and 5500dpi for cold light). Depending on the model, LED lights can even be attached to the tripod or camera, allowing itself to be more portable. They are good for adding depth through shadows and harsh lights. It also gives out a cinematic feel, even to the most amateur set designs. These lights run by battery power and so aren’t suitable for long sessions of filming. HOW TO SET UP Attach to camera/tripod Add in diffuser if required Control the light settings to your preferred setting Turn on the lights and start filming
  • 8.
    REFLECTOR Reflectors are availablein various colours. Gold reflectors are used to reflect off warm light while silver reflectors are used to give off cool lighting. White reflectors do not enhance the temperature of the lighting in any way but they simply reflect off any light shone towards its direction. Black reflectors are used to block the sunlight and absorb the light given off, giving a dim look to the scene. Reflectors are easy to use, extremely light and can be easily portable since it can fold into a much smaller size. In addition, the silver side of the reflector is used to increase highlights and is great for video plus black and white photography. The gold side is used to produce a natural, golden warm fill that is good for sunsets or indoor portraits. White is used to produce an even, neutral-coloured bounce light and black is used to block light or subtract it. The translucent fabric is used to diffuse the light, producing a broad light source and a soft effect.
  • 9.
    #3 SOUND To collectsound for a film, professional, high quality equipment is needed. This includes getting a recording of dialogues and the extra sound effects that are created.
  • 10.
    BOOM MICROPHONE The boommic is a combination of two seperate devices– the boom pole and the shotgun mic. The boom pole can be adjusted, enabling the user to set it at a preferred height. The shotgun mic requires battery power and can only record sounds once connected to an audio recorder. HOW TO SET UP Assemble the shotgun mic Adjust the length of the boom pole Connect the shotgun mic to the boom pole
  • 11.
    AUDIO RECORDER (ZOOMH6) The model we used to record sounds is the Zoom H6. This model can record sounds of up to five different microphones at the same time, with each sound source having its recording volume set separately. Audio recorders require battery power, making them unsuitable for long hours of filming and recording. HOW TO SET UP Turn the device on Connect the recording devices to the right stations Press the buttons for stations that require recording Proceed on to adjusting the volume Press record
  • 12.
    RADIO MICROPHONE The radiomic is often used within tv shows, especially during game shows and interviews. This is due to its feature that allows itself to be clipped on to clothes. The audio signals picked up from the radio mic are transmitted in the form of radio waves to a receiver– which is connected to an audio recorder. Radio mics are light and portable but require battery power to function. It is also only able to send signals to their paired up receivers, which then makes the recording impossible if either one of the devices are unable to be used. HOW TO SET UP Connect receiver to audio recorder Attach the radio mic to a subject Start the recording