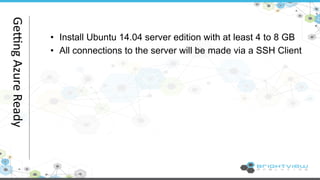
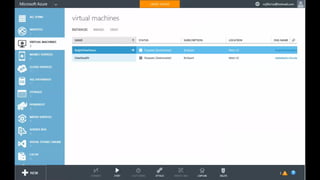
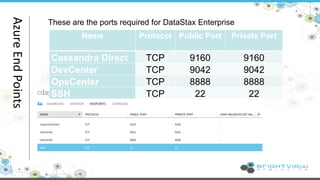
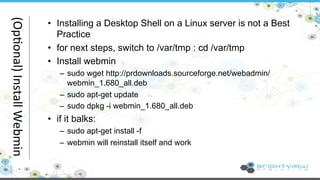
DataStax Enterprise on Microsoft Azure
BrightView Analytics provides a robust 
Software-as-a-Service (SaaS) 
business solution, which delivers 
critical student & district performance 
data to Administrators, Teachers, 
Parents, and Students via the Internet. 
• www.brightviewanalytics.com 
• Joey Filichia 
• Business Intelligence Architect 
• Software Engineer 
• jfilichia@brightviewanalytics.com 
About 
Us
• Install Ubuntu 14.04 server edition with at least 4 to 8 GB 
• All connections to the server will be made via a SSH Client 
Ge+ng 
Azure 
Ready
• Install Ubuntu 14.04 server edition with at least 4 to 8 GB 
• All connections to the server will be made via a SSH Client 
Ge+ng 
Azure 
Ready
These are the ports required for DataStax Enterprise 
Azure 
End 
Points 
Name Protocol Public Port Private Port 
Cassandra Direct TCP 9160 9160 
DevCenter TCP 9042 9042 
OpsCenter TCP 8888 8888 
SSH TCP 22 22
Tools 
Required 
Putty 
Notepad ++ 
(or other Notepad app) 
An Active Internet Connection
• Don’t do it manually, use a PPA! 
– sudo add-apt-repository ppa:webupd8team/java 
– sudo apt-get update 
– sudo apt-get install oracle-java7-installer 
• Set Environmental Variables: 
– sudo apt-get install oracle-java7-set-default 
Installing 
Java
• for next steps, switch to /var/tmp : cd /var/tmp 
• Get the All-In-One Installer: 
– sudo wget --user=<Login> --password=<Password> 
http://downloads.datastax.com/enterprise/DataStaxEnterprise-linux-x64- 
installer.run 
• Set file permissions 
– sudo chmod a+x DataStaxEnterprise-linux-x64-installer.ru 
• Run file 
– sudo ./DataStaxEnterprise-linux-x64-installer.run 
Installing 
DataStax
Run through the All-In-One installer, accepting all the 
defaults. 
• Accept the License 
• Select Yes when asked 
Agreement 
about Starting Services after 
• Select all Components 
Install 
• Use the default directory 
• Select Cassandra Node 
• Choose Simple Install from 
• Give the Ring a name 
the install types 
• Seed : 127.0.0.1 
• Set the default interface 
• Agent address: 127.0.0.1 
• Install the Services and 
• Review Installation Options 
Utilities 
• Finish Installing. Installing 
DataStax
• Start the Stax and it’s agent (if you didn’t already) 
– sudo service dse start 
– sudo service datastax-agent start 
• start OpsCenter: 
– sudo service opscenterd stop 
– sudo service opscenterd start 
• See your Creation! 
– http://<<Cloud Service Address>>:8888/opscenter/index.html 
Star@ng 
it 
Up
• Installing a Desktop Shell on a Linux server is not a Best 
Practice 
• for next steps, switch to /var/tmp : cd /var/tmp 
• Install webmin 
– sudo wget http://prdownloads.sourceforge.net/webadmin/ 
webmin_1.680_all.deb 
– sudo apt-get update 
– sudo dpkg -i webmin_1.680_all.deb 
• if it balks: 
– sudo apt-get install -f 
– webmin will reinstall itself and work 
(Op@onal) 
Install 
Webmin

Cassandra Day Denver 2014: Setting up a DataStax Enterprise Instance on Microsoft Azure

  • 1.
    DataStax Enterprise onMicrosoft Azure
  • 2.
    BrightView Analytics providesa robust Software-as-a-Service (SaaS) business solution, which delivers critical student & district performance data to Administrators, Teachers, Parents, and Students via the Internet. • www.brightviewanalytics.com • Joey Filichia • Business Intelligence Architect • Software Engineer • jfilichia@brightviewanalytics.com About Us
  • 3.
    • Install Ubuntu14.04 server edition with at least 4 to 8 GB • All connections to the server will be made via a SSH Client Ge+ng Azure Ready
  • 4.
    • Install Ubuntu14.04 server edition with at least 4 to 8 GB • All connections to the server will be made via a SSH Client Ge+ng Azure Ready
  • 5.
    These are theports required for DataStax Enterprise Azure End Points Name Protocol Public Port Private Port Cassandra Direct TCP 9160 9160 DevCenter TCP 9042 9042 OpsCenter TCP 8888 8888 SSH TCP 22 22
  • 6.
    Tools Required Putty Notepad ++ (or other Notepad app) An Active Internet Connection
  • 7.
    • Don’t doit manually, use a PPA! – sudo add-apt-repository ppa:webupd8team/java – sudo apt-get update – sudo apt-get install oracle-java7-installer • Set Environmental Variables: – sudo apt-get install oracle-java7-set-default Installing Java
  • 8.
    • for nextsteps, switch to /var/tmp : cd /var/tmp • Get the All-In-One Installer: – sudo wget --user=<Login> --password=<Password> http://downloads.datastax.com/enterprise/DataStaxEnterprise-linux-x64- installer.run • Set file permissions – sudo chmod a+x DataStaxEnterprise-linux-x64-installer.ru • Run file – sudo ./DataStaxEnterprise-linux-x64-installer.run Installing DataStax
  • 9.
    Run through theAll-In-One installer, accepting all the defaults. • Accept the License • Select Yes when asked Agreement about Starting Services after • Select all Components Install • Use the default directory • Select Cassandra Node • Choose Simple Install from • Give the Ring a name the install types • Seed : 127.0.0.1 • Set the default interface • Agent address: 127.0.0.1 • Install the Services and • Review Installation Options Utilities • Finish Installing. Installing DataStax
  • 10.
    • Start theStax and it’s agent (if you didn’t already) – sudo service dse start – sudo service datastax-agent start • start OpsCenter: – sudo service opscenterd stop – sudo service opscenterd start • See your Creation! – http://<<Cloud Service Address>>:8888/opscenter/index.html Star@ng it Up
  • 11.
    • Installing aDesktop Shell on a Linux server is not a Best Practice • for next steps, switch to /var/tmp : cd /var/tmp • Install webmin – sudo wget http://prdownloads.sourceforge.net/webadmin/ webmin_1.680_all.deb – sudo apt-get update – sudo dpkg -i webmin_1.680_all.deb • if it balks: – sudo apt-get install -f – webmin will reinstall itself and work (Op@onal) Install Webmin