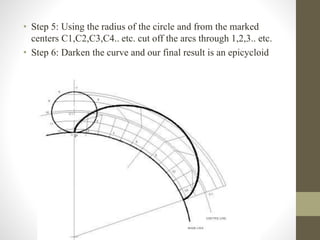
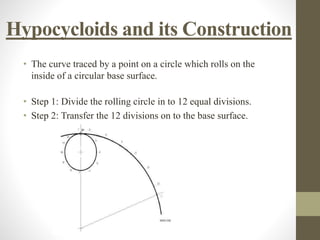
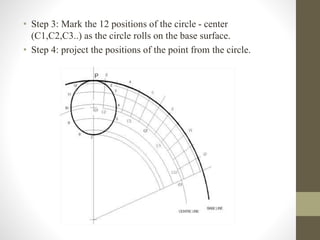
• Name : Surbhi R Yadav
• Branch : Computer Engineering
• Division : A
• Semester : First
• Subject : Engineering Graphics
• Roll No : 48
• Enrollment No : 141200107065
• Faculty Name : Mr. Bhavya Kothak
Aditya Silver Oak Institute of Technology
Cycloidal Group of
Curves
Introduction
• When one curve rolls over another curve
without sliding or slipping, the path of any
point of the rolling curve is called a
roulette.
• When rolling curve is a circle and the
curve on which it rolls is a straight line or a
circle, we get cycloidal group of curves.
• There are nine different curves in this
group.
Classification of Cycloidal
Curves
Cycloid :
1. Inferior Trochoid
2. Superior Trochoid
Epicycloid
1. Inferior Epitrochoid
2. Superior Epitrochoid
Hypocycloid
1. Inferior Hypotrochoid
2. Superior Hypotrochoid
Cycloids
• A cycloid is a curve generated by a point on the
circumference of the circle as the circle rolls along a
straight line with out slipping..
• The moving circle is called the "Generating circle" and
the straight line is called the "Directing line" or the "Base
line".
• The point on the Generating circle which generates the
curve is called the "Generating point"
Construction of a Cycloid
• Step1: Draw the generating circle and the
base line equal to the circumference of the
generating circle
• Step 2 : Divide the circle and the base line in to equal number
of parts. also erect the perpendicular lines from the division of
the line
• Step 3: with your compass set to the radius of the circle and
centers as C1,C2,C3,.... etc. cut the arcs on the lines from
circle through 1,2,3, .. etc.
• Step 4: locate the points which are produced by cutting arcs
and joining by a smooth curve.
• By joining these new points you will have created the locus of
the point P for the circle as it rotates along the straight line
with out slipping
• Hence our final result is a cycloid
Epicycloids
• The cycloid is called the epicycloid when the generating circle
rolls along another circle outside(directing circle)
• The curve traced by a point on a circle which rolls on the out
side of a circular base surface
Construction of an Epicycloid
• Step1: Draw and divide the circle in to 12 equal divisions.
• Step 2: Transfer the 12 divisions on to the base surface.
• Step3: Mark the 12 positions of the circle- centers
(C1,C2,C3,C4..) as the circle rolls on the base surface.
• Step 4: Project the positions of the point from the circle.
• Step 5: Using the radius of the circle and from the marked
centers C1,C2,C3,C4.. etc. cut off the arcs through 1,2,3.. etc.
• Step 6: Darken the curve and our final result is an epicycloid
Hypocycloids and its Construction
• The curve traced by a point on a circle which rolls on the
inside of a circular base surface.
• Step 1: Divide the rolling circle in to 12 equal divisions.
• Step 2: Transfer the 12 divisions on to the base surface.
• Step 3: Mark the 12 positions of the circle - center
(C1,C2,C3..) as the circle rolls on the base surface.
• Step 4: project the positions of the point from the circle.
• Step 5: Using the radius of the circle and from the marked
centers step off the position of the point.
• Step 6: Darken the curve and result is a hypocycloid
Applications of Cycloid
Curves
•Used in design of gear tooth profiles
•Conveyor of mould boxes in foundry
shops
•Commonly used in kinematics and in
mechanism that work with rolling
contact.
Thank You

Engineering Curves

  • 1.
    • Name :Surbhi R Yadav • Branch : Computer Engineering • Division : A • Semester : First • Subject : Engineering Graphics • Roll No : 48 • Enrollment No : 141200107065 • Faculty Name : Mr. Bhavya Kothak Aditya Silver Oak Institute of Technology
  • 2.
  • 3.
    Introduction • When onecurve rolls over another curve without sliding or slipping, the path of any point of the rolling curve is called a roulette. • When rolling curve is a circle and the curve on which it rolls is a straight line or a circle, we get cycloidal group of curves. • There are nine different curves in this group.
  • 4.
    Classification of Cycloidal Curves Cycloid: 1. Inferior Trochoid 2. Superior Trochoid Epicycloid 1. Inferior Epitrochoid 2. Superior Epitrochoid Hypocycloid 1. Inferior Hypotrochoid 2. Superior Hypotrochoid
  • 5.
    Cycloids • A cycloidis a curve generated by a point on the circumference of the circle as the circle rolls along a straight line with out slipping.. • The moving circle is called the "Generating circle" and the straight line is called the "Directing line" or the "Base line". • The point on the Generating circle which generates the curve is called the "Generating point"
  • 6.
    Construction of aCycloid • Step1: Draw the generating circle and the base line equal to the circumference of the generating circle
  • 7.
    • Step 2: Divide the circle and the base line in to equal number of parts. also erect the perpendicular lines from the division of the line
  • 8.
    • Step 3:with your compass set to the radius of the circle and centers as C1,C2,C3,.... etc. cut the arcs on the lines from circle through 1,2,3, .. etc.
  • 9.
    • Step 4:locate the points which are produced by cutting arcs and joining by a smooth curve.
  • 10.
    • By joiningthese new points you will have created the locus of the point P for the circle as it rotates along the straight line with out slipping
  • 11.
    • Hence ourfinal result is a cycloid
  • 12.
    Epicycloids • The cycloidis called the epicycloid when the generating circle rolls along another circle outside(directing circle) • The curve traced by a point on a circle which rolls on the out side of a circular base surface
  • 13.
    Construction of anEpicycloid • Step1: Draw and divide the circle in to 12 equal divisions. • Step 2: Transfer the 12 divisions on to the base surface.
  • 14.
    • Step3: Markthe 12 positions of the circle- centers (C1,C2,C3,C4..) as the circle rolls on the base surface. • Step 4: Project the positions of the point from the circle.
  • 15.
    • Step 5:Using the radius of the circle and from the marked centers C1,C2,C3,C4.. etc. cut off the arcs through 1,2,3.. etc. • Step 6: Darken the curve and our final result is an epicycloid
  • 16.
    Hypocycloids and itsConstruction • The curve traced by a point on a circle which rolls on the inside of a circular base surface. • Step 1: Divide the rolling circle in to 12 equal divisions. • Step 2: Transfer the 12 divisions on to the base surface.
  • 17.
    • Step 3:Mark the 12 positions of the circle - center (C1,C2,C3..) as the circle rolls on the base surface. • Step 4: project the positions of the point from the circle.
  • 18.
    • Step 5:Using the radius of the circle and from the marked centers step off the position of the point. • Step 6: Darken the curve and result is a hypocycloid
  • 19.
    Applications of Cycloid Curves •Usedin design of gear tooth profiles •Conveyor of mould boxes in foundry shops •Commonly used in kinematics and in mechanism that work with rolling contact.
  • 20.